10

1
To get the best out of your new vacuum cleaner, please read through these instructions carefully before using it for the first time. We also recommend that you keep the instructions for future reference, so that you can remind yourself later of the functions of your vacuum cleaner.
• The vacuum cleaner, cord or plug must not be placed in water or any other liquid. • Never touch the vacuum cleaner, cord or plug with wet or damp hands.• Never leave the vacuum cleaner unattended when it is switched on. Children
should be supervised when they use the vacuum cleaner.• Switch the vacuum cleaner off and unplug it when it is not in use, before cleaning,
and before you empty the dust container or clean the filters.• Avoid pulling the cord when removing the plug from the socket. Instead, hold the
plug. Keep hold of the plug when rewinding the cord, so that it does not strike the vacuum cleaner. Keep the cord and appliance away from heat sources, hot objects and naked flames.
• To prevent overheating, the cord must be at least 2/3 unrolled if the vacuum cleaner is to be used for a long period (more than 30 minutes).
• Never use the appliance if it, the cord or the plug is damaged or if the appliance is not functioning correctly. Never use the vacuum cleaner if the filters have not been fitted.
• Only use accessories equipped by the manufacturer.• The appliance is for indoor use only. Do not use it on wet surfaces. Take particular
care when vacuuming stairs, due to the risk of falling or the vacuum cleaner falling and breaking.
• Do not use the appliance to vacuum matches, hot ashes, cigarette, sharp objects, wet or damp substances, combustible materials (petrol, solvents, etc.) or vapour from these.
• Do not cover the appliance’s suction or exhaust port. Ensure that you keep clothing, hair and body parts away from the nozzle and moving parts of the vacuum cleaner.
• Never try to repair the vacuum cleaner by yourself. If the appliance, cord or plug needs to be repaired, it should be taken to our after-sales service centre.
SAFETY MEASURES
2
• Attach the hose to the vacuum cleaner by inserting it into the hose connector. • Connect the two extension tubes. Fit the combined extension tube into the other end
of the hose, then attach the floor nozzle to the end of the tube.• The special 2-in-1 nozzle provided as accessory inside the box are used for
particular vacuuming tasks, such as for furniture, in the car, and so on. Detach the floor nozzle and fit the 2-in-1 nozzles to the end of the extension tube.
• Pull the cord out of the vacuum cleaner. The cord must not be pulled out any further than the red mark label. Plug in and switch the power on.
• Press the on/off button to start and stop the vacuum cleaner.• While in use, the suction strength can be regulated by opening and closing the air
valve on the handle at the end of the hose. • The floor nozzle has two settings. When cleaning hard surfaces. the nozzle brushes
should be extended. When cleaning carpets and rugs, the brushes should be retracted into the nozzle. Press the brush change button to switch between the two settings.
• If you need to pause to move furniture etc during vacuuming, you can place the floor nozzle in the parking holder using the fixture on the back of the nozzle.
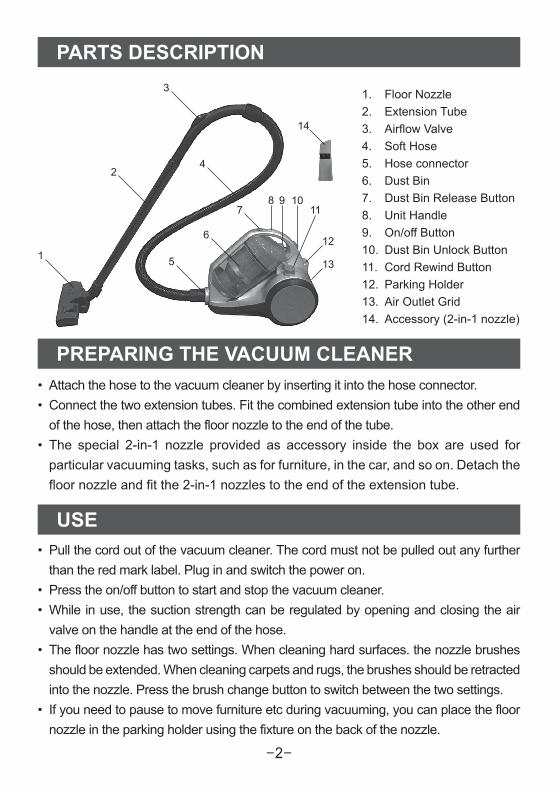
1. Floor Nozzle2. Extension Tube3. Airflow Valve4. Soft Hose5. Hose connector6. Dust Bin7. Dust Bin Release Button8. Unit Handle9. On/off Button10. Dust Bin Unlock Button11. Cord Rewind Button 12. Parking Holder13. Air Outlet Grid14. Accessory (2-in-1 nozzle)
PARTS DESCRIPTION
PREPARING THE VACUUM CLEANER
USE
1
2
3
4
5
6
78
12
13
9 1011
14

3
This vacuum cleaner is not equipped with a dustbag. The dust/dirt is vacuumed into the transparent dust container instead. Once the dust is in this container, it whirls around so that it does not block suction. The air vacuumed in is cleaned by means of a washable permanent filter in the dust container and a HEPA 12 exhaust filter.
You must never vacuum without all filters in place or when a filter is damaged. If you do, dust may penetrate into the interior of the vacuum cleaner and damage the motor.
It is easy to see when the transparent dust bin needs emptying. The bin needs to be cleaned when dust accumulated reaches the MAX mark.
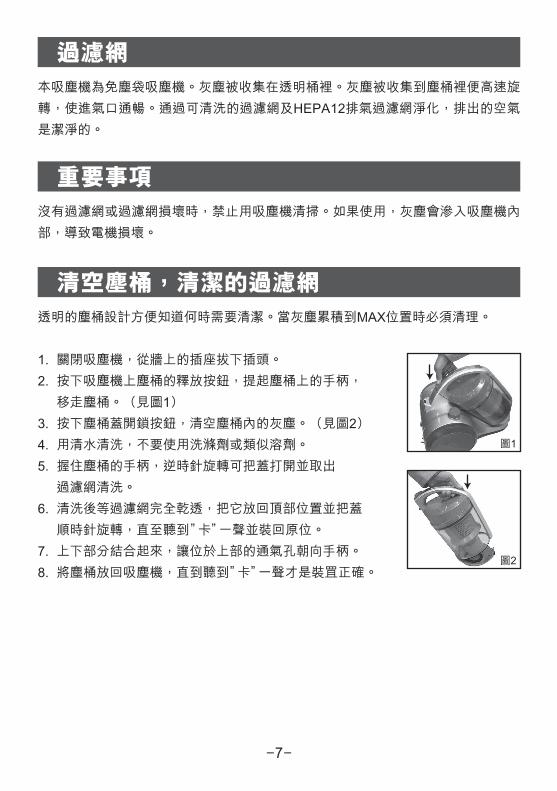
1. Turn off the vacuum cleaner, and remove the plug fromthe wall socket.
2. Remove the dust container from the vacuum cleaner by pressing the Dust Bin Unlock Button and lifting the handle on the dust container. (see Pic.1)
3. Press the Dust Bin Release Button to empty all dust easily. (see Pic.2)
4. Wash all in water without any detergent or similar.5. Hold the unit handle and turn anti-clockwise direction to release the filter cover. The washable permanent filter
can be take out for cleaning.6. Allow the filter to dry completely, and replace it on the
upper section by turning it clockwise direction until it clicks into place.7. Fit the upper section on the lower section so the hole in the top of the upper
section points towards the handle.8. Replace the dust bin in the vacuum cleaner. Press down until you hear a “click”
sound.
FILTER
IMPORTANT
EMPTYING THE DUST CONTAINER AND CLEANING THE PERMANENT FILTER
Pic.1
Pic.2

4
This exhaust filter should also be cleaned regularly to maintain suction power. Take away the Air Outlet Grid and remove the filter and clean it, or replace the filter. If you use water to clean the filter, it must be completely dry before being replaced in the vacuum cleaner.
• The standard lifespan of the filters is one year. However, it will also depend on the duration of usage and air pollution level of the surroundings.
• The filters are recommended to be cleaned using a vacuum cleaner after 3 to 4 monthes of usage.
• Please contact our after-sales service center to purchase filters for replacement.
• You can lift and carry the vacuum cleaner using the carrying handle. Never pull or lift the vacuum cleaner by the cord. Press the brush change button to switch.
• Before putting the vacuum cleaner away, rewind the cord. Switch off at the socket, unplug, and press the automatic cord rewind button until the cord is fully retracted.
• Clean the vacuum cleaner by wiping it with a damp cloth.• You must not use any form of solvent, strong or abrasive cleaning agent.• Make sure all filters are kept clean. Replace the filters once they become worn or
can no longer be cleaned.
Exhaust filter (HEPA 12)
Filter Replacement
TRANSPORT AND STORAGE
CLEANING
TECHNICAL SPECIFICATIONS
Model No.
Voltage / Hertz
Rated Power
Product Size (mm)
Net Weight (kg)
CVC2000S
220-240V~ 50/60Hz
2000W Max
365(L)*270(D)*300(H)
4.5