7
© 2002 - 2011 Scarlett Rose page 1 Celtic Plaid Celtic Plaid Celtic Plaid - a free pattern a free pattern a free pattern
© 2002 - 2011 Scarlett Rose page 1
Celtic Plaid Celtic Plaid Celtic Plaid --- a free patterna free patterna free pattern

© 2002 - 2011 Scarlett Rose page 2
Celtic Plaid - a free pattern by Scarlett Rose
http://www.ScarlettRose.com
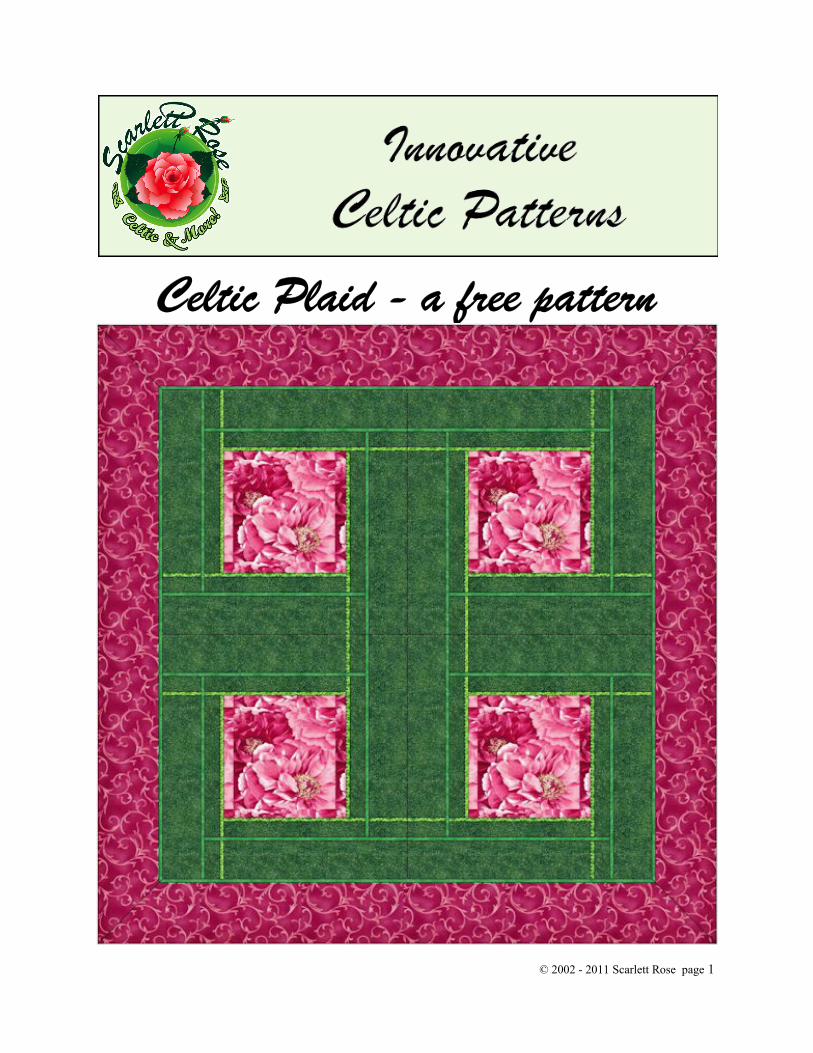
Supply List for a four block 40” Celtic Plaid wallhanging, as shown:
1 yd of print fabric for background strips around center squares
1/2 yd or more of a large scale print for center squares of blocks (depending on motifs)
1/2 yd of fabric each of two prints (for bias, if making your own) or two rolls of readymade bias
1 yd of print for border and binding
Backing and batting of your choice
This pattern is free for personal use. Please do not remove credits or links. Do not sell this
pattern or include it in any collections, books or any other media unless permission is obtained from Scarlett Rose.
The color graphics were designed in EQ7.

© 2002 - 2011 Scarlett Rose page 3
This 16” block design is based on a traditional
patchwork pattern called “Bright Hopes”.
The 8 1/2” center square is fussy cut from a
large print. The border is made up of four
pieces, each measuring 4 1/2" x 12 1/2". These
pieces can be sewn on so that they spiral either
to the right or left.
The first piece is sewn to the center block, right
sides together and matching the top edges. Stop
an inch or so before the end of the block and
leave the excess length of the border piece free.
The next piece is added along the side with the
matching length. This is repeated for the third
and fourth pieces.
After the fourth piece is added, then finish sewing the seam of the first piece, which now
matches in length because of the addition of the fourth piece of the border.
This technique is called partial seaming and is used in patchwork for easier piecing of some
patterns. The diagram above shows this technique.
Besides using large scale prints, the 8" finished center square could feature your choice of
machine or hand embroidery designs, a pieced patchwork block, an appliqué block or inkjet
printed fabric.
Press all the seams towards the rectangles, away from the center square.
Make two blocks spiraling to the right and two blocks that spiral to the left, see diagrams below.

© 2002 - 2011 Scarlett Rose page 4
Make 1/4” bias tape by your favorite method,
either by cutting and sewing bias for hand
appliqué or by making fusible bias for machine
appliqué. You can also purchase readymade
bias, if you prefer. If needed, please refer to the
instructions included with the bias bars or
fusible tape makers.
Place the strips of bias along the inside edge of
the seams on the block (or as quilters would
say, “in the ditch”).
Hand appliqué the strips with matching thread
or if using fusible, iron the strips down in turn,
making sure that the top cut edge of each strip is
covered by the next strip. The last strip will
need to be tucked under the first strip. For the
fusible, peel up the bias carefully and re-iron it down over the cut edge of the last strip.
Once this first row of bias is ironed down, then topstitch each strip with a matching color of
metallic thread, matching cotton thread or contrast thread. Use clear thread with a reduced
length blind hem stitch, zigzag stitch or machine appliqué stitch for invisible machine appliqué.
Using a ruler and a marking pen or pencil, mark
a line one inch away from the first row of bias.
This will be your guide for placing the second
row of bias.
Hand appliqué this next row of bias or if using
fusible bias, iron down the fusible bias. Make
sure that the top cut edge of the bias is covered
by the next strip. Again, the last strip will need
to be tucked under the first strip. Then sew,
with appropriate thread color.
Sew the four 16 1/2" Celtic Plaid blocks
together. Please double check that there are two
of each of the Celtic Plaid blocks and that they
are set together so that they alternate,
one spiraling to the right and one spiraling to
the left. Refer to the pattern picture or the layout diagram if needed.
Measure the finished center panel and cut the 4 1/2" wide border strips to fit. Miter the corners
of the border or set them square, your choice.
Appliqué strips of one of the bias colors to the border, in the ditch, for the accent frame.

© 2002 - 2011 Scarlett Rose page 5
Layer and quilt as desired. Make the
binding from the border fabric.
The next couple pages show some ideas
for coloring and size variations of the
Celtic plaid block design for you to
consider.
Use any large scale print, batik or other
novelty fabric for the center squares.
Change the amount of bias colors.
Use up to 8 colors for a rainbow effect,
or pair lights and darks of colors for
shading.
The more colors used for the bias, the
more the interlacing will show up!
Make more blocks for larger size quilts.
The center square could also be used for
signatures, making this design a special
friendship quilt!
Fabric painting, stenciling or stamping
could be done in the squares, too.

© 2002 - 2011 Scarlett Rose page 6
In this sample layout, bias
tape was also placed between
the first and second borders.
Four colors of bias, in two
shades, were used in the
blocks, with a repeat of one
color pair on the border. The
blocks were pieced with a
light fabric for the back-
ground square.
The machine embroidery
shown in the center squares
are cross stitch knot designs
from the Large Multicolor
Knot Collection 1.
These knots could also be
hand cross stitched on even
weave fabric or with waste
canvas. The e-chart for the
knot designs is the Tricolor
Knot Collection I.
Simply change the thread colors to match your fabrics and combine them in any way you wish.
The center square could be a
simple pieced block, as shown in
this batik sample.
Chose your favorite 8” patch-
work block!
Make a sampler by picking out
many different blocks. Mix
patchwork and appliqué.
Hand or machine quilt a design
in the center square.
Use trapunto.

© 2002 - 2011 Scarlett Rose page 7
Using photos and fabrics found in
Electric Quilt 7, here are two
versions of this wallhanging that
could be made with inkjet printed
images.
Please visit http://www.scarlettrose.com/plaid.html to view the Gallery for this design. If you
make a project from this pattern, please email a picture of your finished project to
[email protected] and it will be posted to the Gallery!
To purchase Scarlett’s Celtic &
More quilt e-patterns & e-charts,
please visit
http://www.scarlettrose.com/
epatterns.html
To download Scarlett’s Celtic &
More catalog or for information
about her workshops and lectures,
please visit her website at
http://www.scarlettrose.com.


