26
Centrify Server Suite Centrify for DB2 July 2015 Centrify Corporation

Centrify Server Suite
Centrify for DB2
July 2015
Centrify Corporation

Legal notice
This document and the software described in this document are furnished under and are subject to the terms of a license agreement or a non-disclosure agreement. Except as expressly set forth in such license agreement or non-disclosure agreement, Centrify Corporation provides this document and the software described in this document “as is” without warranty of any kind, either express or implied, including, but not limited to, the implied warranties of merchantability or fitness for a particular purpose. Some states do not allow disclaimers of express or implied warranties in certain transactions; therefore, this statement may not apply to you.
This document and the software described in this document may not be lent, sold, or given away without the prior written permission of Centrify Corporation, except as otherwise permitted by law. Except as expressly set forth in such license agreement or non-disclosure agreement, no part of this document or the software described in this document may be reproduced, stored in a retrieval system, or transmitted in any form or by any means, electronic, mechanical, or otherwise, without the prior written consent of Centrify Corporation. Some companies, names, and data in this document are used for illustration purposes and may not represent real companies, individuals, or data.
This document could include technical inaccuracies or typographical errors. Changes are periodically made to the information herein. These changes may be incorporated in new editions of this document. Centrify Corporation may make improvements in or changes to the software described in this document at any time.
© 2004-2016 Centrify Corporation. All rights reserved. Portions of Centrify software are derived from third party or open source software. Copyright and legal notices for these sources are listed separately in the Acknowledgements.txt file included with the software.
U.S. Government Restricted Rights: If the software and documentation are being acquired by or on behalf of the U.S. Government or by a U.S. Government prime contractor or subcontractor (at any tier), in accordance with 48 C.F.R. 227.7202-4 (for Department of Defense (DOD) acquisitions) and 48 C.F.R. 2.101 and 12.212 (for non-DOD acquisitions), the government’s rights in the software and documentation, including its rights to use, modify, reproduce, release, perform, display or disclose the software or documentation, will be subject in all respects to the commercial license rights and restrictions provided in the license agreement.
Centrify, DirectControl, DirectAuthorize, DirectAudit, DirectSecure, DirectControl Express, Centrify User Suite, and Centrify Server Suite are registered trademarks and Centrify for Mobile, Centrify for SaaS, Centrify for Mac, DirectManage, Centrify Express, DirectManage Express, Centrify Identity Platform, Centrify Identity Service, and Centrify Privilege Service are trademarks of Centrify Corporation in the United States and other countries. Microsoft, Active Directory, Windows, and Windows Server are either registered trademarks or trademarks of Microsoft Corporation in the United States and other countries.
Centrify software is protected by U.S. Patents 7,591,005; 8,024,360; 8,321,523; 9,015,103 B2; 9,112,846; 9,197,670; and 9,378,391.
The names of any other companies and products mentioned in this document may be the trademarks or registered trademarks of their respective owners. Unless otherwise noted, all of the names used as examples of companies, organizations, domain names, people and events herein are fictitious. No association with any real company, organization, domain name, person, or event is intended or should be inferred.

Contents 3
Contents
Introduction. . . . . . . . . . . . . . . . . . . . . . . . . . . . . . . . . . . . . . . . . . . . . . . . . . . . . . . . . . . . . . . . . . . . . . . . . . . . . 4
Conventions used in this book . . . . . . . . . . . . . . . . . . . . . . . . . . . . . . . . . . . . . . . . . . . . . . . . . . . . . . 4
Authentication and authorization in DB2 . . . . . . . . . . . . . . . . . . . . . . . . . . . . . . . . . . . . . . . . . . . . . . . . . . 4
Centrify for DB2 security and authentication plug-ins . . . . . . . . . . . . . . . . . . . . . . . . . . . . . . . . . 5
Making connections to the DB2 Administration Server (DAS) . . . . . . . . . . . . . . . . . . . . . . . . . . 7
Software requirements . . . . . . . . . . . . . . . . . . . . . . . . . . . . . . . . . . . . . . . . . . . . . . . . . . . . . . . . . . . . . . . . . . . 7
Centrify for DB2 server installation and configuration . . . . . . . . . . . . . . . . . . . . . . . . . . . . . . . . . . . . . . . 8
Unzip and restore the Centrify for DB2 package . . . . . . . . . . . . . . . . . . . . . . . . . . . . . . . . . . . . . . 9
Install the Centrify for DB2 package using the platform’s installation program . . . . . . . . . 10
Install and configure plug-ins using the setupdb2.sh script . . . . . . . . . . . . . . . . . . . . . . . . . . . 11
Install manually . . . . . . . . . . . . . . . . . . . . . . . . . . . . . . . . . . . . . . . . . . . . . . . . . . . . . . . . . . . . . . . . . . 13
Upgrading from an earlier release . . . . . . . . . . . . . . . . . . . . . . . . . . . . . . . . . . . . . . . . . . . . . . . . . . 20
If an installation attempt fails . . . . . . . . . . . . . . . . . . . . . . . . . . . . . . . . . . . . . . . . . . . . . . . . . . . . . . 21
Setting up the GSSAPI DB2 client . . . . . . . . . . . . . . . . . . . . . . . . . . . . . . . . . . . . . . . . . . . . . . . . . . . . . . . . . 21
DB2 client installation on a UNIX computer . . . . . . . . . . . . . . . . . . . . . . . . . . . . . . . . . . . . . . . . . 21
DB2 client installation on a Windows computer . . . . . . . . . . . . . . . . . . . . . . . . . . . . . . . . . . . . . 22
Testing the installation . . . . . . . . . . . . . . . . . . . . . . . . . . . . . . . . . . . . . . . . . . . . . . . . . . . . . . . . . . . . . . . . . . 22
Uninstalling DB2 plug-ins. . . . . . . . . . . . . . . . . . . . . . . . . . . . . . . . . . . . . . . . . . . . . . . . . . . . . . . . . . . . . . . . 23
Execute the uninstalldb2.sh script. . . . . . . . . . . . . . . . . . . . . . . . . . . . . . . . . . . . . . . . . . . . . . . . . . 24
Reconfigure environment variables and configuration files on DB2 servers . . . . . . . . . . . . 25
Manually reset DB2 configuration variables . . . . . . . . . . . . . . . . . . . . . . . . . . . . . . . . . . . . . . . . . 26
References . . . . . . . . . . . . . . . . . . . . . . . . . . . . . . . . . . . . . . . . . . . . . . . . . . . . . . . . . . . . . . . . . . . . . . . . . . . . . 26

Introduction
Introduction
Centrify Server Suite provides secure access control and centralized identity management by seamlessly integrating UNIX, Linux, and Macintosh OS X computers, and J2EE and web platforms with Microsoft Active Directory.
This document describes how to extend Server Suite authentication services to DB2® database instances. This solution allows you to use Microsoft Active Directory as the centralized authentication and access control data store in a heterogeneous environment containing Windows and UNIX computers, as well as DB2 relational database management systems.
Conventions used in this book
The following conventions are used in this document:
Fixed-width font is used for sample code, program names, program output, file names, and commands that you type at the command line. When italicized, the fixed-width font is used to indicate variables. In addition, in command line reference information, square brackets [ ] indicate optional arguments.
Italics in the standard font are used to indicate a book title.
Bold text is used to emphasize commands, buttons, or user interface text, and to introduce new terms.
For simplicity, we will use UNIX in this document to refer to all Server Suite supported versions of the UNIX and Linux operating systems unless otherwise noted.
Authentication and authorization in DB2In DB2, user and group authentication is performed by a facility that is external to the DB2 database management system, such as the operating system, a domain controller, or a Kerberos security system. It is accomplished using dynamically loadable libraries called security plug-ins.
The default IBM DB2 username/password plug-in authenticates users only in an NIS domain or in the /etc/passwd password file. If another security plug-in has not been explicitly configured, the user credentials provided in the connection request are authenticated by the security facility on the DB2 Universal Database (UDB) server. That is, the default plug-in sends the user ID and password to the operating system for validation.
Authorization is the process of determining access information about specific database objects and actions based on a supplied user ID. Privileges can be granted to specific users or to groups of users. Users that are a member of a group automatically inherit the group’s privileges. As mentioned before, these users and groups are defined outside the DB2 UDB; for example, in Active Directory.
Centrify for DB2 4
Authentication and authorization in DB2
DB2 supports replacement plug-ins for authentication and authorization. The authentication plug-ins can replace the default username and password method, and support alternative authentication methods including GSSAPI. DB2 also supports the use of multiple plug-ins for authentication.
Centrify for DB2 security and authentication plug-ins
The Centrify for DB2 package provides plug-ins that allow you to connect or attach to a DB2 database using either an Active Directory or a UNIX user identity. In addition, the package includes a group plug-in used for authorization.
The package provides two security plug-ins for authentication:
centrifydc_db2userpass: A username/password plug-in to replace the DB2 default.
centrifydc_db2gsskrb5: A GSSAPI plug-in for single sign on support.
The security plug-ins can be used independently or in conjunction with one another.
If you specify and configure both the username/password plug-in and the GSSAPI plug-in, the GSSAPI plug-in is used when the user connects without specifying a user name and password. The user account can be on an Active Directory domain controller or UNIX computer. If the user does specify a user name and password, the username/password plug-in is used instead.
If only the GSSAPI plug-in is configured, only Active Directory users can connect to the database instance. In addition, the Active Directory user name instead of the UNIX user name must be used in the SQL GRANT or REVOKE statements when granting or revoking permissions. In this case, the Active Directory user name should follow the DB2 user naming conventions.
DB2 and Centrify plug-in compatibility
Starting with DB2 release 10.5.4, DB2 does not allow security plug-ins to fork a process to authenticate DB2 users. To support this behavior, the Centrify plug-ins starting with Centrify for DB2 5.2.3 use the CentrifyDC service to authenticate Active Directory and local users.
If your environment contains DB2 10.5.4 or later:
Only Centrify for DB2 5.2.3 or later plug-ins are supported, and
Before you install Centrify for DB2, you must install the Server Suite 2015.1 or later agent (that is, agent version 5.2.3) on each DB2 server, and
You must ensure that the agent (that is, the centrifydc service) is running on each DB2 server.
5

Authentication and authorization in DB2
Username/password plug-in
The Centrify username/password plug-in, centrifydc_db2userpass, supports authentication from both Active Directory and non-Active Directory users. A non-Active Directory user may be one of the following:
a UNIX user from local stores such as /etc/passwd and Name Service Switch (NSS)
any user who has been authenticated using Pluggable Authentication Modules (PAM)
any user who has been authenticated using the AIX Loadable Authentication Module (LAM)
The Centrify username/password plug-in, like the IBM default username/password plug-in, gives you the option to allow users who are already logged in to a DB2 server machine to connect to a database instance without entering a user name or password. However, the default is to require a logged in user to re-enter the user name and password to access the database instance.
GSSAPI plug-in
The GSSAPI plug-in, centrifydc_db2gsskrb5, supports single sign on to a DB2 instance using the user’s Active Directory account. This plug-in assumes that the user requesting access to the database is already logged in to the client computer and has been authenticated through the Kerberos mechanism.
The GSSAPI plug-in allows users to run the connect and attach commands without specifying a user name and password even if the user is connecting from a remote DB2 client. It requires the user to have a valid Kerberos ticket. Generally, users obtain a Kerberos ticket automatically when they log in as an Active Directory user. However, in the following situations the user does not obtain a ticket automatically:
The user logs in to the DB2 server as a local, non-Active Directory user.
The user enters the UNIX command su - user as root to get a shell owned by another Active Directory user or local user.
The user logs in as a user who has both an Active Directory account and a local user account. However, the Active Directory account is not in the same zone as the machine you logged in to.
In each of these cases, the user needs to obtain Kerberos tickets before single sign-on support is provided.
To obtain tickets for an Active Directory user, type kinit user. The user is prompted for a password. To avoid being prompted, you can create a keytab file in advance using the adkeytab command, set the environment variable KRB5_KTNAME to the full path of your keytab file, and then run kinit -k user@DOMAIN to obtain the tickets.
Note If a user name is explicitly provided when only the GSSAPI plug-in is installed (for example, by entering the DB2 command connect to testdb user username using password), the plug-in first authenticates the given user to the Kerberos Key Distribution
Centrify for DB2 6

Software requirements
Center (KDC), and then obtains a ticket-granting ticket (TGT) upon success. The plug-in next uses the TGT to get a service ticket for the DB2 server.
Group plug-in
You install the Group plug-in, centrifydc_db2group, to retrieve the list of groups to which a user belongs for authorization. The group plug-in is called automatically after user authentication by DB2. The group info retrieved is used by DB2 to check a user’s access rights and determine whether the user has privilege to do specific tasks; for example, connect, query, perform database management, and so on.
The Group plug-in queries Active Directory first for the groups to which the user belongs, and then it looks in the local groups on the host. The two lists are then merged, with duplicates removed and returned to DB2.
Making connections to the DB2 Administration Server (DAS)
The DB2 Administration Server (DAS) allows administrators to manage DB2 instances remotely. Using utilities such as DB2 Control Center (db2cc) to perform operations such as creating, removing, starting, or stopping a database instance remotely require a DAS connection. Tasks that can be performed on a running instance (such as creating or dropping a table in the instance) do not require a DAS connection.
The DAS uses a separate authentication scheme from the instance authentication. The DAS does not call into the DB2 security plug-ins or PAM when authenticating users. If you want to log in as an Active Directory user and use utilities such as DB2 Control Center to remotely administer an instance, you have the following options, irrespective of the plug-ins that you select:
Run the utility that connects to the DAS (such as db2cc) on the DB2 server machine as the user who can perform the desired administrative tasks. Make sure that this user is in the same zone as the DB2 server machine.
Install and configure either the Microsoft or Centrify password synchronization service. For more details about the Centrify password synchronization service, refer to the Centrify Server Suite Administrator’s Guide.
Create a local user on the DB2 server machine and enter that user’s user name and password when DB2 Control Center (or other utility connecting to the DAS) requests a user name and password.
Software requirementsYou must have the Centrify agent installed on each DB2 server, and the DB2 servers must be joined to an Active Directory domain.
7

Centrify for DB2 server installation and configuration
If you use the GSSAPI plug-in, the plug-in must be installed on the DB2 server and each DB2 client. In addition, both the DB2 client and the DB2 server computers must be joined to the same Active Directory domain.
If you use the username/password plug-in, you must install the PAM library. You can install the PAM library after you install the Centrify for DB2 package.
See “DB2 and Centrify plug-in compatibility” on page 5 for details about Server Suite, Centrify for DB2, and DB2 release requirements.
See the release notes for the Centrify software, DB2 versions and versions of Red Hat, SuSE, Solaris, and AIX operating systems supported in this release. In general, the Centrify for DB2 package supports the same versions of Solaris, Red Hat, SuSE and AIX operating systems supported in DB2 version 9.5, 9.7, 10.1, and 10.5 with the following exceptions:
For Red Hat and SuSE Linux, only x86 and x86-64 bit (AMD style) architectures are supported.
Centrify for DB2 server installation and configurationThis section describes how to install and configure the Centrify for DB2 package on a DB2 server.
Note For information about client installation and setup, see “Setting up the GSSAPI DB2 client” on page 21.
The Centrify for DB2 package includes the /usr/share/centrifydc/bin/setupdb2.sh script that automates the installation and configuration of the Centrify for DB2 plug-ins. In most situations, you use the setupdb2.sh script to install and configure the Centrify for DB2 plug-ins. Alternatively, you can manually install, set up, configure, and verify the plug-ins without using the setupdb2.sh script. See “Install manually” on page 13 for details about installing and configuring Centrify for DB2 without using the setupdb2.sh script.
Notes To use the setupdb2.sh script, you must know the Active Directory administrator password.
An uninstallation script, /usr/share/centrifydc/bin/uninstalldb2.sh, is also included in the Centrify for DB2 package. Use this script to remove an existing Centrify for DB2 release before you upgrade to a new release, or to remove a partially installed Centrify for DB2 release after a failed installation attempt. See “Execute the uninstalldb2.sh script” on page 24 for details about using this script.
Centrify for DB2 8

Centrify for DB2 server installation and configuration
The following sections describe how to install and configure the Centrify for DB2 package on each supported platform using the setupdb2.sh script:
Unzip and restore the Centrify for DB2 package
Install the Centrify for DB2 package using the platform’s installation program
Install and configure plug-ins using the setupdb2.sh script
Unzip and restore the Centrify for DB2 package
Note If Centrify for DB2 is already installed, uninstall it now as described in “Execute the uninstalldb2.sh script” on page 24.
To begin the installation, unzip and restore the Centrify for DB2 package on each DB2 server. The following sections describe how to unzip and restore the package on each supported platform. In each example, release is the release number of the Centrify for DB2 software (for example, 4.5.0), os_release is the release number of the operating system (for example, 10.0), and architecture is the processor architecture that is supported (for example, i386).
AIX
Execute the following commands to unzip and restore the Centrify for DB2 package files on an AIX computer:gunzip centrify-db2-release-aixos_release-ppc.tgz
tar -xvf centrify-db2-release-aixos_release-ppc-bff.tar
gunzip centrify-db2-release-aixos_release-ppc-bff.gz
After you execute these commands, the file centrify-db2-release-aixos_release-ppc-bff is ready to be installed using the native AIX installer. Go to Install the Centrify for DB2 package using the platform’s installation program and continue from there.
Linux
Execute the following commands to unzip and restore the Centrify for DB2 package files on a Linux computer. The examples shown here assume that you are installing on Red Hat Linux.gunzip centrify-db2-release-rhelos_release-architecture.tgz
tar -xvf centrify-db2-release-rhelos_release-architecture.tar
After you execute these commands, the file centrify-db2-release-rhelos_release-architecture.rpm is ready to be installed using the native Linux installer. Go to Install the Centrify for DB2 package using the platform’s installation program and continue from there.
Solaris
Execute the following commands to unzip and restore the Centrify for DB2 package files on a Solaris computer:gunzip centrify-db2-release-solos_release-ppc-bff.tgz
tar -xvf centrify-db2-release-solos_release-ppc-bff.tar
9
Centrify for DB2 server installation and configuration
After you execute these commands, the file centrify-db2-release-solos_release-ppc-bff is ready to be installed using the native Solaris installer. Go to Install the Centrify for DB2 package using the platform’s installation program and continue from there.
Install the Centrify for DB2 package using the platform’s installation program
After you have unzipped and restored the Centrify for DB2 package files, install the package using the platform’s native installation program. The following sections describe the installation procedure on each supported platform. In each example, release is the release number of the Centrify for DB2 software, and os_release is the release number of the operating system.
AIX
Execute the following command to install the Centrify for DB2 package using the native AIX installation program:installp -d centrify-db2-release-aixos_release-ppc-bff CentrifyDC.db2
After you execute this command, you are ready to install and configure the Centrify for DB2 plug-ins. You can install and configure the plug-ins using the setupdb2.sh script, or manually without using the setupdb2.sh script. See “Install and configure plug-ins using the setupdb2.sh script” on page 11 or “Install manually” on page 13 for details about these procedures.
Linux
Execute the following command to install the Centrify for DB2 package using the native Linux installation program. The examples shown here assume that you are installing on Red Hat Linux.
If you are installing the Centrify for DB2 package for the first time:rpm -ivh centrify-db2-release-rhelos_release-architecture.rpm
After you execute this command, you are ready to install and configure the Centrify for DB2 plug-ins. You can install and configure the plug-ins using the setupdb2.sh script, or manually without using the setupdb2.sh script. See “Install and configure plug-ins using the setupdb2.sh script” on page 11 or “Install manually” on page 13 for details about these procedures.
Solaris
Execute the following command to install the Centrify for DB2 package using the native Solaris installation program.pkgadd -a admin -n -d centrify-db2-release-solos_release.rpm \Centrify.db2
After you execute this command, you are ready to install and configure the Centrify for DB2 plug-ins. You can install and configure the plug-ins using the setupdb2.sh script, or manually without using the setupdb2.sh script. See “Install and configure plug-ins using the
Centrify for DB2 10
Centrify for DB2 server installation and configuration
setupdb2.sh script” on page 11 or “Install manually” on page 13 for details about these procedures.
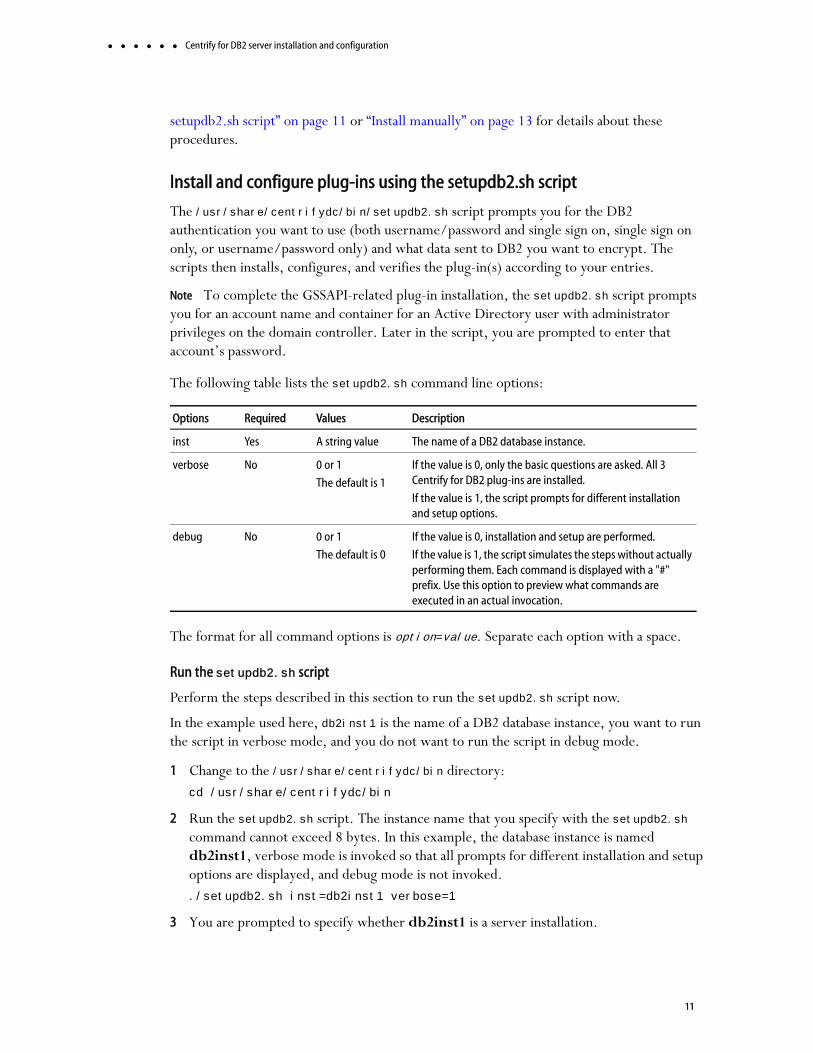
Install and configure plug-ins using the setupdb2.sh script
The /usr/share/centrifydc/bin/setupdb2.sh script prompts you for the DB2 authentication you want to use (both username/password and single sign on, single sign on only, or username/password only) and what data sent to DB2 you want to encrypt. The scripts then installs, configures, and verifies the plug-in(s) according to your entries.
Note To complete the GSSAPI-related plug-in installation, the setupdb2.sh script prompts you for an account name and container for an Active Directory user with administrator privileges on the domain controller. Later in the script, you are prompted to enter that account’s password.
The following table lists the setupdb2.sh command line options:
The format for all command options is option=value. Separate each option with a space.
Run the setupdb2.sh script
Perform the steps described in this section to run the setupdb2.sh script now.
In the example used here, db2inst1 is the name of a DB2 database instance, you want to run the script in verbose mode, and you do not want to run the script in debug mode.
1 Change to the /usr/share/centrifydc/bin directory:cd /usr/share/centrifydc/bin
2 Run the setupdb2.sh script. The instance name that you specify with the setupdb2.sh command cannot exceed 8 bytes. In this example, the database instance is named db2inst1, verbose mode is invoked so that all prompts for different installation and setup options are displayed, and debug mode is not invoked../setupdb2.sh inst=db2inst1 verbose=1
3 You are prompted to specify whether db2inst1 is a server installation.
Options Required Values Description
inst Yes A string value The name of a DB2 database instance.
verbose No 0 or 1
The default is 1
If the value is 0, only the basic questions are asked. All 3 Centrify for DB2 plug-ins are installed.
If the value is 1, the script prompts for different installation and setup options.
debug No 0 or 1
The default is 0
If the value is 0, installation and setup are performed.
If the value is 1, the script simulates the steps without actually performing them. Each command is displayed with a "#" prefix. Use this option to preview what commands are executed in an actual invocation.
11

Centrify for DB2 server installation and configuration
In this example, db2inst1 is a server installation, so select the default (y, for yes).
4 You are prompted to verify that the installed version of DB2 is release 9.5 or later. In this example, DB2 9.5 is the installed version, so select the default (y, for yes).
5 You are prompted to select an authentication method. You can select username/password and single sign-on, single sign-on only, or username/password only. See “Username/password plug-in” on page 6 and “GSSAPI plug-in” on page 6 for details about these choices.
In this example, select username/password only.
6 You are prompted to specify which data sent to DB2 should be encrypted. This step is optional.
In this example, select [1] Nothing.
Note If you select [5] Skip this step, the plugin setup program exits.
7 You are prompted to specify whether to use the CentrifyDC group plug-in. See “Group plug-in” on page 7 for details about this choice.
In this example, select yes.
8 You are prompted whether to configure the instance user as a service account.
If you are setting up the GSSAPI plug-in (that is, if you selected a single sign-on option in Step 5) and you have not yet configured the instance user as a service account, you must select option 1, “Use adkeytab to create a service account in Active Directory and keytab file” in this step. You will be prompted later for the Active Directory Administrator password.
If you have already configured the instance user as a service account, the necessary keytab file already exists. If this is the case, select option 2, “Provide the name of an already existing keytab file,” and provide the full path and file name of the keytab file.
If you are not setting up the GSSAPI plug-in, you can optionally skip this step.
In this example, even though the GSSAPI plug-in is not being set up (that is, a single sign-on option was not selected in Step 5), you can still choose to configure the instance user as a service account. To do so, select option 1.
9 You are prompted to provide the password for the database instance that you specified in Step 2.
10 You are prompted to specify a user who has administrator privileges for the domain (that is, Active Directory Administrator privileges). Specify a user name (for example, [email protected]).
11 You are prompted to specify the container object in which to create the service account. The setupdb2.sh script can use only the container objects in the domain to which the computer is currently joined. You cannot specify another domain for the container object
Centrify for DB2 12

Centrify for DB2 server installation and configuration
when you use the setupdb2.sh script to install and configure plug-ins. If you want to specify a different domain, you must install the plug-ins manually without using the setupdb2.sh script. See Step 2 on page 17 for details about specifying a different domain.
Type the name of the container object in relative DN format (that is, do not specify the domain portion of the DN). For example, if you wanted to create the service account in the users container in the currently joined domain, you would type the following:CN=users
12 You are prompted for more information depending on which plug-ins you are setting up:
The group that owns the /usr/share/centrifydc/bin/db2userpass_checkpwd file. You are prompted for this information if you are setting up the username/password plug-in.
The password for the user with Active Directory Administrator privileges that you specified in Step 10. You are prompted for this information if you are setting up the GSSAPI plug-in.
13 System information displays as files are configured. When the setupdb2.sh script finishes the configuration, a completion message displays.
This completes the automated installation on the DB2 server. If you selected single sign-on and username/password or single sign-on only, you need to install the GSSAPI client on every client computer. Go to “Setting up the GSSAPI DB2 client” on page 21 for information about that procedure.
If you selected username/password only, you are done with the installation. Go to “Testing the installation” on page 22 to finish.
Install manually
Perform the following steps if you want to install Centrify for DB2 manually without using the setupdb2.sh script. If you already installed Centrify for DB2, skip this section and go to “Setting up the GSSAPI DB2 client” on page 21.
Perform the procedures described in “Unzip and restore the Centrify for DB2 package” on page 9 and “Install the Centrify for DB2 package using the platform’s installation program” on page 10.
Copy the Centrify for DB2 shared libraries to the appropriate DB2 locations (see “Copy the plug-ins” on page 14).
If you plan to use username/password for authentication, configure the operating system to load the username/password plug libraries (see “Set up for the username/password plug-in” on page 15).
If you plan to use single sign-on, configure the operating system to use the GSSAPI plug-in and set up the key table (See “Set up for the GSSAPI plug-in” on page 16).
Configure DB2 to use the three plug-ins (See “Configure the DB2 instance” on page 18).
13

Centrify for DB2 server installation and configuration
Confirm that the DB2 configuration is correct (See “Verify the set up” on page 20).
Note The Centrify for DB2 Group plug-in does not require any set up.
Copy the plug-ins
Use the following commands to copy the Centrify for DB2 shared libraries from the installation directory to the proper DB2 directory for each instance—db2inst1 in the commands that follow:
Notes
The libcentrifydc_db2userpass.so that you use is version-dependent. Different versions of this library are provided in /usr/share/centrifydc/lib64 and /usr/share/centrifydc/lib:
libcentrifydc_db2userpass82.so: This is a legacy file that supported DB2 versions 9.1 and earlier. DB2 versions 9.1 and earlier are no longer supported, and this file will be removed in a future release of Centrify for DB2.
libcentrifydc_db2userpass95.so: Use this file for DB2 version 9.5 and later.
After you copy the file to the destination directory, remove the lib prefix and the version number. For example, if you have DB2 version 9.5, you would copy libcentrifydc_db2userpass95.so and change to name to centrifydc_db2userpass.so in the destination directory.
For 64 bit instances:
cp /usr/share/centrifydc/lib64/libcentrifydc_db2userpassnn.so ~db2inst1/sqllib/security64/plugin/server/centrifydc_db2userpass.so
cp /usr/share/centrifydc/lib64/libcentrifydc_db2gsskrb5.so ~db2inst1/sqllib/security64/plugin/server/centrifydc_db2gsskrb5.so
cp /usr/share/centrifydc/lib64/libcentrifydc_db2gsskrb5.so ~db2inst1/sqllib/security64/plugin/client/centrifydc_db2gsskrb5.so
cp /usr/share/centrifydc/lib64/libcentrifydc_db2group.so ~db2inst1/sqllib/security64/plugin/group/centrifydc_db2group.so
cp /usr/share/centrifydc/lib/libcentrifydc_db2gsskrb5.so ~db2inst1/sqllib/security32/plugin/client/centrifydc_db2gsskrb5.so
Centrify for DB2 14

Centrify for DB2 server installation and configuration
For 32 bit instances:
cp /usr/share/centrifydc/lib/libcentrifydc_db2userpassnn.so ~db2inst1/sqllib/security32/plugin/server/centrifydc_db2userpass.so
cp /usr/share/centrifydc/lib/libcentrifydc_db2gsskrb5.so ~db2inst1/sqllib/security32/plugin/server/centrifydc_db2gsskrb5.so
cp /usr/share/centrifydc/lib/libcentrifydc_db2gsskrb5.so ~db2inst1/sqllib/security32/plugin/client/centrifydc_db2gsskrb5.so
cp /usr/share/centrifydc/lib/libcentrifydc_db2group.so ~db2inst1/sqllib/security32/plugin/group/centrifydc_db2group.so
Set up for the username/password plug-in
The username/password plug in library, centrifydc_db2userpass.so, is now in place. Three more procedures are required to finish Centrify for DB2 username/password plug-in installation and configuration:
Configure the instance’s Linux computer(s) to use the Centrify for DB2 library for PAM authentication.
Note The Centrify for DB2 username/password security plug-in uses PAM to authenticate users. This step is required only for DB2 servers running on Linux platforms. On AIX-based computers, the Centrify for DB2 username/password plug-in uses the native LAM authentication framework which is already configured for authentication against Active Directory accounts.
Set parameters in the /etc/centrifydc/centrifydc.conf file.
Assign permissions for the program that checks the password for local users.
1 Configure Linux-based computers:
Note This operation requires root user privileges.
You need to tell the PAM service to use Centrify for DB2 plug-in for authentication and account management. The name of the Centrify for DB2 username/password plug-in is centrifydc_db2userpass.
Each PAM service has its own configuration file in the /etc/pam.d directory. To add the Centrify for DB2 username/password plug-in on a Red Hat Linux computer, create the file/etc/pam.d/centrifydc_db2userpass
with the following contents:# Centrify PAM service for DB2 usename/password support
# %PAM-1.0
auth required pam_stack.so service=system-auth
auth required pam_nologin.so
account required pam_stack.so service=system-auth
##########################################
If you are configuring a SUSE Linux 10 computer, the contents of /etc/pam.d/
15

Centrify for DB2 server installation and configuration
centrifydc_db2userpass should be as follows:auth include common-auth
account include common-account
If you are configuring a SUSE Linux 8 or 9 computer, the contents of /etc/pam.d/centrifydc_db2userpass should be as follows:auth required pam_unix2.so
auth required pam_nologin.so
auth required pam_env.so
account required pam_unix2.so
account required pam_nologin.so
2 Set /etc/centrifydc/centrifydc.conf parameters: The following configuration options require you to edit the /etc/centrifydc/centrifydc.conf file on the DB2 server.
If you want to allow users who are already logged in to the DB2 server to log in to the database instance without entering their user name and password, add the following line to /etc/centrifydc/centrifydc.conf:db2.userpass.allow.localnopasswd.db2_instance_name: true
The default value is false, meaning that users already logged in to the server must enter their user name and password to access the database instance.
If you have an environment in which the user name case used for database authentication differs from user name case stored in /etc/passwd, you need to add the following parameter to the /etc/centrifydc/centrifydc.conf file:db2.userpass.username.lower: true
When this parameter is present and set to true, the DB2 username/password plug-in converts the user name to lowercase before attempting authentication. When this parameter is set to false, it leaves the case as-is.
By default, the Centrify DB2 agent authenticates all Active Directory users even if the Active Directory user is not in the zone. To optionally constrain the authentication to zone enabled Active Directory users only, add the following parameter to the /etc/centrifydc/centrifydc.conf file:db2.user.zone_enabled.db2_instance_name: true
After you add this parameter, restart the DB2 instance to pick up the new setting.
Stop and start the agent after you modify centrifydc.conf to enable the conversion.
Set up for the GSSAPI plug-in
This section describes how to configure the server to use the Centrify for DB2 GSSAPI plug-in.
1 As root, use the adjoin command to join the UNIX DB2 server machine and each UNIX DB2 client using GSSAPI to the same Active Directory domain. See the Centrify Server Suite Administrator's Guide for the adjoin command options. Be careful to join the appropriate
Centrify for DB2 16
Centrify for DB2 server installation and configuration
Active Directory organizational unit and Centrify zone for your configuration.
Note You must have the account name and password for an Active Directory user that has administrator privileges on the Active Directory domain controller to use adjoin. If you do not specify the account name in the adjoin command line you will be prompted to enter the administrator password.
2 As root, use the adkeytab command to create a Kerberos service account for the DB2 instance and generate a keytab file. (The adkeytab tool is included in the Server Suite package; see /usr/sbin.)
The following example creates the account for the database instance db2inst1 in the Users container in the currently joined domain. The account resides on a DB2 server with host name (not fully-qualified) hostname, and generates a keytab file (db2inst1.keytab) in the $INSTHOME directory. Substitute your own instance, host, and keytab file names as appropriate.adkeytab -n -c CN=Users -u Administrator -K \
$INSTHOME/db2inst1.keytab -P db2inst1/hostname db2inst1
If you had wanted to create the account in a different domain than the currently joined domain, you would have used the adkeytab -d option.
This example uses the domain controller’s Administrator account to generate the keytab file and requires root to know the administrator password. If you do not know the administrator password, use the -u option to specify any user with administrator privileges on the Active Directory domain controller.
The adkeytab command always sets the password of the domain account to a random value regardless of whether the account already exists. Use the following command to change the Active Directory password. This example uses db2inst1 for the DB2 instance name and password for the password string for the instance user’s account in Active Directory. Substitute your own instance and password as appropriate.adkeytab -C db2inst1 -w password
Note If there is a local user (for example, in /etc/passwd or /etc/shadow) with the same account name as the instance user, the adkeytab command does not change the local password.
In both examples, you are prompted for the Active Directory Administrator password before the command is executed.
After you have generated the keytab file with the adkeytab command, do not move or delete it. If you do, the agent will not renew the keytab.
In addition, set the service account password in Active Directory to “never expire.”
3 Open the file /etc/centrifydc/user.ignore and add the instance user to the end of the file. (This file contains user names that are always treated as local—for example, root, mail, and daemon—when looking up user information.) This allows the instance user to log in
17

Centrify for DB2 server installation and configuration
as a local user to perform maintenance tasks.
4 Set appropriate permissions to protect the keytab file generated in Step 2.
For the GSSAPI plug-in to work, the keytab file must be made readable by the DB2 instance owner. In addition, because the keytab file contains sensitive information such as the secret key associated with the DB2 instance service account, it should be properly protected. Execute the following commands as root to achieve this. The following example uses db2inst1 for the DB2 instance name and db2grp1 for the primary group of the instance user. Substitute your own instance and group names as appropriate.chmod 600 $INSTHOME/db2inst1.keytab
chown db2inst1:db2grp1 $INSTHOME/db2inst1.keytab
5 Set up the DB2 environment variables to use the new keytab file. By default, DB2 uses the keytab file defined in the KRB5_KTNAME environment variable for authentication. The default is /etc/krb5.keytab. The following procedures describe how to set the variable for different UNIX shells. Perform the action as the DB2 instance owner, and replace db2inst1 with your actual instance name.
For Bourne, Korn and bash shell users, add the following lines to $INSTHOME/sqllib/userprofile:KRB5_KTNAME=$INSTHOME/db2inst1.keytab
export KRB5_KTNAME
For C shell users, add the following lines to $INSTHOME/sqllib/usercshrc:setenv KRB5_KTNAME $INSTHOME/db2inst1.keytab
By default, DB2 filters out all user environment variables except for those prefixed with DB2 or db2. To pass the value stored in KRB5_KTNAME to the DB2 instance, the variable must be added to the DB2ENVLIST parameter. To do so, run the following command as the DB2 instance user:db2set DB2ENVLIST=KRB5_KTNAME
Note Before executing db2set, you must either:
Log out after updating the userprofile and usercshrc files to set the KRB5_KTNAME environment and log back in again; or
Set the environment variable in your shell before issuing the command.
Configure the DB2 instance
Enter the following commands to modify each DB2 instance’s configuration parameters to use the Centrify for DB2 plug-ins for authentication and authorization.
Centrify for DB2 18

Centrify for DB2 server installation and configuration
All of the following commands should be executed as an instance user.
Case 1: Use the username/password plug-in only:
db2 update dbm cfg using SRVCON_PW_PLUGIN centrifydc_db2userpass
db2 update dbm cfg using SRVCON_AUTH NOT_SPECIFIED
db2 update dbm cfg using AUTHENTICATION SERVER
Note If you select the SRVCON_AUTH option, the user name and password are transmitted in the clear. This library also includes the following options to encrypt different parts of the message:
SERVER_ENCRYPT: The user name and password are encrypted in messages sent from DB2 client to DB2 server.
DATA_ENCRYPT: User data as well as the authentication data (user name and password) are encrypted in messages sent from DB2 client to DB2 server.
DATA_ENCRYPT_CMP: DATA_ENCRYPT with backwards compatibility to older versions of the DB2 client. (If you have an older version of the DB2 client that does not support the DATA_ENCRYPT option, only the authentication data is encrypted unless you select the DATA_ENCRYPT_CMP option.)
For example, to set the username/password plug-in to encrypt all data going to the server you would use the following command: db2 update dbm cfg using SRVCON_AUTH DATA_ENCRYPT
Case 2: Use the GSSAPI plug-in only:
db2 update dbm cfg using SRVCON_PW_PLUGIN NULL
db2 update dbm cfg using SRVCON_GSSPLUGIN_LIST centrifydc_db2gsskrb5
db2 update dbm cfg using LOCAL_GSSPLUGIN centrifydc_db2gsskrb5
db2 update dbm cfg using SRVCON_AUTH GSSPLUGIN
db2 update dbm cfg using AUTHENTICATION SERVER
Case 3: Use the username/password plug-in and the GSSAPI plug-in together:
db2 update dbm cfg using SRVCON_PW_PLUGIN centrifydc_db2userpass
db2 update dbm cfg using SRVCON_GSSPLUGIN_LIST centrifydc_db2gsskrb5
db2 update dbm cfg using LOCAL_GSSPLUGIN centrifydc_db2gsskrb5
db2 update dbm cfg using SRVCON_AUTH GSS_SERVER_ENCRYPT
db2 update dbm cfg using AUTHENTICATION SERVER
For all cases: Run the following command as the DB2 instance user to configure the instance to use the Centrify for DB2 group plug-in: db2 update dbm cfg using GROUP_PLUGIN centrifydc_db2group
This completes the Centrify for DB2 package manual installation and configuration. Next, verify that the configuration parameters are set properly.
19
Centrify for DB2 server installation and configuration
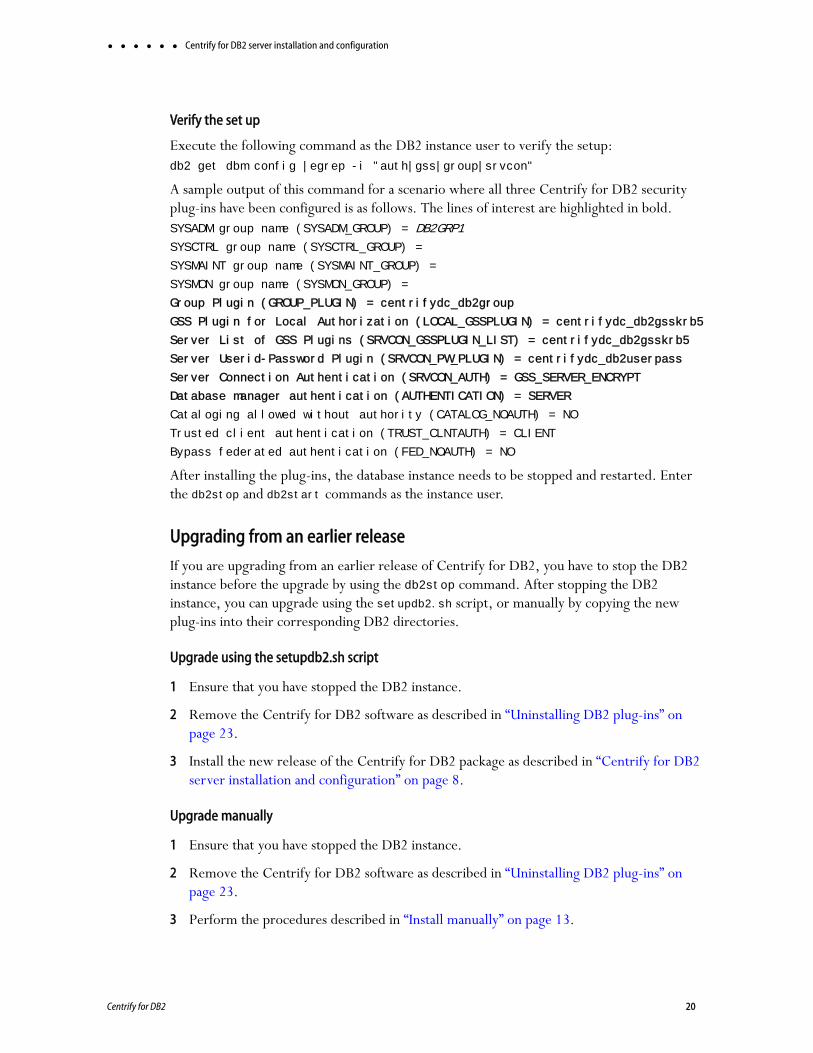
Verify the set up
Execute the following command as the DB2 instance user to verify the setup:db2 get dbm config |egrep -i "auth|gss|group|srvcon"
A sample output of this command for a scenario where all three Centrify for DB2 security plug-ins have been configured is as follows. The lines of interest are highlighted in bold. SYSADM group name (SYSADM_GROUP) = DB2GRP1
SYSCTRL group name (SYSCTRL_GROUP) =
SYSMAINT group name (SYSMAINT_GROUP) =
SYSMON group name (SYSMON_GROUP) =
Group Plugin (GROUP_PLUGIN) = centrifydc_db2group
GSS Plugin for Local Authorization (LOCAL_GSSPLUGIN) = centrifydc_db2gsskrb5
Server List of GSS Plugins (SRVCON_GSSPLUGIN_LIST) = centrifydc_db2gsskrb5
Server Userid-Password Plugin (SRVCON_PW_PLUGIN) = centrifydc_db2userpass
Server Connection Authentication (SRVCON_AUTH) = GSS_SERVER_ENCRYPT
Database manager authentication (AUTHENTICATION) = SERVER
Cataloging allowed without authority (CATALOG_NOAUTH) = NO
Trusted client authentication (TRUST_CLNTAUTH) = CLIENT
Bypass federated authentication (FED_NOAUTH) = NO
After installing the plug-ins, the database instance needs to be stopped and restarted. Enter the db2stop and db2start commands as the instance user.
Upgrading from an earlier release
If you are upgrading from an earlier release of Centrify for DB2, you have to stop the DB2 instance before the upgrade by using the db2stop command. After stopping the DB2 instance, you can upgrade using the setupdb2.sh script, or manually by copying the new plug-ins into their corresponding DB2 directories.
Upgrade using the setupdb2.sh script
1 Ensure that you have stopped the DB2 instance.
2 Remove the Centrify for DB2 software as described in “Uninstalling DB2 plug-ins” on page 23.
3 Install the new release of the Centrify for DB2 package as described in “Centrify for DB2 server installation and configuration” on page 8.
Upgrade manually
1 Ensure that you have stopped the DB2 instance.
2 Remove the Centrify for DB2 software as described in “Uninstalling DB2 plug-ins” on page 23.
3 Perform the procedures described in “Install manually” on page 13.
Centrify for DB2 20

Setting up the GSSAPI DB2 client
4 Restart the DB2 instance after the files are in place using db2start.
If you are currently using a Beta version of the software, refer to Centrify Knowledge Base article KB-0938 for information about how to perform the upgrade.
If an installation attempt fails
If you attempt to install the Centrify for DB2 package and the installation fails, before retrying the installation you must uninstall any files that were installed by performing the procedures described in “Uninstalling DB2 plug-ins” on page 23.
Setting up the GSSAPI DB2 clientThe Centrify for DB2 GSSAPI security plug-in has a client component that must be installed on each DB2 Windows- and UNIX-based client computer accessing the DB2 server.
DB2 client installation on a UNIX computer
Copy the Centrify for DB2 package to each client. Unzip, restore, and install the package as described in “Centrify for DB2 server installation and configuration” on page 8.
Just like the DB2 server, you can use either use the setupdb2.sh setup script or manually install and configure the software. The following sections describe these procedures.
Install using the setupdb2.sh script
To install the Centrify for DB2 package using the setupdb2.sh script, perform the steps described in “Install and configure plug-ins using the setupdb2.sh script” on page 11.
Note The setupdb2.sh script may wrongly identify a DB2 version 8 client as a DB2 server. If this happens, when the script prompts you to confirm the detection, answer no. The script will then install the GSSAPI plug-in for DB2 client.
21

Testing the installation
Install manually
Perform the following steps to install the Centrify for DB2 package manually.
1 Copy the shared libraries. Run the following commands as the instance user to copy the shared libraries to the target directories where db2inst1 is the instance name:
For a 64 bit DB2 instance:cp /usr/share/centrifydc/lib64/libcentrifydc_db2gsskrb5.so ~db2inst1/sqllib/security64/plugin/client/centrifydc_db2gsskrb5.so
cp /usr/share/centrifydc/lib/libcentrifydc_db2gsskrb5.so ~db2inst1/sqllib/security32/plugin/client/centrifydc_db2gsskrb5.so
For 32 bit instances, run:cp /usr/share/centrifydc/lib/libcentrifydc_db2gsskrb5.so
~db2inst1/sqllib/security32/plugin/client/centrifydc_db2gsskrb5.so
2 Set up the DB2 configuration variables. As the DB2 instance user, run the following commands to tell DB2 to use server authentication schemes:db2 update dbm cfg using LOCAL_GSSPLUGIN centrifydc_db2gsskrb5
db2 update dbm cfg using AUTHENTICATION SERVER
DB2 client installation on a Windows computer
The Centrify for DB2 client is suitable for 32- and 64-bit Windows platforms, and supports 32-bit DB2 releases. Perform the following procedure to install and configure each DB2 client to use the Centrify for DB2 GSSAPI security plug-in:
1 Unzip the file centrify-db2-release-win-architecture.zip.
2 Optional: If the file centrify_db2gsskrb5.dll is zipped, unzip it.
3 For each instance that you want to connect to a DB2 server with single sign-on capability, copy centrifydc_db2gsskrb5.dll to the following location:DB2_install_directory\security\plugin\DB2_instance_name\client
4 Log on as the instance user and run the DB2 command shell, db2cmd.exe. This command can be found in the directory DB2_installation_directory\BIN.
5 Enter the following command in the db2cmd.exe window:db2 update dbm cfg using authentication server
Testing the installationThis section describes how to test the Centrify for DB2 security plug-ins after installation. The test can be performed on the DB2 server or from a computer with DB2 client software installed.
Centrify for DB2 22
Uninstalling DB2 plug-ins
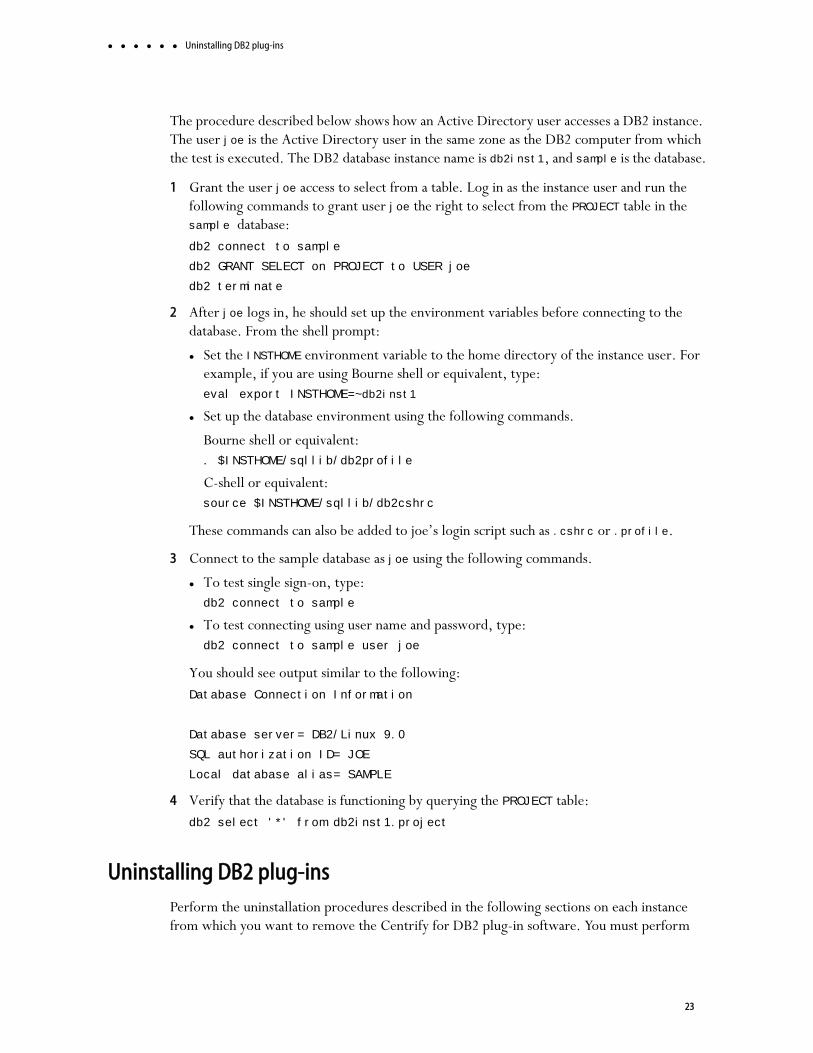
The procedure described below shows how an Active Directory user accesses a DB2 instance. The user joe is the Active Directory user in the same zone as the DB2 computer from which the test is executed. The DB2 database instance name is db2inst1, and sample is the database.
1 Grant the user joe access to select from a table. Log in as the instance user and run the following commands to grant user joe the right to select from the PROJECT table in the sample database:db2 connect to sample
db2 GRANT SELECT on PROJECT to USER joe
db2 terminate
2 After joe logs in, he should set up the environment variables before connecting to the database. From the shell prompt:
Set the INSTHOME environment variable to the home directory of the instance user. For example, if you are using Bourne shell or equivalent, type:eval export INSTHOME=~db2inst1
Set up the database environment using the following commands.
Bourne shell or equivalent:. $INSTHOME/sqllib/db2profile
C-shell or equivalent:source $INSTHOME/sqllib/db2cshrc
These commands can also be added to joe’s login script such as .cshrc or .profile.
3 Connect to the sample database as joe using the following commands.
To test single sign-on, type: db2 connect to sample
To test connecting using user name and password, type:db2 connect to sample user joe
You should see output similar to the following:Database Connection Information
Database server= DB2/Linux 9.0
SQL authorization ID= JOE
Local database alias= SAMPLE
4 Verify that the database is functioning by querying the PROJECT table:db2 select '*' from db2inst1.project
Uninstalling DB2 plug-insPerform the uninstallation procedures described in the following sections on each instance from which you want to remove the Centrify for DB2 plug-in software. You must perform
23

Uninstalling DB2 plug-ins
these procedures before you upgrade to a new Centrify for DB2 release, or to remove a partially installed Centrify for DB2 release after a failed installation attempt.
The uninstallation procedures are as follows. Unless otherwise noted, each procedure is required.
Execute the uninstalldb2.sh script on DB2 clients and servers to revert DB2 to the settings that existed before the Centrify for DB2 package was installed.
Reconfigure environment variables and configuration files on DB2 servers.
Manually reset DB2 configuration variables. This procedure is optional. In most situations, the uninstalldb2.sh script automatically resets DB2 configuration variables to their default values, or to the values that they had before the Centrify for DB2 package was installed.
Execute the uninstalldb2.sh script
The uninstallation script /usr/share/centrifydc/bin/uninstalldb2.sh will undo the Centrify for DB2 installation and revert DB2 to its previous settings. The uninstalldb2.sh script can be run on a DB2 client and a DB2 server. The following table lists the uninstalldb2.sh options.
Because the inst option is required, you must know the name of the instance from which you are removing the Centrify for DB2 plug-in software. The following section describes how to determine the instance name.
Determining the instance name
You can determine the instance name in one of these ways:
By reviewing the DB2 log in this location:
$INSTHOME/sqllib/db2dump/
By executing one of the following commands:
Options Required Values Description
inst Yes A string value The name of a DB2 database instance.
verbose No 0 or 1
The default is 1
If the value is 0, only the basic questions are asked. All 3 Centrify for DB2 plug-ins are uninstalled.
If the value is 1, the script prompts for different options, such as which plug-ins to remove.
debug No 0 or 1
The default is 0
If the value is 0, uninstallation is performed.
If the value is 1, the script displays the steps without actually performing them. Each command is displayed with a "#" prefix. Use this option to preview what commands are executed in an actual invocation.
Centrify for DB2 24

Uninstalling DB2 plug-ins
On AIX:/opt/IBM/db2/V9.5/instance/db2ilist
/opt/IBM/db2/V9.5/instance/db2ilist
On Linux:/opt/ibm/db2/V9.5/instance/db2ilist
/opt/ibm/db2/V9.7/instance/db2ilist
Running the uninstalldb2.sh script
The format for script options is option=value. In the following example, db2inst1 is the name of a DB2 database instance, the verbose option is selected, and the debug mode is not invoked:uninstalldb2.sh inst=db2inst1 verbose=1
Execute the uninstalldb2.sh script now using options that are appropriate for your DB2 server or client.
Reconfigure environment variables and configuration files on DB2 servers
The uninstalldb2.sh script cannot undo some environment variable and configuration file setup steps on the DB2 server. Perform the following steps to revert environment variables and the keytab file to their original settings. These steps are optional; they do not affect how DB2 runs.
1 Remove the lines added to $INSTHOME/sqllib/userprofile and $INSTHOME/sqllib/usercshrc. The lines to remove are:$INSTHOME/sqllib/userprofile:
# Setup for centrifydc_db2gsskrb5
KRB5_KTNAME=$INSTHOME/db2inst1.keytab
export KRB5_KTNAME
DB2_KRB5_PRINCIPAL=instance/hostname
export DB2_KRB5_PRINCIPAL
$INSTHOME/sqllib/usercshrc:
# Setup for centrifydc_db2gsskrb5
setenv KRB5_KTNAME $INSTHOME/db2inst1.keytab
setenv DB2_KRB5_PRINCIPAL instance/hostname
2 Unset the list of variables that DB2 should send to its processes. As the instance owner, type:db2set DB2ENVLIST=KRB5_KTNAME
3 Delete the Active Directory instance owner’s account and remove the keytab file from the instance owner’s home directory.
25

References
Manually reset DB2 configuration variables
Note This procedure is optional, as configuration variables are typically reset by the uninstalldb2.sh script.
Perform the procedure described in this section to manually set the DB2 configuration variables back to the values they had before the plug-ins were installed. If you know the original plug-in values, reset them accordingly.
If you do not know the original values, use the following commands to reset the variables to their default values. Run these commands as the instance owner:db2 update dbm cfg using SRVCON_AUTH NOT_SPECIFIED
db2 update dbm cfg using AUTHENTICATION SERVER
db2 update dbm cfg using GROUP_PLUGIN NULL
db2 update dbm cfg using LOCAL_GSSPLUGIN NULL
db2 update dbm cfg using SRVCON_GSSPLUGIN_LIST NULL
db2 update dbm cfg using SRVCON_PW_PLUGIN NULL
Note These commands work for both a DB2 client and a DB2 server.
ReferencesFor further information about setting up DB2, see the following documentation:
Quick Beginnings for DB2 Servers
DB2 UDB Security Part 1: Understand how user and group accounts interact with DB2 UDB
Centrify for DB2 26


