45
Centrify Infrastructure Services Samba Integration Guide December 2017 (release 2017.3) Centrify Corporation
Centrify Infrastructure Services
Samba Integration Guide December 2017 (release 2017.3)
Centrify Corporation
Legal noticeThis document and the software described in this document are furnished under and are subject to the terms of a license agreement or a non-disclosure agreement. Except as expressly set forth in such license agreement or non-disclosure agreement, Centrify Corporation provides this document and the software described in this document “as is” without warranty of any kind, either express or implied, including, but not limited to, the implied warranties of merchantability or fitness for a particular purpose. Some states do not allow disclaimers of express or implied warranties in certain transactions; therefore, this statement may not apply to you.
This document and the software described in this document may not be lent, sold, or given away without the prior written permission of Centrify Corporation, except as otherwise permitted by law. Except as expressly set forth in such license agreement or non-disclosure agreement, no part of this document or the software described in this document may be reproduced, stored in a retrieval system, or transmitted in any form or by any means, electronic, mechanical, or otherwise, without the prior written consent of Centrify Corporation. Some companies, names, and data in this document are used for illustration purposes and may not represent real companies, individuals, or data.
This document could include technical inaccuracies or typographical errors. Changes are periodically made to the information herein. These changes may be incorporated in new editions of this document. Centrify Corporation may make improvements in or changes to the software described in this document at any time.
© 2004-2017 Centrify Corporation. All rights reserved. Portions of Centrify software are derived from third party or open source software. Copyright and legal notices for these sources are listed separately in the Acknowledgements.txt file included with the software.
U.S. Government Restricted Rights: If the software and documentation are being acquired by or on behalf of the U.S. Government or by a U.S. Government prime contractor or subcontractor (at any tier), in accordance with 48 C.F.R. 227.7202-4 (for Department of Defense (DOD) acquisitions) and 48 C.F.R. 2.101 and 12.212 (for non-DOD acquisitions), the government’s rights in the software and documentation, including its rights to use, modify, reproduce, release, perform, display or disclose the software or documentation, will be subject in all respects to the commercial license rights and restrictions provided in the license agreement.
Centrify, DirectControl, DirectAuthorize, DirectAudit, DirectSecure, DirectControl Express, Centrify for Mobile, Centrify for SaaS, DirectManage, Centrify Express, DirectManage Express, Centrify Suite, Centrify User Suite, Centrify Identity Service, Centrify Privilege Service and Centrify Server Suite are registered trademarks of Centrify Corporation in the United States and other countries. Microsoft, Active Directory, Windows, and Windows Server are either registered trademarks or trademarks of Microsoft Corporation in the United States and other countries.
Centrify software is protected by U.S. Patents 7,591,005; 8,024,360; 8,321,523; 9,015,103; 9,112,846; 9,197,670; 9,442,962 and 9,378,391.
The names of any other companies and products mentioned in this document may be the trademarks or registered trademarks of their respective owners. Unless otherwise noted, all of the names used as examples of companies, organizations, domain names, people and events herein are fictitious. No association with any real company, organization, domain name, person, or event is intended or should be inferred.
Contents
About this guide 5
Intended audience . . . . . . . . . . . . . . . . . . . . . . . . . . . . . . . . . . . . . . . . . . . . . . . . 5
Using this guide . . . . . . . . . . . . . . . . . . . . . . . . . . . . . . . . . . . . . . . . . . . . . . . . . . 7
Conventions used in this guide . . . . . . . . . . . . . . . . . . . . . . . . . . . . . . . . . . . . . 7
Finding more information. . . . . . . . . . . . . . . . . . . . . . . . . . . . . . . . . . . . . . . . . . 8
Contacting Centrify . . . . . . . . . . . . . . . . . . . . . . . . . . . . . . . . . . . . . . . . . . . . . . . 9
Chapter 1 Using infrastructure services technology with Samba 10
What is Samba?. . . . . . . . . . . . . . . . . . . . . . . . . . . . . . . . . . . . . . . . . . . . . . . . . . 10
What is Centrify-enabled Samba? . . . . . . . . . . . . . . . . . . . . . . . . . . . . . . . . . . 10
Centrify-enabled Samba architecture . . . . . . . . . . . . . . . . . . . . . . . . . . . . . . . 12
Chapter 2 Installing the Centrify Samba integration components 14
Installation process overview . . . . . . . . . . . . . . . . . . . . . . . . . . . . . . . . . . . . . . 14
What’s in the adbindproxy package. . . . . . . . . . . . . . . . . . . . . . . . . . . . . . . . . 18
Installing the adbindproxy components . . . . . . . . . . . . . . . . . . . . . . . . . . . . . 18
Chapter 3 Migrating existing Samba users to Centrify 21
Migrating UNIX profiles to Active Directory . . . . . . . . . . . . . . . . . . . . . . . . . . 21
Migrating Samba servers to Centrify Zones . . . . . . . . . . . . . . . . . . . . . . . . . . 24
Chapter 4 Configuring the Samba integration 25
Running the adbindproxy.pl script . . . . . . . . . . . . . . . . . . . . . . . . . . . . . . . . . 25
Verifying the Samba integration. . . . . . . . . . . . . . . . . . . . . . . . . . . . . . . . . . . . 32
Modifying the Samba smb.conf configuration file . . . . . . . . . . . . . . . . . . . . 35
3

Chapter 5 Using adbindproxy.pl 41
Index 44
Samba Integration Guide 4
About this guide
Centrify Infrastructure Services centrally secures cross-platform data centers through Active Directory-based identity and access management for a wide range of heterogeneous systems, hypervisors and applications.
Built on an integrated architecture that leverages patented technology, the Centrify Infrastructure Services of solutions help centralize ID, access privilege delegation and policy management to reduce the organization’s IT expense and complexity, improve end-user productivity, strengthen security and enhance regulatory compliance initiatives. Key components of Centrify Infrastructure Services include integrated authentication, access control, role-based privilege management, user-level auditing and server protection solutions.
This book describes how to integrate the Samba open source file and print sharing program on a Linux or UNIX computer that has the DirectControl agent already installed.
Note Beginning in calendar year 2016, Centrify no longer supports the Centrify-enabled version of Samba that was available for use with earlier Centrify Server Suite releases. If you are currently using Centrify-enabled Samba with Centrify Server Suite 2013.3 or later, you must uninstall Centrify-enabled Samba, install open-source Samba, and install the latest version of the adbindproxy package. Those steps are described in Chapter 2, “Installing the Centrify Samba integration components”. After you perform those steps, Centrify Server Suite (2013.3 or later) is integrated with open-source Samba.
Intended audienceThis book is written for an experienced system administrator familiar with the unpacking and installation of programs on Linux or UNIX computers. In addition, the instructions assume that you have a working knowledge of Samba and how to perform common administrative tasks for creating and maintaining Samba shares.
5
Intended audience
This book also requires you to have a working knowledge of Centrify Infrastructure Services and how to perform common administrative tasks using the Access Manager console and the Active Directory Users and Computers administration tool. If you are unfamiliar with infrastructure services, see the Administrator’s Guide for Linux and UNIX and other documentation.
Samba Integration Guide 6
Using this guide
Using this guideThe book guides you through the installation and configuration of the components necessary to integrate infrastructure services and Samba. It is organized as follows:
Chapter 1, “Using infrastructure services technology with Samba,” provides a brief overview of Samba, and how Samba, Centrify DirectControl, and Active Directory work together to provide a secure, integrated environment.
Chapter 2, “Installing the Centrify Samba integration components” describes how to unpack and install the Centrify adbindproxy package.
Chapter 3, “Migrating existing Samba users to Centrify,” describes how to migrate your existing Samba users to Active Directory for use with infrastructure services.
Chapter 4, “Configuring the Samba integration,” describes how to use the Samba configuration file and test your integration of Samba, Centrify DirectControl, and Active Directory.
Chapter 5, “Using adbindproxy.pl,” describes the adbindproxy.pl utility, which enables you to configure Samba for interoperability with Centrify DirectControl.
Conventions used in this guideThe following conventions are used in this guide:
Fixed-width font is used for sample code, program names, program output, file names, and commands that you type at the command line. When italicized, this font is used to indicate variables. In addition, in command line reference information, square brackets ([ ]) indicate optional arguments.
Bold text is used to emphasize commands, buttons, or user interface text, and to introduce new terms.
Italics are used for book titles and to emphasize specific words or terms.
• About this guide 7
Finding more information
The variable release is used in place of a specific release number in the file names for individual Centrify DirectControl software packages. For example, centrifydc-release-sol8-sparc-local.tgz in this guide refers to the specific release of the DirectControl agent for Solaris on SPARC available in a Centrify DirectControl download package. In the download package, the file name indicates the Centrify DirectControl version number. For example, if the software package installs Centrify DirectControl version number 4.4.2, the full file name is centrifydc-4.4.2-sol8-sparc-local.tgz.
Finding more informationBefore you start, be sure to read through the Release Notes included with the software package. This file provides the most up-to-date information about the package, including system requirements and supported platforms, and any additional information that may not be included in other documentation.
For information about how to set up and use Samba, you should review the guides included in the Samba distribution or the documentation available at http://samba.org.
Centrify provides extensive documentation targeted for specific audiences, functional roles, or topics of interest. If you want to learn more about Centrify and Centrify products and features, start by visiting the Centrify website. From the Centrify website, you can download data sheets and evaluation software, view video demonstrations and technical presentations about Centrify products, and get the latest news about upcoming events and webinars.
For access to documentation for all Centrify products and services, visit the Centrify documentation portal. From the Centrify documentation portal, you can always view or download the most up-to-date version of this guide and all other product documentation.
To get to the documentation portal, go to docs.centrify.com.
Samba Integration Guide 8
Contacting Centrify
Contacting CentrifyIf you have a problem during Server Suite software installation or configuration, need help with Active Directory configuration, or want clarification on best practices contact your Centrify System Engineer or Technical Support. Go to www.centrify.com/support and log in for the Technical Support contact information.
• About this guide 9
Chapter 1
Using infrastructure services technology with Samba
This chapter describes how Samba integrates with infrastructure services, and highlights some integration issues that you might encounter. Here are the topics in this chapter:
What is Samba?
What is Centrify-enabled Samba?
“Centrify-enabled Samba architecture” on page 12
What is Samba?Samba is an open source file and printer sharing program that allows a Linux or UNIX host to participate as an Active Directory services domain member. When Samba is installed, Windows users can share files and printers on the Linux or UNIX computers.
Samba.org distributes the Samba files and expects users to download and build their own packages. All major Linux and free UNIX distributions have Samba as a native package. For a native install of Samba on your system, see your distributor’s package or port system.
Also, the https://samba.plus/samba/ web site offers Samba packages for Red Hat Enterprise Linux (RHEL), SuSE Linux Enterprise Server (SLES), and Debian systems. The http://en.opensuse.org/Samba web site offers Samba packages for all SuSE Linux products, including SLES.
What is Centrify-enabled Samba?Centrify-enabled Samba is an adbindproxy module and PERL configuration script that enables infrastructure services and Samba to work together without UID, GID, or Active Directory conflicts.
In previous releases, Centrify would modify the Samba package and provide a unique, Centrify version of Samba for different operating
10
What is Centrify-enabled Samba?
systems. In this release, Centrify provides a couple of components that work with the stock Samba packages.
Centrify Infrastructure Services is an integrated set of commercial identity management products that enable a Linux, UNIX, or Mac host to participate as an Active Directory domain member. When you install Centrify Infrastructure Services products, you can manage the Centrify-managed computer’s user and group accounts and privileges entirely through Active Directory.
When open-source Samba is configured as an Active Directory domain member and the DirectControl agent is installed together with Samba on the same Linux or UNIX host, two problems can arise:
Samba and the DirectControl agent both attempt to create and manage the same Active Directory computer account object, causing one of the products to stop working.
Conflicting UIDs and GIDs are generated by Samba and the Centrify Management Services tools for the same Active Directory users and groups. However, the two programs use different algorithms for generating these values. The result is file ownership conflicts and access control problems.
To resolve these issues, Centrify provides the following components:
adbindproxy (adbindd) module: The adbindproxy module uses the adbindd daemon. Unless otherwise noted, “adbindproxy” and “adbindd” are used interchangeably in the documentation. The adbindproxy (adbindd) module intercepts Samba UNIX ID mapping requests and reroutes them to the DirectControl agent for processing. This module ensures that Samba and DirectControl agent agree on the UNIX attribute values.
adbindproxy.pl PERL configuration script: Automates most of the setup process and designates the DirectControl agent as the manager of the shared computer object.
Chapter 1 • Using infrastructure services technology with Samba 11
Centrify-enabled Samba architecture
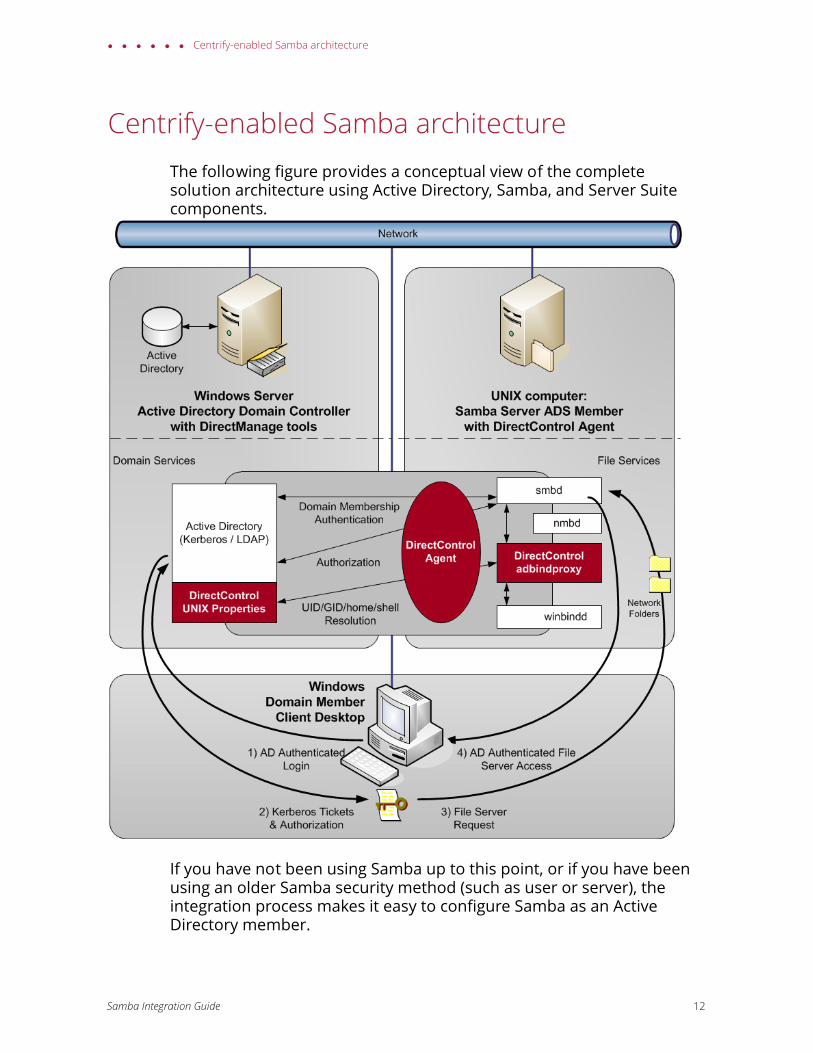
Centrify-enabled Samba architectureThe following figure provides a conceptual view of the complete solution architecture using Active Directory, Samba, and Server Suite components.
If you have not been using Samba up to this point, or if you have been using an older Samba security method (such as user or server), the integration process makes it easy to configure Samba as an Active Directory member.
Samba Integration Guide 12
Centrify-enabled Samba architecture
On the other hand, if you have already been using Samba as an Active Directory domain member and have assigned UIDs and GIDs to Active Directory users and groups, the PERL configuration script helps to resolve conflicts when Samba and infrastructure services are integrated.
The integrated solution, composed of the DirectControl agent (installed separately), open-source Samba, and adbindproxy, provides the following:
Samba and the DirectControl agent use the same Active Directory computer object without conflicts.
Consistent user and group attributes are applied on files across Windows, Linux and UNIX computers.
All UNIX user identity attributes, including the UID, GID, home directory, and login shell in UNIX profiles, are centrally stored and managed in Active Directory.
Both Kerberos and NTLM Samba authentication methods are supported.
Standard Samba access-control features are implemented and augmented by the Centrify zones technology.
Chapter 1 • Using infrastructure services technology with Samba 13
Chapter 2
Installing the Centrify Samba integration components
This chapter explains how to install the Centrify adbindproxy package. You install the adbindproxy package on your Linux and UNIX computers so that the DirectControl agent works with Samba.
This chapter includes the following topics:
Installation process overview
“What’s in the adbindproxy package” on page 18
“Installing the adbindproxy components” on page 18
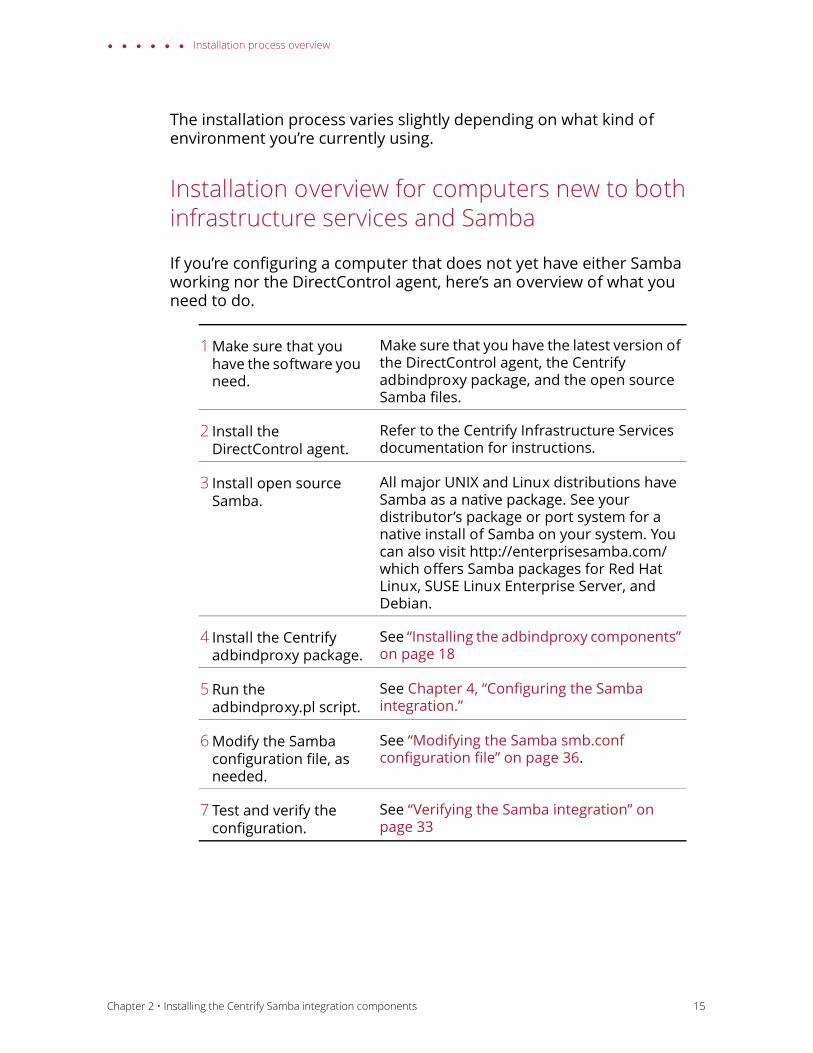
Installation process overviewYour Linux or UNIX computer can be in one of three main states regarding Samba and infrastructure services:
New to both Centrify Infrastructure Services and Samba:
Samba is not in use and the computer does not have the DirectControl agent installed. The Samba packages might already be installed but you haven’t configured Samba yet. For details, see “Installation overview for computers new to both infrastructure services and Samba” on page 15.
Using Samba, new to Centrify Infrastructure Services:
Samba is in use but the computer doesn’t have the DirectControl agent installed. For details, see “Installation overview for computers new to Centrify Infrastructure Services” on page 16.
Using the previous Centrify-enabled version of Samba:
Samba is in use and the DirectControl agent is installed, and you’re using the previous release of Centrify-enabled Samba. For details, see “Upgrade overview for computers with Centrify-enabled Samba” on page 16.
14
Installation process overview
The installation process varies slightly depending on what kind of environment you’re currently using.
Installation overview for computers new to both infrastructure services and Samba
If you’re configuring a computer that does not yet have either Samba working nor the DirectControl agent, here’s an overview of what you need to do.
1 Make sure that you have the software you need.
Make sure that you have the latest version of the DirectControl agent, the Centrify adbindproxy package, and the open source Samba files.
2 Install the DirectControl agent.
Refer to the Centrify Infrastructure Services documentation for instructions.
3 Install open source Samba.
All major UNIX and Linux distributions have Samba as a native package. See your distributor’s package or port system for a native install of Samba on your system. You can also visit http://enterprisesamba.com/ which offers Samba packages for Red Hat Linux, SUSE Linux Enterprise Server, and Debian.
4 Install the Centrify adbindproxy package.
See “Installing the adbindproxy components” on page 18
5 Run the adbindproxy.pl script.
See Chapter 4, “Configuring the Samba integration.”
6 Modify the Samba configuration file, as needed.
See “Modifying the Samba smb.conf configuration file” on page 36.
7 Test and verify the configuration.
See “Verifying the Samba integration” on page 33
Chapter 2 • Installing the Centrify Samba integration components 15
Installation process overview
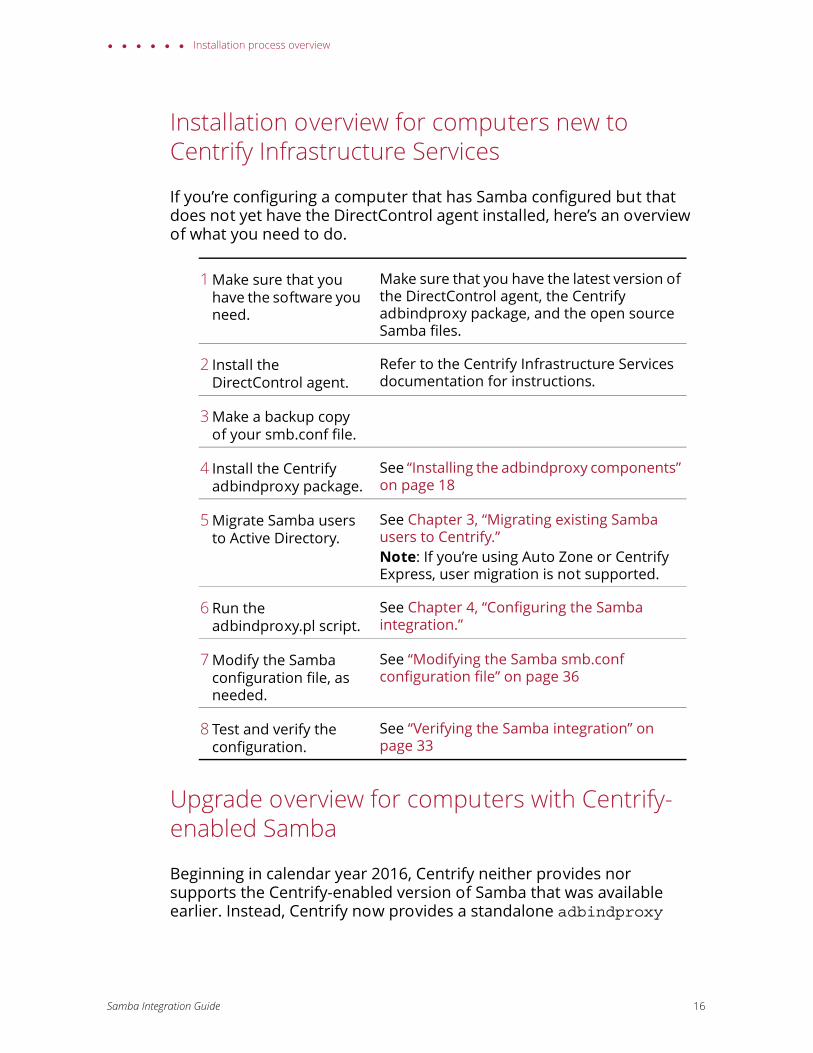
Installation overview for computers new to Centrify Infrastructure Services
If you’re configuring a computer that has Samba configured but that does not yet have the DirectControl agent installed, here’s an overview of what you need to do.
Upgrade overview for computers with Centrify-enabled Samba
Beginning in calendar year 2016, Centrify neither provides nor supports the Centrify-enabled version of Samba that was available earlier. Instead, Centrify now provides a standalone adbindproxy
1 Make sure that you have the software you need.
Make sure that you have the latest version of the DirectControl agent, the Centrify adbindproxy package, and the open source Samba files.
2 Install the DirectControl agent.
Refer to the Centrify Infrastructure Services documentation for instructions.
3 Make a backup copy of your smb.conf file.
4 Install the Centrify adbindproxy package.
See “Installing the adbindproxy components” on page 18
5 Migrate Samba users to Active Directory.
See Chapter 3, “Migrating existing Samba users to Centrify.”Note: If you’re using Auto Zone or Centrify Express, user migration is not supported.
6 Run the adbindproxy.pl script.
See Chapter 4, “Configuring the Samba integration.”
7 Modify the Samba configuration file, as needed.
See “Modifying the Samba smb.conf configuration file” on page 36
8 Test and verify the configuration.
See “Verifying the Samba integration” on page 33
Samba Integration Guide 16
Installation process overview
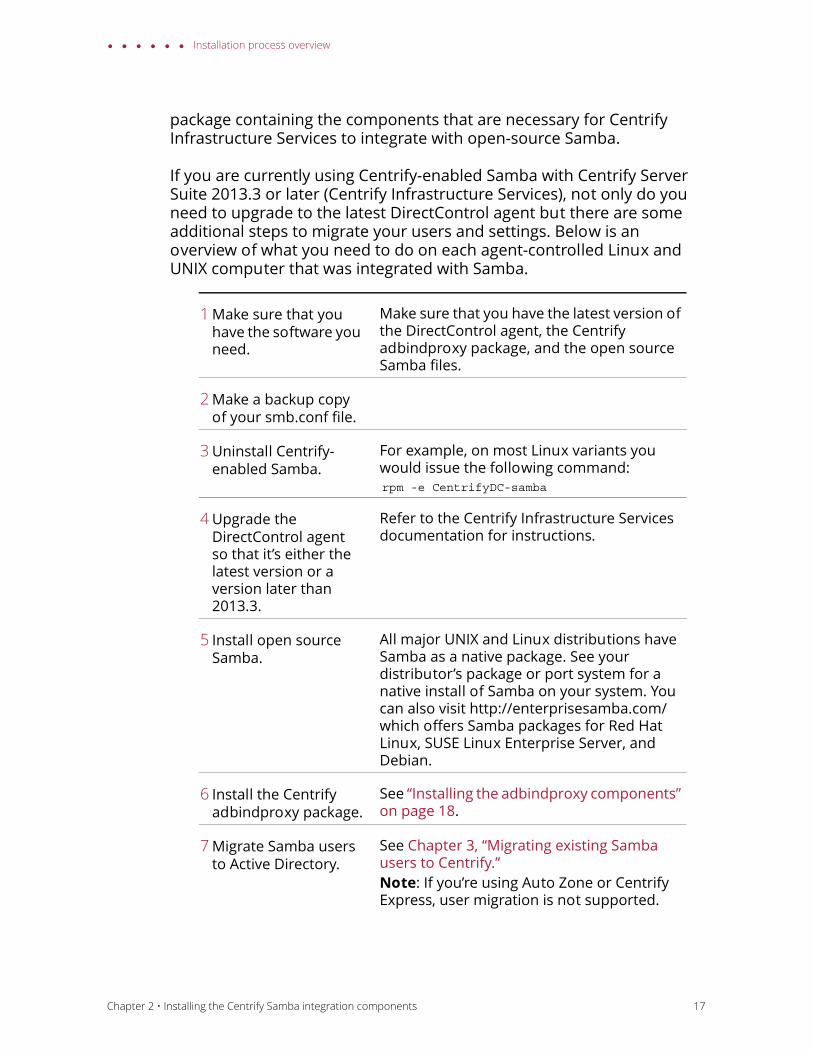
package containing the components that are necessary for Centrify Infrastructure Services to integrate with open-source Samba.
If you are currently using Centrify-enabled Samba with Centrify Server Suite 2013.3 or later (Centrify Infrastructure Services), not only do you need to upgrade to the latest DirectControl agent but there are some additional steps to migrate your users and settings. Below is an overview of what you need to do on each agent-controlled Linux and UNIX computer that was integrated with Samba.
1 Make sure that you have the software you need.
Make sure that you have the latest version of the DirectControl agent, the Centrify adbindproxy package, and the open source Samba files.
2 Make a backup copy of your smb.conf file.
3 Uninstall Centrify-enabled Samba.
For example, on most Linux variants you would issue the following command:rpm -e CentrifyDC-samba
4 Upgrade the DirectControl agent so that it’s either the latest version or a version later than 2013.3.
Refer to the Centrify Infrastructure Services documentation for instructions.
5 Install open source Samba.
All major UNIX and Linux distributions have Samba as a native package. See your distributor’s package or port system for a native install of Samba on your system. You can also visit http://enterprisesamba.com/ which offers Samba packages for Red Hat Linux, SUSE Linux Enterprise Server, and Debian.
6 Install the Centrify adbindproxy package.
See “Installing the adbindproxy components” on page 18.
7 Migrate Samba users to Active Directory.
See Chapter 3, “Migrating existing Samba users to Centrify.”Note: If you’re using Auto Zone or Centrify Express, user migration is not supported.
Chapter 2 • Installing the Centrify Samba integration components 17
What’s in the adbindproxy package
What’s in the adbindproxy package After you download and extract the Centrify adbindproxy package, you’ll see the following files:
./Centrify-Adbindproxy-Release-Notes.html
./centrifydc-adbindproxy-release-rhel4-x86_64.rpm
The software bundle has a name in this format: centrify-adbindproxy-release-rhel4-x86_64.rpm and contains these components:
adbindproxy (adbindd) module: The adbindproxy module uses the adbindd daemon. Unless otherwise noted, “adbindproxy” and “adbindd” are used interchangeably in the documentation. The adbindproxy (adbindd) module intercepts Samba UNIX ID mapping requests and reroutes them to the DirectControl agent for processing. This module ensures that Samba and the DirectControl agent agree on the UNIX attribute values.
adbindproxy.pl PERL configuration script: This script automates most of the setup process and designates the DirectControl agent as the manager of the shared computer object.
Installing the adbindproxy componentsPerform the following steps to install the integration components from the adbindproxy package. In these steps, the file name centrifydc-adbindproxy-*.rpm is used in place of the full file name. You can use the wildcard symbol (*) to substitute for a portion of the file name if there are no conflicting files in the directory.
8 Run the adbindproxy.pl script.
See Chapter 4, “Configuring the Samba integration.”
9 Modify the Samba configuration file, as needed.
See “Modifying the Samba smb.conf configuration file” on page 36
10Test and verify the configuration.
See “Verifying the Samba integration” on page 33
Samba Integration Guide 18
Installing the adbindproxy components
Note If you are upgrading from a previous version of Centrify-enabled Samba, see “Upgrade overview for computers with Centrify-enabled Samba” on page 16 before proceeding.
Be sure to enter the full path name in the command line if multiple versions of the same file exist in the same directory.
To install the Centrify Samba integration components:
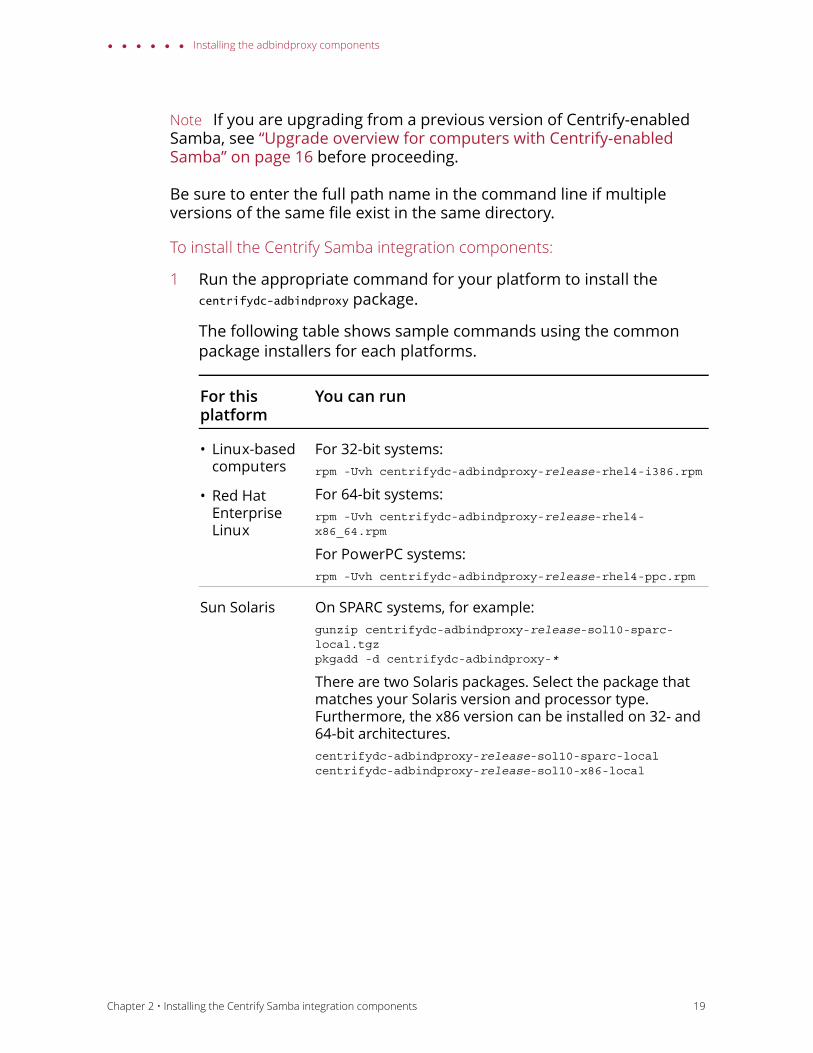
1 Run the appropriate command for your platform to install the centrifydc-adbindproxy package.
The following table shows sample commands using the common package installers for each platforms.
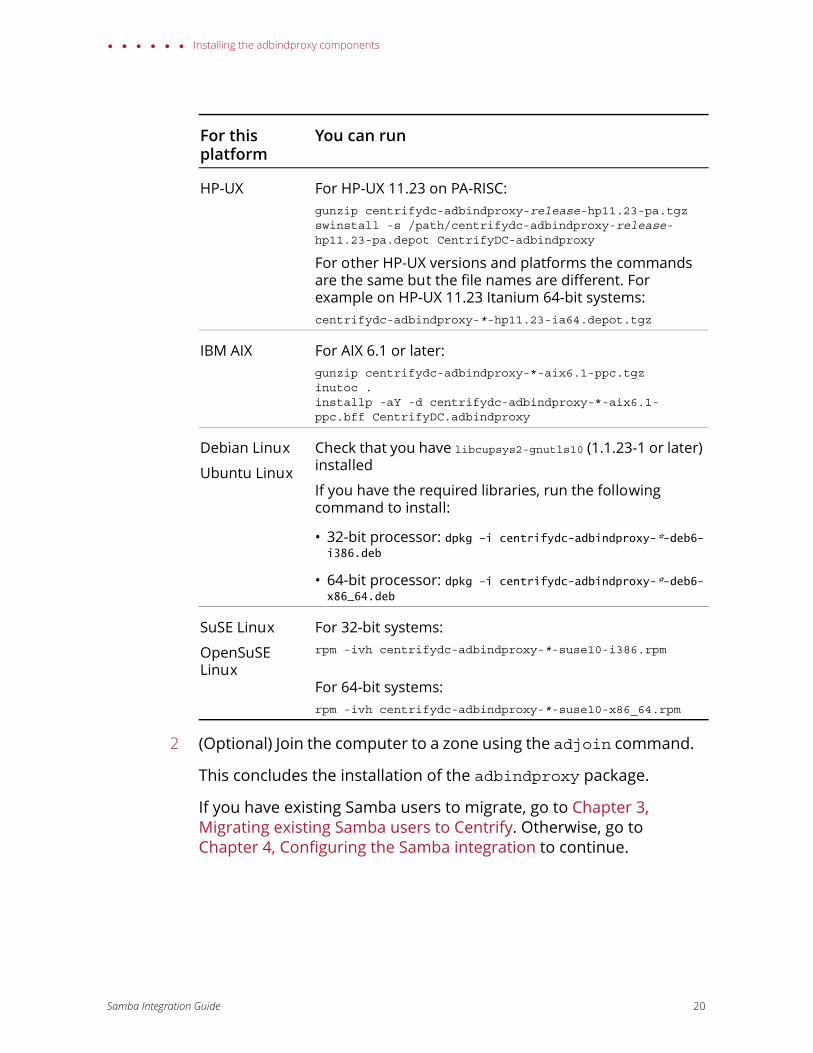
For this platform
You can run
• Linux-based computers
• Red Hat Enterprise Linux
For 32-bit systems:rpm -Uvh centrifydc-adbindproxy-release-rhel4-i386.rpm
For 64-bit systems:rpm -Uvh centrifydc-adbindproxy-release-rhel4-x86_64.rpm
For PowerPC systems:rpm -Uvh centrifydc-adbindproxy-release-rhel4-ppc.rpm
Sun Solaris On SPARC systems, for example:gunzip centrifydc-adbindproxy-release-sol10-sparc-local.tgz pkgadd -d centrifydc-adbindproxy-*
There are two Solaris packages. Select the package that matches your Solaris version and processor type. Furthermore, the x86 version can be installed on 32- and 64-bit architectures.centrifydc-adbindproxy-release-sol10-sparc-localcentrifydc-adbindproxy-release-sol10-x86-local
Chapter 2 • Installing the Centrify Samba integration components 19
Installing the adbindproxy components
2 (Optional) Join the computer to a zone using the adjoin command.
This concludes the installation of the adbindproxy package.
If you have existing Samba users to migrate, go to Chapter 3, Migrating existing Samba users to Centrify. Otherwise, go to Chapter 4, Configuring the Samba integration to continue.
HP-UX For HP-UX 11.23 on PA-RISC:gunzip centrifydc-adbindproxy-release-hp11.23-pa.tgz swinstall -s /path/centrifydc-adbindproxy-release-hp11.23-pa.depot CentrifyDC-adbindproxy
For other HP-UX versions and platforms the commands are the same but the file names are different. For example on HP-UX 11.23 Itanium 64-bit systems:centrifydc-adbindproxy-*-hp11.23-ia64.depot.tgz
IBM AIX For AIX 6.1 or later:gunzip centrifydc-adbindproxy-*-aix6.1-ppc.tgzinutoc .installp -aY -d centrifydc-adbindproxy-*-aix6.1-ppc.bff CentrifyDC.adbindproxy
Debian Linux
Ubuntu Linux
Check that you have libcupsys2-gnutls10 (1.1.23-1 or later) installed
If you have the required libraries, run the following command to install:
• 32-bit processor: dpkg –i centrifydc-adbindproxy-*-deb6-i386.deb
• 64-bit processor: dpkg –i centrifydc-adbindproxy-*-deb6-x86_64.deb
SuSE Linux
OpenSuSE Linux
For 32-bit systems:rpm -ivh centrifydc-adbindproxy-*-suse10-i386.rpm
For 64-bit systems:rpm -ivh centrifydc-adbindproxy-*-suse10-x86_64.rpm
For this platform
You can run
Samba Integration Guide 20
Chapter 3
Migrating existing Samba users to Centrify
This chapter describes how to migrate an existing user population from Samba servers to the integrated Centrify Infrastructure Services.
Note The information in this chapter is relevant to computers with the core infrastructure services components installed and for which you created a Centrify zone. These instructions do not apply to computers with Centrify Express installed or computers that are joined through Auto Zone. If you are using Centrify Express or if you have joined a computer using workstation mode, it is not possible to migrate existing Samba UID and GID settings.
The following topics are covered:
Migrating UNIX profiles to Active Directory
Migrating Samba servers to Centrify Zones
Migrating UNIX profiles to Active DirectoryIf your current environment includes Samba servers that are joined to the Active Directory domain as member servers and existing Windows users access the data on those servers, you may want to migrate those existing users to infrastructure services to rationalize UIDs and GIDs and manage all of your network’s conflicting identities in a single, centralized ID repository.
Note Migrate your Samba users to Active Directory, as explained in this section, before integrating Samba and Server Suite as explained in “Running the adbindproxy.pl script” on page 26.
There are two ways to migrate your UNIX profiles to Active Directory:
If winbind is currently configured in your /etc/nsswitch.conf file, you need to run the getent command to retrieve the user information.
If you do not have winbind configured in your /etc/nsswitch.conf file, then run the adbindproxy perl script to migrate the users. See the instructions below.
21

Migrating UNIX profiles to Active Directory
Migrating users if winbind is configured in /etc/nsswitch.conf
To save the winbind information to a file:
1 If winbind is currently configured in your /etc/nsswitch.conf file, run the following commands to save the information to a file before installing the adbindproxy package:getent passwd | grep -e -f /etc/passwd > /tmp/passwd.winbindgetent group | grep -e -f /etc/group > /tmp/group.winbind
2 Move the exported files to a computer where you have installed the Access Manager console.
3 In the Access Manager console, use the Import from UNIX wizard to import the users and groups (with their existing UID and GID mappings) into the zone.
For more information on importing existing user and group information and mapping information to Active Directory, see the “Importing existing users and groups” chapter in the Administrator’s Guide for Linux and UNIX.
Migrating users with the adbindproxy perl script
If winbind is not currently configured in your /etc/nsswitch.conf file, follow the steps below after you’ve installed the adbindproxy package.
This script gets the UID andGID files from Samba. You then import them into Active Directory.
To migrate UNIX user profiles to Active Directory using the adbindproxy.pl script:
1 Identify the Samba servers you want to update to integrate with infrastructure services.
2 On each of the Samba servers to be updated, locate the winbindd_idmap.tdb file and create a backup copy of the file.
Samba Integration Guide 22
Migrating UNIX profiles to Active Directory
a To locate the winbindd_idmap.tdb file, you can run a command similar to the following to view details about the Samba build:
/CurrentSambaBInaryPath/smbd -b |grep -i lockdir
b In the output, you should see a line similar to the following that indicates the location of the winbind_idmap.tdb file:
LOCKDIR: /var/lib/samba
3 Make a backup copy of the winbindd_idmap.tdb file.
For example:cp /var/lib/samba/winbind_idmap.tdb /tmp/winbind_idmap.tdb.pre_adbindproxybackup
4 Run the adbindproxy.pl script with the following options to generate the export files.perl /usr/share/centrifydc/bin/adbindproxy.pl --exports --groupFile filename --userFile filename --tdbFile filename
See Chapter 5, “Using adbindproxy.pl,” for details about the command-line parameters for adbindproxy.pl.
When you run these adbindproxy.pl options it generates export files for the users and the groups that are currently known by the Samba server. By default, these files are created as:/var/centrifydc/samba/passwd/var/centrifydc/samba/group
5 Move the exported files to a computer where you have installed the Access Manager console.
6 In the Access Manager console, use the Import from UNIX wizard to import the users and groups (with their existing UID and GID mappings) into the zone.
For more information on importing existing user and group information and mapping information to Active Directory, see the “Importing existing users and groups” chapter in the Administrator’s Guide for Linux and UNIX.
Chapter 3 • Migrating existing Samba users to Centrify 23
Migrating Samba servers to Centrify Zones
Migrating Samba servers to Centrify ZonesSamba generates UIDs and GIDs based on a range of values that have been defined for a specific server. In most cases, a user who has accessed two different Samba servers is likely to have two different UIDs: for example, a user could have UID 6003 on the server mission and UID 9778 on the server dolores.
Therefore, in an initial migration of existing users, each Samba server must join the Active Directory domain in separate Centrify Zones to accommodate the different UIDs and GIDs users and groups may have.
If you want users to have consistent GIDs and UIDs, then you need to put the Samba servers in the same zone.
Samba Integration Guide 24
Chapter 4
Configuring the Samba integration
This chapter describes how to configure the DirectControl agent and Samba to work together properly after you have installed the integration components from the Centrify adbindproxy package and joined agent-controlled computers to a zone.
The following topics are covered:
Running the adbindproxy.pl script
Verifying the Samba integration
Modifying the Samba smb.conf configuration file
Running the adbindproxy.pl scriptThis section describes how to configure Samba using the adbindproxy.pl script.
Note If your current environment has Windows users accessing data on Samba member servers that are joined to the Active Directory domain, you may want to migrate those users to infrastructure services. This way, you can use Centrify Zones to manage conflicting identities and rationalize UIDs and GIDs. For details on how to migrate those users, see Chapter 3, “Migrating existing Samba users to Centrify.” Complete the migration before integrating Samba and Server Suite.
The adbindproxy.pl script performs the following tasks:
Determines the computer’s operating system and adjusts accordingly.
Confirms that the DirectControl agent is installed.
Confirms that open-source Samba has been installed.
Determines if you are joined to an Active Directory domain and, if you are, displays the domain name and Centrify Zone.
25
Running the adbindproxy.pl script
Asks if you want to join Samba to the current Active Directory domain or another. If you choose another, the script guides you through the current domain leave and new domain join processes.
Note If you want to modify or set advanced join settings (for example, update PAM or NSS config, use DES for encryption, or use a computer alias), either run adleave before you run adbindproxy.pl or select a different domain when prompted in the script. Otherwise, the script does NOT prompt you to enter advanced join settings.
If you have a previous Samba installation, asks if you want to keep the smb.conf settings or use new ones. adbindproxy.pl automatically saves the existing copy.
Note The script automatically looks for an existing smb.conf file using the smbd -b command. If your current version of smbd does not support the -b option or you have smb.conf in a custom directory the script will not find it. If you want to use your existing smb.conf, move it to /etc/samba before you run the script.
Removes old state files from previous instances of Samba, including any existing winbind entries from the /etc/nsswitch.conf file.
Restarts the necessary clients (nmbd, winbindd, adbindd and smbd).
Installs scripts to automatically start the correct Samba and Centrify services each time the computer boots.
Before you run adbindproxy.pl, read through the prompts described below to make sure you’re prepared with the answers. For example, before you run the script be sure you know the path where Samba is installed.
To begin, log on and switch to the root user and proceed with the following steps:
To run the adbindproxy.pl script:
1 To start the script, from root enter the following:perl /usr/share/centrifydc/bin/adbindproxy.pl
2 Specify the path to the Samba installation:
a If Samba is not installed in the default location (/usr), enter the Samba path.
Samba Integration Guide 26
Running the adbindproxy.pl script
b If Samba is installed in /usr, press Enter to accept the default. Otherwise, enter your path.
3 Next, specify the domain to join.
You proceed based on whether the computer is already joined to a domain or not:
If you are already joined to a domain when you initiated the script, the script displays the domain name and zone and asks you the following:
Do you want to leave or join to another domain? [N]
To continue to join the current joined Active Directory domain press Enter and skip ahead to Step 6 on page 29.
If you want to leave the current domain and join another OR change any advanced options (see list below) in your current domain enter Y and then continue to Step 4.
If you are not joined to a domain, the script displays the following message:
Not joined to any domain. Make sure you enter the correct domain and zone information in the next steps
This initiates a set of prompts that ask you for the Active Directory domain name, the Centrify Zone and advanced options.
Continue to Step 4.
4 In this step, you join the new Active Directory domain.
Note You arrive at this step if you are not joined to an Active Directory Domain when you started adbindproxy.pl or if you decided to leave that domain OR you decided to change advanced options in your current join. If none of these conditions apply to you, skip to Step 6.
a At this prompt, enter the domain name:Enter the Active Directory domain to join:
b At the DNS health prompt, press Enter to verify that the domain exists.
Check DNS health for [domain]? Note: this may take several minutes [Y]:
c At the next prompt, enter the following domain properties:
Chapter 4 • Configuring the Samba integration 27

Running the adbindproxy.pl script
Note If you are running infrastructure services in Express Mode or need to join the domain through Auto Zone, enter NULL_AUTO for the zone name.
Centrify zone on the target Active Directory domain
Computer name on which the adbindproxy package is installed
Active Directory authorized user (default is Administrator)5 (Optional) In this next step, you can specify advanced join options.
The script prompts you with the following message:Do you wish to specifyadvanced join options? [N]:
The options are listed below. The defaults are in brackets.
a If do not need any advanced join options, enter N. Otherwise, enter Y and make your selections.Canonical name of Active Directory Computer Container
Preferred Domain Server to use (press Enter for none)
Update PAM and NSS Config [Y]
Trust computer for delegation? [N]
Use DES encryption only? [N]
Run adjoin in verbose mode? [N]
Addition computer alias (press Enter for none)
The script then displays the selections you made and asks if you want to proceed.
b Enter Y to proceed or N to abort adbindproxy.pl.
If you were not joined to an Active Directory domain when you started the script, you are prompted to enter your password once.
c Enter the password for the Active Directory Domain, computer and authorized user specified in the prompts.
Note If you choose to proceed AND you are leaving the current Active Directory domain to join another, the script prompts you twice to enter your password.
d In response to the first prompt, enter the current Active Directory domain account password to leave that domain.
e In response to the second prompt, enter the password for the Active Directory Domain, computer and authorized user specified in the prompts to join the new domain.
Samba Integration Guide 28
Running the adbindproxy.pl script
6 At the next prompt, if the samba winbindd listen path is not in /run/samba/winbindd, enter the path or press Enter to accept the default.
7 If there is an existing smb.conf file, continue to Step 8.
Otherwise, if there is no existing smb.conf file (which is true for new installations of Samba), the adbindproxy script searches for existing smb.conf files. If it does not find an existing smb.conf file, it automatically creates a new one, stores it in /etc/samba, and displays the following message:Updating smb.conf with Centrify recommended settings ...
and finishes the script.
This new smb.conf file has minimal global settings and a samba-test share. Go to “Finishing Up” on page 31 for the messages.
Note Regardless of whether you update an existing smb.conf or create a new one, you will need to modify the /etc/samba/smb.conf file to have the [global] section settings and the appropriate shares for your environment. See “Modifying the Samba smb.conf configuration file” on page 35 for instructions. The file created by adbindproxy.pl should be used for verifying the Samba integration only.
If you do have at least one existing smb.conf file, continue to Step 8.
8 If you have an existing smb.conf file, you next specify whether to update the settings in the existing smb.conf file or create a new, skeletal smb.conf file. If you choose to use the existing settings, you can also choose to do a backup of the existing smb.conf file.
If the script does find an existing smb.conf file, the script copies the smb.conf file to /etc/samba and asks the following question:Do you want to keep the original samba settings? [Y]:
Note If the script finds more than one smb.conf, it displays the list and asks you to select one. After you make the selection, it copies that one to /etc/samba and continues.
Note Regardless of whether you update an existing smb.conf or create a new one, you will need to modify the /etc/samba/smb.conf file to have the [global] section settings and the appropriate shares for your environment. See “Modifying the Samba smb.conf configuration file” on page 35 for instructions. The
Chapter 4 • Configuring the Samba integration 29
Running the adbindproxy.pl script
file created by adbindproxy.pl should be used for verifying the Samba integration only.
Don’t keep the original Samba settings: Enter N to not keep the original Samba settings and instead create the new, basic smb.conf.
The script creates a backup copy of your smb.conf in /etc/samba. The backup filename is in this format: smb.conf.yyyy-mm-dd-hh-mm. This new smb.conf file has minimal global settings and a samba-test share, if no shares exist.
Continue to “Finishing Up” on page 31.
Keep the original Samba settings: Enter Y to modify the existing file and continue to Step 9.
9 If you’ve chosen to keep the original Samba settings, the script displays the following prompt about backing up the existing settings: Backup existing /etc/samba/smb.conf and add Centrify recommended settings?
[Y]
Enter Y to create a backup in the form, smb.conf.yyyy-mm-dd-hh-mm.
Enter N to use the existing smb.conf without making a backup.
Note If the existing smb.conf has Security = ADS and the workgroup and realm are set, the script does NOT modify the existing file; the original is left unchanged.
10 If you’ve chosen to keep the original Samba settings, the script displays the following prompt about resetting the Samba cache for user and group IDs. Reset the Samba User/Group ID Cache (Centrify Samba may create conflicting mappings) [Y]
Unless you have created custom mappings, use the default [Y]. This flushes the cache and displays the following message:This prompt is only pertinent to the small set of Samba administrators who created custom user and group ID mappings. If you do have custom mappings, use the default to flush the cache and prevent potential conflicts. After
Samba Integration Guide 30
Running the adbindproxy.pl script
adbindproxy.pl completes, re-add your mappings as necessary.
If you entered Y, the script creates new mappings in the Samba User/Group ID cache, which may result in conflicts if there are any mappings in place already.
Finishing Up
To complete the configuration, adbindproxy.pl stops any running versions of smbd, adbindd, winbindd and nmbd, starts the required Centrify processes, and displays a set of progress and configuration messages. You should see the following messages:
Init Samba start script ...Restarting Samba daemons ...Reloading systemd: [ OK ]Restarting centrifydc-samba (via systemctl): [ OK ]Current DirectControl Configuration:...Current Samba Configuration:...
The adbindproxy script displays the following:
Press ENTER to continue ...Notes: If you need to join other domain, please re-run this script and enter a different domain name !Done.
Note If any service fails to start, you should run one of the following after the adbindproxy.pl script completes its execution.
On Linux or Solaris computers, run:
/etc/init.d/centrifydc-samba restart
On HP-UX computers, run:
/sbin/init.d/centrifydc-samba restart
On AIX computers, run:
stopsrc -g samba && startsrc -g samba
As a quick test, log off as the root user and log on with an Active Directory user account that has been granted access to the local
Chapter 4 • Configuring the Samba integration 31
Verifying the Samba integration
computer’s zone. If this is the first time that you are logging on with this user account, check that the user’s home directory is created, which is created automatically by Server Suite the first time you log on.
Verifying the Samba integrationTo verify that Samba and infrastructure services are working together correctly, you test if you can access Samba shares. If you upgraded existing shares, then you can test those; otherwise, you can verify the connection using the test share.
There are two key scenarios for testing whether Samba is configured properly for integration with Server Suite and Active Directory:
“Accessing Samba from a UNIX client session”
“Accessing Samba shares from a Windows desktop” on page 34
Accessing Samba from a UNIX client session
To test access to Samba shares on a Linux or UNIX computer, users should do the following:
To access Samba from a UNIX client session:
1 Log on to the Linux or UNIX computer using the Active Directory account that has been granted access to the local computer’s zone.
Run the following command:smbclient -k -L host_name
The smbclient program displays information about Samba and the SMB shares that are available on the local computer. For example, you should see a listing similar to the following (where s.s.s is the Samba version):
Samba Integration Guide 32
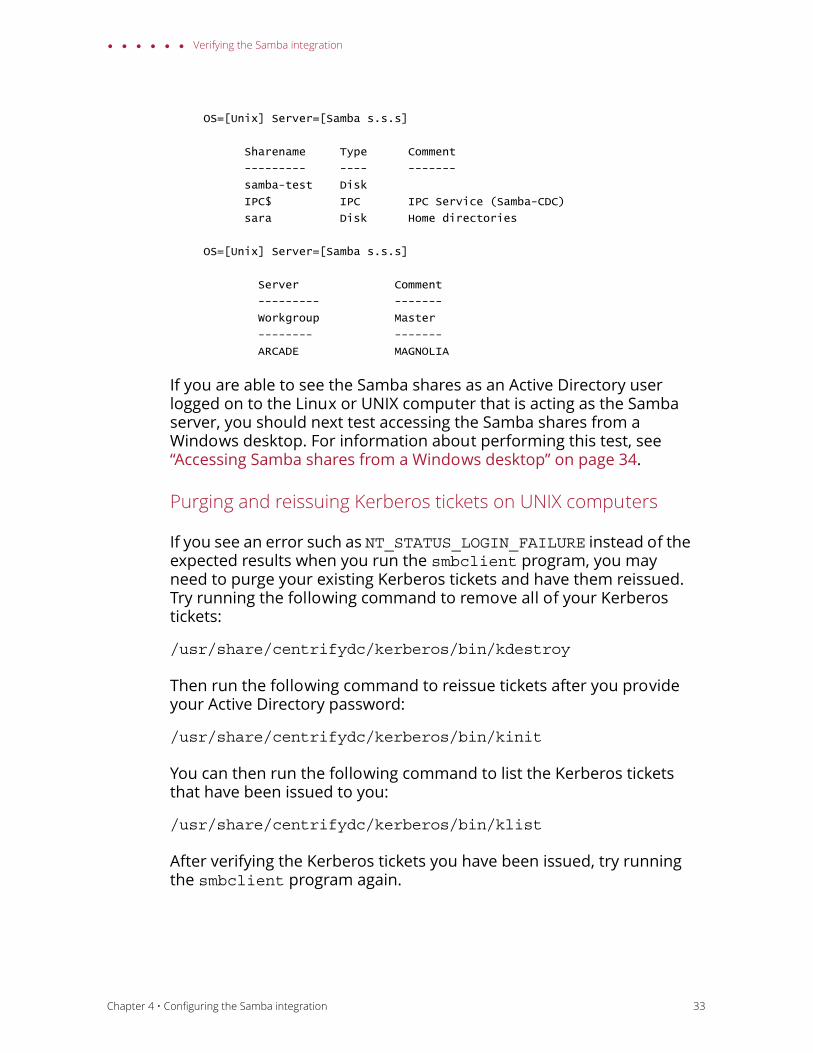
Verifying the Samba integration
OS=[Unix] Server=[Samba s.s.s]
Sharename Type Comment
--------- ---- -------
samba-test Disk
IPC$ IPC IPC Service (Samba-CDC)
sara Disk Home directories
OS=[Unix] Server=[Samba s.s.s]
Server Comment
--------- -------
Workgroup Master
-------- -------
ARCADE MAGNOLIA
If you are able to see the Samba shares as an Active Directory user logged on to the Linux or UNIX computer that is acting as the Samba server, you should next test accessing the Samba shares from a Windows desktop. For information about performing this test, see “Accessing Samba shares from a Windows desktop” on page 34.
Purging and reissuing Kerberos tickets on UNIX computers
If you see an error such as NT_STATUS_LOGIN_FAILURE instead of the expected results when you run the smbclient program, you may need to purge your existing Kerberos tickets and have them reissued. Try running the following command to remove all of your Kerberos tickets:
/usr/share/centrifydc/kerberos/bin/kdestroy
Then run the following command to reissue tickets after you provide your Active Directory password:
/usr/share/centrifydc/kerberos/bin/kinit
You can then run the following command to list the Kerberos tickets that have been issued to you:
/usr/share/centrifydc/kerberos/bin/klist
After verifying the Kerberos tickets you have been issued, try running the smbclient program again.
Chapter 4 • Configuring the Samba integration 33
Verifying the Samba integration
Verifying the version of Samba you are using
If purging and reissuing tickets does not resolve the problem, confirm the version of the smbstatus that is currently running using the following command:
smbstatus | grep version
The command should display the Samba version you have installed. For example:
Samba version s.s.s
(where s.s.s is the installed Samba version)
If the correct version of Samba is installed, run smbstatus again and note the names of any *.tdb files that do not exist, and try restoring them from your backup, then try running the smbclient program again.
If you don’t see the correct Samba shares
If the smbclient program does not display the Samba shares you have defined in the configuration file, you should review the settings in the smb.conf file and then restart the DirectControl agent and run the adflush command.
Accessing Samba shares from a Windows desktop
To test access to Samba shares on a Linux or UNIX computer from a Windows desktop:
1 Log on to a Windows computer that is joined to the domain with an Active Directory user account.
2 Click Start > Windows Explorer, then navigate to the domain.
For example, open My Network Places > Entire Network > Microsoft Windows Network > Arcade to view the Arcade.net domain.
Samba Integration Guide 34
Modifying the Samba smb.conf configuration file
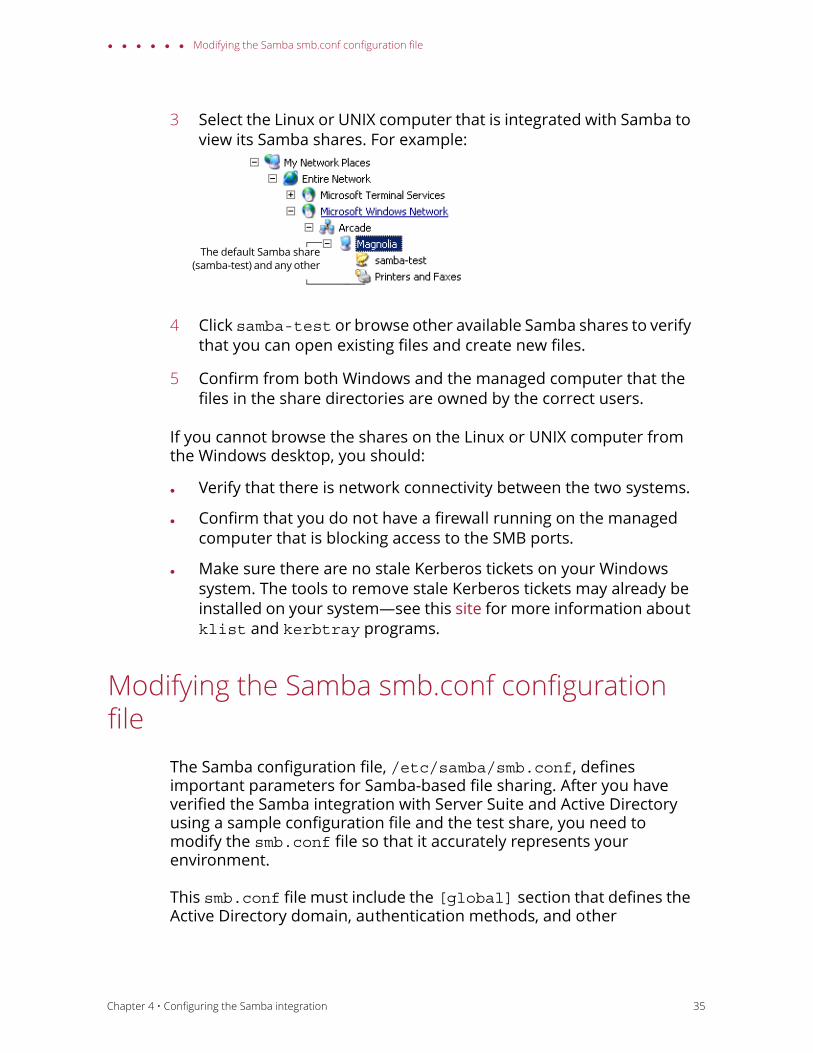
3 Select the Linux or UNIX computer that is integrated with Samba to view its Samba shares. For example:
4 Click samba-test or browse other available Samba shares to verify that you can open existing files and create new files.
5 Confirm from both Windows and the managed computer that the files in the share directories are owned by the correct users.
If you cannot browse the shares on the Linux or UNIX computer from the Windows desktop, you should:
Verify that there is network connectivity between the two systems.
Confirm that you do not have a firewall running on the managed computer that is blocking access to the SMB ports.
Make sure there are no stale Kerberos tickets on your Windows system. The tools to remove stale Kerberos tickets may already be installed on your system—see this site for more information about klist and kerbtray programs.
Modifying the Samba smb.conf configuration file
The Samba configuration file, /etc/samba/smb.conf, defines important parameters for Samba-based file sharing. After you have verified the Samba integration with Server Suite and Active Directory using a sample configuration file and the test share, you need to modify the smb.conf file so that it accurately represents your environment.
This smb.conf file must include the [global] section that defines the Active Directory domain, authentication methods, and other
The default Samba share(samba-test) and any other
Chapter 4 • Configuring the Samba integration 35
Modifying the Samba smb.conf configuration file
parameters. The file should also include a section for each directory you are making accessible as a SMB share.
At the beginning of a line, both the hash symbol (#) and the semi-colon (;) indicate lines to ignore. By convention, in this file, the hash indicates a comment and the semi-colon indicates a parameter you may wish to enable.
If you specify multiple users in valid users, user names can be separated by a comma or by white space.
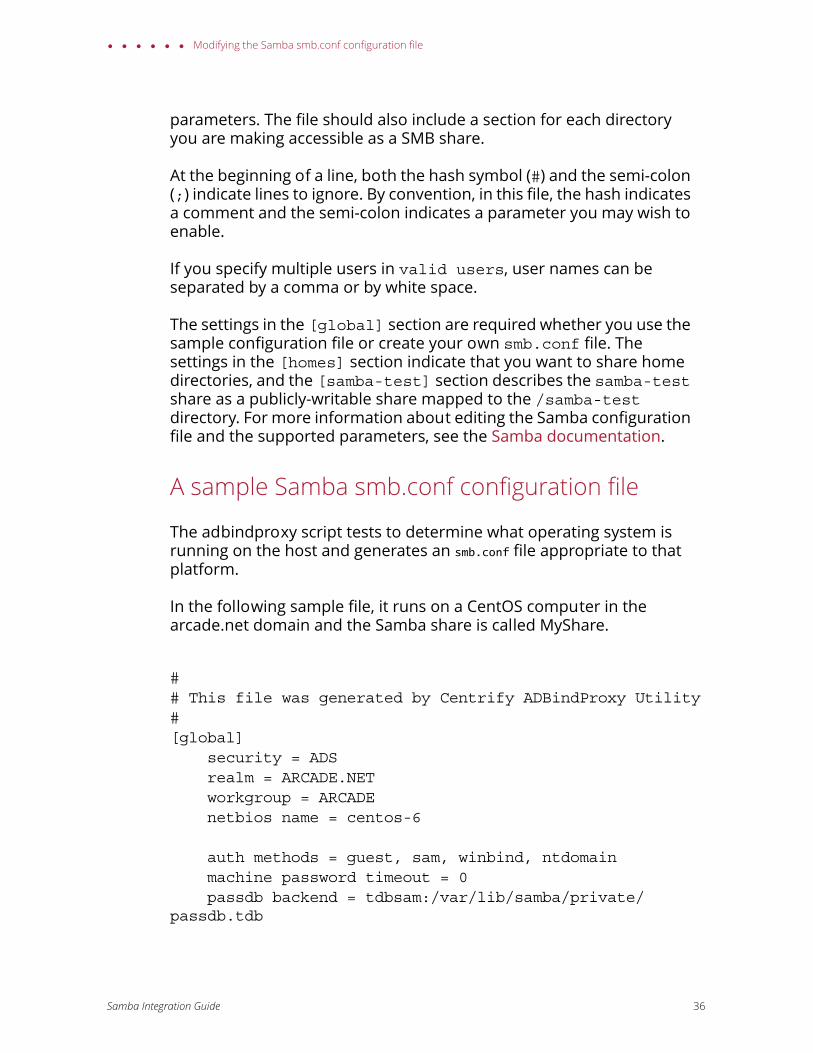
The settings in the [global] section are required whether you use the sample configuration file or create your own smb.conf file. The settings in the [homes] section indicate that you want to share home directories, and the [samba-test] section describes the samba-test share as a publicly-writable share mapped to the /samba-test directory. For more information about editing the Samba configuration file and the supported parameters, see the Samba documentation.
A sample Samba smb.conf configuration file
The adbindproxy script tests to determine what operating system is running on the host and generates an smb.conf file appropriate to that platform.
In the following sample file, it runs on a CentOS computer in the arcade.net domain and the Samba share is called MyShare.
## This file was generated by Centrify ADBindProxy Utility#[global] security = ADS realm = ARCADE.NET workgroup = ARCADE netbios name = centos-6
auth methods = guest, sam, winbind, ntdomain machine password timeout = 0 passdb backend = tdbsam:/var/lib/samba/private/passdb.tdb
Samba Integration Guide 36
Modifying the Samba smb.conf configuration file
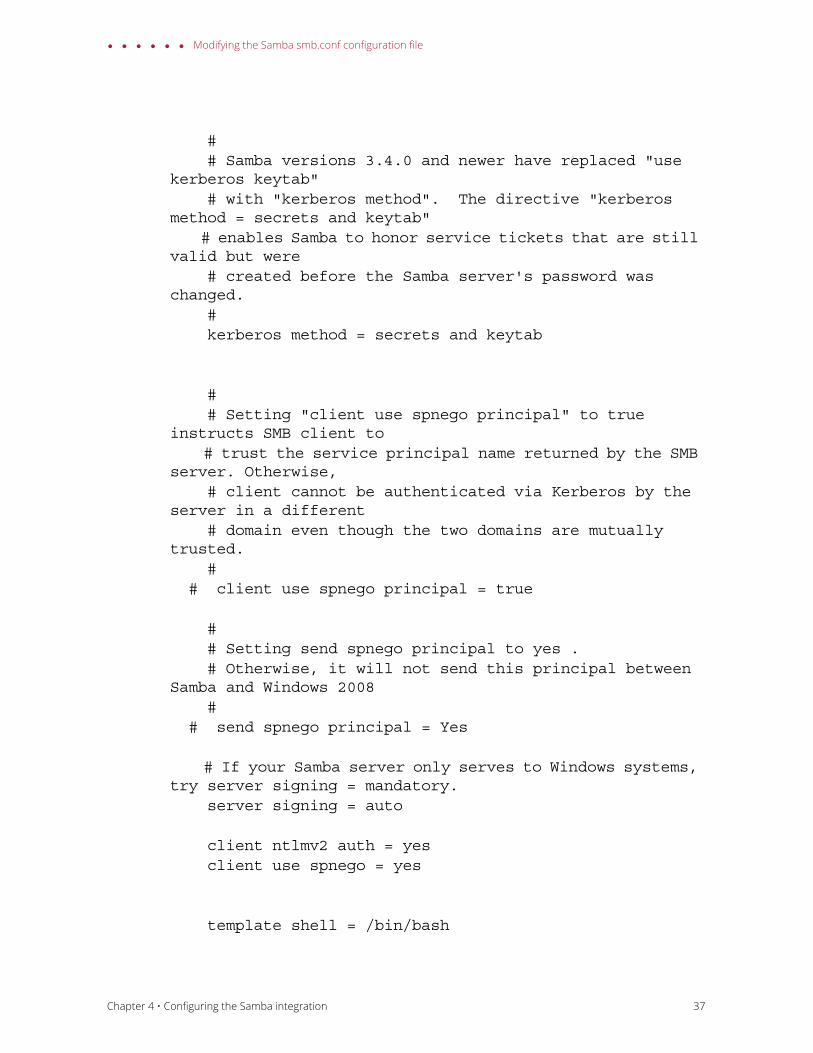
# # Samba versions 3.4.0 and newer have replaced "use kerberos keytab" # with "kerberos method". The directive "kerberos method = secrets and keytab" # enables Samba to honor service tickets that are still valid but were # created before the Samba server's password was changed. # kerberos method = secrets and keytab
# # Setting "client use spnego principal" to true instructs SMB client to # trust the service principal name returned by the SMB server. Otherwise, # client cannot be authenticated via Kerberos by the server in a different # domain even though the two domains are mutually trusted. # # client use spnego principal = true # # Setting send spnego principal to yes . # Otherwise, it will not send this principal between Samba and Windows 2008 # # send spnego principal = Yes # If your Samba server only serves to Windows systems, try server signing = mandatory. server signing = auto client ntlmv2 auth = yes client use spnego = yes
template shell = /bin/bash
Chapter 4 • Configuring the Samba integration 37
Modifying the Samba smb.conf configuration file
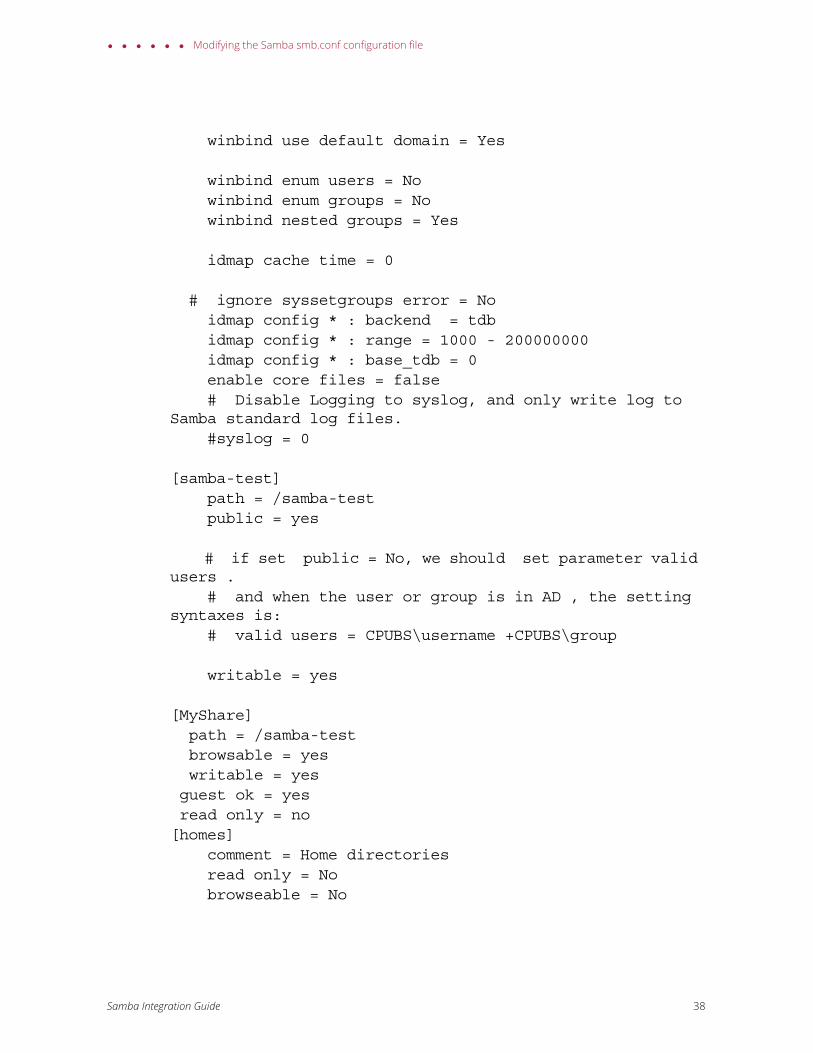
winbind use default domain = Yes
winbind enum users = No winbind enum groups = No winbind nested groups = Yes
idmap cache time = 0
# ignore syssetgroups error = No idmap config * : backend = tdb idmap config * : range = 1000 - 200000000 idmap config * : base_tdb = 0 enable core files = false # Disable Logging to syslog, and only write log to Samba standard log files. #syslog = 0
[samba-test] path = /samba-test public = yes
# if set public = No, we should set parameter valid users . # and when the user or group is in AD , the setting syntaxes is: # valid users = CPUBS\username +CPUBS\group
writable = yes
[MyShare] path = /samba-test browsable = yes writable = yesguest ok = yesread only = no[homes] comment = Home directories read only = No browseable = No
Samba Integration Guide 38
Modifying the Samba smb.conf configuration file
SMB.conf file variations for different platforms
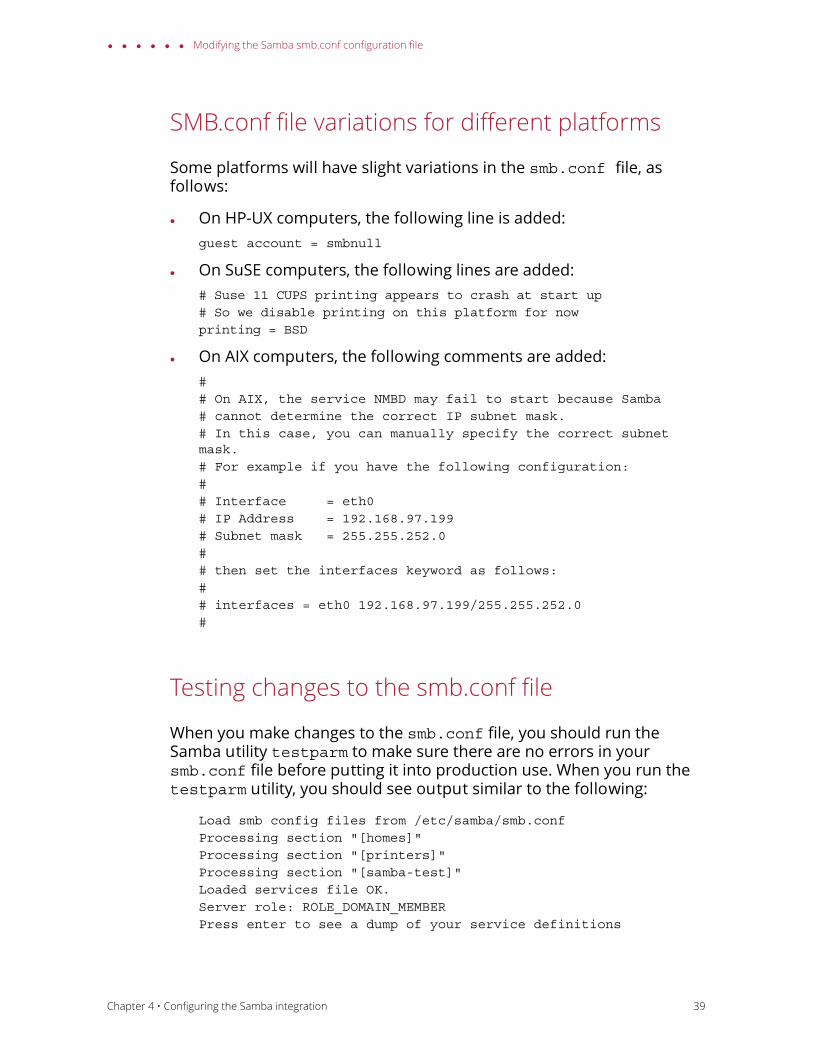
Some platforms will have slight variations in the smb.conf file, as follows:
On HP-UX computers, the following line is added:guest account = smbnull
On SuSE computers, the following lines are added:# Suse 11 CUPS printing appears to crash at start up# So we disable printing on this platform for nowprinting = BSD
On AIX computers, the following comments are added:## On AIX, the service NMBD may fail to start because Samba # cannot determine the correct IP subnet mask.# In this case, you can manually specify the correct subnet mask.# For example if you have the following configuration:## Interface = eth0# IP Address = 192.168.97.199# Subnet mask = 255.255.252.0## then set the interfaces keyword as follows:## interfaces = eth0 192.168.97.199/255.255.252.0#
Testing changes to the smb.conf file
When you make changes to the smb.conf file, you should run the Samba utility testparm to make sure there are no errors in your smb.conf file before putting it into production use. When you run the testparm utility, you should see output similar to the following:
Load smb config files from /etc/samba/smb.confProcessing section "[homes]"Processing section "[printers]"Processing section "[samba-test]"Loaded services file OK.Server role: ROLE_DOMAIN_MEMBERPress enter to see a dump of your service definitions
Chapter 4 • Configuring the Samba integration 39

Modifying the Samba smb.conf configuration file
[global]workgroup = ARCADErealm = ARCADE.NETsecurity = ADS
auth methods = guest, sam, winbind, ntdomainpassdb backend = tdbsam:/etc/samba/private/passdb.tdbsyslog = 0enable core files = Noserver signing = automachine password timeout = 0adbindproxy backend = cdc:/usr/share/centrifydc/lib/
libcapi.soadbindproxy standard mappers = Notemplate shell = /bin/bashwinbind use default domain = Yes
[homes]comment = Home Directoriesread only = Nobrowseable = No
[printers]comment = All Printerspath = /usr/spool/sambaprintable = Yesbrowseable = No
[samba-test]path = /samba-testread only = Noguest ok = Yes
Samba Integration Guide 40
Chapter 5
Using adbindproxy.pl
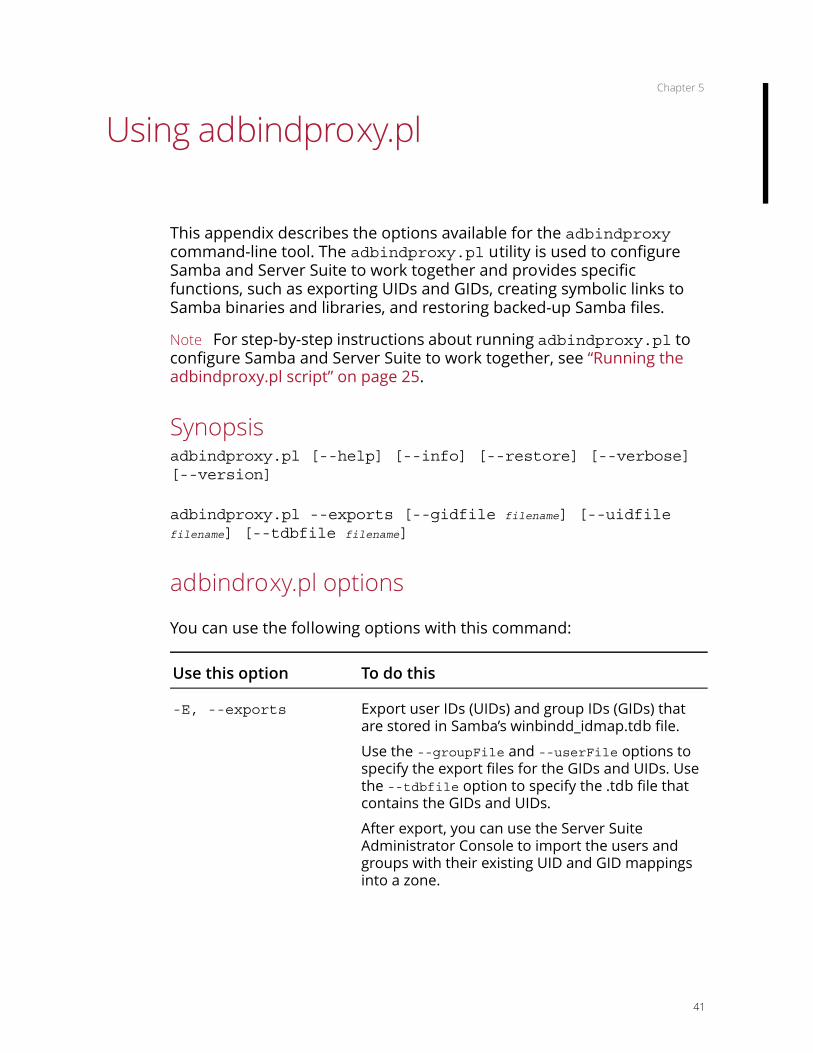
This appendix describes the options available for the adbindproxy command-line tool. The adbindproxy.pl utility is used to configure Samba and Server Suite to work together and provides specific functions, such as exporting UIDs and GIDs, creating symbolic links to Samba binaries and libraries, and restoring backed-up Samba files.
Note For step-by-step instructions about running adbindproxy.pl to configure Samba and Server Suite to work together, see “Running the adbindproxy.pl script” on page 25.
Synopsisadbindproxy.pl [--help] [--info] [--restore] [--verbose] [--version]
adbindproxy.pl --exports [--gidfile filename] [--uidfile filename] [--tdbfile filename]
adbindroxy.pl options
You can use the following options with this command:
Use this option To do this
-E, --exports Export user IDs (UIDs) and group IDs (GIDs) that are stored in Samba’s winbindd_idmap.tdb file.
Use the --groupFile and --userFile options to specify the export files for the GIDs and UIDs. Use the --tdbfile option to specify the .tdb file that contains the GIDs and UIDs.
After export, you can use the Server Suite Administrator Console to import the users and groups with their existing UID and GID mappings into a zone.
41
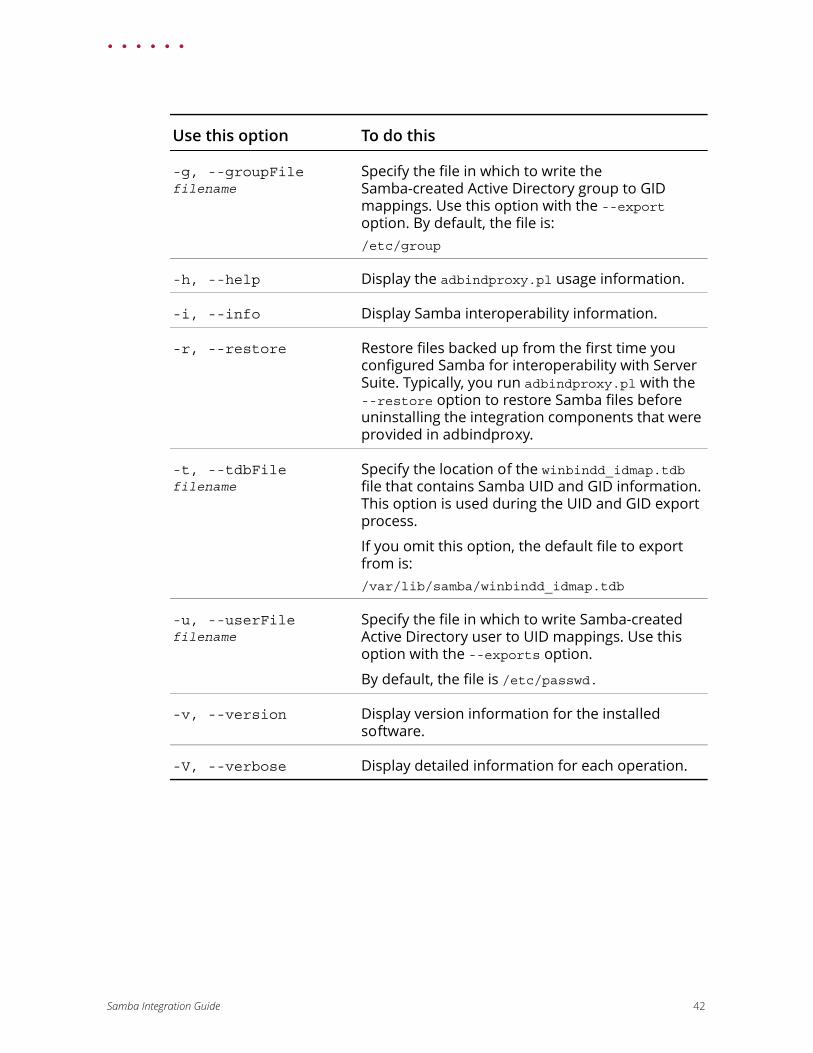
-g, --groupFile filename
Specify the file in which to write the Samba-created Active Directory group to GID mappings. Use this option with the --export option. By default, the file is:/etc/group
-h, --help Display the adbindproxy.pl usage information.
-i, --info Display Samba interoperability information.
-r, --restore Restore files backed up from the first time you configured Samba for interoperability with Server Suite. Typically, you run adbindproxy.pl with the --restore option to restore Samba files before uninstalling the integration components that were provided in adbindproxy.
-t, --tdbFile filename
Specify the location of the winbindd_idmap.tdb file that contains Samba UID and GID information. This option is used during the UID and GID export process.
If you omit this option, the default file to export from is:/var/lib/samba/winbindd_idmap.tdb
-u, --userFile filename
Specify the file in which to write Samba-created Active Directory user to UID mappings. Use this option with the --exports option.
By default, the file is /etc/passwd.
-v, --version Display version information for the installed software.
-V, --verbose Display detailed information for each operation.
Use this option To do this
Samba Integration Guide 42
Examples
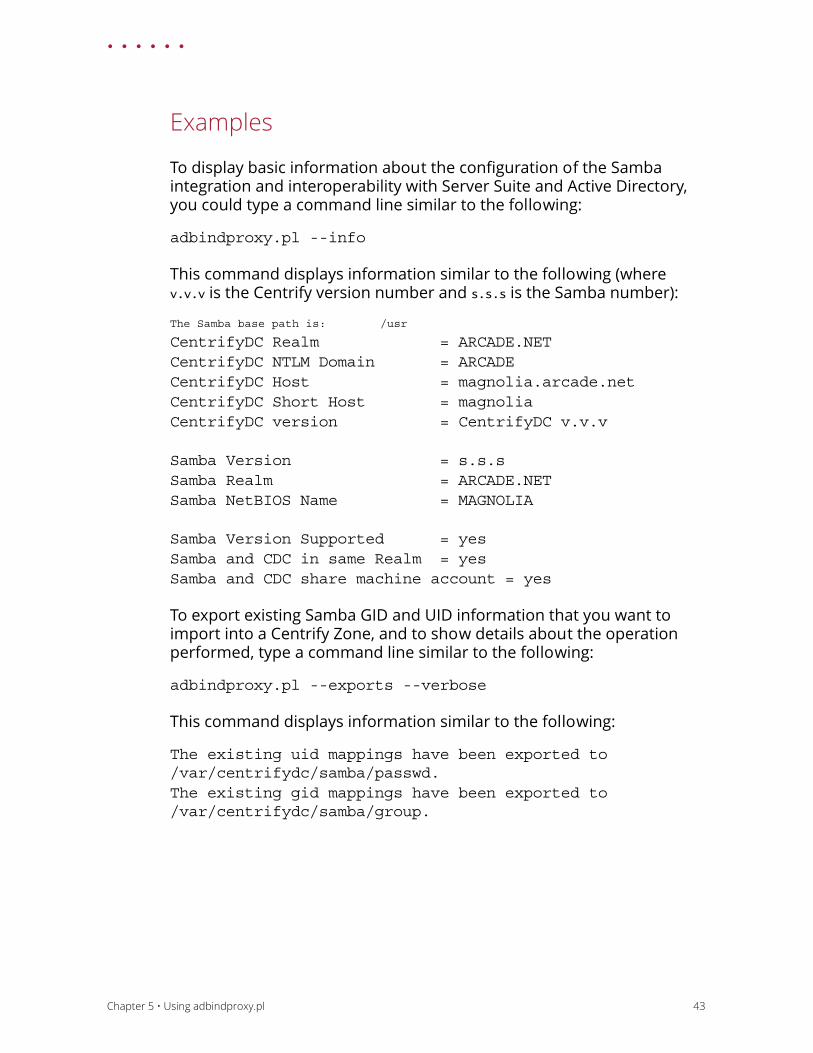
To display basic information about the configuration of the Samba integration and interoperability with Server Suite and Active Directory, you could type a command line similar to the following:
adbindproxy.pl --info
This command displays information similar to the following (where v.v.v is the Centrify version number and s.s.s is the Samba number):
The Samba base path is: /usr
CentrifyDC Realm = ARCADE.NETCentrifyDC NTLM Domain = ARCADECentrifyDC Host = magnolia.arcade.netCentrifyDC Short Host = magnoliaCentrifyDC version = CentrifyDC v.v.v
Samba Version = s.s.sSamba Realm = ARCADE.NETSamba NetBIOS Name = MAGNOLIA
Samba Version Supported = yesSamba and CDC in same Realm = yesSamba and CDC share machine account = yes
To export existing Samba GID and UID information that you want to import into a Centrify Zone, and to show details about the operation performed, type a command line similar to the following:
adbindproxy.pl --exports --verbose
This command displays information similar to the following:
The existing uid mappings have been exported to /var/centrifydc/samba/passwd.The existing gid mappings have been exported to /var/centrifydc/samba/group.
Chapter 5 • Using adbindproxy.pl 43
Index
Aaccess to Samba shares
from Windows 34UNIX 32
adbindd 26
adbindproxy 11winbind proxy 13
adbindproxy.pl 11advanced join options 28export option 23join domain 27keep Samba settings 29nmbd 31running 25set advanced join settings 26smbd -b 26stop adbindd 31stop smbd 31task summary 25winbindd 31
adleave 26
Administrator Consoleimport groups 22, 23import users 22, 23
CCentrify-enabled Samba
adbindd 26nmbd 26smbd 26winbindd 26
conventions, documentation 7
Ddocumentation
conventions 7Samba 8
Ffile sharing 10
displayed on Windows 35testing access 32
Ggroup
save to file 21, 22
JJoin domain 27
Kkdestroy 33
Kerberoslist tickets 33purging tickets 33reissue tickets 33stale tickets 35
Kerberos authentication 13
Kerberos ticketsremoving 33
kerberos tickets, removing stale 35
kerbtray 35
kinit 33
klist 33, 35
LLinux
installation commands 19, 20
Nnmbd 26
NT_STATUS_LOGIN_FAILURE 33
NTLM authentication 13
44
Ppasswd
save to file 21, 22
PERL configuration script 11
SSamba
accessing from Windows 35configuration file 35documentation 8keep settings 29protocols 10testing 32verify version 34
Samba serversjoin Centrify Zones 24
Samba testparm utility 39
smb.conf 35testparm utility 39
smbd 26
smbd command 26
smbstatusversion 34
Ttestparm 39
Uusers
export existing information 23importing to Active Directory 22, 23
Wwinbind 21, 22
winbindd 26
winbindd_idmap.tdblocate 22
• Index 45


