34
Cerner WebConnect User Manual LB-079-MED* *ISO 15189:2012 accreditation applies for the NRL Dubai laboratory only
| Date post: | 01-Sep-2018 |
| Category: |
Documents |
| Upload: | trinhhuong |
| View: | 220 times |
| Download: | 0 times |

Cerner WebConnect
User Manual
LB-079-MED*
*ISO 15189:2012 accreditation applies for the NRL Dubai laboratory only

2
CONTENTS
INTRODUCTION 3
1 BEFORE YOU GET STARTED
1.1 System Requirements
1.2 Internet Explorer Settings
1.2.1 Security settings
1.2.2 Internet Explorer compatibility settings:
1.3 Configuring Java Settings
1.4 ACCESSING CERNER WEBCONNECT
4
4
4
5
5
6
1.5 Barcode Printer Setup
1.6 My Preferences
2 TEST ORDERING
2.1 New Patient Registration
6
8
10
10
2.1.1 Patient Information Screen
2.1.2 Patient Search-Quick and Advanced
2.1.3 Patient List
12
14
15
2.2 Place New Order
2.2.1 Order Information Field
2.2.2 Test Field
2.2.3 Comment Fields
2.2.4 Diagnosis Code Field
2.2.5 Order Review
2.3 Test Catalog
2.4 Transport List
2.4.1 Historical Transport Lists
3 TEST REPORTING
3.1 New Results
3.2 Viewing Previous Results
3.2.1 Report Order Status
3.3 Utilization Report
4 ABOUT NATIONAL REFERENCE LABORATORY
16
17
17
18
18
18
21
22
23
25
25
29
32
33
34
NRL-MKT-GDL-002 v.1

3
INTRODUCTION
Welcome to Cerner WebConnect
In medical laboratories, test ordering and results management are key to all pre-analytical, analytical and post-analytical processes. Acknowledging this importance as well as a part of our vision to increase the spectrum, coverage and overall efficiently of laboratory testing in the region, NRL has successfully implemented an Advanced Laboratory Information System – Cerner Webconnect.
NRL as a regional leader in laboratory testing is the only standalone referral laboratory in the region to implement Cerner. The implementation of Cerner WebConnect enables a paper light environment & processes for both NRL and our clients, thus ensuring higher efficiency and greater patient safety.
The health information technologies of Cerner, the developer of WebConnect, connect people, infor-mation and systems, at approximately 14,000 facilities worldwide.
In NRL, Cerner Webconnect was implemented as of January 10th, 2015 and therefore, any test ordered after January 10th 2015 can be reviewed via Cerner WebConnect.
Our previous LIS LABDAQ, was deactivated on January 10th, 2015. However, any results loaded prior to January 10th, 2015 will be still accessible via LABDAQ.
Our Business Development Executive will visit your facility and will train your staff individually on how to use Cerner WebConnect. We strongly encourage you to use Cerner WebConnect for you results or-dering and reporting as it brings multiple benefits to your organization.
Benefits of using Cerner WebConnect
Benefits of Online Ordering
• Onlinetestorderentrywillensurereductionofdataentryerrors,thusamoreefficient turn-around-time (TAT) of tests; • Createapaperlightenvironment&processforbothNRL&yourfacility,thusensuring higher efficiency and greater patient safety; • Withtheoptiontocreatea“FavoriteTestMenu”foryourfacility,repetitivetestordering is performed in a very efficient manner; • Acomprehensivetestmenuincorporatedinthesamesystem.
Benefits of Results Viewing
• Dynamicsearchenginetoeasilyfindresults; • Detailedstatustrackingofspecimens(pre-analytic,analyticandpost-analyticstages); • Generatetrendingreports; • Utilizationreporttracking; • Categoryviewreporting.
NRL-MKT-GDL-002 v.1

4
For accessing Webconnect please use Internet Explorer (ver-sion 9 or above) and make the following changes (Figure 1):
In Internet Explorer include the Webconnect address https://client.nrl.aeinthe“websites”fieldasinthescreenshotfollow-ing these steps: Internet explorer-> Internet Options-> Security settings
In order to access Cerner WebConnect all you need a computer with Internet Explorer version 9 or above and a high bandwidth internet connection (1Mbps).
1. BEFORE YOU GET STARTED
1.1 System Requirements
1.2 Internet Explorer Settings
NRL-MKT-GDL-002 v.1
1.2.1 Security Settings
Figure 1 Internet Explorer Security Settings

5
NRL-MKT-GDL-002 v.1
Figure 2 Internet Explorer compatibility view settings
Figure 3 Configuring Java Settings
1.3 Configuring Java Settings
Make sure that the latest Java client setup has been installed and make the following changes. Go to Configure Java settings-> Security tab and include https://client.nrl.aeinthe“ExceptionSiteList”byclicking“EditSiteList”(Figure3).
In your Internet Explorer settings, include our website in the Compatibility View Settings by adding nrl.ae to the list as Figure 2.
1.2.2 Internet Explorer compatibility settings:

6
For printing of the specimen barcode labels you will need
to install a DYMO LabelWriter Barcode printer that you
will be provided by NRL.
Please find the link to the printer set up and instructions
inthemainmenuontherightsideofthescreen“Barcode
PrinterSetup”(Figure5).
1.4 ACCESSING CERNER WEBCONNECT
1.5 Barcode Printer Setup
NRL-MKT-GDL-002 v.1
Cerner WebConnect can be accessed online at the following address:
https://client.nrl.ae
You will be provided your User ID and password by NRL to use it to login the system (Figure 4).
Before you proceed with using the system you will need to setup the Barcode Printed and set your system preferences. If you are using Cerner WebConnect for results reporting only please skip to My Preferences (Section 1.6).
Figure 4 Cerner WebConnect Starting Page
Figure 5 Barcode printer setup option in main menu

7
NRL-MKT-GDL-002 v.1
The following options will appear where you can set up the printer:
Please follow the following instructions in order to set it up:
Finding your printer name
• OnWindows2000,openthePrinterscontrolpanel.• OnWindowsXP,openthePrintersandFaxescontrolpanel.
Figure 6 Installing the DYMO LabelWriter Printer
For Printer Name , it is important to type the name exactly as it appears in the control panel. In the example in Figure 6, the name would be:
DYMO LabelWriter 300-USB
Then, right-click the printer and choose Properties from the context menu. Click on the Ports tab to find the name of the port where the printer is connected. In the example in Figure 7, the name would be:
USB001
Figure 7 DYMO LabelWriter USB Properties

8
• ChangetheDefaultFacility.Thisdeterminesyour“working”Locationforthepatientregistrations
and orders you create. Most users have only one facility listed. However, if you are associated with
more than one location, choose the default for the facility you work at the most. When you work
at the alternate location, you may change the location in the upper-left corner drop-down box
1.6 My Preferences
NRL-MKT-GDL-002 v.1
In System Settings you can customize how the system will work for you. To access the system settings please click My Preferences in the main menu on the right side of the screen. In the following screen (Figure 8), there are three tabs to set your preferences – User Information, System Settings and Results.Select User Information to add or change the address for your primary office, or your contact information, including your home phone, office phone, fax, pager, or email. The information you enter is not shared with others (Figure 8).
When you have finished making all changes to User Information, click Save to store your new settings. To exit without making or saving changes, click Exit Preferences. (Save and Exit Preferences buttons are located at the bottom of the screen).
In the next tab choose System Settings to:
Change the Default View when you first log into Cerner WebConnect (Figure 9).
Figure 8 System Settings User Information
Figure 9 System Settings – System Settings Tab

9
New Results configurations allow the user to define:
• Recent:inthesettingRecent results are those received up to [system configuration] day(s) ago. You
may enter any number less than [system configuration]’. Default = 14; field can accept any number
1-[system configuration].
• Patientselectiondefault:inthesettingWhen opening New Results, start with all patients [dro
down: slected | not selected]. The default is not selected
• ClinicalResultsdisplaylength:inthesettingWhen viewing a patient’s clinical results, default to
showing those from the past [90] days. Default = 90
• ChangeyourlogonPassword.ClickChangePasswordtosaveit.Tomaintainsystemsecurity,youshould
change your password often. You will be forced to change your password frequently. Password strengths
and policies are defined by your System Administrator.
• ItisimportanttochoosethelanguageasEnglish-Britishinordertousetheappropriateregionalformats.
When you have finished with making all changes, click Save to store your new settings. To exit without making or
saving changes, click Exit Preferences.
Results
Select Results to define what Results display in New Results (Figure 10).
NRL-MKT-GDL-002 v.1
Figure 10 My Preferences – Results screen

10
2. TEST ORDERING
Test ordering is a very simple and intuitive process in WebConnect.
Short overview of the procedure:
Step 1. Search for patient (Figure 11)
Step 2. Find registered patient or register new patient (Figure 13)
Step 3. Review order history
Step 4. Add new order (mandatory fields – referring physician, code, place, time and test) (Figure 18, Figure 19)
Step 5. Review order (Figure 21)
Step 6. Confirm and approve (Figure 21)
The process in more details follows.
NRL-MKT-GDL-002 v.1
2.1 New Patient Registration
Quick Patient search
Patient registration allows you to create a new registration record for a patient that does not exist in the WebCon-nect database for your working location.
To avoid duplicate patient records, you must perform a patient search prior to registering a new patient.
There are two types of patient searches available in Cerner WebConnect: Quick Search and Advanced Search.
Quick Search
• InthePt.Searchfieldfromtheleft-handnavigation,enteatleastthreecharactersofthepatient’s name (first and/or last) or the MRN and press <Enter> or click go. (Figure 11).
Note:Placeyourmouseoverthe“?”iconforareminderofwhatthequicksearchcriteriaare.
Please find more information on how to perform the advanced search in in Section 2.1.2.

11
NRL-MKT-GDL-002 v.1
Figure 12 Register New Patient Button
Figure 11 Before registering a patient perform a search in order to avoid duplication
If a record of a patient is not found you will see a message No Patient Found and the Register New Patient button (Figure 12).

12
2.1.1 Patient Information Screen
NRL-MKT-GDL-002 v.1
Click the Register New Patient button(Figure12)toopenanewwindowwhereyouwillenterthepatient’sinformation(Figure 13).
Patient Information
In the given fields (Figure 13), enter information as completely as possible. Required fields are marked with an asterisk and back lighted yellow. The Required fields are:
• LastName • FistName • Dateofbirth • MNR • Gender • Referringphysician
Click the Find button next to Referring Physician to open a window where you can search for the physician (Figure 14). The list of physicians is provided by your facility and is pre-populated by the NRL system administrator.
Figure 13 Patient Information Screen

13
NRL-MKT-GDL-002 v.1
Figure 14 Physician Search
Figure 15 Referring Physician
Ifthephysicianisnotlisted,pleasechoose“ref.”inthephysicianfiledandpressenter.ThiswillautomaticallyselectRef.,Physician (UNKNOWN) (Figure 15).
The mandatory fields must be completed before submitting the registration.
14
• ClickSubmit to complete the registration. Warnings are displayed for mandatory fields with incomplete information. The mandatory fields must be completed before moving to the next screen. • ClickPrevious to return to previous screens to change information. • ClickCancel to leave the registration window without registering the patient (A warning will display to confirm your request to Cancel) or leave this module without clicking Submit to prevent the registration.
2.1.2 Patient Search-Quick and Advanced
If you need to order a test for an existing patient, you will first need to find the patient record.As mentioned previously, there are two types of patient searches available in Cerner WebConnect: Quick Search and Ad-vanced Search.
Quick Search
• InthePt.Searchfield(Figure11)fromtheleft-handnavigation,enteratleastthreecharactersofthep tient’sname(firstand/orlast),theMRN,thePIDortheSSNandpress<Enter>orclickgo. • Placeyourmouseoverthe“?”iconforareminderofwhatthequicksearchcriteriaare.
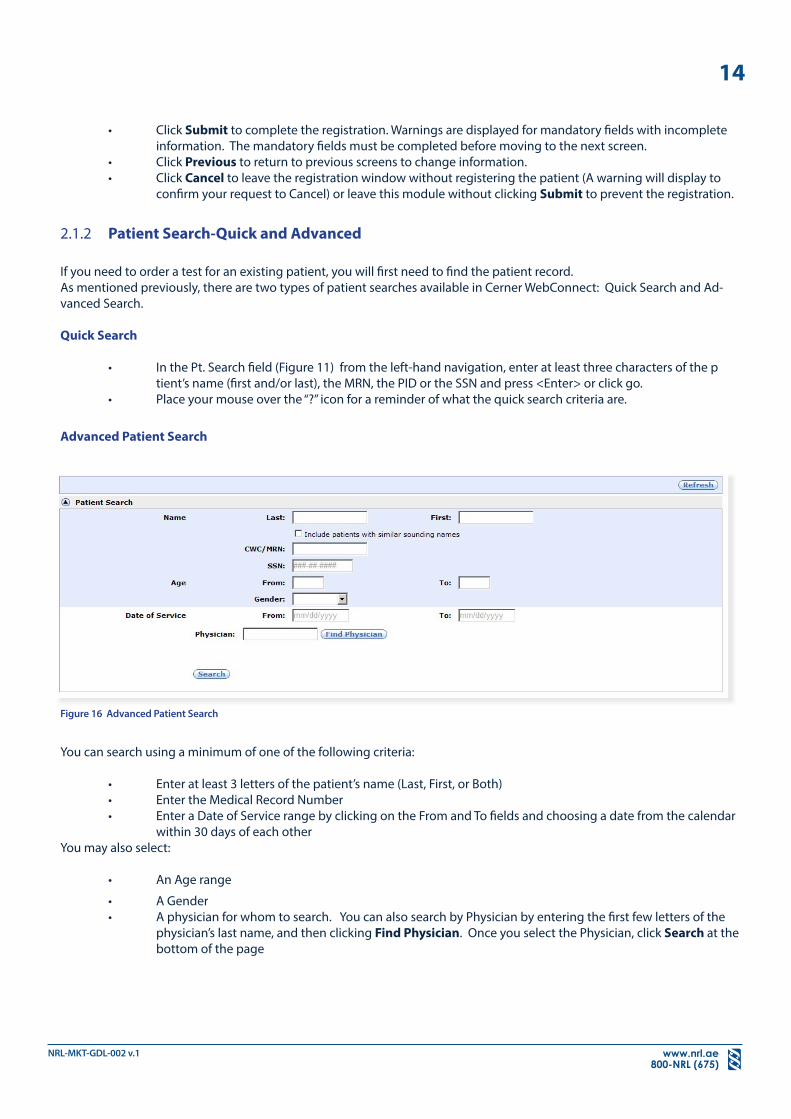
Advanced Patient Search
You can search using a minimum of one of the following criteria:
• Enteratleast3lettersofthepatient’sname(Last,First,orBoth) • EntertheMedicalRecordNumber • EnteraDateofServicerangebyclickingontheFromandTofieldsandchoosingadatefromthecalendar within 30 days of each other You may also select:
• AnAgerange
• AGender • Aphysicianforwhomtosearch.YoucanalsosearchbyPhysicianbyenteringthefirstfewlettersofthe physician’slastname,andthenclickingFind Physician. Once you select the Physician, click Search at the bottom of the page
NRL-MKT-GDL-002 v.1
Figure 16 Advanced Patient Search
15
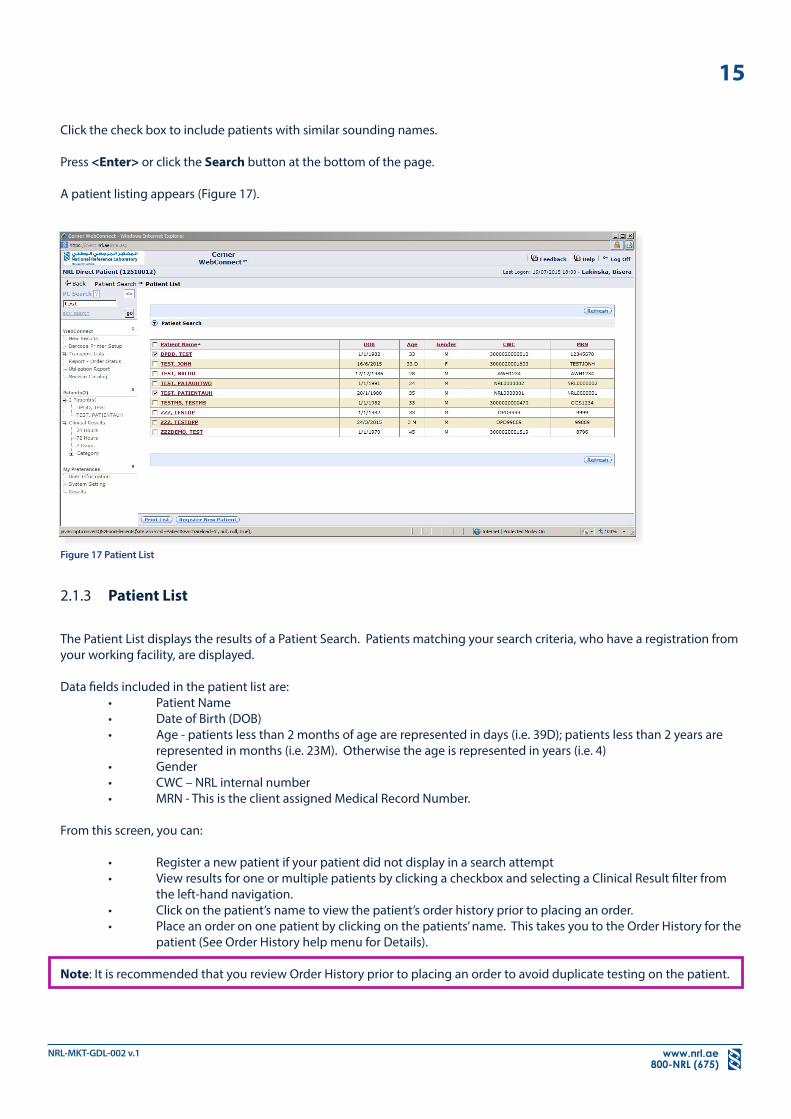
Click the check box to include patients with similar sounding names.
Press <Enter> or click the Search button at the bottom of the page.
A patient listing appears (Figure 17).
NRL-MKT-GDL-002 v.1
Figure 17 Patient List
2.1.3 Patient List
The Patient List displays the results of a Patient Search. Patients matching your search criteria, who have a registration from your working facility, are displayed.
Data fields included in the patient list are: • PatientName • DateofBirth(DOB) • Age-patientslessthan2monthsofagearerepresentedindays(i.e.39D);patientslessthan2yearsare represented in months (i.e. 23M). Otherwise the age is represented in years (i.e. 4) • Gender • CWC–NRLinternalnumber • MRN-ThisistheclientassignedMedicalRecordNumber.
From this screen, you can:
• Registeranewpatientifyourpatientdidnotdisplayinasearchattempt • ViewresultsforoneormultiplepatientsbyclickingacheckboxandselectingaClinicalResultfilterfrom the left-hand navigation. • Clickonthepatient’snametoviewthepatient’sorderhistorypriortoplacinganorder. • Placeanorderononepatientbyclickingonthepatients’name.ThistakesyoutotheOrderHistoryforthe patient (See Order History help menu for Details).
Note: It is recommended that you review Order History prior to placing an order to avoid duplicate testing on the patient.

16
A new order can be placed on a patient after successfully finding the correct patient in Patient Search or after registering a new patient in Patient Registration.
Once you verify that you have the correct patient by reviewing the demographics in the patient header and review the Order History to assure that an order is necessary, click Place New Order to add a new procedure (Figure 18).
Once you click Place New Order you will be taken to the following screen (Figure 19):
NRL-MKT-GDL-002 v.1
Figure 18 Place New Order Button
2.2 Place New Order
Figure 19 Test Order Window

17
NRL-MKT-GDL-002 v.1
2.2.1 Order Information Field (mandatory)
Following are detailed information on how to fill the place new order form (Figure 19): Mandatory fields: • Collection code – free text (it is up to your facility to choose the collection code that you will use. For exaple it can be the name of the phlebotomist or the employee ID). • Date/Time – standard pop-up calendar; or user may enter dd/mm/yyyy and enter in military time or standard time with AM or A, PM or P and the system will perform conversion.
Shortcuts –in the date field you can type T – for today, and in the time field N - for present time and the system with automatically fill the fields with these information.
Orders may be placed only 7 days in the future. For example, if today is Monday, orders may be placed for next Monday, but not Tuesday. There is no restriction on time. For example if today is 0800 Monday, order may be placed for next Monday after 0800.
Note: The ordering physician list will be populated with the information that was entered during the patient registration. You can change the ordering physician by clicking the Find button (Figure 14).
2.2.2 Test Field (mandatory)
There is two ways to select the test you want to order. You can either select from the favorites list or you can search in the service catalog.
• AfavoriteslistmaybedefinedforthefacilitybytheNRLSystemAdministrator.Theuserselectsfavorite tests by checking the box beside the test. • TosearchfortestsenterthetestnameintheTestField.Whileperformingthesearch,ifthesearchfinds only one matching result, the test code is added back to the main order page with the check box selected. The test displays within the Tests/ Procedure field (sorted alphabetically). • Ifthesearchfindsmultipleresults,apopupwindowdisplaysallmatchedresultsfortheusertoselect (See 2.3). • Promptresponses–Forsometestsyouwillbepromptedtoaddadditionalinformationpriorto submitting the order (Figure 20).
Figure 20 Additional Test Information is required for certain tests

18
NRL-MKT-GDL-002 v.1
» The prompt questions and answers are printed on the requisition form • Duplicatechecking–ThefollowingscenariosarecheckedforduplicateswithinWebConnect.Ifa procdure is cancelled by the LIS because of a duplicate, the cancel is reflected in Order History.
» Individual test in a Panel » Compound test included in a panel » Two Panels include the same compound tests » Two Panels include the same individual tests
After all procedures are selected, the user clicks Add to Order (Figure 19). A message is displayed to the user while it runs. NOTE: The order process in not yet complete. The Order Review section displays and the user is expected to verify the order prior to clicking Confirm and Approve.
2.2.3 Comment Fields (optional)
• RequisitionComment » Free text field; not mandatory. (This field will print on the Requisition only.) • ProcedureComment » Free text field; not mandatory • Procedurecommentsareenteredonceandappliedtoeachprocedureintheordering session. Comment may be removed/altered from a specific order in Order Review. They are sent to the Laboratory Information System. • CommentsdonotdisplayonresultreportsunlesstheLaboratoryInformationSystem sends the informtion with the results
This field is not applicable.
2.2.5 Order Review After clicking Add to Order to can proceed to reviewing order when you can do the following (Figure 21):
• ChangeanypreviousenteredinformationinOrderReview • Changetheordercommentforaspecifictest • Changetheprioritycodeforaspecifictest
2.2.4 Diagnosis Code Field (optional)

19
Key Points when reviewing:
• UserexpandstheNewOrderfieldsbyclickingthearrowatthelefttoverifyphysicianandrequesteddate and time information. • Usermaychangetheorderpriorityfromthedefault(choicesaredefinedbythesystem): » Routine – reporting will be within the expected TAT » Stat – reporting less than the communicated TA • ActionsColumn
» Modify – expands the New Order, Diagnosis and Test Section to allow the user to make changes for that procedure only. Changes to New Order section are applicable to all tests/panels. Changes to Order Comment and Diagnosis and Test are applicable to the test/panelselectedas‘Modify’only. » Delete– removes the test.
NRL-MKT-GDL-002 v.1
Figure 21 Order review, Confirm and Approve button

20
Confirm the order
Once you are done with the review and accept the modifications, click Confirm & Approve to accept the order. An Order Status Message will appear (Figure 22).
Please note that this activity might take a while depending on the speed of the internet connection.
Once the order is processed an order confirmation screen will be displayed (Figure 23).
Now your order has been sent to NRL.
Once the order is confirmed, bar code labels will automatically be printed from the printer that is installed to the system. You can always print more labels if needed (Figure 25).
NRL-MKT-GDL-002 v.1
Figure 23 Order confirmation
Figure 22 Order status message

21
2.3 Test Catalog
NRL-MKT-GDL-002 v.1
Users may search the lab test catalog from the link in the left navigation menu.
On click a window will open to start the search (Figure 24).
To Perform a Search:
• Entertestnamebydescription • ClickFind Test or hit <Enter> • SearchResultsaredisplayedintheleftwindow » Use the scroll bar to scroll through list • Clickonthetestnamehyperlinktodisplaytestinformationinrighthandwindow » Mnemonic » Test Catalog » Test Description » CPT Code(s) » Performing Laboratory » Specimen Requirements • ClickPrint to print the contents of the right window
If the test you are looking for is not available in the service directory please order a miscellaneous tests and include the tests details in the comments field.
Figure 24 Test catalog

22
2.4 Transport List (optional)
NRL-MKT-GDL-002 v.1
You have an option to print a transport list to keep for your records. Transport List is an available link in the left naviga-tion.
The active Transport List (Figure 25) contains specimens sorted by performing lab. In the left navigation link, select the Transport List by first clicking on the performing lab.
The current transport list for the working facility displays for tests to be performed at the chosen lab. The following information is displayed:
• Check box or ? icon- to select an item to qualify for the printed list; for items with incomplete collec tioninformation,a?iconappears.ThecollectioninformationmustbecompletedbyclickingCollec tions in the Actions column for an item to qualify for a Transport List • Patient name, MRN, DOB and Sex • Tests/Panels ordered • Transport Temperature-when the Transport List is printed, the pages are separated by Transport Temperature • Containers (by netting logic) • Collector • Collection date/time • Requisition number • Actions available for this order - Print Requisition, Print ABN (if required), Reprint Labels, Print Extra Label, Collections (to Update collection information)
Scroll through the page and select specific items which qualify for transport on the current courier run or select all specimens which qualify for transport on the current courier run by clicking the check box at the top of the page. Scroll through the transport list matching specimens for the courier against the list. At the bottom of the page, click Print Requisition to print requisitions for selected items. Click Print Labels to reprint labels for selected specimens. Click Print List to print the transport list. By printing the list, you clear the list of the selected items sent to the lab.
Figure 25 Transport list

23
NRL-MKT-GDL-002 v.1
Figure 26 Printed transport list
2.4.1 Historical Transport Lists
Click the Historical link in the left navigation. Transport lists printed within the last day display.
The Transport List Search shows (Figure 27):
• TransportListNumber-ahyperlinktothelist • Facility • Senddateandtime
You may change the search criteria by expanding the Transport List Search window. Click on the down arrow to expand the window. You may search for a list by:
• SpecificTransportListNumber • Datesentrange(ClickintheFromareatoselecttheSearchbeginningdate;ClickintheToareatoselect the Search ending date) • PerformingLab(selectperforminglabfromdrop-downlist) Click Search. A list of Transport List meeting your new search requirements displays.
The Transport List prints, with pages sorted by Transport Temperature (Figure 26). The Transport List hard copy displays the performing lab on the left header and the sending facility on the right header.
The transport list number, temperature, facility code and send date/time are listed at the top of the page. Patient demo-graphics, tests/panels ordered, Containers, Collector Name and Code, Collection Date, Time and Method and Requisition Number print on the list. The footer displays date/time and user who printed the list.

24
NRL-MKT-GDL-002 v.1
Figure 27 Historical transport list

25
New Results serves as an Inbox for results for patients defined in your Preferences settings. The results will remain in your Inbox for the length of time you designate in your Preferences settings.
In New Results the tests are reported in reverse chronological or-der. However, you may change the sort by clicking on a hyperlink column header. The system will remember the way you sorted the view and use that as the default sort the next time you access My Results. Many users find it helpful to sort this view by Patient Name or Medical Record Number.
Access New Results by clicking New Results in the left navigation menu (Figure 28) .
3. TEST REPORTING
NRL-MKT-GDL-002 v.1
3.1 New Results
Figure 28 New results link
The following information window is displayed (Figure 29):
• Patient Name (DOB, Age, Gender) • MRN/CWC (Medical Record Number/CWC- is NRL internal number) • Type - contains test reports by type as well as a number of test ordered and number of test reported (in bold) • New Results - lists the name of the tests where abnormal results are highlighted • Old Days – Number of days after the test is ordered
Figure 29 New results page

26
NRL-MKT-GDL-002 v.1
Figure 30 New Results Options
Select the check box for the results you want to see, and then click the View Selected button at the bottom of the page (Figure 29, Figure 30). A new window will open (Figure 31).
The results are present in a table with the following columns:
• Read/Unread The envelope icon will be closed if the report has not been viewed, and will be open if the report has been viewed. The envelope icon will include a page in the upper right hand if the result has been printed. • Abn Warning. If the test is abnormal, the abnormal flag (A, CH, H, L, M, R) will display. • Test Name • Patient Name • MRN • Collect Date/Time. • Result Date/Time. • Ordering Physician. • Result Status.
All options available in the bottom of the page are View Selected, Print Selected, Recently Opened and Print List from the bottom of the page (Figure 30).
Figure 31 Viewing new results

27
NRL-MKT-GDL-002 v.1
Figure 32 Detailed clinical results
If multiple pages of results exist, you will see the page number you are on in the lower left corner displayed with the total number of pages (i.e., 1 of 4). You can move between pages by clicking on the single arrow to move forward or backward one page or the double arrows to move to the last page or to the first page.
Next you see the patient header with the patient’s name, MRN, Date of Birth, Age, and Gender.
The next section displays the Test Description, the Collected date/time, the Patient name, the Result date/time, Or-dered by physician name, and Accession Number.
The next section contains the test results. An Abnormal column, on the left, displays an indicator in it if the test result is ABNORMAL. The component name, the result value, the unit of measure, and the reference range are listed in the Results section.
Thetestresultwillendwiththepatient’snameonthebottomline.
In the upper right hand side under the patient header is a series of icons that will allow you to: • Printtheseresults • Trendselectedcomponents(Figure37) • Graphselectedcomponents(Figure38)Hover over the icons for a description of their action and then click on the icon of choice to perform the described action.
You can access the results details either by checking the boxes in the new results screen and click View Selected, or click on the name of the patient and then click the test name. A detailed page for each result is displayed (Figure 32).

28
Recently opened
To view all reports that have been previously viewed, click the Recently Opened button in the lower portion of the New Results screen (Figure 30).
If you wish to return any reports currently in the Recently Opened to the New Results Page, select the item and click Mark as New (Figure 33).
If there is more than one page in the Summary, you can see the number in the upper right hand corner. To view subsequent pages, click the single arrow to move one page at a time, or one of the double arrows to go to the last page or back to the first page.
You would typically use the View Selected and Print Selected option.
Printing results
To print the results, check the box in front of the test you want printed and click Print Selected (Figure 30).
NRL-MKT-GDL-002 v.1
Figure 33 Recently opened view
PRINTING TIP - Prior to printing results, sort the view by patient name or MRN or PID so that all results for the same patient print on the same piece of paper. If your print job jams or is incomplete, use the Recently Opened and Print Selected to reprint results.

29
NRL-MKT-GDL-002 v.1
Figure 34 Clinical results filter
3.2 Viewing Previous Results
If you want to see the previously reported results, select the pa-tient from Patient List, and select Clinical Results in one of the following filters from the left-hand navigation (Figure 34):
• 24 Hours • 72 Hours • 7 Days • Category - Click Category for display of all results for the selected patient(s) for the last 90 days. Or click the + to expand the tree and select a category of service results (i.e. Lab, Micro, Pathology, Radiology)
To view one result in detail, click the checkbox for the result you want then click the View Selected button at the bottom of the page (Figure 35). Or click on the test name.
To view multiple results in detail, click multiple checkboxes for the results you want then click View Selected button at the bot-tom of the page.
To view all result details for a particular patient, click the check-box next to the ABN column for that patient. Click the checkbox againtouncheckthe‘all’testselection.
Figure 35 Clinical results window (check one or many to view results details)

30
NRL-MKT-GDL-002 v.1
Figure 36 Detailed clinical results
In the upper right hand side under the patient header (Figure 36) is a series of icons that will allow you to:
• Printtheseresults • Trendselectedcomponents(Figure37) • Graphselectedcomponents(Figure38)
Hover over the icons for a description of their action and then click on the icon of choice to perform the described action.
Figure 37 Trend results

31
NRL-MKT-GDL-002 v.1
Figure 38 Results graph
Additional Notes:
• Ifyouwishtoseeresultsolderthan90days,changethedaterangeatthetopoftheresultscreen.Enter the date in dd/mm/yyyy format, or click the calendar icon and select the dates from the calendar. Note: Be sure to enter the beginning and ending dates, and then click the Refresh button in the upper right cor ner of the page. • UsetheCategoryFiltertochooseacategory(i.e.Lab,Micro,Pathologyetc).Thesearethesamecategories from the left navigation. • TheClinicalResultsviewshowsallordersontheselectedpatient(s)-notjustresultedorders.Ordersthat are in a Drawn, Pending or Cancelled status do not have a select check box since there are no results to view. • Resorttheviewbyclickingonanycolumnheader.Thepageisresortedsortisascendingbythatcolumn. Click the same column to sort in reverse. • IntheResultDetailsview,aboldedheaderdisplaysthefollowinginformationforeachpatient:Name,PID (if your facility has a practice management system), MRN, Date of birth, Age, Sex and SSN. Results for each individualtestaredisplayedunderthepatientheader.Pleasesee‘ResultDetails’foradditionalhelpabout this view.
Printing Results
To print the Clinical Results list, click the Print List button at the bottom of the page.To print the details of a result(s), select the checkbox for the test(s) you intend to print. Click Print Selected button at the bottom of the page.

32
To see the order status of your orders click the Report Order Status in the left frame.
You will see a list of the tests you have ordered and their status (Figure 39):
Order Status Options: • Ordered–ordersareplacedintheWebconnectsystem • In-lab–samplesarereceivedbythetestingdepartment • Pending–testinginprogress • Modified–correctionsormodificationsontheresults • AuthVerified–verifiedcompletedresults
NRL-MKT-GDL-002 v.1
Figure 39 Report – Order Status
3.2.1 Report Order Status

33
NRL-MKT-GDL-002 v.1
Figure 40 Utilization Report
To access your utilization report, click the Utilization Report link on the left frame menu.
A report will open listing the number of the individual tests you ordered (Figure 40). You can customize the period for the utilization report in the header of the report
3.3 Utilization Reports

National Reference Laboratory (NRL) is a Mubadala Healthcare initiative, created in partnership with and operated by LaboratoryCorporationofAmerica(LabCorp),oneoftheworld’slargestandmostexperiencedclinicallaboratoryoper-ators.
NRL aims to increase the spectrum, coverage and overall efficiency of laboratory testing, and implement international best practice reference laboratory testing processes. NRL is committed to driving improvement in the quality standards of medical diagnostic testing in the region by investing in the latest technologies and acting as a trusted resource for healthcare providers.
NRL has laboratories based in Abu Dhabi located in the Industrial City of Abu Dhabi and Dubai in the Nucleotide Com-plex of Dubai Biotechnology and Research Park (Dubiotech). Together, they comprise 32,000 square feet of laboratory space with both standard and advanced testing capabilities, offering healthcare providers in the region a one-stop solu-tionforalloftheirmedicaldiagnostictestingneeds.NRL’sAbuDhabifacilityisCAP(CollegeofAmericanPathologists)Accredited whilst our Dubai facility boasts both the CAP and ISO 15189 Accreditations.
National Reference LaboratoryT. +971 800-NRL (675)E. [email protected]
Abu Dhabi (Headquarters)Abu Dhabi Business HubUnit C25/26ICAD, Abu DhabiP.O. Box 92323, Abu Dhabi, UAE
DubaiDubai Biotechnology and Research Park (DuBiotech)Nucleotide Lab ComplexGround Floor Lab Number 0013P.O Box 2087, Dubai, UAE
34
4. ABOUT NATIONAL REFERENCE LABORATORY
NRL-MKT-GDL-002 v.1
For issues related to Cerner Webconnect please contact your NRL Business Development Executive.


