18
TVLOOK MANUAL ________________________________ __________________________________________________ Emitor AB

TVLOOK MANUAL
________________________________
__________________________________________________
Emitor AB

(1) Owner's Manual Thank You for purchasing a Emitor AB TVLOOK-instrument. This manual covers the operation and maintenance of the Emitor AB TVLOOK-instrument. All information in this publication is based on the latest product information available at the time of printing. Emitor AB reserves the right to make changes at any time without notice and without incurring any obligation. No part of this publication may be reproduced without written permission. This manual should be considered a permanent part of the instrument and should remain with it if it is resold. If a problem should arise, or if You have any questions about the instrument, consult an authorized Emitor AB dealer. ! Notice ! Operating a TVLOOK-instrument requires special skills. Please read this Owner's Manual thoroughly before operating the instrument. Contents: 1. Description. 2. Operation. I. Unpacking.
II. Connection. III. Knob and control-button. IV. Information:
3. Functions: A. Full spectrum, span 13 and SPAN. B. Max hold. C. Reference cursor and signal/noise ratio. D. Digital measuring. E. Memory. F. Picture, TV, Text-TV (CEEFAX). G. Attenuation– automatic and manual. H. ITS-function. I. Audio. J. Internal – External Video/Audio. K. Favouritechannels. L. User Span. M. Set (personal setup). N. PC-software. O. Checking and charging the battery.
4. Maintenance. 5. Technical specification.
(2) 1. Description: Emitors TVLOOK is developed in Sweden for working together with all kinds of TV and Radio signals between 2-900 MHz. TVLOOK operates the frequency-range of 2-900 MHz and is accordingly one of the first to be able to work with the return-path signals in Cable-TV networks (5-65 MHz) this in conjunction with the new EN50083 standard. The spectrum can of course be zoomed into smaller parts (min 13 MHz-span). TVLOOK is very sensitive and accurate. It presents signals +1dB (at +20 C). Multistandard Audio/Video (PAL, NTSC and SECAM). Presentation is made on the 4.5” B/W-monitor and all menus/help-displays are shown on the LCD-screen (64x128) beside the monitor. It´s easily operated as it uses new very powerful processor technology -not a lot of unnecessary buttons and knobs. The basic functions are easy to get a hold on and takes only minutes to learn. Still, very powerful with 100 memory positions and favourite channels setups. It also displays sync- and ITS- signals. Text-TV (ceefax) is standard. TVLOOK can also measure the level on digital transponder (Digital dB). To make the unit complete, it has a RS232 connection to computer and attached with the instrument comes a Windows 95/98 software. Memorypositions are easily transfered to the computer and nice looking printouts (on standard paper !) are done in minutes. TVLOOK has a rechargable battery of 12v, 7 amp. which, fully charged, will operate the instrument for at least two hours. The recharging of the battery is supervised by the instruments microprocessor. It makes sure that the recharging is done fast and secure. The status of the battery is indicated on the LCD-screen. Along with the TVLOOK comes a PC-software (on CD), a strong nylon carrying-case, a 220v/13.5v DC power-supply and a car-charger.
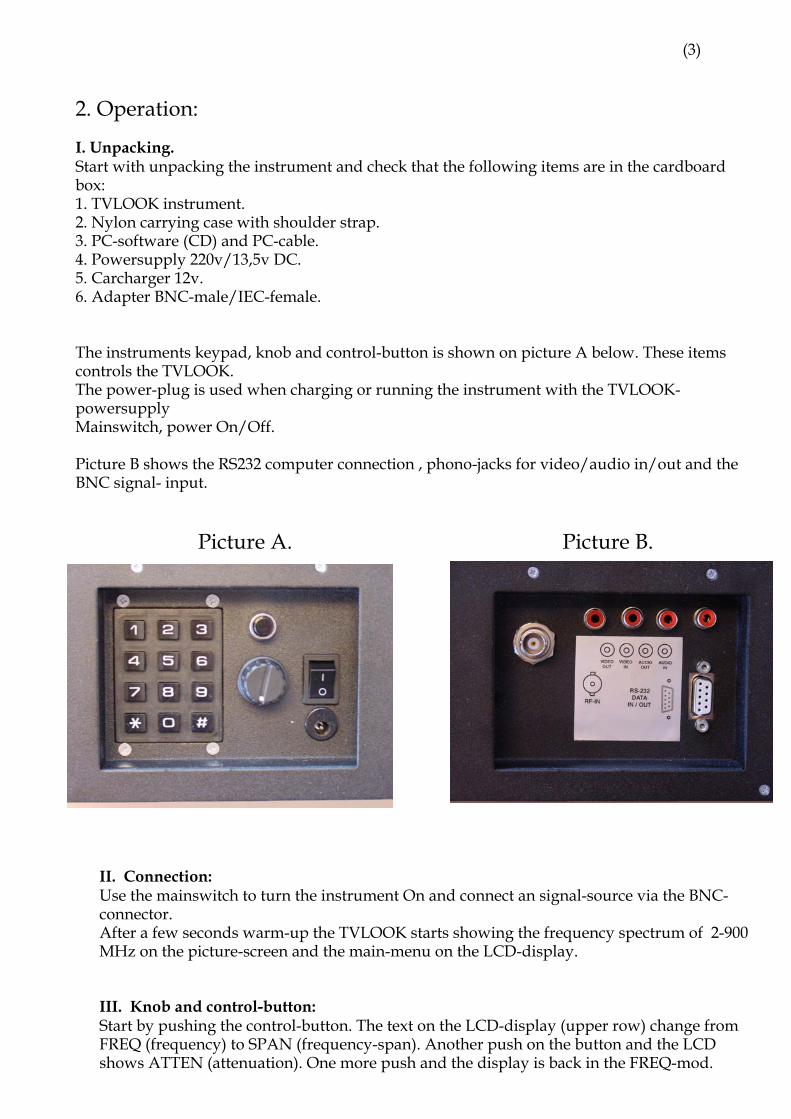
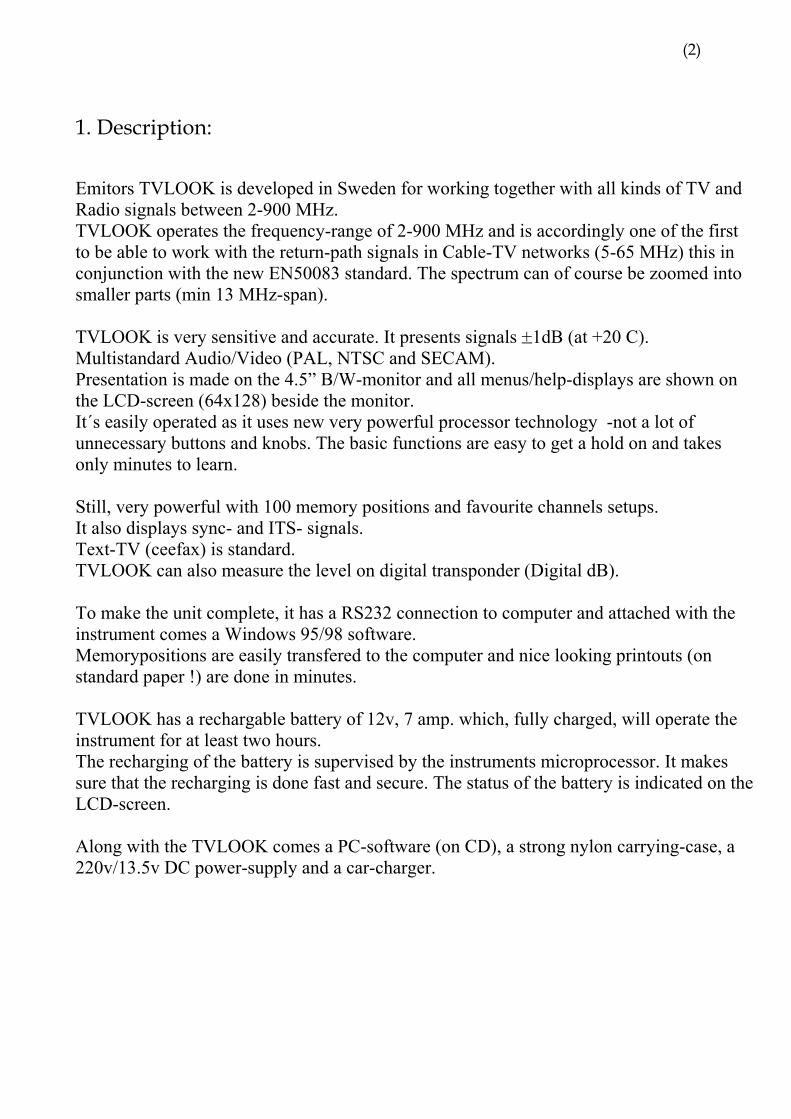
(3) 2. Operation: I. Unpacking. Start with unpacking the instrument and check that the following items are in the cardboard box: 1. TVLOOK instrument. 2. Nylon carrying case with shoulder strap. 3. PC-software (CD) and PC-cable. 4. Powersupply 220v/13,5v DC. 5. Carcharger 12v. 6. Adapter BNC-male/IEC-female. The instruments keypad, knob and control-button is shown on picture A below. These items controls the TVLOOK. The power-plug is used when charging or running the instrument with the TVLOOK-powersupply Mainswitch, power On/Off. Picture B shows the RS232 computer connection , phono-jacks for video/audio in/out and the BNC signal- input. Picture A. Picture B.
II. Connection: Use the mainswitch to turn the instrument On and connect an signal-source via the BNC-connector. After a few seconds warm-up the TVLOOK starts showing the frequency spectrum of 2-900 MHz on the picture-screen and the main-menu on the LCD-display.
III. Knob and control-button: Start by pushing the control-button. The text on the LCD-display (upper row) change from FREQ (frequency) to SPAN (frequency-span). Another push on the button and the LCD shows ATTEN (attenuation). One more push and the display is back in the FREQ-mod.
(4) The control-button handle a few important functions (only controlled by this button and not via the LCD´s menu system). It is important to learn how to use the control-button in order to handle the TVLOOK easy and correct. The functions of the control-button in the different modes. Spectrum: Picture-mode: Ceefax (text-TV): ITS-mode: Frequency Frequency Page Cursor Bandwidth(span) Channel Video-line Attenuation Favourite Volume When TVLOOK is in Frequency-mode, the cursor is controlled by the knob. Try to move the cursor up/down by turning the knob left/right. IV. Information: The cursors position (frequency), the spectrums startfrequency (2.00 MHz), the spectrums stopfrequency (902 MHz) and bandwidth (900.00 MHz) can be read out on the picture-screen. The dB attenuation value is shown with actual value (ATT:). VBW and RBW stands for Video-Bandwidth and Resolution-Bandwidth of which will be told later in this manual. The perhaps most important information, the dB-value, is showed in the middle of the info-picture. Measuring of the measured frequency is done continuos and the presentation is being updated a couple of times per second.
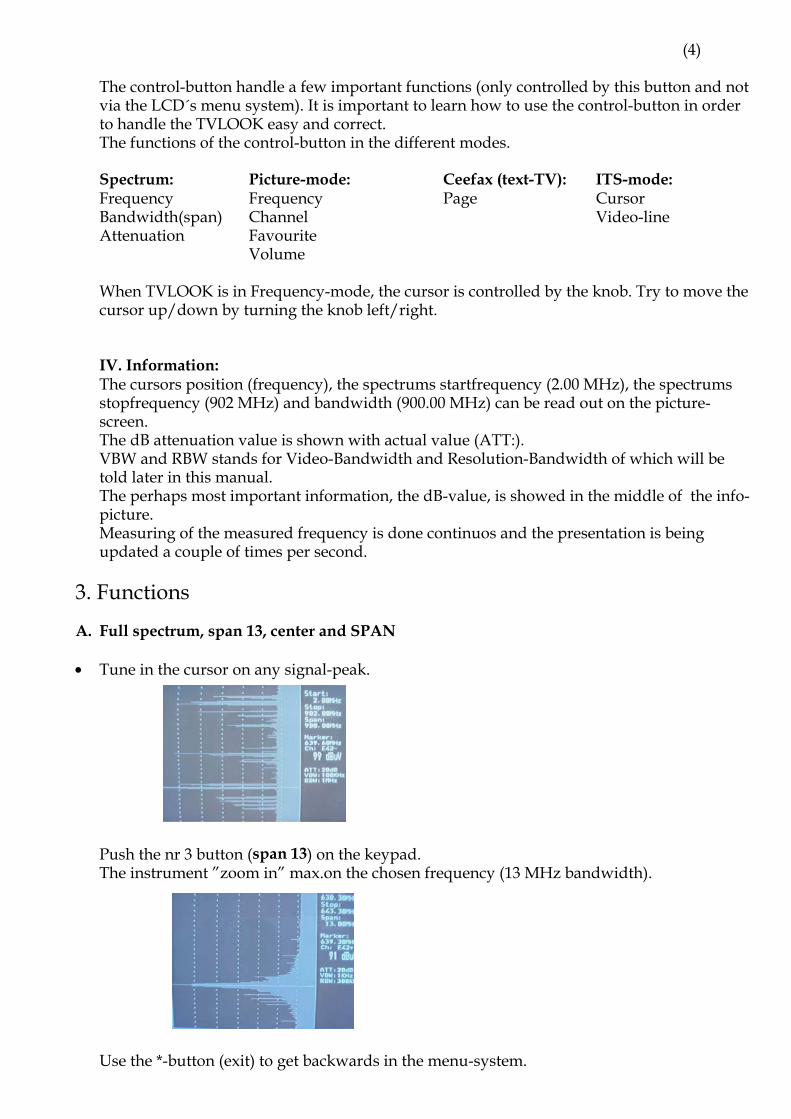
3. Functions A. Full spectrum, span 13, center and SPAN • Tune in the cursor on any signal-peak.
Push the nr 3 button (span 13) on the keypad. The instrument ”zoom in” max.on the chosen frequency (13 MHz bandwidth).
Use the *-button (exit) to get backwards in the menu-system.
(5)
• Tune in any signal-peak and push button nr 5 (center). The instrument centers on the cursor position..
• Push button nr 3 (span 900) to get back to the original (full) bandwidth. - Where ever You may be in the spectrum-mode, You can always adjust the bandwidth with
the ”span” function. Use the control-button and step to the ”span”-mode. Change the bandwidth by turning the knob left/right. This ”zoom in” is measured from the cursor position and the bandwidth is reduced from, so to say, both ends. Max. ”zoom in”, most narrow bandwidth, is 13 MHz and full bandwidth is 900 MHz.
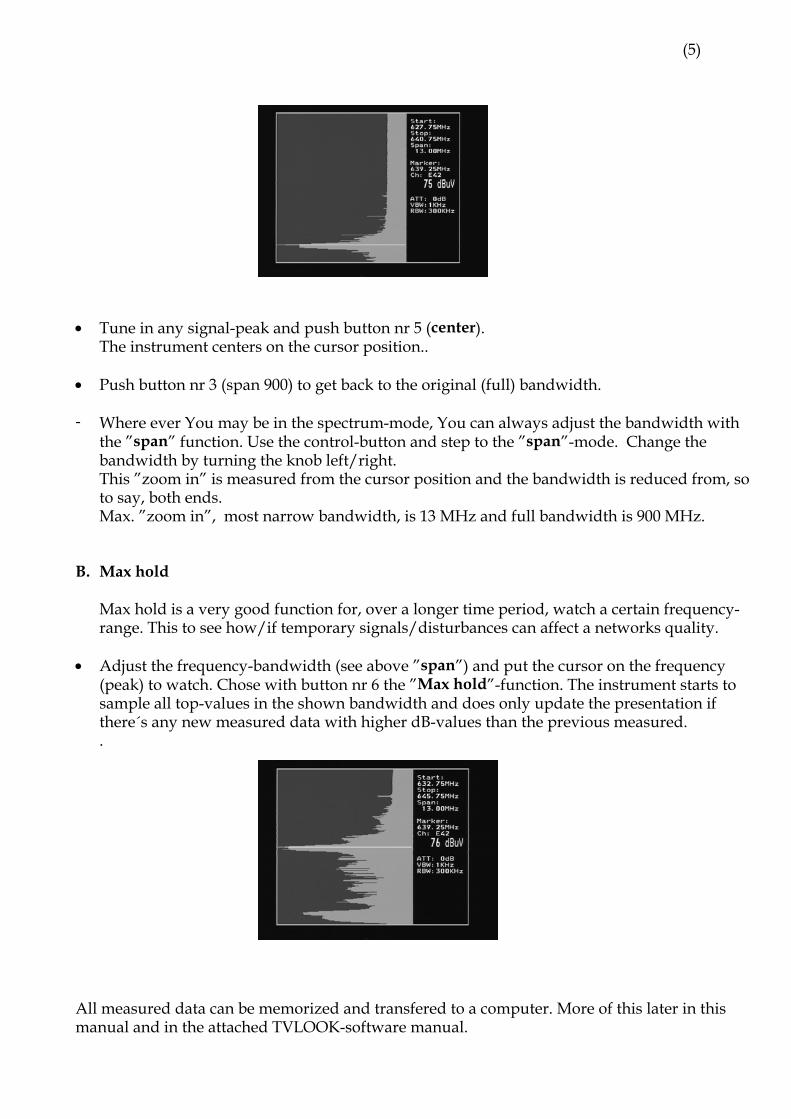
B. Max hold
Max hold is a very good function for, over a longer time period, watch a certain frequency-range. This to see how/if temporary signals/disturbances can affect a networks quality.
• Adjust the frequency-bandwidth (see above ”span”) and put the cursor on the frequency
(peak) to watch. Chose with button nr 6 the ”Max hold”-function. The instrument starts to sample all top-values in the shown bandwidth and does only update the presentation if there´s any new measured data with higher dB-values than the previous measured. .
All measured data can be memorized and transfered to a computer. More of this later in this manual and in the attached TVLOOK-software manual.
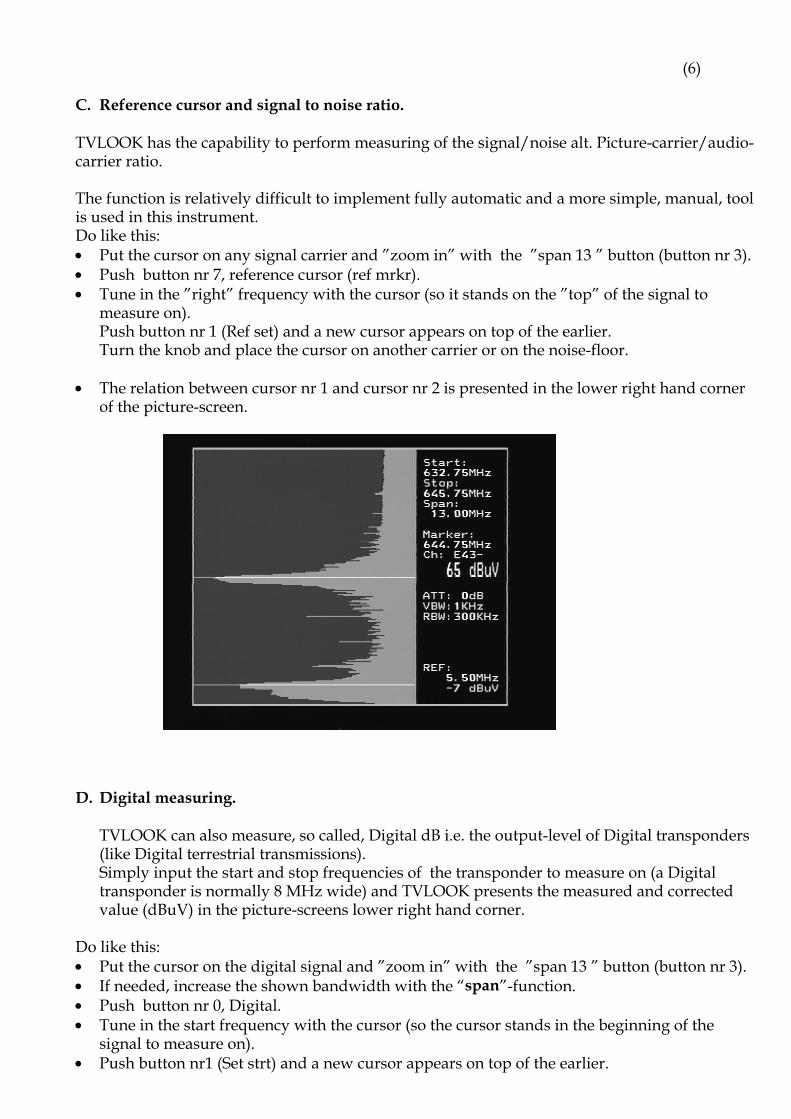
(6) C. Reference cursor and signal to noise ratio. TVLOOK has the capability to perform measuring of the signal/noise alt. Picture-carrier/audio-carrier ratio. The function is relatively difficult to implement fully automatic and a more simple, manual, tool is used in this instrument. Do like this: • Put the cursor on any signal carrier and ”zoom in” with the ”span 13 ” button (button nr 3). • Push button nr 7, reference cursor (ref mrkr). • Tune in the ”right” frequency with the cursor (so it stands on the ”top” of the signal to
measure on). Push button nr 1 (Ref set) and a new cursor appears on top of the earlier. Turn the knob and place the cursor on another carrier or on the noise-floor.
• The relation between cursor nr 1 and cursor nr 2 is presented in the lower right hand corner
of the picture-screen.
D. Digital measuring.
TVLOOK can also measure, so called, Digital dB i.e. the output-level of Digital transponders (like Digital terrestrial transmissions). Simply input the start and stop frequencies of the transponder to measure on (a Digital transponder is normally 8 MHz wide) and TVLOOK presents the measured and corrected value (dBuV) in the picture-screens lower right hand corner.
Do like this: • Put the cursor on the digital signal and ”zoom in” with the ”span 13 ” button (button nr 3). • If needed, increase the shown bandwidth with the “span”-function. • Push button nr 0, Digital. • Tune in the start frequency with the cursor (so the cursor stands in the beginning of the
signal to measure on). • Push button nr1 (Set strt) and a new cursor appears on top of the earlier.
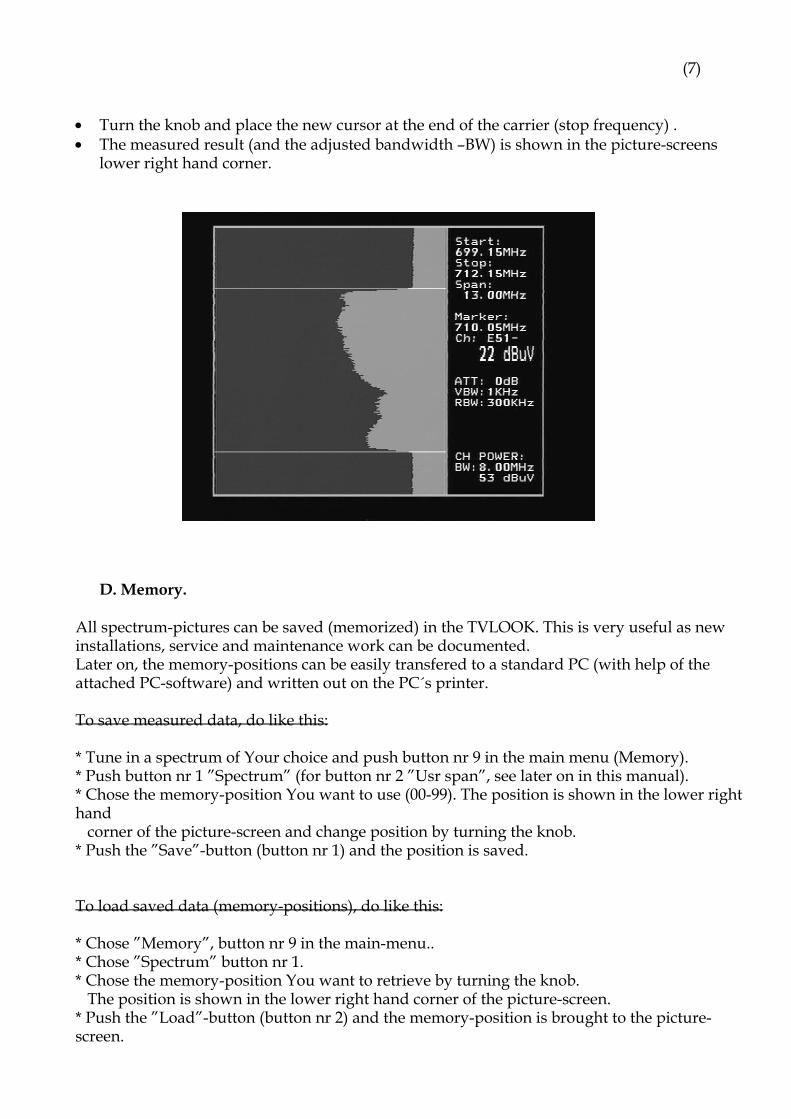
(7) • Turn the knob and place the new cursor at the end of the carrier (stop frequency) . • The measured result (and the adjusted bandwidth –BW) is shown in the picture-screens
lower right hand corner.
D. Memory. All spectrum-pictures can be saved (memorized) in the TVLOOK. This is very useful as new installations, service and maintenance work can be documented. Later on, the memory-positions can be easily transfered to a standard PC (with help of the attached PC-software) and written out on the PC´s printer. To save measured data, do like this: * Tune in a spectrum of Your choice and push button nr 9 in the main menu (Memory). * Push button nr 1 ”Spectrum” (for button nr 2 ”Usr span”, see later on in this manual). * Chose the memory-position You want to use (00-99). The position is shown in the lower right hand corner of the picture-screen and change position by turning the knob. * Push the ”Save”-button (button nr 1) and the position is saved. To load saved data (memory-positions), do like this: * Chose ”Memory”, button nr 9 in the main-menu.. * Chose ”Spectrum” button nr 1. * Chose the memory-position You want to retrieve by turning the knob. The position is shown in the lower right hand corner of the picture-screen. * Push the ”Load”-button (button nr 2) and the memory-position is brought to the picture-screen.

(8) F. Picture, TV, CEEFAX (Text-TV). After choosing a certain TV-carrier, it is very easy to go over to picture-mode. Simply push the picture-button (button nr 1 in the main-menu) and TVLOOK turn into picture-mode. The knob controls the frequency tuning but the function change to, Channel, then to; Favourite (favourite-channels), then to; Volume and then back to Freq (frequency) when stepping with the control-button (indication is shown on top of the LCD-display).
- Measuring on a TV-channel is normally done in the ”Picture-mode” (Picture and dB-level is shown at the same time). A more thorough check of the picture quality can be done in the TV- mode (TV-menu, below) as the picture wont be disturbed by the measuring filter in that mode (no measuring). To get into the TV-mode push button nr 1.

(9) The LCD-display shows the TV-mode sub-menus. Select Text-TV (CEEFAX) with button nr 1.
• If the chosed TV-channel transmits Text-TV (CEEFAX) it will now be displayed on the
picture-screen. Chose page, between 100-899, by turning the knob. The picture and Text-TV (CEEFAX) can be mixed with button nr 2. Hidden text can be displayed with button nr 1 (reveal).
G. Attenutation – automatic and manual.
TVLOOK is normally using automatic attenuation when in TV-mode (the signal is always attenuated manually in spectrum-mode). This to make sure that the measuring-devices in the instrument works in the best way. However, under some circumstances, it might be better to attenuate manually in order to be able to view/measure on a certain carrier. The manual attenuation is controlled like this: - In spectrum-mode: push the control-button so ”atten” shows on top of the LCD-display. Select suitable attenuation-value by turning the knob left/right for lower/higher value.(the attenuation value is shown in the middle of the info-window on the picture- screen). - In Picture- and TV- mode: push button nr 4 ”Man att” (manual attenuation) and select suitable attenuation-value with the knob (is shown in the LCD-display). Returning to automatic attenuation: In Picture/TV-mode: Push the button nr 4 ”Auto att”.
I. ITS-function.
A TV-picture is built up with a number of lines. The TV-system standard in Europe (PAL) uses 625 lines. The ITS-signal is transmitted “on top” of a couple of these lines and is a standard for judging a TV-signals quality. Earlier, it has not been easy to check the ITS-signals as very few TV-instruments been capable to display them. With the TVLOOK it is both possible and easy. The function is, as said above, very useful to check a TV-signals quality but also for adjusting TV-modulators in a head-end (adjust video-level and white-balance.

(10)
Do like this: * Tune in any TV-channel on TVLOOK and chose ITS-mode (button nr 2 in the TV-menu). TVLOOK shows an ITS-line (default setup is line 19 but a TV-channel shows the ITS- information normally on a couple of the lines between 15 and 25, alt. 325 and 335). The picture below shows how an ideal ITS-signal should look like (correct level of the videosignal).
* Find an ITS-line by pushing the control-button one time (V-line ”Videoline” lit on top of the LCD- display). * Turn the knob until a valid ITS-line been found (ex. it may be line 19 for the video-signal level and line 20 for the presentation of the frequency response). - A video-signal shall be 1 Volt ”peak to peak” i.e. from the synclevel floor to top. - The sync-pulse (above the burst – linesync) shall be 0.3 Volt from the synclevel floor which means that it is 0.7 Volt from black to white. * The TVLOOKcan present the ITS-line in two ways; plotted or drawn. The drawn line looks “better” and is more complete than the plotted one. At the other hand, the plotted one is better when the line is being continuos scanned (when, for example, adjusting modulator video-levels etc.). Chose between drawn or plotted with button nr 3. Chose continuos scanning with the auto-button (nr 2) or ”write one time” with the “trigg”-button (nr 1). * It is easy to memorize an ITS-line by simply pushing the ”Memory”-button and, thereafter, chosing a free memory position (with the knob). The memory positions (pos 00-99) is shown in the bottom of the LCD-display. After selecting a free position, push the “save” button (button nr 1). * Retrieve a saved ITS-line by chosing ”Memory” (button nr 4) in the ITS-menu. Select, with the knob, the memory-position to load. Push the ”Load”-button (nr 2) and the ITS-line is retrieved to the picture-screen.

(11) I. Audio. This version of the TVLOOK can select between and work with the three most common TV-sound systems in Europe (tune in the distance between the picture-carrier and sound carrier). The selection is made under ”sound” in the TV-menu. Select with button 1-3 any of the three versions. • Beeper. It might be tricky to install normal TV-antennas and, at the same time, try to watch the signal-level on the TV-instrument. Therefor TVLOOK has a very useful ”beeper”-function to help finding the max-strength signal. It works with a pitch tone that gets higher and higher the better the signal. This function is also accessed via ”sound” in the main-menu starts by pushing button nr 3 ”beeper”. The beeper is turned Off when chosing “Beep off” (button nr 2). J. Internal – External Video/Audio. External Video and Audio signal can be presented on the TVLOOK (for ex. TV-signals from a head-end). This is made by first connecting the Video/Audio signals via the Phono-jacks on the side of the instrument. The function is turned On by choosing ”Picture” in the main-menu and thereafter pushing button nr 4 ”Ext A/V” and button nr 2. TVLOOK can in the same way “transmit” video/audio-signals (ex. for viewing spectrum and TV-pictures on a larger/colour-monitor. Connect as above with the difference to use button nr 1 in the end (Int A/V).

(12) K. Favourite channels. Thanks to the powerful processor, TVLOOK can measure up to 10 pre-set channels at the same time (and it can be setup with 10 pages of 10 channels each). This is done by choosing the channels(frequencies) to measure on and programme them in the favourite channel memory. Programming of favourite-channels: * Put the cursor in spectrum-mode on the frequency to programme (ex. 125 MHz). * Chose Picture (button nr 1). * Chose Memory (button nr 5). * Chose the memory position (00-99) to place this frequency with help of the knob. The position is shown at the bottom at the LCD-display (ex. turn to pos. 03). On the row above it is shown if the position already is occupied (used) or free to be programmed (free). * Repeat as above with the other channels (frequencies) to be programmed. The channels are thereafter permanently stored in the TVLOOK (until choosed to be deleted). Measure on favourite-channels: Measuring on the favourite-channels is easily done once they have been programmed. This is done under the menu “Favourite” in the main-menu (button nr 2). If more than 10 channels (frequencies) has been programmed, step to the next page with the ”Pg down”-button (page down). Back again with the ”Pg up”-button (page up). Measuring is done continously of the dB values on respectively frequency. The “Max hold” function (sampling of the highest values) is also available in this mode, it is enabled with button nr 1. Return to continous measuring of actual values with another push on button nr 1 (No hold). - Also remember that the favourite-channels are shown when the ”Favourite” is chosen with the control-button (is shown at the top of the LCD-display). The favourite-channels are shown in sequence order on the picture-screen when turning the knob. Measure favourite-channels and place the information in memory positions. - Chose the page of favourite-channels You want to memorize (for ex. pos 0-9). - Push the “Memory” button (nr 4). - Chose the memory-position where You want to store this measuring (there are100
memories, pos 00-99) by turning the knob. The positions are shown in the picture-screens lower right hand corner and it also tells if the chosen postion is free to use (free) or already occupied with a measuring, earlier stored (used). When a suitable position is chosen (and free), push the “save” button (nr1). The text in the picture-screen changes from “free” to “used”.
Getting a saved favourite-channels memory. - Chose ”Favourite” in the main-menu (button nr 2). - Push the ”Memory”-button (nr 4). - Chose the memory-position You want to load by turning the knob (position 00-99). - Push the ”Load”-button (nr 2) and the memory-position is retrieved to the picture-screen.

(13) L. User Span (individual setup of frequency-bands). TVLOOK works when being turned On with the whole frequency-range of 2-900 MHz. That makes it very easy to get an overview over the whole spectrum and makes it simple to find all signals within this area. In many cases, however, it might be better to divide the frequency-spectrum in the working-areas in which installation and service works are normally being done (for ex in the returnpath, in FM, in UHF etc.). These working-areas might differ a lot depending on where the instruments are being used (geographically) or by whom. For that reason the TVLOOK has the unique possibility to do a individual setup of such frequency-bands. Programming the frequency-bands, do like this: * Chose a frequency-band to programme (for ex. 5-65 MHz) and put the cursor in the middle of that area (aprox. 31 MHz). * Push with the control-button so “SPAN” (bandwidth) lit on top of the LCD-display. Retract the spectrum by turning the knob so only the wanted frequency-band (5-65 MHz) is shown in the picture-screen. Notice ! It might take a little effort to get the exact frequncy-band wanted (it is sometime necessary to step a couple of times between “FREQ” and “SPAN”). It is, however, well spent time as this programming is only needed to be done once – these frequency-bands are thereafter permanently programmed (until chosen to be deleted). * When the “right” frequency-band is tuned in, push the ”Memory”-button (nr 9). * Push button nr 2 “Usr span” and thereafter the ”Save”-button (nr1). * Chose the memory-position this frequency-band should have (for ex. nr 1) and push that button. The chosen frequency-area is shown at the chosen place in the LCD-display. - Repeat the above steps to memorize more frequency-bands (up to 8 bands). Watch the frequency-bands, do like this: * Chose ”Usr span” in the main-menu (button nr 4). * Chose any of the previous (see above) programmed frequency-bands in the list.

(14) M. Set (personal setup). The TVLOOK-instrument can be setup for a better individual performance and to do special kind of measuring. These kind of setups are done under the menu nr 8 (SET) in the main-menu. The following parameters can be adjusted: Button nr 1: ”Vid BW” (Video Bandwidth filter).
The Videofilter is placed after the measuring chip-set in the instrument and is used for, with different resolution, present the frequency-spectrum. The resolution of the details of a signal-carrier gets finer the more narrow filter being used (but the sweep-time gets longer instead). The different Videofilters are: auto-mode (default), 100 kHz, 10 kHz, 1 kHz or 100 Hz.
Button nr 2: ”Res BW” (Resolution Bandwidth).
The resolution bandwidth shows the incoming signal before the measuring chip-set in the instrument. Chose between the narrow 300 kHz or the wider 1 MHz resolution. The instrument is normally working in the ”auto” mode.
Button nr 3: ”P-insert” (Power insert).
This function is used to run external active accessories (like antenna-amplifiers) which needs a power-source to operate. The output voltage can be adjusted between 12-24 volt DC and is fed via the BNC-connector.
The chosen output voltage is always shown in upper left hand of the LCD-display (next to the battery-symbol). Default setting of the instrument is power-off (0 volt). Notice ! Remember that miss-use of this function may cause irreparable damage to all connected equipment not made to be power-fed.
Button nr 4: Set up, with sub-menu: Button nr 1: LCD –Contrast and “Backlite” On/Off can be adjusted.
Button nr 2: Screen-saver On/Off. Default setting is On. Button nr 3: Display and sub-menu 1, S-cursor (Scan-cursor). Shows how fast the instrument “scans” a certain frequency-band. Default setting is Off. Sub-munu 2, Grat. (grating) shows a grating-net which can make the signal-readout more easy under some circumstances. Default setting is Off. Sub-menu 3, Units, chose between the signal-readouts of dBuV, dBm or dBmV Sub-menu 4, TV level, the level which the automatic attenuation uses for the picture-presentation (should be between 53-63 dB). Button nr 4: Version. Shows for ex. the instruments serial number, date of manufacturing, software-version etc.
N. PC-software.
With this TVLOOK comes a PC-software (on CD) which makes it easy to transfer the earlier saved memory-positions from TVLOOK to a PC. The software makes it also simple to transfer the data to other softwares (like word-processing programmes) and add on information (like addresses, time-date etc.). Print-outs can be done from the standard PC-printer. Manual for the software is attached with the CD.

(15) O. Checking/charging the battery. As the instrument has been stored for some time before transportation it is important to check the battery-condition. To do this turn the mainswitch On. When starting the instrument, the monitor and LCD-display turns On. There´s a battery symbol at the top of the LCD-display that shows the status of the battery. All black means that the battery is fully charged. If the symbol is empty it means that the battery is empty to. If the battery needs recharging, use the power-supply attached with the instrument. A thermometer-scale (0-100%) will lit on the LCD-display as the recharging starts. Notice. The instrument should be turned of when being recharged. Recharging from fully discharged battery to about 98% capacity takes aprox.30 hours. When the battery been recharged, TVLOOK is ready to be used. 4. Maintenance. The instrument is equipped with a rechargeable battery and it is important that the battery is maintained. Recharging should be done with the, enclosed car-adaptor or external power supply of 220v/13.5v DC, center-pin -plus and chassi -earth. Note, the instrument can be operated, for shorter periods of time, by the external power supply. However, the TVLOOK is not made for permanent operation. Contact Your dealer for more information. Adjustments for vertical hold, brightness and contrast are located under the instrument. Contact Your dealer for proper adjustments. The battery needs recharging when the battery-symbol at the top of the LCD-display is empty. Remember that a cold battery has much lower capacity than a warm one. TVLOOK is designed for outside use in rough conditions but it should not be exposed for rain or snow as this can damage or shorten the lifetime of the instrument.
(16) 5. Technical specification.
Input frequency: 2-900MHz. Input level, picture: 110 dByV. Spectrum: 120 dByV. Noise-level: 25 dB max. Attenuation: 45 dB in 1 dB step. Signal strength. Presentation: dB readout on LCD and monitor. Pitch-tone on loud-speaker. Accuracy: +1dB (at +20 C) TV/Audio standard Multi TV/Audio. Frequency span: 2-900 MHz, easily reduced to 13 MHz (max zoom in). Resolution bandwidth: 1 MHz or 300 kHz. Video bandwidth: 100kHz or 10 kHz or 1 kHz or 100 Hz Input impedance: 75 Ohm, BNC Monitor: 4.5” picture-tube black and white. Menus/help displays: On LCD 64x128 next to the monitor. TV-line analyzer: Sync and ITS presentation. Memory: -100 memory positions. -Favourite channels setup. -Maxhold-function (sampling). PC-connection: RS232-output and software for Win -95/98. Video/Audio input: Yes, phono-plugs. Video/Audio output: Yes, phono-plugs. Text-TV (CEEFAX): Yes. Output voltage: Yes. 12-24 volt. Battery: Rechargeable 12v, 7 amp/hours. Operational: Min. 2 hours. Weight: 6 kg incl.battery. Accessories: Nylon carrying- case. Powersupply of 220/13.5v, 1.6amp. Car-charger. PC-software and PC-cable. BNC-male/IEC-female adapter. Owners manual.

Emitor AB Tel: +46 8 7750001 Sjöviksbacken 14 Fax: +46 8 7750006 117 43 Stockholm www.emitor.se Sweden


