49
CFT2200 User Guide

CFT2200User Guide
0
(
6
6
$
*
(
6
0(18 6(/(&7 (17(5 92/80( &+$11(/
&$87,21
5,6.�2)�(/(&75,&�6+2&.
5()(5�6(59,&,1*�72�48$/,),('�6(59,&(�3(56211(/�
72�5('8&(�7+(�5,6.�2)�(/(&75,&�6+2&.�'2�127�5(029(�&29(5��25�%$&.��12�86(5�6(59,&($%/(�3$576�,16,'(�
&$87,21�
Graphical symbols and supplemental warning marking locations on bottom of terminal.
WARNINGTO PREVENT FIRE OR SHOCK HAZARD, DO NOT EXPOSE THIS APPLIANCE TORAIN OR MOISTURE.
CAUTIONTO PREVENT ELECTRICAL SHOCK, DO NOT USE THIS (POLARIZED) PLUGWITH AN EXTENSION CORD, RECEPTACLE, OR OTHER OUTLET UNLESSTHE BLADES CAN BE FULLY INSERTED TO PREVENT BLADE EXPOSURE.
The lightning flash with arrowhead symbol, within an equilateral triangle, isintended to alert the user to the presence of uninsulated “dangerous voltage”within the product’s enclosure that may be of sufficient magnitude to constitutea risk of electric shock to persons.
The exclamation point, within an equilateral triangle, is intended to alert theuser to the presence of important operating and maintenance (servicing)instructions in the literature accompanying the appliance.
This installation should be made by a qualified service person and should conform to alllocal codes.
REPAIRSIf you find the unit in need of repair, contact your cable system operator for repair orreplacement.
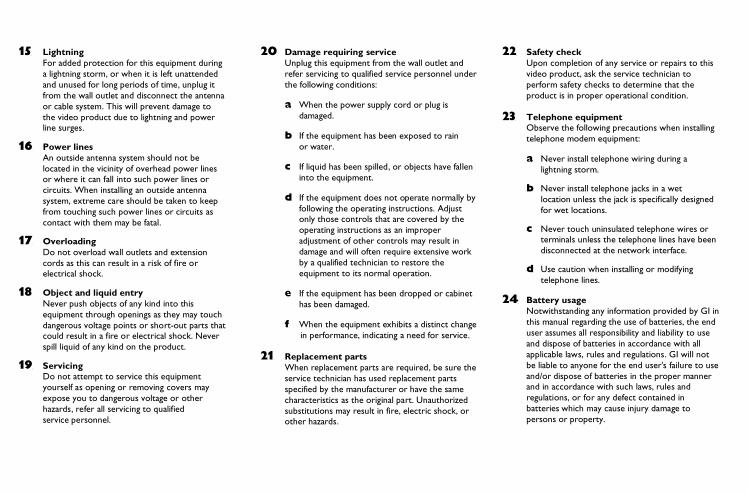
NOTE TO CATV SYSTEM INSTALLERThis reminder is provided to call the CATV system installer’s attention to Article 820-40 ofthe NEC that provides guidelines for proper grounding and, in particular, specifies that thecable ground shall be connected to the grounding system of the building, as close aspossible to the point of cable entry as practical.
EXAMPLE OF ANTENNA GROUNDING
Antenna le ad in w ire
G ro undclam p
Antennadischarge u nit (N E C S ect ion 810 -20 )
G ro unding co nduc tor s(N EC Section 810-2 1)
G ro und in gc la mp s
Power se rvice g roundingelectro de sy stem
(N EC A rt ic le 2 50 , Par t H )
E lec tr ic ser viceequ ipm ent
N EC =N AT IO N A L ELEC T RIC AL CO D E
Copyright © 1999 by General Instrument Corporation. All rights reserved. No part of the contents of this book may be reproduced or transmitted in any form or by any means withoutwritten permission of the publisher.
The General Instrument logo, STARFONE and STARVUE are registered trademarks of General Instrument Corporation.

IMPORTANT SAFEGUARDS
1� Read instructionsAll the safety and operating instructions shouldbe read before the appliance is operated.
2� Retain instructionsThe safety and operating instructions should beretained for future reference.
3� Heed warningsAll warnings on the appliance and in theoperating instructions should be adhered to.
4� Follow instructionsAll operating and use instructions should befollowed.
5� CleaningUnplug this product from the wall outlet beforecleaning. Do not use liquid cleaners or aerosolcleaners. Use a damp cloth for cleaning.
6� AttachmentsDo not use attachments not recommendedas they may cause hazard.
7� Water and moistureDo not use this equipment near water; forexample, near a bath tub, wash bowl, kitchensink, or laundry tub, in a wet basement, or neara swimming pool, and the like.
8� AccessoriesDo not place this product on an unstable cart,stand, tripod, bracket, or table. The product mayfall causing serious injury and serious damage tothe appliance. Use only with a cart, stand, tripod,bracket, or table recommended by themanufacturer, or sold with the equipment. Anymounting of the appliance should follow themanufacturer’s instructions, and should use amounting accessory recommended by themanufacturer.
9� VentilationSlots and openings in the cabinet are provided forventilation and to ensure reliable operation of theequipment and to protect it from overheating. Theopenings should never be blocked by placing theproduct on a bed, sofa, rug, or similar surface.Equipment should never be placed near or over aradiator or heat register, or in a built-in installationsuch as a bookcase or rack unless properventilation is provided.
10� Power sourcesThis product should be operated only from thetype of power sources indicated on the markinglabel. If you are not sure of the type of powersupplied to your home, consult your local powercompany. For equipment intended to operate frombattery power, or other sources, refer to theoperating instructions.
11� Ground or polarizationThis equipment may be equipped with a polarizedalternating-current line plug (a plug having oneblade wider than the other). This plug will fit intothe power outlet only one way. This is a safetyfeature. If you are unable to insert the plug fullyinto the outlet, try reversing the plug. If the plugshould still fail to fit, contact your electrician toreplace your obsolete outlet. Do not defeat thesafety purpose of the polarized plug.
12� Alternate warningsThis equipment may be equipped with a 3-wiregrounding-type plug, a plug having a third(grounding) pin. This pin will only fit into agrounding-type power outlet. This is a safetyfeature. If you are unable to insert the plug intothe outlet, contact your electrician to replace yourobsolete outlet. Do not defeat the safety purposeof the grounding-type plug.
13� Power cord protectionPower supply cords should be routed so that theyare not likely to be walked on or pinched by itemsplaced upon or against them, paying particularattention to cords at plugs, conveniencereceptacles, and the point where they exit fromthe appliance.
14� Outdoor Antenna GroundingIf an outside antenna or cable system is connectedto the equipment, be sure the antenna or cablesystem is grounded as to provide some protectionagainst voltage surges and built-up static charges.
15� LightningFor added protection for this equipment duringa lightning storm, or when it is left unattendedand unused for long periods of time, unplug itfrom the wall outlet and disconnect the antennaor cable system. This will prevent damage tothe video product due to lightning and powerline surges.
16� Power linesAn outside antenna system should not belocated in the vicinity of overhead power linesor where it can fall into such power lines orcircuits. When installing an outside antennasystem, extreme care should be taken to keepfrom touching such power lines or circuits ascontact with them may be fatal.
17� OverloadingDo not overload wall outlets and extensioncords as this can result in a risk of fire orelectrical shock.
18� Object and liquid entryNever push objects of any kind into thisequipment through openings as they may touchdangerous voltage points or short-out parts thatcould result in a fire or electrical shock. Neverspill liquid of any kind on the product.
19� ServicingDo not attempt to service this equipmentyourself as opening or removing covers mayexpose you to dangerous voltage or otherhazards, refer all servicing to qualifiedservice personnel.
20� Damage requiring serviceUnplug this equipment from the wall outlet andrefer servicing to qualified service personnel underthe following conditions:
a� When the power supply cord or plug isdamaged.
b� If the equipment has been exposed to rainor water.
c� If liquid has been spilled, or objects have falleninto the equipment.
d� If the equipment does not operate normally byfollowing the operating instructions. Adjustonly those controls that are covered by theoperating instructions as an improperadjustment of other controls may result indamage and will often require extensive workby a qualified technician to restore theequipment to its normal operation.
e� If the equipment has been dropped or cabinethas been damaged.
f� When the equipment exhibits a distinct changein performance, indicating a need for service.
21� Replacement partsWhen replacement parts are required, be sure theservice technician has used replacement partsspecified by the manufacturer or have the samecharacteristics as the original part. Unauthorizedsubstitutions may result in fire, electric shock, orother hazards.
22� Safety checkUpon completion of any service or repairs to thisvideo product, ask the service technician toperform safety checks to determine that theproduct is in proper operational condition.
23� Telephone equipmentObserve the following precautions when installingtelephone modem equipment:
a� Never install telephone wiring during alightning storm.
b� Never install telephone jacks in a wetlocation unless the jack is specifically designedfor wet locations.
c� Never touch uninsulated telephone wires orterminals unless the telephone lines have beendisconnected at the network interface.
d� Use caution when installing or modifyingtelephone lines.
24� Battery usageNotwithstanding any information provided by GI inthis manual regarding the use of batteries, the enduser assumes all responsibility and liability to useand dispose of batteries in accordance with allapplicable laws, rules and regulations. GI will notbe liable to anyone for the end user’s failure to useand/or dispose of batteries in the proper mannerand in accordance with such laws, rules andregulations, or for any defect contained inbatteries which may cause injury damage topersons or property.

CONTENTS
Introduction..................................................2Front Panel..........................................................................3
Rear Panel ...........................................................................5
Recording Your Connections ...................... 7
Basic Operation.............................................8Turning Power On and Off.............................................8
Changing Channels............................................................8
Adjusting the Volume.......................................................9
Disabling the Remote Control.................................... 10
Restoring the Remote Control................................... 10
On-Screen Display ....................................... 11Displaying the MAIN MENU ....................................... 11
Displaying the Program Guide .................................... 12
Tuning to a Program...................................................... 13
Channel Status ................................................................ 14
Favorite Channels........................................15Adding Favorite Channels.............................................15
Removing Favorite Channels .......................................16
Passwords ....................................................17Adding a Parental Control Password.........................17Adding a Pay-Per-View Password...............................18
Changing or Deleting Passwords ................................19
Parental Control ........................................20Setting Control by Channel..........................................21
Setting Control by Rating .............................................22
Setting Control by Time ...............................................23
Activating Parental Control..........................................24
Pay-Per-View ..............................................25
Purchase Control........................................ 26
Program Recording .................................... 27

Timers..........................................................29Setting the Program Timer .......................................... 29
Adding a Force Tune Timer ........................................ 30
Adding a Record Timer ................................................ 31
Edit, Review, or Delete a Timer................................. 32
Setting the Sleep Timer ................................................ 33
Setting the Alarm Timer............................................... 34
Messages ...................................................... 35
Time Display ................................................36
AC Power Outlet .........................................37
Basic Connections........................................38Basic Connections ..........................................................39
With Audio and Video Baseband Connections ......40
With Picture-in-Picture TV ..........................................41
The VCR Controller....................................42

2
INTRODUCTION
Welcome to General Instrument’s CFT2200 set-top terminal, yourintroduction to unsurpassed audio and video, cable entertainment.
The CFT2200 provides an on-screen display to view, control, and editprogram and special features.
To understand your CFT2200, take the time to read this guide and yourremote control instructions.
3
INTRODUCTION
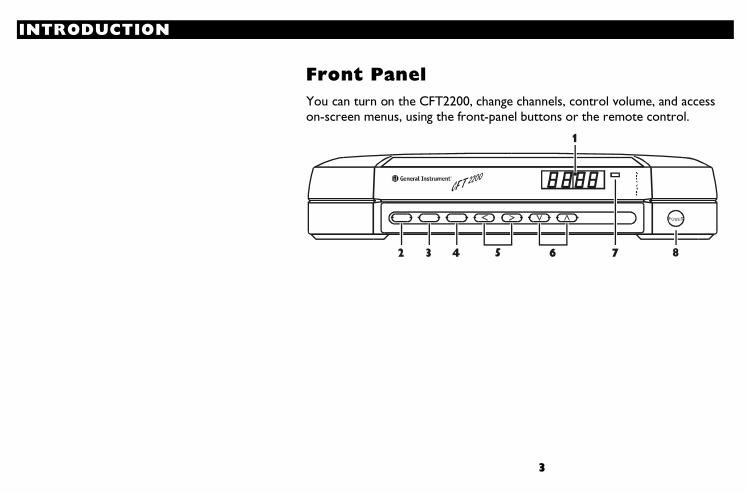
Front PanelYou can turn on the CFT2200, change channels, control volume, and accesson-screen menus, using the front-panel buttons or the remote control.
0
(
6
6
$
*
(
6
0(18 6(/(&7 (17(5 92/80( &+$11(/
2 3 4 5 6
1
7 8
4
INTRODUCTION
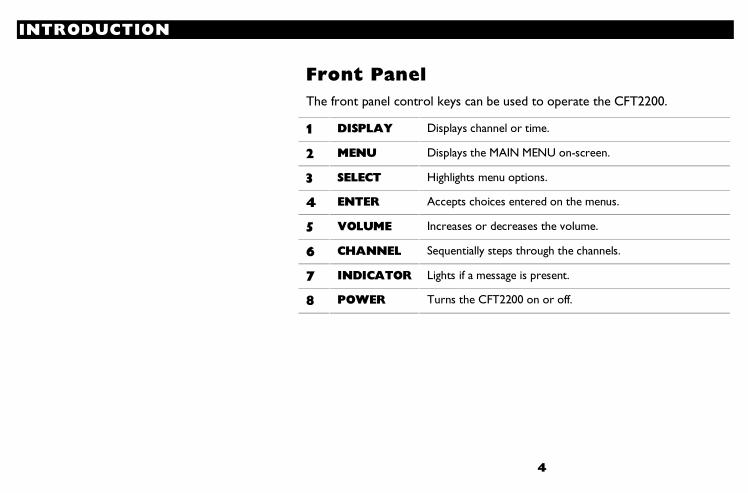
Front PanelThe front panel control keys can be used to operate the CFT2200.
1 DISPLAY Displays channel or time.
2 MENU Displays the MAIN MENU on-screen.
3 SELECT Highlights menu options.
4 ENTER Accepts choices entered on the menus.
5 VOLUME Increases or decreases the volume.
6 CHANNEL Sequentially steps through the channels.
7 INDICATOR Lights if a message is present.
8 POWER Turns the CFT2200 on or off.

5
INTRODUCTION
Rear PanelThe rear panel contains connectors, an ac outlet, and removable panels forinstalling optional modules with special features.
5)�,1
72�79
,3399,'(2,��5
/�56:,7&+('��������9��+]��$����:�0$;
1 2 3
4 5 76

6
INTRODUCTION
Rear PanelThe rear panel contains the following connectors and optional features:
1 AC OUTLET This connector provides an ac outlet to connect the TV.
2 TO TV This is the basic connection from the CFT2200 to the TVor the VCR.
3 RF IN This is the connection for cable input from the cable walloutlet.
4 IR This is the connection for the IR Blaster adapter.
5 L-R These are the left and right audio connections.
6 VIDEO This is the connection for video to your TV or VCR.
7 IPPV This connection is the optional impulse Pay-Per-Viewfeature.

7
RECORDING YOUR CONNECTIONS
NOTE
Always disconnect the power from the CFT2200before moving it or changing the cableconnections.
Use this diagram to draw your cable connections. This diagram will help youreconnect your system if you move or add new equipment.
A /B InSW ITC H
&$%/(�,1$
%
STA RV U E
72�&219&$%/(�,1
RF Byp ass
5)287
5),1
&219,1
A /B O utsw itch7279
5I,1
$17,1
)520&219
STA RFO N E
3+21(
D igital aud io',*,7$/�287
D igital aud iobypass
',*,7$/�287 $8',2
�,1
6:,7&+('��������9��+]��$����:�0$;
O p tio n a l fe a tu res
O p tio n a l fe a tu res
O p tio n a l fe a tu res
VCR optional
&$%/(�287
&$%/(�,1 9,'(2
,1
287$8',2
9,'(2$8',2
STEREO
5,*+7
$8',2�,1
$8',2�287/()7
5,*+7/()7
TV
C AB LE IN VIDEORLAUD IO

8
BASIC OPERATION
Turning Power On and OffPress POWER on the front panel or the remote control to turn the CFT2200on and off. If you are using a universal remote control, be sure it is set tocontrol the CFT2200.
Changing ChannelsPress CHANNEL on the front panel or CHAN on the remote control to changechannels.

9
BASIC OPERATION
Adjusting the VolumePress VOLUME on the front panel or VOL on the remote control to adjust thevolume. When you adjust the volume, the volume scale is displayed on thescreen. To turn the sound off and on, press MUTE on the remote control.
The CFT2200 can be set for the best sound quality on your stereo or TV.When you reach this setting, a small triangle and the message BEST STEREOare displayed.

1 0
BASIC OPERATION
NOTE
To understand your remote control, read theinstructions that came with it.
Disabling the Remote ControlYou can temporarily disable your remote control to prevent accidentallychanging the current programming settings.
To disable the remote control:
1� Press MENU on the front panel of the CFT2200 or on the remotecontrol to display the MAIN MENU.
2� Select Control Your Terminal.
3� Select Deactivate Remote Control.
4� Press SELECT on the remote control. The letters rL0 (remote lockout)display on the front panel.
Restoring the Remote ControlPress any key button on the CFT2200 front panel to restore the remotecontrol.

1 1
ON-SCREEN DISPLAY
NOTE
The on-screen display is set on a 15-secondinternal timer. If you do not complete yourselection before timing out, you must start again.Read the instructions before beginning.
Displaying the MAIN MENUThe on-screen display offers many options that enhance your televisionviewing. The easy-to-follow screens enable you to locate information youwant quickly and easily. The bottom of each screen provides instructions formaking selections.
Before using the on-screen display, read the user guide supplied with yourremote control.
Press MENU to display the MAIN MENU. The menu shown is only a sample.The one you see can have different entries in a different order.
1 2
ON-SCREEN DISPLAY
7:&��������������������SP
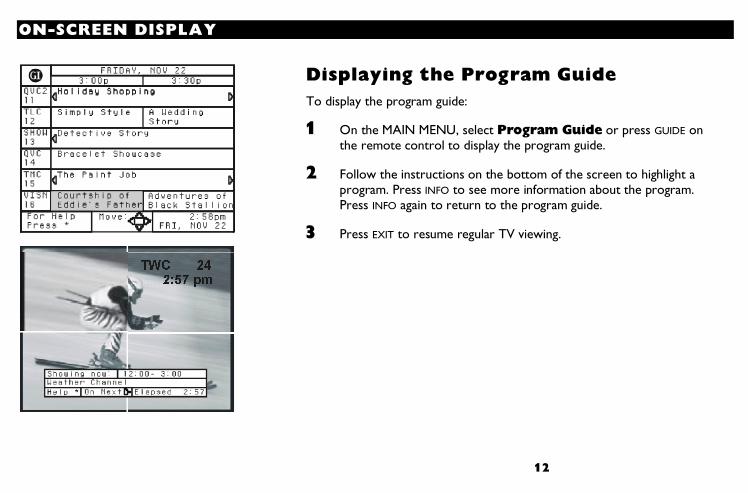
Displaying the Program GuideTo display the program guide:
1� On the MAIN MENU, select Program Guide or press GUIDE onthe remote control to display the program guide.
2� Follow the instructions on the bottom of the screen to highlight aprogram. Press INFO to see more information about the program.Press INFO again to return to the program guide.
3� Press EXIT to resume regular TV viewing.
1 3
ON-SCREEN DISPLAY
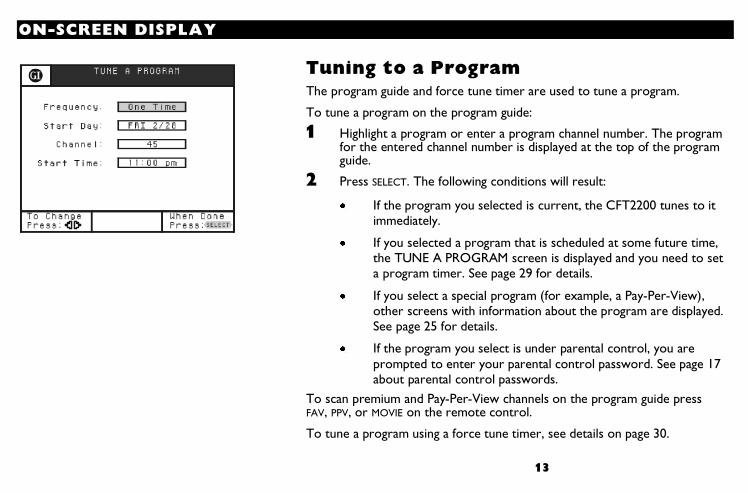
Tuning to a ProgramThe program guide and force tune timer are used to tune a program.
To tune a program on the program guide:
1� Highlight a program or enter a program channel number. The programfor the entered channel number is displayed at the top of the programguide.
2� Press SELECT. The following conditions will result:
�� If the program you selected is current, the CFT2200 tunes to itimmediately.
�� If you selected a program that is scheduled at some future time,the TUNE A PROGRAM screen is displayed and you need to seta program timer. See page 29 for details.
�� If you select a special program (for example, a Pay-Per-View),other screens with information about the program are displayed.See page 25 for details.
�� If the program you select is under parental control, you areprompted to enter your parental control password. See page 17about parental control passwords.
To scan premium and Pay-Per-View channels on the program guide pressFAV, PPV, or MOVIE on the remote control.
To tune a program using a force tune timer, see details on page 30.

1 4
ON-SCREEN DISPLAY
NOTE
If you disable automatic display, to access theCHANNEL STATUS screen and Mini-Guide, pressINFO on the remote control.
Channel StatusWhen you change channels, the Channel Status screen is displayed. Thisscreen includes the Mini-Guide and information about special features thathave been set for that channel, such as, parental control.
The channel status screen disappears after five seconds, but you can pressEXIT or SELECT on the remote control to remove it immediately. You canenable or disable the automatic Channel Status screen.
To set the Channel Status screen:
1� Press MENU on the front panel of the CFT2200 or on the remotecontrol to display the MAIN MENU.
2� On the MAIN MENU select Control Your Terminal.
3� Select Modify Screen Display.
4� Select Disable Channel Status.
5� Highlight Enable Channel Status or Disable ChannelStatus.
6� Press SELECT and then press EXIT.
1 5
FAVORITE CHANNELS
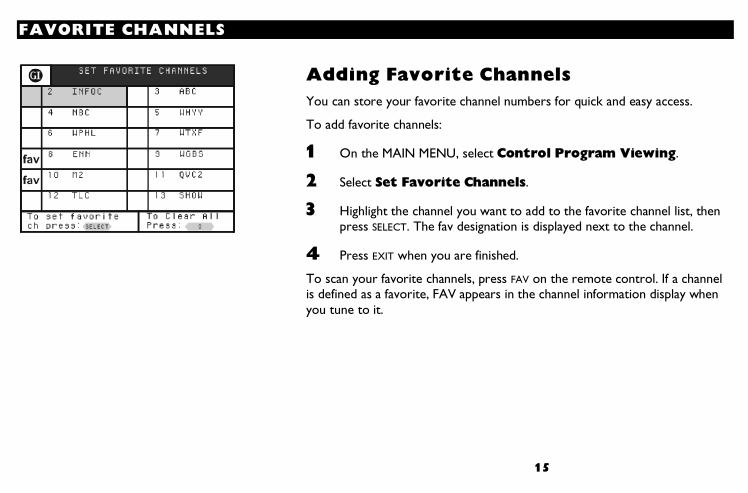
Adding Favorite ChannelsYou can store your favorite channel numbers for quick and easy access.
To add favorite channels:
1� On the MAIN MENU, select Control Program Viewing.
2� Select Set Favorite Channels.
3� Highlight the channel you want to add to the favorite channel list, thenpress SELECT. The fav designation is displayed next to the channel.
4� Press EXIT when you are finished.
To scan your favorite channels, press FAV on the remote control. If a channelis defined as a favorite, FAV appears in the channel information display whenyou tune to it.

1 6
FAVORITE CHANNELS
Removing Favorite ChannelsTo remove a favorite channel:
1� Highlight the channel you want to remove from the favorite channellist, then press SELECT. The fav designation next to the channeldisappears. Press 0 (zero) to remove all favorite channels.
2� Press EXIT when you are finished.

1 7
PASSWORDS
The parental control and the Pay-Per-View features enable you to controlchannel access using a password. You can create a different passwordfor each.
Adding a Parental Control PasswordTo add a four-digit Parental Control password (for example, 1224):
1� On the MAIN MENU, select Control Program Viewing.
2� Select Set Parental Control.
3� Select Control Viewing By Channel, Rating, or Time.
4� Using the numeric keys on the remote control, enter your passwordon the ENTER PARENTAL CONTROL PASSWORD screen and thenpress SELECT.
5� Re-enter the password to confirm it.
6� On the ACTIVATE PARENTAL CONTROL screen, press SELECT.
If you forget your password, call your cable service provider for assistance.

1 8
PASSWORDS
NOTE
After you set the password, if you enter itincorrectly, you are prompted to try again. If youenter it incorrectly three times in a row, you mustwait 15 minutes before trying again.
Adding a Pay-Per-View PasswordTo add a four-digit Pay-Per-View purchase password (for example, 1228):
1� On the MAIN MENU, select Control Program Viewing.
2� Select Set Spending Limit.
3� Use the numeric keys on your remote control to enter the passwordyou have chosen and then press SELECT. The SET SPENDING LIMITscreen is displayed.
4� Use the numeric keys on your remote control to enter the spendinglimit. If you set the limit at $00.00, all purchases require the password.If you set a limit greater then zero, the password is required only if thepurchase exceeds the limit.
5� Press SELECT.
If you forget your password, call your cable company for assistance.
1 9
PASSWORDS
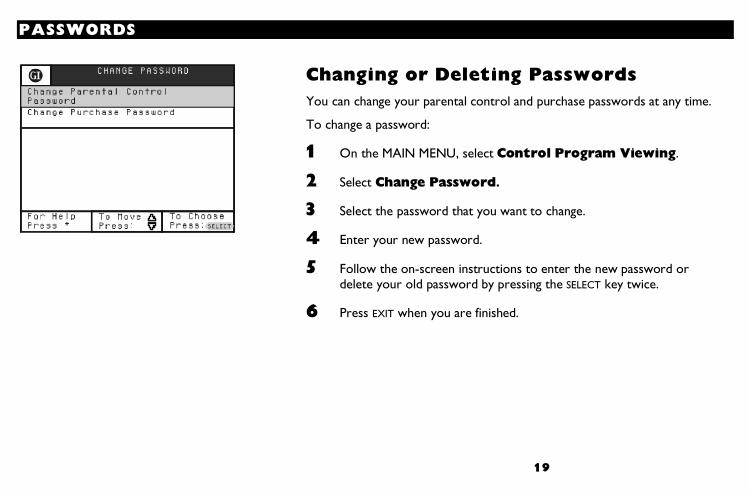
Changing or Deleting PasswordsYou can change your parental control and purchase passwords at any time.
To change a password:
1� On the MAIN MENU, select Control Program Viewing.
2� Select Change Password.
3� Select the password that you want to change.
4� Enter your new password.
5� Follow the on-screen instructions to enter the new password ordelete your old password by pressing the SELECT key twice.
6� Press EXIT when you are finished.

2 0
PARENTAL CONTROL
NOTESetting parental control by channel number is themost secure method. Parental control by rating ortime depends on information sent periodically byyour cable service provider, usually about everyhalf-hour. This information is erased by a powerfailure and parental control is lost until your cableservice provider resends the necessaryinformation after power is restored.
If you want to control your children’s television viewing, you can use theparental control feature after creating your 4-digit password. You canprevent the CFT2200 from tuning to programming based on channelnumber, rating, or time of day.
When anyone tries to tune a controlled program, a password prompt isdisplayed. After you enter the password, all programming is accessiblewithout the password.
To establish parental control:
1� Create a four-digit password (See page 17).
2� Select the channels, ratings, or time periods that you want to control.See instructions for setting and re-activating parental control on pages21-24.

2 1
PARENTAL CONTROL
Setting Control by ChannelTo set parental control by channel:
1� On the MAIN MENU, select Control Program Viewing.
2� Select Set Parental Control.
3� Select Control Viewing By Channel.
4� Use the cursor keys to highlight the channel.
5� Press SELECT. A lock symbol appears next to the channel.
6� To remove control, highlight the channel and then press SELECT. Press0 (zero) to clear all channels.
7� If you want additional control by other methods, press LAST to displaythe SET PARENTAL CONTROL screen. Press EXIT when you arefinished.
2 2
PARENTAL CONTROL
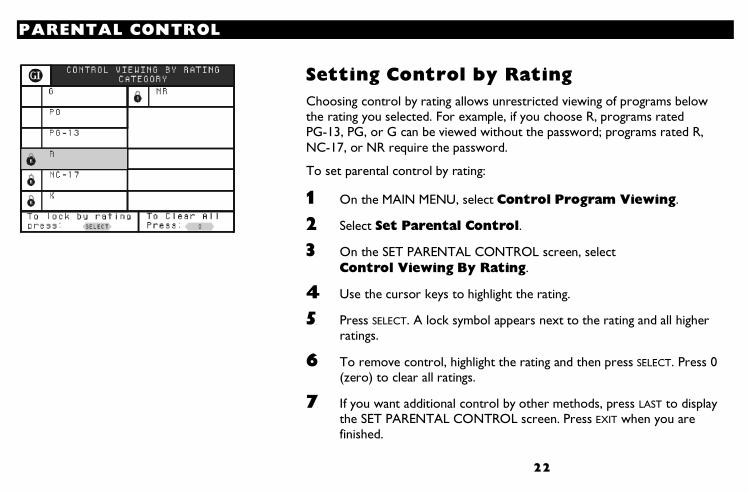
Setting Control by RatingChoosing control by rating allows unrestricted viewing of programs belowthe rating you selected. For example, if you choose R, programs ratedPG-13, PG, or G can be viewed without the password; programs rated R,NC-17, or NR require the password.
To set parental control by rating:
1� On the MAIN MENU, select Control Program Viewing.
2� Select Set Parental Control.
3� On the SET PARENTAL CONTROL screen, selectControl Viewing By Rating.
4� Use the cursor keys to highlight the rating.
5� Press SELECT. A lock symbol appears next to the rating and all higherratings.
6� To remove control, highlight the rating and then press SELECT. Press 0(zero) to clear all ratings.
7� If you want additional control by other methods, press LAST to displaythe SET PARENTAL CONTROL screen. Press EXIT when you arefinished.

2 3
PARENTAL CONTROL
Setting Control by TimeTo set parental control by time:
1� On the MAIN MENU, select Control Program Viewing.
2� Select Set Parental Control.
3� On the SET PARENTAL CONTROL screen, selectControl Viewing By Time.
4� Set the timer to ENABLE.
5� Set the control start and stop times.
6� Press SELECT.
7� To remove control by time, set the timer to DISABLE.
8� If you want additional control by other methods, press LAST to displaythe SET PARENTAL CONTROL screen. Press EXIT when you arefinished.

2 4
PARENTAL CONTROL
Activating Parental ControlYou can view controlled programs by entering your password whenprompted. When you do this, all programming is accessible without thepassword until you re-establish parental control.
To activate parental control:
1� On the MAIN MENU select Control Program Viewing.
2� Select Activate Parental Control.
3� Press EXIT.
2 5
PAY-PER-VIEW
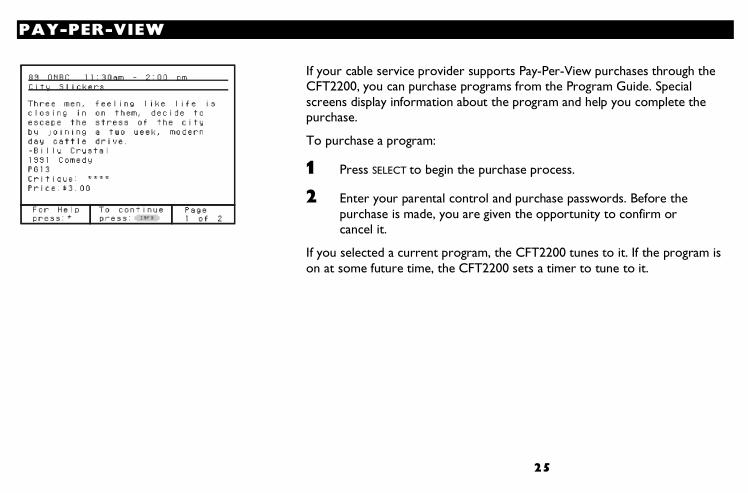
If your cable service provider supports Pay-Per-View purchases through theCFT2200, you can purchase programs from the Program Guide. Specialscreens display information about the program and help you complete thepurchase.
To purchase a program:
1� Press SELECT to begin the purchase process.
2� Enter your parental control and purchase passwords. Before thepurchase is made, you are given the opportunity to confirm orcancel it.
If you selected a current program, the CFT2200 tunes to it. If the program ison at some future time, the CFT2200 sets a timer to tune to it.
2 6
PURCHASE CONTROL
NOTEIf you enter your password incorrectly, you areprompted to try again. If you enter it incorrectlythree times in a row, you must wait 15 minutesbefore trying again.
Purchase control enables you to control Pay-Per-View purchases by creatinga password and spending limit. Enable purchase control by establishing apurchase password and spending limit. The purchase password is not thesame as the parental control password, although you can define them byusing the same four digits.
Choose a four-digit purchase password that is easy for you to remember. Ifyou forget your password, call your cable service provider for assistance. Seepage 18 to create a purchase password and spending limit.
2 7
PROGRAM RECORDING
NOTEWhile a recording is in progress, the CFT2200front panel displays rEC, and control from frontpanel buttons and remote control are locked out.To exit the record mode and restore control,press EXIT and then REC on the remote control.
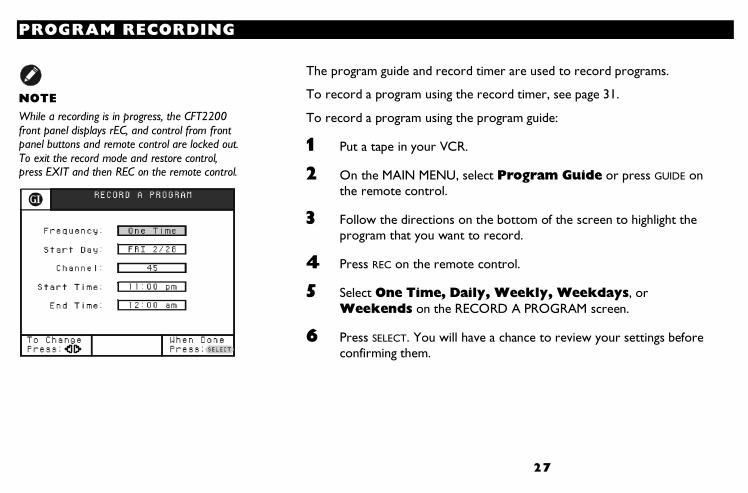
The program guide and record timer are used to record programs.
To record a program using the record timer, see page 31.
To record a program using the program guide:
1� Put a tape in your VCR.
2� On the MAIN MENU, select Program Guide or press GUIDE onthe remote control.
3� Follow the directions on the bottom of the screen to highlight theprogram that you want to record.
4� Press REC on the remote control.
5� Select One Time, Daily, Weekly, Weekdays, orWeekends on the RECORD A PROGRAM screen.
6� Press SELECT. You will have a chance to review your settings beforeconfirming them.

2 8
PROGRAM RECORDING
7� Program your VCR to turn on at the same time and tune to the samechannel that you set on the RECORD A PROGRAM screen. TheCFT2200 and the VCR must be programmed separately for eachscheduled recording.
�� If the program you select is under parental control, you areprompted to enter your parental control password.
�� If you select a Pay-Per-View program, you are prompted tocomplete the purchase process.
�� If you set a timer that conflicts with one you set earlier, you areprompted to select one. Follow the on-screen instructions.

2 9
TIMERS
Setting the Program TimerThe TUNE A PROGRAM screen is displayed when you try to tune aprogram playing in the future.
To set the timer:
1� Select One-Time, Daily, Weekly, Weekdays, or Weekends.
2� Press SELECT and then EXIT. The area around the program in theprogram guide turns dark blue to indicate that a timer is set. TheCFT2200 automatically tunes to the program at its start time.

30
TIMERS
To MovePress:
Adding a Force Tune TimerA Force Tune Timer is used to tune a program at the desired time.
To add a Force Tune Timer:
1� On the MAIN MENU, select Control Program Timers.
2� Select Add Force Tune Timer.
3� Follow the instructions on the bottom of the screen to make yourselections and then press SELECT. If you set a timer that conflicts withone you set earlier, you are prompted to select one.
4� Confirm your selection and then press SELECT on your remote control.

3 1
TIMERS
To MovePress:
Adding a Record TimerA Record Timer is used to record a program at a desired time.
To add a Record Timer:
1� On the MAIN MENU, select Control Program Timers.
2� Select Add Record Timer.
3� Follow the instructions on the bottom of the screen to make yourselections and then press SELECT. If you set a timer that conflicts withone you set earlier, you are prompted to select which one to keep.
4� Confirm your selection and then press SELECT on your remote control.

32
TIMERS
Edit, Review, or Delete a TimerTo edit, review, or delete timers use the EDIT PROGRAM TIMERS screen:
1� On the MAIN MENU, select Control Program Timers.
2� Select Edit Program Timers.
3� Select a timer to edit, review, or delete.
4� Follow the instructions on the bottom of the screen to make yourselections and then press SELECT.
5� Confirm your selection and then press SELECT on your remote control.

3 3
TIMERS
Setting the Sleep TimerYou can set the CFT2200 to turn itself and your TV off after a certain period oftime. Your TV must be plugged into the ac outlet in the rear of the CFT2200 andthe outlet must be set to switch on and off with the CFT2200. See page 37 to setthe ac outlet.
To set the sleep timer:
1� On the MAIN MENU, select Control Your Terminal.
2� Select Set Sleep Timer.
3� Set the time.
4� Press SELECT and then press EXIT.

34
TIMERS
Setting the Alarm TimerYou can set alarm timers to turn the CFT2200 and your TV on and off atcertain times. Your TV must be plugged into the ac outlet on the rear of theCFT2200 and the outlet must be set to switch on and off with the CFT2200.See page 37 to set the ac outlet.
To set the alarm timers:
1� On the MAIN MENU, select Control Your Terminal.
2� Select Set Alarm Timers.
3� Set Daily Turn On and Daily Turn Off to Enabled.
4� Set the on and off times. Momentarily pressing the left and right cursorkeys changes the time by one minute. Press and hold the cursor keysto change the time in 15-minute increments.
5� Press SELECT and then press EXIT.

35
MESSAGES
Occasionally, your cable service provider might send you messages aboutnew service offerings, special promotions, or other information. TheMESSAGES indicator is displayed on the CFT2200 front panel until you readthe messages displayed.
To read the messages:
1� On the MAIN MENU, select Messages.
2� Select a message from the list.
3� After reading the message, you have the option to save it. While youcan delete most of the messages, some can only be deleted by yourservice provider.
4� Press EXIT when you are finished.
36
TIME DISPLAY
0
(
6
6
$
*
(
6
&+$11(/
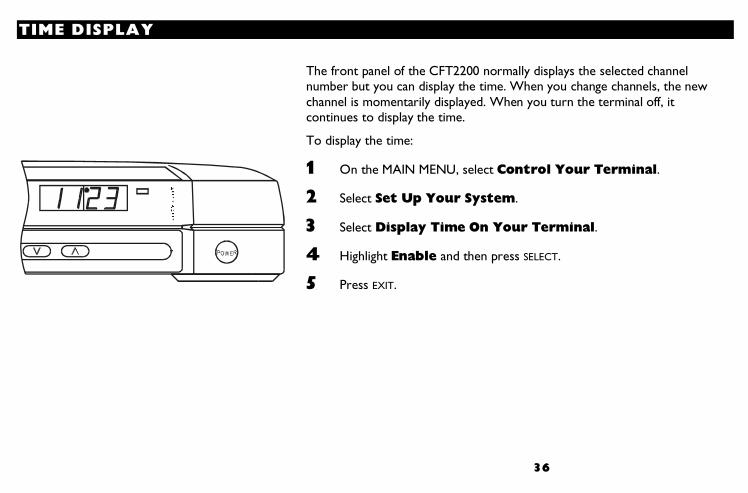
The front panel of the CFT2200 normally displays the selected channelnumber but you can display the time. When you change channels, the newchannel is momentarily displayed. When you turn the terminal off, itcontinues to display the time.
To display the time:
1� On the MAIN MENU, select Control Your Terminal.
2� Select Set Up Your System.
3� Select Display Time On Your Terminal.
4� Highlight Enable and then press SELECT.
5� Press EXIT.

37
AC POWER OUTLET
NOTESome TV sets require the power to always remainon. Check the user handbook for your TV.
You can plug your TV into the ac connector on the rear of the CFT2200.This enables you to turn your TV on and off with the CFT2200. The defaultsetting for the outlet is switched (that is, it turns on and off with theCFT2200).
To set the ac power outlet to unswitched:
1� On the MAIN MENU, select Control Your Terminal.
2� Select Set Up Your System.
3� Select Set AC Power Outlet.
4� Highlight the unswitched option.
5� Press SELECT and then press EXIT.

38
BASIC CONNECTIONS
You may want to add a VCR or your stereo system.
To add equipment, you need the correct cables:
�� For most connections, use 75-ohm coaxial cable equipped with F-typeconnectors.
�� To use the audio or video outputs from the CFT2200, use cablesequipped with RCA-type connectors.
The following diagram illustrates the basic connection to view cableprogramming. With an optional VCR, you can record programming. You canrecord and listen to stereo programming if you have a stereo TV or stereoVCR.

39
BASIC CONNECTIONS
Basic Connections
VCR optional
&$%/(�287
&$%/(�,1 9,'(2
,1
287$8',2
9,'(2$8',2
TV
C AB LE IN VIDEORLAUD IO
6:,7&+('��������9��+]��$����:�0$;
F romcab leo ut le t
In
O u t
4 0
BASIC CONNECTIONS
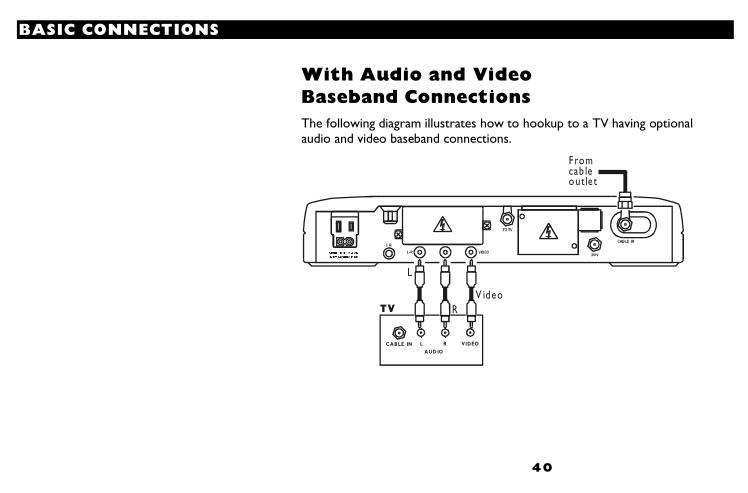
With Audio and VideoBaseband ConnectionsThe following diagram illustrates how to hookup to a TV having optionalaudio and video baseband connections.
TV
6:,7&+('��������9��+]��$����:�0$;
F romcab leo ut le t
V ideo
L
R
C AB LE IN VIDEORLAUD IO

4 1
BASIC CONNECTIONS
With Picture-in-Picture TVIf your TV offers this feature, the following diagram illustrates how to enablePicture-in-Picture. You can only tune non-scrambled channels on the B input.
TVPicture-in-Pitcure
C AB LE IN VIDEORLAUD IO
6:,7&+('��������9��+]��$����:�0$;
F romcab leo ut le t
In In
A B
Sp lit te r

4 2
THE VCR CONTROLLER
Some cable service providers offer the option of infrared VCR control. If yourCFT2200 is equipped with the VCR controller option, an IR transmitter isplugged into the rear of the CFT2200 and mounted to the front of your VCR.The CFT2200 can then turn the VCR on to record a selected program and turnit off when the program is over.
IR Blaster placed near VCR
remote-controlsensor
0
(
66
$*
(
6
0(18 6(/(&7 (17(5 92/80( &+$11(/
4 3
THE VCR CONTROLLER
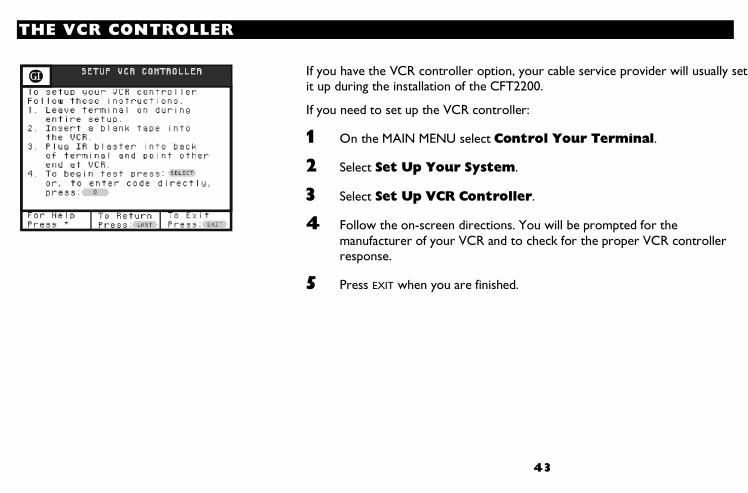
If you have the VCR controller option, your cable service provider will usually setit up during the installation of the CFT2200.
If you need to set up the VCR controller:
1� On the MAIN MENU select Control Your Terminal.
2� Select Set Up Your System.
3� Select Set Up VCR Controller.
4� Follow the on-screen directions. You will be prompted for themanufacturer of your VCR and to check for the proper VCR controllerresponse.
5� Press EXIT when you are finished.

G e n e r a l I n s t r u m e n t C o r p o ra t i o n4 6634 0 - 0 0 1 - 9 9
7 / 9 9


![Rear panel Front panel - Accuphase panel Rear panel P-7300 Guaranteed Specifications [Guaranteed specifications are measured according to EIA standard RS-490.] Connection example for](https://static.documents.pub/doc/80x56/5ac327a37f8b9aae1b8c0d51/rear-panel-front-panel-panel-rear-panel-p-7300-guaranteed-specifications-guaranteed.jpg)


