91
USER MANUAL axeltechnology.com CGLIVE! (Rev. 2.1 ENG)

USER MANUAL
axeltechnology.com
CGLIVE! (Rev. 2.1 ENG)

ENG
| INSTALLATION 2
CONTENT
1 INSTALLATION .......................................................................................................................................................... 4 2 CG LIVE FIRST OPENING ......................................................................................................................................... 8 3 INTRODUCTION ......................................................................................................................................................... 9 4 COMMANDS BAR(A) ............................................................................................................................................... 10
4.1 EDIT MODE COMMANDS BAR ........................................................................................................................ 10 4.2 LIVE MODE COMMANDS BAR ......................................................................................................................... 11
5 DESIGN AREA(B) .................................................................................................................................................... 12 6 PAGES(C) ................................................................................................................................................................. 13 7 ITEMS(D) .................................................................................................................................................................. 15 8 PARAMETERS(E) .................................................................................................................................................... 17
8.1 TEXT ................................................................................................................................................................. 17 8.1.1 TEXT SECTION............................................................................................................................................................... 17 8.1.2 POSITION SECTION ...................................................................................................................................................... 19 8.1.3 COLORS SECTION ......................................................................................................................................................... 22 8.1.4 STYLES SECTION ........................................................................................................................................................... 23 8.1.5 EFFECT SECTION ......................................................................................................................................................... 23 8.1.6 DATA TAGS SECTION ................................................................................................................................................... 24
8.2 CRAWL ............................................................................................................................................................. 25 8.2.1 CRAWL SECTION ........................................................................................................................................................... 25 8.2.2 POSITION SECTION ...................................................................................................................................................... 27 8.2.3 COLORS SECTION ......................................................................................................................................................... 30 8.2.4 STYLES SECTION ........................................................................................................................................................... 31 8.2.5 EFFECT SECTION ......................................................................................................................................................... 31
8.3 ROLL ................................................................................................................................................................. 33 8.3.1 ROLL SECTION .............................................................................................................................................................. 33 8.3.2 POSITION SECTION ...................................................................................................................................................... 35 8.3.3 COLORS SECTION ......................................................................................................................................................... 38 8.3.4 STYLES SECTION ........................................................................................................................................................... 39 8.3.5 EFFECT SECTION ......................................................................................................................................................... 40
8.4 TICKER ............................................................................................................................................................. 41 8.4.1 TICKER SECTION .......................................................................................................................................................... 41 8.4.2 POSITION SECTION ...................................................................................................................................................... 44 8.4.3 COLORS SECTION ......................................................................................................................................................... 47 8.4.4 STYLES SECTION ........................................................................................................................................................... 48 8.4.5 EFFECT SECTION ......................................................................................................................................................... 49
8.5 LOGO ................................................................................................................................................................ 50 8.5.1 LOGO SECTION ............................................................................................................................................................. 50 8.5.2 POSITION SECTION ...................................................................................................................................................... 51 8.5.3 EFFECTS SECTION ....................................................................................................................................................... 54 8.5.4 DATA TAGS SECTION ................................................................................................................................................... 55
8.6 BACKGROUND ................................................................................................................................................. 56 8.6.1 BACKGROUND SECTION ............................................................................................................................................. 56 8.6.2 POSITION SECTION ...................................................................................................................................................... 57 8.6.3 EFFECTS SECTION ....................................................................................................................................................... 57
8.7 SHAPE .............................................................................................................................................................. 58 8.7.1 SHAPE SECTION ............................................................................................................................................................ 58 8.7.2 POSITION SECTION ...................................................................................................................................................... 59 8.7.3 COLORS SECTION ......................................................................................................................................................... 62 8.7.4 EFFECTS SECTION ....................................................................................................................................................... 62
8.8 SLIDE SHOW .................................................................................................................................................... 63 8.8.1 SLIDESHOW SECTION .................................................................................................................................................. 63 8.8.2 POSITION SECTION ...................................................................................................................................................... 63 8.8.3 EFFECTS SECTION ....................................................................................................................................................... 67
8.9 CLOCK .............................................................................................................................................................. 68 8.9.1 CLOCK SECTION ........................................................................................................................................................... 68 8.9.2 POSITION SECTION ...................................................................................................................................................... 70 8.9.3 COLORS SECTION ......................................................................................................................................................... 73 8.9.4 STYLES SECTION ........................................................................................................................................................... 74 8.9.5 EFFECT SECTION ......................................................................................................................................................... 75 8.9.6 DATA TAGS SECTION ................................................................................................................................................... 75
8.10 TABLE ............................................................................................................................................................... 76 8.10.1 TABLE SECTION ........................................................................................................................................................ 76 8.10.2 POSITION SECTION .................................................................................................................................................. 77 8.10.3 EFFECT SECTION ..................................................................................................................................................... 80
9 GROUPS ................................................................................................................................................................... 81 9.1.1 GROUP PARAMETERS .................................................................................................................................................. 82

ENG
| INSTALLATION 3
10 PROJECT MANAGEMENT .................................................................................................................................. 83 10.1 GENERAL SETTINGS ...................................................................................................................................... 84 10.2 PROGRAM SETTINGS ..................................................................................................................................... 85 10.3 PREVIEW SETTINGS ....................................................................................................................................... 86 10.4 ADVANCED SETTINGS .................................................................................................................................... 87
11 GLOSSARY .......................................................................................................................................................... 88 12 FINAL CONSIDERATION AND AXEL TECHNOLOGY CONTACT ..................................................................... 91

ENG
| INSTALLATION 4
1 INSTALLATION Open the CGLiveSetup.exe
Click on Next

ENG
| INSTALLATION 5
Click on Next
Click on YES

ENG
| INSTALLATION 6
.
Click on Install

ENG
| INSTALLATION 7
Click Finish for the last configurations and wait for their implementation
Click OK to complete the installation

ENG
| CG LIVE FIRST OPENING 8
2 CG LIVE FIRST OPENING Click on CGLive icon to open the program.
From this menu select the channel video format
Wait for the CGLive initialization
Wait for the CG Live Engine initialization For the first CGLive settings see the PROJECT MANAGEMENT chapter.

ENG
| INTRODUCTION 9
3 INTRODUCTION CGLive software permit you to broadcast graphic items on your videos. These ITEMS can be very complex, static or animated. A dynamic item and its contents sets up an ISTANCE. More istances and more items can be gather together in a GROUP. So, a PAGE can include more items and more groups. A PROJECT is the combination of more pages.
Picture 1 · basic CGLive parts
USER GUI
The CGLive GUI can be schematically divided in 5 sections.
Picture 2 · Interface partition in 5 functional sections.

ENG
| COMMANDS BAR(A) 10
4 COMMANDS BAR(A)
4.1 EDIT MODE COMMANDS BAR
Main commands are included in the commands bar. The first button of this bar selects for the operative mode: LIVE! or
EDIT.
The LIVE! mode permit you to broadcast full pages and individual graphic items.
On the other hand the EDIT mode allows you to compose the page structure.
The two modes are mutually exclusive: in LIVE! mode you can not change the pages structure, in EDIT mode you can
not work on the aired items.
You can easily switch to LIVE mode and to EDIT mode
with the same button. If you are in the EDIT mode you will
see GO TO LIVE MODE, otherwise you will see GO TO
EDIT MODE.
allows you to select an item in the design area
Click this button and with the mouse add for a static text in
the design area
Click this button and with the mouse add for a crawl in the
design area
Click this button and with the mouse add for a roll in the
design area
Click this button and with the mouse add for a ticker in the
design area
Click this button and with the mouse add for a static or
animated logo in the design area
Click this button and with the mouse add for a static or
animated background picture in the design area
Click this button and with the mouse add for a shape in the
design area
Click this button and with the mouse add for a slideshow in
the design area
Click this button and with the mouse add for a digital clock
in the design area
Click this button and with the mouse add for a table in the
design area

ENG
| COMMANDS BAR(A) 11
Increases Z-Order for the selected element
Decreases Z-Order for the selected element
Locks the selected item. Select the item from the Items
section and press this button
to unlock it
HIDE/SHOW the selected item
4.2 LIVE MODE COMMANDS BAR
This command clears the selected page, except for the Master Page
This command clears all the pages, Master Page Included

ENG
| DESIGN AREA(B) 12
5 DESIGN AREA(B) The central screen section is the design area. You can have a clear view of the selected page. Here in EDIT mode you
can add, move or remove items and groups.
This is an example of an empty page
This page is composed with three main rectangles. Their corners pixels coordinates depend on the Video Format you choosed. With the commands bar you can add in the page the item you want. Move it in this area and change its parameters. This is an example of a filled page
Select from the design area the element you want to change, move or remove.

ENG
| PAGES(C) 13
6 PAGES(C)
In the left section there are pages previews of the whole project.
Buttons at the bottom of this section or keyboard shortcuts allow you to manage pages and to modify them.
You can insert a page after the current one, you can cut a page, you can copy the current page to paste it, you can
delete the page.
All pages are mutually exclusive: the broadcasted page replaces the previous one.
The MASTER PAGE, or page 0, has a different behavior. You can overlap on the master page one page at a time. You
can manage items of this page individually and independently from the aired page. So items as dedicated logos,
telephone numbers, messages can quickly appear or disappear. The Master Page

ENG
| PAGES(C) 14
On every page preview you can right-click with the mouse to open the contextual menu
Usually function Keys F1, F2, F3, F4, F5, F6, F7, F8, F9, F10 are default shortcuts to air pages automatically, but you
can also create new shortcuts from the last menu.
With the two buttons at the bottom you can air the single page or remove it from the air, also the complete master page.

ENG
| ITEMS(D) 15
7 ITEMS(D)
In the right section of the screen you can have a view of the items of the selected page.
From this section, You can select the item that you want to change.
With the two buttons at the bottom you can air the single item or remove it from the air,

ENG
| ITEMS(D) 16
On every item preview you can right-click with the mouse to open the following menu

ENG
| PARAMETERS(E) 17
8 PARAMETERS(E)
In EDIT mode you have parameters of the selected item in the bottom section of the GUI.
8.1 TEXT
You can have the need to display a static text on the video that you are broadcasting.
8.1.1 TEXT SECTION
8.1.1.1 TEXT
Type the static text you want to display in the white empty space. If you prefer check the “From file” box and click on the folder button to browse for a specific source file for the text.
Click this button if you have checked the “From file” box and you want to directly open the source file
From this menu you can choose the text scale
From this menu you can press one of the nine squares to align the text in his text box. The nine available alignment positions are: TopLeft, TopCenter, TopRight, MiddleLeft, MiddleCenter, MiddleRight BottomLeft, BottomCenter, BottomRight
ENG
| PARAMETERS(E) 18
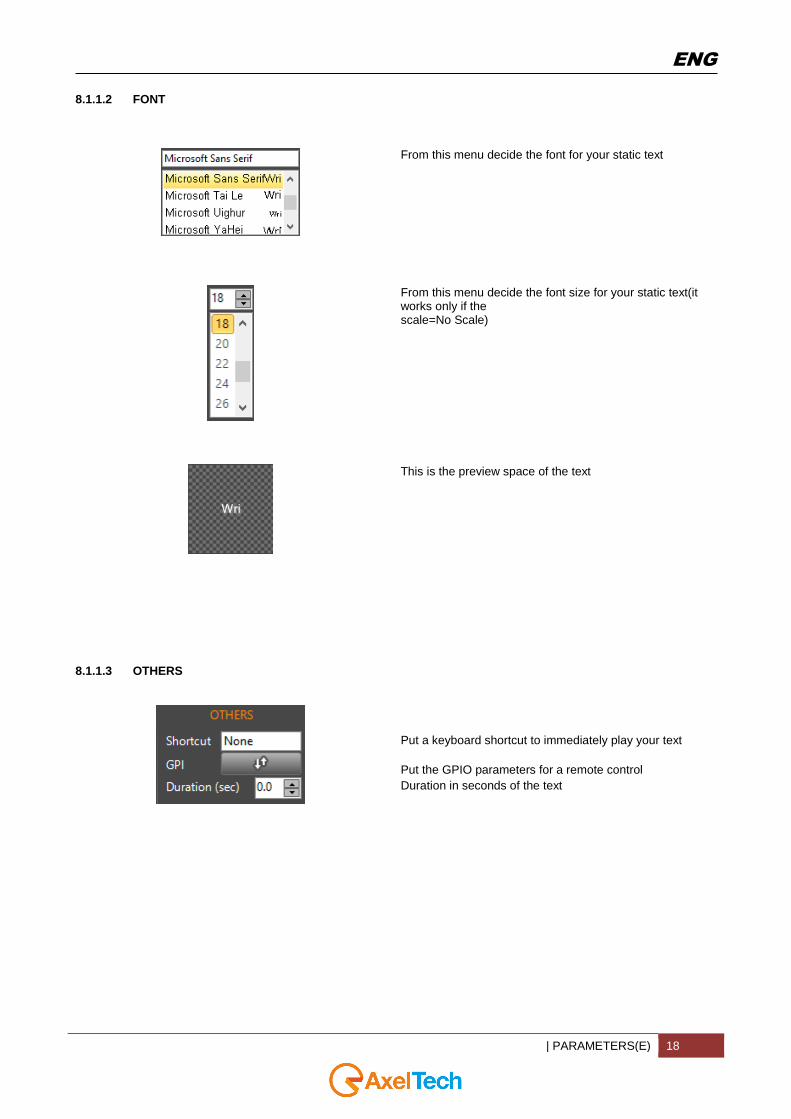
8.1.1.2 FONT
From this menu decide the font for your static text
From this menu decide the font size for your static text(it works only if the scale=No Scale)
This is the preview space of the text
8.1.1.3 OTHERS
Put a keyboard shortcut to immediately play your text
Put the GPIO parameters for a remote control
Duration in seconds of the text

ENG
| PARAMETERS(E) 19
8.1.2 POSITION SECTION
8.1.2.1 LOCATION
It moves the selected static text box by x along the X axis.
It increases/decreases the selected static box text width
It moves the selected static text box by y along the Y axis.
It increases/decreases the selected static text box height
It selects if width and height parameters work in pixel or in
percentage unit of measurement
Lock/unlock the selected static text. If the text is locked it
means you cannot change it
HIDE/SHOW the selected static text in the program output
In text box resizing It disables all the top handles and all the left handles.
In text box resizing it disables all the top handles

ENG
| PARAMETERS(E) 20
In text box resizing it disables all the top handles and all the right handles
In text box resizing it disables all the left handles
In text box resizing it enables all the handles and resizes
the text box maintaining the central symmetry in every
variations
In text box resizing it disables all the right handles
In text box resizing it disables all the bottom handles and all the left handles
In text box resizing it disables all the bottom handles
In text box resizinig it disables all the bottom handles and all the right handles
In text box resizing it enable all the handles. Every resize is free from aspect ratio

ENG
| PARAMETERS(E) 21
Restore the original size of the object
8.1.2.2 ALIGN
In text box realignment it takes the left side of the text box
aligned with the nearest left border of the screen
In text box realignment it takes the vertical symmetry axis
of the text box aligned with the vertical symmetry axis of
the screen
In text box realignment it takes the right side of the text box aligned with the nearest right border of the screen
In text box realignment it takes the top side of the text box
aligned with the nearest top border of the screen
In text box realignment it takes the horizontal symmetry
axis of the text box aligned with the horizontal symmetry
axis of the screen
In text box realignment it takes the bottom side of the text
box aligned with the nearest bottom border of the screen
8.1.2.3 Z-ORDER
It takes the text in the first visible layer
It takes the text in the last visible layer
It raises the text layer
It lowers the text layer

ENG
| PARAMETERS(E) 22
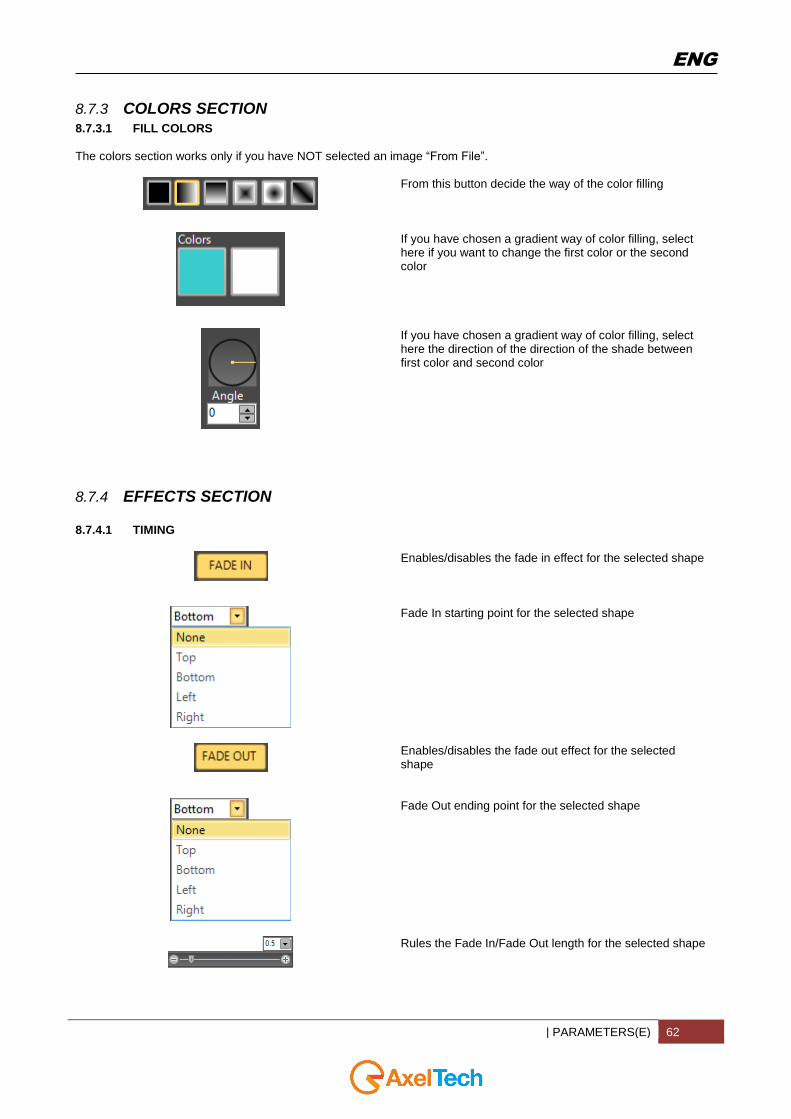
8.1.3 COLORS SECTION 8.1.3.1 FILL COLORS
The colors section works only if you have NOT selected a text “From File”.
From this button decide the way of the color filling
If you have chosen a gradient way of color filling, select here if you want to change the first color or the second color
If you have chosen a gradient way of color filling, select here the direction of the direction of the shade between first color and second color
8.1.3.2 BORDER COLORS
From this button decide the way of the color filling of the border
If you have chosen a gradient way of color filling, select here if you want to change the first color or the second color of the border
From this menu select the width of the border
8.1.3.3 SHADOW COLOR
Enables/Disables the shadow color for the static text
Click here to change the shadow color
Set the shadow angle directly from the graphic interface(the circle) or with the two parameters “Angle” and “Direction”

ENG
| PARAMETERS(E) 23
8.1.3.4 COLOR PALETTE
When you have chosen which color you want to change, choose your color from this palette or from RGBA(red, green, blue, alpha channel) values. If you want to extract a
color from any screen point use the eyedropper .
8.1.3.5 COLOR PREVIEW
Here you can have a preview for the text color.
8.1.4 STYLES SECTION
A style is the union between font features and color features. Choose a standard, recent or custom style of the static text from the following boxes.
For the style you can also import a .xml file.
8.1.5 EFFECT SECTION
8.1.5.1 TIMING
Enables/disables the fade in effect for the selected static text
Fade In starting point for the selected static text
Enables/disables the fade out effect for the selected static text

ENG
| PARAMETERS(E) 24
Fade Out ending point for the selected static text
Rules the Fade In/Fade Out length for the selected static text
8.1.6 DATA TAGS SECTION
8.1.6.1 SHORTCUT
Double clicking on this box you can type the text you want to display with the shortcut
Double clicking on this box you can choose a shortcut for the text you set. Please press the key you want to associate with it. After you have set the shortcut you can use it to recall the text immediately

ENG
| PARAMETERS(E) 25
8.2 CRAWL
You can have the need to display a crawl on the video that you are broadcasting. A crawl is a text that scrolls from left to right or from right to left at the speed that you prefer: it is a primarily horizontal, text-based display in the form of a graphic that typically resides in the lower third of the screen space on a television station or network (usually during news programming).
8.2.1 CRAWL SECTION
8.2.1.1 CRAWL
Type the crawl you want to display in the white empty space or check the “From file” box and click on the folder button to browse for a specific source file for the text. Here you can also broadcast a post from a social network previously set in the remote Social Hub application
Click this button if you have checked the “From file” box and you want to directly open the source file
Here you can set the distance between a crawl and his repetition, or between a crawl and the next one.
Here you can set the speed and the direction of the horizontal crawl scroll.
If you check this box there is no gap between a crawl and his repetition, or between a crawl and the next one
If you selected a social network source, the “Play-Mode”
decides how to repeat the way to display your crawl. “Loop”
plays the crawl in a continuative way. “Play Once” plays the
crawl only one time. “Play Once And Hide” plays the logo
only once and hides the logo.

ENG
| PARAMETERS(E) 26
If you selected a social network source, the “Social lines”
decides how many social lines it displays.
8.2.1.2 FONT
From this menu you can decide the font for your crawl
From this menu you can decide the font size for your crawl
This is the preview space of the crawl
8.2.1.3 OTHERS
Put a keyboard shortcut to immediately play your crawl Put the GPIO parameters for a remote control Duration
in seconds of the crawl

ENG
| PARAMETERS(E) 27
8.2.2 POSITION SECTION 8.2.2.1 LOCATION
It moves the selected crawl box by x along the X axis.
It increases/decreases the selected roll box width
It moves the selected roll box by y along the Y axis.
It increases/decreases the selected roll box height
It selects if width and height parameters work in pixel or in
percentage unit of measurement
Lock/unlock the selected crawl. If the text is locked it
means you cannot change it
HIDE/SHOW the selected crawl in the program output
In crawl box resizing It disables all the top handles and all the left handles.
In crawl box resizing it disables all the top handles
In crawl box resizing it disables all the top handles and all the right handles

ENG
| PARAMETERS(E) 28
In crawl box resizing it disables all the left handles
In crawl box resizing it enables all the handles and resizes
the crawl box maintaining the central symmetry in every
variations
In crawl box resizing it disables all the right handles
In crawl box resizing it disables all the bottom handles and all the left handles
In crawl box resizing it disables all the bottom handles
In crawl box resizinig it disables all the bottom handles and all the right handles
In crawl resizing it enable all the handles. Every resize is free from aspect ratio
Restore the original size of the object

ENG
| PARAMETERS(E) 29
8.2.2.2 ALIGN
In crawl box realignment it takes the left side of the text
box aligned with the nearest left border of the screen
In crawl box realignment it takes the vertical symmetry
axis of the text box aligned with the vertical symmetry axis
of the screen
In crawl box realignment it takes the right side of the text box aligned with the nearest right border of the screen
In crawl box realignment it takes the top side of the text
box aligned with the nearest top border of the screen
In crawl box realignment it takes the horizontal symmetry
axis of the crawl box aligned with the horizontal symmetry
axis of the screen
In crawl box realignment it takes the bottom side of the logo aligned with the nearest bottom border of the screen
8.2.2.3 Z-ORDER
It takes the crawl in the first visible layer
It takes the crawl in the last visible layer
It raises the crawl layer
It lowers the crawl layer

ENG
| PARAMETERS(E) 30
8.2.3 COLORS SECTION 8.2.3.1 FILL COLORS
The colors section works only if you have NOT selected a text “From File”.
From this button decide the way of the color filling
If you have chosen a gradient way of color filling, select here if you want to change the first color or the second color
If you have chosen a gradient way of color filling, select here the direction of the direction of the shade between first color and second color
8.2.3.2 BORDER COLORS
From this button decide the way of the color filling of the border
If you have chosen a gradient way of color filling, select here if you want to change the first color or the second color of the border
From this menu select the width of the border
8.2.3.3 SHADOW COLOR
Enables/Disables the shadow color for the crawl
Click here to change the shadow color
Set the shadow angle directly from the graphic interface(the circle) or with the two parameters “Angle” and “Direction”

ENG
| PARAMETERS(E) 31
8.2.3.4 COLOR PALETTE
When you have chosen which color you want to change, choose your color from this palette or from RGBA(red, green, blu, alpha channel) values. If you want to extract a
color from any screen point use the eyedropper .
8.2.3.5 COLOR PREVIEW
Here you can have a preview for the crawl color.
8.2.4 STYLES SECTION
A style is the union between font features and color features. Choose a standard, recent or custom style of the crawl from the following boxes.
For the style you can also import a .xml file.
8.2.5 EFFECT SECTION
8.2.5.1 TIMING
Enables/disables the fade in effect for the selected crawl box
ENG
| PARAMETERS(E) 32
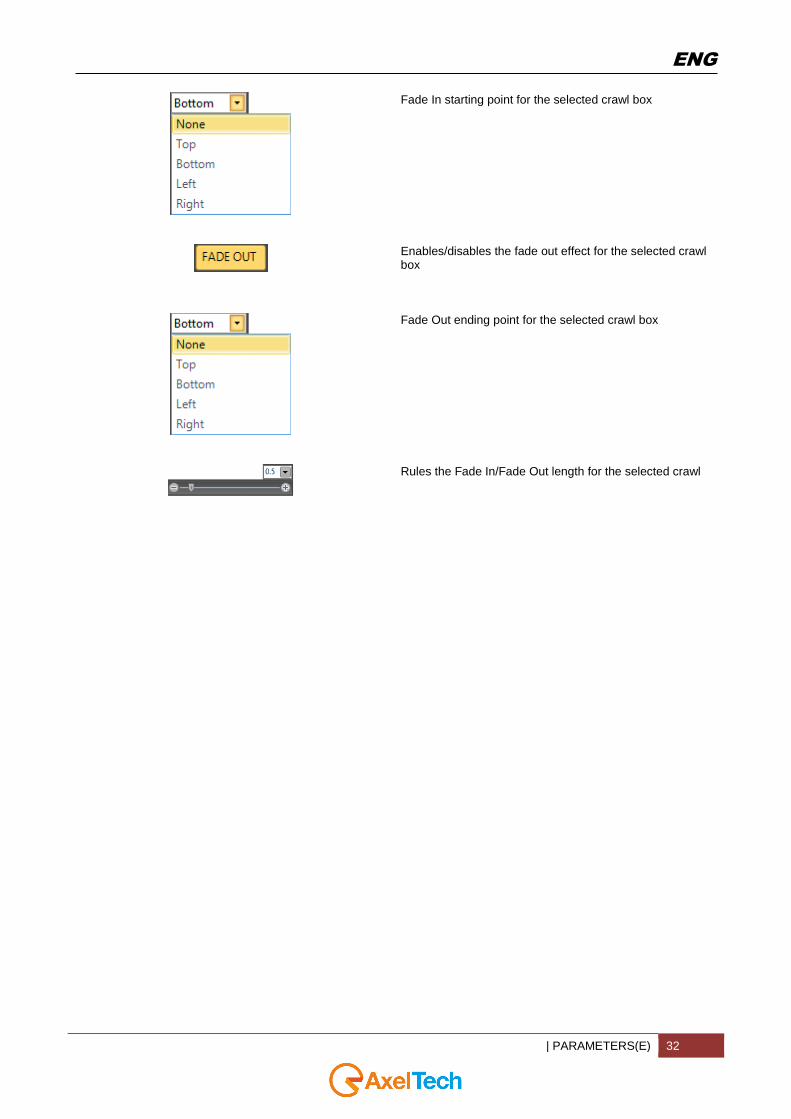
Fade In starting point for the selected crawl box
Enables/disables the fade out effect for the selected crawl box
Fade Out ending point for the selected crawl box
Rules the Fade In/Fade Out length for the selected crawl

ENG
| PARAMETERS(E) 33
8.3 ROLL
You can have the need to display a roll on the video that you are broadcasting. A roll is a text that scrolls in vertical direction: you can make it scroll from bottom to top or from top to bottom at the speed that you prefer. For example a typical use of rolls is in closing credits at the end of a television program.
8.3.1 ROLL SECTION
8.3.1.1 ROLL
Type the roll you want to display in the white empty space or check the “From file” box and click on the folder button to browse for a specific source file for the roll. Here you can also broadcast a post from a social network previously set in the remote Social Hub application
Click this button if you have checked the “From file” box and you want to directly open the source file
Here you can set the distance between a roll line and the next line.
Here you can set the speed and the direction of th vertical roll scroll.
If you check this box there is no gap between a roll and his repetition, or between a roll and the next one
If you selected a social network source, the “Play-Mode”
decides how to repeat the way to display your roll. “Loop”
plays the roll in a continuative way. “Play Once” plays the
roll only one time. “Play Once And Hide” plays the roll only
once and hides the logo.
If you selected a social network source, the “Social lines”
decides how many social lines it displays.

ENG
| PARAMETERS(E) 34
8.3.1.2 FONT
From this menu you can decide the font for your roll
From this menu you can decide the font size for your roll
This is the preview space of the roll
8.3.1.3 OTHERS
Put a keyboard shortcut to immediately play your roll Put the GPIO parameters for a remote control Duration in seconds of the roll

ENG
| PARAMETERS(E) 35
8.3.2 POSITION SECTION
8.3.2.1 LOCATION
It moves the selected roll box by x along the X axis.
It increases/decreases the selected roll box width
It moves the selected roll box by y along the Y axis.
It increases/decreases the selected roll box height
It selects if width and height parameters work in pixel or in
percentage unit of measurement
Lock/unlock the selected roll. If the roll is locked it means
you cannot change it
HIDE/SHOW the selected roll in the program output
In roll box resizing It disables all the top handles and all the left handles.
In roll box resizing it disables all the top handles
In roll box resizing it disables all the top handles and all the right handles

ENG
| PARAMETERS(E) 36
In roll box resizing it disables all the left handles
In roll box resizing it enables all the handles and resizes
the roll box maintaining the central symmetry in every
Variations
In roll box resizing it disables all the right handles
In roll box resizing it disables all the bottom handles and all the left handles
In roll box resizing it disables all the bottom handles
In roll box resizinig it disables all the bottom handles and all the right handles
In roll resizing it enable all the handles. Every resize is free from aspect ratio
Restore the original size of the object

ENG
| PARAMETERS(E) 37
8.3.2.2 ALIGN
In roll box realignment it takes the left side of the text box
aligned with the nearest left border of the screen
In roll box realignment it takes the vertical symmetry axis
of the text box aligned with the vertical symmetry axis of
the screen
In roll box realignment it takes the right side of the text box aligned with the nearest right border of the screen
In roll box realignment it takes the top side of the text box
aligned with the nearest top border of the screen
In roll box realignment it takes the horizontal symmetry
axis of the roll box aligned with the horizontal symmetry
axis of the screen
In roll box realignment it takes the bottom side of the logo
aligned with the nearest bottom border of the screen
8.3.2.3 Z-ORDER
It takes the roll in the first visible layer
It takes the roll in the last visible layer
It raises the roll layer
It lowers the roll layer

ENG
| PARAMETERS(E) 38
8.3.3 COLORS SECTION 8.3.3.1 FILL COLORS
The colors section works only if you have NOT selected a text “From File”.
From this button decide the way of the color filling
If you have chosen a gradient way of color filling, select here if you want to change the first color or the second color
If you have chosen a gradient way of color filling, select here the direction of the direction of the shade between first color and second color
8.3.3.2 BORDER COLORS
From this button decide the way of the color filling of the border
If you have chosen a gradient way of color filling, select here if you want to change the first color or the second color of the border
From this menu select the width of the border
8.3.3.3 SHADOW COLOR
Enables/Disables the shadow color for the roll
Click here to change the shadow color
Set the shadow angle directly from the graphic interface(the circle) or with the two parameters “Angle” and “Direction”

ENG
| PARAMETERS(E) 39
8.3.3.4 COLOR PALETTE
When you have chosen which color you want to change, choose your color from this palette or from RGBA(red, green, blu, alpha channel) values. If you want to extract a
color from any screen point use the eyedropper .
8.3.3.5 COLOR PREVIEW
Here you can have a preview for the roll color.
8.3.4 STYLES SECTION
A style is the union between font features and color features. Choose a standard, recent or custom style of the roll from the following boxes.
For the style you can also import a .xml file.

ENG
| PARAMETERS(E) 40
8.3.5 EFFECT SECTION
8.3.5.1 TIMING
Enables/disables the fade in effect for the selected roll box
Fade In starting point for the selected roll box
Enables/disables the fade out effect for the selected roll box
Fade Out ending point for the selected roll box
Rules the Fade In/Fade Out length for the selected roll
ENG
| PARAMETERS(E) 41
8.4 TICKER
You can have the need to display a ticker on the video that you are broadcasting. A ticker is a text(e.g. with guest names of a television program or some information you want to give to your audience) that appears on the screen and that disappears from it after the time you prefer, and in the way that you prefer. Differently from crawl or roll his moving behavior is totally based on your preferences.
8.4.1 TICKER SECTION
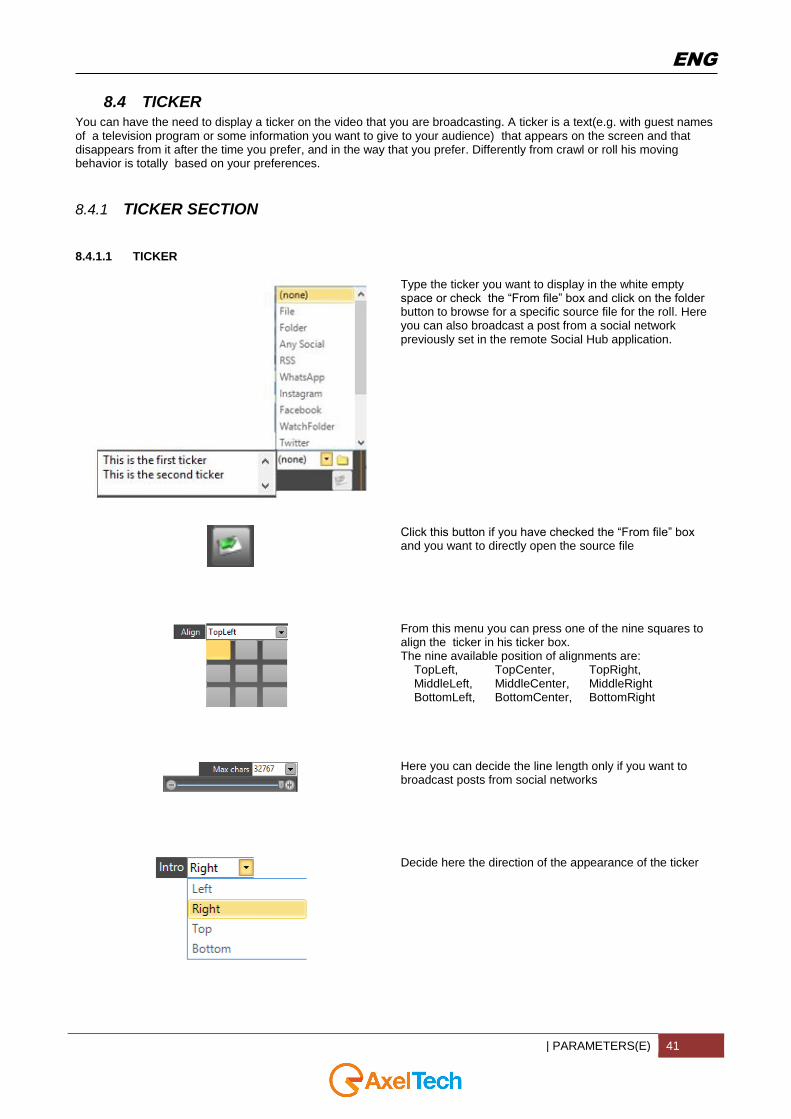
8.4.1.1 TICKER
Type the ticker you want to display in the white empty space or check the “From file” box and click on the folder button to browse for a specific source file for the roll. Here you can also broadcast a post from a social network previously set in the remote Social Hub application.
Click this button if you have checked the “From file” box and you want to directly open the source file
From this menu you can press one of the nine squares to align the ticker in his ticker box. The nine available position of alignments are: TopLeft, TopCenter, TopRight, MiddleLeft, MiddleCenter, MiddleRight BottomLeft, BottomCenter, BottomRight
Here you can decide the line length only if you want to broadcast posts from social networks
Decide here the direction of the appearance of the ticker

ENG
| PARAMETERS(E) 42
Decide here the direction of the disappearance of the ticker
Here you can set how many lines of your ticker you want to display at the same time
Here you can set the displaying length of the single ticker line
Here you can set the pause length between the displaying of a ticker and his repetition
Here you can set the lines distance of a ticker
8.4.1.2 FONT
From this menu you can decide the font for your ticker
From this menu you can decide the font size for your ticker

ENG
| PARAMETERS(E) 43
This is the preview space of the ticker
8.4.1.3 OTHERS
Put a keyboard shortcut to immediately play your ticker Put the GPIO parameters for a remote control Duration in seconds of the ticker
8.4.1.4 RSS
here you can decide the color, the shade direction and angle for the RSS title, and also the color, the shade direction and the size for the outline (Only if the news of the ticker is taken from an RSS)

ENG
| PARAMETERS(E) 44
8.4.2 POSITION SECTION
8.4.2.1 LOCATION
It moves the selected ticker box by x along the X axis.
It increases/decreases the selected ticker box width
It moves the selected ticker box by y along the Y axis.
It increases/decreases the selected ticker box height
It selects if width and height parameters work in pixel or in
percentage unit of measurement
Lock/unlock the selected ticker. If the ticker is locked it
means you cannot change it
HIDE/SHOW the selected ticker in the program output
In ticker box resizing It disables all the top handles and all the left handles.
In ticker box resizing it disables all the top handles
In ticker box resizing it disables all the top handles and all the right handles
In ticker box resizing it disables all the left handles

ENG
| PARAMETERS(E) 45
In ticker box resizing it enables all the handles and resizes
the ticker box maintaining the central symmetry in every
variations
In ticker box resizing it disables all the right handles
In ticker box resizing it disables all the bottom handles and all the left handles
In ticker box resizing it disables all the bottom handles
In ticker box resizing it disables all the bottom handles and all the right handles
In ticker resizing it enable all the handles. Every resize is free from aspect ratio
Restore the original size of the object

ENG
| PARAMETERS(E) 46
8.4.2.2 ALIGN
In ticker box realignment it takes the left side of the ticker
box aligned with the nearest left border of the screen
In ticker box realignment it takes the vertical symmetry
axis of the ticker box aligned with the vertical symmetry
axis of the screen
In ticker box realignment it takes the right side of the ticker box aligned with the nearest right border of the screen
In ticker box realignment it takes the top side of the ticker
box aligned with the nearest top border of the screen
In ticker box realignment it takes the horizontal symmetry
axis of the ticker box aligned with the horizontal symmetry
axis of the screen
In ticker box realignment it takes the bottom side of the
ticker box aligned with the nearest bottom border of the
screen.
8.4.2.3 Z-ORDER
It takes the ticker in the first visible layer
It takes the ticker in the last visible layer
It raises the ticker layer
It lowers the ticker layer

ENG
| PARAMETERS(E) 47
8.4.3 COLORS SECTION 8.4.3.1 FILL COLORS
The colors section works only if you have NOT selected a text “From File”.
From this button decide the way of the color filling
If you have chosen a gradient way of color filling, select here if you want to change the first color or the second color
If you have chosen a gradient way of color filling, select here the direction of the direction of the shade between first color and second color
8.4.3.2 BORDER COLORS
From this button decide the way of the color filling of the border
If you have chosen a gradient way of color filling, select here if you want to change the first color or the second color of the border
From this menu select the width of the border
8.4.3.3 SHADOW COLOR
Enables/Disables the shadow color for the ticker
Click here to change the shadow color
Set the shadow angle directly from the graphic interface(the circle) or with the two parameters “Angle” and “Direction”

ENG
| PARAMETERS(E) 48
8.4.3.4 COLOR PALETTE
When you have chosen which color you want to change, choose your color from this palette or from RGBA(red, green, blu, alpha channel) values. If you want to extract a
color from any screen point use the eyedropper .
8.4.3.5 COLOR PREVIEW
Here you can have a preview for the ticker color.
8.4.4 STYLES SECTION
A style is the union between font features and color features. Choose a standard, recent or custom style of the ticker from the following boxes.
For the style you can also import a .xml file.

ENG
| PARAMETERS(E) 49
8.4.5 EFFECT SECTION
8.4.5.1 TIMING
Enables/disables the fade in effect for the selected ticker box
Fade In starting point for the selected ticker box
Enables/disables the fade out effect for the ticker roll box
Fade Out ending point for the selected ticker box
Rules the Fade In/Fade Out length for the selected ticker

ENG
| PARAMETERS(E) 50
8.5 LOGO
You can have the need to display a logo on the video that you are broadcasting. For example the TV Logo, or the Newscast Logo.
8.5.1 LOGO SECTION
8.5.1.1 LOGO
Clicking on the folder you can browse in your system to select a file
If you selected a file from a folder full of pictures and all are
saved with the same name with a progressive number, the
“Play-Mode” animates the logo. “Loop” animates the logo in
a continuative way. “Play Once” animates the logo only one
time. “Play Once And Hide” animates the logo only once
and hides the logo.
Here you can decide the transparency percentage value.
8.5.1.2 PREVIEW
From this section you can have a preview of the logo file.
8.5.1.3 OTHERS
Put a keyboard shortcut to immediately play your logo Put the GPIO parameters for a remote control Duration in seconds of the logo

ENG
| PARAMETERS(E) 51
8.5.2 POSITION SECTION
8.5.2.1 LOCATION
It moves the selected logo by x along the X axis.
It increases/decreases the selected logo width
It moves the selected logo by y along the Y axis.
It increases/decreases the selected logo height
It selects if width and height parameters work in pixel or in
percentage unit of measurement
it maintaince the original aspect ratio of the selected logo
Lock/unlock the selected logo. If the logo is locked it
means you can not
HIDE/SHOW the selected logo in the program output
In logo resizing It disables all the top handles and all the left handles.
In logo resizing it disables all the top handles
In logo resizing it disables all the top handles and all the right handles

ENG
| PARAMETERS(E) 52
In logo resizing it disables all the left handles
In logo resizing it enables all the handles and resizes the
logo maintaining the central symmetry in every variations
In logo resizing it disables all the right handles
In logo resizing it disables all the bottom handles and all the left handles
In logo resizing it disables all the bottom handles
In logo resizinig it disables all the bottom handles and all the right handles
In logo resizing it enable all the handles. Every resize is free from aspect ratio
Restore the original size of the object

ENG
| PARAMETERS(E) 53
8.5.2.2 ALIGN
In logo realignment it takes the left side of the logo aligned
with the nearest left border of the screen
In logo realignment it takes the vertical symmetry axis of
the logo aligned with the vertical symmetry axis of the
screen
In logo realignment it takes the right side of the logo aligned with the nearest right border of the screen
In logo realignment it takes the top side of the logo aligned
with the nearest top border of the screen
In logo realignment it takes the horizontal symmetry axis
of the logo aligned with the horizontal symmetry axis of the
screen
In logo realignment it takes the bottom side of the logo
aligned with the nearest bottom border of the screen
8.5.2.3 Z-ORDER
It takes the logo in the first visible layer
It takes the logo in the last visible layer
It raises the logo layer
It lowers the logo layer

ENG
| PARAMETERS(E) 54
8.5.3 EFFECTS SECTION
8.5.3.1 TIMING
Enables/disables the fade in effect for the selected logo
Fade In starting point for the selected logo
Enables/disables the fade out effect for the selected logo
Fade Out ending point for the selected logo
Rules the Fade In/Fade Out length for the selected static text

ENG
| PARAMETERS(E) 55
8.5.4 DATA TAGS SECTION
8.5.4.1 SHORTCUT
Set the path for the logo you want to display with the Shortcut
Double clicking on this box you can choose a shortcut for the logo you set. Please press the key you want to associate. After you have set the shortcut you can use it to recall immediately the logo

ENG
| PARAMETERS(E) 56
8.6 BACKGROUND
You can have the need to broadcast a digital image (photo, drawing etc.) used as a decorative background for the whole output screen.
8.6.1 BACKGROUND SECTION
8.6.1.1 BACKGROUND
Clicking on the folder you can browse in your system to
select a file
If you selected a file from a folder full of pictures and all are
saved with the same name with a progressive number, the
“Play-Mode” animates the background. “Loop” animates the
background in a continuative way. “Play Once” animates the
background only one time. “Play Once And Hide” animates
the background only once and hides the background.
Here you can decide the transparency percentage value
8.6.1.2 PREVIEW
From this section you can have a preview of the
background file.
8.6.1.3 OTHERS
Put a keyboard shortcut to immediately play your background Put the GPIO parameters for a remote control Duration in seconds of the background

ENG
| PARAMETERS(E) 57
8.6.2 POSITION SECTION
8.6.2.1 LOCATION
Lock/unlock the selected background. If the background is
locked it means you cannot change it
HIDE/SHOW the selected background in the program output
8.6.3 EFFECTS SECTION
8.6.3.1 TIMING
Enables/disables the fade in effect for the selected background
Fade In starting point for the selected background
Enables/disables the fade out effect for the selected background
Fade Out ending point for the selected background
Rules the Fade In/Fade Out length for the selected background

ENG
| PARAMETERS(E) 58
8.7 SHAPE
You can have the need to display a shape and to put it, for example, behind the text that you are broadcasting.
8.7.1 SHAPE SECTION
8.7.1.1 SHAPE
Select here the shape type between available ones…
…if you want you can also click on the folder to browse in
your system for a specific picture that will be shaped as
you have previously chosen in the “shape type”
select the rotation angle for you shape
Select the Round Corners value for your shape
check this box to have the Gamma correction for your
shape
8.7.1.2 PREVIEW
From this section you can have a preview of the shape.
8.7.1.3 OTHERS
Put a keyboard shortcut to immediately play your shape Put the GPIO parameters for a remote control Duration in seconds of the shape
ENG
| PARAMETERS(E) 59
8.7.2 POSITION SECTION
8.7.2.1 LOCATION
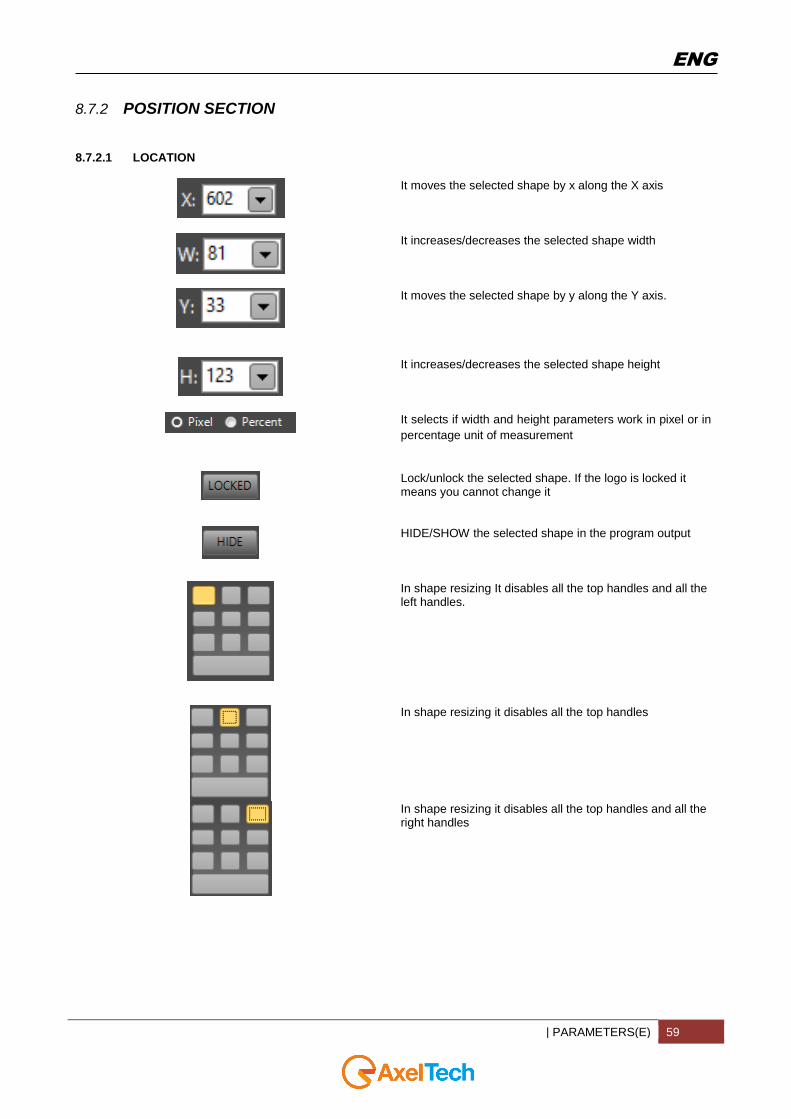
It moves the selected shape by x along the X axis
It increases/decreases the selected shape width
It moves the selected shape by y along the Y axis.
It increases/decreases the selected shape height
It selects if width and height parameters work in pixel or in
percentage unit of measurement
Lock/unlock the selected shape. If the logo is locked it means you cannot change it
HIDE/SHOW the selected shape in the program output
In shape resizing It disables all the top handles and all the left handles.
In shape resizing it disables all the top handles
In shape resizing it disables all the top handles and all the right handles

ENG
| PARAMETERS(E) 60
In shape resizing it disables all the left handles
In shape resizing it enables all the handles and resizes the
shape maintaining the central symmetry in every
variations
In shape resizing it disables all the right handles
In shape resizing it disables all the bottom handles and all the left handles
In shape resizing it disables all the bottom handles
In shape resizinig it disables all the bottom handles and all the right handles
In shape resizing it enable all the handles. Every resize is free from aspect ratio
Restore the original size of the object

ENG
| PARAMETERS(E) 61
8.7.2.2 ALIGN
In shape realignment it takes the left side of the shape
aligned with the nearest left border of the screen
In shape realignment it takes the vertical symmetry axis of
the shape aligned with the vertical symmetry axis of the
screen
In shape realignment it takes the right side of the shape aligned with the nearest right border of the screen
In shape realignment it takes the top side of the shape
aligned with the nearest top border of the screen
In shape realignment it takes the horizontal symmetry axis
of the shape aligned with the horizontal symmetry axis of
the screen
In shape realignment it takes the bottom side of the shape
aligned with the nearest bottom border of the screen
8.7.2.3 Z-ORDER
It takes the shape in the first visible layer
It takes the shape in the last visible layer
It raises the shape layer
It lowers the shape layer
ENG
| PARAMETERS(E) 62
8.7.3 COLORS SECTION 8.7.3.1 FILL COLORS
The colors section works only if you have NOT selected an image “From File”.
From this button decide the way of the color filling
If you have chosen a gradient way of color filling, select here if you want to change the first color or the second color
If you have chosen a gradient way of color filling, select here the direction of the direction of the shade between first color and second color
8.7.4 EFFECTS SECTION
8.7.4.1 TIMING
Enables/disables the fade in effect for the selected shape
Fade In starting point for the selected shape
Enables/disables the fade out effect for the selected shape
Fade Out ending point for the selected shape
Rules the Fade In/Fade Out length for the selected shape

ENG
| PARAMETERS(E) 63
8.8 SLIDE SHOW
You can have the need to display a slide show on the video that you are broadcasting
8.8.1 SLIDESHOW SECTION
8.8.1.1 SLIDESHOW
-Clicking on “Add” you can browse in your system to select
a picture file to add at the Slide Show “List”.
-Clicking on “Blank” you can add for a Blank Slide to your
Slide Show “List”
-Clicking on “Remove” you can delete the selected picture
from the Slide Show “List”
-Clicking on “Copy” you can copy an already added picture
-Clicking on “Paste” you can paste an already copied
picture
Here you can decide the transparency percentage value
for the whole slide show.
8.8.2 POSITION SECTION
8.8.2.1 LOCATION
It moves the selected slide show box by x along the X axis.
It increases/decreases the selected slide show box width
It moves the selected slide show box by y along the Y axis.
It increases/decreases the selected slide show box height
It selects if width and height parameters work in pixel or in
percentage unit of measurement
it maintaince the aspect ratio of the selected slide show

ENG
| PARAMETERS(E) 64
Lock/unlock the selected slide show box. If the logo is
locked it means you cannot change it
HIDE/SHOW the selected slide show in the program output
In slide show box resizing It disables all the top handles and all the left handles.
In slide show box resizing it disables all the top handles
In slide show box resizing it disables all the top handles and all the right handles
In slide show box resizing it disables all the left handles
In slide show resizing it enables all the handles and
resizes the slide show maintaining the central symmetry in
every variations
In slide show box resizing it disables all the right handles

ENG
| PARAMETERS(E) 65
In slide show box resizing it disables all the bottom handles and all the left handles
In slide show box resizing it disables all the bottom handles
In slide show box resizinig it disables all the bottom handles and all the right handles
In slide show resizing it enable all the handles. Every resize is free from aspect ratio
Restore the original size of the object

ENG
| PARAMETERS(E) 66
8.8.2.2 ALIGN
In slide show box realignment it takes the left side of the
box aligned with the nearest left border of the screen
In slide show box realignment it takes the vertical
symmetry axis of the box aligned with the vertical
symmetry axis of the screen
In slide show box realignment it takes the right side of the box aligned with the nearest right border of the screen
In slide show box realignment it takes the top side of the
box aligned with the nearest top border of the screen
In slide show box realignment it takes the horizontal
symmetry axis of the slide show box aligned with the
horizontal symmetry axis of the screen
In slide show box realignment it takes the bottom side of
the box aligned with the nearest bottom border of the
screen.
8.8.2.3 Z-ORDER
It takes the slide show in the first visible layer
It takes the slide show in the last visible layer
It raises the slide show layer
It lowers the slide show layer

ENG
| PARAMETERS(E) 67
8.8.3 EFFECTS SECTION
8.8.3.1 TIMING
Enables/disables the fade in effect for the selected slide show
Fade In starting point for the selected slide show
Enables/disables the fade out effect for the selected slide show
Fade Out ending point for the selected slide show
Rules the Fade In/Fade Out length for the selected slide show

ENG
| PARAMETERS(E) 68
8.9 CLOCK
You can have the need to display a clock on the video that you are broadcasting.
8.9.1 CLOCK SECTION
8.9.1.1 CLOCK
Select the displaying clock type Select if you want to display the time, a countdown or a countup.
From this menu you can choose the text scale for the Clock
From this menu you can press one of the nine squares to align the clock in his clock box. The nine available alignment positions are: TopLeft, TopCenter, TopRight, MiddleLeft, MiddleCenter, MiddleRight BottomLeft, BottomCenter, BottomRight
Choose the “Start Time” value for the Countdown or for the Countup

ENG
| PARAMETERS(E) 69
8.9.1.2 FONT
From this menu you can decide the font for your clock
From this menu you can decide the font size for your clock
This is the preview space of the clock
8.9.1.3 OTHERS
Put a keyboard shortcut to immediately play your clock
Put the GPIO parameters for a remote control
Duration in seconds of the clock

ENG
| PARAMETERS(E) 70
8.9.2 POSITION SECTION
8.9.2.1 LOCATION
It moves the selected clock box by x along the X axis.
It increases/decreases the selected clock box width
It moves the selected clock box by y along the Y axis.
It increases/decreases the selected clock box height
It selects if width and height parameters work in pixel or in
percentage unit of measurement
Lock/unlock the selected clock. If the clock is locked it
means you cannot change it
HIDE/SHOW the selected clock in the program output
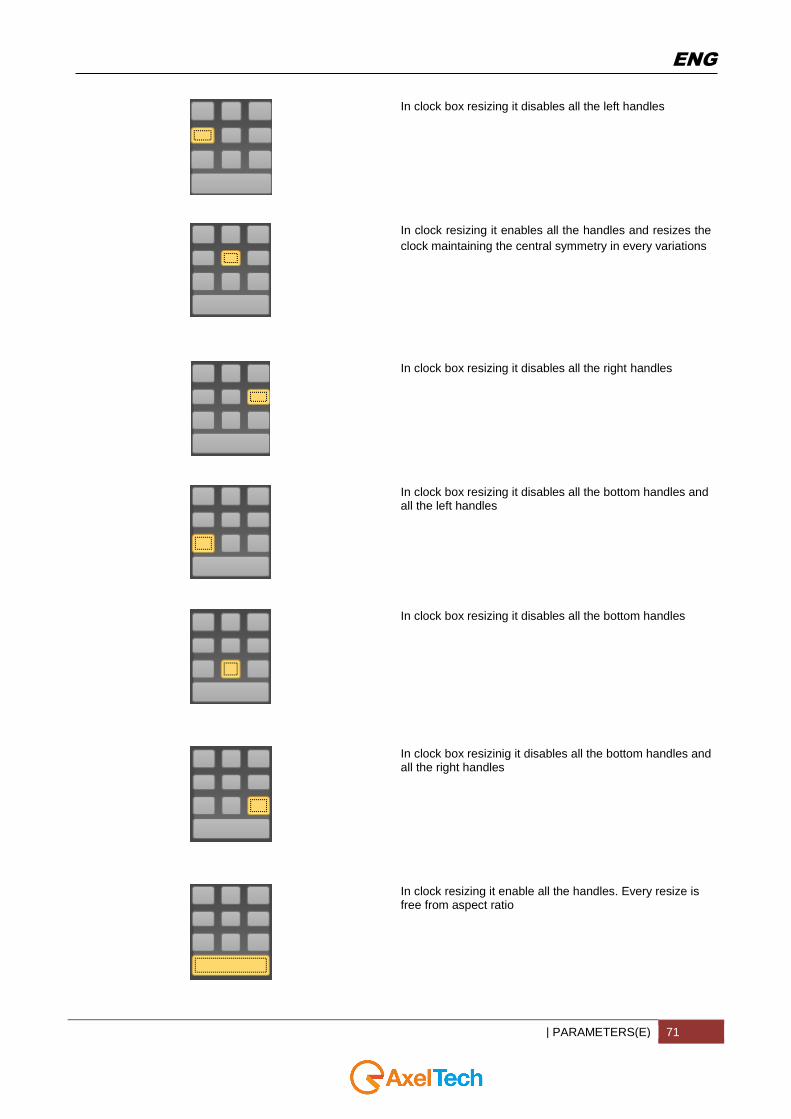
In clock box resizing It disables all the top handles and all the left handles.
In clock box resizing it disables all the top handles
In clock box resizing it disables all the top handles and all the right handles
ENG
| PARAMETERS(E) 71
In clock box resizing it disables all the left handles
In clock resizing it enables all the handles and resizes the
clock maintaining the central symmetry in every variations
In clock box resizing it disables all the right handles
In clock box resizing it disables all the bottom handles and all the left handles
In clock box resizing it disables all the bottom handles
In clock box resizinig it disables all the bottom handles and all the right handles
In clock resizing it enable all the handles. Every resize is free from aspect ratio

ENG
| PARAMETERS(E) 72
Restore the original size of the object
8.9.2.2 ALIGN
In clock box realignment it takes the left side of the clock
box aligned with the nearest left border of the screen
In clock box realignment it takes the vertical symmetry
axis of the clock box aligned with the vertical symmetry
axis of the screen
In clock box realignment it takes the right side of the clock box aligned with the nearest right border of the screen
In clock box realignment it takes the top side of the text
box aligned with the nearest top border of the screen
In clock box realignment it takes the horizontal symmetry
axis of the clock box aligned with the horizontal symmetry
axis of the screen
In clock box realignment it takes the bottom side of the
clock box aligned with the nearest bottom border of the
screen
8.9.2.3 Z-ORDER
It takes the clock in the first visible layer
It takes the clock in the last visible layer
It raises the clock layer
It lowers the clock layer

ENG
| PARAMETERS(E) 73
8.9.3 COLORS SECTION 8.9.3.1 FILL COLORS
From this button decide the way of the color filling
If you have chosen a gradient way of color filling, select here if you want to change the first color or the second Color
If you have chosen a gradient way of color filling, select here the direction of the direction of the shade between first color and second color
8.9.3.2 BORDER COLORS
From this button decide the way of the color filling of the border
If you have chosen a gradient way of color filling, select here if you want to change the first color or the second color of the border
From this menu select the width of the border
8.9.3.3 SHADOW COLOR
Enables/Disables the shadow color for the roll
Click here to change the shadow color
Set the shadow angle directly from the graphic interface(the circle) or with the two parameters “Angle” and “Direction”

ENG
| PARAMETERS(E) 74
8.9.3.4 COLOR PALETTE
When you have chosen which color you want to change, choose your color from this palette or from RGBA(red, green, blu, alpha channel) values. If you want to extract a color from any
screen point use the eyedropper
8.9.3.5 COLOR PREVIEW
Here you can have a preview for the clock color.
8.9.4 STYLES SECTION
A style is the union between font features and color features. Choose a standard, recent or custom style of the clock from the following boxes.
For the style you can also import a .xml file.

ENG
| PARAMETERS(E) 75
8.9.5 EFFECT SECTION
8.9.5.1 TIMING
Enables/disables the fade in effect for the selected clock box.
Fade In starting point for the selected clock box
Enables/disables the fade out effect for the selected clock box
Fade Out ending point for the selected clock box
Rules the Fade In/Fade Out length for the selected clock
8.9.6 DATA TAGS SECTION
8.9.6.1 SHORTCUT
Double clicking on this box you can type the clock type you want to display with the shortcut
Double clicking on this box you can choose a shortcut for the clock you set. Please press the key you want to associate with it. After you have set the shortcut you can use it to recall the roll immediately

ENG
| PARAMETERS(E) 76
8.10 TABLE
You can have the need to display data on the video that you are broadcasting.
8.10.1 TABLE SECTION
8.10.1.1 TABLE
For a table it is available only the “File” source. Click on the folder button to browse for a specific excel file(.xlsx).
opens the source file directly
select between available excel sheets the one you want to display
select here a cell range to display
From this menu you can choose the text scale
Check this box to have an entrance transition effect for very row of the xlsx Table
Check this box to have an exit transition effect for every row of the xlsx Table

ENG
| PARAMETERS(E) 77
8.10.1.2 OTHERS
Put a keyboard shortcut to immediately play your table Put the GPIO parameters for a remote control Duration in seconds of the table
8.10.2 POSITION SECTION
8.10.2.1 LOCATION
It moves the selected table by x along the X axis.
It increases/decreases the selected table text width
It moves the selected static table by y along the Y axis.
It increases/decreases the selected table height
It selects if width and height parameters work in pixel or in
percentage unit of measurement
Lock/unlock the selected table. If the table is locked it
means you cannot change it
HIDE/SHOW the selected table in the program output
In table box resizing It disables all the top handles and all the left handles.
in table box resizing it disables all the top handles
ENG
| PARAMETERS(E) 78
In table box resizing it disables all the top handles and all the right handles
In table box resizing it disables all the left handles
In table resizing it enables all the handles and resizes the
table maintaining the central symmetry in every variations
In table box resizing it disables all the right handles
In table box resizing it disables all the bottom handles and all the left handles
In table box resizing it disables all the bottom handles
In table box resizinig it disables all the bottom handles and
all the right handles

ENG
| PARAMETERS(E) 79
In table resizing it enable all the handles. Every resize is
free from aspect ratio
Restore the original size of the object
8.10.2.2 ALIGN
In table box realignment it takes the left side of the table
box aligned with the nearest left border of the screen
In table box realignment it takes the vertical symmetry axis
of the table box aligned with the vertical symmetry axis of
the screen
In table box realignment it takes the right side of the table box aligned with the nearest right border of the screen
In table box realignment it takes the top side of the table
box aligned with the nearest top border of the screen
In table box realignment it takes the horizontal symmetry
axis of the table box aligned with the horizontal symmetry
axis of the screen
In table box realignment it takes the bottom side of the
table box aligned with the nearest bottom border of the
screen.

ENG
| PARAMETERS(E) 80
8.10.2.3 Z-ORDER
It takes the table in the first visible layer
It takes the table in the last visible layer
It raises the table layer
It lowers the table layer
8.10.3 EFFECT SECTION
8.10.3.1 TIMING
Enables/disables the fade in effect for the selected table
Fade In starting point for the selected table
Enables/disables the fade out effect for the selected table
Fade Out ending point for the selected table
Rules the Fade In/ Fade Out length for the selected table

ENG
| GROUPS 81
9 GROUPS
To create a group select here the items, right click on one of them, and press “Group”.
CG Live puts all the selected items in the Group, as shown in the picture. To ungroup them again, right click on the group and click “Ungroup” After the group creation, it works as a single item except for the group parameters:

ENG
| GROUPS 82
9.1.1 GROUP PARAMETERS
for every item that you have in the group you can select the Delay and the Duration.
9.1.1.1 OTHERS
Put a keyboard shortcut to immediately play your group Put the GPIO parameters for a remote control
Other parameters work exactly as for other items..

ENG
| PROJECT MANAGEMENT 83
10 PROJECT MANAGEMENT
At the top left part of the screen, on pages previews you have three buttons to manage the project
To open a project in .acgs* format
To save a project in .acgs format
To open project settings
Click on the “open settings” button and choose if you want to: create a new project, open an existing project, Save the current project, Save As the current project, enter in the project configuration panel, read the CG Live! program logs, enter in the About section, Exit from CG Live!.
Opening the config button you will see the following configuration pane sections
*Axel Technology format for project layouts

ENG
| PROJECT MANAGEMENT 84
10.1 GENERAL SETTINGS
From this section of the configuration panel you can:
- change the CG Live! language.
- Choose if the CG Live engine autostarts at Windows startup

ENG
| PROJECT MANAGEMENT 85
10.2 PROGRAM SETTINGS
From this section of the configuration panel you can:
- Choose if the CG Live Engine is on Local PC or in a Remote PC. If it is in a Remote PC, type for his Name or IP
Address.
- Select the output Video Device for the playout
- Select the Video Format for the playout
- Select if the Key Mode is External, Internal, OFF (see the Glossary)
- You can choose for the correct fields order to ensures proper playback of your interlaced video.
- Type the TCP port for the CG Live remote control.

ENG
| PROJECT MANAGEMENT 86
10.3 PREVIEW SETTINGS
- Select the output Video Device for the preview
- Select the Video Format for the preview
- Select if the preview Key Mode is OFF, Internal or External(See the Glossary)
- You can choose for the correct fields order to ensures proper playback of your interlaced video.
- If you have selected VGA for the Video Device select the frame rate you prefer
- Type the TCP port for the CG Live remote control.

ENG
| PROJECT MANAGEMENT 87
10.4 ADVANCED SETTINGS
- Default milliseconds Interval Delay for transitions
- Default Interval Refresh for items from file
- on Data Tag grid Enable /disable to play selected items in different row of the grid
- Hide /Show the preview panel
- Enable/disable the Play button on pages
- Enable/disable the Play Locked button on pages. Play Locked differently from the normal play button allows you
to play more than one pages at a time. (The play button for the Master Page works always as the play locked
for other pages)
- Logs Detail level

ENG
| GLOSSARY 88
11 GLOSSARY
Key mode external: The graphics is overlayed by an external video switcher via key and fill signals. You need a
board with key and fill outputs (I.e. Decklink Extreme 4K). This is the way that allows better output. Video switcher linear-key allow a perfect overlay, alpha channel management and a clear and crisp output.

ENG
| GLOSSARY 89
Key mode internal: The graphics is overlayed on the throughput video by the video board. You need a board with
input and output connections (i.e. Decklink Studio). If the Character Generator workstation crash, video signal is lost.

ENG
| GLOSSARY 90
Key mode off: The graphics covers all the screen, without overlay. Also the graphics background is sent to the video
output. You can overlay graphics with an external video switcher via chromakey or lumakey. Very poor output.

ENG
| FINAL CONSIDERATION AND AXEL TECHNOLOGY CONTACT 91
12 FINAL CONSIDERATION AND AXEL TECHNOLOGY CONTACT
________________________________________________________________________________________________________________________________________________________________________________________________ ________________________________________________________________________________________________ ________________________________________________________________________________________________ ________________________________________________________________________________________________________________________________________________________________________________________________ ________________________________________________________________________________________________ ________________________________________________________________________________________________ ________________________________________________________________________________________________ ________________________________________________________________________________________________________________________________________________________________________________________________ ________________________________________________________________________________________________ ________________________________________________________________________________________________ ________________________________________________________________________________________________ ________________________________________________________________________________________________ ________________________________________________________________________________________________ ________________________________________________________________________________________________ ________________________________________________________________________________________________ ________________________________________________________________________________________________ ________________________________________________________________________________________________ ________________________________________________________________________________________________ ________________________________________________________________________________________________ ________________________________________________________________________________________________ ________________________________________________________________________________________________ ________________________________________________________________________________________________ ________________________________________________________________________________________________ ________________________________________________________________________________________________ ________________________________________________________________________________________________ ________________________________________________________________________________________________ ________________________________________________________________________________________________ ________________________________________________________________________________________________ ________________________________________________________________________________________________ ________________________________________________________________________________________________ ________________________________________________________________________________________________ ________________________________________________________________________________________________ ________________________________________________________________________________________________ ________________________________________________________________________________________________ ________________________________________________________________________________________________
Main Office BOLOGNA: Via Caduti Di Sabbiuno 6/F 40011 Anzola Emilia - Bologna - Italy
Tel. +39 051 736555 - Fax. +39 051 736170
For Technical information or support [email protected]
For General information and Sales dept
www.axeltechnology.com


