26
Chairmaker’s Notebook

Chairmaker’s Notebook

Chairmaker’s Notebook
Peter Galbert
lost art press : fort mitChell

first published by lost art press llC in 201526 Greenbriar ave., fort mitchell, KY 41017, UsaWeb: http://lostartpress.com
Title: Chairmaker’s NotebookAuthor: peter GalbertEditor: Christopher schwarzIllustrator: peter GalbertCopy editor: megan fitzpatrickIndex: suzanne ellisonDesign and layout: linda Watts
Copyright © 2015 by peter Galbert
isBN: 978-0-9906230-3-8
all riGhts reservedNo part of this book may be reproduced in any form or by any electronic or mechanical means including information storage and retrieval systems without permission in writing from the publisher, except by a reviewer, who may quote brief passages in a review.
This book was printed and bound in the United states.

Contents
1. Why Green Wood? 2 2. Windsor Joinery 14 3. Chair design & the plans in this Book 24 4. The Chairmaker’s Workshop 34 5. hand tools: sharpening & Use 48 6. Woods for Chairmaking 66 7. an introduction to splitting tools 78 8. splitting parts from the log 92 9. The drawknife 100 10. shaving & Carving with a drawknife 112 11. shaving & shaping parts 128 12. Bending Wood 142 13. turning tools 160
14. turning practice 168 15. turning: from rough to finish 184 16. drilling 206 17. reaming 218 18. tools for seat Carving 234 19. Carve the seat 246 20. Undercarriage Joinery 268 21. Undercarriage assembly 288 22. Complete the Undercarriage 298 23. Uppercarriage assembly: Balloon-back 306 24. Uppercarriage assembly: fan-back 328 25. finishing 336
Foreword viIntroduction vii
Appendix A. Creating & Using Sightlines 352Appendix B. The Shavehorse 360
Appendix C. Grinding Drill Bits 372Afterword 378
Sources 380Further Reading 381Acknowledgments 382About the Author 383
Index 384

from the moment i first laid eyes on a handmade Wind-sor chair in the mid-1990s, i wanted to build a whole army of them. i read every available book on the topic, but i had so many questions about every aspect of the craft that i wasn’t confident enough to give it a go.
if i’d had this book, however, things would have been different.
“Chairmaker’s Notebook” is a landmark work – a description i use sparingly. i consider it a new bench-mark, both for chairmaking books and explanatory jour-nalism. here’s why.
peter Galbert builds some of the nicest Windsor chairs i’ve ever seen. he’s a technical virtuoso with an artist’s eye, but that alone is not what makes “Chairmak-er’s Notebook” special.
instead, this book is an important work because peter spent years rethinking and refining the chair-construc-tion process. he developed mind-blowingly simple ways to deal with the compound joinery in a chair’s undercar-riage and upper assembly. and he created simple tools and jigs that make it easy for a beginner to start building chairs.
foreword
additionally, peter came up with clever and clear ways of explaining his techniques – from using a drawknife to back-wedging a chair’s spindles – so you will understand and be confident enough to build a chair using only this book as your guide. his explanations of complex ideas are so simple that they permanently crystallize in your head; you’ll wonder why you didn’t always see the wood, tools or joinery in this way.
and if creating innovative techniques and clever ways to explain them isn’t enough, there are the 500 handmade drawings. peter drew every illustration in this book (some of them three or four times) to amplify the text and pro-vide clarity that a photograph cannot.
as a result, “Chairmaker’s Notebook” is one of those rare woodworking books that is a perfect document. it’s a joy to read, a pleasure to look at and something that will change the way you work.
i’m proof of that. Though i have successfully built Windsor chairs for 11 years now, editing this book fun-damentally changed my shop practices, tools and tech-niques. i am the book’s first and biggest fan. and it is our pleasure here at lost art press to offer it to you.
Christopher schwarzJanuary 2015fort mitchell, Ky.
vi

Chairmaking is simple. if you’ve ever split firewood or bent a stick until it snapped, you’ve encountered the basics. This might sound like a gross simplification, but after years of plumbing the depths of the tools, tech-niques and materials, i marvel at the simplicity that lies at the heart of the craft.
introduction
my earliest relationship with wood had nothing to do with making furniture. i recall wandering through the woods, playing with the sticks littering the ground. i could bend them into bows, sharpen them into spears or peel them smooth for walking sticks. i didn’t think much of it, but i was using the material for its inherent strengths in the simplest, most direct way. The wood was everywhere, and it seemed like it could be made into anything.
at the time, it would have made perfect sense to me to take a straight stick and put it in the back of a chair. had i suggested it, someone probably would have told me that furniture parts are sawn from larger boards and weren’t simply sticks that had been shaped a bit. i was, however, more correct than wrong in my assumption.
in the ensuing years, i learned that wood is a hard, dry and expensive thing that comes in rectangles and can be cut with blazing speed and accuracy with the help of power tools. While there are huge advantages to working this way at times, this starting point has limitations, both in the results and the experience of reaching them.
Suited up for Workin the mid-1990s, i worked in cabinet shops in New York City. i spent long days building boxes and milling planks or plywood while wearing a respirator, eye protection and hearing protection. i was paying my bills, but my future seemed bleak because my real goal, working intimately with the wood, seemed no closer.
on occasion, chisels and handplanes came into play, but advances in power tooling had nearly eliminated their use altogether, especially in the time-hungry competitive world of cabinetry. The closest that i got to a hand tool
vii
A walk in the woods starts with finding the perfect walking stick.

viii
viii
was usually sandpaper. and i was teased by my co-workers for trying to find a place for hand tools in the process. looking back, i realize that few of them knew or needed to know how to use them. The lesson i took from those jobs was that hand tools cannot compete with power tools on the turf of modern production methods. But looking around, i noticed that almost all of the work was made up of 90° angles and few curves. The materials and machines seemed to push everything in that direction; any deviation from flat and square proved time-consuming and difficult.
i was determined to find a different way, so i rented a 20' x 12' workshop that i shared with a guitar maker, and i set out to figure out what i could make with wood and my hand tools that could sustain me.
i brought with me an idea that i believe plagues many woodworkers. i defined my achievement and skill by my ability to manipulate the wood to fit my will, regardless of its properties. how many war stories have we heard and told about overcoming the properties of tough wood? Then, to top it all, being able to say that it was done with hand tools is the epitome of mastery. as i tried different projects, i discovered that these ideas get stale as the bot-tom line starts aching. like John henry racing the steam drill, you can do it, but it’ll perhaps merely kill you or your business in the end.
There are many wooden objects, such as tables, where building them by hand gave little competitive advantage – except you could say that it had been done by hand. and even then, i would be competing with factories set up to make similar furniture at a price i could never match.
it was discouraging, and i was close to throwing in the towel on my woodworking career.
i jealously watched my shopmate use simple hand
tools to make gorgeous archtop guitars. Watching him transform the wood into a lovely object was one thing, but then to hear the music pour out of it made me think differently about my expectations, the tools and the mate-rial. he wasn’t battling the wood, he was working with it. i am not musical, so i began to seek both the technology and the object that could give me a similar connection to the wood.
My firSt ChairChairs seemed a natural choice. They had always fasci-nated me for the endless design options and because of the intimate relationship we have with them. i had done enough research into their construction to think they would free me to work differently.
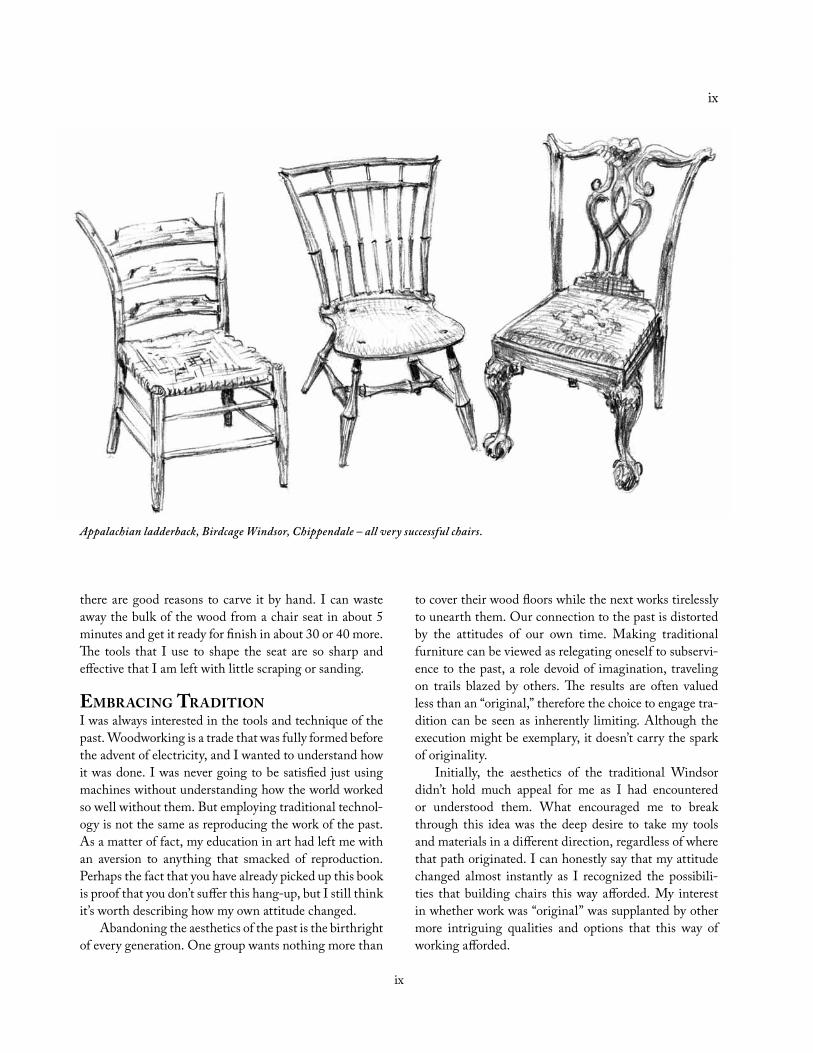
first, i looked into making Chippendale chairs. in addition to the exacting square joinery, they had a rigid posture that didn’t seem inviting. The turning point came when i abandoned the pursuit of the flat and square and started thinking about the green-wood appalachian lad-derback chairs that had always interested me. reading “make a Chair from a tree” by John (now Jennie) alex-ander was my first introduction to the direct link between green wood and chairs, but appalachia felt like a long haul from the streets of manhattan.
after thought and research, i decided to make a Windsor chair. i built it based on a photo in a magazine article by Curtis Buchanan. it took me the better part of six months to pull it off. it took so long because i was not only working on it between jobs, but i was also delving into a whole new approach to woodworking. i had never worked green wood for furniture, nor turned on a lathe, nor made tapered joints. and the list goes on.
after completing my first chair, i realized i had side-stepped all the problems i’d faced when building “flat” work. No longer did i need more space, more machines, more materials, more electricity and more time. once i was further along the learning curve, the pace with which i could work – from a log to a finished piece – was practi-cal, measured in days, not months. and there were the benefits to doing things by hand. i found that i was no longer competing with power tools; they simply didn’t meet the requirements of the task.
Woodworking was like playing again, and i was sold. splitting, shaving and bending wood was a clear path to a comfortable, durable and beautiful chair.
even for parts made from dry wood, such as the seat, Not my favorite outfit.
ix
ix
there are good reasons to carve it by hand. i can waste away the bulk of the wood from a chair seat in about 5 minutes and get it ready for finish in about 30 or 40 more. The tools that i use to shape the seat are so sharp and effective that i am left with little scraping or sanding.
eMbraCing traditioni was always interested in the tools and technique of the past. Woodworking is a trade that was fully formed before the advent of electricity, and i wanted to understand how it was done. i was never going to be satisfied just using machines without understanding how the world worked so well without them. But employing traditional technol-ogy is not the same as reproducing the work of the past. as a matter of fact, my education in art had left me with an aversion to anything that smacked of reproduction. perhaps the fact that you have already picked up this book is proof that you don’t suffer this hang-up, but i still think it’s worth describing how my own attitude changed.
abandoning the aesthetics of the past is the birthright of every generation. one group wants nothing more than
to cover their wood floors while the next works tirelessly to unearth them. our connection to the past is distorted by the attitudes of our own time. making traditional furniture can be viewed as relegating oneself to subservi-ence to the past, a role devoid of imagination, traveling on trails blazed by others. The results are often valued less than an “original,” therefore the choice to engage tra-dition can be seen as inherently limiting. although the execution might be exemplary, it doesn’t carry the spark of originality.
initially, the aesthetics of the traditional Windsor didn’t hold much appeal for me as i had encountered or understood them. What encouraged me to break through this idea was the deep desire to take my tools and materials in a different direction, regardless of where that path originated. i can honestly say that my attitude changed almost instantly as i recognized the possibili-ties that building chairs this way afforded. my interest in whether work was “original” was supplanted by other more intriguing qualities and options that this way of working afforded.
Appalachian ladderback, Birdcage Windsor, Chippendale – all very successful chairs.

x
By ditching all the assumptions and processes that come along with working with planks and starting with the log, i found making chairs to be the equivalent of a fresh tomato versus canned: perhaps a little less conve-nient is some ways, but engaging and full of potential that was previously impossible or impractical.
at first it may seem strange that i would need to turn to a craft that is centuries old to find a “fresh” way to work with wood, but then again, the folks who made chairs in the 18th century had a very different relationship to their world. Back to the food analogy. seasonal food was a way of life, and while there were certainly means of preserva-tion, the limited options available gave them a framework for making decisions that i think has real value, especially in today’s world with its excess of options.
You may wonder “don’t you feel limited by the tech-nology and aesthetic of the Windsor form?” my answer is “absolutely not.” i’ve found that the “limitations” of the form have given me a deeper understanding of the tools, materials and goals involved in making chairs. Chairs have a broad range of shapes they can take, but they must always conform to the needs of the human form. all successful chairs must address this, and once you begin down the path of chairmaking, the similari-ties and solutions become apparent. i’ve found that the technology involved in Windsors is beautifully suited to meeting the needs of the human form, and as far as aes-thetics go, i see such a wide range of possibilities that i cannot imagine coming to the end of them. When i have spent time attempting direct reproductions, i always come away with new awareness and inspiration. Walking in the shoes of those makers of the past is a privilege, and the lessons of their lifetime of effort are free for the tak-ing. What you do with that information is up to you. This is well stated in the oft repeated quote “poor artists copy, great artists steal.”
it’s not uncommon for me to encounter a student who is interested in the technology, in spite of their feelings about the appearance of “traditional” chairs or creating “reproduction” furniture. i have yet, however, to see one who has not been engaged by the simple brilliance of the process. and even if they never make another Windsor, it always informs the other work they will build.
i always seem to turn to food as a metaphor for build-ing furniture. in cooking, the freshness of the ingredi-ents and working with them from their most raw state gives a level of control and involvement that can readily
be appreciated by the cook and the diner. it’s no exaggera-tion to say that my experience making chairs within this tradition is very similar. from the fresh air in my lungs as i split the log to the subtleties of the tool marks that show my path to completing it, i am engaged. and this is reflected in the final product. i started my furniture mak-ing by placing a premium on originality, but now i focus on whether my process and product has life.
forgive me if this sounds far afield; we are still talk-ing about furniture, right? to make the point, i’ll go back to food because it’s a topic where we have all spent a life-time refining our tastes and awareness. Just like an excep-tional meal, there are qualities in furniture that engage us as makers or consumers that make it feel vital and alive. i became aware of this as i started making chairs, but even more so when i saw the public’s reaction to them. This is how i sustain my interest and judge my results.
tradition & toolSaddressing the topic of tools, especially those used in the service of a traditional craft, can be a sticky business. Through the years, i’ve found tools and techniques that match my interests. This is something you will have to work out for yourself as well.
The simplicity of the tools definitely factored in my choice to make chairs, and i thoroughly enjoy their role in
Brad-points, augers and spoon bits all do a great job in their own way.

xi
my work. But through the years, a variety of tools, some quite unexpected, have proven their value in my shop. like any valued employee, each tool must earn its keep in my small shop. and while i have affection for certain tools, i try not to let that cloud my judgment concerning their usefulness.
in my thinking, the impulse to advance a tradition is a vital part of partaking in it. We honor the past by listening and linking to it, not just attempting to repeat it. time has a way of weeding out lousy ideas, while the worthwhile ones march on. in looking back at the his-tory of woodworking and chairmaking, it’s easy to make assumptions about the reasons certain tools and tech-niques were used. i try to keep in mind that every crafts-man was modern at the time and tried to match the qual-ity of the chair produced with the demands of the market.
When i became interested in chairmaking, i didn’t have any specialty tools associated with the craft, and my budget was tight. so instead of seeking out a set of qual-ity auger bits and a brace, i grabbed my cordless drill and reground some old twist bits into brad points with long center spurs.
Not only did they cut great, but by setting the clutch low on the drill, i discovered that i could get blow-out-free exit holes.
perhaps the bit and brace would have become my pride and joy, but not because they were “historically accurate.” sure, at some time in the past, auger bits were used in chairmaking, but that doesn’t make them more appropriate than the cordless drill. auger bits were a late 19th-century tool, so using them on an 18th-century chair isn’t any more “accurate” than using a brad-point. historical accuracy is a worthy pursuit, but it is not my personal priority.
i hope to show there are many successful ways to achieve results, and plenty of room to conceive of new methods. moments after showing me how to split parts from a log (and blowing my mind in the process), dave sawyer showed me it could also be done on the band saw. although the band saw was slower, it ensured that we were able to get two parts from an undersized billet, which suited dave’s Yankee urges.
There is much to be learned from the tools and tech-niques of the past, especially if it leads to the realization that a quiet, hand-tool driven shop can be a place of ref-uge that is also highly productive.
setting the correct expectations for each tool and task
takes time and practice. i’ve found that the tools in chair-making perform with a speed and accuracy that makes the process flow. hand tools are easier and more effective when working with wood that is split or cut parallel to the fibers. That’s because the cutting direction will always be toward the thinner portion of the workpiece, and the cut can be made on all the faces without concern of grain reversals. While electric saws can ignore fiber direction, hand tools are sensitive to it, and simplifying the direc-tion to cut is essential to getting good results.
the right tool for the Jobone recurring theme i’ve come across is that each tool, used in its proper place and to the maximum extent of its ability, will speed the process and leave less work for the next tool. switching tools too early can make a job laborious. This is always the case, from the moment that i decide to switch from wedges to the froe, all the way to moving from the travisher to the scraper.
“What are the essential tools required to make a chair?” The question is partially answered by the type of chair you wish to make, and the speed and ease with which you want to make it. a seat can be carved with a gouge and a scraper. it might take more time, but you can get the job done. for my first chairs, i bent a piece of steel into a “U” shape. i ground one edge to make a scorp of sorts and dug away. i never bothered to harden the steel, so it cut poorly; perhaps this is where i learned the impor-tance of skewing and slicing across the grain.
Couldn’t a machine be rigged to do it in less time? perhaps. if you were producing a large quantity of identi-cal chairs, it might prove effective to mechanize the pro-cesses. such mechanization on the small scale, however, often serves to sidestep the real time-saver, which is well-honed tools and skill.
There is a character to a handmade chair that a factory chair, with its strict uniformity, can’t match. our eyes quickly pick up on the sameness of machined construc-tion and cease to explore the form. The skilled process of building a chair by hand is reflected in the final product. When a viewer approaches the chair, the crisp tool marks become visible and inviting to touch. When the person sits down and experiences the unexpected flexibility and comfort, he or she immediately registers the difference. The quality of the parts and the chair as a whole rests firmly in the maker’s eye and hands.
i believe that much of the evolution of the Windsor

xii
Even a full set of tools for chairmaking represents a small collection.

xiii
forms can be attributed to this expanded role of the crafts-man. over time, and in hands of so many makers, it is no surprise that the form changed into so many inter-esting and refined forms. sometimes the change came incrementally; other times there were leaps, such as the continuous-arm chair, that pushed the craft into new ter-ritory. as a modern maker of a traditional form, i feel most indebted to the craftsmen who were willing to step up and nudge the form forward.
in david pye’s book “The Nature and art of Work-manship,” he delineates between the craftsmanship of risk and of certainty. The difference is how much of the result is predetermined by the jigging and how much is left to the hand and skill of the craftsman. it’s never solely one or the other, but a negotiation of the two. one of the joys i find in chairmaking is traveling close to the risk side of things, which not only suits the technology and results, but commands my focus. each maker must fit his or her own priorities into the equation to learn where the line between romance, power overkill and appropriate technology lies. i don’t want to run a factory. i don’t want to manage employees. i don’t want my designs written in stone. The limitations imposed by my tiny city shop led me to discover chairmaking and, more importantly, that matching the tools to the materials and the process is one of the keys to being competitive using hand tools.
What iS a WindSor Chair?There are a few characteristics that define a Windsor chair, such as turned legs, a carved seat, thin spindles and even carvings on more ornate examples. to me, however, it’s the structure of the chair, not the styling, that best defines a Windsor. The legs and top parts terminate at the seat. Unlike Chippendale, appalachian ladderbacks or shaker chairs, no part extends from the floor to the top of the piece. Using the seat as an anchor creates some limitations, but it also opens up a wide variety of design possibilities within a durable, time-tested framework.
The forms that we recognize as Windsors have been continually produced for centuries. Through time, the style has paid a high price for its success. as factories replaced individual craftsmen, the parts became thicker, the turnings clumsier and the overall beauty diminished. The heavy, artless and uncomfortable chairs that lurk in dark restaurants often occupy our thoughts when we hear “Windsor,” but they don’t do justice to the brilliant tech-nology involved in Windsor chairmaking.
The many innovations with Windsors belong to countless craftsmen through lifetimes of thought-ful work. But making a Windsor by hand is more than mere nostalgia, it’s an entry into a whole different kind of woodworking where hand tools and a simple shop can create an elegant chair.
Why WindSorS?There are lots of different ways to make wood add up to a chair. so what is it that makes the Windsor such an enduring and interesting form?
This well-proportioned comb-back high chair designed by Dave Sawyer is a good example of the strength and flexibility possible with the Windsor technology. It’s just wide enough for me to squeeze into, and very comfortable when I do.

xiv
When i began building chairs, i found the tools and techniques were in tune with the characteristics of the wood and the end product. like wool for yarn or hops in beer, it simply felt like the right thing to do with hand tools and wood.
Before i made chairs, my approach to wood choice was largely a matter of color; cherry is red, oak brown and maple blonde.
visitors to my shop often ask: “What kind of wood is it?” They expect the chair to be made from a single spe-cies. i explain that unlike wooden furniture where the materials are largely chosen for visual appeal, the species in Windsors are chosen for their strength, workability and the role that they play in the chair.
ring-porous hardwoods, such as oak, hickory and ash, make up the bent parts and spindles. They split easily
from the green logs and shave along the fibers to make parts of maximum strength and flexibility. The seat is made of large trees such as eastern white pine and pop-lar that are easy to dry and carve. The turnings are made of dense hardwoods, such as hard maple, that have great strength and hold crisp detail. of course, there can be variation on the choice of woods, but the primary require-ments of strength and workability are key.
This use of riven wood as a structural material yields many advantages in meeting the goals of the chair. The parts can be made unexpectedly thin, which gives the chair a lightness and flexibility that sets it apart from other wooden chairs. Working split wood also speeds the process by eliminating the need to reverse the cutting direction. This is a huge advantage when using hand tools.
splitting wood by hand for a chair isn’t a romantic gesture, but a way to bring about qualities in the chair that would be impractical to achieve by other means.
Unlike rustic furniture, which celebrates the raw materials and simple design, i found Windsors inter-esting because the end product goes beyond its humble organic origins. When i first looked at the chairs, i couldn’t imagine a process that would begin with a log.
a praCtiCal, not hiStoriCal, approaChobviously there is a long history to the Windsor chair. and along the way, i’m sure that just about every imag-inable technology has been used to build them and all sorts of design innovations have been tried. i am neither a historian nor a wood technologist; luckily, there are a number of good books on both subjects. in setting out to write this book, i wanted to make chairmaking accessible and open a door into a gratifying kind of woodworking.
looking back, i recognize that my own transition into working with green wood took place in stages. i remember simply wanting to see what a drawknife could do, and i didn’t care if it was on a split piece of oak des-tined for a chair or a 2x4. i encourage you to act on your impulse to explore and play. These are vital steps in the learning process.
even though i could simply lay out a single path to success for making a chair, i recognize that each of us comes from a different background, workshop and skill set, so i’ve tried to stress the principles that you’ll encoun-ter, knowing that you will apply the information that best suits your ability and interests.
Parts split and shaved along their long fibers retain the strength of the tree.
xv
i’ve structured the information so that the basic con-cepts are illustrated, and if you want to go deeper into the topic, you can delve further into the text. illustrating the book myself was an obvious choice for me because not only do i enjoy drawing, but i also hope to impart as much visual information as possible. plus, the chairs, with their thin lines and crisp silhouettes, translate beau-tifully when drawn.
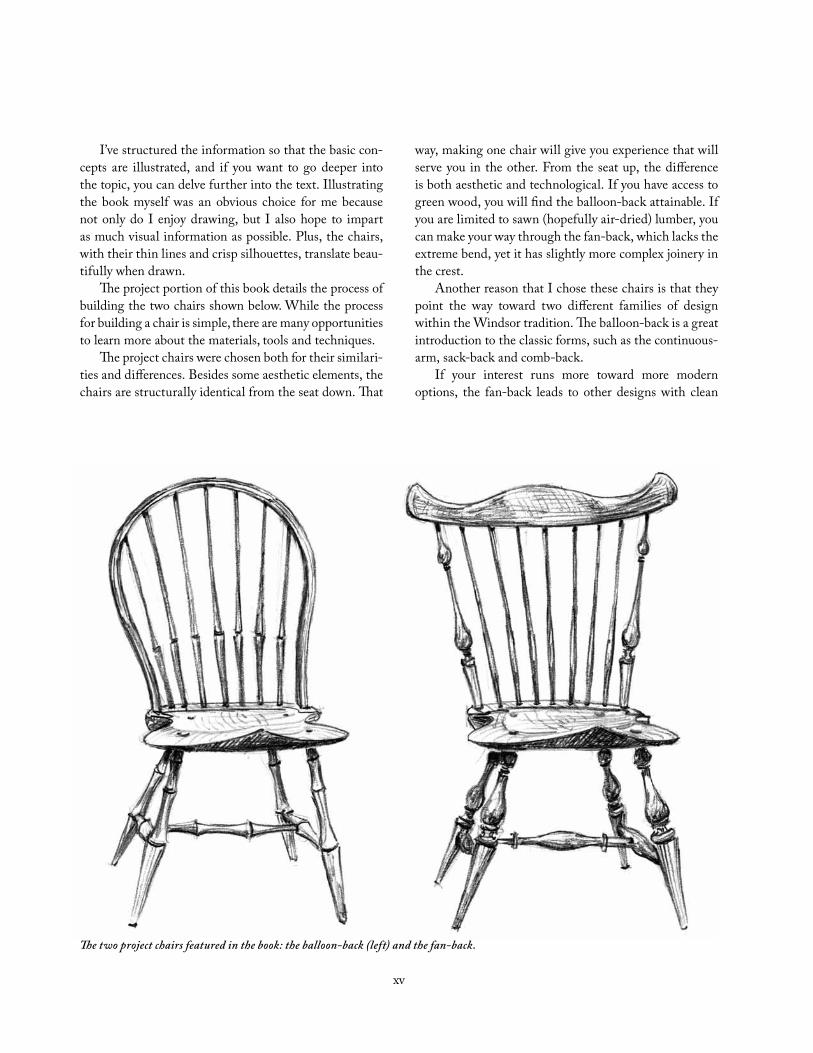
The project portion of this book details the process of building the two chairs shown below. While the process for building a chair is simple, there are many opportunities to learn more about the materials, tools and techniques.
The project chairs were chosen both for their similari-ties and differences. Besides some aesthetic elements, the chairs are structurally identical from the seat down. That
way, making one chair will give you experience that will serve you in the other. from the seat up, the difference is both aesthetic and technological. if you have access to green wood, you will find the balloon-back attainable. if you are limited to sawn (hopefully air-dried) lumber, you can make your way through the fan-back, which lacks the extreme bend, yet it has slightly more complex joinery in the crest.
another reason that i chose these chairs is that they point the way toward two different families of design within the Windsor tradition. The balloon-back is a great introduction to the classic forms, such as the continuous-arm, sack-back and comb-back.
if your interest runs more toward more modern options, the fan-back leads to other designs with clean
The two project chairs featured in the book: the balloon-back (left) and the fan-back.

xvi
asian-influenced lines, such as the birdcage and the step-down-crest styles. my unpainted contemporary designs are mostly rooted in the technology that begins with the fan-back form.
i also cover options for building these chairs using the lathe in a limited way, or without using a lathe at all. While turning is the most efficient way to make the legs and joinery, not having experience with or access to a lathe should not stop you from making a fine chair.
in this book, i’ve tried to address the questions that riddled me as i ventured into chairmaking and share some of the lessons and discoveries i’ve found helpful along the way. i spent most of my earlier years as a wood-worker poring over books to squeeze out the information that i needed. one thing that struck me was that i got something new each time i returned to my favorite texts. my goal here is to not only demonstrate ways to achieve the tasks, but to show some of the common problems you might encounter and how to address them. Because of
Drawing of two “ families” of chairs to which each project chair belongs.
this, some of the descriptions might make more sense to you once you’ve worked with the process and found a problem for yourself. if the depth of the information here ever seems daunting, take a deep breath and rest assured you can make a chair that will exceed your expectations with only the basic concepts in hand. once you’ve grown comfortable with them, the rest of the information might be more inviting.
even for experienced furniture makers, each process will likely introduce new challenges. from splitting wood to turning, steam bending to carving, it’s a different way of looking at making a piece of furniture. While there are many steps involved in making a successful chair, and mastering the process can be a lifetime pursuit, a little effort and resilience will pay off at each turn.
my hope is that the information here encourages you to build your first chair, or perhaps just your latest.
peter Galbert2014

Before speeding headlong into the glue-up, it’s worth revisiting the moisture content and the condition of the tenons and mortises. It’s important that the tenons be correctly sized only after being fully dried in the kiln and that they are stored in the kiln prior to assembly to ensure they are the proper dimension. I also bolster my chances for success by drilling my mortises right before assembly. Any time that they are allowed to sit will possibly affect their size.
I size my tenons as exactly as possible to fit the mor-tise that my bit is drilling. Every drill bit makes a slightly different-size hole, depending on its condition, the way it is chucked in the drill and the material it’s drilling. (More on this in the Drilling chapter). I always make a test hole in material that is the same species and moisture content as the legs.
These are not the kind of joints that you dry-fit by driving them all the way into the mortises. They will immediately pull moisture from the mortise and likely lock tight. Think of them like wooden nails. You should be able to slide each tenon only about one-third or so of the way in. When you pull it out, it might make a pop-ping sound. Resist the temptation to do too much test-fitting because that will compress the tenon fibers.
As I mentioned in the chapters on turning, I prefer to turn my stretchers from air-dried stock to a rough and oversized shape. Then I wrap the larger sections where the mortises for the center stretcher go in newspaper and put the stretcher in the kiln for a few days until the ends stop shrinking. I rechuck the stretcher blanks in the lathe and turn them to final shape and turn the tenons to size right before assembly. If needed, I can store them in the
Undercarriage Assembly
kiln until assembly, with the center portion wrapped in newspaper to prevent excess moisture loss.
If you plan to use a dedicated tenon cutter to form your tenons, you can turn the entire stretcher from air-dried blanks, leaving the ends oversized, then dry them before using the cutter.
Details on sizing joints are in the Turning: From Rough to Finish chapter.
Before assembly, I scuff-sand my tapered tenons with #220-grit paper to rough them up and remove the oxida-tion and burnishing from the reaming process. I also take inventory of the parts and their labels to ensure I can eas-ily locate their positions in the chair.
aSSeMble the underCarriageWhen driving joints together, I use old magazines or catalogs as a buffer between my bench and the mortised part to avoid denting the piece. It’s important to note that I drive the joint home with the tenoned part in one hand and the mortised part on the bench.
When I strike the end grain of a tenon while seating the tenon on the opposite side of a stretcher, I use a metal hammer; once the assembly advances and I am striking the surface of another turned part, I use a dead-blow mal-let. A tiny chamfer helps the joints’ initial fitting. You can do this by rubbing the corner of the tenon against a block of hardwood end grain.
aSSeMble the h-aSSeMblyThe first step is to assemble the H-stretcher assembly. Apply glue to the mortise and the tenon and orient the center stretcher as shown in Fig. 21.2. Then drive the
21
289

290 cHAIRMAkER’s noTEBook
tenon in until the line that marks the end of the 1" tenon is touching at the short end of the mortise.
next, I apply glue and orient the other side stretcher so that the front is in the same direction as the first one, then set the tenon a quarter of the way into the joint. This allows me to rotate the side stretcher until it’s parallel to the other one. You can check the results on the benchtop as shown.
If the joint locks and you are unable to adjust it with simple pressure, place the side stretcher on the bench and apply a subtle twist to the center stretcher while resting the stretcher against your hip to oppose the twisting force.
During the moments that the tenon advances into the mortise, it also twists. By sighting down from the top, I can see the result and continue to twist the center stretcher if needed.
Clean off the glueI clean the hide glue around joints as I assemble them. cleaning glue should be a process of removing it, not just diluting it and spreading it around until it blends in. Glue residue can affect paint adhesion as well as the patination
in unpainted pieces such as cherry. so it is a good idea to remove it thoroughly. I begin by using a cheap chip brush that has been cut short to form stiff bristles. I dip the brush in hot water from the glue-heating reservoir and remove most of the water from the brush before swiping away the excess glue.
I clean the brush several times during this process and blot the excess water away on a towel before touching it to the joint. once all traces of visible glue are removed, I scrub the joint lightly and pat away the moisture from the area. Hide glue naturally glows green under UV light, which is helpful when determining whether your clean-ing process is effective.
Mount the h-aSSeMbly in the legSPlace the seat upside down on blocks to prevent the tops of the leg tenons from striking the benchtop as they stick out past the carved seat. The actual assembly takes place in two stages. First the legs are glued to the side stretch-ers, then the leg-and-stretcher assembly is glued into the seat. I’ve tried lots of different methods for aligning the
Fig. 21.1 How to assemble mortise-and-tenon joints for the undercarriage.
Use a metal hammer when striking a bare tenon.
Always have the joint being assembled on the bench.
Use a dead-blow mallet when striking assembled parts.
Rubbing the edge of a tenon on the end grain of hardwood to make a micro-chamfer eases assembly.
Old magazines prevent dents.

UnDERcARRIAGE AssEMBlY 291
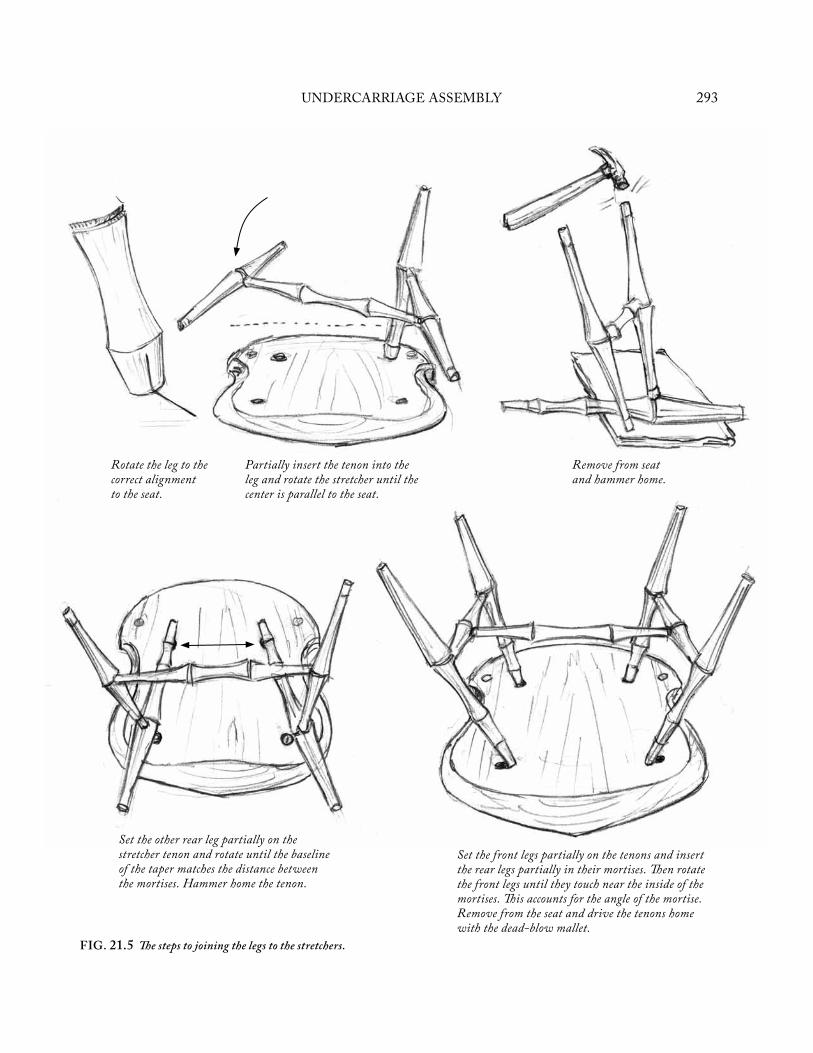
parts during assembly. This is an important step because the joints lock as they are seated. once the tenons are set all the way, there is usually little hope of adjusting the rotation of the leg.
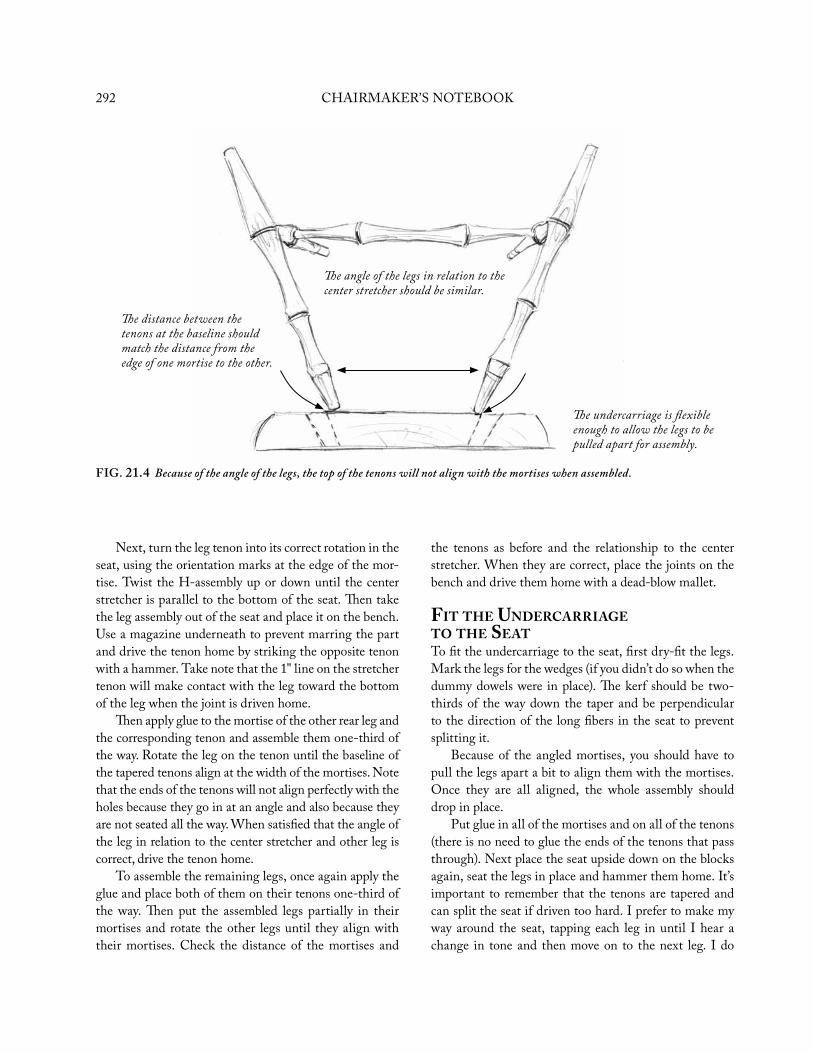
To find the correct rotation of the legs when put-ting them on the stretcher assembly, I use the distance between the mortises in the seat as a reference. I rotate the legs on the stretchers until the distance of the baseline of the tapered tenons matches the distance between the mortises. It’s important to note that the ends of the tapers will not align with the mortises at this point. I also check the symmetry of the angles of the legs in relation to the center stretcher before driving the joints home.
Be sure that the legs are clearly labeled with their respective seat mortises as well as the tenons of the stretcher assembly.
start with one of the rear legs and put glue in the mor-tise and on the tenon of the corresponding side stretcher. Insert the stretcher piece about one-third of the way into the joint. Don’t drive the joint all the way home or the tenon might lock and swell. set the leg in its mortise in the seat.
The tangential plane of the tenon should be perpendicular to the long fibers in the mortised piece.
Make sure that the marks denoting the rear of the stretchers are on the same side.
Drive the tenon until the baseline makes contact with the mortise on the obtuse side of the joint.
Twist the side stretchers into alignment on the benchtop before driving the joint home.
Fig. 21.2 Steps for assembling the H-stretcher.
Fig. 21.3 How to twist the center stretcher as you seat the tenon.
292 cHAIRMAkER’s noTEBook
next, turn the leg tenon into its correct rotation in the seat, using the orientation marks at the edge of the mor-tise. Twist the H-assembly up or down until the center stretcher is parallel to the bottom of the seat. Then take the leg assembly out of the seat and place it on the bench. Use a magazine underneath to prevent marring the part and drive the tenon home by striking the opposite tenon with a hammer. Take note that the 1" line on the stretcher tenon will make contact with the leg toward the bottom of the leg when the joint is driven home.
Then apply glue to the mortise of the other rear leg and the corresponding tenon and assemble them one-third of the way. Rotate the leg on the tenon until the baseline of the tapered tenons align at the width of the mortises. note that the ends of the tenons will not align perfectly with the holes because they go in at an angle and also because they are not seated all the way. When satisfied that the angle of the leg in relation to the center stretcher and other leg is correct, drive the tenon home.
To assemble the remaining legs, once again apply the glue and place both of them on their tenons one-third of the way. Then put the assembled legs partially in their mortises and rotate the other legs until they align with their mortises. check the distance of the mortises and
Fig. 21.4 Because of the angle of the legs, the top of the tenons will not align with the mortises when assembled.
the tenons as before and the relationship to the center stretcher. When they are correct, place the joints on the bench and drive them home with a dead-blow mallet.
fit the underCarriage to the SeatTo fit the undercarriage to the seat, first dry-fit the legs. Mark the legs for the wedges (if you didn’t do so when the dummy dowels were in place). The kerf should be two-thirds of the way down the taper and be perpendicular to the direction of the long fibers in the seat to prevent splitting it.
Because of the angled mortises, you should have to pull the legs apart a bit to align them with the mortises. once they are all aligned, the whole assembly should drop in place.
Put glue in all of the mortises and on all of the tenons (there is no need to glue the ends of the tenons that pass through). next place the seat upside down on the blocks again, seat the legs in place and hammer them home. It’s important to remember that the tenons are tapered and can split the seat if driven too hard. I prefer to make my way around the seat, tapping each leg in until I hear a change in tone and then move on to the next leg. I do
The angle of the legs in relation to the center stretcher should be similar.
The distance between the tenons at the baseline should match the distance from the edge of one mortise to the other.
The undercarriage is flexible enough to allow the legs to be pulled apart for assembly.
UnDERcARRIAGE AssEMBlY 293
Fig. 21.5 The steps to joining the legs to the stretchers.
Rotate the leg to the correct alignment to the seat.
Partially insert the tenon into the leg and rotate the stretcher until the center is parallel to the seat.
Set the other rear leg partially on the stretcher tenon and rotate until the baseline of the taper matches the distance between the mortises. Hammer home the tenon.
Set the front legs partially on the tenons and insert the rear legs partially in their mortises. Then rotate the front legs until they touch near the inside of the mortises. This accounts for the angle of the mortise. Remove from the seat and drive the tenons home with the dead-blow mallet.
Remove from seat and hammer home.

294 cHAIRMAkER’s noTEBook
Fig. 21.6 Steps for assembling the legs to the seat.
Split and shaved wedges drive easier and resist breaking.
Place the seat on boards when gluing in the legs.
Hold the leg vertical while driving wedges.

UnDERcARRIAGE AssEMBlY 295
this a few times because the seating of each joint seems to allow the other to seat a little more. Finally, when I whack each joint and hear a dull thud, I flip the seat over to drive the wedges.
I always drive the wedges immediately to avoid dis-turbing the glue as it sets. Hold the leg vertical over the leg of the bench to ensure that the force driving the wedge is absorbed without driving the leg back out of its mortise.
I prefer to split and shave my wedges from hard maple or oak. split wedges break less often and drive more smoothly than sawn wedges. I glue only one side of the wedge to allow a “plane of failure” where stress can be relieved during seasonal movement. I make my wedges just a hair wider than the mortise at the top and cut off the corners to ease their entry. once again, you will hear a dull thud when the wedges are driven fully home.
let the chair sit overnight so the glue can fully cure before trimming the legs and the tenons.
aSSeMbly probleMSMost of the time, there are small imperfections, but nothing that the forgiving nature of the chair can’t read-ily absorb. However, some problems will have to be addressed either before or during assembly. Usually, a little persuasion with a mallet or hammer can stress the legs into position, but some circumstances may require further effort.
tenon driveS too deepIt isn’t unusual to drive a tenon too deep, especially
when you are new to making joints with such tight toler-ances. It’s usually only an 1 ∕ 8" or less because of the depth of the mortise. If for some reason it’s deeper, which still won’t be too much of an issue, you can either drive the tenon on the other side of the stretcher less, or attempt to pull the stretcher out by twisting and pulling. A little heat from a heat gun or lamp might help, but be careful; even hard maple tenons can shear when twisted.
tenon Won’t drive inIf the joint is too tight or you’re using yellow glue, the
tenon might seize halfway home. sometimes a good hard whollop will free the joint and it will drive the rest of the way with no problem. In extreme circumstances I’ve sac-rificed the mortised part by splitting it apart at the tenon. The tenons should be able to slide one-third of the way into the mortise without twisting and squeaking.
If the tenon is within 1 ∕ 8" or so from being fully seated and won’t go any deeper, then the mortise might not be deep enough. It won’t be an issue, but you should check the other mortises to make sure that they are a full 1" on the shallow side.
Split Seatseat splits during assembly are rare when fitting well-
shaped tenons in wood that has been properly dried. I’ve only seen lots of splitting when the moisture content of the wood used in the seat is questionable. When the outer portions of a seat are drier than the center, the shrinking on the surface creates tension between the two faces of the board. When the top is carved, leaving only a small band of the surface wood at the spindle deck, the battle of tensions is off-balance, and driving a tenon in the bottom is the last straw. small splits that stay within the edges of the seat can be filled with thin shims and epoxy. splits that reach the edge can be kerfed with a saw and filled with veneer and epoxy. obviously this is not the most desirable result. Allowing the seat stock to acclimate to the shop for a couple of months should resolve the issue if variation in moisture is the cause.
Split legThe joints in chairs must be tight, it’s not unheard of
to see a small split on the lower portion of the leg. The lower portion of the legs is thinner due to the tapering, and because the mortise is drilled at an angle. Driving the tenon at odd angles can also contribute to a split.
While this isn’t the most desirable result, the split doesn’t cause any problems, besides adding a little anxiety to the process. If this happens, take it as proof that the joints are tight. And inspect the rest of them to make sure that they aren’t oversized. If you’ve left the tenons exposed to the air outside of the kiln for too long, they may have absorbed moisture and swelled. Placing them in the kiln, or in a hotter kiln, can help. care should be taken not to place green wood in the kiln alongside the dry wood before assembly, because the moist atmosphere will transfer the moisture and cause the tenons to swell.
bad rotation of a part on a tenonIf a part is fully seated yet it is rotated so that the tan-
gential plane is not perpendicular to the long fibers, you might be able to correct it by applying rotary motion (and perhaps some heat) to the joint. A tight joint might make

296 cHAIRMAkER’s noTEBook
this impossible, but this isn’t such a bad result that I’d cut the part off. on the other hand, if the part is rotated so that the geometry of the undercarriage becomes overly stressed and heat and torque cannot correct the rotation, I cut or split the part off and make another.
Wrong leg loCation I always draw a line completely around the side
stretchers to correspond with the back of the chair. I can see the mark regardless of the position of the stretchers. This helps ensure that the stretchers are correctly oriented to each other and that the legs are in the proper position.
Another easy thing to spot is the reference line marked on the outside of the leg during the drilling process. If you ever see this mark on the inside of a leg during assembly, then you immediately know that it is in the wrong position. If the leg is put on the wrong tenon, hopefully it is only put on the wrong side; otherwise the difference between the front and back angles may require you to split off the leg if it won’t come loose.
Fig. 21.7 Occasionally a leg will split.
Wedge probleMSDriving wedges can be tough. Getting them started
when the kerf has closed can lead to all sorts of clumsi-ness. A small tap with a chisel in the kerf usually creates enough of a start. If not, a triangular file does a good job of widening the starting point. often the wedge drives in crooked. If this is a constant problem, check the wedges to make sure that one edge isn’t thinner than the other. I use a metal hammer to focus the force of the blow.
If a wedge breaks while driving it, you can often drive the rest of the broken wedge into the gap and continue. If not, I usually just chase the part that is already in the gap with a new wedge, rather than trying to fish it out.
It’s wise to not have too much of the tenon exposed beyond the mortise when wedging. When the tenon is too long, it can deflect enough to cause it to break below the edge of the mortise, leaving an ugly wound.
It seems obvious, but it’s true, that the best results during assembly will come from avoiding errors earlier in the process. luckily, the H-stretcher assembly is forgiv-ing, and the undercarriage can usually be persuaded into behaving, even with less-than-perfect joint alignment.
When building my first chairs, I swept the shop twice and took a long coffee break while mustering the nerve to assemble the undercarriage. Most of this need arose from my inexperience and lack of a consistent process. since then, I’ve refined my process and assembly is anti-climactic. That being said, it’s still ok to sweep the shop one more time and wait for the coffee to finish while you mull it over.
Split legs are usually the result of an oversized tenon and the frail edge at the bottom of the mortise.