UNCONTROLLED IF PRINTED 19-1 ADF Force Extraction Cleaning Manual CHAPTER 19 CLEANING INSTRUCTIONS – CRAWLER EXCAVATORS 19.1 This chapter provides basic cleaning requirements for selected vehicles. Where there is a specific requirement or need to highlight particular problem areas detailed cleaning guides are provided as tables and figures or as Annexes in this chapter. 19.2 Excavators are very complex pieces of machinery. While all contamination and BRM must be removed, the main areas of concern are: a. external areas; b. cabin; c. engine bay; d. hydraulic and electrical cables; e. car body; f. tracks; g. turret/slew ring; and h. the boom arm and bucket. 19.3 All points are not specific to all crawler excavators. External Areas 19.4 The cleaning instructions for the excavator’s external areas include the points detailed in Table 19-1. Table 19–1: Cleaning Instructions for the Excavator’s External Areas Serial Comments or Tasks Technical Time (hours) 1 All CES is to be removed and independently cleaned. Where possible/practical do not refit until after the vehicle has been inspected by DA. 2 Lights are to be loosened and cleaned and any damaged lights are to be removed to allow cleaning of the fitting to ensure there is no soil, plant or insect matter. 3 Access panels, belly plates and rock guards are to be removed and the track area cleaned of all soil, plant and insect matter with high-pressure water. 4 Remove floor panels and machine body access plate from underside of machine. 0.5 5 Clean areas on top of transmission and underneath the engine to remove dirt and dust that has accumulated in the body of the machine. 6 Remove vertical access panel in front of blade and ripper control
Transcript
UNCONTROLLED IF PRINTED
19-1
ADF Force Extraction Cleaning Manual
CHAPTER 19
CLEANING INSTRUCTIONS – CRAWLER EXCAVATORS
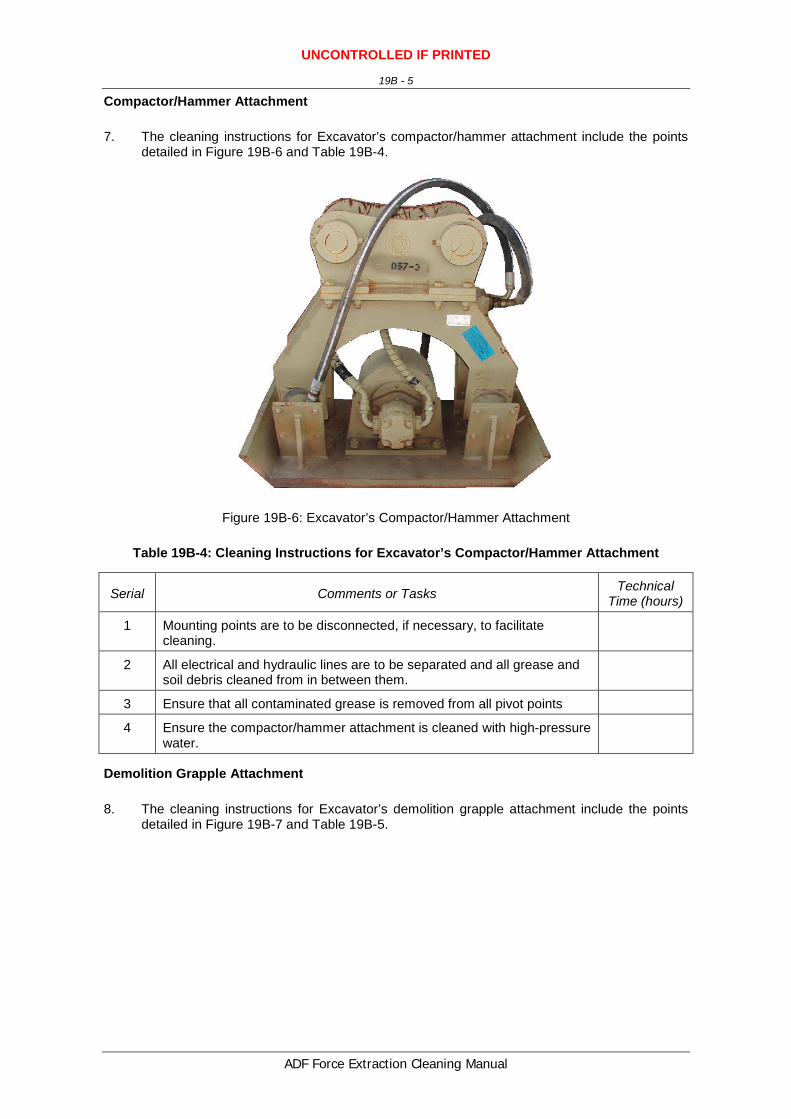
19.1 This chapter provides basic cleaning requirements for selected vehicles. Where there is a specific requirement or need to highlight particular problem areas detailed cleaning guides are provided as tables and figures or as Annexes in this chapter.
19.2 Excavators are very complex pieces of machinery. While all contamination and BRM must be removed, the main areas of concern are:
a. external areas;
b. cabin;
c. engine bay;
d. hydraulic and electrical cables;
e. car body;
f. tracks;
g. turret/slew ring; and
h. the boom arm and bucket.
19.3 All points are not specific to all crawler excavators.
External Areas
19.4 The cleaning instructions for the excavator’s external areas include the points detailed in Table 19-1.
Table 19–1: Cleaning Instructions for the Excavator’s External Areas
Serial Comments or Tasks Technical Time (hours)
1 All CES is to be removed and independently cleaned. Where possible/practical do not refit until after the vehicle has been inspected by DA.
2 Lights are to be loosened and cleaned and any damaged lights are to be removed to allow cleaning of the fitting to ensure there is no soil, plant or insect matter.
3 Access panels, belly plates and rock guards are to be removed and the track area cleaned of all soil, plant and insect matter with high-pressure water.
4 Remove floor panels and machine body access plate from underside of machine.
0.5
5 Clean areas on top of transmission and underneath the engine to remove dirt and dust that has accumulated in the body of the machine.
6 Remove vertical access panel in front of blade and ripper control
UNCONTROLLED IF PRINTED
19-2
ADF Force Extraction Cleaning Manual
Serial Comments or Tasks Technical Time (hours)
valves. Pressure-wash the exterior of the direction control valves and linkages to remove all dust and dirt.
7 Refer to bellow for detailed cleaning guidelines for the Telescopic Boom and the Bucket.
8 Mounting points are to be disconnected, if necessary, to facilitate cleaning.
1.0
9 Hydraulic lines are to be wiped clean of all soil and fluid. 0.1
10 Cable conduit is to be cleaned with high-pressure water or removed.
11 Hydraulic hose guards, hydraulic cylinder and blade mounting points are to be cleaned with high-pressure water.
12 The external areas of the excavator are to be cleaned with a high-pressure water cleaner.
Cabin
19.5 The cleaning instructions for an excavator’s cabin include the points detailed in Table 19-2.
Table 19–2: Cleaning Instructions for the Excavator’s Cabin
Serial Comments or Tasks Technical Time (hours)
1 Remove any rubber floor mats and clean floor surface.
2 Remove and clean all door rubbers, internal door panelling and clean all windowsills.
3 Remove and clean under the seat, including the rubber seat shroud.
4 Remove any non-affixed floor panel if applicable and clean underneath.
5 Remove rubber pedal covers and clean.
6 Clean behind all cabin walls lining/panelling. Access will be required for inspection.
7 All air-conditioning vents must be internally cleaned. Access will be required for inspection
8 Clean inside all joystick controls. Access will be required for inspection.
9 Check cleanliness of cabin roof, both inside and out.
10 Clean ladder to cabin (may have hollow frame) and under each footstep.
11 Internally clean all light covers. Access will be required for inspection.
12 Empty windscreen reservoir.
13 Check for false floor under cabin and remove (if applicable) for cleaning.
14 Check if the vertical cabin housing can be flushed via drainage holes.
15 Clean around roll over protection support structure.
UNCONTROLLED IF PRINTED
19-3
ADF Force Extraction Cleaning Manual
Engine Bay
19.6 The cleaning instructions for a excavator’s engine bay include the points detailed in Table 19-3.
Table 19–3: Cleaning Instructions for the Excavator’s Engine Bay
4 Check all surfaces of the engine block including between tappet covers.
5 Remove belly plates if applicable and clean.
6 Remove all non-affixed engine covers to allow access for cleaning and inspection.
7 Remove all engine cover rubbers for cleaning and inspection.
8 Check engine housing for open-ended or spot-welded hollow support framework - flush to verify cleanliness.
9 Chassis rails either side of engine are hollow and maybe flushed via drainage holes on underside of the rail (Access maybe available once belly plate bolts have been removed).
10 Flush radiator and oil cooler from both sides to verify fin/core cleanliness.
11 Loosen radiator shroud to let any loose debris fall through after flushing.
12 Check either side of radiator for vertical hollow support structures. Flush to verify internal cleanliness if present.
13 Check all wiring harnesses for internal cleanliness.
14 Check under all hydraulic looming for cleanliness.
15 Ensure all engine mounts are clean.
16 Ensure that all surfaces of sump and engine block is clean.
17 All water reservoirs must be emptied (excluding radiator).
18 Remove all contaminated grease from universal joints.
19 Internally clean all light covers. Access will be required for inspection.
20 Removing zip-ties and electrical tape that hold electric and process hydraulic hoses together can facilitate the cleaning and inspection
21 Check above the sway bar – for cleanliness.
22 Flush under all checker-plate (non-slip footings) to ensure clean
23 Remove batteries and clean terminals, leads and the battery box.
UNCONTROLLED IF PRINTED
19-4
ADF Force Extraction Cleaning Manual
Hydraulic and Electrical Cables
19.7 The cleaning instructions for the excavator’s hydraulic and electrical cables include the point detailed in Table 19-4.
Table 19–4: Cleaning Instructions for the a Excavator’s Hydraulic and Electrical Cables
Serial Comments or Tasks Technical Time (hours)
1 All electrical and hydraulic lines are to be separated and all grease and soil debris cleaned from in between them.
2.0
Car-body
19.8 The cleaning instructions for an excavator’s car-body include the points detailed in Table 19-5.
Table 19–5: Cleaning Instructions for the Excavator’s Car-body
Serial Comments or Tasks Technical Time (hours)
1 All non-affixed panels to be removed including engine covers
2 Looming around electric and hydraulic loses
3 Wiring Harness – check inside
4 Radiator – check inside fins (flushed)
5 Radiator shroud – remove and flush
6 Counterweight – Some models must be removed to allow access
7 Engine Cover rubbers – remove to check cleanliness
8 Oil cooler - check inside fins (flushed)
9 Air filters
10 Air filter - Pre cleaner
11 Battery Box
12 On some models the bottom rail along both sides is open ended
13 All water reservoirs to be emptied (excluding radiator)
14 Remove all electrical tape and some zip ties
Tracks, Rollers and Frames
19.9 The cleaning instructions for an excavator’s tracks include the points detailed in Table 19-6.
Table 19–6: Cleaning Instructions for the Excavator’s Tracks
Serial Comments or Tasks Technical Time (hours)
1 Individual rubber track pads are to be removed (if applicable – small excavators) and cleaned.
2 Remove motor covers and plates to enable cleaning
3 Once motor cover plates have been removed - clean inside drive
UNCONTROLLED IF PRINTED
19-5
ADF Force Extraction Cleaning Manual
Serial Comments or Tasks Technical Time (hours)
motor.
4 Rollers – each countersunk bolt hole must be cleaned
5 Track frame ends – if hollow they will require flushing to remove all contamination.
6 Track Rock guards – remove and flush inside track frames
7 Once rock guards have been removed, check where bolts attach to frame as it may be a hollow cavity, which will require flushing.
8 Roll tracks – one revolution required to completely check each pad and countersunk bolts on rollers and idler wheels
9 Clean behind sprockets (all excavators)
10 Spring adjuster inside track frame can harbour contamination
11 If excavator has telescopic tracks (generally small excavators), ensure these are extended and internally cleaned.
12 Carrier roller above tracks – can have hollow support structure, which requires checking.
13 Clean all internal ledges and hollow cavities inside track frames, which can harbour contamination.
14 Remove all non-affixed covers & plates.
Turret/Slew Ring
19.10 The cleaning instructions for an excavator’s turrets/slew rings include the points detailed in Table 19-7.
Table 19–7: Cleaning Instructions for the Excavator’s Turret/Slew Ring
Serial Comments or Tasks Technical Time (hours)
1 Remove turret belly plate and clean inside
2 Check underside of turret for drainage holes (down towards track frames)
3 Hydraulic cables run from turret down to drive motors – hollow cavity needs to be thoroughly investigated and cleaned
4 Grease pivot points – all contaminated grease to be removed
Telescopic Booms & Buckets
19.11 The cleaning instructions for a excavator’s booms and buckets include the points detailed in Table 19-8 and in Annex B to this Chapter.
Table 19–8: Cleaning Instructions for the Excavator’s Telescopic Booms & Buckets
Serial Comments or Tasks Technical Time (hours)
1 Check front and backside of bucket for any cracks, splits or evidence of repair. If any detected, the inside will need to be verified clean.
UNCONTROLLED IF PRINTED
19-6
ADF Force Extraction Cleaning Manual
Serial Comments or Tasks Technical Time (hours)
2 Remove and flush all non-affixed wear plates on back of bucket. The wear plates either side of the bucket must be either dismantled or at the very least loosened off and flushed behind.
3 Flush spot-welded wear plates on back of bucket.
4 All cutting teeth are to be removed from bucket (Boots)
5 Ensure the countersunk holes where the wear plates attach are free of all contamination.
6 Flush under the checker-plate.
7 Ensure all contaminated grease is removed from the rams and pivot points.
8 Check all hydraulic lines and mounting points. The boom can be extended and lowered to address occupational health & safety concerns (otherwise use scaffolding or cherry picker).
9 Boom arm maybe hollow and necessitate the removal of external, non-affixed plates
10 Check along the length of the boom, ensuring all risk material including contaminated grease is Removed. All hydraulic lines need to be cleaned and inspected.
11 Check along all surfaces, and hydraulic rams for the presence of any drainage holes or openings in the boom stick. Ensure the holes are un-blocked and flush.
12 All knuckles must be cleaned
13 All contaminated grease to be removed
Annexes:
A. Cleaning Instructions – Caterpillar 320/325 Crawler Excavator B. Cleaning Instructions – Crawler Excavator Attachments C. Cleaning Checklist – Crawler Excavators
1. This annex provides specific cleaning requirements for selected vehicles. Where there is a specific requirement or need to highlight particular problem areas detailed cleaning guides are provided as tables and figures in this annex.
2. The cleaning requirements that follow are in addition to those points for excavators included in Chapter 19 of this publication.
External Areas
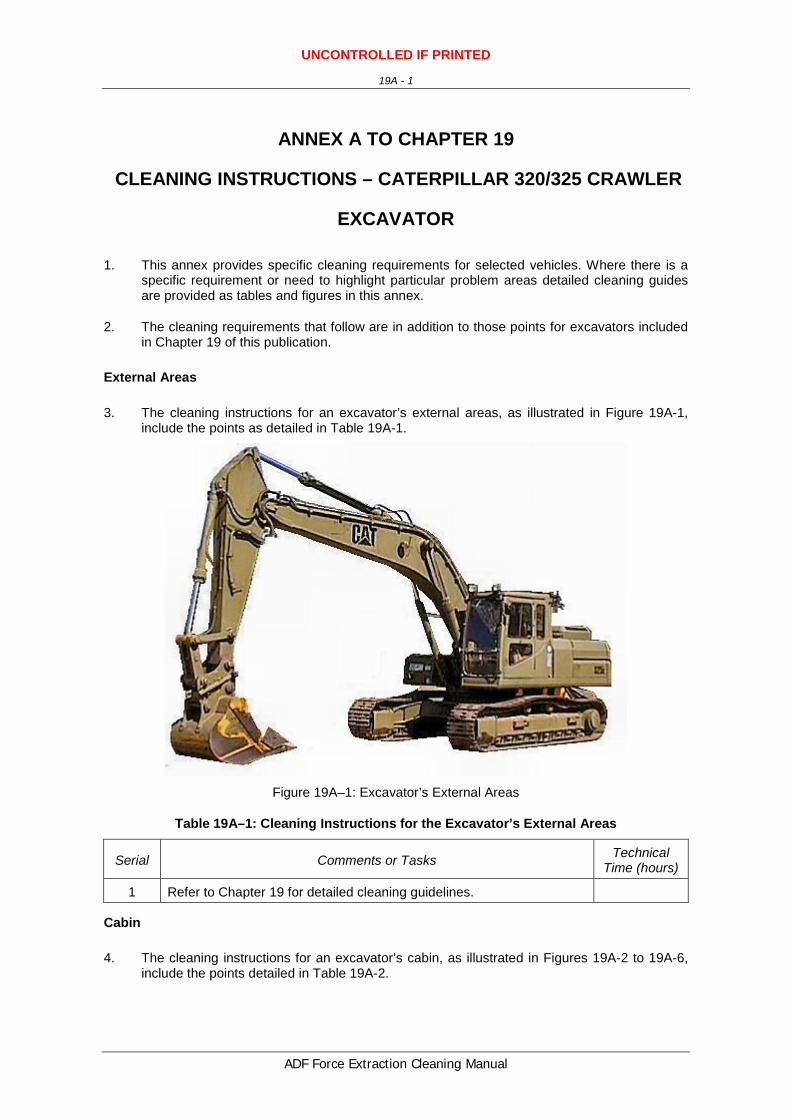
3. The cleaning instructions for an excavator’s external areas, as illustrated in Figure 19A-1, include the points as detailed in Table 19A-1.
Figure 19A–1: Excavator’s External Areas
Table 19A–1: Cleaning Instructions for the Excavator’s External Areas
Serial Comments or Tasks Technical Time (hours)
1 Refer to Chapter 19 for detailed cleaning guidelines.
Cabin
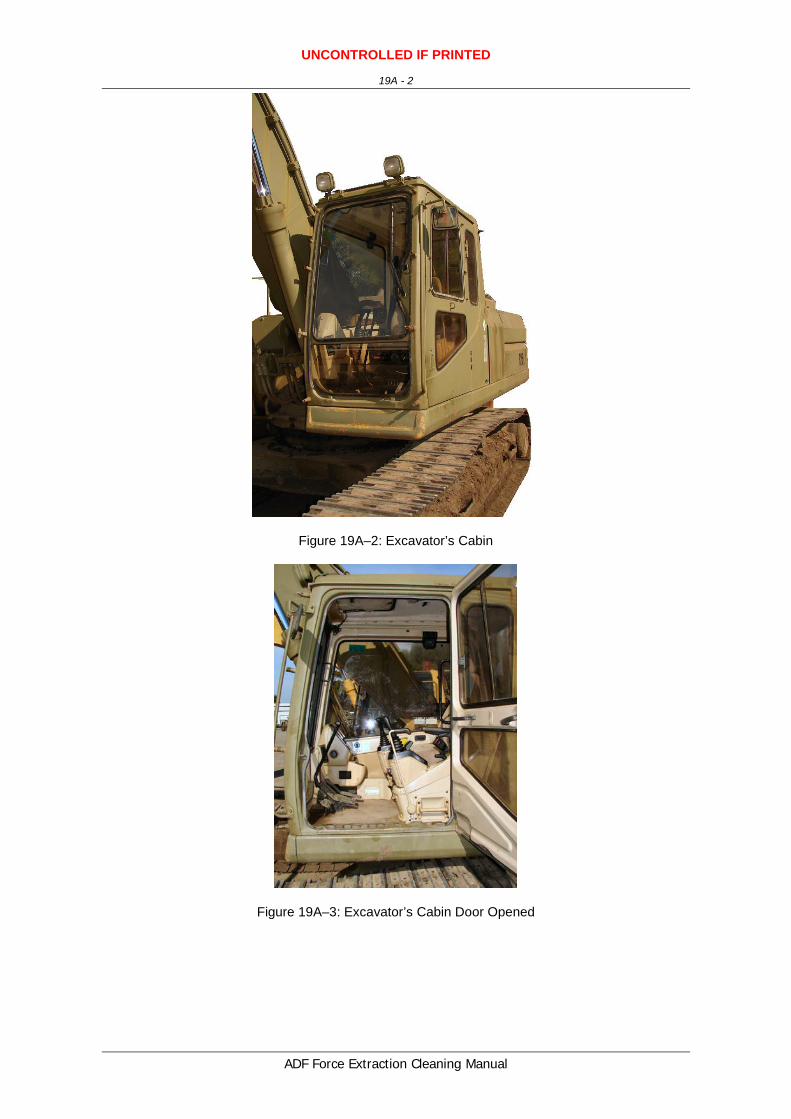
4. The cleaning instructions for an excavator’s cabin, as illustrated in Figures 19A-2 to 19A-6, include the points detailed in Table 19A-2.
UNCONTROLLED IF PRINTED
19A - 2
ADF Force Extraction Cleaning Manual
Figure 19A–2: Excavator’s Cabin
Figure 19A–3: Excavator’s Cabin Door Opened
UNCONTROLLED IF PRINTED
19A - 3
ADF Force Extraction Cleaning Manual
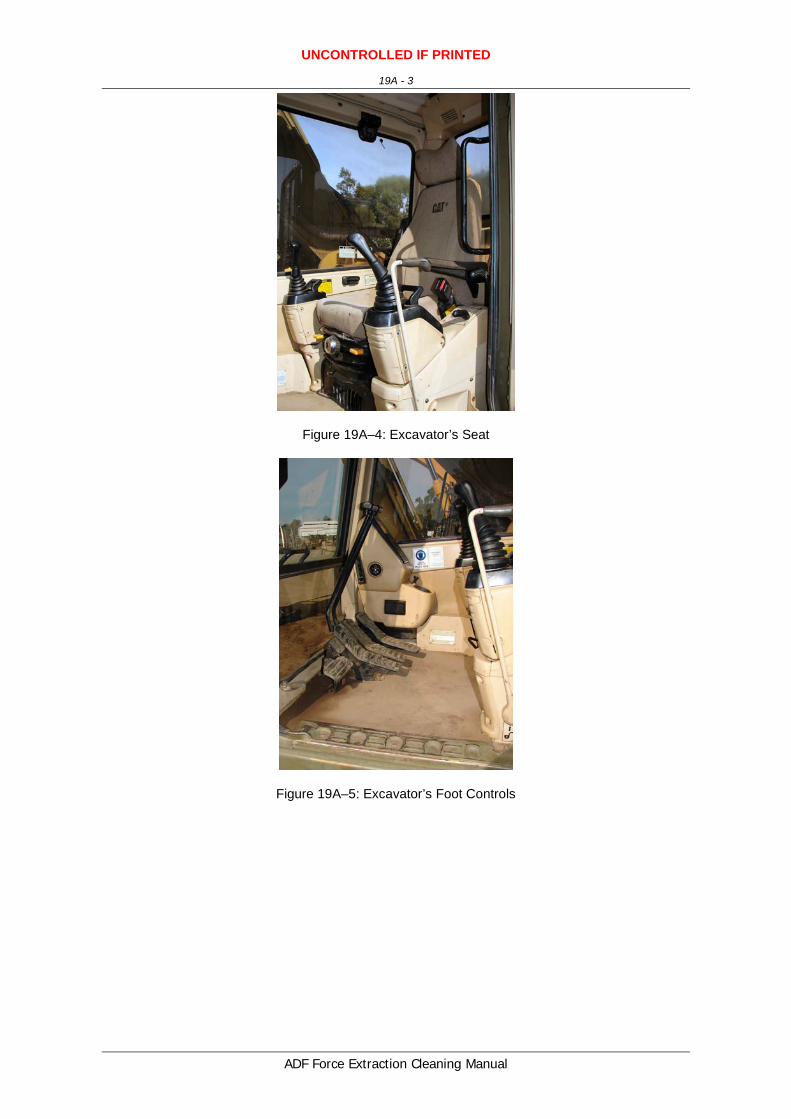
Figure 19A–4: Excavator’s Seat
Figure 19A–5: Excavator’s Foot Controls
UNCONTROLLED IF PRINTED
19A - 4
ADF Force Extraction Cleaning Manual
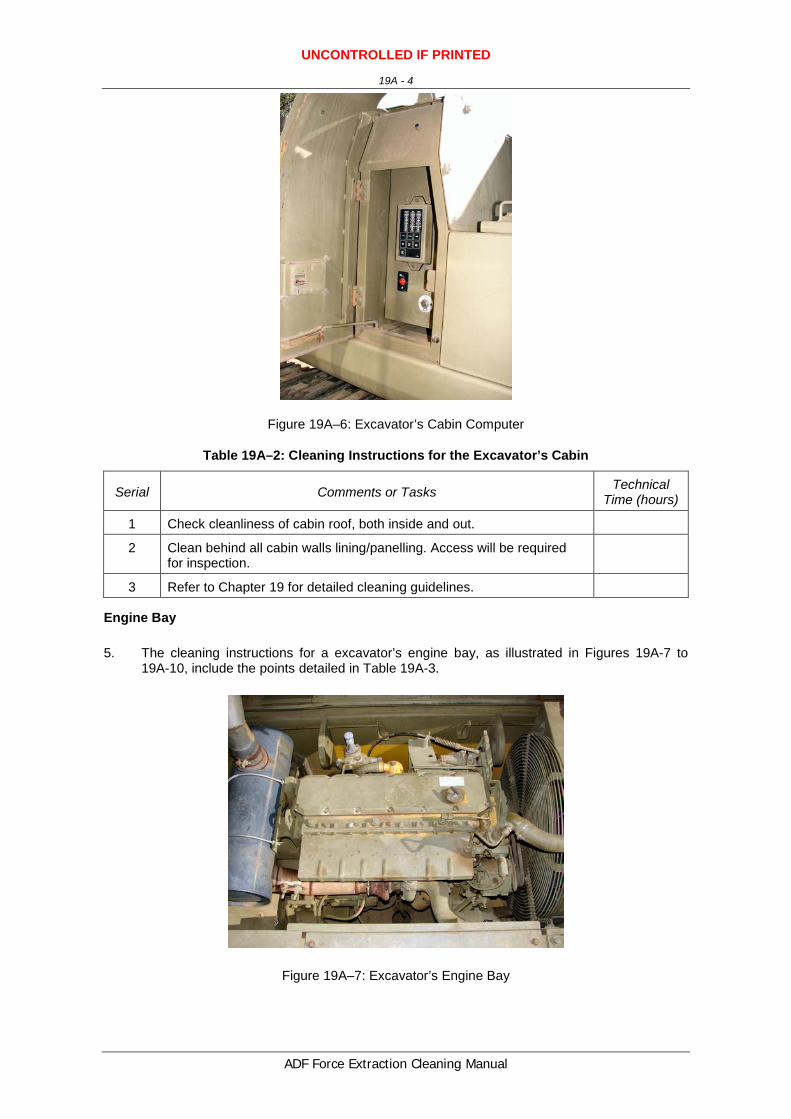
Figure 19A–6: Excavator’s Cabin Computer
Table 19A–2: Cleaning Instructions for the Excavator’s Cabin
Serial Comments or Tasks Technical Time (hours)
1 Check cleanliness of cabin roof, both inside and out.
2 Clean behind all cabin walls lining/panelling. Access will be required for inspection.
3 Refer to Chapter 19 for detailed cleaning guidelines.
Engine Bay
5. The cleaning instructions for a excavator’s engine bay, as illustrated in Figures 19A-7 to 19A-10, include the points detailed in Table 19A-3.
Figure 19A–7: Excavator’s Engine Bay
UNCONTROLLED IF PRINTED
19A - 5
ADF Force Extraction Cleaning Manual
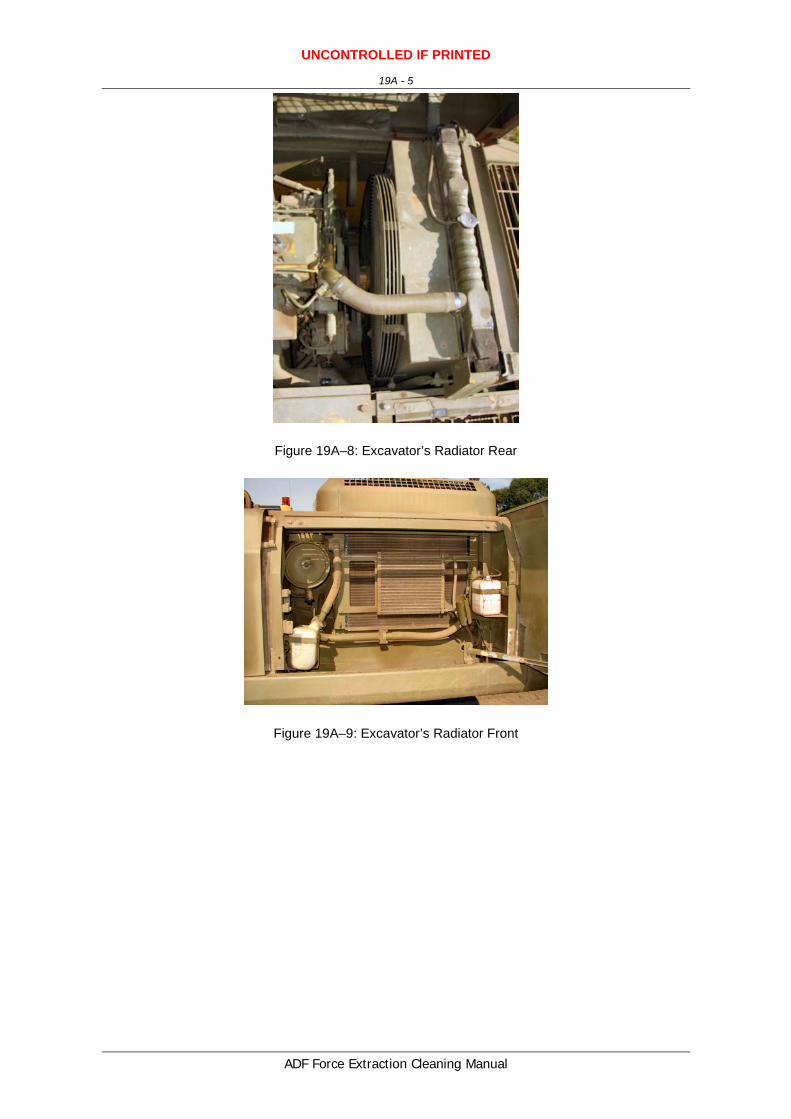
Figure 19A–8: Excavator’s Radiator Rear
Figure 19A–9: Excavator’s Radiator Front
UNCONTROLLED IF PRINTED
19A - 6
ADF Force Extraction Cleaning Manual
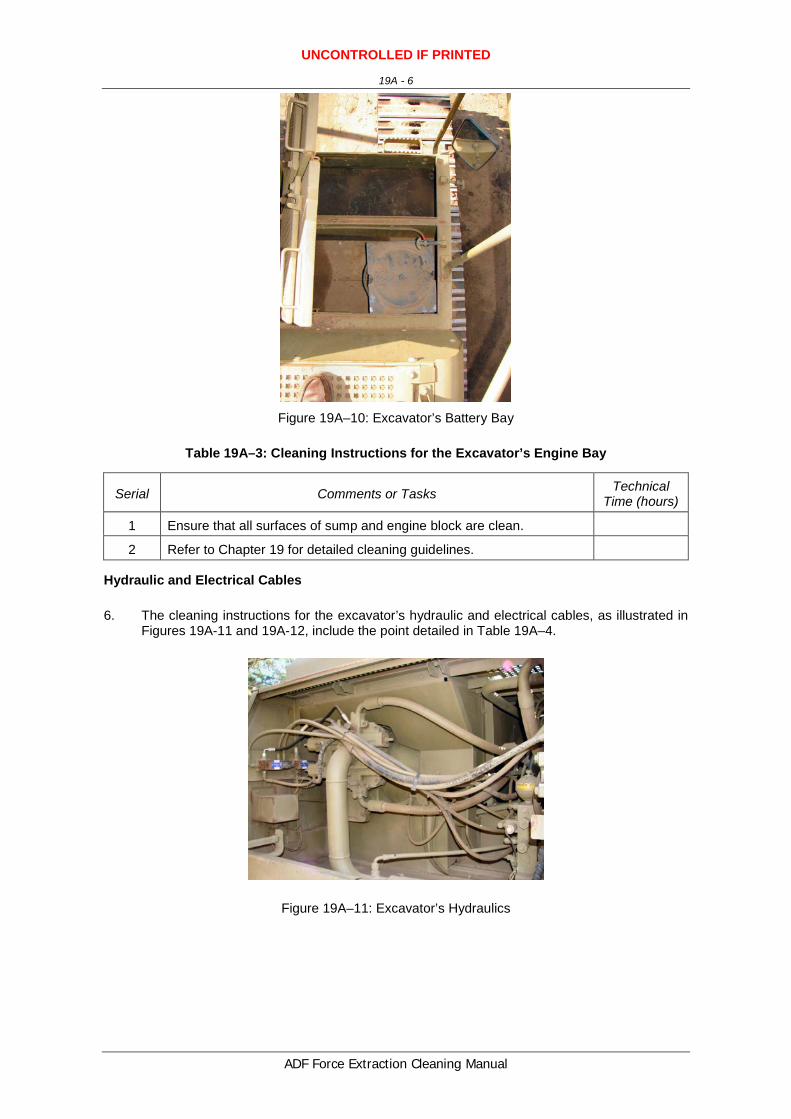
Figure 19A–10: Excavator’s Battery Bay
Table 19A–3: Cleaning Instructions for the Excavator’s Engine Bay
Serial Comments or Tasks Technical Time (hours)
1 Ensure that all surfaces of sump and engine block are clean.
2 Refer to Chapter 19 for detailed cleaning guidelines.
Hydraulic and Electrical Cables
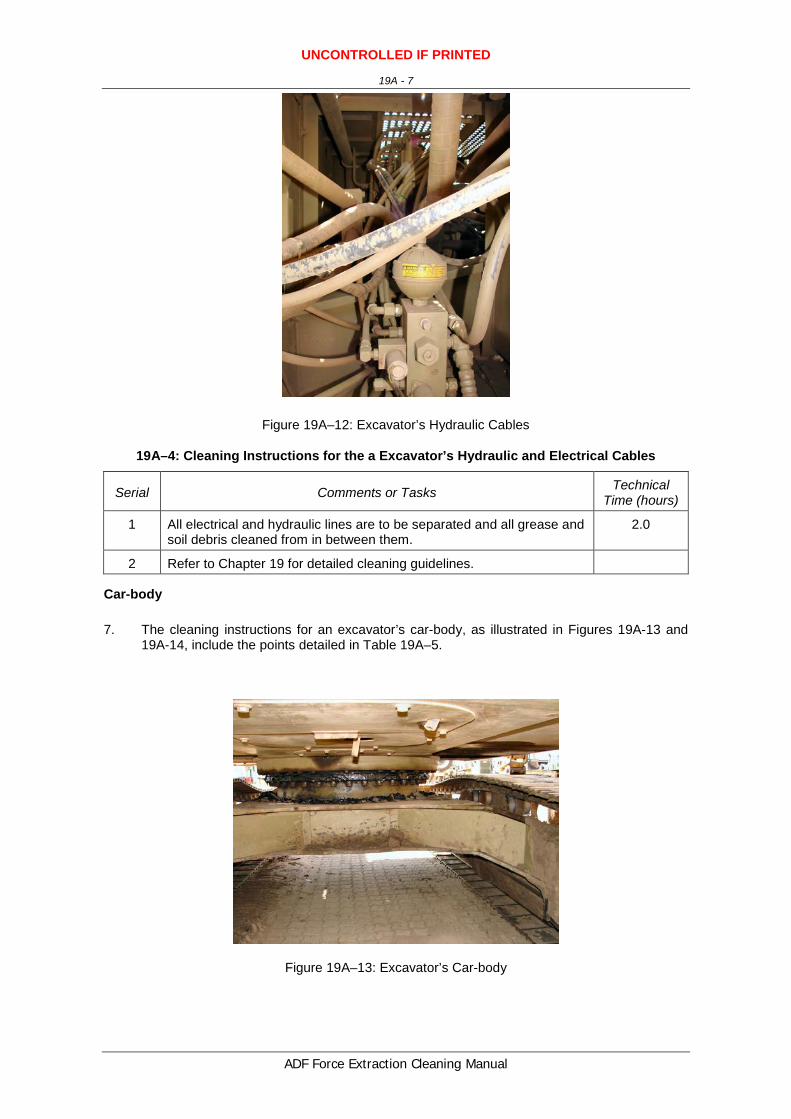
6. The cleaning instructions for the excavator’s hydraulic and electrical cables, as illustrated in Figures 19A-11 and 19A-12, include the point detailed in Table 19A–4.
Figure 19A–11: Excavator’s Hydraulics
UNCONTROLLED IF PRINTED
19A - 7
ADF Force Extraction Cleaning Manual
Figure 19A–12: Excavator’s Hydraulic Cables
19A–4: Cleaning Instructions for the a Excavator’s Hydraulic and Electrical Cables
Serial Comments or Tasks Technical Time (hours)
1 All electrical and hydraulic lines are to be separated and all grease and soil debris cleaned from in between them.
2.0
2 Refer to Chapter 19 for detailed cleaning guidelines.
Car-body
7. The cleaning instructions for an excavator’s car-body, as illustrated in Figures 19A-13 and 19A-14, include the points detailed in Table 19A–5.
Figure 19A–13: Excavator’s Car-body
UNCONTROLLED IF PRINTED
19A - 8
ADF Force Extraction Cleaning Manual
Figure 19A–14: Excavator’s Turntable
Table 19A–5: Cleaning Instructions for the Excavator’s Car-body
Serial Comments or Tasks Technical Time (hours)
1 All underside and apertures are to be cleaned with high-pressure water clean.
2 Turntable areas are to be cleaned of all contaminant, soil, plant and insect matter by high-pressure water. Regrease after inspection.
3 Refer to Chapter 19 for detailed cleaning guidelines.
Tracks, Rollers and Frames
8. The cleaning instructions for an excavator’s tracks, as illustrated in Figures 19A-15 and 19A-16, include the points detailed in Table 19A–6
Figure 19A–15: Excavator’s External Side Tracks
UNCONTROLLED IF PRINTED
19A - 9
ADF Force Extraction Cleaning Manual
Figure 19A–16: Excavator’s Internal Side Tracks
Table 19A–6: Cleaning Instructions for the Excavator’s Tracks
Serial Comments or Tasks Technical Time (hours)
1 Individual rubber track pads are to be removed (if applicable – small excavators) and cleaned.
2 Remove motor covers and plates to enable cleaning
3 Roll tracks – one revolution required to completely check each pad and countersunk bolts on rollers and idler wheels
4 Refer to Chapter 19 for detailed cleaning guidelines.
Telescopic Booms & Buckets
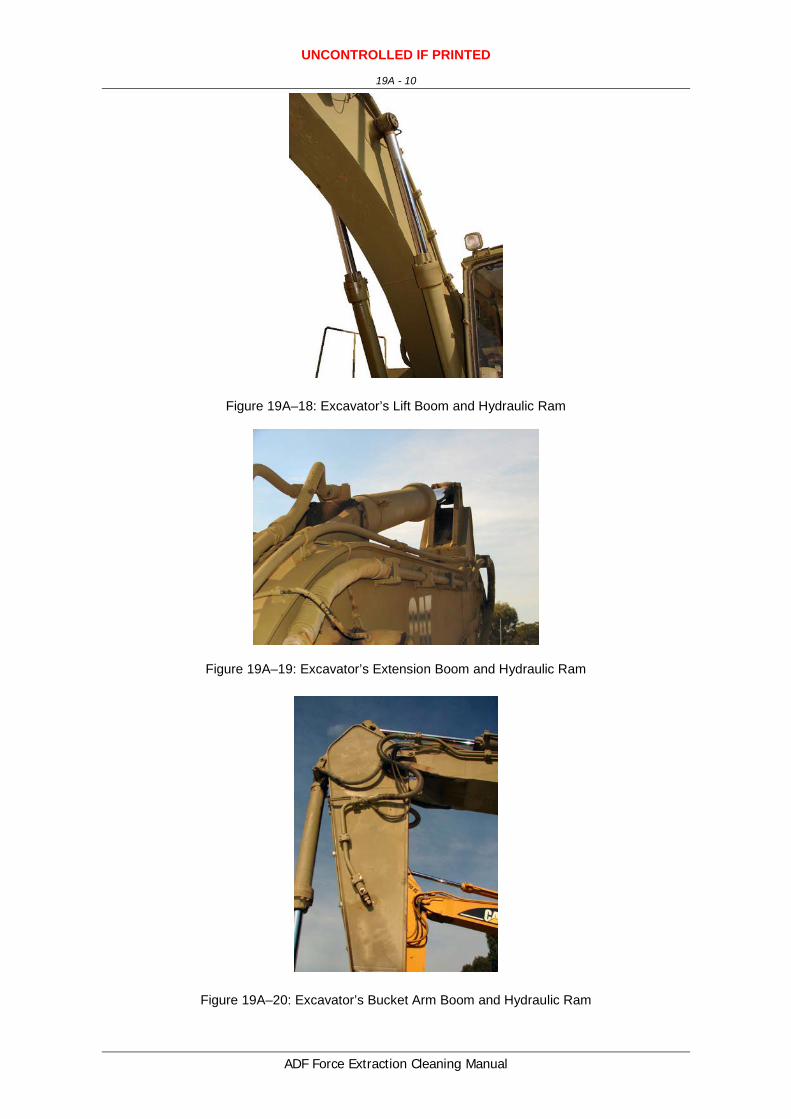
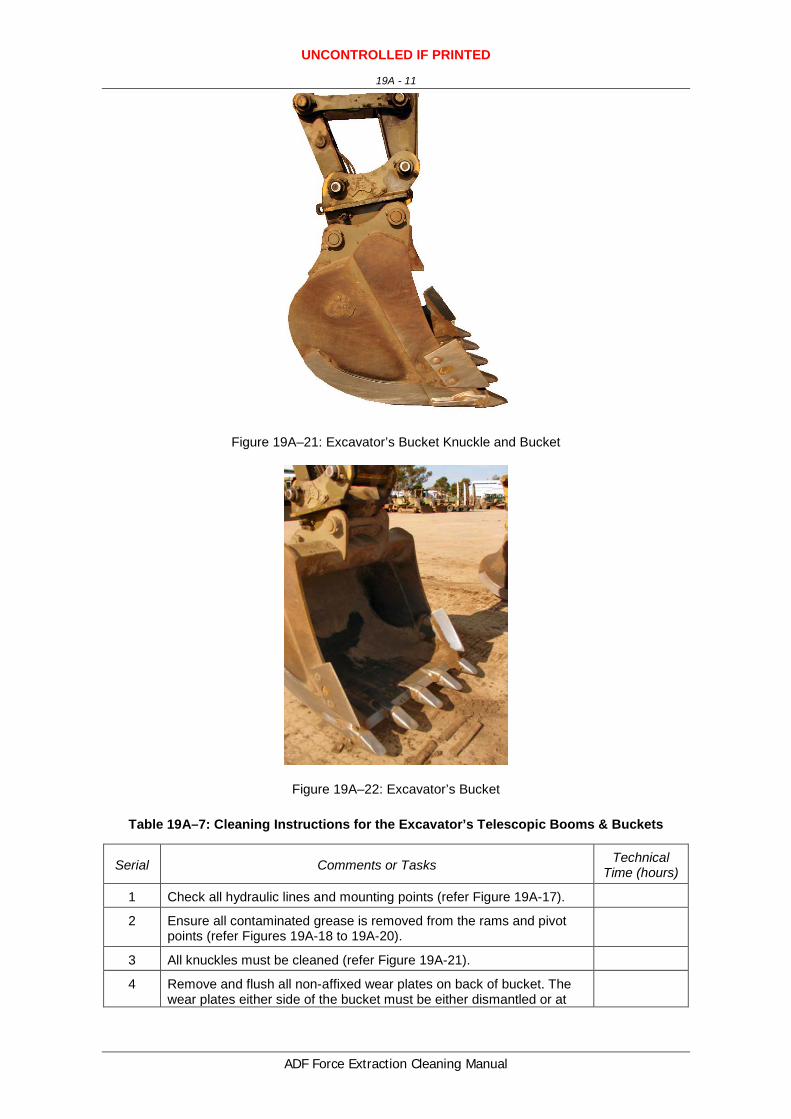
9. The cleaning instructions for a excavator’s booms and buckets, as illustrated in Figures 19A-17 to19A-22, include the points detailed in Table 19A–7.
Figure 19A–17: Excavator’s Boom Hydraulics
UNCONTROLLED IF PRINTED
19A - 10
ADF Force Extraction Cleaning Manual
Figure 19A–18: Excavator’s Lift Boom and Hydraulic Ram
Figure 19A–19: Excavator’s Extension Boom and Hydraulic Ram
Figure 19A–20: Excavator’s Bucket Arm Boom and Hydraulic Ram
UNCONTROLLED IF PRINTED
19A - 11
ADF Force Extraction Cleaning Manual
Figure 19A–21: Excavator’s Bucket Knuckle and Bucket
Figure 19A–22: Excavator’s Bucket
Table 19A–7: Cleaning Instructions for the Excavator’s Telescopic Booms & Buckets
Serial Comments or Tasks Technical Time (hours)
1 Check all hydraulic lines and mounting points (refer Figure 19A-17).
2 Ensure all contaminated grease is removed from the rams and pivot points (refer Figures 19A-18 to 19A-20).
3 All knuckles must be cleaned (refer Figure 19A-21).
4 Remove and flush all non-affixed wear plates on back of bucket. The wear plates either side of the bucket must be either dismantled or at
UNCONTROLLED IF PRINTED
19A - 12
ADF Force Extraction Cleaning Manual
Serial Comments or Tasks Technical Time (hours)
the very least loosened off and flushed behind (refer Figure 19A-22).
5 Flush spot-welded wear plates on back of bucket.
6 All cutting teeth are to be removed from bucket (Boots)
7 For detailed guidelines on excavator attachments such as the bucket in Figure 19A-22, refer to Chapter 19 and Chapter 19 Annex B
8 Refer to Chapter 19 for detailed cleaning guidelines
UNCONTROLLED IF PRINTED
19B - 1
ADF Force Extraction Cleaning Manual
ANNEX B TO CHAPTER 19
CLEANING INSTRUCTIONS – CRAWLER EXCAVATOR
ATTACHMENTS
1. This annex provides basic and specific cleaning requirements for selected vehicle attachments. Where there is a specific requirement or need to highlight particular problem areas detailed cleaning guides are provided as tables and figures in this annex.
2. The cleaning requirements that follow are in addition to those points for excavators included in Chapter 19 of this publication.
3. Excavator attachments contained in this Annex are as follows:
a. auger attachment;
b. trapezoidal bucket attachment;
c. grapple bucket/brush grapple attachment;
d. compactor/hammer attachment;
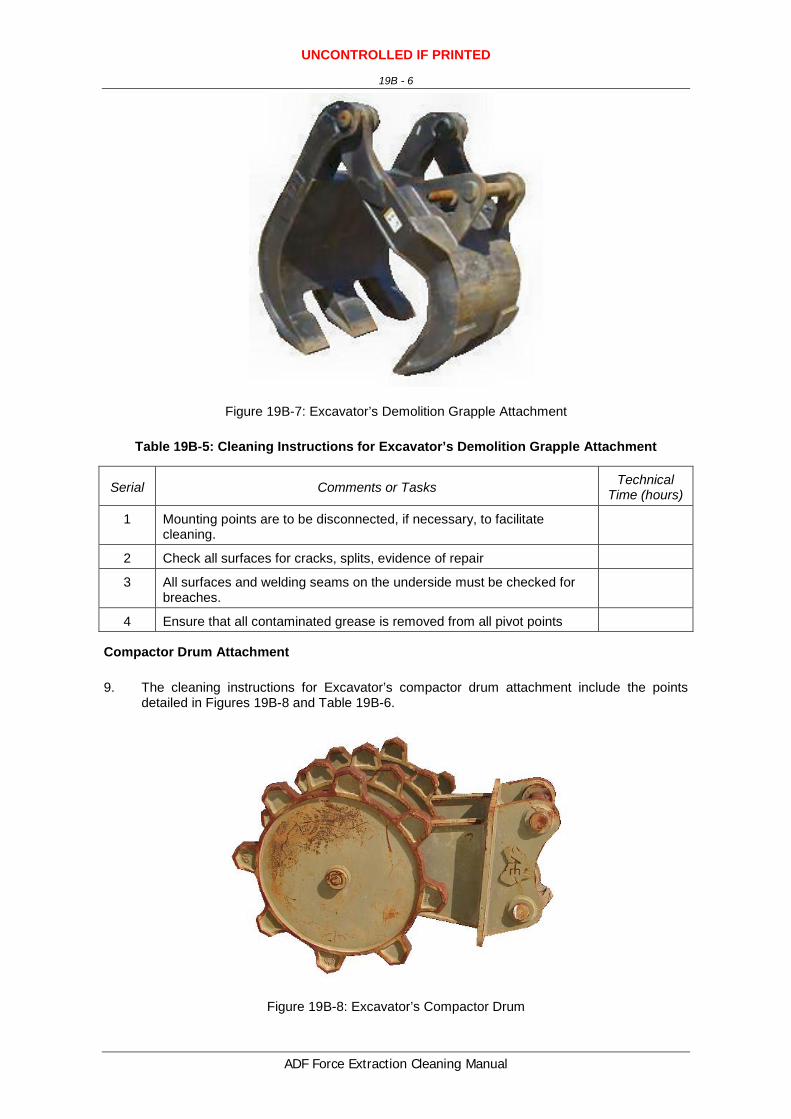
e. demolition grapple attachment;
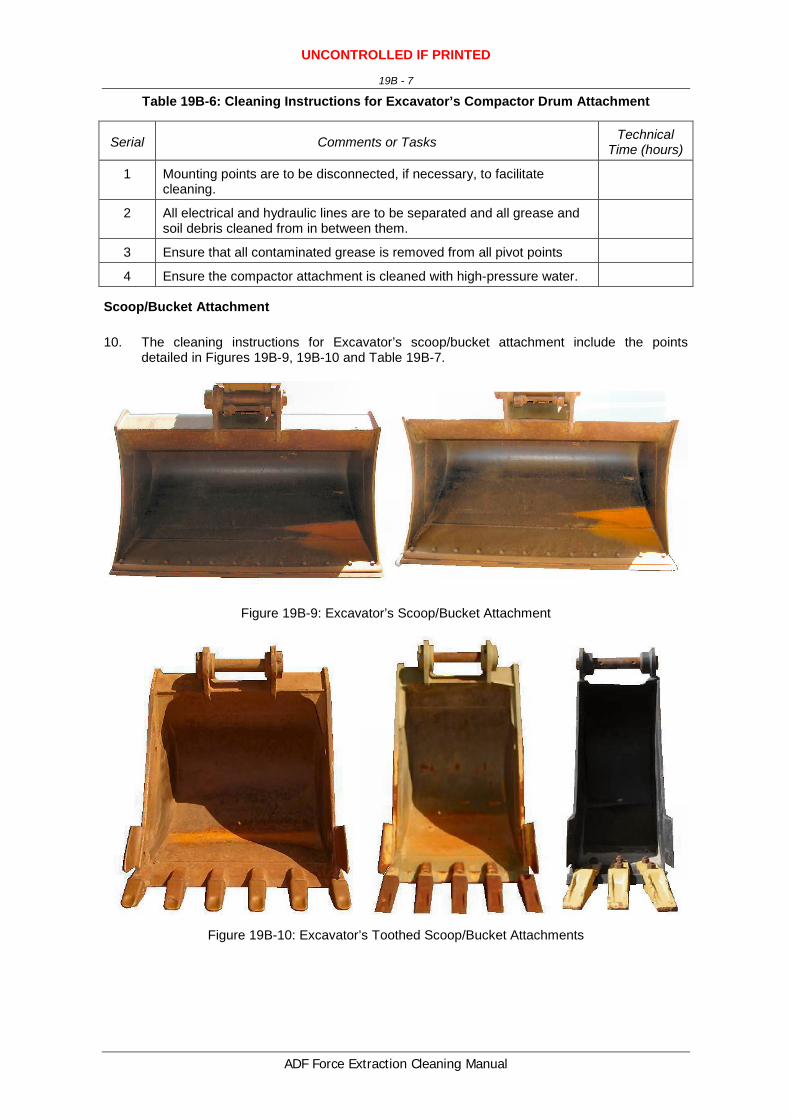
f. scoop/bucket attachment;
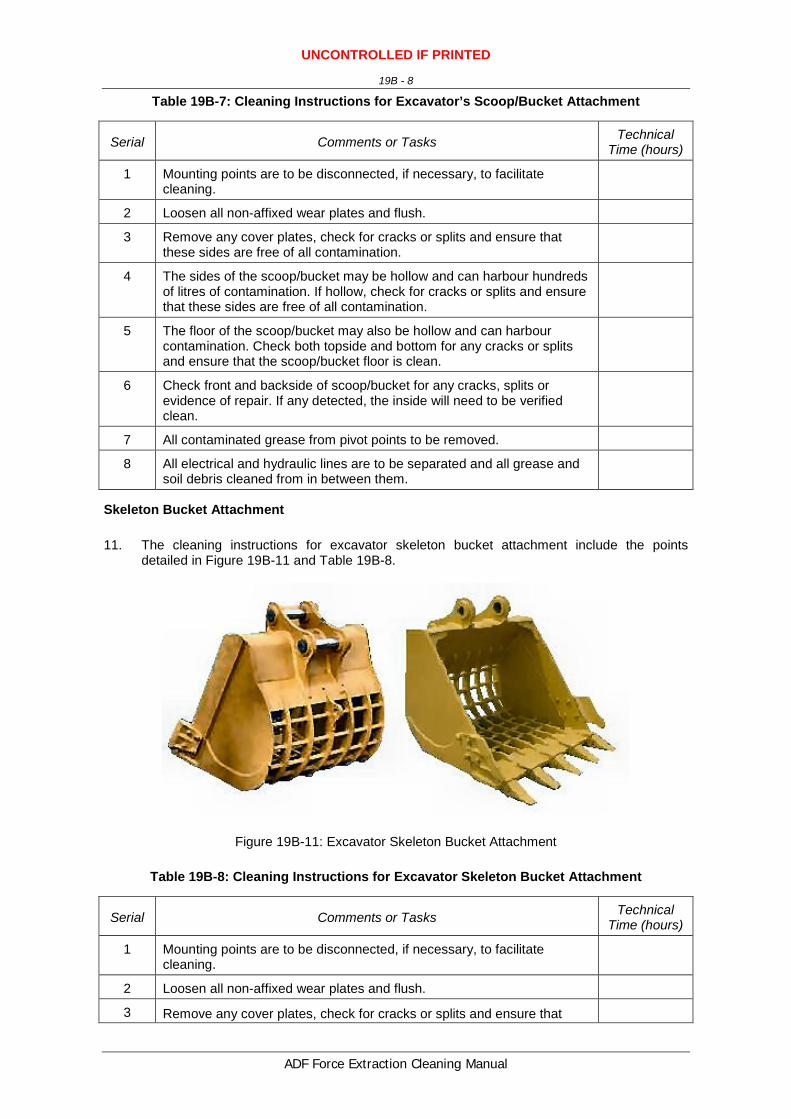
g. skeleton bucket attachment and
h. rock hammer attachment.
Auger Attachment
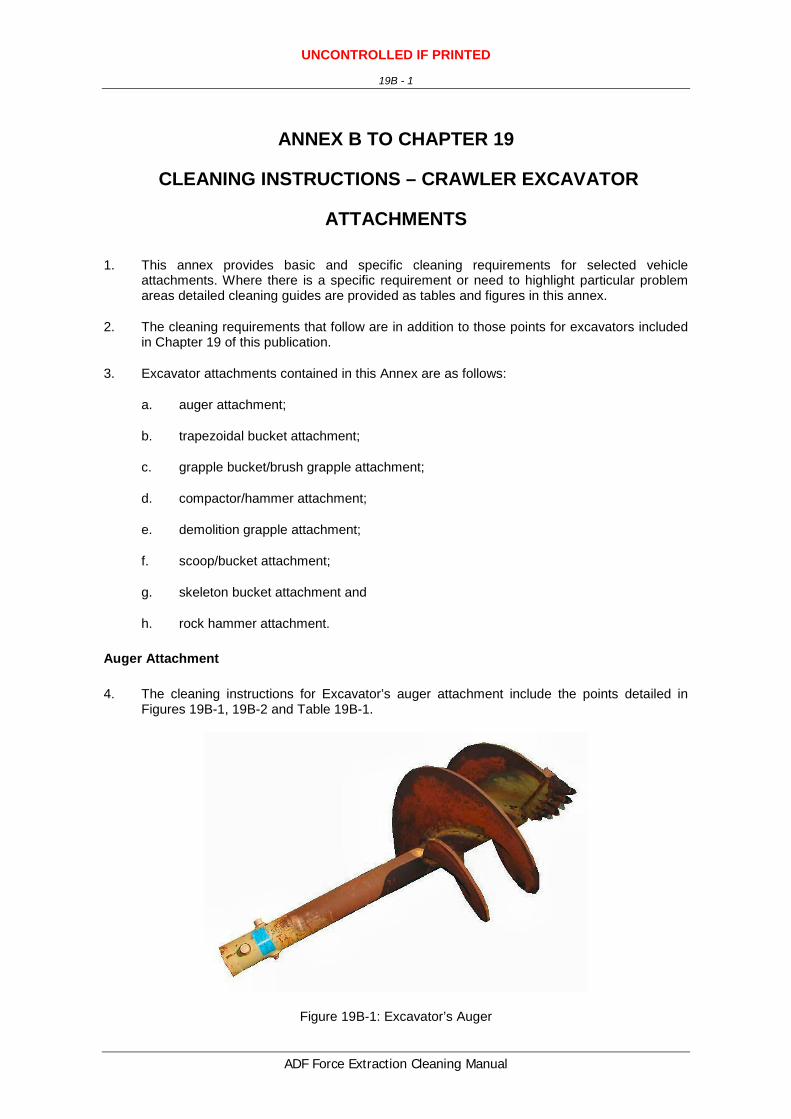
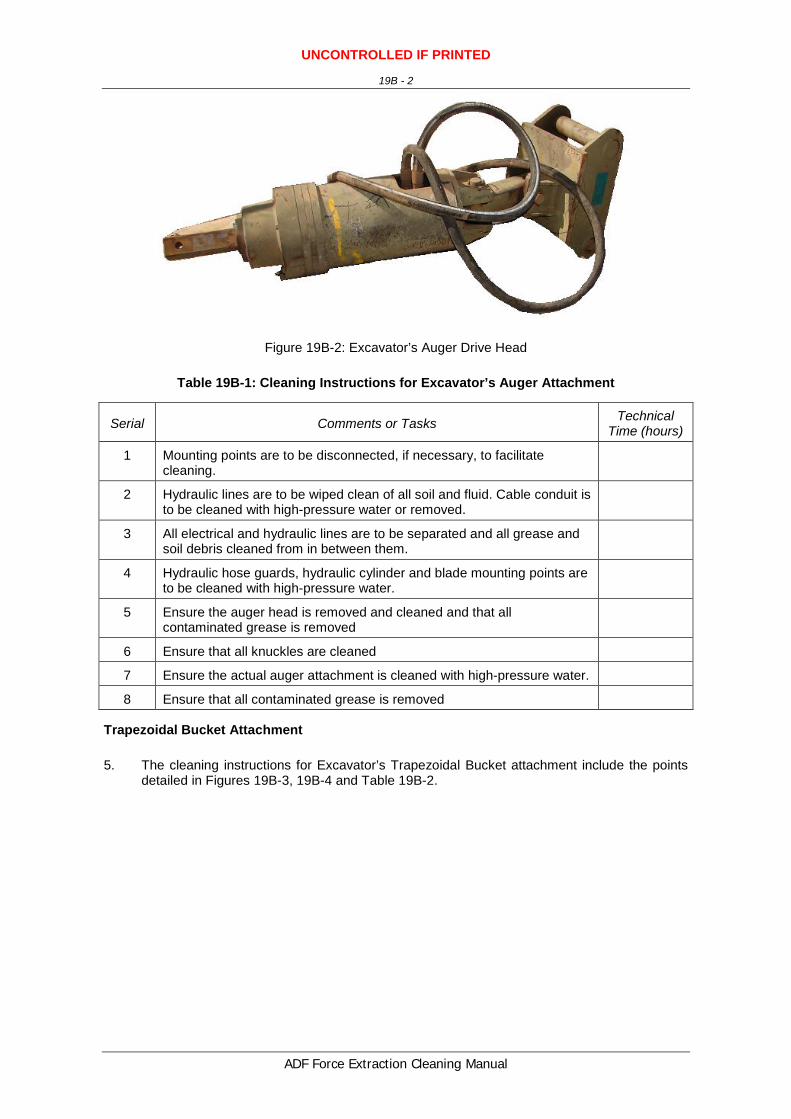
4. The cleaning instructions for Excavator’s auger attachment include the points detailed in Figures 19B-1, 19B-2 and Table 19B-1.
Figure 19B-1: Excavator’s Auger
UNCONTROLLED IF PRINTED
19B - 2
ADF Force Extraction Cleaning Manual
Figure 19B-2: Excavator’s Auger Drive Head
Table 19B-1: Cleaning Instructions for Excavator’s Auger Attachment
Serial Comments or Tasks Technical Time (hours)
1 Mounting points are to be disconnected, if necessary, to facilitate cleaning.
2 Hydraulic lines are to be wiped clean of all soil and fluid. Cable conduit is to be cleaned with high-pressure water or removed.
3 All electrical and hydraulic lines are to be separated and all grease and soil debris cleaned from in between them.
4 Hydraulic hose guards, hydraulic cylinder and blade mounting points are to be cleaned with high-pressure water.
5 Ensure the auger head is removed and cleaned and that all contaminated grease is removed
6 Ensure that all knuckles are cleaned
7 Ensure the actual auger attachment is cleaned with high-pressure water.
8 Ensure that all contaminated grease is removed
Trapezoidal Bucket Attachment
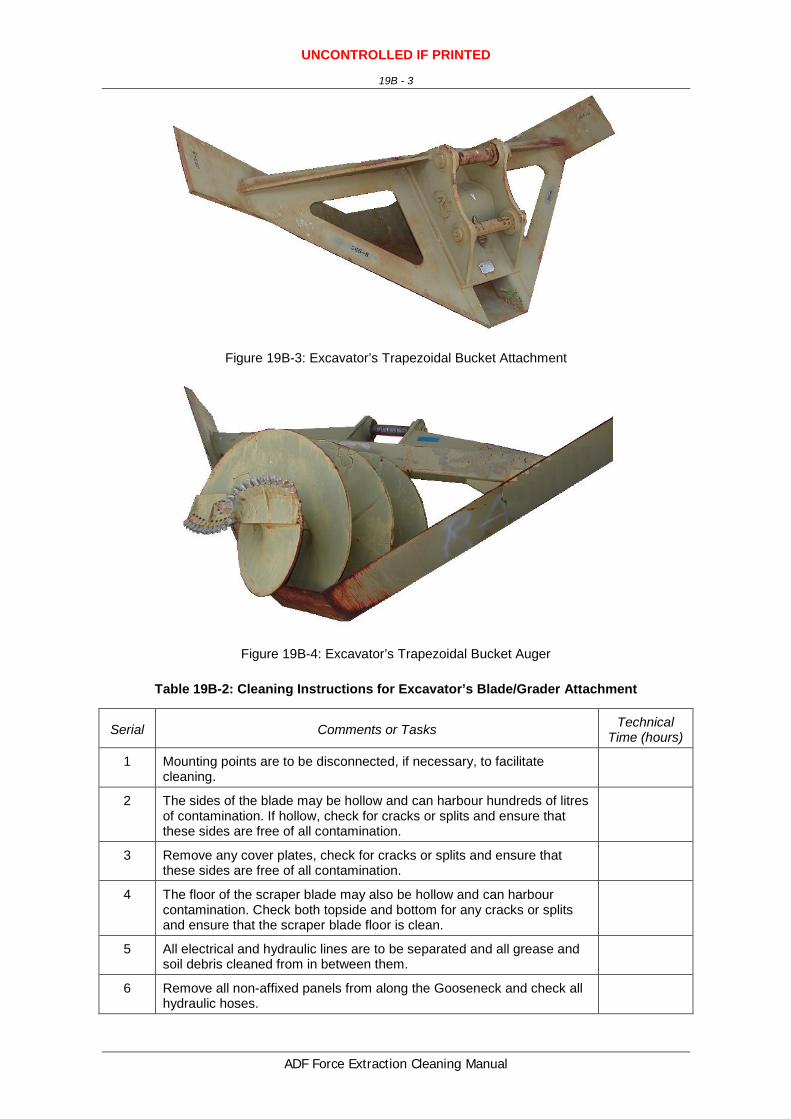
5. The cleaning instructions for Excavator’s Trapezoidal Bucket attachment include the points detailed in Figures 19B-3, 19B-4 and Table 19B-2.
Table 19B-2: Cleaning Instructions for Excavator’s Blade/Grader Attachment
Serial Comments or Tasks Technical Time (hours)
1 Mounting points are to be disconnected, if necessary, to facilitate cleaning.
2 The sides of the blade may be hollow and can harbour hundreds of litres of contamination. If hollow, check for cracks or splits and ensure that these sides are free of all contamination.
3 Remove any cover plates, check for cracks or splits and ensure that these sides are free of all contamination.
4 The floor of the scraper blade may also be hollow and can harbour contamination. Check both topside and bottom for any cracks or splits and ensure that the scraper blade floor is clean.
5 All electrical and hydraulic lines are to be separated and all grease and soil debris cleaned from in between them.
6 Remove all non-affixed panels from along the Gooseneck and check all hydraulic hoses.
UNCONTROLLED IF PRINTED
19B - 4
ADF Force Extraction Cleaning Manual
Serial Comments or Tasks Technical Time (hours)
7 Remove all non-affixed wear plates from the blade.
8 Check front and backside of blade for any cracks, splits or evidence of repair. If any detected, the inside will need to be verified clean.
9 All pivot points must be cleaned (remove all contaminated grease).
10 The Gooseneck may be hollow and may have drainage holes on the underside either at the front or rear – if present flush to verify internal cleanliness
11 Flush spot-welded wear plates on back of blade.
Grapple Bucket/Brush Grapple Attachment
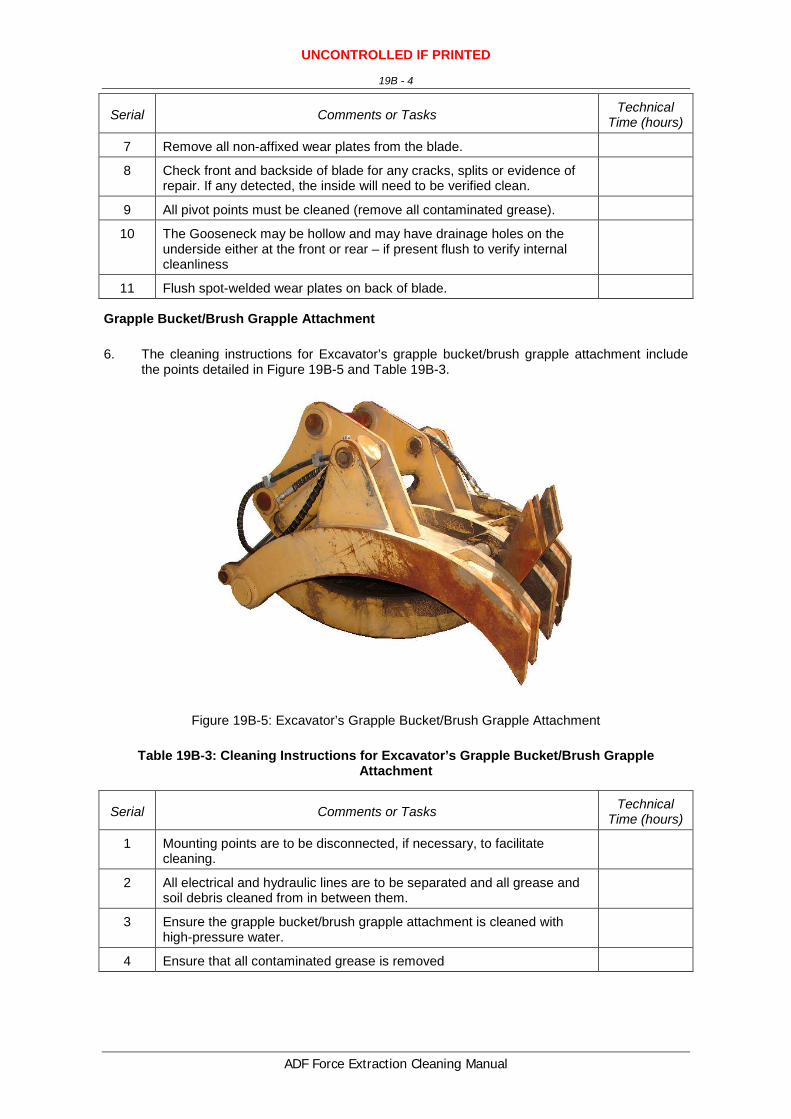
6. The cleaning instructions for Excavator’s grapple bucket/brush grapple attachment include the points detailed in Figure 19B-5 and Table 19B-3.
Table 19B-7: Cleaning Instructions for Excavator’s Scoop/Bucket Attachment
Serial Comments or Tasks Technical Time (hours)
1 Mounting points are to be disconnected, if necessary, to facilitate cleaning.
2 Loosen all non-affixed wear plates and flush.
3 Remove any cover plates, check for cracks or splits and ensure that these sides are free of all contamination.
4 The sides of the scoop/bucket may be hollow and can harbour hundreds of litres of contamination. If hollow, check for cracks or splits and ensure that these sides are free of all contamination.
5 The floor of the scoop/bucket may also be hollow and can harbour contamination. Check both topside and bottom for any cracks or splits and ensure that the scoop/bucket floor is clean.
6 Check front and backside of scoop/bucket for any cracks, splits or evidence of repair. If any detected, the inside will need to be verified clean.
7 All contaminated grease from pivot points to be removed.
8 All electrical and hydraulic lines are to be separated and all grease and soil debris cleaned from in between them.
Skeleton Bucket Attachment
11. The cleaning instructions for excavator skeleton bucket attachment include the points detailed in Figure 19B-11 and Table 19B-8.
Table 19B-8: Cleaning Instructions for Excavator Skeleton Bucket Attachment
Serial Comments or Tasks Technical Time (hours)
1 Mounting points are to be disconnected, if necessary, to facilitate cleaning.
2 Loosen all non-affixed wear plates and flush.
3 Remove any cover plates, check for cracks or splits and ensure that
UNCONTROLLED IF PRINTED
19B - 9
ADF Force Extraction Cleaning Manual
Serial Comments or Tasks Technical Time (hours)
these sides are free of all contamination.
4 The sides of the scoop/bucket may be hollow and can harbour hundreds of litres of contamination. If hollow, check for cracks or splits and ensure that these sides are free of all contamination.
5 The floor of the scoop/bucket may also be hollow and can harbour contamination. Check both topside and bottom for any cracks or splits and ensure that the scoop/bucket floor is clean.
6 Check front and backside of scoop/bucket for any cracks, splits or evidence of repair. If any detected, the inside will need to be verified clean.
Rock Hammer Attachment
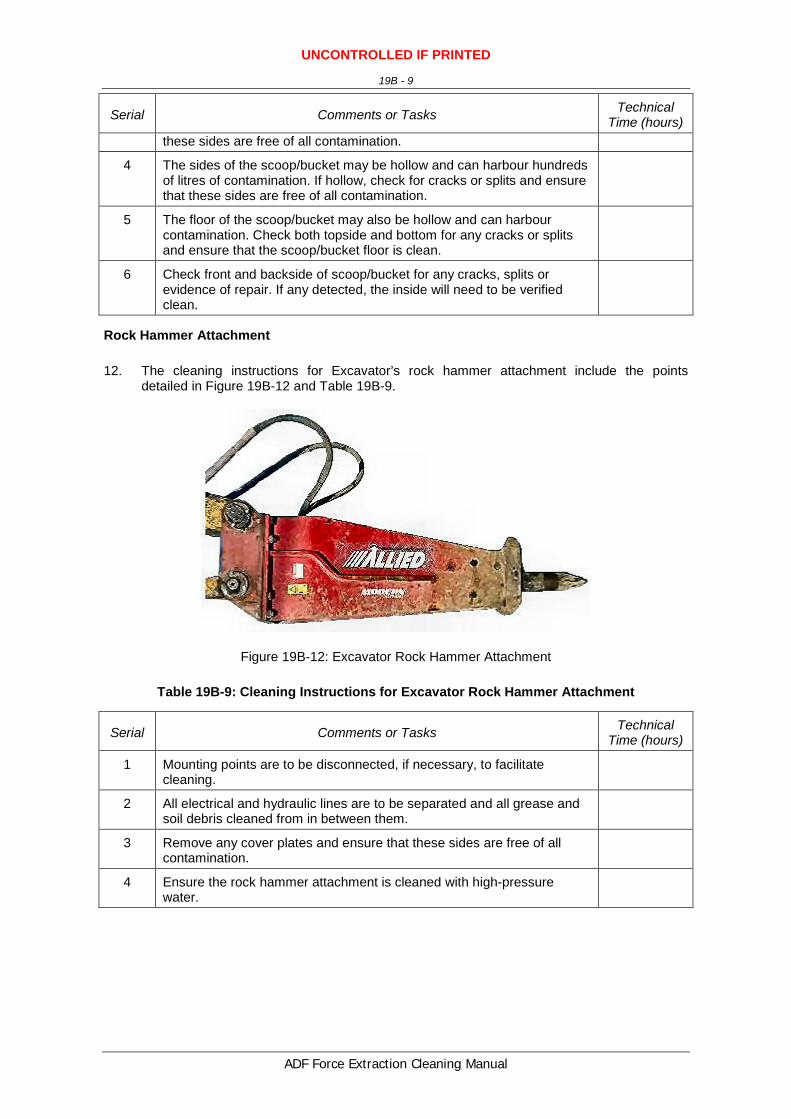
12. The cleaning instructions for Excavator’s rock hammer attachment include the points detailed in Figure 19B-12 and Table 19B-9.
Figure 19B-12: Excavator Rock Hammer Attachment
Table 19B-9: Cleaning Instructions for Excavator Rock Hammer Attachment
Serial Comments or Tasks Technical Time (hours)
1 Mounting points are to be disconnected, if necessary, to facilitate cleaning.
2 All electrical and hydraulic lines are to be separated and all grease and soil debris cleaned from in between them.
3 Remove any cover plates and ensure that these sides are free of all contamination.
4 Ensure the rock hammer attachment is cleaned with high-pressure water.
UNCONTROLLED IF PRINTED
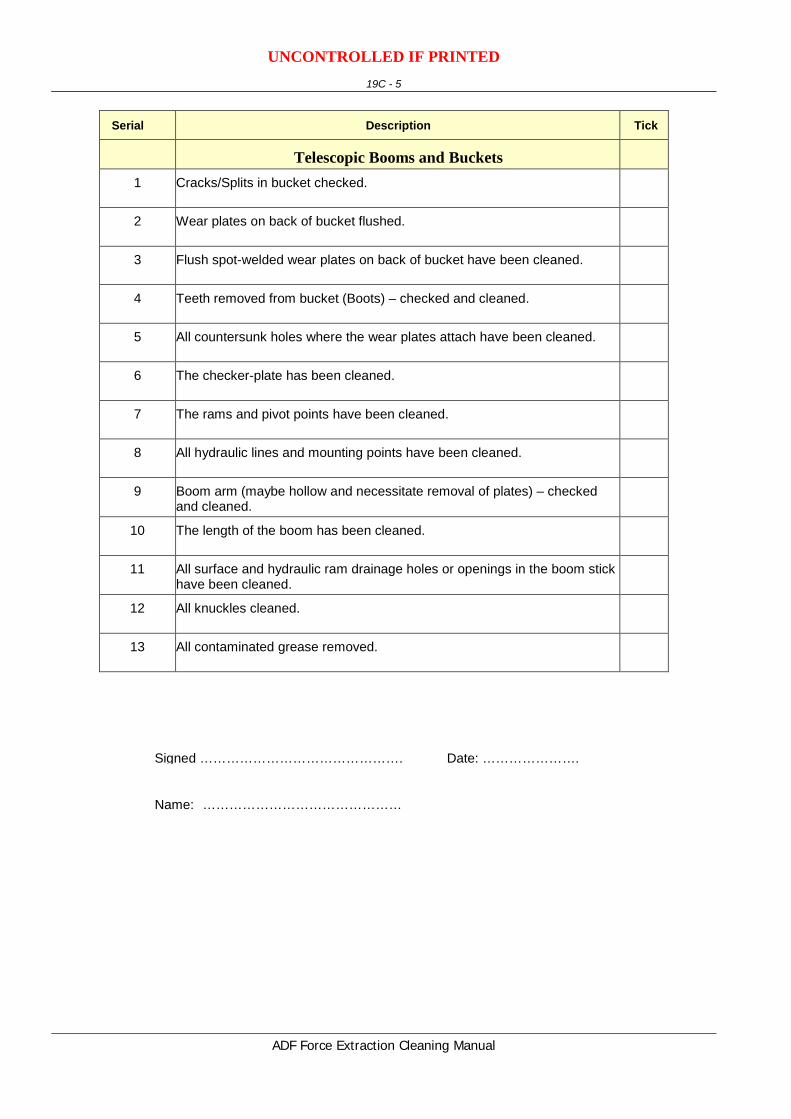
19C - 1
ADF Force Extraction Cleaning Manual
ANNEX C TO CHAPTER 19
CRAWLER EXCAVATORS – CLEANING CHECKLIST
All serials may not be specific to all excavators
Vehicle Registration No: ……………………………….
Serial
Description
Tick
External Areas
1 All CES has been removed and independently cleaned.
2 Lights has been loosened and cleaned and any damaged lights has been removed and cleaned.
3 Access panels, belly plates and rock guards have been removed and the track area cleaned.
4 Floor panels and machine body access plates have been removed for cleaning.
5 Areas on top of the transmission and underneath the engine have been cleaned.
6 Vertical access panels in front of the blade and ripper control valves removed and cleaned.
7 Mounting points have been disconnected and cleaned.
8 Hydraulic lines have been wiped clean.
9 The cable conduit has been wiped clean.
10 Hydraulic hose guards, hydraulic cylinder and blade mounting points have been wiped cleaned.
11 All external areas of the excavator have been cleaned.
Cabin
1 Floor matting removed and floor surface and mats cleaned.
2 Cabin door rubbers – checked and cleaned.
3 Seat –removed and cleaned under – checked and cleaned.
4 Any non-affixed floor panels (if applicable) removed and cleaned underneath.
5 Pedal covers – checked and cleaned.
UNCONTROLLED IF PRINTED
19C - 2
ADF Force Extraction Cleaning Manual
Serial
Description
Tick
6 Cabin wall linings – checked behind.
7 Air conditioning filters and vents – checked and cleaned.
8 Joystick controls (inside) – checked and cleaned.
9 Cabin roof cleaned both inside and out.
10 Ladder to cabin and each footstep cleaned.
11 Lights has been loosened and cleaned and any damaged lights has been removed and cleaned.
12 Windscreen reservoir emptied.
13 Any false floor under the cabin has been removed for cleaning.
14 The vertical cabin housing has been checked to see if it can be flushed via drainage holes.
15 The roll over protection support structure has been cleaned.
Engine Bay
1 The air-filter pre-cleaner cover has been removed and cleaned.
2 The air-filter has been removed and cleaned.
3 Inside fan-belt flywheels (harmonic balancer) has been removed and cleaned.
4 All surfaces of the engine block including between tappet covers has been cleaned.
5 All belly plates (if applicable) have been removed and cleaned.
6 All non-affixed engine covers has been removed and cleaned and compartments cleaned.
7 All engine cover rubbers have been cleaned.
8 Check engine housing for open-ended or spot-welded hollow support framework - flush to verify cleanliness.
9 Chassis rails either side of engine are hollow and maybe flushed via drainage holes on underside of the rail (Access maybe available once belly plate bolts have been removed).
10 Flush radiator and oil cooler from both sides to verify fin/core cleanliness.
11 Loosen radiator shroud to let any loose debris fall through after flushing.
UNCONTROLLED IF PRINTED
19C - 3
ADF Force Extraction Cleaning Manual
Serial
Description
Tick
12 Check either side of radiator for vertical hollow support structures. Flush to verify internal cleanliness if present.
13 Check all wiring harnesses for internal cleanliness.
14 Check under all hydraulic looming for cleanliness.
15 Ensure all engine mounts are clean.
16 Ensure that all surfaces of sump and engine block is clean.
17 All water reservoirs must be emptied (excluding radiator).
18 Remove all contaminated grease from universal joints.
19 Internally clean all light covers. Access will be required for inspection.
20 Removing zip-ties and electrical tape that hold electric and process hydraulic hoses together can facilitate the cleaning and inspection
21 Check above the sway bar – for cleanliness.
22 Flush under all checker-plate (non-slip footings) to ensure clean.
23 Remove batteries and clean terminals, leads and the battery box.
Hydraulic and Electrical Cables
1 All electrical and hydraulic lines have been separated and cleaned.
Car Body
1 All non-affixed panels removed (including engine covers) – checked and cleaned.
2 Looming around electric and hydraulic loses – checked and cleaned.
3 Wiring Harness – – checked and cleaned.
4 Radiator –inside fins (flushed) – checked and cleaned.
5 Radiator shroud – removed and flushed.
6 Counterweight –removed for access – checked and cleaned.
7 Engine Cover rubbers – removed – checked and cleaned.
8 Oil cooler - inside fins (flushed) – checked and cleaned.
UNCONTROLLED IF PRINTED
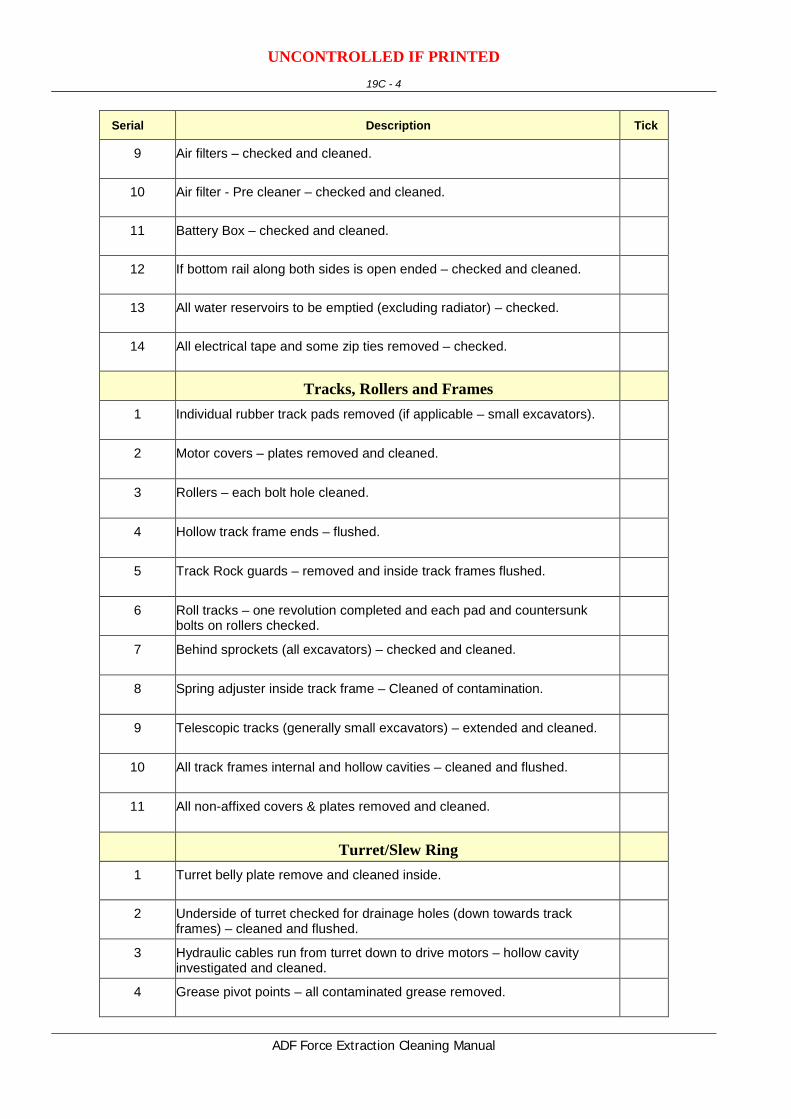
19C - 4
ADF Force Extraction Cleaning Manual
Serial
Description
Tick
9 Air filters – checked and cleaned.
10 Air filter - Pre cleaner – checked and cleaned.
11 Battery Box – checked and cleaned.
12 If bottom rail along both sides is open ended – checked and cleaned.
13 All water reservoirs to be emptied (excluding radiator) – checked.
14 All electrical tape and some zip ties removed – checked.