A NSWER K EY 124 Chapter 20: Fire Fighter Rehabilitation Matching 1. E (page 779) 2. G (page 768) 3. B (page 777) 4. A (page 776) 5. C (page 769) 6. J (page 780) 7. F (page 771) 8. I (page 770) 9. D (page 777) 10. H (page 779) 1. D (page 777) 2. A (page 780) 3. A (page 772) 4. A (page 780) 5. D (page 770) 6. C (page 778) 7. D (page 776) 8. D (page 780) 9. A (page 769) 10. D (page 774) Vocabulary 1. Rehabilitate: To rehabilitate means to restore someone or something to a condition of health or to a state of useful and constructive activity. The goal of rehabilitation (usually simply called “rehab”) is to take time to “recharge your body’s batteries” so you can continue to be a productive member of the team. Rehabilitation is a critical factor in maintaining your health and well-being. (page 768) 2. Dehydration: Dehydration is a state in which fluid losses are greater than fluid intake into the body. If left untreated, this imbalance can lead to shock and even death. Dehydration reduces strength, endurance, and mental judgment, as evidenced by a variety of signs and symptoms. Extreme dehydration can lead to confusion and total collapse. (page 771) 3. Hypothermia: Hypothermia, a condition in which the internal body temperature falls below 95°F (35°C), can lead to loss of coordination, muscle stiffness, coma, and death. (page 777) 4. Frostbite: Damage to tissues as the result of exposure to cold; frozen or partially frozen body parts. (page 777) 5. Emergency incident rehabilitation: A function on an emergency scene that cares for the well-being of the fire fighters on the scene. It includes relief from climatic conditions, rest, cooling or warming, rehydration, calorie replacement, medical monitoring, member accountability, and release. (pages 769, 777) Fill-In 1. glucose (page 780) 2. medical evaluation; treatment (page 781) 3. Sugar (page 780) 4. Rehabilitation (page 768) 5. Reassignment (page 782) 6. Bloating (page 780) 7. intensity (page 769) 8. one (page 780) 9. Frostbite (page 777) 10. Carbohydrates (page 780) 1. T (page 780) 2. T (page 782) 3. T (page 770) 4. T (page 770) 5. T (page 769) 6. F (page 780) 7. F (page 779) 8. T (page 778) 9. F (page 780) 10. T (page 773) True/False Short Answer 1. During short-duration incidents, low-sugar, high-protein sports bars can be used to keep the glucose balance steady. During extended-duration incidents, a fire fighter should eat a more complete meal. The proper balance of carbohydrates, proteins, and fats will help to maintain energy levels throughout the emergency. To ensure peak performance, a meal should include complex carbohydrates such as whole-grain breads, whole-grain pasta, rice, and vegetables. It is also better to eat a series of smaller meals, rather than one or two large meals, because larger meals can increase glucose levels and slow down the body. (page 780) 2. Part of your responsibility is to know your own limits. No one else knows what you ate, whether you are lightheaded or dehydrated, whether you are feeling ill, or whether you need a breather. You are the only person who knows these things. Therefore, you may be the only person who knows when you need to request rehabilitation. (page 782) Multiple Choice
Transcript
A N S W E R K E Y124
Chapter 20: Fire Fighter RehabilitationMatching
1. E (page 779)
2. G (page 768)
3. B (page 777)
4. A (page 776)
5. C (page 769)
6. J (page 780)
7. F (page 771)
8. I (page 770)
9. D (page 777)
10. H (page 779)
1. D (page 777)
2. A (page 780)
3. A (page 772)
4. A (page 780)
5. D (page 770)
6. C (page 778)
7. D (page 776)
8. D (page 780)
9. A (page 769)
10. D (page 774)
Vocabulary1. Rehabilitate: To rehabilitate means to restore someone or something to a condition of health or to a state of useful
and constructive activity. The goal of rehabilitation (usually simply called “rehab”) is to take time to “recharge your body’s batteries” so you can continue to be a productive member of the team. Rehabilitation is a critical factor in maintaining your health and well-being. (page 768)
2. Dehydration: Dehydration is a state in which fluid losses are greater than fluid intake into the body. If left untreated, this imbalance can lead to shock and even death. Dehydration reduces strength, endurance, and mental judgment, as evidenced by a variety of signs and symptoms. Extreme dehydration can lead to confusion and total collapse. (page 771)
3. Hypothermia: Hypothermia, a condition in which the internal body temperature falls below 95°F (35°C), can lead to loss of coordination, muscle stiffness, coma, and death. (page 777)
4. Frostbite: Damage to tissues as the result of exposure to cold; frozen or partially frozen body parts. (page 777)
5. Emergency incident rehabilitation: A function on an emergency scene that cares for the well-being of the fire fighters on the scene. It includes relief from climatic conditions, rest, cooling or warming, rehydration, calorie replacement, medical monitoring, member accountability, and release. (pages 769, 777)
Fill-In1. glucose (page 780)
2. medical evaluation; treatment (page 781)
3. Sugar (page 780)
4. Rehabilitation (page 768)
5. Reassignment (page 782)
6. Bloating (page 780)
7. intensity (page 769)
8. one (page 780)
9. Frostbite (page 777)
10. Carbohydrates (page 780)
1. T (page 780)
2. T (page 782)
3. T (page 770)
4. T (page 770)
5. T (page 769)
6. F (page 780)
7. F (page 779)
8. T (page 778)
9. F (page 780)
10. T (page 773)
True/False
Short Answer1. During short-duration incidents, low-sugar, high-protein sports bars can be used to keep the glucose balance
steady. During extended-duration incidents, a fire fighter should eat a more complete meal. The proper balance of carbohydrates, proteins, and fats will help to maintain energy levels throughout the emergency. To ensure peak performance, a meal should include complex carbohydrates such as whole-grain breads, whole-grain pasta, rice, and vegetables. It is also better to eat a series of smaller meals, rather than one or two large meals, because larger meals can increase glucose levels and slow down the body. (page 780)
2. Part of your responsibility is to know your own limits. No one else knows what you ate, whether you are lightheaded or dehydrated, whether you are feeling ill, or whether you need a breather. You are the only person who knows these things. Therefore, you may be the only person who knows when you need to request rehabilitation. (page 782)
Multiple Choice
Chapter 21: Wildland and Ground Cover Fires 125
3. Drinks such as colas, coffee, and tea should be avoided because they contain caffeine, which acts as a diuretic that causes the body to excrete more water. (page 779)
4. The basic concepts of reducing contamination in the field include: (1) All PPE that has been exposed to hazardous conditions should be removed and cleaned. (2) Remove all surface contaminants and clean any exposed skin as much as possible before starting rehabilitation. (3) PPE should be stored only in the proper PPE storage area. (4) Avoid continued exposure to possible carcinogens. (5) Follow department protocols. (page 777)
Fire Alarms1. Fire fighters responding to incidents during cold weather are subject to both hypothermia and frostbite (damage to
tissues resulting from prolonged exposure to cold). In these cases, the rehabilitation center needs to be heated so that fire fighters can warm up before returning to the chilly environment. Fire fighters who are wet or severely chilled should be wrapped in warming blankets and moved into a well-heated area before they remove their turnout gear. As soon as possible, all wet clothing should be removed and replaced with warm, dry clothing. (page 778-779)
2. Part of your responsibility is to know your own limits. No one else can know what you ate, whether you are lightheaded or dehydrated, whether you are feeling ill, or whether you need a breather. You are the only person who knows these things. Therefore, you may be the only person who knows when you need to request rehabilitation. It may be difficult to say, “I need a break,” while your team members are still hard at work. Even so, it is better to take a break when you need it than to push yourself too far and have to be rescued by other members of your department. (page 782)
Chapter 21: Wildland and Ground Cover FiresMatching
1. E (page 789)
2. I (page 792)
3. D (page 792)
4. B (page 792)
5. C (page 793)
6. K (page 792)
7. H (page 792)
8. F (pages 794–795)
9. J (page 788)
10. A (page 789)
11. G (page 790)
Multiple Choice1. D (page 792)
2. B (page 800)
3. B (pages 794–795)
4. C (page 799)
5. B (page 797)
6. A (page 794)
7. D (page 799)
8. A (page 799)
9. B (page 790)
10. D (page 792)
11. C (page 792)
12. C (page 789)
13. B (page 792)
14. A (page 789)
15. A (page 791)
16. D (page 789)
Vocabulary1. Heavy fuels: Fuels of a large diameter, such as large brush, heavy timber, snags, stumps, branches, and dead timber
on the ground. These fuels ignite and are consumed more slowly than light fuels. (page 789)
2. Fuel continuity: The relative closeness of wildland fuels—which affects a fire’s ability to spread from one area of fuel to another. (page 790)
3. Backpack pump extinguisher: A portable fire extinguisher usually consisting of a 5-gallon (19-L) water tank that is worn on the user’s back and features a hand-powered piston pump for discharging the water. (page 793)
4. Topography: The features of the earth’s surface; changes in land elevation and the position of natural and human-made features. (page 792)
5. Aerial fuels: Fuels located more than 6 ft (2 m) off the ground, usually part of or attached to trees. (page 789)
A N S W E R K E Y126
Fill-In1. backpack pump extinguishers (page 793)
2. humidity (page 791)
3. oxygen (page 790)
4. area of origin (page 792)
5. under; on; above (page 789)
6. spot (page 792)
7. Fixed (page 793)
8. Weather (page 789)
9. Wildland; ground (page 799)
10. quickly (page 789)
1. T (page 791)
2. T (page 804)
3. T (page 790)
4. F (page 799)
5. F (page 789)
6. T (page 792)
7. T (page 789)
8. T (page 788)
9. F (page 789)
10. T (page 791)
True/False
Short Answer1. Hazards of wildland fires are (Students should list three of the following): (1) Driving on unimproved roads and
steep terrain greatly increases the chance of fire apparatus rollovers. (2) When working in rough terrain, wildland and ground fire fighters are at increased risk for falls. Rough ground often contains holes that are difficult to see in smoky conditions. Steep terrain also increases the likelihood of falls. (3) Because wildland and ground firefighting involves working with sharp tools, it is important to prevent injuries caused by these tools. (4) Other hazards of fighting wildland and ground fires include burns and smoke inhalation. Because the PPE worn by wildland and ground fire fighters provides less protection than the PPE worn by structural fire fighters, fire fighters must keep far enough from the heat of the fire to prevent burns. (5) Because much wildland and ground firefighting is done without self-contained breathing apparatus (SCBA), fire fighters must avoid inhaling poisonous gases and suspended smoke particles. Use SCBA in any conditions where it is needed. (6) When engaged in wildland and ground firefighting, be alert for the hazards posed by falling trees. During a fire, the lower parts of trees may burn away and weaken the support for the rest of the tree. Trees of all sizes can fall with little warning. (7) Be alert for the presence of electrical hazards. Electrical transmission lines and other electrical wires may be present in the location of a wildland fire. Wires that drop on vegetation may ignite a wildland and ground fire and pose an electrical hazard to fire fighters. Many of these safety hazards can be difficult to see at night and in smoky conditions. (page 803)
2. The four components of LCES are: (1) Lookouts—who need to be stationed at a location where they can see the fire fighters working at the scene; (2) Communications—which on a wildland fire scene must be clear, concise, and prompt; (3) Escape routes—which provide fire fighters with a path from a dangerous location to an area away from the fire; (4) Safety zones—which are preestablished areas of refuge to which fire fighters can retreat to and not need to use a fire shelter. (page 802)
Fire Alarms1. The anchor, flank, and pinch attack requires two or more teams of fire fighters. This is the safest and most reliable
method of fire attack. The key is the establishment of two solid anchor points. One team establishes an anchor point on the left side of the fire near the point of origin and mounts a direct attack along the left flank of the fire, working toward the head of the fire. The second team establishes an anchor point on the right side of the fire near the point of origin and mounts a direct attack along the right flank of the fire, also working toward the head of the fire. As the teams advance, the fire gets “pinched” between them, which reduces its growth. (page 799)
2. Driving on unimproved roads and steep terrain greatly increases the chance of fire apparatus rollovers. Given these dangers, drivers must thoroughly understand the operating characteristics of their fire apparatus and operate the apparatus within the safe limits for which it was designed. All fire fighters should keep their seat belts fastened whenever the apparatus is moving. (page 803)
Skill Drills
Skill Drill 21-1: Suppressing a Ground Cover Fire, Fire Fighter I, NFPA 4.3.19Test your knowledge of this skill drill by filling in the correct words in the photo captions.
1. Don appropriate personal protective equipment (PPE). Identify safety and exposure risks. Protect exposures if necessary.
2. Construct a fire control line by removing fuel with hand tools.
Chapter 21: Wildland and Ground Cover Fires 127
3. As an alternative to Step 2, extinguish the fire with a backpack pump extinguisher or a handline.
4. Overhaul the area completely to ensure complete extinguishment of the ground cover fire. (page 796)
Skill Drill 21-2: Using a Fire Shelter Fire Fighter I, NFPA 4.3.19Test your knowledge of this skill drill by placing the photos below in the correct order. Number the first step with a “1,” the second step with a “2,” and so on.
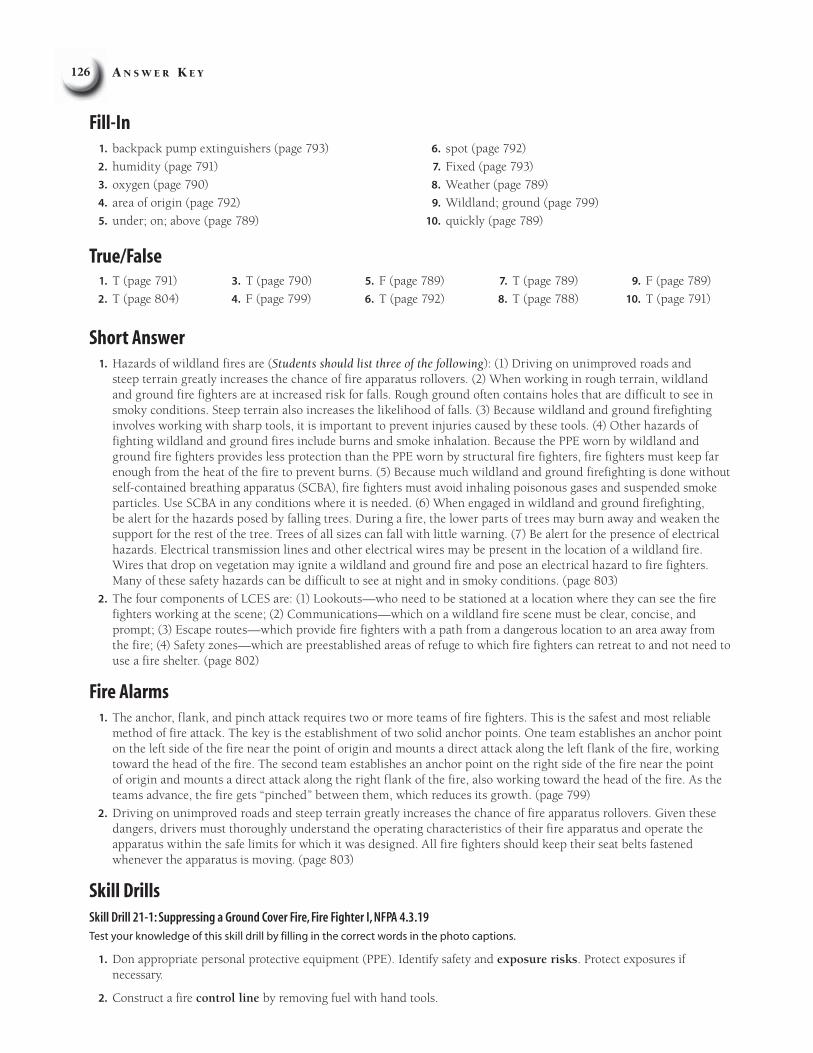
1. Pick the largest available clearing. Wear
gloves and a hard hat, and cover your
face and neck if possible. Scrape away
flammable litter if you have time.
3. Grasp the handle labeled “Left Hand” in your left hand
and the handle labeled “Right Hand” in your right
hand.
4. Shake the shelter until it is unfolded. If it is windy, lie
on the ground to unfold the shelter.
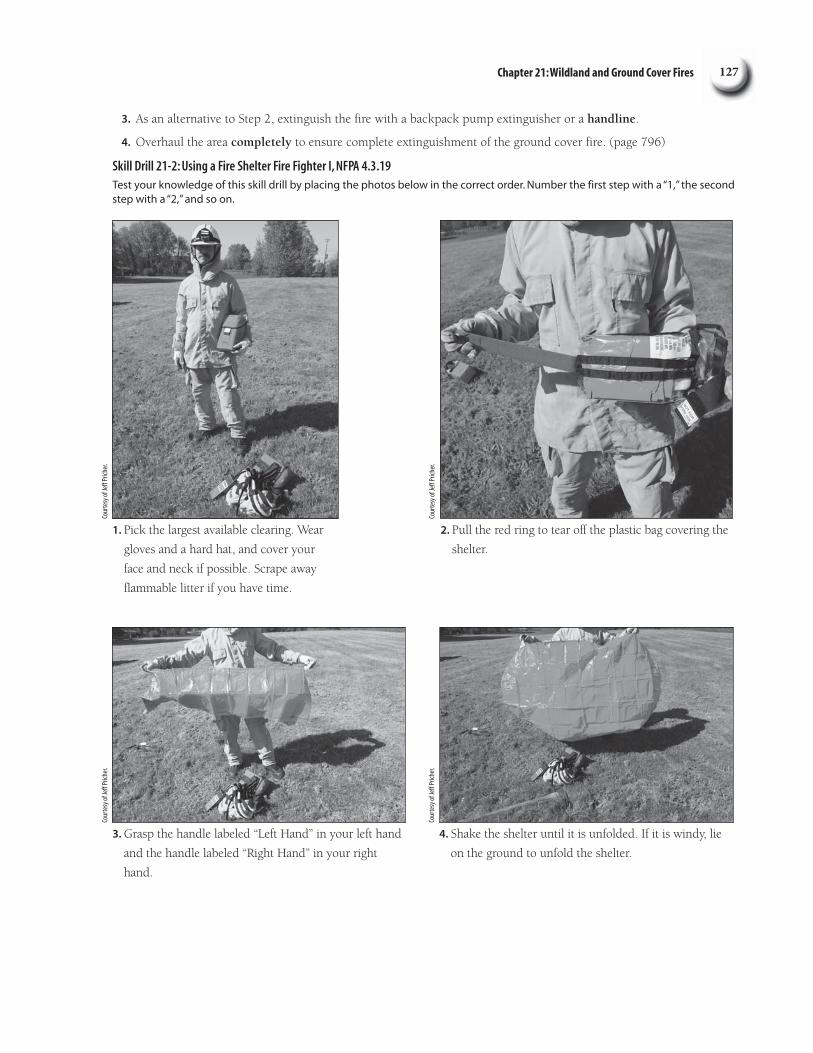
2. Pull the red ring to tear off the plastic bag covering the
shelter.
Cour
tesy
of Je
ff Pr
icher.
Cour
tesy
of Je
ff Pr
icher.
Cour
tesy
of Je
ff Pr
icher.
Cour
tesy
of Je
ff Pr
icher.
A N S W E R K E Y128
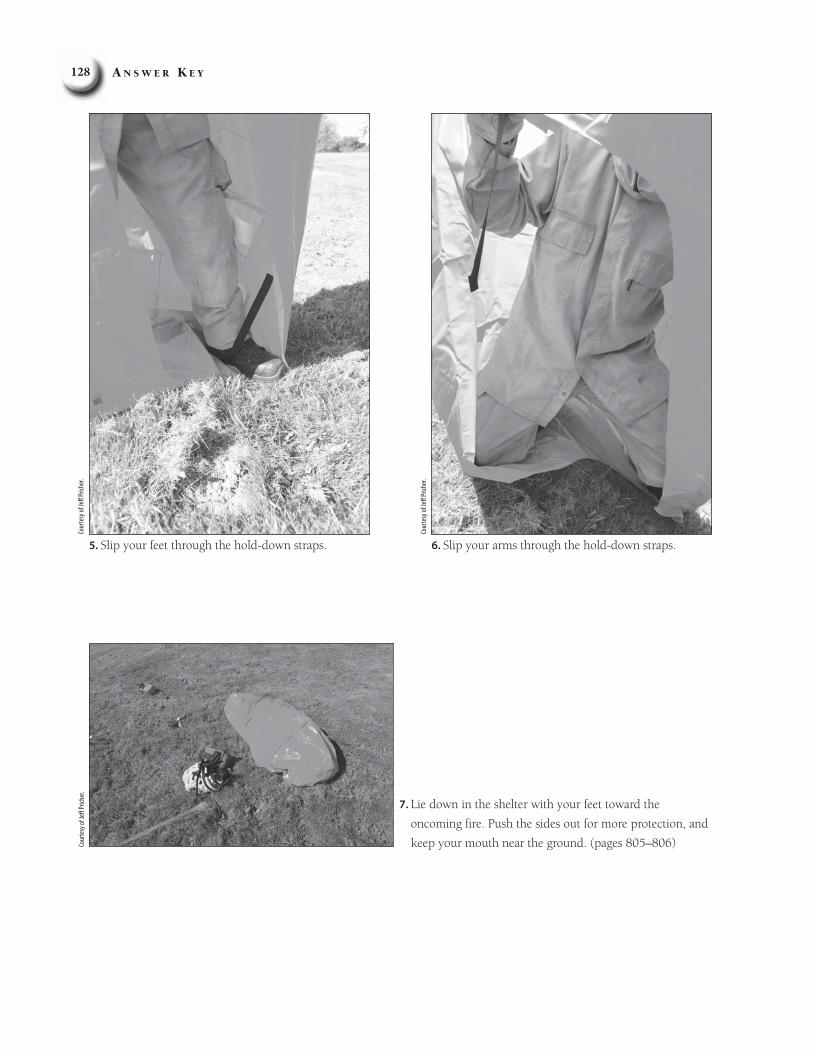
5. Slip your feet through the hold-down straps. 6. Slip your arms through the hold-down straps.
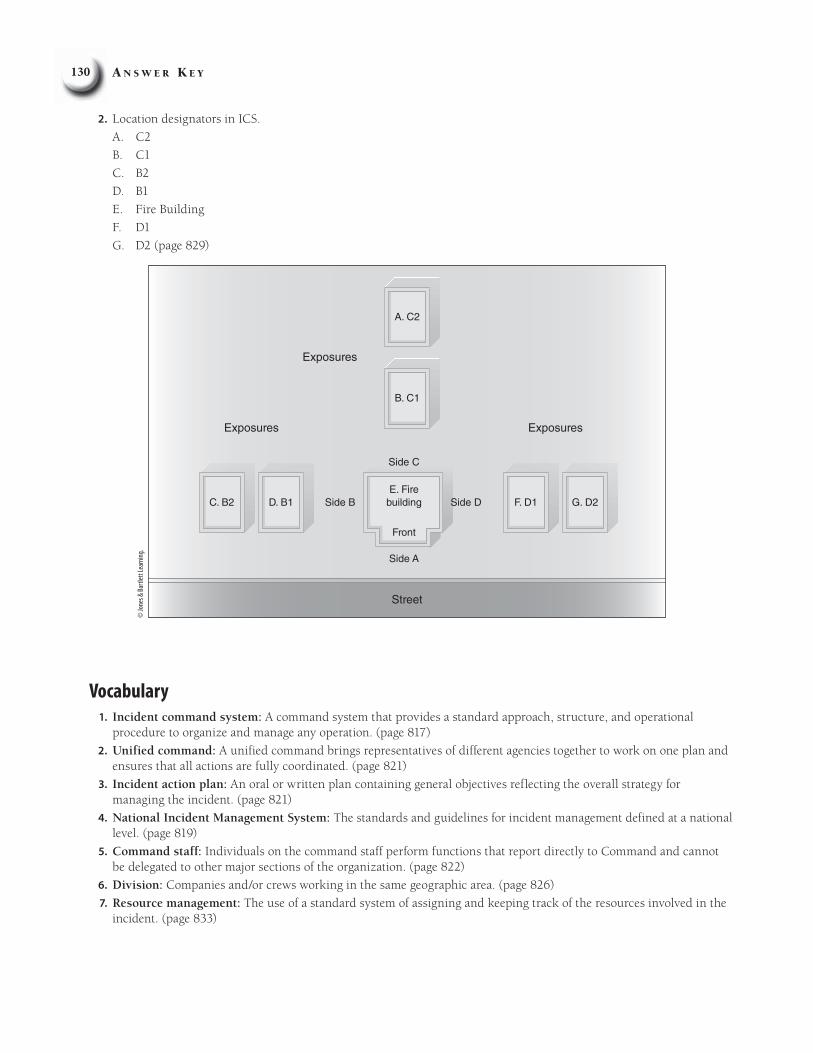
7. Lie down in the shelter with your feet toward the
oncoming fire. Push the sides out for more protection, and
keep your mouth near the ground. (pages 805–806)
Cour
tesy
of Je
ff Pr
icher.
Cour
tesy
of Je
ff Pr
icher.
Cour
tesy
of Je
ff Pr
icher.
Chapter 22: Establishing and Transferring Command 129
Chapter 22: Establishing and Transferring CommandMatching
1. C (page 833)
2. F (page 828)
3. H (page 833)
4. B (page 827)
5. J (page 839)
6. I (page 817)
7. A (page 826)
8. D (page 825)
9. E (page 825)
10. G (page 826)
Multiple Choice1. A (page 823)
2. B (page 827)
3. C (page 837)
4. B (page 833)
5. C (page 818)
6. C (page 845)
7. C (page 824)
8. A (page 820)
9. D (page 832)
10. B (page 828)
11. B (page 824)
12. C (page 833)
13. A (page 824)
14. D (page 824)
15. C (page 831)
16. B (page 842)
17. D (page 821)
18. A (page 826)
19. A (page 822)
20. A (page 836)
21. D (page 822)
22. B (page 823)
23. C (page 825)
24. A (page 825)
Labeling
Label the following diagram with the correct terms.
1. Creating branches within the operations section is one way to manage the span of control during a large incident.
A. Command
B. Incident safety officer
C. Liaison officer
D. Operations
E. Planning
F. Logistics
G. Finance/administration
H. Suppression
I. Rescue
J. EMS (page 828)
A. Command
C.Liaison officer
B. Incidentsafety officer
D. Operations E. Planning F. Logistics G. Finance/administration
Vocabulary1. Incident command system: A command system that provides a standard approach, structure, and operational
procedure to organize and manage any operation. (page 817)
2. Unified command: A unified command brings representatives of different agencies together to work on one plan and ensures that all actions are fully coordinated. (page 821)
3. Incident action plan: An oral or written plan containing general objectives reflecting the overall strategy for managing the incident. (page 821)
4. National Incident Management System: The standards and guidelines for incident management defined at a national level. (page 819)
5. Command staff: Individuals on the command staff perform functions that report directly to Command and cannot be delegated to other major sections of the organization. (page 822)
6. Division: Companies and/or crews working in the same geographic area. (page 826)
7. Resource management: The use of a standard system of assigning and keeping track of the resources involved in the incident. (page 833)
Chapter 22: Establishing and Transferring Command 131
Fill-In1. Command (page 821)
2. Probabilities (page 835)
3. single resource (page 825)
4. span of control (page 826)
5. communication (page 817)
6. terminology (page 825)
7. organization (page 820)
8. systematic (page 834)
9. general staff (page 823)
10. defensive (page 845)
True/False1. F (page 824)
2. F (page 845)
3. T (page 825)
4. T (page 818)
5. T (page 831)
6. F (page 824)
7. T (page 817)
8. T (page 824)
9. T (page 821)
10. F (page 833)
Short Answer1. The four major functional components are: (1) Operations; (2) Planning; (3) Logistics; (4) Finance/Administration.
(page 823)
2. When command is transferred, a situation status report should include the following: (1) tactical priorities; (2) action plans; (3) hazardous or potentially hazardous conditions; (4) accomplishments; (5) assessment of effectiveness of operations; (6) current status of resources. (page 840)
3. Important characteristics of an ICS include the following (student should identify at least five): (1) Recognized jurisdictional authority and responsibility; (2) Applicable to all risk and hazard situations; (3) Applicable to both day-to-day operations and major incidents; (4) Unity of command; (5) Span of control; (6) Modular organization; (7) Common terminology; (8) Integrated communications; (9) Incident action plans; (10) Designated incident facilities; (11) Resource management. (page 830)
4. The acronym SLICE-RS stands for: S– size-up, L – locate, I – identify and control the flow path, C – cool the space from the safest location, E – extinguish the fire, R – rescue, S – salvage. (page 846)
Fire Alarms1. The ICS was developed so that each person has only one supervisor, eliminating the confusion that can result
when you are given orders from more than one boss. It also ensures that every member on the emergency scene is accounted for. Notify the Division D supervisor that you are assigned to Division C. (page 837)
2. When the fire is too large or too dangerous to extinguish with an offensive attack, the IC will implement a defensive strategy. A defensive strategy is required when the IC determines that the risk to fire fighters’ lives is excessive, as in situations where structural collapse is possible. The IC who adopts a defensive strategy has determined that there is no property left to save or that the potential for saving property does not justify the risk to fire fighters. (page 845)
8. Size-up: The process of initially evaluating an emergency situation to determine which actions need to be taken and which actions can be undertaken safely. (page 833)
9. Freelancing: Acting independently of a supervisor’s orders or the fire department SOPs. (page 831)
10. Crew Resource Management (CRM): A program focused on improving situational awareness, critical decision making, effective communication, proper task allocation, and successful teamwork and leadership. (page 848)
A N S W E R K E Y132
Skill Drills
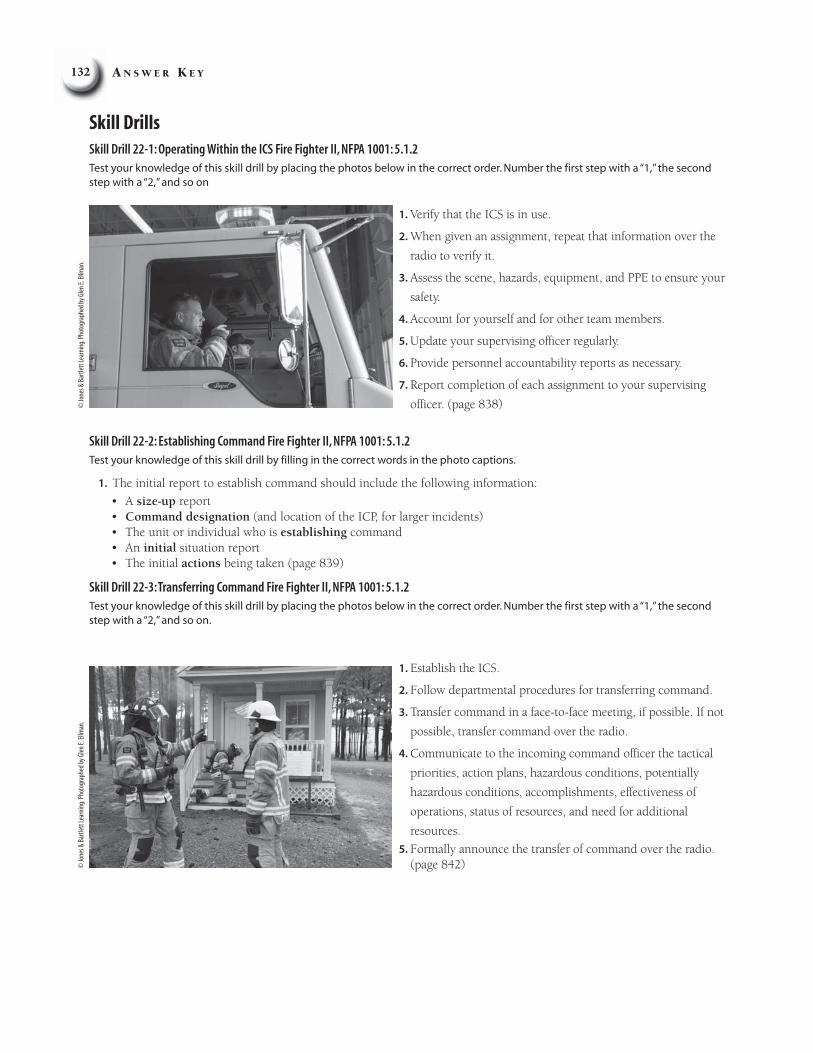
Skill Drill 22-1: Operating Within the ICS Fire Fighter II, NFPA 1001: 5.1.2Test your knowledge of this skill drill by placing the photos below in the correct order. Number the first step with a “1,” the second step with a “2,” and so on
Skill Drill 22-2: Establishing Command Fire Fighter II, NFPA 1001: 5.1.2Test your knowledge of this skill drill by filling in the correct words in the photo captions.
1. The initial report to establish command should include the following information:
A size-up reportCommand designation (and location of the ICP, for larger incidents)The unit or individual who is establishing commandAn initial situation reportThe initial actions being taken (page 839)
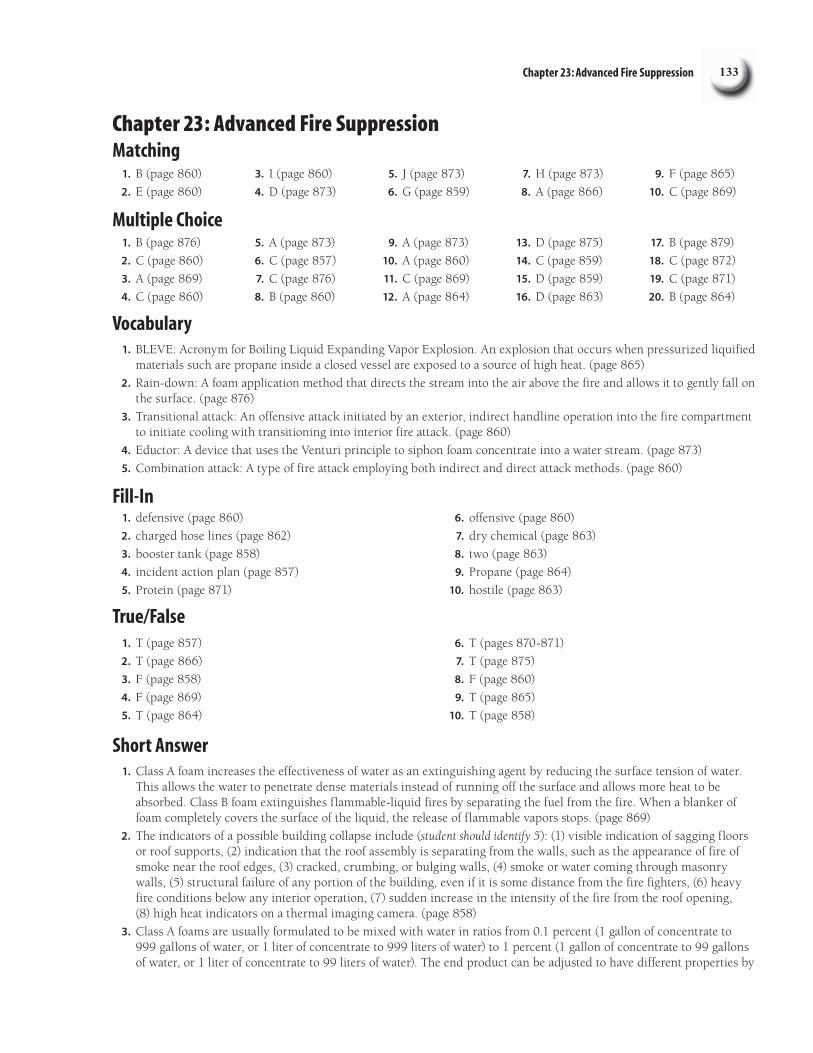
Skill Drill 22-3: Transferring Command Fire Fighter II, NFPA 1001: 5.1.2Test your knowledge of this skill drill by placing the photos below in the correct order. Number the first step with a “1,” the second step with a “2,” and so on.
1. Verify that the ICS is in use.
2. When given an assignment, repeat that information over the
radio to verify it.
3. Assess the scene, hazards, equipment, and PPE to ensure your
safety.
4. Account for yourself and for other team members.
5. Update your supervising officer regularly.
6. Provide personnel accountability reports as necessary.
7. Report completion of each assignment to your supervising
officer. (page 838)
1. Establish the ICS.
2. Follow departmental procedures for transferring command.
3. Transfer command in a face-to-face meeting, if possible. If not
possible, transfer command over the radio.
4. Communicate to the incoming command officer the tactical
Vocabulary1. BLEVE: Acronym for Boiling Liquid Expanding Vapor Explosion. An explosion that occurs when pressurized liquified
materials such are propane inside a closed vessel are exposed to a source of high heat. (page 865)
2. Rain-down: A foam application method that directs the stream into the air above the fire and allows it to gently fall on the surface. (page 876)
3. Transitional attack: An offensive attack initiated by an exterior, indirect handline operation into the fire compartment to initiate cooling with transitioning into interior fire attack. (page 860)
4. Eductor: A device that uses the Venturi principle to siphon foam concentrate into a water stream. (page 873)
5. Combination attack: A type of fire attack employing both indirect and direct attack methods. (page 860)
Fill-In1. defensive (page 860)
2. charged hose lines (page 862)
3. booster tank (page 858)
4. incident action plan (page 857)
5. Protein (page 871)
6. offensive (page 860)
7. dry chemical (page 863)
8. two (page 863)
9. Propane (page 864)
10. hostile (page 863)
True/False
1. T (page 857)
2. T (page 866)
3. F (page 858)
4. F (page 869)
5. T (page 864)
6. T (pages 870-871)
7. T (page 875)
8. F (page 860)
9. T (page 865)
10. T (page 858)
Short Answer1. Class A foam increases the effectiveness of water as an extinguishing agent by reducing the surface tension of water.
This allows the water to penetrate dense materials instead of running off the surface and allows more heat to be absorbed. Class B foam extinguishes flammable-liquid fires by separating the fuel from the fire. When a blanker of foam completely covers the surface of the liquid, the release of flammable vapors stops. (page 869)
2. The indicators of a possible building collapse include (student should identify 5): (1) visible indication of sagging floors or roof supports, (2) indication that the roof assembly is separating from the walls, such as the appearance of fire of smoke near the roof edges, (3) cracked, crumbing, or bulging walls, (4) smoke or water coming through masonry walls, (5) structural failure of any portion of the building, even if it is some distance from the fire fighters, (6) heavy fire conditions below any interior operation, (7) sudden increase in the intensity of the fire from the roof opening, (8) high heat indicators on a thermal imaging camera. (page 858)
3. Class A foams are usually formulated to be mixed with water in ratios from 0.1 percent (1 gallon of concentrate to 999 gallons of water, or 1 liter of concentrate to 999 liters of water) to 1 percent (1 gallon of concentrate to 99 gallons of water, or 1 liter of concentrate to 99 liters of water). The end product can be adjusted to have different properties by
A N S W E R K E Y134
varying the percentage of foam concentrate in the mixture and the application method. It is possible to produce “wet” foam that has good penetrating properties, for example, or “drier” foam that is more effective for applying a protective layer of foam onto a building. (page 870)
4. S.L.I.C.E.-R.S. is an acronym that was developed as a tool to assist fire fighters and officers during scene size-up. The seven components stand for; S – size up, gather and analyze information to help develop the IAP, L – locate the fire, determine the location and extent of the fire inside a building, I – identify and control the flow path, if possible, C – cool the space from the safest location, E – extinguish the fire fully, including overhaul of void spaces, R – rescue, conduct search and rescue operations as indicated by a risk/benefit analysis, S – salvage – protect property from further damage. (page 859)
5. The five major categories of Class B foam are; (1) protein foam, (2) fluoroprotein foam, (3) film-forming fluoroprotein foam, (4) aqueous film-forming foam (AFFF), (5) alcohol-resistant foam. (page 871)
Fire Alarms 1. Ensure that the integrity of the cylinder has been inspected from a distance before making an attempt to approach
and close the discharge valve. If the container is damaged or the discharge valve is missing, the fuel should be allowed to burn off, while hose streams continue to cool the tank from a distance.
Approach a flammable gas fire with two 1 ¾-in. (45-mm) hose lines working together. When approaching, always approach from the sides using a straight stream to cool the tank from a distance. Carefully approach the tank while continuing to adjust the nozzle to a wide fog pattern. The officer/team leader should be located between the two nozzle operators. On the command of the officer, the crew should move forward, remaining together at all times. Upon reaching the discharge valve, the fire fighter in the center can close the discharge valve, stopping the flow of gas. Any remaining fire may then be extinguished by normal means. Continue the flow of water as a protective curtain and to reduce sources of ignition. If the fire is extinguished prematurely, the discharge valve should be closed as soon as the team reaches it. Always approach and retreat with water flowing, in case of reignition. (page 865)
2. Perform this technique by directing the foam steam onto the ground in front of the product involved. The stream is moved back and forth is a slow, steady horizontal motion to push the foam gently until the area is covered. It is important to push the foam slowly and gently so that the foam blanket is not disturbed. Avoid aiming the nozzle down toward the surface of the spill to prevent splashing fuel. You may need to move to different positions to ensure that the entire surface of the fuel is covered by the foam blanket. (page 876)
Skill Drills
Skill Drill 23-1: Coordinating an Interior Attack Fire Fighter II, NFPA 1001: 5.3.2Test your knowledge of this skill drill by placing the photos below in the correct order. Number the first step with a “1,” the second step with a “2,” and so on.
1. Don full personal protective equipment (PPE), including self-contained breathing apparatus (SCBA). Report to the IC, check into the personnel accountability system, and proceed to work as a team. Perform size-up, and give an arrival report. Call for additional resources if needed.
2. Ensure that an adequate water supply and appropriate backup resources are available. Select the appropriate attack technique. Communicate the attack technique to the team.
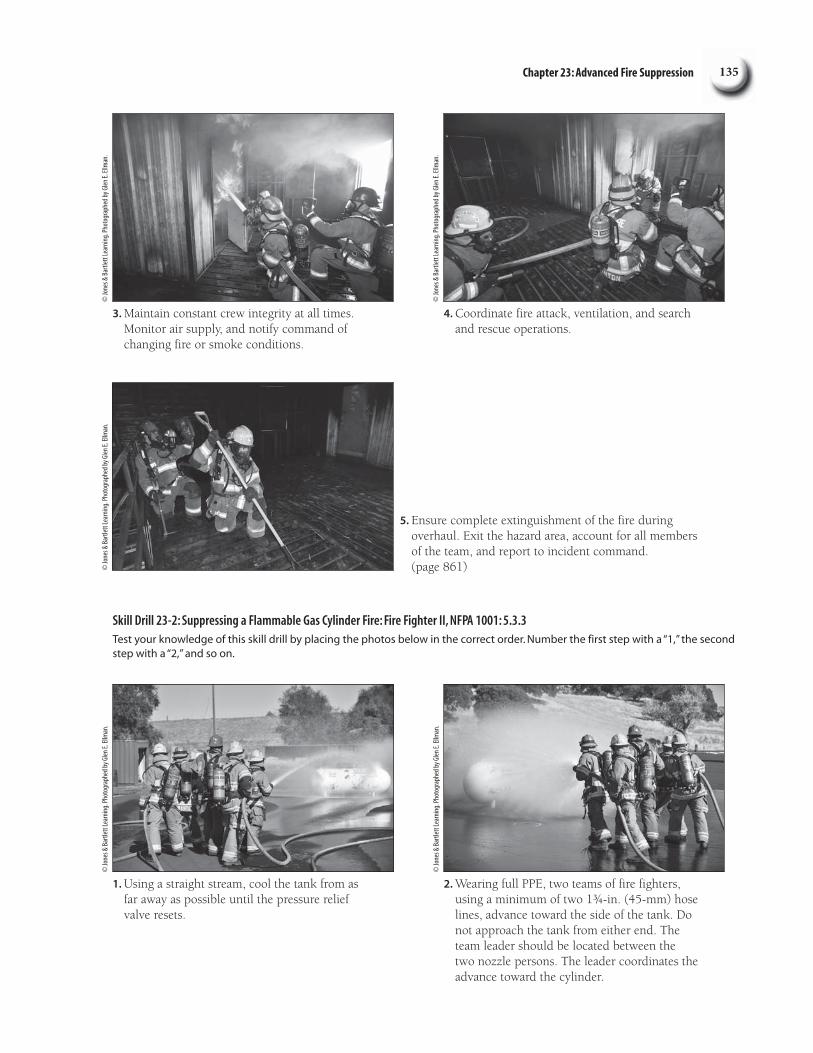
3. Maintain constant crew integrity at all times. Monitor air supply, and notify command of changing fire or smoke conditions.
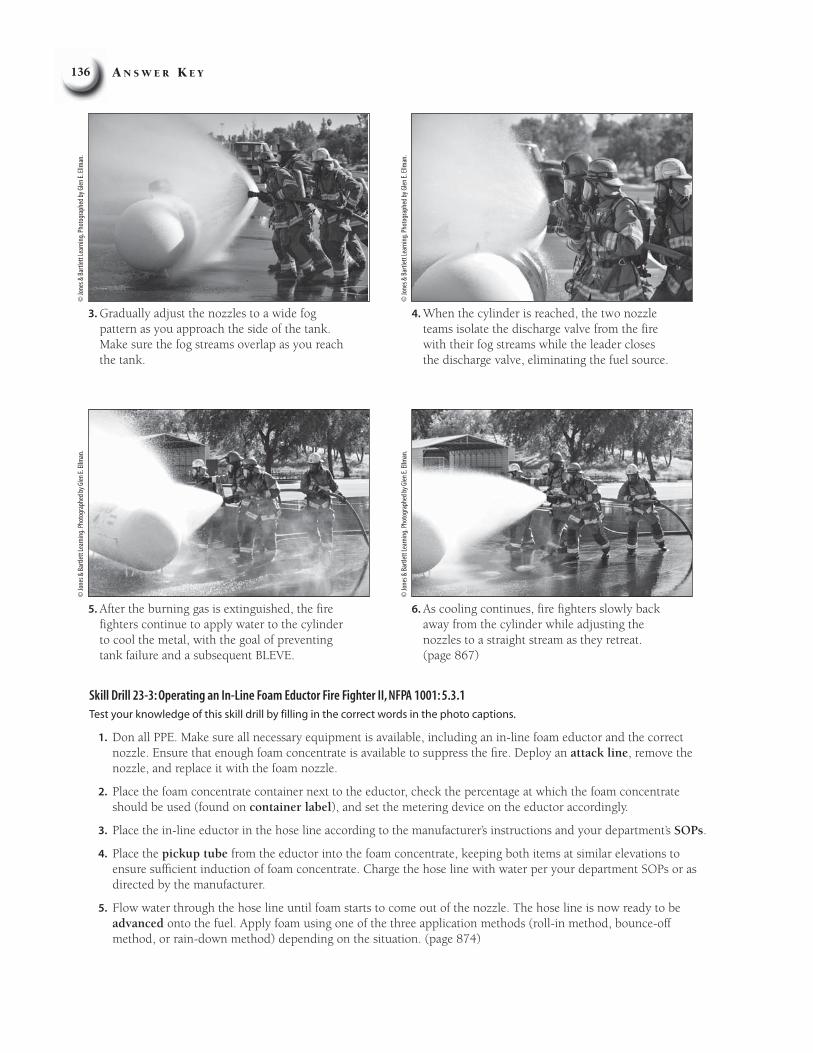
1. Using a straight stream, cool the tank from as far away as possible until the pressure relief valve resets.
5. Ensure complete extinguishment of the fire during overhaul. Exit the hazard area, account for all members of the team, and report to incident command. (page 861)
4. Coordinate fire attack, ventilation, and search and rescue operations.
2. Wearing full PPE, two teams of fire fighters, using a minimum of two 1¾-in. (45-mm) hose lines, advance toward the side of the tank. Do not approach the tank from either end. The team leader should be located between the two nozzle persons. The leader coordinates the advance toward the cylinder.
Skill Drill 23-2: Suppressing a Flammable Gas Cylinder Fire: Fire Fighter II, NFPA 1001: 5.3.3Test your knowledge of this skill drill by placing the photos below in the correct order. Number the first step with a “1,” the second step with a “2,” and so on.
3. Gradually adjust the nozzles to a wide fog pattern as you approach the side of the tank. Make sure the fog streams overlap as you reach the tank.
5. After the burning gas is extinguished, the fire fighters continue to apply water to the cylinder to cool the metal, with the goal of preventing tank failure and a subsequent BLEVE.
4. When the cylinder is reached, the two nozzle teams isolate the discharge valve from the fire with their fog streams while the leader closes the discharge valve, eliminating the fuel source.
6. As cooling continues, fire fighters slowly back away from the cylinder while adjusting the nozzles to a straight stream as they retreat. (page 867)
Skill Drill 23-3: Operating an In-Line Foam Eductor Fire Fighter II, NFPA 1001: 5.3.1Test your knowledge of this skill drill by filling in the correct words in the photo captions.
1. Don all PPE. Make sure all necessary equipment is available, including an in-line foam eductor and the correct nozzle. Ensure that enough foam concentrate is available to suppress the fire. Deploy an attack line, remove the nozzle, and replace it with the foam nozzle.
2. Place the foam concentrate container next to the eductor, check the percentage at which the foam concentrate should be used (found on container label), and set the metering device on the eductor accordingly.
3. Place the in-line eductor in the hose line according to the manufacturer’s instructions and your department’s SOPs.
4. Place the pickup tube from the eductor into the foam concentrate, keeping both items at similar elevations to ensure sufficient induction of foam concentrate. Charge the hose line with water per your department SOPs or as directed by the manufacturer.
5. Flow water through the hose line until foam starts to come out of the nozzle. The hose line is now ready to be advanced onto the fuel. Apply foam using one of the three application methods (roll-in method, bounce-off method, or rain-down method) depending on the situation. (page 874)
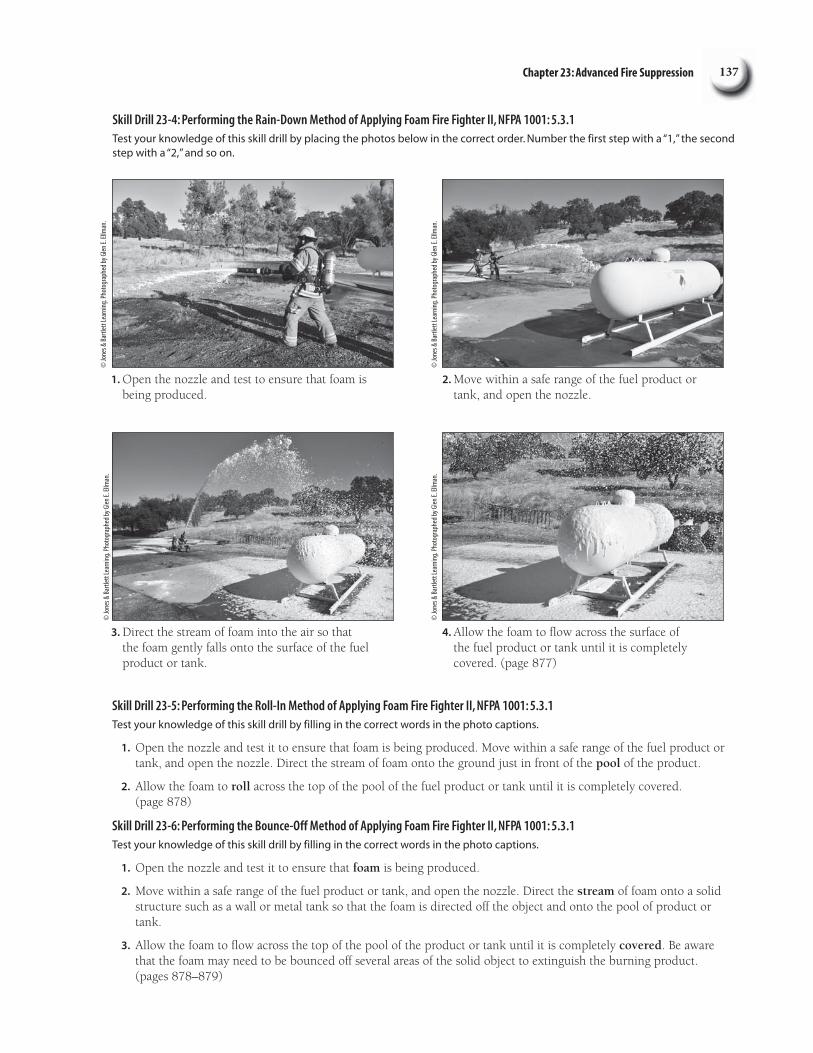
1. Open the nozzle and test to ensure that foam is being produced.
3. Direct the stream of foam into the air so that the foam gently falls onto the surface of the fuel product or tank.
2. Move within a safe range of the fuel product or tank, and open the nozzle.
4. Allow the foam to flow across the surface of the fuel product or tank until it is completely covered. (page 877)
Skill Drill 23-4: Performing the Rain-Down Method of Applying Foam Fire Fighter II, NFPA 1001: 5.3.1Test your knowledge of this skill drill by placing the photos below in the correct order. Number the first step with a “1,” the second step with a “2,” and so on.
Skill Drill 23-5: Performing the Roll-In Method of Applying Foam Fire Fighter II, NFPA 1001: 5.3.1Test your knowledge of this skill drill by filling in the correct words in the photo captions.
1. Open the nozzle and test it to ensure that foam is being produced. Move within a safe range of the fuel product or tank, and open the nozzle. Direct the stream of foam onto the ground just in front of the pool of the product.
2. Allow the foam to roll across the top of the pool of the fuel product or tank until it is completely covered. (page 878)
Skill Drill 23-6: Performing the Bounce-Off Method of Applying Foam Fire Fighter II, NFPA 1001: 5.3.1Test your knowledge of this skill drill by filling in the correct words in the photo captions.
1. Open the nozzle and test it to ensure that foam is being produced.
2. Move within a safe range of the fuel product or tank, and open the nozzle. Direct the stream of foam onto a solid structure such as a wall or metal tank so that the foam is directed off the object and onto the pool of product or tank.
3. Allow the foam to flow across the top of the pool of the product or tank until it is completely covered. Be aware that the foam may need to be bounced off several areas of the solid object to extinguish the burning product. (pages 878–879)
Skill Drill 23-7: Performing an Annual Service Test on a Fire Hose Fire Fighter II, NFPA 1001: 5.5.5Test your knowledge of this skill drill by placing the photos below in the correct order. Number the first step with a “1,” the second step with a “2,” and so on.
1. Don turnout gear. Connect up to 300 ft (91 m) of hose to a hose test gate valve on the discharge valve of a fire department pumper or hose tester.
3. Open the nozzles to purge air from the hose, discharging the water away from the test area. Close the nozzles once the air is purged. Measure and record the length of each section of hose.
5. Close each hose test gate valve.
2. Attach a nozzle to the end of each hose. Slowly fill each hose with water at 50 psi (345 kPa), and remove kinks and twists in the hose.
4. Mark the position of each hose coupling on the hose. This will help determine if slippage occurs during the test (Step 7). Check each coupling for leaks. If leaks are found behind the coupling, remove the hose from service. If the leak is in front of the coupling, tighten the leaking coupling. If the leak continues, replace gaskets if necessary after shutting down the hose line.
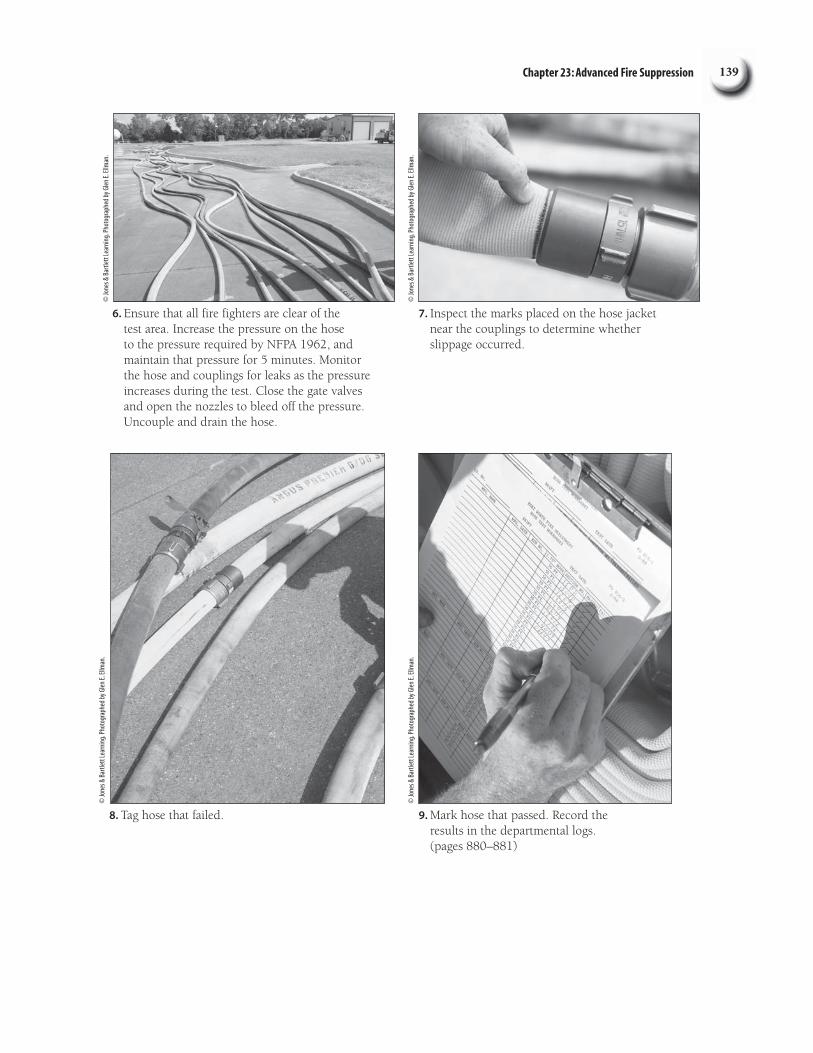
7. Inspect the marks placed on the hose jacket near the couplings to determine whether slippage occurred.
6. Ensure that all fire fighters are clear of the test area. Increase the pressure on the hose to the pressure required by NFPA 1962, and maintain that pressure for 5 minutes. Monitor the hose and couplings for leaks as the pressure increases during the test. Close the gate valves and open the nozzles to bleed off the pressure. Uncouple and drain the hose.
8. Tag hose that failed. 9. Mark hose that passed. Record the results in the departmental logs. (pages 880–881)
Chapter 24: Vehicle Rescue and ExtricationMatching
1. G (page 890)
2. B (page 910)
3. F (page 909)
4. J (page 888)
5. I (page 898)
6. A (page 897)
7. H (page 897)
8. C (page 898)
9. E (page 902)
10. D (page 888)
Multiple Choice1. C (page 890)
2. B (page 905)
3. C (page 913)
4. C (page 905)
5. A (page 909)
6. B (page 913)
7. A (page 913)
8. A (page 910)
9. D (page 908)
10. D (page 908)
11. B (page 909)
12. A (pages 897–900)
13. A (page 888)
14. A (page 902)
15. D (pages 909–910)
16. B (page 909)
17. C (page 897)
18. C (page 905)
19. B (page 898)
20. C (page 900)
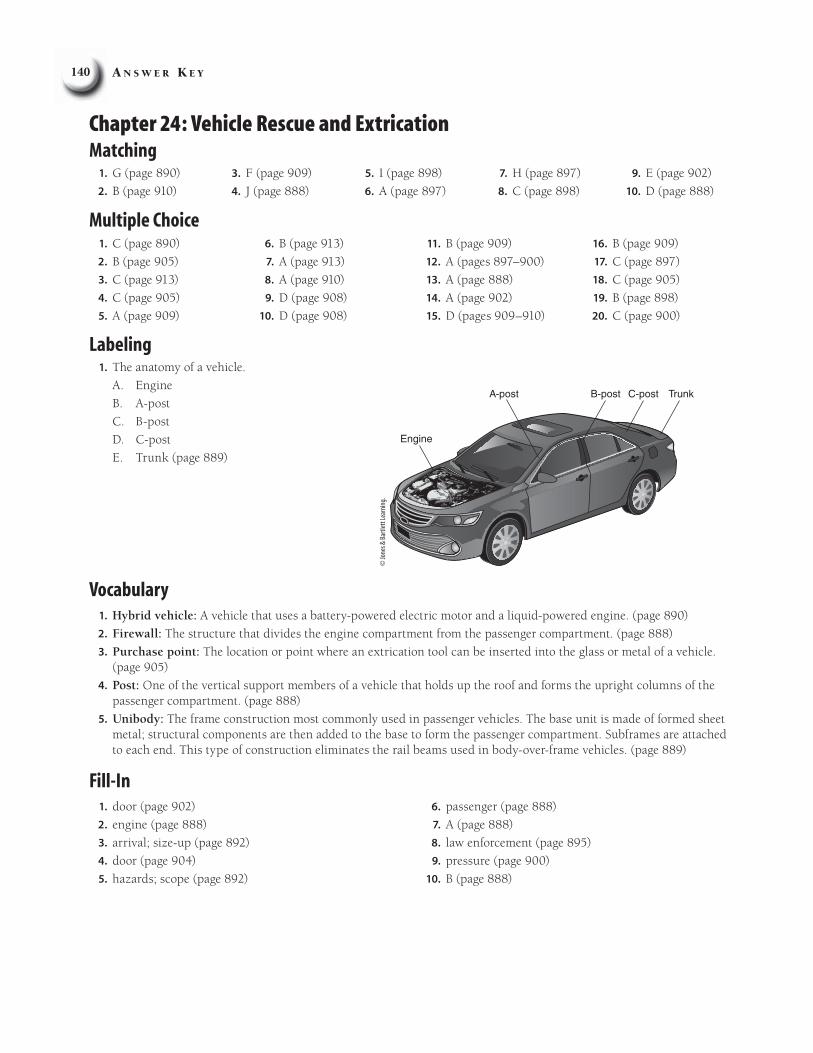
Labeling1. The anatomy of a vehicle.
A. Engine
B. A-post
C. B-post
D. C-post
E. Trunk (page 889)
Engine
A-post B-post C-post Trunk
Vocabulary1. Hybrid vehicle: A vehicle that uses a battery-powered electric motor and a liquid-powered engine. (page 890)
2. Firewall: The structure that divides the engine compartment from the passenger compartment. (page 888)
3. Purchase point: The location or point where an extrication tool can be inserted into the glass or metal of a vehicle. (page 905)
4. Post: One of the vertical support members of a vehicle that holds up the roof and forms the upright columns of the passenger compartment. (page 888)
5. Unibody: The frame construction most commonly used in passenger vehicles. The base unit is made of formed sheet metal; structural components are then added to the base to form the passenger compartment. Subframes are attached to each end. This type of construction eliminates the rail beams used in body-over-frame vehicles. (page 889)
Short Answer1. The four general functions of gaining access and disentangling a victim are: (1) Stabilize or hold an object or vehicle:
An example is stabilizing a vehicle with cribbing to keep it from moving. (2) Bend, distort, or displace: An example is bending a vehicle door back to get it out of the way. (3) Cut or sever: An example is cutting a roof. (4) Disassemble: An example is removing a vehicle door by unbolting the door hinges. (page 908)
2. The five types of alternative-fuel vehicles include: (1) battery electric vehicles, which use an electric motor only; (2) hybrid electric vehicles, which use both a battery-powered electric motor and a liquid-fueled engine; (3) blended liquid fuel-powered vehicles, which use a blend of liquid fuels such as gasoline and methanol or ethanol; (4) compressed gas-powered vehicles, which use one of three types of compressed gas, CNG, LNG, or LPG; (5) fuel cell–powered vehicles, which use fuel cells to generate electricity through a chemical reaction. (page 890)
3. Safety tips for using rescue-lift air bags include the following (Students should list five of the following): (1) Never stack high-pressure lift air bags more than two high. (2) Do not use a rescue-lift air bag to pull a steering column. (3) Do not use a rescue-lift air bag as the sole means to stabilize a vehicle; cribbing must be the primary stabilizer. (4) Never operate the rescue-lift air bag system without having been properly trained and fully understanding how the system works. (5) When stacking rescue-lift air bags, the largest size should be on the bottom and the smallest on top. The bottom rescue-lift air bag should be inflated first. (6) Place a sheet of plywood or other protective material on the ground under the air bag to protect it. (7) Refer to your department SOPs and the manufacturer’s instructions on proper use. (8) Clean rescue-lift air bags by following the recommendations of the manufacturer. (9) Test rescue-lift air bags regularly. (10) Never store a lift air bag near gasoline. (page 900)
Fire Alarms 1a. Protecting the scene from approaching traffic: Whenever possible, place emergency vehicles in a manner that will
ensure safety and does not disrupt traffic any more than necessary. However, do not hesitate to request that the road be closed if necessary. Remember: Safety first! Position large emergency vehicles so that they provide a barrier against motorists who fail to heed emergency warning lights. Many departments place apparatus at an angle to the crash. This position helps to push the apparatus to the side of a crash in the event that the emergency apparatus is struck from behind. Traffic cones or flares can be placed to direct motorists away from the crash. If needed, call for law enforcement to assist in traffic control.Fire fighters need to be readily visible at a crash scene. Personal protective equipment (PPE) must be worn at all MVAs. Unless you are exposed to or are likely to be exposed to fire conditions, you must wear a high-visibility safety vest that is compliant with the appropriate standards.
1b. Scene size-up: (1) Position the emergency vehicle so as to protect the scene and take any additional actions needed to prevent further MVAs. (2) Perform a quick initial assessment as you arrive on scene, establish command, and give a brief initial radio report. (3) Establish fire suppression protection. (4) Perform a 360-degree walk-around to identify potential hazards; look for hazards above and below the vehicle and determine the stabilization equipment needed to prevent further movement of the vehicle(s) involved in the accident. (5) Determine the number of patients, the severity of their injuries, and the amount of entrapment. (6) Give an updated report and call for additional resources if needed. (7) Establish a secure working area and equipment staging area. (8) Direct personnel to perform initial tasks. (pages 892–895)
2a. Equipment to use for vehicle stabilization: (1) Cribbing; (2) Step chocks; (3) Wedges; (4) Rescue-lift air bags
2b. Steps to stabilize the vehicles: (1) Don PPE. (2) Chock both sides of one tire to prevent the vehicle from rolling. (3) Use additional step chocks and cribbing as needed. (4) Consider deflating the tires for added stability. (5) Place the gear shift in park and apply the parking brake. (6) Lower all automatic windows if possible. (7) Turn off the ignition and remove the key or fob. (pages 897–900)
A N S W E R K E Y142
Skill Drills
Skill Drill 24-1: Disable the Electrical System of an Electric Drive Vehicle Fire Fighter II, NFPA 1001: 5.4.1Test your knowledge of this skill drill by filling in the correct words in the photo captions.
1. Immobilize the vehicle by chocking the wheels. Set the parking brake, and place the vehicle in park, if you can access these controls.
2. Lower all automatic windows, if possible. Disable the low-voltage system by shutting off the vehicle’s ignition (power button or conventional key) and disconnecting or cutting the 12-volt battery cables. Cut the 12-volt negative cable first, and then cut the positive cable. Double cut each cable to remove a short section. This will prevent the cables from accidentally touching. For vehicles equipped with a proximity key, move the key as far away from the vehicle as possible to prevent the possibility of unintentional restart. Because it may take up to 10 minutes for the high-voltage system to discharge, use caution while performing extrication operations. (page 891)
Skill Drill 24-2: Performing a Scene Size-Up at a Motor Vehicle Accident Fire Fighter II, NFPA 1001: 5.4.1Test your knowledge of this skill drill by placing the photos below in the correct order. Number the first step with a “1,” the second step with a “2,” and so on.
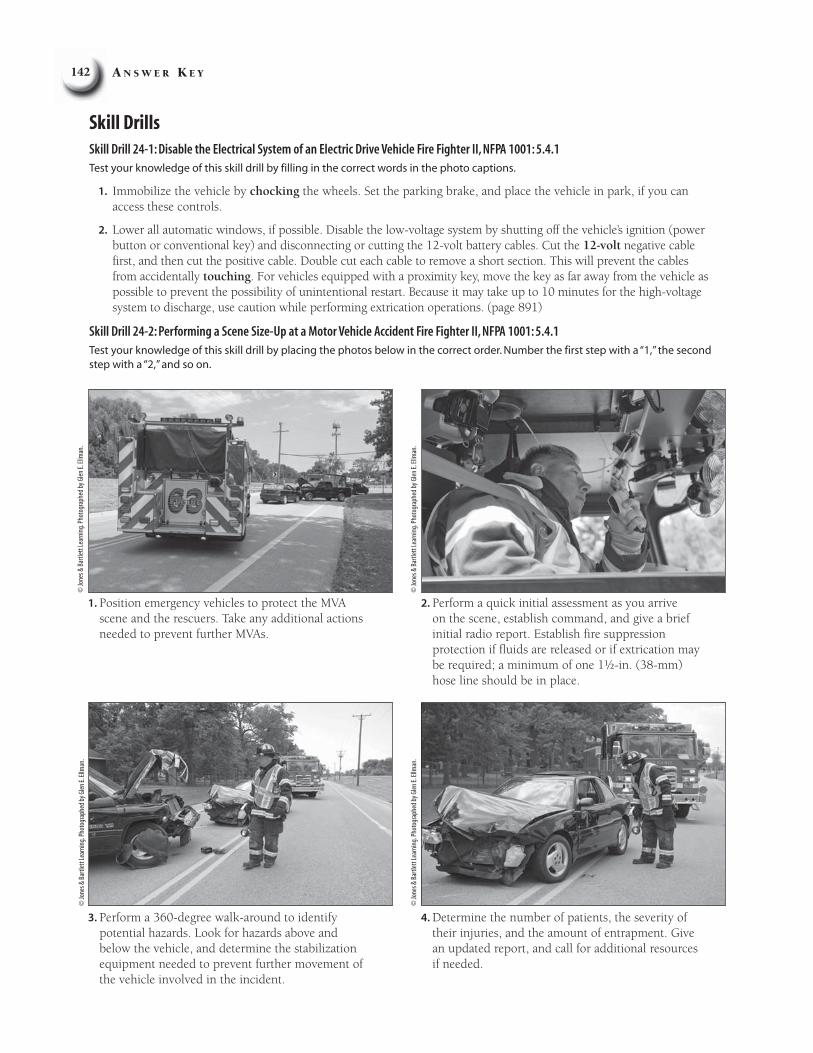
1. Position emergency vehicles to protect the MVA scene and the rescuers. Take any additional actions needed to prevent further MVAs.
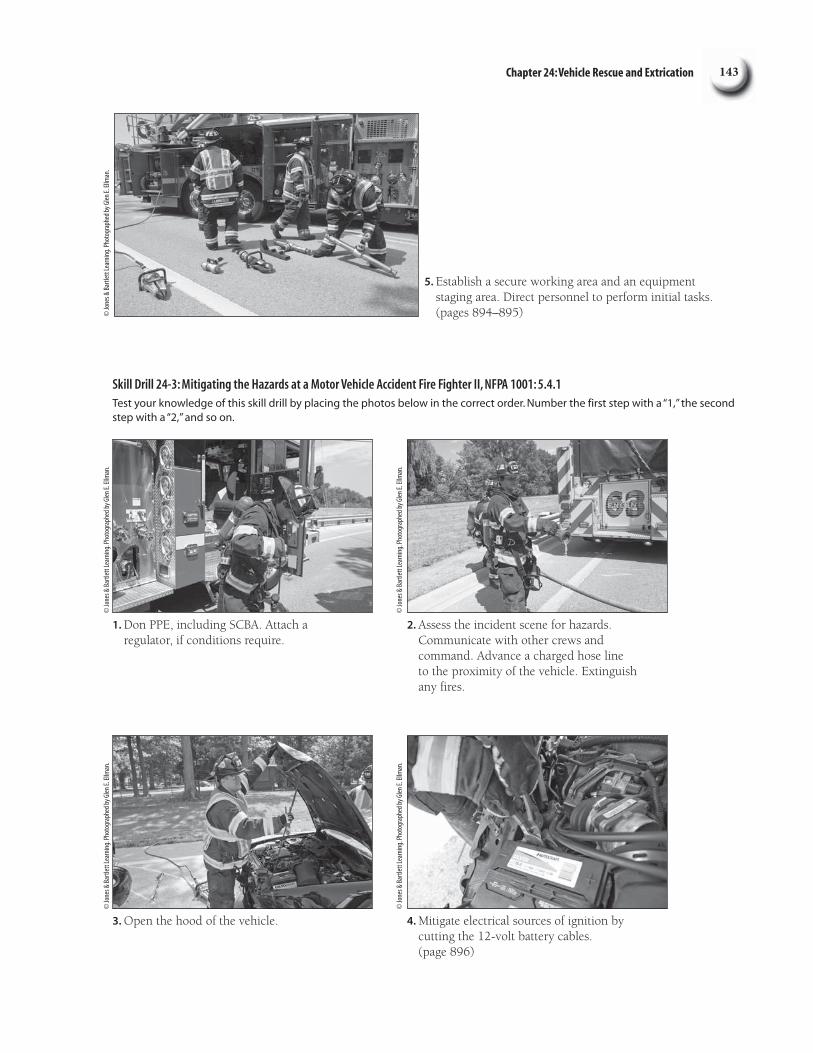
3. Perform a 360-degree walk-around to identify potential hazards. Look for hazards above and below the vehicle, and determine the stabilization equipment needed to prevent further movement of the vehicle involved in the incident.
2. Perform a quick initial assessment as you arrive on the scene, establish command, and give a brief initial radio report. Establish fire suppression protection if fluids are released or if extrication may be required; a minimum of one 1½-in. (38-mm) hose line should be in place.
4. Determine the number of patients, the severity of their injuries, and the amount of entrapment. Give an updated report, and call for additional resources if needed.
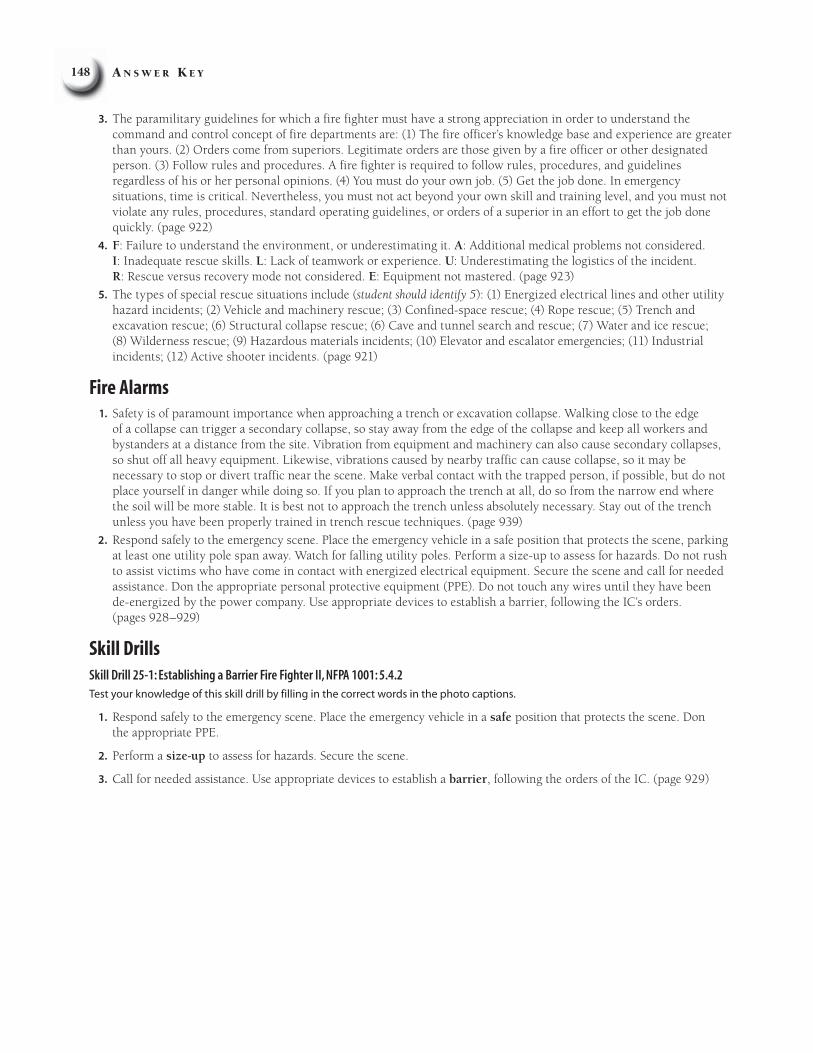
5. Establish a secure working area and an equipment staging area. Direct personnel to perform initial tasks. (pages 894–895)
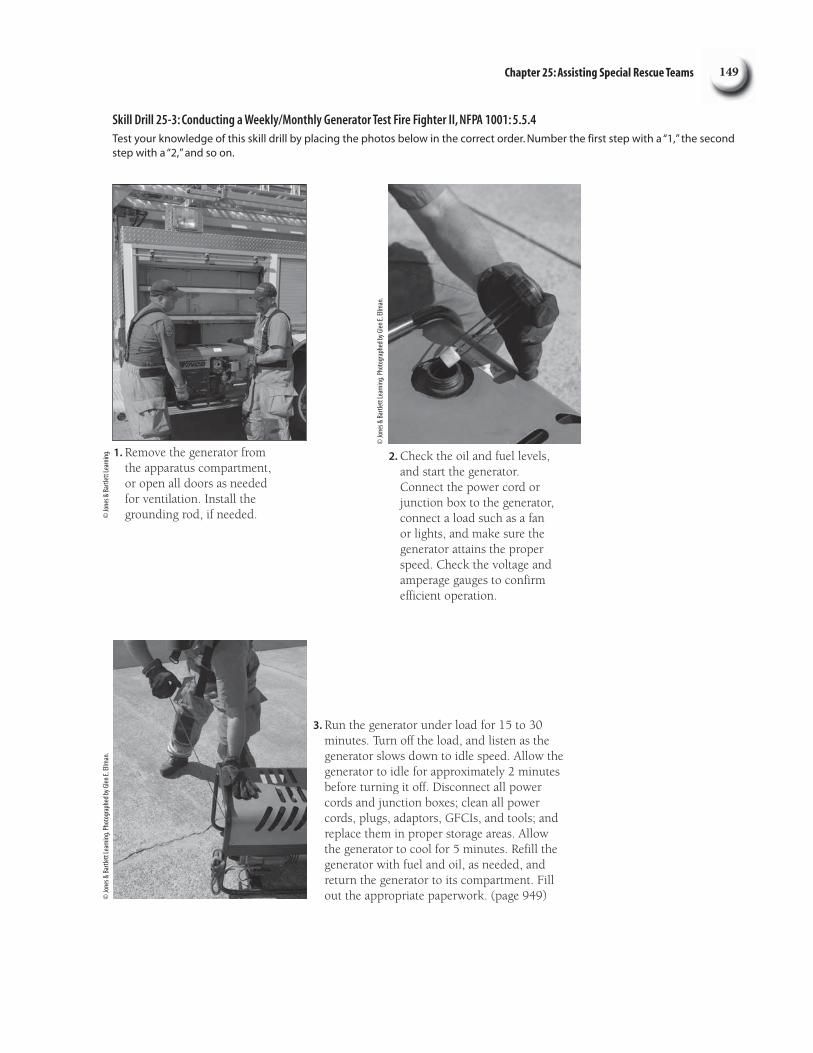
1. Don PPE, including SCBA. Attach a regulator, if conditions require.
3. Open the hood of the vehicle.
2. Assess the incident scene for hazards. Communicate with other crews and command. Advance a charged hose line to the proximity of the vehicle. Extinguish any fires.
4. Mitigate electrical sources of ignition by cutting the 12-volt battery cables. (page 896)
Skill Drill 24-3: Mitigating the Hazards at a Motor Vehicle Accident Fire Fighter II, NFPA 1001: 5.4.1Test your knowledge of this skill drill by placing the photos below in the correct order. Number the first step with a “1,” the second step with a “2,” and so on.
Skill Drill 24-4: Stabilizing a Vehicle Following a Motor Vehicle Accident Fire Fighter II, NFPA 1001: 5.4.1Test your knowledge of this skill drill by placing the photos below in the correct order. Number the first step with a “1,” the second step with a “2,” and so on.
1. Don PPE, including eye protection. Minimize hazards to rescuers and victims. Chock both sides of one tire to prevent the vehicle from rolling by placing one step chock in front of a wheel and a second step chock in back of the wheel.
3. Place the gear shift in park and apply the parking brake, if these controls can be accessed.
2. Use additional step chocks and cribbing, as needed. Consider deflating tires for added stability.
4. Lower all automatic windows, if possible. Turn off the ignition and remove the key or fob. (page 899)
Skill Drill 24-5: Breaking Tempered Glass Fire Fighter II, NFPA 1001: 5.4.1Test your knowledge of this skill drill by filling in the correct words in the photo captions.
1. Don PPE, including eye protection. Minimize hazards to rescuers and victims. Ensure stability of the vehicle by using appropriate chocks and cribbing. Select a tool for breaking tempered glass.
2. Ensure that the victim and other fire fighters are as protected as possible.
3. If using a spring-loaded center punch tool, place the tool in the lower corner of the window and sharply apply pressure until the spring is activated. If using a striking tool, strike the lowest corner away from the victim.
4. Remove loose glass around the window opening. (page 903)
Skill Drill 24-6: Gaining Access to a Vehicle Following a Motor Vehicle Accident Fire Fighter II, NFPA 1001: 5.4.1Test your knowledge of this skill drill by filling in the correct words in the photo captions.
1. Don PPE, including eye protection. Minimize hazards to rescuers and victims. Ensure stability of the vehicle by using appropriate chocks and cribbing. If you can access the passenger compartment, place the gear shift in park, apply the parking brake, lower automatic windows, turn off the ignition, and move the proximity key (if
1. Don PPE, including eye protection. Retrieve and set up the required tools. Check the equipment for readiness. Assess the vehicle for stabilization and hazards, including SRS devices.
3. Engage hand tools or a power unit to force the door, using good body mechanics.
2. Communicate with the victim; minimize hazards to both the rescuers and the victim.
4. Remove the door, if possible. If rapid extrication is required, secure the door with ropes or cribbing so it does not shift while removing the victim. (page 906)
applicable) away from the vehicle. Isolate the power by disconnecting or cutting the battery cables. Determine the best access point, and then open a door, break needed glass, or distort metal.
2. Enter the vehicle, and communicate with the victim. (page 904)
Skill Drill 24-7: Forcing a Vehicle Door Fire Fighter II, NFPA 1001: 5.4.1Test your knowledge of this skill drill by placing the photos below in the correct order. Number the first step with a “1,” the second step with a “2,” and so on.
Skill Drill 24-9: Performing a Dash Roll Fire Fighter II, NFPA 1001: 5.4.1Test your knowledge of this skill drill by filling in the correct words in the photo captions.
1. Don PPE, including eye protection. Minimize hazards to rescuers and victims. Prevent the vehicle from rolling by placing a chock in front of one tire and a second chock behind the same tire. Use additional step chocks and cribbing, as needed. Consider deflating tires for added stability. Communicate with the victim, and ensure that both the victim and rescuers are protected from hazards. Make a relief cut at the bottom of the A-post.
2. Use a hydraulic ram or spreading tool to roll the dash and bulkhead up and away from the victim. Place cribbing under the rocker panel as the dash is being rolled.
3. Place a wedge in the A-post cut to prevent the dash from returning to its original position. (page 911)
Skill Drill 24-10: Performing a Dash Lift Fire Fighter II, NFPA 1001: 5.4.1Test your knowledge of this skill drill by filling in the correct words in the photo captions.
1. Don PPE, including eye protection. Minimize hazards to rescuers and victims. Prevent the vehicle from rolling by placing a chock in front of one tire and a second chock behind the same tire. Use additional step chocks and cribbing, as needed. Consider deflating tires for added stability. Communicate with the victim, and ensure that both the victim and rescuers are protected from hazards. Make necessary relief cuts in the A-post and other structural members, as needed.
2. Use a hydraulic spreading tool in the A-post relief cut to lift the dash and bulkhead up and away from the victim. Place cribbing under the rocker panel as the dash is being lifted.
3. Maintain contact with the hydraulic spreading tool to prevent the tool from shifting while removing the victim. (page 912)
Skill Drill 24-11: Removing the Roof of a Vehicle Fire Fighter II, NFPA 1001: 5.4.1Test your knowledge of this skill drill by placing the photos below in the correct order. Number the first step with a “1,” the second step with a “2,” and so on.
1. Don PPE, including eye protection. Retrieve and set up the required tools. Check the equipment for readiness. Assess the vehicle for stabilization and hazards. Prior to cutting any materials, be sure to identify the presence and location of any hidden pistons, canisters, electrical wiring, or SRS devices, such as air bags and seat belt pretensioners, and address these hazards accordingly. It may be necessary to remove interior trim around the posts to locate these devices. Communicate with the victim, and minimize hazards to both the rescuers and the victim. Remove any remaining glass.
3. Control the vehicle roof and protect against sharp edges at all times.
2. Engage the appropriate tools to remove the roof, while using good body mechanics.
4. Remove the roof to a safe location. Return the tools to the staging area upon completion of the tasks. (page 914)
Chapter 25: Assisting Special Rescue TeamsMatching
1. C (page 937)
2. E (page 925)
3. H (page 936)
4. G (page 935)
5. B (page 930)
6. F (page 938)
7. A (page 924)
8. J (page 939)
9. I (page 921)
10. D (page 944)
Multiple Choice1. B (page 927)
2. D (page 938)
3. C (page 945)
4. B (page 934)
5. B (page 943)
6. C (page 927)
7. C (page 930)
8. C (page 935)
9. D (page 944)
10. A (page 931)
11. B (page 926)
12. D (page 924)
13. D (page 924)
14. D (page 923)
15. C (page 925)
16. A (page 927)
17. B (page 921)
18. A (page 928)
19. B (page 926)
20. A (page 926)
21. C (page 924)
22. C (page 928)
23. C (page 934)
24. A (page 923)
25. D (page 925)
Vocabulary1. Lockout/tagout system: Methods of ensuring that electricity and other utilities have been shut down and switches
are locked so they cannot be switched on, so as to prevent a flow of power or gases into the area where rescue is being conducted. (page 925)
2. Hazardous materials: Any materials or substances that pose a significant risk to the health and safety of persons and/or to the environment if they are not properly handled during manufacture, processing, packaging, transportation, storage, use, or disposal. (page 944)
3. Technical rescue incident: A complex rescue incident involving vehicles or machinery, water or ice, rope techniques, a trench or excavation collapse, confined spaces, a structural collapse, wilderness search and rescue operation, or hazardous materials, and which requires specially trained personnel and special equipment. (page 920)
Fill-In1. asphyxiates (page 929)
2. prior (page 934)
3. Structural (page 940)
4. stabilized (page 927)
5. training (page 931)
6. law enforcement (page 925)
7. incident command system (page 930)
8. awareness (page 921)
9. decontaminated (page 927)
10. terminology (page 923)
11. packaging (page 926)
12. proportional (page 924)
True/False1. T (page 930)
2. F (page 922)
3. T (page 942)
4. T (page 926)
5. T (page 933)
6. F (page 943)
7. T (page 930)
8. F (page 925)
9. T (page 927)
10. T (page 922)
Short Answer1. The three control zones include: (1) Hot Zone: The area for entry teams and special rescue teams only. The hot
zone immediately surrounds the dangers of the site. (2) Warm zone: This area is for properly trained and equipped personnel only and is where decontamination and hot zone support take place. (3) Cold zone: This area is for staging vehicles and equipment, and contains the Command Post. (pages 924–925)
2. The five guidelines that a fire fighter should follow when assisting rescue team members are: (1) Be safe. (2) Follow orders, and work within the Incident Command System (ICS). (3) Work as a team. (4) Think. (5) Follow the Golden Rule of public service, which emphasizes the ethic of reciprocity: Treat others as you would like to be treated. (page 922)
A N S W E R K E Y148
3. The paramilitary guidelines for which a fire fighter must have a strong appreciation in order to understand the command and control concept of fire departments are: (1) The fire officer’s knowledge base and experience are greater than yours. (2) Orders come from superiors. Legitimate orders are those given by a fire officer or other designated person. (3) Follow rules and procedures. A fire fighter is required to follow rules, procedures, and guidelines regardless of his or her personal opinions. (4) You must do your own job. (5) Get the job done. In emergency situations, time is critical. Nevertheless, you must not act beyond your own skill and training level, and you must not violate any rules, procedures, standard operating guidelines, or orders of a superior in an effort to get the job done quickly. (page 922)
4. F: Failure to understand the environment, or underestimating it. A: Additional medical problems not considered. I: Inadequate rescue skills. L: Lack of teamwork or experience. U: Underestimating the logistics of the incident. R: Rescue versus recovery mode not considered. E: Equipment not mastered. (page 923)
5. The types of special rescue situations include (student should identify 5): (1) Energized electrical lines and other utility hazard incidents; (2) Vehicle and machinery rescue; (3) Confined-space rescue; (4) Rope rescue; (5) Trench and excavation rescue; (6) Structural collapse rescue; (6) Cave and tunnel search and rescue; (7) Water and ice rescue; (8) Wilderness rescue; (9) Hazardous materials incidents; (10) Elevator and escalator emergencies; (11) Industrial incidents; (12) Active shooter incidents. (page 921)
Fire Alarms1. Safety is of paramount importance when approaching a trench or excavation collapse. Walking close to the edge
of a collapse can trigger a secondary collapse, so stay away from the edge of the collapse and keep all workers and bystanders at a distance from the site. Vibration from equipment and machinery can also cause secondary collapses, so shut off all heavy equipment. Likewise, vibrations caused by nearby traffic can cause collapse, so it may be necessary to stop or divert traffic near the scene. Make verbal contact with the trapped person, if possible, but do not place yourself in danger while doing so. If you plan to approach the trench at all, do so from the narrow end where the soil will be more stable. It is best not to approach the trench unless absolutely necessary. Stay out of the trench unless you have been properly trained in trench rescue techniques. (page 939)
2. Respond safely to the emergency scene. Place the emergency vehicle in a safe position that protects the scene, parking at least one utility pole span away. Watch for falling utility poles. Perform a size-up to assess for hazards. Do not rush to assist victims who have come in contact with energized electrical equipment. Secure the scene and call for needed assistance. Don the appropriate personal protective equipment (PPE). Do not touch any wires until they have been de-energized by the power company. Use appropriate devices to establish a barrier, following the IC’s orders. (pages 928–929)
Skill Drills
Skill Drill 25-1: Establishing a Barrier Fire Fighter II, NFPA 1001: 5.4.2Test your knowledge of this skill drill by filling in the correct words in the photo captions.
1. Respond safely to the emergency scene. Place the emergency vehicle in a safe position that protects the scene. Don the appropriate PPE.
2. Perform a size-up to assess for hazards. Secure the scene.
3. Call for needed assistance. Use appropriate devices to establish a barrier, following the orders of the IC. (page 929)
Chapter 25: Assisting Special Rescue Teams 149
1. Remove the generator from the apparatus compartment, or open all doors as needed for ventilation. Install the grounding rod, if needed.
2. Check the oil and fuel levels, and start the generator. Connect the power cord or junction box to the generator, connect a load such as a fan or lights, and make sure the generator attains the proper speed. Check the voltage and amperage gauges to confirm efficient operation.
3. Run the generator under load for 15 to 30 minutes. Turn off the load, and listen as the generator slows down to idle speed. Allow the generator to idle for approximately 2 minutes before turning it off. Disconnect all power cords and junction boxes; clean all power cords, plugs, adaptors, GFCIs, and tools; and replace them in proper storage areas. Allow the generator to cool for 5 minutes. Refill the generator with fuel and oil, as needed, and return the generator to its compartment. Fill out the appropriate paperwork. (page 949)
Skill Drill 25-3: Conducting a Weekly/Monthly Generator Test Fire Fighter II, NFPA 1001: 5.5.4Test your knowledge of this skill drill by placing the photos below in the correct order. Number the first step with a “1,” the second step with a “2,” and so on.
Chapter 26: Fire Detection, Suppression, and Smoke Control Systems 151
3. Air sampling detector. (page 965)
4. One type of combination carbon monoxide and smoke alarm. (page 965)
Vocabulary1. Zoned-system: A fire alarm system design that divides a building or facility into zones based on the type or location
of devices so that the area where an alarm originated can be identified. (page 968)
2. Deluge sprinkler system: A sprinkler system that allows water to flow from all of the sprinkler heads when the alarm system detects a predetermined fire condition. (page 981)
3. Smoke control system: A mechanical system that can create positive or negative pressure to control, alter, and limit the spread of smoke and gases. (page 989)
4. Clean agent extinguishing system: A self-contained extinguishing system that expels an electrically nonconducting, volatile or gaseous fire extinguishant that does not leave a residue upon evaporation. (page 988)
5. Fire department connection: A fire hose connection through which the fire department can pump water into a sprinkler system, standpipe system, or other system. (page 978)
Short Answer1. The five fire department notification systems are (1) protected premise (local) alarm system, (2) public emergency
reporting system, (3) remote supervising station system, (4) proprietary supervising system, and (5) central station service system. (pages 968–969)
2. The three fire suppression systems are (1) automatic sprinkler systems, (2) standpipe systems, and (3) special hazard suppression systems. (page 970)
3. The four categories of sprinkler systems are (1) Wet sprinkler system: The piping in a wet system is always filled with water. When activated, water is immediately discharged; (2) Dry sprinkler system: The pipes are filled with pressurized air, which keeps water out until the air pressure is released. The system utilizes accelerators and exhausters; (3) Preaction sprinkler system: This system is similar to a dry sprinkler system except that a secondary device (pull alarm, smoke detector) must be activated before the water is released; and (4) Deluge sprinkler system: In this type of dry sprinkler system, all of the sprinkler heads are activated as soon as the system is activated. The sprinkler heads are always open. (pages 979–981)
4. The three categories of standpipes are (1) A Class I standpipe is designed for use by fire department personnel only. Each outlet has a 2½-inch (64-mm) male coupling and a valve to open the water supply after the attack line is connected. The connection is often located inside a cabinet, which may or may not be locked. Responding fire personnel carry the hose into the building with them, usually in some sort of roll, bag, or backpack. A Class I standpipe system must be able to supply an adequate volume of water with sufficient pressure to operate fire department attack lines. (2) A Class II standpipe is designed for use by the building occupants. The outlets are usually equipped with a length of 1½-inch (38-mm) single-jacket hose preconnected to the system. These systems are intended to enable occupants to attack a fire before the fire department arrives, but their safety and effectiveness are questionable. (3) A Class III standpipe has the features of both Class I and Class II standpipes in a single system. This kind of system has 2½-inch (64-mm) outlets for fire department use, as well as smaller outlets with attached hoses for occupant use. (pages 983–984)
5. The variations that are different in a residential sprinkler system compared to a commercial system include: (1) the primary objective of a residential system is to protect egress routes so occupants can evacuate safely; (2) quick response residential sprinkler heads are used; (3) smaller piping and sprinkler heads with smaller orifices that discharge less water are used; (4) plastic pipe may be used instead of metal pipe; (5) residential systems typically only protect high-risk areas; (6) usually only wet pipe systems are used; (7) there is no fire department connection (FDC); (8) they are not connected to a fire alarm system, unless required by the local jurisdiction. (page 982)
1. gaseous (page 957)
2. I (page 983)
3. beam (page 963)
4. piping (page 974)
5. remote station (page 969)
6. Sidewall (page 974)
7. release (page 973)
8. Rate of rise (page 964)
9. faults (page 958)
10. Passive (page 990)
Fill-In
Chapter 27: Fire and Life Safety Initiatives 153
Chapter 27: Fire and Life Safety InitiativesMatching
1. C (page 1001)
2. D (page 1015)
3. F (page 1002)
4. I (page 1025)
5. A (page 1002)
6. B (page 1029)
7. J (page 999)
8. E (page 1029)
9. H (page 999)
10. G (page 1014)
Multiple Choice1. A (page 999)
2. A (page 1016)
3. C (page 1011)
4. C (page 1029)
5. B (page 999)
6. B (page 1021)
7. D (page 999)
8. D (page 1022)
9. C (page 999)
10. D (page 1029)
11. A (page 1000)
12. D (page 1025)
13. D (page 1001)
14. D (pages 1016–1031)
15. B (page 999)
16. A (page 1024)
17. C (page 1001)
18. A (page 1020)
19. A (page 1012)
20. A (page 1028)
Vocabulary1. Community Risk Reduction (CRR): A comprehensive, all-hazard approach that includes programs, actions, and
services used by a community that prevent or mitigate the loss of life, property, and resources associated with life safety, fire, and other disasters within a community. (page 999)
2. Fire codes: A set of legally adopted rules and regulations designed to prevent fires and protect lives and property in the event of a fire. (page 999)
3. Exit Drills In The Home (E.D.I.T.H.): A public fire and life safety education program designed to teach occupants how to safely exit a house in the event of a fire or other emergency. (page 1004)
4. Fire safety survey: A voluntary inspection of a residence or occupied structure to identify fire and life safety hazards. (page 1008)
5. Conflagration: A large fire involving multiple structures. (page 1016)
6. Preincident plan: A document developed by gathering general and detailed data that is used by responding personnel to effectively and safely manage an emergency at a particular location. (page 1014)
7. Ordinary construction: Buildings where the exterior walls are made of noncombustible or limited-combustible materials, but the interior floors and walls are made of combustible materials. (page 1020)
8. Exposure: Any building or item that might be in danger if a fire occurs in another building or area. (page 1024)
9. Defend-in-place: An operational response in which the action is to relocate the affected occupants to a safe place within the structure during an emergency. (page 1029)
10. Nonambulatory patient: Patients that cannot move themselves to an area of safety during an emergency, owing to their physical condition, medical treatment, or other factors. (page 1029)
Fire Alarms1. Carbon dioxide extinguishes a fire by displacing the oxygen and creates a dangerous situation. Fire fighters must use
extreme caution as oxygen levels will be dangerously low. Full protective equipment (PPE) and SCBA are required. (page 989)
2. From a safety standpoint, fire fighters need to understand the operations and limitations of fire detection and suppression systems. A building with a fire protection system will have very different working conditions during a fire than an unprotected building will. Fire fighters need to know how to fight a fire in a building with a working fire suppression system, and how to shut down the system after the fire is extinguished. From a customer service standpoint, fire fighters who understand how fire protection systems work can help dispel misconceptions about these systems and advise building owners and occupants after an alarm is sounded. (page 956)
A N S W E R K E Y154
Short Answer1. Recommendations for kitchen safety include (Students should include five of the following): (1) Do not leave anything
cooking unattended on a stove. (2) Keep all combustible materials, cleaning supplies, cooking oils, and aerosols away from the stove. (3) Do not place anything that could ignite on a cooking surface, even when it is turned off and cold. (4) Do not place towel racks near the stove. (5) Do not overload electrical outlets or extension cords. (6) Keep electric cords properly maintained; replace any damaged appliances. (7) Keep the range exhaust hood clean and in good working order. (pages 1011–1012)
2. Typical target hazard properties that may be found in a community include: (1) High-rise buildings; (2) Hospitals; (3) Nursing homes and assisted-living facilities; (4) Large apartment buildings; (5) Hotels and rooming houses; (6) Schools; (7) Public-assembly occupancies; (8) Lumberyards; (9) Manufacturing plants; (10) Shopping centers; (11) Warehouses. (page 1015)
3. Examples of public fire safety education programs include (Students should include six of the following): (1) Stop, Drop, and Roll; (2) Close your door safety initiative; (3) Crawl low in smoke; (4) Exit Drills in the Home (EDITH); (5) Emergency notification; (6) Installation and maintenance of smoke alarms; (7) Advantages of residential sprinkler systems; (8) Selection and use of portable fire extinguishers; (9) Learn Not To Burn; (10) Fall prevention; (11) Wildland fire prevention programs. (page 1002)
4. Fire and Life Safety Initiatives that relate specifically to public education and fire prevention include #14 Public Education, which states, “public education must receive more resources and be championed as a critical fire and life safety program” and #15 Code Enforcement and Sprinklers, which states “advocacy must be strengthened for the enforcement of codes and the installation of home fire sprinklers.” (page 999)
5. Water supply considerations where no fire hydrants are available include (Students should identify at least four): (1) What is the nearest water supply? (2) Is the water readily available year-round or is it seasonal? (3) How many tankers (or water tender) trucks will be needed to deliver the water? (4) How long will it take to establish a water shuttle operation? (5) What is the total travel time from the scene to the fill site, and then from the fill site back to the scene. (page 1027)
Fire Alarms1. The steps necessary for conducting a good preincident survey include scheduling the survey in advance. Make
contact with a responsible person. Present a neat and professional image. Identify yourself by name, title, and department. Ensure that a representative accompanies you during the survey. Take notes as needed and start outside. Note the building location. Note the size of the building. Identify the building construction. Identify the building use and occupancy. Note any life hazards. Note the access points to the interior of the building. Note the location of the fire alarm annunciator panel. Note the utility shut-off locations. Assess the apparatus access to the building. Note hydrant locations, FDCs, and/or alternative water supplies. Note ventilation concerns. Record built-
True/False1. T (page 1011)
2. F (page 1016)
3. F (page 1004)
4. T (page 1020)
5. F (page 1004)
6. F (page 1015)
7. T (page 1007)
8. T (page 1019)
9. T (page 1012)
10. F (page 1020)
1. bare hand (page 1004)
2. Standpipe systems (page 1024)
3. prevent (page 999)
4. horizontal (page 1029)
5. systematic (page 1010)
6. institutional (page 1022)
7. smoke alarms (page 1002)
8. exterior, interior (page 1019)
9. legal (page 1001)
10. V (page 1021)
Fill-In
Chapter 28: Fire Origin and Cause 155
Chapter 28: Fire Origin and CauseMatching
1. F (page 1043)
2. B (page 1045)
3. G (page 1047)
4. A (page 1045)
5. D (page 1054)
6. H (page 1054)
7. I (page 1046)
8. J (page 1046)
9. C (page 1046)
10. E (page 1046)
Multiple Choice1. A (page 1041)
2. B (page 1050)
3. C (page 1052)
4. A (page 1044)
5. D (page 1051)
6. D (page 1045)
7. B (page 1052)
8. B (page 1039)
9. B (page 1043)
10. A (page 1047)
11. C (page 1042)
12. D (page 1039)
13. C (page 1054)
14. D (page 1045)
15. A (page 1054)
16. B (page 1054)
17. C (page 1054)
18. A (page 1041)
19. A (page 1046)
20. C (page 1054)
Vocabulary1. Competent ignition source: An ignition source that has sufficient energy and is capable of transferring that energy to
the fuel long enough to raise the fuel to is ignition temperature. (page 1044)
2. Chain of custody: A legal term used to describe the process of maintaining continuous possession and control of evidence from the time it is discovered until it is presented in court. (page 1047)
3. Trailers: Combustible materials (such as rolled rags, blankets, and newspapers or ignitable liquid) that are used to spread fire from one point or area to other points or areas. (page 1051)
4. Depth of char: A fire effect that, when evaluated as a pattern on identical fuels, may be used to determine locations within a structure that were exposed longest to a heat source. (page 1043)
Fill-In1. obstacles (page 1052)
2. Clothing (page 1053)
3. location (page 1050)
4. burn (page 1044)
5. contaminated (page 1047)
6. observes (page 1049)
7. fuel supply (page 1041)
8. cause (page 1048)
9. exterior (page 1042)
10. demonstrative (page 1046)
11. validity (page 1040)
12. natural (page 1045)
True/False1. T (page 1050)
2. T (page 1039)
3. F (page 1049)
4. F (page 1039)
5. F (page 1050)
6. F (page 1043)
7. T (page 1051)
8. T (page 1045)
9. T (page 1047)
10. T (page 1048)
in fire detection and suppression systems. Sketch floor plans. Note the elevator and stairway locations. Review exit plans and exit locations. Identify any special hazards and hazardous materials. Note the building exposures. Anticipate the type of incident expected. Identify any special resources needed. Complete and file the preincident survey form. (page 1017)
2. Tell the home occupant that storage of gasoline and other flammable substances is a major concern, because an open flame or pilot light can easily ignite leaking vapors. Gasoline and other flammable liquids should be stored only in approved containers and in outside storage areas or outbuildings. Small quantities of flammable and combustible liquids (such as paint, thinners, varnishes, and cleaning fluids) should be stored in closed metal containers away from heat sources. (page 1012)
A N S W E R K E Y156
Short Answer1. The three categories of youth firesetters are: (1) child firesetters, from 2 to 6 years old; (2) juvenile firesetters, from
7 to 13 years old; (3) adolescent firesetters, from 14 to 16 years old. (page 1054)
2. The six common arson motives listed in NFPA 921, Guide to Fire and Explosion Investigations are: (1) Vandalism; (2) Excitement; (3) Revenge; (4) Crime concealment; (5) Profit; (6) Extremism. (page 1054)
3. The four classifications of fire cause include: (1) accidental fires, occurring as the result of human activity or inaction that does not involve malicious intent; (2) natural fire causes, such as those caused by earthquakes or tornadoes; (3) incendiary fire causes, those ignited by deliberate and intentional acts; (4) undetermined fire causes, which are fires where a probable cause is not found. (page 1045)
4. The six types of fire evidence include: (1) physical evidence, including items that can be observed, photographed, measured, collected or examined; (2) demonstrative evidence, which is anything that can be used to validate a theory or show how something could have occurred; (3) documentary evidence, including ant type of written document, record, or report; (4) testimonial evidence, which includes testimony and affidavits; (5) direct evidence, including facts that can be observed or reported firsthand; (6) circumstantial evidence, which is based on inference and not on personal observation. (page 1046)
Fire Alarms1. After the investigator identifies the area of origin, fire fighters could be asked to assist in digging out the fire scene.
“Digging out” is a term used to describe the process of carefully looking for evidence within the debris. Sometimes the entire fire scene must be closely examined to determine the cause of the fire and gather evidence. The fire investigator will take extensive photographs of the fire scene as it first appears. He or she will then begin to remove and inspect the debris, layer by layer, working from the top of the pile down to the bottom. Removing and inspecting the layers of debris enable the investigator to determine in what order items burned, whether an item burned from the top down or from the bottom up, and how long it burned. Systematically digging through the debris often can uncover the exact point of origin and cause of both accidental and deliberate fires. The investigator will explain generally what to look for, how to search, and what to do with any potential evidence. (page 1045)
2. Take photographs of each piece of evidence as it is found and collected. If possible, photograph the item as it was found, before it is moved or disturbed. On the fire scene, sketch, mark, and label the location of the evidence.
Place evidence in appropriate containers to ensure their safety and prevent contamination. Unused paint cans with lids that seal automatically when closed are the best containers for transporting evidence. Glass mason jars sealed with a sturdy sealing tape are appropriate for transporting smaller quantities of materials. Plastic containers or bags should not be used to hold evidence involving petroleum products. Soak up small quantities of liquids with either a cellulose sponge or cotton batting.
Tag all evidence at the fire scene. The evidence container should be labeled with the date, time, location, and investiga-tor’s name. Record the time the evidence was found, the location where it was found, and the name of the person who found it. Keep a record of each person who handled the evidence.
Keep a constant watch on the evidence until it can be stored in a secure location. Evidence that must be moved temporarily should be put in a secure place accessible only to authorized personnel. Preserve the chain of custody in handling all the evidence. A broken chain of custody may result in a court ruling that the evidence is inadmissible. (page 1048)