Chapter 5 Advanced Web Server Security Configuration 115 In this Chapter Now that you are familiar with core web security features in IIS 6.0 such as web service extensions and MIME map settings, we will examine other security options in IIS. We will take an in-depth look at the authentication mechanisms and how IIS user accounts are used. Additionally, we will look at some not-so-often-discussed configuration options that can protect your web applications. ■ Configuring Authentication ■ Configuring IIS User Accounts ■ Configuring URLScan ■ Configuring Your Server to Use SSL ■ Configuring URL Authorization with the Authorization Manager ■ Configuring Custom Error Messages ■ Securing Include Files ■ Disabling Parent Paths ■ Configuring IP Address, TCP Port and Host-Header Combinations By the end of this chapter you should be familiar with all aspects of the IIS request processing cycle and how settings in IIS can be used to secure your application against various forms of attack. Additional material on the configuration options and their relationship to one another can be found online at www.syngress.com/solutions. 293_CYA_IIS6_05.qxd 4/28/04 11:20 AM Page 115
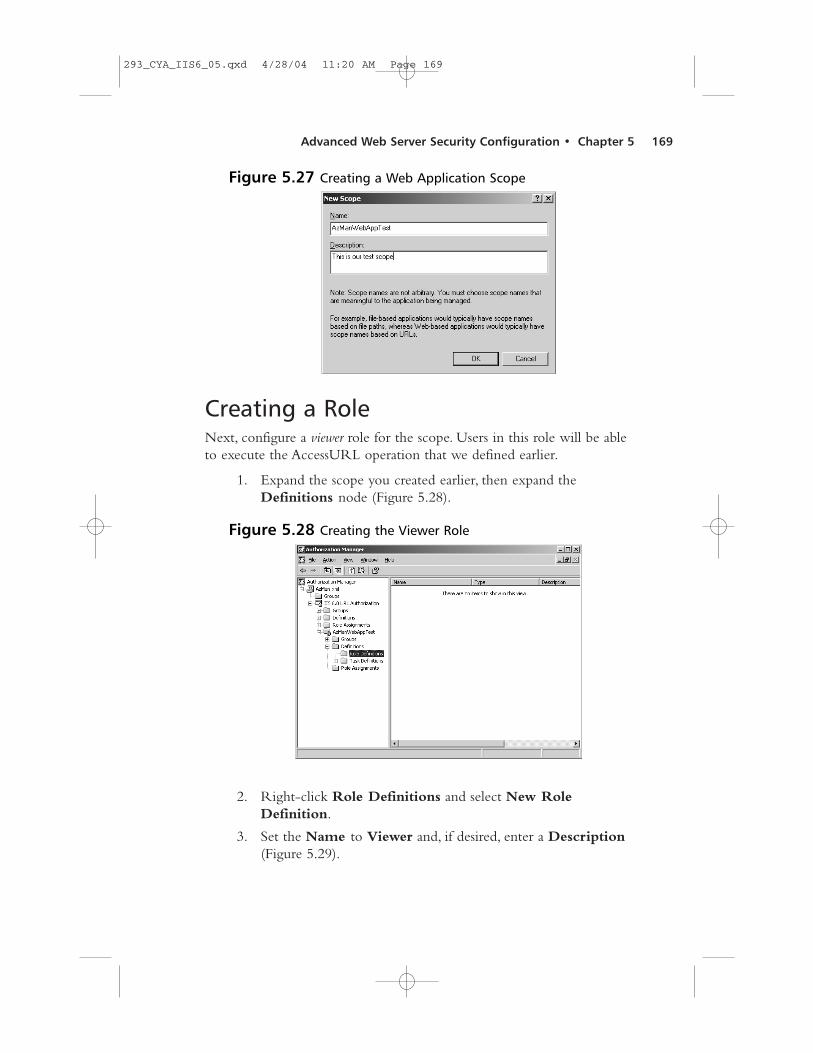
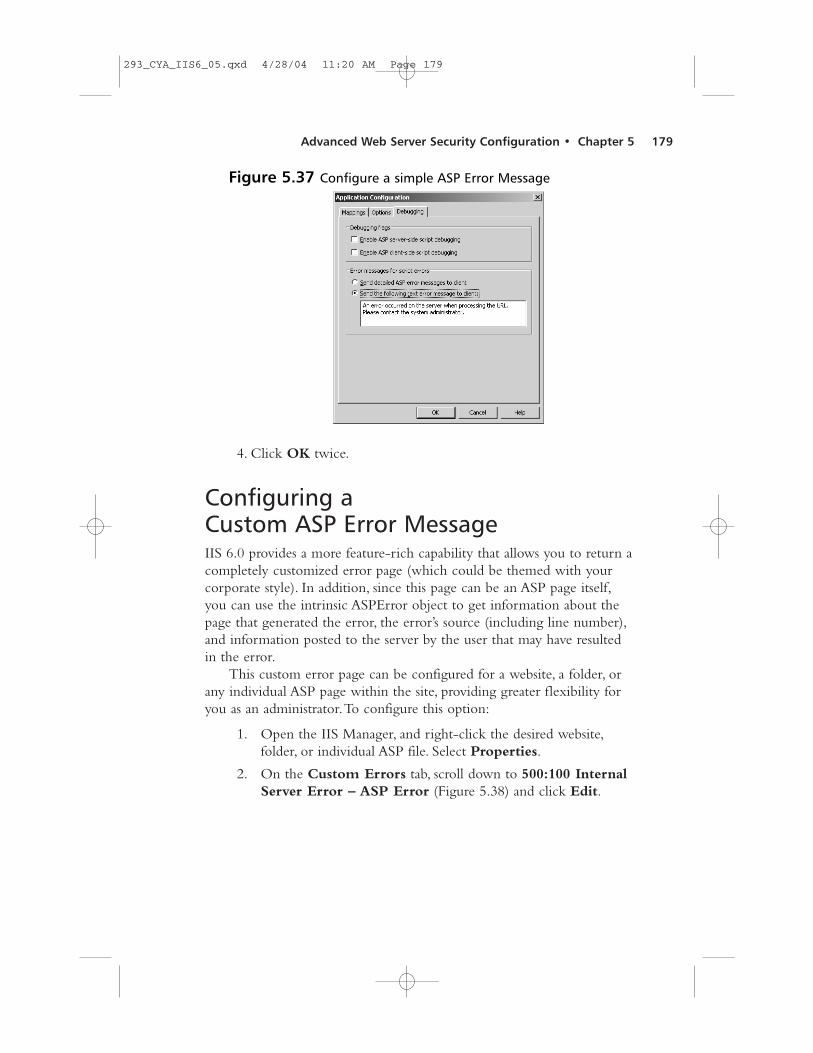
Transcript
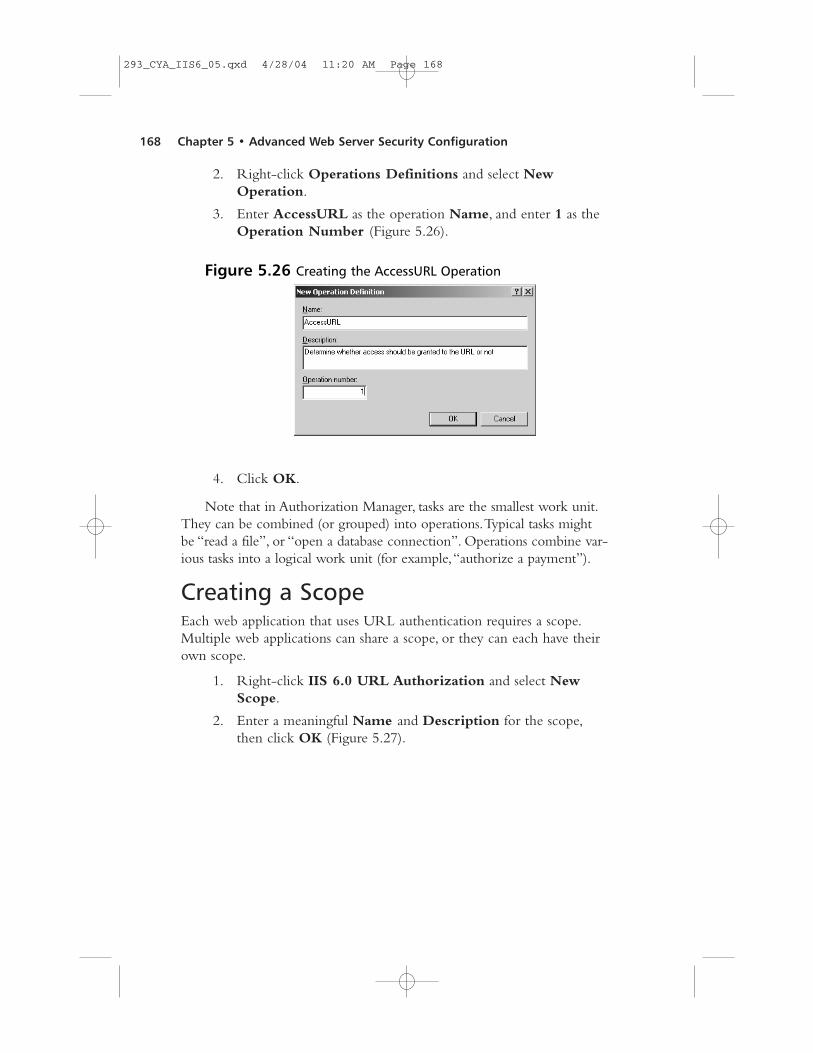
Chapter 5Advanced Web Server
Security Configuration
115
In this ChapterNow that you are familiar with core web security featuresin IIS 6.0 such as web service extensions and MIME mapsettings, we will examine other security options in IIS. Wewill take an in-depth look at the authenticationmechanisms and how IIS user accounts are used.Additionally, we will look at some not-so-often-discussedconfiguration options that can protect your webapplications.
� Configuring Authentication
� Configuring IIS User Accounts
� Configuring URLScan
� Configuring Your Server to Use SSL
� Configuring URL Authorization with the AuthorizationManager
� Configuring Custom Error Messages
� Securing Include Files
� Disabling Parent Paths
� Configuring IP Address, TCP Port and Host-HeaderCombinations
By the end of this chapter you should be familiar with allaspects of the IIS request processing cycle and how settingsin IIS can be used to secure your application against variousforms of attack. Additional material on the configurationoptions and their relationship to one another can be foundonline at www.syngress.com/solutions.
293_CYA_IIS6_05.qxd 4/28/04 11:20 AM Page 115
Configuring AuthenticationWhen IIS 6.0 attempts to read a resource from the server’s disk, forexample, a Hypertext Markup Language (HTML) page, an image, or anactive server pages (ASP)/ASP.NET page, it impersonates a Windowsuser account.That user account’s permissions are checked against the NTfile system (NTFS) Access Control List (ACL) for the file in question todetermine whether the requested action is permitted. In the special casewhere the end user is not required to supply credentials, IIS 6.0 imper-sonates the preconfigured “Anonymous User” account.
BY THE BOOK…IIS provides 7 different authentication mechanisms:
� Anonymous Authentication Users do not have tosupply credentials and a fixed user account is impersonated.
� Basic Authentication Users are prompted to supply ausername and password, which are sent unencryptedacross the network. Basic authentication is supportedby almost all browsers.
� Digest Authentication A hash of the user’s password issent across the network. Digest authentication requiresdomain controllers to be running Windows 2000 orWindows 2003. Digest authentication requires userpasswords to be stored using reversible encryption inActive Directory (AD).
� Advanced Digest Authentication This is similar todigest authentication in that the same hash process isused for sending the user’s password from client toserver. With advanced digest authentication however,the user’s password is already stored as a MessageDigest (MD)5 hash in Active Directory, obviating theneed to store the password using reversible encryption.Advanced digest authentication requires a Windows2003 functional level domain.
� Integrated Windows Authentication (IWA) Useshashing technology to send the user’s credentials acrossthe network. IWA offers two authentication systems;NTLM v2 for legacy clients, and Kerberos for InternetExplorer v5 and later. IIS 6.0 supports both NTLM v2and Kerberos. IWA is the default authentication mecha-nism in IIS 6.0.
116 Chapter 5 • Advanced Web Server Security Configuration
293_CYA_IIS6_05.qxd 4/28/04 11:20 AM Page 116
� UNC (Universal Naming Convention) AuthenticationAllows IIS 6.0 to access resources stored on a remotecomputer using a preconfigured user account specifiedby the administrator, who has permissions to theremote resource.
� Microsoft Passport Authentication A single sign-ontechnology in which the user’s identity is verified byMicrosoft’s Passport system and authorization toresources is determined by the application.
Any of the above authentication mechanisms can be appliedto all websites, an individual website, an individual folder, or afile within a folder. For example, a website can be configured toallow anonymous access, while a single folder within that web-site can be secured using one of the other authentication mecha-nisms so that only users with a valid Windows account can getaccess to the resources in that folder.
Additionally, each resource can have multiple authenticationmechanisms enabled. The server and browser will negotiate andchoose the most secure method support by both.
The Authentication ProcessRegardless of which combination of authentication mechanisms youconfigure for your website’s resources, a browser making an initial requestwill not send user credentials.That is, the initial request will be madeusing an anonymous request. If anonymous authentication is configuredfor the requested resource, then IIS will impersonate the configuredanonymous user account (see “Configuring Anonymous Authentication”later in this section).
If anonymous authentication is not enabled, but one of the otherauthentication mechanisms is enabled, the server and browser will nego-tiate to select the most secure authentication mechanism enabled on theserver and supported by the browser, starting with Integrated WindowsAuthentication, then Digest/Advanced Digest, and finally BasicAuthentication. Passport authentication is not included in this process, asit is a special case. Enabling passport authentication disables all othertypes of authentication.
Note: If no authentication mechanism is configured, the server willreturn a Hypertext Transfer Protocol (HTTP) 401.2 “Unauthorized:Logon failed due to server configuration” error.
Advanced Web Server Security Configuration • Chapter 5 117
293_CYA_IIS6_05.qxd 4/28/04 11:20 AM Page 117
For subsequent requests to the server, the browser will continue touse the credentials of the previous requests for the new request. Forexample, if the previous request was anonymous, then the new requestwill also be anonymous, and if the user supplies a valid Windows user-name/password using basic authentication, the browser will continue tosend that username/password combination for subsequent requests.Thisbehavior will only change if:
� The user closes the browser, in which case the next request tothe website will revert to an anonymous request.
� The Web server indicates that the credentials or authenticationmechanism are not valid for this new request. In this case, thebrowser will attempt to negotiate a different authenticationmechanism and/or prompt the user for alternate credentialsthat are valid for the new request.
This has important implications for authentication mechanisms likebasic authentication, which does not encrypt user credentials, since allsubsequent requests will include the user’s credentials, even if the user isnot required to authenticate (that is, if anonymous authentication isallowed).
Recall from the request processing flow introduced in Chapter 4 thatthe authentication and authorization phases of the request processingcycle are separate.At the authentication stage, the user has to supply validuser credentials. Whether the authenticated user has appropriate NTFSfile permissions to perform the requested action is determined at a subse-quent point in the request processing cycle.
Configuring Anonymous AuthenticationWhen anonymous authentication is permitted, users do not have tosupply a Windows username or password to access the resource. In orderto access the resource, IIS 6.0 impersonates a configured anonymous useraccount. In this process, IIS logs on to the server as a particular user onyour behalf. If NTFS permissions allow the anonymous user accountappropriate access (for example, to read a resource, or write to a file),then the action is performed.
If the configured anonymous user account does not have permissionsto access the resource, and an alternate authentication mechanism isenabled, and the browser supports that alternate authentication mechanism,then the user will be prompted to provide a valid Windows username and
118 Chapter 5 • Advanced Web Server Security Configuration
293_CYA_IIS6_05.qxd 4/28/04 11:20 AM Page 118
password. If no alternate mechanism is specified, IIS will return a “401.3Access Denied Due to ACL on Resource” error.
By default, the anonymous user account is IUSR_<webserver-name>.This account is created when IIS 6.0 is installed, and IIS keeps arecord of the password for this account.You can change the account thatis used for anonymous access, and you can enable or disable anonymousaccess for all websites, or for specific websites, folders, or files. Use thefollowing steps to disable anonymous access:
1. Open the IIS Manager. Right-click the website, folder or fileyou wish to edit and select Properties.To change the settingsfor all websites, right-click the Websites node instead.
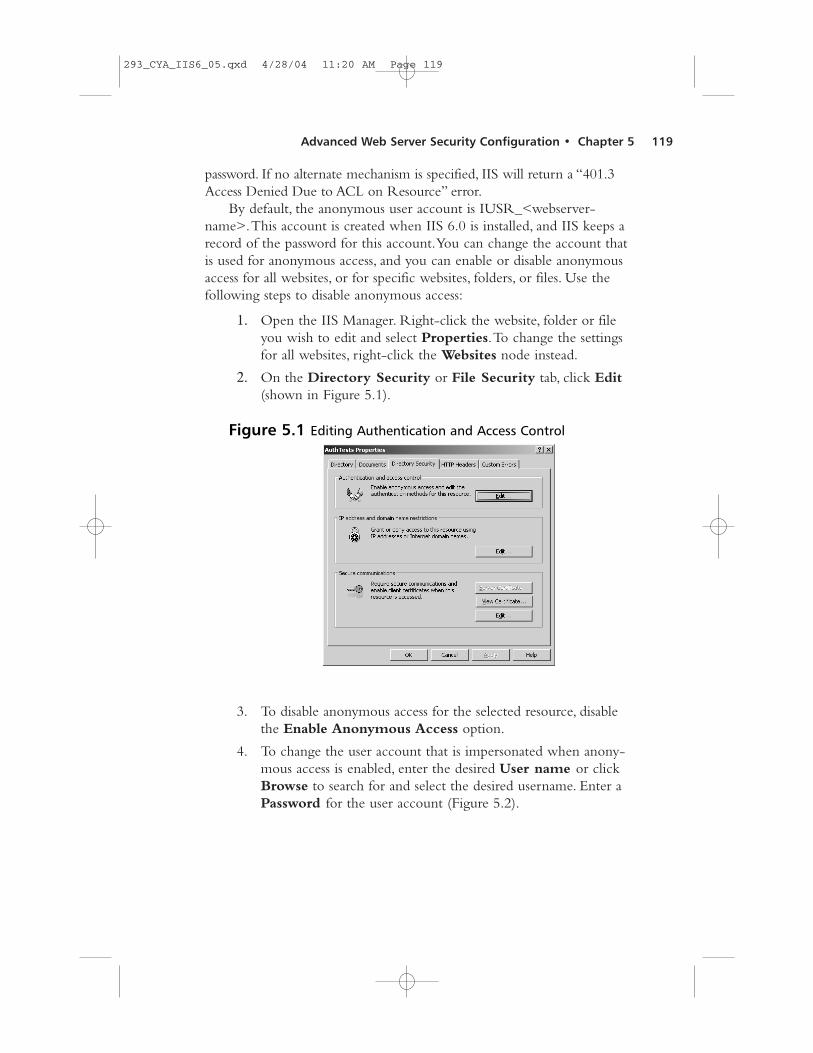
2. On the Directory Security or File Security tab, click Edit(shown in Figure 5.1).
3. To disable anonymous access for the selected resource, disablethe Enable Anonymous Access option.
4. To change the user account that is impersonated when anony-mous access is enabled, enter the desired User name or clickBrowse to search for and select the desired username. Enter aPassword for the user account (Figure 5.2).
Advanced Web Server Security Configuration • Chapter 5 119
Figure 5.1 Editing Authentication and Access Control
293_CYA_IIS6_05.qxd 4/28/04 11:20 AM Page 119
5. Click OK.
Using Windows Explorer or a command line tool, ensure that theconfigured anonymous user account has appropriate NTFS permissionsto the website, folder, or individual files that you have just changed theanonymous user account for (for more information on setting NTFSpermissions, see Chapter 4). If you use a custom account, ensure that thisaccount has the same minimum privileges that the defaultIUSR_<machinename> account has.You can find information on theseprivileges in the “Configuring IIS User Accounts” section of this chapter.
Note that in previous versions of IIS, there was an additional optionto allow IIS to control the password.This allowed IIS to impersonate theconfigured anonymous user account even IIS didn’t have the currentpassword for that account.This feature is disabled in IIS 6.0 by default.See “Configuring SubAuthentication” in this section for more informa-tion on this password synchronization feature, and how to enable it.
Configuring Basic AuthenticationWhen basic authentication is configured, users are prompted to supply avalid Windows username and password in order to access resources.Theusername and password are base64 encoded and passed to the server.
Be aware that base64 encoding is not encryption, and can easily bedecoded using readily available tools.To secure the transmission of usercredentials between client and server, it is recommended that the con-nection be secured using Secure Sockets Layer (SSL).
120 Chapter 5 • Advanced Web Server Security Configuration
Figure 5.2 Editing Anonymous Access
293_CYA_IIS6_05.qxd 4/28/04 11:20 AM Page 120
After the initial request in which the user supplies access credentials,the browser will automatically continue to send the same user credentialsfor all subsequent requests for resources on this server (until the browseris closed).Therefore, all subsequent requests for resources should also besecured using SSL.
Basic authentication is part of the HTTP 1.0 specification, and is thussupported by all major browsers. Because of its simplicity, it can be usedsafely through proxy servers and firewalls.While using BasicAuthentication, IIS 6.0 can access network resources (for example, if it hasto log in to a remote SQL server) using the authenticated user’s credentials
Note that users will not be prompted for a username and password ifanonymous authentication is also enabled. When a browser makes arequest for a resource, it does not send user credentials (the request is“anonymous”). If anonymous authentication is enabled, IIS 6.0 willimpersonate the configured anonymous user account and process therequest.To force the browser to prompt the user for credentials, anony-mous authentication must be disabled.
Basic authentication can be configured for all websites, or for indi-vidual websites, folders, or files.To configure basic authentication, per-form the following steps:
1. Open the IIS Manager. Right-click the desired website, folderor file and select Properties.To change settings for all websites,right-click the Websites node instead.
2. On the Directory Security or File Security tab, click Edit.
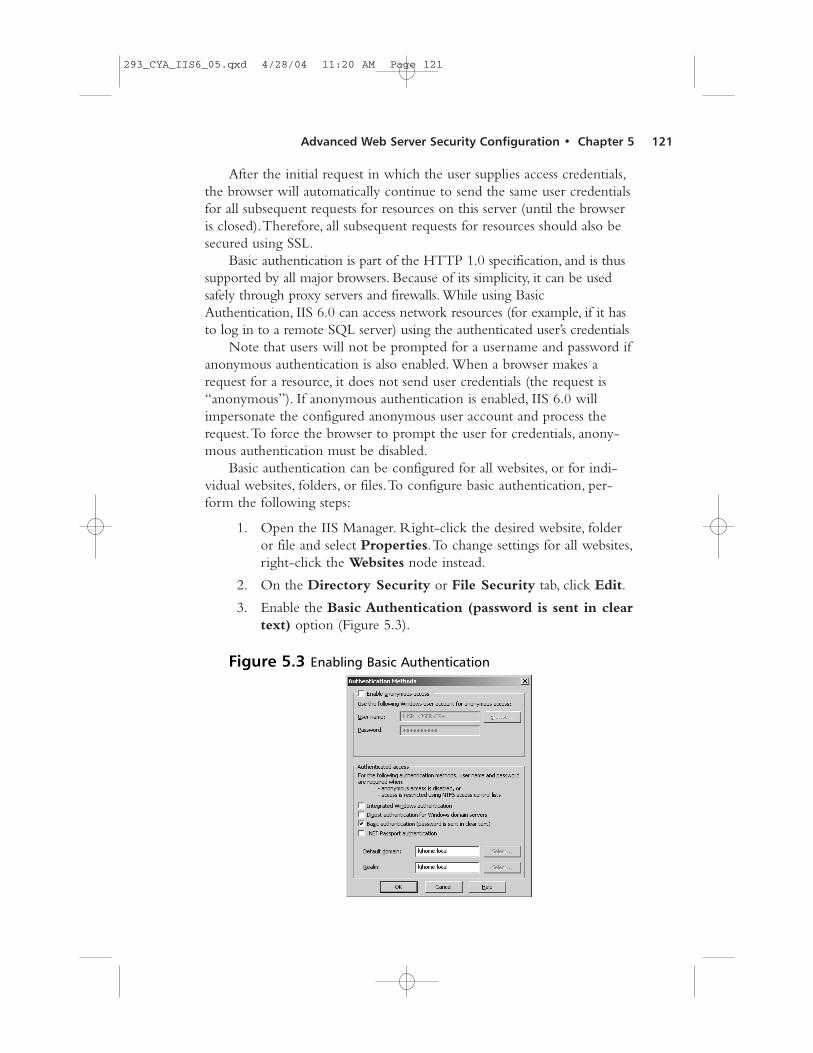
3. Enable the Basic Authentication (password is sent in cleartext) option (Figure 5.3).
Advanced Web Server Security Configuration • Chapter 5 121
Figure 5.3 Enabling Basic Authentication
293_CYA_IIS6_05.qxd 4/28/04 11:20 AM Page 121
4. IIS will provide a warning concerning the vulnerability of cleartext passwords and you will be prompted to confirm yourselection. Select Yes to enable Basic Authentication.
5. If desired, enter a Windows domain in the Default domainfield to specify the domain against which the user’s credentialswill be checked if the user does not supply a domain namewhen prompted by his or her browser. If you do not supply aname, IIS 6.0 will use the name of the local machine.
6. If desired, enter a Windows domain in the Realm field.Thisentry will be displayed as part of the dialogue box promptingfor user credentials in the user’s browser. It is recommendedthat you make this the same as the Default domain field.
Configuring Digest AuthenticationWhen digest authentication is configured, users are prompted to supply aWindows username and password.The username is passed in clear text, butthe password is hashed by the client. Hashing relies on the use of mathe-matical algorithms that cannot be reversed. Given a “hashed” value, theoriginal value is impossible to determine from the hash alone. Simpleexamples of hashing functions include trigonometric functions like Sin()and Cos().The sine of any value yields a distinct result, however given theresult, it is impossible to determine the original value, since the inverse sineof the result yields an infinite number of possible original values.
Digest authentication is defined in RFC 2617, and is an open stan-dard.A number of browsers support digest authentication, includingMicrosoft Internet Explorer v5 and later, Mozilla v1.4 and later, andOpera v6 and later. Because older browsers do not support digestauthentication, you may need to enable basic authentication if you wantyour website to support these older browsers. Digest authentication issafe to use through proxies and firewalls.
When a browser requests a resource secured with digest authentica-tion, IIS 6.0 will send back a random piece of data called a nonce.Thebrowser will generate its own piece of random data (the client nonce, orcnonce). It will then combine the cnonce with the server’s nonce, theuser’s password, and some other data about the request, and generate ahash.The client returns this hash, plus its cnonce, to IIS 6.0.This is calledthe digest. IIS 6.0 will forward this result to the domain controller respon-sible for the relevant domain.The domain controller will perform thesame operation on its copy of the user’s password, and if the hashesmatch, then the user is deemed authenticated.
122 Chapter 5 • Advanced Web Server Security Configuration
293_CYA_IIS6_05.qxd 4/28/04 11:20 AM Page 122
Because only the cnonce and hash are required to access a resource,digest authentication is susceptible to replay attacks if someone is able tocapture packets between the client and the server.This replay window islimited because the server will eventually expire the nonce originallysent to the client, meaning that the hash value is no longer valid to accessthe resource.
Note that the user will not be prompted to supply a username andpassword if anonymous authentication is also enabled. When a browsermakes a request for a resource, it does not send user credentials (therequest is “anonymous”). If anonymous authentication is enabled, IIS 6.0will impersonate the configured anonymous user account and process therequest.To force the browser to prompt the user for credentials, anony-mous authentication must be disabled.
The following are required in order to use digest authentication:
� A browser that supports digest authentication (for example,Internet Explorer 5 or later, Mozilla 1.4 or later, or Opera v6or later).
� The IIS 6.0 server and the user account being used must bothreside in the same Windows domain (or trusted domains).
� The user password must be stored using reversible encryptionin Active Directory. Digest authentication is not supported foraccounts that are local to the IIS 6.0 server.The user accountmust be a domain account.
� The domain controllers must be running Windows 2000 Serveror Windows Server 2003.
� SubAuthentication must be enabled (see “ConfiguringSubAuthentication” later in this section).
� The process identity of the web application pool that therequest is being served from must be running as LocalSystem,not as the default Network Service. See “Configuring IIS UserAccounts” in this chapter for information on changing theprocess identity of a web application pool. Note that setting theprocess identity to LocalSystem could pose a security risk, asthis identity has full access to the entire system.
� The UseDigestSSP metabase key must be set to 0 (false) in theIIS metabase. If this key is not present, then IIS 6.0 will assumethat it is 0.This key can be set for all websites, individual web-sites, folders, or files. If the key is set to 1 (true), IIS 6.0 will
Advanced Web Server Security Configuration • Chapter 5 123
293_CYA_IIS6_05.qxd 4/28/04 11:20 AM Page 123
attempt to use advanced digest authentication instead, whichmay fail if the requirements for advanced digest authenticationare not met.
To set this key, you can use the graphical MetabaseExplorer tool supplied with the IIS 6.0 Resource Kit.You candownload the IIS 6.0 Resource Kit tools fromwww.microsoft.com/downloads/details.aspx?FamilyID=56fc92ee-a71a-4c73-b628-ade629c89499&DisplayLang=en.Alternatively, you can use the following command line script,ensuring that you have administrative privileges on the IIS 6.0server:adsutil.vbs set w3svc/UseDigestSSP 0
See the IIS online help (accessible from the IIS Manager)for examples on using this script to manipulate the IISMetabase, and visit www.syngress.com/solutions to view theappendix for additional information.
Digest authentication can be configured for all websites, or for indi-vidual websites, folders, or files.To configure digest authentication:
1. Open the IIS Manager. Right-click the website, folder, or fileyou wish to edit and select Properties.To change settings forall websites, right-click the Websites node instead.
2. On the Directory Security or File Security tab, click Edit.
3. Enable the Digest authentication for Windows domainservers option (shown in Figure 5.4).
4. IIS will display a warning stating that digest authentication onlyworks with domain accounts. Click Yes to enable digestauthentication.
124 Chapter 5 • Advanced Web Server Security Configuration
Figure 5.4 Configuring Digest Authentication
293_CYA_IIS6_05.qxd 4/28/04 11:20 AM Page 124
5. If desired, enter a Windows domain in the Realm field.This isthe Windows domain that will be used to authenticate the userif the user does not supply a domain as part of his or her cre-dentials. It will also be displayed to user as part of the passwordprompt.
IIS versions prior to IIS 6.0 contain a bug that results in basicauthentication being listed prior to digest authentication if both areenabled for a resource.This results in some browsers (including InternetExplorer) choosing basic authentication instead of digest authentication.In IIS 6.0, this bug has been fixed and digest authentication is listedbefore basic authentication when a list of supported authenticationmechanisms is sent to the client.
Configuring Advanced Digest Authentication
Advanced digest authentication is similar to digest authentication inits communication between client and server. However, advanced digestauthentication differs from digest authentication in the following ways:
� In advanced digest authentication, the domain controllers(DCs) must be running Windows Server 2003, and the domainfunctional level must be raised to Windows 2003. Windows2003 domain controllers store a number of hashes of a user’spassword when the user password is set.This includes an MD5hash of the password.These pre-calculated hashes are stored asfields in the AltSecId field of the user object in ActiveDirectory.
� In advanced digest authentication, the user’s password does nothave to be stored using reversible encryption in ActiveDirectory.This is because the hash sent by the IIS 6.0 server tothe domain controller can be compared directly with the pre-calculated MD5 password hash stored in Active Directory.
� IIS 6.0 does not require SubAuthentication, so the processidentity web application pool servicing the request for theresource does not have to be LocalSystem.
� The UseDigestSSP metabase property must be set to 1 (true). Ifthis property is set to 0, or not set at all, digest authenticationwill be used. Digest authentication may fail if the otherrequirements for digest authentication are not met.
Advanced Web Server Security Configuration • Chapter 5 125
293_CYA_IIS6_05.qxd 4/28/04 11:20 AM Page 125
To set the UseDigestSSP key, you can use the graphicalMetabase Explorer tool supplied with the IIS 6.0 Resource Kit.You can download the IIS 6.0 Resource Kit tools from:www.microsoft.com/downloads/details.aspx?FamilyID=56fc92ee-a71a-4c73-b628-ade629c89499&DisplayLang=en.
Alternatively, you can use the following command linescript, ensuring that you have administrative privileges on theIIS 6.0 server:
adsutil.vbs set w3svc/UseDigestSSP 1
See the online help system (accessible from the IISManager) for examples on using this script to manipulate theIIS Metabase.
Advanced digest authentication can be configured for all websites, orfor individual websites, folders, or files. Use the following steps to con-figure advanced digest authentication:
1. Open the IIS Manager. Right-click the website, folder, or fileyou wish to edit and select Properties.To change settings forall websites, right-click the Websites node instead.
2. On the Directory Security or File Security tab, click Edit.
3. Enable the Digest authentication for Windows domainservers option.
4. IIS will provide a warning stating that digest authenticationonly works with domain accounts. Click Yes to enableadvanced digest authentication.
Configuring Integrated Windows AuthenticationIntegrated windows authentication is deemed by IIS 6.0 to be the mostsecure method of authenticating clients. When a server is configured touse IWA, the user is prompted to supply credentials; however, credentialsare not passed across the network in clear text.Additionally, InternetExplorer can be configured to automatically supply the user credentialsof the current user (by default, this is enabled for sites in the intranet secu-rity zone. For more information on the IE intranet security zone, seehttp://support.microsoft.com/?id=258063). If the automatically supplieduser credentials are not acceptable to the IIS 6.0 server, then the user isprompted to supply alternate credentials.
126 Chapter 5 • Advanced Web Server Security Configuration
293_CYA_IIS6_05.qxd 4/28/04 11:20 AM Page 126
IWA encompasses two authentication mechanisms:
� NTLM v2, for older clients. NTLM v2 authentication is sup-ported by Internet Explorer v3 and later, as well as some third-party browsers, such as Mozilla v1.4.
� Kerberos v5 authentication, which is supported by InternetExplorer v5 and later.
When a browser requests a resource secured using IWA, the IIS 6.0server returns two HTTP WWW-authenticate headers; one for Kerberosauthentication and one for NTLM v2.The browser then selects the moresecure of the two that it supports.
NTLM v2 authentication is similar to digest authentication. When abrowser wishes to use NTLM authentication:
� The server sends a nonce to be used in creating a digest of theuser’s password.
� The browser hashes the user’s password using the NTLM v2algorithm. It then adds the server-supplied nonce to the resultof this first hash and creates a digest by hashing this combinedstring.This is returned to the server.
� The server (or domain controller) already has the user’s pass-word stored as an NTLM v2 hash. It merely adds the nonceand performs the same secondary hash the client performed. Ifthe two hashes match, the user is deemed authenticated.Thebenefit of this mechanism over digest authentication is that itobviates the need to store user passwords using reversibleencryption.
One drawback to NTLM v2 authentication is that it requires anumber of requests and responses to go back and forth between theclient and server.This must be done over a continuously open HTTPconnection. Because of this requirement, NTLM v2 authentication doesnot work through most HTTP proxies.
Kerberos v5 authentication is an open, industry-standard, ticket-basedauthentication method first developed at the Massachusetts Institute ofTechnology (MIT). It uses challenge/response technologies, timestamps fornonces, and a ticket granting service to facilitate a single sign-on. Kerberosv5 is a much more complex authentication mechanism than NTLM v2.
When a client wishes to access a resource secured with Kerberosauthentication:
Advanced Web Server Security Configuration • Chapter 5 127
293_CYA_IIS6_05.qxd 4/28/04 11:20 AM Page 127
� It first contacts the Kerberos authentication server (AS).TheAS, using a secret known to both the AS and client (namely ahash of the user’s password) transmits a temporary ticket grantingticket (TGT) to the client.The TGT can then be used instead ofa hash of the user’s password for subsequent accesses to networkresources.This obviates the need to cache the hash of the user’spassword (which increases security by not requiring the user toenter his or her password for each network access, and increasesperformance by allowing the application to cache the TGT).The TGT is valid only for a limited time, thereby reducing itsusefulness to attackers in case it is stolen.
� The client then contacts the ticket granting services (TGS), toget a ticket to access the service hosting the secured resource(that is, the website hosted by IIS 6.0).The TGS transmits aticket to the browser again using a shared secret (the TGT).Additionally, the TGS transmits a session key to the browser.
� The AS and TGS are together known as the KerberosDistribution Center (KDC). In a Windows domain, domaincontrollers host the KDC.
� The browser then contacts IIS 6.0 with the ticket receivedfrom the TGS.The ticket is encrypted with a key known toIIS6, and contains a session key.The browser also transmits atimestamp encoded with the session key.The server uses theextracted session key to decode the timestamp and ensure thatthe time matches the web server’s time (a slight discrepancy isallowed).This prevents replay attacks, since an attacker cannotgenerate an updated encrypted timestamp.
The Kerberos authentication method is depicted in Figure 5.5.
128 Chapter 5 • Advanced Web Server Security Configuration
Figure 5.5 Client Authentication Using Kerberos v5
293_CYA_IIS6_05.qxd 4/28/04 11:20 AM Page 128
For more information on Kerberos authentication, the followingURLs may be useful:
Note that the user will not be prompted to supply a username andpassword if anonymous authentication is also enabled. When a browsermakes a request for a resource, it does not send user credentials (therequest is “anonymous”). If anonymous authentication is enabled, IIS 6.0will impersonate the configured anonymous user account and process therequest.To force the browser to prompt the user for credentials, anony-mous authentication must be disabled.Additionally, as mentioned previ-ously, Internet Explorer can be configured to automatically send thecredentials of the current user. In this instance, the user is not promptedfor credentials, but the browser does send them to the server.
When using Kerberos authentication, IIS 6.0 can access a remoteresource (for example, to log in to a remote SQL server) using theauthenticated user’s credentials when delegation is configured.This is notpossible when using NTLM v2 authentication unless IIS 6.0 resides in aWindows 2003 domain.
To use Kerberos authentication, the following requirements must be met:
� Clients must support Kerberos authentication.This requiresInternet Explorer v5 or later.Additionally, the client operatingsystem must be Windows 2000 or Windows XP or WindowsServer 2003. Windows NT 4 and earlier, and Windows 9x donot natively support Kerberos authentication.
� In Internet Explorer, the Use Integrated WindowsAuthentication (requires a restart) option must be enabled.This option is not enabled by default when using InternetExplorer v5 on Windows 2000. For more information seehttp://support.microsoft.com/?id=299838.
� Client machines must be able to contact the KDC or Windowsdomain controllers to get their Kerberos tickets. For this reason,Kerberos authentication is often described as being stopped by
Advanced Web Server Security Configuration • Chapter 5 129
293_CYA_IIS6_05.qxd 4/28/04 11:20 AM Page 129
firewalls, since firewalls typically do not allow computers on theunsecured side to communicate with DCs located on thesecured side.
� The Service Principal Name (SPN) must be registered withActive Directory. By default, the NetBIOS name(http://servername) of the IIS 6.0 server is registered under thedefault application pool identity (network service) that it runsunder.To make alterations or add new SPNs you use theSetspn.exe tool. If you change the account that is used as theprocess identity of the application pool servicing http://server-name you need to reregister the SPN: Setspn.exe –Ahttp/<servername> Domain\NewUserAccount.
If the website is accessed using a Domain Name System(DNS) or Windows Internet Name Service (WINS) name thatdiffers from the NetBIOS name, then this must also be regis-tered manually using the setSPN tool. Replace the server namewith the DNS or WINS name that the website is beingaccessed with. For more information on using the Setspn.exetool, see: http://support.microsoft.com/?id=294382.
Setspn.exe is part of the Windows 2000 Resource Kit, andis available for download from www.microsoft.com/win-dows2000/techinfo/reskit/tools/existing/setspn-o.asp.
Note that if you have multiple web applications within a website,and you assign them to web application pools that have differing processidentities, Kerberos delegation will not work. Kerberos delegationrequires a given SPN, being the website’s host name (for example,www.myCompany.com) to be associated with a single user account. Webapplications allocated to web application pools running under differingprocess identities share the same SPN, but do not run under the sameuser account, and Kerberos delegation will fail.
Integrated Windows authentication can be configured for all web-sites, or for individual websites, folders, or files. Use the following steps toconfigure IWA:
1. Open the IIS Manager. Right-click the website, folder, or fileyou wish to edit and select Properties.To change settings forall websites, right-click the Websites node instead.
2. On the Directory Security or File Security tab, click Edit.
3. To enable IWA, enable the Integrated WindowsAuthentication option.
130 Chapter 5 • Advanced Web Server Security Configuration
293_CYA_IIS6_05.qxd 4/28/04 11:20 AM Page 130
Configuring UNC AuthenticationUNC authentication (also known as UNC passthrough authentication)allows you to configure IIS to use a specified user account for accessingresources on a remote share. When you create a virtual directory or awebsite that obtains its content from a remote share, IIS prompts you tosupply a username and password for the remote share.This will be usedwhen a user requests a resource from your website.To configure UNCauthentication:
1. Open the IIS Manager, and locate the folder under which youwill create a new virtual directory.
2. Right-click the folder and select New | Virtual Directory.
3. Enter an Alias for the virtual directory.This will be the foldername used by visitors to your site. For example, if you enterUNCTest, users will access this folder ashttp://yourserver/UNCTest/.
4. Click Next.
5. Use the Path field to enter a UNC path to a remote server, forexample, \\remoteServer\shareName.
6. Click Next.
7. Disable the Always use authenticated user’s credentialswhen validating access to the network directory option.
8. Enter the User name and Password that will be used toaccess the remote share (shown in Figure 5.6). Note that if theusername and password you supply are not valid for the remoteshare, users will receive an “HTTP 500 Internal Server Error:Invalid Username or Password” error message.
Advanced Web Server Security Configuration • Chapter 5 131
Figure 5.6 Configuring UNC Authentication
293_CYA_IIS6_05.qxd 4/28/04 11:20 AM Page 131
9. Re-enter the password when prompted, then click Next.
10. Choose the web permissions that should be allowed for thevirtual directory.The default is to allow Read (for static files)and Scripts (for dynamic content).
Passport AuthenticationPassport authentication is a single sign-on authentication mechanism thatis a proprietary Microsoft technology. When passport authentication isenabled on a resource, all other methods are disabled. When users accessthe resource, IIS checks for a passport authentication ticket cookie. If thecookie is not present, or if the credentials are not valid for the resource,the user is redirect to a Microsoft passport logon server.After authenti-cating, the user is redirected back to the original URL.
Enabling passport authentication requires that you sign up with theMicrosoft passport service. For more information on Microsoft passportauthentication, see: www.microsoft.com/net/services/passport/business.asp.For more information on enabling passport authentication on an IISserver, see: www.microsoft.com/resources/documentation/IIS/6/all/proddocs/en-us/sec_auth_passport.asp.
Configuring SubAuthenticationSubAuthentication is the mechanism by which IIS can synchronize
the passwords it uses with passwords stored in Active Directory or thelocal security accounts database. SubAuthentication was installed bydefault in earlier versions of IIS, but it is not installed by default with IIS6.0 because it constitutes a potential security vulnerability.A user withprivileges to administer a website can set the anonymous user to anaccount with elevated privileges (for example, a domain administratoraccount) without supplying a corresponding password, by enabling theAllow IIS to Control Password option.
SubAuthentication may have to be enabled if you want IIS to syn-chronize passwords, or if you want to use digest authentication.To enableSubAuthentication:
1. Enter the following at the command prompt and press Enter:
2. Set the process identity for the application pool in question toLocalSystem (see “Configuring IIS User Accounts” in thischapter for more information on configuring web application
132 Chapter 5 • Advanced Web Server Security Configuration
293_CYA_IIS6_05.qxd 4/28/04 11:20 AM Page 132
pool identities). Note that setting the process identity toLocalSystem could pose a security risk, as this identity has fullaccess to the entire system.
3. Set the AnonymousPasswordSync metabase property to 1(true).To set this key, you can use the graphical MetabaseExplorer tool supplied with the IIS 6.0 Resource Kit.You candownload the IIS 6.0 Resource Kit tools fromwww.microsoft.com/downloads/details.aspx?FamilyID=56fc92ee-a71a-4c73-b628-ade629c89499&DisplayLang=en.
Alternatively, you can use the following command linescript to set this property, ensuring that you have administrativeprivileges on the IIS 6.0 server:
adsutil.vbs set w3svc/AnonymousPasswordSync 1
See the IIS online help (accessible from the IIS Manager)for examples on using this script to manipulate the IISMetabase.
To disable SubAuthentication, enter the following at a commandprompt and press Enter:
Configuring DelegationDelegation is the process by which a service may impersonate a useraccount and log on to network resources on behalf of that user. Kerberossupports this process if both the computer impersonating, and the useraccount being impersonated are configured to be trusted for delegation.
In a Windows 2003 domain, delegation can be limited to specificservices. So, if you enable IIS 6.0 to be able to impersonate specific users,you can limit the services that IIS 6.0 can connect to when it imperson-ates. In a Windows 2000 domain, this restriction cannot be set.
Perform the following steps to enable delegation in a Windows 2003domain:
1. Open the Active Directory Users and ComputersAdministrative tool on a Domain Controller, or any machinewhere this tool has been installed.
2. Locate the computer account for the server that IIS 6.0 is run-ning on. Right-click it and select Properties.
Advanced Web Server Security Configuration • Chapter 5 133
293_CYA_IIS6_05.qxd 4/28/04 11:20 AM Page 133
3. On the Delegation tab choose either Trust this computerfor delegation to any service (Kerberos Only) or Trustthis computer for delegation to specified services only.If you choose the latter, enable either Use Kerberos Only orUse any authentication protocol.
4. If you have chosen to allow delegation for specific servicesonly, click the Add button. In Add Services, select Users orComputers. Enter the target computer name in the Enter theobject names to select field. In the Add Services section,add the service(s) that IIS 6.0 can connect to.
5. Locate the user account(s) that will be trusted for delegation.Right-click and select Properties.
6. On the Delegation tab, enable the Trust this user for delega-tion to any service (Kerberos only) or Trust this user fordelegation to specified services only option. If you choosethe latter, enable either Use Kerberos Only or Use anyauthentication protocol. If you choose Use any authenticationprotocol, IIS 6.0 can use a Kerberos token to access a remoteresource on the user’s behalf even if the initial authentication toIIS by the browser was via NTLM or digest authentication.More information on Windows 2003 protocol transition can befound on the Microsoft website: www.microsoft.com/technet/prodtechnol/windowsserver2003/technologies/security/constdel.mspx.
7. If you have chosen to allow delegation for specific servicesonly, click the Add button and select Users and Computers.Enter the name of the computer that the user will be trusted todelegate for.
8. In Add Services, select the service or services that will betrusted for delegation, then click OK.
REALITY CHECK…IIS 6.0 offers a wide variety of standard and proprietary authenti-cation mechanisms. The following may be used as a useful sum-mary of benefits and drawbacks:
� Basic authentication is the most widely supported, as it ispart of the HTTP 1.0 specification. It works safely throughHTTP proxies and firewalls. However, user credentials are
134 Chapter 5 • Advanced Web Server Security Configuration
293_CYA_IIS6_05.qxd 4/28/04 11:20 AM Page 134
not encrypted, and so alternate methods (such as SSL)should be used to ensure that user credentials cannot beintercepted. If IIS 6.0 has to access a network resourceusing the authenticated user’s credentials, then this canbe done when using basic authentication.
� Digest/advanced digest authentication is an improvementover basic authentication, and is an open standarddefined in RFC 2617. It relies on the client supportingHTTP v1.1. The user password is hashed, and thus cannotbe decrypted. However, it is vulnerable, in a time-limitedsense, to replay attacks. Digest/advanced digest authenti-cation works safely through HTTP proxies and firewalls.However there are additional server requirements abovebasic authentication.
� Integrated Windows authentication is deemed by IIS 6.0to be the most secure method of authenticating clients.It comprises two authentication systems; NTLM v2,which is supported by IE v3 and later (and Mozilla v1.4and later), and Kerberos, which is supported by IE v5and later running on Windows 2000, Windows XP orWindows Server 2003. Depending on how delegation isconfigured, it may be possible for IIS 6.0 to connect toremote resources on the user’s behalf.
Configuring IIS User AccountsIIS 6.0 uses a number of built-in Windows accounts, as well as a numberof IIS-specific user accounts.The user accounts that are actively useddepend on whether IIS 6.0 is running in IIS5 isolation mode or in IIS6.0 worker process mode (see Chapter 1 for more information on thesemodes).
BY THE BOOK…IIS 6.0 provides two major application processing modes: IIS 6.0worker process isolation mode and IIS 5.0 isolation mode (forbackward compatibility with IIS 5.0 applications).
In IIS 6.0 worker process isolation mode web applications areassigned to web application pools, which can each be configuredto use a separate process identity. The core IIS 6.0 services rununder LocalSystem.
In IIS 5.0 isolation mode, web applications can either runinside the core IIS processes (running as LocalSystem), or out of
Advanced Web Server Security Configuration • Chapter 5 135
293_CYA_IIS6_05.qxd 4/28/04 11:20 AM Page 135
process in a separate dllhost.exe process. These processes can beassigned separate process identities.
The default accounts used by IIS 6.0 in worker process isola-tion mode for running any process that executes user-suppliedcode are low privilege accounts, which helps reduce the possibledamage that a malicious attacker can inflict should an applica-tion be compromised.
IIS 6.0 Running in Worker Process ModeWhen IIS 6.0 is running in worker process mode, websites and webapplications (by default, a website is always configured as a web applica-tion) run inside web application pools. Each web application pool is rep-resented by a w3wp.exe process, which is visible in Task Manager. Eachw3wp.exe process has a process identity.This is the user context that theworker process runs under.This identity is required because a w3wp.exeprocess can be running even if there are no requests coming in frombrowsers.
IIS 6.0 provides the following three preconfigured user accounts thatcan be used as the process identity for a web application pool.You canalso provide your own user account, which we will examine shortly.
� LocalSystem The built-in LocalSystem account has a highlevel of access rights. It is part of the Administrators group andcan access the entire system. Running a worker process asLocalSystem can be a security risk; if the worker process or anapplication running inside that worker process is compromised,attackers may have full access to the system. Some IIS configu-rations (for example, enabling digest authentication or enablingSubAuthentication) require the relevant worker process to runas LocalSystem.
� Network Service The built-in Network Service account hasfar fewer access rights to the system than LocalSystem.This isthe default process identity when creating new web applicationpools.The Network Service user account is able to access thesame network resources as the computer it is running on.
� Local Service The built-in Local Service account has thesame privileges as Network Service on the local machine, but is
136 Chapter 5 • Advanced Web Server Security Configuration
293_CYA_IIS6_05.qxd 4/28/04 11:20 AM Page 136
unable to access the network. Use this account if the workerprocess does not need access to resources outside the localcomputer
� IIS_WPG Group The accounts mentioned are all membersof the IIS_WPG group.This group is assigned the minimumpermissions required for a worker process to start. If you manu-ally create a separate user account to use as a worker processidentity, ensure that it is added to this group, otherwise theworker process may fail to start.
These accounts have the following user rights (as shown with an “x”in Table 5.1).This table also lists the IUSR_<machinename> account,which will be discussed shortly.
Table 5.1 User Rights for Common IIS 6.0 User Accounts
Local Network Local IIS_WPG IUSR_<machUser Right System Service Service Group inename>
Full Access xReplace a Process x xLevel Token (SeAssignPrimary-TokenPrivilege)Adjust Memory x xQuotas for a process (SeIncreaseQuota-Privilege)Generate Security x xAudits (sseAudit-Privilege)Bypass Traverse x x x xChecking (SeChangeNotify-Privilege)Access this x x x xcomputer from a network (SeNetworkLogon-Right)Logon as a Batch x x x xJob (SeBatchLogon-Right)
Advanced Web Server Security Configuration • Chapter 5 137
Continued
293_CYA_IIS6_05.qxd 4/28/04 11:20 AM Page 137
Table 5.1 User Rights for Common IIS 6.0 User Accounts
Local Network Local IIS_WPG IUSR_<machUser Right System Service Service Group inename>
Logon as a Service x(SeInteractiveLogon-Right)Allow Logon x xLocally (SeInteractiveLogon-Right)
Changing the Process Identity of a Web Application PoolPerform the following steps to change the process identity of a webapplication pool:
1. Open the IIS Manager and expand the Application Poolsnode. Right-click the web application pool that you wish tochange the identity of and select Properties.
2. On the Identity tab, select one of the three preconfiguredaccounts from the drop-down list (shown in Figure 5.7) orspecify a custom account by selecting the Configurableoption.
138 Chapter 5 • Advanced Web Server Security Configuration
Figure 5.7 Configuring a Web Application Pool Identity
293_CYA_IIS6_05.qxd 4/28/04 11:20 AM Page 138
3. Click OK.
Other User Accounts –IUSR_<machinename>The IUSR_<machinename> account is also important when runningIIS 6.0 in worker process isolation mode. When anonymous authentica-tion is configured, the user requesting the resource from IIS does nothave to provide Windows user credentials. Instead, IIS impersonates theconfigured anonymous user account, which is IUSR_<machinename>by default.
Note that by default,ASP.NET applications do not useIUSR_<machinename> for anonymous requests.ASP.NET applicationsuse the process identity of web application pool they are in.This can bechanged to the IIS anonymous user account in the web.config file byadding:
<identity impersonate="true">
All other requests (for static files, or ASP applications) useIUSR_<machinename>.Table 5.1 lists the user rights held byIUSR_<machinename>.
You can change the account that is used for anonymous access for allwebsites, or for individual websites, folders, or files.To do so, perform thefollowing steps:
1. Open the IIS Manager. Right-click the website, folder, or fileyou wish to edit and select Properties.To change settings forall website, right-click the Websites node instead.
2. On the Directory Security or File Security tab, click Edit.
3. To disable anonymous access for the resource, disable theEnable Anonymous Access option.To change the useraccount that is impersonated when anonymous access isenabled, enter the User name of the user account, or click theBrowse button to search for and select the account. Enter thePassword for the user account and click OK.
IIS 6.0 Running in IIS5 Isolation ModeWhen running in IIS 5.0 isolation mode, web application pools are notused to host websites or web applications. Instead, each website or webapplication can be set to one of three isolation levels:
Advanced Web Server Security Configuration • Chapter 5 139
293_CYA_IIS6_05.qxd 4/28/04 11:20 AM Page 139
� Low Isolation When set to low isolation, the web applicationruns inside the InetInfo.exe process.This process runs as thebuilt-in LocalSystem.
� Medium Isolation When set to medium isolation, the webapplication runs inside dllhost.exe.A single dllhost.exe processhosts all web applications set to medium isolation. By default,the process identity of dllhost.exe is IWAM_<computername>.
� High Isolation When set to high isolation, the web applica-tion runs inside a dedicated dllhost.exe.There will be one dll-host.exe process for each web application configured to usehigh isolation.As with medium isolation, the process identityfor the dllhost.exe process is IWAM_<computername>.
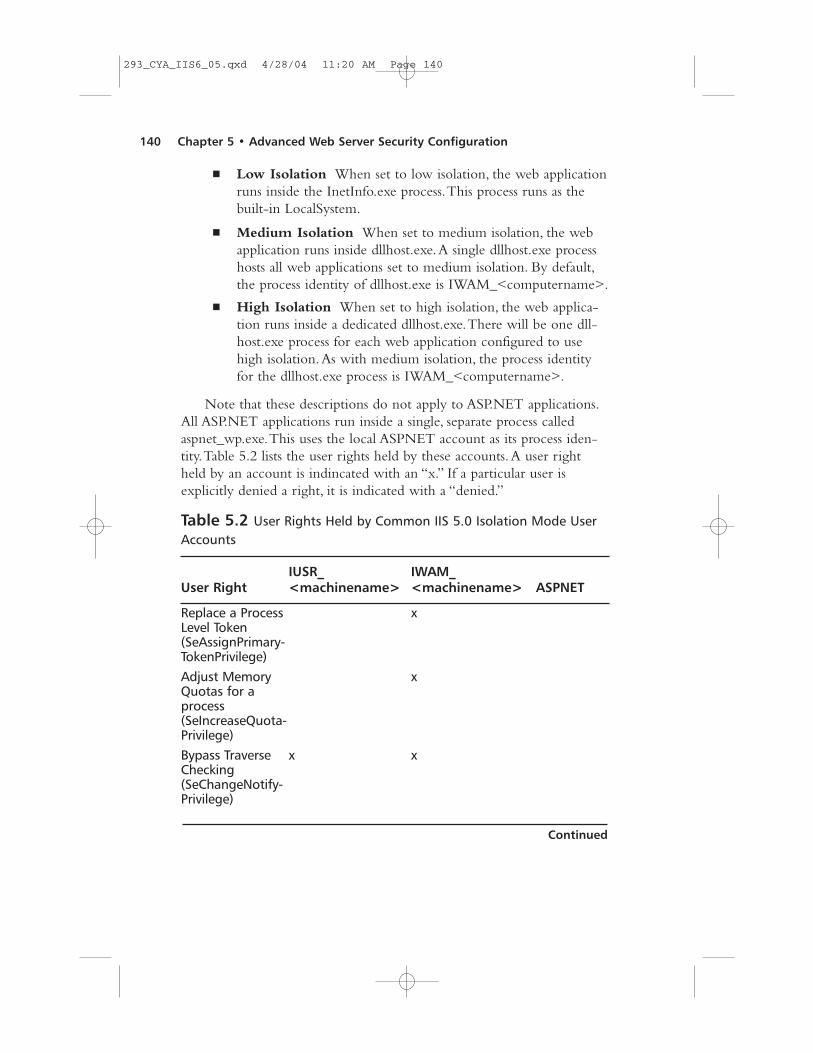
Note that these descriptions do not apply to ASP.NET applications.All ASP.NET applications run inside a single, separate process calledaspnet_wp.exe.This uses the local ASPNET account as its process iden-tity.Table 5.2 lists the user rights held by these accounts.A user rightheld by an account is indincated with an “x.” If a particular user isexplicitly denied a right, it is indicated with a “denied.”
Table 5.2 User Rights Held by Common IIS 5.0 Isolation Mode UserAccounts
IUSR_ IWAM_User Right <machinename> <machinename> ASPNET
Replace a Process xLevel Token (SeAssignPrimary-TokenPrivilege)Adjust Memory xQuotas for a process (SeIncreaseQuota-Privilege)Bypass Traverse x xChecking (SeChangeNotify-Privilege)
140 Chapter 5 • Advanced Web Server Security Configuration
Continued
293_CYA_IIS6_05.qxd 4/28/04 11:20 AM Page 140
Table 5.2 User Rights Held by Common IIS 5.0 Isolation Mode UserAccounts
IUSR_ IWAM_User Right <machinename> <machinename> ASPNET
Access this x x xcomputer from anetwork (SeNetworkLogon-Right)Logon as a x x xBatch Job (SeBatchLogon-Right)Logon as a xService (SeInteractiveLogon-Right)Allow Logon x DeniedLocally (SeInteractiveLogon-Right)Logon through DeniedTerminal Services (SeDenyRemoteInteractiveLogonRight)
IWAM_<computername> AccountIWAM_<computername> is the default process identity for out of processweb applications. Out of process refers to being outside the codeInetInfo.exe process, and thus refers to medium and high isolation applications.
Use the following steps to change the user account used for an outof process application:
1. Open the Component Services MMC snap-in, located inthe Administrative Tools folder.
2. Expand the Computer node, then expand the COM+Applications node.
3. Right-click IIS Out-Of-Process Pooled Applications andselect Properties.
Advanced Web Server Security Configuration • Chapter 5 141
293_CYA_IIS6_05.qxd 4/28/04 11:20 AM Page 141
4. On the Identity tab, select one of the preconfigured accountsor enter your own custom account and corresponding pass-word.
5. Click OK.
ASPNET AccountThe ASPNET account is used as the process identity for theaspnet_wp.exe process.This process is used to host all ASP.NET applica-tions running on the server.
To change this process identity you need to edit the<ProcessModel> section of the machine.config file located in%windir%\Microsoft.Net\Framework\<framework_version>\config\.Themachine.config file is an XML file, and can be edited in any text editor.
IUSR_<machinename>The IUSR_<machinename> account is used for the same purposes inIIS5 isolation mode as in IIS 6.0 worker process isolation mode.
REALITY CHECK…IIS 6.0 ships in a locked-down configuration, and this extends tothe user rights granted to the accounts that are used in a defaultIIS configuration. Unless you have a good reason to do so, it isgenerally unwise to change the default configuration.
You may wish to change the anonymous user account to adomain account if your web application requires the privilegesthat a domain user has. Or, if you are a hosting company thatneeds to strictly isolate each client’s website, you will also needto have a custom configuration. In other circumstances however,the default configuration is a good compromise between safetyand flexibility.
Configuring URLScanMicrosoft provides an Internet Server Application Programming Interface(ISAPI) filter called URLScan, which is designed to examine incomingrequests very early in the processing cycle, and to reject requests that arenot deemed to be acceptable. URLScan was initially released with the
142 Chapter 5 • Advanced Web Server Security Configuration
293_CYA_IIS6_05.qxd 4/28/04 11:20 AM Page 142
IISLockDown tool.The IISLockDown tool, when run on Windows2000 machines, disables a number of IIS features that were enabled bydefault, thus reducing the attack surface of IIS 5.0.There is noIISLockDown tool for IIS 6.0, as IIS 6.0 ships in a locked-down state.
BY THE BOOK…URLScan is a security tool that restricts the types of HTTPrequests that IIS will process. By blocking specific HTTP requests,the URLScan security tool helps prevent potentially harmfulrequests from reaching the server. URLScan v2.5 has beenupdated to work with IIS 6.0, and installs on servers running IIS4.0 and later.
Many of the features of URLScan were absorbed into IIS 6.0.However, URLScan does offer a number of features that are notavailable with IIS 6.0, and also offers additional flexibility that isnot available with IIS 6.0.
Microsoft provides information about URLScan capabilities atwww.microsoft.com/technet/security/tools/urlscan.mspx. Includedis a comparison between URLScan’s capabilities and IIS 6.0 nativecapabilities to help evaluate whether URLScan is appropriate foryour server.
URLScan can be downloaded fromwww.microsoft.com/technet/security/tools/urlscan.mspx.To installURLScan, run the setup.exe file.To uninstall it at any time, use theAdd/Remove Programs Control Panel. Once URLScan is installed,you can configure its settings by navigating to %windir%\system32\inetsrv\urlscan, which contains the URLScan.ini file. Open this file inNotepad.exe (or a similar text editor) to edit the settings. URLScan.ini set-tings are read in by the URLScan filter when IIS is started. For changes tothe settings to take effect, you will have to restart the IISAdmin service.You can do that within the IIS Manager by right-clicking on your serverand selecting All Tasks | Restart IIS.You can also restart IIS from thecommand line by typing iisreset.exe.
Configuring URLScan.iniThe URLScan.ini file is divided into sections.The first section, [Options],contains most of the major settings (listed in Table 5.3). Other sectionscontain supplemental information pertinent to the selections made in the[Options] section.To comment out any particular setting, begin the linewith a semicolon.
Advanced Web Server Security Configuration • Chapter 5 143
293_CYA_IIS6_05.qxd 4/28/04 11:20 AM Page 143
Table 5.3 The [Options] section of URLScan.ini
Parameter Explanation
UseAllowVerbs = 0 | 1 If UseAllowVerbs is set to 1, the HTTPverbs (for example, GET and POST)listed in the [AllowVerbs] section willbe used. Requests using other verbswill be rejected. If set to 0, requestsusing the HTTP verbs listed in the[DenyVerbs] section will be denied,and all other requests allowed. Thedefault is 1.
UseAllowExtensions = 0 | 1 If UseAllowExtensions is set to 1,requests for files ending in the exten-sions listed in the [AllowExtensions]section will be allowed, and all othersdenied. If set to 0, requests for filesending in the extensions listed in the[DenyExtensions] section will bedenied, and all others allowed.
NormalizeUrlBeforeScan = Requests can be encoded. Here a value 0 | 1 in the URL is replaced with a % sign
followed by the numerical ASCII value.For example, the “.” character can beencoded as %2E, the letter “a” as%61, and so forth. SettingNormalizeUrlBeforeScan to 1 un-encodes the URL before attempting tomatch any of the rules specified inURLScan.ini. This prevents attackersfrom attempting to bypass URL restric-tions (for example, by encoding exten-sion). The NIMDA worm was able tospread from IIS server to IIS server byexploiting an un-encoding bug in IIS.The default is 1.
144 Chapter 5 • Advanced Web Server Security Configuration
Continued
293_CYA_IIS6_05.qxd 4/28/04 11:20 AM Page 144
Table 5.3 The [Options] section of URLScan.ini
Parameter Explanation
VerifyNormalization = 0 | 1 An encoded request can be encodedagain. For example the character “.”can be encoded as %2E. The % can beencoded as %25, resulting in %252E.Previous versions of IIS were found tobe vulnerable to attacks involving mul-tiple levels of encoding. By settingVerifyNomalization to 1 in conjunctionwith NormalizeUrlBeforeScan), URLScanwill canonicalize the URL, then repeatthe process on the un-encoded URL andcompare the results. If they are dif-ferent, the URL has been encoded morethan once, and the request will berejected. The default is 1.
AllowHighBitCharacters = AllowHighBitCharacters = 1 allows 0 | 1 requests to contain UTF8 characters in
the URL. High bit characters may berequired for languages that containextended character sets. If your files arenamed using only ASCII characters, thisshould be set to 0. The default is 0.
AllowDotInPath = 0 | 1 AllowDotInPath determines whetherURLs that contain a “.” character thatis not part of the file extension shouldbe allowed. A setting of 0 deniesrequests with the “.” character if it’snot part of the file extension. The pres-ence of a “.” character may indicate adirectory traversal attack, where theattacker attempts to navigate outsidethe web root using a URL that con-tains “../” to move up a directory fromthe current directory. It may also indi-cate an attack that attempts to call adenied file, but attempts to hide theattack by including the name of safefile in the URL, for example,/someExecutable.exe?someSafeFile.html
Advanced Web Server Security Configuration • Chapter 5 145
Continued
293_CYA_IIS6_05.qxd 4/28/04 11:20 AM Page 145
Table 5.3 The [Options] section of URLScan.ini
Parameter Explanation
However, some web applications (suchas Outlook Web Access) may requireyou to set this to 1, because filenamesfor individual messages are based onthe subject of the message, and thesubject may contain the “.” character.
RemoveServerHeader = 0 | 1 As part of an HTTP response, theserver normally returns an HTTP serverheader indicating the type of serverresponding. IIS 6.0 returns“Server: Microsoft-IIS/6.0”.By setting this to 1, this behavior issuppressed. Some corporate policiesrequire this setting to obscure thebrand and version of the server.However, this does not provide protec-tion against automated attacks thatsystematically attempt to exploit vul-nerabilities from a wide variety of plat-forms, nor will it prevent OSfingerprinting via other means. Bydefault, this is set to 0.
AlternateServerName = If RemoveServerHeader is set to 1, you <name> can supply an alternate HTTP Server:
header by supplying a value forAlternateServerName.
EnableLogging = 0 | 1 If set to 1, URLScan will log rejectedrequests to a URLScan logfile. If set to0, logging is not enabled.
PerProcessLogging = 0 | 1 If set to 1, URLScan will create sepa-rate log files for each w3wp.exeworker process. The log file nameincludes the process ID (PID) of eachworker process. If set to 0, all rejectedrequests are logged to the same file.
PerDayLogging = 0 | 1 If set to 1, URLScan will create sepa-rate log files each day. The log filename will contain (in MMDDYYformat) the day pertaining to the logfile. If this setting is used in conjunc-tion with PerProcessLogging, the filename will contain both the date andthe PID in the format, for example, Urlscan.DDMMYY.<processID>.log.
146 Chapter 5 • Advanced Web Server Security Configuration
Continued
293_CYA_IIS6_05.qxd 4/28/04 11:20 AM Page 146
Table 5.3 The [Options] section of URLScan.ini
Parameter Explanation
LoggingDirectory = <path> A full path that indicates whereURLScan logs should be stored. Bydefault, this is %windir%\system32\inetsrv\urlscan\logs\.
AllowLateScanning = 0 | 1 This setting determines whether theURLScan filter is a high priority filter (itapplies before other ISAPI filters) or alow priority filter (it applies after highpriority filters). AllowLateScanning = 0loads URLScan as a high priority filter,and is the default. If you wish to useFrontpage Server Extensions, you willneed to set this to 1.
UseFastPathReject = 0 | 1 This setting is used to determine theuser experience and IIS logging ofrejected requests. SettingUseFastPathReject = 1 will causeURLScan to send a plain “404 File NotFound” error message to the client,and URLScan will not log the rejectionin the IIS logs.
RejectResponseURL = <URL> If UseFastPathReject is set to 0, youcan deliver a customized “404 File NotFound” page by supplying a valid vir-tual path for this parameter. Forexample, /someDirectory/someErrorPage.htm.This means that you can deliver thesame rich user experience as withlegitimate requests (that is, non-blocked) requests for non-existentresources. Additionally, the followingvariables are available as part of therequest context, which can beaccessed from an ASP page or ASP.NETpage (in the Request.ServerVariables()collection):
� HTTP_URLScan_Status_Header = why the request hadbeen blocked.� HTTP_URLScan_Original_Verb = the request’s HTTP verb.
Advanced Web Server Security Configuration • Chapter 5 147
Continued
293_CYA_IIS6_05.qxd 4/28/04 11:20 AM Page 147
Table 5.3 The [Options] section of URLScan.ini
Parameter Explanation
� HTTP_URLScan_Original_URL = the original URLrequested.If RejectResponseURL is set to /~*,URLScan enters a special logging modewhere requests are not rejected, butrequests that would be rejected arestill logged in the URLScan log. This isuseful for testing your URLScan.ini settings.
LogLongURLs = 0 | 1 Setting LogLongURLs allows URLScanto log rejected URLs up to 128KB. Ifset to 0, only the first 1KB of arejected URL will be logged.
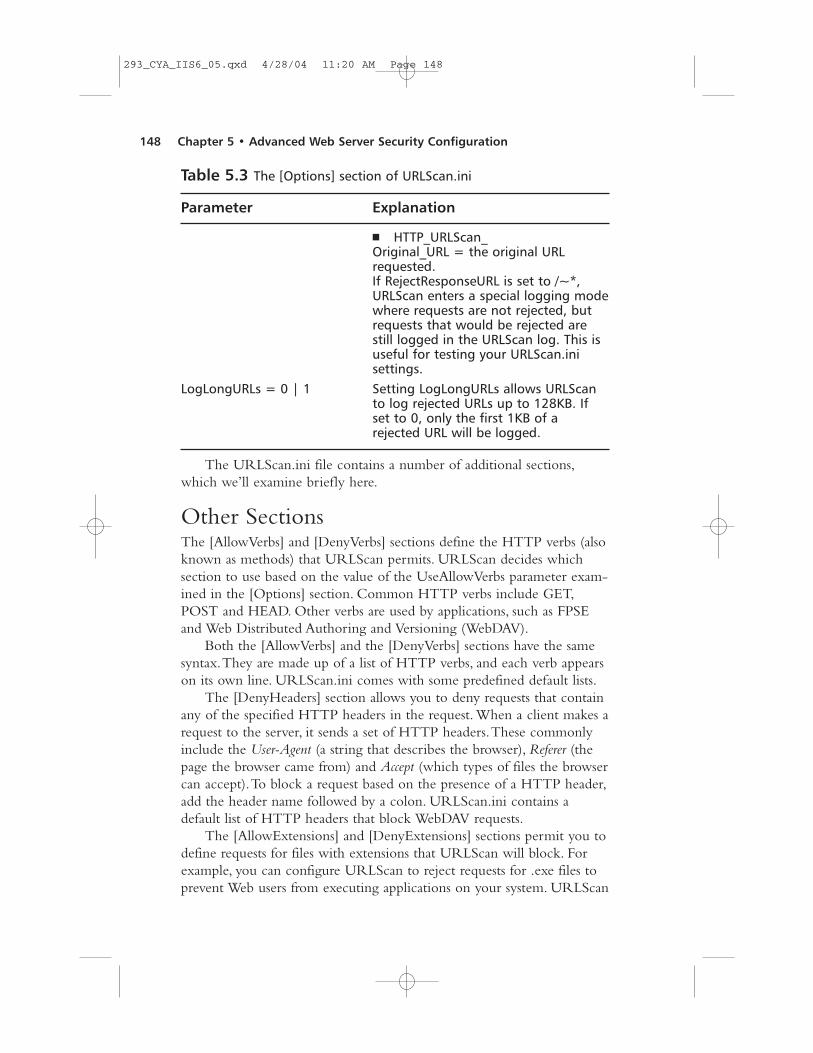
The URLScan.ini file contains a number of additional sections,which we’ll examine briefly here.
Other SectionsThe [AllowVerbs] and [DenyVerbs] sections define the HTTP verbs (alsoknown as methods) that URLScan permits. URLScan decides whichsection to use based on the value of the UseAllowVerbs parameter exam-ined in the [Options] section. Common HTTP verbs include GET,POST and HEAD. Other verbs are used by applications, such as FPSEand Web Distributed Authoring and Versioning (WebDAV).
Both the [AllowVerbs] and the [DenyVerbs] sections have the samesyntax.They are made up of a list of HTTP verbs, and each verb appearson its own line. URLScan.ini comes with some predefined default lists.
The [DenyHeaders] section allows you to deny requests that containany of the specified HTTP headers in the request. When a client makes arequest to the server, it sends a set of HTTP headers.These commonlyinclude the User-Agent (a string that describes the browser), Referer (thepage the browser came from) and Accept (which types of files the browsercan accept).To block a request based on the presence of a HTTP header,add the header name followed by a colon. URLScan.ini contains adefault list of HTTP headers that block WebDAV requests.
The [AllowExtensions] and [DenyExtensions] sections permit you todefine requests for files with extensions that URLScan will block. Forexample, you can configure URLScan to reject requests for .exe files toprevent Web users from executing applications on your system. URLScan
148 Chapter 5 • Advanced Web Server Security Configuration
293_CYA_IIS6_05.qxd 4/28/04 11:20 AM Page 148
decides which section to use based on the value of UseAllowExtensionsdiscussed in the [Options] section.
Both the [AllowExtensions] and the [DenyExtensions] sections havethe same syntax.They are made up of a list of filename extensions, andeach extension appears on its own line.The extension starts with aperiod (.) (for example, .ext).You can configure URLScan to blockrequests that contain certain sequences of characters in the URL usingthe [DenyUrlSequences] section. For example, you can block requeststhat contain two consecutive periods (..), which are frequently used withexploits that take advantage of directory traversal vulnerabilities.Tospecify a character sequence to block, put the sequence on a line by itselfin the [DenyUrlSequences] section.
Note that adding character sequences may adversely affect OutlookWeb Access (OWA) for Microsoft Exchange. When you open a messagefrom OWA, the subject line of the message is contained in the URL thatis requested from the server. Subject lines that contain characters orsequences listed in the [DenyURLSequences] cannot be previewed,opened, or moved by OWA users.
The [RequestLimits] section allows you to limit the size of any partof the incoming request, including limits on the length of individualHTTP headers.To limit the length of any HTTP header, propend Max-followed by the HTTP header name, for example:
Max-User-Agent: 1000 ; limit user-agent header to 1000 bytes
URLScan.ini comes with default settings for overall content-length(30,000,000 bytes), maximum URL length (260 bytes) and maximumquerystring length (2048 bytes).
REALITY CHECK…Most of the functionality of URLScan is already included in IIS6.0. Additionally, the built-in security features in IIS 6.0 provide asimpler way of maintaining your security policy. For example, dis-abling the ASP web services extension in the IIS Manager auto-matically disables all extensions that are mapped to asp.dll. To dothe same thing in URLScan would require manually adding eachextension (including any custom file extensions you have mappedto asp.dll).
However, URLScan does provide some advantages. It offersgreater granularity that IIS 6.0 in rejecting requests. If you requirethe granularity provided by URLScan, it cannot easily be replicatedin IIS 6.0’s native features. URLScan also intercepts requests very
Advanced Web Server Security Configuration • Chapter 5 149
293_CYA_IIS6_05.qxd 4/28/04 11:20 AM Page 149
early in the request processing cycle, leading to faster rejection ofdisallowed requests. By contrast, rejection of a request for a dis-abled web service extension occurs very late in the request pro-cessing cycle. Finally, as a defense-in-depth measure, running bothIIS 6.0 and URLScan diversifies risk. A bug in either product thatmay make your server vulnerable may be prevented by the other,helping to keep your server uncompromised.
Configuring Your Server to Use SSLSecure Sockets Layer is an industry standard method of encrypting traffic.While it is typically used for securing HTTP traffic, the technology canalso be used for securing other types of traffic such as Simple Mail TransferProtocol (SMTP). SSL should be used whenever you need to send sensi-tive information between client and server (for example, authenticationcredentials or user-supplied information such as credit card numbers).Thisis particularly important when using basic authentication, as user creden-tials are passed in an unencrypted format (see Configuring Authenticationin this chapter for more information on basic authentication).The tech-nologies that SSL uses can also be used to certify the identity of a server(or client), so you should use SSL whenever you need to certify the iden-tity of your server or clients.
BY THE BOOK…Secure Sockets Layer is a public key-based security protocol thatis used by Internet services and clients to authenticate each otherand to ensure message integrity and confidentiality. Certificatesare used to authenticate the server (and optionally the client),and cryptography is used to ensure message confidentiality andprevent tampering.
SSL should be used to secure the transmission of any sensi-tive data, including user credentials and user supplied data (suchas credit card numbers). Use of SSL however, does place an addi-tional resource burden on the server, as there is an overheadinvolved in encrypting and decrypting packets.
150 Chapter 5 • Advanced Web Server Security Configuration
293_CYA_IIS6_05.qxd 4/28/04 11:20 AM Page 150
SSL uses certificates and public key cryptography to establish theidentity of the server or client, and to create secure, encrypted trafficbetween server and client.
First, the identity of the server or client and the validity of its SSLcertificate are checked. When a client requests a resource using thehttps:// protocol (and the server is configured to allow https:// traffic),the server will return its SSL certificate.The client will perform anumber of checks on this certificate:
� It will check to ensure that the certificate hasn’t expired.
� It will ensure that the name of the server that it is connectingto is the same as the name of the server in the certificate (forexample, this can stop a malicious attacker from setting up a sitepretending to be syngress.com since only syngress.com has acertificate containing “www.syngress.com” as the site to besecured.This works in conjunction with the next check).
� It will ensure that the certificate was originally issued by atrusted Certificate Authority (CA). Browsers have built-in trustfor a number of major commercial CAs such as Verisign orThawte.You can check the trusted CAs in Internet Explorer byaccessing Tools | Internet Options | Content |Certificates | Trusted Root Certificate Authorities inInternet Explorer. Because the browser trusts those CAs, ittrusts certificates issued by those CAs.These CAs are expectedto perform due diligence on applicants for certificates to ensurethat only legitimate applicants are issued with certificates.Thisprevents a malicious user from setting up their own CA, andissuing themselves a certificate for syngress.com.The browserwill not trust a certificate issued by a non-trusted CA.
Your organization (or partner organizations) can setup a CA andconfigure browsers within the organization to trust certificates issued byit.This is useful if you have non-public websites that have to be securedwith SSL, as it avoids the expense of purchasing a certificate from a com-mercial CA. Optionally, a browser may also check the CA’s certificaterevocation list (CRL) to ensure that a legitimately issued certificate (onethat meets the checks) has not been subsequently revoked by the issuingCA.
If the certificate meets all these requirements, then the client andserver can proceed to the next step: configuring a secure channel toencrypt traffic. If the certificate does not meet these requirements, theuser will be warned about potential problems with the certificate and
Advanced Web Server Security Configuration • Chapter 5 151
293_CYA_IIS6_05.qxd 4/28/04 11:20 AM Page 151
must manually decide whether to proceed or not (as shown in Figure 5.8and Figure 5.9).
To set up the encryption to be used for traffic, the browser willextract the server’s public key from the server’s SSL certificate.The clientwill generate a random session key and encrypt this with the server’spublic key and return it to the server.The server will use its private keyto decrypt the transmission and extract the session key. Future communi-cation between the browser and server will be based on this session keyusing symmetric encryption (which is faster than public/private keyencryption). More information on public key encryption, certificates, andcertificate trust hierarchies is available in Chapter 11, which covers
152 Chapter 5 • Advanced Web Server Security Configuration
Figure 5.8 The Hostname Requested does not Match the Hostnamein the Certificate
Figure 5.9 The Certificate is Issued by an Untrusted CertificateAuthority
293_CYA_IIS6_05.qxd 4/28/04 11:20 AM Page 152
Microsoft Certificate Services. Microsoft Certificate Services can acts as aCA for your organization.
In the next section we will look at the options available in IIS 6.0has for configuring SSL. When securing SSL websites, be aware that youcannot use host headers to run multiple SSL-secured websites on a singleIP address. For more information on host headers, see “Configuring IPAddress,TCP Port and Host-Header Combinations” in this chapter.
Generating a Certificate RequestThe first step in configuring IIS 6.0 to allow https:// requests is to gen-erate a certificate request.This request for an SSL certificate will be sentto a CA for processing.This can be a commercial CA (in the event thatyour Web server will be available to the general public), or an internal,organizational CA (in the event that the site will be accessed by internalusers only).To generate a CA request:
1. Open the IIS Manager. Right-click the website for which youwill generate a certificate request, then click Properties.
2. Select the Directory Security tab.At this stage, your Webserver does not have an SSL certificate, so the ViewCertificate option should be unavailable.
3. Click the Server Certificate button to begin the Web ServerCertificate wizard.
4. Click Next on the initial Welcome screen.
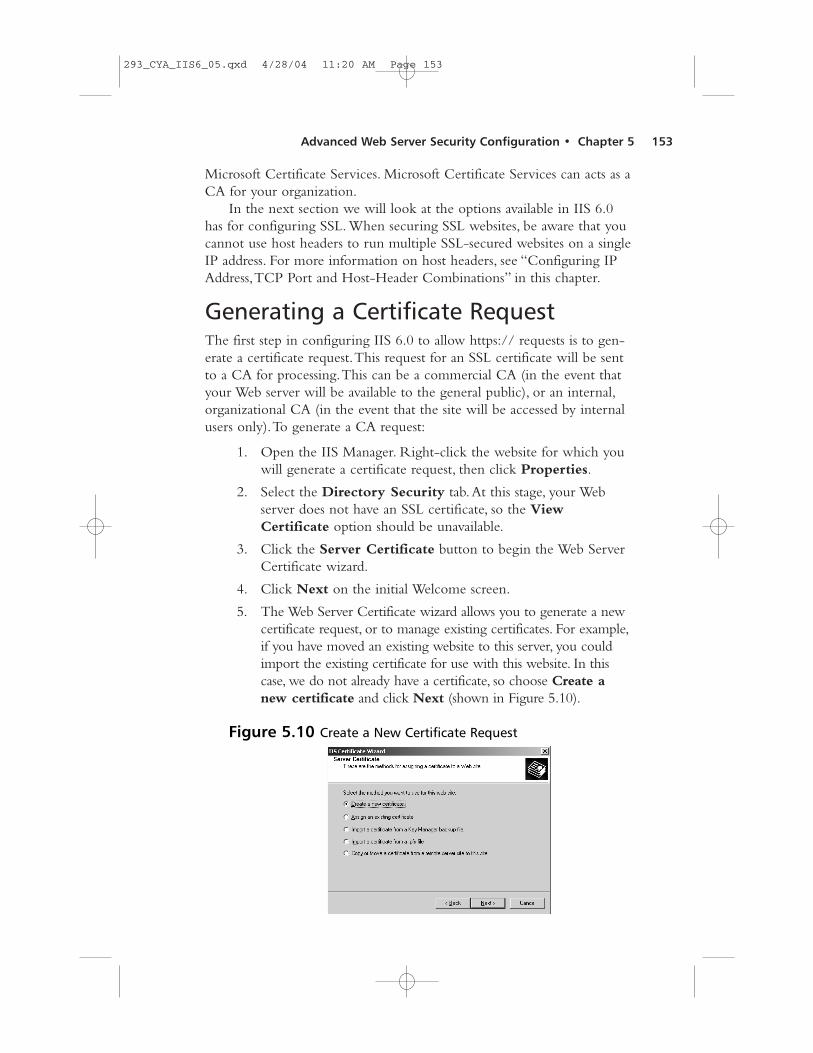
5. The Web Server Certificate wizard allows you to generate a newcertificate request, or to manage existing certificates. For example,if you have moved an existing website to this server, you couldimport the existing certificate for use with this website. In thiscase, we do not already have a certificate, so choose Create anew certificate and click Next (shown in Figure 5.10).
Advanced Web Server Security Configuration • Chapter 5 153
Figure 5.10 Create a New Certificate Request
293_CYA_IIS6_05.qxd 4/28/04 11:20 AM Page 153
6. You can now choose to either create a request and submit itmanually to a CA, or submit the request automatically to anonline CA.The latter option is available if you have an ActiveDirectory Integrated Enterprise Root CA (see Chapter 11 formore information). In this case, we will create the request, andsubmit it manually. Choose Prepare the Request now, butsend it later and click Next.
7. On the next screen, enter a “friendly” Name for the certificate(Figure 5.11).Additionally, choose a Bit length to be used forthe public key encryption. 1024 bits is the standard length.Higher values are stronger, but place an increased computa-tional burden on your server.
8. Click Next.
9. Next, enter your Organization, and Organizational unit.These do not affect the security of your certificate, but are vis-ible to end users if they examine the details of your certificate.After entering these details, click Next.
10. The next screen asks for your server’s common name (Figure5.12). It is critical that you enter the correct name at this step.The name should be the same as what users will enter in theirbrowsers to access your site. If this is a public site, you shoulduse a Fully Qualified Domain Name (FQDN) such aswww.myCompany.com. If this is an internal site that will beaccessed by its NetBIOS name, you can enter the NetBIOSname instead, for example, ITSupportIntranet. Enter yourserver’s Common name and click Next.
154 Chapter 5 • Advanced Web Server Security Configuration
Figure 5.11 Entering a Friendly Name and Configuring Key BitLength
293_CYA_IIS6_05.qxd 4/28/04 11:20 AM Page 154
11. In the next step, you are required to select your Country andenter your State/Province and City/Locality.These do notaffect the security of your certificate, but are visible to endusers who choose to view the details of your certificate.Afterentering the proper information, click Next.
12. In the next step, you save the request to a file.This file will besubmitted to your CA as a request for an SSL certificate.Choose a location and click Next (Figure 5.13).
13. You will be asked to confirm all the details you have entered. Ifyou need to change any details, click the Back button to
Advanced Web Server Security Configuration • Chapter 5 155
Figure 5.12 Enter Your Site’s Common Name
Figure 5.13 Choosing a Filename for the Certificate Request
293_CYA_IIS6_05.qxd 4/28/04 11:20 AM Page 155
return to the appropriate previous screen. When the details areall correct, press Next to create your certificate request, thenclick Finish to close the wizard.
IIS 6.0 remembers that you have generated a certificate request forthe website in question.The next time you start the Web ServerCertificate wizard, you will have the option to process the pendingrequest (that is, install a certificate) or delete the pending request. Choosethe second option if you want to remove the existing pending requestand generate a new certificate request.
Submitting a Certificate RequestThe certificate request must now be submitted to a Certificate Authority.You can submit the request to a commercial CA (such as Versign,Thawteor GeoTrust), or to an internal CA. In this case we will submit therequest to a Microsoft Certificate Services server. Use the following stepsto submit your request:
1. Obtain the name of your Microsoft Certificate Service server.
2. Browse to http://<certificate server name>/certsrv/(shown in Figure 5.14).
3. Select Request a Certificate and then choose Submit anAdvanced Certificate Request.
156 Chapter 5 • Advanced Web Server Security Configuration
Figure 5.14 Certificate Services Website
293_CYA_IIS6_05.qxd 4/28/04 11:20 AM Page 156
4. On the Advanced Certificate Request page, select Submit acertificate request by using a base-64-encoded CMC orPKCS #10 file.
5. Using Notepad, open the certificate request file you saved inthe previous section (located in c:\certreq.txt by default), andpaste the entire contents into the textbox (shown in Figure5.15). By default, the Browse for a File option will not workif you a browsing from a Windows Server 2003 machine due todefault IE security restrictions, though it will work if you arebrowsing from a different OS.
6. Click the Submit button to submit your request. If the data inthe certificate request file is valid, the Certificate Service web-site will present an acknowledgement page (Figure 5.16).
Advanced Web Server Security Configuration • Chapter 5 157
Figure 5.15 Entering the Certificate Request
293_CYA_IIS6_05.qxd 4/28/04 11:20 AM Page 157
Your Certificate Services administrator will now either issue a cer-tificate or reject the request.This is done through the Certificate ServicesMMC snap-in.
Installing an Issued CertificateOnce your certificate has been issued, you can install it on your Webserver. In this section, we will download and install the SSL certificategenerated by Microsoft Certificate Services. If you have submitted yourrequest to a commercial CA, they will have procedures for you to followto obtain your certificate.
1. Browse to http://<certificate server name>/certsrv, andselect View the status of a pending certificate request”.
2. Select the certificate request you submitted earlier.
3. Download the certificate using either of the encoding methods(shown in Figure 5.17) and save the file onto your hard disk.
Note that the server running Microsoft Certificate Serviceshas URLScan installed, .cer files are blocked in the default con-figuration.You will need to edit the URLScan.ini file to allowrequests for files with the .cer extension.This applies only tothe Web server running on the Microsoft Certificate Servicesserver, not the Web server you are installing the certificate onto.
158 Chapter 5 • Advanced Web Server Security Configuration
4. Open IIS Manager, right-click the website on which you willbe installing the certificate and click Properties.
5. On the Directory Security tab, click the Server Certificatebutton to start the Web Server Certificate wizard.
6. Click Next on the initial Welcome screen.
7. Select the Process the pending request and install thecertificate option (Figure 5.18) and click Next.
Advanced Web Server Security Configuration • Chapter 5 159
Figure 5.17 Download the Issued Certificate
Figure 5.18 Installing the Issued Certificate
293_CYA_IIS6_05.qxd 4/28/04 11:20 AM Page 159
8. Enter the path of the certificate you downloaded and saved ear-lier in this section and click Next (Figure 5.19).
9. Enter the SSL port that this website should use. By default, thisis port 443. Note that only one website per IP address canlisten on port 443 (you cannot use host headers with SSL-secured sites). Click Next.
10. A screen detailing your choices will be presented. Confirm thatthe information is correct. If anything needs to be altered, clickthe Back button to return to the appropriate screen. If every-thing is correct, click Next to install the certificate.
11. Click Finish to close the wizard.
12. To verify that your SSL certificate is installed correctly, openyour web browser and navigate to https://<your servername>/.
If you are having problems with your SSL-secured site after youfinish installing the certificate, Microsoft has an SSL diagnostics tool youcan run that checks for common issues.You can download SSLDiag fromwww.microsoft.com/downloads/details.aspx?FamilyID=cabea1d0-5a10-41bc-83d4-06c814265282&.
Managing your Website CertificatesTo manage certificates issues to your websites, use the “Web ServerCertificate” wizard.This wizard allows you to export certificates (for
160 Chapter 5 • Advanced Web Server Security Configuration
Figure 5.19 Enter the Path to the Certificate
293_CYA_IIS6_05.qxd 4/28/04 11:20 AM Page 160
example, if you wish to move the website to a new server), create newrequests, and remove the currently installed certificate.
Configuring IIS SSL OptionsTo configure the website’s SSL settings:
1. Open the IIS Manager, right-click the desired website, folder,or file, and select Properties.
2. On the Directory Security or File Security tab, select Edit.
3. To require an SSL connection to access the resource, enable theRequire secure channel (SSL) option (shown in Figure 5.20).
4. To require 128-bit encryption, enable the Require 128-bitencryption option. Older browsers, and browsers distributedin countries where US export restrictions still apply, may notsupport 128-bit encryption, and will not be able to negotiate aconnection if this option is enabled. However, if this option isnot enabled, these browsers will fall back to lower levels (forexample, 40-bit encryption).These levels are no longer deemedsecure because modern computers can break the encryptionrelatively quickly.
5. Client certificates can be used to identify clients in the same waythat a server’s SSL certificate identifies the server. By default,client certificates are ignored, but you can choose to Acceptclient certificates or Require client certificates (the former
Advanced Web Server Security Configuration • Chapter 5 161
Figure 5.20 Require a Secure Connection for the Resource
293_CYA_IIS6_05.qxd 4/28/04 11:20 AM Page 161
allows client certificates as an option, and the latter requires theclient to present a certificate to allow the connection).
6. To map client certificates to Windows user accounts, enable theEnable client certificate mapping option and click Edit tomap certificates to user accounts. See Chapter 11 for moreinformation on issuing certificates to clients.
7. If you are using client certificates to identify users and wish torestrict the CAs whose certificates you will accept, enable theEnable certificate trust list option and click Add to add thedesired CAs. Certificates from CAs not defined here will not beaccepted.This may be useful in an intranet scenario where youwant only certificates issued by your own internal CAs to beused for identifying clients.
8. Click OK.
REALITY CHECK…SSL provides a secure and trusted method of verifying the iden-tity of servers and clients, and for encrypting traffic betweenserver and client. It is designed to prevent identity hijackingthreats (where a server or client is not who it claims to be), man-in-the-middle attacks (where an attacker attempts to interceptand modify traffic in transit), and snooping attacks (where anattacker tries to intercept and read traffic in transit).
Despite these benefits, there are some limitations to SSL.First, any information transmitted as part of the requested URL(for example, as part of the query string) is not encrypted. If youpass sensitive information in the URL request, it can be read byanyone intercepting traffic. The following URLs, for example,would be vulnerable:
Second, information that is transmitted in an encryptedformat is decrypted at both the client and server sides. Anattacker who was able to compromise a client or server would beable to read the decrypted information in clear text. This couldbe done on-the-fly, or it could be done by retrieving informationstored in databases or in IIS log files.
162 Chapter 5 • Advanced Web Server Security Configuration
293_CYA_IIS6_05.qxd 4/28/04 11:20 AM Page 162
Another limitation of SSL is the inability to use host headersto run multiple SSL-secured websites on a single IP address. Anormal, unsecured HTTP v1.1 request includes a host: HTTPheader:
Get /default.aspx HTTP/1.1
Host: www.myCompany.com
Accept: */*
Connection: Keep-Alive
User-Agent: Mozilla/4.0 (compatible; MSIE 6.0; Windows
NT 5.1; .NET CLR 1.1.4322)
Accept-Encoding: gzip, deflate
When an SSL-secured connection is used, everything exceptthe first line (the GET request) is encrypted. Because of this, theWeb server does not know to which website the request shouldbe routed. As a result, the Host: HTTP header cannot be used toidentify which server the browser is seeking the resource from.Each SSL-secured website must by run on its own IP address orTCP port (if using a single IP address and multiple websites).
For more information on host headers see “Configuring IPAddress, TCP Port and Host-Header combinations” in this chapter.
Configuring URL Authorizationwith the Authorization ManagerWindows Server 2003 introduces a new role-based authorization manager.While traditional authorization has revolved around creating AccessControl Entries (ACEs) on predefined resources such as files or registrykeys, the Authorization Manager is designed to provide access control totasks that comprise an application.
The Authorization Manager can be managed using an MMC snap-in.To access the Authorization Manager, select Start | Run and enterazman.msc.An authorization application programming interface (API)is also exposed that applications (including ASP and ASP.NET web-basedapplications) can utilize to access the services provided by theAuthorization Manager.
BY THE BOOK…In the Windows Server 2003 family, Authorization Manager intro-duces a new role-based authorization mechanism. Rather than
Advanced Web Server Security Configuration • Chapter 5 163
293_CYA_IIS6_05.qxd 4/28/04 11:20 AM Page 163
base access on static Access Control Entries (ACEs), access can begranted or denied based on the type of work the user is per-forming.
Authorization Manager allows you to define tasks and roles.Only those users who are in configured roles are allowed to exe-cute the defined tasks. The rules governing role membership canbe programmed using a scripting language, offering the abilityto dynamically decide what tasks can be executed.
For example, a role called “Expense Authorizers” may allowusers in the role to authorize expenses via a web-based applica-tion, but only if the expense amount is less than a specified level(which in turn may be dynamically determined, by beingretrieved from a database). Users who are not in the role cannotauthorize expenses at all.
A detailed analysis of the full scope of Authorization Manager isbeyond the scope of this book.Authorization Manager provides a set ofAPIs that can be programmed against in ASP or ASP.NET applications.An example is the “Authorization and Profile Application Block” pro-duced by the Microsoft Patterns and Practices group, which can use anAuthorization Manager datastore.The Authorization and ProfileApplication Block can be downloaded from: http://msdn.microsoft.com/library/default.asp?url=/library/en-us/dnpag/html/authpro.asp?frame=true.
In addition to the APIs, a URL Authorization feature is available,which allows administrators to determine who can access a given URLwithout setting ACEs on the physical file. Instead, rules determining whocan access the URL can be managed via Authorization Manager. In thissection we will examine the concepts used in Authorization Manager bybuilding and configuring a simple, dynamic, authorization rule.
After you create the authorization store itself, you will be required toconfigure access to it, and to create applications, operations, scopes, androles. Finally, you will associate resources with the applications.
Creating the Authorization StoreTo begin, use the following steps to create an authorization store thatwill hold the application’s rules:
1. To open the Authorization Manager MMC snap-in, selectStart | Run and enter azman.msc.
164 Chapter 5 • Advanced Web Server Security Configuration
293_CYA_IIS6_05.qxd 4/28/04 11:20 AM Page 164
2. By default, the application will open in admin mode.Thismode does not allow the creation of new authorization stores,only the administration of previously created stores.To create anew store, you must first switch to developer mode.To do so,right-click Authorization Manager and select Options.Select Developer Mode (Figure 5.21) and click OK.
3. Right-click Authorization Manager, and select NewAuthorization Store.
4. Select to either store the authorization store in ActiveDirectory or in a local XML file. For this example, we will usean XML file. Enter the name and location in the Store namefield or click the Locations button to search for and select thestore (Figure 5.22). Enter a Description and click OK.
Advanced Web Server Security Configuration • Chapter 5 165
Figure 5.21 Switching from Administrator to Developer Mode
Figure 5.22 Create a new XML Authorization Store
293_CYA_IIS6_05.qxd 4/28/04 11:20 AM Page 165
Configuring Access to the Authorization StoreNow that the authorization store has been created, you must give the IISworker process access to read it.The default IIS worker process identity isNetwork Service. However, if you have a web application that you’dlike to secure running under a different process identity, you give thataccount permission to read the store instead.
1. Right-click on the authorization store you created in the pre-vious step and select Properties.
2. On the Security tab, select Reader from the User Rolesdrop-down list. Click Add and select Network Service(Figure 5.23).
3. Click OK.
Creating a New ApplicationNext, you must create a new application. Each store can host multipleapplications, each containing their own roles, tasks, and rules. For URLauthorization, the application must be called IIS 6.0 URLAuthorization.
1. Right-click on the authorization store you created previouslyand select New Application.
166 Chapter 5 • Advanced Web Server Security Configuration
Figure 5.23 Allow the Network Service user to access theAuthorization Store
293_CYA_IIS6_05.qxd 4/28/04 11:20 AM Page 166
2. Enter IIS 6.0 URL Authorization as the application name,and enter a Description and Version information (Figure5.24).
3. Click OK.
Creating an OperationOperations are used to determine whether access should be granted to aspecified URL. In the following steps, you will create an operation calledAccessURL.
1. Expand the IIS 6.0 URL Authorization application that youcreated earlier, then expand the Definitions node (Figure 5.25).
Advanced Web Server Security Configuration • Chapter 5 167
Figure 5.24 Creating the IIS 6.0 URL Authorization Application
Figure 5.25 Operation Definitions Node
293_CYA_IIS6_05.qxd 4/28/04 11:20 AM Page 167
2. Right-click Operations Definitions and select NewOperation.
3. Enter AccessURL as the operation Name, and enter 1 as theOperation Number (Figure 5.26).
4. Click OK.
Note that in Authorization Manager, tasks are the smallest work unit.They can be combined (or grouped) into operations.Typical tasks mightbe “read a file”, or “open a database connection”. Operations combine var-ious tasks into a logical work unit (for example,“authorize a payment”).
Creating a ScopeEach web application that uses URL authentication requires a scope.Multiple web applications can share a scope, or they can each have theirown scope.
1. Right-click IIS 6.0 URL Authorization and select NewScope.
2. Enter a meaningful Name and Description for the scope,then click OK (Figure 5.27).
168 Chapter 5 • Advanced Web Server Security Configuration
Figure 5.26 Creating the AccessURL Operation
293_CYA_IIS6_05.qxd 4/28/04 11:20 AM Page 168
Creating a RoleNext, configure a viewer role for the scope. Users in this role will be ableto execute the AccessURL operation that we defined earlier.
1. Expand the scope you created earlier, then expand theDefinitions node (Figure 5.28).
2. Right-click Role Definitions and select New RoleDefinition.
3. Set the Name to Viewer and, if desired, enter a Description(Figure 5.29).
Advanced Web Server Security Configuration • Chapter 5 169
Figure 5.27 Creating a Web Application Scope
Figure 5.28 Creating the Viewer Role
293_CYA_IIS6_05.qxd 4/28/04 11:20 AM Page 169
4. Click Add and select the Operations tab. Enable theAccessURL checkbox (shown in Figure 5.30) and click OK.
5. Next, add a business rule to dynamically determine whetherthe AccessURL option can be executed. Enter the followingcode in Notepad, and save it as AzManTest.vbs on your harddisk:
AzBizRuleContext.BusinessRuleResult = False
If Hour(Time()) < 12 then
AzBizRuleContext.BusinessRuleResult = True
Else
AzBizRuleContext.BusinessRuleResult = False
End If
170 Chapter 5 • Advanced Web Server Security Configuration
Figure 5.29 New Role Definition
Figure 5.30 Adding the “AccessURL” Operation
293_CYA_IIS6_05.qxd 4/28/04 11:20 AM Page 170
6. In Authorization Manager, click the Authorization Scriptbutton and use the Browse button to load the script into thewindow (Figure 5.31).
The code allows access to the URL if the current systemtime is before midday, and denies access if the time is aftermidday. Click OK twice to exit and return to AuthorizationManager. If your current system time is greater than 12, swapthe < sign for a > sign.
7. Next, assign Windows users to the application role. Right-clickthe Role Assignments node and select Assign Roles. Enablethe Viewer checkbox and click OK. Viewer should now beadded as an icon under Role Assignments.
8. Right-click Viewer and select Assign Windows Users andGroups.Add the desired user account and click OK.TheAuthorization Manager should look similar to Figure 5.32.
Advanced Web Server Security Configuration • Chapter 5 171
Figure 5.31 Adding a Business Rule
293_CYA_IIS6_05.qxd 4/28/04 11:20 AM Page 171
Configuring IIS 6.0Now that we have completing defining the application in Authorizationmanager, we need to associate an resource (e.g. a webpage) with thisapplication. We also need to make some configuration changes to IIS, tolink IIS to Authorization Manager.To associate an IIS resource with thisapplication:
1. Create a new folder under the default website root, and namethe folder AzManTest. Place a simple HTML page within thatfolder, containing the desired text.Your entry should look likethe following:
<html>
<body>Hello World</body>
</html>
2. Open the IIS Manager, right-click the AzManTest folder andselect Properties. On the Directory tab, click Create tocreate a new web application.
3. Click the Configuration button (Figure 5.33).
172 Chapter 5 • Advanced Web Server Security Configuration
Figure 5.32 Assigning Windows Users and Groups to a Role
293_CYA_IIS6_05.qxd 4/28/04 11:20 AM Page 172
4. On the Mappings tab, click the Insert button.
5. In the Add/Edit Application Extension Mapping window(Figure 5.34), click Browse and navigate to %windir%\system32\inetsrv. Select urlauth.dll and click Open. ClickOK twice.
6. Click the Directory Security tab and click the Edit button.
7. Disable the Allow Anonymous Access option. Ensure that atleast one of the other options is checked.
8. In the IIS Manager, access the Web Service Extension nodeand click Add a New web Service Extension.
9. Click the Add button. Click Browse and navigate to%windir%\system32\inetsrv\, then select urlauth.dll.Click OK.
Advanced Web Server Security Configuration • Chapter 5 173
Figure 5.33 Configuring the IIS Web Application
Figure 5.34 Add the URLAuth ISAPI Interceptor
293_CYA_IIS6_05.qxd 4/28/04 11:20 AM Page 173
10. Enter URL Authorization in the Extension Name field andenable the Enable Extension option (Figure 5.35).
11. Click OK and close the IIS Manager.
We will now associate the AzManTest folder with the scope wedefined in Authorization Manager.
1. Use Notepad to enter the following code into a text file, andsave it as SetURLAuth.js:
2. Replace c:\AzMan.xml with the path to the XML authori-zation store you created, and replace AzManWebAppTestwith the name of the scope you defined under IIS 6.0 URLAuthorization in Authorization Manager.
3. Double-click the JS file to run it.
174 Chapter 5 • Advanced Web Server Security Configuration
Figure 5.35 Adding the URL Authorization Web ServiceExtension
293_CYA_IIS6_05.qxd 4/28/04 11:20 AM Page 174
Testing the Authorization StoreThe final step is to test the URL authorization.To begin, open a web-browser and navigate to http://<yourserver>/AzManTest/default.htm. Note that if you are using Internet Explorer andIntegrated Windows Authentication is enabled, IE will automaticallylog you on. Since we explicitly added our account to the Viewer role,we will be permitted to view the page.To prevent an auto-logon, use theIP address or the FQDN of the server instead.
According to the business rules we set up in the above exercise, ifyou open a new browser window and enterhttp://<IPAddress>/AzManTest/default.htm, and supply a user-name/password that is not associated with our usual account, we shouldbe denied access.This is because we did not add any other users to theViewer role in our authorization store.
To test the business rule, edit the AzManTest.vbs file you created ear-lier, and swap the < for a > symbol (or visa versa), so that the codeshould deny access based on your current time. In the AuthorizationManager, navigate to the Role Definitions node, and double-click theViewer icon. On the Definition tab, click Authorization Script, andchoose Reload Rule Into Store.The Script Source window shouldreflect your change. If you now attempt to reload the page you success-fully loaded before, you will be denied access with a HTTP 401.1“Unauthorized:Access is denied due to invalid credentials” error.
Configuring Custom Error MessagesIIS provides you with the ability to return a customized URL to userswhen a HTTP error is generated.These are commonly used to producea nicer user experience, especially in the case of “404 File Not Found”situations. However, using custom error messages can also provide a secu-rity benefit. In the event of an application error, a custom error messagecan prevent information disclosure (by preventing the user from seeingthe error’s source and stack trace), and by allowing the server to log theerror or alert the administrator.
Advanced Web Server Security Configuration • Chapter 5 175
293_CYA_IIS6_05.qxd 4/28/04 11:20 AM Page 175
BY THE BOOK…IIS 6.0 provides two methods for configuring custom error mes-sages for ASP based applications. Either of these methods can beused when an unhandled exception is raised. An unhandledexception is an error that is not taken care of (handled) withinthe code itself. A simple generic error page can be sent back forany unhandled ASP error, or a custom page can be sent back. IISdoes not handle ASP.NET errors natively in IIS 6.0. Instead, toconfigure a custom page for unhandled ASP.NET exceptions youmust edit the ASP.NET web.config file.
By using custom error pages for unhandled applicationerrors, you can reduce the risk of disclosing sensitive informationabout the structure of the application that can aid an attacker.Some examples of information disclosure are provided later inthis section.
Additionally, you can provide a better monitoring environ-ment for administrators by having a page generate an alert (forexample, via e-mail), or log an event (for example, to a data-base). The alert can include information about the requestedURL, querystring, remote IP address, and the error type.
The Default ASP Error MessageBefore customizing the error message, we will look at what the defaultASP error message looks like (Figure 5.36).
176 Chapter 5 • Advanced Web Server Security Configuration
Figure 5.36 Default ASP Error Message Disclosing a ConnectionString
293_CYA_IIS6_05.qxd 4/28/04 11:20 AM Page 176
This piece of programming contains a simple VBScript error on thesame line that holds the connection string to an SQL server.Also visiblein the connection string is the User ID being used to login to the server,the Password (a blank one), and the IP address of the SQL server (thesame as the Web server). While not all coding errors might so easilyresult in information that could be of use to attackers, the possibility ofdisclosing some information that would be useful to attackers is real.
Notes from the Underground…
The Risks of Information DisclosureMany poorly programmed web applications share a commoncharacteristic – they fail to rigorously filter input supplied by theuser. This allows a malicious attacker to mount SQL injectionattacks, cross-site-scripting attacks, or replay attacks.
SQL injection vulnerabilities occur when a web applicationtakes user input, concatenates it with an existing, predefinedSQL string, and submits it to the database for processing. If theuser input is not adequately screened, then it may be possible to“inject” malicious SQL code.
For example, a typical login form on a webpage mightsolicit a username and password from a visiting user, and con-catenate that with the following string:
SELECT * FROM Users WHERE Username = '<supplied
username>' AND UserPassword = '<supplied password>'
If the attacker could enter the following as a username: ‘OR 1=1 —, then the SQL statement becomes:
SELECT * FROM Users WHERE Username = '' OR 1=1 -- AND
UserPassword = ''
For an SQL server database, the double dashes (—) indicatethat the rest of the line is a comment, and since 1=1 is alwaystrue, all user records will be returned from the database,allowing the user to log in. In a more malicious example, assumea form that allows a user to submit an OrderID, and the formreturns all items that were purchased as part of that order:
SELECT ItemName, ItemDescription, Quantity FROM Items
INNER JOIN OrderItems WHERE OrderID = <user supplied
OrderID>
Advanced Web Server Security Configuration • Chapter 5 177
Continued
293_CYA_IIS6_05.qxd 4/28/04 11:20 AM Page 177
If a malicious user could enter the following as a OrderID:1 UNION SELECT Username, UserPassword, 1 FROM Users, thefinal SQL statement would be:
SELECT ItemName, ItemDescription, Quantity FROM Items
INNER JOIN OrderItems WHERE OrderID = 1 UNION SELECT
UserName, UserPassword, 1 FROM Users
This would allow the attacker to see all users and theirpasswords in the database.
SQL injection attacks usually require the attacker to knowsomething about the schema of the database so that they canappropriately name the tables and fields in their malicious SQLcode. By failing to suppress the default error messages ASP gen-erates, an attacker can easily map the tables and fields that doexist. An example of this is beyond the scope of this book, how-ever the following two papers from security firm NGSSoftwaredemonstrate how this can be done: www.nextgenss.com/papers/advanced_sql_injection.pdf and www.nextgenss.com/papers/more_advanced_sql_injection.pdf.
Configuring a Basic ASP Error MessageIIS 6.0 provides the ability to replace the default error messages gener-ated by ASP applications with a generic error message that masks theunderlying error cause. Configuring this option is straightforward; how-ever it provides no alerting capabilities, and does not provide a rich userexperience.This setting can only be configured on a website or webapplication root, but not on individual folders or files.
1. Open the IIS Manager and navigate to the website or webapplication that you would like to configure the error for. Webapplications are represented with a small cog icon. Right-clickand select Properties.
2. On the Home Directory tab (for websites) or VirtualDirectory tab (for web applications), click the Configurationbutton.
3. On the Debugging tab, select Send the following texterror message to the client (shown in Figure 5.37) and editthe text if desired.
178 Chapter 5 • Advanced Web Server Security Configuration
293_CYA_IIS6_05.qxd 4/28/04 11:20 AM Page 178
4. Click OK twice.
Configuring a Custom ASP Error MessageIIS 6.0 provides a more feature-rich capability that allows you to return acompletely customized error page (which could be themed with yourcorporate style). In addition, since this page can be an ASP page itself,you can use the intrinsic ASPError object to get information about thepage that generated the error, the error’s source (including line number),and information posted to the server by the user that may have resultedin the error.
This custom error page can be configured for a website, a folder, orany individual ASP page within the site, providing greater flexibility foryou as an administrator.To configure this option:
1. Open the IIS Manager, and right-click the desired website,folder, or individual ASP file. Select Properties.
2. On the Custom Errors tab, scroll down to 500:100 InternalServer Error – ASP Error (Figure 5.38) and click Edit.
Advanced Web Server Security Configuration • Chapter 5 179
Figure 5.37 Configure a simple ASP Error Message
293_CYA_IIS6_05.qxd 4/28/04 11:20 AM Page 179
3. Select a Message type option (Figure 5.39) and click OK.
4. The File option serves any file off your server’s hard diskwithout any server-side processing (as shown in Figure 5.40).This is useful only if you are serving an HTML page to theclient.The HTML page could contain your corporatebranding, and a message indicating that an error has occurred.If you choose this option, enter the name of the File that con-tains the error message, or click the Browse button to searchfor and select the desired file.
5. Click OK.
180 Chapter 5 • Advanced Web Server Security Configuration
Figure 5.38 Locating the ASP 500:100 Error Page
Figure 5.39 Choices for Custom Error Page
293_CYA_IIS6_05.qxd 4/28/04 11:20 AM Page 180
6. The URL option allows you to specify a virtual path thatpoints to another page on the server.This is useful if thecustom error page will do some server-side processing itself (forexample, generating an e-mail and sending it to the adminis-trator). If you choose this option, enter the URL (which canbe an ASP page itself ) and click OK (Figure 5.41).
If the custom 500-100.asp page is configured to be an ASP page, youcan use the intrinsic ASPError object to return details of the unhandledexception.The following code demonstrates how to retrieve informationthat may be useful for debugging errors in your applications:
<%
Set objASPError = Server.GetLastError()
strErrorCode = objASPError.ASPCode
strErrorNumber = objASPError.Number
strErrorSource = objASPError.Source
strErrorFile = objASPError.File
Advanced Web Server Security Configuration • Chapter 5 181
' The following two lines get the information sent
' by the browser as a form POST or via the querystring
' If you are placing this into a database you may
' wish to truncate this in case it is larger than your
' field definition
strPostData = Request.Form
strGetData = Request.QueryString
%>
The information can be set up to be e-mailed to you, or logged to adatabase.
It should be noted that errors in the custom error page itself are nothandled by serving another copy of the custom error page (that wouldlead to an infinite loop). Instead, you will need to use VBScript’s (OnError Resume Next) or Jscript’s (Try…Catch) error handling options toensure that your custom error page itself doesn’t generate an unhandledexception. For example, if your web application loses connectivity to yourdatabase server then your application may start generating exceptions. IIS6.0 will serve the configured custom 500-100 error page. However if youattempt to connect to the same database in your 500-100 error page(without using On Error Resume Next if you are using VBScript), thenthe 500-100 error page itself will generate an unhandled exception, andthis error will be sent directly to the user browsing your page.
Configuring a Custom ASP.NET Error MessageASP.NET does not use the settings in IIS 6.0 to determine which errorpages to supply when an unhandled exception occurs. Instead, it uses itsown configuration files (typically a web.config file) to determine whatshould happen. Since ASP.NET does not use IIS 6.0 settings, a detaileddiscussion on how to configure error messages for ASP.NET is beyondthe scope of this book.To set custom error pages, edit the<customErrors> node of the web.config file as follows:
182 Chapter 5 • Advanced Web Server Security Configuration
The mode attribute is used to determine whether the custom errorsshould be displayed for all clients, or only for clients that are notbrowsing from the local machine.The defaultRedirect attribute is usedfor all errors that do not have a specific error message listed. For eacherror code that you wish to handle, add an <error> node that containsthe HTTP status that the page should be served for, and a virtual pathprovided to, the page in question.
To handle 500 errors resulting from ASP.NET pages, you can usecreate an Application_Error routine in the global.asax file serving yourweb application.This routine will handle all exceptions not handled on apage basis.
When creating custom error messages, be aware that the error mes-sage itself must be served from the same web application pool as the pagewhere the error was generated.Attempting to serve a custom error pagefrom a folder that is being served by a different web application pool willgenerate an error.
If your custom error page is too short, Internet Explorer 5 and laterwill substitute its own, more detailed, error page in place of yours, unlessthe user chooses to disable this behavior.The user can do this by dis-abling the Show Friendly HTTP Errors option (to access this option,select Tools | Internet Options | Advanced. For more information,see the Microsoft KB article: http://support.microsoft.com/?id=218155.
REALITY CHECK…Custom error pages allow you to present a rich page to yourusers when an error condition occurs. Additionally, error pagesthat handle application errors help to alert you to bugs in yourapplication, while keeping information disclosure to attackers toa minimum (they will be aware that they have located a bug inyour application, but may have some difficulty determining thenature and extent of the bug).
Advanced Web Server Security Configuration • Chapter 5 183
293_CYA_IIS6_05.qxd 4/28/04 11:20 AM Page 183
Regardless of whether you log the error information to adatabase or have the details sent via an e-mail alert, consider theuse of a governor of some kind. Otherwise you run the risk on abusy site of being flooded with alerts.
Securing Include FilesInclude files are a convenient way of storing commonly used HTML orcode.The code or HTML is placed into a central file, and then“included” with every file that requires it.This improves the maintain-ability of your web applications because changes to the contents of theinclude file are reflected immediately in every page that includes thiscentral file.
BY THE BOOK…Include files use directives (pieces of code) included in webpages. IIS 6.0 provides three technologies that support serverside include (SSI) directives. Files with .stm, .shtm, and .shtmlextensions are processed by the SSI web service extension. ASPfiles (.asp) can also contain include directives. Finally, ASP.NETpages can also contain include directives. However, there arealternate ways to include content in ASP.NET pages (for example,user controls) that are superior to using include directives.
Since include files are now often used to centralize webapplication data and settings (such as database connectionstrings), it is important that any include files you do have aresecured against malicious attackers.
If an attacker was able to determine the name of your include files,he or she may be able to directly request the include file.A common wayof finding the name of an include file is by attempting to generate anunhandled exception (error) in your code. If the error occurs in aninclude page, then the default ASP error page that is generated includesthe name of the include file (as shown in Figure 5.42) If you are using acustomized ASP error page, you can prevent this type of information dis-closure.
184 Chapter 5 • Advanced Web Server Security Configuration
293_CYA_IIS6_05.qxd 4/28/04 11:20 AM Page 184
To prevent attackers from gaining access to possible script sourcecode in your include pages, the following configuration steps are recommended:
� If your include files contain an extension that is not used forany other purpose in your web application (for example, .inc)and you’re running URLScan, add that extension to the[DenyExtension] list.
� If your include files are named with a static file extension (thatis, a file extension that’s not mapped to a web service exten-sion), such .htm or .inc, remove IIS Read web permissions forthe folder that contains your include files (ensure that there areno static files in that folder that are required to be serveddirectly).To do this, open the IIS Manager, and expand thefolder that contains your includes files. Right-click and chooseProperties. On the Directory tab, disable the Read option(shown in Figure 5.43).This prevents static files from beingserved from this directory.
Advanced Web Server Security Configuration • Chapter 5 185
Figure 5.42 Disclosing the Name of an Include File
293_CYA_IIS6_05.qxd 4/28/04 11:20 AM Page 185
� If your include files are named with a dynamic file extension(that is, a file extension that is mapped to a web service exten-sion), such as .asp, remove the IIS script web permissions forthe folder that contains your include files (ensure that there areno dynamic files in that folder that are required to be serveddirectly).To do this, open the IIS Manager, and expand thefolder that contains your includes files. Right-click and chooseProperties. On the Directory tab, change the Execute per-missions from Scripts Only to None.This prevents dynamicfiles from being served from this directory.
ASP.NET introduces the concept of user controls (with an .ascxextension). User controls are a superior way of storing commonly usedcontent to include files.The default ASP.NET configuration preventsASP.NET user controls from being requested by a user directly.This is setin the machine.Config file located in %windir%\Microsoft.NET\Framework\v1.1.4322\config, where the .ascx extension is mapped tothe System.Web.HttpForbiddenHandler, which denies requests (as shownin Figure 5.44).
186 Chapter 5 • Advanced Web Server Security Configuration
Figure 5.43 Removing IIS Web Read Permissions
293_CYA_IIS6_05.qxd 4/28/04 11:20 AM Page 186
REALITY CHECK…Some security guides recommend using the .asp extension forany include file. If the include file is requested directly, it will beprocessed by the ASP engine, and the source will not be sent tothe user (only the results of the processing).
While this may work in some cases (where the source codeconsists of routines, or classes), it may present problems if theincluded code opens database connections, generates e-mails, orinstantiates other objects, since an attacker who repeatedly callsthe page may start to consume an excessive amount of resourceson your server (unless the include file also contains code to cleanup and dispose of the objects used).
Disabling Parent PathsParent paths are paths that access folders located above the current folder.Enabling parent paths allows application code to access folders above thecurrent folder.
BY THE BOOK…When you enable parent paths, you specify that an ASP pageshould allows paths relative to the current directory (using the ../notation). Parent paths are no longer enabled by default. This
Advanced Web Server Security Configuration • Chapter 5 187
Figure 5.44 ASP.NET User Control Files are not Served by Default
293_CYA_IIS6_05.qxd 4/28/04 11:20 AM Page 187
affects your application if it has a web page that contains the#include server-side include directive and uses “..” notation torefer to a parent directory. Enabling parent paths corresponds tothe metabase setting AspEnableParentPaths.
Enabling parent paths becomes a problem if the application navigatesso far up the folder hierarchy that it is now outside the web root. Forexample, assume you have two web applications maintained by two dif-ferent users, located in c:\inetpub\application1\ and c:\inetpub\application2\.
If parent paths are allowed, then a malicious coder could enter thefollowing:
in order to get the physical path to the default.asp page located inapplication2 (the ../ syntax tells the code to move up one folder).Thisphysical path could then be used by the file system object to open thedefault.asp page and stream the source code back to the malicious user.
By default, parent paths are disabled in IIS 6.0.This prevents ASPcode and include directives from using the “../” syntax to move up afolder from the current folder. If an application requires parent paths tobe enabled, perform the following steps:
1. Open the IIS Manager and locate the website or web applica-tion root where the files that require parent path access arelocated. Right-click and choose Properties.
2. On the Home Directory or Directory tab click theConfiguration button.
3. On the Options tab, enable the Enable parent paths option(shown in Figure 5.45).
188 Chapter 5 • Advanced Web Server Security Configuration
Figure 5.45 Enabling Parent Paths
293_CYA_IIS6_05.qxd 4/28/04 11:20 AM Page 188
Note that enabling parent paths poses a security risk. Before enablingparent paths, ensure that the application in question does not attempt toaccess unauthorized resources. Microsoft recommends disabling parentpaths on your web servers: http://support.microsoft.com/?kbid=184717.
Configuring IP Address, TCP Portand Host-Header combinationsIntroduced as part of HTTP v1.1, the host HTTP header allows multiplewebsites to be run on a single IP address using TCP port 80 only. Priorto this, each website required its own unique IP address, or had to be runon a non-standard (not port 80) TCP port.
BY THE BOOK…When an HTTP v1.1-compatible client makes a request to a Webserver for a resource (for example, a web page, image or docu-ment), it includes the DNS or NetBIOS name (the host) of thewebsite that it’s requesting the resource from. The Web server (inthis case IIS) examines the supplied host header to see if itmatches any of those configured on the server. If there’s amatch, the normal request processing process occurs. If there’sno match, IIS returns an “HTTP 400 Bad Request” error to theclient browser.
When configuring websites, each website can have one ormore combinations of IP address plus TCP port (this is typicallyport 80) plus host-header name. Each combination of IP addressplus TCP port plus host header name is known as a website iden-tity. Each website has at least 1 website identity, but can havemore.
However, on a given Web server, each such identity must beunique. If they are not unique, when an HTTP request comes in,IIS will not know which website the request should be routed to.
Requests for a website identity that doesn’t match any con-figured on the server will be rejected with an “HTTP 400 BadRequest” error.
When configuring a website identity, the host-header name isoptional.Additionally, the IP address can be a specific IP address assignedto the machine, or you can choose All unassigned, in which case thewebsite identity will include all IP addresses not already assigned to otherwebsites.
Advanced Web Server Security Configuration • Chapter 5 189
293_CYA_IIS6_05.qxd 4/28/04 11:20 AM Page 189
When IIS matches incoming requests to website identities, it assignsthe requests in order of specificity.
� If there is a website that has an exact match of IP address plusTCP port plus host header name, the request is routed to thatwebsite.
� If there is a website that has an IP address plus TCP port match(and no host-header name), the request is routed that that website.
� If the request does not match any of the these two, but there isa website that has all unassigned addresses for the IP address,plus a TCP port match (and no host-header name), the requestis routed to this website.
Otherwise, the request is rejected.
Suppose a corporation has the following four DNS names configured asshown in Table 5.4:
Both 192.168.0.100 and 192.168.0.200 are assigned to the same IISserver. In the IIS MMC snap-in, the website identities shown in Table5.5 are configured:
190 Chapter 5 • Advanced Web Server Security Configuration
293_CYA_IIS6_05.qxd 4/28/04 11:20 AM Page 190
Requests for both www.myCompany.com andhttp://mail.myCompany.com will be answered by website 1, since thereis an exact match. Requests for http://support.myCompany.com andhttp://192.168.0.100 will be answered by Website 2. Website 1 will notanswer requests for http://192.168.0.100 because that doesn’t match anyof the configured identities for that website. Website 3 will not answerrequests for http://192.168.0.100 because that’s been allocated to website2. Website 3 will only answer request on otherwise unallocated IPaddresses.
Lastly, requests for http://intranet.myCompany.com andhttp://192.168.0.200 will be answered by Website 3. Website 3 willanswer requests for http://192.168.0.200 because that IP address hasn’tbeen allocated to any other website.
When IIS 6.0 is installed, the default website is configured to listenon “All Unassigned” IP addresses (which equates to all addresses assignedto the machine, since there are no other sites configured).To change thisbehavior, and have the default site listen on for requests for a specificDNS name perform the following steps:
1. Open the IIS Manager from the Administration Tools Folder.
2. Expand the Websites node.
3. Right-click the default website and select Properties. Notethat unlike many properties, website identities can only be con-figured at the website level (not the folder, or file level).
4. On the Website tab, click the Advanced button.
5. Select the pre-existing website identity and click the Editbutton.
6. Enter the DNS name that you wish the site to answer requestsfor (see Figure 5.46), and click the OK button.
Advanced Web Server Security Configuration • Chapter 5 191
Figure 5.46 Adding/Editing a Website Identity
293_CYA_IIS6_05.qxd 4/28/04 11:20 AM Page 191
7. If the site should answer requests for more than one DNSname (like website 1 in the example above), click the Addbutton to add another website identity.
8. Click OK twice to return to the IIS Manager.
REALITY CHECK…Configuring host header names for all your websites isn’t strictlya security measure. Host header names were designed to allowmultiple websites to be hosted on a single IP address.
However, many automated worms that attack IIS, includingCode Red and NIMDA are incapable of interrogating the DNS.Instead, they send HTTP requests to an IP address only, omittinga host name. If no website on your Web server is configured tolisten on an IP address only, then the worm will never be able tohave its payload examined by IIS. Additionally, your website’s logfiles do not record numerous worm-inspired requests such as thefollowing, which is a typical Code Red request from an infectedmachine to your server:
Configuring host header names for all your websites will notstop a dedicated attacker, but it may make your server moreresistant to automated worm-based attacks.
Your A** is Covered if You…� Familiarize yourself with the available authentication methods,
and the benefits and drawbacks of each. For basic authentica-tion, evaluate the need for SSL to secure transmission of usercredentials. For digest and IWA, ensure that your clientbrowsers support these authentication mechanisms, and yourserver and network support the prerequisites for using theseauthentication mechanisms.
192 Chapter 5 • Advanced Web Server Security Configuration
293_CYA_IIS6_05.qxd 4/28/04 11:20 AM Page 192
� Configure user accounts with the minimum privileges requiredfor IIS web functionality.
� Are aware of which user account settings must to be configuredso that you can isolate web applications from each other ifrequired.
� Are familiar with the URLScan tool from Microsoft, and howit can help secure your Web server by providing an additionaldefensive layer.
� Configure appropriate application settings to protect your webapplications from information disclosure attacks.You shoulddevelop custom application error pages that inform yourdevelopers of errors while hiding configuration informationfrom malicious attackers.You should secure include files thatmay contain sensitive configuration information about yourapplication.
� Be aware of the new Authorization Manager functionalityincluded with Windows 2003, and how it allows for role-basedauthorization, as compared with the traditional ACE authoriza-tion method traditionally used to secure access to resources.
Advanced Web Server Security Configuration • Chapter 5 193