CHAPTER THREE: WORKING WITH PRESENTATIONS 1 OMA241 –INTEGRATED OFFICE APPLICATIONS | Integrate Presentation with Other Applications Manage and Deliver Presentations Organizing and Presenting the Data Chapter 3 WORKING WITH PRESENTATIONS
Transcript
CHAPTER THREE: WO RKI NG WITH PRES ENTATIO N S 1
OMA241 –INTEGRATED OFFICE APPLICATIONS |
TOPIC
Integrate Presentation with Other
Applications
Manage and Deliver
Presentations
Organizing and
Presenting the Data
Chapter 3
WORKING WITH
PRESENTATIONS
CHAPTER THREE: WO RKI NG WITH PRES ENTATIO N S 2
OMA241 –INTEGRATED OFFICE APPLICATIONS |
Creating a plain text outline for your presentation first can help
you organize your thoughts and the flow of ideas on the slides. In a
text editor or word processor, you can more easily see the whole
outline than in PowerPoint.
A. CREATE A PLAIN TEXT OUTLINE
1) Open NOTEPAD or another plain
text editor.
2) Type the following text in the blank Notepad document.
3) Save to your class folder
Chapter3 with the
file name P-A1.txt
(Create the folder if you do not have
one yet.)
4) Close Notepad.
TO CREATE A PRESENTATION FROM A TEXT OUTLINEEXERCISE 1
LESSON 1 ORGANIZING AND
PRESENTING THE DATA
CHAPTER THREE: WO RKI NG WITH PRES ENTATIO N S 3
OMA241 –INTEGRATED OFFICE APPLICATIONS |
B. OPEN A PLAIN TEXT OUTLINE IN POWERPOINT
1) Open PowerPoint.
2) Navigate to your Class disk to the text file you just typed. [\Chapter3\]
3) If necessary, change the file type box to ALL OUTLINES.
The file P.txt should be the only file showing.
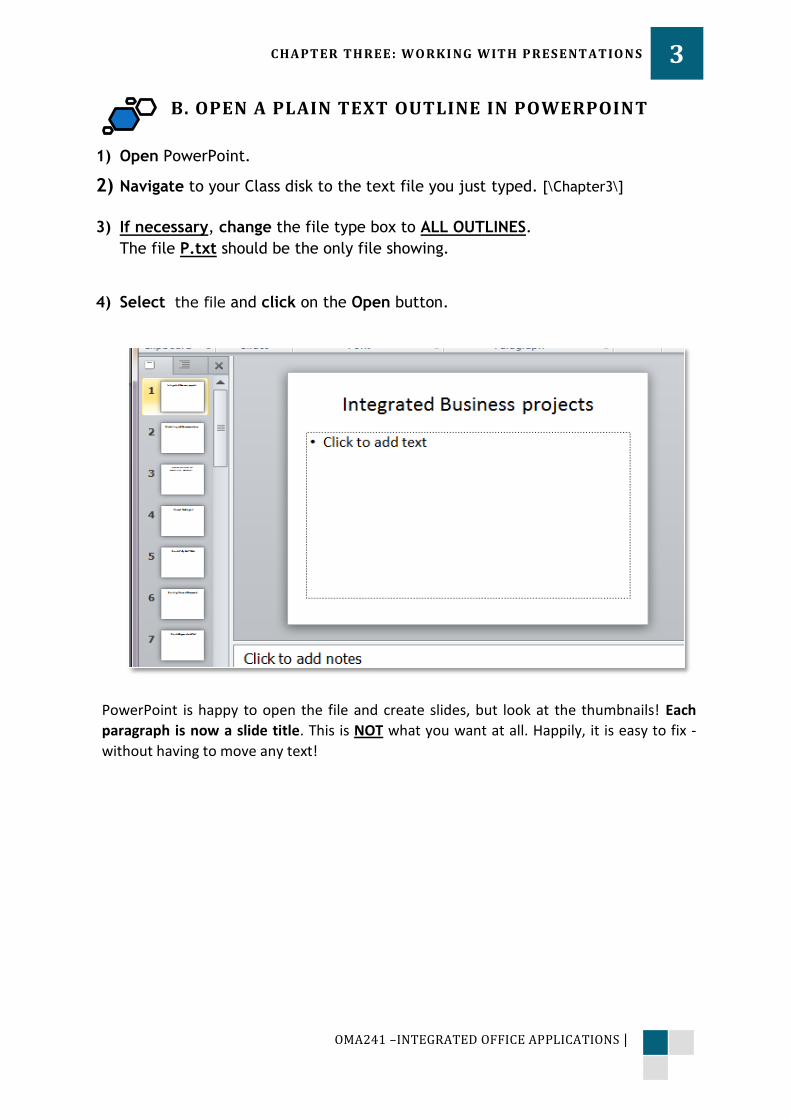
4) Select the file and click on the Open button.
PowerPoint is happy to open the file and create slides, but look at the thumbnails! Each
paragraph is now a slide title. This is NOT what you want at all. Happily, it is easy to fix -
without having to move any text!
CHAPTER THREE: WO RKI NG WITH PRES ENTATIO N S 4
OMA241 –INTEGRATED OFFICE APPLICATIONS |
C. USE INCREASE/DECREASE INDENT TO
PROMOTE/DEMOTE
The Home ribbon tab has two buttons that make it easy to manage the outline
levels. These look like the Decrease Indent and Increase Indent buttons you may be familiar with from Word. In PowerPoint the indention is a side-effect of changing the outline list level.
Increase List Level put into a LESS important spot in the outline. You demote it in importance, from level 1 level 2 OR level 2 level 3. Or make in a subtopic.
Decrease List Level You promote it, making it MORE important.
NOTE: Increasing the list level therefore also increases the indention.
Level 1 has no indention. Level 2 has some indention but less than Level 3.
1) Click the OUTLINE in the
Navigation pane.
Each paragraph from the text outline has a slide icon -17 slides! You must fix this mess!
2) Click on the slide icon for
Slide #3: Preparing
Marketing.... The whole
line is selected.
3) On the Home ribbon tab,
click Increase List Level
button .
The title text from Slide 3 is
now a bullet item on Slide 2 and
the slides are renumbered.
CHAPTER THREE: WO RKI NG WITH PRES ENTATIO N S 5
OMA241 –INTEGRATED OFFICE APPLICATIONS |
4) Open the P-A1.txt from the Notepad for you to have a guide in the indention.
Position the Notepad window on the LEFT part of your screen, and the
PowerPoint on the RIGHT side.
5) Continue by selecting slides 4 and 5 increase the list level – indent it 2 times.
6) Click the Save button
7) Save with the name P-A1.pptx
NOTEPAD POWERPOINT
CHAPTER THREE: WO RKI NG WITH PRES ENTATIO N S 6
OMA241 –INTEGRATED OFFICE APPLICATIONS |
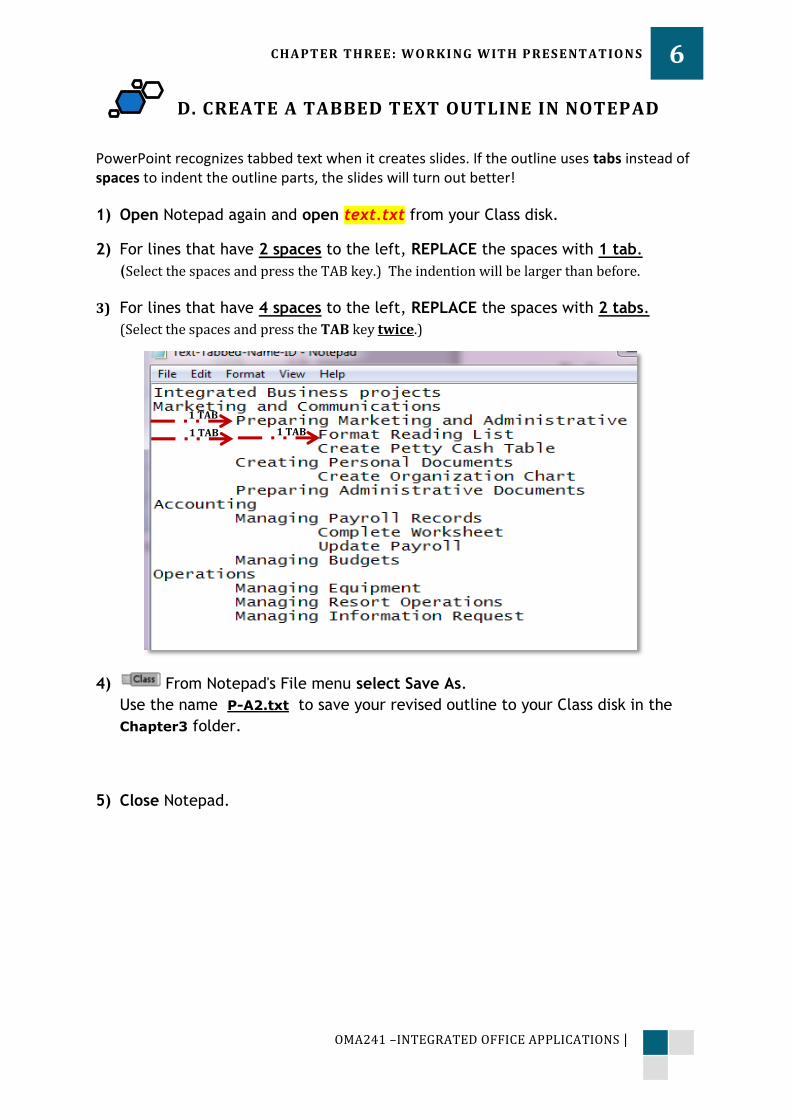
D. CREATE A TABBED TEXT OUTLINE IN NOTEPAD
PowerPoint recognizes tabbed text when it creates slides. If the outline uses tabs instead of spaces to indent the outline parts, the slides will turn out better!
1) Open Notepad again and open text.txt from your Class disk.
2) For lines that have 2 spaces to the left, REPLACE the spaces with 1 tab.
(Select the spaces and press the TAB key.) The indention will be larger than before.
3) For lines that have 4 spaces to the left, REPLACE the spaces with 2 tabs.
(Select the spaces and press the TAB key twice.)
4) From Notepad's File menu select Save As.
Use the name P-A2.txt to save your revised outline to your Class disk in the
Chapter3 folder.
5) Close Notepad.
1 TAB
1 TAB 1 TAB
CHAPTER THREE: WO RKI NG WITH PRES ENTATIO N S 7
OMA241 –INTEGRATED OFFICE APPLICATIONS |
E. OPEN TABBED TEXT OUTLINE IN POWERPOINT
1) Switch to PowerPoint.
2) Open P-A2.txt on your Class disk.
3) Switch to Slide Sorter
View by clicking the Slide Sorter button in the View bar on the Status bar.
These slides are in much better form that the ones from the first text outline.
4) Click the Save As button on the Quick Access Toolbar.
The Save As dialog appears since this presentation has not been saved before. Use the P-A2.pptx
CHAPTER THREE: WO RKI NG WITH PRES ENTATIO N S 8
OMA241 –INTEGRATED OFFICE APPLICATIONS |
PowerPoint can open many Word documents and create
slides from the text. You will get better results if you create a copy to edit and then assign outline levels to all of the text that you want in the presentation.
The more complex the Word doc, the more you will need to make changes before letting PowerPoint create slides from it.
Images in your Word doc will not be put on the slides automatically. You will have to insert them into the presentation yourself.
A. OPEN WORD DOCUMENT
1) Open Word (Not PowerPoint) and open the file
hikeinfo.doc
[This file will be provided by the Instructor/Demonstrator]
Make sure that this file is save in your PowerPoint
Exercise folder.
B. EDIT WORD DOCUMENT INTO AN OUTLINE
1) Edit the text so that the document
reads as shown.
NOTE: If the word document contains long
text /sentences this is the time to simplify it!!!
The font and styling of the text will not
actually matter at this point. You will be
changing those in PowerPoint later.
2) Delete the images as you edit, because
PowerPoint will not import them.
3) Edit the content into an outline.
TO CREATE A PRESENTATION FROM A WORD OUTLINEEXERCISE 2
CHAPTER THREE: WO RKI NG WITH PRES ENTATIO N S 9
OMA241 –INTEGRATED OFFICE APPLICATIONS |
C. APPLY HEADINGS
1) Access the Home tab of the Ribbon. Within the Styles group select Perspective
style.
2) Put your cursor in the first line, “Take a
Hike”, in the Styles palette box on the
Home ribbon tab apply Heading 1.
3) Apply Heading 1 to the lines listed below, which will become slide titles:
To apply a style to multiple lines that are not next to each other, hold CTRL
down while selecting.
CTRL + ALT + 1 is the key combo to apply Heading 1.
Planning the Adventure
Packing supplies
Wearing the Right Clothes
4) Apply Heading 2 to the lines listed below. These will become first level bullets in PowerPoint. Heading 2 tells PowerPoint to put the text on a slide.
CTRL + ALT + 2 is the key combo to apply Heading 2.
An Adventure with Kids
Pines Nature Center
Trail Length – Varies by child’s age
Backpack – Limit to 20 percent of child’s
weight
Snacks and drinks
Miscellaneous
Dress in layers
Wear long pants and long-sleeved shirt
Wear a hat and comfortable shoes
5) Apply Heading 3 to the lines which will become second level bullets:
CTRL + ALT + 3 is the key combo to apply Heading 3. Ages 2 to 4: 1 to 2 miles
Ages 5 to 7: 3 to 4 miles
Ages 8 to 12: 5 to 7 miles
Childs favorite healthy foods
Fruit and nuts
CHAPTER THREE: WO RKI NG WITH PRES ENTATIO N S 10
OMA241 –INTEGRATED OFFICE APPLICATIONS |
Water
Sunscreen
Insect repellent
First-aid kit
Children get cold quicker than adults
Protect against insects and cuts
Keep body warm
6) Save as A3.docx
7) Close Word.
D. OPEN A WORD OUTLINE IN POWERPOINT
PowerPoint automatically creates a presentation when you open a word processing document with PowerPoint.
1.) If necessary, open PowerPoint and open the file select A3.docx.
Problem: No Word documents are showing: Solution: Change the Files of type: box to All Outlines.
2) Click on each of the slide thumbnails to see what PowerPoint put on the slides. Not too bad at first glance.
The formatting is quite different from the original and not at all what you will want for your presentation.
3) Click View, then Slide Sorter to see the entire slides.
4) Click the Save
button .
Save it as P-A3.pptx to the Chapter4 folder.
CHAPTER THREE: WO RKI NG WITH PRES ENTATIO N S 11
OMA241 –INTEGRATED OFFICE APPLICATIONS |
E. CHANGE SLIDE LAYOUT
The first slide is a Title slide but it uses the normal slide layout. All it takes is a simple click to change a slide layout.
1.) Select Slide #1 to display it in the
Slide pane.
2.) On the Home ribbon tab, click on
the Layout button .
3.) Click the thumbnail for Title Slide, which has two placeholders in the middle of the slide. Your title and subtitle placeholders are moved.
Most of the formatting for your slides should be controlled by the Slide Master. That makes it easy to be consistent throughout the presentation and will make new slides match the old automatically.
Saving your formatting as a custom template makes it easy for you to reuse your lovely design and its effects in other presentations.
This time you will create the template from scratch.
A. FORMAT FONTS ON SLIDE MASTER
1.) Open P-A3.pptx which you created in the last lesson.
2.) Click View, select Slide Master View and select the thumbnail at the top of the
Navigation pane.
The slides are using some formatting that has been inherited from the original document, just as
if you had manually applied the formatting.
3.) On the Slide Master, select the Title placeholder.
4.) Right click in the Title placeholder to show the Mini-Toolbar and context menu.
5.) From the Mini-Toolbar, set the Font to Arial Black. Leave the Font Size at 44
pt.
6.) Change the
font color to
Olive Green.
7.) Drag across all text in the Text placeholder to select it.
TO CREATE A CUSTOM TEMPLATEEXERCISE 3
CHAPTER THREE: WO RKI NG WITH PRES ENTATIO N S 13
OMA241 –INTEGRATED OFFICE APPLICATIONS |
8.) Change the font to Tahoma. .Leave the font size alone.
9.) Use Save As to save the presentation with the name P-A3b.pptx to your
Class disk in the chapter3 folder
B. FORMAT BULLETS ON SLIDE MASTER
1.) In the Slide Master view, click on the
first outline level to select it
3.) Right click on the selected line and
select Bullets from the context menu.
Click on Bullets and Numbering.
4.) Click on the hollow square bullet
style.
5.) Click on Olive Green for the color.
6.) Click on OK to close the Bullets and
Numbering dialog.
The first outline level now has a
bullet that is square and colored.
7.) Select the Second outline level and change its bullet to: - Shape = filled round bullet
- Color = blue,
- Size = 120%
8.) Close the Slide Master view and look at Slide #2:
Planning.
Something is wrong! The formatting was not applied.
9.) Save P-A3b.pptx
CHAPTER THREE: WO RKI NG WITH PRES ENTATIO N S 14
OMA241 –INTEGRATED OFFICE APPLICATIONS |
C. REMOVE MANUAL TEXT FORMATTING
The slides are still using the fonts from the original outline. You must make the slides use the formatting from the Masters. The easiest way uses the Outline.
1.) In the Slide Pane, click on Slide #2:
Planning the Adventure in an area outside
of the two placeholders.
2.) Use the key combo CTRL + A.
3.) Both placeholders are selected.
4.) Use the key combo CTRL + SHIFT + Z.
All of the formatting that is not on the
Slide Master is removed.
5.) If necessary, show the Outline pane again.
6.) Click in the Outline pane and repeat the key combos above:
CTRL + A to select all the outline text
CTRL + SHIFT + Z to remove formatting that is not on the Slide Master
The manual formatting is
removed for all of the
slides and the Slide
Master rules again.
7.) Switch to Slide Sorter
view to see all of the
slides at once.
8.) Save .
Old formatting
Master slide formatting
CHAPTER THREE: WO RKI NG WITH PRES ENTATIO N S 15
OMA241 –INTEGRATED OFFICE APPLICATIONS |
TO INSERT HEADER AND FOOTERS:
1) Click the Insert tab Text Group , click the Header & Footer to display the
Header and Footer dialog box.
2) In the Header & Footer dialog box, click the Notes and Handouts tab -> Under
Include on Page, select the Date and Time check box.
3) If necessary, click the Update automatically option button so that the current
date prints on the notes and handout each time, the presentation is printed.
4) Select the page number and Footer checkbox, Type Your Own name and ID
TO PRINT A PRESENTATION
1) Click the FilePrint.
2) In the gallery, under Handout, click 4 slides Horizontal. Notice that the Print
Preview displays the slide handout., and the current date, filename and page
number.
3) Click Print Button.
4) In the File Info tab Properties. Click Show Document Panel, and then in
the Author, delete any text and type your firstname and lastname.
5) In the Subject Box, type your course name and section number.
6) In the keywords box, type the (keywords about the presentation) and then
Close.
TO INSERT HEADER & FOOTER AND PRINT A PRESENTATIONEXERCISE 4
CHAPTER THREE: WO RKI NG WITH PRES ENTATIO N S 16
OMA241 –INTEGRATED OFFICE APPLICATIONS |
Text Outline Title and Main Topics(Topic 1 ,2, …) - NO TAB or NO spaces
Level 1 Subtopics – should have one (1) TAB
Level 2 Subtopics – should have two (2) TABs
Word Outline Title and Main Topics(Topic 1 ,2, …) - Heading1
Level 1 Subtopics – Heading2
Level 2 Subtopics – Heading 3
TITLE Topic1
Level1 Subtopic Level2 Subtopic
Level2 Subtopic Level1 Subtopic
Topic2 Level1 Subtopic Level1 Subtopic
TITLE Topic1
Level1 Subtopic Level2 Subtopic
Level2 Subtopic Level1 Subtopic
Topic2 Level1 Subtopic Level1 Subtopic
SUMMARY
CHAPTER THREE: WO RKI NG WITH PRES ENTATIO N S 17
OMA241 –INTEGRATED OFFICE APPLICATIONS |
PowerPoint – Lab1 : Create Presentation from Word Outline
IN MS WORD
a) Copy the Word document NZInfo.doc from the \Chapter4
Resource file folder
b) Create an outline by applying Heading 1 to main topics, Heading 2
to subtopics and so on. Edit by removing the images.
c) Save it as NZInfo-Text.doc.
IN POWERPOINT
d) Open the word file you just created (NZInfo-Text.doc.) in PowerPoint .
e) Create the presentation with the following requirements:
Theme – apply Austin theme.
Clipart – Insert one (1) related clipart image to slide#2.
Slide Layout– apply Title Slide to slide#1.
Transition – apply Cover effect to slide#1; apply Checkboard effect to slide#2
Animation – apply Float in effect to text in slide#1 ; apply Zoom effect to clipart
in slide#1
f) Save the presentation as PPT-Lab1.pptx in the Chapter3 folder
LET’S APPLY IT!
CHAPTER THREE: WO RKI NG WITH PRES ENTATIO N S 18
OMA241 –INTEGRATED OFFICE APPLICATIONS |
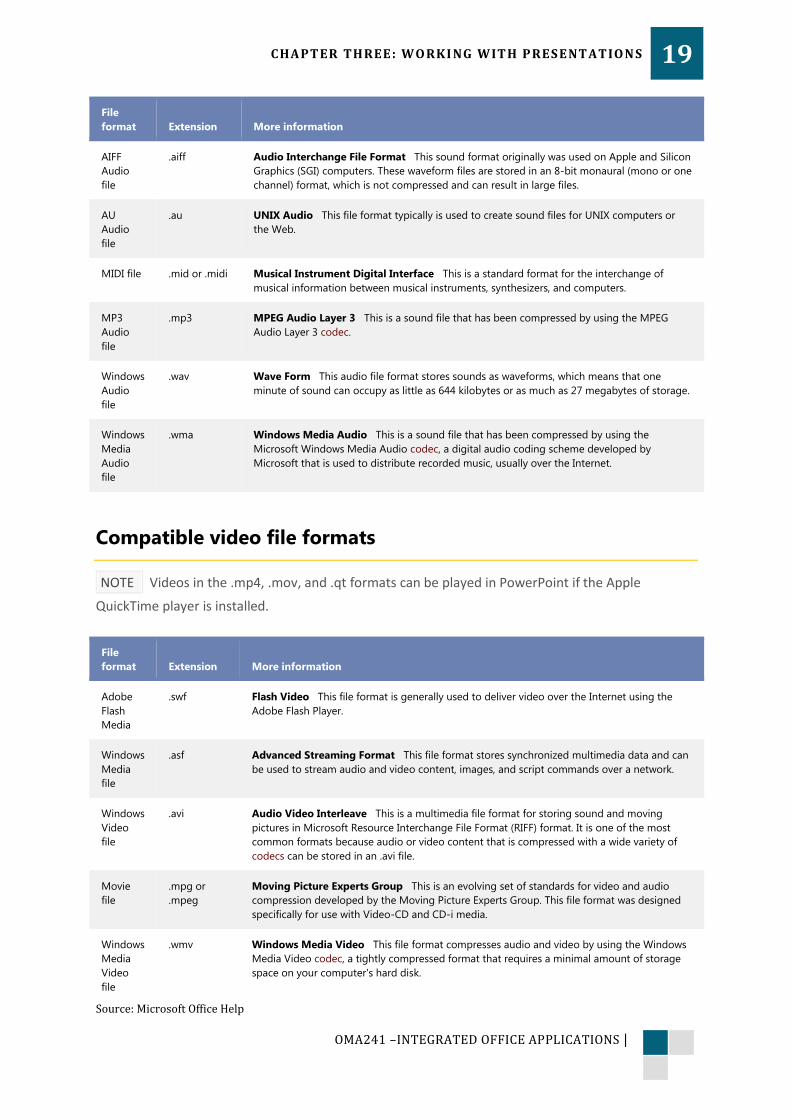
Overview of audio and video files
The following tables show the audio and video file formats that you can use in PowerPoint 2010. If
you do not see a file format listed below, you can convert that file type to a supported file format by
using programs, utilities, or add-ins other than PowerPoint 2010 such as those listed below.
Microsoft Windows Media Encoder Windows Media Encoder is a free program that makes
some files compatible with PowerPoint. For more information, see Microsoft Windows
Media Encoder.
Windows Media Player Windows Media Player is a digital media player and media library
application used for playing audio, video, and viewing images on personal computers
running the Microsoft Windows operating system, as well as on Pocket PC and Windows
Mobile-based devices.
Compatible audio file formats
Note Both iPod and Zune support the Advanced Audio Coding (AAC) file format. PowerPoint 2010
will support this file format provided that the correct codec (codec: An abbreviation for
compressor/decompressor. Software or hardware used to compress and decompress digital media.)
is installed. Examples of codecs for the AAC file format include the Apple QuickTime player and
.aiff Audio Interchange File Format This sound format originally was used on Apple and Silicon
Graphics (SGI) computers. These waveform files are stored in an 8-bit monaural (mono or one
channel) format, which is not compressed and can result in large files.
AU
Audio
file
.au UNIX Audio This file format typically is used to create sound files for UNIX computers or
the Web.
MIDI file .mid or .midi Musical Instrument Digital Interface This is a standard format for the interchange of
musical information between musical instruments, synthesizers, and computers.
MP3
Audio
file
.mp3 MPEG Audio Layer 3 This is a sound file that has been compressed by using the MPEG
Audio Layer 3 codec.
Windows
Audio
file
.wav Wave Form This audio file format stores sounds as waveforms, which means that one
minute of sound can occupy as little as 644 kilobytes or as much as 27 megabytes of storage.
Windows
Media
Audio
file
.wma Windows Media Audio This is a sound file that has been compressed by using the
Microsoft Windows Media Audio codec, a digital audio coding scheme developed by
Microsoft that is used to distribute recorded music, usually over the Internet.
Compatible video file formats
NOTE Videos in the .mp4, .mov, and .qt formats can be played in PowerPoint if the Apple
QuickTime player is installed.
File
format Extension More information
Adobe
Flash
Media
.swf Flash Video This file format is generally used to deliver video over the Internet using the
Adobe Flash Player.
Windows
Media
file
.asf Advanced Streaming Format This file format stores synchronized multimedia data and can
be used to stream audio and video content, images, and script commands over a network.
Windows
Video
file
.avi Audio Video Interleave This is a multimedia file format for storing sound and moving
pictures in Microsoft Resource Interchange File Format (RIFF) format. It is one of the most
common formats because audio or video content that is compressed with a wide variety of
codecs can be stored in an .avi file.
Movie
file
.mpg or
.mpeg
Moving Picture Experts Group This is an evolving set of standards for video and audio
compression developed by the Moving Picture Experts Group. This file format was designed
specifically for use with Video-CD and CD-i media.
Windows
Media
Video
file
.wmv Windows Media Video This file format compresses audio and video by using the Windows
Media Video codec, a tightly compressed format that requires a minimal amount of storage
space on your computer's hard disk.
Source: Microsoft Office Help
CHAPTER THREE: WO RKI NG WITH PRES ENTATIO N S 20
OMA241 –INTEGRATED OFFICE APPLICATIONS |
Video and audio can be linked or embedded from files or clip
art. In this lesson, you will embed video and audio from files.
Media files tend to be large; therefore, always compress the
files as you did with photographs.
TO EMBED VIDEO IN PRESENTATION
PowerPoint will support QuickTime (.mov, .mp4) and Adobe Flash (.swf) files when you have
installed the QuickTime and Adobe Flash players.
1.) Click in the slide; then click the arrow
under Video and select Video from File.
2) In the Insert Video dialog box, locate the
video you want to embed and click Insert.
[C:\Users\Public\Videos\Sample Videos]
TIP You can also click the Video icon in a
content layout to insert a video.
TO LINK VIDEO FROM THE PRESENTATION
You can link to an external video or movie file from your
Microsoft PowerPoint 2010 presentation. By linking your
video, you can reduce the file size of your presentation.
1.) Click in the slide; then click the arrow
under Video and select Video from File.
2.) In the Insert Video dialog box, locate the
video you want to link and click Insert.
[C:\Users\Public\Videos\Sample Videos]
TO EMBED OR LINK VIDEO AND AUDIOEXERCISE 5
CHAPTER THREE: WO RKI NG WITH PRES ENTATIO N S 21
OMA241 –INTEGRATED OFFICE APPLICATIONS |
Important To prevent possible problems with broken links, it is a good idea to copy the
videos into the same folder as your presentation, and link to them there.
Comparison of file size for embed Video and Link Video:
TO LINK VIDEO FILE ON A WEBSITE
You can link to a video file on your local drive or to a video file that you uploaded to a web site, such
as YouTube or hulu.
Important Please make sure that you obtain the owner's approval before you link to, use, or
distribute content (that you did not create) that is copyrighted.
1) On the Slides tab in Normal view, click the slide to which you want to add a
video.
2) In your browser, go to the web site that contains the video that you want to
link to, such as YouTube or hulu.
3) On the web site, locate the video, and then locate and copy the Embed
code.
CHAPTER THREE: WO RKI NG WITH PRES ENTATIO N S 22
OMA241 –INTEGRATED OFFICE APPLICATIONS |
Note Most web sites that contain videos include an embed code, yet the locations of embed
codes will differ depending on each web site. And, some videos do not have an embed code,
and therefore you cannot link to those. And, to be clear, even though they are called 'embed
codes', you are actually linking to the video and not embedding it in your presentation
4) Back in PowerPoint, on the Insert tab, in the Media group, click the arrow
under Video.
5) Click Video From Web Site.
6) In the Video From Web Site dialog box, paste the embed code, and then
click Insert.
Embed code
CHAPTER THREE: WO RKI NG WITH PRES ENTATIO N S 23
OMA241 –INTEGRATED OFFICE APPLICATIONS |
TO EMBED AUDIO:
1.) Click in the slide; then click the arrow under Audio and select Audio from File.
2.) In the Insert Audio dialog box, locate the audio you want to embed and click
Insert.
TO FORMAT VIDEO OR AUDIO:
The Format and Playback tools for video and audio are very similar.
1.) To start the media, select Automatically or On Click.
2.) Check options desired such as Rewind after Playing, Hide During Show (audio
icon), or Trim Video or Trim Audio.
3.) To shorten video or audio, select the media and click Play. Then click Trim
Video or Trim Audio and drag the beginning green marker or ending red marker
inward to reduce the amount of time.
CHAPTER THREE: WO RKI NG WITH PRES ENTATIO N S 24
OMA241 –INTEGRATED OFFICE APPLICATIONS |
Overview of External Data
When you want to use data from an existing spreadsheet or document, you certainly don't want to
have to type it in all over again. There are a few decisions you must make.
What Do You Want?
Part of a document or the whole document?
Static copy or one that can update to show changes in the original file
Edit in the original program or as PowerPoint text or object
How to Insert the Data
You have two methods to get external data onto a slide:
1) Copy and Paste
Depending on what you copied, you may have several Paste Options.
Examples:
Cells in a spreadsheet:
o Use Destination Styles
o Keep Source Formatting
o Embed
o Picture
o Keep Text Only
Chart in a spreadsheet:
o Use Destination Theme and Embed
o Keep Source formatting and Embed
o Use Destination Theme and Link Data
o Keep Source formatting and Link Data
2) Insert Object
Insert ribbon tab > Object > Dialog
Insert Object
The file is embedded on the slide unless you check one of the boxes.
'Link' puts a picture of the file on the slide.
'Display as icon' put an icon on the slide. While running the slide show, clicking the icon opens the object. The icon is most often used to open another presentation.
CHAPTER THREE: WO RKI NG WITH PRES ENTATIO N S 25
OMA241 –INTEGRATED OFFICE APPLICATIONS |
.
Consequences of your choices:
Simple Paste: The pasted data is on the slide, just as if you had typed it.
Embed:
o External data is now included in the presentation file and is not connected to the original
file any more.
o Changes on the slide will not affect the original file.
o Changes to the original file will not affect the presentation, including moving, renaming,
or deleting the original file.
o Editing what was embedded uses the original program.
Link:
o Changes to the original file will show up on the slide, after you Update Link.
o Changes while in PowerPoint are actually changes to the original file.
Be warned!
o Moving, renaming or deleting the original file breaks the link. You will not be able to edit
what shows in PowerPoint
CHAPTER THREE: WO RKI NG WITH PRES ENTATIO N S 26
OMA241 –INTEGRATED OFFICE APPLICATIONS |
When a chart is pasted or embedded in a presentation, any
changes made in the Excel chart must be made separately in
the chart in a presentation.
When a chart is linked, changes in the Excel chart are also
made in the chart in the presentation.
TO EMBED AN EXCEL CHART
1.) Copy the Excel file [nz-languages.xls] to the same folder as will be used to
store the presentation. Get resource files from your Instructor/Demonstrator.
2.) Open the PowerPoint, create New Presentation. First SlideLayout – Title and
Content
3.) On the Insert ribbon tab, click on the Object button
4.) To embed the chart
(external Excel file )
in a slide, Click on
the radio button
(circle) for Create
from file.
The dialog changes! You
need the path to the file
you want to import
5.) Click the Browse Button.
6.) Navigate to the resource files on your hard disk and select nz-languages.xls
7.) Click Ok.
8.) You can now move the object or resize it on your slide.
9.) Type on the Title – Embed Chart
10.) Insert New Slide _ Slide#2
TO LINK OR EMBED EXCEL CHARTSEXERCISE 6
CHAPTER THREE: WO RKI NG WITH PRES ENTATIO N S 27
OMA241 –INTEGRATED OFFICE APPLICATIONS |
TO LINK AN EXCEL CHART
1) On the Insert ribbon tab, click on the Object button
2) To link the chart to a
slide, (external Excel file )
in a slide, Click on the
radio button (circle) for
Create from file and
click Link.
The dialog changes! You need
the path to the file you want to
link.
3) Type on the Title of Slide#2 – Link Chart
4) Double-lick the chart to edit the chart in MS Excel. Changes made in the Excel automatically reflected in MS Powerpoint
TO MODIFY A LINKED EXCEL WORKSHEET OBJECT 1) Double-click the worksheet object in the PowerPoint
2) Make your changes to the worksheet
3) Save your changes to the Excel worksheet
4) Close the Excel worksheet .
5) Save your changes to the PowerPoint.
Worksheet is the same in Excel
and in PowerPoint
CHAPTER THREE: WO RKI NG WITH PRES ENTATIO N S 28
OMA241 –INTEGRATED OFFICE APPLICATIONS |
You can print handouts from Microsoft PowerPoint 2010, but
if you want to use the editing and formatting features of
Microsoft Word, you can work on and print your handouts
using Word. In the open presentation, do the following:
TO CONVERT A POWERPOINT PRESENTATION INTO A WORD
DOCUMENT.
1) Click File tab , then click Save & Send ,
2) Under File Types click Create Handouts, then under Create Handouts in
Microsoft Word, click the button Create Handouts
3) Select the Page Layout in Microsoft Word(Select on the type of handouts you
want to make) then do one of
the following:
a. To paste content that
you want to remain
unchanged when the
content in the original
PowerPoint presentation
is updated, click Paste,
and then click OK.
b. To ensure that any
updates that occur to
the original PowerPoint
presentation are
reflected in the Word
document, click Paste
Link, and then click OK.
4) The presentation opens as a
Word document in a new
window. You can edit, print or save as with any Word document.
TO EDIT OR PRINT POWERPOINT HANDOUTS IN WORDEXERCISE 7


![[PPT]PowerPoint Presentation - Indian Institute of Banking · Web viewPresentation on Working Capital By M.P. DEIVIKARAN Working capital Introduction Working capital typically means](https://static.documents.pub/doc/80x56/5ab89eec7f8b9ac10d8d309b/pptpowerpoint-presentation-indian-institute-of-banking-viewpresentation.jpg)


