BRCM COLLEGE OF ENGINEERING & TECHNOLOGY,
BAHAL
Chemistry Lab Manual
BRCM COLLEGE OF ENGINEERING & TECHNOLOGY, BAHAL (BHIWANI)
(An ISO: 9001-2008 certified Institution, Permanently affiliated to M.D University, Rohtak)
LIST OF EXPERIMENTS
1. To determine Ca++
and Mg++
hardness of water using EDTA solution.
2. To determine alkalinity of given water sample.
3. To Prepare Phenol-formaldehyde (P-F) resin
4. To prepare Urea-formaldehyde (U-F) resin.
5. To find out saponification number of Oil
6. To determine strength of HCl solution by titrating against NaOH solution
conductometerically.
7. To determine viscosity of lubricant by Red Wood Viscosity (No. 1 & No. 2).
8. To determine dissolved oxygen (D.O.) in the given water sample.
9. To determine of total iron in an ore solution by internal indicator method.
10. To determine TDS of Water samples of different sources.
DO’S
The Chemistry laboratory must be a safe place in which to work and learn about
Chemistry. Most of these involve just using common sense.
1. Use protective clothing all the time (e.g. lab coat and safety glasses).
2. Be familiar with your lab assignment before you come to lab. Follow all written
and verbal instructions carefully. Observe the safety alerts in the laboratory
directions. If you do not understand a direction or part of a procedure, ask the
teacher before proceeding.
3. Wash acid, base, or any chemical spill off of yourself immediately with large
amounts of water. Notify your teacher of the spill.
4. Clean up spills immediately. If you spill a very reactive substance such as an acid
or base, notify the people in the area and then obtain assistance from your
teacher. Acid spills should be neutralized with baking soda, base spills with
vinegar before cleaning them up.
5. If chemical substances get in your eye, wash the eye out for 15 minutes. Hold your
eye open with your fingers while washing it out.
6. Place the reagents in a systemic manner.
7. If you burn yourself on a hot object, immediately hold the burned area under cold
water for 15 minutes. Inform your teacher.
8. Observe good housekeeping practices. Work areas should be kept clean and tidy
at all times. Only lab notebooks or lab handouts should be out on the table while
performing an experiment. Books and book bags should not be on the lab table.
Passageways need to be clear at all times.
9. Always add acid to water and stir the solution while adding the acid. Never add
water to an acid.
10. Report all accidents to your teacher.
11. Thoroughly clean your laboratory work space at the end of the laboratory session.
Make sure that all equipments are clean, and returned to its original place.
DON’T
1. Work in the laboratory without an instructor present. Work only with your lab
partner(s). Do not venture to other lab stations for any reason.
2. Wear bulky or dangling clothing.
3. Eat or drink in the laboratory. Don't chew on the end of a pen which was lying on
the lab bench.
4. Use Mobile Phones.
5. Directly touch any chemical with your hands. Never taste materials in the
laboratory.
6. Waste the reagents.
7. When entering the lab/classroom, do not touch any equipment, chemicals, or
other materials without being instructed to do so. Perform only those
experiments authorized by the instructor.
8. When weighing never place chemicals directly on the balance pan. Never weigh
a hot object.
9. Smell anything in the laboratory unless your teacher tells you it is safe. Do not
smell a substance by putting your nose directly over the container and inhaling.
Instead, waft the vapors toward your nose by gently fanning the vapors toward
yourself.
10. Absolutely no running, practical jokes, or horseplay is allowed in the laboratory.
11. Allow the reagent bottles to accumulate on the bench.
Experiment No. 1
Aim: To determine the Ca++
and Mg++
hardness of given water sample using EDTA solution.
Apparatus/reagent required: Burette, beaker, conical flask, measuring cylinder, standard hard
water, EDTA solution, ammonium buffer solution of NH4Cl + NH4OH (pH-10), calcium
precipitating buffer solution of NH4Cl + NH4OH + (NH4)2C2O4.
Indicator: Eriochrome black–T (EBT).
Na+
OH
S
O
O
-O
N+
O
-O
N N OH
Figure: 1
Represented as H2In-
IUPAC Name: Sodium 1-(1-hydroxy-2-naphthylazo)-6-nitro-2-naphthol-4-sulphonate
End point: Colour changes from wine red to pure blue.
Theory
For finding the total hardness of water, a known volume of water sample, buffered to a
pH around 10 with ammonical buffer solution of NH4Cl + NH4OH, is titrated with standard
EDTA solution using EBT as indicator.
Erio-T indicator is an organic dye having two phenolic ionisable hydrogen atoms (Fig. 1).
It can have different forms of depending upon pH:
H2In-
pH > 6.3
HIn2-
pH > 11.5
In3-
When indicator EBT is added to hard water at a pH around 10 maintained with
ammonical buffer, it forms unstable wine red coloured complexes with bivalent metal ions of
water as:
M2+ + HIn2-
pH = 10M In
- + H+
from water
M2+ = Ca2+, Mg2+
Unstable(wine red)
Ethylenediaminetetraacetic acid (EDTA) (Fig 2) is taken in the form of its disodium salt
due to higher solubility.
N-CH2CH2-N
HOOCH2C
NaOOCH2C
CH2COONa
CH2COOH
Fig. 2: Sodium salt of EDTA (represented as Na2H2Y)
For the simplicity, it can be represented as H2Y2-
. It ionises in aqueous solution to give a
strong chelating ion. It forms complexes with Ca++
and Mg++
.
Na H2Yin water
2Na+ + H2Y2-
(Chelating ion)
EDTA when added to wine red solution, it combines with free metal ions of hard water to
form their respective soluble complexes. These are more stable than these are more stable than
metal-indicator complexes.
M2+ + H2Y2-
from water EDTA
pH = 10
MY2- + 2H+
Metal-EDTA
complex
When all free metal ions of hard water have complexed with EDTA, a slight excess of
EDTA removes metal ions from weak metal indicator complexes to form stronger metal-
complexes. This releases the indicator in free form which is blue in colour. This is end point of
titration i.e. wine red to blue.
MIn- + H2Y2-
Less stable Excess EDTA
pH=10
MY2- + HIn2- + H+
Reaction occurs according to scheme 1.
Metal ions + Indicator metal ion-indicator unstable complex (wine red)
MY2- + 2H+
EDTA
metal ion-EDTA stable complex + indicator (Blue colour)
MY2- ( HIn2- + H+)
(excess)
M2+ H2Y2-
Scheme1
After determination of total hardness in water sample, Ca2+
ions in hard water are
precipitated as calcium oxalate by adding calcium precipitation solution i.e. NH4Cl + NH4OH +
(NH4)2C2O4.
Ca2+
(from hard water)
COO
COO
+
COO-
COO-
Ca
Calcium oxalate(white ppt)
The solution is filtered to remove white ppt. Titration of filtrate against standard EDTA
solution solution using EBT indicator gives Mg2+
hardness in water sample. Hardness due to
Ca2+
is obtained by subtracting Mg2+
hardness from total hardness.
Procedure
Step 1. Standardization of EDTA solution
Fill burette with EDTA solution. Pipette out 20 mL of Standard Hard Water (SHW) in to
a conical flask. To this add 5 mL ammonium buffer solution. On addition of 3-4 drops of Erio-T
indicator to this wine red colour will appear. Titrate wine red colour solution against EDTA
solution tillthe end point i.e. colour change from wine red to blue. Repeat for taking concordant
readings. Let V1 mL of EDTA solution be used.
Step2. Total hardness in water samples
Titrate 20 mL of given hard water sample against EDTA as in step 1. Let volume of
EDTA used be V2 mL.
Step 3. Determination of Mg2+
hardness in sample
Pipette out 100 mL of sample in a 250 beaker. Add 25 mL calcium precipitating buffer
solution to this with constant stirring of solution by glass rod. Keep as such for about 30 minute
for settling of white ppt formed. Filter the solution.
Titrate 20 mL of given hard water sample against EDTA as in step 1. Let volume of
EDTA used be V3 mL.
General Calculations:
Step 1. Standardization of EDTA solution
1 mL of SHW = 1 mg of CaCO3 (given)
Volume of SHW taken for titration = 20 mL
Concordant volume of EDTA solution used = V1 mL
20 mL of SHW = V1 mL of EDTA solution
1 mL of EDTA solution = 20/ V1 mL of SHW
1 mL of EDTA solution = 20/ V1 mL of CaCO3
Step2. Total hardness in water samples
Volume of hard water sample taken for titration = 20 mL
Concordant volume of EDTA solution used = V2 mL
20 mL of hard water = V2 mL of EDTA solution = V2×(20/ V1) mg of CaCO3
So 1000 mL of hard water = (V2×(20/ V1)×1000)/20 mg of CaCO3
Total hardness = (V2/ V1)×1000 ppm of CaCO3
Step 3. Determination of Mg2+
hardness in sample
Amount of hard water sample taken for titration = 100 mL
Amount of calcium precipitating buffer added = 25 mL
Hardness of 125 mL prepared solution = Mg2+
hardness of 100 mL hard water sample
So, 20 mL filtrate = (100×20)/125 = 16 mL of hard water
Concordant volume of EDTA solution used = V3 mL
So 16 mL of hard water = V3 mL of EDTA solution = V3×(20/ V1) mg of CaCO3
1000 mL of hard water = (V3×(20/ V1)×1000)/16 mg of CaCO3
Mg2+
hardness in water sample = (V3×(20/ V1)×1000)/16 ppm in terms of CaCO3
Ca2+
hardness in water sample = Total hardness - Mg2+
hardness in water sample
Results
Hardness due to Ca++
in water sample = ……ppm in terms of CaCO3
Hardness due to Mg++
in water sample = ……ppm in terms of CaCO3
Precautions
1. All solutions should be freshly prepared.
2. Distilled water should be checked with care before use.
3. The same amount of the indicator must be added to each time.
4. The reaction mixture must be shaken briskly during the reaction.
5. The end point must be observed during the titration.
6. pH = 10 should be maintained during the titration.
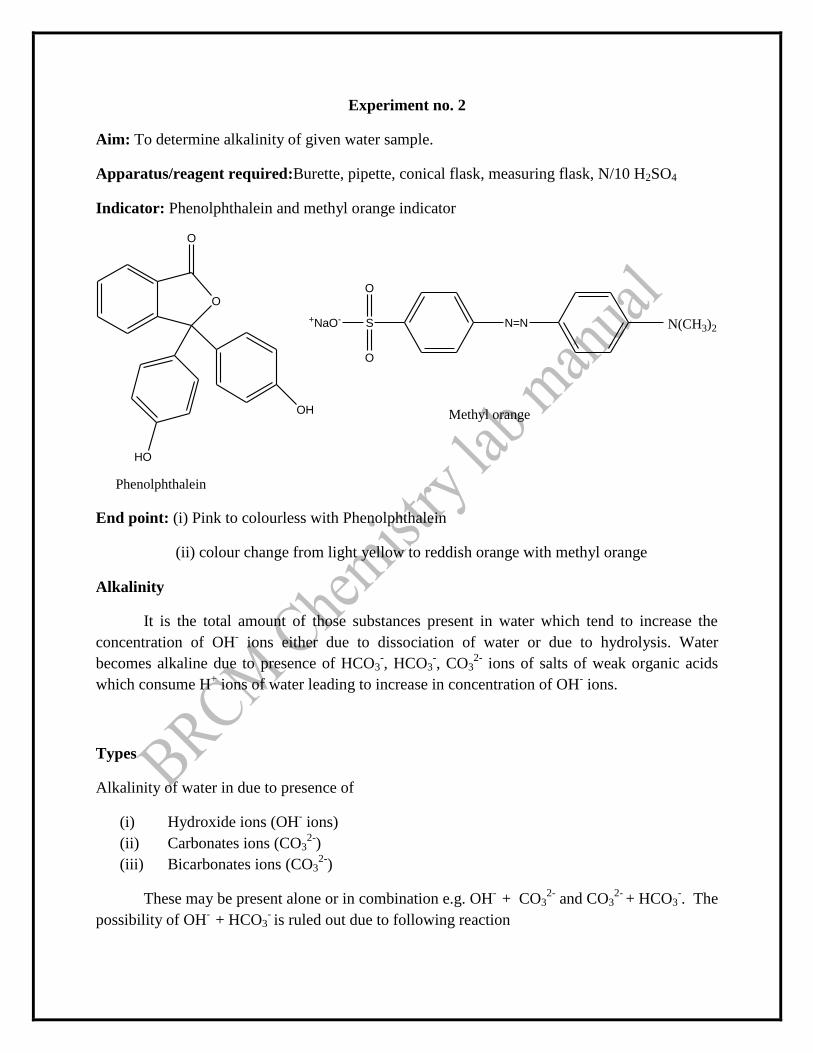
Experiment no. 2
Aim: To determine alkalinity of given water sample.
Apparatus/reagent required:Burette, pipette, conical flask, measuring flask, N/10 H2SO4
Indicator: Phenolphthalein and methyl orange indicator
O
HO
OH
O
Phenolphthalein
N=N N(CH3)2S
O
O
+NaO-
Methyl orange
End point: (i) Pink to colourless with Phenolphthalein
(ii) colour change from light yellow to reddish orange with methyl orange
Alkalinity
It is the total amount of those substances present in water which tend to increase the
concentration of OH- ions either due to dissociation of water or due to hydrolysis. Water
becomes alkaline due to presence of HCO3-, HCO3
-, CO3
2- ions of salts of weak organic acids
which consume H+ ions of water leading to increase in concentration of OH
- ions.
Types
Alkalinity of water in due to presence of
(i) Hydroxide ions (OH- ions)
(ii) Carbonates ions (CO32-
)
(iii) Bicarbonates ions (CO32-
)
These may be present alone or in combination e.g. OH-
+ CO32-
and CO32-
+ HCO3-. The
possibility of OH-
+ HCO3- is ruled out due to following reaction
OH-
+ HCO3- → CO3
2- + H2O
Hence, all three cannot be present together.
Theory
The type and amount of alkalinity in water can be determined by titrating a known
volume of it against standard acid using two indicator namely phenolphthalein and methyl
orange in the same order.
Volume of acid used up to phenolphthalein end point (A mL) neutralizes all OH- ions and
converts CO32-
ions into HCO32-
ions (i.e. half neutralization of CO32-
). The end point is
disappearance of pink colour at a pH around 8.3. The acid used in further titration using methyl
orange as an indicator neutralizes all HCO3-
ions whether present originally or obtained from
CO32-
ions. The end point is colour change from light yellow to reddish orange and comes at a
pH range of 3-4.5. The total acid used in titration (A+B mL) gives total alkalinity of water. The
reactions involved are:
(i) OH- + H+ H2O
(ii) CO32- + H+ HCO3
-
P
(iii) HCO3- + H+ CO2 + H2O
M
P = Phenolphthalein alkalinity = OH- + ½ CO3
2-
M = Total or methyl orange alkalinity = OH- + CO3
2- + HCO3
- (due to all ions)
M-P = Alkalinity due to HCO3- ions
From the calculated values of P and M, following alkalinity correlations can be made
using following table:
Case Alkalinity (ppm)
OH-
CO32-
HCO3-
P = 0 0 0 M
P = M P or M 0 0
P = ½M 0 2P or M 0
P >1/2M 2P-M 2(M-P) 0
P < ½M 0 2P M-2P
Procedure
1. Rinse and fill the burette with standard acid and note down its initial reading.
2. Pipette out 20 mL of water sample in a conical flask and ad 1-2 drops of phenolphthalein
indicator and pink colour will appear.
3. Titrate pink solution against acid till colour disappears and note down the final reading.
4. Now add 1-2 drops of methyl orange indicator to this and colour of solution becomes
light yellow.
5. Titrate it further against acid till colour changes to light orange. Note the final burette
reading again. Repeat for making concordant reading.
Observations
Table: Titration of water vs acid
Sr. no.
Initial
burette
reading
(x)
Final burette
reading with
phenolphthalein
(y)
Final
burette
reading
with
methyl
orange (z)
Vol. of acid
used (mL) up to
phenolphthalein
end point (y-x)
Vol. of
acid used
(mL) up to
methyl
orange
(z-x)
1.
2.
3.
Concordant reading of acid used upto phenolphthalein end point = y-x mL = A mL
Vol. of acid used up to methyl orange = Total volume consumed = z-x mL = B mL
General calculations
For finding the phenolphthalein alkalinity (P)
Concordant volume of acid used = A mL
Applying Normality equation
N1V1 = N2V2
(water) (acid)
N1× 20 = ×A
N1 =
Strength in terms of CaCO3 = Normality × Eq. wt. of CaCO3
= ×50 gL-1
So, phenolphthalein alkalinity (P) = ×50 × 1000 mgL-1
= × 50 × 1000 ppm
= 250 × A ppm
For finding the methyl orange alkalinity (M)
Concordant volume of acid used = T mL
Applying Normality equation
N3V3 = N4V4
(water) (acid)
N3× 20 = (1/10)×T
N3 = A/200
Strength in terms of CaCO3 = Normality × Eq. wt. of CaCO3
= (T/200) ×50 gL-1
So, methyl orange alkalinity (P) = (T/200) ×50 × 1000 mgL-1
=(T/200) ×50 × 1000 ppm
= 250 × A ppm
Since, P is related to M as ……., the water samples contains following alkalinity:
(i) Alkalinity due to OH- = ……..ppm
(ii) Alkalinity due to CO32-
= ……ppm
(iii) Alkalinity due to HCO3- = ……ppm
Results
(i) Phenolphthalein alkalinity = ….. ppm
(ii) Methyl orange alkalinity = ……..ppm
(iii) Alkalinity due to OH- = ………..ppm
(iv) Alkalinity due to CO32-
= ………ppm
(v) Alkalinity due to HCO3- = ……...ppm
Experiment No. 3
Aim: To prepare Phenol formaldehyde (P-F) resin.
Chemicals required: Phenol (2g), 40% aq formaldehyde solution or formalin (2.5 mL), glacial
acetic acid (5 mL) and conc. HCl (8mL).
Theory: Phenol formaldehyde resin or P-F resin or phenolic resins (also called phenoplasts) are
important class of polymers which are formed by condensation polymerization of phenol and
formaldehyde in acidic or alkaline medium. Following steps are involved:
Step 1: Formation of methylol phenol derivative
Initially the monomers combine to form methylol phenol derivative depending upon phenol to
formaldehyde ratio.
OH
H+
OH
CH2OH
+
OH
CH2OH
2-Hydroxymethyl phenol
4-Hydroxymethyl phenol
(P/F: 1:1)
+ CH2O
CH2O
OH
CH2OH
CH2OH
2,4-Dihydroxymethyl phenol
(P/F: 1:2)
CH2O
OH
CH2OH
CH2OH
2,4,6-Dihydroxymethyl phenol
(P/F: 1:3)
HOH2C
Step 2: The phenol formaldehyde derivatives react among themselves or with phenol to give a
linear polymer or a higher cross linked polymer.
(a) Linear polymer (Novolac)
OH
H
+n
n
-nH2O
OH
CH2OH
OH
CH2
OH
Novolac
CH2
(b) Cross linked polymer (Bakelite)
A highly cross linked thermosetting polymer called Bakelite may be formed by further
condensation of novolac or methylol derivative.
It was first prepared by Backeland. It is easily formed if curing agent hexamethylene
tetramine is added during synthesis.
OH
H
+nm
condensation polymerisatoin
OH
CH2OH
OH
CH2
OH
CH2
OH
CH2
H2CH2C
OH
CH2
OH OH
Procedure
1. Place 5 mL of glacial acetic acid and 2.5 mL of 40 % aq formaldehyde solution in a 100
mL beaker. Add 2 g phenol safely.
2. Wrap the beaker with a wet cloth or place it in a 250 mL beaker having small amount
of water in it.
3. Add conc. HCl drop wise with vigorous stirring by a glass rod till a pink coloured
gummy mass appears.
4. Wash the pink residue several times with to make it free from acid.
5. Filter the product and weigh it after drying in folds of a filter or in an oven. Report the
yield of polymer formed.
Observation
Weight of empty watch glass = W1 g
Weight of watch glass + poymer formed = W2 g
Weight of polymer formed = W2 – W1 g
Result
Weight of phenol formaldehyde resin = W g
Experiment No. 4
Aim: To prepare Urea formaldehyde (U-F) resin.
Chemical required: Urea (2g), 40% aq formaldehyde solution or formalin (5 mL), conc. H2SO4
(3-4 drops).
Theory
Urea formaldehyde resins are formed by condensation of urea and formaldehyde in acidic
medium in following steps:
Step 1. Formation of methylol urea derivative
Initially urea and formaldehyde react to form methylol urea derivatives depending upon
forsmaldehyde (U/F ratio).
C O
N HH
N HH
+ CH2=O
U/F=1:1
H+
U/F=1:2
C O
N CH2OHH
N HH
C O
N CH2OHH
N CH2OHH
Monomethylol urea
N,N'-Dimethylol urea
Step 2: Polymerization of methylol urea
Several molecules of methylol urea derivatives condense with loss of water molecules to
form a highly cross linked urea formaldehyde resin.
C O
N CH2OHH
N CH2OHH
C O
N CH2OHH
N CH2OHH
+
-nH2o
C O
N* CH2
N CH2*
n n
C O
N CH2
N CH2
*
*
n
Procedure
Take a 5 mL of 40% aqueous formaldehyde solution in a 100 mL beaker. To this add 2 g
urea powder. Stir with a glass rod to make a saturated solution. Add a few drops of conc. H2SO4
and stir vigorously till a white solid mass is formed. Filter the residue and wash it several times
with distilled water to remove any acid. Dry the residue in folds of filter paper or in an oven and
weigh. Report the yield of urea formaldehyde polymer formed.
Observation
Weight of empty watch glass = W1 g
Weight of watch glass + poymer formed = W2 g
Weight of polymer formed = W2 – W1 g
Result
Weight of urea formaldehyde resin = W g
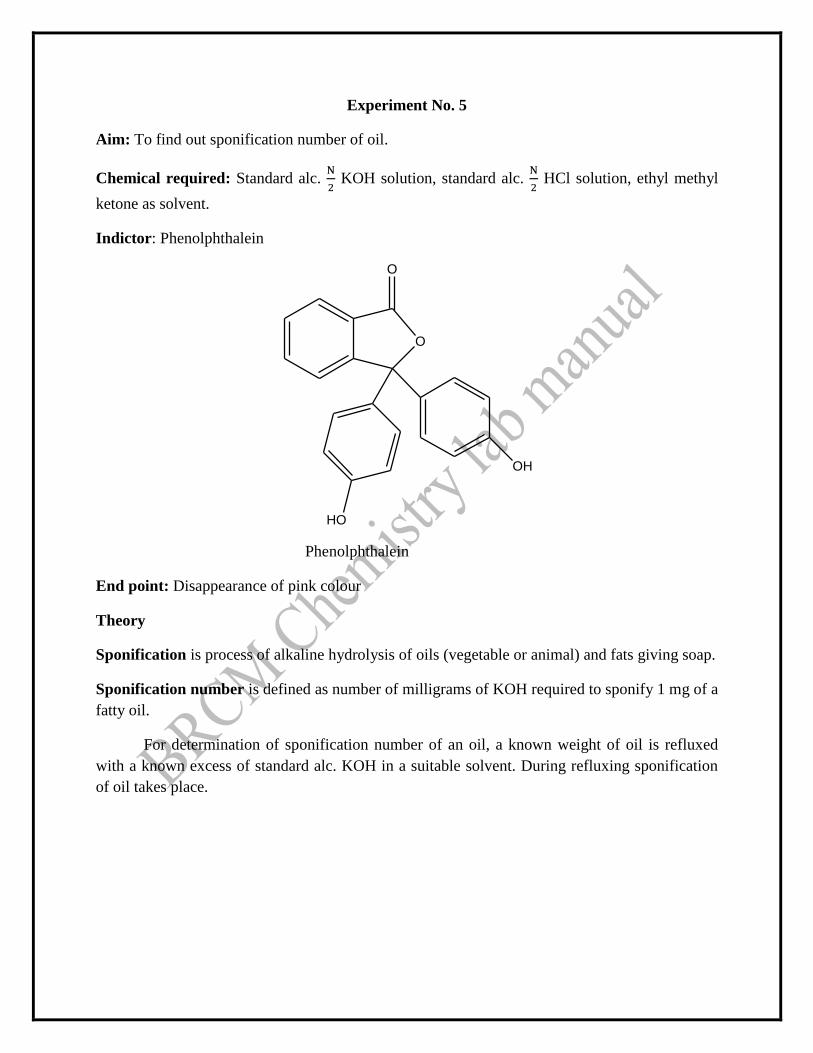
Experiment No. 5
Aim: To find out sponification number of oil.
Chemical required: Standard alc. KOH solution, standard alc. HCl solution, ethyl methyl
ketone as solvent.
Indictor: Phenolphthalein
O
HO
OH
O
Phenolphthalein
End point: Disappearance of pink colour
Theory
Sponification is process of alkaline hydrolysis of oils (vegetable or animal) and fats giving soap.
Sponification number is defined as number of milligrams of KOH required to sponify 1 mg of a
fatty oil.
For determination of sponification number of an oil, a known weight of oil is refluxed
with a known excess of standard alc. KOH in a suitable solvent. During refluxing sponification
of oil takes place.
CH2 O C
O
R1
CH2 O C
O
R1
CH2 O C
O
R1
+ 3 KOH
CH2OH
CH OH
CH2OH
+
R1COOK
R2COOK
R3COOK
(R1, R2, R3 may be same or different)
Amount of unreacted KOH left behind is determined by titration of mixture against
standard HCl using phenolphthalein indicator. Disappearance of pink colour of solution marks
the end point.
H+ + OH
- → H2O
A blank experiment without oil is also performed. From the volume of HCl used in two
titrations, sponification of oil can be obtained.
Procedure
1. Take two 250 mL conical flasks and lebel them as I and II. Weigh accurately about 1-2
gm of given oil in a weighing bottle and transfer it to flask I. Weigh the empty bottle also.
2. Add 25 mL of ethyl methyl ketone and 25 mL of alc. KOH solution to both flaskas.
3. Put an air condenser in mouth of each bottle of each flask and keep them for refluxing on
a water bath for 45 minutes.
4. Remove the flask from water bath. Wash the inner walls of each condenser with some
distilled water into the respective flasks. Remove bith condenser and cool both the flasks
at room temperature.
5. Add 7-8 drops of phenolphthalein indicator to each flask. Titrate the solution of each
flask against N/2 HCl taken in a burette till pink colour just disappears. Note burette
reading in both titrations.
Observations
Weight of weighing bottle + oil sample = W1 g
Weight of empty weighing bottle = W2 g
Weight of oil taken for experiment = W1 – W2 g
Volume of ethyl methyl ketone added to each flask = 25 mL
Volume of N/2 alc. KOH added to each flask = 25 mL
Table: Titration of unreacted KOH vs N/2 HCl
Initial burette reading
(mL)
Final burette reading
(mL)
Volume of HCl used
(mL)
For flask I
For flask II
Volume of N/2 HCl used by unreacted KOH in flask I = A mL
Volume of N/2 HCl used by unreacted KOH in flask II = B mL
Vol. of N/2 HCl is equivalent to volume of N/2 KOH used for sponification of W1 – W2 g
oil = (B-A) mL
Sponification number of oil =
= = = X
Result: Sponification number of given oil is X.
Experiment No. 6
Aim: Determination of strength of HCl solution by titrating it against NaOH solution
conductometrically.
Apparatus required: conductivity meter, conductivity cell
Chemical required: KCl, NaOH, HCl and distilled water.
Theory
End point of a volumetric analysis can also be found by conductometric titration which
involves measurement of conductance of solution during titration. The principle of these
titrations is that electrolytic conductance varies during the course of titration as it depends upon
ions in solution and their mobility. The end point is found to from a plot of conductance of
values against volume of titrant added which gives two lines intersecting each other. The point of
intersection gives the end point of titration.
Titration of HCl vs NaOH (strong acid vs strong base) is studied by titrating it a known
volume of acid against standard alkali and measuring conductance of solution at different times.
Initially the conductance is high as HCl is strong electrolyte and is highly ionized. On adding
NaOH from burette, the conductance decreases, it is because fast moving H+
ions of HCl are
neutralized and replaced by slow moving Na+ ions.
H+ + Cl- + Na+ + OH- Na+ + Cl- + H2O
A C
End point
volume of NaOH added
con
duct
ance
(m
ho)
(mL)
Fig. 1 plot of conductance vs volume of NaOH added
After complete neutralization, added NaOH increases the conductance of solution due to
addition of highly mobile OH- ions, conductivity is minimum at equivalent point. On plotting
conductance vs vol. of NaOH added, a V-shaped graph is obtained (Fig 1). The point of
intersation of two lines gives end point. From volume of NaOH used at end point, the strength of
HCl solution can be determined.
Procedure
1. Calibrate the conductivity meter using N/10 KCl.
2. Pipette out 50 mL of given HCl solution in a 100 mL beaker.
3. Dip conductivity cell in a HCl solution.
4. Note down the conductance value of solution.
5. Add 1 mL of N/10 NaOH solution from burette. Stir solution with a glass rod and note
down the conductance of solution when it becomes stable.
6. Add NaOH solution in 1 mL lots and note the corresponding conductance values till
conductance becomes constant.
7. Plot a graph between conductance (Y-axis) and volume of added NaOH solution (along
X-axis).
8. Find out the volume of NaOH used at end point of intersation of two lines in graph.
Observation
Temperature of HCl solution = …..oC
Volume of HCl taken = 50 ml
Normality of NaOH taken = N/10
Table: Titration of HCl vs NaOH solution
S. No. Vol. of NaOH added (mL) Observed conductance
(mho)
1 0
2 1
3 2
. .
. .
General calculations
Let the volume of NaOH used at end point (from graph) = V mL
Applying normality equation
N1V1 = N2V2
(HCl) (NaOH)
N1 × 50 = (1/10)×V
N1 =
Strength of HCl solution = normality × equivalent wt of HCl
= = X g L-1
Result: Strength of HCl solution is ….. g L-1
Experiment No. 7
Aim: Determination of viscosity of lubricant by Redwood viscometer (No. 1 & 2).
Apparatus required: Redwood viscometer (No. 1 & 2), stop watch, thermometer, given
lubricant oil and distilled water.
Theory
Viscosity is defined as the internal friction offered by internal friction offered by the
layers of fluid of its flow. Viscosity is a measure of flow ability of a liquid at a definite
temperature. It determines the performance of oil under operating conditions. Higher the
viscosity of fluid lesser will be its flow.
Coefficient of viscosity is called absolute viscosity is defined as tangential force per unit
area required to maintain a unit velocity gradient between two parallel layers a unit apart. It is
denoted by η (eta).
Mathematically, η =
Where F = force
A= Area
dv/dx=velocity gradient.
Units: In C.G.S. system poise = dyne cm-2
s
In SI system Nm-2
s.
The absolute viscosity of lubricant is determined by measuring the time of flow of the oil
through a capillary of definite dimensions at uniform temperature. The viscosity is can be
measured by a Redwood viscometer.
Description of redwood viscometer:
It is available in two sizes. These are:
(i) RW1 or Redwood No. 1 (Universal)
(ii) RW2 or Redwood No. 2 (Admirality)
Viscometer Diameter of capillary Length of jet
RW1 1.62 mm 10 mm
RW2 3.8 mm 50 mm
The rate of discharge of oil through RW2 is nearly 10 times faster than the discharge
through RW1 because receiving flask of RW2 has a wider mouth.
Construction
It consists of a standard brass oil cup fitted with an agate jet of specific dimension in the
middle of base and open at the upper end (Fig. 1). The jet can be opened or closed by a polished
ball valve which controls the flow of oil. A pointer is provided in the oil cup to indicate the level
up to which oil shall be filled in it. The lid of the cup is provided with a thermometer to note the
temperature of oil. Surrounding the oil cup is cylindrical vessel made of copper. This vessel is
filled with water and serves as a water bath to maintain the oil at a desired temperature of oil. It
is heated by means of heating coils.
The water bath is provided with stirrer having four blades to maintain uniform
temperature of bath. A thermometer is fitted in a water bath to know the temperature of water at
its base. A 50 mL flask called Kohlrausch flask is provided below the jet to collect the liquid
flowing out of the jet. The apparatus is also provided with leveling screws for its leveling.
Fig. 1. Redwood apparatus no. 1 & 2.
Procedure
1. Level the viscometer with the help of leveling screws. Fill the outer bath with water and
connect to the electric mains. Clean the oil cup and discharge jet with a suitable jet with a
suitable solvent like hexane, carbon tetrachloride etc. and properly dry it.
2. Place the ball valve on agate jet to close it. Pour the test oil in the cup carefully up to the
pointer. Insert a thermometer and stirrer and cover the lid.
3. Adjust the temp. of water bath until the oil attains the desired temperature. In this period
keep water in water bath and oil in oil cup.
4. Place a clean and dry Kohlrausch flask immediately below and directly in the line with
the discharge jet
5. Remove the ball when oil attains desired temperature with one hand and start stop watch
with the other hand. Allow the oil to flow till the flask is filled up to 50 mL mark. Stop
the stop watch and note the time of flow in seconds.
6. Repeat the experiment 3-4 times and record the reading.
7. Report the mean value in Redwood seconds and also mentioning the viscometer used and
the test temperature.
Observations
Table: For time of flow
Sr. No. Temperature (oC) Time of flow (RW seconds)
1
2
3
Result: Viscosity of given lubricant is …….RW seconds.
Experiment No. 8
Aim: Determination of dissolved oxygen (D. O.) in given water sample.
Chemicals required: 48% Manganous sulphate solution (MnSO4), alkaline potassium iodide
(KI+KOH), conc. H2SO4, standard sodium thiosulphate or hypo solution (N/20 Na2S2O3).
Indicator: freshly prepared starch solution added near the end point.
End point: Disappearance of blue colour (Hypo in burette).
Theory:
Dissolved oxygen (D.O.): It is defined as the amount of dissolved oxygen in milligram present
in per litre of water. Its amount is about 8 ppm at room temperature.
DO can be determined by Winkler’s iodometric titration method. In this method DO is
made to oxidize iodide ion to iodine (I2) indirectly in the presence of manganous sulphate, KOH
and sulphuric acid. Fixation of DO gives manganous oxide which on acidifying releases nascent
oxygen required for oxidizing iodide ions. The liberated iodine is titrated against standard
sodium thiosulphate solution using freshly prepared starch solution as indicator near the end
point. Following reactions are involved:
MnSO4 + 2KOH Mn(OH)2 + K2SO4
2Mn(OH)2 + O2 2MnO (OH)2
(DO) Basic manganic oxide (brown ppt)
2MnO (OH)2 + H2SO4 MnSO4 + H2O + [O]
(Nascent oxygen)
2KI + H2SO4 + [O] K2SO4 + H2O + I2
I2 + 2Na2S2O3 2NaI + Na2S4O6
sodium thiosulphate Sod. tetrathionate
From the vol. of hypo used in the titration, DO of water can be determined.
Procedure
1. Rinse and fill the burette with hypo solution and note its IBR. Fill the DO bottle with
water sample avoiding air bubbles.
2. Add 1 mL of 48% MnSO4 solution and alkaline KI solution by keeping tip of pipette
inside water.
3. Put a stopper on the flask and shake well. Keep the bottle undisturbed for some time to
allow the brown ppt of basic oxide to settle.
4. Add 2 mL conc. H2SO4. Put a stopper on the flask again and shake well to dissolve the
ppt.
5. Transfer 100 mL of brown solution to a conical flask. Titrate slowly against hypo
solution till colour becomes pale yellow. Add 2 mL starch solution so that colour
becomes blue. Titrate further against hypo till blue colour disappears. Note FBR at end
point. Repeat to get concordant reading.
Observation
Volume of solution taken for each titration = 100 mL
S. No. IBR (mL) FBR (mL) Vol.of hypo solution
used (mL)
General calculation
Volume of hypo solution used in titration = V mL
Normality of hypo solution = N/20
Applying normality equation
N1V1 = N2V2
(water) (Hypo)
N1 × 100 = (1/20) × V
N1 =
Strength of dissolved oxygen = Normality × Equivalent wt of oxyen
= g L-1
= mg L-1
= 4 V ppm
Result : The amount of dissolved oxygen in water sample is ….ppm
Experiment No. 9
Aim: To determine of total iron in an ore solution by internal indicator method.
Chemicals required: 5 % stannous chloride solution (SnCl2), saturated mercuric chloride
solution (HgCl2), standard dichromate solution (N/10 K2Cr2O7), conc. HCl and dil. HCl
Indicator: Sodium diphenylamine sulfonate
End point: A blue-green, through a greyish tinge to the first permanent violet
Theory
An iron ore solution is prepared by treating the ore with acid. It contains both ferrous
(Fe+2
) and ferric (Fe+3
) ions. The amount of iron in ore can be estimated by its titration with an
oxidizing agent like standard pot. dichromate solution in acidic medium.
For finding total iron, the ore solution is first reduced with slight excess of SnCl2 in
medium acidified with conc. HCl.
Sn+2 Sn+4 + 2e- (oxidation)
2Fe+3 + 2e- 2Fe+2 (reduction)
Sn+2 + 2Fe+2 Sn+4 + 2Fe+2
Sn+2 left in excess is destroyed by adding saturated mercuric chloride solution in one lot.
Sn+2 Sn+4 + 2e-
2Hg+ + 2e- + 2Cl- Hg2Cl2
2Hg+ + 2Sn+2 + 2Cl- Sn+4 + Hg2Cl2
(Silky white ppt)
Total iron present as Fe+2 in reduced solution is titrated agianst dichromate solution in acidic
medium using sodium diphenyl diammine sulphonate indicator.
Cr2O72- + 14H+ + 6e- 2Cr+3 + 7H2O
Fe+2 Fe+3 + e- x 6
Cr2O72- + 14H+ + 6Fe+2 2Cr+3 + 6Fe+3 + 7H2O
At the end point when all Fe+2 ions get oxidised by dichromate, an excess drop of dichromate
oxidises the indicator.
From the vol. of dichromate solutionsed in used in titration, total iron in ore solution can be calculated
Procedure
1. Rinse and fill the burette with dichromate solution. Note the initial burette reading (IBR).
2. Pipette out 10 mL of solution in a conical flask.
3. Add 3 mL conc. HCl into it and boil on flame to get yellowish colour solution.
4. Add 5% SnCl2 solution dropwise till yellow colour disappears. Add 2-3 mL drops in
execss.
5. Cool the solution to room temperature under tap water,
6. Add 3 mL saturated HdCl2 solution in one lot and shake it till silky white ppt are
abtained.
7. Add 10 mL dil. HCl, 7-8 drops of indicator and titrate against dichromate solution till end
point.
8. Note final burette reading, repeat the titration to record concordant value.
Observations
Table: Titration of reduced ore solution vs K2Cr2O7 solution
Sr. No. IBR (mL) FBR (mL) Vol.of K2Cr2O7
solution used (mL)
General calculation:
Volume of ore solution taken for titration = 10 mL
Concordant vol. of K2Cr2O7 solution used = V mL
Normality of K2Cr2O7 solution = N/10
Applying normality equation
N1V1 = N2V2
(ore) (K2Cr2O7)
N1 × 10 = (1/10) × V
N1 =
Strength of dissolved oxygen = normality × equivalent wt of iron
= g L-1
= mg L-1
= A ppm
Result: The total iron in given ore solution contains A ppm.
Experiment No. 10
Aim: To determine total dissolved solids (TDS) in given water samples.
Requirements: conductivity meter, conductivity cell, KCl, distilled water and water samples
Theory
Total Dissolved Solids (TDS) is total amount of soluble mineral and salts impurities present in
water. TDS is measured in parts per million (ppm). For example, drinking water should be less
than 500 ppm, water for agriculture should be less than 1200 ppm, and high tech manufactures
often require impurity free water.
One way to measure impurities in water is to measure the electric conductivity of water.
A conductivity sensor measures how much electricity is being conducted through a centimeter of
water. Specific conductivity is expressed as mhos per centimeter (M/cm), sometimes called
siemens per centimeter (S/cm). Because a mho (or siemen) is a very large unit, the micromho
(microsiemen) or millimho (millisiemen) typically is used (mS/cm). To convert the electric
conductivity of a water sample (mS/cm) into the approximate concentration of total dissolved
solids (ppm), the mS/cm is multiplied by a conversion factor. The conversion factor depends on
the chemical composition of the TDS and can very between 0.54 – 0.96. A value of 0.67 is
commonly used as an approximation if the actual factor is not known.
TDS in ppm = Conductivity (μS/cm) x 0.67
Procedure
1. Calibrate the conductivity meter using N/100 KCl and find out its cell constant.
2. Pipette out 50 mL of given water sample in a 100 mL beaker.
3. Dip conductivity cell in water sample.
4. Note down the conductance value of sample.
5. Repeat steps 2-4 for other water samples.
Observation
Conductance of given water samples are…….. μS.
Calculations
Conductivity of water sample = Conductance x Cell constant μScm-1
TDS in ppm = Conductivity (μScm-1
) x 0.67
Result: TDS of water samples are ……..ppm.