+ All Categories
Home > Documents > Cisco MeetingPlace Network Based Recorder...

Cisco MeetingPlace Network Based Recorder...

Date post: 29-Apr-2018
Category:
Upload: doantuyen
View: 236 times
Download: 2 times
Share this document with a friend
2
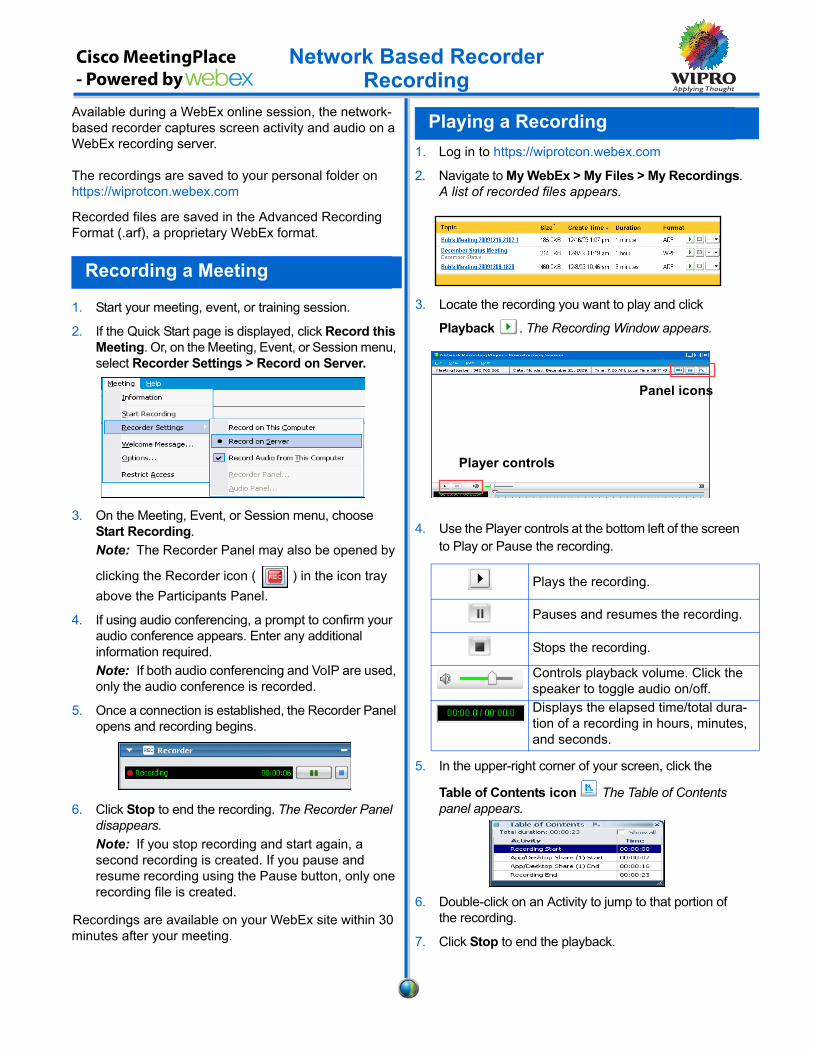
Available during a WebEx online session, the network- based recorder captures screen activity and audio on a WebEx recording server. The recordings are saved to your personal folder on https://wiprotcon.webex.com Recorded files are saved in the Advanced Recording Format (.arf), a proprietary WebEx format. 1. Start your meeting, event, or training session. 2. If the Quick Start page is displayed, click Record this Meeting. Or, on the Meeting, Event, or Session menu, select Recorder Settings > Record on Server. 3. On the Meeting, Event, or Session menu, choose Start Recording. Note: The Recorder Panel may also be opened by clicking the Recorder icon ( ) in the icon tray above the Participants Panel. 4. If using audio conferencing, a prompt to confirm your audio conference appears. Enter any additional information required. Note: If both audio conferencing and VoIP are used, only the audio conference is recorded. 5. Once a connection is established, the Recorder Panel opens and recording begins. 6. Click Stop to end the recording. The Recorder Panel disappears. Note: If you stop recording and start again, a second recording is created. If you pause and resume recording using the Pause button, only one recording file is created. Recordings are available on your WebEx site within 30 minutes after your meeting. 1. Log in to https://wiprotcon.webex.com 2. Navigate to My WebEx > My Files > My Recordings. A list of recorded files appears. 3. Locate the recording you want to play and click Playback . The Recording Window appears. 4. Use the Player controls at the bottom left of the screen to Play or Pause the recording. 5. In the upper-right corner of your screen, click the Table of Contents icon The Table of Contents panel appears. 6. Double-click on an Activity to jump to that portion of the recording. 7. Click Stop to end the playback. Recording a Meeting Playing a Recording Plays the recording. Pauses and resumes the recording. Stops the recording. Controls playback volume. Click the speaker to toggle audio on/off. Displays the elapsed time/total dura- tion of a recording in hours, minutes, and seconds. Player controls Panel icons Network Based Recorder Recording Cisco MeetingPlace - Powered by
Transcript

Available during a WebEx online session, the network-based recorder captures screen activity and audio on a WebEx recording server.

The recordings are saved to your personal folder onhttps://wiprotcon.webex.com

Recorded files are saved in the Advanced RecordingFormat (.arf), a proprietary WebEx format.

1. Start your meeting, event, or training session.

2. If the Quick Start page is displayed, click Record this Meeting. Or, on the Meeting, Event, or Session menu, select Recorder Settings > Record on Server.

3. On the Meeting, Event, or Session menu, choose Start Recording.Note: The Recorder Panel may also be opened by

clicking the Recorder icon ( ) in the icon tray above the Participants Panel.

4. If using audio conferencing, a prompt to confirm your audio conference appears. Enter any additional information required.Note: If both audio conferencing and VoIP are used, only the audio conference is recorded.

5. Once a connection is established, the Recorder Panel opens and recording begins.

6. Click Stop to end the recording. The Recorder Panel disappears.Note: If you stop recording and start again, a second recording is created. If you pause and resume recording using the Pause button, only one recording file is created.

Recordings are available on your WebEx site within 30 minutes after your meeting.

1. Log in to https://wiprotcon.webex.com

2. Navigate to My WebEx > My Files > My Recordings.A list of recorded files appears.

3. Locate the recording you want to play and click

Playback . The Recording Window appears.

4. Use the Player controls at the bottom left of the screen to Play or Pause the recording.

5. In the upper-right corner of your screen, click the

Table of Contents icon The Table of Contents panel appears.

6. Double-click on an Activity to jump to that portion of the recording.

7. Click Stop to end the playback.

Recording a Meeting

Playing a Recording

Plays the recording.

Pauses and resumes the recording.

Stops the recording.

Controls playback volume. Click the speaker to toggle audio on/off.Displays the elapsed time/total dura-tion of a recording in hours, minutes, and seconds.

Player controls

Panel icons

Network Based RecorderRecording

Cisco MeetingPlace- Powered by

To make your recordings available for others, you can send recording links via email for viewers to access, or you can publish your recordings on your WebEx site. Auto-generated recording links are easy to copy and paste into emails or instant messages.To prevent unauthorized access to your recording, you can specify a password for the recording. If the recording is downloaded to the viewer’s computer, the network-based player will need to be downloaded and installed as well.

2. Navigate to My WebEx > My Files > My Recordings.3. Under the Topic heading, select a title. The Recording Information page appears.

4. Do one of the following: Click the Copy icon for the link you want to distribute, and paste the link into an email or instant message; click Send Email; or copy and paste the link itself into an email or instant message.

5. If you would like to require a password to view the recording, click Modify

.

6. Enter a password in the Set password and Confirm password boxes, and click Save.

1. Log in https://wiprotcon.webex.com

2. On the left navigation bar, under Support click Downloads.

3. In the Recorder and Players section, click the Recording and Playback link.4. Locate the WebEx Player download for your operating system, under “for .ARF.”

Sending Recording links by Email

Downloading the WebEx Player

Network Based RecorderPublishing a Recording

1. Log in to https://wiprotcon.webex.com

Note: Network-based recordings are saved as .arf files. You cannot play these recordings with the players that support .wrf files.

5. Click Download and follow the instructions. The WebEx Player is installed.

.Support

Cisco MeetingPlace- Powered by

Conference Help Desk India from Office Extension line: 777777 India Toll #: +91-80-3096-7333 India Toll free #: +91- 1800-200-8777US Toll #: +1-213-289-5993US Toll free#: +1-855-626-8484UK Toll#: +44-208-080-6358UK Toll free#: + 0-800-756-2998VOIP #: 8247333Mailto: [email protected]


Recommended