14
Cisco SPA8000 8-Port Telephony Gateway SIP Trunking Configuration Guide using AccessLine SIP Trunking Version 1.0 July 30, 2012
Cisco SPA8000 8-Port Telephony Gateway
SIP Trunking Configuration Guide
using AccessLine SIP Trunking
Version 1.0
July 30, 2012

Cisco SPA8000 Configuration Guide for
AccessLine SIP Trunking v1.0
May 31, 2012
Page 2 of 14
Introduction These Notes describe the procedures for configuring Session Initiation Protocol (SIP) Trunking between
service provider AccessLine and a Cisco SPA8000 8 Port Analog Gateway. The Interop was performed
with an Iwatsu ADIX-VS Phone System (Analog PBX) as the analog end point to the gateway. The Iwatsu
ADIX-VS phone system is an analog PBX connecting with RJ11 to the SPA8000. This Interop is not limited
to this analog phone device.
The AccessLine SIP Trunking service referenced within these Notes is designed for business customers.
The service enables local and long distance PSTN calling via standards-based SIP trunks directly as an
alternative to legacy analog or digital trunks, without the need for additional TDM enterprise gateways
and the associated maintenance costs.
Prerequisite for Configuring Cisco SPA8000 with AccessLine SIP Trunks
AccessLine Configuration Information You should have the configuration information from Accessline before you start the install. This
information will provide settings for the SIP connection(s).
The information you will receive from Accessline will be composed of the following information. Your
order will be different from this information:
• Primary codec: G.729
• Secondary codec: G.711
SIP TRUNK ID dgwsid10941
PASSWORD ********
DNS NAME usbc.accessline.com
IP ADDRESS 64.28.113.10
PORT 6060
Call processing has been setup to allow up to 2 simultaneous calls.
The following 911 callback number has been configured in our network as the
default for this location; please test and make sure you are able to present
this as the 911 callback number and program it to route appropriately on
inbound.
2065172775
This can also be used for testing inbound calls and has been setup as the
default for outbound CLI. The following additional test number has also been
provisioned.
2065172789
Cisco SPA8000 Configuration Guide for
AccessLine SIP Trunking v1.0
May 31, 2012
Page 3 of 14
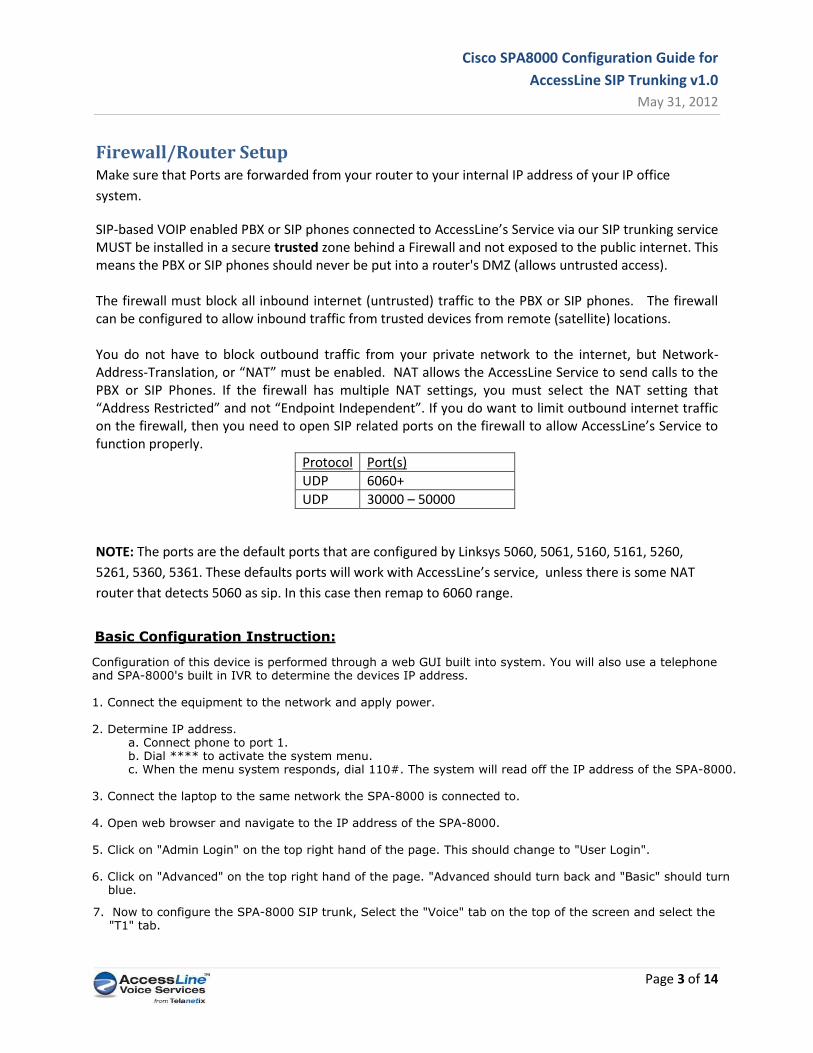
Firewall/Router Setup Make sure that Ports are forwarded from your router to your internal IP address of your IP office
system.
SIP-based VOIP enabled PBX or SIP phones connected to AccessLine’s Service via our SIP trunking service MUST be installed in a secure trusted zone behind a Firewall and not exposed to the public internet. This means the PBX or SIP phones should never be put into a router's DMZ (allows untrusted access). The firewall must block all inbound internet (untrusted) traffic to the PBX or SIP phones. The firewall can be configured to allow inbound traffic from trusted devices from remote (satellite) locations. You do not have to block outbound traffic from your private network to the internet, but Network-Address-Translation, or “NAT” must be enabled. NAT allows the AccessLine Service to send calls to the PBX or SIP Phones. If the firewall has multiple NAT settings, you must select the NAT setting that “Address Restricted” and not “Endpoint Independent”. If you do want to limit outbound internet traffic on the firewall, then you need to open SIP related ports on the firewall to allow AccessLine’s Service to function properly.
Protocol Port(s)
UDP 6060+
UDP 30000 – 50000
NOTE: The ports are the default ports that are configured by Linksys 5060, 5061, 5160, 5161, 5260,
5261, 5360, 5361. These defaults ports will work with AccessLine’s service, unless there is some NAT
router that detects 5060 as sip. In this case then remap to 6060 range.
Configuration of this device is performed through a web GUI built into system. You will also use a telephone and SPA-8000's built in IVR to determine the devices IP address.
1. Connect the equipment to the network and apply power.
2. Determine IP address. a. Connect phone to port 1. b. Dial **** to activate the system menu. c. When the menu system responds, dial 110#. The system will read off the IP address of the SPA-8000.
3. Connect the laptop to the same network the SPA-8000 is connected to.
4. Open web browser and navigate to the IP address of the SPA-8000.
5. Click on "Admin Login" on the top right hand of the page. This should change to "User Login".
6. Click on "Advanced" on the top right hand of the page. "Advanced should turn back and "Basic" should turn blue.
7. Now to configure the SPA-8000 SIP trunk, Select the "Voice" tab on the top of the screen and select the "T1" tab.
Basic Configuration Instruction:
Cisco SPA8000 Configuration Guide for
AccessLine SIP Trunking v1.0
May 31, 2012
Page 4 of 14
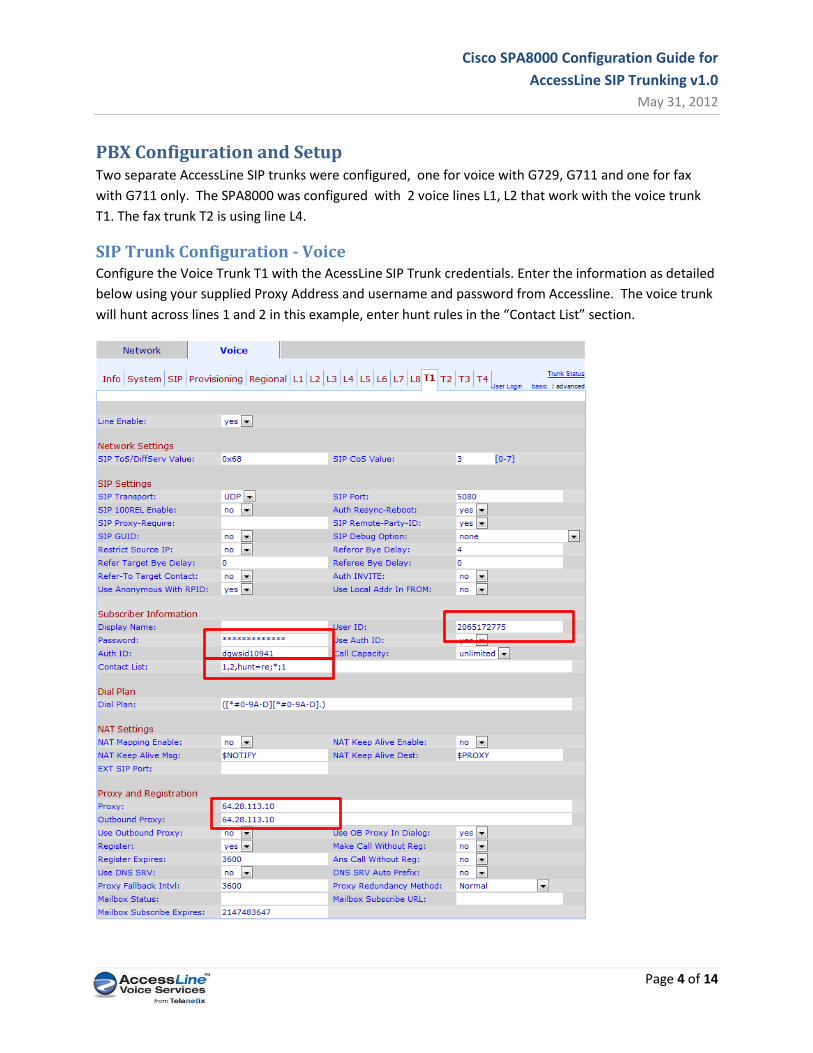
PBX Configuration and Setup Two separate AccessLine SIP trunks were configured, one for voice with G729, G711 and one for fax
with G711 only. The SPA8000 was configured with 2 voice lines L1, L2 that work with the voice trunk
T1. The fax trunk T2 is using line L4.
SIP Trunk Configuration - Voice Configure the Voice Trunk T1 with the AcessLine SIP Trunk credentials. Enter the information as detailed
below using your supplied Proxy Address and username and password from Accessline. The voice trunk
will hunt across lines 1 and 2 in this example, enter hunt rules in the “Contact List” section.
Cisco SPA8000 Configuration Guide for
AccessLine SIP Trunking v1.0
May 31, 2012
Page 5 of 14
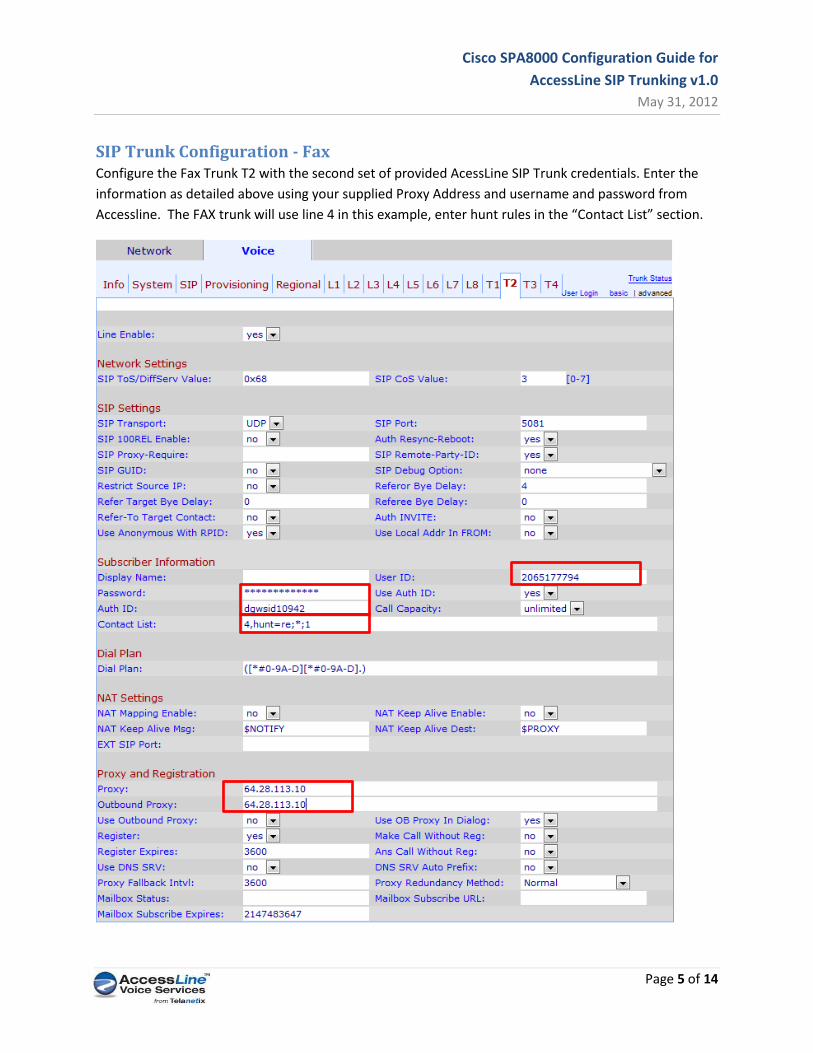
SIP Trunk Configuration - Fax Configure the Fax Trunk T2 with the second set of provided AcessLine SIP Trunk credentials. Enter the
information as detailed above using your supplied Proxy Address and username and password from
Accessline. The FAX trunk will use line 4 in this example, enter hunt rules in the “Contact List” section.
Cisco SPA8000 Configuration Guide for
AccessLine SIP Trunking v1.0
May 31, 2012
Page 6 of 14
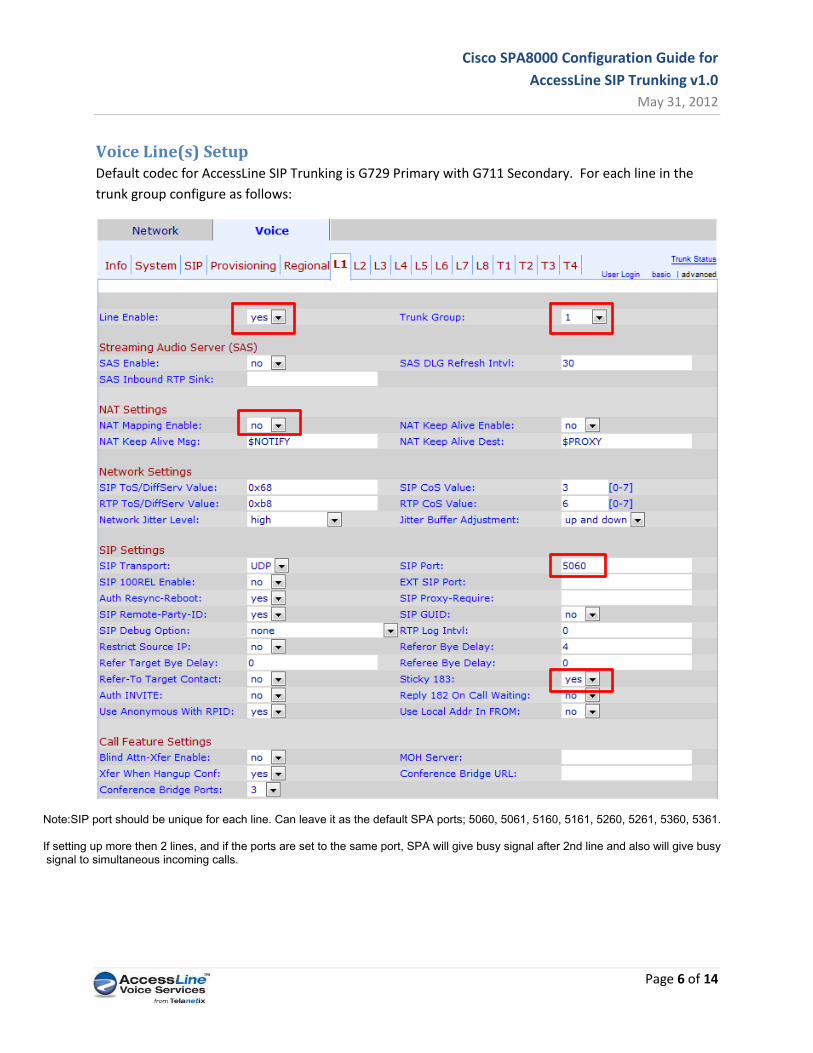
Voice Line(s) Setup Default codec for AccessLine SIP Trunking is G729 Primary with G711 Secondary. For each line in the
trunk group configure as follows:
Note:SIP port should be unique for each line. Can leave it as the default SPA ports; 5060, 5061, 5160, 5161, 5260, 5261, 5360, 5361.
If setting up more then 2 lines, and if the ports are set to the same port, SPA will give busy signal after 2nd line and also will give busy signal to simultaneous incoming calls.
Cisco SPA8000 Configuration Guide for
AccessLine SIP Trunking v1.0
May 31, 2012
Page 7 of 14
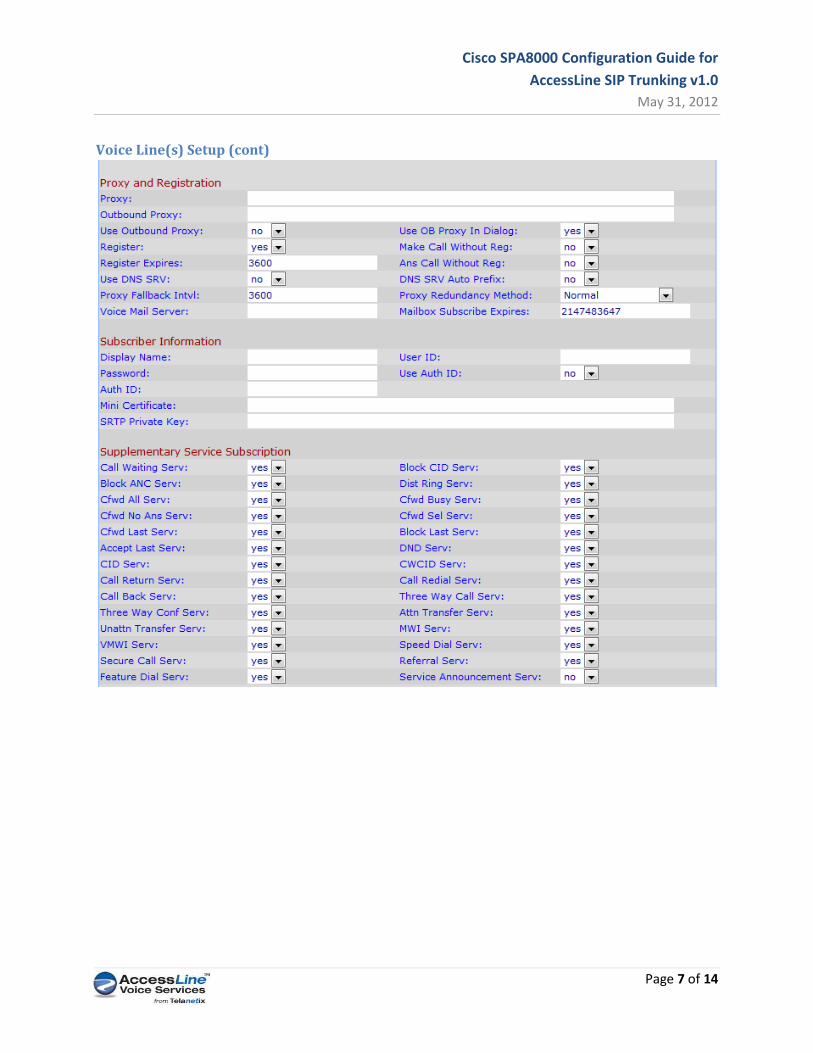
Voice Line(s) Setup (cont)
Cisco SPA8000 Configuration Guide for
AccessLine SIP Trunking v1.0
May 31, 2012
Page 8 of 14
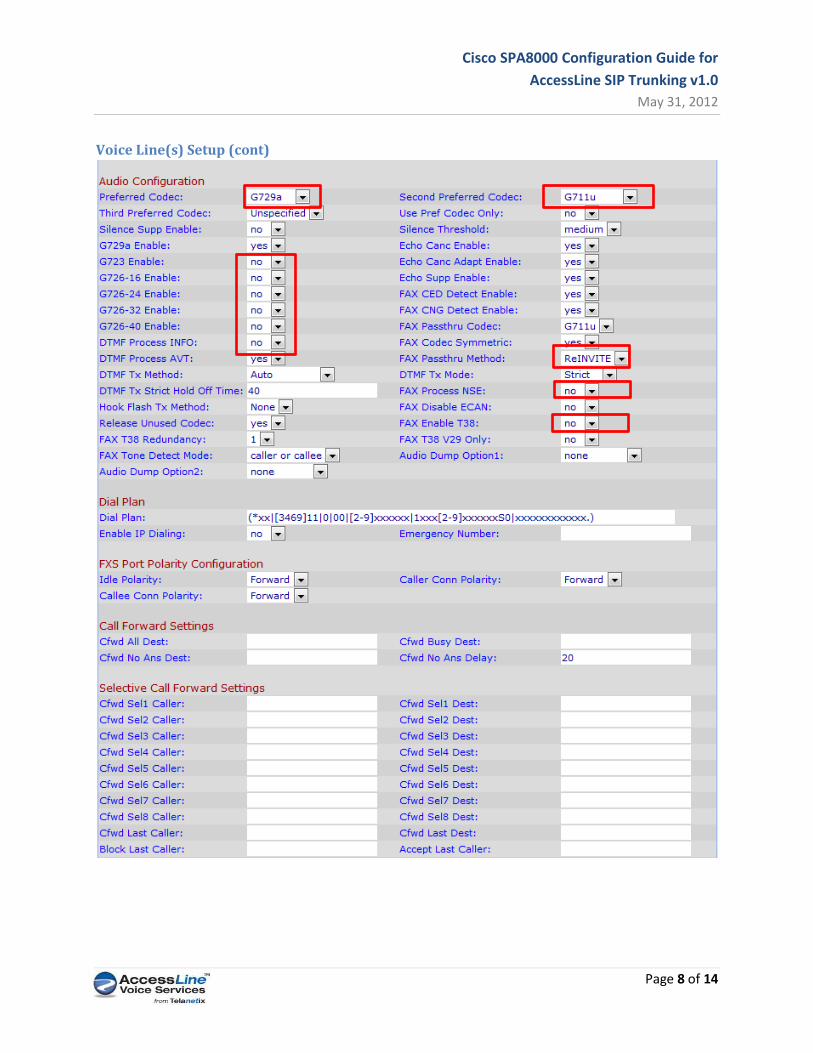
Voice Line(s) Setup (cont)
Cisco SPA8000 Configuration Guide for
AccessLine SIP Trunking v1.0
May 31, 2012
Page 9 of 14
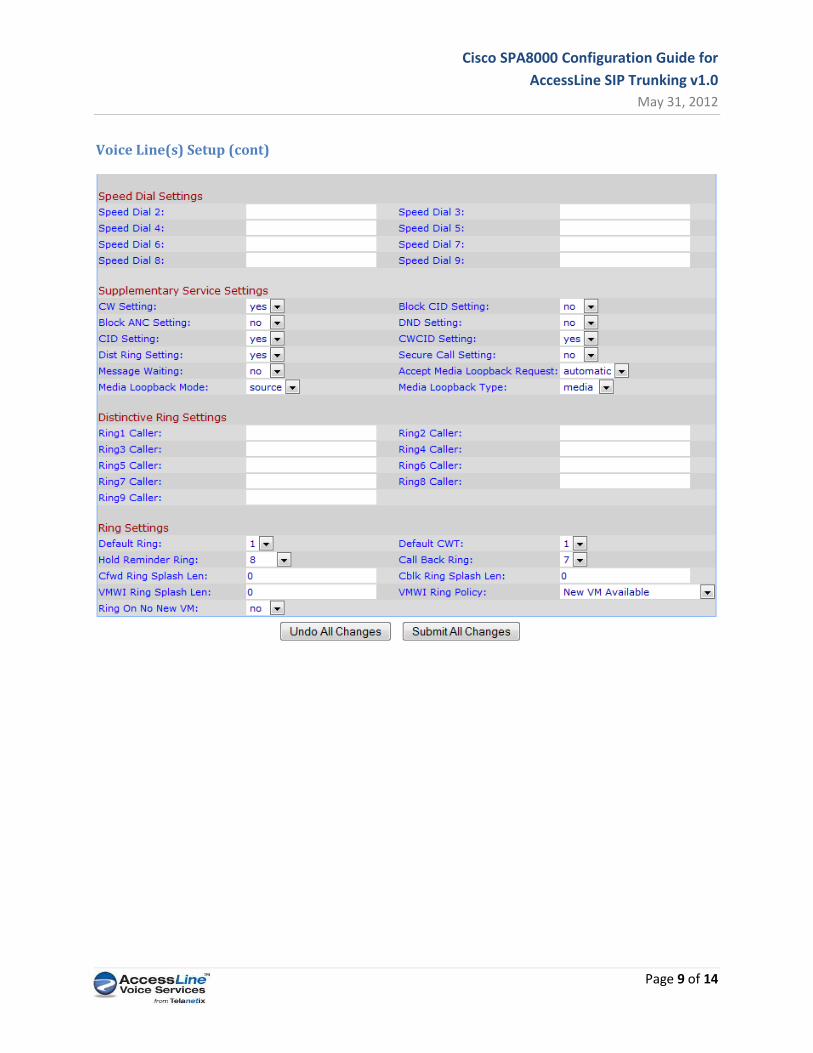
Voice Line(s) Setup (cont)

Cisco SPA8000 Configuration Guide for
AccessLine SIP Trunking v1.0
May 31, 2012
Page 10 of 14
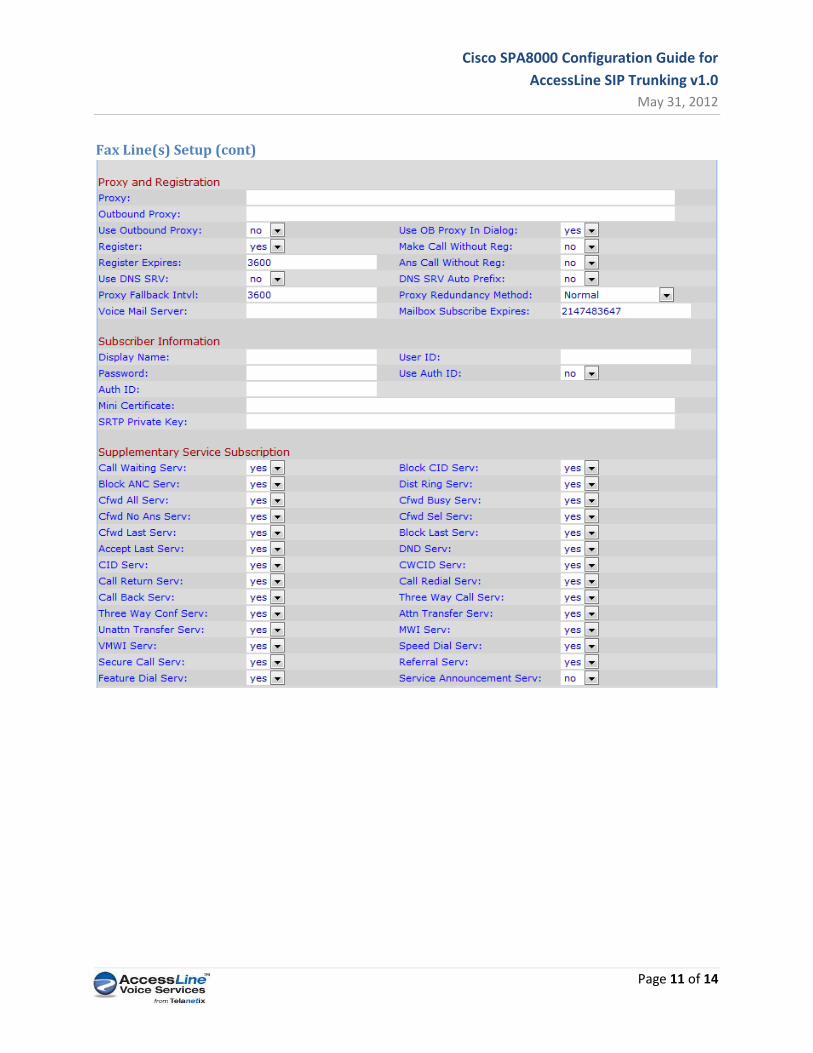
Fax Line(s) Setup Default codec for AccessLine FAX SIP Trunking is G711 Primary only. For each line in the trunk group
configure as follows:
Cisco SPA8000 Configuration Guide for
AccessLine SIP Trunking v1.0
May 31, 2012
Page 11 of 14
Fax Line(s) Setup (cont)
Cisco SPA8000 Configuration Guide for
AccessLine SIP Trunking v1.0
May 31, 2012
Page 12 of 14
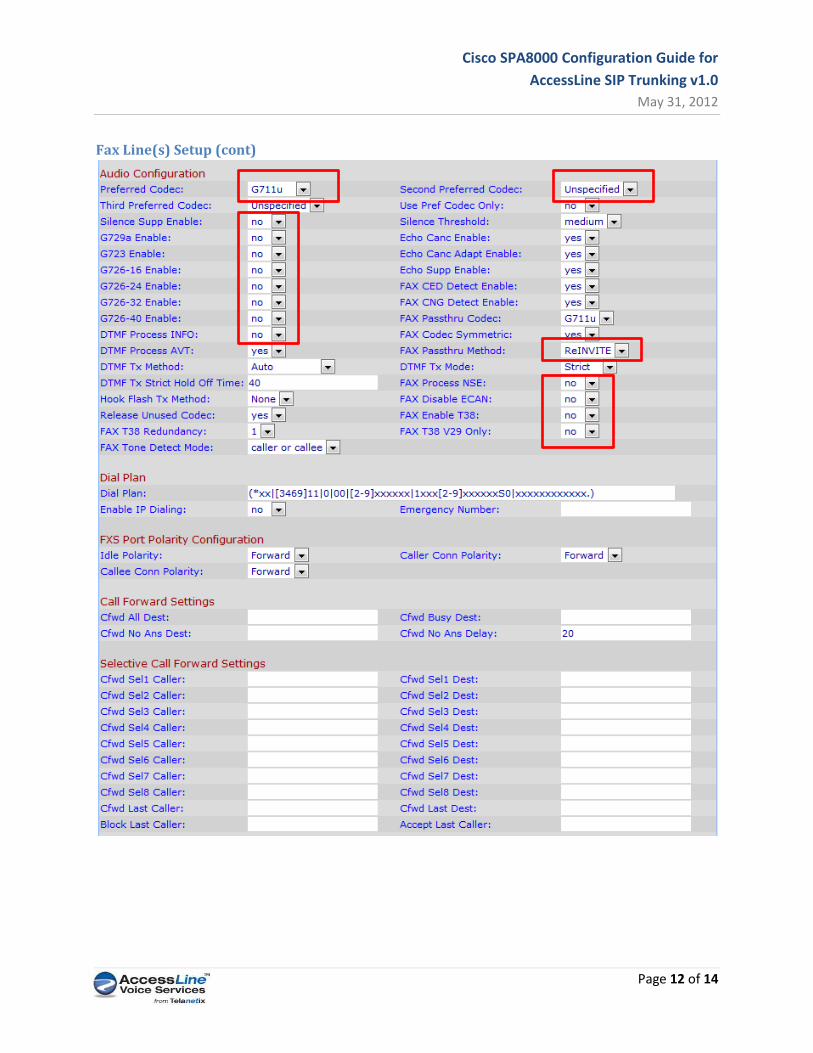
Fax Line(s) Setup (cont)
Cisco SPA8000 Configuration Guide for
AccessLine SIP Trunking v1.0
May 31, 2012
Page 13 of 14
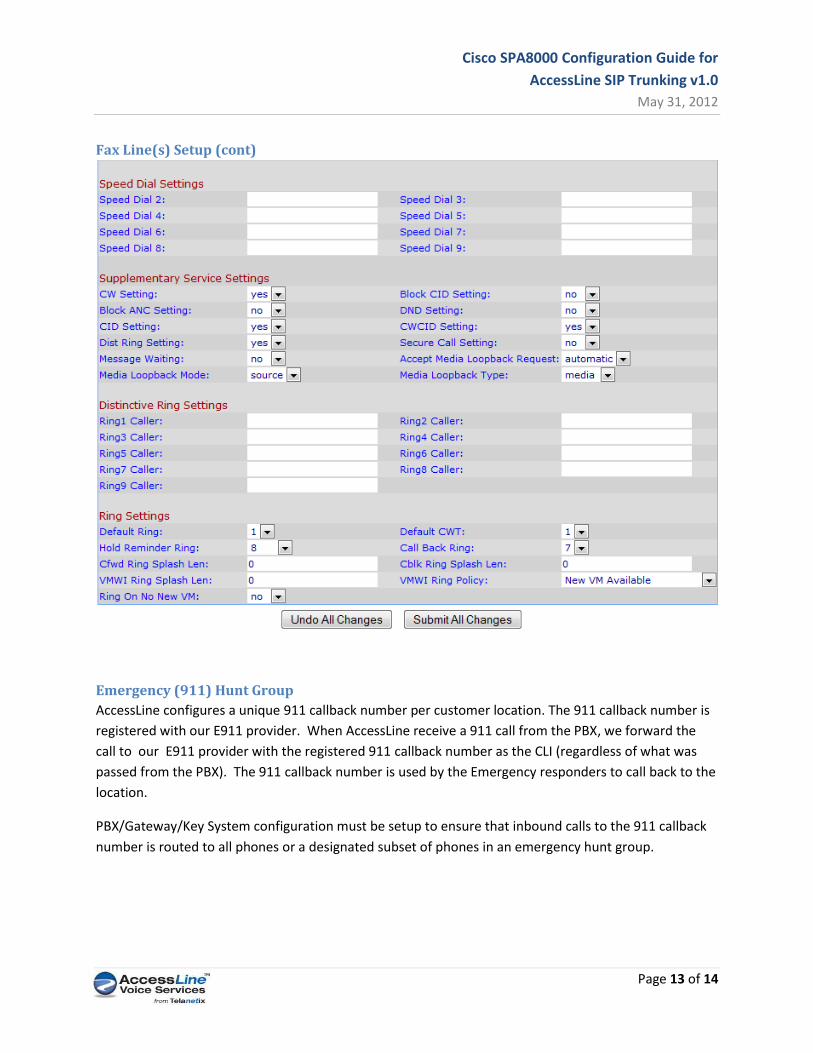
Fax Line(s) Setup (cont)
Emergency (911) Hunt Group
AccessLine configures a unique 911 callback number per customer location. The 911 callback number is
registered with our E911 provider. When AccessLine receive a 911 call from the PBX, we forward the
call to our E911 provider with the registered 911 callback number as the CLI (regardless of what was
passed from the PBX). The 911 callback number is used by the Emergency responders to call back to the
location.
PBX/Gateway/Key System configuration must be setup to ensure that inbound calls to the 911 callback
number is routed to all phones or a designated subset of phones in an emergency hunt group.
Cisco SPA8000 Configuration Guide for
AccessLine SIP Trunking v1.0
May 31, 2012
Page 14 of 14
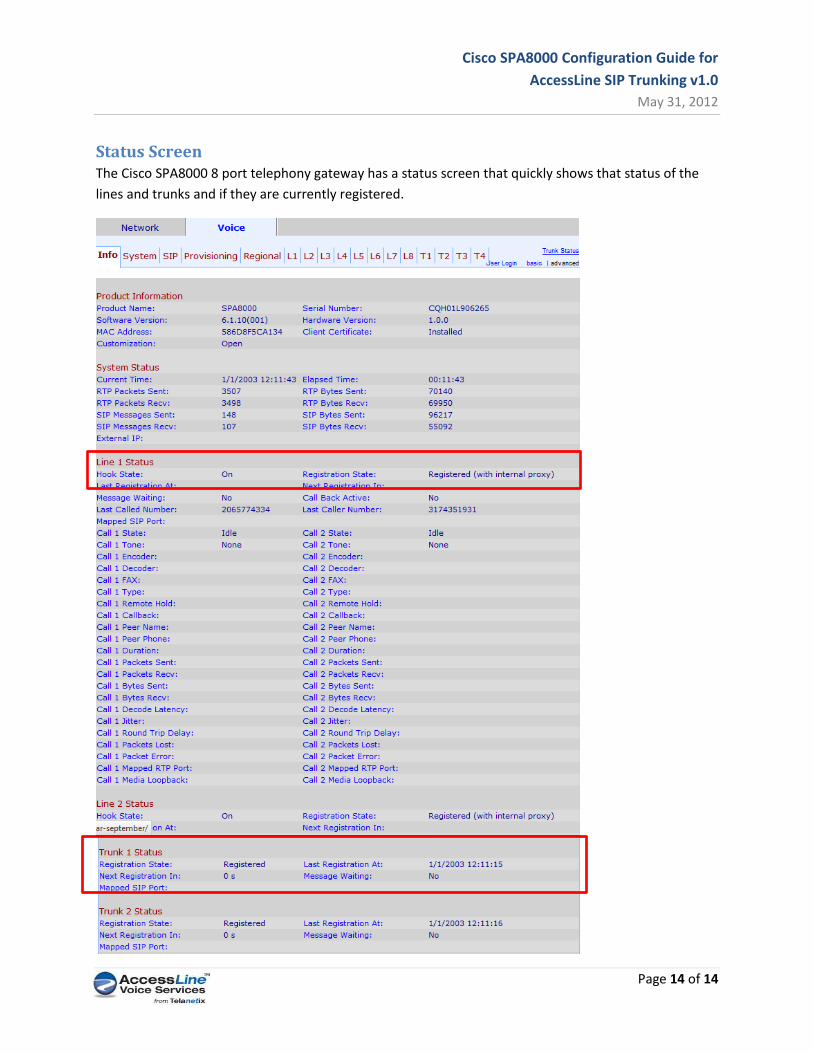
Status Screen The Cisco SPA8000 8 port telephony gateway has a status screen that quickly shows that status of the
lines and trunks and if they are currently registered.


