50
Cisco Unified Communications Domain Manager Self Service Guide, Release 11.5(3) First Published: 03/05/2018 Last Modified: 04/23/2018 Copyright © 2018 Cisco Systems, Inc
| Date post: | 05-Jul-2018 |
| Category: |
Documents |
| Upload: | nguyenhanh |
| View: | 215 times |
| Download: | 0 times |

Cisco Unified Communications Domain Manager Self Service Guide, Release 11.5(3)
First Published: 03/05/2018Last Modified: 04/23/2018
Copyright © 2018 Cisco Systems, Inc

Full Cisco Trademarks with Software License THE SPECIFICATIONS AND INFORMATION REGARDING THE PRODUCTS IN THIS MANUAL ARE SUBJECT TO CHANGE WITHOUT NOTICE. ALL STATEMENTS, INFORMATION, AND RECOMMENDATIONS IN THIS MANUAL ARE BELIEVED TO BE ACCURATE BUT ARE PRESENTED WITHOUT WARRANTY OF ANY KIND, EXPRESS OR IMPLIED. USERS MUST TAKE FULL RESPONSIBILITY FOR THEIR APPLICATION OF ANY PRODUCTS.
THE SOFTWARE LICENSE AND LIMITED WARRANTY FOR THE ACCOMPANYING PRODUCT ARE SET FORTH IN THE INFORMATION PACKET THAT SHIPPED WITH THE PRODUCT AND ARE INCORPORATED HEREIN BY THIS REFERENCE. IF YOU ARE UNABLE TO LOCATE THE SOFTWARE LICENSE OR LIMITED WARRANTY, CONTACT YOUR CISCO REPRESENTATIVE FOR A COPY.
The Cisco implementation of TCP header compression is an adaptation of a program developed by the University of California, Berkeley (UCB) as part of UCB's public domain version of the UNIX operating system. All rights reserved. Copyright © 1981, Regents of the University of California.
NOTWITHSTANDING ANY OTHER WARRANTY HEREIN, ALL DOCUMENT FILES AND SOFTWARE OF THESE SUPPLIERS ARE PROVIDED “AS IS" WITH ALL FAULTS. CISCO AND THE ABOVE-NAMED SUPPLIERS DISCLAIM ALL WARRANTIES, EXPRESSED OR IMPLIED, INCLUDING, WITHOUT LIMITATION, THOSE OF MERCHANTABILITY, FITNESS FOR A PARTICULAR PURPOSE AND NONINFRINGEMENT OR ARISING FROM A COURSE OF DEALING, USAGE, OR TRADE PRACTICE.
IN NO EVENT SHALL CISCO OR ITS SUPPLIERS BE LIABLE FOR ANY INDIRECT, SPECIAL, CONSEQUENTIAL, OR INCIDENTAL DAMAGES, INCLUDING, WITHOUT LIMITATION, LOST PROFITS OR LOSS OR DAMAGE TO DATA ARISING OUT OF THE USE OR INABILITY TO USE THIS MANUAL, EVEN IF CISCO OR ITS SUPPLIERS HAVE BEEN ADVISED OF THE POSSIBILITY OF SUCH DAMAGES.
Any Internet Protocol (IP) addresses and phone numbers used in this document are not intended to be actual addresses and phone numbers. Any examples, command display output, network topology diagrams, and other figures included in the document are shown for illustrative purposes only. Any use of actual IP addresses or phone numbers in illustrative content is unintentional and coincidental.
Cisco and the Cisco logo are trademarks or registered trademarks of Cisco and/or its affiliates in the U.S. and other countries. To view a list of Cisco trademarks, go to this URL: https://www.cisco.com/go/trademarks. Third-party trademarks mentioned are the property of their respective owners. The use of the word partner does not imply a partnership relationship between Cisco and any other company. (1721R)

Change History Change History on page 3
Change History Date Section Description
November 15, 2017 User Interface on page 7 Added SSO login information
March 10, 2017 User Interface on page 7 Added an optional banner step
April 23, 2018 Configure Simultaneous Ring on page 30
Configure Move to Mobile on page 30
Added configurations to manage a phone.
April 23, 2018 Add a Personal Phone on page 29 Added steps to configure a personal phone.
April 23, 2018 Your Personal Phone Management on page 29 Added steps to manage a personal phone.
April 23, 2018 Voicemail on page 33 Updated to support message actions.
April 23,2018 Message Actions on page 40
Manage Message Actions on page 40
Added procedure to manage message actions.
April 23, 2018 Home on page 17 Dashboard is renamed as Home on the user interface.
Cisco Unified Communications Domain Manager Self Service Guide, Release 11.5(3) iii
Contents
Contents
Full Cisco Trademarks with Software License..................................................................
Change History...................................................................................................................
Change History..........................................................................................
Introduction..........................................................................................................................
User Interface.....................................................................................................
First Sign In........................................................................................................
Password Hints...................................................................................................
Session Timeout.................................................................................................
Available Features and Services.......................................................................
Manage Self Service..........................................................................................................
Manage Your Self-Service................................................................................
Set up Your Password Reset Questions............................................................
Reset Your Password........................................................................................
Buttons and Common Tasks.............................................................................................
Buttons and Icons.............................................................................................
Common Tasks.................................................................................................
Dashboard..........................................................................................................................
Home................................................................................................................
My Information...................................................................................................................
My Information................................................................................................
Change Your User Language............................................................................
Manage Your Password and PIN......................................................................
Change Your Password.....................................................................................
Change Your PIN..............................................................................................
Access WebEx..................................................................................................
Phones................................................................................................................................
Phones..............................................................................................................
Manage a Phone...............................................................................................
Add Your Own Smart Device...........................................................................
Edit a Smart Device..........................................................................................
Bulk Modify Your Company Phones...............................................................
Your Personal Phone Management..................................................................
Add a Personal Phone......................................................................................
Configure Simultaneous Ring...................................................................

Contents
Configure Move to Mobile.......................................................................
Edit a Personal Phone.......................................................................................
Delete a Personal Phone...................................................................................
Bulk Modify Your Personal Phones.................................................................
Voice Mail............................................................................................................................
Voicemail..........................................................................................................
Create Your Own Voicemail Account...............................................................
Change Your Voicemail Settings......................................................................
Alternate Numbers & Notification Devices.....................................................
Manage Alternate Numbers & Notification Devices.......................................
Caller Input.......................................................................................................
Manage Caller Input Keys................................................................................
Message Actions...............................................................................................
Manage Message Actions.................................................................................
Call Forwarding..................................................................................................................
Call Forwarding................................................................................................
Activate and Manage a Line for Call Forwarding............................................
My Availability....................................................................................................................
My Availability.................................................................................................
Set Do Not Disturb for Your Phone..................................................................
Speed Dials.........................................................................................................................
Speed Dials and Busy Lamp Fields..................................................................
Manage Speed Dials and Busy Lamp Fields....................................................
Add a Speed Dial (Abbreviated Dials).............................................................
Links...................................................................................................................................
Links.................................................................................................................

Introduction User Interface on page 7
First Sign In on page 9
Password Hints on page 9
Session Timeout on page 9
Available Features and Services on page 10
User Interface You can use various browsers to access the Self-Service interface. For a list of browsers, refer to the Cisco Unified Communications Domain Manager Planning and Install Guide.
Note: Find out the address (URL) of your Self-Service web pages, your username, and your password from your System Administrator.
Use this procedure to sign in to the Self-Service interface.
Procedure1. Enter https://<service-ip-or-node-name>/selfservice/#/login?theme=cisco_selfservice&lang=<language> in your browser URL
field; for example, https://172.29.21.200/selfservice/#/login?theme=cisco_selfservice&lang=en-us. For this example, the Self-Service interface uses the Cisco self-service theme and the text on the Login page is displayed in English.
2. Enter your username or email address.
Note:
You can also sign in with a username such as [email protected], although most users sign in using their email address.
SSO login:
http://<Hostname>/sso/{SSO login URI}/login 3. Enter the password provided by your administrator.
Cisco Unified Communications Domain Manager Self Service Guide, Release 11.5(3) 7

Introduction / Available Features and Services
4. Click Login.
Figure 1: Login PageIf presented with a banner notice, read the banner text and click Agree to sign in. If you click Cancel, you cannot sign in.
By default, when you sign in to the Self-Service interface, the home page appears. The home page cannot be changed in this release of the user interface. For more information on the user roles and themes that are available, refer to the Cisco Unified Communications Domain Manager Maintain and Operate Guide.
If you are signing in for the first time, you may be prompted to change your password. See First Sign In on page 9.
The home page consists of three areas:
Figure 2: Home Page
a) Button Bar—This bar is located on the left side of the page. The buttons provide links to the various functions in Self-Service. Refer to Buttons and Icons on page 13 and Common Tasks on page 14 for a description of all buttons on the button bar, as well as miscellaneous buttons and icons used in Self-Service.
8 Cisco Unified Communications Domain Manager Self Service Guide, Release 11.5(3)

Introduction / First Sign In
b) Dashboard—This area is the center section of the page. It provides quick links to the main Self-Service functionality. It also shows a summary of your company phones (as set up by your Administrator) and personal phones that you configured.
c) Activity Feed Area—This area is located on the right side of the page. This area displays an activity log of all activities that occurred in the current browser session. Notifications include:
c) Important: If a transaction causes an error, you are notified of this on the associated transaction screen. All error messages and notifications returned by the system are displayed in the Activity Feed area only. We recommend that you regularly inspect the Activity Feed area during each browser session.
d) Drop-down Options—Directly above the Activity Feed area, the currently signed-in user is displayed. There are four options in this drop-down list:
First Sign In You may be prompted to change your password when you sign in to Self-Service for the first time.
Procedure1. Enter the current password in the Current Password field. 2. Enter the new password in the New Password field. 3. Re-enter the new password in the Confirm New Password field. 4. Click the Change button. 5. Browse to the website address provided using a web browser.
Password Hints When considering a password, make sure that it:
Consists of at least eight characters, and contains at least:
Do not use keyboard pattern or obvious passwords such as a birthday or your name.
Do not share your password with other users.
Do not write down your password or store it in an obvious place, such as sticking a note on your computer monitor, or writing it in a diary or journal.
Session Timeout To keep your information secure, Self-Service is designed with an automatic session timeout feature. Session timeouts are set up in your credential policy by your administrator.
There are two types of timeouts:
Idle Timeout
Defines the number of minutes a session remains active when there is no activity. Default is 20 minutes.
Absolute Timeout
Defines the maximum number of minutes a session can be active. Default is 1440 minutes (24 hrs). In both instances, you see the following message:
Your session will expire in 30 seconds
Idle TimeoutIf you use your mouse or keyboard after receiving the session timeout notification, this action is considered to be 'activity' and results in the extension of your current session. If there is no activity within the specified time, you are automatically logged out of Self-Service and returned to the Login screen, when you try to perform a transaction.
Cisco Unified Communications Domain Manager Self Service Guide, Release 11.5(3) 9

Introduction / Available Features and Services
Absolute TimeoutAfter the time period elapses, you are automatically logged out of Self-Service and returned to the Login screen.
Available Features and Services Depending on how your administrator has set up Self-Service, not all the features and services described in this guide may be available to you.
For example, you can only access Voicemail if a Voicemail account has been created for you. Access is provided either by your administrator or by you (if you have the required permissions).
Your administrator can also enable either full Voicemail or limited Voicemail. With limited Voicemail, you cannot use some settings such as Call Input or Alternative Numbers & Notification Devices.
10 Cisco Unified Communications Domain Manager Self Service Guide, Release 11.5(3)

Manage Self Service Manage Your Self-Service on page 11
Set up Your Password Reset Questions on page 11
Reset Your Password on page 12
Manage Your Self-Service When you are signed in to your Self-Service account, you can:
Reset Your Password—Accessed from your Login page when you have forgotten your password.
Note: This capability is available only to non-LDAP or SSO users. Consult your administrator for more information.
Password Reset Questions—Allows you to set up your own password reset questions.
Set up Your Password Reset Questions
Note: You can set up your own password reset questions only if the credential policy applied to your user account has Number of Questions Asked During Password Reset set to > 0.
Procedure1. Sign in to Self-Service. 2. Click the arrow next to the signed-in user at the top right side of the screen above the Activity Feed area. 3. Choose the Password Reset Questions option from the drop-down menu. The Password Reset Questions screen is displayed.
Cisco Unified Communications Domain Manager Self Service Guide, Release 11.5(3) 11

Manage Self Service / Reset Your Password
4. Type your password in the Current Password* field. 5. Choose the required security question from the Question* drop-down menu. 6. Enter your answer to the question in the Answer* field. 7. Repeat steps 5 and 6 until you have set up the required number of security questions (as determined by your administrator). 8. Enter your password in the Please enter your password field. 9. Click Submit when complete to save your security questions and answers.
Reset Your Password You can only reset your password if you have already provided answers to the security questions created by your administrator.
If you forget your password while attempting to sign in to Self-Service:
Procedure1. Enter your username or email address in the Username or Email field on the Login screen. 2. Click the I forgot my password hyperlink located below the Password field. 3. Click in each security question field and type the correct answer. The number of available security questions is set by your
administrator. 4. Click in the New Password field and type your new password. 5. Re-enter your new password in the Repeat Password field. 6. Click Submit. Your password is changed and you return to the Login screen.
12 Cisco Unified Communications Domain Manager Self Service Guide, Release 11.5(3)

Buttons and Common Tasks Buttons and Icons on page 13
Common Tasks on page 14
Buttons and Icons The button names are displayed when you hover over a button. The available buttons depend on how your Administrator has set up Self-Service.
Cisco Unified Communications Domain Manager Self Service Guide, Release 11.5(3) 13

Buttons and Common Tasks / Common Tasks
Icon Button Description
Home Displays an overview of your Self-Service configuration, including quick links to the
main features and a summary of your phones.
My Information Provides a view of your personal information as set up by your administrator.
Phones Displays all phones (and associated lines) assigned to you by your administrator. Also
allows you to configure the phone’s lines.
Voicemail Displays the Voicemail settings. This area is visible only if you have a voice mailbox
configured. Consult your administrator if necessary.
Call Forwarding Displays the call forwarding status of your phone lines.
My Availability Displays the Do Not Disturb settings for each of your phones.
Speed Dials and BLFs Allows you to manage the speed dials and busy lamp fields for each of your phones.
Links Displays hyperlinks to predetermined objects or items such as a support site or a downloadable user guide.
Help Displays the help pages for each area of Self-Service, such as Phones, Voicemail, Call
Forwarding, Speed Dials, and so on.
Logout Logs you out of the Self-Service interface.
Add or Insert Creates a new item such as a phone, line, or speed dial.
Edit Edits an existing item, such as editing a phone description or number.
Remove or Delete Removes or deletes the selected item; for example, removes a personal phone or speed dial entry.
Information Icon Typically located in the top right corner of certain display areas such as ‘Select a Phone’,
‘Your Personal Phones’, and so on, or next to an item. When you move your cursor over this icon, text is displayed that describes the purpose of the particular area or item.
Active Flag Shows when certain line settings such as call forwarding or do not disturb are active.
Inactive Flag Shows when certain line settings such as call forwarding or do not disturb are inactive.
Refresh Located in the top right corner of each display area that can be edited. Click to update or
edit a specific area. Typically done to refresh the view to include any updates, such as adding a speed dial.
Close Located in the top right corner of a popup window. Click to close the popup window.
Common Tasks Use the Self-Service interface to perform several common tasks.
Inline Editing lets you edit any text that you can select and edit directly on the page without going to a separate page. It makes editing more direct, easier, and faster because you can edit the text in the same place where it is shown.
Inline Editing is best for a simple, occasional change. If the main action on the page is to add or edit detailed information for a phone or line, then it is better to use Edit Mode.
ProcedureUse either of the following methods to perform edits in the user interface.
14 Cisco Unified Communications Domain Manager Self Service Guide, Release 11.5(3)

Buttons and Common Tasks / Common Tasks
Option Description
Inline Editing 1. Click in the relevant field (for example, phone and speed dial names and numbers). The Save changes and Cancel buttons appear when you enter text in the field.
2. Click Save changes to save the changes or click Cancel to cancel the change.
Edit Mode Click a specific phone or line to open a detailed view of the selected item that you can edit on the right side of the screen.
Cisco Unified Communications Domain Manager Self Service Guide, Release 11.5(3) 15

Dashboard Home on page 17
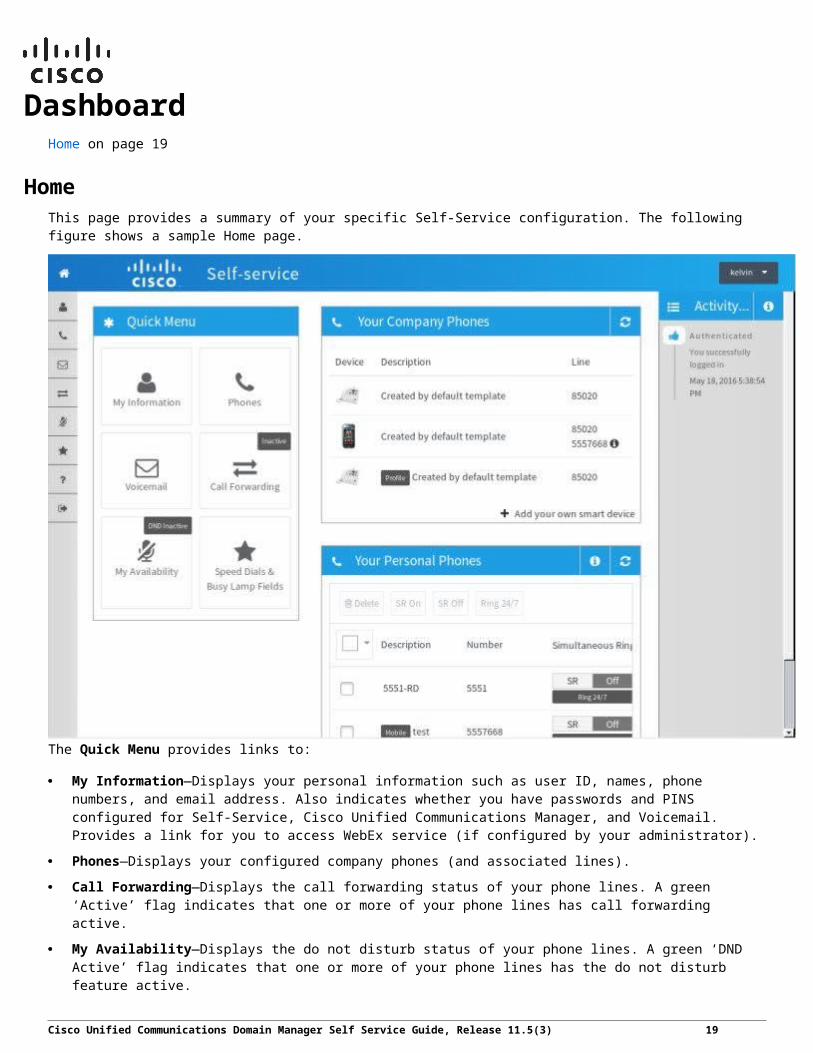
Home This page provides a summary of your specific Self-Service configuration. The following figure shows a sample Home page.
The Quick Menu provides links to:
My Information—Displays your personal information such as user ID, names, phone numbers, and email address. Also indicates whether you have passwords and PINS configured for Self-Service, Cisco Unified Communications Manager, and Voicemail. Provides a link for you to access WebEx service (if configured by your administrator).
Phones—Displays your configured company phones (and associated lines).
Call Forwarding—Displays the call forwarding status of your phone lines. A green ‘Active’ flag indicates that one or more of your phone lines has call forwarding active.
My Availability—Displays the do not disturb status of your phone lines. A green ‘DND Active’ flag indicates that one or more of your phone lines has the do not disturb feature active.
Speed Dials & BLFs - Displays the speed dial and busy lamp field configuration (if set up) for each of your company phones.
Cisco Unified Communications Domain Manager Self Service Guide, Release 11.5(3) 17
Dashboard / Home
Voicemail—Displays the configured time zone and language settings for your Voicemail account. These settings are only visible if you have a voice mailbox.
Links—Displays links to predetermined objects or items such as a support site or a downloadable user guide.
Personal Phones—Lists your personal phones, such as home phone, tablet, mobile phone, and so on. Personal phones can also be configured (if necessary) to ring whenever a company phone rings (to facilitate the Single Number Reach feature). You can also edit existing personal phones (by setting them to ring simultaneously with your company phones), or add new phones if necessary. You can only see this feature if your administrator set up a remote destination profile (RDP) to you. Note also that multiple RDPs per user are not supported. If you are associated with multiple RDPs, the personal phones feature is hidden. If a dual-mode device, such as Cisco Dual Mode for Android or iPhone, is associated to you, you can manage both the phone number and simultaneous ring setting for the device. See Add a Personal Phone on page 29, Edit a Personal Phone on page 30, and Delete a Personal Phone on page 30 for more information on each task.
18 Cisco Unified Communications Domain Manager Self Service Guide, Release 11.5(3)

My Information My Information on page 19
Change Your User Language on page 20
Manage Your Password and PIN on page 20
Change Your Password on page 20
Change Your PIN on page 20
Access WebEx on page 20
My Information View the "My Information" page from the Quick Menu, or by clicking on the button bar. Use this page to view your personal information as set up by the administrator. The following figure provides an example of the My Information page.
In this example, dimmed items such as User ID, names, manager, department, and email address cannot be edited. Editable details include language.
Note: If you are unable to edit phone numbers and email address, it may be because of the way your Self-Service interface is set up. Contact your administrator for more information.
The My Credentials section on the page displays all Self-Service, Cisco Unified Communications Manager, and Voicemail passwords and PINS (if configured by your administrator).
Figure 4: Sample My Credentials
Passwords and PINs can be changed. See Manage Your Password and PIN on page 20 for more details.
The WebEx Self-Service section of the screen is only visible if your administrator has configured you to use the WebEx feature. This section of the screen provides you with a link to the WebEx server. See Access WebEx on page 20 for details.
Cisco Unified Communications Domain Manager Self Service Guide, Release 11.5(3) 19

My Information / Change Your User Language
Change Your User Language Procedure
1. Click on the button bar.2. In the My Information section of the screen, choose the required language from the Language drop-down list.3. Click Save when complete.
Text displayed in the Self-Service interface is shown in your chosen language.
Manage Your Password and PIN Your password allows you to sign in to Self-Service. Your administrator assigns a password to you when your user account is created. See First Sign In on page 9.
Make sure that your passwords are secure. Passwords must include at least one numeral, one punctuation character, and must be a combination of uppercase and lowercase letters. See Change Your Password on page 20 and Password Hints on page 9.
Your PIN allows you to sign in to a phone using Roaming Login/Logout. When your administrator creates your user and roaming profile, you are allocated a default PIN. See Change Your PIN on page 20.
Change Your Password Procedure
1. Click on the button bar.2. In the My Credentials section of the screen, enter your Current Password.
The New Password field appears.3. Enter a new password in the New Password field (Self-Service, Unified CM, or Voicemail) as applicable. See Password Hints
on page 9 for more information.
Note: When you enter your new password, a password strength meter appears above the New Password field. This meter indicates the strength of your password; for example, ‘Weak password, estimated crack time: 7 hours’, ‘Good password, estimated crack time: 3 months’, ‘Perfect password, estimated crack time: centuries’. The New Password field also displays a checklist to show you how well your new password meets the Password Hints on page 9.
4. Confirm (re-enter) your password in the appropriate repeat password field.5. Click Save to change your password.
Change Your PIN Procedure
1. Click on the button bar.2. In the My Credentials section of the screen, enter a new PIN in the New Pin field.3. Confirm (re-enter) your PIN in the Repeat Pin field.4. Click Save Pin.
Access WebEx This feature is available only if your administrator has provided you with this capability.
Procedure
1. Click on the button bar. The Webex Self Service box appears in the lower right of the “My Information” page.
20 Cisco Unified Communications Domain Manager Self Service Guide, Release 11.5(3)

My Information / Access WebEx
2. Click the Launch Webex Self Service link.
You are redirected to your WebEx server.3. Enter your User ID and password for the WebEx session.
Cisco Unified Communications Domain Manager Self Service Guide, Release 11.5(3) 21

Phones Phones on page 23
Manage a Phone on page 25
Add Your Own Smart Device on page 26
Edit a Smart Device on page 27
Bulk Modify Your Company Phones on page 28
Your Personal Phone Management on page 29
Add a Personal Phone on page 29
Edit a Personal Phone on page 30
Delete a Personal Phone on page 30
Bulk Modify Your Personal Phones on page 30
Phones When you click the icon on the button bar or Quick Menu, the Phones page appears as shown in the following example.
Cisco Unified Communications Domain Manager Self Service Guide, Release 11.5(3) 23

Phones / Bulk Modify Your Company Phones
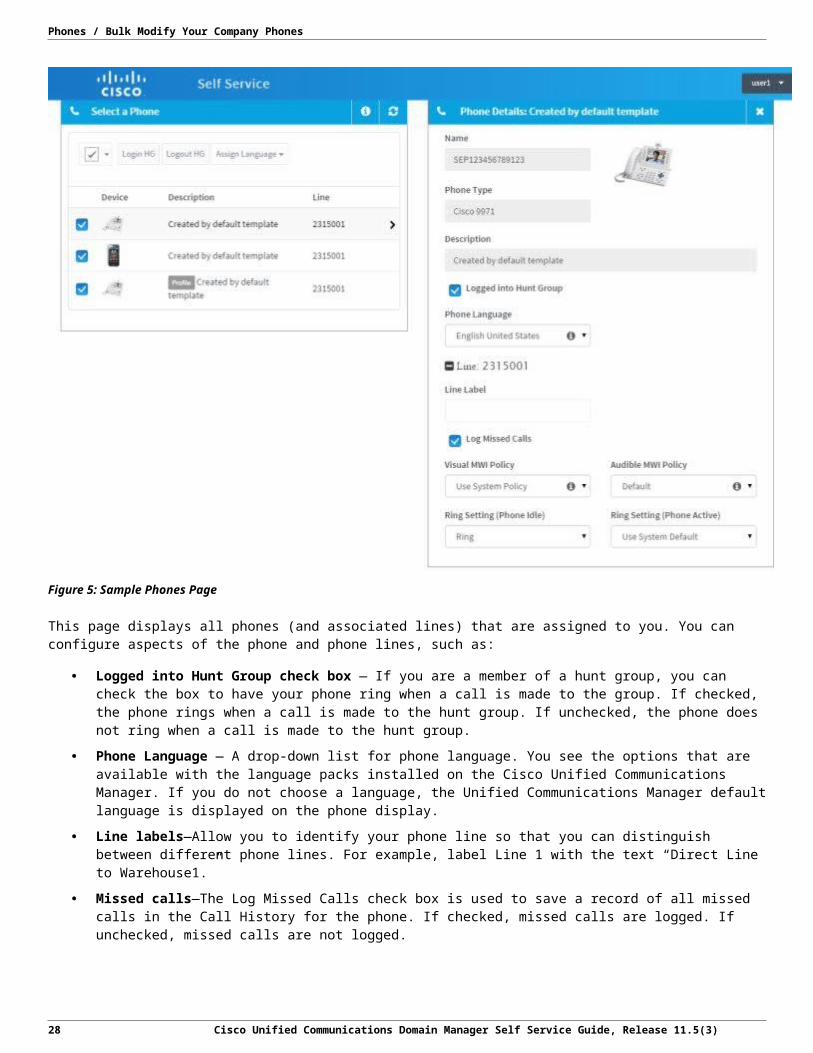
Figure 5: Sample Phones Page
This page displays all phones (and associated lines) that are assigned to you. You can configure aspects of the phone and phone lines, such as:
Logged into Hunt Group check box — If you are a member of a hunt group, you can check the box to have your phone ring when a call is made to the group. If checked, the phone rings when a call is made to the hunt group. If unchecked, the phone does not ring when a call is made to the hunt group.
Phone Language — A drop-down list for phone language. You see the options that are available with the language packs installed on the Cisco Unified Communications Manager. If you do not choose a language, the Unified Communications Manager default language is displayed on the phone display.
Line labels—Allow you to identify your phone line so that you can distinguish between different phone lines. For example, label Line 1 with the text “Direct Line to Warehouse1.”
Missed calls—The Log Missed Calls check box is used to save a record of all missed calls in the Call History for the phone. If checked, missed calls are logged. If unchecked, missed calls are not logged.
Visual and audible Message Waiting Indication (MWI) setting—Choose how you are alerted when there are messages waiting for you. Visual options are Use System Policy (set up by your system administrator), Prompt Only (the phone beeps when you answer it), Light Only (a lamp that lights when messages are waiting), Light and Prompt (both visual and audible prompts), and None (no indicators). Audible options are Default, Off, or On.
24 Cisco Unified Communications Domain Manager Self Service Guide, Release 11.5(3)

Phones / Your Personal Phone Management
Ring settings—Ring settings determine how your phone rings when an incoming call is received. You can set different rings for when you are already on a call and when you are not on a call. Options are: Use System Default, Disable, Flash Only, Ring Once, Ring, and Beep Only.
Manage a Phone Procedure
1. Click on the button bar. 2. Click the phone that you want to edit.
The details about the phone are displayed. The basic phone details, such as name, phone type, protocol, and description are dimmed, and cannot be edited.
3. If the phone is a member of a hunt group, you can check or uncheck the Logged into Hunt Group check box to sign in or sign out of the hunt group. If checked, the phone rings when a call is made to the hunt group.
If unchecked, the phone does not ring when a call is made to the hunt group.
4. Click the Phone Language drop-down list and choose the required language to display on your phone. Only languages that are installed on the Cisco Unified Communications Manager are available in the drop-down list. If you do not choose a language, the phone automatically uses the default language configured in Cisco Unified Communications Manager.
5. Click + next to the line that you want to edit. 6. Add or edit the Line Label if necessary. 7. Check or uncheck the Log Missed Calls check box. If checked, this indicates that missed calls are logged. 8. Configure the required visual message waiting indicator policy if necessary, by selecting the desired option from the drop-down
list. Choose a message waiting policy based on the needs of your users. Choices are: Option Description
Use System Policy Follows the policy determined by your system administrator. Contact your administrator if you are not sure what policy is used.
Light and Prompt Lights the lamp and displays the prompt if there is a message waiting on this line of your phone.
Prompt only Displays the prompt if a message is waiting on the primary line.
Light only Lights the message-waiting lamp if a message is waiting on the primary line.
None Lamp stays off even when you have messages waiting on this line. The message waiting indicator on your phone's display still shows if you have messages on this line.
An administrative assistant who shares the manager's directory number as a secondary directory number may want to have the policy set to Light and Prompt. The administrator can then see whether the manager's line has pending voice messages. General office members who share a line with a coworker, may set the policy so the indicator lights only when messages are pending for the primary line appearance.
9. Configure the required audible message waiting indicator policy if required by selecting the required option from the drop-down list. Choose one of: Off, On, or Default.
10. Configure the required ring setting (phone idle). This setting defines the way the line on your phone rings when you receive a call while you are not using the phone. Choose one of: Use System Default, Disable, Flash only, Ring once, Ring, and Beep only.
Cisco Unified Communications Domain Manager Self Service Guide, Release 11.5(3) 25
Phones / Bulk Modify Your Company Phones
11. Configure the required ring setting (phone active). This setting defines the way the line on your phone rings when you receive a call while you are on the phone. Choose one of: Use System Default, Disable, Flash only, Ring once, Ring, and Beep only.
12. Click Save changes to save the settings or Cancel to cancel the changes.
Changes made in Self-Service are automatically synchronized with Cisco Unified Communications Manager.
Add Your Own Smart Device Procedure
1. Click on the button bar. 2. In the Your Company Phones section of the screen, click + Add your own smart device. 3. In the Description field, enter a name for your smart device. 4. Select the required lines (check boxes) to associate to the smart device. 5. In the Device Type drop-down list, select the required smart device from the options. For example, iPhone, iPad, Android Phone,
or Tablet. 6. In the Your mobile number field, enter a number for your smart device. 7. Select the required check boxes to configure your smart device. For example, use this phone for retrieving voicemail messages,
and receive SMS notifications for voicemail messages.
26 Cisco Unified Communications Domain Manager Self Service Guide, Release 11.5(3)

Phones / Your Personal Phone Management
8. Click Save to save the smart device or Cancel to cancel adding the smart device.
Changes made in Self-Service are automatically synchronized with Cisco Unified Communications Manager.
Edit a Smart Device Procedure
1. Click on the button bar. 2. In the Your Company Phones section of the screen, click the smart device that you want to edit. 3. Change the smart device details as necessary. See Manage a Phone on page 25 for details.
Note: The administrator is the only person who can delete phones in the Your Company Phones area of the Self-Service interface.
Cisco Unified Communications Domain Manager Self Service Guide, Release 11.5(3) 27

Phones / Bulk Modify Your Company Phones
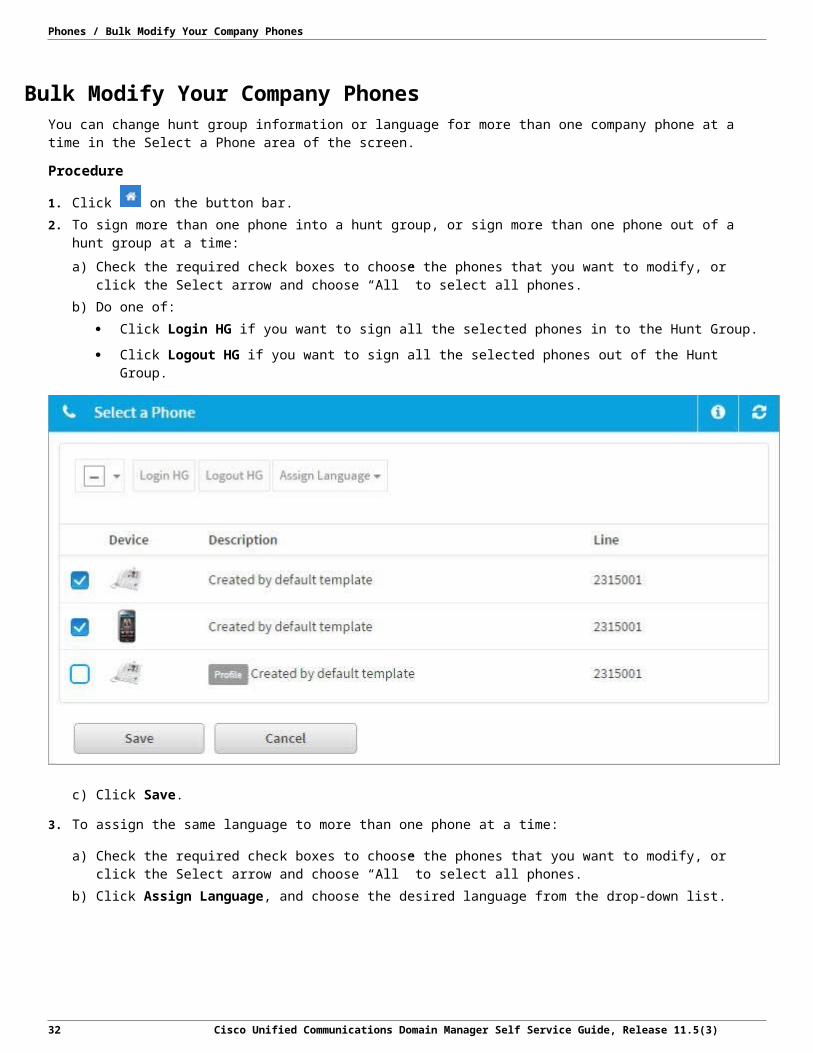
Bulk Modify Your Company Phones You can change hunt group information or language for more than one company phone at a time in the Select a Phone area of the screen.
Procedure
1. Click on the button bar. 2. To sign more than one phone into a hunt group, or sign more than one phone out of a hunt group at a time:
a) Check the required check boxes to choose the phones that you want to modify, or click the Select arrow and choose “All” to select all phones.
b) Do one of: Click Login HG if you want to sign all the selected phones in to the Hunt Group.
Click Logout HG if you want to sign all the selected phones out of the Hunt Group.
c) Click Save.
3. To assign the same language to more than one phone at a time:
a) Check the required check boxes to choose the phones that you want to modify, or click the Select arrow and choose “All” to select all phones.
b) Click Assign Language, and choose the desired language from the drop-down list.
28 Cisco Unified Communications Domain Manager Self Service Guide, Release 11.5(3)

Phones / Your Personal Phone Management
c) Click Save.
Your Personal Phone Management Your Personal Phones is only available (and visible) if your administrator has allocated a remote destination profile (RDP) to you. Multiple RDPs per user is not supported. If you are associated with multiple RDPs, the personal phones feature is hidden. If a dual mode device, such as the Cisco Dual Mode for Android or iPhone, is associated to you, you can manage both the phone number and simultaneous ring setting for the device.
The badge in the description column (Mobile or SNR) indicates which of the two types of remote destination personal phones this is:
You can also allocate a remote destination profile to yourself (if your Administrator has given you the required permissions) by clicking + Click here to enable personal phone management.
Changes made in Self-service are automatically synchronized with Unified CM.
Procedure1. Mobile = Mobile Identity dual mode device, Example Iphone, Android, Tablet2. SNR = Single Number Reach (remote destination profile). For SNR type personal phones only, a Move to Mobile toggle switch is
available to facilitate the transfer of active calls to this mobile phone.
Add a Personal Phone
Before you BeginYou can only add a SNR type personal phone.
Procedure1. Click Home.2. In the Your Personal Phones section of the screen, click on the + Add a Phone link to add a new personal phone.3. Enter a name for your phone in the Description field.4. Enter a number for your phone in the Number field.5. Configure Simultaneous Ring and/or Move to Mobile as required (see below).
Cisco Unified Communications Domain Manager Self Service Guide, Release 11.5(3) 29
Phones / Bulk Modify Your Company Phones
Configure Simultaneous Ring Procedure1. Set the Simultaneous Ring toggle switch to either Ring On or Ring Off. Ring On = Simultaneous Ring enabled (this phone rings
simultaneously when your company phones are called), Ring Off = Simultaneous Ring disabled.2. Click Next.3. Check or uncheck the Line, for example 4301, check box. When checked, simultaneous ring is active for the selected line(s).4. Choose the time zone for the phone from the drop-down list.5. Check or uncheck the Set advanced timer options for simultaneous ring check box. If checked, configure the following:
Number of seconds to wait before this phone rings when the business line is dialed.
Fine tune options to prevent the redirected calls from reaching the phone’s Voicemail.
6. Click Next.7. Configure the phone’s ring schedule: choose either Ring 24/7 or Add a ring schedule as follows:
Enter a ring schedule name.
Specify the days (alternatively click the Select drop-down and choose an option), status (Ring On or Off), and times (From, To) for the ring schedule.
8. Click Save to add the personal phone or Cancel to abort.
Configure Move to Mobile Procedure1. To transfer active calls to the SNR type personal phone, set the Move to Mobile toggle switch to MP On, click Next twice, and
then click Save.2. Changes made in Self-service are automatically synchronized with Unified CM.
Edit a Personal Phone Procedure1. In the Your Personal Phones section of the screen, click the Edit icon next to the phone that you want to edit. 2. Edit the name of your phone in the Description field. 3. Edit the number of your phone in the Number field. 4. Edit the Simultaneous Ring (SR) On/Off toggle switch.5. Edit the Move to Mobile On/Off toggle switch (only available for SNR type personal phones). See Add a Personal Phone on page
29 for details. 6. Click Save when complete to implement the changes or Cancel to cancel the changes. Changes made in Self-Service are
automatically synchronized with Cisco Unified Communications Manager.
Note: See Bulk Modify Your Company Phones on page 28 for information on how to edit the settings for multiple phones at once.
Delete a Personal Phone See Bulk Modify Your Company Phones on page 28 for details on how to delete one or more personal phones.
Bulk Modify Your Personal Phones You can change more than one personal phone at the same time in the Your Personal Phones area of the screen.
Procedure
1. Click on the button bar.
30 Cisco Unified Communications Domain Manager Self Service Guide, Release 11.5(3)

Phones / Your Personal Phone Management
2. Check the required check boxes to choose the phones that you want to modify, or click the Select arrow and choose “All” to select all phones.
3. Modify personal phone settings:
Task Steps
To set simultaneous ring on or off for one or more phones Click SR On if you want the selected phones to have simultaneous ring set to On. If you choose SR On, the selected phones automatically always ring when your company phone rings.
Click SR Off if you do not want the selected phones to have simultaneous ring set on.
To set up the ring schedule for one or more phones Click Ring 24/7 if you want the selected phones to always ring when your company phone rings, regardless of the day or time.
If you do not click Ring 24/7, the phones keep their original ring schedule.
To delete one or more personal phones 1. Click Delete, to delete the selected personal phones. A confirmation dialog box appears.
2. Click Yes to delete the phones or click Cancel to cancel the deletion.
4. Click Save to save the changes, or click Cancel to cancel the changes.
Example: Bulk Modify Your Personal PhonesIn this example, Phone 1234 has Simultaneous Ring set to ON so the personal phone rings whenever the company phone rings. The phone is set to ring 24 hours a day, seven days a week. Because the simultaneous ring settings are active they appear green in color, and are not dimmed. The checked box at the top shows that if there were more than one personal phone, all phones would have the same settings.
Cisco Unified Communications Domain Manager Self Service Guide, Release 11.5(3) 31

Phones / Bulk Modify Your Company Phones
32 Cisco Unified Communications Domain Manager Self Service Guide, Release 11.5(3)

Voice Mail Voicemail on page 33
Create Your Own Voicemail Account on page 34
Change Your Voicemail Settings on page 35
Alternate Numbers & Notification Devices on page 36
Manage Alternate Numbers & Notification Devices on page 37
Caller Input on page 38
Manage Caller Input Keys on page 39
Message Actions on page 40
Manage Message Actions on page 40
Voicemail You can only see this page if a voicemail account has been assigned to you. Either you (if you have permission) or your administrator sets up the voicemail account. Your administrator also sets up the Voicemail features and services that are available to you. See Available Features and Services on page 10.
Once you have a voicemail account, you can change some voicemail settings from within Self-Service, such as Time Zone and Language settings. You can also manage your Caller Input keys, Alternate Numbers & Notification Devices, and Message Actions.
Cisco Unified Communications Domain Manager Self Service Guide, Release 11.5(3) 33

Voice Mail / Create Your Own Voicemail Account
Figure 6: Sample Voicemail Page
Figure 7: Sample Voicemail Page
Create Your Own Voicemail Account Procedure
1. Click on the button bar.
34 Cisco Unified Communications Domain Manager Self Service Guide, Release 11.5(3)
Voice Mail / Manage Caller Input Keys
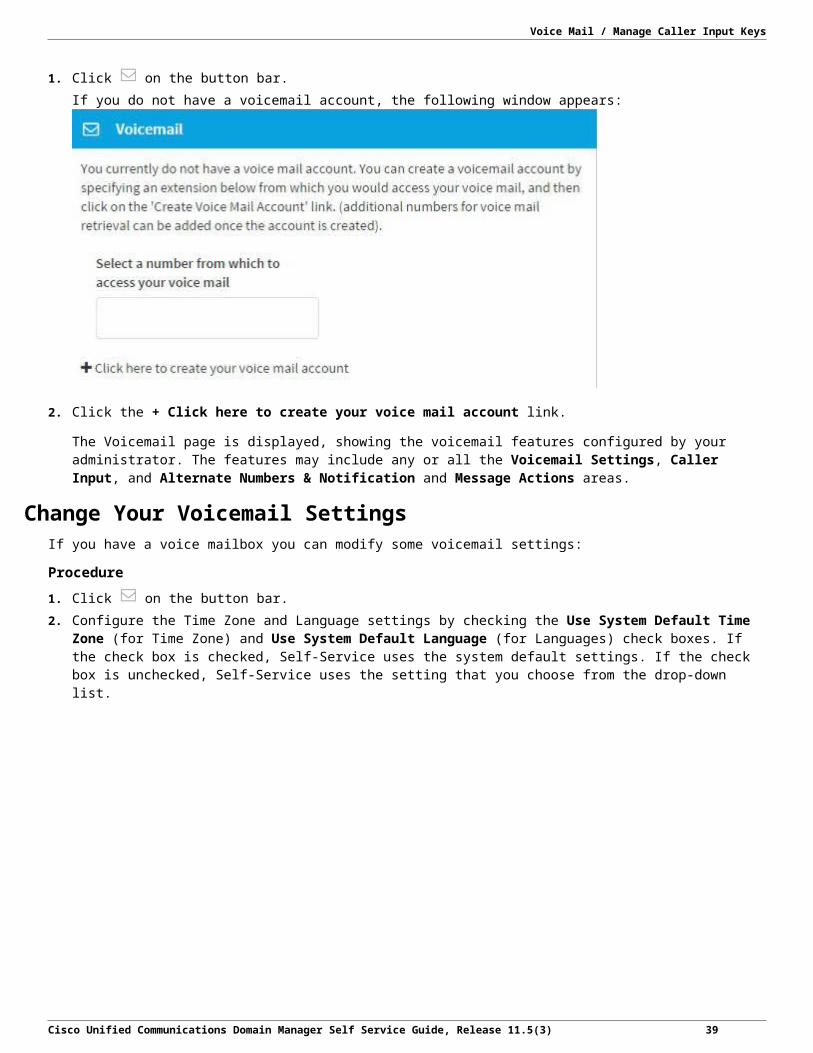
If you do not have a voicemail account, the following window appears:
2. Click the + Click here to create your voice mail account link.
The Voicemail page is displayed, showing the voicemail features configured by your administrator. The features may include any or all the Voicemail Settings, Caller Input, and Alternate Numbers & Notification and Message Actions areas.
Change Your Voicemail Settings If you have a voice mailbox you can modify some voicemail settings:
Procedure
1. Click on the button bar. 2. Configure the Time Zone and Language settings by checking the Use System Default Time Zone (for Time Zone) and Use
System Default Language (for Languages) check boxes. If the check box is checked, Self-Service uses the system default settings. If the check box is unchecked, Self-Service uses the setting that you choose from the drop-down list.
Cisco Unified Communications Domain Manager Self Service Guide, Release 11.5(3) 35

Voice Mail / Create Your Own Voicemail Account
3. Click Save when complete to save the voicemail settings or Cancel to cancel the changes you made.
Alternate Numbers & Notification Devices You can use alternate numbers to provide extra access points to your voice mailboxes.
Notifications are used to notify you when you have a new voicemail message. For example, you can set up the system to send you notification using the phone or SMS when you receive a new voicemail message.
36 Cisco Unified Communications Domain Manager Self Service Guide, Release 11.5(3)
Voice Mail / Manage Caller Input Keys
Figure 8: Example Alternate Numbers & Notification Devices Page
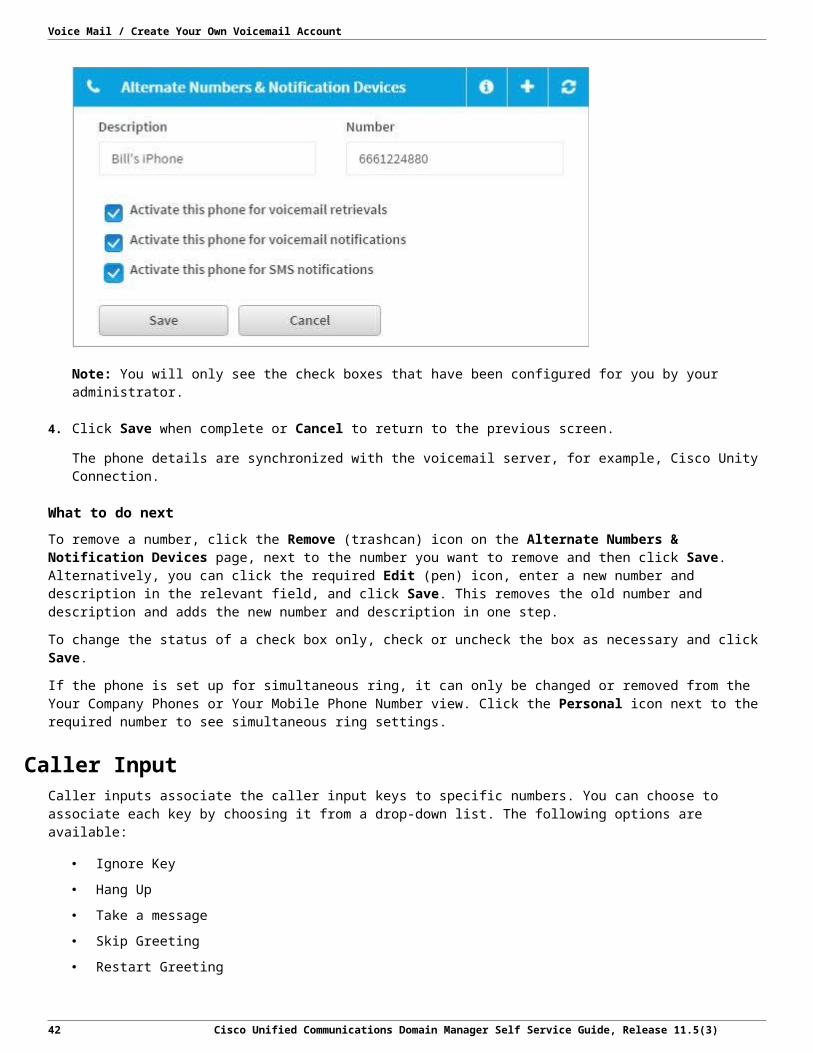
Manage Alternate Numbers & Notification Devices To add a new phone number as an alternate number or notification device from which you can retrieve voicemail or voicemail notifications respectively:
Procedure1. Click the + icon on the Alternate Numbers & Notification Devices page.
The following page appears:
2. Enter a Description and Number for the phone.3. Check or uncheck the Activate this phone for voicemail retrievals, Activate this phone for voicemail notifications, and
Activate this phone for SMS notifications check boxes. If you check the box, the phone is activated for the service.
Cisco Unified Communications Domain Manager Self Service Guide, Release 11.5(3) 37

Voice Mail / Create Your Own Voicemail Account
Note: You will only see the check boxes that have been configured for you by your administrator.
4. Click Save when complete or Cancel to return to the previous screen.
The phone details are synchronized with the voicemail server, for example, Cisco Unity Connection.
What to do nextTo remove a number, click the Remove (trashcan) icon on the Alternate Numbers & Notification Devices page, next to the number you want to remove and then click Save. Alternatively, you can click the required Edit (pen) icon, enter a new number and description in the relevant field, and click Save. This removes the old number and description and adds the new number and description in one step.
To change the status of a check box only, check or uncheck the box as necessary and click Save.
If the phone is set up for simultaneous ring, it can only be changed or removed from the Your Company Phones or Your Mobile Phone Number view. Click the Personal icon next to the required number to see simultaneous ring settings.
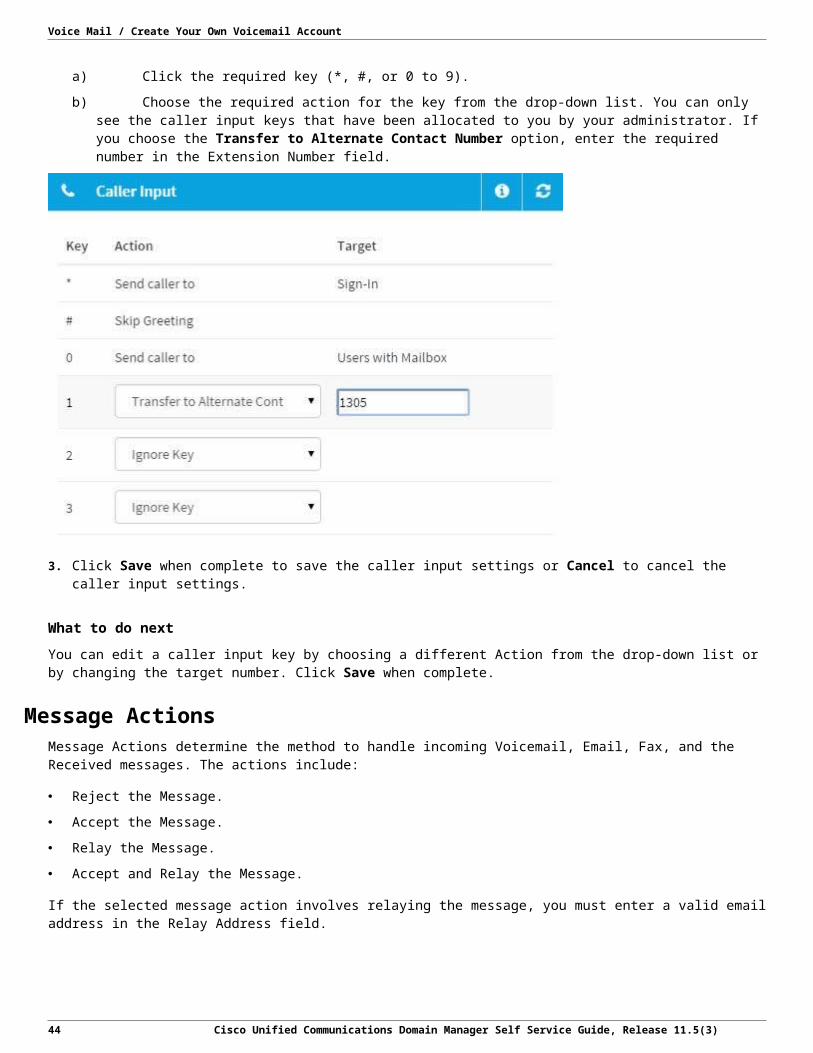
Caller Input Caller inputs associate the caller input keys to specific numbers. You can choose to associate each key by choosing it from a drop-down list. The following options are available:
Ignore Key
Hang Up
Take a message
Skip Greeting
Restart Greeting
Transfer to Alternate Contact Number
38 Cisco Unified Communications Domain Manager Self Service Guide, Release 11.5(3)

Voice Mail / Manage Caller Input Keys
Send caller to User
Figure 9: Example Caller Input Page
Manage Caller Input Keys Procedure
1. Click on the button bar to open the Voicemail Settings page. 2. In the Caller Input area, configure the caller input keys as necessary:
a) Click the required key (*, #, or 0 to 9).
Cisco Unified Communications Domain Manager Self Service Guide, Release 11.5(3) 39
Voice Mail / Create Your Own Voicemail Account
b) Choose the required action for the key from the drop-down list. You can only see the caller input keys that have been allocated to you by your administrator. If you choose the Transfer to Alternate Contact Number option, enter the required number in the Extension Number field.
3. Click Save when complete to save the caller input settings or Cancel to cancel the caller input settings.
What to do nextYou can edit a caller input key by choosing a different Action from the drop-down list or by changing the target number. Click Save when complete.
Message Actions Message Actions determine the method to handle incoming Voicemail, Email, Fax, and the Received messages. The actions include:
Reject the Message.
Accept the Message.
Relay the Message.
Accept and Relay the Message.
If the selected message action involves relaying the message, you must enter a valid email address in the Relay Address field.
Manage Message Actions Complete this task to select the Voicemail type and the necessary action.
Procedure1. Click Voicemail to open the Voicemail Settings screen.2. In the Message Actions area, you can:
Click the required Message Type drop-down. For example: Voicemail. Choose the required message action from the drop-down.
40 Cisco Unified Communications Domain Manager Self Service Guide, Release 11.5(3)

Voice Mail / Manage Caller Input Keys
Enter a valid email address in the Relay Address field. This is required, if the selected message action requires to relay the message. For example: Selecting the Accept and Relay the Message option.3.
3. Click Save to save the changes to message action settings or Cancel to terminate the changes.
You can edit message actions by choosing a different message action from the drop-down list and click Save when complete.
Cisco Unified Communications Domain Manager Self Service Guide, Release 11.5(3) 41
Call Forwarding Call Forwarding on page 43
Activate and Manage a Line for Call Forwarding on page 43
Call Forwarding This screen displays the call forwarding status of your phone lines (Active when call forwarding is enabled, Inactive when call forwarding is disabled). The following figure shows a sample of the Call Forwarding page and its options.
Figure 10: Sample Call Forwarding Page
Activate and Manage a Line for Call Forwarding Procedure
1. Click on the button bar. Your lines are displayed showing the call forwarding status of each line. 2. Select the relevant “Inactive” line to set up and activate call forwarding settings.
The settings are also collectively known as the "Line Profile.” See Note at the end of this section for more information on Line Profiles. The following call forward settings are available:
Cisco Unified Communications Domain Manager Self Service Guide, Release 11.5(3) 43

Call Forwarding / Activate and Manage a Line for Call Forwarding
Option Description
Forward all incoming calls To forward all incoming calls to a specific number or Voicemail under all circumstances, check the Activate call forwarding & forward all calls to: box and choose the required destination from the drop-down list. Alternatively, choose the Specify another number option and enter your own destination in the adjacent free text field if necessary. If this box is checked, the other call forwarding options are hidden.
Internal calls (calls from a company phone number) To forward all incoming internal calls to a specific number or Voicemail when the line is busy, check the When the line is busy, forward calls to: box, and choose the required destination from the drop-down list.
To forward all incoming internal calls to a specific number or Voicemail when there is no answer, check the When there is no answer, forward calls to: box, and choose the required destination from the drop-down list.
Alternatively, choose the Specify another number option and enter your own destination in the adjacent free text fields if necessary.
External calls (calls from outside my company) To forward all external calls to a specific number or Voicemail when the line is busy, check the When the line is busy, forward calls to: box, and choose the required destination from the drop-down list.
To forward all external calls to a specific number or Voicemail when there is no answer, check the When there is no answer, forward calls to: box, and choose the required destination from the drop-down list.
Alternatively, choose the Specify another number option and enter your own destination in the adjacent free text field if necessary.
3. Click Save when complete.
When you click Save at any point, you are given a choice to apply the call forward settings to all lines or to this line only. Click the relevant button: Yes, Apply to all lines or No, only this line.
44 Cisco Unified Communications Domain Manager Self Service Guide, Release 11.5(3)

Call Forwarding / Activate and Manage a Line for Call Forwarding
What to do nextTo turn off call forwarding for a line, click the required ‘Active’ line, uncheck the check boxes, and click Save. Alternatively, you can check the relevant check boxes in the Select a Line area of the screen, or click the Select arrow and choose All to select all lines, and then click Deactivate CF.
To edit call forwarding settings for a line, click the required ‘Active’ line, change the settings as required, and click Save. Alternatively, you can apply the line settings for one of your lines to other lines by checking the relevant check boxes in the Select a Line area of the screen, clicking Assign Line Profile, choosing the line profile to copy from the drop-down list, and clicking Save.
Cisco Unified Communications Domain Manager Self Service Guide, Release 11.5(3) 45

My Availability My Availability on page 47
Set Do Not Disturb for Your Phone on page 47
My Availability This page displays the Do Not Disturb settings for each of your phones. When a setting appears Green it shows that the setting is Active or Enabled. When a setting is dimmed, it shows that the setting is Inactive or Disabled.
Figure 11: My Availability Page
Set Do Not Disturb for Your Phone Procedure
1. Click on the button bar or Quick Menu to view the status of the Do Not Disturb (DND) settings for your phones.2. (Optional) You can modify the Do Not Disturb setting for multiple phones at the same time:
a) Check the check boxes to choose the phones you want to modify, or click the Select arrow and choose All to select all phones.
b) Complete steps 3 and 4 to set the DND setting and save the DND setting for all selected phones.
3. Click the DND switch beside each phone as required: DND On indicates that DND is active for the phone. The DND switch turns green when active.
Cisco Unified Communications Domain Manager Self Service Guide, Release 11.5(3) 47

My Availability / Set Do Not Disturb for Your Phone
DND Off indicates that DND is inactive for the phone. The DND switch remains dimmed.
4. Click Save to implement the settings for each phone or Cancel to cancel changes.5. If Presence is set up by your administrator, click the check box beside the “Automatically update my status when there is a
meeting in my calendar field.”6. Click Save to implement the setting or Cancel to cancel the change.
48 Cisco Unified Communications Domain Manager Self Service Guide, Release 11.5(3)

Speed Dials Speed Dials and Busy Lamp Fields on page 49
Manage Speed Dials and Busy Lamp Fields on page 49
Add a Speed Dial (Abbreviated Dials) on page 50
Speed Dials and Busy Lamp Fields Speed dial numbers allow you to store numbers and then use side buttons on the phone, or abbreviated dialing from the softkey template, to dial the stored numbers. Some phones, such as Model 7960 and 7970 have speed dial buttons on the right side of the phone that you can use to dial frequently dialed numbers. The Cisco 7912 phones do not have buttons, but you can use the softkey template on the phone's LCD display.
Speed Dials are one or two-digit index codes (1 to 99) that you can assign to phone numbers or contact entries. To place a call using Speed Dials, select the Speed Dials index code from the menu on your phone’s touchscreen. You do not need to dial the entire number. The number of speed dials available depends on the phone button template. The exact name of the speed dial service on your phone may vary, depending on how your system administrator configured the service.
Busy lamps also allow you to store numbers and then use side buttons on the phone to dial the stored numbers. The status of the lamp indicates if the line is currently in use. Some Cisco phones, such as the 7931 series, have busy lamps on the right side that you can use to dial frequently dialed numbers.
Busy lamps are one or two-digit index codes (1 to 99) that you can assign to phone numbers or contact entries.
The number of busy lamps available depends on the phone button template. The exact name of the busy lamp service on your phone may vary, depending on how your administrator configured the service.
Manage Speed Dials and Busy Lamp Fields To assign a speed dial or busy lamp field (BLF) to a button:
Procedure
1. Click on the button bar. Your configured phones are displayed.
2. Click a ‘Phone’ to view the speed dials and busy lamp fields configured for that specific line (as determined by the phone button template for that phone). If a button has not been assigned to a busy lamp or speed dial, then the word ‘Unassigned’ is displayed in the Number field for that button.
Cisco Unified Communications Domain Manager Self Service Guide, Release 11.5(3) 49

Speed Dials / Add a Speed Dial (Abbreviated Dials)
Figure 12: Sample Speed Dial and Busy Lamp Fields page
3. Click next to the button to which you want to assign a speed dial or busy lamp. 4. Enter information in the fields as required:
Number—The phone number (or URI) for this speed dial. Enter the phone number (or URI) exactly as you would dial it from your desk phone, including an access code (such as 9), country code, or area code. A URI is in the username@host format, where the host can be an IPv4 address or fully qualified domain name. The username portion of a URI can be a maximum of 47 characters and the full URI can be a maximum of 254 characters.
Label—The name to associate with this speed dial.
5. Click Save when complete to assign the speed dial to the button.
What to do nextTo edit an existing speed dial or BLF entry, click Edit next to the button you want to edit. Enter new information in the relevant field as described in previous steps and click Save when complete.
To remove a speed dial or BLF entry, click Remove next to the entry that you want to remove and click Save. The button number returns to the Unassigned status.
Add a Speed Dial (Abbreviated Dials) Procedure
1. Click on the button bar. Your configured phones are displayed.
2. Click the relevant ‘Phone’ to view the speed dials and BLFs configured for the line. 3. To add more speed dials over and above those provided for by the phone button template, click + Add a Speed Dial in the
Abbreviated Dials area of the screen. 4. Enter information in the fields as required:
Key—The key associated with the speed dial. If you enter two keys with the same value, for instance two 3’s, the system automatically removes the first key and replaces it with the second key.
Number—The phone number (or URI) for this speed dial. Enter the phone number (or URI) exactly as you would dial it from your desk phone, including an access code (such as 9), country code, or area code. A URI is in the username@host format, where the host can be an IPv4 address or fully qualified domain name. The username portion of a URI can be a maximum of 47 characters and the full URI a maximum of 254 characters.
Label—The name to associate with this speed dial.
50 Cisco Unified Communications Domain Manager Self Service Guide, Release 11.5(3)

Speed Dials / Add a Speed Dial (Abbreviated Dials)
5. Click Save when complete to add the speed dial. When there is more than one speed dial, the speed dials are automatically reordered in numerical sequence from lowest to highest.
When you click Save at any point, you are given the choice to apply the selected speed dial setting to all phones, or to this phone only. Click the relevant button: Yes, Apply to all phones or No, only this phone.
What to do nextTo insert a speed dial entry directly above an existing speed dial entry, click + Insert a speed dial entry above this entry (+ icon) to open an empty speed dial entry form. Enter the required information and click Save when complete.
To edit an existing speed dial entry, click in the appropriate fields and enter new information as described in previous steps. Click Save when complete.
To remove a speed dial entry, click Remove this speed dial (trashcan icon) next to the speed dial you want to remove and click Save. The relevant speed dial is removed from the list.
Cisco Unified Communications Domain Manager Self Service Guide, Release 11.5(3) 51

Links Links on page 53
Links The Links section of the Self-Service interface provides hyperlinks to predetermined objects or items such as a support site or a downloadable User Guide. Your administrator configures and controls the links that appear.
Click on the button bar or Dashboard to open the Links Shortcuts, then click the desired hyperlink.
If your administrator has not configured any links for you, then this section is not displayed. Contact your administrator for more information.
Cisco Unified Communications Domain Manager Self Service Guide, Release 11.5(3) 53

Index
Cisco Unified Communications Domain Manager Self Service Guide, Release 11.5(3) Index-54


