www.piigab.com PiiGAB Processinformation i Göteborg AB • Anders Carlssons gata 7 • S-417 55 Göteborg • Sweden Tel: +46(0)31 559977 • E-mail: [email protected]Getting started PiiGAB M-Bus 900S Wireless
Transcript
www.piigab.com
PiiGAB Processinformation i Göteborg AB • Anders Carlssons gata 7 • S-417 55 Göteborg • Sweden Tel: +46(0)31 559977 • E-mail: [email protected]
Getting started PiiGAB M-Bus 900S Wireless
Getting started PiiGAB M-Bus 900S Wireless 1.00.01
2.1 REQUIREMENTS ............................................................................................................. 5 2.1.1 Supported M-Bus gateways ................................................................................. 5 2.1.2 Hardware add-on ................................................................................................. 5 2.1.3 Software versions ................................................................................................ 5 2.1.4 License ................................................................................................................. 5 2.1.5 Check if the wireless application is installed ........................................................ 6 2.1.6 Install or upgrading the wireless application ........................................................ 6
2.2 OPTIONAL REQUIREMENTS ............................................................................................. 7 2.2.1 System clock ........................................................................................................ 7
3. COLLECT INFORMATION FROM THE SITE ................................................................... 8
3.1 HOW MANY WIRELESS M-BUS METERS ............................................................................ 8 3.2 IDENTIFICATION NUMBER OF EACH WIRELESS M-BUS METERS .......................................... 8 3.3 UPDATE RATE OF EACH WIRELESS M-BUS METERS .......................................................... 8 3.4 M-BUS MODE OF EACH WIRELESS M-BUS METERS .......................................................... 8 3.5 CONFIGURE WIRELESS M-BUS METERS .......................................................................... 8
4. START THE WIRELESS APPLICATION .......................................................................... 9
4.1 QUICK TEST WITH THE PIIGAB M-BUS SETUP WIZARD .................................................... 9
5. THE METER LIST ............................................................................................................ 10
5.1 SECONDARY ADDRESS AND PRIM ADDR ........................................................................ 10 5.2 MFCT AND METER TYPE ............................................................................................. 10 5.3 RSSI .......................................................................................................................... 10 5.4 TIME STAMP ................................................................................................................ 10
6. THE CONFIGURE PAGE ................................................................................................ 11
6.2 WIRED M-BUS SLAVEPORT CONFIGURATION ................................................................ 12 6.2.1 UDP/IP or TCP/IP .............................................................................................. 12 6.2.2 RS232 or RS485 ................................................................................................ 12 6.2.3 M-Bus slave (M-Bus slave port 1 and M-Bus slave port 2) ............................... 12 6.2.4 M-Bus timeout .................................................................................................... 12
7. THE INTERNAL METER ................................................................................................. 13
7.1 SUMMARY OF THE INTERNAL METER .............................................................................. 13 7.2 DESCRIPTION OF THE INTERNAL METER ......................................................................... 13
7.2.1 First telegram ..................................................................................................... 13 7.2.2 Second telegram and all further telegrams ........................................................ 13
8. CONTENT OF EXTERNAL METERS.............................................................................. 14
8.1 OBJECT 1: SERIAL NUMBER OF THE PIIGAB M-BUS 900S ............................................. 14 8.2 OBJECT 2: PERIOD ...................................................................................................... 14 8.3 OBJECT 3: SIGNAL STRENGTH ...................................................................................... 14 8.4 OBJECT 4: TIMESTAMP ................................................................................................ 14
9. INCLUDE AND EXCLUDE FILES ................................................................................... 15
9.2 M-BUS MODES ............................................................................................................ 15 9.3 HOW IT WORKS ............................................................................................................ 15
9.3.1 Content of include and exclude files .................................................................. 16 9.4 FIND SECONDARY ADDRESS INFORMATION .................................................................... 16 9.5 EXAMPLE .................................................................................................................... 16 9.6 UPLOAD THE INCLUDE/EXCLUDE FILES AND USE THEM .................................................... 16
11.2 USING THE LOG ........................................................................................................ 19 11.2.1 New wireless meter received ............................................................................. 19 11.2.2 Existing wireless meter received ....................................................................... 19 11.2.3 Request and response from the M-Bus client.................................................... 19
12.1 CONTACTS .............................................................................................................. 20 12.2 ORDER INFORMATION ............................................................................................... 20
12.2.1 New PiiGAB M-Bus 900S .................................................................................. 20 12.2.2 ................................................................................................................................ 20
12.4 EXAMPLES OF INCLUDE AND EXCLUDE FILES .............................................................. 21 12.4.1 Include only PiiGAB meters for T2+C mode ...................................................... 21 12.4.2 Exclude PiiGAB meters for T1 mode ................................................................. 21 12.4.3 Include specific meters with primary addresses for S1 mode ........................... 21
12.5 TEST WITH PIIGAB M-BUS SETUP WIZARD ............................................................... 22
Getting started PiiGAB M-Bus 900S Wireless 1.00.01
1. Document information PiiGAB M-Bus 900S Wireless is a hardware and software add-on for PiiGAB M-Bus 900S. The hardware add-on allows the PiiGAB M-Bus 900S to receive wireless M-Bus telegrams from wireless M-Bus meters. The software add-on interprets the wireless telegrams and converts them to wired M-Bus telegrams. The wireless meters can be considered as wired M-Bus meters. Any M-Bus client communicating over network, serial or external M-Bus master can read the wireless meters through the PiiGAB M-Bus 900S wireless.
1.1 Versions
Version Detail
1.00.00 Initial version
Getting started PiiGAB M-Bus 900S Wireless 1.00.01
2.1 Requirements Here are the requirements to use a PiiGAB M-Bus 900S Wireless.
2.1.1 Supported M-Bus gateways The wireless application is only supported for PiiGAB M-Bus 900S. PiiGAB’s other M-Bus gateways (PiiGAB M-Bus 810 or PiiGAB M-Bus 900 V1/V2) cannot use the wireless application. However these gateways and most other M-Bus gateways can read the wireless M-Bus meters through a PiiGAB M-Bus 900S running the wireless application.
2.1.2 Hardware add-on PiiGAB M-Bus 900S need a specific hardware add-on to handle the wireless M-Bus meters. The hardware add-on can be ordered with a new PiiGAB M-Bus 900S.
2.1.2.1 Additional antenna
PiiGAB M-Bus 900S is delivered with a foldable antenna as default. Other antennas can be used as well. Please contact PiiGAB for further information. Please see contact and order information at the end of this document for ordering.
2.1.3 Software versions Some additional applications in the PiiGAB M-Bus 900S is required to use the wireless application.
1. Open PiiGAB M-Bus 900S’s web interface. 2. Go to the Configure page. 3. Make sure the MBusHub and System versions are the following or higher.
2.1.4 License Make sure the license in the PiiGAB M-Bus 900S enables the use of the wireless application.
1. Open PiiGAB M-Bus 900S’s web interface. 2. Go to the Administration page. 3. Make sure the Wireless tag is present in the license.
The image show a license that handles 500 wireless M-Bus meters. Note: If the Wireless tag is missing in the license. Please contact PiiGAB and specify the serial number to have this verified.
Getting started PiiGAB M-Bus 900S Wireless 1.00.01
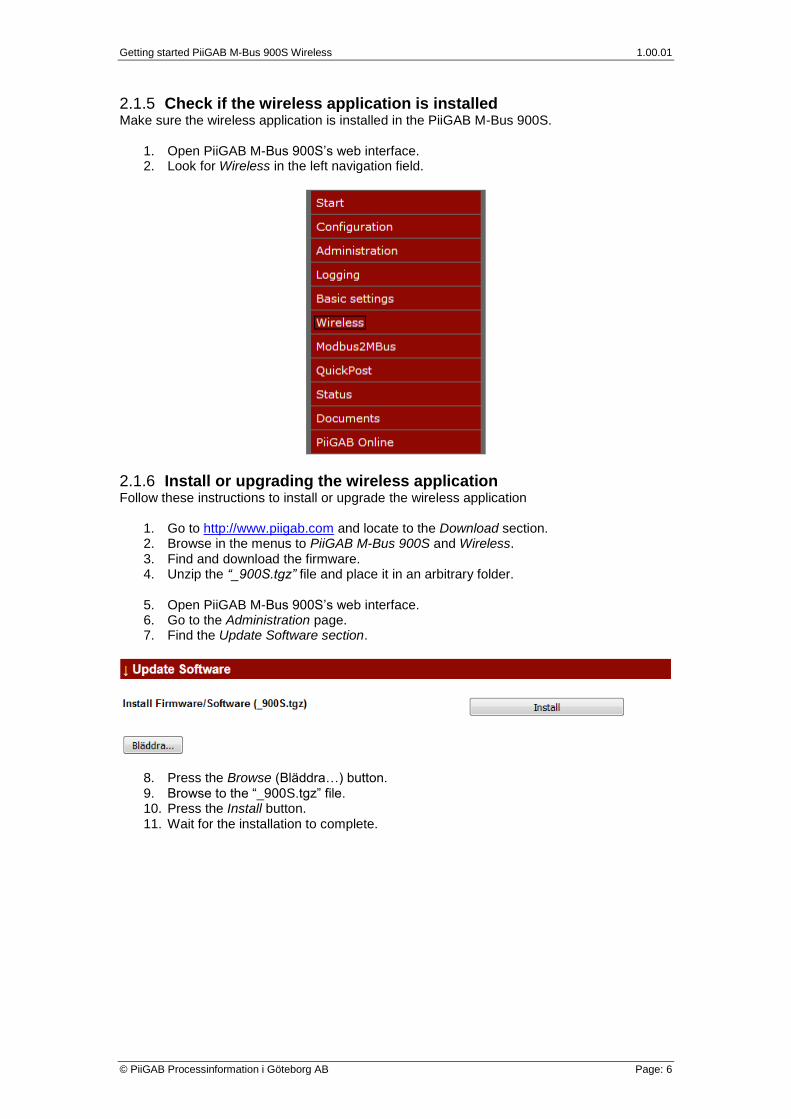
2.1.5 Check if the wireless application is installed Make sure the wireless application is installed in the PiiGAB M-Bus 900S.
1. Open PiiGAB M-Bus 900S’s web interface. 2. Look for Wireless in the left navigation field.
2.1.6 Install or upgrading the wireless application Follow these instructions to install or upgrade the wireless application
1. Go to http://www.piigab.com and locate to the Download section. 2. Browse in the menus to PiiGAB M-Bus 900S and Wireless. 3. Find and download the firmware. 4. Unzip the “_900S.tgz” file and place it in an arbitrary folder.
5. Open PiiGAB M-Bus 900S’s web interface. 6. Go to the Administration page. 7. Find the Update Software section.
8. Press the Browse (Bläddra…) button. 9. Browse to the “_900S.tgz” file. 10. Press the Install button. 11. Wait for the installation to complete.
2.2 Optional requirements For optimal use it’s recommended to pay attention to the optional requirements.
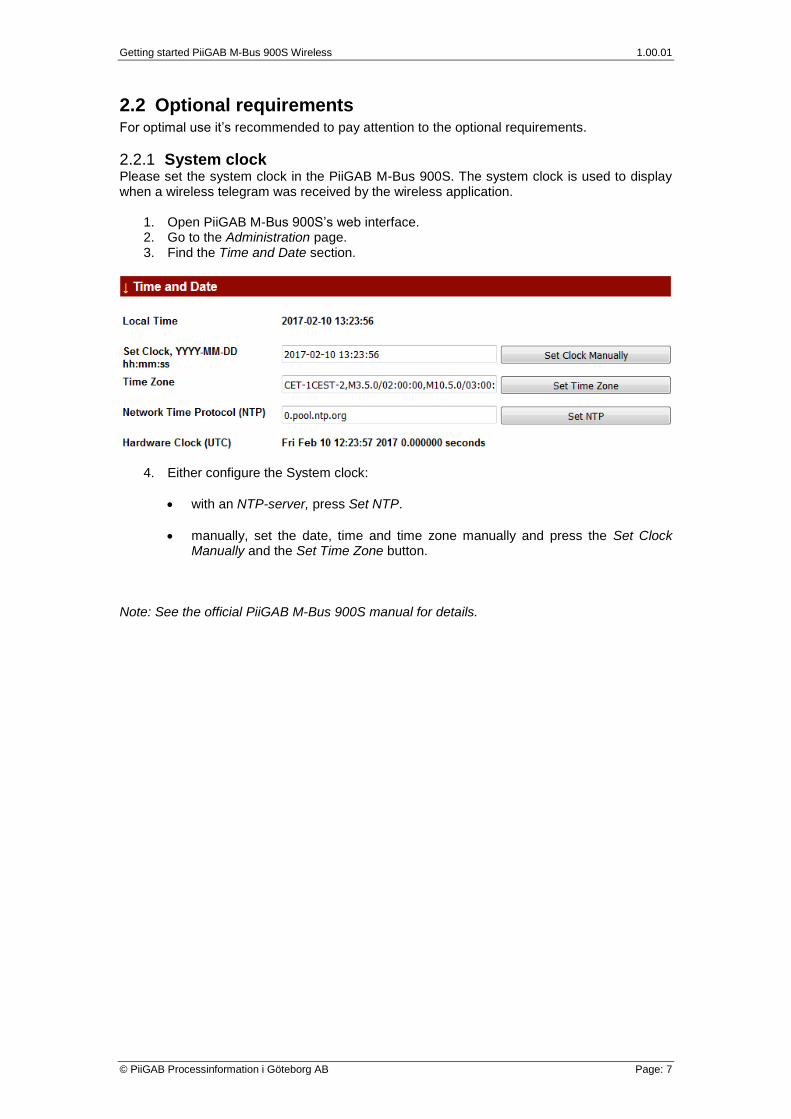
2.2.1 System clock Please set the system clock in the PiiGAB M-Bus 900S. The system clock is used to display when a wireless telegram was received by the wireless application.
1. Open PiiGAB M-Bus 900S’s web interface. 2. Go to the Administration page. 3. Find the Time and Date section.
4. Either configure the System clock:
with an NTP-server, press Set NTP.
manually, set the date, time and time zone manually and press the Set Clock Manually and the Set Time Zone button.
Note: See the official PiiGAB M-Bus 900S manual for details.
Getting started PiiGAB M-Bus 900S Wireless 1.00.01
3. Collect information from the site From the site it’s necessary to gather information about the wireless M-Bus meters. The gathered information will be used when later verifying that all M-Bus meters has been received by the wireless application.
3.1 How many wireless M-Bus meters The license specifies how many wireless M-Bus meters are allowed. Please verify that amount of included wireless meters in the site doesn’t exceeds the license’s limit.
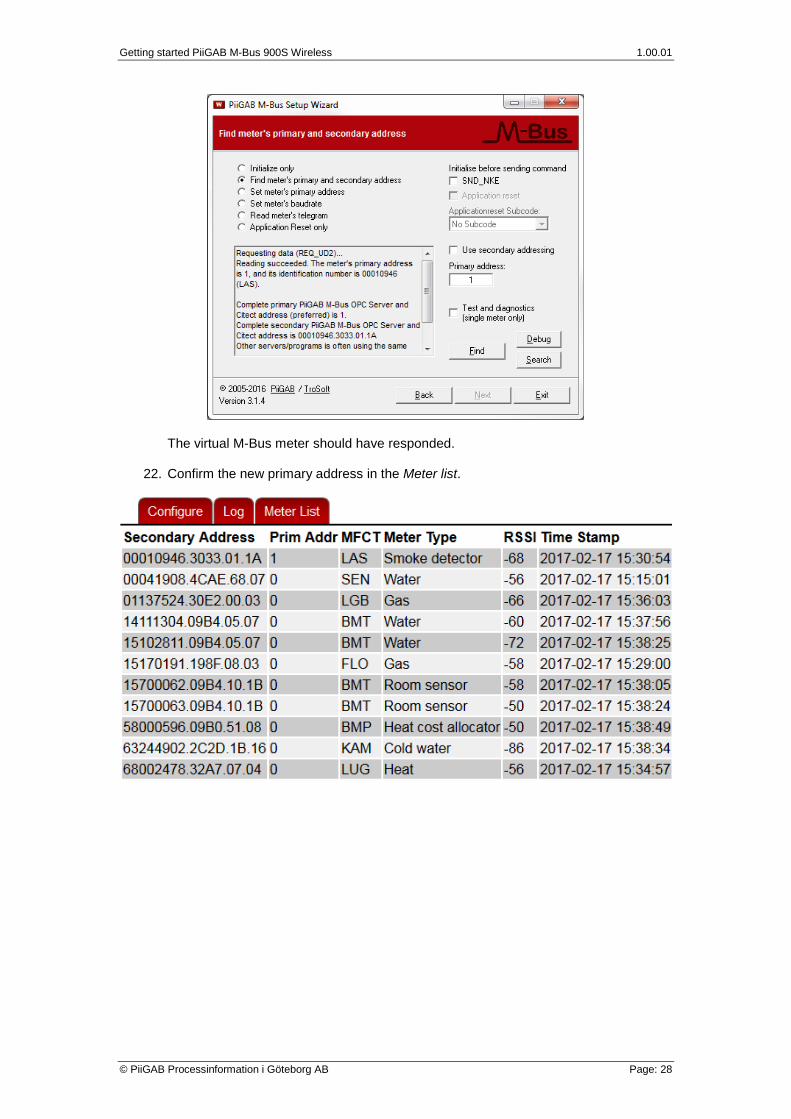
3.2 Identification number of each wireless M-Bus meters To identify a specific wireless M-Bus meter, collect the identification number of each meter. Later use the “meter list” in the wireless application’s web interface which will list all received wireless M-Bus meters. The entire secondary address of each received wireless M-Bus meters will be listed there. Compare the secondary address to the identification numbers.
3.3 Update rate of each wireless M-Bus meters How often does each wireless M-Bus meter transmit new data? Notice if the meter has not transmitted data to the wireless application the “meter list” in the web interface will not list the meter. Change the transmission rate of the meters if necessary. Please see the meter’s manual for information how to change the transmission rate.
3.4 M-Bus mode of each wireless M-Bus meters It’s possible to set what M-Bus mode the wireless application should use. This selected M-Bus mode in the application must be compatible with the wireless M-Bus meter’s mode. Please see the meter’s manual for details about the meter’s M-Bus mode.
3.5 Configure wireless M-Bus meters It’s not possible to configure the wireless M-Bus meters from the PiiGAB M-Bus 900S. Use the meters’ manual or contact the manufacturer for the information how to configure the wireless M-Bus meters.
Getting started PiiGAB M-Bus 900S Wireless 1.00.01
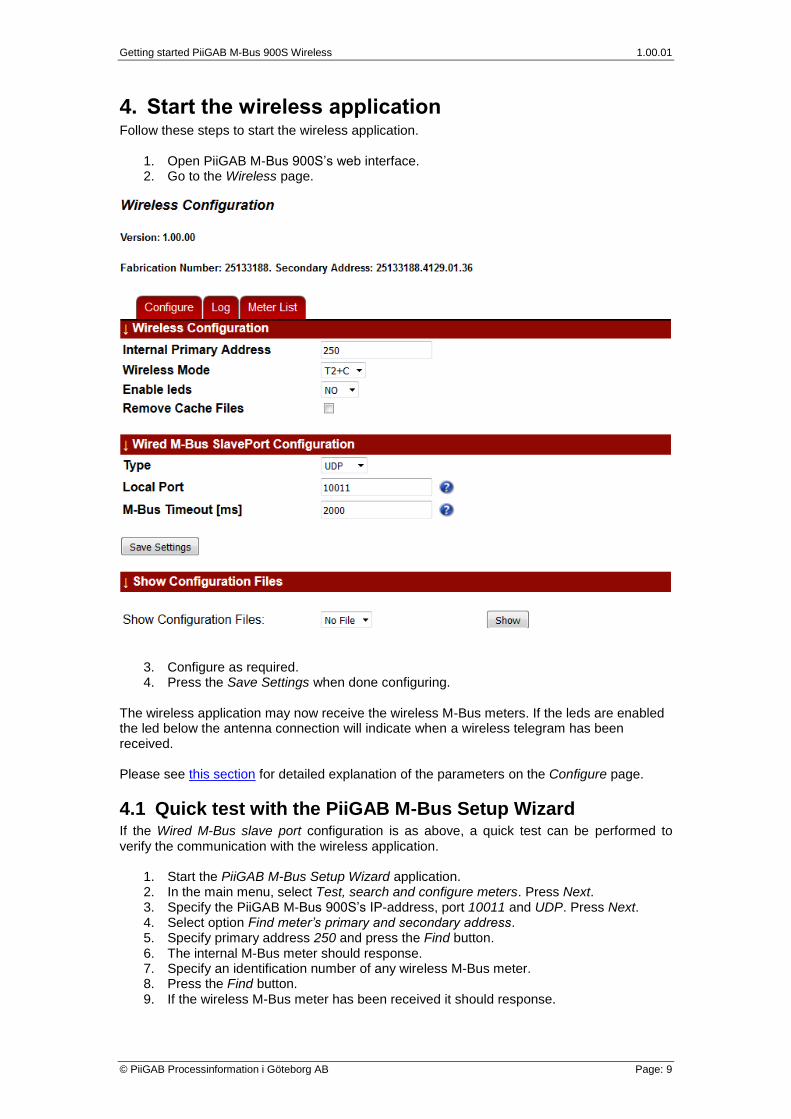
4. Start the wireless application Follow these steps to start the wireless application.
1. Open PiiGAB M-Bus 900S’s web interface. 2. Go to the Wireless page.
3. Configure as required. 4. Press the Save Settings when done configuring.
The wireless application may now receive the wireless M-Bus meters. If the leds are enabled the led below the antenna connection will indicate when a wireless telegram has been received. Please see this section for detailed explanation of the parameters on the Configure page.
4.1 Quick test with the PiiGAB M-Bus Setup Wizard If the Wired M-Bus slave port configuration is as above, a quick test can be performed to verify the communication with the wireless application.
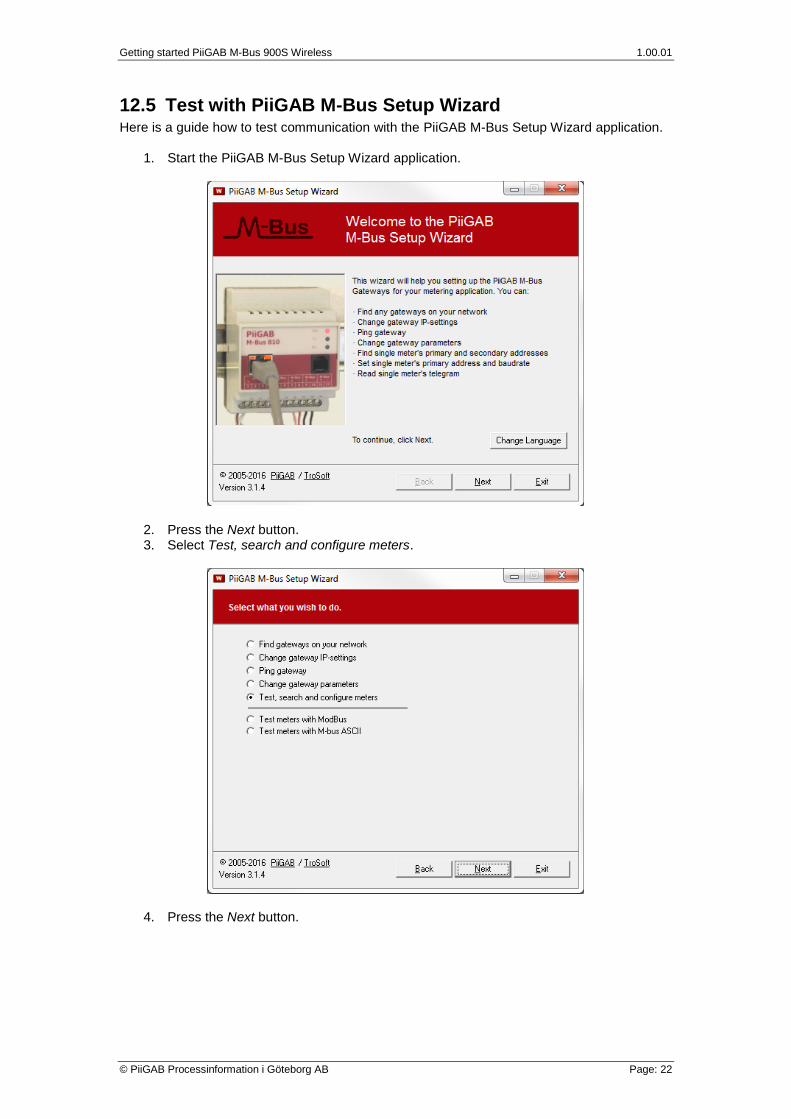
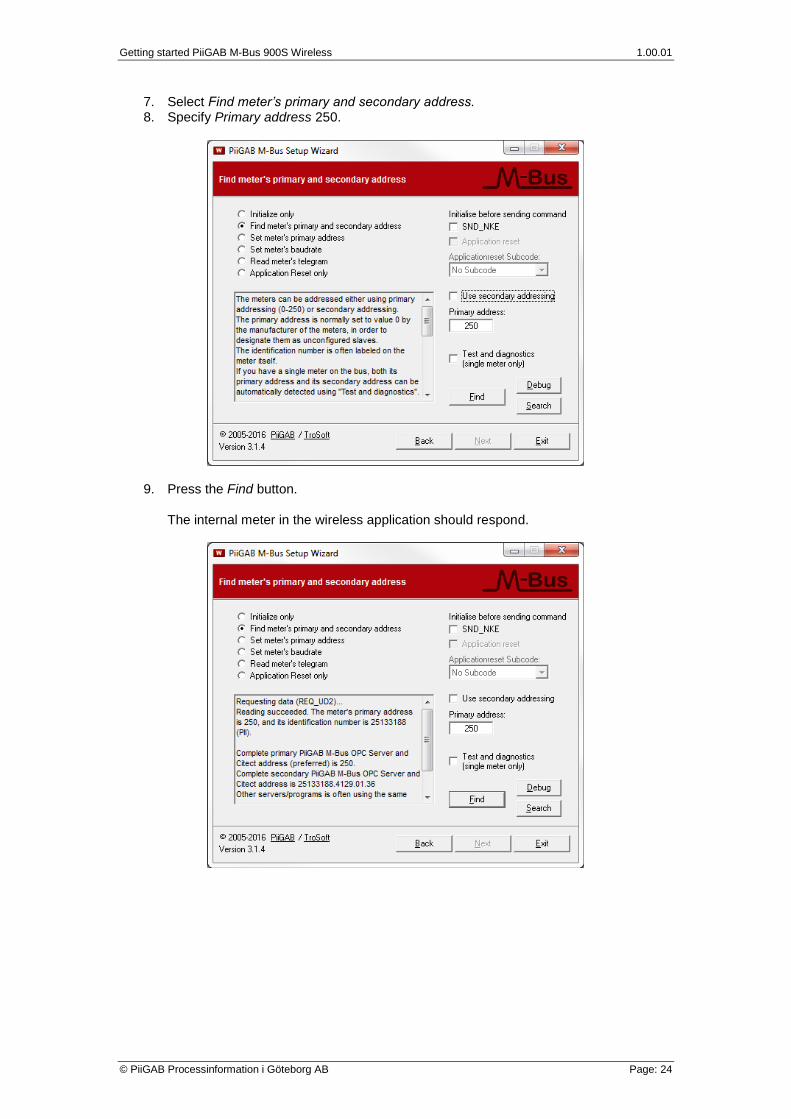
1. Start the PiiGAB M-Bus Setup Wizard application. 2. In the main menu, select Test, search and configure meters. Press Next. 3. Specify the PiiGAB M-Bus 900S’s IP-address, port 10011 and UDP. Press Next. 4. Select option Find meter’s primary and secondary address. 5. Specify primary address 250 and press the Find button. 6. The internal M-Bus meter should response. 7. Specify an identification number of any wireless M-Bus meter. 8. Press the Find button. 9. If the wireless M-Bus meter has been received it should response.
Getting started PiiGAB M-Bus 900S Wireless 1.00.01
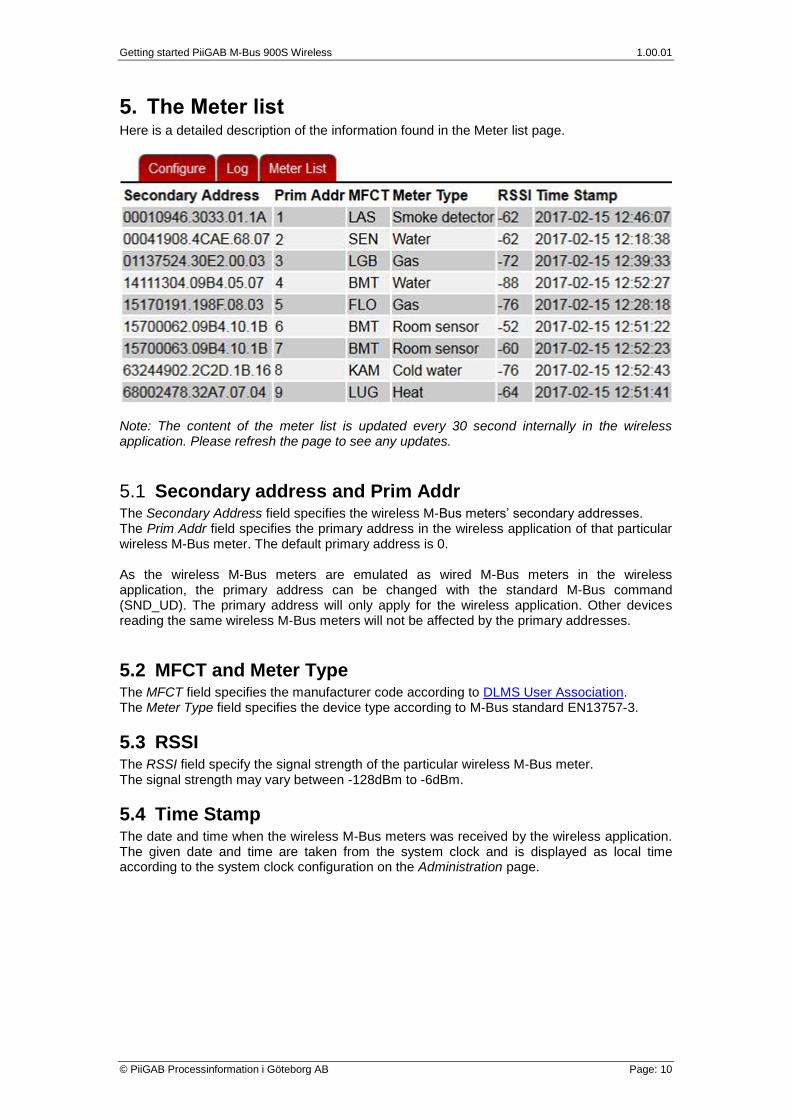
5. The Meter list Here is a detailed description of the information found in the Meter list page.
Note: The content of the meter list is updated every 30 second internally in the wireless application. Please refresh the page to see any updates.
5.1 Secondary address and Prim Addr The Secondary Address field specifies the wireless M-Bus meters’ secondary addresses. The Prim Addr field specifies the primary address in the wireless application of that particular wireless M-Bus meter. The default primary address is 0. As the wireless M-Bus meters are emulated as wired M-Bus meters in the wireless application, the primary address can be changed with the standard M-Bus command (SND_UD). The primary address will only apply for the wireless application. Other devices reading the same wireless M-Bus meters will not be affected by the primary addresses.
5.2 MFCT and Meter Type The MFCT field specifies the manufacturer code according to DLMS User Association. The Meter Type field specifies the device type according to M-Bus standard EN13757-3.
5.3 RSSI The RSSI field specify the signal strength of the particular wireless M-Bus meter. The signal strength may vary between -128dBm to -6dBm.
5.4 Time Stamp The date and time when the wireless M-Bus meters was received by the wireless application. The given date and time are taken from the system clock and is displayed as local time according to the system clock configuration on the Administration page.
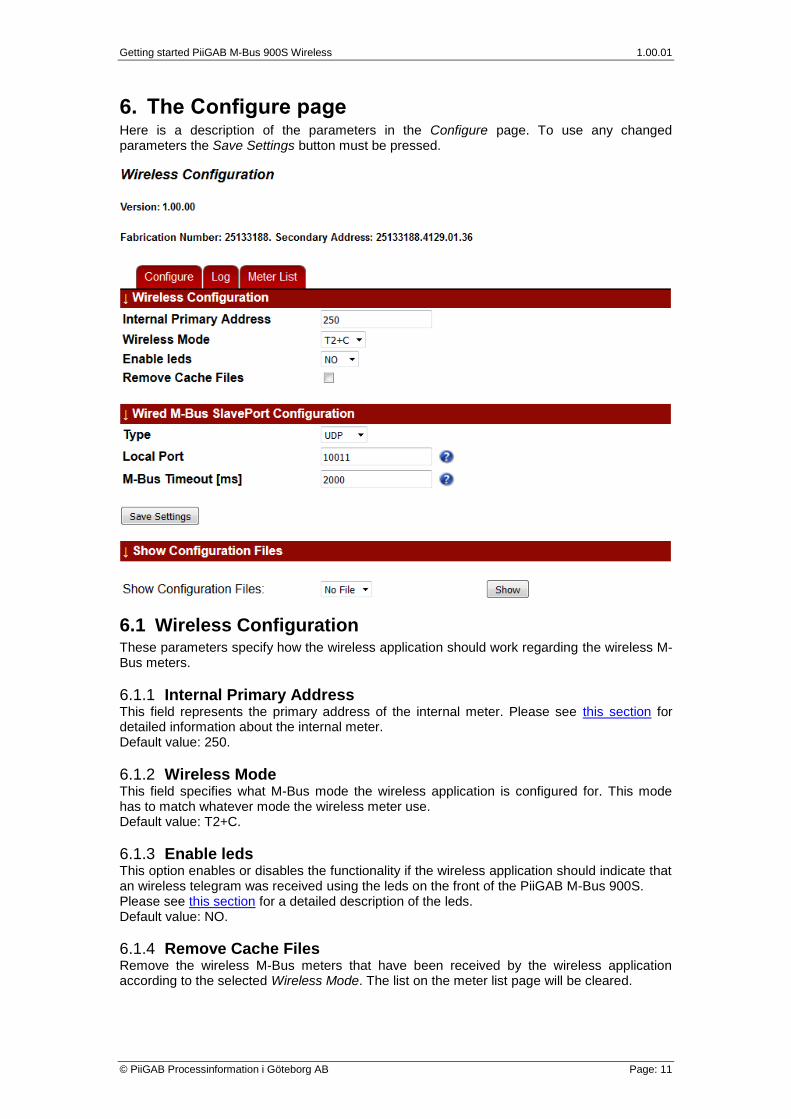
6. The Configure page Here is a description of the parameters in the Configure page. To use any changed parameters the Save Settings button must be pressed.
6.1 Wireless Configuration These parameters specify how the wireless application should work regarding the wireless M-Bus meters.
6.1.1 Internal Primary Address This field represents the primary address of the internal meter. Please see this section for detailed information about the internal meter. Default value: 250.
6.1.2 Wireless Mode This field specifies what M-Bus mode the wireless application is configured for. This mode has to match whatever mode the wireless meter use. Default value: T2+C.
6.1.3 Enable leds This option enables or disables the functionality if the wireless application should indicate that an wireless telegram was received using the leds on the front of the PiiGAB M-Bus 900S. Please see this section for a detailed description of the leds. Default value: NO.
6.1.4 Remove Cache Files Remove the wireless M-Bus meters that have been received by the wireless application according to the selected Wireless Mode. The list on the meter list page will be cleared.
Getting started PiiGAB M-Bus 900S Wireless 1.00.01
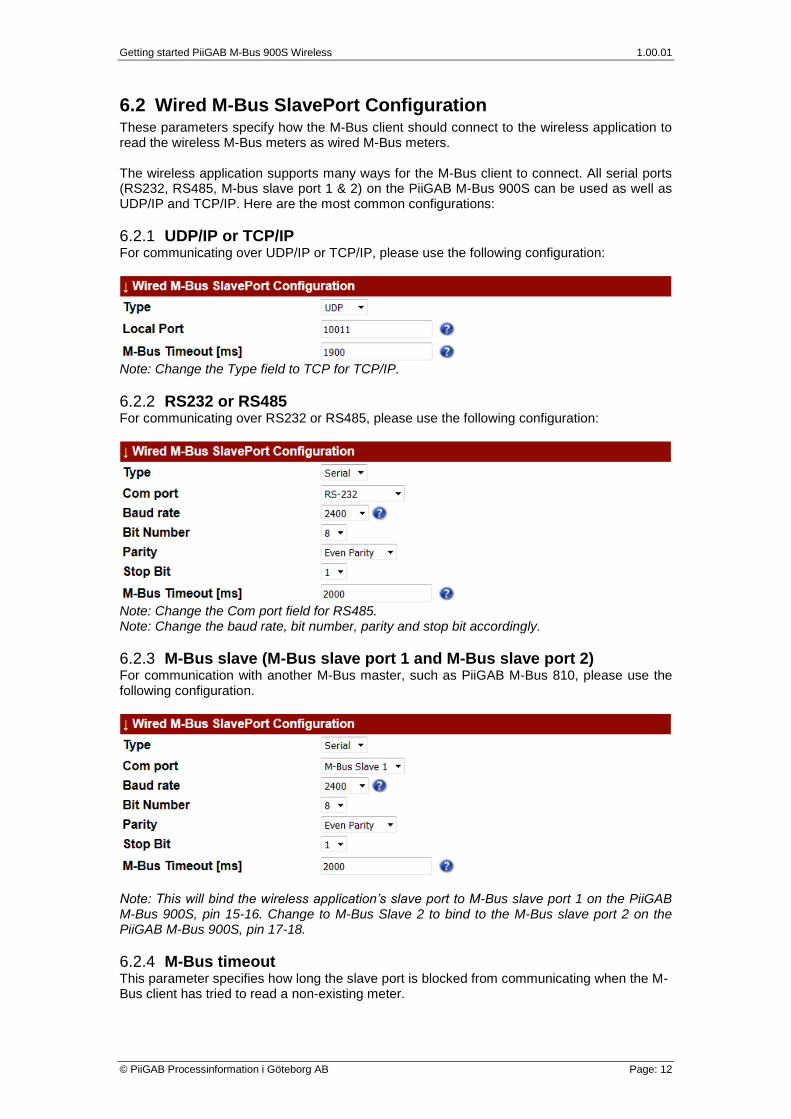
6.2 Wired M-Bus SlavePort Configuration These parameters specify how the M-Bus client should connect to the wireless application to read the wireless M-Bus meters as wired M-Bus meters. The wireless application supports many ways for the M-Bus client to connect. All serial ports (RS232, RS485, M-bus slave port 1 & 2) on the PiiGAB M-Bus 900S can be used as well as UDP/IP and TCP/IP. Here are the most common configurations:
6.2.1 UDP/IP or TCP/IP For communicating over UDP/IP or TCP/IP, please use the following configuration:
Note: Change the Type field to TCP for TCP/IP.
6.2.2 RS232 or RS485 For communicating over RS232 or RS485, please use the following configuration:
Note: Change the Com port field for RS485. Note: Change the baud rate, bit number, parity and stop bit accordingly.
6.2.3 M-Bus slave (M-Bus slave port 1 and M-Bus slave port 2) For communication with another M-Bus master, such as PiiGAB M-Bus 810, please use the following configuration.
Note: This will bind the wireless application’s slave port to M-Bus slave port 1 on the PiiGAB M-Bus 900S, pin 15-16. Change to M-Bus Slave 2 to bind to the M-Bus slave port 2 on the PiiGAB M-Bus 900S, pin 17-18.
6.2.4 M-Bus timeout This parameter specifies how long the slave port is blocked from communicating when the M-Bus client has tried to read a non-existing meter.
Getting started PiiGAB M-Bus 900S Wireless 1.00.01
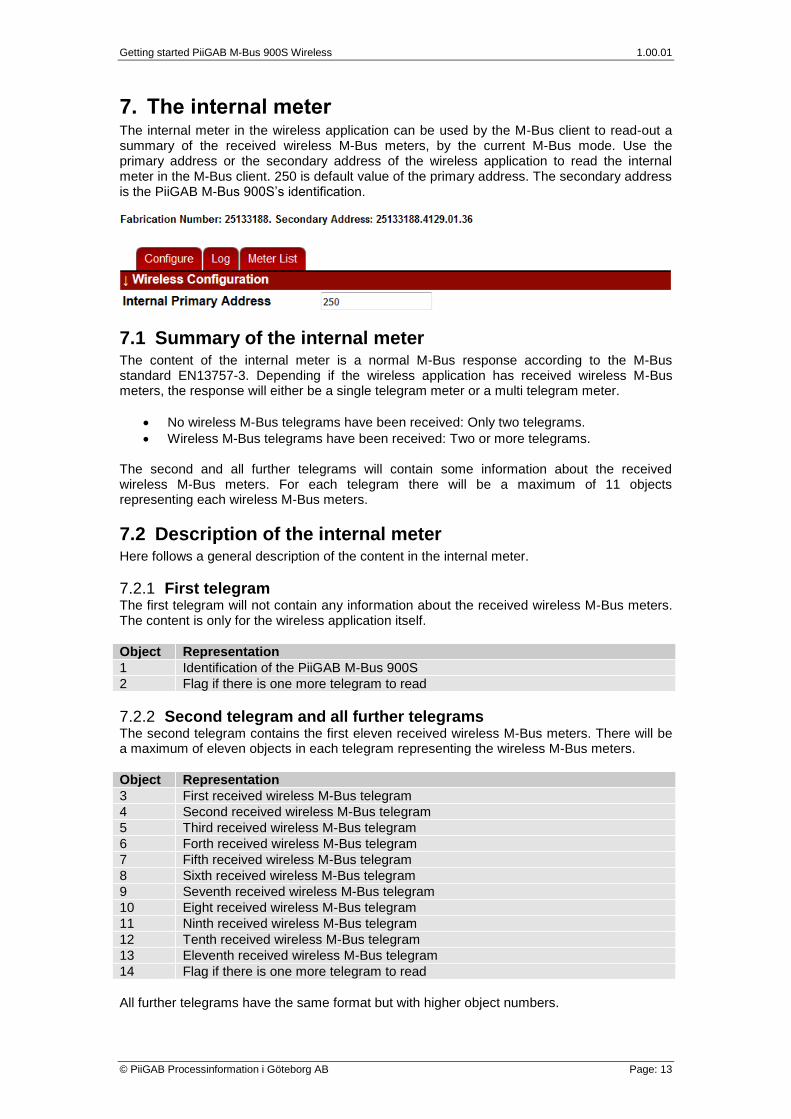
7. The internal meter The internal meter in the wireless application can be used by the M-Bus client to read-out a summary of the received wireless M-Bus meters, by the current M-Bus mode. Use the primary address or the secondary address of the wireless application to read the internal meter in the M-Bus client. 250 is default value of the primary address. The secondary address is the PiiGAB M-Bus 900S’s identification.
7.1 Summary of the internal meter The content of the internal meter is a normal M-Bus response according to the M-Bus standard EN13757-3. Depending if the wireless application has received wireless M-Bus meters, the response will either be a single telegram meter or a multi telegram meter.
No wireless M-Bus telegrams have been received: Only two telegrams.
Wireless M-Bus telegrams have been received: Two or more telegrams. The second and all further telegrams will contain some information about the received wireless M-Bus meters. For each telegram there will be a maximum of 11 objects representing each wireless M-Bus meters.
7.2 Description of the internal meter Here follows a general description of the content in the internal meter.
7.2.1 First telegram The first telegram will not contain any information about the received wireless M-Bus meters. The content is only for the wireless application itself.
Object Representation
1 Identification of the PiiGAB M-Bus 900S
2 Flag if there is one more telegram to read
7.2.2 Second telegram and all further telegrams The second telegram contains the first eleven received wireless M-Bus meters. There will be a maximum of eleven objects in each telegram representing the wireless M-Bus meters.
Object Representation
3 First received wireless M-Bus telegram
4 Second received wireless M-Bus telegram
5 Third received wireless M-Bus telegram
6 Forth received wireless M-Bus telegram
7 Fifth received wireless M-Bus telegram
8 Sixth received wireless M-Bus telegram
9 Seventh received wireless M-Bus telegram
10 Eight received wireless M-Bus telegram
11 Ninth received wireless M-Bus telegram
12 Tenth received wireless M-Bus telegram
13 Eleventh received wireless M-Bus telegram
14 Flag if there is one more telegram to read
All further telegrams have the same format but with higher object numbers.
Getting started PiiGAB M-Bus 900S Wireless 1.00.01
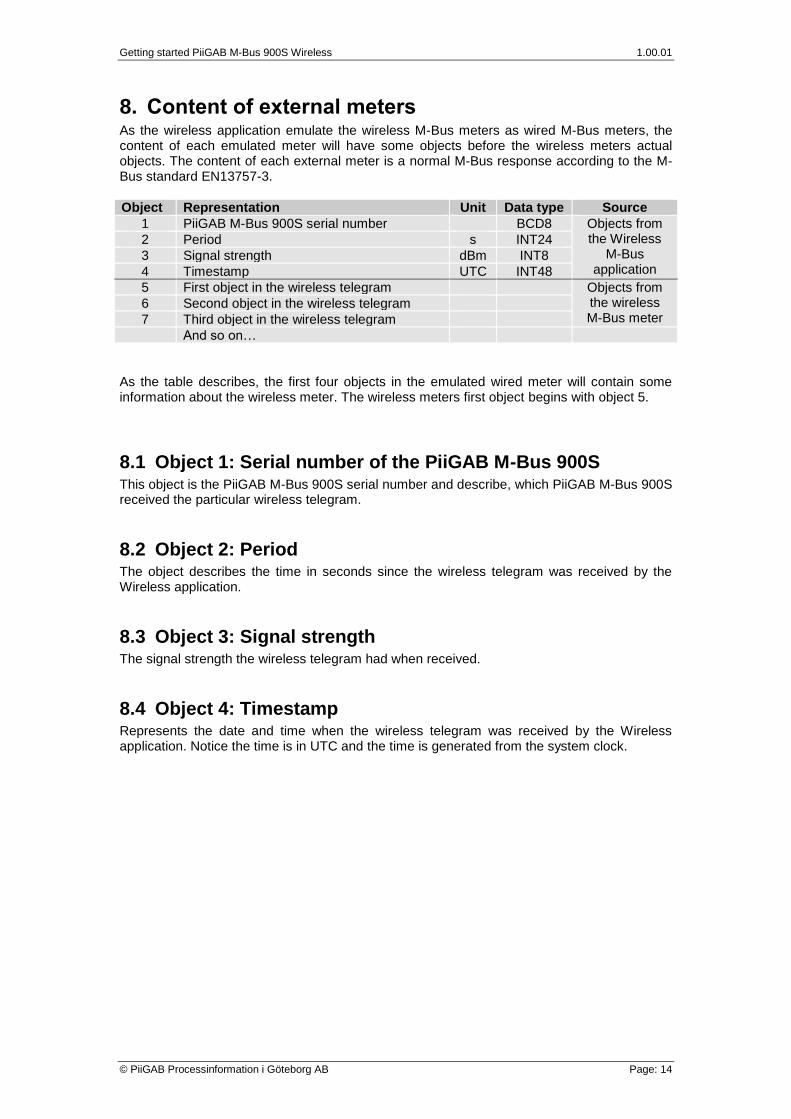
8. Content of external meters As the wireless application emulate the wireless M-Bus meters as wired M-Bus meters, the content of each emulated meter will have some objects before the wireless meters actual objects. The content of each external meter is a normal M-Bus response according to the M-Bus standard EN13757-3.
Object Representation Unit Data type Source
1 PiiGAB M-Bus 900S serial number BCD8 Objects from the Wireless
M-Bus application
2 Period s INT24
3 Signal strength dBm INT8
4 Timestamp UTC INT48
5 First object in the wireless telegram Objects from the wireless M-Bus meter
6 Second object in the wireless telegram
7 Third object in the wireless telegram
And so on…
As the table describes, the first four objects in the emulated wired meter will contain some information about the wireless meter. The wireless meters first object begins with object 5.
8.1 Object 1: Serial number of the PiiGAB M-Bus 900S This object is the PiiGAB M-Bus 900S serial number and describe, which PiiGAB M-Bus 900S received the particular wireless telegram.
8.2 Object 2: Period The object describes the time in seconds since the wireless telegram was received by the Wireless application.
8.3 Object 3: Signal strength The signal strength the wireless telegram had when received.
8.4 Object 4: Timestamp Represents the date and time when the wireless telegram was received by the Wireless application. Notice the time is in UTC and the time is generated from the system clock.
Getting started PiiGAB M-Bus 900S Wireless 1.00.01
9. Include and exclude files It’s possible to filter what meter should, or should not, be able to read from the wireless application. This “filter” functionality has almost infinitive variations. For instance:
Include wireless M-Bus meters from one or more specific manufacturers.
Exclude wireless M-Bus meters from other sites within the same wireless range.
Include any specific wireless M-Bus meter.
Exclude any specific wireless M-Bus meters.
Include wireless M-Bus meters and specify primary addresses for them.
9.1 Files The functionality uses two files to include and exclude wireless M-Bus meters.
File Name
Exclude wireless_exclude_<mode>.csv
Include wireless_include_<mode>.csv
9.2 M-Bus modes The files must be bound to a specific M-Bus mode the wireless application is using. It is possible to have several include/exclude files for different M-Bus modes. The include/exclude files which will be used by the wireless application is determined by what M-Bus mode is used.
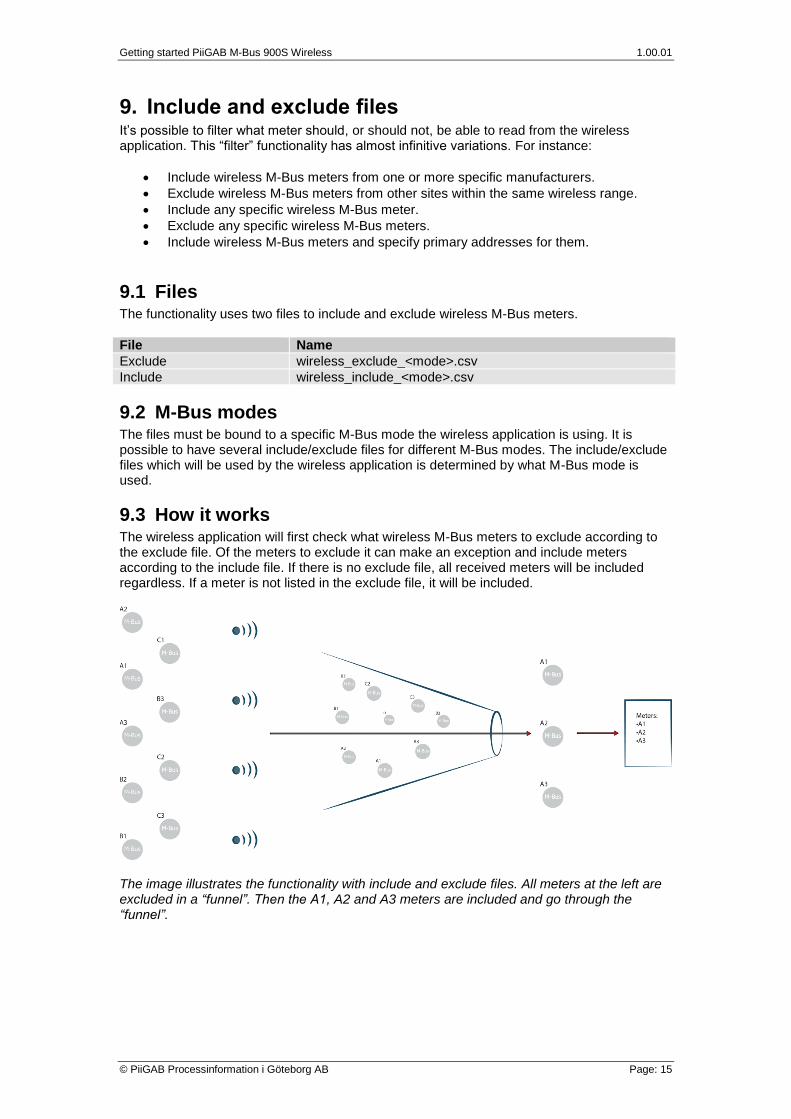
9.3 How it works The wireless application will first check what wireless M-Bus meters to exclude according to the exclude file. Of the meters to exclude it can make an exception and include meters according to the include file. If there is no exclude file, all received meters will be included regardless. If a meter is not listed in the exclude file, it will be included.
The image illustrates the functionality with include and exclude files. All meters at the left are excluded in a “funnel”. Then the A1, A2 and A3 meters are included and go through the “funnel”.
Getting started PiiGAB M-Bus 900S Wireless 1.00.01
9.3.1 Content of include and exclude files The content of the files is either one or several rows with the following format: <secondary address>;<primary address>;<wireless key>
Secondary address: the format of a secondary address XXXXXXXX.MMMM.VV.MM (Identification.Manufacturer.Version.Medium)
Primary address: The meter’s primary address.
Wireless key: The wireless M-Bus key for the meter. Not yet implemented. Example:
12345678.4129.00.00 Include/exclude specific meter.
FFFFFFFF.48AC.FF.FF Include/exclude only manufacturer. 12345678.FFFF.FF.FF;1 Include/exclude specific meter with primary address.
9.4 Find secondary address information The content of a secondary address can either be found on the meter, the meter’s manual, the manufacturer or by reading meter. The Meter list show all current meters that have been received and the entire secondary address is displayed there.
9.5 Example Please see this section for examples how to use the include and exclude files.
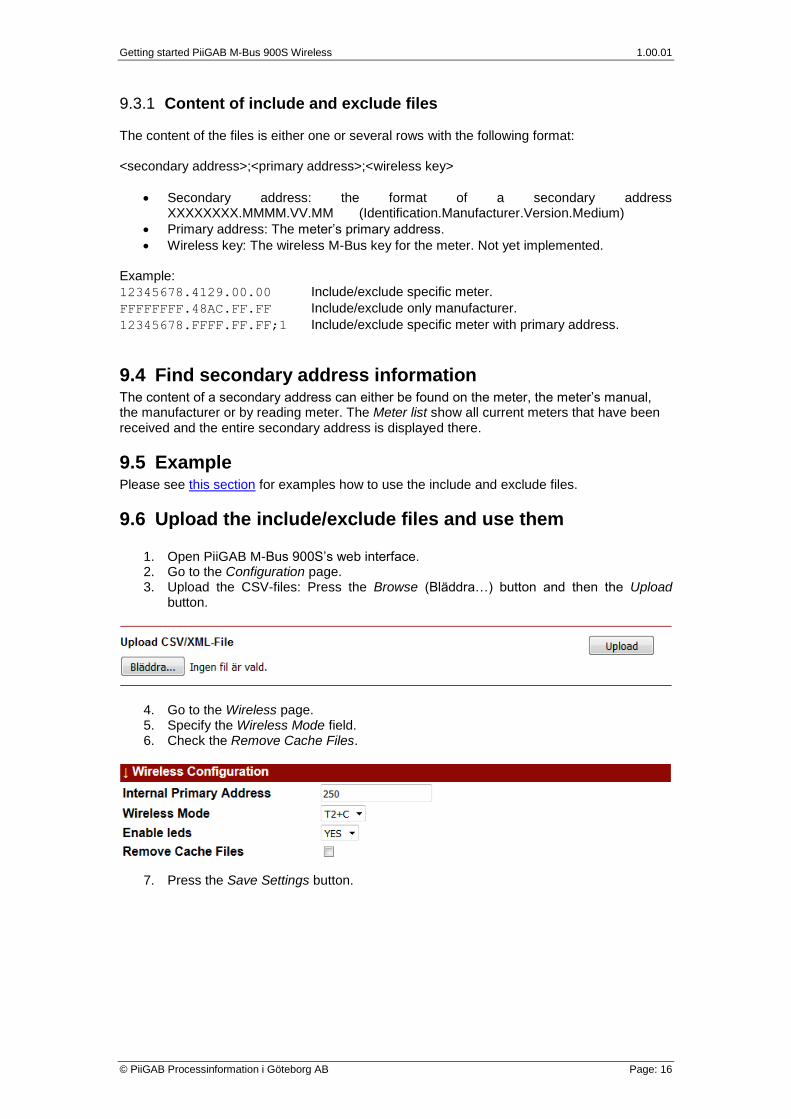
9.6 Upload the include/exclude files and use them
1. Open PiiGAB M-Bus 900S’s web interface. 2. Go to the Configuration page. 3. Upload the CSV-files: Press the Browse (Bläddra…) button and then the Upload
button.
4. Go to the Wireless page. 5. Specify the Wireless Mode field. 6. Check the Remove Cache Files.
7. Press the Save Settings button.
Getting started PiiGAB M-Bus 900S Wireless 1.00.01
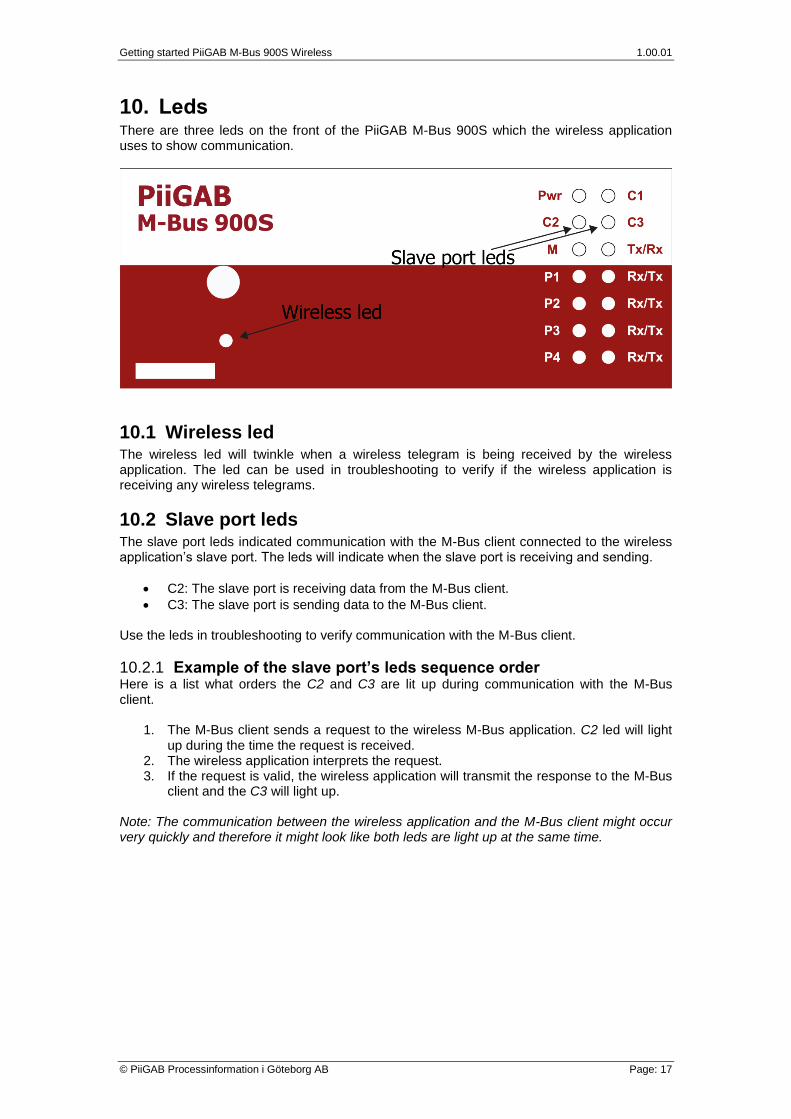
10. Leds There are three leds on the front of the PiiGAB M-Bus 900S which the wireless application uses to show communication.
10.1 Wireless led The wireless led will twinkle when a wireless telegram is being received by the wireless application. The led can be used in troubleshooting to verify if the wireless application is receiving any wireless telegrams.
10.2 Slave port leds The slave port leds indicated communication with the M-Bus client connected to the wireless application’s slave port. The leds will indicate when the slave port is receiving and sending.
C2: The slave port is receiving data from the M-Bus client.
C3: The slave port is sending data to the M-Bus client. Use the leds in troubleshooting to verify communication with the M-Bus client.
10.2.1 Example of the slave port’s leds sequence order Here is a list what orders the C2 and C3 are lit up during communication with the M-Bus client.
1. The M-Bus client sends a request to the wireless M-Bus application. C2 led will light up during the time the request is received.
2. The wireless application interprets the request. 3. If the request is valid, the wireless application will transmit the response to the M-Bus
client and the C3 will light up. Note: The communication between the wireless application and the M-Bus client might occur very quickly and therefore it might look like both leds are light up at the same time.
Getting started PiiGAB M-Bus 900S Wireless 1.00.01
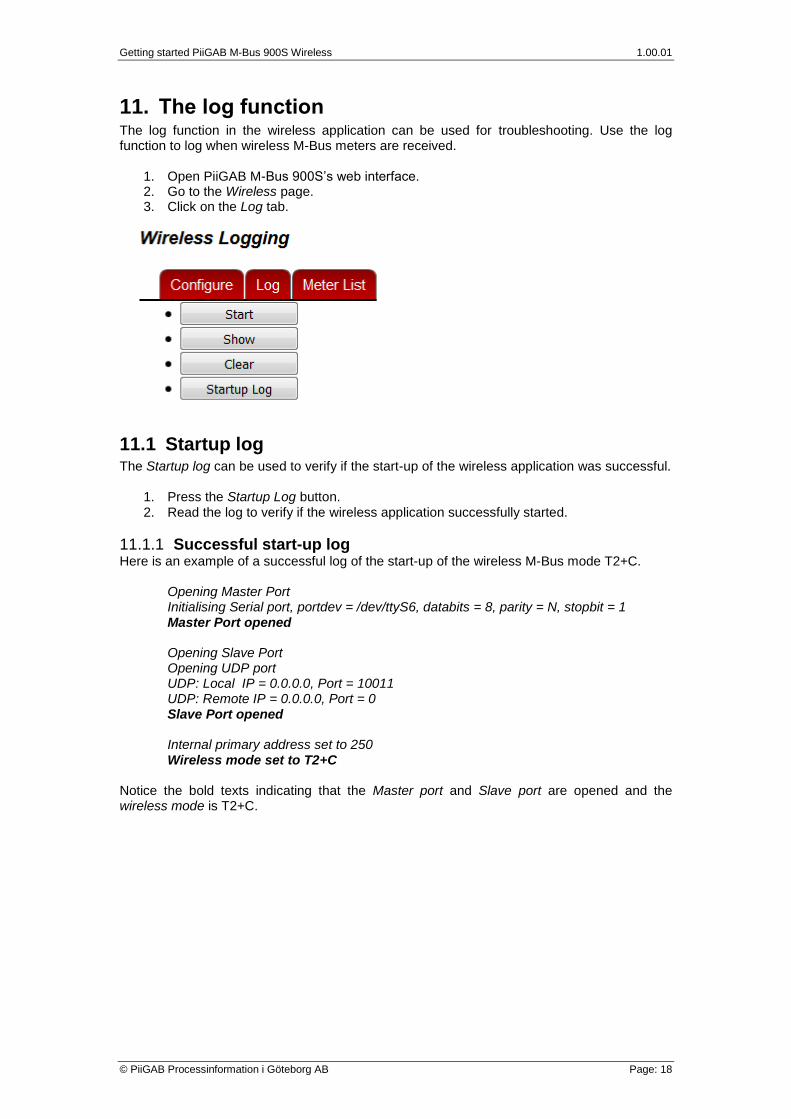
11. The log function The log function in the wireless application can be used for troubleshooting. Use the log function to log when wireless M-Bus meters are received.
1. Open PiiGAB M-Bus 900S’s web interface. 2. Go to the Wireless page. 3. Click on the Log tab.
11.1 Startup log The Startup log can be used to verify if the start-up of the wireless application was successful.
1. Press the Startup Log button. 2. Read the log to verify if the wireless application successfully started.
11.1.1 Successful start-up log Here is an example of a successful log of the start-up of the wireless M-Bus mode T2+C.
Opening Master Port Initialising Serial port, portdev = /dev/ttyS6, databits = 8, parity = N, stopbit = 1 Master Port opened Opening Slave Port Opening UDP port UDP: Local IP = 0.0.0.0, Port = 10011 UDP: Remote IP = 0.0.0.0, Port = 0 Slave Port opened Internal primary address set to 250
Wireless mode set to T2+C Notice the bold texts indicating that the Master port and Slave port are opened and the wireless mode is T2+C.
Getting started PiiGAB M-Bus 900S Wireless 1.00.01
11.2 Using the log 1. Optional: Press the Clear button. This will clear any previous logs. 2. Press the Start button. 3. Wait for any communication, either from the wireless meters or the M-Bus client. 4. Press the Show button to show the log.
11.2.1 New wireless meter received Here is the log when a new wireless M-Bus meter in the wireless application has been received again.
Received a full telegram
68 24 44 2d 2c 02 49 24 63 1b 16 8d 20 6b 01 32
32 02 36 ae 79 34 dd 1b 4a 71 00 11 00 00 00 11
00 00 00 a6 ff ca 16
Adding telegram to map and setting primary address to 0
11.2.2 Existing wireless meter received Here is the log when an existing wireless M-Bus meter in the wireless application has been received again.
Received a full telegram
68 24 44 2d 2c 02 49 24 63 1b 16 8d 20 01 11 30
32 02 36 ae 79 34 dd 1b 4a 71 00 11 00 00 00 11
00 00 00 91 cb 03 16
Updating telegram already in map
11.2.3 Request and response from the M-Bus client Here is the log when the M-Bus client is requesting and receiving data for a virtual M-Bus meter in the wireless application. Request from client
68 0b 0b 68 53 fd 52 46 09 01 00 ff ff ff ff ee
16
Response to client
e5
Request from client
10 7b fd 78 16
Response to client
68 35 35 68 08 00 72 46 09 01 00 33 30 01 1a 01
00 00 00 0c 78 88 31 13 25 03 74 10 03 00 01 fd
71 c6 06 6d 24 1e 28 34 22 08 2f 2f 02 fd 97 1d
00 00 04 fd 08 18 0a 00 00 f4 16
Getting started PiiGAB M-Bus 900S Wireless 1.00.01
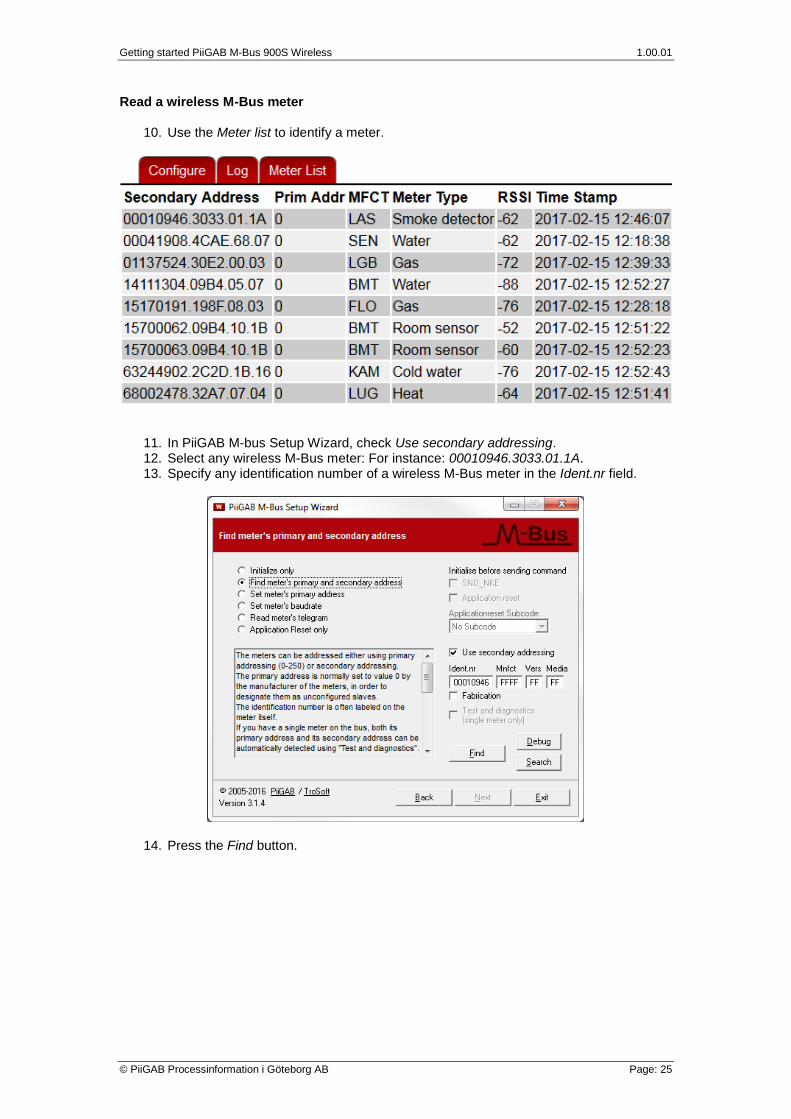
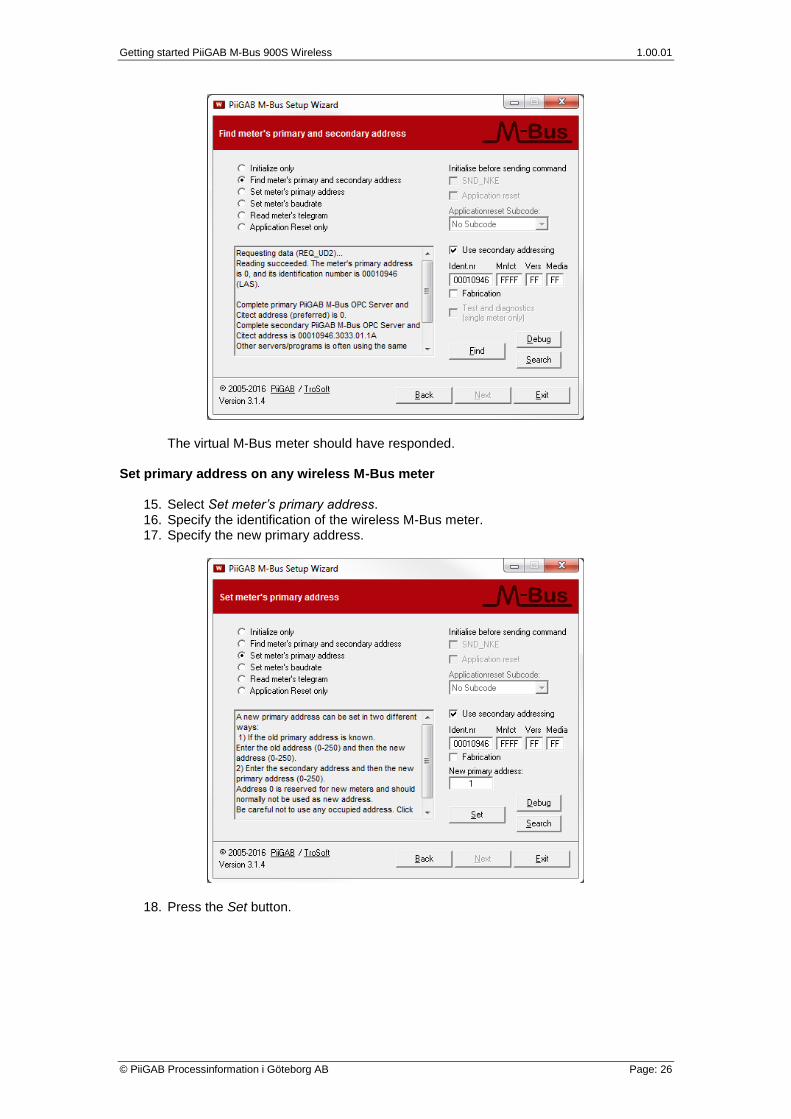
11. In PiiGAB M-bus Setup Wizard, check Use secondary addressing. 12. Select any wireless M-Bus meter: For instance: 00010946.3033.01.1A. 13. Specify any identification number of a wireless M-Bus meter in the Ident.nr field.
14. Press the Find button.
Getting started PiiGAB M-Bus 900S Wireless 1.00.01