+ All Categories
Home > Documents > CitiDirect Online Banking - via CitiDirect BE portal · CitiDirect Online Banking - via CitiDirect...

CitiDirect Online Banking - via CitiDirect BE portal · CitiDirect Online Banking - via CitiDirect...

Date post: 24-Dec-2019
Category:
Upload: others
View: 36 times
Download: 0 times
Share this document with a friend
73
CitiDirect Online Banking - via CitiDirect BE portal Security Manager User Manual CitiService CitiDirect HelpDesk Phone No. 0 801 343 978, +48 (22) 690 15 21 Monday - Friday 8.00 – 17.00 [email protected] ®
Transcript

CitiDirect Online Banking - via CitiDirect BE portal

Security Manager

User Manual

CitiService CitiDirect HelpDesk Phone No. 0 801 343 978, +48 (22) 690 15 21 Monday - Friday 8.00 – 17.00 [email protected]

®

www.citihandlowy.pl

Bank Handlowy w Warszawie S.A.

2

Table of Contents

1. INTRODUCTION 4

2. USER 5

2.1 Creating a User (creating Security Manager) 5

2.2 Creating a User (authorizing Security Manager) 11

2.3 Repairing, modifying or rejecting User record changes 14

2.4 Deleting a User (creating Security Manager) 17

2.5 Deleting a User (authorizing Security Manager) 19

2.6 Blocking a User (creating Security Manager) 20

2.7 Blocking a User (authorizing Security Manager) 21

2.8 Viewing existing Users 21

3. ENTITLING A USER WITH ACCESS TO CITIDIRECT 24

3.1 Entitling a User with access to CitiDirect (creating Security Manager) 24

3.2 Entitling a User with access to CitiDirect (authorizing Security Manager) 26

4. PROFILE MANAGEMENT IN CITIDIRECT 28

4.1 Creating access profiles (creating Security Manager) 28

4.2 Creating access profiles (authorizing Security Manager) 33

5. ASSIGNING ENTITLEMENTS TO USERS 35

5.1 Assigning entitlements to Users (creating Security Manager) 35

5.2 Assigning entitlements to Users (authorizing Security Manager) 38

6. TRANSACTION AUTHORIZATION FLOW SCHEME 42

6.1 Creating and modifying a transaction flow scheme (creating Security Manager) 42

6.2 Creating and modifying a transaction flow scheme (authorizing Security Manager) 47

7. STANDING INSTRUCTION - SETUP 48

7.1 Standing Instruction – profile and payment flow configuration 48

7.2 Other settings – Standing Instruction library and reports 60

www.citihandlowy.pl

Bank Handlowy w Warszawie S.A.

3

8. CLIENT PREFERENCES MODIFICATION 62

8.1 Client preferences modification (creating Security Manager) 62

8.2 Client preferences modification (authorizing Security Manager) 64

9. MOBILE / TABLET ACCESS 65

9.1 Mobile / tablet access (creating Security Manager) 65

9.2 Mobile / tablet access (authorizing Security Manager) 68

10. ACCESS MANAGEMENT REPORTS 70

11. VIEWING INACTIVE USERS 72

www.citihandlowy.pl

Bank Handlowy w Warszawie S.A.

4

1. Introduction

CitiDirect is accessed via the CitiDirect BE portal page – at https://portal.citidirect.com. Detailed information

on login is available in the ‘Login’ User Manual at www.citidirect.pl website.

After login into CitiDirect BE portal the Security Manager can access the following two tabs from the

navigation bar at the top of the screen:

a) ‘Self Service’ – used to perform main administrative activities on the Users

b) ‘CitiDirect Services’ – used to access CitiDirect application and other administrative functions

The administrative activities performed by a Security Manager in order to assign suitable CitiDirect

entitlements to the CitiDirect to a particular User are performed in two administrative modules, i.e. directly

from the CitiDirect BE portal (options available in the ‘Self Service’ menu) and in the window of the CitiDirect

Services application (options available in the ‘User Administration’ menu).

Main steps, which must be performed in order to create a new User and grant them suitable entitlements to

use CitiDirect are as follows:

1. creating the User in the CitiDirect BE portal

2. granting the User access to the CitiDirect application, (action performed in the CitiDirect BE portal)

3. assigning the User individual entitlements to chosen CitiDirect functions, (action performed in CitiDirect

Services window)

Note! The changes made in the system during each of the above steps must be AUTHORIZED by a

person with Security Manager entitlements, other than the person who created/entered the changes.

Detailed instructions on User entitlements administration can be found in the next sections of this User

Manual.

Note! Under the provisions of the Act on Counteracting Money Laundering and Terrorism Financing

of 16 November 2000, the Bank is obliged to identify persons authorized to place instructions and

conclude transactions in the name of the Account Holder.

With respect to the above, entitling a User (new or existing) to authorize transactions made from a particular

account, and in case there is no authorization flow on the account – entitling them to initiate transactions with

the Bank, requires the ‘Personal data of persons making transactions / statements of will in the name of the

Account Holder / Client’ form to be filed with the Bank for such change to be active in the system. In case the

form in question has been already filed with the Bank for a particular User, there is no need to file it again.

www.citihandlowy.pl

Bank Handlowy w Warszawie S.A.

5

2. User

By creating new users, the Administrator has the option of choosing credential type that will be assigned to them. CitiDirect Users can log in using mobile tokens (MobilePASS applications) or hardware (SafeWord cards). Creating SafeWord sign-in users must be preceded by the release of SafeWord cards for these users.

Therefore it is essential to inform Citi Handlowy of the need to issue such Safeword cards by filing the ‘CitiDirect - Request for Safeword cards and PIN issuance – Security Manager’ application form, completed with data of the Users to be created in the system for whom the Safeword cards should be issued. Safeword cards for the Users are delivered to the Client together with the instruction for the Security Manager. The instruction is titled ‘CitiDirect – Safeword Cards Assignment to Users – Security Manager’ and contains information on the assignment of Safeword cards to particular Users.

In order to create, modify or delete a User and activate the received Safeword cards in the system it is

necessary to log into CitiDirect BE Portal and perform the actions described below.

2.1 Creating a User (creating Security Manager)

To create a new User, hover the mouse pointer over the ‘Self Service’ option in the CitiDirect BE portal

navigation bar – a drop-down menu will appear.

Select ‘User & Entitlements - New ’ from the list.

A sidebar navigation menu will appear. Select ‘Users & Entitlements – New’ ‘Users’ ‘Create’.

www.citihandlowy.pl

Bank Handlowy w Warszawie S.A.

6 The form for creating a new User will appear.

Fill out the following sections:

User Information,

Credentials,

User Entitlement Association,

User Access Profile Association.

The other sections will becomes active when the first one is completed.

Select User profile status from the drop-down list:

‘Active’ – If you choose the MobilePASS - Host 9 Credential type, you will be able to use CitiDirect right

away. If you choose the SafeWord Credential type, you will be able to use CitiDirect after you have received

a PIN for your SafeWord card. ‘Inactive’ – You will not be able to log on to the system immediately after you configure your MobilePASS

application or receive your PIN to the SafeWord card. In order to allow the user access to the system, it

will be necessary for the Administrator to change the status of the User profile to "Active".

NOTE! If no User status is selected, the system will automatically assign the ‘Active’ status.

After selecting the User status please complete the ‘User Information’ section. Fields marked with a star are

mandatory and cannot remain empty. Some of the mandatory fields will be automatically completed by the

system, based on the data entered during the creation of the Client Profile in CitiDirect. Please verify the

correctness of this suggested data. Completing the information in all the mandatory fields is necessary for

successful User creation.

Address data must be confirmed by selecting the ‘The above address is correct’ checkbox. If the

address automatically filled in by the system is incorrect, select ‘Create new address’. This will clear the

previous address data and let you input a new address.

www.citihandlowy.pl

Bank Handlowy w Warszawie S.A.

7 Presented below is the new User creation screen view.

Next, please fill out the ‘Credentials’ section as presented on the following picture

Leave the ‘User ID’ field blank.

Select dates, days and hours

when the User should be allowed

to work in the system.

8

www.citihandlowy.pl

Bank Handlowy w Warszawie S.A.

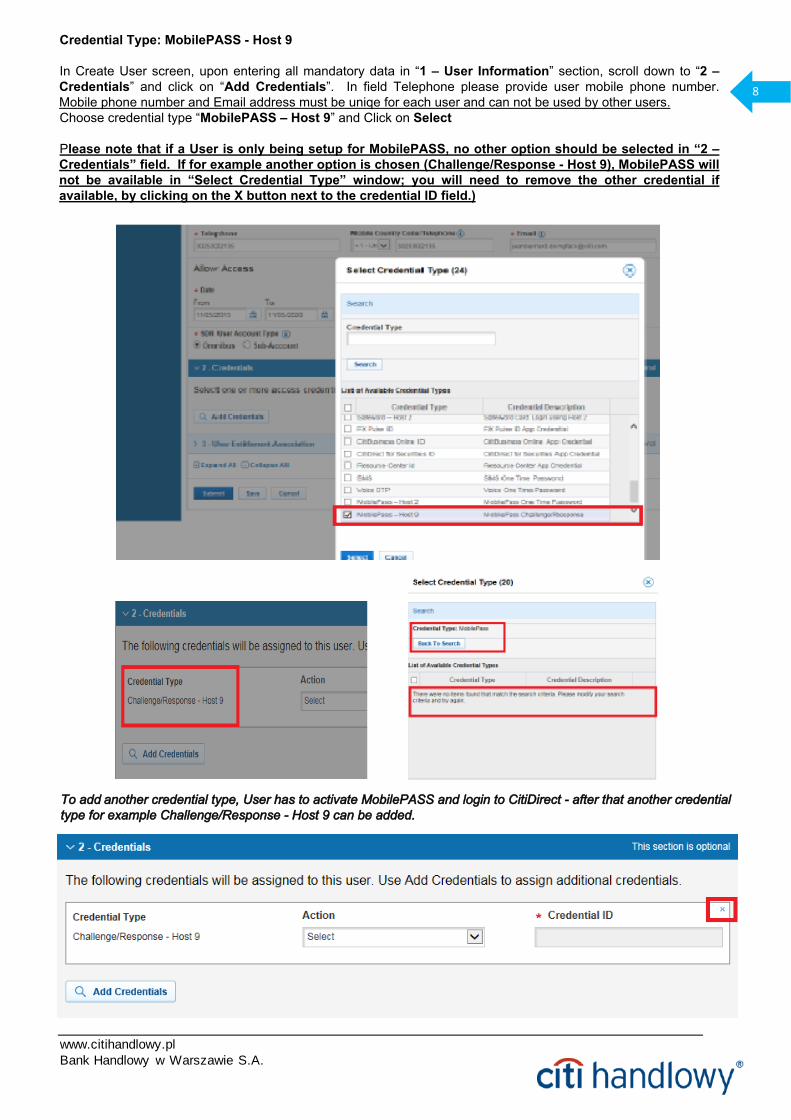
Credential Type: MobilePASS - Host 9

In Create User screen, upon entering all mandatory data in “1 – User Information” section, scroll down to “2 – Credentials” and click on “Add Credentials”. In field Telephone please provide user mobile phone number. Mobile phone number and Email address must be uniqe for each user and can not be used by other users.Choose credential type “MobilePASS – Host 9” and Click on Select

Please note that if a User is only being setup for MobilePASS, no other option should be selected in “2 – Credentials” field. If for example another option is chosen (Challenge/Response - Host 9), MobilePASS will not be available in “Select Credential Type” window; you will need to remove the other credential if available, by clicking on the X button next to the credential ID field.)

To add another credential type, User has to activate MobilePASS and login to CitiDirect - after that another credential type for example Challenge/Response - Host 9 can be added.

www.citihandlowy.pl

Bank Handlowy w Warszawie S.A.

9

Credential Type: SafeWord card

After you complete section 1, section 2 will become active. Expand the ‘Credentials’ section and select ‘Link

Existing Safeword Card’ in the ‘Action’ drop-down menu. Next, in the ‘Credential ID’ field enter the serial

number of the Safeword card for the currently created User, according to the instruction with assignment of

the Safeword cards to particular Users that you received from the Bank.

NOTE!: The Safeword Card number must be identical with the Safeword card number that the Bank

specified for the User in the ‘CitiDirect – Safeword Cards Assignment to Users – Security Manager’

instruction delivered together with the Safeword cards each time such cards are issued.

When creating a new User on the Client Profile in CitiDirect, there is an option to assign particular groups of

entitlements to that User already during the creation process in section 3. ‘User Entitlement Association’.

While assigning such entitlements during User creation please do not perform any of the steps described

under section 3. ‘Entitling User with access to CitiDirect’ of this User Manual. To add entitlements, move

them from ‘Available Entitlements’ window to ‘Entitlements for Association’ with the ‘Add’ button.

If you wish to assign Security Manager entitlements to a User, select the ‘SYSTEM ADMINISTRATOR’

group from this list.

www.citihandlowy.pl

Bank Handlowy w Warszawie S.A.

10

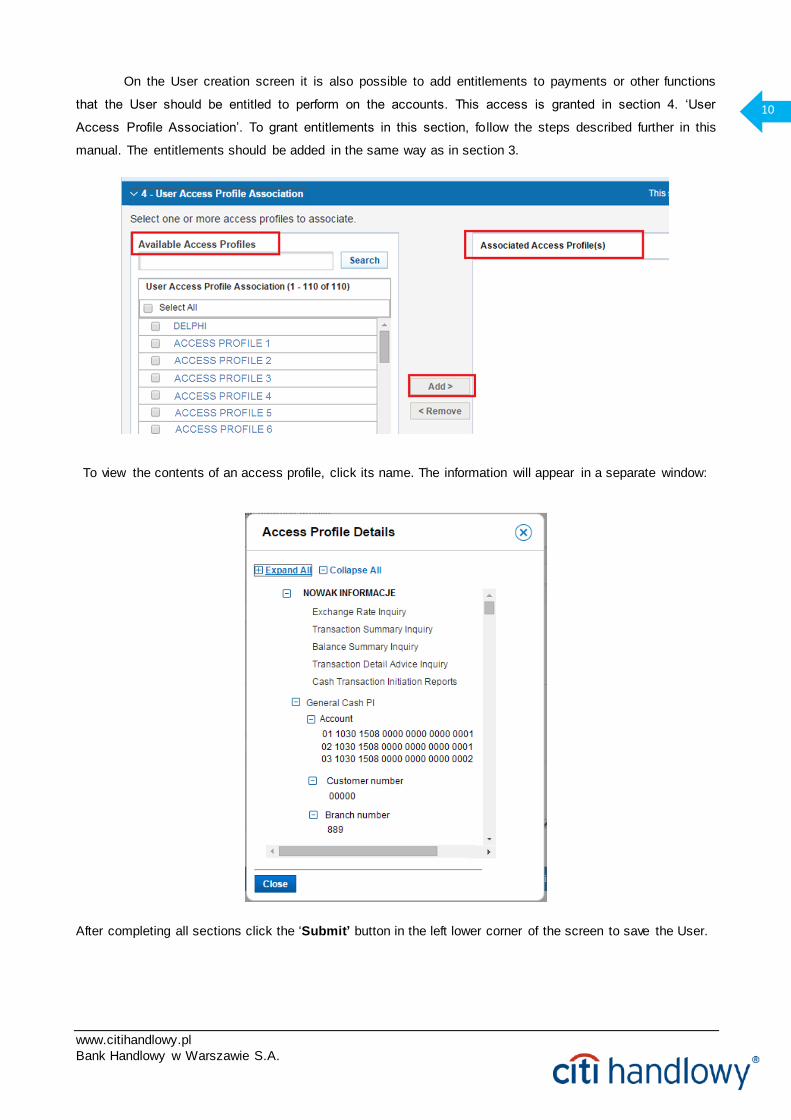
On the User creation screen it is also possible to add entitlements to payments or other functions

that the User should be entitled to perform on the accounts. This access is granted in section 4. ‘User

Access Profile Association’. To grant entitlements in this section, fo llow the steps described further in this

manual. The entitlements should be added in the same way as in section 3.

To view the contents of an access profile, click its name. The information will appear in a separate window:

After completing all sections click the ‘Submit’ button in the left lower corner of the screen to save the User.

www.citihandlowy.pl

Bank Handlowy w Warszawie S.A.

11

A message will appear. It will either be a confirmation message informing that the User was sent for

authorization or an error message with instructions on what needs to be corrected.

2.2 Creating a User (authorizing Security Manager)

Actions of creating the User and performing modifications on the User profile, (eg. change of e-mail address)

need to be authorized. The created User can be authorized by an existing User with Security Manager

entitlements, other than the User who performed the creation action.

In order to authorize the User, hover over the ‘Self Service’ option in the CitiDirect BE Portal main navigation

menu and then select ‘Users & Entitlements’ from the list.

Sections with records awaiting authorization are

marked with an orange dot and a counter

indicating the number of records awaiting

authorization. You can enter the authorization

interface by selecting: ‘Users & Entitlements’,

‘Users’, and then ‘Authorize’.

www.citihandlowy.pl

Bank Handlowy w Warszawie S.A.

12

In order to authorize the User and check their details, select the appropriate record from the ‘Authorize’

worklist and click the field with a hyperlink (in this case: the surname and name of the User) – detailed

information about this record will be displayed.

In the detailed view of the record you can see all the User information that has been entered by the Security

Manager who created the User. Please always verify the correctness of this data, especially:

a) User Information – User data such as First Name, Last Name, company address and e-mail address

b) Access settings – date, time, days of the week when the User is entitled to work in the system

c) Credentials (i.e. Safeword card number) – must match with the Safeword card number specified for

this User on the ‘CitiDirect – Safeword Cards Assignment to Users ’ instruction that the Security

Manager received from the Bank.

d) User Entitlement Association – entitlements assigned to the User. The following entitlement should

be assigned to the User: ‘CitiDirect Services’. If the User should be granted Security Manager

entitlements, they should also be assigned the ‘SYSTEM ADMINISTRATOR’ group.

e) User Access Profile Association – assignment of respective access profiles that contain entitlements

to functionality related to accounts.

Click here to enter the User details.

www.citihandlowy.pl

Bank Handlowy w Warszawie S.A.

13

The below picture shows example view of details of the User submitted for authorization:

In order to authorize a User record, click the ‘Authorize’ button. A window will appear informing about

successful authorization of User profile or possible errors.

If the entered data is correct, click

‘Authorize’ to authorize this User.

www.citihandlowy.pl

Bank Handlowy w Warszawie S.A.

14

In case of any errors in the entered data, the created record should be sent to repair (sending to repair has

been described in the 2.3 section of the hereby Manual) or rejected. If you choose to reject the record, you

will be able to create the User again according to section 2.1 of the Manual.

2.3 Repairing, modifying or rejecting User record changes

In case of discovering errors while verifying the data entered by the creating Security Manager, the

authorizing Security Manager can choose to either send the verified record (i.e. User creation/modification)

to repair or can decide to reject it. If the authorizing Security Manager rejects the newly created record (for

instance: if the User is not supposed to have access to the system) – the record representing the created

User will disappear from the system. The User can be created in the system again in the future should such

need arise.

After choosing ‘Send to Repair’ or ‘Reject’ options, the system will additionally ask you for the reason for

correction or rejection of the record. Specify the reason and then click ‘Send to Repair’ or ‘Reject’ to confirm.

www.citihandlowy.pl

Bank Handlowy w Warszawie S.A.

15

The record, which has been sent ‘To Repair’ will appear on the ‘Modify/Repair’ worklist, where User data can

be corrected or rejected (refer to the example below):

To see the reason why the record was sent to repair go to User details by clicking the hyperlink (in this case:

the surname and name of the User). An additional window will appear on the User data screen, providing

information on the reason entered by the authorizing Security Manager who sent the record to repair.

www.citihandlowy.pl

Bank Handlowy w Warszawie S.A.

16

To modify an existing User please select the User on the ‘All Users’ worklist (refer to the example below). To

enter the User details, click the field with a hyperlink (in this case: the surname and name of the User). A

window with User data will then be displayed where the data can be modified. Afterwards the modified

record can be submitted for authorization as described under section 2.1. User creation (creating Security

Manager) of the User Manual.

In case of authorization of the User who has already existed in the system when his information was being

changed, the authorizing Security Manager can check what information has been changed by selecting the

‘Review Changes’ option at the bottom of User details screen (refer to the example below).

After clicking ‘Review Changes’ button a new window will appear, where the data that has been changed will

be displayed as old and new values side-by-side or as information about added or removed values:

www.citihandlowy.pl

Bank Handlowy w Warszawie S.A.

17

If the authorizing Security Manager rejects the modified record its content will be reversed to the state from

before the change was made.

NOTE!: Modifying the Last Name of the User that already exists in the system is performed by the

Bank - if the Security Manager makes such a change on their own, it may result in the User in

question being blocked in the system. Performing such a change requires sending a prior written

notice to the Bank containing information about the previous and new surname, ID card number and the

Safeword card number of the User whose data should be modified. Such data modification can be performed

only for the User’s last name - there is no possibility to transfer ownership of a Safeword card from one

User to another. In case of performing modification of last name for the User entitled to the

authorization of payments from a particular account - filing a new ‘Personal data of persons making

transactions/statements of will in the name of the Account Holder / Client’ form with the Bank is required in

order for such a change to become active in the system.

2.4 Deleting a User (creating Security Manager)

In order to delete an existing User from the system, after you login to the CitiDirect BE portal, select ‘Users &

Entitlements’, then ‘Users’, and then the ‘All Users’ section.

Select the User who should be deleted from the system by going into the details of that User.

www.citihandlowy.pl

Bank Handlowy w Warszawie S.A.

18

After entering the view of User details, select ‘Delete User in CitiDirect’ option.

After the ‘Delete User in CitiDirect’ option is selected, the system will ask you if you are sure you want to

delete the User from the system. If you are sure, please confirm by clicking ‘Yes’ or ‘No’, in case the User

should remain in the system.

If ‘Yes’ is selected, the User deletion will be submitted for authorization – a confirmation will appear, as

shown below:

www.citihandlowy.pl

Bank Handlowy w Warszawie S.A.

19

2.5 Deleting a User (authorizing Security Manager)

Authorizing deletion of a User from the system is performed according to the section 2.2 of the hereby User

Manual – the only difference is the description in the ‘Action’ column (refer to the example below), which

informs about the removal of the User from CitiDirect:

and the User details that provide information about the action which is currently being authorized (‘Delete

User in CitiDirect’).

NOTE! There is no possibility to restore the User who has been deleted from the system. In order to

assign entitlements to the deleted User, it is necessary to request the issuing of a new Safeword card

by the means of delivering a new completed ‘CitiDirect - Request for Safeword cards and PIN issuance –

Security Manager’ form to the Bank and specifying data of the User who should be created in the system

and for whom the new card should be issued.

After the User is deleted from the system, they will still remain visible on the User list with appropriate flag

(please refer to the example below). This flag is used both for deleted and blocked users.

www.citihandlowy.pl

Bank Handlowy w Warszawie S.A.

20

Additionally, there is information about User deletion in the User details.

2.6 Blocking a User (creating Security Manager)

If you do not wish to permanently delete the User from the system, you can choose to temporarily block them

instead. The User can be blocked in two ways:

a) By changing the User’s status – immediately blocks the User in the system – ‘All Users’ section,

select the User who should be blocked in the system (like in the section 2.4 of the hereby Manual),

and then in the User details change their status to ‘Inactive’.

www.citihandlowy.pl

Bank Handlowy w Warszawie S.A.

21

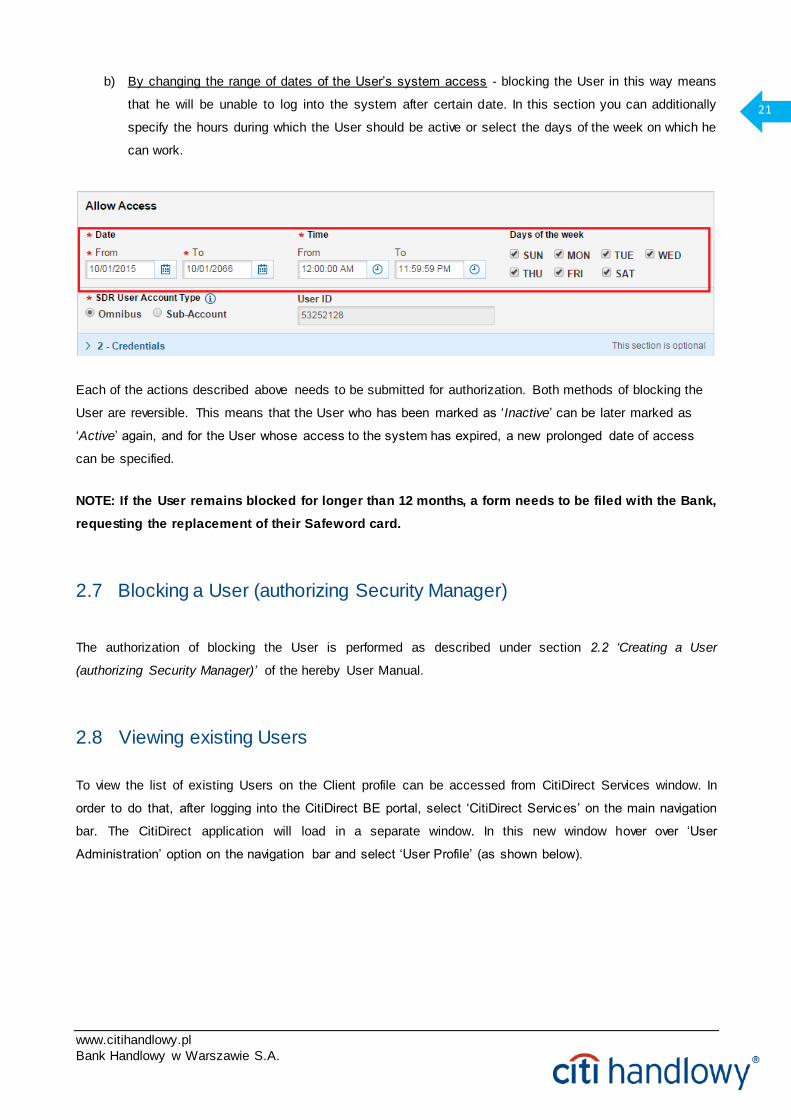
b) By changing the range of dates of the User’s system access - blocking the User in this way means

that he will be unable to log into the system after certain date. In this section you can additionally

specify the hours during which the User should be active or select the days of the week on which he

can work.

Each of the actions described above needs to be submitted for authorization. Both methods of blocking the

User are reversible. This means that the User who has been marked as ‘Inactive’ can be later marked as

‘Active’ again, and for the User whose access to the system has expired, a new prolonged date of access

can be specified.

NOTE: If the User remains blocked for longer than 12 months, a form needs to be filed with the Bank,

requesting the replacement of their Safeword card.

2.7 Blocking a User (authorizing Security Manager)

The authorization of blocking the User is performed as described under section 2.2 ‘Creating a User

(authorizing Security Manager)’ of the hereby User Manual.

2.8 Viewing existing Users

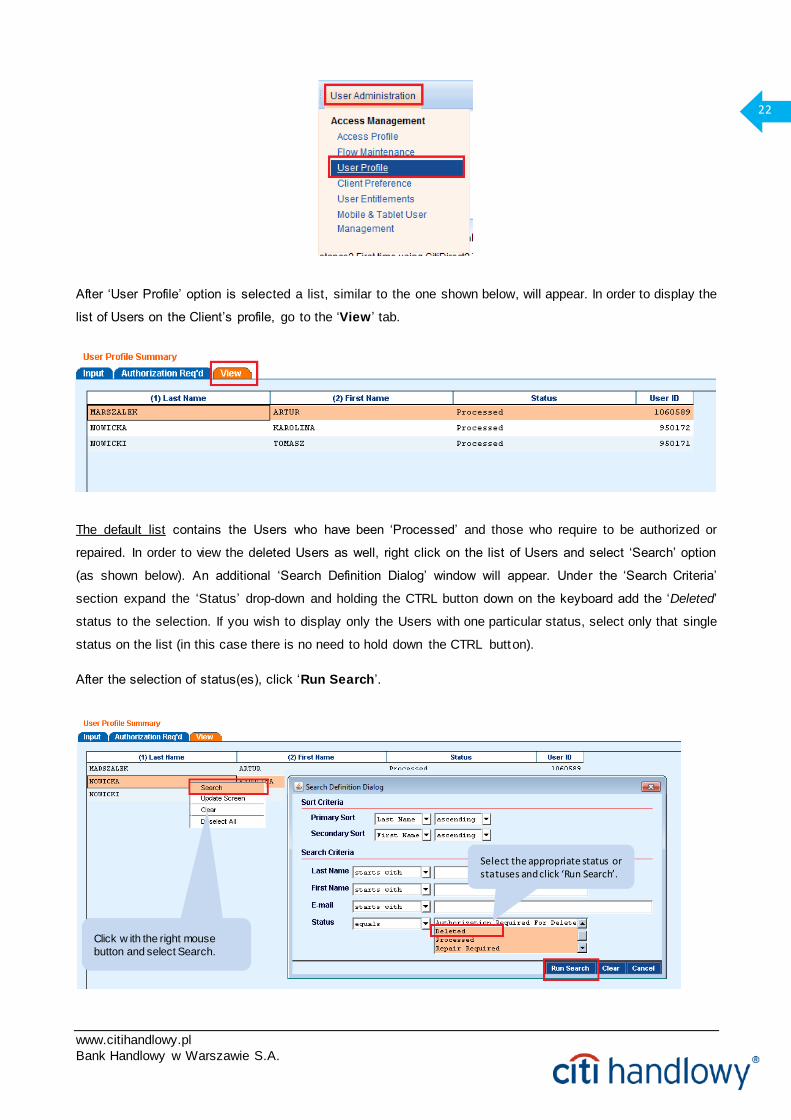
To view the list of existing Users on the Client profile can be accessed from CitiDirect Services window. In

order to do that, after logging into the CitiDirect BE portal, select ‘CitiDirect Services’ on the main navigation

bar. The CitiDirect application will load in a separate window. In this new window hover over ‘User

Administration’ option on the navigation bar and select ‘User Profile’ (as shown below).

www.citihandlowy.pl

Bank Handlowy w Warszawie S.A.

22

After ‘User Profile’ option is selected a list, similar to the one shown below, will appear. In order to display the

list of Users on the Client’s profile, go to the ‘View ’ tab.

The default list contains the Users who have been ‘Processed’ and those who require to be authorized or

repaired. In order to view the deleted Users as well, right click on the list of Users and select ‘Search’ option

(as shown below). An additional ‘Search Definition Dialog’ window will appear. Under the ‘Search Criteria’

section expand the ‘Status’ drop-down and holding the CTRL button down on the keyboard add the ‘Deleted’

status to the selection. If you wish to display only the Users with one particular status, select only that single

status on the list (in this case there is no need to hold down the CTRL button).

After the selection of status(es), click ‘Run Search’.

Select the appropriate status or statuses and click ‘Run Search’.

Click w ith the right mouse

button and select Search.

www.citihandlowy.pl

Bank Handlowy w Warszawie S.A.

23

The View tab also allows checking of such User details such as address, Safeword card number etc. To

access this information, select a User and press ‘Go to Details’ (as shown below).

A window containing User data will appear (refer to the example below).

www.citihandlowy.pl

Bank Handlowy w Warszawie S.A.

24

3. Entitling a User with access to CitiDirect

3.1 Entitling a User with access to CitiDirect (creating Security Manager)

If the CitiDirect access entitlements have not been assigned during the User creation process according to

the steps described under section 2.1 ‘Creating a User (creating Security Manager’) they must be assigned

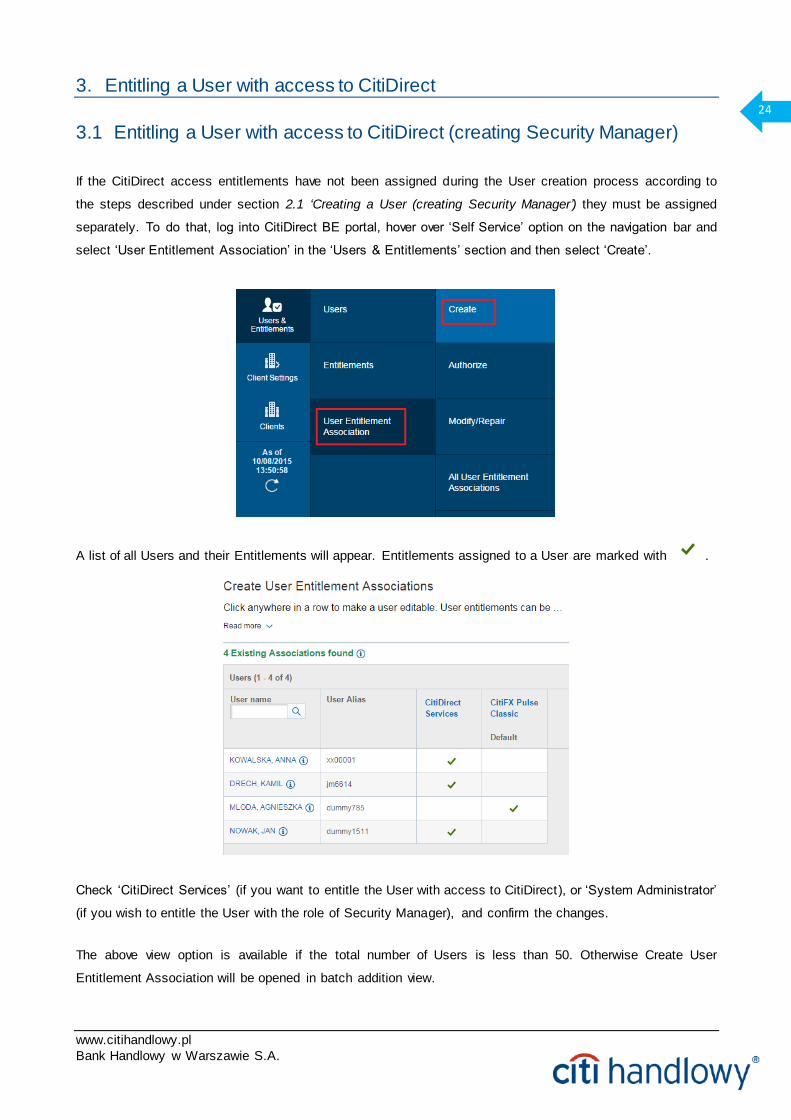
separately. To do that, log into CitiDirect BE portal, hover over ‘Self Service’ option on the navigation bar and

select ‘User Entitlement Association’ in the ‘Users & Entitlements’ section and then select ‘Create’.

A list of all Users and their Entitlements will appear. Entitlements assigned to a User are marked with .

Check ‘CitiDirect Services’ (if you want to entitle the User with access to CitiDirect), or ‘System Administrator’

(if you wish to entitle the User with the role of Security Manager), and confirm the changes.

The above view option is available if the total number of Users is less than 50. Otherwise Create User

Entitlement Association will be opened in batch addition view.

www.citihandlowy.pl

Bank Handlowy w Warszawie S.A.

25

In case of batch Entitlement association in the list of Users select the ones to whom you want to give

Entitlements and in the list of Entitlements select the ones you want to give them. Then click on ‘Associate’.

The assignment of entitlements is confirmed in the ‘Existing Associations found’ table:

Assign the entitlements by clicking ‘Submit’ – the records will be submitted for authorization. The batch

Entitlement Association interface is also accessible in profiles with fewer than 50 users. To change the

Entitlement creation view select the ‘Switch to Card Method’ option.

www.citihandlowy.pl

Bank Handlowy w Warszawie S.A.

26

3.2 Entitling a User with access to CitiDirect (authorizing Security Manager)

To authorize entitlements to CitiDirect access assigned by the creating Security Manager go hover over the

‘Self Service’ option on the CitiDirect BE portal navigation bar and select ‘Users & Entitlements’, then ‘User

Entitlement Association’ and then the ’Authorize’ section. Sections that demand authorization are marked

with an orange dot and the number of records to authorize.

To authorize the assignment of entitlements, select the record from the list and click ‘Authorize’.

www.citihandlowy.pl

Bank Handlowy w Warszawie S.A.

27

To check the details of the entitlements that have been assigned for the User, click on the hyperlink under

the surname and name of the User.

In the Details section of the entitlement that awaits authorization there will be the worklist status, which

represents the current authorization stage.

If you discover any mistakes (eg. the User only has the ‘CitiDirect Services’ entitlement while they should

also receive the “System Administrator” entitlement) you can send the record to repair or reject it – in this

case follow the steps described under section 2.3 of the hereby Manual.

www.citihandlowy.pl

Bank Handlowy w Warszawie S.A.

28

4. Profile management in CitiDirect

4.1 Creating access profiles (creating Security Manager)

In order to assign the User entitlements in CitiDirect two steps are necessary:

1. Create an access profile, containing entitlements you wish to assign

2. Assign this profile to the User created according to the section 2.1 of the hereby Manual.

To begin, after logging into CitiDirect BE Portal click on the ‘CitiDirect Services’ tab in the main menu – this

will launch the CitiDirect application, which will open in a separate window.

NOTE! Do not close the old CitiDirect BE window – closing it will result in CitiDirect Services window shutting

down as well.

To create an access profile hover over ‘User Administration’ option on the CitiDirect Services navigation bar

and select the ‘Access Profile’ option from the drop-down menu.

www.citihandlowy.pl

Bank Handlowy w Warszawie S.A.

29

A list containing existing access profiles will appear. On this list you may also see default profiles, which

contain basic entitlements. Default profiles can be edited to create your own customized access profiles with

selected entitlements.

The profiles listed below are the examples of default profiles:

NOTE! The default profiles are not always present in the system. All profiles that were previously created

can be edited, however each time you create a new profile on the basis of an existing profile, remember to

assign a new name to the created profile . If you are creating a new profile on the basis of an existing one

that is already assigned to Users in CitiDirect but do not save the modified profile under a new name, the

entitlements in the existing profile will be replaced and in consequence the entitlements of the Users who

had this existing profile already assigned to them will also be replaced.

To create a new access profile click ‘New’ in the right lower corner.

www.citihandlowy.pl

Bank Handlowy w Warszawie S.A.

30

After you click ‘New’ a window will appear with the list of available services (entitlements) on the left. When

you add a new service (entitlement) to the access profile it will appear the right side of the screen. From the

list of available services select the ones you wish to assign to the User. To add a service, click on it. Detailed

description of the available services can be found under section 4.3 of the hereby User Manual.

List of services (entitlements)

assigned to the User.

List of services

(entitlements) that can be assigned to

the User)

www.citihandlowy.pl

Bank Handlowy w Warszawie S.A.

31

To view details of a particular service expand the list by clicking on the next to the name of that service.

A window with list of available actions will appear (refer to the example below). Select the actions to which

you wish to entitle the User and then confirm your choice with the ‘OK’ button – the selected actions should

appear on the right side of the screen now.

In the same way you can add other limited entitlements such as accounts to which the User will be entitled or

transaction amount limit.

NOTE! If particular account numbers to which the User should be entitled are not specified in the

Payments, Messages and General Cash PI services – The User will be by default granted entitlements

to ALL accounts on this profile and to each account added to the profile in the future.

3. Select appropriateprocesses and confirm

with ‘OK’.

2. Click

‘Processes’

1. Select the service andclick the ‘+’ symbol next to

its name.

www.citihandlowy.pl

Bank Handlowy w Warszawie S.A.

32

Presented below are the basic entitlements assigned to the User in CitiDirect:

www.citihandlowy.pl

Bank Handlowy w Warszawie S.A.

33

When the contents of access profile are ready, click ‘Submit’.

Access Profile Name window will appear – type the name of created access profile and confirm with

‘OK’. The profile has been submitted for authorization.

Authorization of the access profile, just like other such authorizations, can be performed by a User with

Security Manager entitlements, other than the User who created/entered the change.

4.2 Creating access profiles (authorizing Security Manager)

To authorize an access profile containing the specified list of services and entitlements, go to the CitiDirect

Services window, hover over ‘User Administration’ option on the main navigation bar and select ‘Access

Profile’ from the drop-down list.

www.citihandlowy.pl

Bank Handlowy w Warszawie S.A.

34

Next, go to the ‘Authorization Req’d’ tab, where the list of profiles awaiting authorization will be displayed.

Click on the name of the access profile you wish to authorize – the information about the profile will appear

on the right side of the screen. To verify the profile details click ‘Expand All’. If the contents of the profile are

suitable, click ‘Authorize’.

Select the profile you w ish to authorize.

The ‘Expand All’ button

show s all the profile access details.

If the scope of the

entitlements for the profile is correct, click ‘Authorize’.

www.citihandlowy.pl

Bank Handlowy w Warszawie S.A.

35

5. Assigning entitlements to Users

5.1 Assigning entitlements to Users (creating Security Manager)

To grant the selected range of CitiDirect entitlements to the User, assign the previously created access

profile to this User. Each User may have multiple access profiles assigned to them.

In the CitiDirect Services window hover over ‘User Administration’ option on the main navigation bar and

select ‘User Entitlements’ from the drop-down menu.

A list of Users with assigned entitlements will appear. If you want to:

modify existing User entitlements: double-click the User on the list or select the User and click the

‘Go to Details’ button.

assign entitlements to a User who has no assigned entitlements yet: click the ‘New’ button in

the right lower corner of the screen

If there is only one User with no entitlements, right after clicking ‘New’ you will be redirected to the screen

with details. If there are more Users without entitlements, a list containing their names and surnames will

appear – please select the User who you wish to entitle from that list and confirm your selection with ‘OK’.

www.citihandlowy.pl

Bank Handlowy w Warszawie S.A.

36

After choosing the User, assign the selected access profiles to them by using the ‘Add’ button.

After clicking the ‘Add’ option a list of available, previously created profiles will appear, from which the

suitable profiles should be selected. If you want to add a few access profiles to the User, hold down CTRL

button while selecting the profiles on the list. Then click ‘OK’ to add the selected profiles for the User.

www.citihandlowy.pl

Bank Handlowy w Warszawie S.A.

37

Next, confirm the assigning of entitlements by clicking the ‘Submit’ button.

After you click ‘Submit’ a system warning will appear. This „AML Warning” message contains information

regarding settings that fall under the scope of anti-money laundering (AML) regulations.

Confirm the message by clicking ‘Yes’.

The change has now been submitted for authorization. The authorization of User entitlements, just like other

authorizations, can be performed by a User with Security Manager entitlements other than the User who

entered/created the change.

www.citihandlowy.pl

Bank Handlowy w Warszawie S.A.

38

NOTE!: Under the provisions of the Act on Counteracting Money Laundering and Terrorism Financing of

16th November 2000, the Bank is obliged to identify persons authorized to place instructions and conclude

transactions in the name of the Account Holder. With respect to the above, entitling a User (new or

existing) to authorize transactions made from a particular account, and in case there is no

authorization flow on the account – entitling them to initiate transactions with the Bank, requires the

‘Personal data of persons making transactions / statements of will in the name of the Account Holder

/ Client’ form to be filed with the Bank for such change to be active in the system.

In case the form in question has been already filed with the Bank for a given User, there is no need to file it

again.

If the above-mentioned document is not delivered to the Bank, the User will be blocked in the system

until the document is filed, even if the entitlements have been assigned and the User’s Safeword

card is active.

5.2 Assigning entitlements to Users (authorizing Security Manager)

The entitlements assigned to the Users by the creating Security Manager must be authorized by another

User with the Security Manager entitlements, other than the person who entered/created the changes. If

acting as the authorizing Security Manager you do not wish to authorize the assignment of User

entitlements, you can send such a record to repair or reject it – in this case the new User will remain

without entitlements while the modified User will retain the entitlement scope from before the modification.

To authorize the User entitlement assignment, in the CitiDirect Services window hover over ‘User

Administration’ on the main navigation bar and select ‘User Entitlements’ option from the drop-down list.

www.citihandlowy.pl

Bank Handlowy w Warszawie S.A.

39

Next, go to the ‘Authorization Req’d’ tab.

A list of Users awaiting authorization will be displayed. The further actions to be performed depend on

whether you are authorizing a new User or authorizing modifications made to an existing User:

a) Authorizing a new User

If before authorizing a new User you first wish to make sure that appropriate access profiles

(entitlements) have been assigned to them, select this User on the list and click ‘Go to Details’ button in

the lower right corner of the screen.

After clicking ‘Go to Details’, you will see the access profiles assigned to this User:

If the added access profiles are correct, click ‘Authorize’. If they contain errors that you wish to correct,

click ‘Send to Repair’ or ‘Reject’.

Access profiles (entitlements) added for

this User.

www.citihandlowy.pl

Bank Handlowy w Warszawie S.A.

40

To confirm the authorization, click ‘Submit’. If an „AML Warning” system message will appear, informing

about the settings falling under the scope of anti-money laundering regulations (AML) – refer to a

detailed description in the previous chapter – confirm the message by clicking ‘Yes’.

The record has been authorized.

b) Authorizing entitlements of a modified User

If before authorizing a modified User you wish to first make sure if appropriate access profiles

(entitlements) have been assigned to them, select this User on the list and click ‘View Changes’ button.

After ‘View Changes’ is selected a new window will appear, where the changes made to the User

entitlements will be marked in green.

After you preview the entered changes click ‘Cancel’ to return to the list of Users awaiting authorization.

www.citihandlowy.pl

Bank Handlowy w Warszawie S.A.

41

If the access profiles (entitlements) are correct, click the ‘Authorize’ button. If you see errors, click ‘Send

to Repair’ or ‘Reject’ buttons.

To confirm the authorization, click ‘Submit’. If an „AML Warning” system message appears, informing

about the settings falling under the scope of anti-money laundering regulations (AML) – refer to a

detailed description in the previous chapter – confirm the message by clicking ‘Yes’.

The record has been authorized.

www.citihandlowy.pl

Bank Handlowy w Warszawie S.A.

42

6. Transaction authorization flow scheme

Transaction authorization flow scheme determines the number of Users needed to release the transaction

for processing in the Bank. The entitlements assigned to Users through the access profiles must be

consistent with the authorization flow set for the accounts. If there is no User with necessary

entitlements on the Client’s Profile in CitiDirect , sending the transactions for processing by the Bank will not

be possible.

6.1 Creating and modifying a transaction flow scheme (creating Security Manager)

The Security Manager can define transaction authorization flow, i.e. specify how many levels of verification a

particular transaction must undergo before it can be sent for processing by the Bank – the default

authorization flow scheme is set to a single authorization. Described below are the steps which need to

be performed to set up or modify the default authorization flow or to set up an additional transaction flow

scheme:

a) Modifying / setting up a default transaction flow scheme

In the CitiDirect Services window hover over ‘User Administration’ on the main navigation bar and select

‘Flow Maintenance ’ option from the drop-down list.

A list of services will appear - such as Payments, Messages, Libraries – for which the flow settings can be

changed (on the left side of the screen) and the current configuration of the particular service (on the right

side of the screen).

www.citihandlowy.pl

Bank Handlowy w Warszawie S.A.

43

After selecting the ‘Service Class’ (type of service) that should be changed from the list and clicking ‘Go to

Details’ button (right lower corner), on the left side of the screen you will be able to select or modify the flow

of actions that need to be performed before the transaction (or another item) is sent for processing by the

Bank.

A window will open, where you can set the number of Users who need to participate in the particular action

or to specify whether such an action should be required at all. Confirm your configuration by clicking ‘OK’ –

the selected options will appear on the right side of the screen (refer to the below example: configuration of

authorization required for Payments).

Select the level of

required authorization.

Confirm w ith ‘OK’.

www.citihandlowy.pl

Bank Handlowy w Warszawie S.A.

44

If you wish to delete the existing action, eg. the Release step for Payments (as shown below) – right-click it

and select ‘Delete’ – the action will be removed from the right side of the screen.

After setting up the chosen actions, confirm the configuration by clicking ‘Submit’.

b) Creating an additional transaction flow

It’s possible to set up more than one configuration for each service. However in order to do that each such

configuration must have different transaction creation criteria eg. account, amount, creation method. Eg. if

you choose ‘account’ as the differentiating criterion, it’s possible to set up a double required authorization on

one of the accounts and a single required authorization for the other accounts.

To create a new transaction flow scheme, click ‘New’ at the right lower corner of the screen.

Click ‘New ’.

www.citihandlowy.pl

Bank Handlowy w Warszawie S.A.

45

Confirm the configuration for the new

authorization f low scheme by clicking ‘Submit’.

Next, proceed according to the steps presented below:

Note! You need to specify at least one ‘output’ criterion for the transaction (eg. required Authorization or

required Release step). If the transactions should not be subject to verification of any kind (often applied in

case of libraries), select authorization level 1 and set the number of required authorizers to 0.

2.Specify the transaction input criteria.

NOTE!: If no accounts are specified for the scope of this f low , it w ill be automatically encompass all the

accounts available on the profile.

1. Select the service for which the new

transaction f low scheme should be specif ied

3. Pick the output criteria and specify

the number of Users w ho should participate in the process of authorizing

the transaction.

www.citihandlowy.pl

Bank Handlowy w Warszawie S.A.

46

To confirm the authorization, click ‘Submit’. If an „AML Warning” system message appears, informing

about the settings falling under the scope of anti-money laundering regulations (AML) – refer to the

detailed description under the previous sections – confirm the message by clicking ‘Yes’.

Name the created flow scheme and confirm it by clicking ‘OK’.

NOTE! Name of each flow schemes must be different – the system will not allow to save the same

flow name two times.

Authorization of an access profile, just like other authorizations, can be performed by a User with Security

Manager entitlements other than the User who entered/created the change.

www.citihandlowy.pl

Bank Handlowy w Warszawie S.A.

47

6.2 Creating and modifying a transaction flow scheme (authorizing Security Manager)

In the CitiDirect Services window hover over ‘User Administration’ on the main navigation bar and select

‘Flow Maintenance ’ option from the drop-down list.

In order to authorize the created flow scheme, go to the ‘Authorization Req’d’ tab.

Select the flow you wish to authorize. Details of the configuration will appear at the right side of the screen.

Select the ‘Expand All’ option to see the full view of details. If the configuration is correct – click ‘Authorize’.

If there are errors, select ‘Reject’. If the settings are rejected, they will need to be entered again according to

the section 6.1 of the hereby User Manual.

www.citihandlowy.pl

Bank Handlowy w Warszawie S.A.

48

7. Standing Instruction - setup

In order to begin using Standing Instruction functionality, it is necessary to first contact the Bank

and activate this service on the Client Profile in CitiDirect.

The Security Manager will be able to assign entitlements to create standing instructions to the Users only

after the initial setup is performed on the side of the Bank.

7.1 Standing Instruction – profile and payment flow configuration

To assign entitlements to standing instructions to a User, the Security Manager should follow the

steps outlined below:

1. create an access profile with Standing Instruction functionality enabled

2. authorize the created access profile

3. define the payment flow

4. authorize the new payment flow or modify an already existing payment flow

5. assign User entitlements to the authorized access profile

6. authorize the assigned User entitlements

Step 1 - Creating an access profile with standing instruction functionality enabled

After the Bank performs the initial setup on the Profile in CitiDirect at the Client’s request, the Standing

Instruction functionality is automatically added to all access profiles existing on such a Client Profile in

CitiDirect. The exceptions from this rule are access profiles with ‘Creation Me thod’ specified. In this

case, the Security Manager should add the missing creation methods, i.e. ‘Standing Instruction’ and

‘Recurring Payments’ to these access profiles

www.citihandlowy.pl

Bank Handlowy w Warszawie S.A.

49

There are two ways for the Security Manager to add Standing Instruction functionali ty to access profiles.

The first option is to create a new access profile specifically for the Standing Instruction service.

Second option is to modify an already existing access profile and add the Standing Instruction

functionality to it.

In case of the modification of an already existing profile , such an access profile can be saved under its

already existing name – this will cause the expansion of entitlements for those Users who have this profile

assigned to them.

Saving the profile under a new name will result in the creation of a new access profile, which will then

need to be assigned to the Users who should gain access to it.

To create a new access profile, select the ‘User Administration’ tab in the CitiDirect main menu and then

click the ‘New ’ button in the right lower corner of the screen.

www.citihandlowy.pl

Bank Handlowy w Warszawie S.A.

50

Modification of an already existing profile can be performed under the same tab. To modify an existing

profile, select it from the list of existing profiles and then click the ‘Go to Details’ button in the right lower

corner of the screen.

In both of the abovementioned situations (creation of a new access profile or editing an already existing

profile), adding the Standing Instruction functionality is performed in the same way. Regardless of whether

you have clicked on ‘New’ or on ‘Go to Details’ the next step is to select ‘Payments’ from the list of criteria

on the left and click icon to expand the list. Next, select ‘Creation Method’ option from the list – a window

with list of functions will appear on the screen. On that list, select ‘Standing Instruction’ and ‘Recurring

Payments’ and confirm your choice by clicking ‘OK’. The selected functions should now display to the right

part of the screen.

To select additional functions from the list, hold down the ‘CTRL’ key on your keyboard and select them from

the list – then confirm your choice by clicking ‘OK’. The change must then be approved with ‘Authorize’

button at the bottom of the screen. If the access profile is also meant to grant access to the Standing

Instructions library, please refer to the detailed information in the ‘Other settings – Standing Instruction

library and reports’ section of the hereby User Manual.

1. Find the service and click the

‘+’ symbol next to its name

2. Click the ‘Creation Method’

3. Select functions from the list and click

the ‘OK’ button.

www.citihandlowy.pl

Bank Handlowy w Warszawie S.A.

51

The selected options are presented below:

When the contents of an access profile are ready, click the ‘Submit’ button.

After you click the ‘Submit’ button, a new window with access profile name will appear – type the name of the

created profile here and confirm with the ‘OK’ button. The Access Profile has been submitted for

authorization.

Step 2 - Authorize the created access profile

To authorize an access profile , go to the ‘User Administration’ tab in the CitiDirect Services window main

menu and select the ‘Access Profile ’ option. Next go to the ‘Authorization Req’d’ tab – a list of profiles

pending authorization will appear.

Authorization of an access profile can be performed by a person with the Security Manager entitlements,

different from the person who created/entered the changes.

After selecting the suitable options, confirm

your choice w ith the ‘Submit’ button.

Confirm the change w ith ‘OK’.

www.citihandlowy.pl

Bank Handlowy w Warszawie S.A.

52

Click the name of the profile you want to authorize – the contents of the profile will appear on the right side of

the screen. If the profile has been modified, you can click on ‘View Changes’ in order to see comparison of

previous and current contents of the profile in a new window.

To authorize the profile, click ‘Authorize’.

Step 3 Define the payment flow

While defining the settings concerning the payment flow for Standing Instructions and Recurring Payments,

please keep in mind the following:

i. The ‘Standing Instruction’ requires definition of a separate payment flow (‘Flow Maintanance’)

that will apply to each created Standing Instruction.

ii. For the Recurring Payments the same flow as for the standard payments may be used.

Exception from that rule is the flow with specified ‘Creation Methods’. In this case, the Security

Manager should add the ‘Recurring Payments’ creation method to the existing flow.

iii. If the Recurring Payments should require a separate flow from the flow of standard payments,

the Security Manager should create a separate payment flow with ‘Recurring Payments’ as creation

method.

www.citihandlowy.pl

Bank Handlowy w Warszawie S.A.

53

Described below are the details of applying these settings:

(i) Defining new payment flow for the ‘Standing Instruction’ function

In the ‘User Administration’ tab in the main menu, select ‘Flow Maintenace’.

Next, click the ‘New’ button in the right lower corner of the screen.

Click on the button and select ‘Payments’ from the drop-down menu:

Next, select ‘Creation method’ - a window will appear. Select ‘Standing Instruction’ and confirm by clicking

‘OK’.

www.citihandlowy.pl

Bank Handlowy w Warszawie S.A.

54

The selected records will appear on the right side of the screen. To save the changes, click ‘Submit’.

www.citihandlowy.pl

Bank Handlowy w Warszawie S.A.

55

In the next window, you can change the name of the payment ‘Flow’:

Click ‘OK’ to save the changes.

Important! For the flow concerning ‘Standing Instruction’, only the ‘Output Criteria’ Authorization options are

applicable. Therefore, in case of specifying one of the following options: ‘Release Required’ and / or

‘Verification Required’ as output criteria (during the creation of the flow for Standing Instruction) these

options will not be considered.

(ii) If using the same flow for Recurring Payments and standard payments is not possible –

‘Recurring Payments’ option should be added for the flows where ‘creation methods’ are specified.

To do that, go to ‘User Administration’ tab in the main menu and select ‘Flow Maintenance ’:

www.citihandlowy.pl

Bank Handlowy w Warszawie S.A.

56

Next, select an existing ‘Flow’, with other creation methods than ‘Recurring Payments’ specified.

To modify the flow, click the ‘Go to Details’ button in the right lower corner of the screen.

Click the ‘Creation Method’ option on the list of the ‘Input Criteria’. A window will be displayed. P ick

‘Recurring Payments’ option from the list available in that window and confirm the change with ‘OK’.

The change will appear on the right side of the screen.

www.citihandlowy.pl

Bank Handlowy w Warszawie S.A.

57

To save the changes, click ‘Submit’.

In the next window, you may change the name of the ‘Flow’.

Click ‘OK’ to save the change.

(iii) Creating separate flow for ‘Recurring Payments’.

To create a separate flow, go to the ‘User Administration’ tab in the main menu and select ‘Flow

Maintenance ’.

www.citihandlowy.pl

Bank Handlowy w Warszawie S.A.

58 Next, click the ‘New’ button in the right lower corner of the screen.

Click on the icon and select ‘Payments’ from the drop-down menu:

Select ‘Creation Method’ and choose ‘Recurring Payments’ from the list in the new window. Confirm your

choice with ‘OK’ button.

www.citihandlowy.pl

Bank Handlowy w Warszawie S.A.

59

Selected records will appear on the right side of the screen. To save the changes click ‘Submit’.

The next window enables you to change the name of the ‘Flow’:

Click ‘OK’ to save this change.

Step 4 - Authorize new payment flow or modified existing payment flow

According to the description under section 6.2 of the hereby User Manual, configuration setup requires

authorization.

Step 5 - Assign Users with entitlements to the authorized access profile

Assigning Standing Instruction entitlements to the Users, i.e. assigning authorized access profile to the User

is performed according to the description of User entitlements assignment available under section 5.1 of the

hereby User Manual.

Settings applied to the flow of payments for Standing Instructions and Recurring Payments determine which

entitlements will be needed for the Users to make payments with use of those functions.

The Users who should only be enabled to create Standing Instructions and Recurring Payments should be

assigned a different access profile than the Users with authorization entitlements.

Step 6 Authorize the assigned User entitlements

Authorization of assigned User entitlements is performed according to the description of User entitlement

assignment available under section 5.2 of the hereby User Manual.

If acting as the authorizing Security Manager you do not want to authorize the assigned entitlements, you

can send such modification to repair or reject it (in such case, the new User will have no assigned

entitlements, while the modified User will retain the scope of entitlements from before the modification.)

www.citihandlowy.pl

Bank Handlowy w Warszawie S.A.

607.2 Other settings – Standing Instruction library and reports

The ‘Payments – Standing Instructions’ library is used by the Users entitled to access it in order to create

entries containing Standing Instruction Types, Business Units and email addresses – all of which are be

stored in the library for later use during creation of standing instructions and in the Standing Instructions

reports. The User who creates standing instructions may set notifications for them – those notifications are

sent to the email addresses stored in the library.

Entitlements to the Standing Instruction Library should be assigned already from the level of the access

profile creation/modification. Such creation/modification has been described above in Step 1 ‘Creating an

access profile with standing instruction functionality enabled’. The ‘Payments – Standing Instruction’ library

should be selected from the list of entitlement criteria as additional setting and added to the access profile.

www.citihandlowy.pl

Bank Handlowy w Warszawie S.A.

61

To define the authorization flow for the Standing Instructions Library, select ‘Access Profiles’ from the ‘User

Administration’ tab in the main menu. Next, select the flow you wish to authorize from the ‘Input’ tab and click

on ‘Go to Details’ button in the right lower corner of the screen. Input appropriate data to define the flow. It is

possible to define up to three levels of authorization for creating of modifying the records in the library. If

creating library entries should not be subject to any validation, please choose level 1 authorization and set

the number of authorizing persons to 0.

The User may also have access to reports from initiated standing instructions. Such report belongs to the

reports from initiated transactions – being assigned entitlements to this group of reports is enough for the

User to be able to access the standing instruction report.

www.citihandlowy.pl

Bank Handlowy w Warszawie S.A.

62

8. Client preferences modification

The Security Manager can make changes to the Client’s preferences such as manual input of transaction

reference or setting default values for fields, eg. default account for fees and commissions.

8.1 Client preferences modification (creating Security Manager)

In the CitiDirect Services window hover over the ‘User Administration’ option in the main menu and go to the

‘Client Preference ’ tab to modify the settings related to preferences.

A list of functions available from the ‘Client Preferences’ screen will appear. To modify any function except

for Payments, please contact Citi Handlowy.

To modify the Client preferences regarding ‘Payments’, select this option on the list and click ‘Go to Details’.

www.citihandlowy.pl

Bank Handlowy w Warszawie S.A.

63

Just like with other CitiDirect configuration screens the left side of the screen features the services available

for modification, while the right side displays those services that have already been added.

For ‘Payment’ preferences only the ‘Method’ option can be modified. To modify ‘Method’ just select it from

the list – an additional window will appear where the setting can be changed. Confirm the new choice with

‘OK’ and then submit the change for authorization by clicking the ‘Submit’ button.

Note! Please do NOT modify the option ‘Base Currency’ under the ‘Payments’ service – it must be

always set to ‘PLN’. If any other currency is set there, no payments can be made.

Authorization of payment, just like other such authorizations, can be performed by a User with Security

Manager entitlements, other than the User who created/entered the change.

www.citihandlowy.pl

Bank Handlowy w Warszawie S.A.

64

8.2 Client preferences modification (authorizing Security Manager)

To authorize preferences go to ‘Client Preference’ tab from the ‘User Administration’ drop-down menu in the

CitiDirect Services window.

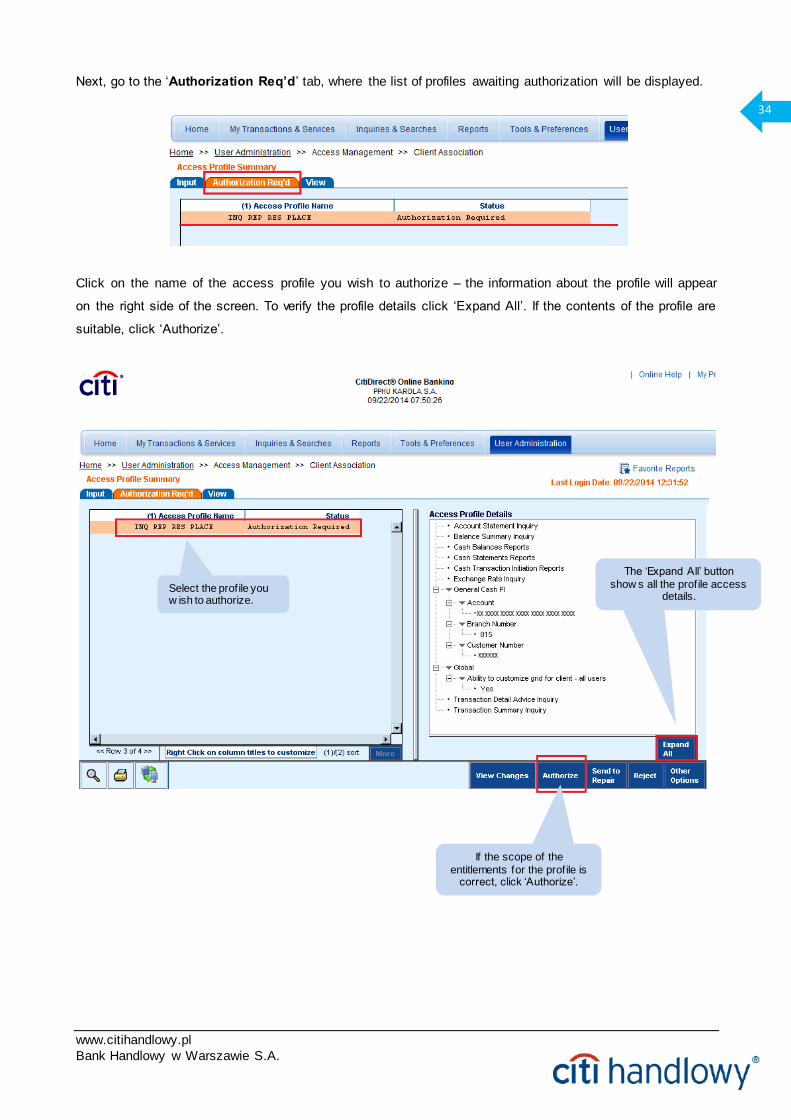
To perform authorization, go to the ‘Authorization Req’d tab’.

To authorize the changes made to the Client preferences select the appropriate record from the list under

the ‘Authorization Req’d’ tab and then click the ‘View Grid’ button. The options selected in the Payments

preferences will appear. If the changes are correct, click the ‘Authorize’ button. If you see errors, click ‘Send

to Repair’ or ‘Reject’ options.

www.citihandlowy.pl

Bank Handlowy w Warszawie S.A.

65

9. Mobile / tablet access

9.1 Mobile / tablet access (creating Security Manager)

In order to grant CitiDirect mobile access and/or tablet access to the User, or to modify such existing access

– go to the CitiDirect services window, hover over ‘User Administration’ tab and then select the ‘Mobile &

Tablet User Management’ option from the drop-down list.

Depending on whether the Security Manager assigns entitlements to the User or just edits the existing

mobile / tablet access entitlements, they must perform the steps described below:

a) Entitling the User with mobile / tablet access

To entitle the User with mobile / tablet access, select ‘New’ in the ‘Input / Modify’ tab.

www.citihandlowy.pl

Bank Handlowy w Warszawie S.A.

66

A list of Users will appear. Select a User that you wish to entitle with mobile/tablet access.

If there is only one User with no entitlements to mobile/tablet access, right after clicking ‘New’ you will be

redirected to the screen with details. If there is more Users without such entitlements, a list containing their

names and surnames will appear – please select the User who you wish to entitle from that list and confirm

your selection with ‘OK’.

Complete the ‘SMS Country Code / Phone Number’ field in the User details.

To enter the phone number, click the icon – a list with country codes will appear. Select the telephone

code of the User’s country from the list. Confirm your choice with ‘OK’ button. The further part of the User’s

number needs to be typed manually.

Now enter the User’s email address and select the language preference for the received email notifications.

In case of entitling the User with mobile access select the ‘Mobile Access Enabled’ checkbox and in case of

entitling the User with tablet access select the ‘Tablet Access Enabled’ checkbox.

www.citihandlowy.pl

Bank Handlowy w Warszawie S.A.

67

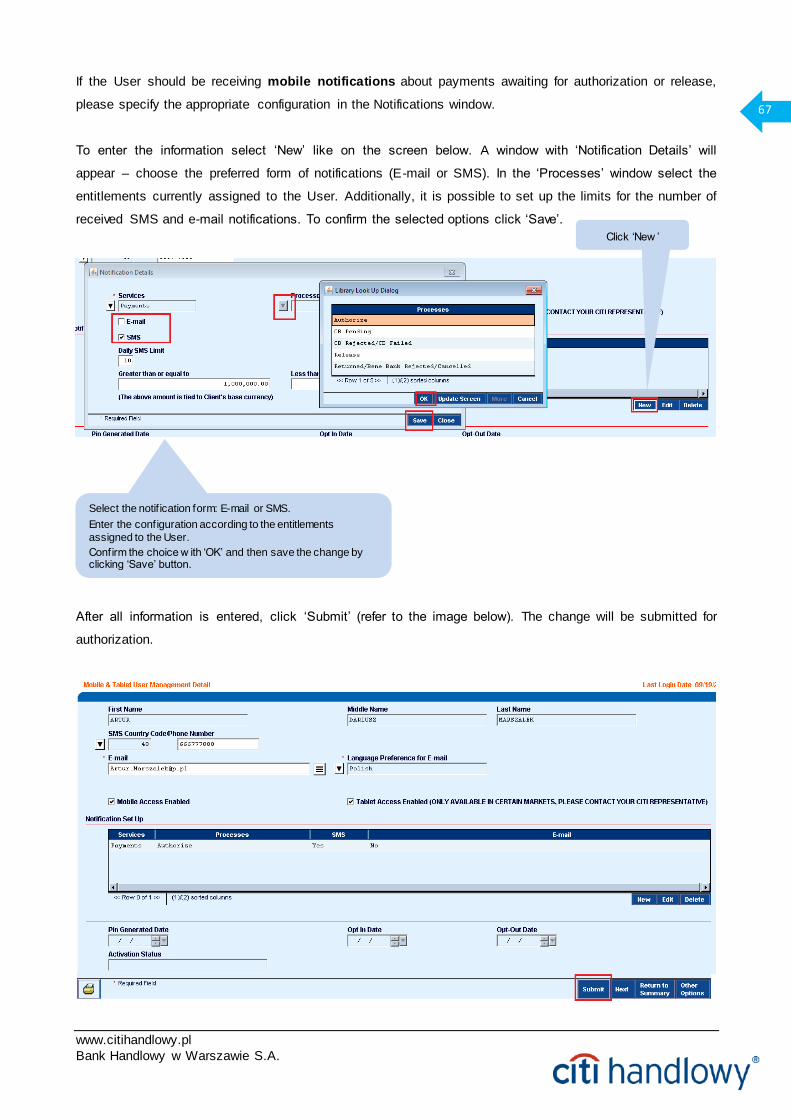
If the User should be receiving mobile notifications about payments awaiting for authorization or release,

please specify the appropriate configuration in the Notifications window.

To enter the information select ‘New’ like on the screen below. A window with ‘Notification Details’ will

appear – choose the preferred form of notifications (E-mail or SMS). In the ‘Processes’ window select the

entitlements currently assigned to the User. Additionally, it is possible to set up the limits for the number of

received SMS and e-mail notifications. To confirm the selected options click ‘Save’.

After all information is entered, click ‘Submit’ (refer to the image below). The change will be submitted for

authorization.

Select the notif ication form: E-mail or SMS.

Enter the configuration according to the entitlements

assigned to the User.

Confirm the choice w ith ‘OK’ and then save the change by clicking ‘Save’ button.

Click ‘New ’

www.citihandlowy.pl

Bank Handlowy w Warszawie S.A.

68

b) Modifying the Users mobile / tablet access

To modify an already existing mobile/tablet access entitlements for a particular User, select this User from

the list available in the ‘Input / Modify’ tab and the click ‘Go to Details’. Next steps are identical to the ones

described above.

Authorization of mobile/tablet access entitlement, just like other such authorizations, can be performed by a

User with Security Manager entitlements, other than the User who created/entered the change.

9.2 Mobile / tablet access (authorizing Security Manager)

In order to authorize the granting of mobile access and/or tablet access, hover over ‘User Administration’ tab

in the CitiDirect Services window and then select ‘Mobile & Tablet User Management’ option.

Go to the ‘Authorize’ tab. Select the User who should be authorized. In order to display the details of the

User, click ‘Go to Details’ button.

www.citihandlowy.pl

Bank Handlowy w Warszawie S.A.

69

If the entered data is correct, click ‘Authorize’. If you see errors, click ‘Reject’.

www.citihandlowy.pl

Bank Handlowy w Warszawie S.A.

70

10. Access Management Reports

‘Access Management Reports’ option enables generating system reports containing details of individual

access profiles (Access Profile Summary Report) and reports containing details about User profiles and the

access profiles assigned to them (User Profile and Entitlements Report). Compare the data from these two

reports to perform a complex review of User entitlements in CitiDirect.

To generate the abovementioned reports, in the CitiDirect Services window hover over the ‘Reports’ tab and

select the ‘Access Management Reports’ option.

To check User entitlements and access profiles you can generate the following two reports from the list:

a) Access Profile Summary Report – information about entitlements in particular access profiles.

b) User Profile and Entitlements Report – information about Users and access profiles assigned to them.

In order to generate a report, select the report and click ‘Edit Report’.

www.citihandlowy.pl

Bank Handlowy w Warszawie S.A.

71

When you enter the report details view, adjust the report format. By default the report is generated in Adobe

(PDF) format. If you want the report to be generated in another format, click the ‘Format’ option and choose

the preferred format from the list. Click ‘OK’. Then run the report with the ‘Run’ button.

As soon as the report is available it will appear in the ‘View Reports’ window. To open and save it, double-

click on it.

www.citihandlowy.pl

Bank Handlowy w Warszawie S.A.

72

11. Viewing inactive Users

Except for the User view accessed via the ‘User Profile’ option described under section 2.8 of the hereby

Manual, CitiDirect also offers an option to view all the Users present in the system together with their

Safeword cards and last login dates.

To view such data, in CitiDirect Services window hover over ‘Inquiries & Searches’ option and go to ‘Inactive

User Inquiry’.

Specify the next day’s date in the criteria and select ‘Users that have never accessed CitiDirect’ option.

Confirm by clicking ‘Submit’ – a list of Users will appear.

The list displays all the Users on the Client’s profile, together with their assigned Safeword cards, login dates

and creation dates.

Such list can be exported into a file by clicking the icon in the left lower part of the screen.

www.citihandlowy.pl

Bank Handlowy w Warszawie S.A.

73

NOTE! Viewing Users in such a way enables the Security Manager to check if the User’s Safeword card is

active on the side of the Bank. If more than 12 months have passed from the User’s last login date, the card

may be blocked by the system even if the User status viewed by the Security Manager remains set as

‘Active’ - the User profile status options have been described under section 2.1 of the hereby User Manual.

In case of such User, a completed form requesting replacement of the Safeword card needs to be filed with

the Bank. The system does not block the Safeword cards of the Users who never logged into the system.

Bank Handlow y w Warszawie S.A. with registered office in Warsaw, 16 Senatorska Street, 00-923 Warsaw , registered in the register of entrepreneurs of the National Court Register maintained by the Distric t Court for the Capital City of Warsaw in Warsaw , 12th Business Division of the National Court Register under No. KRS 000 000 1538; Tax Identif ication Number NIP 526-030-02-91; w ith share capital of

PLN 522,638,400, fully paid-up.

This advertising material is for information purposes only and does not constitute an offer in the meaning of article 66 of the Civil Code.

Citi and Citi Handlow y are registered trademarks of Citigroup Inc., used under license. Citigroup Inc. and its subsidiaries are also entitled to rights to certain other trademarks contained herein.


Recommended