© 2013 City and Guilds of London Institute. All rights reserved. 1 of 15
Level 2 Diploma in Site Carpentry
PowerPoint presentation
Safe working practices and procedures for changing a circular saw blade
Unit 211: Set up and operate a circular saw
© 2013 City and Guilds of London Institute. All rights reserved. 2 of 15
Level 2 Diploma in Site Carpentry
Safety legislation
The main legislations covering circular saws are:
• The Provision of Work Equipment Regulations 2002 (PUWER)
• Safe Use of Woodworking Machinery Approved Code of Practice (ACoP)
© 2013 City and Guilds of London Institute. All rights reserved. 3 of 15
Level 2 Diploma in Site Carpentry
Safety pre-checks
Before any maintenance is to be carried out on any saw ensure that:
• the machine has stopped
• the machine is isolated and locked
• a sign has been placed on the machine warning ‘Do not operate. Maintenance in progress’.
© 2013 City and Guilds of London Institute. All rights reserved. 4 of 15
Level 2 Diploma in Site Carpentry
Changing the saw blade
The need to change a saw blade is usually as a result of one of the following.
• The teeth have become damaged or blunt.
• The teeth require cleaning of resign build up.
• The type of material being cut.
• The type of cutting process requires a different type of blade.
© 2013 City and Guilds of London Institute. All rights reserved. 5 of 15
Level 2 Diploma in Site Carpentry
Removal of the blade
This is the same process for rip saw benches and dimension saw benches.
• Consult the risk assessment to ensure you are following all required control measures.
• Ensure you are trained and authorised to carry out this activity.
© 2013 City and Guilds of London Institute. All rights reserved. 6 of 15
Level 2 Diploma in Site Carpentry
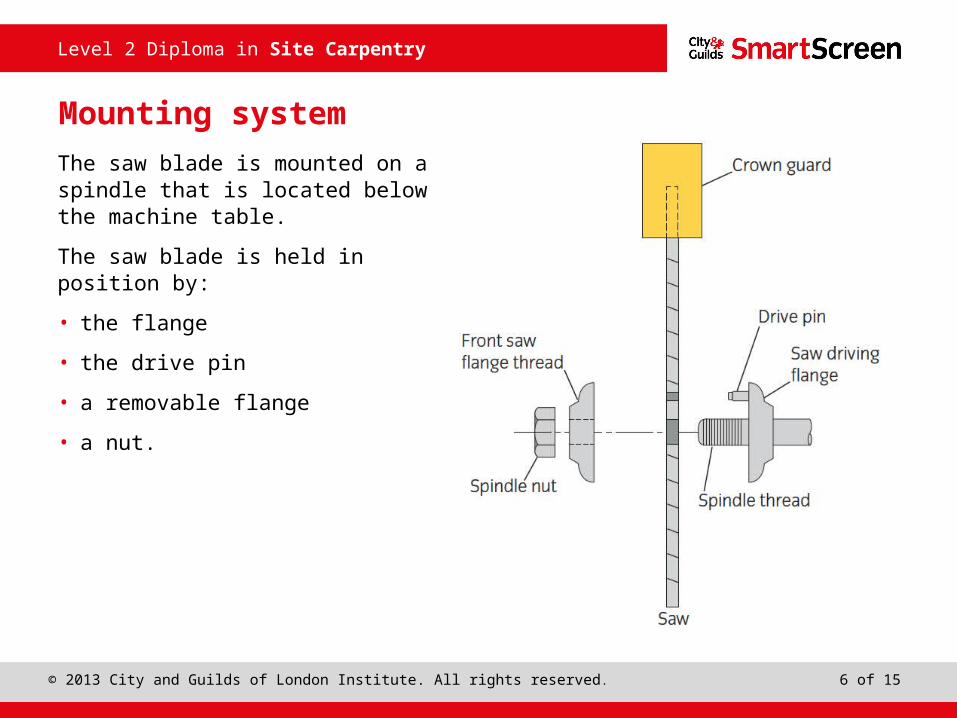
Mounting system
The saw blade is mounted on a spindle that is located below the machine table.
The saw blade is held in position by:
• the flange
• the drive pin
• a removable flange
• a nut.
© 2013 City and Guilds of London Institute. All rights reserved. 7 of 15
Level 2 Diploma in Site Carpentry
Procedure for removal of the blade
1. Remove or raise the crown guard.
2. Remove finger plate or draw back sliding table.
3. Undo the nut, noting that it will have a left-hand thread.
© 2013 City and Guilds of London Institute. All rights reserved. 8 of 15
Level 2 Diploma in Site Carpentry
Procedure for the removal of the blade continued
4. Remove the nut and flange.
5. Remove the blade. Do not place it directly onto the metal bed – place it onto timber to protect the teeth.
6. Clean the flanges, spindle and nut.
© 2013 City and Guilds of London Institute. All rights reserved. 9 of 15
Level 2 Diploma in Site Carpentry
Selecting the type of blade
7. Select the required tooth material for the intended material to be cut.
8. Select the replacement blade. Ensure the correct angle of the hook for the intended working activity.
9. Ensure the blade is within the size limits.
© 2013 City and Guilds of London Institute. All rights reserved. 10 of 15
Level 2 Diploma in Site Carpentry
Riving knife
10. Remove the riving knife and clean.
11. Select a riving knife suitable for the replacement blade. Think about:
• length
• thickness
• radius to follow blade.
© 2013 City and Guilds of London Institute. All rights reserved. 11 of 15
Level 2 Diploma in Site Carpentry
Fitting a replacement blade
12. Locate the blade on the spindle, ensuring it is facing in the correct direction.
13. Engage the driving pin, which should be at the top of the blade.
14. Replace the outer flange and nut.
15. Fully tighten with the correct length spanner.
16. Position the riving knife as close as practicable to the blade and tighten.
17. Ensure the riving knife follows the curve of the blade and is no more than 8mm away from the blade.
© 2013 City and Guilds of London Institute. All rights reserved. 12 of 15
Level 2 Diploma in Site Carpentry
Riving knife position: blades less than 600mm in diameter
© 2013 City and Guilds of London Institute. All rights reserved. 13 of 15
Level 2 Diploma in Site Carpentry
Riving knife position: blades more than 600mm in diameter
© 2013 City and Guilds of London Institute. All rights reserved. 14 of 15
Level 2 Diploma in Site Carpentry
Pre-start checks
18. Fit all the guards and refit the finger plate.
19. Remove all tools, etc.
20. Set the guard as low as possible.
21. Start then stop the machine, listening carefully for any unusual noise.
22. Ensure the blade comes to a standstill within 10 seconds.
23. Set the guards in the correct position and carry out a trial cut.
© 2013 City and Guilds of London Institute. All rights reserved. 15 of 15
Level 2 Diploma in Site Carpentry
Any questions?