12
P/N: 2055050159 All rights reserved – © 06/2018 Classic PSU Super-cap power supply User manual

P/N: 2055050159 All rights reserved – © 06/2018
Classic PSU
Super-cap power supply
User manual

2
Nagra – Classic PSU
Table of contents
Safety warning ........................................................................................... 3 Warranty ................................................................................................... 3 Congratulations .......................................................................................... 4
Package contents ..................................................................................... 4 Installation ................................................................................................. 5
Positioning .............................................................................................. 5 Connection block ..................................................................................... 5 Front panel ............................................................................................. 6 Connecting the mains ............................................................................... 6 Which output to use? ............................................................................... 7 Connecting your Nagra gear to the CLASSIC PSU......................................... 7 Fuse replacement .................................................................................... 7
Operating the CLASSIC PSU ......................................................................... 8 Nagra Modulometer ................................................................................. 8 LED and Modulometer intensity adjustment ................................................ 8 Remote control ........................................................................................ 8 Starting the CLASSIC PSU using the trigger input ...................................... 10 Using the trigger outputs ........................................................................ 10 Case cleaning ........................................................................................ 10 Technical specifications .......................................................................... 11 EU Declaration of conformity ................................................................... 12
3
Nagra – Classic PSU
Safety warning
Read this manual carefully before operating the CLASSIC PSU;
Please contact your Nagra dealer, should you have any questions on
how to setup or the use of your CLASSIC PSU,;
Audio Technology Switzerland SA declines any responsibility in the
event of an accident caused by the non-observation of these
instructions or any other form of user negligence;
There are no user adjustments inside the CLASSIC PSU, do not attempt
to open it.
Warranty Audio Technology Switzerland SA, certifies that this device has been inspected
and tested before leaving our factory.
Every Nagra unit goes through our test laboratory. The measurement results are
recorded in the “Protocol” documentation that comes with the device.
We guarantee our products against all manufacturing defects, for a period of
three years, starting from the date of delivery to the customer (validated by the
serial number on the device casing and the invoice from an official Nagra dealer).
This warranty is only valid for the original purchaser of new equipment.
This limited warranty covers the repair and / or replacement of defective parts
and labor.
The absence of a serial number invalidates the warranty.
We decline any responsibility for damage resulting directly or indirectly from the
use of our products.
As we constantly strive to improve our products, we reserve the right to modify
them or change their specifications without notice.
Disposal of old electrical & electronic equipment (Applicable in the
European Union and other European countries with separate
collection systems).
This symbol on the product or on its packaging indicates that this product shall not be treated as household waste. Instead it shall be
handed over to the applicable collection point for the recycling of
electrical and electronic equipment. By ensuring this product is
disposed of correctly, you will help prevent potential negative
consequences for the environment and human health. The
recycling of materials will help to conserve natural resources. For
more detailed information about recycling of this product, please
contact your local authority, your household waste disposal service
or the shop where you purchased the product. Applicable to the following devices: CLASSIC PSU power supply.

4
Nagra – Classic PSU
Congratulations
Congratulations! You have just acquired a fine piece of equipment.
The CLASSIC PSU was created by an engineering team with more than 65 years’
experience designing world-class products for the professional audio, national
security and military businesses.
Ever since its creation in 1951, Nagra has built devices that offer exceptional sonic performance. The company has received many awards for its technical
innovations and the excellence of its products. Among the most prestigious,
Nagra has been awarded three Oscars® and an Emmy®.
The professional and Hi-Fi ranges are designed by the same Research and
Development department. Nagra has launched a Hi-Fi range to allow a wider
public to benefit from technical advances that are often the privilege of the
professionals.
The CLASSIC PSU will enhance your Nagra system and allow you to access better
sonic performance and enjoy your music more.
Thank you for your confidence.
Package contents
Besides this manual and the CLASSIC PSU itself, the box contains:
Mains cable*;
Measurement protocol showing response curve characteristics for
your device, measured by the Nagra laboratory;
Pair of “haute horlogerie” Nagra gloves
Please contact your Nagra dealer if anything is missing. If you have purchased the optional third output it is already installed inside the CLASSIC PSU.
* Depending on the country of purchase, the cable supplied by Nagra will feature
a European, Swiss or US plug.

5
Nagra – Classic PSU
Installation
Positioning In order to protect against the risks of fire and electric shock, please keep this
device away from rain and humidity, use exclusively indoors.
The Nagra CLASSIC PSU must rest on a stable support. We recommend that you
use the anti-vibration support, Nagra Classic VFS, Vibration Free Support,
developed by Nagra consisting of isolated solid aluminum plates using the same
silicon base damping material as the Nagra CD mechanics. Feel free to contact
your Nagra dealer for more information.
it is not advised to place other Nagra units above or below the CLASSIC PSU, as it
features a large transformer. It is preferable to use a separate shelf for other devices.
Connection block
1. Main switch I for On / O for Off
2. Fuse holder
3. IEC socket for mains power cable
4. Ground connector
5. 12 V outputs for Nagra DC power cables
6. 1/8” jack ouputs for home automation triggering external
7. 1/8” jack input for home automation
1
2
3 4 5 6
1
2
7
6
Nagra – Classic PSU
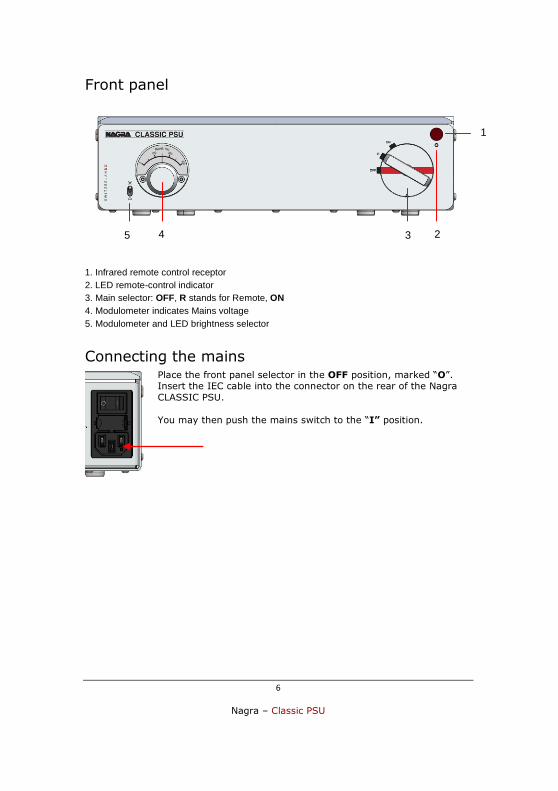
Front panel
1. Infrared remote control receptor
2. LED remote-control indicator
3. Main selector: OFF, R stands for Remote, ON
4. Modulometer indicates Mains voltage
5. Modulometer and LED brightness selector
Connecting the mains Place the front panel selector in the OFF position, marked “O”. Insert the IEC cable into the connector on the rear of the Nagra
CLASSIC PSU.
You may then push the mains switch to the “I” position.
2
1
3 4 5
7
Nagra – Classic PSU
Which output to use? Outputs 1 to 3 are all the same. They are completely isolated from one another,
so you may connect your equipment as you wish, whether it is digital or analog.
If you have purchased the optional third output, then it is active, otherwise only
outputs 1 and 2 are used.
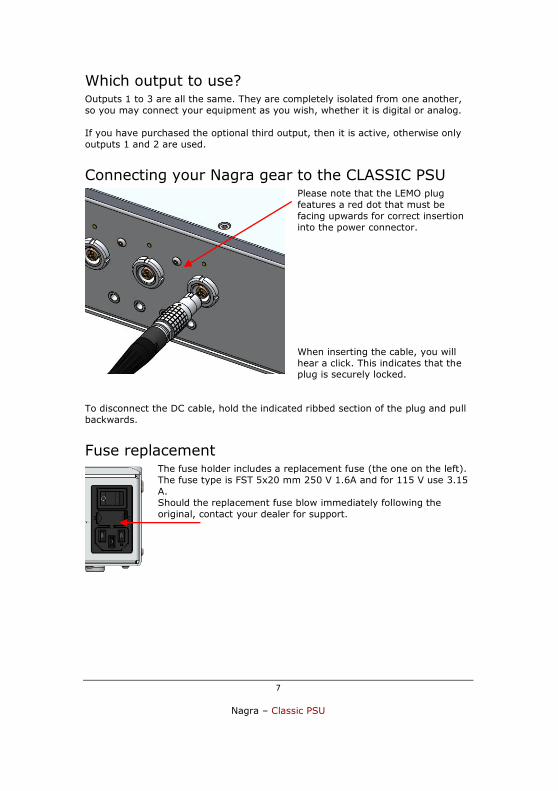
Connecting your Nagra gear to the CLASSIC PSU Please note that the LEMO plug
features a red dot that must be
facing upwards for correct insertion
into the power connector.
When inserting the cable, you will
hear a click. This indicates that the plug is securely locked.
To disconnect the DC cable, hold the indicated ribbed section of the plug and pull
backwards.
Fuse replacement The fuse holder includes a replacement fuse (the one on the left).
The fuse type is FST 5x20 mm 250 V 1.6A and for 115 V use 3.15
A.
Should the replacement fuse blow immediately following the
original, contact your dealer for support.

8
Nagra – Classic PSU
Operating the CLASSIC PSU These are the functions available from the main selector.
OFF The CLASSIC PSU is in standby position R (Remote) The CLASSIC PSU will be turned on and off by the remote control, or
the input trigger, for more information see page 9 ON The power on sequence will start, outputs 1 through 3 will be powered and then
the remote output triggers, for more information about the latter see page 10
The power down sequence order is similar; first the remote output will shut
down, then each output from 1 to 3. This allows a very smooth power on and off
for the system and should avoid any annoying clicks in the speakers.
Nagra Modulometer The Nagra Modulometer was inherited from the second recorder developed by
Nagra back in 1952, the Nagra II. The Modulometer is a precision modulation
meter that displays the necessary information to perform the best possible recording.
In the case of the CLASSIC PSU, the
Modulometer indicates the mains power
voltage.
Depending on your country, the nominal
voltage will vary from 100 to 240 V.
Should the voltage be below minimum or
above maximum, this should raise
concerns about a mains power problem in your area. The CLASSIC PSU only displays
the voltage, it does not affect it.
LED and Modulometer intensity adjustment This two-way toggle switch allows you to adjust the LED and Modulometer
backlight intensity. Pushing the toggle UP will increase the intensity, pushing it
down will lower the intensity all the way to complete extinction. There are 7
different levels.

9
Nagra – Classic PSU
Remote control
Factory settings for the remote control
The Nagra CLASSIC PSU is factory set to be device number 6 with Nagra remote
control code (RCU and RCU II).
Changing device number (for dealers)
If you wish to use another device number, turn the CLASSIC PSU Off and unplug
the mains cable. Then open the top plate. The selector is on the front panel
board, on the right-hand side.
0 position is for Philips RC 5 format –1 to 6 is to use Nagra RCU and RCU II
device number, simply turn the selector to the number you wish the
CLASSIC PSU to respond to.
Using a “universal remote” with the CLASSIC PSU
Place the selector shown above on the 0 position. The CLASSIC PSU will respond
to IR signals coded in Philips RC-5 format. The CLASSIC PSU is allocated a system number 7 for “Reserved”. Function 12 “Standby” is available to turn the
unit On and Off.
NB An alternate, in position “9”, the Classic PSU bears RC-5 system number “11”.

10
Nagra – Classic PSU
Starting the CLASSIC PSU using the trigger input On the R position, you can start the CLASSIC
PSU using the REM (for REMote) input.
Please note that both the tip and the sleeve of
the 1/8” Jack should be connected to the ground.
Signal on the ring CLASSIC PSU
Connected to the ground Off
Open or connected to max 12 V On
Whenever you connect a jack on the REM connector, it will override the Infra Red remote control.
Using the trigger outputs
See the following picture for cabling of the 1/8” jack.
CLASSIC PSU Tip and ring
AMP On Connected
AMP Off Open
The outputs will be activated at the end of the powering sequence, to avoid any
clicks that sometimes occur at start-up. When powering down, these outputs will
be turn off first.
Case cleaning Clean the CLASSIC PSU casing using a soft, non-fluffy, slightly damp cloth. Do
not use any cleaning products which could have a corrosive effect.

11
Nagra – Classic PSU
Technical specifications
Compatibility Nagra VPS, Jazz, Melody
preamplifiers, Classic DAC,
HD DAC, Classic PREAMP,
Nagra CD players
Output type 1 to 3, 12 V DC, 1.5 A GND contact - command
Lemo pin 2-3 Lemo pin 1
Linear noise 30 μV maximum No load
10 Hz - 500 kHz
20 μV maximum Full load
10 Hz - 500 kHz
Home automation
input
output
1x 3.5 mm jack connectors
3x 3.5 mm jack connectors
Input command
Output switching by relay
Mains power
100, 115, 120, 127
230 or 240 VAC
±10%
Power consumption
Maximum 100 W In standby < 1W
Dimensions 280 x 350 x 76 mm Excluding connectors L x W x H
12 x 13.7 x 3 inches Excluding connectors
Weight 7.5 Kg (15.4 lbs.)
With third option
Specifications may change without notice

12
Nagra – Classic PSU
EU Declaration of conformity


