Page 1
Bugs on Wheels
Clean‐Up Crew
Organisms and Environments TEKS for Activities and Presentation
Second Grade: 2.9(A), 2.9(B), 2.9(C)
Third Grade: 3.9(A), 3.9(B), 3.10(A)
Fourth Grade: 4.9(A), 4.9(B), 4.10(A)
Fifth Grade: 5.9(A), 5.9(B), 5.10(A), 5.10(C)
Seventh Grade: 7.10(A), 7.12(A)
Eighth Grade: 8.11(A), 8.11(B)
Program Vocabulary
Aeration, Antenna, Arthropod, Bacteria, Chemical reaction, Colony, Compost, Crime scene
investigation, Crustacean, Debridement, Decomposer, Decomposition, Detritus, Detritivore,
Dung, Element, Entomology, Feces, Fertilizer, Forensic, Forest; Fungi, Grub, Guano, Herbivores,
Insect, Isopod, Larva, Leaf litter, Maggot, Microorganism, Mimic, Navigate, Necrotic, Nitrogen
cycle, Nutrient, Organic matter, Organism, Ovipositor, Parts of an insect (Head, Thorax, and
Abdomen), Protozoan, Pupa, Recycle, Salmonella, Scarab beetle, Scavenger, Segment, Social
insect, Spiracle, Sterile, Terrestrial, Tropical
Pre‐Visit Activity Experimenting with Decomposition
Students Will:
Understand that decomposition is the natural process of dead animal or plant tissue
being decomposed or broken down
Make predictions on the probability that an item will decompose
Conduct experiments to test their predictions
Understand the basics of composting and the role decomposers play in the process
Materials:
Scale, Garbage bag – one per group, Twist ties, Soil (must be collected from outside), Items to
test such as: Soda can, Slice of bread, Styrofoam cup, Plastic shopping bag, Brown paper lunch
bag, Newspaper, Glass bottle, Strawberry or other fruit, Walnut or peanut shells, Toilet paper,
Leaf, Copies of Data Sheet, Pencils
Page 2
Bugs on Wheels
Procedure:
1. Explain to the class that they will be placing various items into a sealed trash bag with soil
collected from outside. The bags will then be left undisturbed for one month. After a
month, they will open the bags and observe how the items have changed over time.
2. Separate the class in to working groups of 2‐4 students. Distribute a data collection sheet
to each student.
3. Show each of the items that will be placed in the bags and instruct students to fill out the
first column of the data chart with the name of each item.
4. Allow groups time to discuss what they think will happen to each of the items in the bag
and what each item may look like after a month. Encourage students to use prior
knowledge and experience to make predictions. Then, instruct students to fill out the
second and third columns of the table with their predictions and rationale.
5. Allow students to share their predictions and rationales with the class.
Preparing the Bag:
1. Instruct groups to fill their bag with 1‐2 gallons of damp (not wet) soil.
2. Explain that the soil has many microscopic decomposers in it, like bacteria and fungi.
Explain that it may also have some invertebrate decomposers like worms or insects.
3. Direct groups to weigh each item using the scale and record the weights in the fourth
column on their data sheets.
4. Instruct students to distribute each of the items throughout the soil in the bag.
Encourage them to be gentle with the items so they are not damaged before the
experiment begins.
5. Then, tell them to blow air into the bag and then seal it tightly using a twist tie.
6. Lastly, instruct groups to place a note on the bag with the date it was created.
7. Collect data sheets. They will be used again, in one month’s time.
One Month Later…
1. Review the experiment and the role of decomposers in soil production. Then, hand out
the data sheets the students used last month.
2. Instruct groups to retrieve their bags and carefully open them. Warn students not to hold
the bag or items from the bag close to their face or to put dirty hands near their nose or
mouth. This will protect them from inhaling mold spores. It is best to do this portion of
the activity outside, if possible.
3. Encourage students to carefully sift through the contents and look for the original items
they placed in the soil. In addition, encourage them to look for any decomposers that
may be visible to the naked eye.
4. As a class, create a master list of each item. After students have had an opportunity to
observe each item, create a description of the degree of decomposition for each item,
based on general consensus from all the groups.
Page 3
Bugs on Wheels
5. Next, direct students to weigh each item from the bag and record this data in the last
column of the data sheet.
6. Encourage students to compare the predictions they made a month ago to the master
record the class created today.
7. Instruct students to calculate the weight difference for each item. Ask students to
consider what weight loss indicates.
8. Invite students to share their observations and findings with the class.
Questions to Ask:
Why did some of the items break down well and others did not?
Did all the items that decomposed turn into compost?
What did all of the items that did not decompose have in common?
What did all of the items that did decompose have in common?
If an item weighs less than it did originally, what does that suggest?
Background:
Microorganisms, like bacteria and fungi, along with larger organisms, such as worms, insects, and
arthropods, are all a part of the amazing process of decomposition. These fungi, bacteria, and
invertebrates break down organic matter, which is composed of organisms that are dead, into
smaller and smaller particles that we call compost. This compost is actually the waste matter
produced by the decomposers and is a vital source of nutrients for the soil. Healthy topsoil is
typically dark brown in color and smells somewhat fresh. Compost is an all‐natural fertilizer and
is the product of nature’s recycling “program”. Without the work of the decomposers, dead
matter would cover the entire Earth!
Item Will it decompose?
Explain your prediction
Original Weight
Ending Weight
Weight Difference
Page 4
Bugs on Wheels
Pre‐Visit Activity: Anatomy of an Insect
Students will:
Know insects have three main parts (also called segments); the head, the thorax, and the
abdomen
Be able to identify the parts of an insect, including the head, thorax, abdomen, antennae,
and wings
Understand that insects have an exoskeleton that provides them structure and
protection
Materials:
Pencils, Paper, Markers or crayons, Pictures of various insects, Scissors, Craft stems, Craft
feathers, Toothpicks, Clay, Other craft supplies as needed
Procedure:
1. Allow students time to observe the various pictures of insects. Help students to identify
the head, thorax, and abdomen of the insects in each of the pictures. Are there any
additional parts found on the insects that they can identify (antennae, legs, wings, etc.)?
2. Encourage students to describe the insect; the shape of wings, size ratios of head, thorax,
and abdomen in relation to each other.
3. Instruct students to make a sketch of their favorite insect and to label the head, thorax,
and abdomen. Allow them to color the insect, if time allows.
4. Provide various craft materials such as clay, feathers, craft stems, and toothpicks. Model
how to make a head, thorax, and abdomen. Then, model how to attach the three parts
together and to add legs, wings, and antennae.
5. Allow students time to create their own unique insect using the craft materials.
6. Check for understanding by having each student identify the head, thorax, abdomen,
antennae, and wings on their creations.
Background:
Insects are arthropods. Arthropods are known for their exoskeletons, a hard protective exterior
case that covers the entire body. The insect’s muscles are attached to the inside of the
exoskeleton, much like the way our muscles are attached to our bones. This exoskeleton
provides protection for the insect.
All insects have three main body parts; the head, thorax, and abdomen. The main features of the
head are large compound eyes and antennae. The mouthparts are also located on the head.
The mid‐portion of the insect’s body is called the thorax. The jointed legs and wings, if present,
are attached to the thorax. Breathing holes, called spiracles, are also located on the thorax.
Insects breathe through these holes instead of their mouths.
Page 5
Bugs on Wheels
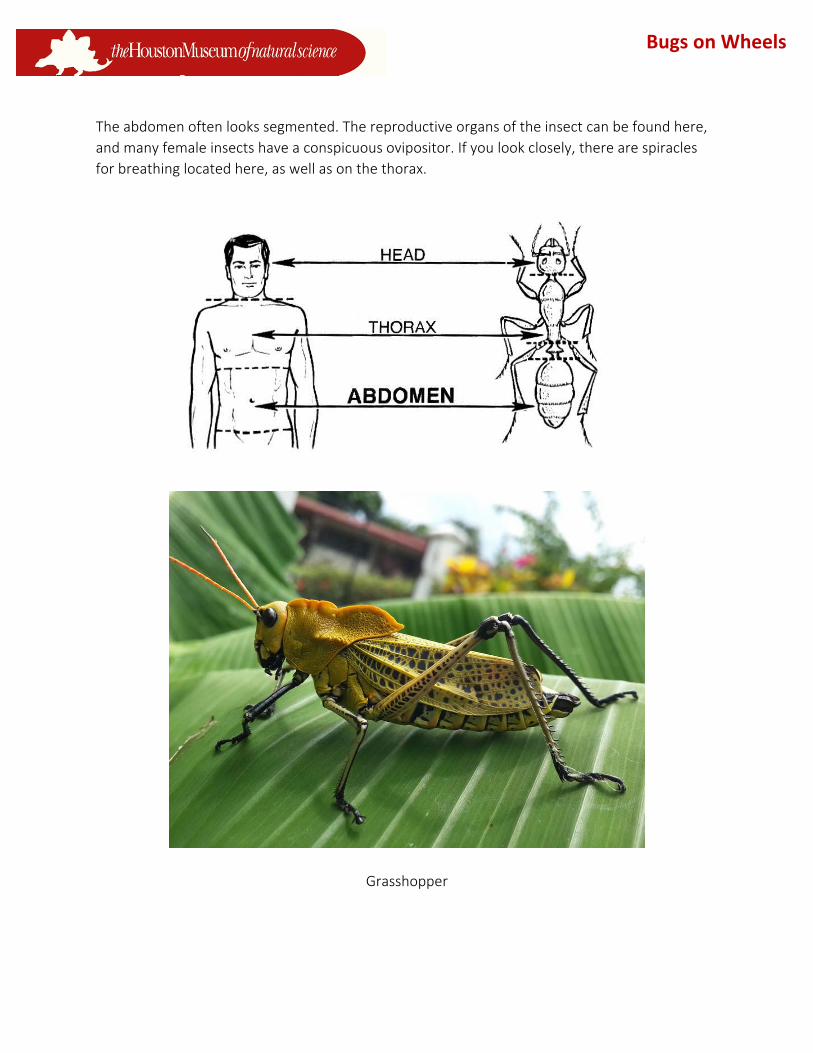
The abdomen often looks segmented. The reproductive organs of the insect can be found here,
and many female insects have a conspicuous ovipositor. If you look closely, there are spiracles
for breathing located here, as well as on the thorax.
Grasshopper
Page 6
Bugs on Wheels
Patent‐leather Beetle
Ladybug
Page 7
Bugs on Wheels
Post Visit Activity: Food Webs: Making the Connection
Students will:
Understand how animals are interconnected by feeding relationships
Distinguish between producers (plants) and consumers: herbivores (plant eaters),
carnivores (animal eaters), omnivores (eat both plants and animals) and decomposers
(break down dead animals and plants)
Design a food web and explain how energy flows through the web
Materials:
Cork board, Push pins, various colors of ribbon or yarn, Pictures of animals (in a single food web)
– you will want to make several sets using different food webs (you may find your own examples
or use the animals in the food webs provided)
Prep‐work
Research different food webs and download pictures of the animals you have chosen to
use for this activity or use the ones provided.
Laminate and cut out sets of the different food web animals.
Cut strips of different colors of ribbon or yarn. Pin the food webs to the cork boards
before class.
Procedure:
1. After learning the basics of food chains and food webs, show the class the animals that
make up the food web on the corkboard.
2. Explain that they will use pins and different colors of ribbon or yarn to connect the food
chains within the larger food web.
3. Model for the class how to connect the chains together within the web using a strands of
different color ribbon or yarn
4. Allow students a chance to complete several different webs using this method.
5. Encourage students to identify the producers and consumers in the food webs they
create. In addition, have them identify the carnivores, herbivores, and omnivores. Can
they identify any decomposers in the food webs?
Background:
All of the food chains in a single ecosystem can be combined to make what is known as a food
web. Every living organism in a particular ecosystem is a member of more than one food chain.
Food chains are one possible path that nutrients and energy can flow through an ecosystem.
These overlapping/interconnected chains are what make up a food web.
Page 8
Bugs on Wheels
There are three categories, called trophic levels, into which organisms in a food web are
grouped: The producers (First trophic level), the consumers (second level), and the decomposers
(third level).
Producers make their own food. Most use sunlight, carbon dioxide, and water, in a process
known as photosynthesis, to produce a nutrient called glucose. The next group are the
consumers, the primary consumers are herbivores and they eat algae, plants, and other
producers.
Secondary consumers eat the herbivores and tertiary consumers eat the secondary consumers.
There may be many levels of consumers before a chain reaches the predator at the top of the
chain, known as the apex predator. The great white shark is an example of an apex predator.
Consumers can be herbivores (eating only plants), carnivores (eating only meat), or omnivores
(eating plants and meat).
Detritivores, make up the last level, they eat nonliving plant and animal remains. Vultures and
dung beetles are examples of detritivores. Decomposers, like fungi and bacteria turn
decomposing plants and animals into inorganic materials that are an important part of nutrient
rich soil.
Page 9
Bugs on Wheels
Savannah Food Web
Taiga Food Web
Page 10
Bugs on Wheels
Post Visit Activity: Decomposers in History
Students will:
Understand the scarab beetle’s role as a decomposer
Understand that the ancient Egyptians mythologized the scarab beetle because of its
dung‐rolling behavior
Create a scarab beetle amulet to aid in understanding the role of nature in mythology
Materials:
Plaster of Paris, plastic spoons, paint or markers, pictures of Egyptian scarab amulets, pictures of
scarab beetles rolling dung, picture of Khepri (Ra)
Prep‐work
Mix plaster according to the package directions. Fill each spoon with the mixture and set aside to
dry. You will need one plaster “blank” for each student.
Class Discussion:
1. Lead a class discussion of the role of dung beetles as decomposers.
2. Show the class the pictures of the scarab beetle rolling a dung ball. Ask the students,
“What do you think they are doing?” They are rolling the ball of dung they collected,
Page 11
Bugs on Wheels
using their hind legs, to an appropriate spot to bury it. Then, the female lays an egg inside
the ball, where it hatches into a larva, feeds, turns into a pupa, and then emerges fully‐
formed as a beetle.
3. Tell the class that scarab beetles are decomposers, but were also an important part of
ancient Egyptian mythology.
4. Show the class the pictures of the ancient Egyptian scarab amulets. Ask the class, “Why
do you think the ancient Egyptians mythologized the hard‐working scarab beetle?” The
image of the scarab rolling the round ball of dung and Khepri (Ra) rolling the “round” sun
across the sky were linked together in Egyptian mythology. The scarab became the
symbol for the birth (dawn) and death (sunset) of the sun each day.
Procedure:
1. Allow students to observe the pictures of the ancient Egyptian scarab amulets.
2. Distribute a plaster “blank” to each student and allow them to use paint or markers to
create their own scarab amulets.
3. Allow the scarabs to dry before sending them home.
Background:
Ancient Egyptians believed that the god of the rising sun, Khepri (Ra), rolled the sun across the
sky from where it rose in the morning to where it set in the evening. Some scarab beetles roll
dung, which is animal waste, into a ball as a brooding chamber for their young. The female
scarab beetle lays her eggs in the ball of dung and when her babies hatch, they have plenty of
food. The young scarabs emerge from the ball fully formed. This must have looked magical to the
ancient Egyptians!
The image of the scarab rolling the round ball of dung and Khepri (Ra) rolling the “round” sun
across the sky were linked together in Egyptian mythology. The scarab became the symbol for
the travels of the sun; the birth (dawn) and death (sunset) of the sun each day.
Scarab amulets were made from many different materials such as gold, silver, serpentine, agate,
carnelian, glass, clay, and a special material, unique to Egypt, called faience. The amulets were
worn for luck and often included in the burials of ancient Egyptians. An interesting prospect,
given the insect’s role as a decomposer.
Scarabs are found, on land, in almost every part of the world. They make up approximately 10%
of all know beetles. The June bugs, that most students will be familiar with, are scarab beetles.
Some types of scarab beetles are brightly colored and patterned, but the majority are black or
brown in color.
Scarab beetles feed on many things, but the most widely known diet is that of the dung beetle,
which feeds exclusively on undigested nutrients found in the excrement from herbivores.
Page 12
Bugs on Wheels
Some dung beetles create almost perfectly spherical balls of dung and then roll them using their
hind legs to an appropriate spot and bury it. The female then lays an egg inside the ball, where it
hatches into a larva, feeds, turns into a pupa, and then emerges fully‐formed as a beetle. Dung
beetles are an essential part of the environment and are responsible for moving and
decomposing such large amounts of dung that they serve to control disease amongst livestock.
Scarabaeus sacer rolling a ball of dung
Page 13
Bugs on Wheels
Khepri, God of rebirth, the sunrise and scarab. Ra's aspect in the morning
Page 14
Bugs on Wheels
Ancient Egyptian Faience Scarab Amulet