Cricket servicesThese services make using Cricket even better and easier!
My Cricket: Access billing, make a quick payment, view usage, and access support from the palm of your hand.
Cricket Wi-Fi: Automatically connect to free and open Wi-Fi® hotspots, helping you to maximize data usage and enhance coverage.
Cricket Voicemail: Quickly view, access, and play back your voicemail messages. Easily save important numbers to your Favorites list and respond to messages by calling back or texting.
Deezer: Listen on-the-go with ad-free streaming music, download your favorites to your phone, and get customized playlists based on your preferences.
Touch screenUsing the touch screen• Useyourfingertiptolightly
touch the screen.
• Tap,drag,orslideyourfinger up, down, left, and right on the touch screen to perform different functions.
• Toreturntotheprevious screen, tap the Back key .
• PresstheHome key at any time to return to the main home screen.
• TaptheRecent Apps key to view and access a list of apps you’ve recently used.
• TapApps to access applications on your phone.
Notifications panelView a quick summary of alerts on your phone, such as new messages, emails, calls, and software updates with the Notificationspanel.
• Swipedownfromthetopof any home screen to access theNotificationspanel.
• Clearindividualnotifications by swiping left or right on the alert, or tap Clear to remove allnotifications.
Clear and SimpleQuick Start Guide
Getting to know your LG Risio™
Phone setupInserting the battery, micro-SIM card, and microSD™ card1. Carefully remove the
back cover by using a fingerorthumbtopull from the bottom of the device.
2. Remove the battery.
3. Insertthemicro-SIMinto the slot as shown with the gold-colored contacts facing down. Reinsert the battery.
4. InsertthemicroSD card (optional) into the microSDslotasshown with the gold-colored contacts facing down.
5. Replace the back cover (the cover is secure when it clicks into place) and charge your phone.
EmailEmail setup (Gmail™, Yahoo!®, etc.)1. From the home screen,
tap Apps and then tap Email .
2. Selectanemailprovider.
3. Enter the email address and password and then tap Next.
4. Once your email has synced with your phone, tap Done. You can now read and send emails.
Create and send an email message1. From the home screen,
tap Apps and then tap Email .
2. To compose a new message, tap Compose .
3. Tap the Tofieldandenter an email address or name, or tap Contacts to select a contact from the address book.
4. Enter a subject and message.
5. Toattachfiles,tapAttach. and follow on-screen instructions.
AccessoriesCricket offers a full line of accessories. For more information, go to www.cricketwireless.com/shop/accessories or visit your local Cricket retailer.
Apps on Google Play™
Access Google Play1. From the home screen, tap
Play Store .
2. UseyourexistingGoogle™ account to log in, or create one following the on-screen instructions.
Navigate Google PlayFind apps, games, and more inthePlayStore.
1. Tap a category to browse popular apps, games, movies, and music organized by popularity or category.
2. Tap Search to search thePlayStoreforaspecific game or app.
3. To install, tap the app and follow the on-screen instructions. Once installed, you will see an alert in the Notificationspanel.Open theappfromthisnotification or by locating it in Apps .
PersonalizeCustomizing home screensPersonalizeyourhomescreenwith apps, widgets, and wallpapers. Tap and hold a blank part of the home screen to access customization options, then select Apps, Widgets, or Wallpapers. Browse options by swiping to scroll through, and tap or drag an item to add it to a home screen.
Organizing home screens• Tomoveawidget,shortcut,
or folder, tap and hold it and then drag it to a new location.
• Todelete,tapandhold and then drag an item to Remove.
• Tocreateafolder,tapandhold an icon and drag it on top of another icon.
• Torenameafolder,tapit,tapthe folder name, and tap the Folder namefieldtobringupthe keyboard.
Camera and videoTake a picture1. From the home screen, tap
Camera , then tap Menu .
2. Tap Settings to adjust your camera settings, such as timer, grid, or resolution. Zoom in and out by pinching/spreading twofingersonthescreen.
3. Tap Shutter or press a Volume key to take a photo.
View pictures1. From the home screen,
tap Apps .
2. Tap Gallery .
Take a video1. In camera mode, tap
Camcorder to automatically start recording.
2. Tap Stop recording to end recording. You may also pause a recording and continue later by tapping Pause , and capture photos while recording by tapping .
Send a picture1. Aftertakingapictureorvideo,taptheGallery
thumbnail in the corner of the screen, tap the screen, and then tap Share .
2. Tap to share your picture or video via messaging, email, Bluetooth®, and more.
Calls and voicemailMake a call1. From the home screen, tap
Phone .
2. Selectanoptiontoplace a call:
• Dial:Manuallyenter telephone numbers.
• Call logs: Retry or return recent calls.
• Contacts: Call a saved contact from your address book.
• Favorites: Call or add a favorite contact.
• Groups: Find contacts easier by their groups.
Use call waitingWith call waiting, you can take two calls at once.
1. While on a call, you will hear a tone if another call comes in.
2. Tap Answer and swipe in any direction to receive the call. Your current call will automatically be placed on hold, and both calls will be listed on screen.
3. Simplytapacallinthelisttomakeitactive.
Check voicemail1. From the home screen, tap Phone .
2. FromtheDialtab,tapVoicemail .
QuickMemo®+Create memos with QuickMemo+1. From the home screen,
tap Apps , then tap QuickMemo+.
2. Tap to add a new memo, or to take a photo to add text or draw on the image.
3. Tap Menu > Done to save your memo.
4. To add a time or location reminder to a memo, tap a memo and then tap Add reminder.
Text and picture messagingSend a text message1. From the home screen, tap
Messaging .
2. Tap Compose to begin a new message.
3. IntheTofield,entera number or a contact name, or tap Contacts to select a contact from the address book.
4. Tap the Enter messagefield and enter your text.
5. Tap Send.
Send a picture message1. Follow steps 1- 4 above.
2. Tap Attach .
3. Tap Image and select a picture, or choose anotherfiletoattach.
4. Tap Send.
Knock Code™ and Knock On™
Set Up Knock CodeKnock Code allows you to unlock your phone with a simple tap pattern code.
1. From the home screen, long press the Recent Apps key , then tap Lock screen settings.
2. Tap Select screen lock and then tap Knock Code.
3. Tap Next.
4. Tap the quadrants on the screen to set your unlock pattern.
5. Tap Continue, enter your tap pattern again, and then tap Confirm.
6. Tap Next.
7. EnterabackupPINandtapNext.Confirm it and tap OK.
8. Selectthetypeofnotificationsyou’dliketo have shown on the Lock screen and tap OK.
Wake up your screen with Knock On1. While the phone is in sleep mode, tap the
screentwicewithyourfinger.
2. When the screen wakes up, you may view notifications,accessappsonyourlockscreen,or unlock your phone.
MBM65179401(1.0) PrintedinChinaNote: To set up corporate email, contact your IT administrator.
Note:YouwillneedtosetupaGoogleWallet™ account to purchase apps.
Pleasedon’ttextanddrive.
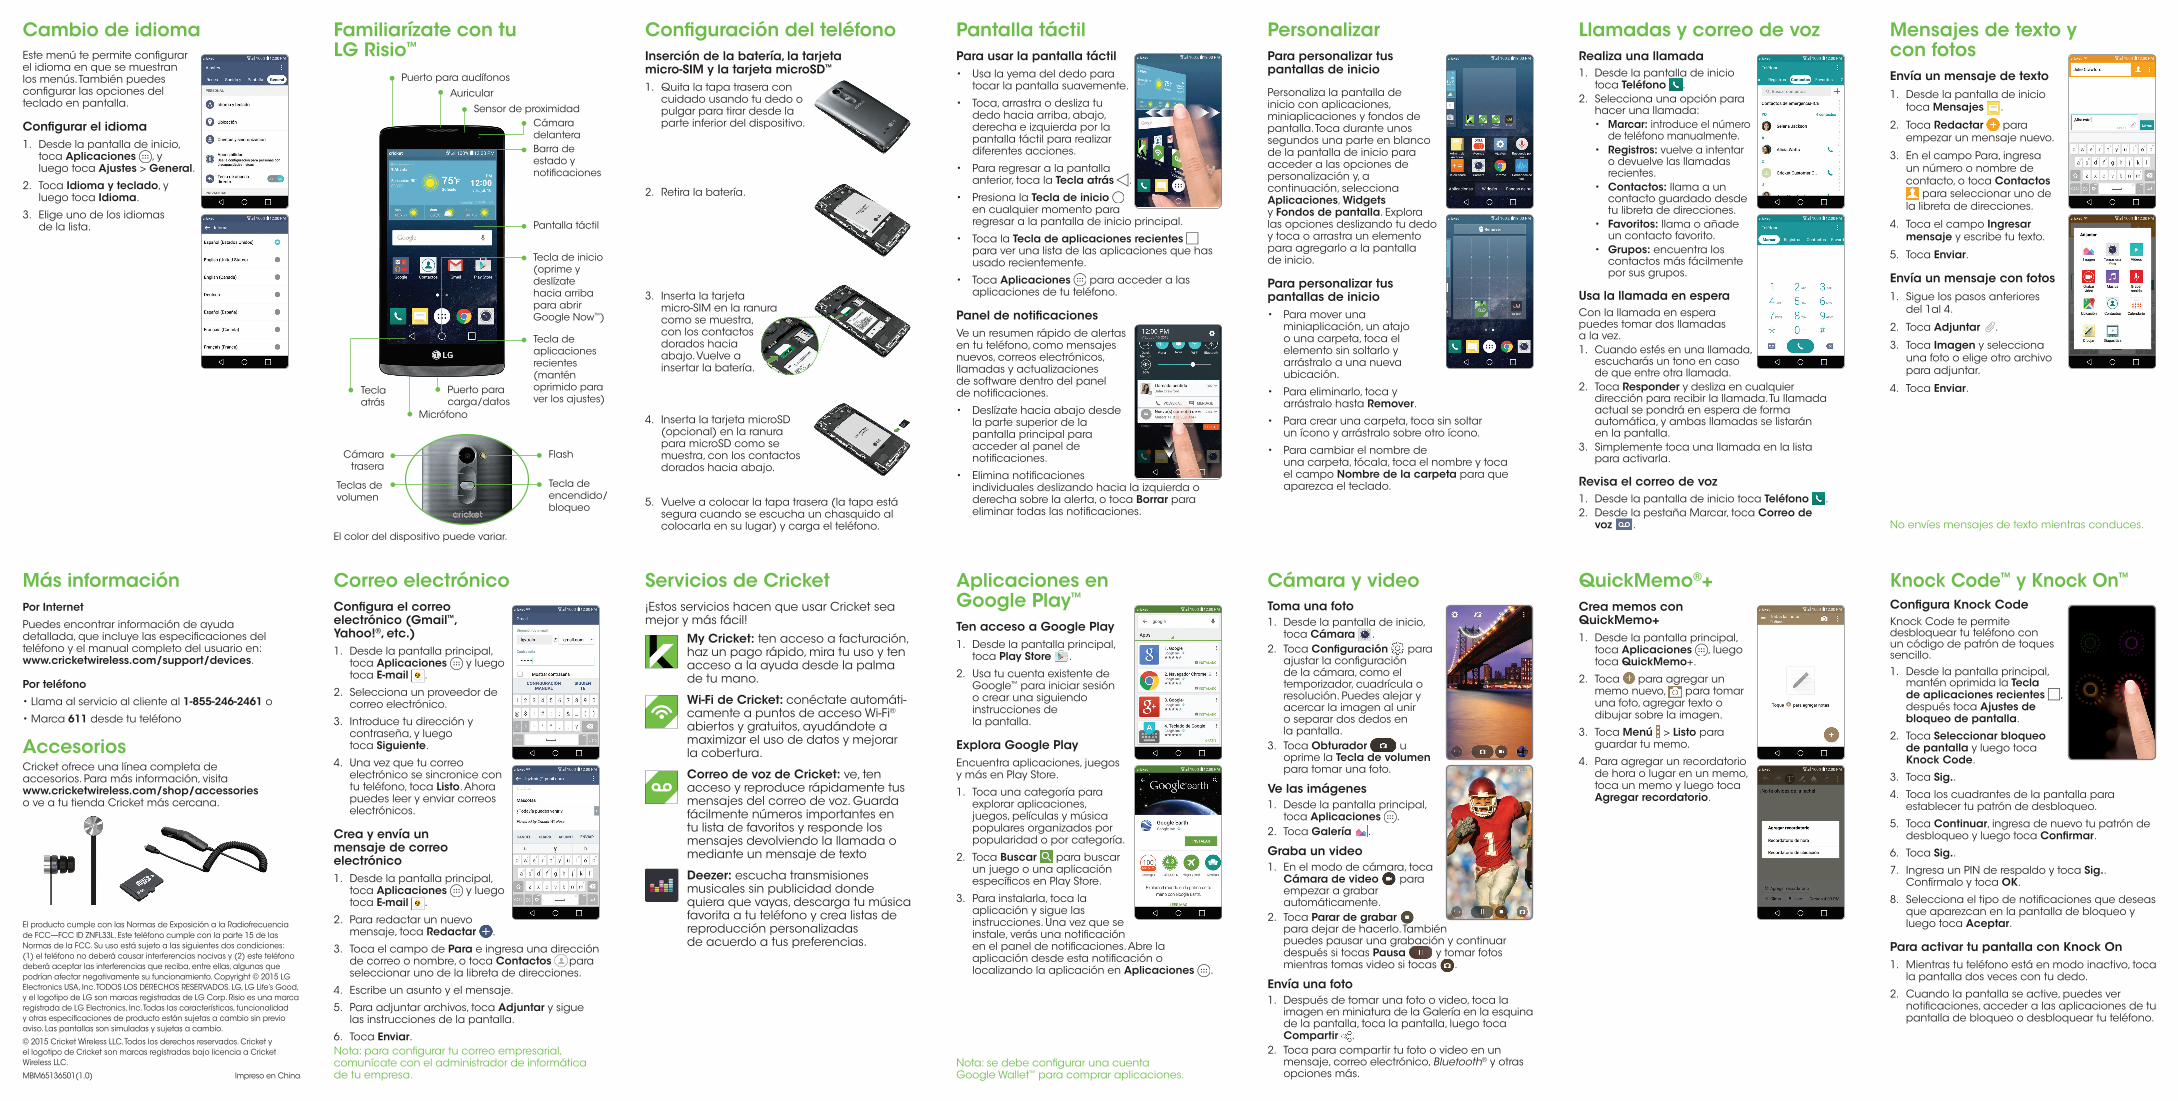
Back key
Headsetport
Front-facing camera
Touch screen
Flash
Power/ lock key
Rear camera
Volume up/down
key
Recent apps key (Long press for settings)
Statusand notifications bar
Homekey(Pressandslide up for GoogleNow™)
Charging/ data port
Microphone
Earpiece
Proximitysensor
Devicecolormayvary.
Familiarízate con tu LG Risio™
Configuración del teléfonoInserción de la batería, la tarjeta micro-SIM y la tarjeta microSD™
1. Quita la tapa trasera con cuidado usando tu dedo o pulgar para tirar desde la parte inferior del dispositivo.
2. Retira la batería.
3. Inserta la tarjeta micro-SIMenlaranuracomo se muestra, con los contactos dorados hacia abajo. Vuelve a insertar la batería.
4. InsertalatarjetamicroSD(opcional) en la ranura paramicroSDcomosemuestra, con los contactos dorados hacia abajo.
5. Vuelve a colocar la tapa trasera (la tapa está segura cuando se escucha un chasquido al colocarla en su lugar) y carga el teléfono.
Servicios de Cricket¡Estos servicios hacen que usar Cricket sea mejor y más fácil!
My Cricket: ten acceso a facturación, haz un pago rápido, mira tu uso y ten acceso a la ayuda desde la palma de tu mano.
Wi-Fi de Cricket: conéctate automáti-camente a puntos de acceso Wi-Fi® abiertos y gratuitos, ayudándote a maximizar el uso de datos y mejorar la cobertura.
Correo de voz de Cricket: ve, ten acceso y reproduce rápidamente tus mensajesdelcorreodevoz.Guardafácilmente números importantes en tu lista de favoritos y responde los mensajes devolviendo la llamada o mediante un mensaje de texto
Deezer: escucha transmisiones musicales sin publicidad donde quiera que vayas, descarga tu música favorita a tu teléfono y crea listas de reproducción personalizadas de acuerdo a tus preferencias.
Correo electrónicoConfigura el correo electrónico (Gmail™, Yahoo!®, etc.)1. Desdelapantallaprincipal,
toca Aplicaciones y luego toca E-mail .
2. Seleccionaunproveedorde correo electrónico.
3. Introduce tu dirección y contraseña, y luego toca Siguiente.
4. Unavezquetucorreo electrónico se sincronice con tu teléfono, toca Listo. Ahora puedes leer y enviar correos electrónicos.
Crea y envía un mensaje de correo electrónico1. Desdelapantallaprincipal,
toca Aplicaciones y luego toca E-mail .
2. Pararedactarunnuevo mensaje, toca Redactar .
3. Toca el campo de Para e ingresa una dirección de correo o nombre, o toca Contactos para seleccionar uno de la libreta de direcciones.
4. Escribe un asunto y el mensaje.
5. Paraadjuntararchivos,tocaAdjuntar y sigue las instrucciones de la pantalla.
6. Toca Enviar.
Más informaciónPor Internet
Puedesencontrarinformacióndeayudadetallada,queincluyelasespecificacionesdelteléfono y el manual completo del usuario en: www.cricketwireless.com/support/devices.
Por teléfono
•Llamaalservicioalclienteal1-855-246-2461 o
•Marca611 desde tu teléfono
AccesoriosCricket ofrece una línea completa de accesorios.Paramásinformación,visita www.cricketwireless.com/shop/accessories o ve a tu tienda Cricket más cercana.
Pantalla táctilPara usar la pantalla táctil• Usalayemadeldedopara
tocar la pantalla suavemente.
• Toca,arrastraodeslizatu dedo hacia arriba, abajo, derecha e izquierda por la pantalla táctil para realizar diferentes acciones.
• Pararegresaralapantalla anterior, toca la Tecla atrás .
• PresionalaTecla de inicio en cualquier momento para regresar a la pantalla de inicio principal.
• TocalaTecla de aplicaciones recientes para ver una lista de las aplicaciones que has usado recientemente.
• TocaAplicaciones para acceder a las aplicaciones de tu teléfono.
Panel de notificacionesVe un resumen rápido de alertas en tu teléfono, como mensajes nuevos, correos electrónicos, llamadas y actualizaciones de software dentro del panel denotificaciones.
• Deslízatehaciaabajodesde la parte superior de la pantalla principal para acceder al panel de notificaciones.
• Eliminanotificaciones individuales deslizando hacia la izquierda o derecha sobre la alerta, o toca Borrar para eliminartodaslasnotificaciones.
Aplicaciones en Google Play™
Ten acceso a Google Play1. Desdelapantallaprincipal,
toca Play Store .
2. Usatucuentaexistentede Google™ para iniciar sesión o crear una siguiendo instrucciones de la pantalla.
Explora Google PlayEncuentra aplicaciones, juegos ymásenPlayStore.
1. Toca una categoría para explorar aplicaciones, juegos, películas y música populares organizados por popularidad o por categoría.
2. Toca Buscar para buscar un juego o una aplicación específicosenPlayStore.
3. Parainstalarla,tocala aplicación y sigue las instrucciones.Unavezquese instale,verásunanotificación enelpaneldenotificaciones.Abrelaaplicacióndesdeestanotificaciónolocalizando la aplicación en Aplicaciones .
PersonalizarPara personalizar tus pantallas de inicio
Personalizalapantallade inicio con aplicaciones, miniaplicaciones y fondos de pantalla. Toca durante unos segundos una parte en blanco de la pantalla de inicio para acceder a las opciones de personalización y, a continuación, selecciona Aplicaciones, Widgets y Fondos de pantalla. Explora las opciones deslizando tu dedo y toca o arrastra un elemento para agregarlo a la pantalla de inicio.
Para personalizar tus pantallas de inicio• Paramoveruna
miniaplicación, un atajo o una carpeta, toca el elemento sin soltarlo y arrástralo a una nueva ubicación.
• Paraeliminarlo,tocay arrástralo hasta Remover.
• Paracrearunacarpeta,tocasinsoltar un ícono y arrástralo sobre otro ícono.
• Paracambiarelnombrede una carpeta, tócala, toca el nombre y toca el campo Nombre de la carpeta para que aparezca el teclado.
Cambio de idiomaEstemenútepermiteconfigurar el idioma en que se muestran los menús. También puedes configurarlasopcionesdel teclado en pantalla.
Configurar el idioma1. Desdelapantalladeinicio,
toca Aplicaciones , y luego toca Ajustes > General.
2. Toca Idioma y teclado, y luego toca Idioma.
3. Elige uno de los idiomas de la lista.
Cámara y videoToma una foto1. Desdelapantalladeinicio,
toca Cámara . 2. Toca Configuración para
ajustarlaconfiguración de la cámara, como el temporizador, cuadrícula o resolución. Puedesalejary acercar la imagen al unir o separar dos dedos en la pantalla.
3. Toca Obturador u oprime la Tecla de volumen para tomar una foto.
Ve las imágenes1. Desdelapantallaprincipal,
toca Aplicaciones .2. Toca Galería .
Graba un video1. En el modo de cámara, toca
Cámara de video para empezar a grabar automáticamente.
2. Toca Parar de grabar para dejar de hacerlo. También puedes pausar una grabación y continuar después si tocas Pausa y tomar fotos mientras tomas video si tocas .
Envía una foto1. Despuésdetomarunafotoovideo,tocala
imagenenminiaturadelaGaleríaenlaesquinade la pantalla, toca la pantalla, luego toca Compartir .
2. Toca para compartir tu foto o video en un mensaje, correo electrónico, Bluetooth® y otras opciones más.
Llamadas y correo de vozRealiza una llamada1. Desdelapantalladeinicio
toca Teléfono . 2. Seleccionaunaopciónpara
hacer una llamada: • Marcar: introduce el número
de teléfono manualmente. • Registros: vuelve a intentar
o devuelve las llamadas recientes.
• Contactos: llama a un contacto guardado desde tu libreta de direcciones.
• Favoritos: llama o añade un contacto favorito.
• Grupos: encuentra los contactos más fácilmente por sus grupos.
Usa la llamada en esperaCon la llamada en espera puedes tomar dos llamadas a la vez. 1. Cuando estés en una llamada,
escucharás un tono en caso de que entre otra llamada.
2. Toca Responder y desliza en cualquier dirección para recibir la llamada. Tu llamada actual se pondrá en espera de forma automática, y ambas llamadas se listarán en la pantalla.
3. Simplementetocaunallamadaenlalista para activarla.
Revisa el correo de voz1. DesdelapantalladeiniciotocaTeléfono .2. DesdelapestañaMarcar,tocaCorreo de
voz .
QuickMemo®+Crea memos con QuickMemo+1. Desdelapantallaprincipal,
toca Aplicaciones , luego toca QuickMemo+.
2. Toca para agregar un memo nuevo, para tomar una foto, agregar texto o dibujar sobre la imagen.
3. Toca Menú > Listo para guardar tu memo.
4. Paraagregarunrecordatorio de hora o lugar en un memo, toca un memo y luego toca Agregar recordatorio.
Mensajes de texto y con fotosEnvía un mensaje de texto1. Desdelapantalladeinicio
toca Mensajes .
2. Toca Redactar para empezar un mensaje nuevo.
3. En el campo Para, ingresa un número o nombre de contacto, o toca Contactos
para seleccionar uno de la libreta de direcciones.
4. Toca el campo Ingresar mensaje y escribe tu texto.
5. Toca Enviar.
Envía un mensaje con fotos1. Siguelospasosanteriores
del 1al 4.
2. Toca Adjuntar .
3. Toca Imagen y selecciona una foto o elige otro archivo para adjuntar.
4. Toca Enviar.
Knock Code™ y Knock On™
Configura Knock CodeKnock Code te permite desbloquear tu teléfono con un código de patrón de toques sencillo.
1. Desdelapantallaprincipal, mantén oprimida la Tecla de aplicaciones recientes , después toca Ajustes de bloqueo de pantalla.
2. Toca Seleccionar bloqueo de pantalla y luego toca Knock Code.
3. Toca Sig..
4. Toca los cuadrantes de la pantalla para establecer tu patrón de desbloqueo.
5. Toca Continuar, ingresa de nuevo tu patrón de desbloqueo y luego toca Confirmar.
6. Toca Sig..
7. IngresaunPINderespaldoytocaSig.. Confírmalo y toca OK.
8. Seleccionaeltipodenotificacionesquedeseasque aparezcan en la pantalla de bloqueo y luego toca Aceptar.
Para activar tu pantalla con Knock On1. Mientrastuteléfonoestáenmodoinactivo,toca
la pantalla dos veces con tu dedo.
2. Cuando la pantalla se active, puedes ver notificaciones,accederalasaplicacionesdetupantalla de bloqueo o desbloquear tu teléfono.