176
Clear Language Driver’s Guide Cars and light trucks
Clear LanguageDriver’s GuideCars and light trucks
The Alberta Motor Association (AMA) is proud to provide roadside assistance, travel, insurance, registries, driver education and many other services to over 940,000 members in Alberta and part of the NWT. www.ama.ab.ca/driver-education
AMA is af!liated with: The Canadian Automobile Association (CAA) www.caa.ca The American Automobile Association (AAA) www.aaa.com/stop
This Clear Language version is not a publication of the Government of Alberta. The Government of Alberta is not responsible for the accuracy of this document. Responsibility rests entirely with Literacy Alberta. Permission for the graphics has been granted by Alberta Transportation.
Literacy Alberta’s Clear Language Driver’s Guide© 2013 Literacy Alberta
Printing date: December 2013
Literacy Alberta3060 – 17 Avenue SWCalgary, AB T3E 7G8403-410-6990
www.literacyalberta.ca
Our mission:Building literacy and essential skills in Alberta through inspiration, innovation and collaboration.

Your guide to:
• Understand road rules
• Prepare for your driver’s licence tests in Alberta
• Drive safely
Literacy Alberta’s
Clear LanguageDriver’s Guide

Contents
Introduction 1
1. Getting ready to drive 3
2. Traf!c controls 21
3. Driving basics 45
4. Intersections and turns 67
5. Highway driving 85
6. Challenging road conditions and emergencies 97
7. Responsible driving 113
8. Sharing the road 125
9. Driving within the law 139
10. Towing a trailer 155
De!nitions 163
Helpful links 168
Introduction 1
Clear Language Driver’s Guide
Introduction
About this guideWelcome to Literacy Alberta’s Clear Language Driver’s Guide. This guide is based on the Alberta Driver’s Guide to Operation, Safety and Licensing – Cars and Light Trucks. It is written in easy-to-understand language.
You can use this guide to prepare for your driver’s tests. It doesn’t replace the Alberta Driver’s Guide. Always use the of!cial Alberta Driver’s Guide to prepare for tests.
Learning to drive takes training, skill, and practice. This guide will help you:
• Understand road rules and traf!c laws
• Prepare for your knowledge test
• Prepare for your road tests
• Drive safely
Road safetyDriving is a serious responsibility. In 2012 in Alberta, there were:
• 136,595 collisions
• 345 deaths
• 18,220 injuries
Responsible drivers make it safer for all of us. To be a safe driver, you need:
• Knowledge: to understand traf!c laws and driving rules.
• Skills: to know how to use vehicles safely.
• Awareness: to know what is happening around you and make decisions safely and quickly.
• Attitude: to drive safely and responsibly every time you drive.
Safe driving can lower the number of injuries and deaths.
See the De!nitions section at the back of this guide for an explanation of terms.
CollisionWhen a vehicle hits another vehicle or something on the roadway such as an animal.

2 Introduction
Clear Language Driver’s Guide
Where can I get more information?
Guides
The of!cial Alberta driver’s guides will help you understand the laws that protect vehicles and people on Alberta roadways. They are guides only and have no legal authority. See the Traf!c Safety Act to get the actual driving laws and regulations.
You can download these guides from Transportation Alberta: www.transportation.alberta.ca/531.htm
• Driver’s Guide to Operation, Safety and Licensing – Cars and Light Trucks
• Commercial Driver’s Guide to Operation, Safety and Licensing – Trucks, Buses, Emergency Responders and Taxis
• Rider’s Guide to Operation, Safety and Licensing – Motorcycles, Mopeds and Power-Assisted Bicycles
• Geared to Go: A Workbook for Coaching New Drivers
Traf!c Safety Act
The laws that apply to driving a vehicle can be found in the Traf!c Safety Act.
You can order, pick up or download copies of the Traf!c Safety Act from:
• Queen’s Printer Bookstore Main Floor, Park Plaza, 10611–98 Avenue Edmonton, Alberta T5K 2P7 Toll free: Call 310-000 and enter 780–427–4952 www.qp.alberta.ca/Laws_Online.cfm
• www.transportation.alberta.ca/525.htm
Driver training schools
Learning to drive safely is important. Use these resources to !nd driving schools.
• Local phone book or Yellow Pages
• Alberta Transportation: www.transportation.alberta.ca/4474.htm
• Phone a Driver Programs Administrator to get advice about different programs in your area. For toll free, call 310-0000. Then enter 403-297-6679 for Calgary or 780-427-8901 for Edmonton.
Other information
Testing, driver’s licence, and vehicle registration information is available at:
• www.servicealberta.ca
• www.e-registry.ca
Queen’s PrinterThe organization that does printing for the government.
See our Helpful Links section at the back for more information about testing and vehicle registration.
VehicleSomething that you drive or ride such as a car, truck, motorcycle, or bicycle.
Getting ready to drive
1

4 Getting ready to drive
Chapter 1 Clear Language Driver’s Guide
Chapter 1 Getting ready to drive1. Questions about driver’s licences 5
What is a licence? 5How many licence types are there? 5What is the Graduated Driver Licensing (GDL) program? 6What do I need to drive a vehicle that is for hire? 9What do I need to drive a vehicle with air brakes? 9What if I am visiting or new to Alberta? 9
2. How do I apply for a driver’s licence? 10Can I apply now? 10Where can I apply? 11What identi!cation do I need to bring? 11What if I have a medical condition? 11
3. What tests will I need to take? 12Knowledge test 12Eye test (vision screening) 13Road tests 13
4. What are condition and endorsement codes? 15Condition codes 15Endorsement codes 16
5. How do I re-class, replace, renew, or update my licence? 16Re-class 16Replace 16Renew 17Update 17
6. How do I register and insure my vehicle? 17Registration 17Insurance 17
De!nitions 18
Getting ready to drive 5
Chapter 1 Clear Language Driver’s Guide
Chapter 1 Getting ready to driveBefore you are allowed to drive, you need to get a driver’s licence. You also need registration and insurance.
Make sure you understand what you need to drive legally in Alberta.
1. Questions about driver’s licencesWhat is a licence?A driver’s licence is proof you are allowed to drive a vehicle. Different licence classes allow you to drive different types of vehicles. These are rules of the Traf!c Safety Act.
You are not allowed to drive on a highway unless you have your licence, insurance, and registration with you. You must show these documents to a peace of!cer if you are stopped. Make sure these documents are with you whenever you drive.
How many licence types are there?There are seven types (classes) of licences for different types of vehicles. You must have the right licence for the type of vehicle you drive.
All new drivers must start with the Graduated Driver Licensing (GDL) program before applying for any other licences. The GDL program includes these licences: Class 7 Learner’s and Class 5 GDL Probationary Licence.
Class 7 Learner’s All new drivers must start with a Class 7 Learner’s Licence. With a Class 7 Learner’s Licence, you can start learning to drive passenger cars, light trucks, and motorcycles.
Class 6 Motorcycle You must have a Class 7 Learner’s Licence or higher and be 16 years of age or older to apply for a motorcycle licence.
Class 5 Passenger vehicles Once you have a Class 5 GDL Probationary Licence, you can drive cars, light trucks, motor homes, or mopeds. You need a full Class 5 (non-GDL) Licence before you can upgrade to any professional class of licence.
GDL – Graduated Driver Licensing programThis three-stage program allows you to drive with less restrictions as you become more experienced.Stage one: Class 7 Learner’s LicenceStage two: Class 5 GDL Probationary LicenceStage Three: After successfully completing the advanced road test, drivers get their full Class 5 Licence.
Driver’s licenceThe certi!cate showing that you are allowed to drive. In this guide we use “driver’s licence” instead of “operator’s licence.”
RegistrationAll motor vehicles and trailers on Alberta roadways must be registered. You must always have the registration document with you when you drive.
6 Getting ready to drive
Chapter 1 Clear Language Driver’s Guide
Class 4 Professional With a Class 4 Licence, you can drive vehicles used for paid services such as an ambulance, taxi, or a small bus with less than 24 passengers.
Class 3 Three or more axles With a Class 3 Licence, you can drive larger vehicles that have three or more axles.
Class 2 Bus With a Class 2 Licence, you can drive vehicles such as a motor coach bus or a large school bus with more than 24 passengers.
Class 1 Professional, with air brakesTo get this licence, you must pass a special air brake training course. You can drive a tractor-trailer vehicle, any other vehicle or combination of vehicles. You cannot drive a motorcycle with this licence.
What is the Graduated Driver Licensing (GDL) program? The Graduated Driver Licensing (GDL) program gives new drivers time to get used to the responsibility of driving.
GDL drivers have one of these licences:
• Stage one: Class 7 Learner’s Licence
• Stage two: Class 5 GDL Probationary Licence
In stage one you drive with a supervisor. In stage two you can drive on your own with some restrictions. Once you complete both stages and pass the advanced road test, you get a full Class 5 Licence and are a non-GDL driver.
Stage one: Class 7 Learner’s Licence
To earn your Class 7 Learner’s Licence, you must:
• Be 14 or older.
• Have valid identi!cation to prove who you are.
• Take an eye test to see if you need to wear glasses when you drive.
• Pass a knowledge test to show you know the rules of the road.
• If you are under 18, bring a parent or guardian with you to sign a consent form. If you are under 18 and you can prove that you are married or are supporting yourself, you can apply on your own.
AxleA bar that connects two wheels on a vehicle. A car has two axles. Larger vehicles or vehicles pulling trailers may have three or more axles.
Air brakesA braking system that uses compressed air to stop a large vehicle or a vehicle pulling a trailer.
Learner driverA person with a Class 7 Learner’s Licence.
Identi!cationDocuments that prove who you are, such as passport, driver’s licence, or birth certi!cate.
Knowledge testA test you need to pass to get your Class 7 Learner’s Licence. You take the test at a registry of!ce. The test is based on the Alberta Driver’s Guide to Operation, Safety and Licensing – Cars and Light Trucks. It asks questions about safe driving, laws, and road signs.

Getting ready to drive 7
Chapter 1 Clear Language Driver’s Guide
You must always follow these rules:
• Drive with a supervisor in the seat beside you. The supervisor must be 18 years or older and have a valid full Class 5 Licence.
• Do not drive between 12:00 a.m. (midnight) and 5:00 a.m.
• Do not have more passengers than seat belts.
• Do not drink alcohol before driving. You must have a zero blood alcohol level when driving a car or riding a motorcycle.
With a Class 7 Learner’s Licence, you can drive:
• Any vehicle or vehicle-trailer combination that someone with a full Class 5 Licence can drive, as long as you have a supervisor in the seat beside you.
• A motorcycle, if you are 16 or older and have a supervisor riding with you who has a Class 6 (non-GDL) Licence.
• A moped.
Stage two: Class 5 GDL Probationary Licence
To earn your Class 5 GDL Probationary Licence, you must:
• Be 16 or older.
• Have had your Class 7 Learner’s Licence for at least one year.
• Pass the basic road test. You will take your road test with a licensed driving examiner. Your examiner will decide if you can drive safely and follow the rules of the road.
You must always follow these rules:
• Do not have more passengers than seat belts.
• Do not drink alcohol. You must have a zero blood alcohol level when driving a car or riding a motorcycle.
• Do not supervise another learner driver.
• You must be a probationary driver for at least two years.
With a Class 5 GDL Probationary Licence, you can drive:
• Any vehicle or vehicle-trailer combination that someone with a full Class 5 Licence can drive. See the list of Class 5 vehicles on the next page.
Basic road testA test to see if you can drive safely, know driving rules, and can park. You need to pass the basic road test to get your Class 5 GDL Probationary Licence.
ExaminerA person who gives a test.
Probationary driverA person in the GDL program who has passed the basic road test and has a Class 5 GDL Probationary Licence.
SupervisorA person who is at least 18 with a valid driver’s licence, who is seated beside you and helps you while you drive. To drive with a Class 7 Learner’s Licence, you need a supervisor.

8 Getting ready to drive
Chapter 1 Clear Language Driver’s Guide
Stage Three: Full Class 5 Licence and exiting
You can now continue as a Class 5 GDL Probationary driver, or you can leave the GDL program.
To exit the GDL program and be a fully independent driver with a full Class 5 Licence, you must:
• Have been in the probationary stage for at least two years.
• Have had no suspensions for the past 12 months.
• Pass the advanced road test.
With your full Class 5 Licence, you:
• Can re-class your licence to a Class 1, 2, 3, or 4.
• Are allowed more demerits (15).
• No longer have the zero alcohol level condition.
• May supervise a learner driver.
With your full Class 5 Licence, you can drive:
• A vehicle with only two axles
• A recreational vehicle with no more than three axles
• A vehicle with only two axles, while you tow a trailer that has one or more axles and no air brakes
• A recreational vehicle with only two axles, while you tow a trailer that has one or more axles and no air brakes
• A recreational vehicle with three axles and no air brakes, while you tow trailer that has one or two axles
• A moped
• All motor vehicles included under Classes 1, 2, 3, and 4 if you are least 18 years old. You must have a supervisor with a valid driver’s licence for the type of vehicle.
• A motorcycle if you have a supervisor with a Class 6 (non-GDL) Licence
• A vehicle with air brakes if you have a supervisor who has an air brake endorsement
Find out more at www.saferoads.com/drivers/driver-licences.html
See page 15 for more on endorsements.
Fully-licensed driverA person who has passed the advanced road test and has a full Class 5 Licence.
Advanced road testA test to see if you have the driving skills and experience under challenging conditions to become a fully-licensed driver. You need to pass the advanced road test to get your full Class 5 Licence.
Re-classMoving from one class of licence to another. For example, during the GDL, you will re-class from a Class 7 Learner’s Licence to a Class 5 GDL Probationary Licence.
Full Class 5 LicenceThe most common licence. Means you can drive a car, truck (two axle), recreational vehicle, or tow a trailer.
Recreational vehicleA motor vehicle or trailer that has living space.

Getting ready to drive 9
Chapter 1 Clear Language Driver’s Guide
What do I need to drive a vehicle that is for hire?If you are being paid to drive you must have a Class 4 Licence.
You do not need a Class 4 Licence if you occasionally drive passengers and receive money only to cover the cost of kilometres travelled, gas, parking, or gate passes and tolls.
What do I need to drive a vehicle with air brakes?Many vehicles, such as large trucks, buses, or motor homes, have braking systems that use compressed air. This is called an air brake system.
You must have training from an approved agency to drive a vehicle with air brakes. Once you pass the training, you will be given an air brake endorsement. You can train for an air brake endorsement if you have a Class 2, 3, 4, or 5 Licence. There will be an endorsement code (the letter “Q”) on the front of your driver’s licence.
To get a Class 1 Licence, drivers must take the training before they get their licence, so they will not have a code on their licence.
You can !nd more information about approved air brake courses at: www.transportation.alberta.ca/4474.htm
What if I am visiting or new to Alberta?
I am visiting
If you are a tourist or a visiting student with a valid driver’s licence from your own province or country, you can drive in Alberta if:
• Your licence is legal.
• Your licence is valid for the type of vehicle you are driving.
• You carry your licence with you at all times.
• You know and follow all traf!c rules and regulations.
Refer to the Alberta Traf!c Safety Act for more information: www.transportation.alberta.ca/525.htm
Visiting studentsWhen driving, visiting students must carry proof they are in full-time studies.
Endorsement codeA letter printed on your licence to show you have taken a certain type of training or course.

10 Getting ready to drive
Chapter 1 Clear Language Driver’s Guide
I just moved to Alberta
From within CanadaIf you move to Alberta from somewhere else in Canada, you may use your valid driver’s licence for 90 days. Before the 90-day deadline, you must apply for an Alberta driver’s licence and hand in your old one. If you have a Class 5 Licence from another province, it is equal to a Class 5 in Alberta, so you don’t have to take a test. However, if you have a Class 1, 2, or 4 Licence from somewhere else in Canada, you must pass an eye test and provide a medical report.
It is illegal to have more than one driver’s licence.
From the United StatesIf you are from the United States, you don’t have to do anything if you have a Class 5, 6, or 7 Licence. Otherwise, you must complete all application requirements. When you apply, you may have to prove that you live in Canada. For details, ask at your local registry of!ce.
From another country with a Reciprocal Licensing AgreementIf Alberta has a Reciprocal Licensing Agreement with your country, you can exchange your licence for a Class 5 Licence without testing. For other licence classes you have to take a driving test and an eye test.
From another country without a Reciprocal Licensing Agreement You can get credit for your previous driving history. If your application is successful, you will not have to go through the GDL program. You can take the road test for a full Class 5 Licence immediately. Ask at a registry of!ce for more information.
2. How do I apply for a driver’s licence?
Can I apply now?You can apply if you are:
• A legal resident of Canada
• Living in Alberta
• 14 years or older
If you are under 18, you need to bring a parent or legal guardian with you to sign a consent form. You will both need to bring identi!cation to prove who you are and how you are related. Until you are 18 years old, your parents or guardians can withdraw their consent at any time. If they do, you will lose your licence.
If you are under 18 and you can prove that you are married or are supporting yourself, you can apply on your own.
RememberIf you are under 18 your parent or guardian must go with you when you apply, unless you are married or supporting yourself.
Alberta has Class 5 Reciprocal Licensing Agreements with the following countries:
AustraliaAustriaBelgiumEnglandFranceGermanyIsle of ManJapan*Republic of KoreaScotlandSwitzerland*United StatesWales*also Class 6 Motorcycle
Reciprocal Licensing AgreementAn agreement that makes a driver’s licence from another country equal to an Alberta driver’s licence. The agreement lets you exchange one for the other.

Getting ready to drive 11
Chapter 1 Clear Language Driver’s Guide
Where can I apply?Apply at any registry of!ce. Go to Service Alberta (www.servicealberta.ca) or the Association of Alberta Registry Agents (www.e-registry.ca) to !nd the nearest one. You must apply for a licence in person, and you must bring the proper identi!cation.
What identi!cation do I need to bring?You will need to bring documents that show who you are and that you live in Alberta.
A registry of!ce will accept many types of identi!cation. To see what you can use for identi!cation go to www.servicealberta.gov.ab.ca/1305.cfm
You will need to show:
• A photo document with your legal name and date of birth such as a passport or resident card
• Other documents such as a birth or marriage certi!cate
• Proof that you live in Alberta, such as a utility bill with your name and address (phone, TV, internet or heating)
Registry agents do not accept temporary driver’s licences, library cards, or business cards as identi!cation. The documents must be up-to-date (not expired) and they cannot be photocopies.
What if I have a medical condition?You must report any medical or physical condition, such as diabetes, that could make you unable to drive safely. If you have a medical condition:
• Get a Medical Examination Form from a registry of!ce or your doctor’s of!ce.
• Have your doctor complete and sign this form, and then take it to your registry of!ce. You may have to pay a fee.
If you are 75 years or older and want to renew or apply for a licence, you must submit a medical report that has been completed and signed by a doctor. You must also take an eye test.
If you are applying for or renewing a Class 1, Class 2, or Class 4 Licence, you must submit a completed medical report:
• Every !ve years, until you reach the age of 45
• Every two years, from age 45 to 65
• Each year, after you turn 65
Any driver can be asked to take a basic road test if there are medical concerns.
Registry agent An of!ce that provides services on behalf of the Government of Alberta. To apply for a driver’s licence or take a driving test, you must go to a registry agent of!ce.
12 Getting ready to drive
Chapter 1 Clear Language Driver’s Guide
3. What tests will I need to take? You will have:
• A knowledge test to see how much you know about traf!c rules and driving safely.
• An eye test to check your eyesight.
• A road test to show how well you can drive.
Knowledge testVisit your local registry of!ce to take your knowledge test. Once you pay to take your test, you will get a test permit (payment receipt). It is not a licence.
There are three ways you can take the test:
• Computer
• Paper
• Oral
There are 30 multiple-choice questions taken from the content in the Alberta Driver’s Guide. You have to answer 25 questions correctly to pass.
Test questions cover:
• Safe driving practices
• Laws
• Road signs
The knowledge test is available in 10 languages:
• English
• Arabic
• Chinese
• Farsi
• French
• Hindi
• Punjabi
• Spanish
• Tagalog
• Vietnamese
After you pass the test, give the registry agent your test permit. Ask them to update your driver’s licence. If you do not pass, you can take the test again. You can take it as many times as you need to, but you must pay each time. You can only take one test a day.
Transportation Alberta practice testswww.saferoads.com/drivers/knowledge-test.html
Alberta Motor Association practice testwww.ama.ab.ca/driver-education/driver-education-learners-practice-test

Getting ready to drive 13
Chapter 1 Clear Language Driver’s Guide
Eye test (vision screening)The registry agent will give you an eye test to see if you need prescription glasses to drive. You must pass the eye test before you can get a driver’s licence. If you wear glasses or contact lenses, make sure to take them with you. If you don’t pass the eye test, the agent will tell you to see an eye doctor.
Road testsThe road test shows a licensed driver examiner how well you can drive. A licensed driver examiner is a person who gives road tests to drivers. They are licensed by the Alberta Government. A registry agent arranges for a driver examiner to test you.
There are two types of road tests: basic and advanced.
Basic road test
You need to pass the basic road test to move from a Class 7 Learner’s Licence to a Class 5 GDL Probationary Licence.
The vehicle for your road test must be in acceptable working condition and must have:
• Valid registration and insurance
• Headlights, brake lights, and turn signal lights
• Horn
• Speedometer
• Brakes and park brake
• Clear windshield
• Wipers
• Tires
• Driver and passenger doors
• Seats and seat belts
• Exhaust system and muf#er
• Mirrors
• Enough gas for a road test
During the basic road test, you must show you can drive safely. The test takes about 30 minutes. The examiner will ask you to:
• Steer, brake, and control the speed of your vehicle.
• Choose the correct lane when you make turns.
• Watch for and follow speed limit signs.
• Decide who has the right-of-way at intersections and when you change lanes.
• Show you know what to do at controlled and uncontrolled intersections.
• Show you can drive safely with other vehicles, pedestrians, and bike riders on roads and at intersections.
• Park parallel and on a hill.
14 Getting ready to drive
Chapter 1 Clear Language Driver’s Guide
Advanced road test
You must pass the advanced road test to exit the GDL program and get your full Class 5 Licence.
When you pass this test, you show that you can drive safely in dif!cult conditions.
The examiner will give you some instructions before the road test and tell you how you did after. All together, this will take about one hour.
You will need to show the examiner that you can:
• Handle different types of intersections, including uncontrolled “T” intersections.
• Drive on high-speed roadways, at 80 to 100 kilometres per hour.
• Merge on highways and control speed in acceleration and deceleration lanes.
• Drive well when there is a lot of traf!c.
• Park at an angle, perpendicular, parallel, and on a hill.
Common reasons for not passing the road tests
The examiner will take off points each time you make a mistake. If there are too many points taken off your score, you will not pass. Don’t worry if you don’t pass the !rst time, you can take the test again at another time. You will have to pay each time you take the test.
You will fail if you:
• Drive faster than the posted speed limit.
• Drive too fast for the road conditions.
• Do not come to a complete stop at a stop sign.
• Do not come to a complete stop before turning right at a red light.
• Do not yield the right-of-way at an intersection or during a lane change.
• Drive too slowly or stop without reason.
• Drive up onto the curb while parking.
• Are not able to park legally after three tries.
• Do not slow down or show that you are watching for other traf!c when you are at an uncontrolled intersection.

Getting ready to drive 15
Chapter 1 Clear Language Driver’s Guide
4. What are condition and endorsement codes?Condition codesA condition code is a letter printed on your driver’s licence to show you must follow a certain rule. For example, if you need to wear glasses or contact lenses to meet the vision requirements, then your licence will have condition code “A” printed on it.
Driver's licence condition codes
A Adequate Lenses
B Special Conditions
C Periodic Medical
D Periodic Vision Report*
E Periodic Driver Examination*
F Valid Temporary Licence
G Valid without Photo
H Daylight Driving Only
J Outside Mirrors
K Automatic Transmission
L Hand Controls
M Under Alberta Transportation Safety Board Review*
N Excludes Class 2 and 4
P Testing to be conducted by Provincial Examiner only*
T Special Medical*
*These items do not appear on the driver’s licence.
Condition codeA letter printed on your licence that means you have to follow a certain rule.

16 Getting ready to drive
Chapter 1 Clear Language Driver’s Guide
Endorsement codesAn endorsement code is a letter printed on your licence to show you have taken a certain type of training or course. For example, if you have endorsement code “Q” it means you have passed an air brake training course.
Your condition and endorsement codes are shown on the front of your licence, in the “Cond/End” section. Some are explained on the back.
Driver's licence endorsement codes
Q Air Brakes
S School Bus
V Extended Length Vehicle Combinations
U Completed Driver Education Course*
*This item does not appear on the driver’s licence.
5. How do I re-class, replace, renew, or update my licence?Re-classTo re-class is to move from one class of licence to another.
When you re-class your licence from Class 5 to Class 1, 2, 3, or 4, you must show proof that you have passed a knowledge test and an eye test. When you re-class to Class 1, 2 or 4, you also must submit a medical report.
Every time you take a test or re-class your licence, you will have to pay a fee. Ask a registry agent about fees.
It is against the law to drive with the wrong licence class. If you own a vehicle, it is against the law to let someone drive your vehicle if they do not have the proper class of licence for the vehicle.
Replace If your driver’s licence is stolen, lost, destroyed, or unreadable, you must immediately apply for a replacement at a registry of!ce.
If your licence is stolen, report it to the police. Take a copy of the police report to the registry of!ce when you apply for your replacement.
For all licence services, you must apply in person at a registry of!ce.
Find a list of registry agents at: www.servicealberta.gov.ab.ca/1641.cfm

Getting ready to drive 17
Chapter 1 Clear Language Driver’s Guide
Renew A renewal application will be mailed to the address on your licence before the expiry date. It is your responsibility to renew your licence, even if you do not receive the renewal application. You are not allowed to drive with an expired licence.
UpdateYou must always have the correct information on your driver’s licence.
Go to a registry of!ce to change information, such as your name, address, or licence class.
You may need to show identi!cation before a change can be made.
6. How do I register and insure my vehicle?RegistrationAll motor vehicles and trailers on Alberta roadways must be registered. You must always have the registration document with you when you drive.
If you are under the age of 18 years, a parent or guardian must also sign the application for registration. Remember, a parent or guardian has the right to withdraw consent in writing at any time. If consent is withdrawn, the licence plate and vehicle registration will be suspended. If you are under 18, but can prove you are married or supporting yourself, you don’t need a parent’s or guardian’s consent.
In Alberta, licence plates belong to the person who owns the vehicle. They cannot be given to another person.
You must register your vehicle within three months of moving to Alberta.
Insurance All motor vehicles must be insured with a public liability insurance policy. This is in the Alberta Insurance Act.
It is against the law to drive a vehicle that is not insured.
Your insurance company gives you a pink card. It must be kept up-to-date. You will need to show it when you register a vehicle. You must also be ready to show it if a peace of!cer asks to see it.

18 Getting ready to drive
Chapter 1 Clear Language Driver’s Guide
De!nitions
Advanced road test – a test to see if you have the driving skills and experience under challenging conditions to become a fully-licensed driver. You need to pass the advanced road test to get your full Class 5 Licence.
Air brakes – a braking system that uses compressed air to stop a large vehicle or a vehicle pulling a trailer.
Axle – a bar that connects two wheels on a vehicle. A car has two axles. Larger vehicles or vehicles pulling trailers may have three or more axles.
Basic road test – a test to see if you can drive safely, know driving rules, and can park. You need to pass the basic road test to get your Class 5 GDL Probationary Licence.
Condition code – a letter printed on your licence that means you have to follow a certain rule.
Demerit points – points that are put on your driving record if you are convicted of a driving offence. If you get too many demerits, you will lose your licence.
Driver’s licence – the certi!cate showing that you are allowed to drive. In this guide we use “driver’s licence” instead of “operator’s licence.”
Endorsement code – a letter printed on your licence to show you have taken a certain type of training or course.
Examiner – a person who gives a test.
Fully-licensed driver – a person who has passed the advanced road test and has a full Class 5 Licence.
GDL – Graduated Driver Licensing program. This three-stage program allows you to drive with gradually fewer restrictions as you become more experienced.
Identi!cation – documents that prove who you are, such as passport, driver’s licence, or birth certi!cate.
Knowledge test – a test you need to pass to get your Class 7 Learner’s Licence. You take the test at a registry of!ce. The test is based on the Alberta Driver’s Guide to Operation, Safety and Licensing – Cars and Light Trucks. It asks questions about safe driving, laws, and road signs.
Learner driver – person with a Class 7 Learner’s Licence.
Probationary driver – a person in the GDL program who has passed the basic road test and has a Class 5 GDL Probationary Licence.
Reciprocal Licensing Agreement – an agreement that makes a driver’s licence from another country equal to an Alberta driver’s licence. The agreement lets you exchange one for the other.

Getting ready to drive 19
Chapter 1 Clear Language Driver’s Guide
Re-class – moving from one class of licence to another. For example, during the GDL, you will re-class from a Class 7 Learner’s Licence to a Class 5 GDL Probationary Licence.
Registration – all motor vehicles and trailers on Alberta roadways must be registered. You must always have the registration document with you when you drive.
Registry agent – an of!ce that provides services on behalf of the Government of Alberta. To apply for a driver’s licence or take a driving test, you must go to a registry of!ce.
Restrictions – rules, limits.
Supervisor – a person who is at least 18 with a valid driver’s licence, who is seated beside you and helps you while you drive. To drive with a Class 7 Learner’s Licence, you need a supervisor.
Suspension – when your licence is taken away for a period of time and you are not allowed to drive.
Vision screening – an eye test you take at a registry of!ce to see if you need prescription glasses to drive.

20 Getting ready to drive
Chapter 1 Clear Language Driver’s Guide
Notes
Traf!c controls
2

22 Traf!c controls
Chapter 2 Clear Language Driver’s Guide
Chapter 2 Traf!c controls1. Traf!c control signals 23
2. Pedestrian signals and signs 25
3. Lane reversal signals 26
4. Sign shapes and colours 26
5. Traf!c regulatory signs 28
6. Traf!c direction signs 28
7. Speed limit signs 29
8. Designated lane signs 29
9. Permissive signs 30
10. Prohibitive signs 31
11. School zones and areas 32
12. Playground zones and areas 32
13. Parking services for people with disabilities 33
14. TTY (teletypewriter) 33
15. Warning signs 34
16. Information and guide signs 37
17. Vehicle warnings 38
18. Construction 38
19. Pavement markings 39
20. Shared-use lanes 41
21. Crosswalks 42
22. No stopping zones 42
De!nitions 43

Traf!c controls 23
Chapter 2 Clear Language Driver’s Guide
Chapter 2 Traf!c controlsTraf!c controls are lights, signs, and road markings that show how you are allowed to move your vehicle on the road. They also warn you to look ahead when there is something that could be unsafe.
To drive, you must know what all traf!c controls mean.
1. Traf!c control signalsTraf!c control signals are green, yellow and red lights that show how vehicles are allowed to move at intersections or where roadways join.
The colour of the light shows which vehicles have the right-of-way (right to go). The traf!c control signal may be vertical or horizontal.
Vertical traf!c control signalRed at the top, yellow in the middle, and green at the bottom.
Horizontal traf!c control signalRed on the left, yellow in the middle, and green on the right.
Solid red light
When you are facing a solid red light, you must come to a complete stop before the stop line or crosswalk. If there is no stop line or crosswalk, you must stop before the intersection.
If it is safe, you may turn right after you come to a complete stop. Otherwise, you must stay stopped until the light turns green.
A solid double red light has the same meaning as a single red light.
Right turn at red light: You may turn right at a red light, unless there is a sign that tells you not to turn. You must !rst come to a complete stop before the stop line or crosswalk. Then you can make the turn, if it is safe and you yield to other traf!c. To yield is to let others go !rst.
Left turn at red light: The only time you can turn left at a red light is from a one-way street to a one-way street, unless there is a sign that tells you left turns are not allowed. If the turn is allowed, you must come to a complete stop before the stop line or crosswalk. Then you can make the turn, if it is safe and you yield to other traf!c.
Solid yellow light
When a green light changes to solid yellow (not #ashing), it means the light is going to change to red right away.
You must bring your vehicle to a complete stop before the stop line or crosswalk. If there is no stop line or crosswalk, you must stop before the intersection.
If you are too close to the intersection to stop safely or are already in the intersection, you must safely drive through.

24 Traf!c controls
Chapter 2 Clear Language Driver’s Guide
Flashing green light
Just like a solid green light, when you are facing a #ashing green light, you are allowed to go through the intersection without stopping. You must !rst yield to:
• Oncoming traf!c if you are turning left
• Pedestrians in the crosswalk if you are turning right or left
Flashing yellow light
When you face a #ashing yellow light, you may carefully go through the intersection, after you yield to pedestrians and other vehicles in the intersection.
Flashing red light
When you are facing a solid red light, you must come to a complete stop before the stop line or crosswalk. If there is no stop line or crosswalk, you must stop before the intersection.
The #ashing red light is like a stop sign. You can go through when it is safe, after you yield to other drivers and pedestrians.
When the lights in all directions are #ashing red the intersection becomes a four-way stop.
Solid green light
When you are facing a solid green light, you are allowed to go through the intersection without stopping. You must !rst yield to:
• Oncoming traf!c if you are turning left
• Pedestrians in the crosswalk if you are turning right or left
When you approach a green light, be ready for it to turn yellow. A good tip is to check the pedestrian walk light at the intersection. If it shows the WALK symbol, the light will stay green. Some lights have a numbered countdown to show how long until the light changes. If it shows the DON’T WALK symbol, be ready to stop.
If the traf!c light does change, you must stop before the intersection if you can do it safely.
Green arrow with green light
When you are facing a traf!c control with a green arrow and a solid green light, you may enter the intersection and go in the direction shown by the arrow, without yielding. You may also go in any other direction that is allowed by the solid green light.
Green arrow with red light
When you are facing a traf!c control with a green arrow and a solid red light, you may enter the intersection and go through without stopping, but only in the direction shown by the arrow. You cannot go in any other direction.

Traf!c controls 25
Chapter 2 Clear Language Driver’s Guide
2. Pedestrian signals and signsA pedestrian is a person who is travelling on foot. A person who is walking beside and pushing a bicycle is also a pedestrian.
You must understand pedestrian control signals to safely share the road with others.
When pedestrians face a traf!c signal with a word or symbol that means WALK, they may enter the crosswalk or roadway when it is safe, and cross in that direction.
Pedestrian signal meaning “WALK”
When pedestrians face a traf!c signal with a word or symbol that means DON’T WALK, they must not enter the crosswalk or roadway. Pedestrians who have begun crossing when the DON’T WALK word or symbol appears may continue crossing the crosswalk.
Pedestrian signal meaning “DON’T WALK” or “WAIT”
Some pedestrian signals have a countdown timer to show how much time is left before the light changes.
Yellow lights on a sign with a symbol mean that you must drive carefully because of school zones or areas, playground zones or areas, school crossings, and pedestrian crossings.
When the yellow lights are #ashing, you must slow down to no more than 30 km/h and yield or stop for pedestrians.
Pedestrian crossing sign with yellow lights
Pedestrian crossing sign without yellow lights
At intersections with traf!c control signals, but without pedestrian WALK and DON’T WALK signals, pedestrians must obey the rules for the colour of light they are facing.
• Solid red light: Do not enter the intersection.
• Solid yellow light: Clear the intersection if already crossing, or do not enter the intersection.
• Solid green light: Cross the road within the marked crosswalk or a safe zone.
Pedestrians should check in all directions for vehicles before starting to cross a road.

26 Traf!c controls
Chapter 2 Clear Language Driver’s Guide
3. Lane reversal signals Lane reversal signals are used to control the direction traf!c must drive in a lane. These signals are often used to reverse or change the direction traf!c must drive at different times of the day.
The signal over a lane changes between a red X and a green arrow.
Solid red XWhen a red X is shown over a driving lane, you cannot enter or stay in that lane. This signal means the lane is being used by oncoming traf!c. Move safely into a lane with a green arrow.
Green arrow pointing downIf you are facing a green arrow that points down, you are allowed to drive in that lane.
Vehicle moving from red X lane to green arrow lane.
4. Sign shapes and coloursTraf!c regulation signs show who has the right-of-way, what is allowed and what is not allowed. They also control speed, turns, direction of travel, passing, traf!c lanes, parking, and crosswalks.
The words and symbols on traf!c regulation signs tell you what can or cannot be done at a speci!c place or time. They also give you other information.
The shape and colour of the signs tell you what type of message it is.
Action or activity in the circle is not allowed
Square shape
Red circle and slash on white background
Action or activity in circle is allowed
Green circle on white background
Square shape
Rules such as speed limit
Message on white background
Rectangle shape
Traf!c controls 27
Chapter 2 Clear Language Driver’s Guide
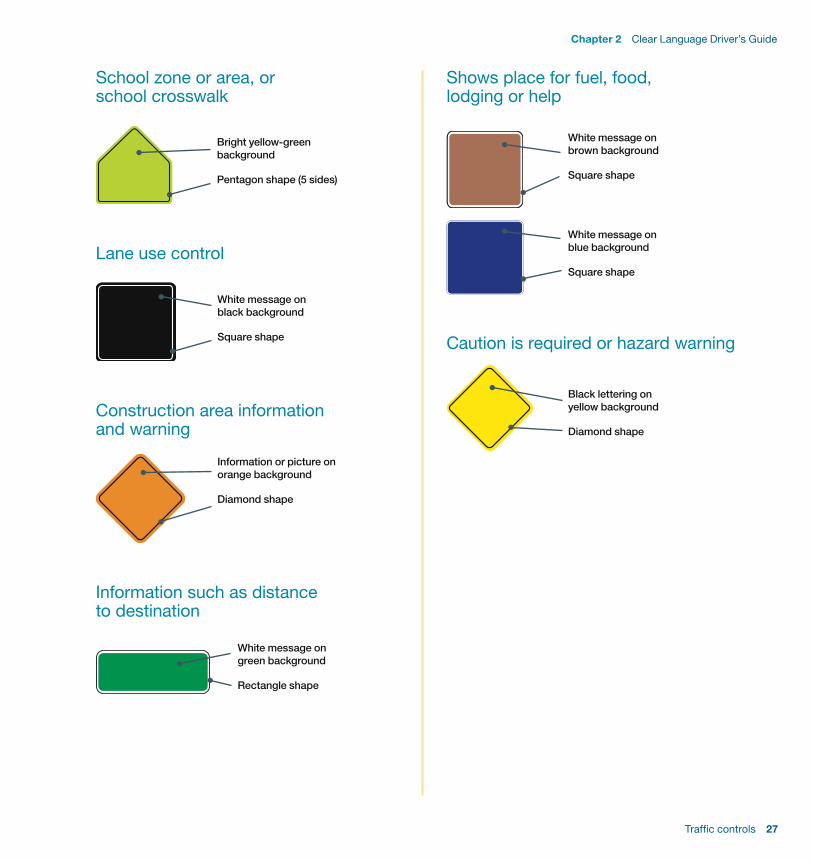
School zone or area, or school crosswalk
Bright yellow-green background
Pentagon shape (5 sides)
Lane use control
White message on black background
Square shape
Construction area information and warning
Information or picture on orange background
Diamond shape
Information such as distance to destination
White message on green background
Rectangle shape
Shows place for fuel, food, lodging or help
White message on brown background
Square shape
White message on blue background
Square shape
Caution is required or hazard warning
Black lettering on yellow background
Diamond shape

28 Traf!c controls
Chapter 2 Clear Language Driver’s Guide
5. Traf!c regulatory signs
StopCome to a complete stop and do not go until it is safe.
YieldYield the right-of-way to traf!c not facing the sign. Also yield to all pedestrians that are waiting to cross and are in the crosswalk or intersection.
Wrong wayMeans traf!c is coming toward you. You cannot enter.
Do not enter Railway crossing
6. Traf!c direction signs
Traf!c may go in direction of arrow only
Two way traf!c
Divider ahead – keep right

Traf!c controls 29
Chapter 2 Clear Language Driver’s Guide
7. Speed limit signs Speed limits do not tell you how fast you should go. They show the maximum speed you are allowed to drive when conditions are ideal. It is against the law to go at any speed that is unsafe for the conditions.
Speed limit signs are in kilometres per hour (km/h).
Unless there is a sign showing a different speed limit, these are the maximum speed limits:
• Provincial highway outside an urban area: 100 km/h
• Provincial highway inside the corporate limits of a city: 80 km/h
• Roadway that is outside an urban area: 80 km/h
• Roadway that is in an urban area: 50 km/h
Provincial highway route markers have numbers with one, two, or three digits.
A local road does not usually have a route marker. It may have a name, such as Irricana Road. Or it may be a township road, such as TWP RD 52, or a range road, such as RGE RD 252.
8. Designated lane signsThe message or symbol on these signs shows the direction(s) a vehicle must travel in the lane.
Right turn Left turn
Straight or Straight or right turn left turn
Straight Left turn only lane control
Dual turnsSome intersections allow more than one vehicle travelling in the same direction to turn at the same time. Stay in your lane during and after the turn.
Right Left

30 Traf!c controls
Chapter 2 Clear Language Driver’s Guide
Left lane turn left, right lane straight or turn left
Left lane turn left, right lane straight
Left lane turn left, centre lane straight, right lane straight or turn right
Lanes reserved for special vehiclesSome lanes are reserved for speci!c vehicles like buses, taxis, and bicycles. The symbol on the sign will show which vehicles are allowed to travel in the lane.
Reserved lanes may operate at all times or only some of the time. Reserved lanes that operate only some of the time will show the hours of the day and the days of the week.
9. Permissive signsWhen something is allowed, signs have a green circle on a white square. The action inside the green circle is allowed.
Turn left only Turn right only
Straight only Dangerous goods
Trucks Bicycles
Motorized Passing snow vehicles allowed
Traf!c controls 31
Chapter 2 Clear Language Driver’s Guide
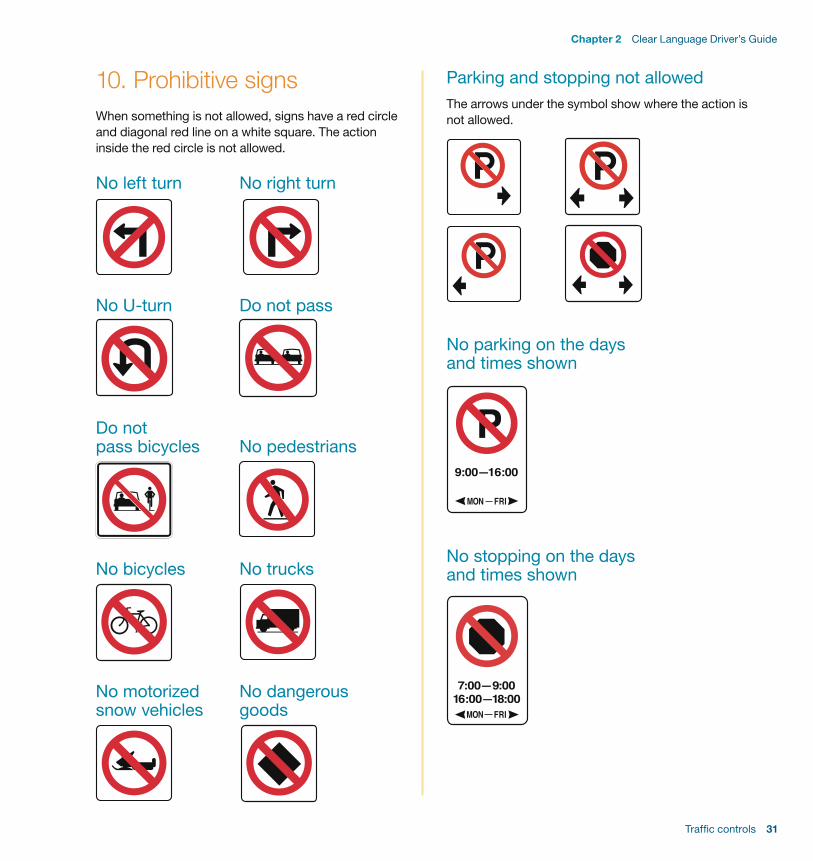
10. Prohibitive signsWhen something is not allowed, signs have a red circle and diagonal red line on a white square. The action inside the red circle is not allowed.
No left turn No right turn
No U-turn Do not pass
Do not pass bicycles No pedestrians
No bicycles No trucks
No motorized No dangerous snow vehicles goods
Parking and stopping not allowedThe arrows under the symbol show where the action is not allowed.
No parking on the days and times shown
No stopping on the days and times shown

32 Traf!c controls
Chapter 2 Clear Language Driver’s Guide
11. School zones and areas School zoneWhen you approach a school sign with a maximum speed sign, you are entering a school zone. You must not go over the posted speed during the school zone times.
School zone times (school days only):
• 8:00 a.m. – 9:30 a.m.
• 11:30 a.m. – 1:30 p.m.
• 3:00 p.m. – 4:30 p.m.
These hours may vary for different towns and cities according to their bylaws. If a town or city does have times different from these, the times will be posted under the school sign.
You are not allowed to pass or try to pass another vehicle travelling in the same direction during school zone times.
The speed limit for both urban and rural school zones is 30 km/h, unless otherwise posted.
School zone ends A school zone ends where a traf!c sign shows:
• a higher maximum speed, or
• the end of the school zone
School area When you approach a school sign without a speed limit sign, you are entering a school area. This sign is to warn drivers that children may be walking or crossing the road. You must drive carefully through the school area.
School crosswalkThis sign warns drivers to watch for pedestrians.
12. Playground zones and areas Playground zoneWhen you approach a playground sign with a maximum speed sign, you are entering a playground zone. You must not go over the posted speed during the playground zone times.
Traf!c controls 33
Chapter 2 Clear Language Driver’s Guide
Playground zone times:
• Every day from 8:30 a.m. to one hour after sunset
You are not allowed to pass or try to pass another vehicle travelling in the same direction during playground zone times.
The speed limit for both urban and rural playground zones is 30 km/h, unless otherwise posted.
Playground zone ends A playground zone ends where a traf!c sign shows:
• a higher maximum speed, or
• the end of the playground zone
Playground areaWhen you approach a playground sign without a speed limit sign, you are entering a playground area. This sign is to warn drivers that children may be near. You must drive carefully through the playground area.
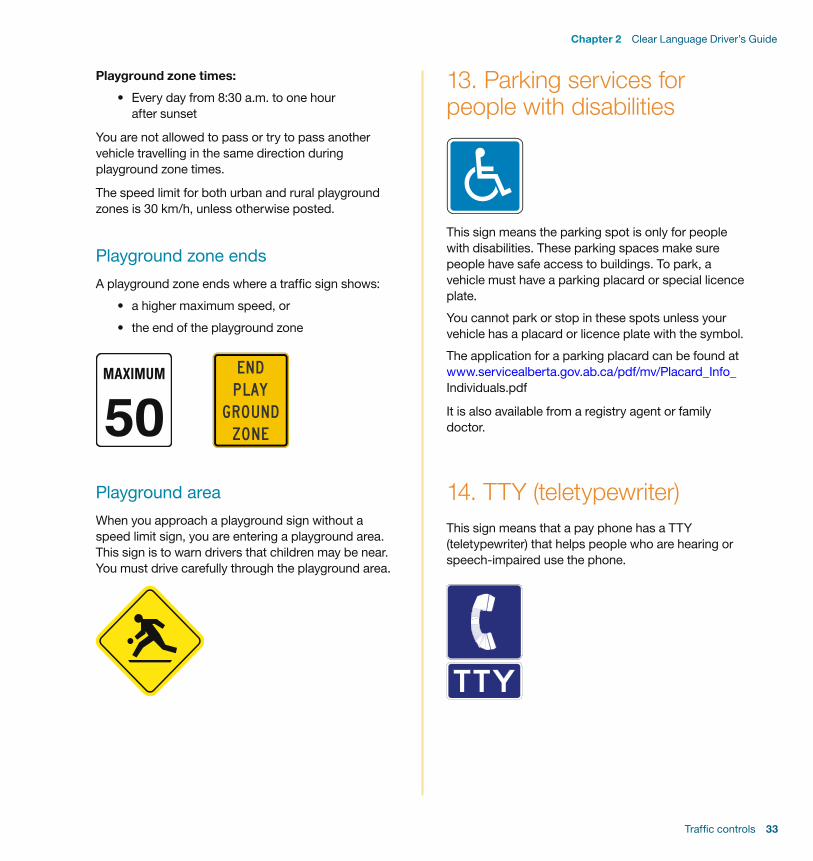
13. Parking services for people with disabilities
This sign means the parking spot is only for people with disabilities. These parking spaces make sure people have safe access to buildings. To park, a vehicle must have a parking placard or special licence plate.
You cannot park or stop in these spots unless your vehicle has a placard or licence plate with the symbol.
The application for a parking placard can be found at www.servicealberta.gov.ab.ca/pdf/mv/Placard_Info_Individuals.pdf
It is also available from a registry agent or family doctor.
14. TTY (teletypewriter) This sign means that a pay phone has a TTY (teletypewriter) that helps people who are hearing or speech-impaired use the phone.

34 Traf!c controls
Chapter 2 Clear Language Driver’s Guide
15. Warning signsWarning signs tell you to watch ahead. There may be an action you need to take, or something dangerous on the road.
Some of these signs warn of: • A traf!c regulation, such as stop or yield • Condition of the road • Hazards you may have to respond to
Traf!c regulations
Stop ahead Yield ahead
School bus stop ahead
Traf!c control signals ahead
Stop at traf!c lights ahead when yellow lights #ashing
This warning sign is placed before some intersections with traf!c control signals. If the yellow lights are #ashing as you approach the intersection, you must prepare to stop.
It means the traf!c control signal will be turning from green to yellow, or yellow to red, or is already red.
Turn or curve ahead
Sharp turn right Curve right
Road turns left/right
Road curves left Sharp turn left
Winding road
Recommended maximum speed through this curve in ideal driving conditions
Traf!c controls 35
Chapter 2 Clear Language Driver’s Guide
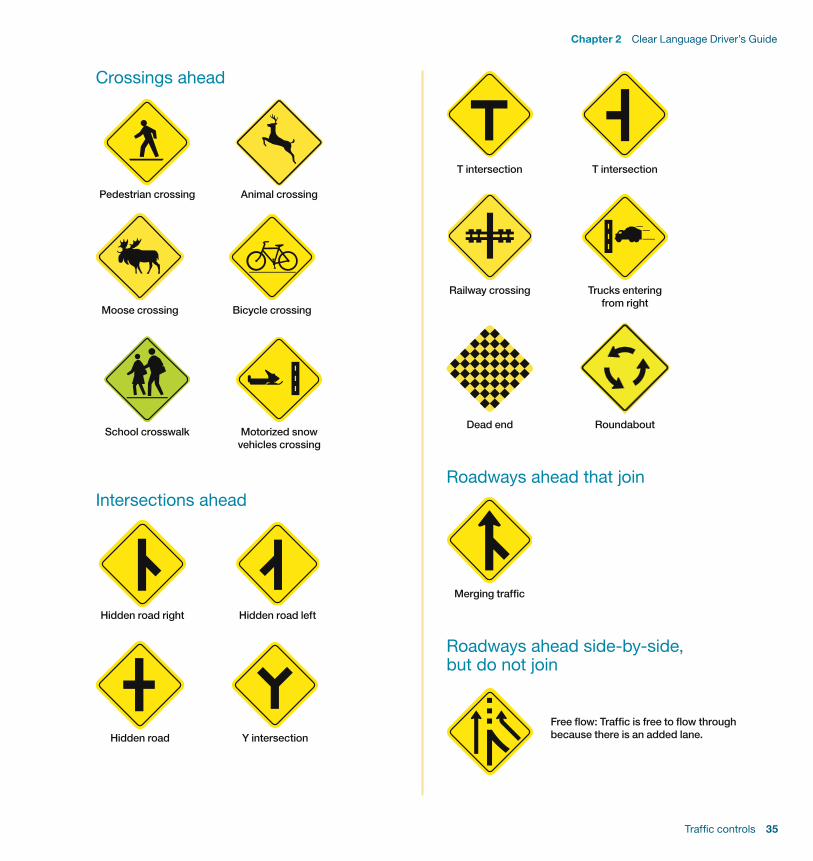
Crossings ahead
Pedestrian crossing Animal crossing
Moose crossing Bicycle crossing
School crosswalk Motorized snow vehicles crossing
Intersections ahead
Hidden road right Hidden road left
Hidden road Y intersection
T intersection T intersection
Railway crossing Trucks entering from right
Dead end Roundabout
Roadways ahead that join
Merging traf!c
Roadways ahead side-by-side, but do not join
Free "ow: Traf!c is free to "ow through because there is an added lane.
36 Traf!c controls
Chapter 2 Clear Language Driver’s Guide
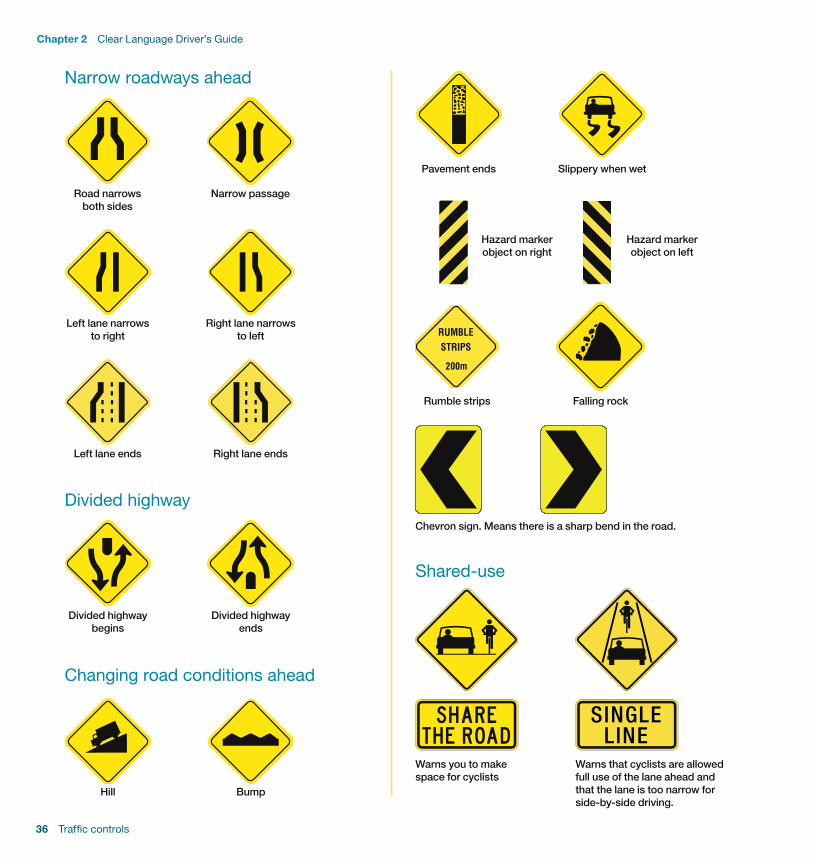
Narrow roadways ahead
Road narrows both sides
Narrow passage
Left lane narrows to right
Right lane narrows to left
Left lane ends Right lane ends
Divided highway
Divided highway begins
Divided highway ends
Changing road conditions ahead
Hill Bump
Pavement ends Slippery when wet
Hazard marker object on right
Hazard marker object on left
Rumble strips Falling rock
Chevron sign. Means there is a sharp bend in the road.
Shared-use
SINGLELINE
Warns you to make space for cyclists
Warns that cyclists are allowed full use of the lane ahead and that the lane is too narrow for side-by-side driving.

Traf!c controls 37
Chapter 2 Clear Language Driver’s Guide
16. Information and guide signsInformation and guide signs provide information about routes, off-road facilities, geographical features, and points of interest.
Route markersRoute markers show numbers, names, or other information about roads.
Trans-Canada highway
Bicycle route marker
Yellowhead highway
Highway route marker Highway route marker
Highway informationThese signs tell you which direction and how far it is to a place.
Direction
Distance Direction and distance
Off-road services and facilitiesThese signs show what is available and the direction to a service or recreational area.
Hospital Airport
Parking Fuel
Food Trailer campground
Telephone Accommodation
RCMP or city police
Recreation area ahead

38 Traf!c controls
Chapter 2 Clear Language Driver’s Guide
17. Vehicle warnings
Slow-moving vehicleThis sign is placed on the back of vehicles that travel less than 40 km/h, such as farm tractors, machinery, or construction equipment. It warns you to be ready to slow down.
Over-sized loadsThis sign means a wide load is being transported. Be careful when you pass vehicles with this sign.
18. ConstructionYou must always obey the speed limit for a construction zone, even when people and equipment are not working. There may be dangers like bumps, fresh oil, and loose gravel.
When workers are in the zone, the !ne for speeding !ne will be doubled.
Always:
• Obey the #ag person’s signal.
• Be ready to slow down or stop.
Here are some of the warning signs about road construction:
People working Flag person
Survey crew ahead Uneven pavement
Detour is __ km ahead
Construction zone ends

Traf!c controls 39
Chapter 2 Clear Language Driver’s Guide
19. Pavement markingsMarkings on the roadway can show:
• That lanes separate opposing traf!c
• That traf!c moves in the same direction
• That traf!c moves in the opposite direction
• Passing zones and no passing zones
• What the lane is used for
• Which type of vehicles are allowed lane
• Pedestrian crosswalks
• Stop lines
• Parking areas
• Messages with words or symbols
Sometimes pavement markings are used with other traf!c control signs or signals.
Lane markingsLane markings can be yellow or white, single or double, solid or broken. These lines give you important information about the direction of traf!c #ow, lane changing, lane restrictions, and passing.
Solid line markings
You are NOT allowed to cross a solid line to pass or change lanes.
Broken line markings
You are allowed to cross a broken line to pass or change lanes.
Yellow line markings
Yellow lines mean that vehicles on each side of the yellow line must travel in opposite directions. A yellow line should always be on your left side.
Solid yellow lines, single or double, mean that passing is not allowed.
Broken yellow lines mean that passing is allowed. Be sure that the lane is clear before passing.
A solid yellow line and a broken yellow line together:
• If the broken line is on your side, you may pass.
• If the solid line is on your side, you may not pass.

40 Traf!c controls
Chapter 2 Clear Language Driver’s Guide
White line markings
White lines mean that vehicles on each side of the white line are going in the same direction.
Solid white lines mean that lane changing is not allowed.
Broken white lines mean that lane changing is allowed.
SymbolsSymbols may be used on pavement to warn drivers, show regulations, or guide traf!c. They may be alone or with signs. These markings include:
Arrows
Arrows show how vehicles are allowed to move in a lane.
On a two way left turn lane, the centre lane of the road is shared and reserved for left turning traf!c going in either direction.
Diamond markings
Diamond markings mean that a lane is reserved for speci!c vehicles. There may also be signs that show times when the lane is reserved, or which vehicles are allowed.

Traf!c controls 41
Chapter 2 Clear Language Driver’s Guide
20. Shared-use lanesBicycle lanesBicycle lanes can be found in the curb lane of a road or beside a row of parking stalls. They are marked with bicycle symbols painted on the street and with signs.
Vehicles are only allowed in bike lanes to:
• Turn
• Enter or leave a parking spot
A bicycle lane is separated from traf!c and parking by solid white lines. It has the image of a bicycle and diamond painted on the street. Near a corner, the solid line usually changes to a broken (dashed) line to show that drivers are allowed to enter the bicycle lane to turn right.
Be careful and check for cyclists when you use their lane.
This lane is reserved for cyclists.
Markings that show two arrows above a bicycle guide cyclists and remind drivers that cyclists use the same lane.
Drivers and cyclists share the lane.
Reserved bicycle lane ahead.
X markingsX markings on rural highways show the approach to a railway crossing. There will also be a warning sign before the railway crossing.
Read more on railway crossings in Chapter 8.
Painted islandPainted islands mean that you are not allowed to use this area for driving. Do not park or stop in this area.
You can drive across a painted island to enter or leave a driveway, alleyway, or private drive.

42 Traf!c controls
Chapter 2 Clear Language Driver’s Guide
21. CrosswalksCrosswalk lines mark pedestrian crosswalks.
All intersections have crosswalks, even if they are not marked – unless there is a sign that says crossing is not allowed.
Stop lines show where vehicles must stop at intersections or railway crossings.
Crosswalk lines
Stop line
22. No stopping zonesYou should not stop in a “no stopping zone” because you may be in the way of vehicles that are turning. This is usually where large vehicles need extra room to turn.
No stopping zone

Traf!c controls 43
Chapter 2 Clear Language Driver’s Guide
De!nitions
Crosswalk – a section of road that pedestrians use to cross from one side to the other. Marked with white painted lines and sometimes with overhead #ashing lights. Drivers must stop for pedestrians at crosswalks.
Designated lane – a lane on a roadway that has special rules or uses. Signs, markings, or symbols show how traf!c must use the lane.
Fine – an amount of money you must pay if you break a law.
Intersection – where two or more roads meet.
Merging – joining moving traf!c.
Pedestrian – a person who is travelling on foot. A person who is walking beside and pushing a bicycle is also a pedestrian.
Permissive – allowed, legal.
Placard – small sign.
Prohibitive – not allowed.
Railway crossing – where train tracks cross a road.
Regulatory, regulation – rules, laws, controls.
Reserved – saved for.
Roundabout – see traf!c circle or roundabout.
Rural – away from cities and towns.
T intersection – an intersection where two roadways meet and form a “T”.
Traf!c circle or roundabout – an intersection where roadways meet and form a circle. Traf!c goes in a counter-clockwise direction around a centre island. Also called a circular intersection.
TTY – teletypewriter service on pay phones to help hearing or speech-impaired people use the phone.
Urban – in a city or town.
U-turn – turning your vehicle around at an intersection to go the opposite way.
Yield – let others go !rst.
Zones – areas with speci!c rules, like school zones.

44 Traf!c controls
Chapter 2 Clear Language Driver’s Guide
Notes

Driving basics
3

46 Driving basics
Chapter 3 Clear Language Driver’s Guide
Chapter 3 Driving basics1. Check before you drive 47
Outside check 47Inside check 48Final check 49
2. Driving with automatic and manual (standard) transmissions 50
Automatic transmission 50Manual (standard) transmission 51
3. Steering 52
4. Signalling 53
5. Accelerating 54
6. Braking and stopping 55Time and distance 55Safe braking 56
7. Reversing 56Reversing tips 56How to reverse in a straight line 57How to reverse left or right 57
8. Parking 57How to parallel park 57How to angle park 60How to perpendicular (90-degree) park 61How to park on a hill 62Do not park here 63
De!nitions 64

Driving basics 47
Chapter 3 Clear Language Driver’s Guide
Chapter 3 Driving basicsSafe drivers prepare before they drive and know how to handle their vehicle. To be a safe driver, you must learn how your vehicle starts, moves, and stops.
Before you leave your parking spot, learn the basics.
1. Check before you driveThere are three checks you must do before you drive. Check the outside of your vehicle, check the inside of your vehicle, and then do a !nal check.
Outside checkEvery time you drive, do these three outside checks:
1 Walk around your vehicle and look for anyone or anything that could be in your way. This could be a child playing on the road, animals, or garbage.
2 Check to see that your tires have enough air. They shouldn’t be low or #at.
3 Make sure there is no #uid dripping from your vehicle or any unusual #uids under your vehicle.
If you are parked on a roadway when you make these checks, be careful and walk in a direction that lets you see traf!c coming toward you.
If something is wrong, !x it before you drive. Then get in your vehicle for an inside check.
Outside check
1 Walk around and look 2 Check your tires3 Check for #uids

48 Driving basics
Chapter 3 Clear Language Driver’s Guide
Inside checkOnce you are in the driver’s seat, do these !ve inside checks:
1 Lock your doors.
Lock your doors to stop them from opening while you are driving or if there is a collision. This will also stop others from getting in.
2 Move your seat so you can see and use all the controls. Follow these steps:
• Move your seat at least 25 centimetres (10 inches) away from the steering wheel.
• Make sure you can see over the steering wheel. Many vehicles have a steering wheel that can be tilted or moved back and forth.
• Find a good sitting position. You should be able to relax your arms when you hold the steering wheel. Your elbows should be slightly bent when your hands are in the correct position. See Steering in this chapter for a picture.
• Be sure you can reach all the controls and see the full instrument panel.
• Make sure you can work the brake, clutch, and accelerator pedals. You should be able to push them all the way to the #oor.
3 Move your head restraint to the correct position.
This helps protect you if you hit something or have to stop suddenly.
• If your head restraint moves up and down, move it so the centre of the restraint is even with the tops of your ears.
• If your restraint moves forward, move it closer to the back of your head. The space between your head and the restraint should be 10 centimetres (4 inches) or less.
• Make sure the head restraint for each passenger is also in the correct position.
Put your head restraint in the correct position to protect your head and neck.
Correct Too low
Inside check
1 Lock doors
2 Adjust seat
3 Adjust head restraint
4 Adjust mirrors
5 Fasten and adjust seat belt
Note: Newer vehicles are equipped with a driver-side air bag system that is part of the steering wheel.
ClutchA pedal used in a vehicle with a manual transmission. It is used to start the vehicle, change from one gear to the next, and just before you stop to prevent stalling.
Head restraint Movable part at the top of your seat that supports and protects your head and neck during a sudden stop.

Driving basics 49
Chapter 3 Clear Language Driver’s Guide
4 Adjust your mirrors.
Move your outside and inside rear-view mirrors so you can see behind and beside you.
• Move the inside rear-view mirror so you can see all of the back window.
• Move both outside mirrors so you can see just a little of your vehicle and the space beside it. This helps reduce blind spots. A blind spot is a space where you cannot see anything. A blind spot will make it hard to see a vehicle coming toward you from behind. You must be able to see well to drive safely.
5 Put on your seat belt.
You must wear a seat belt. It is the law. Seat belts save lives and protect you.
• Pull the lap belt low and snug over your hips.
• Place the shoulder strap over your shoulder and across your chest.
• Do not put the shoulder strap behind your back or under your arm.
You must wear a seat belt. It is the law.
Once you have checked the outside and the inside of your vehicle, you are ready to do the !nal check.
Final checkBefore moving your vehicle:
• Look to see that your route is clear.
• Check the rear-view and side mirrors to make sure it is safe to go.
• Check over your shoulders to make sure your blind spots are clear.
If you are moving away from the right side of the road, use your left turn signal to show that you are entering traf!c.
If you are on the left side of a one-way road, use your right turn signal.
Always check to make sure it is safe to enter the road.
Blind spotsAreas beside your car that you can’t see when you look in your side or rear-view mirrors. Before you change lanes, you have to shoulder check to see if there is a vehicle or anything else in your blind spots.
Shoulder check A quick look over your shoulder to see if there is a vehicle in your blind spots.

50 Driving basics
Chapter 3 Clear Language Driver’s Guide
2. Driving with automatic and manual (standard) transmissions Vehicles come with either an automatic or manual transmission. The transmission is the part of the vehicle that moves power from the engine to the wheels.
Automatic transmissionIn vehicles with an automatic transmission, when driving forward you choose one gear, then the transmission automatically changes gears as you speed up or slow down.
There is a lock release button or control built into the gear selector so that you don’t shift incorrectly and move unsafely or in an unexpected direction. Use the lock release to:
• Move the gear selector from Park to Reverse or any forward gear while the brake pedal is pressed.
• Shift from Drive to a lower gear (!rst or second).
• Shift into Park from any gear.
Gears for an automatic transmission
Park (P)Your vehicle will only start in this gear. Use when you start your vehicle or leave it parked. This locks the transmission and stops the wheels from turning.
Reverse (R)Use when you are backing up. When the vehicle is in Reverse, the white or clear lights at the back will show others behind you that you are backing up.
Neutral (N)Use to take the transmission out of gear. The wheels have no power and are not locked. Your vehicle will start in this gear. This position is used for towing vehicles.
Drive (D)Use for normal forward driving. The automatic transmission will change up and down through the gears, depending on your speed.
Gears: 1st, 2nd and 3rdUse these gears when you need more power, but less speed. Also use to stop the transmission from shifting to a higher gear. Use when going up or down hills, and for road conditions like slush, snow, ice, sand, or loose gravel.
Overdrive (O)Only on some vehicles. Use for higher speeds. This gear helps save fuel.
RememberYou car will only start in Park or Neutral. Your car will not start when it is in Reverse or Drive.
See your owner’s manual for more information about the transmission lock release.
See your owner’s manual for more information on how to select and use gears.

Driving basics 51
Chapter 3 Clear Language Driver’s Guide
Manual (standard) transmissionIn vehicles with a manual transmission, you have to change the gears yourself. You must work a clutch pedal with your left foot. At the same time, you use a gearshift with your right hand to choose the gear you want. This takes a lot of practice and skill. The gearshift is usually found between the two front seats.
Gears for a manual transmission
Reverse (R)Use when you are backing up. When the vehicle is in Reverse, the white or clear lights at the back will show others behind you that you are backing up.
NeutralUse to take the transmission out of gear. The wheels have no power and are not locked. Your vehicle will start in this gear.
Gears: 1st to 5thVehicles with a manual transmission can have up to !ve gears for moving forward. Use 1st gear to start driving. Then shift to higher gears as you speed up.
Starting a vehicle with a manual transmissionTo start a vehicle with a manual transmission, put the gearshift in Neutral. Push the clutch completely down with your left foot. Then use your key to start the engine. Follow the steps for shifting gears to move your vehicle forward.
Using the clutch to shift gears
The clutch pedal is used to connect and disconnect the vehicle’s engine and transmission.
When the clutch pedal is not pressed down, the engine and transmission are connected and power goes to the wheels.
When the clutch pedal is pressed down, there is no connection and no power to the wheels. This is when you shift gears.
To shift gears, follow these steps:
1 Place the gearshift in Neutral.
2 Push the clutch pedal completely down with your left foot.
3 Choose your gear.
4 Slowly lift your left foot off the clutch pedal.
5 As you release the clutch, you will feel the engine and transmission connect. The point where they connect is called the friction point. At the friction point, slowly release the clutch and at the same time gently press down on the gas. Do this slowly for a smooth change.
Automatic transmission• Gas pedal• Brake• Gearshift
Manual transmission• Gas pedal• Brake• Gearshift• Clutch
See your owner’s manual for the speeds at which you should shift gears.
Shifting patternThe way the gears are arranged is called the shifting pattern. There is usually a picture of the pattern on the handle of the gearshift. See your owner’s manual to learn about the shifting pattern for your vehicle.
Friction point In a manual transmission. The point where the engine and transmission connect, as you release the clutch.
52 Driving basics
Chapter 3 Clear Language Driver’s Guide
Tips for driving with a manual transmission
• Practice changing gears with the vehicle turned off and the clutch pedal pressed down. This will help you remember gear positions. Then you can !nd them without taking your eyes off the road.
• To learn to use the clutch smoothly, practice !nding the friction point without using the gas pedal.
• Carefully choose the proper gear so the vehicle does not lug. This is when it moves in a rough, bumpy way.
• Use the right gear so the engine does not race. This is when you quickly speed up (rev) the engine but the vehicle does not move properly.
• Do not ride the clutch. This is when you leave your foot on the clutch pedal when you !nish changing to another gear. It will cause extra wear on the clutch. Take your foot off the clutch pedal each time you !nish changing gears.
• When you turn a corner, use the proper gear for the speed of the turn and keep your foot off the clutch pedal.
• When you are slowing down to stop, do not press the clutch pedal. This can make it harder to control your vehicle and can be unsafe. It also stops you from being able to speed up if you need to.
• Only use the clutch to start the vehicle, to change from one gear to the next, and just before you stop to prevent stalling.
3. Steering Place your steering wheel at the correct height and your hands in the proper driving position. See the picture for the correct position. Now you are ready to steer. Keep two hands on the steering wheel when you drive.
When you turn a corner, use the hand-over-hand method. After the turn, put your hands and the steering wheel back to the driving position. You can also let the steering wheel slide through your hands back into position by slightly loosening your grip.
Use the clutch when you:• start the vehicle• change gears• stop (to prevent stalling)
RevTo make an engine run quickly by pressing the accelerator pedal.

Driving basics 53
Chapter 3 Clear Language Driver’s Guide
Hand-over-hand method for a right turn
A Driving position.
E Reverse the steps to !nish the turn. Bring the steering wheel back to the normal position. When the turn is done, put hands back in the driving position.
B For right turns, the left hand applies turning power. Right hand lets go of the steering wheel and moves to the top of the steering wheel.
C Right hand takes new position and applies turning power.
D Left hand lets go and returns to the starting position.
4. Signalling Signalling means using your turn signal lights and brake lights to show other drivers what you are going to do.
When you apply your brakes, your brake lights tell other drivers that you are slowing or stopping.
You must use your turn signal lights to:
• Move away from a curb or parking lane
• Turn left or right
• Change lanes
Use your turn signals carefully. If you signal too early or too late, you may confuse other drivers.
After using a turn signal, remember to turn it off, if it does not turn off automatically.

54 Driving basics
Chapter 3 Clear Language Driver’s Guide
Electrical signals
Hand signals
Left turn signal
Left turn signal
Right turn signal
Right turn signal
Slowing or stopping
Slowing or stopping
5. AcceleratingTo accelerate is to move your vehicle faster. It is also called speeding up.
Always control your driving speed. Look where you want to go and slowly press on the gas pedal to move. Hold it at the proper position for the speed you want. This will take some practice.
Safe speed tips
• Accelerate smoothly. Do not let your tires spin.
• Drive at a safe speed for the weather, road, and traf!c conditions.
• Do not speed up or slow down if you don’t need to.
• Do not go over the posted speed limit.
• Try to drive at the speed of traf!c. Driving too slowly can be unsafe.
• Once in a while, take a quick look at your speedometer to check your speed.
Remember, you may have to brake suddenly. Watch your speed and what is happening around you.

Driving basics 55
Chapter 3 Clear Language Driver’s Guide
6. Braking and stopping Time and distanceTo drive safely and avoid collisions, you must know how much time and distance you need to brake and stop. There are three things that affect how long and far it takes to stop.
Perception
Perception time is how long it takes you to realize that you need to stop. This can take about three-quarters of a second or more, depending on your experience.
Perception distance is how far your vehicle travels during this time.
Reaction
Reaction time is how long it takes you to move your foot to the brake pedal and start braking, after you realize that you need to stop. Most people’s reaction time is three-quarters of a second.
Reaction distance is how far your vehicle travels during this time.
Braking
Braking time is how long it takes your vehicle to stop after you begin to brake.
Braking distance is how far your vehicle travels during this time.
Stopping distances
This graph compares speeds and stopping distances. Vehicle type, road, and weather conditions will all affect your stopping distance.
Distance travelled while perceiving the need to stop (based on perception time of # second)
Distance travelled while reacting (based on reaction time of # second)
Distance travelled after brakes applied (under normal road conditions and brake ef!ciency)
110 km/h
100 km/h
80 km/h
50 km/h
30 km/h
Total stopping distance equals:
Perception distance+
Reaction distance+
Braking distance
Be extra careful and slow down when you drive on unpaved or gravel roads. It can be harder to speed up, slow down, and control your vehicle.

56 Driving basics
Chapter 3 Clear Language Driver’s Guide
Safe brakingThere are things you can’t control that may affect your stopping time and distance. For example, you can’t control road and weather conditions.
However, there are many things you can control. To stop in less time and with less distance:
• Scan the road ahead.
• Make good decisions.
• Stay alert and take a break if you are tired.
• Do not drink alcohol.
• Drive at a safe speed.
• Keep your brakes and tires in the best condition.
Be safe. Brake early. Release the gas and slow down before you press the brake pedal.
If you must stop quickly, use threshold braking. This prevents the wheels from locking and helps you to control steering. If your wheels do lock, release pressure on the brake pedal slightly.
For more information about vehicles with anti-lock brakes (ABS), see Chapter 6 Challenging Road Conditions and Emergencies. Check your owner’s manual for information on ABS.
7. Reversing To reverse is to move your vehicle backwards. It is also called backing up.
All reversing must be done at a crawl or slow walking speed.
Always be careful when you back up. It is hard to see what is around your vehicle. Before you back up, look around and behind your vehicle. Carefully check for anything that is in your way or unsafe. Only reverse when it is safe.
Reversing tips• Reverse slowly.
• Reverse your vehicle into the nearest lane and then move forward.
• Do not reverse into the second lane of traf!c.
• Do not reverse into an intersection or crosswalk in an urban area. It is illegal.
• Watch for vehicles in front of you with white lights on. This means they are in reverse gear. They may be moving into your path.
RememberWhen you back up, the front and back of your vehicle will move in opposite directions. For example, if the front moves to the left, the back moves to the right.
ABSAnti-lock braking system.
Threshold brakingApplying just enough brake pressure so wheels don’t lock.
ScanTo look all around and beyond where you are.
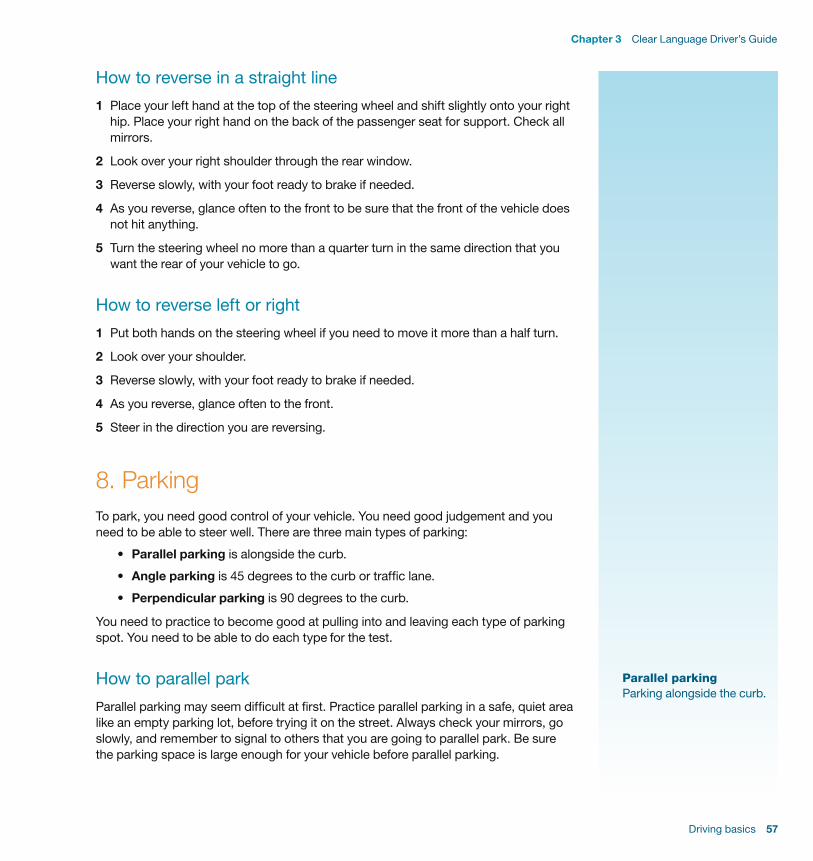
Driving basics 57
Chapter 3 Clear Language Driver’s Guide
How to reverse in a straight line1 Place your left hand at the top of the steering wheel and shift slightly onto your right
hip. Place your right hand on the back of the passenger seat for support. Check all mirrors.
2 Look over your right shoulder through the rear window.
3 Reverse slowly, with your foot ready to brake if needed.
4 As you reverse, glance often to the front to be sure that the front of the vehicle does not hit anything.
5 Turn the steering wheel no more than a quarter turn in the same direction that you want the rear of your vehicle to go.
How to reverse left or right 1 Put both hands on the steering wheel if you need to move it more than a half turn.
2 Look over your shoulder.
3 Reverse slowly, with your foot ready to brake if needed.
4 As you reverse, glance often to the front.
5 Steer in the direction you are reversing.
8. ParkingTo park, you need good control of your vehicle. You need good judgement and you need to be able to steer well. There are three main types of parking:
• Parallel parking is alongside the curb.
• Angle parking is 45 degrees to the curb or traf!c lane.
• Perpendicular parking is 90 degrees to the curb.
You need to practice to become good at pulling into and leaving each type of parking spot. You need to be able to do each type for the test.
How to parallel park Parallel parking may seem dif!cult at !rst. Practice parallel parking in a safe, quiet area like an empty parking lot, before trying it on the street. Always check your mirrors, go slowly, and remember to signal to others that you are going to parallel park. Be sure the parking space is large enough for your vehicle before parallel parking.
Parallel parkingParking alongside the curb.

58 Driving basics
Chapter 3 Clear Language Driver’s Guide
Entering a parallel parking spot
1 Check all mirrors to see if it is safe. Stop when your rear bumper is in line with the rear bumper of the other vehicle (B). Your vehicle should be parallel to the other vehicle with about one metre (3 feet) of space between vehicles. Select the reverse gear. Look over your right shoulder and behind you.
2 Reverse straight back very slowly, about one-half metre (1.5 feet). Steer sharply to the right until your vehicle is at about a 45-degree angle to the curb. Look in the direction you are moving and keep glancing to the front. Your steering wheel should now be in line with the rear bumper of B.
3 While reversing, straighten your front wheels. Continue reversing until the right corner of your front bumper is in line with the rear bumper of the other vehicle.
4 Turn the wheel sharply to the left. Continue to look in the direction you are moving while glancing to the front. Reverse until your vehicle is parallel with the curb. Be careful not to hit the bumper of the vehicle behind you. You must be no further than 50 centimetres (20 inches) from the curb.
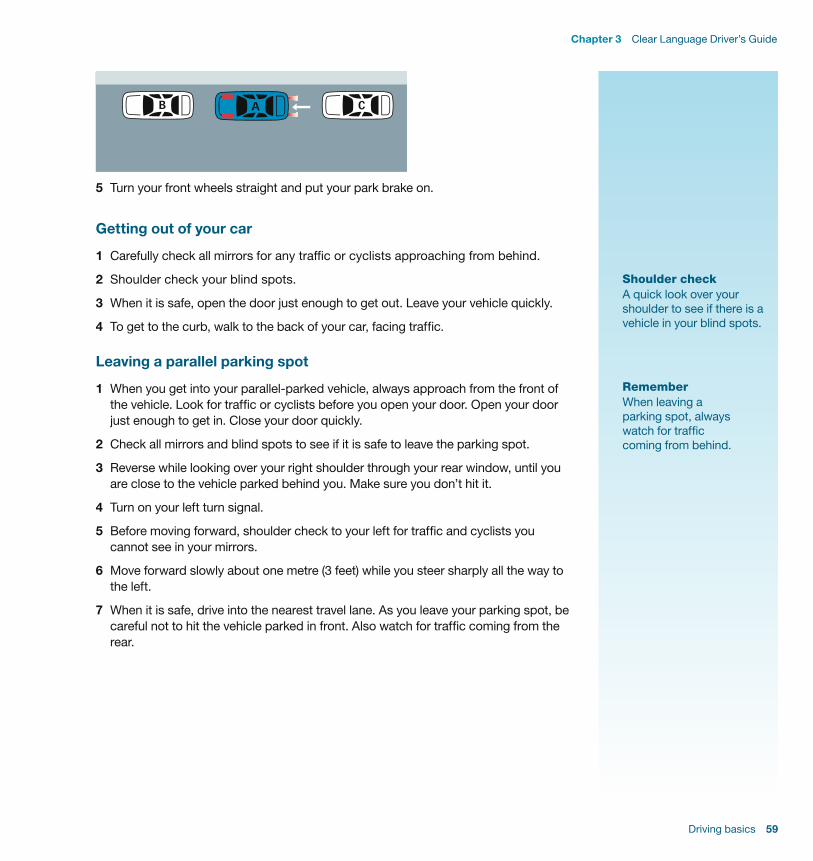
Driving basics 59
Chapter 3 Clear Language Driver’s Guide
5 Turn your front wheels straight and put your park brake on.
Getting out of your car
1 Carefully check all mirrors for any traf!c or cyclists approaching from behind.
2 Shoulder check your blind spots.
3 When it is safe, open the door just enough to get out. Leave your vehicle quickly.
4 To get to the curb, walk to the back of your car, facing traf!c.
Leaving a parallel parking spot
1 When you get into your parallel-parked vehicle, always approach from the front of the vehicle. Look for traf!c or cyclists before you open your door. Open your door just enough to get in. Close your door quickly.
2 Check all mirrors and blind spots to see if it is safe to leave the parking spot.
3 Reverse while looking over your right shoulder through your rear window, until you are close to the vehicle parked behind you. Make sure you don’t hit it.
4 Turn on your left turn signal.
5 Before moving forward, shoulder check to your left for traf!c and cyclists you cannot see in your mirrors.
6 Move forward slowly about one metre (3 feet) while you steer sharply all the way to the left.
7 When it is safe, drive into the nearest travel lane. As you leave your parking spot, be careful not to hit the vehicle parked in front. Also watch for traf!c coming from the rear.
RememberWhen leaving a parking spot, always watch for traf!c coming from behind.
Shoulder check A quick look over your shoulder to see if there is a vehicle in your blind spots.
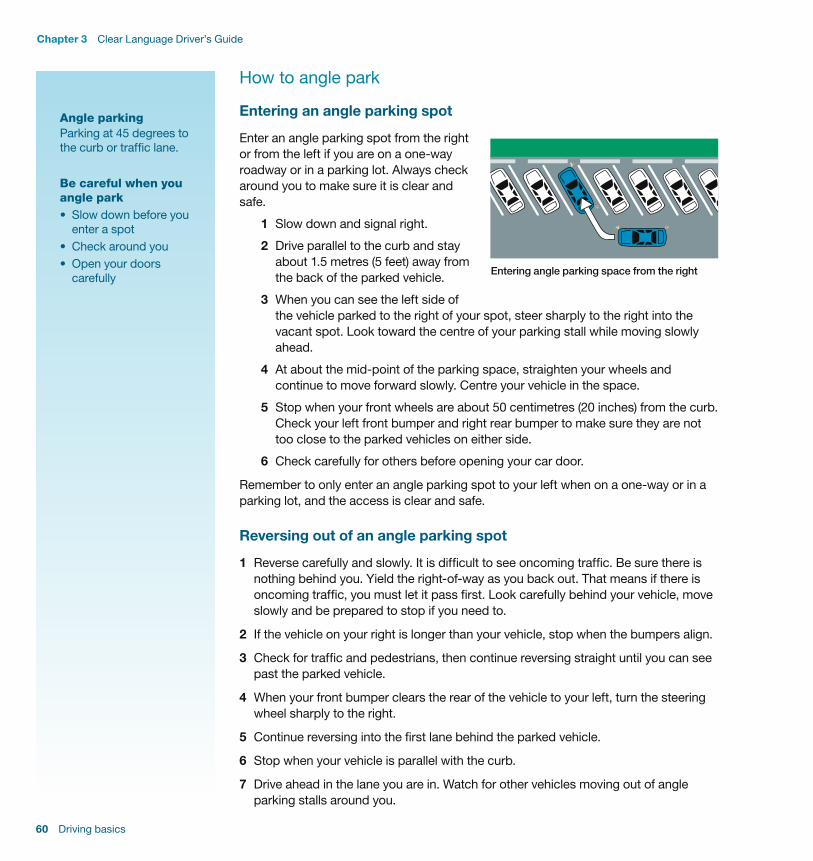
60 Driving basics
Chapter 3 Clear Language Driver’s Guide
How to angle park
Entering an angle parking spot
Enter an angle parking spot from the right or from the left if you are on a one-way roadway or in a parking lot. Always check around you to make sure it is clear and safe.
1 Slow down and signal right.
2 Drive parallel to the curb and stay about 1.5 metres (5 feet) away from the back of the parked vehicle.
3 When you can see the left side of the vehicle parked to the right of your spot, steer sharply to the right into the vacant spot. Look toward the centre of your parking stall while moving slowly ahead.
4 At about the mid-point of the parking space, straighten your wheels and continue to move forward slowly. Centre your vehicle in the space.
5 Stop when your front wheels are about 50 centimetres (20 inches) from the curb. Check your left front bumper and right rear bumper to make sure they are not too close to the parked vehicles on either side.
6 Check carefully for others before opening your car door.
Remember to only enter an angle parking spot to your left when on a one-way or in a parking lot, and the access is clear and safe.
Reversing out of an angle parking spot
1 Reverse carefully and slowly. It is dif!cult to see oncoming traf!c. Be sure there is nothing behind you. Yield the right-of-way as you back out. That means if there is oncoming traf!c, you must let it pass !rst. Look carefully behind your vehicle, move slowly and be prepared to stop if you need to.
2 If the vehicle on your right is longer than your vehicle, stop when the bumpers align.
3 Check for traf!c and pedestrians, then continue reversing straight until you can see past the parked vehicle.
4 When your front bumper clears the rear of the vehicle to your left, turn the steering wheel sharply to the right.
5 Continue reversing into the !rst lane behind the parked vehicle.
6 Stop when your vehicle is parallel with the curb.
7 Drive ahead in the lane you are in. Watch for other vehicles moving out of angle parking stalls around you.
Entering angle parking space from the right
Be careful when you angle park• Slow down before you
enter a spot• Check around you• Open your doors
carefully
Angle parkingParking at 45 degrees to the curb or traf!c lane.
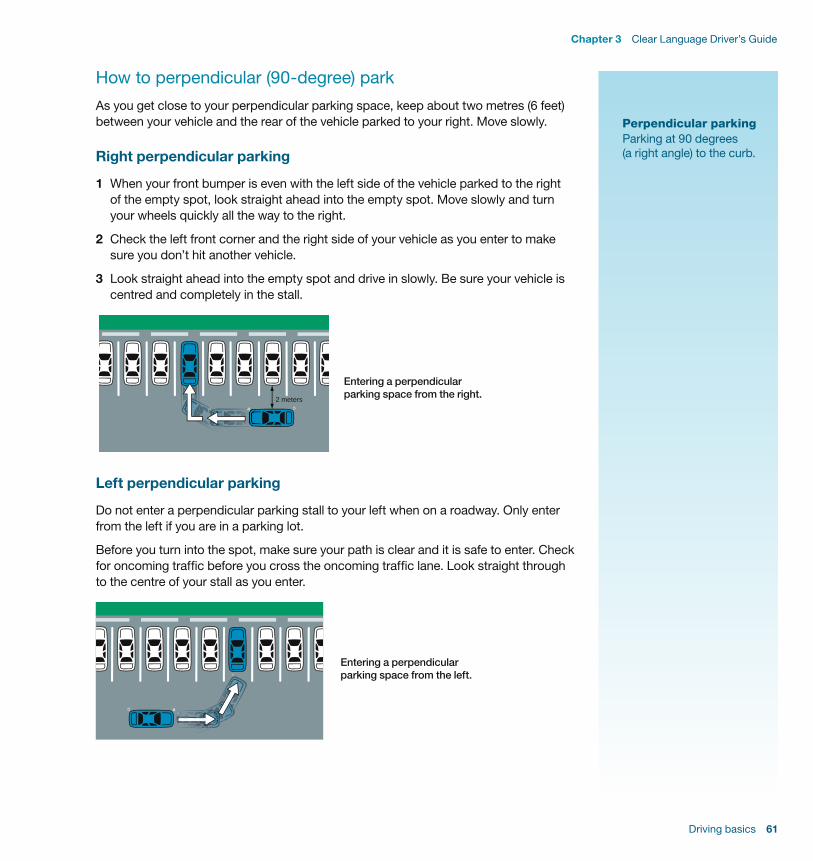
Driving basics 61
Chapter 3 Clear Language Driver’s Guide
How to perpendicular (90-degree) parkAs you get close to your perpendicular parking space, keep about two metres (6 feet) between your vehicle and the rear of the vehicle parked to your right. Move slowly.
Right perpendicular parking
1 When your front bumper is even with the left side of the vehicle parked to the right of the empty spot, look straight ahead into the empty spot. Move slowly and turn your wheels quickly all the way to the right.
2 Check the left front corner and the right side of your vehicle as you enter to make sure you don’t hit another vehicle.
3 Look straight ahead into the empty spot and drive in slowly. Be sure your vehicle is centred and completely in the stall.
2 meters
Entering a perpendicular parking space from the right.
Left perpendicular parking
Do not enter a perpendicular parking stall to your left when on a roadway. Only enter from the left if you are in a parking lot.
Before you turn into the spot, make sure your path is clear and it is safe to enter. Check for oncoming traf!c before you cross the oncoming traf!c lane. Look straight through to the centre of your stall as you enter.
2 meters
Entering a perpendicular parking space from the left.
Perpendicular parkingParking at 90 degrees (a right angle) to the curb.

62 Driving basics
Chapter 3 Clear Language Driver’s Guide
How to park on a hill Parking on a hill can be risky. You don’t want your vehicle to roll away or move. Follow these steps to stop your car from rolling away.
Facing uphill, on the right side of the road
• On a street with a curb, turn the front wheels to the left (toward the centre of the road). With the wheels turned, let your vehicle roll back slowly until the back of the right front tire touches the curb. This helps stop your vehicle from rolling into traf!c.
• On a street without a curb, turn your front wheels to the right (toward the edge of the road). Then if your vehicle starts to roll, it will go off the road and not into traf!c.
• Always set your park brake and place your automatic transmission in Park or your manual transmission in low gear to stop your vehicle from rolling downhill.
Uphill with curb Uphill without curb
When you park on the left side of the road, turn the front wheels in the opposite direction.
Facing downhill, on the right side of the road
• Always turn your front wheels to the right (toward the edge of the road).
• If there is a curb, let your vehicle roll slowly until your right front tire touches it. Then if your vehicle starts to roll, it will go off the road and not into traf!c.
• Always set your park brake and place your automatic transmission in Park or your manual transmission in low gear to stop your vehicle from rolling downhill.
Downhill
When you park on the left side of the road, turn the front wheels in the opposite direction.

Driving basics 63
Chapter 3 Clear Language Driver’s Guide
Do not park hereThere are a lot of parking rules. Follow the law and do not park in a way that blocks other vehicles. Inside a town or city, do not park:
• On a sidewalk or boulevard
• On any part of a crosswalk
• On the approaches to bridges or underpasses
• Within an intersection
• Within 1.5 metres (5 feet) of access to a garage, private roadway, or driveway
• Within 5 metres (16 feet) of a stop sign or yield sign
• Within 5 metres of the nearest side of a marked crosswalk
• Within 5 metres of a !re hydrant
• Alongside or opposite any street construction or obstruction
• If a sign or notice prohibits stopping or parking
• Beside other vehicles (double-parking)
• Closer than 5 metres to the edge of the intersecting roadway, except where permitted, such as at a parking meter
• Next to a !re, explosion, motor vehicle crash, or other incident
On a roadway outside an urban area, do not park:
• On the roadway, parking lane, or shoulder of a primary highway, unless your vehicle is broken down or unless it is permitted by law
• Unless it is clear for other motor vehicles to pass
• Unless your vehicle can be seen for 60 metres (200 feet) along the roadway in both directions
No parking within 5 metres (16 feet) of a !re hydrant.
No parking within 5 metres (16 feet) of a stop or yield sign.
No parking within 5 metres (16 feet) of a marked crosswalk.
Check signs and road markings for parking rules. These show times and places that parking is not allowed.
ObstructionSomething blocking the roadway such as another vehicle, an animal, garbage, or traf!c control signage.
BoulevardThe strip of ground between the edge of a private property and the road.

64 Driving basics
Chapter 3 Clear Language Driver’s Guide
De!nitions
ABS – anti-lock braking system.
Accelerate – to move faster or speed up.
Angle parking – parking at 45 degrees to the curb or traf!c lane.
Automatic transmission – vehicles with an automatic transmission have gears that change automatically as you speed up or slow down.
Blind spots – areas beside your car that you can’t see when you look in your side or rear-view mirrors. Before you change lanes, you have to shoulder check to see if there is a vehicle or anything else in your blind spots.
Boulevard – the strip of ground between the edge of a private property and the road.
Braking distance – how far your vehicle travels during “braking time.”
Braking time – how long it takes your vehicle to stop after you begin to brake.
Clutch – a pedal used in a vehicle with a manual transmission. It is used to start the vehicle, change from one gear to the next, and just before you stop to prevent stalling.
Collision – when a vehicle hits another vehicle or something on the roadway such as an animal.
Friction point – in a manual transmission. The point where the engine and transmission connect, as you release the clutch.
Head restraint – movable part at the top of your seat that supports and protects your head and neck during a sudden stop.
Lug – when a vehicle with a manual transmission moves in a rough, bumpy way. This happens if you don’t shift gears smoothly.
Manual (standard) transmission – to drive a vehicle with a manual transmission, you must push a clutch pedal, then change gears with a gearshift, when you speed up or slow down.
Obstruction – something blocking the roadway such as another vehicle, an animal, garbage, or traf!c control signage.
Parallel parking – parking alongside the curb.
Perception distance – how far your vehicle travels during “perception time.”
Perception time – how long it takes you to realize that you need to stop.
Perpendicular parking – parking at 90 degrees (a right angle) to the curb.
Primary highway – main highway.
Reaction distance – how far your vehicle travels during “reaction time.”

Driving basics 65
Chapter 3 Clear Language Driver’s Guide
Reaction time – how long it takes you to move your foot to the brake pedal and start braking, after you realize that you need to stop.
Rev – to make an engine run quickly by pressing the accelerator pedal.
Reverse – to move backwards or back up.
Scan – to look all around and beyond where you are.
Shoulder check – a quick look over your shoulder to see if there is a vehicle in your blind spots.
Signalling – using your turn signal lights to show other drivers what you are going to do.
Threshold braking – applying just enough brake pressure so wheels don’t lock.
Transmission – the part of a vehicle that moves power from the engine to the wheels. A vehicle can have an automatic or manual (standard) transmission.

66 Driving basics
Chapter 3 Clear Language Driver’s Guide
Notes

Intersections and turns
4

68 Intersections and turns
Chapter 4 Clear Language Driver’s Guide
Chapter 4 Intersections and turns 1. Right-of-way 69
2. Intersections 69Intersections controlled by signs 70Uncontrolled intersections 71Keep intersections clear 72
3. Traf!c circles and roundabouts 73One lane traf!c circle or roundabout 73Two lane traf!c circle or roundabout 74
4. Turning 76Right turns 76Left turns 78Turning lanes 80U-turns 82
De!nitions 83

Intersections and turns 69
Chapter 4 Clear Language Driver’s Guide
Chapter 4 Intersections and turns An intersection is where two or more roads meet. When you come to an intersection, you will need to slow down, stop, turn or drive through.
There are many types of intersections. Some have signs and signals that tell you what to do. Others have no signs, but there are rules you need to follow. Make sure you understand the signs, signals and rules so you can safely drive through or turn at all intersections.
1. Right-of-way There is always a chance of a collision where roads meet. Drivers need to know who may proceed and who must wait.
Right-of-way rules tell you which driver must yield (let the other driver go !rst) and which driver may go ahead.
To know who has the right-of-way, you need to watch for signs, signals, and sometimes the position of vehicles at an intersection.
However, even if you have the right-of-way, you must still do all you can to prevent a collision.
2. Intersections An intersection is where two or more roads meet. Intersections are called controlled if there are traf!c signs and/or signal lights.
Intersections with no traf!c signs or signal lights are called uncontrolled. There are speci!c rules for uncontrolled intersections. The rules are there to prevent collisions, but other drivers may not be aware of uncontrolled intersection rules, or they may not be paying attention. So, remember, even if you have the right-of-way, always be aware of what other drivers are doing. Only go when it is safe.
Remember: directions given by a peace or police of!cer must be followed over traf!c signs or signals.
See Chapter 2 Traf!c Controls for information on lane markings and signs.
Controlled intersectionAn intersection with traf!c control lights or signs.
Uncontrolled intersectionAn intersection with no traf!c control lights or signs.

70 Intersections and turns
Chapter 4 Clear Language Driver’s Guide
Intersections controlled by signsStop signs
You must always come to a complete stop at a stop sign. Then, check the intersection carefully. Give pedestrians and other traf!c the right-of-way. Make sure you understand the rules so that you know when it is safe to go ahead.
Follow these rules when you come to a stop sign:
Bring your vehicle to a complete stop before the marked stop line.
At a crosswalk, stop before the line.
Where there is no stop line, stop before the marked crosswalk.
If there is no stop line or the crosswalk is unmarked at the intersection, you must stop within three metres (10 feet) of the intersecting roadway. Imagine where a crosswalk would be painted and stay back from that area.
Three and four-way stops
Some intersections have stop signs at three or four of the corners. These corners are called “courtesy corners”. This means that drivers stop, then let the vehicle that arrives !rst, go through !rst. If two vehicles arrive at the same time, drivers let the vehicle on the right go !rst. Use common sense too. Never proceed unless it is safe.
Courtesy cornerFirst to arrive, !rst to go.
PedestrianA person who is travelling on foot. A person who is walking beside and pushing a bicycle is also a pedestrian.

Intersections and turns 71
Chapter 4 Clear Language Driver’s Guide
Yield signs
A yield sign means that you must give the right-of-way to other vehicles that are not facing the yield sign. You have to merge with the traf!c that is already moving. When you are coming up to a yield sign, drive at a speed allowing you to stop easily if needed.
If there are pedestrians or traf!c in your path, you must come to a complete stop before the intersection and yield the right-of-way.
If there are no pedestrians or traf!c, you can go through the intersection without coming to a complete stop.
Vehicle at yield sign lets other vehicle pass.
Uncontrolled intersections Uncontrolled intersections have no traf!c signs or signal lights. You must yield the right-of-way to the vehicle on your right.
Follow these steps:
1 Check for traf!c to your left and right as you get closer to the intersection.
2 Adjust your speed for the visibility and road conditions. Fences, trees, or parked cars may block your view. Allow enough time and distance if you need to stop.
3 Proceed only when you are sure the other vehicle is going to yield, even if you have the right-of-way.
Follow these rules at intersections with no signs or signals:
A
A
A
B
B
B
A
A
A
B
B
B
A yields to B: This intersection has no signs or signals and B is to the right of A.
A yields to B: A would be crossing B’s path and neither is to the right of the other.
YieldTo let others go !rst.

72 Intersections and turns
Chapter 4 Clear Language Driver’s Guide
T intersection
A T intersection is where two roads meet and form a “T”.
At an uncontrolled T intersection, the driver on the right has the right-of-way.
Be careful because the driver going straight through (vehicle A) may think they have the right-of-way.
T intersection with no signs or signalsA yields to B. To be safe, vehicle B must wait until vehicle A gives the right-of-way.
A
A
A
B
B
B
Other intersections
Exits from service roads, alleys, parking lots, and driveways are often uncontrolled.
You must:
• Stop before crossing any sidewalk.
• Stop before crossing or entering a street.
• Yield to pedestrians.
• Be extra careful when you are turning left.
Keep intersections clear Do not enter an intersection until you can completely move through it and the crosswalk on the other side.
Vehicle A is in the proper place.
Vehicle B has blocked the crosswalk.
Vehicles C and D have used poor judgement and have had to stop in the intersection. Cross traf!c has been affected.
Ensure that there is enough space to allow your vehicle to completely clear the intersection and crosswalks before entering.

Intersections and turns 73
Chapter 4 Clear Language Driver’s Guide
3. Traf!c circles and roundabouts Traf!c circles and roundabouts are intersections where roadways meet and form a circle. They are also called circular intersections. They are made to improve safety and traf!c #ow.
Traf!c always moves in a counter-clockwise direction around the centre island. This means you drive in the opposite direction of the hands on a clock, or to your left.
Drivers entering must yield to cars already in the traf!c circle or roundabout.
Traf!c circles and roundabouts are different. Roundabouts have a smaller centre island. They have a tighter curve around the centre to encourage lower speeds. Roundabouts may have a sloped curb to help larger vehicles move through. Pedestrian crossings on roundabouts are placed away from the intersection to make it easier for drivers to see and safer for pedestrians to cross.
Drivers must follow similar rules when using roundabouts or traf!c circles.
One lane traf!c circle or roundabout
Entering and exiting a one lane traf!c circle or roundabout
For a one lane circular intersection, remember these rules:
• Yield to drivers already in the circle.
• As you enter and exit, watch for pedestrians and cyclists at the crosswalks.
• Only enter when it is safe.
• Use your right signal to show you plan to exit.
How to signal
When you want to exit at the !rst available exit:
• Use your right signal as you approach.
• Leave your signal on until you have exited the circle.
When you plan to use any other exit:
• Wait until you pass the exit that is just before the exit you want. Then turn on your right turn signal. This tells other drivers that you plan to leave the circle at the next exit.
Circular intersectionAnother name for a traf!c circle or roundabout.
A one lane circular intersection (traf!c circle or roundabout).

74 Intersections and turns
Chapter 4 Clear Language Driver’s Guide
Two lane traf!c circle or roundabout
Entering and exiting a two lane traf!c circle or roundabout
For a two lane circular intersection, remember these rules:
• Yield to drivers already in the circle.
• As you enter and exit, watch for pedestrians and cyclists at the crosswalks.
• Only enter when it is safe.
• While in the circle, the driver on the right must yield to the driver on the left.
• Use your right signal to show you plan to exit.
• Do not change lanes in the circle.
You can enter and exit a two lane traf!c circle or roundabout from the right lane or the left lane. Use the right lane if you want to use the !rst available exit. Use the left lane if you want to use any other exit.
Using the right lane to enter and exit
If you plan to use the !rst exit, use the right lane:
1 Approach the circle using the right lane.
2 Turn on your right signal as you approach. Leave it on until you exit.
3 As you approach, watch for pedestrians and cyclists at the crosswalk.
4 Yield to traf!c in the circle.
5 Look ahead for pedestrians at the crosswalk where you will be exiting.
6 Exit using the right lane.
Using the left lane to enter and exit
If you plan to travel past the !rst exit, use the left lane:
1 Approach the circle using the left lane.
2 Turn on your left signal to show that you do not plan to use the !rst exit.
3 As you approach, watch for pedestrians and cyclists at the crosswalk.
4 Yield to traf!c in the circle.
5 Turn on your right signal when you pass the exit that is just before the exit you want.
6 Check for traf!c in the right lane that may be continuing around the circle.
7 Look ahead for pedestrians at the crosswalk where you will be exiting.
8 Exit using the left lane.
9 If you cannot stop or exit safely, stay in your lane and travel around the circle again.

Intersections and turns 75
Chapter 4 Clear Language Driver’s Guide
Examples of a two lane traf!c circle or roundabout
Traf!c in the red lanes (white arrows) must yield to traf!c in the yellow lanes (black arrows).
Traf!c entering the circle (grey lanes) must yield to traf!c in the circle (both red and yellow lanes).
Vehicles B and C must yield to vehicle A. Vehicle E must yield to vehicle D, while vehicles F and D may proceed together.
Vehicle H must yield to vehicle G.

76 Intersections and turns
Chapter 4 Clear Language Driver’s Guide
4. Turning Drivers who don’t turn safely cause many collisions. You need to be aware of road signs, traf!c, and pedestrians all at the same time when you are turning. You need to watch carefully and control your vehicle, especially when you are making a turn during busy traf!c times. Remember these points when you turn:
• Yield to pedestrians at crosswalks and intersections.
• Turn into the !rst available traf!c lane, when there is space.
• Do not turn wide.
• Do not use two lanes when you turn.
• After you turn, look well ahead to see where you need to go.
• If a parked vehicle or obstruction is far enough away (at least half a block), complete the turn in the lane behind the vehicle or obstruction. Then, signal and change lanes when it is safe.
Right turns Lanes are not always marked with lines or signs.
A curb lane is the lane next to the curb where vehicles park. Curb lanes are used for turning. When turning right, be sure to turn from a curb lane into a curb lane.
Prepare for a turn in advance.
1 Move into the turning lane at least 15 metres (50 feet) before the intersection.
2 Check your rear-view and side mirrors.
3 Do a shoulder check.
4 Signal and change lanes only when it is safe.
5 Check the street you are turning onto to be sure nothing is blocking the lane you want to use.
6 Check over your right shoulder for approaching cyclists and pedestrians.
7 You must yield the right-of-way to pedestrians and traf!c on the cross street.
When turning right from a two-way road onto another two-way road, stay centred in your turning lane, one metre (3 feet) from the curb or edge of the road. Keep this distance as you approach, while you turn, and as you leave the intersection.
You may turn right at a red light once you have stopped completely at the stop line or crosswalk, unless there is a sign that says turns are not allowed. You cannot go until all pedestrians and traf!c are cleared from your path.
Steps for safe turning
1 Do a shoulder check, signal, and when safe, move into the proper lane.
2 Signal with enough time to warn other drivers and pedestrians.
3 Check oncoming and cross traf!c, and the crosswalk to your left for pedestrians.

Intersections and turns 77
Chapter 4 Clear Language Driver’s Guide
• If it is safe, complete your turn.
• Turn into the !rst available traf!c lane on the right when there is space to gently accelerate and change lanes.
• After you complete the turn, look well ahead along your path.
Parked vehicle
• The !rst available lane you are turning onto may have a parked vehicle or obstruction close to the corner.
• Yield to other vehicles approaching from your left that are travelling in the lane you will enter.
• Turn into the !rst available lane to the left of the parked vehicle when it is clear and safe.
• If a parked vehicle or obstruction is far enough away, complete the turn in that lane behind them.
• Make sure the curb lane is clear of parked vehicles for at least half a block.
• Then change lanes when safe.
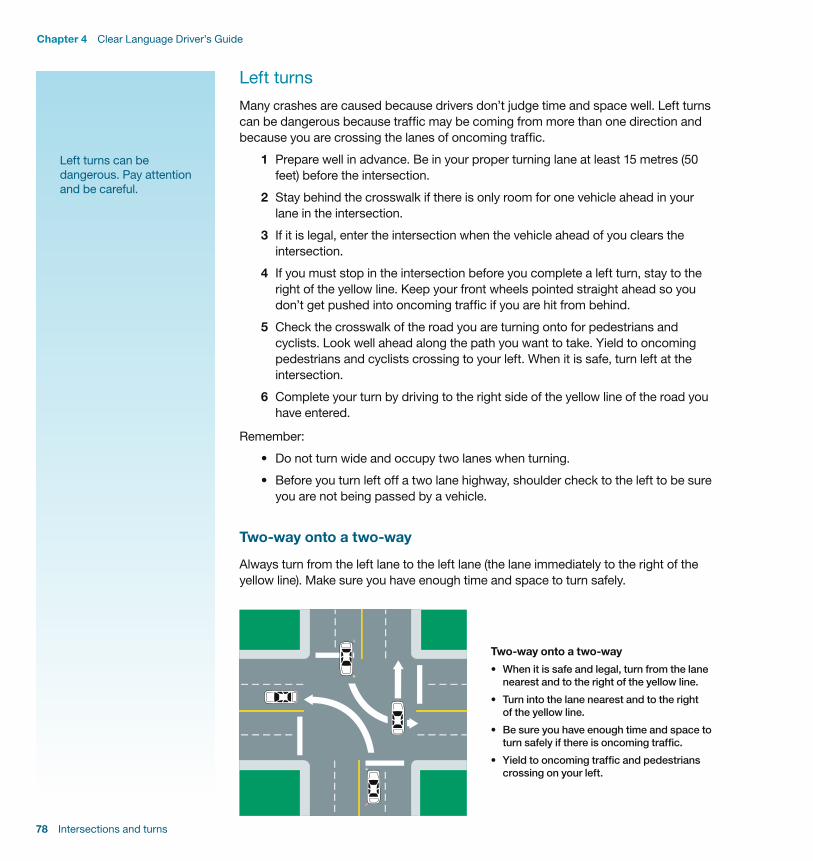
78 Intersections and turns
Chapter 4 Clear Language Driver’s Guide
Left turns Many crashes are caused because drivers don’t judge time and space well. Left turns can be dangerous because traf!c may be coming from more than one direction and because you are crossing the lanes of oncoming traf!c.
1 Prepare well in advance. Be in your proper turning lane at least 15 metres (50 feet) before the intersection.
2 Stay behind the crosswalk if there is only room for one vehicle ahead in your lane in the intersection.
3 If it is legal, enter the intersection when the vehicle ahead of you clears the intersection.
4 If you must stop in the intersection before you complete a left turn, stay to the right of the yellow line. Keep your front wheels pointed straight ahead so you don’t get pushed into oncoming traf!c if you are hit from behind.
5 Check the crosswalk of the road you are turning onto for pedestrians and cyclists. Look well ahead along the path you want to take. Yield to oncoming pedestrians and cyclists crossing to your left. When it is safe, turn left at the intersection.
6 Complete your turn by driving to the right side of the yellow line of the road you have entered.
Remember:
• Do not turn wide and occupy two lanes when turning.
• Before you turn left off a two lane highway, shoulder check to the left to be sure you are not being passed by a vehicle.
Two-way onto a two-way
Always turn from the left lane to the left lane (the lane immediately to the right of the yellow line). Make sure you have enough time and space to turn safely.
Two-way onto a two-way• When it is safe and legal, turn from the lane
nearest and to the right of the yellow line.
• Turn into the lane nearest and to the right of the yellow line.
• Be sure you have enough time and space to turn safely if there is oncoming traf!c.
• Yield to oncoming traf!c and pedestrians crossing on your left.
Left turns can be dangerous. Pay attention and be careful.

Intersections and turns 79
Chapter 4 Clear Language Driver’s Guide
Two-way onto a one-way
Turn from the lane nearest the yellow line. Turn into the !rst available lane on the left side of the road. Be sure that the left curb lane is clear.
Two-way onto a one-way• When it is safe and legal, turn from the lane
nearest the yellow line.
• Turn into the !rst available lane on the left side of the road.
• Yield to oncoming traf!c and pedestrians crossing to your left.
One-way onto a two-way
Turn from the lane nearest the left side of the road. Turn into the nearest lane to the right of the yellow line.
One-way onto a two-way• When it is safe and legal, turn from the lane
nearest the left side of the road.
• Turn into the nearest lane to the right of the yellow line.
• Yield to pedestrians to your left.

80 Intersections and turns
Chapter 4 Clear Language Driver’s Guide
One-way onto a one-way
When the light is red, come to a complete stop at the line or crosswalk. If there are no signs that say turns are not allowed, you may turn left on the red light from a one-way to a one-way. Turn from the lane nearest the left side of the road. Only proceed if it is safe.
One-way onto a one-way• When it is safe and legal, turn from the lane
nearest the left side of the road. Turn into the lane nearest to the left side of the road. Yield to pedestrians crossing to your left.
• If the light is red, you must !rst come to a full stop at the stop line or crosswalk. Then if it is safe and there are no signs that say turns are not allowed, you may turn left from a one-way to a one-way.
• These rules also apply to dual lane turns.
Turning lanes Some lanes are only turning lanes. As you approach an intersection, always check the signs and pavement markings. Make sure you are in the correct lane to turn or go straight ahead.
Dual turn lanes
When turning right or left, where dual turn lanes are shown by markings or signs, choose one of the marked lanes and turn into the corresponding lane.
Dual lane turns
Dual lanesWhere two lanes of traf!c run side-by-side going the same direction.
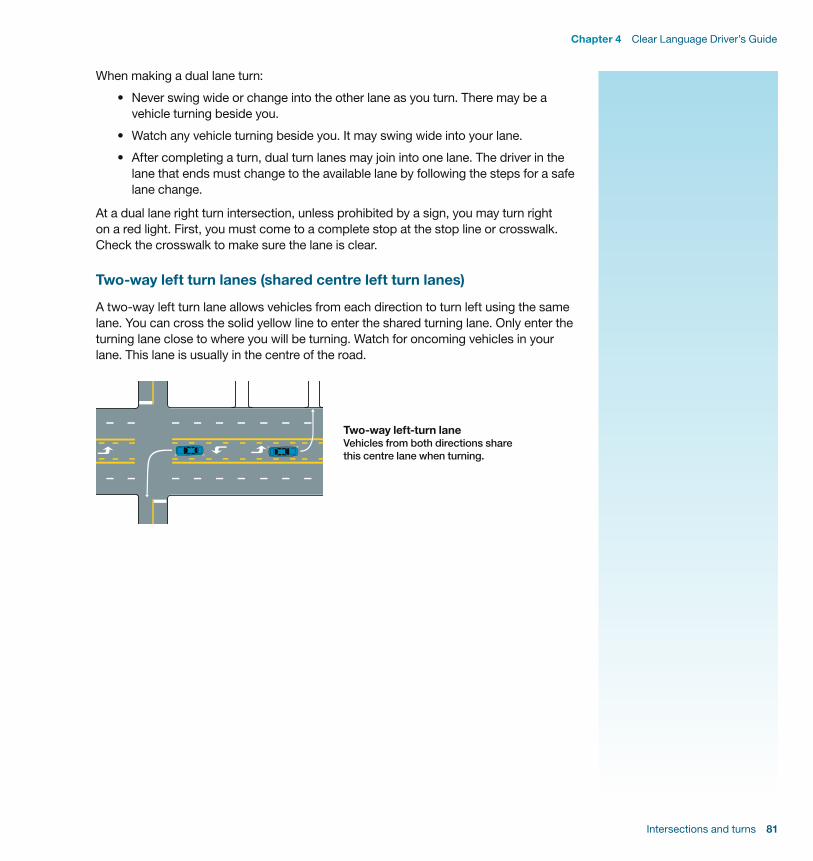
Intersections and turns 81
Chapter 4 Clear Language Driver’s Guide
When making a dual lane turn:
• Never swing wide or change into the other lane as you turn. There may be a vehicle turning beside you.
• Watch any vehicle turning beside you. It may swing wide into your lane.
• After completing a turn, dual turn lanes may join into one lane. The driver in the lane that ends must change to the available lane by following the steps for a safe lane change.
At a dual lane right turn intersection, unless prohibited by a sign, you may turn right on a red light. First, you must come to a complete stop at the stop line or crosswalk. Check the crosswalk to make sure the lane is clear.
Two-way left turn lanes (shared centre left turn lanes)
A two-way left turn lane allows vehicles from each direction to turn left using the same lane. You can cross the solid yellow line to enter the shared turning lane. Only enter the turning lane close to where you will be turning. Watch for oncoming vehicles in your lane. This lane is usually in the centre of the road.
Two-way left-turn lane Vehicles from both directions share this centre lane when turning.

82 Intersections and turns
Chapter 4 Clear Language Driver’s Guide
U-turns A U-turn is done by turning your vehicle around at an intersection to go in the opposite direction. Do not make a U-turn unless it is legal and safe.
U-turns are not allowed:
• At an intersection controlled by traf!c lights unless permitted by a traf!c control device
• At an intersection that has a no U-turn sign
In urban areas you cannot make a U-turn:
• On a roadway between intersections
• At an alley intersection
• At an intersection where one or more of the roadways is used by vehicles to access a public or private parking lot.
Outside urban areas you cannot make a U-turn:
• On a curve
• Near the bottom or top of a hill, where another driver cannot see you from 150 metres in either direction
This sign means U-turns are not allowed.

Intersections and turns 83
Chapter 4 Clear Language Driver’s Guide
De!nitions
Circular intersection – see traf!c circle or roundabout.
Controlled intersection – an intersection with traf!c control lights or signs.
Courtesy corner – an intersection with stop signs on all corners. Drivers stop, then let the vehicle that arrives !rst, go !rst. If two vehicles arrive at the same time, drivers let the vehicle on the right go !rst.
Crosswalk – a section of road that pedestrians use to cross from one side to the other. Marked with white painted lines and sometimes with overhead #ashing lights. Drivers must stop for pedestrians at crosswalks.
Dual lanes – where two lanes of traf!c run side-by-side going the same direction.
Intersection – where two or more roads meet.
Pedestrian – a person who is travelling on foot. A person who is walking beside and pushing a bicycle is also a pedestrian.
Right-of-way – the right to go !rst. Drivers may have to yield the right-of-way to another driver or a pedestrian.
Roundabout – see traf!c circle or roundabout.
T intersection – an intersection where two roadways meet and form a “T”.
Traf!c circle or roundabout – an intersection where roadways meet and form a circle. Traf!c goes in a counter-clockwise direction around a centre island. Also called a circular intersection.
Uncontrolled intersection – an intersection with no traf!c control lights or signs.
U-turn – turning your vehicle around at an intersection to go the opposite way.
Yield – let others go !rst.

84 Intersections and turns
Chapter 4 Clear Language Driver’s Guide
Notes

Highway driving
5

86 Highway driving
Chapter 5 Clear Language Driver’s Guide
Chapter 5 Highway driving 1. Entering and exiting 87
Merging – joining moving traf!c 87Right-of-way 87How to merge safely 88Exiting a highway 89Weave zones 89
2. Lane selection and position 90Changing lanes 90Safe lane changing steps 91
3. Passing 91Passing lanes 91Passing on a two lane highway 92Passing on a multi-lane highway 93
4. Curves 93
5. Hills 94
6. Emergency stopping lane 94
De!nitions 95

Highway driving 87
Chapter 5 Clear Language Driver’s Guide
Chapter 5 Highway driving When you drive on a highway, you have to move your vehicle in lanes of high speed traf!c. You need to concentrate, make good decisions and have complete control of your vehicle.
Before you drive on a highway, learn how to enter, exit, pass, and change lanes safely.
1. Entering and exiting
Merging – joining moving traf!c To enter most highways, you must merge with traf!c travelling at a higher speed. The merge lane allows drivers to get up to highway speed. Highway drivers must cooperate and make space for those merging.
When you are merging, drivers behind you expect you to keep moving ahead. If you slow down or stop, you may be hit from behind.
To merge safely, you need to be a good judge of speed, distance, and timing.
Right-of-wayNeither the merging vehicle or the ones already on the highway have the right-of-way. Merging is a shared responsibility between the vehicles joining and those already on the highway.
Merging is a shared responsibility When driving on a highway, make space for other vehicles to enter.
Highways are also called freeways or motorways.

88 Highway driving
Chapter 5 Clear Language Driver’s Guide
How to merge safely1 Plan and time your approach to merge with traf!c without suddenly slowing down
or stopping.
2 Check the traf!c #ow as soon as you see your merge lane.
3 Find a space in the traf!c. Keep checking the space and begin adjusting your speed and timing as needed.
4 Turn on your signal light before you enter traf!c and keep it on while you are accelerating.
5 Accelerate to the speed of the traf!c.
6 Keep shoulder checking and looking in your rear-view mirror. Watch the space.
7 When it is safe and legal, after you are past the solid white line on the acceleration lane, move into the space.
8 Maintain your speed at or near that of others.
9 Turn off your signal light.
10 Maintain a safe, legal speed.
TRAFFIC FLOW
ADJUST TO HIGHWAY SPEED IN ACCELERATIONLANE
DO NOT ENTER HIGHWAY HERE ATA SHARP ANGLE
SIGNAL AND MOVE CAREFULLYINTO HIGHWAY LANE
BE PREPARED TO ADJUST SPEED WHEN APPROACHINGMERGING AREA
WRONG
Correct and incorrect method for merging.
RememberIf you are on the main roadway, and traf!c is merging, move left to the next lane if it is safe. This leaves the right travel lane clear for the merging vehicles to enter.

Highway driving 89
Chapter 5 Clear Language Driver’s Guide
Exiting a highwayFollow these steps to exit a highway safely:
1 Plan ahead. Be in the proper lane before you reach the exit.
2 Use your turn signal well in advance to alert the drivers behind you.
3 Move into the deceleration lane if there is one. If possible, do not slow down until you are in the deceleration lane.
4 When you have exited, turn off your signal light.
If you miss your exit, do not stop. Never stop and reverse on the highway, the emergency stopping lane or shoulder. Continue to the next exit and plan how to return to your route.
Correct (safe) and incorrect (unsafe) ways to exit a highway.
CHECK POSTEDSAFE SPEED FOR RAMP
DO NOT SLOWDOWN HERE
DO NOT MAKE LAST MINUTETURN-OFFWRONG
TRAFFIC FLOW
SLOW DOWN AFTER TURNINGINTO DECELERATION LANE
Weave zones Sometimes different drivers use the same lane to exit and enter a highway. The area they share is called a weave zone. In a weave zone, drivers must be careful and cooperate with each other. Vehicles share the same lane to slow down for the exit, while other vehicles are using it to increase speed to enter the highway.
Vehicles will cross paths in a weave zone. Control your speed and the timing of lane changes to merge. This requires skilful use of time and space.
Be careful in these zones so that you and other drivers can exit and enter highways safely.
Vehicles will cross paths in a weave zone.
DecelerateTo slow down.

90 Highway driving
Chapter 5 Clear Language Driver’s Guide
2. Lane selection and position Most major roadways and highways are divided into lanes with painted lines. The lines show where you should travel and the rules you should follow. White lines are for traf!c moving in the same direction. Yellow lines separate traf!c moving in the opposite direction.
Choose the lane that best meets your needs for safely getting to your destination. Stay in the centre of that lane. Plan ahead. Do not leave lane changes to the last minute.
Changing lanes Because of blind spots, you must do shoulder checks and mirror checks before changing lanes.
A proper shoulder check requires a quick glance back over your shoulder, in the direction you want to move. If you want to move left, look over your left shoulder. If you want to move right, look over your right shoulder. You can now see the area that you can’t see in your mirrors.
If you cannot see out of your backseat side windows or a back rear window, you will need to attach an additional convex mirror to your outside mirrors, which will show a wider area.
Once you have fully checked the traf!c all around and you know it is safe, you can change lanes.
Using the left outside mirror, the driver of vehicle A can see vehicle C.
Using the inside rear-view mirror, the driver of vehicle A can see vehicle B.
B A
Using both outside mirrors and inside rear-view mirror, the driver of vehicle A can see vehicles B, C and D. The driver of vehicle A cannot see vehicles E and F, either in the mirrors or through peripheral (side) vision. Vehicles E and F are in vehicle A’s blind spots.The red shading shows the blind spots for driver A.
Beware of blind spots Always shoulder check before changing lanes.
Convex mirrorA mirror with a curved surface. You can see more with a convex mirror than you can with a #at mirror.

Highway driving 91
Chapter 5 Clear Language Driver’s Guide
Safe lane changing steps1 Make sure you are allowed to change lanes.
2 Check for traf!c by glancing in your side and rear-view mirrors.
3 Shoulder check to be sure your blind spots are clear.
4 Turn on your signal light.
5 If safe, change lanes while keeping the same speed.
6 Turn off your signal light.
3. Passing It is against the law to go over the speed limit when you pass. It is also illegal and unsafe to pass when:
• Oncoming traf!c is too close.
• You don’t think you can pass safely.
• There is a solid yellow line on your side of the centre line.
• You are in a no passing zone.
• You are in a school or playground zone.
• You are driving on a curve of a two lane highway.
• Another vehicle is stopped to allow a pedestrian to cross.
• A school bus has stopped. It will have #ashing red lights and the STOP arm will be extended.
Passing lanes Sometimes a passing lane is added to a highway where there are steep hills, often in mountainous areas. Slower traf!c can move into the right hand lane, allowing faster vehicles to pass safely. There will be signs posted to let drivers know there is a passing lane ahead and what distance it covers.
Signs will also be posted to warn that the passing lane is ending. When the end of the passing lane is near, drivers in the right lane must merge safely with traf!c to the left. Drivers in the left lane must cooperate with drivers from the right lane.
See Chapter 8 Sharing the Road for more on school bus safety.
A passing lane lets other vehicles pass safely.
RememberIt is against the law to go over the speed limit when you pass.

92 Highway driving
Chapter 5 Clear Language Driver’s Guide
Passing on a two lane highway On a two lane highway with one lane of traf!c in each direction, passing another vehicle can be dif!cult and dangerous. Errors in judgement can cause head-on collisions and deaths.
Make sure you can see clearly far enough ahead before passing on a two lane highway. Many things can make it dif!cult for drivers to see well including:
• Sunlight • Dust • Rain or snow • Other vehicles • Hills and curves
Be very careful and only pass if you need to and it is legal. Never pass while you are driving on a curve of a two lane highway. It is illegal and unsafe.
Follow these steps if you must pass on a two lane highway:
1 Keep a safe distance behind the vehicle you are planning to pass.
2 Pass only when there is a safe distance between you and any traf!c coming your way. Leave enough room and time.
3 Check your side and rear-view mirrors.
4 Shoulder check left to make sure other vehicles are not passing you.
5 Turn on your left signal light.
6 Check again that there is no oncoming traf!c for a safe distance before you attempt to pass.
7 Do not go over the speed limit when you pass. It is illegal.
8 When you can see the vehicle you passed in your rear-view mirror, do a shoulder check to the right.
9 Turn on your right signal light.
10 Return to your original lane, while maintaining your speed.
11 Turn your signal light off.
When another vehicle passes you on a two lane highway, help the other driver by staying in your lane. Move to the right side of your lane to give the other driver a better view of the road ahead.
Pass only when it is permitted, safe and you can see clearly.
Passing on a two lane highway.
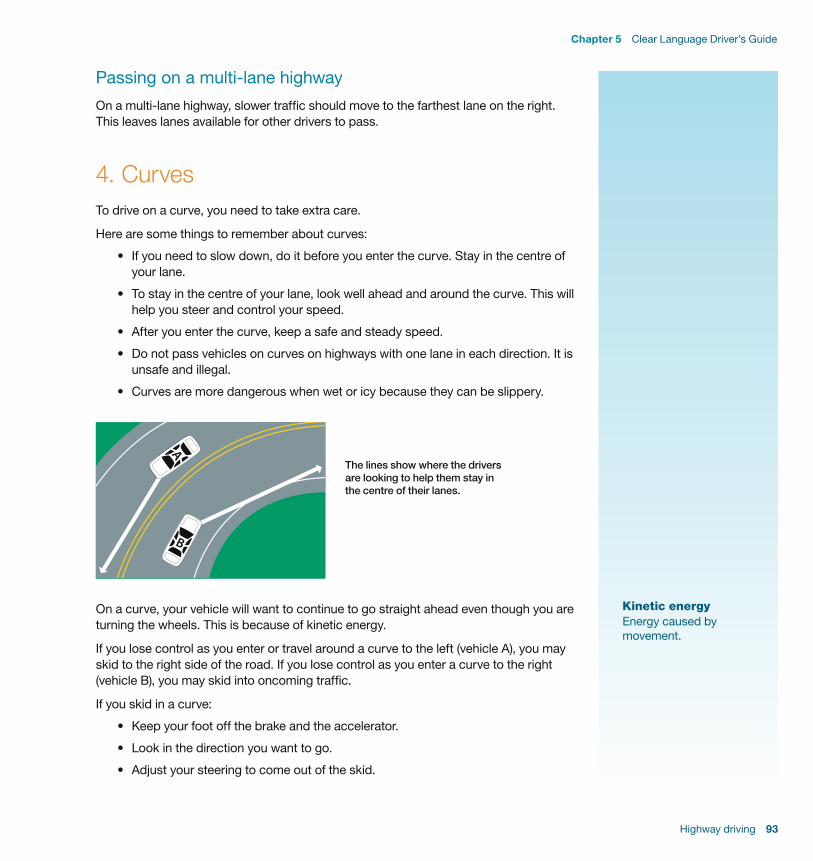
Highway driving 93
Chapter 5 Clear Language Driver’s Guide
Passing on a multi-lane highwayOn a multi-lane highway, slower traf!c should move to the farthest lane on the right. This leaves lanes available for other drivers to pass.
4. CurvesTo drive on a curve, you need to take extra care.
Here are some things to remember about curves:
• If you need to slow down, do it before you enter the curve. Stay in the centre of your lane.
• To stay in the centre of your lane, look well ahead and around the curve. This will help you steer and control your speed.
• After you enter the curve, keep a safe and steady speed.
• Do not pass vehicles on curves on highways with one lane in each direction. It is unsafe and illegal.
• Curves are more dangerous when wet or icy because they can be slippery.
The lines show where the drivers are looking to help them stay in the centre of their lanes.
B
A
On a curve, your vehicle will want to continue to go straight ahead even though you are turning the wheels. This is because of kinetic energy.
If you lose control as you enter or travel around a curve to the left (vehicle A), you may skid to the right side of the road. If you lose control as you enter a curve to the right (vehicle B), you may skid into oncoming traf!c.
If you skid in a curve:
• Keep your foot off the brake and the accelerator.
• Look in the direction you want to go.
• Adjust your steering to come out of the skid.
Kinetic energyEnergy caused by movement.

94 Highway driving
Chapter 5 Clear Language Driver’s Guide
5. HillsTo drive on a hill, you need to take extra care.
When you go up a hill:
• Be careful and move to the right side of your lane when you are close to the top of the hill. This helps keep you from being hit by an oncoming vehicle that has crossed over the centre line into your lane.
• Do not pass near the top of a hill on a two lane highway, as you cannot see what is ahead of you.
When you go down a hill:
• If the hill is very steep, adjust your speed. It takes longer to stop when going down a hill.
• If your vehicle has a manual transmission, you can shift to a lower gear to help stop your brakes from overheating.
6. Emergency stopping lane The part of a primary highway that is between the edge of the roadway and the !rst lane driving lane is for drivers who need to make an urgent stop or have car problems. This lane is sometimes called the shoulder.
Do not drive in the emergency stopping lane. Do not use this lane to pass. Do not move into this lane to let another vehicle pass you.
Emergency stopping lanes are found on each side of the lanes of travel on a primary highway.
Emergency Stopping
Lane
Emergency Stopping
Lane

Highway driving 95
Chapter 5 Clear Language Driver’s Guide
De!nitions
Convex mirror – a mirror with a curved surface. You can see more with a convex mirror than you can with a #at mirror.
Decelerate – to slow down.
Kinetic energy – energy caused by movement.
Merging – joining moving traf!c.
Weave zone – an area on a highway where drivers use the same lane to exit and enter. Drivers need to be careful in a weave zone because some vehicles are slowing to exit while others are speeding up to enter.

96 Highway driving
Chapter 5 Clear Language Driver’s Guide
Notes

Challenging road conditions and emergencies
6

98 Challenging road conditions and emergencies
Chapter 6 Clear Language Driver’s Guide
Chapter 6 Challenging road conditions and emergencies 1. Emergency supplies 99
2. Mechanical breakdowns 99Brake failure 100Power steering problems 100Tire failure 100Headlight failure 101
3. Emergency braking 101If your vehicle has ABS brakes 101If your vehicle does not have ABS brakes 102
4. Skid control 102Skid recovery 103Braking skid (non-ABS) 103Power (acceleration) skid 103Cornering skid 104
5. Off-road recovery 104
6. Environmental challenges 104Rain and hydroplaning 105Smoke and fog 105Glare 105Winter conditions – ice and snow 105Black ice 106
7. Bridges, overpasses, and shaded areas 107
8. Night driving 107
9. Animals 108
10. Collisions 108
11. Emergency and maintenance vehicles 109
12. Stopping for law enforcement 110
De!nitions 111

Challenging road conditions and emergencies 99
Chapter 6 Clear Language Driver’s Guide
Chapter 6 Challenging road conditions and emergencies Even when you follow the law and drive safely, many things can make driving dangerous. These may be mechanical problems, weather and road conditions, or the way others are driving.
Plan ahead so you can handle dif!cult conditions and emergencies on the road.
1. Emergency suppliesKeep these emergency supplies in your car at all times:
• First aid kit
• Approved warning devices like re#ective triangles
• Booster cables
• Non-perishable food and drink
• Jack and in#ated spare tire
• Flashlight with extra batteries
• Towrope
• Headlight bulbs
2. Mechanical breakdowns Keep your vehicle working properly. Check your owner’s manual for the service schedule. If your vehicle breaks down while you are driving, it can be dangerous.
If you have to stop because of a mechanical problem, remember these steps:
1 If possible, change lanes and park safely. Do not stop on a bridge or in a tunnel.
2 If the vehicle is left in a potentially dangerous location, turn on your hazard lights.
3 Raise your hood, if it is safe. Then move away from vehicle.
4 When it is safe, place your re#ective triangles behind your vehicle, about 10 to 20 metres (33 to 66 feet) apart.
Always use your hazard lights to warn others of your problems.
Hazard lightsThe #ashing lights on a vehicle that warn other drivers of hazards, emergencies, sudden stops, and collisions. Also called four-way #ashers.

100 Challenging road conditions and emergencies
Chapter 6 Clear Language Driver’s Guide
Do not repair your vehicle on crowded or fast-moving roadways.
If there is danger, move everyone out of the vehicle to a safe location behind and off to the vehicle’s side. If another driver stops to offer help, ask them to call for assistance.
Move away from the vehicle while waiting for help.
DO NOT WAITIN THIS AREA
Brake failureMost vehicles come with a brake warning system to protect you against total brake failure. When you see the brake warning light come on, !rst check that the park brake has been released. If there is still a problem, move safely to the side of the road.
If you have power brakes, they could fail if your engine stops while you are moving. If the car does not slow with normal braking pressure, push the brake pedal harder and apply steady pressure.
If your brakes fail while you are driving slowly, carefully ease up on the accelerator and try to use your park brake to slow down. You may also be able to shift to a lower gear to help make a safe and controlled stop.
Leave your car in a safe location. Do not drive until the brakes have been checked and repaired. Check your vehicle owner’s manual for more information.
Power steering problemsIf your power steering fails, you can still use the steering wheel. It will take extra effort to turn the steering wheel.
Tire failure If a tire has an air leak, you may feel the vehicle begin to pull and vibrate through the steering wheel. If this air leak is not sealed, the tire will go #at. When a front tire is #at, the vehicle will pull strongly in the direction of the #at. A #at rear tire may make your vehicle move from side to side. It can be harder to steer.
If you have a brake problem, do not drive until the brakes have been repaired.

Challenging road conditions and emergencies 101
Chapter 6 Clear Language Driver’s Guide
If a tire goes #at while you are driving, follow these steps:
1 Do not apply the brakes right away.
2 Take your foot off the gas pedal and allow the engine to slow you down.
3 Hold the steering wheel with a !rm grip, keeping the vehicle on a straight course. Look and steer in the direction you want to go.
4 When you have control of your vehicle and you have reduced your speed, gently push the brake pedal with steady pressure.
5 Move to the emergency stopping lane or the edge of the road. Park in a safe place.
6 Turn on your hazard lights.
Always check and maintain all four tires and the spare.
Headlight failure Always check your headlights before travelling. Keep extra bulbs with you. Review the owner’s manual on how to change them.
If both headlights fail, follow these steps:
1 Turn on your hazard lights.
2 Turn the headlight control off and on to see if they come back on.
3 If they don’t come back on, slow down and move to the emergency stopping lane or edge of the road. Park in a safe place.
Replace a headlight or headlight bulb as soon as it is not working. Driving with only one headlight is a risk to you and others.
3. Emergency braking There are times when something unexpected happens and you need to brake suddenly. You need to stop the vehicle as quickly as possible without losing control of your vehicle.
If your vehicle has ABS brakesAn anti-lock braking system (ABS) allows you to steer while braking. ABS applies brake pressure at each wheel, switching back and forth between locked to slightly rolling. This creates a vibration through the brake pedal. You can brake very !rmly and still steer.
ABSAnti-lock braking system.

102 Challenging road conditions and emergencies
Chapter 6 Clear Language Driver’s Guide
To brake in an emergency, follow these steps:
1 Apply a steady !rm pressure to the brake pedal.
2 Do not pump or release the brake pedal.
3 Look and steer in the direction you want to go.
Check your vehicle owner’s manual for more information on emergency braking and brake care.
If your vehicle does not have ABS brakesIn a vehicle without ABS brakes, if you press the brake pedal too !rmly the wheels will stop rolling and lock. If your wheels lock, your car may skid and you could lose control of your steering. If your wheels lock, ease off the brake pedal. Slightly brake again, but not as !rmly.
To brake in an emergency, follow these steps:
1 Press !rmly on the brake pedal to the point just before the wheels lock (threshold braking).
2 If the wheels lock, release the brake pedal slightly to regain steering control.
3 Press the brake pedal !rmly again, without locking the wheels.
4 Look and steer in the direction you want the front of the vehicle to go.
4. Skid control Always drive smoothly and with control to lower your risk of skidding. Skidding is when you lose control of your vehicle and it slides.
Skidding can be caused by the road surface, vehicle speed, turning, and tire conditions. Plan and look ahead so you don’t have to brake suddenly or steer sharply. If you are not familiar with the road or the conditions are not ideal, slow down.
Skids can happen when you:
• Drive too quickly on poor road conditions like ice, snow, rain, mud, sand, or gravel
• Turn the steering wheel too sharply
• Turn the steering wheel too much for your speed
• Accelerate too quickly
• Brake too !rmly
Reduce speed to increase control.
Most skids are due to poor driving.
SkidWhen you lose control of your vehicle and it slides.

Challenging road conditions and emergencies 103
Chapter 6 Clear Language Driver’s Guide
Skid recoveryIt is very important to keep your foot off the brake pedal if you start to skid.
How you steer depends on the direction of the skid. Look and steer in the direction you want the front of the vehicle to go.
Do not make large steering adjustments. Point the tires along the centre of your lane.
Look and steer in the direction you want the front of the vehicle to go. Note the position of the front tires (in red).
A
A A
Braking skid (non-ABS)If your vehicle does not have anti-lock brakes, you may skid when you press your brakes too !rmly, causing your wheels to lock. You will not be able to steer the vehicle.
If you skid when you brake:
1 Take your foot off the brake pedal. When your vehicle’s wheels start to roll, you will be able to steer again.
2 Look and steer in the direction you want the front of the vehicle to go.
3 If you need to apply the brakes again, use !rm pressure but not enough to lock the wheels.
Power (acceleration) skidA power skid happens when you accelerate too quickly and your wheels spin.
If you skid when trying to speed up:
1 Take your foot off the gas pedal to stop the wheels spinning.
2 Correct your steering if you need to. Look and steer in the direction you want the front of your vehicle to go.
3 Be careful not to over-correct your steering or you may skid in the opposite direction.
4 Use gentle acceleration to continue moving forward.

104 Challenging road conditions and emergencies
Chapter 6 Clear Language Driver’s Guide
Cornering skidA cornering skid can happen when you turn too quickly and make your vehicle slide sideways. Speed, tire condition, road surface, and the slope of the road can make you more likely to skid.
If you skid when turning a corner:
1 Take your foot off the gas pedal. Do not use your brakes.
2 Look and steer in the direction you want the front of your vehicle to go.
5. Off-road recovery If you drive off the paved portion of the roadway, follow these steps to recover:
1 Keep a !rm grip on the steering wheel.
2 Do not try to steer the vehicle back onto the road immediately.
3 Take your foot off the gas pedal to reduce your speed.
4 Avoid braking. If you need to brake, use gradual pressure to keep control.
5 When you are able, turn on your signal light and emergency #asher to warn others.
6 Check for traf!c and signal before you begin to steer the vehicle back onto the road.
7 Steer back onto the road slowly and move into the proper travel lane.
8 Return to normal driving and control your speed.
Gradual return to the roadway.
A
AA
A
6. Environmental challengesWhen driving conditions are poor, due to weather, reduced visibility, or road dangers, slow down and allow more time for your trip.
Leave more space between you and the car in front. Slow down and keep a space cushion.
Space cushionYou have a space cushion when you leave enough space between you and other vehicles to stop safely or move around a hazard. You leave space ahead, behind, and on both sides of your vehicle.
Challenging road conditions and emergencies 105
Chapter 6 Clear Language Driver’s Guide
Rain and hydroplaningWhen you are driving in wet conditions, your tires may lose contact with the road surface. This is called hydroplaning. This can make you lose control of your vehicle.
• Slow down, but do not brake or you may skid.
• Release pressure on the accelerator to allow the vehicle to slow down.
• Look and steer where you want to go.
When it is raining, use low beam headlights. High beams re#ect the light back to you, creating glare. High beams can also make it dif!cult for other drivers to see.
You could be sprayed with water and mud, making it dif!cult to see. Keep your windshield clean and washing #uid !lled up. Be careful not to splash others.
Smoke and fog When you drive through smoke and fog, use low beam headlights. High beams re#ect the light back to you, creating glare. If you can’t see well enough to drive safely, slow down and move to a safe place well off the road.
If you must stop in an unsafe place, move everyone to a safe location away from the car in case it is hit. Turn on your hazard lights. Do not drive until you can see properly and it is safe.
GlareGlare from the sun, re#ections, and the lights of other vehicles can affect your vision in the daytime or at night. If glare makes it dif!cult to see the road, reduce your speed. Keep your vehicle’s windows clean inside and outside to reduce glare.
Winter conditions – ice and snowWinter driving requires special care, attention and preparation. Weather conditions during the colder months can make driving very dangerous.
Winter weather dangers
Winter weather brings:
• Freezing rain
• Very cold temperatures
• Icy surfaces and black ice
• Blizzards and blowing snow
• Heavy snowfall
• High wind chill

106 Challenging road conditions and emergencies
Chapter 6 Clear Language Driver’s Guide
Winter emergency supplies
In addition to your regular emergency kit, keep these supplies in your car:
• Blankets and extra warm clothing
• Sand, road salt, or cat litter
• Shovel
• Heat source such as a candle in a container and matches
• Ice scraper and snowbrush
• Tire chains
Winter driving tips
• Get your vehicle serviced for winter conditions. Be sure that your vehicle’s battery, tires, exhaust system, windshield wipers, and heating system are in good working condition. Make sure your engine coolant (anti-freeze) is rated for the lowest possible temperature.
• Intersections may become icy more quickly due to vehicle exhaust, engine heat, and vehicles spinning their wheels or skidding. Allow more time and distance to stop and start. The most important thing is to slow down.
• Be careful when the temperature rises to the point where the snow begins to melt. Roads can become very slippery. When the frost comes out on the surface, a thin layer of water is formed, making it slippery.
• Do not use cruise control in poor weather and road conditions. Cruise control makes your vehicle accelerate and you could skid, spin, or lose control.
• Make sure there is no snow, frost, steam, mud, or anything else on your windshield. It is dangerous to drive if you can’t see clearly.
• If you are stranded off the highway and your vehicle is in a safe place, it is usually safer to stay with your vehicle. Run the engine just enough to stay warm. When the engine is running, open a window a little to let outside air into your vehicle. The air #ow will help prevent carbon monoxide poisoning. Carbon monoxide is a poisonous gas that is colourless, odourless, and tasteless, so it is very dangerous.
Black iceBlack ice is caused by moisture freezing directly on the road surface. Often you cannot see it. However, if the asphalt looks shiny and black instead of grey-white, be careful and reduce your speed without braking.
Some provinces and territories require winter tires or chains on tires for extra grip during the winter months.
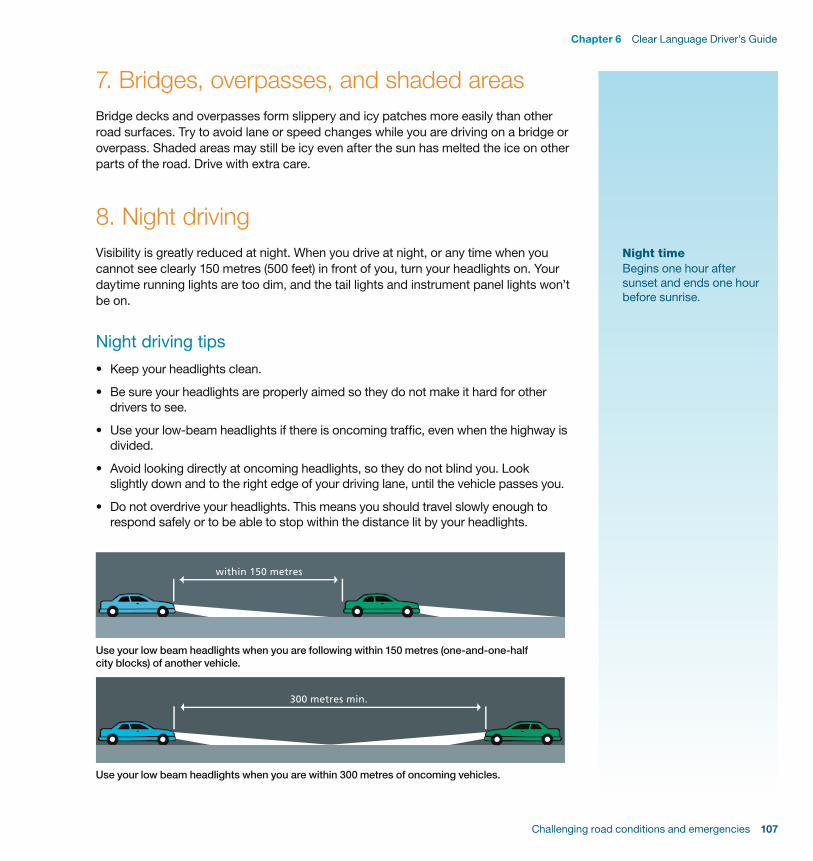
Challenging road conditions and emergencies 107
Chapter 6 Clear Language Driver’s Guide
7. Bridges, overpasses, and shaded areasBridge decks and overpasses form slippery and icy patches more easily than other road surfaces. Try to avoid lane or speed changes while you are driving on a bridge or overpass. Shaded areas may still be icy even after the sun has melted the ice on other parts of the road. Drive with extra care.
8. Night driving Visibility is greatly reduced at night. When you drive at night, or any time when you cannot see clearly 150 metres (500 feet) in front of you, turn your headlights on. Your daytime running lights are too dim, and the tail lights and instrument panel lights won’t be on.
Night driving tips• Keep your headlights clean.
• Be sure your headlights are properly aimed so they do not make it hard for other drivers to see.
• Use your low-beam headlights if there is oncoming traf!c, even when the highway is divided.
• Avoid looking directly at oncoming headlights, so they do not blind you. Look slightly down and to the right edge of your driving lane, until the vehicle passes you.
• Do not overdrive your headlights. This means you should travel slowly enough to respond safely or to be able to stop within the distance lit by your headlights.
Use your low beam headlights when you are following within 150 metres (one-and-one-half city blocks) of another vehicle.
Use your low beam headlights when you are within 300 metres of oncoming vehicles.
Night timeBegins one hour after sunset and ends one hour before sunrise.
108 Challenging road conditions and emergencies
Chapter 6 Clear Language Driver’s Guide
9. Animals Each year drivers and animals are injured or killed due to collisions. Watch for signs warning of animals crossing. Slow down and look well ahead. Scan the sides of the roads for movement. Remember animals often travel in groups.
Be careful at sunrise and sunset when animals are most active. At night, your lights may blind animals making them stay in one position. Watch for your headlights re#ected in animals’ eyes. Be ready to take action to avoid animals, if it is safe.
If you come across an animal on the road:
• Brake and prepare to stop.
• Plan to avoid the animal, if it is safe.
• Choose an escape route away from oncoming traf!c.
10. CollisionsA collision is when a vehicle hits another vehicle or something on the roadway such as an animal.
If you are the !rst person at the scene of a collision, stop away from it in a safe place. Offer to help if possible. Prevent other vehicles from becoming involved by using #ashing hazard lights and warning triangles. If needed, call 911 for the police, an ambulance, or other emergency help. Make sure to give correct information about the collision, especially about injured people and the location.
If you are in a collision, help where you can, protect the scene, and call 911 if needed.
It is important to get details from other drivers.
• Get the licence plate numbers of all vehicles involved.
• Exchange names, contact information, and insurance details.
• Record the names and contact information of all witnesses.
• Do not discuss who was at fault.
• Record the time, location, weather, and any other details that may be important. Take photos as additional proof.
• Notify your insurance company as soon as possible.
You are required to report all collisions to the police or local law enforcement if:
• Anyone has been injured or killed, or
• Overall damages are more than $2,000
If you cause any damage to a traf!c control device, a parking meter, or any public property, immediately report it to the police.
Call 911 for emergency help.
If police are called, all drivers must remain at the scene.

Challenging road conditions and emergencies 109
Chapter 6 Clear Language Driver’s Guide
If you hit an unattended vehicle, notify the owner of any damage and provide your contact details. If you are unable to locate the owner, write your name, address, driver’s licence number, vehicle plate number and phone number on a piece of paper and securely attach it to the other vehicle. Record their licence plate details.
11. Emergency and maintenance vehiclesServices that respond to highway problems include:
• Law enforcement (police, RCMP and sheriffs)
• Ambulance
• Fire!ghters
• Towing
There may also be road construction or maintenance works on site.
When an ambulance, !re, or police emergency vehicle is approaching from any direction sounding a siren, you must yield the right-of-way.
• Safely move your vehicle to allow the emergency vehicle passage.
• Drive as closely as possible to the right curb or edge of a two-way roadway.
• Move right or left to the nearest curb on one-way streets.
• Stop until the emergency vehicle has passed. Check that no other emergency vehicles are approaching.
Do not follow an emergency vehicle any closer than 150 metres (500 feet).
If you see a vehicle with #ashing green lights, treat it like any other emergency vehicle. It might be volunteer !re!ghters.
Road maintenance and construction vehicles can use or park on any portion of the road. Signs and #ashing lights will warn you. Signs will be posted well before a construction zone warning you of a lane reduction, closure, or workers ahead. Obey all traf!c control devices and #ag persons.
Road incidents may cause the lanes to be blocked or narrowed. Flashing lights from emergency vehicles will warn you of a problem ahead. Traf!c collisions, broken down cars, spilled cargo, and highway maintenance or construction may require you to change speed, change lanes, or come to a stop.
Drivers must reduce speed to 60 km/h or the posted speed, whichever is lower, when passing emergency vehicles or tow trucks that are stopped with their lights #ashing. This law applies to the lane(s) immediately next to the stopped vehicles. The !ne for speeding in these areas is double the normal amount.
If you are not in the lane next to the stopped vehicles, you still need to be watchful and cautious.
Men at work
Obey "ag person
Lane ends or narrows
RememberWhen workers are present, the !nes for speeding in these areas will be doubled.
Road constructionReduce speed to 60 km/h or posted speed. This is the law.

110 Challenging road conditions and emergencies
Chapter 6 Clear Language Driver’s Guide
Always follow directions given by emergency or road personnel directing traf!c. Be aware of vehicles and emergency personnel around the incident. There is a high risk of response personnel or equipment being hit by passing vehicles.
Always yield to emergency vehicles with siren or lights operating. Keep a safe following distance of at least 150 metres (500 feet).
12. Stopping for law enforcementWhen a police of!cer is behind you with the emergency lights #ashing, you must move your vehicle to a safe location. This allows the police vehicle to either pass or stop safely behind you.
• On a two-way roadway, carefully and legally stop in a safe place at the right edge of the roadway.
• On a one-way roadway, carefully and legally stop in a safe place at the nearest edge of the roadway.
Always make sure it is safe to stop and that there is enough room for the police car behind yours.
When the police stop behind you, make sure everyone with you and the police of!cers are safe by doing the following:
1 Stay calm. After you have stopped your vehicle, put it into Park (automatic transmission) or Neutral (manual transmission). Apply the park brake.
2 Stay in your car. Find your licence, registration, and insurance documents. Be ready to show them.
3 Wait for instructions from the police of!cer. Be cooperative. Give the documents to the of!cer if asked.
4 Do not move your vehicle until the police of!cer says you can.

Challenging road conditions and emergencies 111
Chapter 6 Clear Language Driver’s Guide
De!nitions
ABS – anti-lock braking system.
Collision – when a vehicle hits another vehicle or something on the roadway such as an animal.
Hazard lights – the #ashing lights on a vehicle that warn other drivers of hazards, emergencies, sudden stops, and collisions. Also called four-way #ashers.
Hydroplaning – losing control of your vehicle in wet, rainy conditions because the tires lose contact with the road surface.
Skid – when you lose control of your vehicle and it slides.

112 Challenging road conditions and emergencies
Chapter 6 Clear Language Driver’s Guide
Notes

Responsible driving
7

114 Responsible driving
Chapter 7 Clear Language Driver’s Guide
Chapter 7 Responsible driving 1. Be aware 115
2. Plan ahead 115
3. Check for hazards 116
4. Keep a space cushion 116
5. Control time and distance 117
6. Distracted driving 117
7. Keep passengers safe 118Child safety seats 118
8. Fuel safely 119
9. Save fuel and help our environment 120Choosing a vehicle 120Speed control 120Idling 120Block heaters 121Extra weight 121Maintenance 121Air conditioning 121Trip planning 121
10. Traf!c laws you need to know 122
De!nitions 123

Responsible driving 115
Chapter 7 Clear Language Driver’s Guide
Chapter 7 Responsible driving Responsible, proactive, or defensive driving means thinking ahead about driving safely. It means keeping you and your passengers safe.
When you think ahead about possible hazards, you have more time to take action and avoid danger. You can avoid collisions when other drivers make mistakes.
Responsible driving also means thinking of the environment.
1. Be awareResponsible driving means that you are aware of all that is happening around you.
Pay attention to vehicles on both sides of you, in front of and behind you, and to vehicles in your blind spots.
Concentrate on looking forward and scanning for hazards developing ahead of you. In an urban area, look at least 12 to 15 seconds ahead of your vehicle This is about one to one-and-a-half blocks. In rural areas, look at least 20 to 25 seconds ahead. This is your visual lead time. It gives you time to respond to any hazards ahead.
Check your rear-view mirror every 8 to 12 seconds (about every block in an urban area) to see what is happening behind you. Always use the rear-view mirror when you want to change lanes, slow down, or stop.
Remember to glance at your speedometer to check your speed.
2. Plan ahead Plan your travel route before you set out. Be sure you are in the proper lane well before you exit or turn. Use your turn signal lights to show other drivers what you are going to do. If you miss your exit or turn, continue on to the next exit or intersection. Never reverse your vehicle to get back to a missed exit.
ProactiveTo do or think about something ahead of time or before you need to, so you can avoid dangers when you drive.
Be aware• Check all around you.• Scan ahead for hazards.• Check rear-view mirror
every 8 to 12 seconds.
Defensive driving coursesIt is a good idea to learn as much as you can by taking an approved driver education course. They are often called Defensive Driving courses. Licensed driver training schools and authorized agencies offer the courses. For information go to:www.transportation.alberta.ca/4474.htm

116 Responsible driving
Chapter 7 Clear Language Driver’s Guide
3. Check for hazards When you drive responsibly, you check for hazards and are ready to avoid them.
There are two types of hazards – !xed and changeable.
Fixed hazards include:
• Restricted vision areas such as curves, hills and hidden driveways
• Intersections
• Merging roadways
Changeable hazards include:
• School children and pedestrians
• Left-turning vehicles
• Icy or poor road surfaces
• Traf!c lights that are not working properly
• Emergency vehicles
Be prepared to take action to avoid a problem or collision. If you must turn sharply to avoid something in your lane, try to stay on your side of the yellow line. Think about where you could drive to avoid hitting something.
4. Keep a space cushionLeave enough space between yourself and other cars – ahead, behind, and on both sides – to stop safely or steer around a possible hazard.
• If someone follows too closely, and if it is safe, slow down just enough to encourage them to pass. If they do not pass, make a wider space between you and the vehicle ahead. Or, when it is safe, pull over and let them pass you.
• When you stop in traf!c, leave enough space to move your vehicle into another lane without having to reverse. This reduces your risk of hitting the vehicle ahead if you are hit from behind. This also gives you space to move out of the way if a vehicle behind you skids or slips on ice.

Responsible driving 117
Chapter 7 Clear Language Driver’s Guide
5. Control time and distance Use the two-second rule. Drive at least two seconds behind the vehicle ahead of you. This is for good road and weather conditions. When conditions are not good, allow even more distance.
To know if you are two seconds behind the vehicle in front of you, watch for it to pass a !xed object like a road marking. Then start counting. Count one thousand-and-one, one thousand-and-two.
If the front of your vehicle reaches the object before you are !nished counting, you are following too closely. Slow down and count again.
The two-second rule works at any speed.
If you are driving a larger vehicle like a motorhome, allow four seconds.
Keep a minimum two-second distance when following another vehicle.
6. Distracted drivingDistracted driving is when you don’t give your full attention to driving because you are doing something else like talking or texting.
Do not do any activities that distract you while driving. While all forms of distracted driving can be hazardous, the Traf!c Safety Act includes !nes for certain distractions.
Distracted driving !nes include:
• Using a hand-held cell phone, texting or emailing
• Using electronic devices, such as laptop computers, video games, cameras, and video entertainment displays
• Programming portable audio players
• Entering information on GPS units
• Reading printed materials
• Writing, printing, or sketching
• Personal grooming
Do not use a phone or other electronic devices while driving. They can take your attention away from what is happening around you. This applies to hands-free cellular phones as well.
Always keep a safe following distance and travel time to the vehicle ahead of you.

118 Responsible driving
Chapter 7 Clear Language Driver’s Guide
7. Keep passengers safeIn Alberta, all drivers and passengers must be properly secured with a seat belt or an approved child safety seat. Child safety seats must be properly attached with a seat belt or anchor system.
If you are the driver, you must make sure all passengers under 16 years are properly secured, or you can be !ned. Passengers 16 years and older can be !ned if they haven’t secured themselves properly.
Child safety seats Children under six years, weighing 18 kilograms (40 pounds) or less, must be properly secured in a safety seat. Their seat must be installed according to vehicle and seat manufacturers’ instructions.
Only use seats with a label stating the product meets Canada Motor Vehicle Safety Standard 213. Choose a seat that is right for your child’s age and weight.
Rear-facing seats
From birth, children must ride in either a rear-facing infant seat or a rear-facing convertible seat.
Forward-facing seats
Forward-facing safety seats are made for children who weigh 10 to 18 kilograms (22 to 40 pounds).
All newer vehicles and child safety seats come equipped with the universal anchor system or UAS/LATCH. In older vehicles, the child safety seat must be properly secured using the seat belt. Check the vehicle and seat manuals.
UAS/LATCH with tetherConvertible child safety seat
Canada Motor Vehicle Safety Standard 213www.saferoads.com/vehicles/children-safety.html
Rear-facing child safety seat

Responsible driving 119
Chapter 7 Clear Language Driver’s Guide
Booster seats
Children who weigh more than 18 kilograms (40 pounds) should be secured in an approved booster seat before using just a seat belt.
8. Fuel safely Pay attention when you are !lling up with fuel. Avoid accidents, !res, and explosions:
• Do not smoke, light matches, or use a lighter. Gas vapours mix with the air. If a #ame or spark is near, it can cause a !re or explosion.
• Do not use a cellular phone while fuelling. They can make a spark.
• Turn your vehicle ignition off before fuelling.
• Turn off all pilot lights on a recreational vehicle (RV) or trailer. They can make a spark and ignite gas vapors.
• Do not let children handle the fuel nozzle. Make sure they do not breathe the fumes or get splashed.
• Stay by the nozzle handle during fuelling. Static electricity can be generated as you move around or get in and out of your vehicle. This could start a !re.
• Do not over!ll your tank. Spills can harm the environment.
• Never prop the fuel nozzle handle open with an object. This can cause spills.
• Tell the station attendant if there is a fuel spill.
• When !lling gas containers, place them on the ground. This will release static electricity and keep spills out of your vehicle.
Examples of booster seats
120 Responsible driving
Chapter 7 Clear Language Driver’s Guide
9. Save fuel and help our environment When you use less fuel, you reduce pollution. You also save on fuel costs.
There are many ways to use less fuel when you drive.
Choosing a vehicleIf you drive a fuel-ef!cient car or a car with a smaller engine, you save fuel.
When you buy a vehicle, look for the EnerGuide label. This shows how many litres the vehicle will use for each 100 kilometres (litres/100 km). It also shows how much fuel will likely cost each year.
Speed control Most drivers use much less fuel if they drive slower. Every 10 km/h above 90 km/h uses about 10 percent more fuel.
When you control your speed, you make driving safer and more fuel-ef!cient.
Gradually increase then keep a steady speed. When you speed up quickly, drive at higher speeds or keep changing your speed, you can use up to 40 percent more fuel.
Cruise control helps maintain a fuel-ef!cient, steady speed on the highway.
To get maximum fuel economy with a manual transmission, shift through the lower gears smoothly and quickly. Build up speed in the higher gears.
An automatic transmission shifts to a higher gear earlier if you reduce pressure on the gas pedal as you increase speed.
IdlingIdling is when you leave your vehicle running when it is parked. Idling wastes fuel. Ten seconds of idling can use more fuel than turning your engine off and on. For every 10 minutes of idling, the average vehicle uses about one-third of a litre of fuel.
Idling in the winter does not warm the tires, steering, or other moving parts. According to Natural Resources Canada, one minute of idling on a cold day is enough to warm your engine. Start your car, and by the time you clear away snow and scrape windows, your car is ready.
Fuel = gas
Help our environment
• Control speed• Limit idling• Reduce use of block
heater• Remove extra weight• Service vehicle• Limit air conditioning• Plan trips
Responsible driving 121
Chapter 7 Clear Language Driver’s Guide
Block heatersA block heater is a part in the engine block that warms the oil. This makes it easier to start your car when it is cold.
Using a block heater properly can improve your vehicle’s fuel economy by as much as 10 percent. Use a timer to switch the block heater on two hours before you plan to drive. Do not leave your block heater on overnight or you will use lots of energy which can be expensive.
Extra weight Extra weight uses extra fuel. Heavy bags of sand and salt in the trunk will help with winter driving traction, but remember to remove them in the spring.
MaintenanceA properly maintained car will be more fuel ef!cient and safe. If you don’t take care of your vehicle it can be costly:
• A poorly tuned engine can use up to 50 percent more fuel.
• A clogged air !lter can reduce fuel ef!ciency by 10 percent.
• When tires don’t have enough air, fuel use is increased by about !ve percent. Low tires also increase tire wear and make your vehicle more likely to skid.
Air conditioningThe less you use your air-conditioner, the better your fuel ef!ciency will be. The air-conditioner can increase the fuel you use by:
• 10 to 25 percent when you drive in urban traf!c
• 3 to 4 percent when you drive on highways
Stay cool at highway speeds by opening your vents to let air from the outside #ow though your vehicle. When you are driving in the city, open your windows.
Trip planningTrip planning can save you time, money, and fuel. Avoid high traf!c routes. Combine several errands into one trip.

122 Responsible driving
Chapter 7 Clear Language Driver’s Guide
10. Traf!c laws you need to know• Do not use your vehicle to tow anyone, for example, a person on skis, riding a sled,
motorcycle, or bicycle.
• It is against the law to let a person ride in a trailer when it is being towed.
• People under 14 years cannot operate a tractor or any self-propelled farm equipment on a highway.
• If the view from your inside rear-view mirror is blocked, you must attach an outside rear-view mirror on each side of the vehicle.
• If a vehicle’s load extends 1.5 metres (5 feet) or more beyond the rear of the vehicle, the following is required:
- During daylight hours: attach a red #ag to the end of the extension or load. The #ag must be at least 30 centimeters (one foot) long on each of the four sides of the square.
- At night: attach a red light to the end of the extension or load.
• In a residential area, you must not operate a vehicle in a way that disturbs the residents between the hours of 10 p.m. and 7 a.m.
• If you drive a vehicle on a roadway without care and attention, or without reasonable consideration for others using the road, you could be found guilty of careless driving.
• It is illegal to drive using two lanes on a highway, except when conditions make you unable to use a single lane.
• When you are driving, you must not allow anyone to ride on the outside of your vehicle. This includes the open box of a pick up truck. You and the other person can be charged for this offence.
OffenceAn action that breaks the law.

Responsible driving 123
Chapter 7 Clear Language Driver’s Guide
De!nitions
Distracted driving – not giving your full attention to driving because you are doing something else like talking or texting.
Proactive – to do or think about something ahead of time or before you need to, so you can avoid dangers when you drive.
Space cushion – you have a space cushion when you leave enough space between you and other vehicles to stop safely or move around a hazard. You leave space ahead, behind, and on both sides of your vehicle.

124 Responsible driving
Chapter 7 Clear Language Driver’s Guide
Notes

Sharing the road
8

126 Sharing the road
Chapter 8 Clear Language Driver’s Guide
Chapter 8 Sharing the road1. Pedestrians 127
Pedestrians at crosswalks 127More pedestrian safety tips 128
2. Cyclists 128Tips for drivers 128Tips for cyclists 129
3. Motorcyclists 129
4. School buses 130On an undivided highway (no median) 130On a divided highway (with a median) 131
5. Commercial vehicles 131Time 131Space 132Turns 132Log hauling vehicles 132
6. Railway crossings 133Advance warning signs 133Pavement markings 133Railway crossing signs 133Railway crossing sign with a stop sign 133Flashing red lights and bell 134Gates (arms), lights and bells 134Safety tips for railway crossings 134Light rail transit (LRT) 135
7. Vehicles carrying passengers or dangerous goods 135
8. Off-road (ATV) vehicles 135
9. Funeral processions 135
10. Snowplows 136
De!nitions 137

Sharing the road 127
Chapter 8 Clear Language Driver’s Guide
Chapter 8 Sharing the roadWhen you drive, you share the road with many others. Some are driving large vehicles like trucks and trains. They take a long time to stop and need extra room on the road. Others are walking or riding small vehicles like bicycles or motorcycles. They are easily hurt if they are hit.
Pay close attention to all people and vehicles that share the road. Be aware, think of others, and be safe.
1. PedestriansA pedestrian is a person who is travelling on foot. A person who is walking beside and pushing a bicycle is also a pedestrian.
Pedestrians at crosswalksPedestrians have the right-of-way at both marked and unmarked crosswalks. Follow these rules at all intersections:
• When you see a yellow #ashing crosswalk light, slow to 30 km/h and yield to pedestrians wanting to cross the street. Stop safely before the crosswalk.
• When a pedestrian is in a crosswalk or shows they want to cross the street, you must yield the right-of-way.
• When you stop for a pedestrian at a crosswalk, stop far enough back so drivers in other lanes can see them and have time to stop. Stop about two to three car lengths from the crosswalk.
• Never pass another car when you are coming to a crosswalk. The other vehicle may be slowing or stopping for a pedestrian.
Pedestrian using their arm to show they want to cross the street.
In urban areas pedestrians may signal that they are crossing by raising their arm and pointing to the opposite curb.
PedestrianA person who is travelling on foot. A person who is walking beside and pushing a bicycle is also a pedestrian.
128 Sharing the road
Chapter 8 Clear Language Driver’s Guide
More pedestrian safety tips • Take extra care around pedestrians that can’t see well (visually impaired). They
may have a white cane or guide dog.
• At night, do not overdrive your headlights. This means you should drive so you are able to stop within the distance you can clearly see with your headlights.
• When it is dark, watch carefully for pedestrians. If they are wearing dark clothing, they can be hard to see.
• Watch for children in areas where people live, and around schools and playgrounds. They may suddenly run into the road. Watch for them around parked vehicles, riding bikes or playing on the street. Glance under parked vehicles ahead on both sides of the road. Check for their feet, toys, and bicycle wheels. These give you warning that you may need to stop.
2. CyclistsCyclists and their passengers under 18 years must wear helmets. A cyclist who is walking beside and pushing a bicycle is a pedestrian.
A bicycle that is being ridden is a vehicle. The rider must follow the rules of the road like drivers of other vehicles.
Tips for drivers • When passing a cyclist, change lanes like you would for other vehicles.
• When turning right, watch for cyclists alongside your car. Do a shoulder check of your blind spot to the right.
• When parked at the curb, it is your responsibility to check for cyclists before opening your door.
• Before moving away from the curb, do a shoulder check.
• Do not follow too closely behind cyclists. Make sure you can safely stop on short notice.
• Watch for children on bikes. They may not have the proper skills, knowledge, or experience to ride safely and they can easily lose control.
• Cyclists must ride close to the curb. However, they may need to ride further out to avoid drainage grates, potholes, garbage, slippery surfaces, and rough pavement. Be aware of the roadway conditions that may affect them.
• Cyclists must use the proper lane when turning left. A bicycle and rider are smaller than other vehicles and are hard for drivers to see. They are more exposed to traf!c on left turns. Be very careful when cyclists are turning left, especially on multi-lane roads.
RememberA cyclist on a moving bicycle is considered a vehicle. Other drivers cannot share a lane with them.

Sharing the road 129
Chapter 8 Clear Language Driver’s Guide
Tips for cyclists• Wear bright and re#ective clothing.
• Ride close to the curb.
• Keep both hands on the bike grips, except when hand signalling.
• Keep both feet on the pedals.
• Be sure the brakes work.
• Make sure your bicycle has a bell or horn.
• Ride single !le, except when you pass another bicycle.
• Only carry the number of people the bicycle is made for.
• Never hold onto, or attach the bicycle to, any other moving vehicle.
• When cycling after dark, have at least one headlight (but not more than two), one red tail light, and at least one rear-mounted red re#ector.
3. MotorcyclistsMotorcycle riders need the whole lane to travel safely. They often travel in the left portion of the lane to be more visible.
Tips for drivers• Motorcycle turn signals can be hard to see. Watch the rider for clues. If the rider does
a shoulder check, they may be changing lanes or turning.
• When you turn left, watch for oncoming motorcycles. Seeing them and judging their speed can be hard in heavy traf!c, and at dusk or at night.
• Motorcyclists can stop quickly. When following a motorcycle, leave enough time and space to stop safely.
• Never drive beside a motorcycle in the same lane.
• Be aware that motorcyclists often move within their lane to avoid road hazards.
• Remember poor weather, road conditions, and hazards could make the rider lose control.

130 Sharing the road
Chapter 8 Clear Language Driver’s Guide
4. School buses Pay close attention when you are near school buses. Watch for students getting on and off.
Be prepared to stop and leave a safe distance, whether you are behind the bus or facing it in the opposite lane.
On an undivided highway (no median)• When you approach a school bus that has its amber lights #ashing, be ready to stop
whether you are coming from the front or the back.
• If you pass, use caution.
• When the school bus stops for students, alternating red lights will #ash. You will also see a stop sign extend from the left side of the bus. Come to a full stop about 20 metres (four to !ve car lengths) away from the bus. This distance lets drivers behind you see the #ashing lights and students crossing the road.
• Stay stopped until the #ashing lights are turned off and the stop sign folds back in.
On a two lane undivided highway, both lanes must stop for a school bus.
STOPapprox. 20 metres
SCHOOL BUS
STOPapprox. 20 metres
On a four lane undivided highway, all four lanes must stop for a school bus.
STOPapprox. 20 metres
SCHOOL BUS
STOPapprox. 20 metres
MedianAn area that divides two lanes of traf!c. It may have grass, trees, metal rails, cement, or just be paved.
RememberWhen you stop for a school bus, come to a full stop about 20 metres (four to !ve car lengths) away from the bus.

Sharing the road 131
Chapter 8 Clear Language Driver’s Guide
On a divided highway (with a median) • When you approach a school bus from the rear and its alternating amber lights are
#ashing, follow the same rules as you would for a highway that is not divided by a median.
• When you approach a school bus from the front and the school bus has its alternating amber or red lights #ashing, you may carefully drive by. Watch for pedestrians. Remember, this is only on a divided highway.
On a highway divided by a median, vehicles to the rear of the school bus must stop.
STOPapprox. 20 metres
SCHOOL BUS
MAY PROCEED WATCH FOR
PEDESTRIANS
Median
Follow these rules whenever you see school bus lights #ashing. Some cities and towns have speci!c rules for school bus operations.
5. Commercial vehiclesLarge vehicles can cause visibility, passing, and turning problems. Be prepared to give them the extra space and time they need.
Some vehicles with oversized loads travel in a convoy with a pilot vehicle at the front and back. They may travel at a slower speed and look for a chance to allow faster traf!c to pass. If a large vehicle or convoy moves to the side of the road to let you pass, make sure you have enough room to safely go around them. Before you pass, make sure you can see that there is no traf!c coming from the other direction.
If a commercial vehicle passes you, remember that it can create strong gusts of wind. Be prepared.
Time• You will need more time when passing a large vehicle.
• Large commercial vehicles need more time and distance to slow or stop.
• After passing, leave extra room before you move back into the lane.
ConvoyTwo or more vehicles travelling together. It can be hard to see around and pass a convoy.

132 Sharing the road
Chapter 8 Clear Language Driver’s Guide
Space• For better visibility, increase your following time and space between you and a large
vehicle. This also helps avoid rocks or other material their tires can spray.
• Never move into the space in front of a large vehicle that is approaching a traf!c light. If the traf!c light changes to red the driver may need that space for stopping.
• If you stop on a hill behind a large vehicle, leave extra space. When the driver releases the brakes, it may roll back.
• Be cautious when a large vehicle is backing up. If you are too close behind, the driver may not see you.
• Large vehicles have blind spots. If you are driving behind one and cannot see both of its side mirrors, you are too close.
Turns• Large commercial vehicles need extra room to turn.
• When a large vehicle is turning right, stay well back. Do not drive in the space on its right.
• If a large vehicle is turning in front of you, be aware it may need to drive across the centre line, cut a corner, or use part of your lane to complete the turn. Stop back from the intersection.
Log hauling vehiclesLog hauling vehicles are long and heavy when loaded.
Never pass a log hauling truck that is turning off the highway. Logs may extend as far as nine metres (30 feet) from the rear of the truck. When a truck is turning, the logs can block some or all of the lanes of the highway. A truck may need to use all lanes to turn. Stay well back.
Log hauling vehicles may need all lanes of the highway when turning.

Sharing the road 133
Chapter 8 Clear Language Driver’s Guide
Railway crossing sign with a stop signWhen there is a stop sign at a railway crossing you must come to a complete stop between !ve metres (15 feet) and 15 metres (50 feet) from the nearest rail.
Do not proceed until you are sure a train is not approaching and it is safe to cross.
Railway crossing signsThese signs are at all public railway crossings. They mean drivers must yield to all trains.
If there is more than one train track, the crossing sign will show the number of tracks.
You must stop when a train is visible, sounding a signal or approaching within 500 metres (about !ve city blocks) of the crossing.
Advance warning signsThese signs tell you to look, listen, and slow down because you may have to stop. The speed sign below the advance warning sign is the recommended speed for that crossing. You will have to slow down.
Pavement markingsPavement markings, such as an X or stop line, may appear on the approach to some railway crossings. If you must stop for a train, do it before the stop line.
6. Railway crossings A railway crossing is where train tracks cross a road.
If a train is coming, never rush to cross the tracks before the train gets there. Trains need a very long distance to stop. Always check before driving over a railway crossing.
Railway crossings have signs warning drivers. Crossings can also have mechanical or electrical warning devices to stop you.
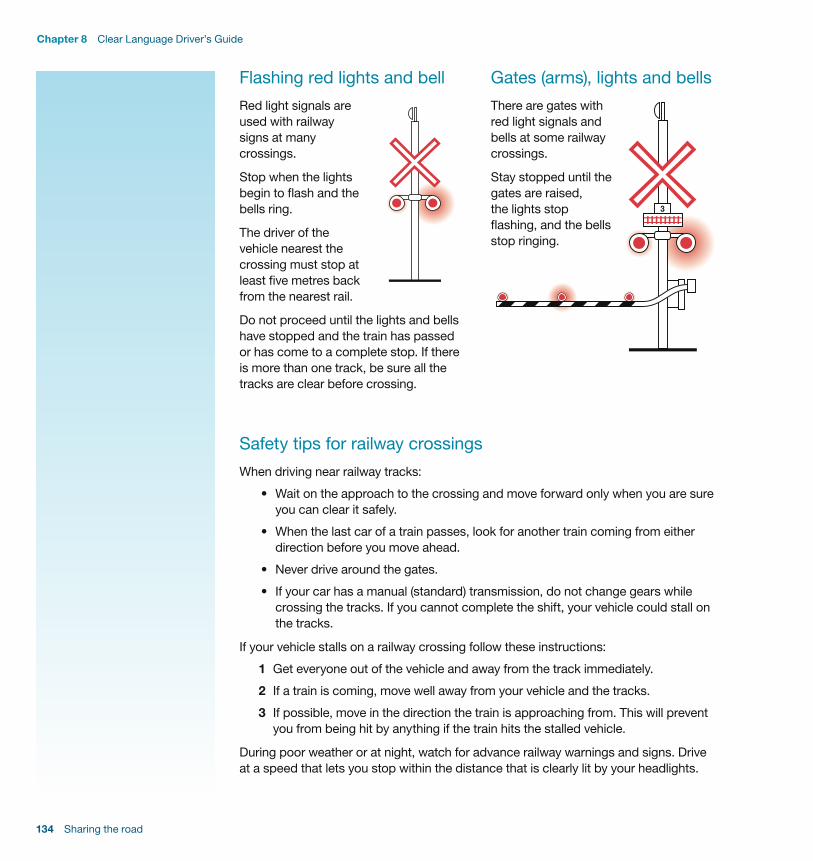
134 Sharing the road
Chapter 8 Clear Language Driver’s Guide
Flashing red lights and bellRed light signals are used with railway signs at many crossings.
Stop when the lights begin to #ash and the bells ring.
The driver of the vehicle nearest the crossing must stop at least !ve metres back from the nearest rail.
Do not proceed until the lights and bells have stopped and the train has passed or has come to a complete stop. If there is more than one track, be sure all the tracks are clear before crossing.
Gates (arms), lights and bellsThere are gates with red light signals and bells at some railway crossings.
Stay stopped until the gates are raised, the lights stop #ashing, and the bells stop ringing.
Safety tips for railway crossingsWhen driving near railway tracks:
• Wait on the approach to the crossing and move forward only when you are sure you can clear it safely.
• When the last car of a train passes, look for another train coming from either direction before you move ahead.
• Never drive around the gates.
• If your car has a manual (standard) transmission, do not change gears while crossing the tracks. If you cannot complete the shift, your vehicle could stall on the tracks.
If your vehicle stalls on a railway crossing follow these instructions:
1 Get everyone out of the vehicle and away from the track immediately.
2 If a train is coming, move well away from your vehicle and the tracks.
3 If possible, move in the direction the train is approaching from. This will prevent you from being hit by anything if the train hits the stalled vehicle.
During poor weather or at night, watch for advance railway warnings and signs. Drive at a speed that lets you stop within the distance that is clearly lit by your headlights.

Sharing the road 135
Chapter 8 Clear Language Driver’s Guide
Light rail transit (LRT) Light rail transit (LRT) crossings in cities are similar to other railway crossings. Pedestrians, cyclists, and motorists must be careful near LRT crossings.
LRT systems are powered by electricity, which makes them very quiet. These crossings use a variety of warning devices – traf!c signal lights, signs, bells, and gates. These warnings all mean STOP. Do not cross the tracks. Always look and be aware.
Never drive around the gates, even if an LRT train has just passed. Another one may be coming from the other direction. Due to its weight and speed, a train may take up to 100 metres (330 feet) to stop.
7. Vehicles carrying passengers or dangerous goods Commercial vehicles transporting passengers or dangerous goods can be required by law or company policy to stop at railway crossings. Be prepared for them to stop. Stay a safe distance back.
8. Off-road (ATV) vehiclesOff-road vehicles such as quads, snowmobiles, and dirt bikes may not be easy to see. When driving, be aware of off-road vehicles operating nearby or wanting to cross the roadway. Use caution and be prepared for them.
9. Funeral processions Do not pass though a funeral procession. Yield the right-of-way until it has passed, before you proceed.
If you are driving in a funeral procession, you may follow it through a controlled intersection without stopping. You must have your headlights on. Only proceed if you are following immediately behind the car in front of you. Make sure it is safe.
ATVAll-terrain vehicle. Only legal for off-road travel. Includes snowmobiles, quad bikes, and motorized three and four wheel bikes.
LRT Light rail transit, found in urban areas.
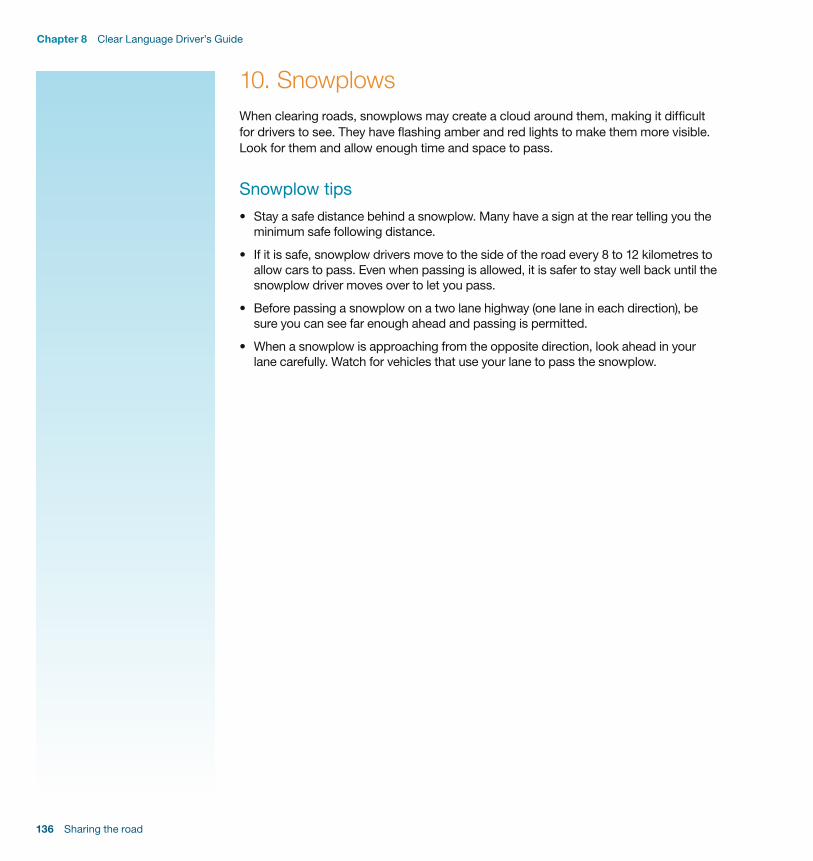
136 Sharing the road
Chapter 8 Clear Language Driver’s Guide
10. SnowplowsWhen clearing roads, snowplows may create a cloud around them, making it dif!cult for drivers to see. They have #ashing amber and red lights to make them more visible. Look for them and allow enough time and space to pass.
Snowplow tips• Stay a safe distance behind a snowplow. Many have a sign at the rear telling you the
minimum safe following distance.
• If it is safe, snowplow drivers move to the side of the road every 8 to 12 kilometres to allow cars to pass. Even when passing is allowed, it is safer to stay well back until the snowplow driver moves over to let you pass.
• Before passing a snowplow on a two lane highway (one lane in each direction), be sure you can see far enough ahead and passing is permitted.
• When a snowplow is approaching from the opposite direction, look ahead in your lane carefully. Watch for vehicles that use your lane to pass the snowplow.

Sharing the road 137
Chapter 8 Clear Language Driver’s Guide
De!nitions
ATV – all-terrain vehicle. Only legal for off-road travel. Includes snowmobiles, quad bikes, and motorized three and four wheel bikes.
Convoy – two or more vehicles travelling together. It can be hard to see around and pass a convoy.
Fine – an amount of money you must pay if you break a law.
LRT – light rail transit, found in urban areas.
Median – an area that divides two lanes of traf!c. It may have grass, trees, metal rails, cement, or just be paved.
Pedestrian – a person who is travelling on foot. A person who is walking beside and pushing a bicycle is also a pedestrian.
Railway crossing – where train tracks cross a road.

138 Sharing the road
Chapter 8 Clear Language Driver’s Guide
Notes

Driving within the law
9
140 Driving within the law
Chapter 9 Clear Language Driver’s Guide
Chapter 9 Driving within the law1. Be !t to drive 141
What if I am too tired? 141What if I take drugs or medication? 142What if I drink alcohol and drive? 142
2. Driving penalties 143Demerit points 143Driver’s suspensions 145
3. Federal and provincial laws 146Federal: Criminal Code of Canada 146Provincial: Traf!c Safety Act 146
4. What if I am disquali!ed or my licence is suspended? 149What if I drive while suspended or disquali!ed? 149How do I get my licence back after an alcohol or drug-related offence? 149How do I get my licence back after a demerit point suspension? 150Provincial suspensions 150
5. Alberta Transportation Safety Board (ATSB) 151
De!nitions 152
Driving within the law 141
Chapter 9 Clear Language Driver’s Guide
Chapter 9 Driving within the lawDriving within the law means more than obeying traf!c rules and signs. It means making sure your mind and body are in good shape to drive.
There are penalties for driving when you are not !t to drive. Make sure you know the rules so you drive within the law.
1. Be !t to drive Many things can impair you, which means you won’t have good judgement or be able to make good decisions:
• Alcohol • Drugs • Some medications • Stress • Lack of sleep and tiredness (mental, emotional, and physical)
If you are impaired, you won’t be able to drive responsibly or safely.
What if I am too tired?If you fall asleep while you are driving, it can be fatal. If you are too tired, you may not react as quickly as you should and you may not make the right decisions. You can make mistakes like going off the road, driving into oncoming traf!c, or moving into another lane. You may not realize the danger.
You may be tired if you: • Are bored • Have been driving for a long time • Are emotionally stressed • Have tired or strained eyes • Are sick • Have not slept or rested well • Have had a lot of exercise or physical activity • Have eaten too much • Are driving in a warm vehicle • Have taken drugs or alcohol
Impaired drivingDriving when you are not !t to drive because you are too tired, or have been drinking alcohol, taking drugs, or using medication.
PenaltiesDemerit points, !nes, or suspensions given to drivers who break the law.
Demerit pointsPoints that are put on your driving record if you are convicted of a driving offence. If you get too many demerits, you will lose your licence.
FineAn amount of money you must pay if you break a law.
SuspensionWhen your licence is taken away for a period of time and you are not allowed to drive.
OffenceAn action that breaks the law.
Conviction, convictedWhen a court decides you are guilty of an offence.

142 Driving within the law
Chapter 9 Clear Language Driver’s Guide
Reduce the risk
• Be well rested before starting a trip.
• Keep your car comfortable, cool, and fresh.
• Stay alert to your surroundings.
• Scan the road ahead and behind.
• Scan your instrument panel.
• Wear sunglasses on bright days.
• Stop for a rest. Walk around your vehicle.
• Do not drive after drinking alcohol or taking drugs.
What if I take drugs or medication?Some prescription and non-prescription (over-the-counter) medications can impair your driving ability, judgement and decision-making. Side effects can include drowsiness or dizziness.
Know how your medications affect you. Know how alcohol or drugs will affect you if they are combined with your medication.
Always ask your doctor or pharmacist.
What if I drink alcohol and drive?Drinking and driving is dangerous. Drinking alcohol before and while driving is a major cause of traf!c deaths and injuries in Alberta.
Because of alcohol, every year between 2004 and 2008:
• 110 people died
• 1,900 people were injured
If you are caught driving under the in#uence of drugs or alcohol, you may:
• Be !ned
• Get a criminal record
• Spend time in jail
• Lose your licence
• Pay more for insurance
• Be seriously injured or die
• Cause someone else serious injury or death
• Lose your job if you have to drive

Driving within the law 143
Chapter 9 Clear Language Driver’s Guide
2. Driving penaltiesIf you break a driving law, you will get a penalty. You may get demerit points, a !ne, or a licence suspension.
Demerit points Demerit points are put on your driving record if you are convicted of a driving offence. Convictions and licence suspensions stay on your driving record for 10 years, and they become part of your driving history.
You are convicted of an offence when you:
• Pay the !ne on your ticket without going to court.
• Go to court and the judge “!nds you guilty.”
• Do not go to court, do not pay the !ne, and the judge “!nds you guilty” in your absence.
Fully-licensed drivers
8 to 14 demerits
If you get eight to 14 demerit points within two years, you will get a letter that tells you your demerit point standing.
15 or more demerits
If you get 15 or more demerit points within two years, your licence will be suspended for a period of time.
When the suspension ends, you get your licence back. You will have seven demerit points left on your record. These will stay on your record for two years from the day your suspension ended.
GDL drivers
4 to 7 demerits
If you get four to seven demerit points within two years, you will get a letter that tells you your demerit point standing.
8 or more demerits
If you get eight or more demerit points within two years, your licence will be suspended for a period of time.
When the suspension ends, you get your licence back. You will have three demerit points left on your record. These will stay on your record for two years from the day your suspension ended.

144 Driving within the law
Chapter 9 Clear Language Driver’s Guide
Demerit point penalties for fully-licensed and GDL drivers
Points Offence
7 points Failing to remain at the scene of a collision
6 points Careless driving Failing to stop for a school bus RacingSpeeding (exceeding limit by at least 51 km/h)
5 points Failing to stop at a railway crossing (school bus or a vehicle carrying explosives, gas or #ammable liquids) Failing to stop for a peace of!cer
4 points Failing to yield right-of-way to a pedestrian in a crosswalkFollowing too closelySpeeding (exceeding limit by 31 to 50 km/h)
3 points Driving to the left of the yellow line / Driving left of centre on unmarked two-wayDriving in the wrong direction on a one-way highwayFailing to report a collision Failing to stop at an intersection controlled by a stop signFailing to stop for a red light at an intersectionImpeding passing vehicleImproper passingStuntingSpeeding (exceeding limit by 16 to 30 km/h)
2 points Failing to obey instruction of traf!c control deviceImproper backing – backing into an intersection or crosswalk or unsafe backing onto a highwayImproper turnsImproper turns – U-turnTraf!c lane violationSpeeding (exceeding limit to maximum of 15 km/h)
Demerit point penalties speci!c to GDL drivers
Points Offence
2 points Curfew – driving between midnight and 5 a.m. (Class 7 Learner stage only)Having more passengers than seat beltsSupervisor (accompanying driver) not fully quali!ed
For a complete listing of the Demerit Point Program, go to www.transportation.alberta.ca/525.html

Driving within the law 145
Chapter 9 Clear Language Driver’s Guide
Driver’s suspensions Licence suspensions for fully-licensed and GDL drivers are based on how many offences the driver has:
• First offence – automatic one month suspension
• Second offence (within one year) – automatic three month suspension
• Third offence (within two years) – automatic six month suspension. If your licence is suspended, you must go to an Alberta Transportation Safety Board meeting.
You must turn in your licence on or before the date your suspension begins. You can do this at any Alberta registry of!ce.
You may be able to get a Restricted Operator’s Licence. For more information, go to www.transportation.alberta.ca/2566.htm
You may not appeal a demerit point suspension. Convictions can only be removed from your driving record if you appeal in court. Contact any Alberta Provincial Court for more information.
If you get demerit points, you have to wait for two years from the date you were convicted for those demerits to be removed from your driver’s record.
If you take a government-approved defensive driving course before you get 15 or more demerit points, three points may be removed from your record. You can do this only once in a two-year period. Contact a driving school for more information about defensive driving courses.
AMA offers an online and classroom demerit reduction program. Go to www.ama.ab.ca/driver-education/online-demerit-reduction

146 Driving within the law
Chapter 9 Clear Language Driver’s Guide
3. Federal and provincial laws
Federal: Criminal Code of Canada Impaired driving offences include:
• Impaired driving regardless of blood alcohol level.
• Blood alcohol level over the legal limit.
• Drugs, or drugs and alcohol together or a toxicological (blood or urine) sample.
• Refusing to give a breath or blood sample.
• Impaired driving that harms or kills a person.
• Driving while suspended or disquali!ed.
Under the Criminal Code of Canada, if you are found guilty of impaired driving and:
• If you have one past offence within the last 10 years, you will not be allowed to hold a driver’s licence for three years from the conviction date.
• You have two or more past offences in the last 10 years, you will not be allowed to hold a licence for !ve years from the conviction date.
• You have caused a death or injury, your licence will be suspended for !ve years, even if it is your !rst offence.
Provincial: Traf!c Safety Act Alberta Administrative Licence Suspension (AALS) Program
The Alberta Administrative Licence Suspension (AALS) Program deals with alcohol and drug-related impaired driving offences as well as refusal to give breath or blood samples. This includes illegal drugs and legal prescription medicines that could impair your driving.
Charges under the Criminal Code of Canada are under the Alberta Administrative Licence Suspension Program.
You will get an Administrative Licence Suspension if you:
• Have a blood alcohol level greater than 0.08.
• Are impaired by drugs, alcohol, or both.
• Refuse to give a breath sample to a peace of!cer.
If you are charged with an alcohol or drug-related impaired driving offence, your licence will be suspended immediately. It will be suspended until the criminal charge is resolved.
In Alberta, penalties get worse with more convictions.
Alberta Administrative Licence Suspension Program (AALS) Deals with drug and alcohol-related impaired driving charges.
Federal laws: Criminal Code of Canada Impaired driving laws for all of Canada.
Provincial laws: Traf!c Safety Act Traf!c rules just for Alberta. This includes some laws for impaired driving.
Legal limitHow much alcohol can be in your bloodstream when you drive.
Disquali!edWhen you are no longer allowed to drive.

Driving within the law 147
Chapter 9 Clear Language Driver’s Guide
1st Criminal Code charge within 10 years
Immediate penalties:
• Your vehicle will be taken for three days.
• You must pay towing and impound fees.
• Your licence will be suspended until charges have been dealt with by the courts.
If you are convicted:
• Your licence is suspended for one year.
• You must participate in the Ignition Interlock Program (IIP) for one year.
• You must take the Planning Ahead impaired driving course.
2nd Criminal Code charge within 10 years
Immediate penalties:
• Your vehicle will be taken for seven days.
• You must pay towing and impound fees.
• Your licence will be suspended until charges have been dealt with by the courts.
If you are convicted:
• Your licence is suspended for three years.
• You must participate in the Ignition Interlock Program for three years.
• You must take the IMPACT impaired driving course. This may include assessment and monitoring.
3rd Criminal Code charge within 10 years
Immediate penalties:
• Your vehicle will be taken for seven days.
• You must pay towing and impound fees.
• Your licence will be suspended until charges have been dealt with by the courts.
If you are convicted:
• Your licence is suspended for !ve years.
• You must participate in the Ignition Interlock Program for !ve years.
• You must take the IMPACT impaired driving course. This may include assessment and monitoring.
• You must go to an Alberta Transportation Safety Board hearing.
IMPACTWeekend-long course for impaired drivers.
ImpoundWhen your vehicle is taken away for a period of time because of a driving offence.
Ignition Interlock Program (IIP)Allows drivers who have lost their licence to drive with certain conditions.
Alberta Transportation Safety Board (ATSB)Oversees driver suspension and rehabilitation.

148 Driving within the law
Chapter 9 Clear Language Driver’s Guide
Alberta Zero Alcohol Tolerance (AZAT) Program for GDL drivers
If you are in the Graduated Driver Licensing (GDL) program, you cannot drink alcohol and drive.
If you drink alcohol and drive: • Your licence will be suspended immediately for 30 days. • Your vehicle will be taken for seven days.
If you are convicted of drinking alcohol and driving a second time: • Your licence will be suspended for 30 days. • Your vehicle will be taken for seven days • You must appear before the Alberta Transportation Safety Board (ATSB).
To exit the GDL program, you must have no suspensions for one year.
Immediate Roadside Sanctions (IRS) Program
If your blood alcohol level reaches 0.05, you will not be able to drive safely. You will have a higher risk of being in a collision.
If you are asked to give a breath sample and your blood alcohol level is between 0.05 and 0.08, there are things that will happen right away. These are called Immediate Roadside Sanctions:
For a !rst offence in 10 years: • Your vehicle will be taken for three days. • You must pay towing and impound fees. • Your licence will be suspended for three days.
For a second offence in 10 years: • Your vehicle will be taken for seven days. • You must pay towing and impound fees. • Your licence will be suspended for 15 days. • You must take a course such as the Planning Ahead impaired driving course. • You may have to go to an Alberta Transportation Safety Board hearing.
For the third and any more offences in 10 years: • Your vehicle will be taken for seven days. • You must pay towing and impound fees. • Your licence will be suspended for 30 days. • You must take a course such as the IMPACT course. • You must go to an Alberta Transportation Safety Board hearing.
Alberta 24 hour suspension
If you drive while you are impaired because of a physical or medical condition, drugs, or alcohol, your licence may be suspended for 24 hours.
IRS ProgramImmediate Roadside Sanction Program
AZAT ProgramAlberta Zero Alcohol Tolerance Program

Driving within the law 149
Chapter 9 Clear Language Driver’s Guide
4. What if I am disquali!ed or my licence is suspended?If you are disquali!ed it means you are no longer allowed to drive. Your licence will be suspended, which means it will be taken away for a period of time.
If this happens, you will get a Notice of Suspension letter from Driver Fitness and Monitoring. It will be mailed to the address on your motor vehicle !le. It will tell you why your licence is suspended or disquali!ed, and for how long. The letter will also tell you what you need to do to get it back. These are the conditions of the suspension.
When you meet the conditions, you will get another letter. This letter will let you know the suspension has ended and when you can drive again.
In addition to Criminal Code of Canada penalties, the Province of Alberta will suspend your licence and give you conditions to get your licence back. The Province of Alberta suspension is served at the same time as the court-ordered suspension.
What if I drive while suspended or disquali!ed? If you drive while suspended or disquali!ed, you can go to jail, be !ned, or both. If you drive when you have a suspension, you will get another suspension. The vehicle you are driving will be taken and kept for 30 days, even if it belongs to someone else. The owner of the vehicle will have to pay all the towing and impound fees.
How do I get my licence back after an alcohol or drug-related offence? Your licence will be suspended until you have met all the conditions. This is true, even if you leave the province. Read your Notice of Suspension carefully to make sure you have met the conditions. If you do not meet the conditions, you won’t get your licence back.
You may have to:
• Take a one-day or weekend driver program.
• Participate in the Ignition Interlock Program.
You will also need to pay a fee and take a road test.
After your suspension has ended, you must go to an Alberta registry and show proof that you have met the conditions. The registry agent will give you a new licence. You will get a letter to let you know you can drive again.
If your driver’s licence expires while it is suspended, you cannot renew it until you meet all the conditions.
RememberIf you change your mailing address, you must inform an Alberta registry of!ce.
150 Driving within the law
Chapter 9 Clear Language Driver’s Guide
Ignition Interlock Program (IIP)
If you are convicted of impaired driving and lose your licence, you may have to join the Ignition Interlock Program (IIP). Drivers in this program have a device installed in their vehicle. The program lets you drive again, with certain conditions.
You have to join the program if:
• You have more than one alcohol-related Criminal Code conviction in the past ten years.
• It is your !rst offence and your blood alcohol level is more than 0.08.
• You refuse to give a breath, blood, or toxicological (blood or urine) sample.
You will have to pay to install and maintain the ignition interlock device.
Even if you do not have to join the program, you may be able to participate. The Alberta Transportation Safety Board must approve this. More information about the program can be found at www.atsb.alberta.ca.
How do I get my licence back after a demerit point suspension? A Notice of Suspension letter will be mailed to the address on your motor vehicle !le.
The letter will tell you when the suspension starts. It will also tell you what conditions must be met before you can get your licence back.
You must turn your licence over to any Alberta registry of!ce on or before the start date. It is illegal to have your licence while you are suspended. It is a serious offence to drive a vehicle while you are suspended. You cannot drive until the suspension has ended.
Provincial suspensions You can get a provincial suspensions for things such as:
• A poor driving record
• Medical reasons
• If you don’t pay a legal judgement. This could be for damages from a collision, or other judgments such as child or spousal support.
• If you don’t comply with a Notice to Report.
For information about child or spousal support contact: Alberta Justice, Maintenance Enforcement Program, 780-422-5555http://justice.alberta.ca/programs_services/mep/Pages/default.aspx

Driving within the law 151
Chapter 9 Clear Language Driver’s Guide
5. Alberta Transportation Safety Board (ATSB) Drivers need to show they are responsible. The Alberta’s driver licensing system checks driver’s habits and enforces laws when needed.
To make sure drivers are being responsible, the ATSB works on driver rehabilitation. People who must appear before the ATSB choose whether or not to have legal counsel.
The ATSB may suspend the licence of any person referred by the Registrar, the Minister, the courts or the police. The suspension may be for a set period or an unknown period of time. The ATSB may order an education program or set other conditions that must be met to have a licence.
Before suspending or restricting a driver, the ATSB gives the person at least 10 days notice in writing (unless they are already suspended).
To make a decision, the ATSB considers the person’s driving record, attitude, skills and knowledge, disabilities, and anything else they think is important.

152 Driving within the law
Chapter 9 Clear Language Driver’s Guide
De!nitions
Conviction, convicted – when a court decides you are guilty of an offence.
Demerit points – points that are put on your driving record if you are convicted of a driving offence. If you get too many demerits, you will lose your licence.
Disquali!ed – when you are no longer allowed to drive.
Exceed – go beyond what is allowed.
Fine – an amount of money you must pay if you break a law.
Impaired driving – driving when you are not !t to drive because you are too tired, or have been drinking alcohol, taking drugs, or using medication.
Impound – when your vehicle is taken away for a period of time because of a driving offence.
Legal limit – how much alcohol can be in your bloodstream when you drive.
Offence – an action that breaks the law.
Penalties – demerit points, !nes, or suspensions given to drivers who break the law.
Suspension – when your licence is taken away for a period of time and you are not allowed to drive.

Driving within the law 153
Chapter 9 Clear Language Driver’s Guide
Notes


Towing a trailer
10

156 Towing a trailer
Chapter 10 Clear Language Driver’s Guide
Chapter 10 Towing a Trailer 1. Registration and licence plate 157
2. Equipment preparation 157
3. Driving with a trailer 158
4. Turning with a trailer 159
5. Backing a trailer 160
De!nitions 161

Towing a trailer 157
Chapter 10 Clear Language Driver’s Guide
Chapter 10 Towing a Trailer There are some important things to know before you tow a trailer behind your vehicle. To be legal, your trailer must have a licence plate, registration, and special equipment. Driving with a trailer is dif!cult. It takes practice and skill to turn and stop.
Make sure your trailer is legal and you know how to handle it, before you take it on the road.
1. Registration and licence plate Before towing a trailer on the road, you must have:
• A valid Alberta trailer registration
• Registration with you when towing
• A valid licence plate attached to the back of the trailer that is clearly visible
• A clearly visible car licence plate
2. Equipment preparationBefore you drive, check your trailer:
• Lights: Your trailer must have working tail lights, brake lights, and turn signals. These lights must be connected to the towing vehicle so you can operate them while you are driving.
• Safety chains: Attach between the trailer and the towing vehicle when using a ball-and-socket hitch. Cross the chains under the trailer tongue and fasten securely. Chains are not required on !fth-wheel trailers.
• Mirrors: Adjust vehicle mirrors so you can clearly see traf!c approaching from behind. You must install extension mirrors if your trailer is wider than your towing vehicle.
• Secondary emergency breakaway system: Connect the trailer according to the manufacturer’s instructions.
Tail lightsThe lights at the back of a vehicle or trailer that let the driver behind you know that you are stopping or turning.
Fifth-wheel trailerFifth-wheel trailers attach to trucks that have a special hitch. The hitch is inside the back of the truck, over the rear axle.
RememberPractice driving with your trailer in a safe place. Be prepared for trips to take longer.

158 Towing a trailer
Chapter 10 Clear Language Driver’s Guide
You must have brakes on your trailer if you need them for safe control. However, your trailer does not need brakes if:
• Gross weight is 910 kilograms (2,000 pounds) or less, or
• Gross weight is less than half the unloaded weight of your vehicle.
3. Driving with a trailerDrive carefully and plan ahead when towing a trailer.
• Joining traf!c: Allow more time and distance between oncoming vehicles and your own. It will take you longer to reach traf!c #ow speed due to the extra weight. As well, you need more space because the trailer makes your vehicle longer.
• Stopping: It will take you longer to stop, so allow more time and distance. Leave extra room between you and the vehicle ahead.
• Right lane: Remember slower moving traf!c should stay in the right lane on multi-lane highways.
• Look ahead: Plan your driving and watch for possible problems. Avoid quick lane changes or unexpected stops.
• Safe stops: If traf!c builds behind you, !nd a safe place to stop off the road to let others pass.
Gross weightThe combined weight of a trailer and its load.
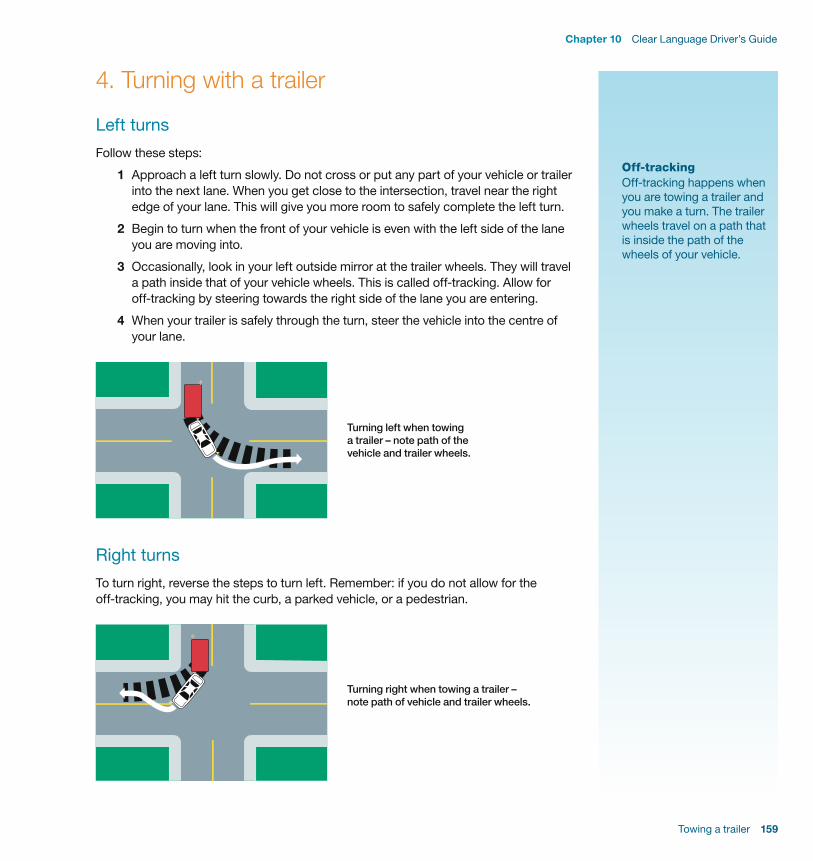
Towing a trailer 159
Chapter 10 Clear Language Driver’s Guide
4. Turning with a trailer
Left turnsFollow these steps:
1 Approach a left turn slowly. Do not cross or put any part of your vehicle or trailer into the next lane. When you get close to the intersection, travel near the right edge of your lane. This will give you more room to safely complete the left turn.
2 Begin to turn when the front of your vehicle is even with the left side of the lane you are moving into.
3 Occasionally, look in your left outside mirror at the trailer wheels. They will travel a path inside that of your vehicle wheels. This is called off-tracking. Allow for off-tracking by steering towards the right side of the lane you are entering.
4 When your trailer is safely through the turn, steer the vehicle into the centre of your lane.
Turning left when towing a trailer – note path of the vehicle and trailer wheels.
Right turnsTo turn right, reverse the steps to turn left. Remember: if you do not allow for the off-tracking, you may hit the curb, a parked vehicle, or a pedestrian.
Turning right when towing a trailer – note path of vehicle and trailer wheels.
Off-trackingOff-tracking happens when you are towing a trailer and you make a turn. The trailer wheels travel on a path that is inside the path of the wheels of your vehicle.

160 Towing a trailer
Chapter 10 Clear Language Driver’s Guide
5. Backing a trailer Backing a trailer takes practice. Sometimes, you will need to turn the steering wheel in the opposite direction than you would if you had no trailer.
When reversing, try to have someone guide you. If you don’t have help, make sure the path behind the trailer is clear. Always reverse slowly, at a walking pace.
Steps for backing a trailer 1 Start by turning the steering wheel in the opposite direction you want to go. Turn the
steering wheel right to go left. Turn the steering wheel left to go right.
2 To make sure your vehicle does not touch the trailer, only turn the steering wheel one-quarter (1/4) to one-half (1/2) turn.
3 As soon as the trailer begins to turn, move the steering wheel back to the normal position. Use only small steering movements.
When backing a trailer to the right, remember you won’t be able to see everything behind you because there are blind spots behind the trailer.
Position of the towing vehicle’s tires for backing a trailer.

Towing a trailer 161
Chapter 10 Clear Language Driver’s Guide
De!nitions
Fifth-wheel trailer – !fth-wheel trailers attach to trucks that have a special hitch. The hitch is inside the back of the truck, over the rear axle.
Gross weight – the combined weight of a trailer and its load.
Off-tracking – happens when you are towing a trailer and you make a turn. The trailer wheels travel on a path that is inside the path of the wheels of your vehicle.
Tail lights – the lights at the back of your vehicle or trailer that show drivers behind that you are stopping or turning.

162 Towing a trailer
Chapter 10 Clear Language Driver’s Guide
Notes

163
Clear Language Driver’s Guide
De!nitionsBoulevard – the strip of ground between the edge of a private property and the road.C3 Driving basics
Braking distance – how far your vehicle travels during “braking time.”C3 Driving basics
Braking time – how long it takes your vehicle to stop after you begin to brake.C3 Driving basics
Circular intersection – see traf!c circle or roundabout.
Clutch – a pedal used in a vehicle with a manual transmission. It is used to start the vehicle, change from one gear to the next, and just before you stop to prevent stalling.C3 Driving basics
Collision – when a vehicle hits another vehicle or something on the roadway such as an animal. C6 Challenging road conditions and emergencies
Condition code – a letter printed on your licence that means you have to follow a certain rule.C1 Getting ready to drive
Controlled intersection – an intersection with traf!c control lights or signs.C4 Intersections and turns
Convex mirror – a mirror with a curved surface. You can see more with a convex mirror than you can with a #at mirror. C5 Highway driving
Conviction, convicted – when a court decides you are guilty of an offence.C9 Driving within the law
Convoy – two or more vehicles travelling together. It can be hard to see around and pass a convoy.C8 Sharing the road
ABS – anti-lock braking system. C6 Challenging road conditions and emergencies
Accelerate – to move faster or speed up.C3 Driving basics
Advanced road test – a test to see if you have the driving skills and experience under challenging conditions to become a fully-licensed driver. You need to pass the advanced road test to get your full Class 5 Licence.C1 Getting ready to drive
Air brakes – a braking system that uses compressed air to stop a large vehicle or a vehicle pulling a trailer.C1 Getting ready to drive
Angle parking – parking at 45 degrees to the curb or traf!c lane.C3 Driving basics
ATV – all-terrain vehicle. Only legal for off-road travel. Includes snowmobiles, quad bikes, and motorized three and four wheel bikes.C8 Sharing the road
Automatic transmission – vehicles with an automatic transmission have gears that change automatically as you speed up or slow down.C3 Driving basics
Axle – a bar that connects two wheels on a vehicle. A car has two axles. Larger vehicles or vehicles pulling trailers may have three or more axles.C1 Getting ready to drive
Basic road test – a test to see if you can drive safely, know driving rules, and can park. You need to pass the basic road test to get your Class 5 GDL Probationary Licence.C1 Getting ready to drive
Blind spots – areas beside your car that you can’t see when you look in your side or rear-view mirrors. Before you change lanes, you have to shoulder check to see if there is a vehicle or anything else in your blind spots.C3 Driving basics

164
Clear Language Driver’s Guide
Courtesy corner – an intersection with stop signs on all corners. Drivers stop, then let the vehicle that arrives !rst, go !rst. If two vehicles arrive at the same time, drivers let the vehicle on the right go !rst.C4 Intersections and turns
Crosswalk – a section of road that pedestrians use to cross from one side to the other. Marked with white painted lines and sometimes with overhead #ashing lights. Drivers must stop for pedestrians at crosswalks.C4 Intersections and turns
Decelerate – to slow down.C5 Highway driving
Demerit points – points that are put on your driving record if you are convicted of a driving offence. If you get too many demerits, you will lose your licence.C9 Driving within the law
Designated lane – a lane on a roadway that has special rules or uses. Signs, markings, or symbols show how traf!c must use the lane.C2 Traf!c controls
Disquali!ed – when you are no longer allowed to drive.C9 Driving within the law
Distracted driving – not giving your full attention to driving because you are doing something else like talking or texting.C7 Responsible driving
Driver’s licence – the certi!cate showing that you are allowed to drive. In this guide we use “driver’s licence” instead of “operator’s licence.”C1 Getting ready to drive
Dual lanes – where two lanes of traf!c run side-by-side going the same direction.C4 Intersections and turns
Endorsement code – a letter printed on your licence to show you have taken a certain type of training or course.C1 Getting ready to drive
Examiner – a person who gives a test.C1 Getting ready to drive
Exceed – go beyond what is allowed.C9 Driving within the law
Fifth-wheel trailer – !fth-wheel trailers attach to trucks that have a special hitch. The hitch is inside the back of the truck, over the rear axle.C10 Towing a trailer
Fine – an amount of money you must pay if you break a law.C9 Driving within the law
Friction point – in a manual transmission. The point where the engine and transmission connect, as you release the clutch.C3 Driving basics
Fully-licensed driver – a person who has passed the advanced road test and has a full Class 5 Licence.C1 Getting ready to drive
GDL – Graduated Driver Licensing program. This three-stage program allows you to drive with gradually fewer restrictions as you become more experienced.C1 Getting ready to drive
Gross weight – the combined weight of a trailer and its load.C10 Towing a trailer
Hazard lights – the #ashing lights on a vehicle that warn other drivers of hazards, emergencies, sudden stops, and collisions. Also called four-way #ashers. C6 Challenging road conditions and emergencies
Head restraint – movable part at the top of your seat that supports and protects your head and neck during a sudden stop.C3 Driving basics
Hydroplaning – losing control of your vehicle in wet, rainy conditions because the tires lose contact with the road surface. C6 Challenging road conditions and emergencies
Identi!cation – documents that prove who you are, such as passport, driver’s licence, or birth certi!cate.C1 Getting ready to drive

165
Clear Language Driver’s Guide
Impaired driving – driving when you are not !t to drive because you are too tired, or have been drinking alcohol, taking drugs, or using medication.C9 Driving within the law
Impound – when your vehicle is taken away for a period of time because of a driving offence.C9 Driving within the law
Intersection – where two or more roads meet.C4 Intersections and turns
Kinetic energy – energy caused by movement.C5 Highway driving
Knowledge test – a test you need to pass to get your Class 7 Learner’s Licence. You take the test at a registry of!ce. The test is based on the Alberta Driver’s Guide to Operation, Safety and Licensing – Cars and Light Trucks. It asks questions about safe driving, laws, and road signs.C1 Getting ready to drive
Learner driver – person with a Class 7 Learner’s Licence.C1 Getting ready to drive
Legal limit – how much alcohol can be in your bloodstream when you drive.C9 Driving within the law
LRT – light rail transit, found in urban areas.C8 Sharing the road
Lug – when a vehicle with a manual transmission moves in a rough, bumpy way. This happens if you don’t shift gears smoothly.C3 Driving basics
Manual (standard) transmission – to drive a vehicle with a manual transmission, you must push a clutch pedal, then change gears with a gearshift, when you speed up or slow down.C3 Driving basics
Median – an area that divides two lanes of traf!c. It may have grass, trees, metal rails, cement, or just be paved.C8 Sharing the road
Merging – joining moving traf!c.C5 Highway driving
Obstruction – something blocking the roadway such as another vehicle, an animal, garbage, or traf!c control signage.C4 Intersections and turns
Offence – an action that breaks the law.C9 Driving within the law
Off-tracking – happens when you are towing a trailer and you make a turn. The trailer wheels travel on a path that is inside the path of the wheels of your vehicle.C10 Towing a trailer
Operator’s licence – see driver’s licence.
Parallel parking – parking alongside the curb.C3 Driving basics
Pedestrian – a person who is travelling on foot. A person who is walking beside and pushing a bicycle is also a pedestrian. C8 Sharing the road
Penalties – demerit points, !nes, or suspensions given to drivers who break the law.C9 Driving within the law
Perception distance – how far your vehicle travels during “perception time.”C3 Driving basics
Perception time – how long it takes you to realize that you need to stop.C3 Driving basics
Permissive – allowed, legal.C2 Traf!c controls
Perpendicular parking – parking at 90 degrees (a right angle) to the curb.C3 Driving basics
Placard – small sign.C2 Traf!c controls
Primary highway – main highway.C3 Driving basics

166
Clear Language Driver’s Guide
Proactive – to do or think about something ahead of time or before you need to, so you can avoid dangers when you drive.C7 Responsible driving
Probationary driver – a person in the GDL program who has passed the basic road test and has a Class 5 GDL Probationary Licence.C1 Getting ready to drive
Prohibitive – not allowed.C2 Traf!c controls
Queen’s Printer – the organization that does printing for the government.Introduction
Railway crossing – where train tracks cross a road. C8 Sharing the road
Reaction distance – how far your vehicle travels during “reaction time.”C3 Driving basics
Reaction time – how long it takes you to move your foot to the brake pedal and start braking, after you realize that you need to stop.C3 Driving basics
Reciprocal Licensing Agreement – an agreement that makes a driver’s licence from another country equal to an Alberta driver’s licence. The agreement lets you exchange one for the other.C1 Getting ready to drive
Re-class – moving from one class of licence to another. For example, during the GDL, you will re-class from a Class 7 Learner’s Licence to a Class 5 GDL Probationary Licence. C1 Getting ready to drive
Registration – all motor vehicles and trailers on Alberta roadways must be registered. You must always have the registration document with you when you drive.C1 Getting ready to drive
Registry agent – an of!ce that provides services on behalf of the Government of Alberta. To apply for a driver’s licence or take a driving test, you must go to a registry of!ce.C1 Getting ready to drive
Regulatory, regulation – rules, laws, controls.C2 Traf!c controls
Reserved – saved for.C2 Traf!c controls
Restrictions – rules, limits.C1 Getting ready to drive
Rev – to make an engine run quickly by pressing the accelerator pedal.C3 Driving basics
Reverse – to move backwards or back up.C3 Driving basics
Right-of-way – the right to go !rst. Drivers may have to yield the right-of-way to another driver or a pedestrian.C4 Intersections and turns
Roundabout – see traf!c circle or roundabout.
Rural – away from cities and towns.C2 Traf!c controls
Scan – to look all around and beyond where you are.
Shoulder check – a quick look over your shoulder to see if there is a vehicle in your blind spots.C3 Driving basics
Signalling – using your turn signal lights to let other drivers know what you are going to do. C3 Driving basics
Skid – when you lose control of your vehicle and it slides. C6 Challenging road conditions and emergencies
Space cushion – you have a space cushion when you leave enough space between you and other vehicles to stop safely or move around a hazard. You leave space ahead, behind, and on both sides of your vehicle. C7 Responsible driving

167
Clear Language Driver’s Guide
Standard transmission – see manual transmission.
Supervisor – a person who is at least 18 with a valid driver’s licence, who is seated beside you and helps you while you drive. To drive with a Class 7 Learner’s Licence, you need a supervisor.C1 Getting ready to drive
Suspension – when your licence is taken away for a period of time and you are not allowed to drive.C9 Driving within the law
Tail lights – the lights at the back of your vehicle or trailer that show drivers behind that you are stopping or turning.C10 Towing a trailer
Threshold braking – applying just enough brake pressure so wheels don’t lock.C3 Driving basics
T intersection – an intersection where two roadways meet and form a “T”. C4 Intersections and turns
Traf!c circle or roundabout – an intersection where roadways meet and form a circle. Traf!c goes in a counter-clockwise direction around a centre island. Also called a circular intersection. C4 Intersections and turns
Transmission – the part of a vehicle that moves power from the engine to the wheels. A vehicle can have an automatic or manual (standard) transmission.C3 Driving basics
TTY – teletypewriter service on pay phones to help hearing or speech-impaired people use the phone.C2 Traf!c controls
Uncontrolled intersection – an intersection with no traf!c control lights or signs.C4 Intersections and turns
Urban – in a city or town.C2 Traf!c controls
U-turn – turning your vehicle around at an intersection to go the opposite way.C4 Intersections and turns
Vehicle – something that you drive or ride such as a car, truck, motorcycle, or bicycle.
Vision screening – an eye test you take at a registry of!ce to see if you need prescription glasses to drive.C1 Getting ready to drive
Weave zone – an area on a highway where drivers use the same lane to exit and enter. Drivers need to be careful in a weave zone because some vehicles are slowing to exit while others are speeding up to enter. C5 Highway driving
Yield – let others go !rst.C4 Intersections and turns
Zones – areas with speci!c rules, like school zones.C2 Traf!c controls

168
Clear Language Driver’s Guide
Helpful linksAir brake training informationwww.transportation.alberta.ca/4474.htm
Alberta Administrative Licence Suspension (AALS) Programwww.atsb.alberta.ca/503.htm
Alberta driver’s guides onlinewww.transportation.alberta.ca/531.htm
Alberta Driver’s Program Administratorwww.servicealberta.ca
Alberta Ignition Interlock Program (IIP)www.atsb.alberta.ca/documents/iiprogram08.pdf
Alberta Insurance Actwww.qp.alberta.ca/documents/Acts/I03.pdf
Alberta Laws Onlinewww.qp.alberta.ca/Laws_Online.cfm
Alberta Motor Associationwww.ama.ab.ca
Alberta Motor Association practice testhttp://www.ama.ab.ca/driver-education/driver-education-learners-practice-test
Alberta Traf!c Safety Act www.transportation.alberta.ca/525.htm
Alberta Transportation Safety Boardwww.atsb.alberta.ca
Alberta Transportationwww.transportation.alberta.ca For Edmonton request 780-427-8901For Calgary request 403- 297-6679
Alberta Zero Alcohol Tolerance (AZAT) Programwww.atsb.alberta.ca/504.htm
Canada Motor Vehicle Safety Standard 213www.saferoads.com/vehicles/children-safety.html
Driving schoolswww.transportation.alberta.ca/4474.htm
Identi!cation documentswww.servicealberta.gov.ab.ca/1305.cfm
Literacy Albertawww.literacyalberta.ca
Parking placards for people with disabilitieswww.servicealberta.gov.ab.ca/pdf/mv/Placard_Info_Individuals.pdf
Queen’s Printerwww.qp.alberta.ca
Registration informationwww.e-registry.cawww.servicealberta.ca
Registry agentswww.servicealberta.ca/1641.cfm
Restricted Operator’s Licence For more information, visit:www.transportation.alberta.ca/2566.htm
Safe Roadswww.saferoads.com/drivers/drivers-safety.html
Service AlbertaDocuments needed for applications:www.servicealberta.gov.ab.ca/1305.cfm
Transportation Alberta practice testswww.saferoads.com/drivers/knowledge-test.html

Notes

Notes