2 230V 50Hz 115V 60Hz 1 Click Add Printer and follow the Wizard. Click Next Select Local printer attached to this computer Deselect Automatically detect and install my Plug and Play printer Click Next On the Windows applications bar, click Start then select Printers and Faxes Alternatively click Start , select Control Panel then double click Printers and Faxes Click Have Disk Click Browse Select Use the following port Select latest USB port in the drop-down From My Computer select the location: System (C:)\ Program files\ Cembre\ GENIUSPRO\ Driver\ Genius II\ 2000-XP-Vista-7\ Select the file Genius II.inf Click Open The location of the driver file is shown in the lower field, click OK In Printers window select Genius II Click Next Confirm by clicking NEXT Insert Name and Organization in appropriate range. Click NEXT The following window shows the path of the software installa- tion. To continue, click NEXT Waiting for GENIUSPRO ® installation Click CLOSE to exit cont. Insert the CD into the computer. The installation procedure will autostart within seconds. On “Ready to Install” GENIUSPRO ® window, click INSTALL The setup checks for the presence of additional components including Microsoft .Net Framework 4; if necessary confirm the components installation. When installation is completed GENIUSPRO ® icon will appear on the desktop REMOVE THE CD Connect the USB cable between MG2 and the computer. Connect MG2 to mains power and switch on at the back of the printer. Windows XP will indicate that it has found new hardware. D O N O T C O N N E C T T H E PRINTER YET Click Next
Transcript
2
230V 50Hz115V 60Hz
1
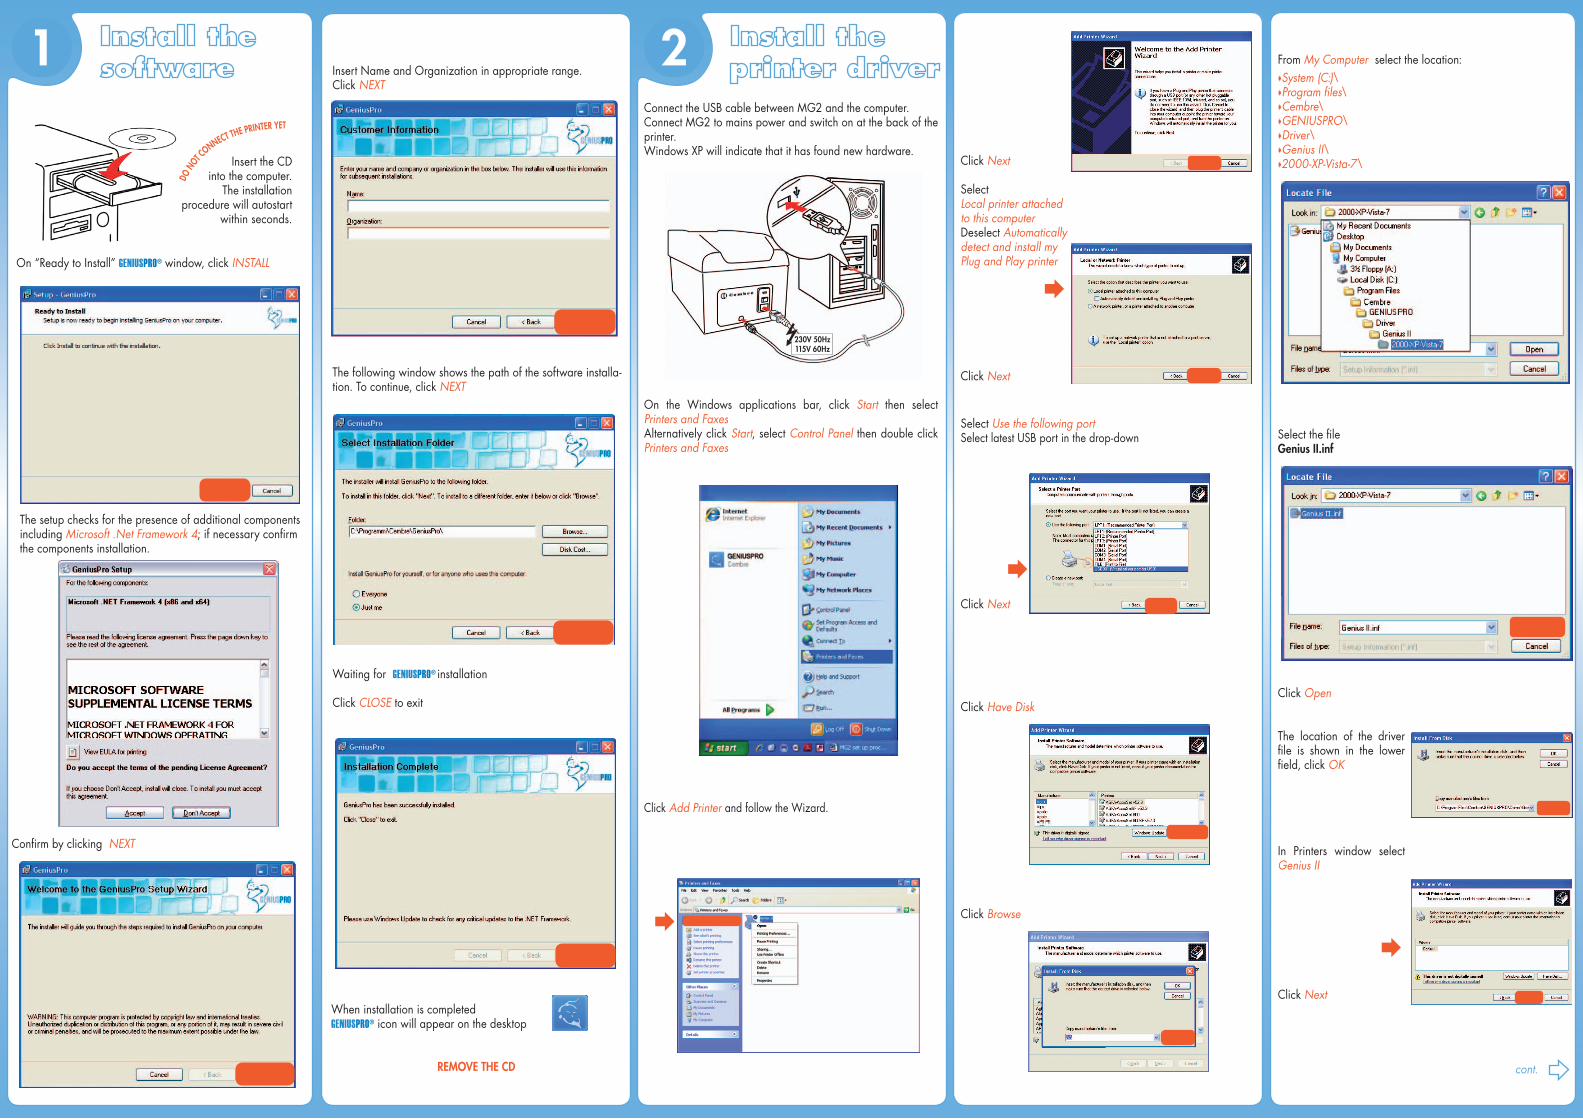
Click Add Printer and follow the Wizard.
Click Next
Select Local printer attached to this computerDeselect Automatically detect and install my Plug and Play printer
Click Next
On the Windows applications bar, click Start then select Printers and FaxesAlternatively click Start, select Control Panel then double click Printers and Faxes
Click Have Disk
Click Browse
Select Use the following portSelect latest USB port in the drop-down
From My Computer select the location:System (C:)\Program files\Cembre\GENIUSPRO\Driver\Genius II\2000-XP-Vista-7\
Select the file Genius II.inf
Click Open
The location of the driver file is shown in the lower field, click OK
In Printers window select Genius II
Click Next
Confirm by clicking NEXT
Insert Name and Organization in appropriate range.Click NEXT
The following window shows the path of the software installa-tion. To continue, click NEXT
Waiting for GENIUSPRO® installation
Click CLOSE to exit
cont.
Insert the CD into the computer.
The installation procedure will autostart
within seconds.
On “Ready to Install” GENIUSPRO® window, click INSTALL
The setup checks for the presence of additional components including Microsoft .Net Framework 4; if necessary confirm the components installation.
When installation is completed GENIUSPRO® icon will appear on the desktop
RemoVe tHe CD
Connect the USB cable between MG2 and the computer.Connect MG2 to mains power and switch on at the back of the printer.Windows XP will indicate that it has found new hardware.
Do n
ot c
onnect the printer Yet
Click Next
2 43 en
glish
++
12 I 100 E
1234
Printer
GENIUSPRO®
softwareon CD
USB cableMains power cable
mg2 installation on Windows® XP (SP3)
Read the Installation and maintenance manual before commencing this procedure
SYStem ReQUIRemeNtS• Processor Pentium®4 (2,4 GHz), equivalent
From Start - Printers and Fax Right click Genius II printer icon
Select GeneralSelect Print Test PageClick OK
If MG2 fails to function, repeat the process of changing USB ports and test printing until MG2 functions correctly.
AtteNtIoN: always connect mG2 to the same physical USB port on the computer, otherwise it will be necessary to recon-figure the connection each time a different port is used.
If the selected USB port is configured correctly, the MG2 car-riage will move out, in and out again, then start to alarm. Cancel the alarm by pushing the red button.Click OK then close the Printers and Faxes window
If the selected USB port is not correctly configured, the printer will not function and Windows will indicate a printing error:
In this case select Ports
Select a different USB port in the drop-down
Click Apply
Select Properties in the drop-down
In General select Print Test Page
GENIUSUITE
Double click on GENIUSPRO® icon on the desktop, a Loa-ding window will appear until the Start window indica-tes the program is ready.
In Start window, click Settings, then Printers
In Printer Configuration window, click Add Printer and select GeniusII from the list
Select Advanced
In Plate drop-down select Plate 1 Click OK on 3 open windows to return to System Default Settings
Now read the User Manual to calibrate MG2 and commence working.
GENIUSPRO®
The configuration is finished.Now you can print with GeniusII.If, when printing, GeniusII rejects the configurations, configure templates thus.
temPLAte CoNFIGURAtIoN – Select GeniusII printer and click one of the four printing configurations (here FLAT).
Click OK for all the open windows to confirm the new settings. Return to Printer Configuration window.
Repeat the operation for the other printing configurations by setting:
MG-CPM plate 2MG-TPM plate 3MG-TDM/TDMO plate 4
eDIt oFFSet – System default print position values. Normally these values are set to 0 and do not require adjustment. Please refer to the user manual for individual media print position fine tuning.
Click OK to save and EXIT
Click on Preferences
Printer name defaults to Genius II, overwrite this if required
In Do you want to use this printer as the default printer?
Select NoClick Next
Select Do not share this printer
In Do you want to print a test page?
Select No
Click Next
Click Finish
To complete theinstallation click Continue Anyway
The Genius II printer icon will appear in the Printer and faxes folder