101
Human Services Department Client Services Management System (CSMS) Client Services Training Participant Guide May 2013
| Date post: | 26-Jul-2019 |
| Category: |
Documents |
| Upload: | dangnguyet |
| View: | 225 times |
| Download: | 0 times |

Human Services Department
Client Services Management System
(CSMS)
Client Services
Training Participant Guide
May 2013

Table of Contents
1. Course Objectives
Course Outcome...................................................................................................1
General Information
2. Getting to Know CSMS .........................................................................2
CSMS Highlights..................................................................................................2
Screen Elements .................................................................................................3
Additional Screen Elements ................................................................................4
3. Logging on to CSMS..............................................................................5
Directions .............................................................................................................5
Changing Your Password.....................................................................................7
Client Services 4. Accessing Client Records....................................................................8
Main Page Tabs & Left Navigation Panel Functionality ......................................9
Searching CSMS for a Client .............................................................................10
Using the Quick Search......................................................................................10
Using the Advanced Search...............................................................................11
Skill Builder 1......................................................................................................11
Client Records Displayed on the Client List Tab ................................................12
Selecting a Client Record...................................................................................13
Creating a Client Record for a New Client .........................................................13
Skill Builder 2......................................................................................................20
Assign a Client to a Case Worker ......................................................................21
Key CSMS Functions to Understand..................................................................22
Working with a Client Record .............................................................................23
Add/Edit an Activity ............................................................................................24
Activity History: Viewing Client Activities............................................................26
Skill Builder 3......................................................................................................27
Client Activity Follow up .....................................................................................28
Case Notes.........................................................................................................30
Append to Case Note .........................................................................................33
Skill Builder 4......................................................................................................34
Discharge a Client ..............................................................................................35
Reopen/Create a New Episode of Care .............................................................36
Conduct an Assessment ....................................................................................38
Skill Builder 5......................................................................................................41
Create a Care Plan.............................................................................................42
Skill Builder 6......................................................................................................47
Care Plan: Viewing and Updating ......................................................................48
Skill Builder 7......................................................................................................50
View a Client’s History........................................................................................51
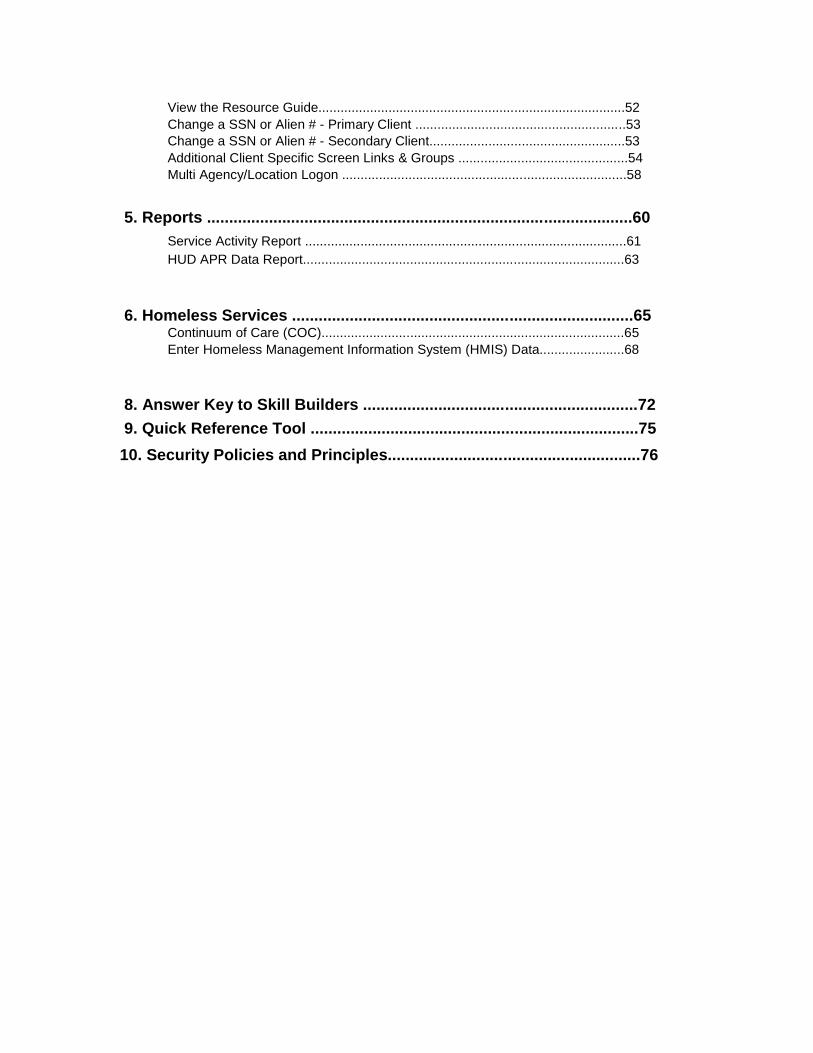
View the Resource Guide...................................................................................52
Change a SSN or Alien # - Primary Client .........................................................53
Change a SSN or Alien # - Secondary Client.....................................................53
Additional Client Specific Screen Links & Groups ..............................................54
Multi Agency/Location Logon .............................................................................58
5. Reports ................................................................................................60
Service Activity Report .......................................................................................61
HUD APR Data Report.......................................................................................63
6. Homeless Services .............................................................................65 Continuum of Care (COC)..................................................................................65
Enter Homeless Management Information System (HMIS) Data.......................68
8. Answer Key to Skill Builders ..............................................................72
9. Quick Reference Tool ..........................................................................75
10. Security Policies and Principles.........................................................76
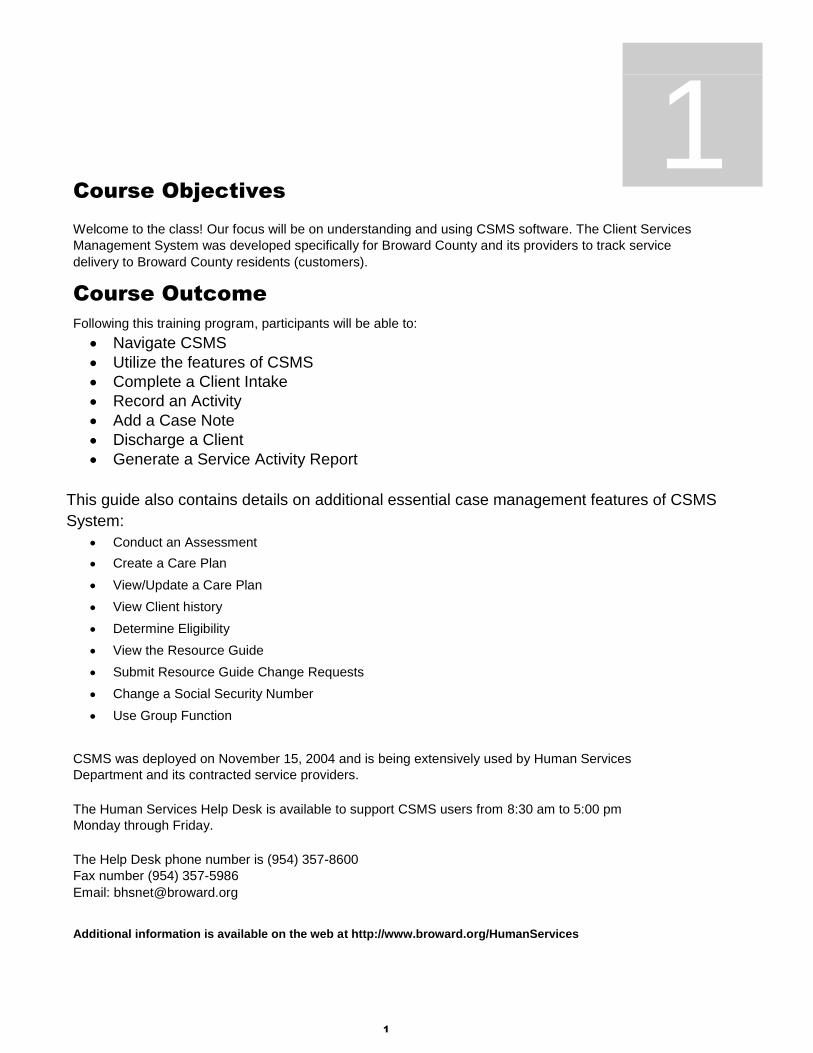
Course Objectives
1
Welcome to the class! Our focus will be on understanding and using CSMS software. The Client Services
Management System was developed specifically for Broward County and its providers to track service
delivery to Broward County residents (customers).
Course Outcome
Following this training program, participants will be able to:
Navigate CSMS
Utilize the features of CSMS
Complete a Client Intake
Record an Activity
Add a Case Note
Discharge a Client
Generate a Service Activity Report
This guide also contains details on additional essential case management features of CSMS
System:
Conduct an Assessment
Create a Care Plan
View/Update a Care Plan
View Client history
Determine Eligibility
View the Resource Guide
Submit Resource Guide Change Requests
Change a Social Security Number
Use Group Function
CSMS was deployed on November 15, 2004 and is being extensively used by Human Services
Department and its contracted service providers.
The Human Services Help Desk is available to support CSMS users from 8:30 am to 5:00 pm
Monday through Friday.
The Help Desk phone number is (954) 357-8600
Fax number (954) 357-5986
Email: [email protected]
Additional information is available on the web at http://www.broward.org/HumanServices 1

2
Getting to Know CSMS
CSMS is a comprehensive Human Services case management system created to effectively track client
data and service delivery.
CSMS Highlights
CSMS is web based.
CSMS connects all agency locations through one central database.
Case notes can be appended (additional text can be added to an existing case note) after being
saved.
Existing client data can be retrieved and used to pre-fill fields.
CSMS includes comprehensive drop down pick lists.
Historical address records are maintained for primary clients.
E-referrals can be sent, received and monitored through CSMS.
Initial Intake dates do not change.
The centralized database eliminates data duplication, resulting in accurate counts.
You can see information about the other (Broward Human Services Network) BHSNet services*
your client is receiving.
* To view this information a client’s consent must be on file, must be current, and the data must be
marked as shareable.
2

Buttons
Icons that perform actions with a mouse click.
Checkboxes
Enable or disable a selection or feature.
Click once to select the checkbox
Click again to deselect the checkbox
Client records
Contain all of the details and history on each client that have been entered into the CSMS
database.
Drop down option
pick lists
The downward pointing arrow indicates there is a pick
list of options to select from.
Data Fields
The spaces where you enter data, choose an option from a pick list in a drop down box,
etc.
Hyperlinks
Underlined entries within CSMS which redirect you to
another screen.
Radio buttons
Circles in front of selection choices.
Only one of the radio button choices can be selected at a
time.
Screen Elements
If you are a regular user of the Internet, you are probably already familiar with many of these terms.
If you don’t know these terms, you will find the following definitions helpful when working with CSMS.
3
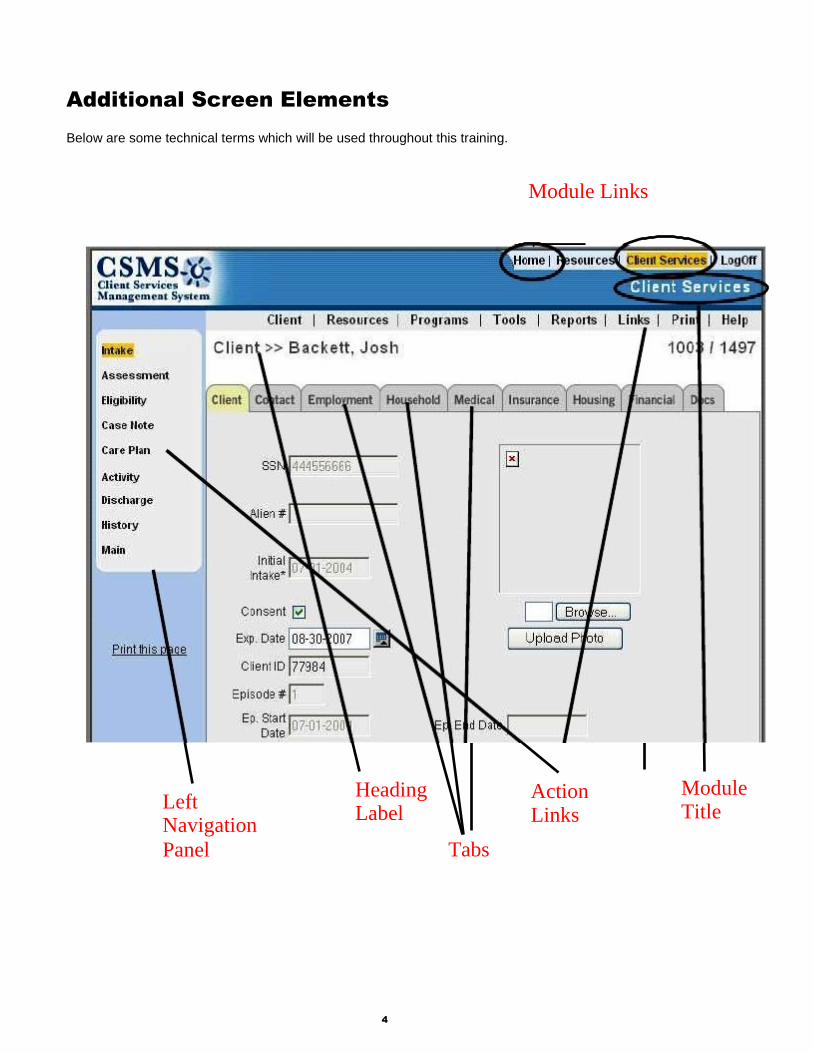
Additional Screen Elements
Below are some technical terms which will be used throughout this training.
Module Links
Left Navigation
Panel
Heading Label
Tabs
Action Links
Module Title
4

3
Logging on to CSMS
Each user has a unique user ID. Each time you log-on to CSMS, you will be prompted to enter your
user ID and password. Since the system uses “single sign on” technology, you will not be asked to
re-enter this information throughout the system.
You will need to re-enter your user ID and password if you log-off, change your password, or
allow your session to timeout (sit untouched for 30 minutes).
If you have been granted the multiple agency/location privilege please refer to page 60 for additional logon
instructions.
Directions:
1. Launch the Internet Explorer browser.
2. For Internal County Employees please enter the web address for CSMS
http://csms.bc.broward.cty/csms (instructions will be provided to you by the help desk upon creation
of your user account)
Note: Providers, external users & VPN users please login via http://connect.broward.org
3. When the Log-on window appears (shown at
right), you will enter your User ID and
Password which is provided to you by the
helpdesk once trained, as indicated above.
User ID = _____________________
Password = ____________________
User IDs and Passwords are case sensitive.
Note: Users are strongly encouraged to change
the password after the initial sign on to CSMS
to ensure security.
4. Click on the Secure Log-on button or hit Enter
on the keyboard. The CSMS Welcome
Page (Home) window will appear (shown on
next page).
5

Welcome Page (Home)
Welcome Page features:
Help Desk Contact information
Resources
Client Services
Home
Log-off
Change Password
6

Changing Your Password
1.
2.
3.
Click on Change Password as noted on the print screen of the Home Page. Doing so will open the
screen below:
There are only three fields in which data must be entered. Type your information into:
Old Password
New Password
Confirm New Password
Click on the OK button.
The system will return you to the Log On screen where you will enter your user ID and new password.
* Note that passwords must be alphanumeric with at least 8 characters or more.
7

Client Services Main Page
Accessing Client Records
4 From the Client Services’ main page you can select a client record to work with under the client list tab, view the referrals you
have received and made or scroll through a list of reminders. This screen with its three tabs, is shown below.
The Client List tab displays a list of client records based on the filter options chosen in the
Quick Search or Advanced Search.
The Referrals tab display a list of referrals received, or those you have made at your agency/
location.
The Reminders tab displays a list of the case note reminders created at your agency/location
presented in summary format.
8

Main Page Tabs & Left Navigation Panel Functionality
Client List Tab
Client list tab defaults to assigned clients and displays a list of clients assigned
to you. This tab will be addressed in detail on pages 10 thru 12.
Referrals
By default, the Referrals tab will display a list of referrals received at your
Agency / location.
To view the list of referrals you have made, select the Made radio button and then click on Refresh List. To return to viewing the list of referrals you have received, select the Received radio button and then click on the Refresh List.
Reminders
By default, the Reminders tab will display a list of case note reminders you
created. The list will include today’s reminders, those set for the previous
seven days, and those set for the next seven days.
To view a list of reminders set for a specific range of dates, enter
the earliest date in the Date From field and the latest date in the Date
To field. Then click on the Refresh List button.
To view a list of reminders set for the upcoming 30 days, check the
Next 30 Days checkbox and then click on the Refresh List button.
9

Searching CSMS for a Client
All client records will fall into one of three categories: Assigned Clients: All client records for which you are the assigned case worker in CSMS. My Clients: All client records you “touched”, and documented the interaction in CSMS (Records you have touched will remain in My Clients for 180 days). Select Location: All client records assigned to your agency location (location selected).
There are two search tools to locate a client on the Client Services main page: Client List Quick Search & Advanced Search
Using the Client List Quick Search
1.
2.
3.
4.
Click on the radio button of the client list you want to use (Assigned Clients,
My Clients, or Select Location).
If you want the search results to include inactive clients, click on the Include
Inactive checkbox at the top of the left navigation panel.
If you want to include Household members, click on the Include Household checkbox at the top left
navigation panel, the household member will display a letter H and the Client ID number of the main client.
Click on the Quick Search button.
10
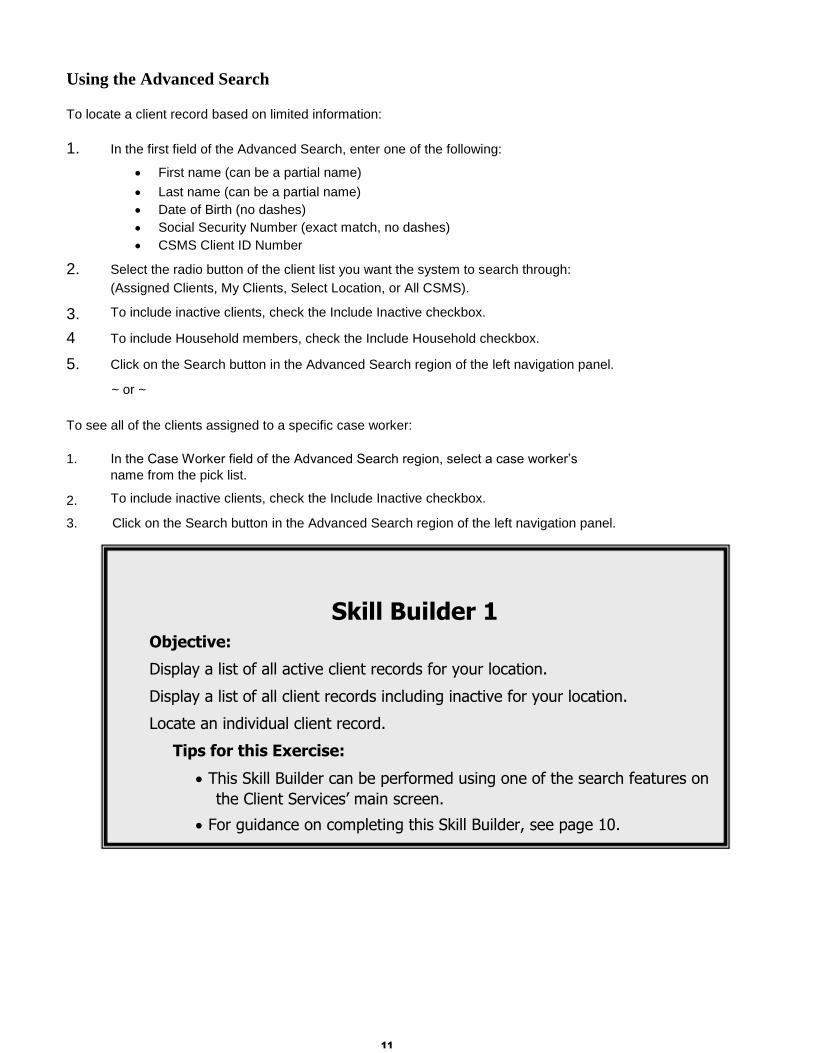
Using the Advanced Search
To locate a client record based on limited information:
1.
In the first field of the Advanced Search, enter one of the following:
First name (can be a partial name)
Last name (can be a partial name)
Date of Birth (no dashes)
Social Security Number (exact match, no dashes)
CSMS Client ID Number
2.
3.
4
5.
Select the radio button of the client list you want the system to search through:
(Assigned Clients, My Clients, Select Location, or All CSMS).
To include inactive clients, check the Include Inactive checkbox.
To include Household members, check the Include Household checkbox.
Click on the Search button in the Advanced Search region of the left navigation panel.
~ or ~
To see all of the clients assigned to a specific case worker:
1.
2.
3.
In the Case Worker field of the Advanced Search region, select a case worker’s
name from the pick list.
To include inactive clients, check the Include Inactive checkbox.
Click on the Search button in the Advanced Search region of the left navigation panel.
Skill Builder 1 Objective:
Display a list of all active client records for your location.
Display a list of all client records including inactive for your location.
Locate an individual client record.
Tips for this Exercise:
This Skill Builder can be performed using one of the search features on
the Client Services’ main screen.
For guidance on completing this Skill Builder, see page 10.
11
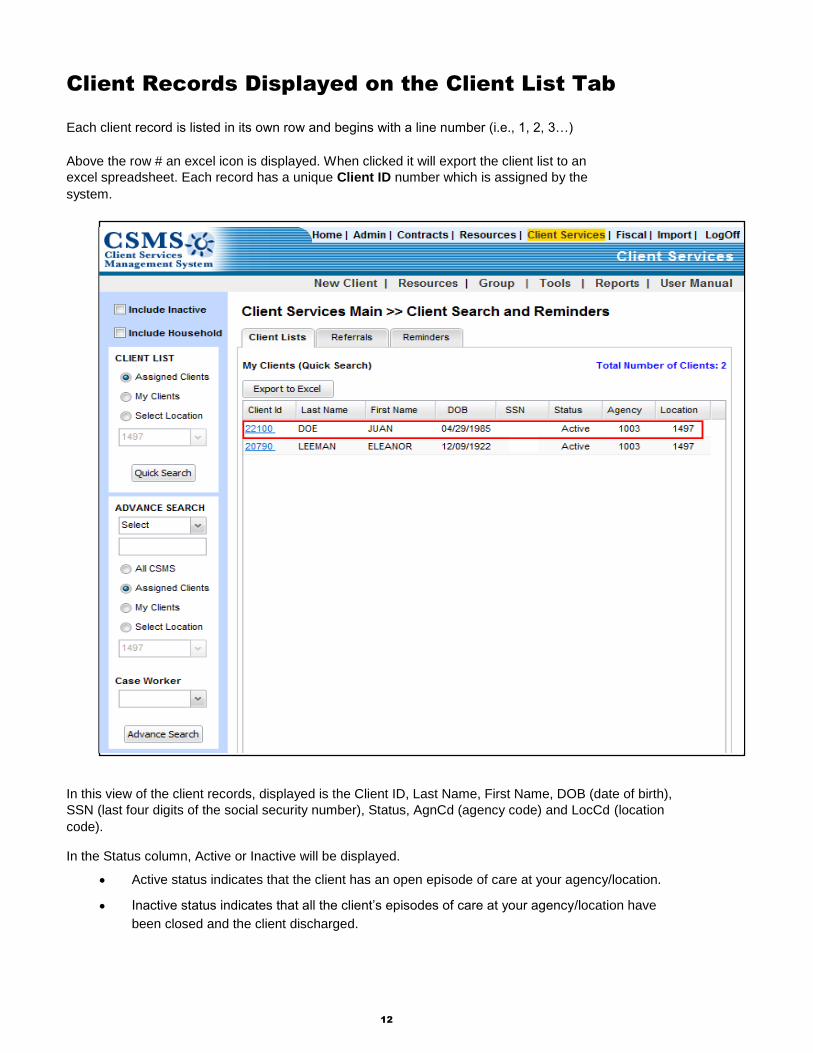
Client Records Displayed on the Client List Tab
Each client record is listed in its own row and begins with a line number (i.e., 1, 2, 3…)
Above the row # an excel icon is displayed. When clicked it will export the client list to an
excel spreadsheet. Each record has a unique Client ID number which is assigned by the
system.
In this view of the client records, displayed is the Client ID, Last Name, First Name, DOB (date of birth),
SSN (last four digits of the social security number), Status, AgnCd (agency code) and LocCd (location
code).
In the Status column, Active or Inactive will be displayed.
Active status indicates that the client has an open episode of care at your agency/location.
Inactive status indicates that all the client’s episodes of care at your agency/location have
been closed and the client discharged.
12

Selecting a Client Record
Clicking on the Client ID number will open a screen of detailed client record information. In the example
below, clicking on the Client ID opens a screen with nine tabs of information on the client selected,
defaulting to the Client tab. This is known as the Intake page.
Creating a New Client Record (Intake for a New Client)
1. From the Client Services main page, click on the New Client option from the Action Menu Bar.
2. A blank client Intake screen will display as show in Fig 1
Note: A client may be new to your Agency, Location , but already have a record in the CSMS database.
Fig 1
13

3. To search the CSMS database and the BIN for a matching client record, enter either the
client’s social security number (SSN) without dashes or Alien # in the appropriate field in Fig 2.
Fig 2
or
4. Click the Retrieve button.
If the client record exists in CSMS, a pop-up window will appear (Fig 3) and, if the consent
is valid, display records for other agency/location(s). Click on the Client ID and the available
shared information will pre-fill.
Multiple records may display for one client. If there is no consent, or the consent has expired,
at the agency where the record exists, then the pop-up window will return the records with a no
consent indicated.
5. Click on the Client ID hyperlink of the record you want to populate your Intake fields. If
there is no consent or the consent has expired, the five (5) master record fields will
populate: Client ID, Client name (including last, first, middle initial, and alias), date of birth,
gender and SSN.
6. If no matching records are retrieved, begin entering data on the client tab of the intake
screen. Any field which is mandatory is indicated with an asterisk (*).
Fig 3
The system will not allow data to be entered in another tab until you have saved the information on
the Client tab. Please review selected Intake field’s explanation that may be of interest to you.
Note: If client does not have a SSN number, then create a pseudo number using the following criteria: First Name initial letter, Middle Name initial letter (if client does not have a middle name then use letter x), Last Name initial letter, two-digit DOB month, two-digit DOB day and two-digit DOB year.
Example = John David Smith DOB 05/10/1950 – SSN pseudo number = JDS051050 Example = John Smith DOB 01/20/1960 – SSN pseudo number = JXS012060
14

Client Tab Highlights
SSN:
Alien #:
Initial Intake:
Consent:
Exp. Date:
Social Security Number
USCIS #
Date of Initial Client Intake and first episode of care at this agency location.
When checked, this indicates that a client’s consent is on file to share their
information with others BHSNet members. * If not checked, no sharing of any client
data will occur.
The expiration of a client’s consent (determined by business rules, generally one
year).
Client ID: A unique identification number assigned by CSMS.
Episode #: Current Episode of Care number assigned by CSMS.
Ep.Start Date: Episode of Care start date of the current episode of care.
Ep. End Date: The Episode of Care end date of the most recent episode of care for an inactive
client.
Referred Date:
By:
Zip:
USCIS status:
The date of the referral.
Name of individual/agency/etc. who referred the client.
Zip code; there are two fields to allow for zip code (5 characters) + extension (4
characters).
United States Citizenship Immigration Services status (formerly INS status).
Homeless checkbox: If checked, use the information in the mandatory fields below:
Street:
City:
A description, i.e., homeless-park, homeless-street, homeless-car, etc.
The name of the city where they are homeless
Contact Tab Highlights
Home Phone: Client’s home phone #
Alternate 1 (and 2): Additional contact telephone numbers, use the pick list to specify type (i.e. beeper,
cell, etc).
HCE Caregiver:
SSN:
Billing contact:
(field is specific to EVSD) If checked, the following field is mandatory:
Social Security Number of the care-giver
Indicates if the primary or secondary contact is the billing contact.
Employment Tab Highlights
In order to begin entering data on the
Employment tab, click on the Add Job button
at the bottom of the screen.
The primary client’s employment history will
be tracked on the employment history screen
(shown at right) as jobs are entered.
Benefits: Upgrade:
Contact phone:
Term:
Indicates the job being entered
is a position change with at least
a 10% increase in salary.
There are two fields, one for phone
number, and one for the extension
number.
CSMS calculates the length of
employment based on start date
and end date data.
15

Mandatory fields on this screen are:
Employer
Start Date
Household Tab Highlights
In order to begin entering data on the Household tab, click on the Add Member button at the bottom of
the screen. Summary information on each household member will display on the summary screen
(shown at right) as members are added to the database.
Shareable:
Shareable:
Medications:
In the Additional Information section, indicates if the data in the Additional Information section may be shared throughout BHSNet. In the Employment Information section Indicates if the data in the Employment. Information section may be shared throughout BHSNet. In the Medical section a text field to enter medications the household member
is taking.
Note: this functionality is not as detailed for household members as it is for primary clients.
Medical Tab Highlights Mental Illness: Yes/No pick list. If yes, ICD9 code: Refers to the yes or no answer provided in the “mental illness” field. Other: This field allows a case worker to enter any other disability that needs to be
listed. Medication button
Medication Window Highlights
Click on the medication button to open a window displaying the client’s medication summary.
Name:
Type: Route: Side effect: If yes, explain:
Name of the medication (not the name of the client).
Prescription or over-the-counter. How the medication is taken (i.e. oral, topical, inhalant, etc). Yes/No pick list. Refers to the yes or no answer provided in the “side effect” field.
Insurance Tab Highlights
In order to begin entering data on the
Insurance tab, click on the Add
Insurance button at the bottom of the
screen.
Summary information of each policy will
display on the summary screen (shown
at right) as policy information is added to
the database.
16

Medicaid Program: A Medicaid program
code, i.e. MWA or QMB.
Waiver LOC Eff Date: Medicaid Waiver
Level of Care Effective Date (field is
specific to EVSD).
Note: If you update the Waiver
LOC Effective Date field and save the
record, the previous effective date
will be noted below the data fields (as
shown circled at right).
Housing Tab Highlights
This screen is used to add or edit a
client’s address after the initial Intake
is performed. This is also where the
client’s residence history is tracked and
can be viewed.
The pick list for many of the fields on this screen will have different selections for case workers logged on
as Homeless providers. All other agencies’ case workers will have standard pick list choices.
Housing Agency Location: Name of facility, i.e., HAC.
Homeless: Indicates if the client is homeless.
Note: If homeless was checked on the Client tab of the Intake, and the client is no longer homeless, this
check box is the only way to change the information initially entered during the client Intake.
Term: CSMS calculates the length of residence based on start date and end date data.
Financial Tab
Last Modified Date: CSMS populates this field.
To Add Income, Expense, or Asset
to the Financial Tab
1. Determine if you are entering an
income, expense, or asset item.
2. From the appropriate pick list choose a
type of income, expense, or asset.
Note: you can only enter one at a time, not
all three as shown at right.
3. In the amount field associate with the item you are adding, enter the
value of the item in dollars and cents.
17
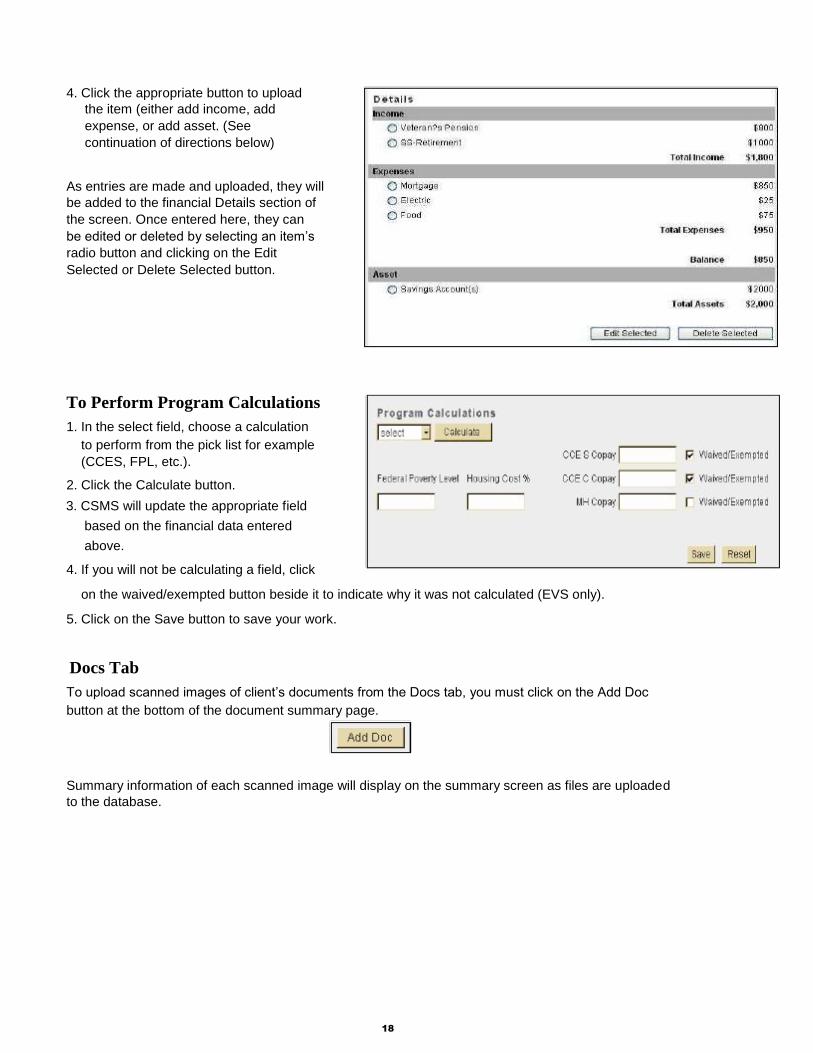
4. Click the appropriate button to upload
the item (either add income, add
expense, or add asset. (See
continuation of directions below)
As entries are made and uploaded, they will
be added to the financial Details section of
the screen. Once entered here, they can
be edited or deleted by selecting an item’s
radio button and clicking on the Edit
Selected or Delete Selected button.
To Perform Program Calculations
1. In the select field, choose a calculation
to perform from the pick list for example
(CCES, FPL, etc.).
2. Click the Calculate button.
3. CSMS will update the appropriate field
based on the financial data entered
above.
4. If you will not be calculating a field, click
on the waived/exempted button beside it to indicate why it was not calculated (EVS only).
5. Click on the Save button to save your work.
Docs Tab
To upload scanned images of client’s documents from the Docs tab, you must click on the Add Doc
button at the bottom of the document summary page.
Summary information of each scanned image will display on the summary screen as files are uploaded
to the database.
18
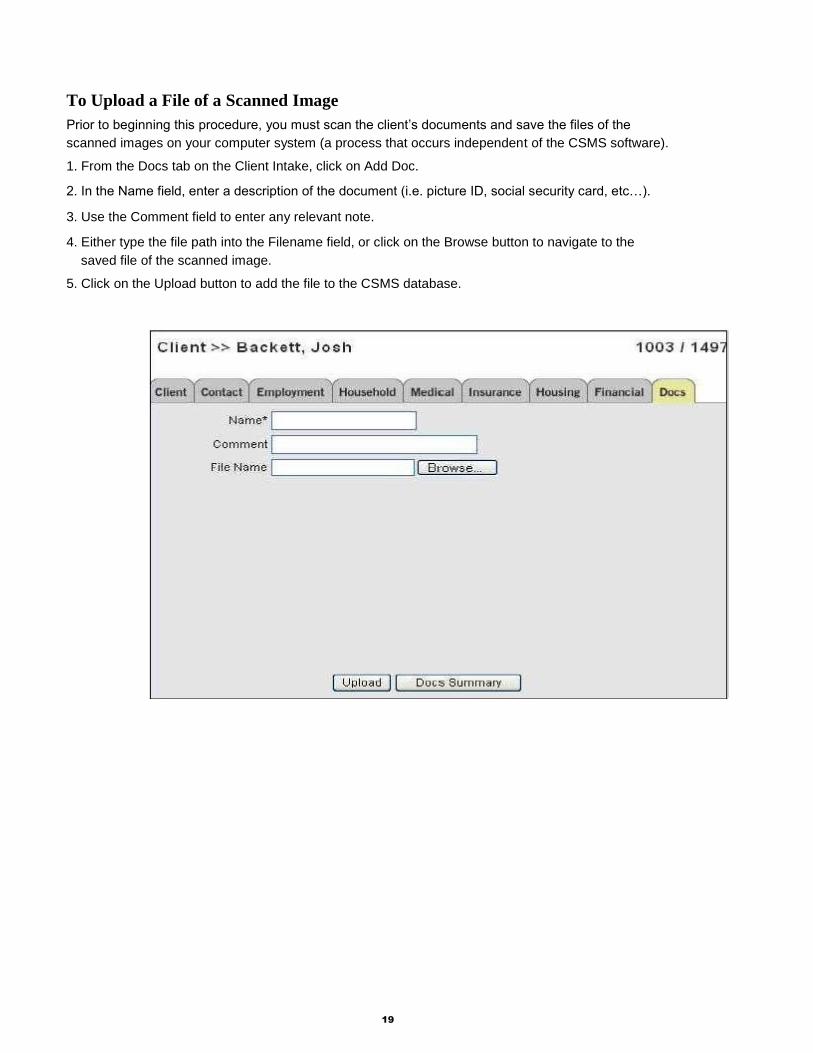
To Upload a File of a Scanned Image
Prior to beginning this procedure, you must scan the client’s documents and save the files of the
scanned images on your computer system (a process that occurs independent of the CSMS software).
1. From the Docs tab on the Client Intake, click on Add Doc.
2. In the Name field, enter a description of the document (i.e. picture ID, social security card, etc…).
3. Use the Comment field to enter any relevant note.
4. Either type the file path into the Filename field, or click on the Browse button to navigate to the
saved file of the scanned image.
5. Click on the Upload button to add the file to the CSMS database.
19

Skill Builder 2
Objective: Perform an Intake of a new client. For help, see pages 13 to 19.
Directions: Complete each task described below, or answer the question asked. If you need assistance, raise your hand.
_____________________________________
1. Start an Intake for a new client. Hint/Tip: What link on the Client Services’ main screen will open an empty Intake screen?
2. Begin the Intake by completing the fields on the Client tab. Hint/Tip: How might the Retrieve button help you?
3. Add the client’s contact data on the Contact tab. Make the primary contact the billing contact.
Reminder: Have you been saving your work?
4. Add details about the client’s current (benefit-providing) job on the Employment tab.
5. Add one member of the client’s household on the Household tab.
6. Add a prescription medicine to the client’s medication summary on the Medical tab.
7. This client does not have insurance (skip the Insurance tab).
8. This client is new; do you need to enter any data on the Housing tab?
20

Assign a Client to a Case Worker
1. Select the Client record to be assigned from the Client Services’ main screen.
2. From the Client action link (located above the primary client’s name) hover over the drop down
menu, and click on the Assign Case Worker menu item from the list (shown below).
3. In the window that opens, select the case worker to receive the assignment from the pick list
under Case Worker / Caseload (noted below the circled area).
4. Click on the Save button.
21

Functional
Area Tasks Performed within the Area
Intake A client’s profile information is entered (demographic data, contact information,
employment data, medical profile, insurance and financial data, scanned images of
documents, as well as a household profile).
When a client record is initially created, CSMS assigns an Episode of Care
number to the profile.
When a client returns for additional services; services can be added to an
existing Episode of Care or a new Episode of Care can be opened (as detailed
later, on page 36).
An Episode of Care, in CSMS, is a period of time during which an active client is receiving
services at a particular agency location. A Client becomes inactive when discharged from
an Episode of Care. A client may have multiple Episodes of Care
Assessment Case workers select and conduct an assessment (a group of questions to be asked of
the client). Based on the answers provided, CSMS will generate a status rating (in crisis,
at risk, stable, safe, or thriving) for the client in categories including (but not limited to)
education, employment, income, substance use, and nutrition.
Care Plan Define the client’s problem(s) and plan action(s) to address the problem(s) or service(s).
The Care Plan is flexible to meet the varied needs of the different agencies using CSMS.
It is a contract to between the case worker and the client to address the problems
and meet the outcomes/ goals
It defines a client’s problem(s) and desired outcome(s).
It identifies planned services as well as actions steps that will enable the client to
meet their short term and long term goals.
Activity Case workers record activities for clients. This includes documenting the services your
agency has provided and sending referrals for needed services to other agencies.
An Activity History can be viewed, showing all the services provided to and referrals
made for a specific client. If there are valid consents in place, you can also view
services provided and referrals made by other agencies, that were marked sharable.
Case workers’ case management follow-up can also be documented here.
The term activities refer to services and referrals.
Key CSMS Client Services Functions to Understand
As we work through the course materials, it will be helpful to understand the purpose of the primary CSMS
functional areas. They are: Intake, Assessment, Care Plan, and Activity.
22

Action Link Function
Intake Return to the Intake screen (where client data is tracked on nine tabs)
Assessment Conduct a client assessment using prepared assessment tools (refer to
page 38 of this training guide)
Eligibility Identify types of services a client may be eligible for, based on Intake
Data (refer to page 52 of this training guide)
Case Note Document case status, progress, details of case worker activity, and
case worker and client’s intended actions (refer to page 30 of this training
guide)
Care Plan Document client problems, planned actions, and/or services to be
provided (refer to page 48 of this training guide)
Activity Records services provided, referrals made or referrals to authorized
services (refer to page 28 of this training guide)
Discharge Records completion of an episode of care (refer to page 35 of this
training guide)
History View a client’s complete BHSNet experience* Assuming a client’s
consent is on file, current, and the data is marked shareable (refer to
page 51 of this training guide)
Main Return to the Client Services’ main screen (where client records are
listed)
Print this page Provides professional print option
Working with a Client Record
Once you have selected a
client record to work with
and are looking at the
Intake screen, a list of
Action Links will display in
the left navigation panel.
(shown below).
23

Add/Edit Activity
The Add/Edit Activity screen is where services provided, referrals made, and services
authorized are recorded. The fields will vary slightly between adding a service and adding
a referral. Click on the Activity action link from the left navigation panel (shown at right).
Add an Activity (Service) 1. Enter the activity data in the
screen’s fields.
Activity Date: Date the
service was provided.
Activity Type: Service or
referral (in this sample,
service is selected).
Agency: Your agency
when entering a service
(prefills).
Location: Your location
when entering a service
(prefills).
Follow Up Date: Entering a
date here will create a
follow-up entry that will
appear on the Followup tab
when you log-on to CSMS
(once the date you enter
here is within seven days of
the current date.)
For the second gray section of the
screen, follow the business rules of
your agency to determine which
fields to populate.
2. Share Activity defaults as
checked. You uncheck the box
If the activity is not sharable.
3. Once all your data is entered, you must click on the Save button to upload the data to the database.
If you leave this screen without
saving, your entries will have to be
re-entered.
24

Add an Activity (Referral)
Note: Only the differences between a referral activity and a service activity are noted below. Please
review the previous page for information on screen sections not shown below.
1. Enter the activity data in the screen’s fields.
Activity Date: Date the referral
was made.
Activity Type: Service or referral
(in this sample, referral is
selected).
Agency: Specify which agency
you are referring to when
entering a referral.
Location: Specify which location
you are referring to when
entering a referral.
Note: Once referral is selected as the activity type. A small RG button appears to the right of the
agency field. This accesses the resource guide when clicked. Search the resource guide by service,
program or agency until you locate the desired service.
2. When the correct service has been identified, a screen like the one shown at right will be displayed, listing the service’s details.
3. Click on the Select and Continue button at the bottom of the screen to automatically fill the agency, location, program, and service fields of the referral activity with the information related to the selected service in the Resource Guide.
(Program will only fill if the selected service is
affiliated with a program.)
(This RG button feature is only available when
creating a referral activity – not when creating
a service activity.)
4. Continue to complete the referral activity fields and click on Save when finished (as shown on the previous page for service activity).
25
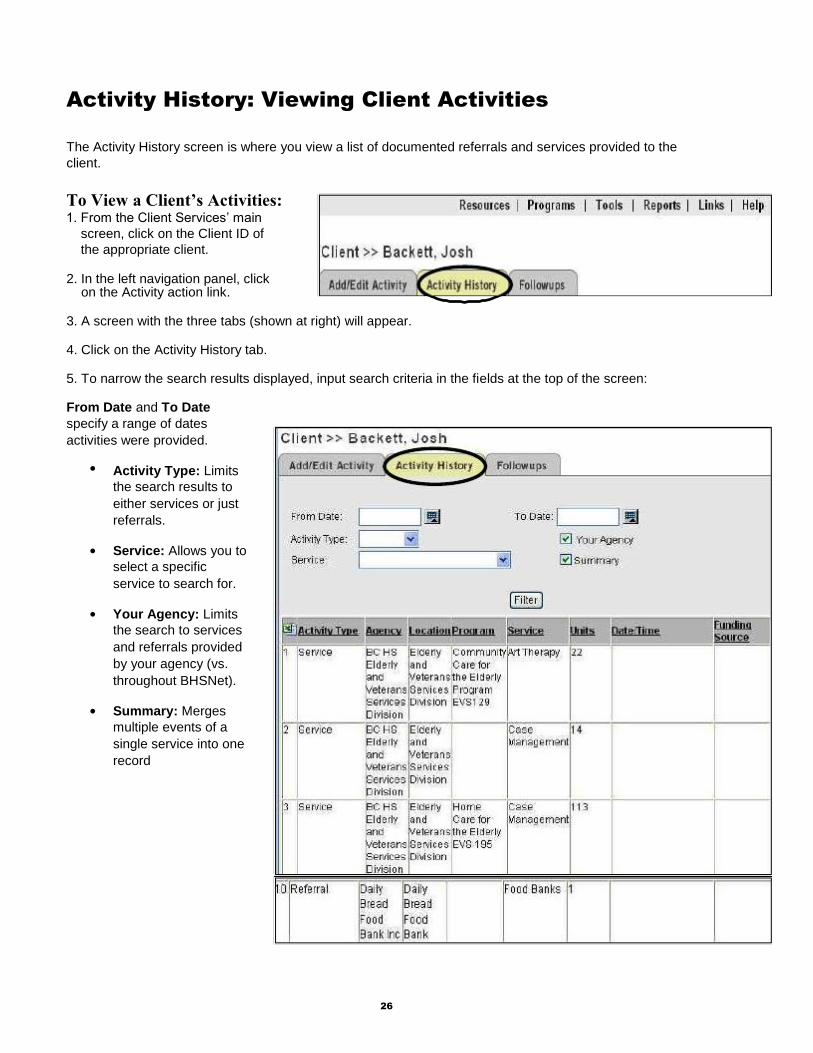
Activity History: Viewing Client Activities
The Activity History screen is where you view a list of documented referrals and services provided to the
client.
To View a Client’s Activities: 1. From the Client Services’ main
screen, click on the Client ID of
the appropriate client.
2. In the left navigation panel, click on the Activity action link.
3. A screen with the three tabs (shown at right) will appear.
4. Click on the Activity History tab.
5. To narrow the search results displayed, input search criteria in the fields at the top of the screen:
From Date and To Date
specify a range of dates
activities were provided.
Activity Type: Limits
the search results to
either services or just
referrals.
Service: Allows you to
select a specific
service to search for.
Your Agency: Limits
the search to services
and referrals provided
by your agency (vs.
throughout BHSNet).
Summary: Merges
multiple events of a
single service into one
record
26
Skill Builder 3
Objective: Navigate through CSMS to locate client records, and create an activity and review the Activity History for that client. For help, see pages 10 to 26.
Directions: Complete each task and write down how you completed it. Number 1 is completed for you as an example.
_____________________________________
1. Begin this Skill Builder by navigating to the Client Services’ main screen Click on the Client Services link at the top of the screen or in the left navigation Panel.
2. Select a client record.
3a. Create an activity for the client.
3b. Create a Referral activity for the client.
4. Navigate to the client’s Activity History.
5. Review the client’s Activity History and select a service or referral in which to view the details.
6. Return to Client Services’ main screen.
27
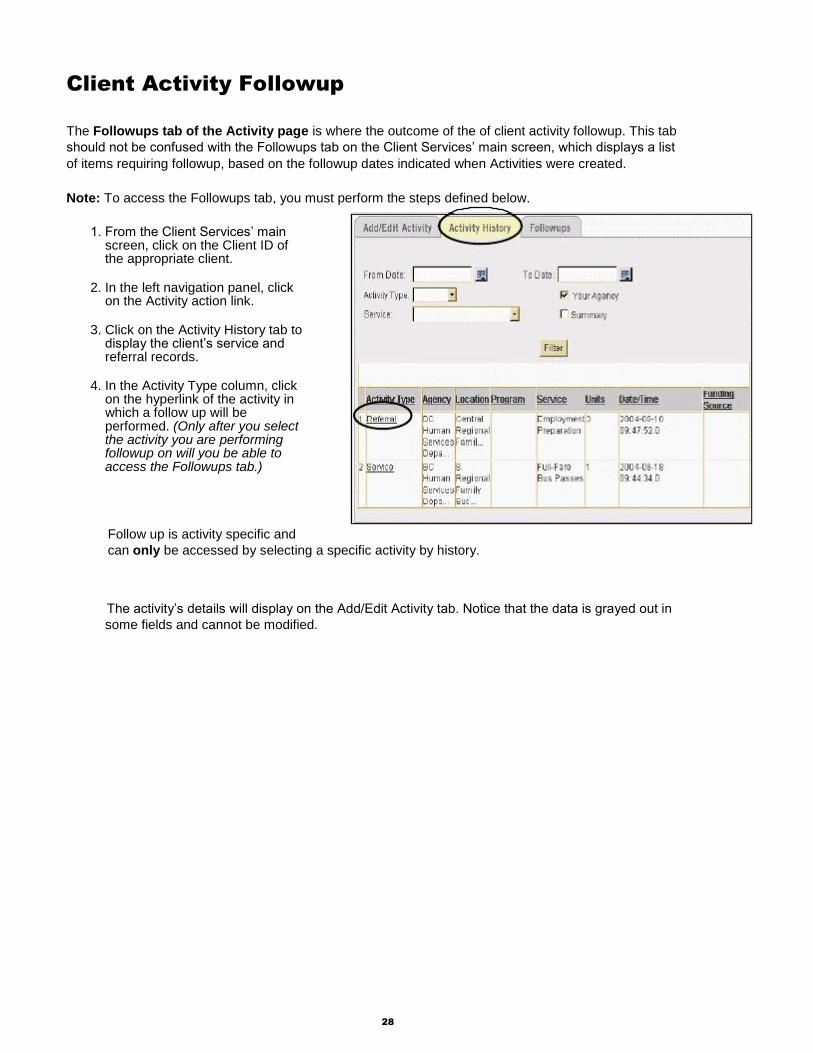
Client Activity Followup
The Followups tab of the Activity page is where the outcome of the of client activity followup. This tab
should not be confused with the Followups tab on the Client Services’ main screen, which displays a list
of items requiring followup, based on the followup dates indicated when Activities were created.
Note: To access the Followups tab, you must perform the steps defined below.
1. From the Client Services’ main screen, click on the Client ID of the appropriate client.
2. In the left navigation panel, click on the Activity action link.
3. Click on the Activity History tab to display the client’s service and referral records.
4. In the Activity Type column, click on the hyperlink of the activity in which a follow up will be performed. (Only after you select the activity you are performing followup on will you be able to access the Followups tab.)
Follow up is activity specific and
can only be accessed by selecting a specific activity by history.
The activity’s details will display on the Add/Edit Activity tab. Notice that the data is grayed out in
some fields and cannot be modified.
28

5. Click on the Followups tab, which is where client activity followup actions will be
documented for the activity
selected in step 4.
The Followups screen will
appear. Client demographic
information will display and any
previous followup actions will be
summarized in a Follow Up
History table.
6. Select appropriate responses
from the pick lists in the relevant
fields at the bottom of the
screen.
7. Click on the Save button.
As entries are made and saved, the records will be added to the summary table on this screen.
29

Case Notes
Documents case status, progress, details of case worker activity, and case worker and
client’s intended actions. All case notes on a particular client are stored together.
Case notes can be added to client records of either active or inactive clients.
Important: In addition to having a dedicated space for case notes, the CSMS software
also enables case workers to attach case notes to Care Plans. For a case note to be
attached to (and accessible from within) a Care Plan, it MUST be created from within
the Care Plan (see pages 42 - 46 for more information).
Case notes created from within a Care Plan can be seen and accessed from the Care
Plan or the Case Note Action link. Those created from case notes, as shown below,
can ONLY be seen and accessed from the Case Note Action Link on the left navigation
panel.
Add Note:
1. From the Client Services’ main screen, click on the Client ID of the appropriate client.
2. In the left navigation panel, click on the Case Note action link (shown above).
3. A summary list of case notes will display and can be limited by entering relevant data
in the fields at the top of the screen, and then clicking on the Filter button.
From: First date in a
range of dates.
To: End date in a range
of dates.
Category: A descriptive
category name given to
each case note when
created.
My Agency: This
checkbox limits the
case notes displayed to
only those created by
case workers at your
agency (vs. throughout
BHSNet).
4. To add a new case note,
click on the Add Note
button.
5. To view or append to an
existing case note, click on its
hyperlink in the Date/Time column.
From the case note history screen a case worker can add a case note or view a prior case note.
30

Case Note screen fields:
Category: A descriptive name selected for the case note, such as: field visit, quarterly, annual,
etc.
Note: the category of a case note cannot be changed once it is saved. Alert case worker, reminders set
for this client will display in red (see reminder date and remove alert below).
Shareable: Indicates if the information in the case note can be shared with other BHSNet
agencies.
Clinical: Indicates if
note is clinical, and if
checked, will not be
shared with other
BHSNet agencies.
Date: The actual
date the actions or
activity provided took
place. (Due to work
back logs, this date
may be different than
the date created
field).
Spellchecker feature
Created By: This
field will be auto
populated by CSMS
with user ID of logged
on worker.
Date Created: This
field will be auto
populated by CSMS
with the actual date
the note is being
entered & saved).
Attach to Which Episode: A pick list of the episodes of care for the client. Every case note
must be attached to an episode of care (see page 36 for more information on episodes of care).
Reminder Date: If a date is entered here, CSMS will add a line item to the Reminders tab on the
Client Services’ main screen and display a list of case note reminders created. The list will
include today’s reminders, those set for the previous seven days and those set for the next seven
days. The summary line of information that displays on the Reminders tab will include the entry
made in the subject field.
Subject: A description of the reminders purpose (this will display on the Reminders tab if a
reminder date has been set). It will also display in the Case Note History and is used at the
discretion of the case worker.
Remove Alert: If the case notes category is Alert Case Worker and a reminder date has been
set, the summary line of data that displays on the Reminders tab will be red. This signals that an
31
alert is set and detailed information is contained in that case note for case workers to be aware.
Once a case note is saved, its category cannot be changed. To remove the red signal, select the
specific case note (Alert Caseworker) and check the Remove Alert checkbox, then save.
Note: A spell check feature is activated by the check mark located on the case note menu bar, to
ensure the spelling is correct in the case note.
6. Click on the Save button.
To print a copy of the Case Note, after saving it, click on the Print button at the bottom of the
screen.
Throughout CSMS, your session will “time-out” after 30 minutes. If you begin a case note,
pause for more than 30 minutes, and then return to it, the information entered will be lost. To
avoid this, you can choose to:
Not leave the case note until it is completed.
Create the case note text in a word processing software, such as Notepad or WordPad, then
copy and paste the case note content into the Case Note screen’s note field.
32

Append to Note (Add text to a case note)
1. Select the case note which requires additional added text from the summary list of case notes
(see page 30).
2. The specific case note will display (as shown below). Data in fields that cannot be modified
after the case note is first saved will display in a light brown color.
3. Click on the Append to Note button.
4. A pop-up window will appear (shown below left). Enter the additional case note data text.
5. Click on the Save button in the pop-up window.
The additional text appears in the
same area as the original text.
The date of the appended text and
the person’s name who created
the additional text are included in
the case note. Once saved
“Additional text has been appended”
is noted at the top of the case note.
It is only displayed at this time and
does not display again when viewing
the case note at a later date.
33
Skill Builder 4
Objective: Create a case note for the client created in Skill Builder 2. For help, see pages 30 to 33. For assistance, review the Answer Key on page 61.
Directions: Complete each task described below.
_____________________________________
Navigate to the Case Note screen after entering into the client record of the new client you created in Skill Builder 2.
Hint/Tip: From which screen is a client record selected?
1.
2.
Add a case note, and include a reminder date.
Append the case note to add a correction.
Bonus Questions
In this Skill Builder, you were asked to add a reminder date to the case note you created.
A.
B.
Where will that reminder display for you? ________________________________________
When will it appear there by default?____________________________________________
34

Discharge a Client
Once a client’s episode of care with your agency location has been completed,
that episode of care must be closed, or discharged. To access the Discharge screen for a
specific client, click on the Discharge action link from the left navigation panel (shown at right).
Episode of Care Requirements:
Only one episode of care for a client should be open at a time (at your agency/location).
All care plan entries must have an actual end date to close an episode of care.
A case worker can only discharge a client’s episode of care for their own agency /
location.
1. From the list of episodes
of care displaying on the
Discharge summary
screen, select the episode
of care to be discharged
by clicking on its hyperlink.
2. Complete the fields on the
Discharge screen:
Start Date: Auto populated by CSMS.
Reason for Opening: Will be grayed out.
Discharge Date: Date the episode of care is being closed.
Reason for Discharge: Pick list will include generic and agency-specific choices as well as
“other” for ability to type reason not in pick list.
Destination: Where was the client discharged (field is specific to Homeless and FSAD).
3. Click on the Discharge button.
4. If there are open items in the care plan a pop up box will open stating “There are open items in the
care plan. Do you want to close all these items automatically?” If OK is selected the system will
close the care plan date using the date of discharge.
5. Notice that the Discharge summary screen now includes an end date for the episode of care.
35
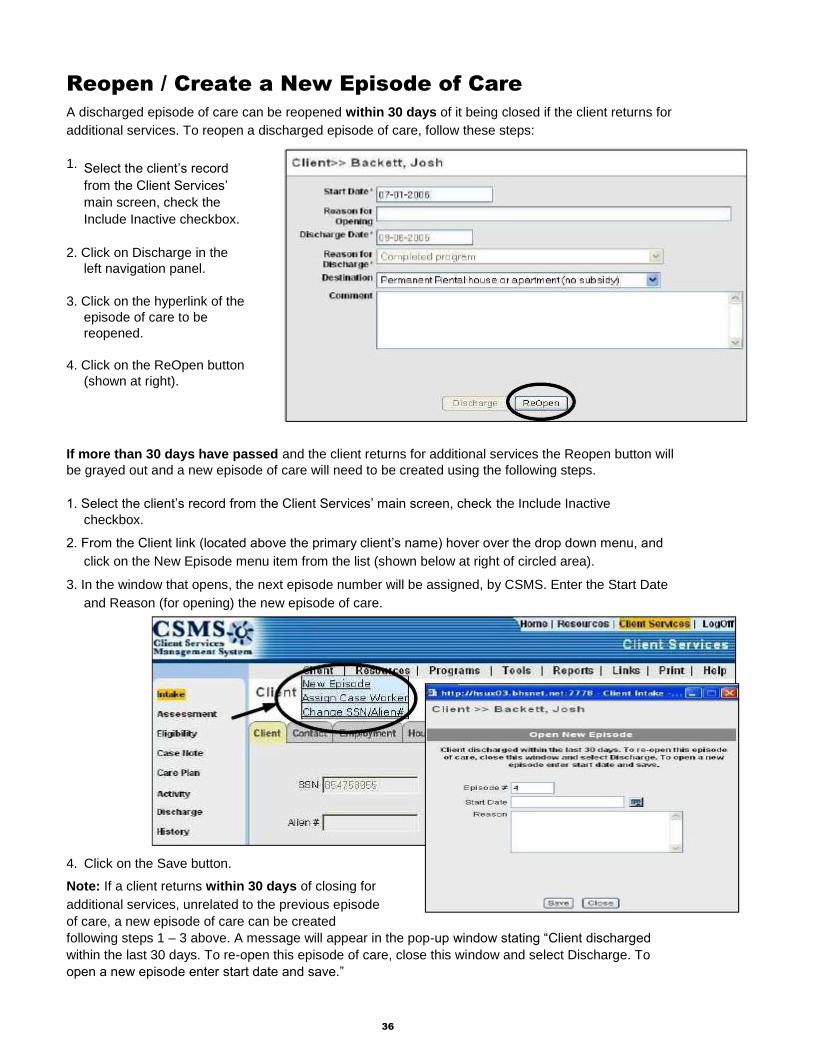
Reopen / Create a New Episode of Care
A discharged episode of care can be reopened within 30 days of it being closed if the client returns for
additional services. To reopen a discharged episode of care, follow these steps:
1.
Select the client’s record from the Client Services’
main screen, check the
Include Inactive checkbox.
2. Click on Discharge in the
left navigation panel.
3. Click on the hyperlink of the
episode of care to be
reopened.
4. Click on the ReOpen button
(shown at right).
If more than 30 days have passed and the client returns for additional services the Reopen button will
be grayed out and a new episode of care will need to be created using the following steps.
1. Select the client’s record from the Client Services’ main screen, check the Include Inactive
checkbox.
2. From the Client link (located above the primary client’s name) hover over the drop down menu, and
click on the New Episode menu item from the list (shown below at right of circled area).
3. In the window that opens, the next episode number will be assigned, by CSMS. Enter the Start Date
and Reason (for opening) the new episode of care.
4.
Click on the Save button.
Note: If a client returns within 30 days of closing for
additional services, unrelated to the previous episode
of care, a new episode of care can be created
following steps 1 – 3 above. A message will appear in the pop-up window stating “Client discharged
within the last 30 days. To re-open this episode of care, close this window and select Discharge. To
open a new episode enter start date and save.”
36
Accept Incoming Referrals
1. From the client Services’ main page, click on the Referrals tab. (Confirm that the list displayed is of
referrals received by using the search tool in the left navigation panel.)
2. Select the
received
referral to be
accepted
by clicking on
the Client ID
hyperlink.
A pop up
window
displaying the client records
found in CSMS will appear.
Select the Referring agency/
location’s client hyperlink.
3. The Intake screen for the
referred client will display
with data pre-filled by the
referring agency. In order
for this to happen the client’s
consent must have been
marked as sharable, be on
file, and Sharable is marked in the referral Activity, from the referring
agency.
4. Retrieve the client.
5. Input Initial Intake date and change any pertinent client information.
6. To accept the client at your agency/location, click on the Save button at
the bottom of the page. This step will activate the client at your
agency/location, open an episode of care, and will specify you as the
Case Worker. To change the Case Worker see section titled Assign a Client to a Case Worker
(refer to page 21).
Note: The ‘New’ found under
the Status column, in the
Referrals Received figure,
above, will change from New
to Open when you click on
New and view the referral.
37

Conduct an Assessment
Assessment tools (groups of questions) are available to evaluate a client. The Standard
Assessment (mandatory for Broward County Human Services’ agencies) will evaluate a
client in eleven categories. The categories include: education, employment housing,
income, mental health, nutrition, parenting, physical health, social functioning,
substance use, and transportation.
1.
2.
3.
From the Client Services’ main screen, click on the Client ID, of the appropriate
client.
In the left navigation panel, click on the Assessment action link (shown at left).
The Assessment screen (shown below) will display. There are three sections on this screen.
Unfinished Assessments: When an incomplete assessment is saved, it is listed in
this section. (Since this is a new client and no assessments have been started,
this section of the screen has nothing in it right now).
Assessments: A list of generic, widely applicable assessment tools are listed here.
Agency Specific Assessments: A list of assessment tools unique to the needs of specific
agencies are listed here.
4.
Select the desired assessment tool by clicking on its hyperlink (i.e., Standard Assessment)
38
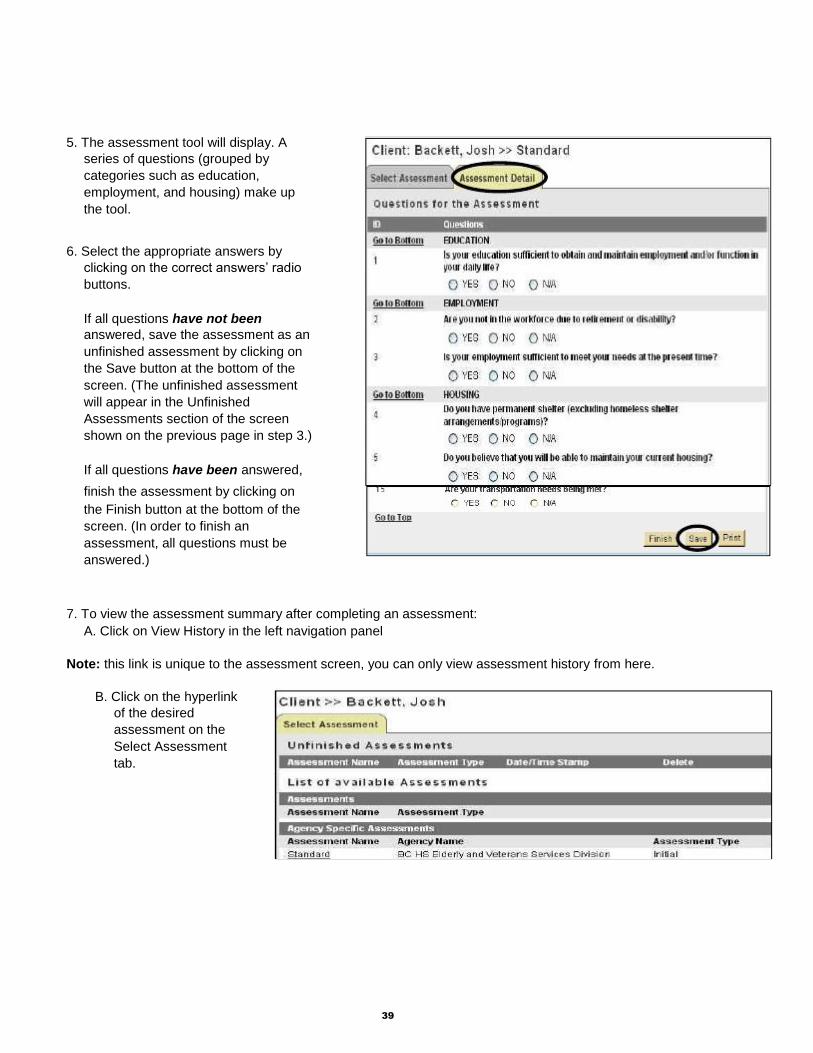
5. The assessment tool will display. A
series of questions (grouped by
categories such as education,
employment, and housing) make up
the tool.
6. Select the appropriate answers by
clicking on the correct answers’ radio
buttons.
If all questions have not been
answered, save the assessment as an
unfinished assessment by clicking on
the Save button at the bottom of the
screen. (The unfinished assessment
will appear in the Unfinished
Assessments section of the screen
shown on the previous page in step 3.)
If all questions have been answered,
finish the assessment by clicking on
the Finish button at the bottom of the
screen. (In order to finish an
assessment, all questions must be
answered.)
7. To view the assessment summary after completing an assessment:
A. Click on View History in the left navigation panel
Note: this link is unique to the assessment screen, you can only view assessment history from here.
B. Click on the hyperlink
of the desired
assessment on the
Select Assessment
tab.
39

C.
Click on the Assessment
Summary tab to obtain status ra
1.
2.
3.
4.
5.
In Crisis
At risk
Stable
Safe
Thriving
View the results on the
Assessment Summary tab. Here, each category from the assessment is listed; a numeric
score displays based on the answers given to the assessment questions, and a status rating is
provided.
D.
Click on the Assessment Detail
tab to obtain the detailed
responses to the assessment
and print the assessment.
40

Skill Builder 5
Objective: Perform an assessment of the new client created in Skill Builder 2. For help, see pages 39 to 41.
For assistance, review the Answer Key on page 62.
Directions: Complete each task described below. _____________________________________
1. Navigate to the Assessment screen after selecting the client record created in Skill Builder 2.
Hint/Tip: From which screen is a client record selected?
2. Select the “Standard Initial” assessment tool.
3. Complete the assessment (provide answers on behalf of the client for the exercise).
Hint/Tip: What role will the Save and Finish buttons play in this task?
4. View the assessment summary when the assessment is complete.
5. Determine how to print the summary.
41

Create a Care Plan
A Care Plan is a contract of services between the case worker and the client. It defines
the client’s problem(s), goal(s)/outcome(s), planned service(s), and action step(s) (steps
the client is responsible for, steps the case worker is responsible for, etc…) to achieve the
outcomes.
1. From the Client Services’ main screen, click on the Client ID of the appropriate client.
2. In the left navigation panel, click on the Care Plan action link (shown at right).
3. Click on Add New Problem.
4. Enter data in the Care Plan’s Problem
screen fields:
Assigned to: Either primary
client or the name of a
household member entered in
the Household tab in Intake.
Problem Category: A pick list
of eleven categories (same
categories as in the assessments).
Strengths: Pick list options are standard within the application.
Barrier: Pick list options are standard within the application.
Problem: Pick list options will vary based on problem category chosen. This field is
mandatory.
Problem Level: Pick list options will vary based on problem chosen.
Start Date: The date the problem was identified.
Review Date: This is not a followup or reminder trigger. To see the data entered here,
you must return to this screen.
42

Shareable: Indicates if this entry’s data can be shared with other agencies.
As Evidenced By: Text field used to record by which means the problem was identified.
5.
Click on the Save button.
6. Notice the changes to the screen:
At the bottom of the screen,
additional buttons have
become available:
Add Outcome: Opens a
screen to document the
desired goal related to the
problem (identified at the
top of the screen). Add Note: Opens a
screen to create
documentation related to
the problem (identified at
the top of the screen).
Using this button to
create a case note will
attach the note to the
Care Plan. Notes created
here will be viewable and
accessible from here,
as well as from the Case
Note history screen
(see page 30 for additional
information)
7. Typically, you will click on Add Outcome to
continue creating entries in the Care Plan.
8. On the Care Plan’s Outcome screen, select
an appropriate Outcome / Goal from the
field’s pick list.
9. Click on the Save button.
43

10. Notice the changes to the
screen:
At the top of the screen, a
message displays that the
outcome was added
successfully.
At the bottom of the
screen, additional buttons
have become available:
Add Service: Opens a
screen to document the
services which are
planned to achieve the
outcome (identified at the
top of the screen).
Add Action Step: Opens
a screen to document the
steps which will be taken
(by the client, case
worker, or other person) in
support of achieving the
outcome (identified at the
top of the screen).
Add Note: Opens a
screen to create
documentation related to the outcome (identified at the top of the screen). Notes added with
this button will be attached to and accessible from the Care Plan and Case Note History.
11. Click on Add Service to continue creating entries in the Care Plan.
44

12.
13.
Enter data in the Care
Plan’s Service screen
fields.
Note the following:
Priority Score:
Score generated to
identify priority status of
client for waitlist
management. {I.E.
EVSD score is
generated from
assessment entered into
CIRTS (Client
Information & Tracking
System)}.
Wait listed:
Indicates if the client
has been wait listed for
the service.
Enter data, if desired, in
the Optional Costing
Information section.
Note: This section is
mandatory for EVSD.
Unit Cost: A dollar
figure.
Amount: Number of
units.
Units: Rate of unit
cost (i.e., per hour,
per session).
Period: Frequency (i.e., per week, per day, per month, per year).
Number: A number (referring to the quantity of the next field’s entry – Duration).
Duration: Length of service (i.e., days, weeks, months, years).
14. Click on the Save button.
If a note needs to be added to the service record, click on Add Note. Notes added with this
button will be attached to and accessible from the Care Plan and the Case Note history page.
To add an Action Step, you must return to the outcome by clicking on the Go To Outcome button
at the bottom right of the screen. (The reason for this is: services and action steps are in support
of achieving an outcome. When either services or action steps are created, they must be
associated with a specific outcome.)
45

15. From the outcome screen that will
display (shown at right), click on
the Add Action Step button.
16. Complete relevant fields on the
Care Plan’s Action Step screen,
which will display. (Remaining
fields will be populated as the Care
Plan is maintained.)
Category: A pick list of eleven
categories (the selection made
here will affect the pick list
options in the action step field).
Action Step: What is going to
be done
Action Step By: Who is
responsible for completing the
Action Step (see the options
shown in the pick list at right).
17. Click on the Save button.
You can now return to the Care
Plan’s main screen and see all of
the entries you have made in the
Care Plan. Click on the Care Plan
Main button, or the Care Plan
action link from the left navigation
panel.
18. When you view the Care Plan’s
main screen, you will now see the
Care Plan summary created at
your agency (as shown at right) If this client has an active Care
Plan with another agency, it will
also be listed here (under that
agency’s name, which will display
as green text inside another gray
bar), when the View All Agencies
checkbox is checked.
If Care Plan entries are made for
household members of the primary
46

client, they will also be listed here if the View Primary & Secondary Clients radio button is selected.
(The secondary client’s name would display in blue text, and the entries related to them would
cascade under their name).
Agency Location/Creating
Care Plan
Client
Problem
Outcome (Goal)
Planned Service
Action Step
Household Member Care
Skill Builder 6 Objective: Create a Care Plan for the client created in Skill Builder 2.
For help, see pages 43 to 48.
For assistance, review the Answer Key on page 62.
Directions:
1.
2.
3.
4.
5.
6.
Add a problem to the Care Plan of the client created in Skill Builder 2.
Attach a case note to the problem entered in step 1, above.
Add an outcome to the problem entered in step 1, above.
Add a service to the outcome entered in step 3, above.
Add an action step to the outcome entered in step 3, above.
View the Care Plan created in steps 1-5 above.
47
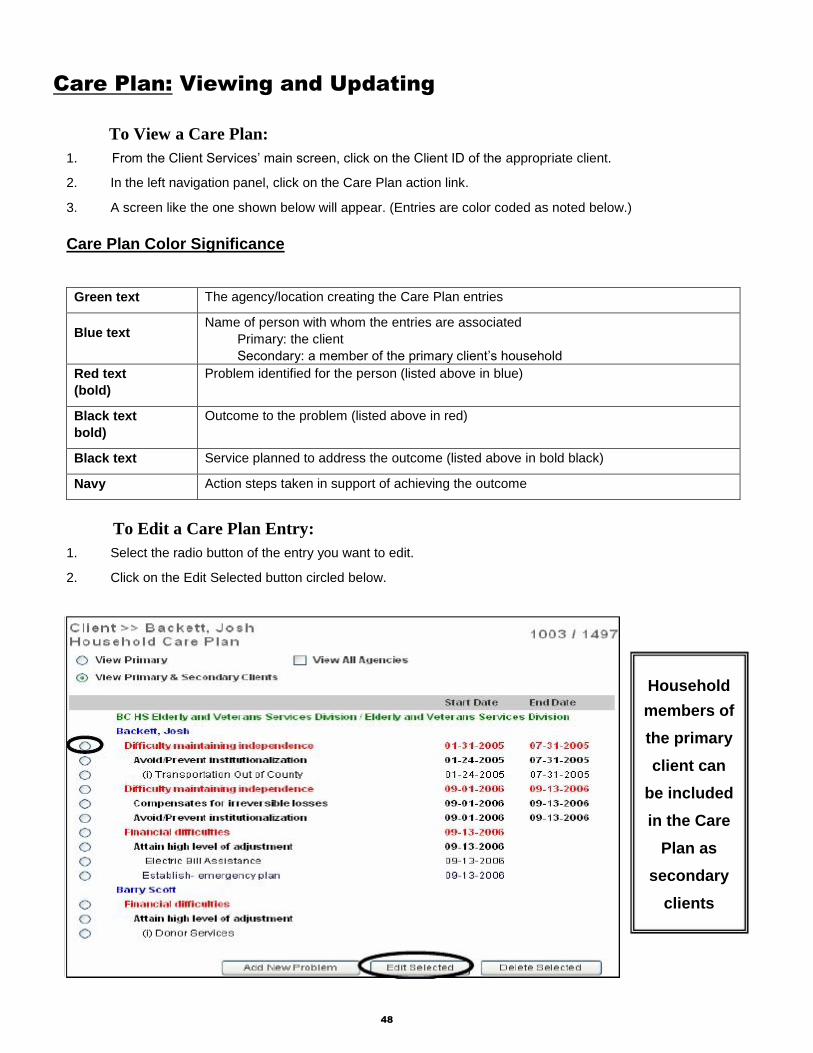
Green text The agency/location creating the Care Plan entries
Blue text Name of person with whom the entries are associated
Primary: the client
Secondary: a member of the primary client’s household
Red text
(bold)
Problem identified for the person (listed above in blue)
Black text
bold)
Outcome to the problem (listed above in red)
Black text Service planned to address the outcome (listed above in bold black)
Navy Action steps taken in support of achieving the outcome
Care Plan: Viewing and Updating
To View a Care Plan:
1.
2.
3.
From the Client Services’ main screen, click on the Client ID of the appropriate client.
In the left navigation panel, click on the Care Plan action link.
A screen like the one shown below will appear. (Entries are color coded as noted below.)
Care Plan Color Significance
To Edit a Care Plan Entry:
1.
2.
Select the radio button of the entry you want to edit.
Click on the Edit Selected button circled below.
48
Household
members of
the primary
client can
be included
in the Care
Plan as
secondary
clients
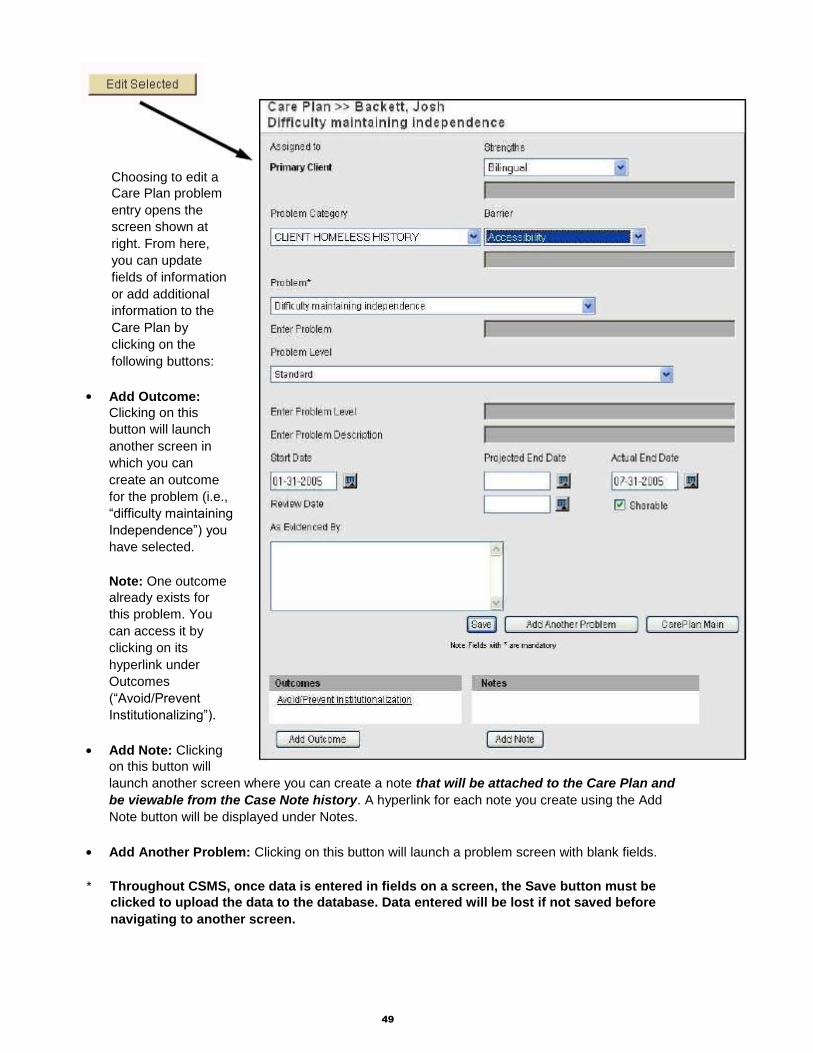
Choosing to edit a
Care Plan problem
entry opens the
screen shown at
right. From here,
you can update
fields of information
or add additional
information to the
Care Plan by
clicking on the
following buttons:
Add Outcome:
Clicking on this
button will launch
another screen in
which you can
create an outcome
for the problem (i.e.,
“difficulty maintaining
Independence”) you
have selected.
Note: One outcome
already exists for
this problem. You
can access it by
clicking on its
hyperlink under
Outcomes
(“Avoid/Prevent
Institutionalizing”).
Add Note: Clicking
on this button will
launch another screen where you can create a note that will be attached to the Care Plan and
be viewable from the Case Note history. A hyperlink for each note you create using the Add
Note button will be displayed under Notes.
Add Another Problem: Clicking on this button will launch a problem screen with blank fields.
* Throughout CSMS, once data is entered in fields on a screen, the Save button must be
clicked to upload the data to the database. Data entered will be lost if not saved before
navigating to another screen.
49
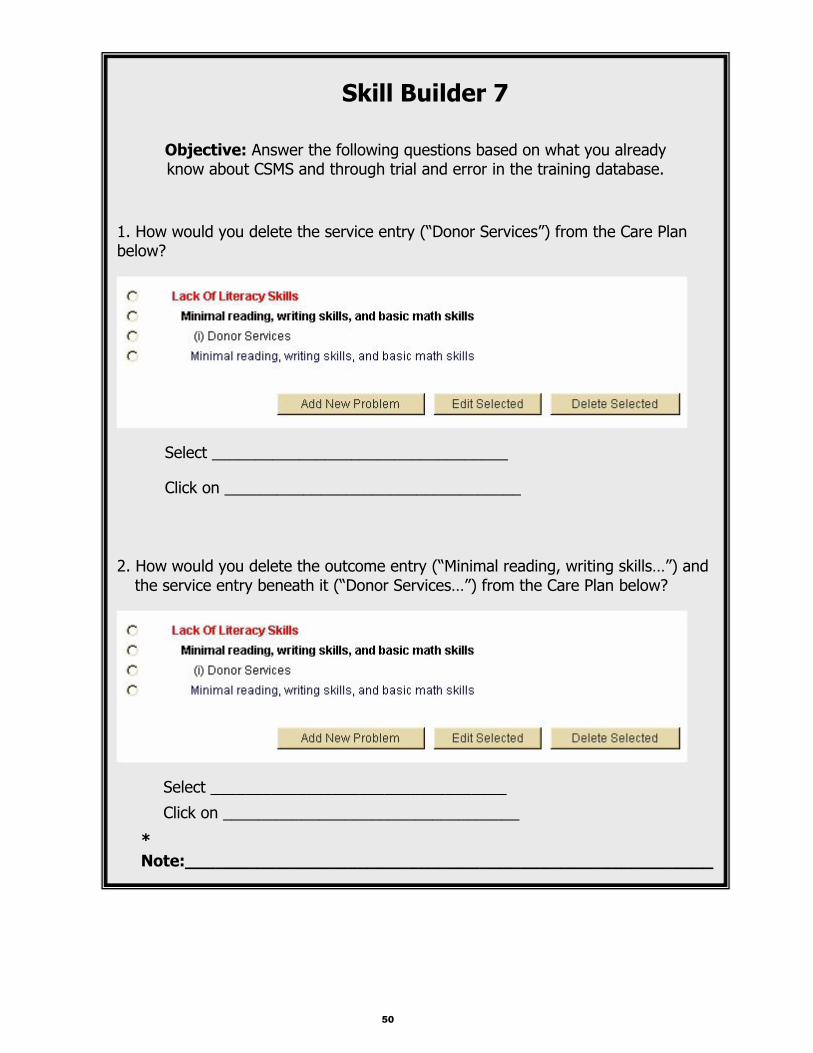
Skill Builder 7
Objective: Answer the following questions based on what you already know about CSMS and through trial and error in the training database.
1. How would you delete the service entry (“Donor Services”) from the Care Plan below?
Select __________________________________
Click on __________________________________
2. How would you delete the outcome entry (“Minimal reading, writing skills…”) and the service entry beneath it (“Donor Services…”) from the Care Plan below?
Select __________________________________
Click on __________________________________
*
Note:____________________________________________________
50

View Client History
If a client has a current consent on file, their BHSNet history (the portions of it that have been made
shareable) can be viewed from one screen.
In the sample below, the client’s BHSNet history only includes one agency location. If the client had a
shareable history with additional agency locations, the episodes of care, at those locations, would
display under headings of the other agency/location names.
To locate and view a client’s history, follow these steps:
1.
2.
3.
4.
Select the primary client’s record from the Client Services’ main screen.
Click on History in the left navigation panel (shown below below/left).
A window will display showing each episode of care at each agency location. Beneath each
episode of care,
hyperlinks to the
Case Notes and
Activities associated
with the episode of
care are listed
(shown at right &
below). Clicking on a hyperlink (Case Notes or Activities) in the History popup will open a page of that
information (as depicted above).
51
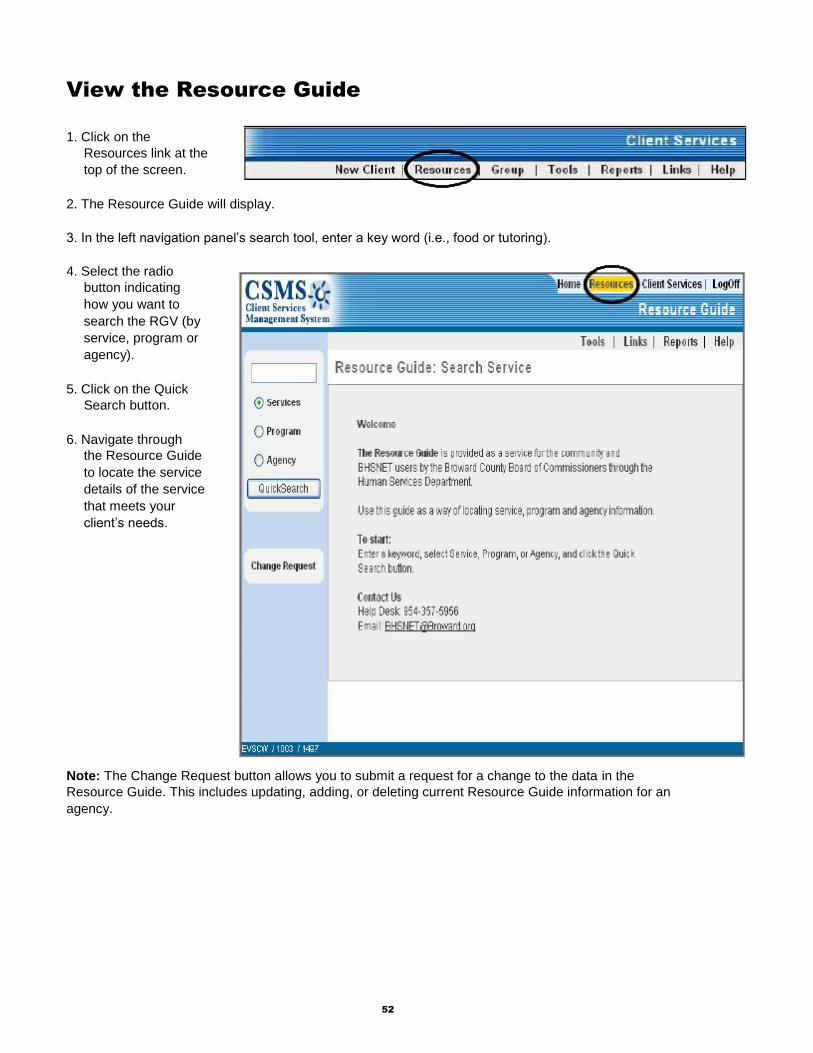
View the Resource Guide
1. Click on the
Resources link at the
top of the screen.
2. The Resource Guide will display.
3. In the left navigation panel’s search tool, enter a key word (i.e., food or tutoring).
4. Select the radio
button indicating
how you want to
search the RGV (by
service, program or
agency).
5. Click on the Quick
Search button.
6. Navigate through
the Resource Guide
to locate the service
details of the service
that meets your
client’s needs.
Note: The Change Request button allows you to submit a request for a change to the data in the
Resource Guide. This includes updating, adding, or deleting current Resource Guide information for an
agency.
52

Change a SSN, Alien #, and other key fields — Primary Client
Once one of the key fields for a primary client has been saved during the intake, modifying it requires
following these steps:
1. Select the primary client’s record from the Client Services’ main screen.
2. Click on Intake in the left navigation panel.
3. From the Client link (located above the primary client’s name) view the drop down menu, and click
on the Change Credentials menu item from the list (shown below).
4. In the window that opens, correct the primary client’s key field data.
5. Click on the Submit button.
Change Credentials, and other key fields — Secondary Client
Changing the social security number or alien number of a household member (secondary client) is
performed differently than for a primary client. Follow these steps:
1.
2.
3.
4.
Select the primary client’s record from the Client Services’ main screen.
Click on the Household tab.
Click on the hyperlink of the secondary client whose information needs updating.
Correct the information requiring update.
5. Click on the Save button.
53

Additional Client Specific Screen Links
A row of action
links appears
above a client’s
name. Some of
these links’ content
is currently being
developed and
others are fully functional. Once fully developed and implemented, they will provide access to the information
listed below.
Client: Refer to pages 21, 36 & 56.
Resources: Refer to pages 54, opens in a new window.
Programs: A list of special programs (such as bed tracking and veteran’s forms).
Tools: A list of special features and tools (such as CIRTS export, etc.).
Reports: The client specific reports will be available through this link, currently DOEA Care Plan
Report is available.
Links: A collection of links to various resources and tools.
Help: Information to assist you in performing tasks in CSMS.
Expanded CSMS Functionality
In addition to the essential features of CSMS that we have covered in detail there are a few advanced
features that may be of interest to users. You should be aware that these functions exist, and once you
master the essential functions of CSMS, you can begin to explore the advanced features of the system.
Group
Groups are created
and used to enable
a user to complete
key functions for
more than one
client at a time.
There are three areas to complete prior to using groups.
This includes creating, maintaining and using a group.
1. Create a group
Hover-over Group from the Client Services Main
page
Click on Create and a popup window will display
Type in the Group Name in the field provided
Click on Create
54
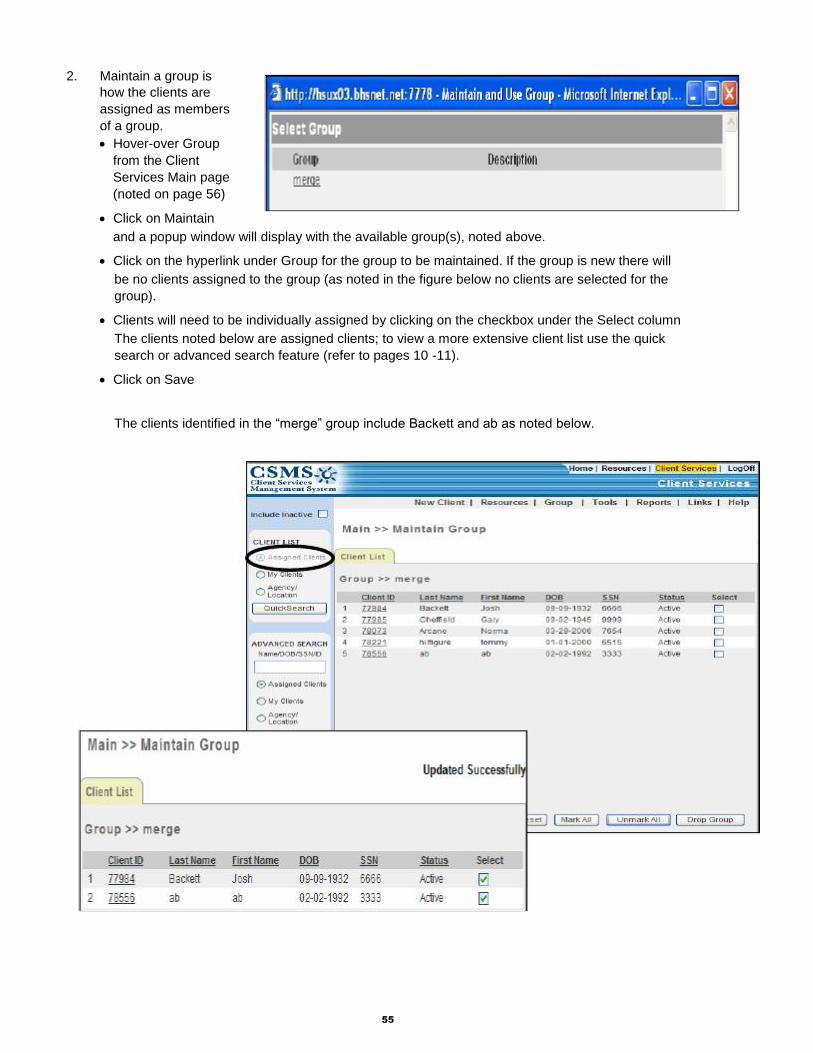
2.
Maintain a group is
how the clients are
assigned as members
of a group.
Hover-over Group
from the Client
Services Main page
(noted on page 56)
Click on Maintain
and a popup window will display with the available group(s), noted above.
Click on the hyperlink under Group for the group to be maintained. If the group is new there will
be no clients assigned to the group (as noted in the figure below no clients are selected for the
group).
Clients will need to be individually assigned by clicking on the checkbox under the Select column
The clients noted below are assigned clients; to view a more extensive client list use the quick
search or advanced search feature (refer to pages 10 -11).
Click on Save
The clients identified in the “merge” group include Backett and ab as noted below.
55

3.
Use Group
Perform a task on all members of a group. The
tasks available are indicated in the left
navigation panel as noted at the right.
When completing Group Case Notes or Group
Activities, a window will open and the activity or
case note is entered as noted in the appropriate
section of this manual.
One group Use function which will be detailed is Merging Clients. This is used when the same
client exists in CSMS with different social security numbers, for example: Clients Backett and ab
have been identified as the same person. To merge their records follow the steps below:
Merge records – Only to be used with two client records
Hover-over Group from the Client Services Main page (noted on page 56)
Click on Use and a pop up
window will display (noted at
right) identifying the
group(s) available to
access.
Click on the hyperlink under
Group to be used. In this
example select “merge”.
The clients list for the group will display
Click on the Merge
Clients in the left
navigation panel. A
popup window is
returned as noted below
at right. Select the
radio button
of the primary
client.
Click on
Submit
56

A popup window is returned indicating “Merged Clients Successfully”
Click on Close
Only client remaining in the group
is now Josh Backett. The secondary
will be deleted.
To access the client, click on the hyperlink under client ID or if another client is desired click on Main in
the left navigation panel which will return you to the client Services Main page.
57

Multiple Agency/Location Logon Multiple Agency/Location privilege is approved by the division director and granted only to those users who
demonstrate a need for multiple-agency and/or multiple location access to CSMS.
The standard logon procedure is identified on page 5 of this manual. Once logged into CSMS there will be
additional screens to navigate through for the access of Client Services main.
CSMS identifies the primary Agency/Location that the User is assigned, circled in the screen below.
The user is responsible to select the Agency and/or Location in which to work.
Select the Agency and/or
Location by selecting from
the drop down.
Click on Continue.
Note:
1. Users who are granted
multiple location only
will be able to toggle
between locations
while in Client Services
Main.
2. Users who are granted
multiple agencies will
be required to logoff
and log back on to
change agencies.
58

Once Continued is clicked on users will be brought to the Welcome/Home page.
Click on Client Services
59

Reports
Non-client specific
This section describes how to run reports in CSMS. Instructions for running and a
brief explanation of, the following reports are included:
5
Service Activity Report – used by internal users and contracted service providers
HUD APR Data Report – used by HUD funded and non-HUD funded homeless service providers
1. Access available
reports from the client
services window and
clicking on the Reports
link circled at the right.
2. Click on the Report
Name. Current
reports available
include: HUD APR
Data Report and
Service Activity.
60

Service Activity Report
The Service Activity report tracks units of services delivered for a defined period of time and includes such
data as program, fund source, and others. This report enables contracted service providers to generate
supporting documentation to backup their invoices. The Service Activity report is often commonly referred
to as the billing report.
In CSMS location information has been separated from program information which allows multiple programs
per contract per agency. This will require fewer reports be run for each billing cycle.
Instructions:
1. From Client Services
click on the Reports
link beneath the
Client Services
module title.
2. In the window that opens, click on the
Service Activity report(s) from the list
of reports:
* Report #15 generates the report on
PDF format
Report #16 generates the report on
XLS (Excel) format.
The Service Activity report parameters screen will display, as shown on the next page.
3. Multiple reporting options will display. By default, the first selection of each option will be pre-filled. Modify
your selections, as needed, based on agency requirements. On the following page are the reporting
parameters for creating the Service Activity report.
61
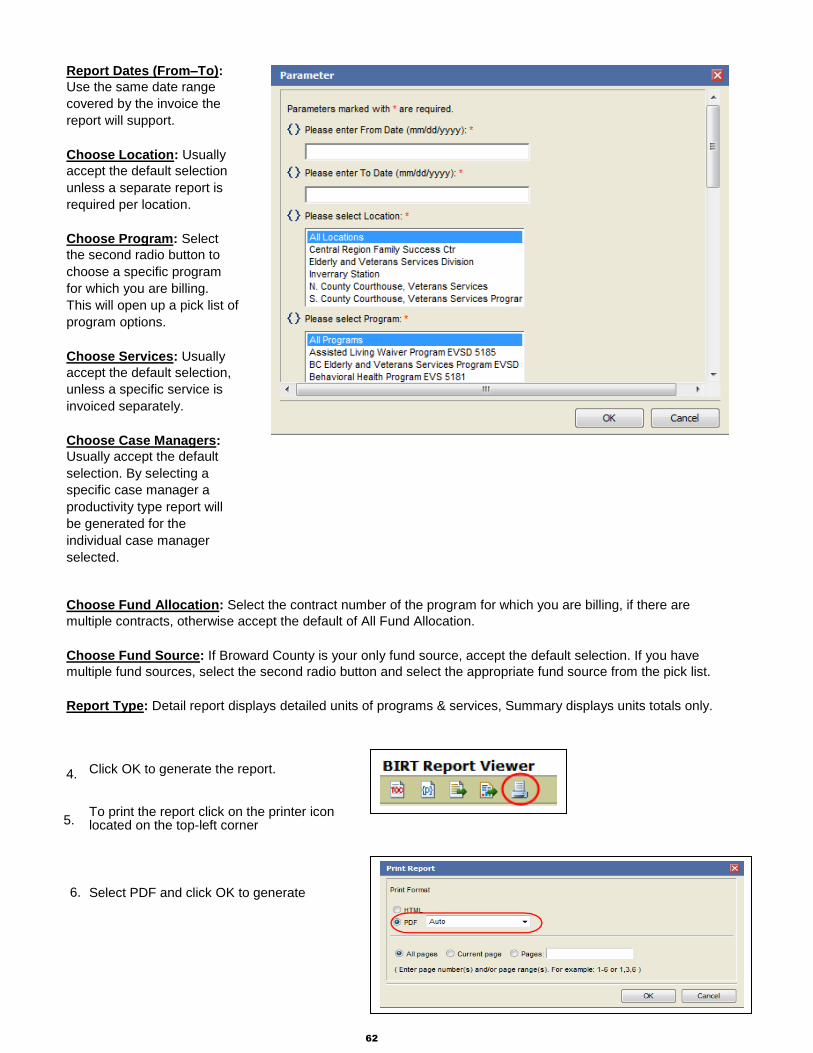
Report Dates (From–To):
Use the same date range
covered by the invoice the
report will support.
Choose Location: Usually
accept the default selection
unless a separate report is
required per location.
Choose Program: Select
the second radio button to
choose a specific program
for which you are billing.
This will open up a pick list of
program options.
Choose Services: Usually
accept the default selection,
unless a specific service is
invoiced separately.
Choose Case Managers:
Usually accept the default
selection. By selecting a
specific case manager a
productivity type report will
be generated for the
individual case manager
selected.
Choose Fund Allocation: Select the contract number of the program for which you are billing, if there are
multiple contracts, otherwise accept the default of All Fund Allocation.
Choose Fund Source: If Broward County is your only fund source, accept the default selection. If you have
multiple fund sources, select the second radio button and select the appropriate fund source from the pick list.
Report Type: Detail report displays detailed units of programs & services, Summary displays units totals only.
4.
5.
6.
Click OK to generate the report.
To print the report click on the printer icon located on the top-left corner Select PDF and click OK to generate
62
6

HUD APR Data Report
Each year, HUD Annual Progress Reports (APR) are completed and submitted to HUD. These reports
track program progress and accomplishments in homeless assistance programs. To support providers in
accurately completing HUD APRs, CSMS enables system users to generate a HUD APR Data report that
captures the relevant data contained in CSMS and its HMIS functionality (see your end-user training
Participant Guide for more information on the HMIS functionality).
To accommodate the HUD APR reporting deadlines, the HUD APR Data report should be run as soon as
possible after the end of each program’s operating year. The HUD APR Data report in CSMS should be
run be all HUD-funded and non-HUD funded providers to enable the measurement of outcomes for
Broward County contracts.
Instructions:
1. Logon to CSMS with your unique User ID and password.
2. Enter the Client Services area by clicking on either of the Client Services links (one appears at the top
of the screen, the other in the left navigation bar).
3. Click on the
Reports link
beneath the Client
Services module
title, as shown at
right.
4. In the window that opens, click on the HUD APR
Data Report from the list of reports.
5. The HUD APR Data report screen will display, as shown on the next page.
63
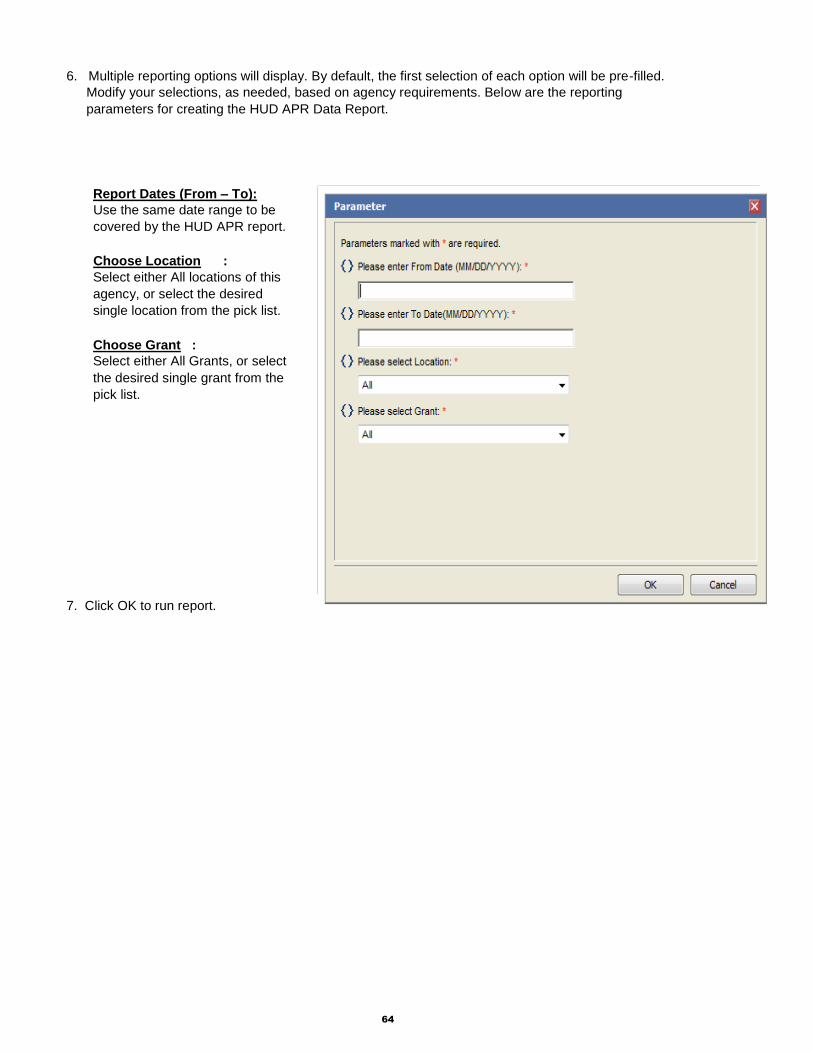
6. Multiple reporting options will display. By default, the first selection of each option will be pre-filled.
Modify your selections, as needed, based on agency requirements. Below are the reporting
parameters for creating the HUD APR Data Report.
Report Dates (From – To):
Use the same date range to be
covered by the HUD APR report.
Choose Location :
Select either All locations of this
agency, or select the desired
single location from the pick list.
Choose Grant :
Select either All Grants, or select
the desired single grant from the
pick list.
7. Click OK to run report.
64

Homeless Services
6
This section refers to instructions for the completion of two questionnaires required for those agencies and
programs providing homeless services.
CoC Questionnaire
Completing a Continuum of Care (CoC) questionnaire for each household member is an ongoing
homeless services requirement. In CSMS, the CoC is an expanded version of the SHP questionnaire,
which tracks information for additional programs.
Keep in mind:
Data from the CoC questionnaires will generate a portion of your agency’s APR (Annual Progress
Report).
A CoC questionnaire should be completed for each participant.
Participant is defined as “single persons and adults in families who received assistance during the
operating year.”
Participant does NOT include children or a caregiver who live with the assisted adults.
1.
2.
3.
Select the primary client’s record from the Client Services’ main screen.
From the
Programs link
(located above
the primary
client’s name)
view the drop
down menu, and
click on the CoC
menu item from the list (shown at right). In the client pick list, select
the name of the first
participant from the
household member list that
displays; Click on Add entry
and complete the fields
with information relevant to
that participant.
65
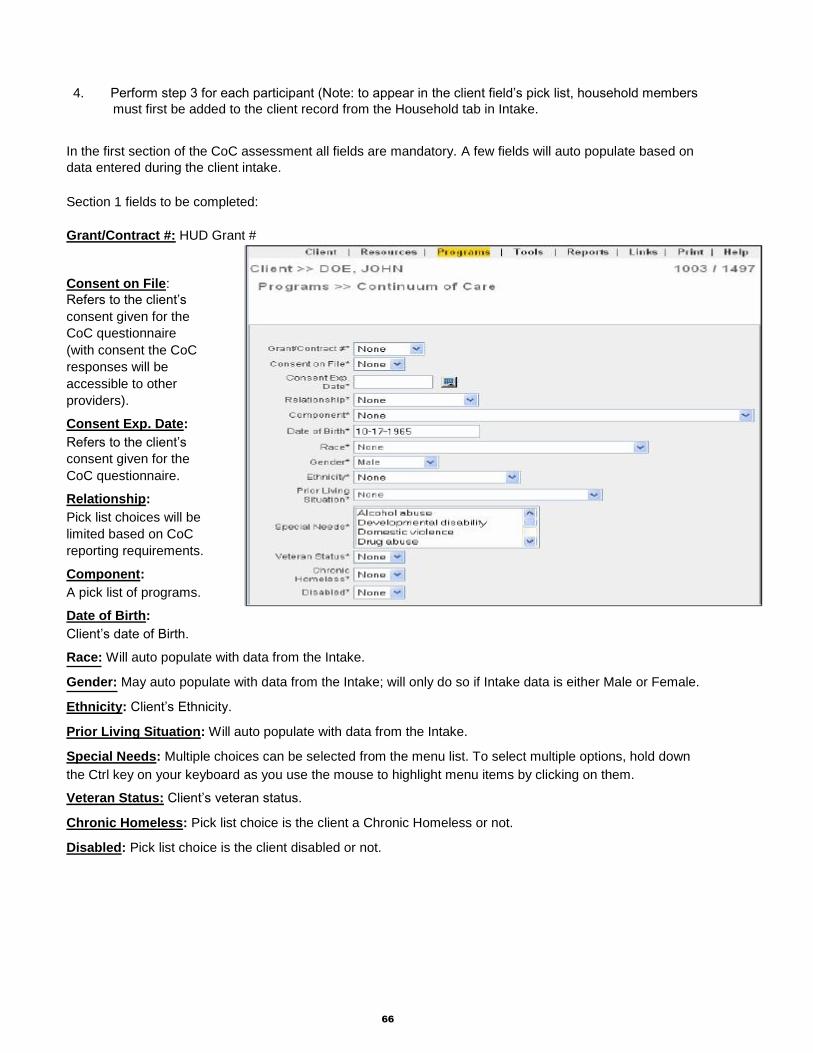
4.
Perform step 3 for each participant (Note: to appear in the client field’s pick list, household members
must first be added to the client record from the Household tab in Intake.
In the first section of the CoC assessment all fields are mandatory. A few fields will auto populate based on
data entered during the client intake.
Section 1 fields to be completed:
Grant/Contract #: HUD Grant #
Consent on File:
Refers to the client’s
consent given for the
CoC questionnaire
(with consent the CoC
responses will be
accessible to other
providers).
Consent Exp. Date:
Refers to the client’s
consent given for the
CoC questionnaire.
Relationship:
Pick list choices will be
limited based on CoC
reporting requirements.
Component:
A pick list of programs.
Date of Birth:
Client’s date of Birth.
Race: Will auto populate with data from the Intake.
Gender: May auto populate with data from the Intake; will only do so if Intake data is either Male or Female.
Ethnicity: Client’s Ethnicity.
Prior Living Situation: Will auto populate with data from the Intake.
Special Needs: Multiple choices can be selected from the menu list. To select multiple options, hold down
the Ctrl key on your keyboard as you use the mouse to highlight menu items by clicking on them.
Veteran Status: Client’s veteran status.
Chronic Homeless: Pick list choice is the client a Chronic Homeless or not.
Disabled: Pick list choice is the client disabled or not.
66

In the second section of the CoC screen, Enter Program, every field is mandatory.
Entry Date:
Income at Entry:
Data entered in this
field should be specific to
the person, not the
household.
Source of Income:
Multiple choices can be selected from the menu list. To select multiple options, hold down the Ctrl key on
your keyboard as you use the mouse to highlight menu items by clicking on them.
The third section of the CoC screen, Exit Program.
Exit Date:
Once Exit date is input all other
fields become mandatory.
Income at Exit:
Data entered in this field should be
specific to the person, not the
household.
Source of Income:
Multiple choices can be selected
from the menu list. To select
multiple options, hold down the Ctrl
key on your keyboard as you use the
mouse to highlight menu items by
clicking on them.
Reason for Leaving:
A single reason can be selected
from the menu list.
Supportive Services: Multiple
choices can be selected from the
menu list. To select multiple options,
hold down the Ctrl key on your
keyboard as you use the mouse to
highlight menu items by clicking on them.
Destination: A single choice can be selected from the menu list.
67

Enter HMIS Data
Compliance with Federal regulations requires that an HMIS (Homeless Management Information System)
questionnaire be completed for each household member upon admission to a program, when discharged,
and any time there is a change in status for the client.
Keep in mind:
1.
2.
3.
4.
Questions asked on the HMIS questionnaires come directly from the Federal Register.
An HMIS questionnaire should be completed for each member of the household.
(Household members must first be added on the Household tab of the client Intake.)
Not all tabs will need to be completed at initial intake (as noted below in item 5).
Select the primary client’s record from the Client Services’ main screen.
From the
Programs link
(located above
the primary
client’s name)
view the drop
down menu, and
click on the HMIS
menu item from
the list (shown at right). Once HMIS is opened only the Client
tab will show. Complete the HMIS assessment and hit save. Five tabs will then display, as shown below. Please note the
tab, labeled Discharge which is synonymous with Exit.
Continue the
questionnaire on
the Family tab
Upon initial intake, the following tabs are mandatory:
Client
Family
Household
Program Level
Take note of the information on the following pages to assist you in completing the HMIS questionnaire.
68
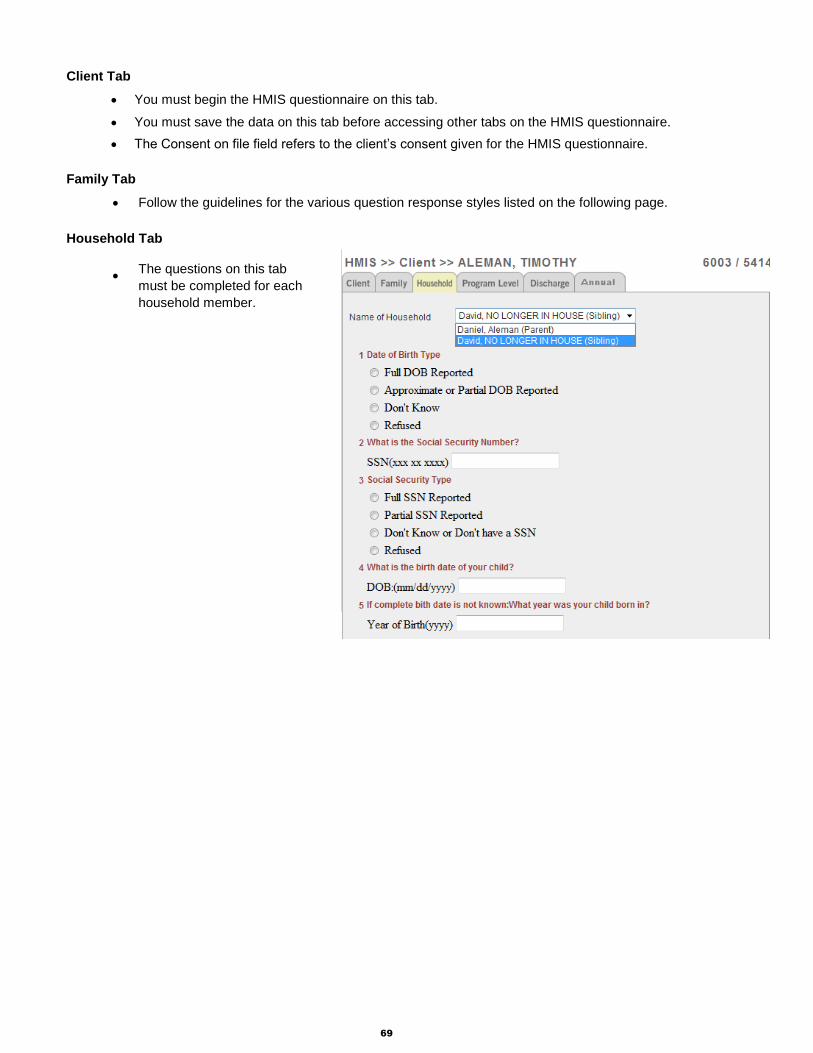
Client Tab
You must begin the HMIS questionnaire on this tab.
You must save the data on this tab before accessing other tabs on the HMIS questionnaire.
The Consent on file field refers to the client’s consent given for the HMIS questionnaire.
Family Tab
Follow the guidelines for the various question response styles listed on the following page.
Household Tab
The questions on this tab
must be completed for each
household member.
69

Program Level Tab
The questions on this tab must be answered for every household member:
upon admission to a program
upon discharge
at any time there is a change of status (qualifying for disability benefits, household member
change, etc.)
To begin the questionnaire, you must click on the New Questionnaire button.
The Member Name field refers to the primary client or a household member.
Questions relating to a disability should only be asked upon initial intake if they are required for
program eligibility. Otherwise, they are required once admitted to a program.
Personal questions relate to:
physical disability
developmental disability
HIV/AIDS
mental health
substance abuse
(HUD has determined that asking disability questions at Intake, prior to admission to a program,
constitutes a violation of Fair Housing Law.)
Discharge Tab (Exit)
Complete the questions on this tab as a client exits each program or is no longer in the homeless
system.
To begin the questionnaire, you must click on the New Questionnaire button.
70
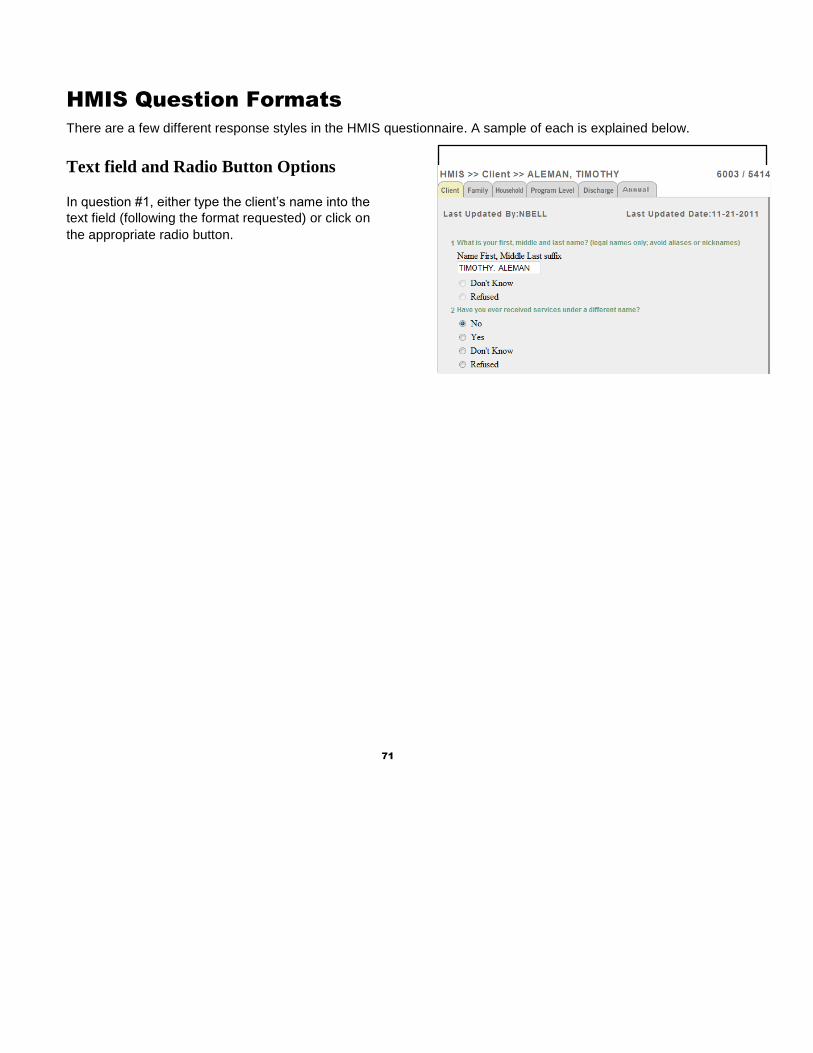
HMIS Question Formats
There are a few different response styles in the HMIS questionnaire. A sample of each is explained below.
Text field and Radio Button Options
In question #1, either type the client’s name into the
text field (following the format requested) or click on
the appropriate radio button.
71

Answer Key to Skill Builders
Skill Builder 1
8 1.
2.
3.
4.
In the Client List Quick Search select the radio button in front of Agency/Location.
Check box next to Include Inactive.
Click on the Quick Search button.
On the List that displays, click on the Client ID hyperlink.
Skill Builder 2
1.
2.
3.
4.
5.
6.
7.
8.
9.
10.
From the Client Services’ main screen, click on New Client near the top of the screen.
To Retrieve: Enter SSN or Alien #; click on Retrieve.
Assuming no results display: enter data in fields, click on Save.
Click on Contact tab; be sure to check billing contact in Primary Contact region of the screen; if
applicable enter other data; click on Save.
Click on Employment tab; click on Add Job button; fill fields; be sure to check benefits
checkbox if applicable; click on Save.
Click on Household tab; click on Add Member button; fill fields; note if information is shareable
(there are two shareable buttons); click on Save.
Click on Medical tab; click on Medication button (bottom of screen); fill fields in pop-up window;
click on Save; click on Close in pop-up window.
SKIP INSURANCE TAB.
Answer: Yes. The start date for the current address. Click on the street address hyperlink and
add start date of current address. Click on Save.
Click on Financial tab; enter data in income, expense, or asset fields; enter dollar amount;
click on Add Income or Add Expense or Add Asset. Continue for other categories;
CLICK ON SAVE BUTTON (at bottom of screen).
Answer: Docs tab.
Skill Builder 3
1.
2.
3.
4.
5.
6.
From the Client Services’ main screen, click on the Client ID hyperlink of the client created in
Skill Builder 2; click on Activity in the left navigation panel.
On the Add/Edit tab, fill in the fields; click on Save.
From Activity History screen click on Add/Edit tab.
Change Activity Type to Referral, fill in fields. Click on Save.
Once Referral is saved by default.
Click on Main in the left navigation panel.
72

Skill Builder 4
1.
2.
3.
From the Client Services’ main screen, click on the Client ID hyperlink of the client created in
Skill Builder 2 click on Case Note in the left navigation panel.
Click on Add Note button; fill in the fields; be sure to add a reminder date; click on Save.
From the Case Notes summary screen, click on the hyperlink of the case note you want to
append; click on the Append to Note button; type the additional information into the note field;
click on the Save button.
Bonus Question Answers:
A.
B.
The reminder will display on the Reminders tab on the Client Services’ main screen.
Seven days prior and seven days after the date indicated in the reminder date field.
Skill Builder 5
1.
2.
3.
4.
5.
From the Client Services’ main screen, click on the Client ID hyperlink of the client created
in Skill Builder 2; click on Assessment in the left navigation panel.
Click on Standard Assessment (it should display in the Assessments region of the screen).
Enter answers (making them up on behalf of client for the activity) for ALL questions; click on
Finish.
Click on the Assessment Summary tab.
On the Assessment Summary tab, click on the Print button (at the bottom of the screen).
Skill Builder 6
Select the client record by clicking on the Client ID hyperlink from the Client Services’ main screen; click
on Care Plan in the left navigation panel; then:
1.
2.
3.
4.
Add a Problem
Click on Add Problem button
Fill fields
Click on Save button
Attach a Note to the Problem
Scroll down to the bottom of the screen
Click on Add Note button
Fill fields
Click on Save button
Add an Outcome
Click on Add Outcome button
Fill fields
Click on Save button
Add a Service
Click on Add Service button
Fill fields
If EVSD: must complete optional costing information section
Click on Save button
73

5.
6.
Add an Action Step
Click on Go To Outcome button
Click on Add Action Step button
Fill fields
Click on Save button
View the Care Plan just Created
Click on Care Plan Main button (left navigation panel’s Care Plan link will get you there too)
Skill Builder 7
1.
2.
Select the radio button in front of (i) Donor Services; click on Delete Selected.
Select the radio button in front of Minimal reading, writing skills…; click on Delete Selected
* Note: Deleting one entry takes with it all the associated entries beneath it. If you delete something
from the database, it is GONE; there is no undo button.
74

For Help Performing this Task: Look on Page(s)
A. Logging on to CSMS 5
B. Changing my CSMS password 7
C. Finding an existing client 10-11
D. Adding a new client 13
E. Entering data in fields of the client Intake 14-19
F. Add/Edit an Activity 24
G. Client activity follow up 28-29
H. Case Notes 30-32
I. Append Case Note 33
J. Discharging a client 35
K. Reopening a client’s closed episode of care or creating a
new episode of care
36
L. Conducting an Assessment 39-41
M. Creating & Editing a Care Plan 43-50
N. Attaching a note to a Care Plan 44-45
O. Determining a client’s possible program Eligibility 53-54
P. Viewing the Resource Guide 55
Q. Change a SSN, Alien #, and other key fields 56
R. Group 57-60
Quick Reference Tool
Purpose: Locate where in this workbook you can find
information and directions related to the tasks listed below.
_____________________________________
75

HUMAN SERVICES DEPARTMENT
Information Systems Security Policies
Table of Contents
1. INTRODUCTION
1.1 Purpose
1.2 Scope
1.3 Objectives
1.4 References
1.5 Security Policies
2.0 ADMINISTRATIVE POLICIES
2.1 Information Security Awareness Policy
2.2 IT Security Incident Handling Policy
2.3 IT Security Risk Assessment Policy
2.4 IT Acceptable Use Policy
2.5 Information Classification Policy
2.6 Audit Policy
2.7 Security Administration Policy
2.8 Physical Security Policy
2.9 Contractor IT Security Program Policy
3.0
4.0
5.0
6.0
TECHNICAL POLICIES
3.1 Password Policy
3.2 Virtual Private Network (VPN) Policy
3.3 Backup Policy
3.4 Replacement of Obsolete Hardware & Software Policy
3.5 HIPPA of 1996 IT Compliance Policy
PROGRAM POLICIES
4.1 Confidential Information and Information Sharing Policy
4.2 Electronic Referral Policy
GLOSSARY
APPENDICES
76

Information Systems Security Policies
1.0 Introduction Policies are high-level statements that provide individuals with a basis for making decisions about the operations of an
organization.
The Human Service Department (“Department”) runs major Information Technology (IT) systems. The nature of
services provided or contracted by the Department requires that client confidentiality and privacy rights are adequately protected. Additionally, a high level of need exists for exchanging data between agencies in order to make decisions. Thus, these security policies have been developed for the aforementioned purposes and comply with the Broward County Board of County Commissioners and Office of Information Technology.
1.1 Purpose The purpose of these security policies is to inform Human Service Department (“Department”) Client Services
Management System (CSMS), ECHO, PICS, BIN (all hereinafter referred to as “Automated Systems”) end-users, customers, contractors, non-profits, administrators, staff, and managers (all hereinafter referred to as “Users”) of their obligation to protect the County’s infrastructure and information assets. Contractors include any agency that maintains a contract, interlocal agreement or memorandum of understanding with the Department or who subcontracts with an agency which maintains a contract or memorandum of understanding with the Department. Staff includes all staff of the Department and staff of any Contractor. The policies specify the DOs and DON’Ts necessary to follow security implementation best practices.
A secondary purpose of these policies is to provide a guideline for audit compliance of computer and systems and
networks and compliance with the Department.
1.2
Scope IT Security is the responsibility of every Information Systems User. As such, all Department Information Systems
Users must be informed of the information technology security policies. Contractors must implement the policies defined in this document. Contractor-level policies must be based on the high-level policy statements presented in this document.
It is the policy of Department that:
1.3
Department information resources are valuable assets of the Department and, as such, must be protected to some degree from unauthorized disclosure, modification, or destruction, whether accidental or intentional. Determining the degree of protection of assets and implementing appropriate controls is a management function from the Contractor.
Electronic protected health information shall be protected following the Health Insurance Portability and Accountability Act of 1996 (HIPAA) Policy as outlined herein.
In the event a disaster or catastrophe disables information processing functions, the ability to continue critical Contractor services must be assured.
Security controls required by law must be complied with and Department standards, where applicable, must be met or exceeded. The expense of security enhancements beyond the minimum requirements must be appropriate to the value of the assets being protected.
Security awareness and training is one of the most effective means of reducing vulnerability to errors and fraud and must be continually emphasized and reinforced.
Consequences of non-compliance with these Policies can include: suspension of access privileges, and breach of contract for cause.
Objectives The objectives of this document are to establish Department-wide Information Technology (IT) Security Policies that:
Prevent the misuse, denial and loss of information assets
Establish responsibility and custodial roles for the protection of information
Prevent statutory or regulatory violations
Preserve department management options in the event of loss or misuse of public and private information.
77
Clarify Information Systems (IS) User responsibilities and duties regarding protection of information resources
Enable managers and IS User to make good decisions about information security
Coordinate efforts of Department contracted providers to provide consistent information.
Achievement of these objectives will ensure the confidentiality, integrity and availability of the information entrusted to
us.
1.4
References County Administrative Code, the OIT Handbook and the Health Insurance Portability and Accountability Act of 1996 (HIPAA) were used in the preparation of this document.
1.5 Security policies Policies are grouped into three categories:
Administrative
Technical
Program
78

2.0 Administrative Policies The following policies are administrative in nature and pertain to DOs and DON’Ts. Proper use of IT resources and
other network services are covered. These policies are in direct support of Security Administration Processes.
2.1 Information Security Awareness Policy
Policy purpose
This Policy will ensure that all IS Users are informed and aware of the importance of protecting the sensitive
information held by the Department prior to being granted access (via a User Confidentiality Security Agreement attached hereto as Exhibit A) to any Department Automated System. This will also ensure that IS Users are aware of information security threats and concerns, and are equipped to support the Department’s IT security policies in the course of their normal work.
Policy Scope
The policy establishes the requirement for security awareness and education of all IS Users that are granted access to
the Department’s information systems and assets. Information assets include any valuable or sensitive information in any form created, gathered or stored and used as a component of a business process.
Policy Description
IS Users will be informed of security procedures and the correct use of information processing facilities to minimize
possible security risks. This includes security requirements, legal responsibilities and business controls, as well as training in the correct use of information processing facilities e.g. log-on procedures, use of applications, if applicable, before access to information or services is granted. The following steps must be followed:
All Contractors shall ensure that their IS users under their supervision are aware of the Department’s current IT security policies.
All Contractors shall inform new full-time and part-time users, employees, temporary workers, contractors, vendors and consultants (IS Users) of the importance of information security and their role in protecting valuable and sensitive information systems and assets during their orientation.
IS Users shall acknowledge in writing that they have been informed and are aware of the policies.
2.2 IT Security Incident Handling Policy
Policy purpose
This policy describes the procedure for dealing with computer security incidents and provides Department support
personnel with information on what to do if they discover a security incident. Another purpose is to minimize the damage from security incidents and malfunctions, and to monitor and learn from such incidents.
Policy Scope
The term incident in this policy is defined as any irregular or adverse event that occurs on any part of the Human
Service Department Information Systems. Some examples of possible incident categories include: compromise of system integrity; denial of system resources; illegal access to a system (either a penetration or an intrusion); unauthorized access to confidential data; malicious use of system resources, or any kind of damage to a system.
The steps involved in handling a security incident are categorized into five stages:
Protection of the system
Identification of the problem
Containment of the problem
Eradication of the problem
Recovering from the incident and the follow-up analysis
79

Appropriate steps will be taken against any user who violates the terms of this policy.
Policy Description
IS Users shall note and report any observed or suspected security weaknesses in, or threats to, systems or services.
They should report these matters either to their immediate supervisors or the Contractor’s local administrator who in turn should report to the Department IT Information Systems Manager. IS Users should not attempt to prove a suspected weakness as testing weaknesses might be interpreted as a misuse of the system.
A computer security incident can occur at any time of the day or night. Thus, time and distance considerations in
responding to the incident are very important.
IT security incidents are classified into three levels depending on severity:
Level 1 incidents are the most serious and should be handled immediately or as soon as possible. Level incidents must be escalated to the Department Information Systems Manager or designee.
Level 2 incidents are less serious but should still be handled the same day that the event occurs (usually within two to fours hours of the event). Level 2 incidents should be escalated to the Department Information Systems Manager or designee.
Level 3 incidents are the least severe, but it is recommended that they be handled within one working day after the event occurs. Level 3 incidents should be escalated to the Department Information Systems Manager or designee.
Logging of information is critical in situations that may eventually involve federal authorities and the possibility of a
criminal trial. The implications from each security incident are not always known at the beginning of, or even during, the course of an incident. Therefore, a separate written log shall be kept by each member of the incident handling team for all security incidents that are under investigation.
Each log entry shall contain the date and time of the action being documented by that log entry. The information in the
log must not be altered, so the log must be securely stored in a location with restricted access so that it cannot be altered by others. Manually written logs are preferable since on-line logs can be altered or deleted. Entries made in the log shall be handwritten in blue or black ink.
Upon successful completion of the incident handling, all logs shall be forwarded to the Contractor local administrator
who will ensure that the original is copied for maintaining in the Contractor’s files before forwarding the original to the Department Information Systems Manager or designee. The types of information that shall be logged are:
Dates and times of incident-related phone calls
Dates and times when incident-related events were discovered or occurred
Amount of time spent working on incident-related tasks
Actions taken by the Contractor
People Contractor has contacted or have contacted Contractor
Names of systems, programs or networks that have been affected
Although virus and worm incidents are very different, the procedures for handling each are very similar aside from the
initial isolation of the system and the time criticality. Worms and some viruses are self-replicating and can spread to hundreds of machines in a matter of minutes, thus, time is a critical factor when dealing with a worm attack.
Isolate the System
Isolate infected system(s) from the remaining Department network as soon as possible. If a worm is suspected, then a
decision must be made to disconnect the Department from the outside world. Network isolation is one method to stop the spread of a worm, but the isolation can also hinder the clean-up effort since the Department will be disconnected from sites which may have patches. The Department Information Systems Manager or designee must authorize the isolation of the Department network from the outside world. Log all actions. Do not power off or reboot systems that may be infected. There are some viruses that will destroy disk data if the system is power-cycled or re-booted. Also, re-booting a system could destroy needed information or evidence.
Notify Appropriate People as outlined above. Identify the Problem
80

Try to identify and isolate the suspected virus or worm-related files and processes. Prior to removing any files or killing any processes, a snapshot of the system must be taken and saved. Below is a list of tasks to make a snapshot of the system:
Save a copy of all system log files. Save a copy of the root history file.
Capture all process status information into a file.
If specific files that contain virus or worm code can be identified, then move those files to a safe place or archive them to tape and then remove the infected files. Also, get a listing of all active network connections
Contain the virus or worm
All suspicious processes shall now be halted and removed from the system. Make a full dump of the system and store
in a safe place. The tapes should be carefully labeled so they will not be used by unsuspecting people in the future. Then remove all suspected infected files or worm code. In the case of a worm attack, it may be necessary to keep the system(s) isolated from the outside world until all Department systems have been inoculated and/or the other Internet sites have been cleaned up and inoculated. Log all actions.
Inoculate the System(s)
Implement fixes and/or patches to inoculate the system(s) against further attack. Prior to implementing any fixes, it may be necessary to assess the level of damage to the system. If the virus or worm code has been analyzed, then the task of assessing the damage is not very difficult. However, if the offending code has not been analyzed, then it may be necessary to restore the system from backup tapes. Once the system is brought back into a safe mode, then any patches or fixes shall be implemented and thoroughly tested. Log all actions.
Return to a Normal Operating Mode
Prior to bringing the systems back into full operation mode, Contractor should notify the same group of people who were notified in stage one. The users should also be notified that the systems are returning to a fully operational state. The Department Information Systems Manager or designee will determine if it is necessary for all users to change their passwords and notify them as needed. Before restoring connectivity to the outside world, verify that all affected parties have successfully eradicated the problem and inoculated their systems. Log all actions.
Follow-up
After the investigation, a short report describing the incident and actions that were taken must be completed. Log all actions.
2.3 IT Security Risk Assessment Policy
Policy purpose
This policy places the accountability and responsibility of performing IT security risk assessment on Contractor
applications/systems administrators. The purpose of the risk assessment is to determine areas of vulnerability, and to initiate appropriate remediation.
Policy scope
IT security risk assessments can be conducted on any Contractor that maintains an agreement or memorandum of
understanding with the Department.
IT security risk assessments can be conducted on any information systems, including applications, servers, and
networks, and any process or procedure by which these systems are administered and/or maintained.
81
Policy description
An initial IT security risk assessment must be performed on every critical business application/system by the
Contractor applications/systems administrator. The execution, development and implementation of remediation programs are the joint responsibility of the Contractor and the Department. Contractor users and employees are expected to cooperate fully with any Risk Assessment being conducted on systems for which they are held accountable. Users and employees are further expected to work with the Risk Assessment Team in the development of a remediation plan.
2.4 Information Technology Acceptable Use Policy
Policy purpose
The purpose of this policy is to outline the acceptable use of Human Service Department Automated Systems assets
and resources. This policy is intended to protect the Department from risks including virus attacks, compromise of network systems and services, and legal issues.
Policy scope
This policy applies to Contractor’s which contract with the Department, its users and customers and pertains to all IT
assets and resources owned or leased by the Department.
Policy description
Department Information Technology assets and resources are provided primarily for the use of Contractors which
contract with the Department. Appropriate use of these resources includes conducting Department business, research, communications, and official work. Access to Department IT assets and resources is a privilege. It requires individual users and employees of Contractor’s to act responsibly, conserve computer resources, and consider the rights and privacy of others. The assets and resources are the property of the Department.
Users and employees of Contractors should be aware that they may be subject to the laws of other states and
countries when they engage in electronic communications with persons in those states or countries or on other systems or networks. Contractors are responsible for ascertaining, understanding, and complying with the laws, rules, policies, contracts, and licenses applicable to their particular uses.
The following uses of Department IT resources are prohibited:
A. Interference or impairment to the activities of others, including but not limited to the following:
1. Authorizing another person to use Department computer systems. Contractors are responsible for
all of their accounts. Contractors must take all reasonable precautions, including password maintenance and file protection measures, to prevent use of their account by unauthorized persons. Users and employees of Contractors must not share their password with anyone else or provide access to the Department network resources to unauthorized persons.
2. Unauthorized access and use of the resources of others, including but not limited to the following:
a.
b.
Use of Department resources to gain unauthorized access to resources of any other
individual, institutions, or organizations.
Use of false or misleading information for the purpose of obtaining access to unauthorized
resources.
B. Accessing, altering, copying, moving, or removing information, proprietary software or other files (including
programs, libraries, data and electronic mail) from any network system or files of other users without proper authorization.
82

C. Damage or impairment of Department resources, including but not limited to the use of any resource irresponsibly or in a manner that adversely affects the work of others, such as:
1. Hacking - attempting to obtain or use passwords, IP addresses or other network codes that have not
been assigned to you or authorized for use as Contractor employees, attempting to obtain unauthorized access to computer accounts, software, files, or any other Department IT resources.
2.
3.
Malicious Activity - intentionally, recklessly or negligently damaging any system (e.g., by the
introduction of any so-called "virus", "worm", or "Trojan-horse" program); damaging or violating the privacy of information not belonging to the user; or misusing or allowing misuse of system resources.
Any other activity not specifically cited above that may be illegal, harmful, destructive, damaging, or
inappropriate use of Department IT resources.
D. Unauthorized commercial activities, including but not limited to the following:
1. Using Department resources for one's own commercial gain, or for other commercial purposes not officially approved by the Department, including web ads.
2. Using Department resources to operate or support a non-Department related business.
E. Violation of local, state or federal laws, including but not limited to, violating any laws or participating in the
commission or furtherance of any crime or other unlawful or improper purpose.
The Department reserves the right to monitor computer and network usage for operational needs and to ensure
compliance with applicable laws and Department policies.
2.5 Information Classification Policy
Policy purpose
This policy identifies the different classifications of information within the Department and defines classifications on
how that information is to be handled and protected. It is also intended for the policy to help users and employees of Contractors to determine what information can be disclosed to non-employees, as well as the relative sensitivity of information that should not be disclosed outside of the Contractor or the Department without proper authorization.
Policy scope
This policy pertains to all information collected, stored and/or generated by Contractor in the use of Department
Automated Systems.
Policy Description
All information, data and documents is to be processed and stored strictly in order to protect its integrity and
confidentiality
Sensitive Information
Sensitive Information is defined as, for purposes of defining Contractor-produced software, only those portions of data
processing software, including the specifications and documentation, which are used to:
A. Collect, process, store, and retrieve information.
B. Collect, process, store, and retrieve financial management information of the provider agency, such as
payroll and accounting records; or
C. Control and direct access authorizations and security measures for automated systems.
D. Medical history records, including HIPAA ePHI 1 and information related to health or property
1 Health Insurance Portability and Accountability Act of 1996 electronic Personal Heath Information (see Health Insurance
Portability and Accountability Act Of 1996 (HIPAA) IT Compliance Policy)
83

insurance.
2.6 Audit Policy
Policy purpose
This policy provides the authority for members of the Department to conduct security audits.
Audits may be conducted to:
A. Ensure integrity, confidentiality, and availability of information and resources
B. Investigate possible security incidents to ensure conformance to Department security policies
C. Monitor user or system activity where appropriate.
Policy scope
This policy covers any system or equipment on or connected to the Department Automated Systems. Department
staff may conduct security audits on other Department owned/operated networks as tasked by the Department Director.
Policy description
When requested and for the purpose of performing an audit, any access needed for the audit will be provided to
members of the Department.
This access may include:
A. User level and/or system level access to any computing or communications device B. Access to information (electronic, hardcopy, etc.) that may be produced, transmitted, or stored on
equipment or premises C. Access to work areas (labs, offices, cubicles, storage areas, etc.) D. Access to interactively monitor and log traffic on Department networks.
2.7 Security Administration Policy
Policy purpose
This policy defines security administration responsibilities for Contractors.
Policy scope
This policy covers all computer and communication devices on the administrative network owned or operated by the
Contractor. The security of a computer system involves safeguards for the hardware, software, and the data stored in the system. Computer system security also involves the protection of stored data and the prevention of unauthorized access and alteration of stored data. Each individual has responsibilities related to maintaining security over the Department’s information assets.
Policy Description
Security administration is an important function in the Department. Security administration responsibilities should be
segregated from systems development, computer operations, and systems programming functions. Security administration should be involved in developing security policies where they do not exist and reviewing policies for effectiveness where they do exist. The function must be involved in the enforcement of security standards and in setting sanctions for noncompliance with established policies, procedures, and standards.
84

Contractors will adopt proper security measures and procedures to protect the Department’s information assets from all threats. These measures include establishing and assigning security administration authority and responsibility.
Contractors
A. Assign an IT Security Point of Contact who is responsible for controlling and monitoring physical and electronic access to Contractor specific information assets.
B. Ensure the ongoing protection of Contractor specific information assets by establishing proper and adequate logical access controls, including password security and other access restrictions, to ensure that only authorized personnel have online access to the automated systems within the Department.
C. Ensure that all staff adheres to the security policies, guidelines and procedures. D. Involve the Department in security evaluations for Contractor specific information assets.
Department IT Security Administration
A. Provide orientation and support to the Contractor’s IT Security Point of Contact. B. Create and enforce security policies. C. Ensure that password security functions, features, and capabilities are activated for online systems. D. Set up user profiles (e.g., identification, authorization, user code, and password). E. Ensure that passwords are of sufficient length and complexity that they cannot be easily compromised. F. Limit the number of log-on attempts to online systems. No more than three to five attempts should be allowed
before disabling the violator’s workstation. G. Ensure that passwords are changed for all online users at least every 90 days. Users with more sensitive
capabilities (e.g., security administrators, certain users of financial and payroll systems) may want to change their passwords more frequently.
H. Establish adequate password security on automated systems. I. Review terminal logs and security violation reports. J. Monitor activity on remote access facilities to ensure that only authorized personnel are using them. K. Detect and monitor access to systems or information outside the normal patterns or needs of a user or
specific workstation. L. Maintain security over Department information to ensure that unauthorized access does not occur. M. Report potential security breaches to Contractor Management. Monitor and track repeated security violators. N. Maintain historical records of security violations for at least 90 days. O. Provide suggestions and recommendations to the Department on security-related matters. P. Research and suggest, as requested, additional security devices, such as modems with dial-back capability,
which can potentially improve security. Q. Closely monitor the following:
1. Individuals with access to any tool that can change programs or data, such as program compilers,
data-altering utilities, report generators, and text editors.
2. Remote access lines, especially those with dial-up and VPN capabilities.
3. Terminated employees, especially those with high-tech capabilities.
4. Repeat violators who claim not to understand log-on procedures.
All IS End-users
A. Adhere to all established security policies. B. Report suspicious systems activity, which may indicate that files or programs have been tampered with to
the Contractor’s IT Security Point of Contact, agency management, and to the Department. C. Refrain from sharing confidential user codes, passwords, or other codes intended to restrict access to
information assets.
2.8 Physical Security Policy
Policy purpose
Authorized access to computer facilities is granted on a “need-to-use” basis.
Policy scope
This policy applies to all Contractors which contract with the Department.
85
Policy description
This policy clearly establishes steps that must be considered to ensure access to computer facilities and information
assets are adequately protected. This includes, but is not limited to: A. Physical security perimeter B. Physical entry controls C. Security of data centers and computer rooms D. Securing individual personal computer and laptops E. Securing employee desks and open areas.
Physical security perimeters
Physical security protection should be based on defined perimeters and achieved through a series of strategically
located barriers throughout the location. The requirements and placement of each security barrier should depend upon the value of the assets and information to be protected, as well as the associated risk. Each level of physical protection should have a defined security perimeter around which a consistent level of security protection is maintained. The Department Information Systems Manager or designee should be contacted for assistance in developing plans for physical security of IT facilities.
The following guidelines for physical security perimeters are provided:
A. Security of the perimeter should be consistent with the value of the assets or services under protection. B. Security perimeter should be clearly defined. C. Support functions and equipment (e.g., photocopiers and fax machines) should be located to minimize the risks of unauthorized access to secure areas and exempt information. D. Physical barriers should, if necessary, be extended from floor to ceiling to prevent unauthorized entry and
environmental contamination. E. Other personnel should not be made aware unnecessarily of the activities within a secure area. F. Prohibition of individuals working alone should be considered, both for safety and to prevent opportunities
for malicious activities. G. Organizationally managed computer equipment should be housed in dedicated areas separate from third-
party managed computer equipment. H. When vacated, secure areas should be physically locked and periodically checked. I. Support services personnel should be granted access to secure areas only when required and authorized;
where appropriate, their access should be restricted (especially to exempt information) and their activities monitored.
J. Photography, recording or video equipment should not be allowed within the security perimeters, unless authorized.
Physical entry controls
Secure areas should be protected by appropriate entry controls to ensure that only authorized personnel are allowed
access. The following controls should be considered: A. Visitors to secure areas should be supervised and their date and time of entry and departure recorded. B. Visitors should only be granted access for specific, authorized purposes. C. All personnel are required to wear visible identification when within the secure area and encouraged to
challenge strangers. D. Access rights to secure areas should be revoked immediately for personnel that terminate employment. E. Any keys or other access devices issued to the employee must be returned as part of the termination
process.
86

Security of data centers & computer rooms
Data Centers and computer rooms supporting critical organizational activities should have stringent physical security.
The selection and design of the site should take account of the possibility of damage from fire, flooding, explosions, civil unrest and other forms of natural or manmade disaster. Consideration should also be given to any security threats presented by organizations and/or businesses in close proximity. The following measures should be considered:
A. Key facilities should be situated away from areas of public access or direct approach by public vehicles. B. Where possible, buildings should be unobtrusive and give minimum indication of their purpose, with no
obvious signs, outside or inside the building, identifying the presence of computing activities. C. Lobby directories and internal telephone books should not identify locations of computer facilities. D. Backup equipment and media should be situated at a safe distance to avoid damage from a disaster at
the main site. E. Appropriate safety equipment should be installed, such as heat and smoke detectors, fire alarms, fire
extinguishing equipment and fire escapes; fire suppression and safety equipment should be checked regularly in accordance with manufacturers’ instructions; employees should be properly trained in the use of safety equipment.
F. Emergency procedures should be fully documented and regularly tested.
G. Doors and windows should be locked when unattended, and external protection should be considered for
windows.
Employee desk/open area policy
To reduce the risks of unauthorized access, loss, and damage to information after normal working hours, exempt and
restricted papers and diskettes should not be left on desks unlocked. Information left out on desks is also likely to be damaged or destroyed in a disaster. The following guidelines should be applied where appropriate.
A. Papers and diskettes should be stored in cabinets when not in use, especially outside of working hours. B. Exempt or critical organizational information should be locked away (ideally in a fire-resistant cabinet)
when not required, especially when the office is vacated. C. Key locks, passwords, or other controls should protect personal computers and computer terminals when
not in use. D. Consideration should be given to the need to protect incoming and outgoing mail points and unattended
fax machines.
2.9 Contractor IT Security Program Policy
Policy purpose
The purpose of this policy is to ensure that each Contractor which contracts with the Department understands that they
must establish, implement and continuously improve an IT Security Program. This program must be sufficient enough to guarantee the integrity, accuracy and availability of information for which they have custodial responsibility. The program must reduce the risk of unauthorized disclosure, modification or destruction of information to a level that management deems necessary. Managers will be held accountable.
Policy Scope
This policy covers each Contractor which contracts with the Department.
Policy Description
Each Contractor will appoint an IT Security Point of Contact (IT Security POC) as an additional duty. The IT Security
POC will work directly with the Department Information Systems Manager in developing and monitoring the program. The following skills/competencies are recommended to be included in the IT Security POC:
A. A working knowledge of all business processes and information handled by those processes. B. A knowledge of the level of risk associated with the loss or destruction of the some or all the information
for which the Contractor has custodial responsibility. C. Excellent written and verbal communications skills. D. Willingness to be an active partner with the Department Information Systems Manager in raising the
87

level of Security within the entire Contractor.
Each Contractor which contracts with the Department must develop a comprehensive Security Program that allows
them to: A. Ensure the accuracy and integrity of automated information, and B. Educate all employees and contractor personnel concerning their responsibilities for maintaining the
security of information resources.
Additionally, it is recommended that the comprehensive Security Program include the following:
A. Place a monetary value on all data, software and information system resources owned by the Contractor for risk management purposes.
B. Identify which information resources are sensitive and take steps to protect such information from disclosure or unauthorized modification.
C. Identify which information resources are essential to the continued operation of critical County functions and take steps to ensure their availability.
D. Evaluate IT Security enhancements beyond the minimum requirements for their cost effectiveness and to apply those which can be cost justified considering the exposure.
Technical Policies The following policies are technical in nature and must be implemented by all Contractors which contract with the
Department.
Access to information and resources available through the Department’s network systems must be strictly controlled to
prevent unauthorized access. Access to all computing and information systems and peripherals shall be restricted unless explicitly authorized.
Access to operating system commands is to be restricted to those persons who are authorized to perform systems
administration/management functions.
The network security policies are intended to protect the integrity of the Department’s Automated Systems and to
mitigate the risks and losses associated with security threats to the system.
The following policies should be read and cross referenced as part of the Broward County’s Network Security.
A. Backup Policy B. HIPAA IT Compliance Policy C. Password Policy
In support of these policies, the Department will:
A. Monitor in real-time, network traffic as necessary and appropriate for the detection of unauthorized activity and intrusion attempts, and
B. Publish security alerts, vulnerability notices and patches and other pertinent information.
3.1 Password Policy
Policy purpose
This policy outlines the handling, responsibilities, and scope of passwords for the Automated Systems.
Policy scope
This policy includes all Contractors which contract with the Department who access to the Department Automated
Systems.
88
Policy description
All Contractor users and employees authorized to access password protected data on Department systems must
complete the appropriate User Access Form. Passwords shall be controlled to prevent their disclosure to unauthorized persons. Contractors shall control their passwords to prevent their disclosure to unauthorized persons.
Passwords for all systems are subject to the following rules:
A. All passwords must be changed every ninety days.
B. Passwords must not be inserted into e-mail messages or other forms of electronic communication.
C. No passwords are to be written, e-mailed, hinted at, or in any way shared with anyone.
D. Passwords are not to be displayed or concealed on your workspace.
E. All systems “Guest” accounts are to be disabled, and any newly created “Temp” accounts to have a limited
“life expectancy” with an option for authorized extension.
F. Password must meet the following criteria:
1. May not contain any part of the user's account name.
2. Must be least 8 alpha-numeric characters long.
3. Only 5 failed attempts will be allowed before account is locked.
4. A user will not be allowed to reuse the password for 15 consecutive change
cycles. (System will remember last 15 passwords).
The Backup policy should be read and cross referenced as part of the Department Automated Systems Security.
3.2 Virtual Private Network (VPN) Policy
Policy purpose
This policy provides guidelines for Remote Access via VPN connections to the Department Automated Systems.
Policy scope
This policy applies to all Contractors which contract with the Department using VPNs to access the Automated
Systems. This policy applies to all implementations of VPN access.
Policy description
The approval authority for remote VPN Access rests with the Contractor IT End-user’s Director and the Department
Information Systems Manager or designee. The request for approval should be submitted by the Contractor IT End- user’s Director on the appropriate User Access Form. The form should be forwarded to the Department Information Systems Manager or designee.
Approved Department IT Contractors may use the benefits of VPNs, which are a user managed service. The IS User
is responsible for selecting an Internet service provider (ISP), coordinating installation, installing any required software, and paying associated fees.
Additionally:
A. IS End-users with VPN privileges are responsible for ensuring that unauthorized personnel do not access
Department internal networks.
B. VPN use is to be controlled using either a one-time password authentication, such as a token device, or a
public/private key system with a strong pass phrase.
C. VPN gateways will be set up and managed by Department.
89

D. All computers connected to Department external networks via VPN or any other technology must use the most up-to-date anti-virus software that is the corporate standard. This includes personal computers.
E. VPN users will be automatically disconnected from Department systems after 60 minutes of inactivity. The
user must then log in again to reconnect to the network. Pings or other artificial network processes are not to be used to keep the connection open.
F. Users of computers that are not Department-owned equipment must configure the equipment to comply
with the Department’s VPN and network policies.
G. Only approved VPN clients may be used.
The following policies should be reviewed and cross-referenced for details of protecting information when accessing
the corporate network via remote access methods.
A. Information Technology Acceptable Use Policy
B. Dial-in Access Policy
3.3 Backup Policy
Policy purpose
This policy provides procedures for backing up electronically stored data, operating system, database and application.
Policy scope
This policy applies to all Contractors which contract with the Department.
Policy description
Contractors maintain the responsibility for backing up electronically stored data, operating systems, databases and
applications.
Contractors are responsible for backing up all data, or work group applications and database stored on their desktops
laptops and any Personal Digital Assistant (PDA). This data can be backed up on network shared drives (preferred), compact disks or floppy disks.
Contractors are responsible for backing up all operating systems, data, applications and databases residing on servers
and network equipment under their span of control in accordance with the guidance provided below.
All operating software and application software necessary to access, recreate, or generate the information must be
backed up periodically. The frequency of backup will depend on the significance of the information and its frequency of change. The most current copy of backup media should be stored off-site. Procedures for recovery and restoration of the information should be documented.
The concept of performing backups of data files and programs is as fundamental as any concept in information
technology. Backup procedures should include the following:
A. Maintaining a copy of backups off site at all times.
B. Backing up systems on a daily basis.
C. Backing up all necessary data files and programs to recreate the operating environment
D. Storing the current copy of backups off organization premises.
E. Storing backup copies at an off-site location sufficiently distant from the data center to ensure their
protection if the original system is destroyed.
F. Considering the ease of access and retrieval from the off-site storage location, including blockage by
debris, transportation, and hours of operation.
G. Backing up the printed documentation and preprinted forms necessary for recovery.
H. Having at least three generations of backup tapes so an earlier generation of backup can be used if the
90
current backup media are damaged or become unreadable.
I.
J.
Ensuring that backup is not continually performed on the same set of tapes.
Testing the backup to determine if data files and programs can be recovered.
K. Backing up on media that are compatible with the alternate computer system that will be used following a
disaster, considering storage density, media type, and type of tape or disk drive.
L. Ensure that the following are stored at an off-site storage location:
Source and object code for production programs,
Master files and transaction files necessary to recreate the current master files,
System and program documentation,
Operating systems, utilities, and other environmental software, and
Other vital records.
3.4 Replacement of Obsolete Hardware & Software Policy
Policy purpose
This policy defines the requirement of data destruction from both hardware and software products used by the
Contractor when they are either replaced or recycled because they are obsolete and/or no longer needed.
Policy scope
This policy applies to all Contractors which contract with the Department.
Policy description
Personal computer turn-in procedure
When a Contractor disposes of personal computers or servers, the Contractor must perform the following steps to
ensure that all data is properly deleted.
A. Purge the hard drive of all applications except the operating system.
B. Purge the hard drive of all other documents.
This Section is in relation to the Health Insurance Portability and Accountable Act of 1996. (HIPAA). Please cross-
reference the Health Insurance Portability and Accountability Act Of 1996 (HIPAA) IT Compliance Policy contained within this document.
HIPAA Security Procedures for PC or server relocation/disposal at covered HIPAA entities
Perform the following steps to ensure that all HIPAA data is properly deleted from surplus equipment.
A. When a PC or server is moved within the covered entity immediate location, the internal HD can be
reformatted.
B. When a PC or server is surplused and/or moved outside of immediate location, the internal HD must be
physically destroyed and safely disposed of by the Contractor. (Note: The objective is to make HD permanently unusable and unrecoverable).
C. Destroy all application software disks.
91

3.5 Health Insurance Portability and Accountability Act Of 1996 (HIPAA) IT Compliance Policy
Policy purpose
This policy identifies the special handling of Electronic Personal Health Information (ePHI) as it applies to the IT
resources throughout the Department. This policy must be used when establishing the individual Contractor IT Security Program. The Health Insurance Portability and Accountability Act of 1996 (HIPAA) identifies and defines certain health plans, health care providers and health care clearinghouses (“Covered Entities”) that must comply with its provisions.
Policy Scope
This policy is applicable to all Contractors that use or disclose electronic protected health information for any purposes.
This policy’s scope includes all electronic protected health information, as described in herein.
Policy Description
Administrative Safeguards
Contractor managers, and supervisors shall work with its Human Resource section to enforce laws and personnel
rules related to the protection of data maintained by Department and confidentiality of health information, with specific attention to the requirements of HIPAA. Contractor employees shall be personally accountable if PHI is released in violation of HIPAA, and shall be subject to sanctions according to existing personnel rules.
Technical Safeguards
A. Access Control and Integrity - Implement technical policies and procedures for electronic information
systems that maintain ePHI to allow access only to those persons or software programs that have been granted access rights as specified in Sec. 164.308(a)(4).
1. Contractor administrators, managers and supervisors shall work with the Department to make
sure that only current, authorized staff has access to computer data where PHI is stored and used. All access to such systems shall be password controlled, and rights to access shall be reviewed for each staff member at least annually.
2. Contractor staff shall use password–protection on their voice-mail accounts. Contractor staff shall
not give out voice mail passwords to any non-Contractor staff, and shall not post or keep passwords written down where they can be readily found by someone else (e.g. taped to desk, side of computer or telephone).
3. Contractor staff shall protect access to their computer through the network log-in screen.
Contractor staff shall not share password with anyone, and shall not post or keep passwords written down where they can be readily found by someone else (e.g. taped to desk, side of computer, or telephone).
4. The Contractor’s IT Security Point of Contact shall be responsible for notifying Human Resources
section of the Contractor and the Department Information Systems Manager regarding terminated workforce members by requesting the deactivation of the individual’s passwords. Access shall be terminated immediately following notification.
5. Contractor staff shall use the “Log-off” function to lock computers when away from their
workstations.
6. Contractor staff shall save electronic files on a secure computer. PHI shall not be saved onto
diskettes, data tapes or CD (including Zip Disks or portable hard disks) unless absolutely necessary.
7. Contractor staff shall orient their computer screens so they may not be easily seen by office
92

visitors when displaying PHI.
8. Contractor staff who uses Personal Digital Assistants (PDAs) shall follow the same types of
safeguards outlined for computer use. If the PDA contains confidential information (such as appointment information that may include PHI), the PDA must be safeguarded from being accessed by anyone outside of Contractor employees. If a PDA containing PHI is lost or stolen, a report shall be promptly filed with the Privacy Officer.
9. Contractor staff shall destroy electronic media containing ePHI that does not have to be retained
prior to disposal of the electronic media.
10. Contractor staff shall ensure that all ePHI stored on Contractor computer hardware is encrypted
and that there are plans to capture that ePHI in times of emergency.
11. Contractor staff will audit computer hardware that hosts ePHI for compliance with the above
Access Control requirements
12. Contractor staff will implement electronic mechanisms to corroborate that ePHI has not been
altered or destroyed in an unauthorized manner.
B. Transmission Security - guard against unauthorized access to ePHI that is being transmitted over an
electronic communications network. (In the February 20, 2003 issue of the Health and Human Services Federal Register, the encryption required by Section 164.312(e)(1)) for ePHI was changed. Covered entities are required to encrypt data being transmitted whenever deemed appropriate by the sending entity. However the section also recommends that covered entities consider use of encryption technology for transmitting ePHI when available, particularly over the internet.) Covered entities will be responsible for identifying transmission encryption requirements which will be implemented using appropriate encryption standards.
Reporting Suspected Violations
If a Contractor staff member suspects that another employee of Contractor has violated the Privacy Policies and
Procedures, the Contractor staff member shall immediately report the suspected violation by using one of the following methods. Reporting the suspected violation is not optional. A report of the suspected violation may be given to the Contractor’s IT Security Point of Contact.
93

Program Policies
4.1 Confidential Information and Information Sharing Policy Policy purpose
This policy provides guidelines for the handling of confidential information and sharing with respect to the Department
Information Systems. The confidentiality policies are to protect the confidentiality, integrity, availability, and reliability of all data shared on the network. These policies are also intended to prevent accidental or intentional unauthorized disclosure, modification, or destruction of information by persons within or outside the participating agencies. Additionally, it is the policy of the Department’s Information Systems to protect the confidentiality, integrity, availability, and reliability of all information technology resources used to support the delivery of services to clients served by participating member agencies. It is the policy of the Department’s Information Systems to preserve client rights to confidentiality, to implement and enforce the protection of the security of client personal information, as well as compliance with Federal, State and Local ordinances, laws, rules, regulations, policies and procedures governing the confidentiality of data.
Policy scope
This policy applies to all Contractors which contract with the Department and use Department Automated Systems and
to Department staff. Confidential data include, but are not limited to: client names, medical history records, social security numbers and financial information.
Policy description
Information shared on the network must be consistent with Federal, State and Local ordinances, rules, regulations,
policies and procedures, including to Chapter 163 of the Florida Statutes, Intergovernmental Programs, Part VI, "Collaborative Client information systems."
Data may be shared with participating agencies only with client's valid consent. This data may not be shared with any
individual or organization that does not have a current signed agreement with the participating agency. The minimum data elements to be collected by participating agencies, as required by funding agencies are as follows: name, alias and zip code, if applicable, gender, and date of birth and social security number.
State, Federal and County laws protect data collected and analyzed by Department for its Information Systems. The
unauthorized disclosure of any information that could be used directly or indirectly to identify clients is prohibited.
Client specific data (e.g., client’s unique record number, exact date of birth or death and other personal identifying
information) shall be released to participating agencies on a need-to-know basis and only with the client's valid consent.
Aggregate data (data that is cumulative and not traceable to individual clients), may be shared among participating
agencies.
Clients must sign the appropriate consent forms before data can be entered into the appropriate Automated System,
except only that Contractor’s performing central intake via telephone may obtain verbal consent. In the event that the potential client declines to provide valid consent, the client intake process will be completed manually or by other previously approved methods.
During the client intake in order to ensure the integrity of client information entered into the system, the person
conducting the full (face-to-face) intake shall request that the client present proper identification (e.g., government issued documentation such as driving license, D.M. V I.D. card, resident alien card, or social security card). Lack of proper identification will not hinder or delay the intake process. A unique record number (URN) I.D. will be generated by the Automated System for each client. The URN will be used to coordinate services across authorized service providers and to generate an unduplicated client count.
94

4.2 Electronic Referral Policy
Policy purpose
This policy provides guidelines for the handling of electronic referrals with respect to Department Information Systems.
Policy scope
This policy applies to all Contractors which contract with the Department and use the Department Information Systems
and Department staff.
Policy description
Electronic Referrals to participating member agencies that provide services, for which the client may be eligible, will be
done electronically via the appropriate Department Automated System. If the Contractor that the client is being referred to is a Department Automated Systems participating agency, the information will be received by that agency electronically, subject to valid client consent. All printed materials generated by the appropriate Department Automated System are considered confidential. This includes confidential client information relative to demographics, annual household income, financial assistance and service outcomes. This printed material may be faxed or mailed to that agency in accordance with all applicable Federal, State and County laws.
95

Terms Definitions
Covered Entities Organizations that are directly regulated by HIPAA and are responsible
for the privacy of protected health information.
Desktop PCs and peripheral equipment are not relevant to the scope of this
policy.
Electronic Protected
Health Information
(ePHI)
Electronically stored or transmitted Protected Health Information.
Encryption Secure Broward County sensitive information in accordance with the
Acceptable Encryption Policy. International issues regarding encryption
are complex. Follow organization guidelines on export controls on
cryptography, and consult your manager and/or organization legal
services for further guidance.
Hypertext transfer
protocol (HTTP)
A protocol that tells computers how to communicate with each other.
Most Web page locations begin with http://.
Internet A global network of computers that communicate using a set of common
protocols including hypertext transfer protocol (HTTP) and Transmission
control protocol/ Internet protocol (TCP/IP). A private global network
inside a company or organization that uses the same kinds of software
that you would find on the public Internet, but that is only for internal use.
Note that an Intranet may not actually be an internet – it may simply be a
network.
Internet service
provider
This is the organization that the County contracts with to get connection
to the Internet.
Intranet An private network of computers that communicate using a set of
common protocols including hypertext transfer protocol (HTTP) and
Transmission control protocol/ Internet protocol (TCP/IP).
One-time password
authentication
The use of a one-time password token to connect to a network over the
Internet.
Personal digital
assistant (PDA)
Personal digital assistant.
Point of contact
(POC)
Point of contact - The POC acts on behalf of the Contractor.
Protected Health
Information (PHI)
Individually identifiable health information that is: transmitted by
electronic media, maintained in electronic media, or transmitted or
maintained in any form or medium. Protected health information
excludes individually identifiable health information in: education records
covered by the Family Educational Rights and Privacy Act; and in
employment records held by a covered entity in its role as employer.
Risk Those factors that could affect confidentiality, availability, and integrity of
Broward County’s key information assets and systems.
Risk assessment Periodic information security assessments for the purpose of determining
areas of vulnerability and to initiate appropriate remediation.
5.0
Glossary
96
Terms Definitions
Transmission control
protocol/Internet
protocol (TCP/IP)
The suite of transmission protocols that are used across the Internet.
Virtual private
network (VPN)
An encrypted channel between nodes on the Internet. The provision of
private voice and data networking from the public switch network through
advanced public switches. The network connection appears to the IT
Customer as an end-to-end, nailed-up circuit without actually involving a
permanent physical connection, as in the case of a leased line. VPNs
retain the advantage of provide networks but add benefits like capacity
on demand.
97
Broward County Human Services Department
Exhibit A
Client Services Information Systems
User Confidentiality Security Agreement
I, the undersigned, have received and read a copy of the Broward County Human Services Department
Information Systems Security Principles and Policies. I hereby agree to abide by these principles and policies.
I acknowledge that violation of the Principles and Policies may result in criminal prosecution, civil
liability, civil penalty and may subject me to disciplinary action, including possible termination of employment.
I understand that the purpose of this agreement is to emphasize that all client information contained in
any of the Department’s client services systems is confidential.
I understand my professional responsibilities, and that I am to report suspected or known security
violations to Broward County Human Services Department.
I understand that access to confidential information is governed by State and Federal laws. Client
confidential information includes medical, social and financial data.
Client data collected by interview, observation or review of documents must be in a setting which
protects the client’s privacy.
I further understand and acknowledge the following:
1. Registered user ID’s and/or passwords are not to be disclosed.
2. Information, electronic or paper-based, is not to be obtained for my own or another person’s
personal use.
3. Client services information systems, data and information technology resources shall be
used only for official business purposes.
4. Copyright law prohibits the unauthorized use or duplication of software.
User Name: ____________________________________
(print)
User Signature: _________________________________ Date Signed: _____________
Agency: _______________________________________
Supervisor Name: _______________________________
(print)
Supervisor Signature: ____________________________ Date Signed: ______________


