+ All Categories
Home > Documents > Client software user manual 1 The

Client software user manual 1 The

Date post: 03-Feb-2022
Category:
Upload: others
View: 5 times
Download: 0 times
Share this document with a friend
17
Adirondack Technology of NY Client Manual CW Series Client software user manual 1The introduction 1.1 The introduction 1.2 System requirements Operating systemover window 2000 CPUInter Pentium 4 2.4G or higher Memory512M or more Monitor : support 1024*768 and the higher resolution Card : support direct draw to accelerate and opening. 1.3 Convention In order to the simplify describe in this manual ,will describe as following . client software called software DVR DVS called equipment "Click" means to click the left mouse button "Double click “means to double click the left mouse button "Right click" means to click the right mouse button 2. software running 2.1 Running and login 2.11 Double-click the shortcut to run the software2.12 Login Choose the user name; enter the password clink to enter the program. you can choose “automatically login,” so it will not appear on the window next time. 2.2 introduction of the Software interface
Transcript

Adirondack Technology of NY Client Manual CW Series

Client software user manual

1. The introduction

1.1 The introduction

1.2 System requirements

Operating system:over window 2000

CPU:Inter Pentium 4 2.4G or higher

Memory:512M or more

Monitor : support 1024*768 and the higher resolution

Card : support direct draw to accelerate and opening.

1.3 Convention

In order to the simplify describe in this manual ,will describe as following .

client software called software

DVR DVS called equipment

"Click" means to click the left mouse button

"Double click “means to double click the left mouse button

"Right click" means to click the right mouse button

2. software running

2.1 Running and login

2.11 Double-click the shortcut to run the software。
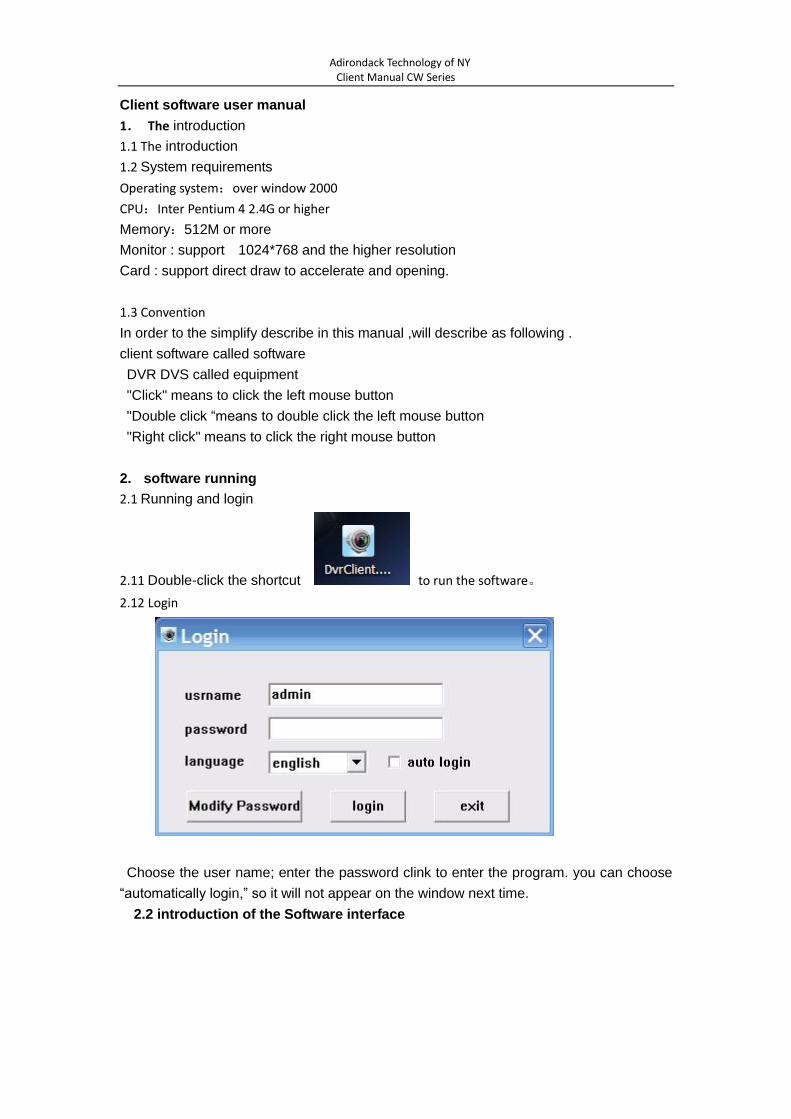
2.12 Login

Choose the user name; enter the password clink to enter the program. you can choose

“automatically login,” so it will not appear on the window next time.

2.2 introduction of the Software interface

Adirondack Technology of NY Client Manual CW Series

Introduction of the Software interface

1) System and the button bar

Interface can be locked, minimize the window to the taskbar, close program operation。

2 )Tab bar

Contain the function of the different software models

Remote preview :Real-time preview on the device

Remote playback: Local video playback and remote playback

Remote settings: Configuration setup

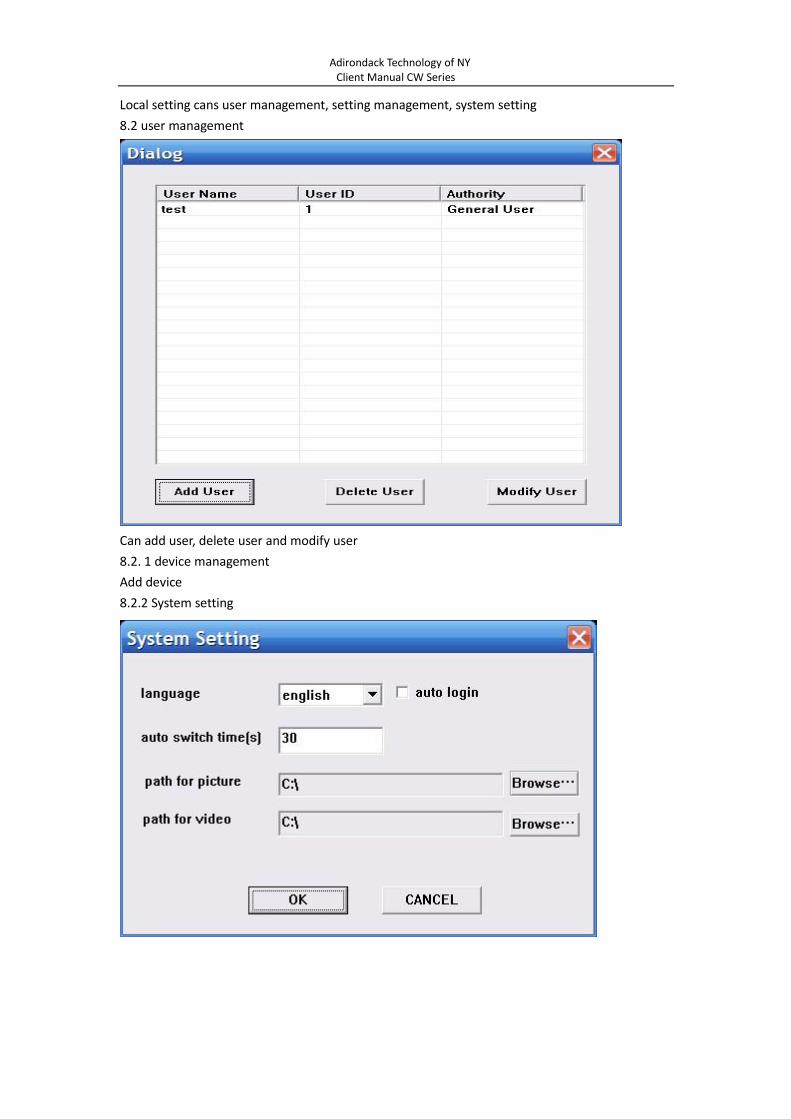
Local settings: user management, device management, system setup

3) Device tree

Show each equipment and to add management group

4 )Preview Display Window

Real-time preview of the device channel

5 )PTZ control window

For PTZ control, adjust the picture

6 )Preview Control Bar

Preview control to stop, drawings, switching screen modes, full screen, rotation, etc.

3. Equipment Management

1

2

3

4

5

6

Adirondack Technology of NY Client Manual CW Series

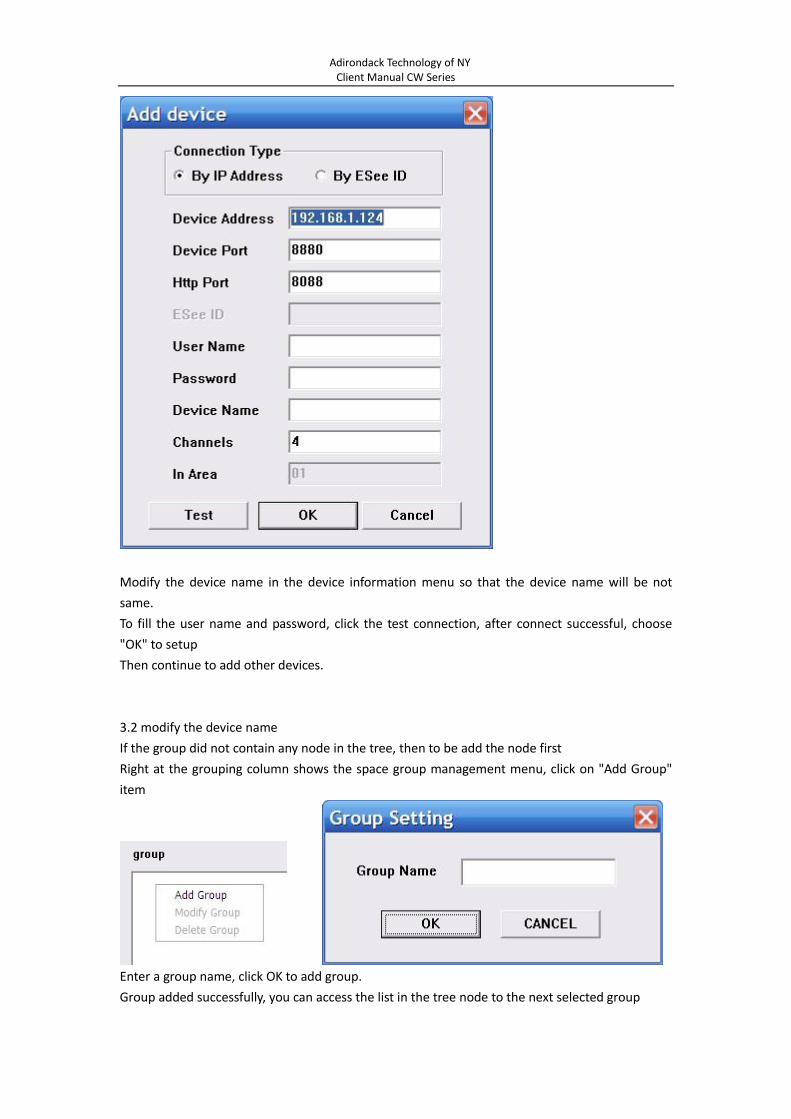
Before using the software to operate, need to add and configure the device operation.

Click the tab bar "Configure" tab to enter configuration mode

Click on the left navigation bar set- "Device Manager" item to enter the device

management interface.

4.1 device tree configuration

When the initial run the software, the list defaults to an empty tree, right-click

any blank space can be a list of trees to add area.

Adirondack Technology of NY Client Manual CW Series

Fill in the name of the regional title bar and click OK you can add a tree to the list area, and

because of this added area as the first area, there is no higher in the region area, the higher the

regional name column blank.

Regional add is complete, right-click the regional nodes may choose to sub-region, add the

operation of equipment

Right-click: The Add area, Pop-up a regional management menu.

Select "Add a sub-regional" sub-regions can be added.

Select "Delete area" will be removed in a selected state area.

Note: If you remove the region which contains other regions under, equipment or channels,

then delete operation will not only delete the selected area, but will remove all of the regions

under this region, equipment or channels; if the region is under the preview channel or Video

will be given a warning.

3.1.1 Manually add the device

Right-click the Add area, pop-up regional management menu, select "Add Device."

Options Explain

Adirondack Technology of NY Client Manual CW Series

device address Device IP address or domain name

device port device port number

http port http port number

User name Device’ Registered User name

User password Device’ Registered User password

Device name Add the device name it can be customized

channel Device’ Channel number, please fill in the actual situation

In area the name of the host region

Click“test connection”to check if it could connect to the device

3.1.2 Search the LAN-line equipment

Right click In any regional / sub-regional, click the menu item in the search Device, search the

same LAN-line equipment

Choose one of them,click“add device”

Adirondack Technology of NY Client Manual CW Series

Modify the device name in the device information menu so that the device name will be not

same.

To fill the user name and password, click the test connection, after connect successful, choose

"OK" to setup

Then continue to add other devices.

3.2 modify the device name

If the group did not contain any node in the tree, then to be add the node first

Right at the grouping column shows the space group management menu, click on "Add Group"

item

Enter a group name, click OK to add group.

Group added successfully, you can access the list in the tree node to the next selected group

Adirondack Technology of NY Client Manual CW Series

Select the channel list tree node; click "add" in the Device Configuration window to add the

selected channel into the group tree

Group, the channel name will show in the form of "device name _ channel name”, after adding a

channel successfully, list tree select the next channel of the device node automatically.

Select the device in list tree; click "add" in the Device Configuration window could add the all

selected channel into the selected group. After a device successfully added all the channels, then

select the next window select list of a device tree node.

Using the device configuration window button bar "Move" and "Down" buttons can be adjust the

order of nodes under channel grouping.

Pitch up the Channels node in the grouping tree, click "delete" button in Device Configuration

window to remove select the channel from the group. After removing the channel, the group tree

will automatically select the next channel in the grouping.

Select the group node of group tree, click "delete" button in Device Configuration window will

display the warning message dialog window. Click "OK" to delete the entire channels node under

the selected group.

Note: same channel couldn't be added in one group. But one channel can be added into different

Adirondack Technology of NY Client Manual CW Series

group

4. Live video

4.1 General live modes

4.1.1 Double click to start preview

Click a player window, the selected window frame will turn into light blue.

Double-click the device list or a grouped channel, the channel will be play in this window.

4.1.2 Start /close all preview

Choose device and click right mouse to choose “open all device channel" for all open, and choose

"close all device channel" for all close.

4.2 live sequence dwell

Click the switch for live sequence dwell, and then begin to play.

Time can be set in the client local setting-system setting.

4.3 Other function

Double click to magnify: in the mode of multi image, double click playing window can magnify it

and return after double click again

Picture mode: can be switch in multi picture.

Adirondack Technology of NY Client Manual CW Series

Full screen: hide some part of item and set the play window maximize.

Last page, next page: show all remain window at present state. Total in 64 preview window, each

time will show 1 page. Window quantity will accord the picture mode.

5. PTZ control

5.1 PTZ control:

Control the direction of rotation, speed, Iris, focus and zoom.ect miscellaneous function.

6. Record and playback

6.1 client local record

Client record: manual client record

In the preview window, click right mouse button to choose" start save video “and begin record.

Video save route can be modify in local setting-system setting

6.2 Remote playback

Click "remote playback" button can turn into remote playback interface.

6.2.1 Remote video document search

To choose the needed search device in right equipment tree, and choose channel, record mode

and starting time. Click "search", the document will be there.

Adirondack Technology of NY Client Manual CW Series

6.2.2 Remote file playback

Video will be play automatically. Also, it can be play in anytime point by dragging progress bar

Support 4channel playback in the same time.

6.2.3 Screenshot

During playback, screenshot can be done to any window. Click “screenshot" button.

Screenshot save route can be set in local setting-system setting.

6.2.4 Backup

Adirondack Technology of NY Client Manual CW Series

6.2.5 Playback control

can drag, suspend and double click to magnify the picture for present playback.

7. Remote setting

Click “remote setting" go into remote setting menu

Choose the device in the right side device tree, double click the device to go into setting

interface.

7.1 system information setting

Adirondack Technology of NY Client Manual CW Series

7.2 General setting

Adirondack Technology of NY Client Manual CW Series

7.3 network setting

7.4 coding setting

Adirondack Technology of NY Client Manual CW Series

7.5 record setting

7.6 screen setting

Adirondack Technology of NY Client Manual CW Series

7.7 video sense setting

7.8 PTZ setting

Adirondack Technology of NY Client Manual CW Series

7.9 sensor setting

8. local setting

8.1 local setting

Adirondack Technology of NY Client Manual CW Series

Local setting cans user management, setting management, system setting

8.2 user management

Can add user, delete user and modify user

8.2. 1 device management

Add device

8.2.2 System setting


Recommended