25
Clinic Assistant Handbook Policies, Procedures & Guidelines Created by: VFC Medical Staff & Volunteer Services Department 5/20/2015

Clinic Assistant Handbook Policies, Procedures & Guidelines
Created by: VFC Medical Staff & Volunteer Services Department 5/20/2015

Clinic Assistant Handbook
Page
1
Table of Contents Introduction ............................................................................................................................................................................ 2
Contact Information ............................................................................................................................................................... 2
Overview ................................................................................................................................................................................. 3
Code of Conduct .................................................................................................................................................................. 3
Dress Code .......................................................................................................................................................................... 3
Attendance & Punctuality ................................................................................................................................................... 4
Volunteer Safety Guidelines .................................................................................................................................................. 4
Clinic Assistant Role & Responsibilities ................................................................................................................................. 5
Clinic Assistant Skills .............................................................................................................................................................. 6
Level 1 ................................................................................................................................................................................. 6
Level 2 ................................................................................................................................................................................. 7
LEAD .................................................................................................................................................................................... 7
Patient Work-Ups ................................................................................................................................................................... 7
Patient Work-Up: Step-by-step ........................................................................................................................................... 7
Required Vitals .................................................................................................................................................................... 8
Staff-Only Patients .............................................................................................................................................................. 8
After the Work-Up .................................................................................................................................................................. 9
Clinical Procedures ............................................................................................................................................................... 11
Height & Weight ................................................................................................................................................................ 11
Temperature ..................................................................................................................................................................... 11
Blood Pressure .................................................................................................................................................................. 11
Blood Glucose ................................................................................................................................................................... 12
Acutely Ill Adults................................................................................................................................................................... 13
Acutely Ill Children ............................................................................................................................................................... 14
Infection Control .................................................................................................................................................................. 14
Universal Infection Control Precautions ........................................................................................................................... 15
Precautions for Handling of Laboratory Specimens ......................................................................................................... 15
Environmental Considerations .......................................................................................................................................... 16
Hypoglycemia Protocol ........................................................................................................................................................ 16
Clinic Assistant Reminders & Resources .............................................................................................................................. 17

Clinic Assistant Handbook
Page
2
Introduction: About VFC
Venice Family Clinic (VFC) is a primary medical care clinic serving low-income families in greater West Los Angeles. VFC provides basic health care, as well as specialized medical and social services, to children and adults who have limited access to such care. Founded in 1970 by Phillip Rossman, MD, and co-founder Mayer B. Davidson, MD, VFC has grown from a small storefront operation into a community health system with ten clinic sites in Venice, Santa Monica, Inglewood, Mar Vista, and Culver City. Today, Venice Family Clinic serves 24,400 patients annually. Ninety-seven percent are low-income and nearly three-quarters are uninsured. Venice Family Clinic provides more than 106,000 primary care, specialty care, mental health, dental, and health education visits annually. Services include diagnosis, treatment, medications, follow-up care, and laboratory tests. Particular emphasis is placed on the needs of women, children, the homeless, and those with chronic diseases. These health care services are provided largely in part by volunteers, including over 500 physicians, who serve on a rotating basis. Many of the volunteer physicians are residents from UCLA, Kaiser, Cedars-Sinai, and Harbor, who volunteer as part of their training. Other volunteer providers come from private practices, HMO’s and the faculty of UCLA. VFC greatly depends on our large volunteer program. Our volunteers include physicians, registered nurses, nurse practitioners, pharmacists, health educators, clinic assistants, psychiatrists, social workers, fundraisers, board members and more! The generous support of volunteers enables VFC to offer high quality health care at a low cost per patient. In all, approximately 2,100 people volunteer at VFC each year. To help us provide the utmost quality of care, please adhere to the following volunteer Clinic Assistant policies, procedures and guidelines. We truly appreciate your help in providing quality health care services to those in need. Thank you for joining our team!
Contact Information
Volunteer Services Email: [email protected] Cassie Roque Volunteer Services Manager [email protected] (310) 664-7561 Waverly Paradox Volunteer Services Coordinator [email protected] (310) 664-7532
For last minute call-outs, please notify the Nursing Station at your assigned site: Simms: (310) 664-7860 Rose: (310) 664-7755 Irma Colen: (310) 664-7422 Levine: (310) 664-7960 - Front Desk

Clinic Assistant Handbook
Page
3
Overview: Code of Conduct, Dress Code, and Attendance & Punctuality
Code of Conduct
As an individual representing the Venice Family Clinic, we ask all of our volunteer Clinics Assistants to conduct themselves in a professional and courteous manner. Interaction with staff, fellow volunteers, and patients should be respectful and amiable. At all times, Clinic Assistants must demonstrate civility and compassion to all VFC patients. Our organization takes a team-based approach that relies on an open and active communication process. When working together, Clinic Assistants should perform all tasks to the best of their ability, listen to the needs of others, and strive to promote a positive environment.
o Immunization Requirements: The outpatient clinic regulations of the State of California, under which
VFC is licensed, requires that each staff person and volunteer who has patient contact provide the following:
• Proof of a current TB skin test (within the last year) • Record of MMR immunization
2. You will not be allowed to begin volunteering until you show written proof of the above. There are two reasons for these regulations: (1) To assure that a staff person or volunteer who may have contracted/been exposed to Tuberculosis, is not unknowingly infecting patients and other staff or volunteers, and (2) To periodically check and make sure no staff person or volunteer has contracted/been exposed to Tuberculosis from the patients.
o Cell Phone Use: Please refrain from using your cell phone during your volunteer service hours. If there is an emergency or you otherwise need to use your phone, please excuse yourself from the clinic floor and return when your phone call is complete. Overuse of cell phones during your services hours may be grounds for dismissal.
Dress Code Because Venice Family Clinic employees and volunteers represent the entire organization to the public, we expect volunteers to dress appropriately for their jobs and respectfully for the people they serve. We ask for all Clinic Assistants to always dress in scrubs and closed toed shoes. Please keep a generally neat appearance, avoiding wrinkled or baggy clothing and keeping long hair tied back. Please remember:
o Clinic Assistants are recommended to wear scrubs only. o VFC Volunteer name badges must be worn at all times. o Shoes must be close-toed and water resistant (rubber preferred). o Volunteers must be groomed and fragrances must be kept to a minimum. o Short, clean, and unpolished fingernails are preferred.

Clinic Assistant Handbook
Page
4
Please refrain from wearing: Shorts Flip-flops
Hats or sunglasses
Sports team jerseys Stained or rumpled clothes Brief midriff tops or tank tops Overly tight or revealing clothes Casual outfits that look like
exercise outfits, i.e. sweats, etc.
Toms, Uggs, or any other casual, cloth-based shoes
T-shirts with offensive or suggestive language
Attendance & Punctuality
Your attendance and punctuality are key components in the success of our programs. Please keep in mind that the Clinic Assistant shifts are assigned based on the needs of our clinic. We truly rely heavily on our volunteers' help to support our Clinic each day, and therefore the consistency and quality of care that we offer our patients is dependent on the reliability of our staff and volunteers. In order to effectively serve VFC patients and assist VFC staff, it is extremely important that you are taking care to attend all of your scheduled shifts and arriving to your shifts on time. If your tardiness or absence is unavoidable, please make sure to give us as much advance notice as possible should you need to call out or be late for a shift. Failure to submit notification of absence could result in a temporary leave from the Clinic Assistant program. Strict Three Strikes Attendance Policy:
o Volunteers must alert Volunteer Services Staff via email ([email protected]) two days prior to any missed shift.
o We have a three strikes rule for our volunteer program in which we place volunteers on a temporary leave when they have three no call / no shows within the past three months.
o A "no call / no show" is when a volunteer fails to let us know at least two business days in advance that they will be tardy to or missing their scheduled shift.
Tracking Attendance / Clocking-In: o You MUST sign in and out each time that you volunteer at VFC. If you don’t sign in each and every time
you volunteer, it will be assumed that you are not showing up. Signing in also enables VFC to document the many hours that are donated by our volunteers, which is especially important in grant applications and reports for funding sources.
o All volunteers at our Simms Mann and 604 Rose Ave clinics should be clocking in through Volgistics. Please clock in for each shift using the iPhone, which is affixed to the upper-right hand corner of the Volunteer Resource Desk, which is located near the Security Desk at both site. You will be clocking in using your Volgistics pin number.
Volunteer Safety Guidelines
The goal of these guidelines is to make us aware of safety and security issues that you might face when volunteering at Venice Family Clinic.

Clinic Assistant Handbook
Page
5
Parking: Parking is available in our clinic parking lots, or on the street. Always lock your car and do not leave valuable items in your car.
o At Rose, free street parking is available on the side streets surrounding the clinic.
Checking-in: When you enter the clinic, please let the security guard know that you are volunteering. Then, be sure to clock in and out for your volunteer shift. Please remember that it is mandatory that you wear your name badge at all times while in VFC.
In Clinic: Please make sure that you read and follow the “Universal Infection Control Precautions”, included in this handbook, when dealing with patients. Never leave sharp objects exposed. Discard of any sharp objects immediately in the sharps containers after use. If you accidentally hurt yourself, report the incident to a staff RN or a staff provider if there is no RN on duty.
Clinic Assistant Role and Responsibilities
Clinic Assistant Role
Clinic Assistants have a very important role at Venice Family Clinic because they help to enable the providers to see patients in a timely manner by taking preliminary health information and vital signs, performing a variety of laboratory tests, and keeping the examination rooms in order. First and foremost, Clinic Assistants are responsible for assisting VFC medical staff in any way possible.
Clinic Assistant Responsibilities
Clinic Assistant volunteers are responsible for providing quality care to each patient and for providing constant support to our clinic staff.
o Come prepared to each Clinic Assistant shift 1. It is very important for you to come prepared in order to be professional and confident, and in
order to successfully complete all of the required job functions of the Clinic Assistant role. 2. You are required to bring the following items to every shift:
Scrubs Volunteer Name Tag Pocket Notebook
Black Pen Functioning Stethoscope Watch with a Second Hand
o Effectively assist clinic staff
1. Taking Vital Signs: Clinic Assistants are responsible for learning all the basic procedures outlined in the training workshop and in the following sections, and should become familiar with all Clinic services.
2. Keeping Exam Rooms in Order: Clinic Assistants should always remember to assist staff to ensure that work-up and exam rooms are prepped and cleaned. Clinic Assistants should get into the habit of checking that examination rooms and work-
up rooms are straightened and kept clean. Picking up items dropped on the floor or left on the counter, putting back instruments to their proper place and replacing supplies are examples of how Clinic Assistants can be helpful.

Clinic Assistant Handbook
Page
6
Clinic Assistants are to remain until all patients have been seen in their clinic and the rooms have been straightened out for the next clinic.
o Improve each patient’s experience at VFC 1. Practicing CI-CARE: CI-CARE is a provider-to-patient communication standard used by the UCLA
Health System to improve the patient experience, by giving patients your undivided attention and treating each patient with respect, dignity, and compassion
2. Serving VFC Patients: Providing quality care to all patients is the primary function of all Clinic Assistants. Although VFC desires to provide medical training and practical experience to the greatest extent possible, that goal is definitely secondary to meeting the needs of our patients. Please do not ask providers if you can shadow them.
o Be proactive 1. Ask Questions! Clinic Assistants must always remember to ask questions of the RN’s and staff
medical assistants when they are uncertain of procedures. 2. Take Initiative! Clinic Assistants are to take the initiative in performing tasks that they are
trained and authorized to do. Please don’t wait to be asked to help!
o Practice Effective Safety Techniques 1. Taking Necessary Safety Precautions: Always take the following precautions to protect yourself
and VFC patients: WEAR GLOVES when handling any type of body fluids (blood, urine, saliva, vomit, feces,
etc.) WASH YOUR HANDS before and after each patient visit.
2. Following Safety Guidelines: The Venice Family Clinic adheres to State and Federal OSHA regulations and is concerned about YOUR health and safety. All volunteers are required to read the “Safety Guidelines for Volunteers” handout.
Please ask about this and take time to read it. Please read “Infection Control/AIDS Risk Reduction Guidelines”
o Remember: If you have had contact with an infected wound, or a child who may have a contagious illness (i.e. Chicken pox, poison oak), SANITIZE YOUR HANDS.
Clinic Assistant Skills: Level 1, Level 2, LEAD
Level 1: Basic Skills
Level 1 Clinic Assistants are responsible for: o Assessing Chief Complaint o Measuring patient’s height and weight o Taking patient’s temperature (orally) o Taking patient’s pulse o Measuring patient’s blood pressure o Learning proper Next-Gen procedures

Clinic Assistant Handbook
Page
7
Level 2: Special Skills In addition to all Basic Skills tasks, Level 2 Clinic Assistants are responsible for:
o Inputting patient vitals into NextGen o Administering Peak Flow tests o Measuring patient’s Pulse Ox o Measuring patient’s blood glucose levels o Pap Smear Set-Up o Prenatal Progress Notes
LEAD: Advanced Skills LEAD Clinic Assistant volunteers will be able to effectively support our Nursing Staff at a higher level, and are also encouraged to train and mentor new Clinic Assistant volunteers. LEAD CAs are nominated by Nursing Staff based upon skill level, dedication to VFC, and demonstrated leadership qualities. Clinic Assistants are eligible to apply as LEAD after accumulating over 100 VFC volunteer hours, and after completing the Special CA Skills Checklist. LEADs are responsible for:
o Co-hosting Clinic Assistant Training Sessions o Hands-on training and mentoring of new Clinic Assistants o Effectively supporting Nursing Staff with advanced clinical tasks
1. Visual Acuity Tests. 2. Urine Dips (checked by Staff). 3. Pregnancy Tests (checked by Staff). 4. EKG Set-Up
Patient Work-Ups
One of VFC Assistant’s major responsibilities is to have the patients ready to be seen by the provider. Clinic Assistants should make sure to complete all of the following steps for each patient visit.
Patient Work-Up: Step-by-Step 1. Pick up a chart - Obtain the patient’s chart from the rack at the front entrance of the clinic floor.
2. Call in the patient - Call the patient in from the waiting room, introduce yourself, and confirm patient’s
name and DOB.
3. Escort the patient to the work-up room - Take the patient into one of the work-up rooms, where weight, blood pressure, pulse and temperature will be measured. There is a measuring device in the hall for height.
4. Assess chief complaints - Record the main reasons that the patient is here. If chief complaint is for
follow-up on lab results, obtain results. Ask assigned MA for further instructions.

Clinic Assistant Handbook
Page
8
5. Take patient’s vitals – Take all required vital signs, which will vary by patient type (general adult,
women’s, prenatal, etc.). REMEMBER! Any patient presenting emergent/urgent symptoms must be brought to the
attention of staff! Please refer to “Priority Handling of Acutely Ill Adults / Children”. Sign all notes and forms - Clinic Assistants should sign all notes and/or forms so that VFC has a
complete record of who was involved in treating a specific patient. Additionally, if questions arise later, Clinic Assistant who initially took that patient’s vital signs might be able to provide the answers.
• NextGen: After you have taken all necessary vitals, notate in the comment section “Vitals taken by … ” and add your NAME and “CA volunteer”
• Paper form or Chart: Write your first initial, last name, and “Vol” (for Volunteer) on the form or note in black ink.
Required Vitals (by patient type) Patient work-ups will vary by patient type. Please refer to the appropriate “Patient Workup Checklist” for a comprehensive overview of the required vitals for each patient type.
o General Adult Visit: Chief Complaint, Tobacco History, Diabetes History, History of Hypertension, History of Asthma, Allergies, Blood Pressure, Pulse, Temperature, Last Menstrual Period (for female patients), Weight, Height (at first visit), BMI, Peak Flow (if Asthmatic), Blood Glucose (if Diabetic)
o Women’s Visit: Chief Complaint, Last Menstrual Period, General Adult Vitals, Ob/Gyn specific screenings
o Prenatal Visit: Chief Complaint, General Adult Vitals, Urine Dipstick results, Pounds gained or lost
o Peds/Teens Visit (Staff Only): Chief Complaint, Weight, Height, Head Circumference (if < two years),
Temperature, and Blood Pressure (if ≥ three years)
Handling “Staff Only” Patients Identify the following patients as “Staff Only” and notify the Nursing Staff immediately:
o Anyone with a “Staff Only” Indicator - noted under the Details section of each patient’s Encounter Form
o Anyone exhibiting violent behavior - Some of the patients that we see are under severe stress and/or have a mental illness. You should not be dealing with a patient that is potentially violent. If you observe any unusual behavior in a patient or if you suspect that they might be under the influence of drugs or alcohol, you should notify a staff person immediately and have them take over. Staff is trained to deal with potentially violent patients. Do not let a situation escalate, CALL A STAFF PERSON IMMEDIATELY! Blue Folder - VFC has a system to warn and ban patients from the clinic when their behavior is
unacceptable. Verbal abuse, foul language, threats, or any act of violence to a staff, volunteer, or property is not tolerated at VFC. If a blue folder covers the patient’s Encounter Form, this means that staff should see the patient, and you should not interact with them.
Warning signs of a potentially violent person: • Shouting/verbal abuse (ex. escalating voice)

Clinic Assistant Handbook
Page
9
• Pacing/agitation • Hyperactivity • Hitting or banging items • Body language
o Anyone exhibiting any of the following concerns:
Eye problems and/or complaints • Refer patient to assigned MA for Visual Acuity Exam.
Urinary complaints • Ask patient to give a urinary sample.
o Obtain a sterile cup, located outside the restrooms by the lab. o Place a label on the sterile cup. o Give hygienic towelette to all females (located in the drawer)
• Leave urine sample metal cabinet in the bathroom(s) by the lab. • Inform the assigned MA to “dip” the urine.
Complaints of cough • Give mask for client to wear.
Fever • Refer patient to assigned MA for an oxygen-saturation (O2-sat) measurement.
o Any “Acutely Ill Adults” or “Acutely Ill Children”
If a patient appears ill or vital signs are abnormal, NOTIFY A PROVIDER IMMEDIATELY! Notable symptoms include:
• Chest pain • Shortness of breath • Bleeding • Diastolic BP above 110 • High Temperature
o When you are unsure about anything!
After the Work-Up
Placing Patients in Exam Rooms
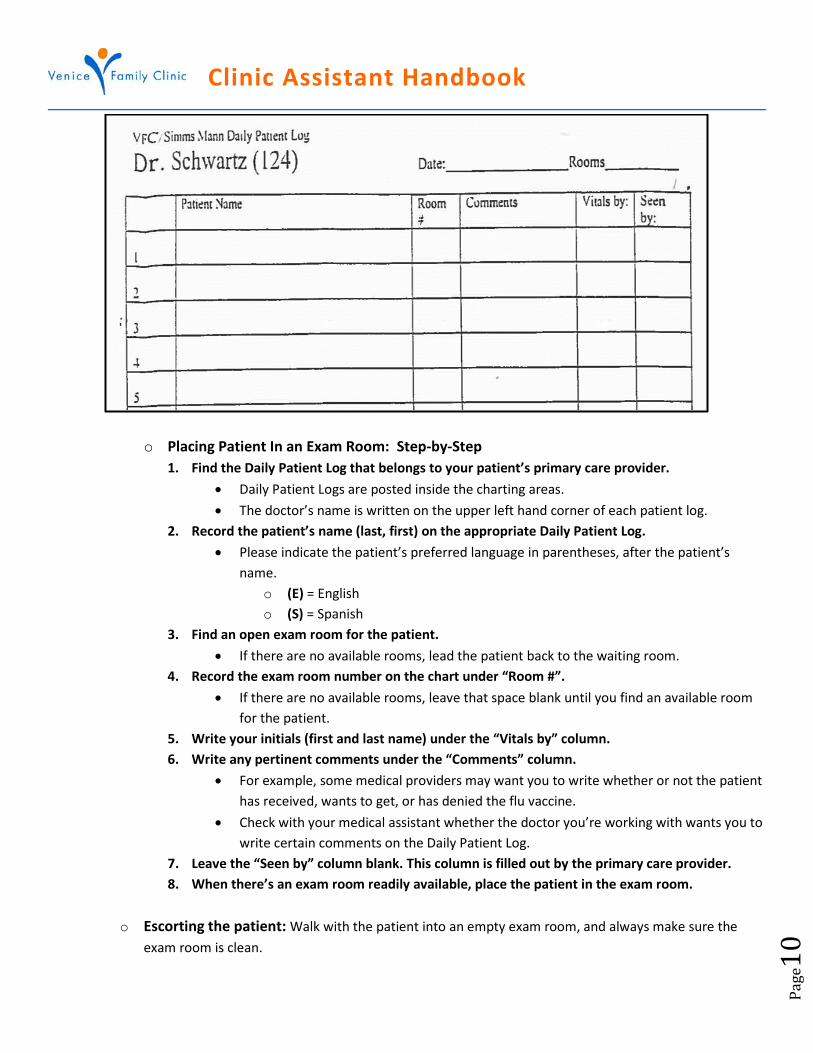
o Updating Daily Patient Log: Daily Patient Logs (shown below) are used to keep track of the patients that are waiting for their provider. To ensure that each patient is promptly seen by their provider, update the appropriate Patient Log immediately after taking a patient’s vital signs.
Clinic Assistant Handbook
Page
10
o Placing Patient In an Exam Room: Step-by-Step 1. Find the Daily Patient Log that belongs to your patient’s primary care provider.
• Daily Patient Logs are posted inside the charting areas. • The doctor’s name is written on the upper left hand corner of each patient log.
2. Record the patient’s name (last, first) on the appropriate Daily Patient Log. • Please indicate the patient’s preferred language in parentheses, after the patient’s
name. o (E) = English o (S) = Spanish
3. Find an open exam room for the patient. • If there are no available rooms, lead the patient back to the waiting room.
4. Record the exam room number on the chart under “Room #”. • If there are no available rooms, leave that space blank until you find an available room
for the patient. 5. Write your initials (first and last name) under the “Vitals by” column. 6. Write any pertinent comments under the “Comments” column.
• For example, some medical providers may want you to write whether or not the patient has received, wants to get, or has denied the flu vaccine.
• Check with your medical assistant whether the doctor you’re working with wants you to write certain comments on the Daily Patient Log.
7. Leave the “Seen by” column blank. This column is filled out by the primary care provider. 8. When there’s an exam room readily available, place the patient in the exam room.
o Escorting the patient: Walk with the patient into an empty exam room, and always make sure the
exam room is clean.

Clinic Assistant Handbook
Page
11
Procedures: Height & Weight, Temperature, Blood Pressure, etc.
Measuring Height & Weight: Adult Patients o Height:
Height should be measured at the patient’s first visit. Height should be measured after shoes have been removed. Measure height with the patient standing erect, feet together, and eyes looking straight
forward. o Weight:
Weight should be taken at all visits. Weight should be measured after heavy clothing has been removed.
How to take a temperature: Step-by-Step By Mouth: Appropriate for everyone two years of age and older
1. Place thermometer in plastic sheath 2. Place end of oral thermometer under tongue 3. Tell patient to close mouth, but not to bite thermometer 4. Leave in place until device signals, remove thermometer 5. Carefully dispose of plastic sheath 6. Note temperature for records
How to test Blood Pressure: Step-by-step Blood pressure readings reflect the amount of pressure required to pump blood through the body. Normally, the heart is pumping the required amount of blood through regular, healthy blood vessels. The pressure in the arteries rises and falls with each heartbeat, thus, there are two readings when blood pressure is measured. Blood pressure is recorded as Systolic over Diastolic (i.e. 120/60). • Standard Technique to test Blood Pressure: The blood pressure cuff is placed around a person’s upper
arm and inflated with air, thus putting pressure over the brachial artery and temporarily stopping the blood flow. By opening a valve, the pressure in the cuff is released, allowing the blood flow to gradually resume. A stethoscope is placed over the artery at the bend of the elbow (antecubital space). Blood pressure sounds (Korotkoff sounds) may be heard as rhythmic ‘beats’ until total resumption of blood flow is achieved. The sound then disappears. The numbers you record are where you first heard the beat (Systolic) and then when the sound disappears (Diastolic).
o Systolic: First audible beat The heart is working (contracting phase) and pumping blood. This is the maximum amount of pressure the arteries usually undergo.
o Diastolic: The last audible beat or the last beat before a change in volume When the heart is between beats (relaxation phase) and resting for a moment. This is the minimal amount of pressure the arteries constantly sustain.
• Measuring Blood Pressure: Step-by-step
1. Choose the correct cuff size

Clinic Assistant Handbook
Page
12
o Cuff should cover 2/3 of the upper arm o There are four kinds of cuffs:
Children’s cuffs Regular adult cuffs Large cuffs for obese patients Thigh cuffs for extremely obese patients
2. Palpate brachial artery o Instruct the patient to relax, place feet flat on the floor, and sit up straight, keeping arm at heart level o Clothing should be out of the way of the cuff
3. Apply cuff o Apply cuff snug and evenly, one inch above the elbow
4. Place and inflate stethoscope o Place diaphragm of stethoscope on bare skin over brachial artery but NOT touching cuff or tubing o Apply slight pressure of diaphragm with one hand o With the other hand, inflate cuff rapidly, using a smooth, continuous rate o Inflate stethoscope to around 160mmHg initially, or higher if necessary o Deflate slowly, 2 - 4 mmHg mercury per heart beat o Read the manometer at eye level
• Readings
o Note which cuff is used o If you are unable to hear, try again after waiting about 1-2 minutes. Also you may try the other arm. If you
are still unable to hear, ask a staff member to help. o Always use EVEN numbers when recording blood pressure o Normal Ranges
Adult: Systolic 100-140, Diastolic 60- 86 Child: Systolic 90- 126, Diastolic 50-80
o Abnormal Readings HIGH blood pressure (>160/100)
• Re-measure blood pressure to confirm reading. Notify Nursing Staff immediately.
How to test Blood Glucose: Step-by-step • Gather all supplies BEFORE starting test
o Gloves – put on BEFORE starting o Alcohol pad o Cotton balls o Small Band-Aid o Blood glucose monitors Found in the Lab. You have to sign out for the Blood Glucose monitor machine.
o Blood monitor strips Found in the Lab. Make sure the strip code matches the monitor code.

Clinic Assistant Handbook
Page
13
• Testing Blood Glucose: Step-by-step 1. Clean end of finger (patient’s preference) with an alcohol pad and dry with cotton ball. 2. Activate NEW lancet. 3. Turn machine on. Instructions will read:
a. Insert strip (you should insert the test strip into the machine) b. Wait c. Apply sample
4. To remove lancet end cover, twist and pull. 5. Apply slight pressure to the finger until some blood appears; wipe away the first drop of blood. 6. Apply slight pressure again, until enough blood for a sample appears. 7. Wait until the glucometer beeps, for total blood sugar results and record results in chart. 8. Remove used lancet and discard in Sharps container. 9. Dispose of other materials (alcohol pad, cotton, etc.) in regular trash. 10. Return monitor to its place in the work-up room. 11. Remove gloves and wash hands.
• Readings
o Normal Ranges o Abnormal readings:
HIGH blood sugar (>350) • Ask for urine sample. Inform the assigned MA to “dip” the urine.
LOW blood sugar (<70) • Patient should be given juice. Notify Nursing Staff immediately. • Refer to “VFC Hypoglycemia Protocol” for more information.
Acutely Ill Adults: Signs & Symptoms
Volunteer clinic assistants make the initial contact with VFC patients presenting for care. It is critical that symptoms and signs of acute or severe illness be recognized immediately to minimize mortality risk. Any abnormal vital signs are to be documented on sign-up sheet in the charting rooms. Alert Nursing Staff or Provider immediately to evaluate a patient who has any of the following complaints or symptoms!
Acutely Ill Adult Indicators Include: • Complaint of shortness of breath, wheezing, or choking • Pulse Oximetry less than 92% on room air • Chest pain or pressure • Recent drug overdose, ingested poison, or recent skin exposure with dangerous chemicals • Complaint of severe headache starting in last 24 hours • New paralysis of any part of the body • Active bleeding or vomiting blood, or report of recently passing bright red blood in stool
o Check hemoglobin and report to provider • Abnormal blood pressure and/or pulse

Clinic Assistant Handbook
Page
14
o Systolic BP > 200mm Hg or < 80 mm Hg o Diastolic BP > 110mm Hg o Pulse > 120/min or < 50/min
• Abnormal blood glucose o Blood Sugar < 70
MUST TREAT with juice and notify Provider or Nursing Staff o Blood Sugar >350
MUST obtain UA (Urine Analysis) to check for ketones • Hemoglobin < 8 • Temperature > 102˚F
Acutely Ill Children: Signs & Symptoms
Acutely ill children may be seriously and dangerously ill and should not be kept waiting. Alert Nursing Staff or Provider immediately to evaluate a child who falls into one of the following categories!
Any infant under six months of age with the following symptoms: • Fever greater than 100° • Diarrhea and/or vomiting • Blue in color
Any child with the following symptoms: • High fever and appearing unresponsive and lethargic
o Check for fever greater than 102° or higher orally and 103° or higher rectally • Fever and a rash • Difficulty breathing, choking, wheezing, having an asthma attack, crowing, croupy, or turning blue • Systolic blood pressure > 126 • Diastolic blood pressure < 50 • Drowsiness, difficulty rousing, vomiting, or bleeding from the ear or nose (with a history of head injury) • Convulsions or loss of consciousness • Severe abdominal pain • Uncontrolled bleeding • Ingested poison, medications, or a foreign body • Burns • Eye trauma • Any child that you are worried about or have any doubts about for any reason
Infection Control: Safety Precautions
It is recognized that AIDS syndrome is a complex disease with an extremely high mortality rate caused by the human immunodeficiency virus (HIV). HIV is known to be transmitted via blood and body fluids, (semen, vaginal secretions, breast milk). The increasing prevalence of HIV increases the risk of exposure to health care workers. Therefore, this policy outlines minimum precautions to be followed with all patients in an attempt to minimize the risk of HIV and Hepatitis transmission. Recommendations are based on the CDC Guidelines as reported August 21, 1987 and February 1989, (“Guidelines for Prevention of HIV & Hepatitis B Virus to Health-Care and Public-Safety Workers”).

Clinic Assistant Handbook
Page
15
Universal Infection Control Precautions Since medical history and examinations cannot reliably identify all patients infected with HIV or other blood-borne pathogens (such as Hepatitis B), blood and body fluid precautions should be consistently used for all patients. All patients should be assumed to be infectious for HIV and blood-borne pathogen.
1. Wear gloves. Gloves should be worn when:
• Touching blood and body fluids (semen, feces, urine, vomit, amniotic fluid, vaginal secretions, breast milk, and joint fluid), mucous membranes or non-intact skin of all patients
• Handling items or surfaces soiled with blood or body fluids • Performing venipunaures or other procedures, such as hematocrits, requiring vascular access • You have open sores or cuts
2. Change gloves after contact with each patient. 3. Wash hands immediately after gloves are removed with soap and warm water. 4. Wash hands and other skin surfaces immediately:
• After using the restroom • After cleaning up blood, urine, feces, or vomit • Before preparing food • If contaminated with blood or body fluids
5. All sharp items are to be disposed of in puncture resistant containers in each exam room, immediately after use.
6. Because of the possibility of intranatal transmission of HIV, pregnant health care workers should be especially familiar with and strictly adhere to these precautions.
7. Shoe covers should be worn if large blood contamination of floor occurs.
Precautions for Handling of Laboratory Specimens
Blood and other body fluids from all patients should be considered infective. Please always take the following precautions when handing laboratory specimens.
1. Wear gloves during venipuncture (i.e. hematocrit), and while handling any open container of body fluids (i.e. during urinalysis).
2. Do not re-cap needles and syringes. 3. Dispose of needles, syringes and used blood tubes in the puncture-proof containers located in
each exam room and in the lab. 4. Exercise care when collecting specimens to avoid contaminating the outside of the container. 5. Place all specimens of blood and body fluid in sealed zip-lock plastic bags for transport. 6. Wash hands immediately after handling all lab specimens.
Environmental Considerations No environmentally mediated mode of HIV transmission has been documented. However, the following precautions should be routinely taken with all patients.

Clinic Assistant Handbook
Page
16
1. Disinfecting patient-care equipment
• Gloves must be worn while handling contaminated equipment. • When possible, equipment should be washed in warm, soapy water to remove soil prior to disinfection. • Cleaned instruments are to be soaked in germicide or a 1:10 dilution of household bleach for 10 minutes.
Containers of bleach are located in the nurses’ station. 2. Cleaning and decontaminating spills of blood or body fluids
• Visible material should be removed. Gloves should be worn. • Area should then be decontaminated using recommended dilutions of a germicide or 1:10 solution of
household bleach. 3. General housekeeping
• Environmental surfaces (i.e. walls and floors) are not associated with transmission of infection to patients or health care workers. However, it is important to keep VFC as clean as possible. Bathroom and exam areas can be cleaned with regular soap and water and can be disinfected with Citrace or 10% bleach solution, if needed.
4. Disposal of infectious waste • Potentially infective waste products include:
o All blood containers and any disposable equipment used in collecting blood specimens o All needles and syringes o Dressing materials saturated with large amounts of blood or body fluids o Any disposable equipment utilized for invasive procedures (i.e. suture kits, scalpels, and blades).
• All potentially infective waste listed above should be disposed of in RED bags to ensure proper handling by cleaning services.
• Large amounts of blood and body fluids can be carefully poured down a toilet for disposal. VFC Hypoglycemia Protocol
Please be aware of the following protocol for any patients that have a Hypoglycemia, as indicated by a LOW blood sugar reading of <70.
1. Ask patient if they are having any of the following symptoms: • Sweating • Shakiness • Tachycardia • Weakness • Dizziness
• Confusion • Anxiety • Blurred vision • Fatigue
**If symptoms are severe, such as a seizure or loss consciousness, treat this as an emergency. Alert all providers overhead, open crash cart and administer Glucagon.**
2. Alert a physician immediately if patient is symptomatic or if blood sugar is < 60 with or without
symptoms. Diabetic patients may be unaware of severe hypoglycemia, yet still require immediate attention.
3. Administer 15g of glucose gel or other glucose product. Appropriate alternatives are juice, raisins,
hard candy. Avoid diet or high fat products (Glucerna, Diet Coke)

Clinic Assistant Handbook
Page
17
4. Recheck blood sugar 15 min after treatment. If hypoglycemia is persistent, repeat treatment and
recheck after 15 minutes. Once blood glucose returns to normal, the patient should consume a meal or snack to prevent recurrence.
Clinic Assistant Reminders & Resources
Please be aware that some clinical scenarios require additional steps. We are here to help you and provide a great service to our clients. As a Clinic Assistant volunteer, you will need to stay up to date with all Clinic policies and procedures. Please make sure you are following the steps below in order to stay informed:
o Read and review all Clinic Assistant email correspondence from the Volunteer Services Department. o Regularly reference the Volunteer Resources site for Clinical Updates and Reminders. o Notify the Volunteer Services Staff of policies or procedures that are unclear or seem inconsistent. o If you are unsure of anything, ask questions!
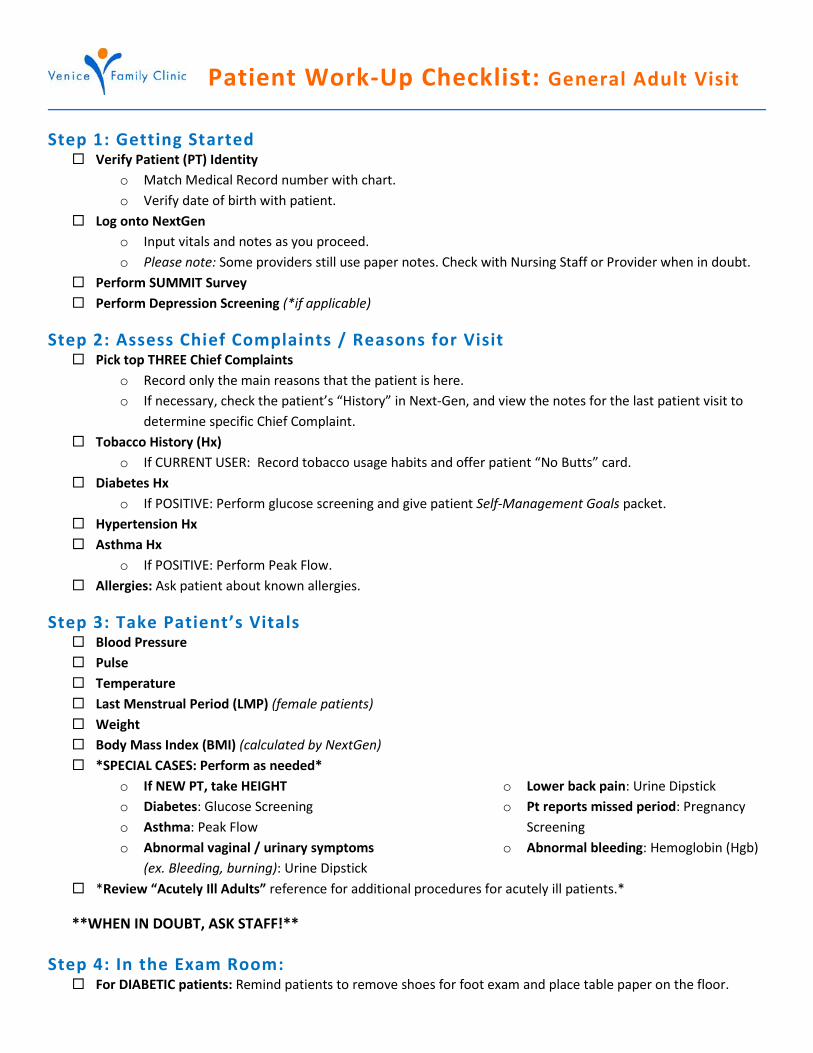
Patient Work-Up Checklist: General Adult Visit
Step 1: Getting Started Verify Patient (PT) Identity
o Match Medical Record number with chart. o Verify date of birth with patient.
Log onto NextGen o Input vitals and notes as you proceed. o Please note: Some providers still use paper notes. Check with Nursing Staff or Provider when in doubt.
Perform SUMMIT Survey Perform Depression Screening (*if applicable)
Step 2: Assess Chief Complaints / Reasons for Visit Pick top THREE Chief Complaints
o Record only the main reasons that the patient is here. o If necessary, check the patient’s “History” in Next-Gen, and view the notes for the last patient visit to
determine specific Chief Complaint. Tobacco History (Hx)
o If CURRENT USER: Record tobacco usage habits and offer patient “No Butts” card. Diabetes Hx
o If POSITIVE: Perform glucose screening and give patient Self-Management Goals packet. Hypertension Hx Asthma Hx
o If POSITIVE: Perform Peak Flow. Allergies: Ask patient about known allergies.
Step 3: Take Patient’s Vitals Blood Pressure Pulse Temperature Last Menstrual Period (LMP) (female patients) Weight Body Mass Index (BMI) (calculated by NextGen) *SPECIAL CASES: Perform as needed*
o If NEW PT, take HEIGHT o Diabetes: Glucose Screening o Asthma: Peak Flow
o Lower back pain: Urine Dipstick o Pt reports missed period: Pregnancy
Screeningo Abnormal vaginal / urinary symptoms
(ex. Bleeding, burning): Urine Dipstick o Abnormal bleeding: Hemoglobin (Hgb)
*Review “Acutely Ill Adults” reference for additional procedures for acutely ill patients.*
**WHEN IN DOUBT, ASK STAFF!**
Step 4: In the Exam Room: For DIABETIC patients: Remind patients to remove shoes for foot exam and place table paper on the floor.

Patient Work-Up Checklist: Women’s Visit
Step 1: Getting started Verify Patient (PT) Identity
o Match Medical Record number with chart. o Verify Date of Birth with PT.
Log onto NextGen o Input vitals and notes as you proceed. o Please note: Some providers still use paper notes. Check with Nursing/Provider when in doubt.
Perform Chlamydia Screening (*if applicable)
Step 2: Assess Chief Complaints / Reasons for Visit Pick top THREE complaints Cervical or Breast Cancer Screening Visits: Fill out DETEC paperwork.
Step 3: Take PT Vitals General Adult Vitals still apply: Refer to “General Adult Visit” checklist
o Don’t forget: Last Menstrual Period (LMP) *SPECIAL CASES: Perform as needed*
o Abnormal vaginal bleeding: Hemoglobin (Hgb) and Urine dipstick
o Abnormal vaginal/urinary symptoms: Urine Dipstick
o PT REPORTS missed period: Pregnancy Screening
o Lower back pain: Urine Dipstick o Endometrial Biopsy EMB or
Colposcopy: Pregnancy Screening o (Intrauterine Device) IUD Procedures:
Pregnancy screening AND PT must NOT be on period
Take Ob/Gyn History (Hx) as needed o Cancer Hx (personal and family) o Sexual Hx o Screening Hx (ie. Paps and
mammograms)
o Age at Menarche o Pregnancies / Births Hx (EVERY
women’s visit) o Drinking Habits
*Review “Acutely Ill Adults” reference for additional procedures for acutely ill patients.*
Step 4: In the Exam Room: Ensure that PT has completed any necessary paperwork PRIOR to receiving any procedures! Ask staff if unsure. Mammogram Referrals
o A clinical breast exam (CBE) will usually be performed: Provide PT with upper-body gown. Instruct PT to undress from waist UP for exam. Leave room!
Pap smears, EMBs, Colposcopies, and IUD procedures: o Perform necessary set-up. (Reference Set-Up Checklists; Ask staff if unsure) o Provide PT with lower-body gown. o Instruct PT to undress from waist DOWN. o Leave room!

Patient Work-Up Checklist: Prenatal Visit
Step 1: Getting Started Verify Patient (PT) Identity
o Match Medical Record number with chart. o Verify Date of Birth with PT
Log onto NextGen o Input vitals and notes as you proceed.
Step 2: Assess Chief Complaints/Reasons for Visit Chief Complaint will usually be a “Routine Pre-Natal Visit” Be sure to note any additional PT complaints/concerns
Step 3: Take Patient’s Vitals *General Adult Vitals still apply: Refer to “General Adult Visit” checklist* *All prenatal visits will have special carbon-copy paper charts that need to be updated with every visit. *
o Obtain PT’s carbon copy and slip under Clinic’s paper notes. This will ensure that PT vitals and provider notes will be accessible to attending OB provider when PT is in labor.
o Record urine dipstick results. o For weight, you must calculate pounds gained/lost between prenatal visits on the prenatal chart, and
chart PT’s weight progress. o Don’t forget that PT vitals should still be entered into NextGen. o When in doubt, ask staff!
Urine dipstick o Most prenatal patients will have already provided a urine sample. o Perform a dipstick test and record results on chart and NextGen.
Step 4: After the Work-Up Write “Prenatal Visit” (PN) in comments after signing PT in to indicate a prenatal visit for Provider.
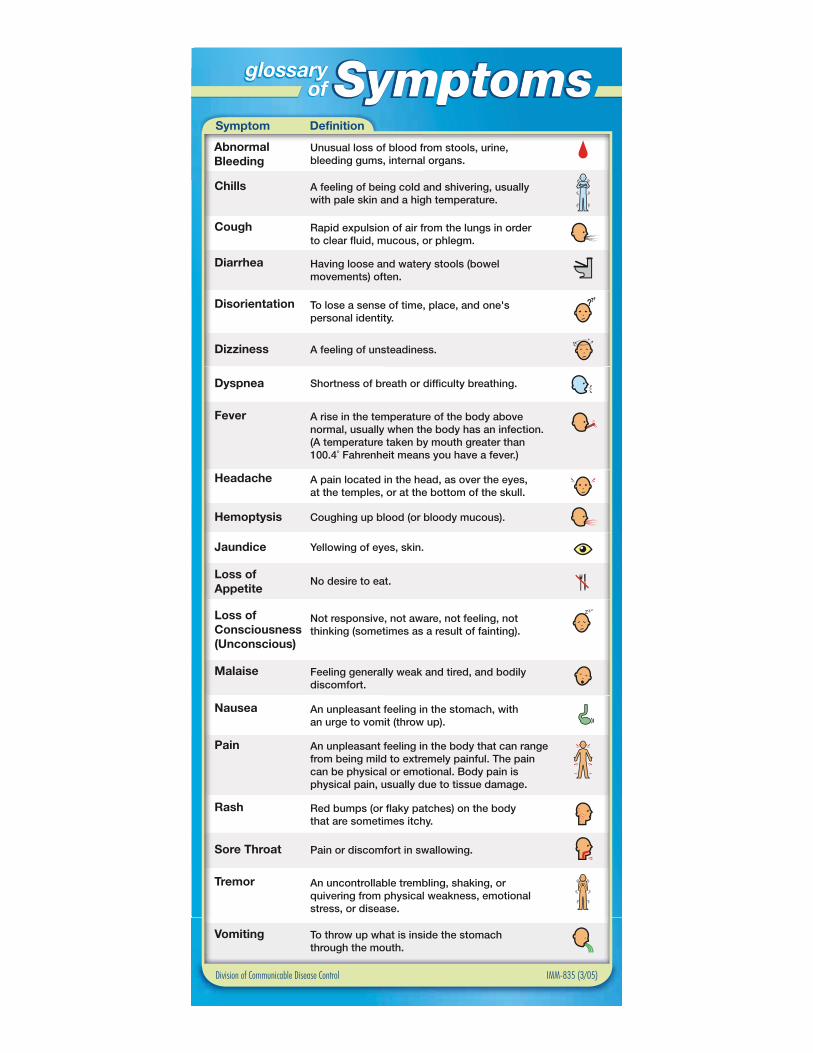
AbnormalBleeding
Chills
Cough
Diarrhea
Disorientation
Dizziness A feeling of unsteadiness.
Dyspnea Shortness of breath or difficulty breathing.
Fever
Headache
Hemoptysis Coughing up blood (or bloody mucous).
Jaundice Yellowing of eyes, skin.
No desire to eat.
Loss of Consciousness(Unconscious)
Loss of Appetite
Malaise
Nausea
Pain
Rash
Sore Throat Pain or discomfort in swallowing.
Tremor
Vomiting
Symptom Definition
IMM-835 (3/05)
A rise in the temperature of the body above normal, usually when the body has an infection.(A temperature taken by mouth greater than 100.4˚ Fahrenheit means you have a fever.)
An unpleasant feeling in the body that can range from being mild to extremely painful. The pain can be physical or emotional. Body pain is physical pain, usually due to tissue damage.
Red bumps (or flaky patches) on the body that are sometimes itchy.
An uncontrollable trembling, shaking, or quivering from physical weakness, emotional stress, or disease.
To throw up what is inside the stomach through the mouth.
Unusual loss of blood from stools, urine, bleeding gums, internal organs.
A feeling of being cold and shivering, usually with pale skin and a high temperature.
Rapid expulsion of air from the lungs in order to clear fluid, mucous, or phlegm.
Having loose and watery stools (bowel movements) often.
To lose a sense of time, place, and one's personal identity.
A pain located in the head, as over the eyes, at the temples, or at the bottom of the skull.
Not responsive, not aware, not feeling, not thinking (sometimes as a result of fainting).
Feeling generally weak and tired, and bodily discomfort.
An unpleasant feeling in the stomach, with an urge to vomit (throw up).
Division of Communicable Disease Control
SymptomsSymptomsSymptomsglossary glossaryof
glossary of

Symptom
IMM-835 (3/05)Division of Communicable Disease Control
SymptomsSymptomsSymptomsglossaryglossaryof
glossaryof
AbnormalBleeding
Chills
Cough
Diarrhea
Disorientation
Dizziness
Dyspnea
Fever
Headache
Hemoptysis
Jaundice
Loss of Consciousness(Unconscious)
Loss of Appetite
Malaise
Nausea
Pain
Rash
Sore Throat
Tremor
Vomiting
Spanish Chinese Korean
Sangrado anormal
Escalofrío
Sentiresedesmayado
Tos
Diarrea, excrementoslíquidos
Desorientación,confusión mental
Dificultad derespirar
Fiebre
Dolor decabeza intenso
Tos consangre
Piel y ojos de coloramarillo (ictericia)
Desmayarse
Indisposcición omalestar
Ganas devomitar o náuseas
Dolor
Erupción osarpullido
Dolor degarganta
Temblorcontinuo
Vómito
Pérdida delapetito


