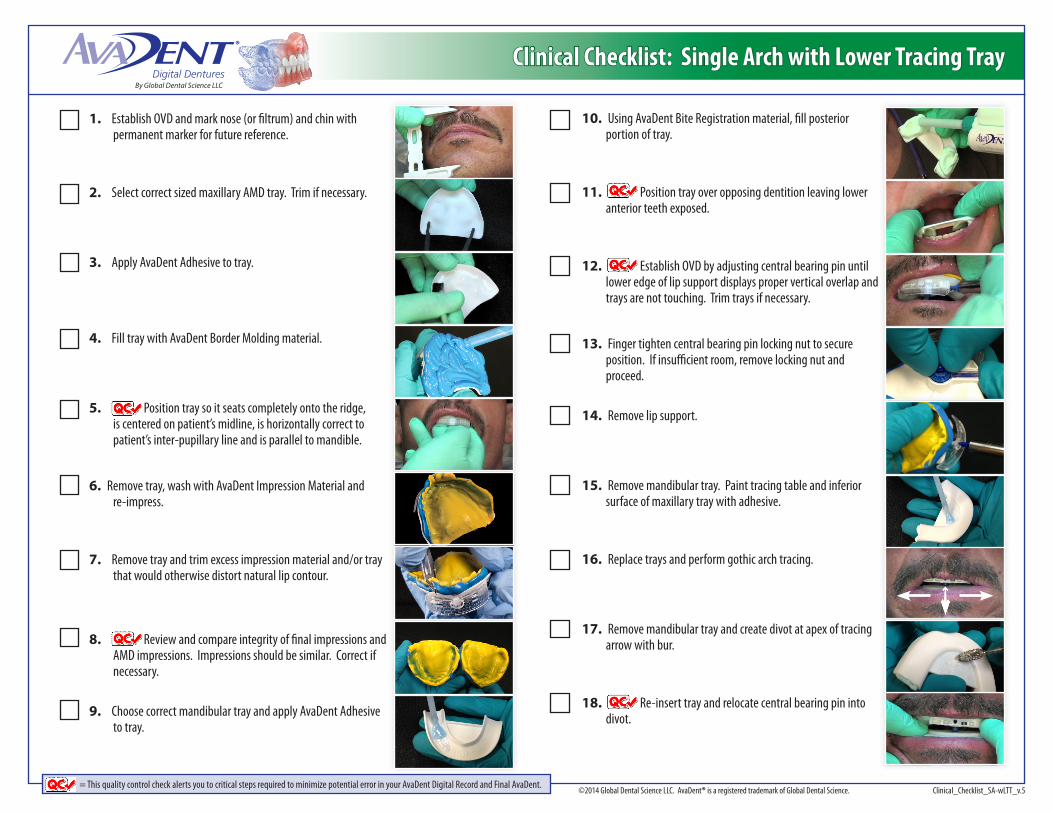
1. Establish OVD and mark nose (or filtrum) and chin with permanent marker for future reference.
2. Select correct sized maxillary AMD tray. Trim if necessary.
3. Apply AvaDent Adhesive to tray.
4. Fill tray with AvaDent Border Molding material.
5. Position tray so it seats completely onto the ridge, is centered on patient’s midline, is horizontally correct to patient’s inter-pupillary line and is parallel to mandible.
6. Remove tray, wash with AvaDent Impression Material and re-impress.
7. Remove tray and trim excess impression material and/or tray that would otherwise distort natural lip contour.
8. Review and compare integrity of final impressions and AMD impressions. Impressions should be similar. Correct if necessary.
9. Choose correct mandibular tray and apply AvaDent Adhesive to tray.
10. Using AvaDent Bite Registration material, fill posterior portion of tray.
11. Position tray over opposing dentition leaving lower anterior teeth exposed.
12. Establish OVD by adjusting central bearing pin until lower edge of lip support displays proper vertical overlap and trays are not touching. Trim trays if necessary.
13. Finger tighten central bearing pin locking nut to secure position. If insufficient room, remove locking nut and proceed.
14. Remove lip support.
15. Remove mandibular tray. Paint tracing table and inferior surface of maxillary tray with adhesive.
16. Replace trays and perform gothic arch tracing.
17. Remove mandibular tray and create divot at apex of tracing arrow with bur.
18. Re-insert tray and relocate central bearing pin into divot.
Clinical Checklist: Single Arch with Lower Tracing TrayBy Global Dental Science LLC
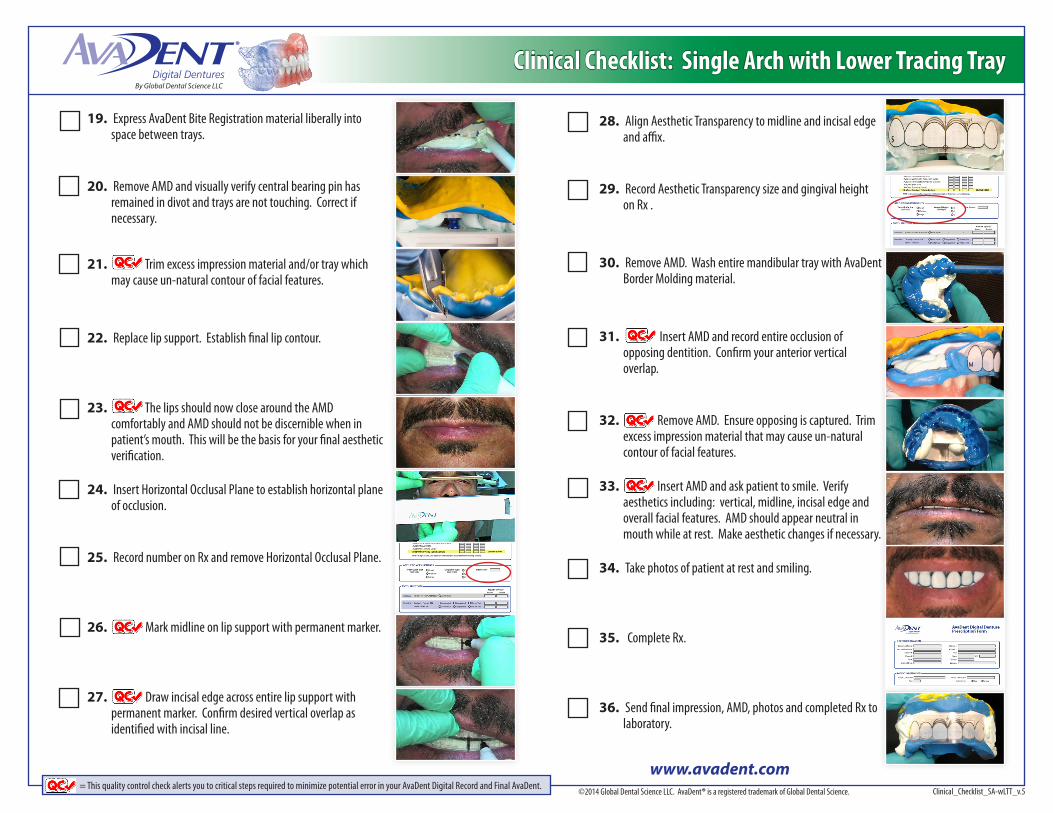
19. Express AvaDent Bite Registration material liberally into space between trays.
20. Remove AMD and visually verify central bearing pin has remained in divot and trays are not touching. Correct if necessary.
21. Trim excess impression material and/or tray which may cause un-natural contour of facial features.
22. Replace lip support. Establish final lip contour.
23. The lips should now close around the AMD comfortably and AMD should not be discernible when in patient’s mouth. This will be the basis for your final aesthetic verification.
24. Insert Horizontal Occlusal Plane to establish horizontal plane of occlusion.
25. Record number on Rx and remove Horizontal Occlusal Plane.
26. Mark midline on lip support with permanent marker.
27. Draw incisal edge across entire lip support with permanent marker. Confirm desired vertical overlap as identified with incisal line.
Clinical Checklist: Single Arch with Lower Tracing TrayBy Global Dental Science LLC
31. Insert AMD and record entire occlusion of opposing dentition. Confirm your anterior vertical overlap.
32. Remove AMD. Ensure opposing is captured. Trim excess impression material that may cause un-natural contour of facial features.
33. Insert AMD and ask patient to smile. Verify aesthetics including: vertical, midline, incisal edge and overall facial features. AMD should appear neutral in mouth while at rest. Make aesthetic changes if necessary.
34. Take photos of patient at rest and smiling.
35. Complete Rx.
36. Send final impression, AMD, photos and completed Rx to laboratory.