18
28 Dr. Pablo Echarri CLINICAL PAPER TRATAMIENTO DE CLASE III CON DISTALIZACIÓN UTILIZANDO CA DISTALIZER ® CLASS III TREATMENT WITH DISTALIZATION USING ® CA DISTALIZER

28
Dr. Pablo Echarri
CLINICAL PAPER
TRATAMIENTO DE CLASE III CON DISTALIZACIÓN UTILIZANDO
CA DISTALIZER®
CLASS III TREATMENT WITH DISTALIZATION USING
® CA DISTALIZER

© 2016 Centro de Ortodoncia y ATM, Ladent, SLAll rights reserved
This book or any part thereof may not be reproduced, stored in retreival system or transmitted in any form or by any means electronic, mechanical, photocopying or otherwise, without prior written permission of the publishers.
© 2016 Centro de Ortodoncia y ATM, Ladent, SLTodos los derechos reservados.
Ninguna parte de esta publicación puede reproducirse o transmitirse por ningún medio electrónico o mecánico, incluyendo fotocopiado o g r a b a d o p o r c u a l q u i e r s i s t e m a d e almacenamiento de información sin el permiso escrito previo de los editores.
Los casos expuestos han sido realizados por el Dr. Pablo Echarri. El trabajo de laboratorio ha sido realizado por el laboratorio Ladent, y se han utilizado los materiales de Scheu Dental Technology.
All cases were carried out by Dr. Pablo Echarri. All the laboratory work was carried out by Ladent laboratory, and the Scheu Dental Technology materials were used.
Dr. Pablo EcharriDental Technology
CLINICAL PAPER
Dr. Pablo EcharriDental Technology
CLINICAL PAPER
TRATAMIENTO DE CLASE III CON DISTALIZACIÓN UTILIZANDO CA DISTALIZER
®
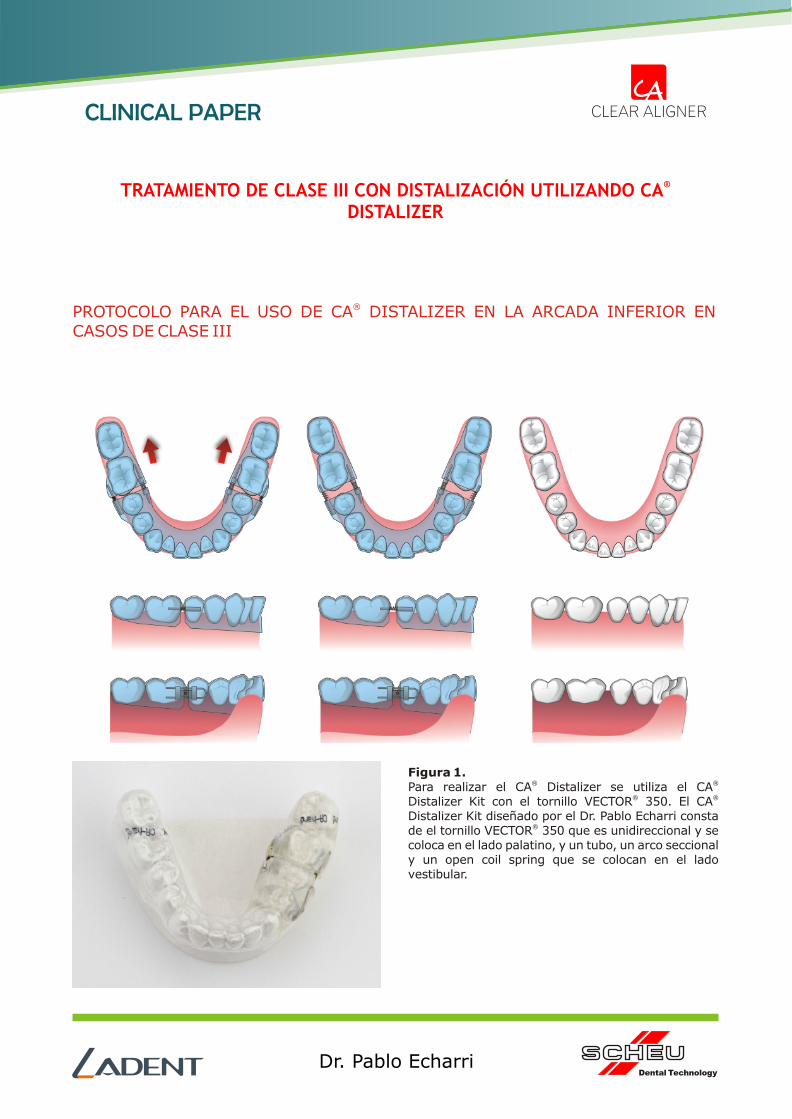
®PROTOCOLO PARA EL USO DE CA DISTALIZER EN LA ARCADA INFERIOR EN CASOS DE CLASE III
Figura 1.® ®Para realizar el CA Distalizer se utiliza el CA
® ®Distalizer Kit con el tornillo VECTOR 350. El CA Distalizer Kit diseñado por el Dr. Pablo Echarri consta
®de el tornillo VECTOR 350 que es unidireccional y se coloca en el lado palatino, y un tubo, un arco seccional y un open coil spring que se colocan en el lado vestibular.

Dr. Pablo EcharriDental Technology
CLINICAL PAPER
Figura 2. ®Protocolo para el uso del CA Distalizer en clase III.
CLASE IIITRATAMIENTO DE LA ARCADA
SUPERIOR CON DISTALIZACIÓNEN CASOS DE CLASE III
®CA DISTALIZER
PARA DISTALIZACIÓN DEL 1º Y 2º MOLAR
Distalización de premolares y caninos con bandas en los
primeros molares y arco lingual, brackets en caninos y
premolares y arco seccional
Alineación, nivelación y retrusión de incisivos con
brackets en incisivos y aparatología fija
Distalización de premolares y caninos con
®CA POWER GRIP 2 y 3
Alineación, nivelación y retrusión de incisivos con
®CA CLEAR ALIGNER
APARATOS FIJOS®CA CLEAR ALIGNER
®Se puede utilizar el CA Distalizer para distalizar el primer y segundo molar y terminar todo el ®tratamiento con CA CLEAR ALIGNER o combinar con aparatos fijos, según las preferencias del
®clínico. Se utilizaría el CA CLEAR ALIGNER aproximadamente 2 meses para distalizar los molares y
a continuación seguir todo el tratamiento con aparatología fija o utilizar aparatología fija sólo para la ®distalización de premolares y caninos y luego remover los brackets y terminar con CA CLEAR
ALIGNER.

Dr. Pablo EcharriDental Technology
CLINICAL PAPER
Figura 3. La distalización en presencia del tercer molar provocaría distoinclinación del molar y riesgo de reabsorción radicular del segundo molar.
®La distalización en la arcada inferior con CA Distalizer está indicada en:
! Casos de clase III molar, hasta conseguir la clase I molar.! Paciente braquifacial o mesofacial, porque la mandíbula postrota (rotación horaria) 1º cada 3
mm de distalización molar.! Mordida profunda anterior ya que la postrotación mandibular (rotación horaria) disminuye el
overbite con la distalización.! Es preferible que el tercer molar esté ausente o con extracción indicada. La distalización
inmediata a la extracción del tercer molar es más rápida por la alta densidad de osteoblastos y
osteoclastos en la zona.
LIMITACIONES
CONDICIONES FAVORABLES
! Paciente dolicofacial.! Mordida abierta anterior.! Presencia de terceros molares.
! Los molares NO deben presentar una rotación mesial mayor a 15º.! Los molares NO deben presentar una inclinación mesial mayor a 15º.! Los molares deben presentar un overjet normal.! Se debe disponer de espacio en el reborde alveolar antes de la distalización.
INDICACIONES

Dr. Pablo EcharriDental Technology
CLINICAL PAPER
Figura 4.La rotación del molar es el ángulo entre la tangente de la cara vestibular del molar y la línea de arcada.
Figura 5.Inclinación del molar es el ángulo entre el eje del primer o segundo molar con el plano oclusal.
Figura 6.Para valorar el espacio de extracción se valora la distancia entre distal del segundo molar y el borde mesial de la rama ascendente de la mandíbula.

Dr. Pablo EcharriDental Technology
CLINICAL PAPER
CONSEJOS
VENTAJAS
ACTIVACIÓN
® Si los molares están en mesiorrotación puede ser conveniente cementar un CA POWER GRIP nº1
en la cara vestibular del molar antes de tomar la impresión.
® ® Antes de adaptar el CA Distalizer se deberá aliviar la parte gingival del CA POWER GRIP ya que el
material utilizado no es elástico y no sería posible su inserción. También hay que aliviar la zona por
lingual y distal de los molares para permitir la distorrotación durante el movimiento de distalización.
®Las ventajas del CA Distalizer son:
! Tiene un mejor control vertical de los molares durante la distalización.! Evita las fuerzas de la oclusión que limitan la distalización.
El ritmo de activación será de ¼ de vuelta cada 2 a 3 días hasta conseguir la clase I molar.
Figura 7.® ® ®CA Distalizer Kit con el tornillo VECTOR 350 insertado en el CA CLEAR ALIGNER.

Dr. Pablo EcharriDental Technology
CLINICAL PAPER
Figura 8.Distalización de caninos y premolares se hace simultáneamente si no es necesario corregir la rotación, alinear o nivelar estos dientes. Si es necesario, estos dientes deberían distalizarse uno por uno y corregir mal posiciones si fuera necesario.

Dr. Pablo EcharriDental Technology
CLINICAL PAPER
Figura 9.Continuación de la distalización de caninos y premolares.
Figura 10.Una vez conseguida la clase I canina, se procede a la alineación de los incisivos con set-ups progresivos. A continuación se procede al detallado final.

Dr. Pablo EcharriDental Technology
CLINICAL PAPER

Dr. Pablo EcharriDental Technology
CLINICAL PAPER
CLASS III TREATMENT WITH DISTALIZATION USING CA DISTALIZER®
®PROTOCOL FOR CA DISTALIZER USE IN MANDIBLE IN CLASS III CASES
Figure 1.® ®Ca Distalizer Kit with VECTOR 350 Screw is used to
® ®carry out the CA Distalizer. The CA Distalizer Kit is designed by Dr. Pablo Echarri, and it consists of
®unidirectional VECTOR 350 Screw which is positioned on palatal side, and a tube, a secctional arch wire and an open-coil spring, which are positioned on the labial side.

Dr. Pablo EcharriDental Technology
CLINICAL PAPER
Figure 2. ®Protocol for the use of CA Distalizer in Class III.
CLASS IIITREATMENT OF MAXILLA
WITH DISTALIZATION IN CLASS III CASES
®CA DISTALIZER
FOR DISTALIZATION st ndOF 1 Y 2 MOLAR
Distalization of bicuspids and canines with bands in first
molars and lingual arch wire, brackets in canines and bicuspids
and secctional arch wire
Alignment, leveling and retrusion of incisors with
brackets in incisors and fixed appliances
Distalization of bicuspids and canines with
®CA POWER GRIP 2 and 3
Alignment, leveling and retrusion of incisors with
®CA CLEAR ALIGNER
FIXED APPLIANCES®CA CLEAR ALIGNER
®CA Distalizer can be used to distalize the first and second molar and to finish the whole treatment ®with CA CLEAR ALIGNER or to combine it with fixed appliances, depending on the preferences of
®the clinician. The CA CLEAR ALIGNER is used for approximately 2 months for molar distalization,
and then the treatment is continued with fixed appliances, or the fixed appliances can be used only
for distalization of bicuspids and canines, and then the brackets should be removed and the ®treatment finished with CA CLEAR ALIGNER.

Dr. Pablo EcharriDental Technology
CLINICAL PAPER
Figure 3. If the third molar is present, the distalization provokes distoclination of the molar and there is a risk of root resorption of the second molar.
®The mandible distalization with CA Distalizer is indicated in:
! Molar Class III cases, until the molar Class I is achieved.! Brachyfacial and dolichofacial patient, because the mandible rotates 1º in clock-wise
direction for each 3 mm of molar distalization.! Anterior deep bite, because mandibular clock-wise rotation reduces the overbite with
distalization.! It is better if the third molar is absent or with indicated extraction. The distalization carried out
immediately after the extraction of the third molar is quicker due to a high density of osteoblasts
and osteoclasts in the zone.
LIMITATIONS
FAVORABLE CONDITIONS
! Dolichofacial patient.! Anterior open bite.! Presence of the third molars.
! The molars should NOT present more than 15º of mesial rotation.! The molars should NOT present more than 15º of mesial inclination.! The molars should present normal overjet.! There must be some available space in the alveolar bone before the distalization.
INDICATIONS

Dr. Pablo EcharriDental Technology
CLINICAL PAPER
Figure 4.The molar rotation is the angle between the tangent of the labial surface of the molar and the dental arch line.
Figure 5.Inclination of the molar is the angle between the axis of the first or second molar and the occlusal plane.
Figure 6.To evaluate the extraction space, the distance between the distal side of the second molar and the mesial edge of mandibular ramus is evaluated.

Dr. Pablo EcharriDental Technology
CLINICAL PAPER
TIPS
ADVANTAGES
ACTIVATION
® If molars are in mesial rotation, it might be convenient to bond CA POWER GRIP nº1 on the labial
surface of the molar before taking the impression.
® ® Before adapting the CA Distalizer, the gingival part of the CA POWER GRIP should be blocked out,
since the used material is not elastic and it would not be possible its insertion. Also, the lingual and
distal sides of the zone of the molars should be also blocked out to allow the distal rotation during
the distalization movement.
®The CA Distalizer advantages are:
! It has better vertical control of the molars during the distalization.! It avoids occlusal forces which limit the distalization.
The rhythm of activation should be 1 turn each 2-3 days, until the molar Class I is achieved.
Figure 7.® ® ®CA Distalizer Kit with VECTOR 350 Screw inserted in CA CLEAR ALIGNER.

Dr. Pablo EcharriDental Technology
CLINICAL PAPER
Figure 8.Canine and bicuspids distalization is carried out simultaneously if it is not necessary to correct rotation, to align or to level these teeth. If it is necessary, they should be distalized one by one, and the malpositioned ones should be corrected

Figure 9.Continuation of canine and bicuspids distalization.
Figura 10.When the canine Class I is achieved, the incisors alignment is carried out with progressive set-ups. In continuation, the final detailing is carried out.
Dr. Pablo EcharriDental Technology
CLINICAL PAPER

Dr. Pablo Echarri
CLINICAL PAPER


