73
Cloud Data Warehouse Modernziation on Azure Workshop Hands on Lab

Cloud Data Warehouse
Modernziation on
Azure Workshop
Hands on Lab

Overview
ACME Corporation is a multi-national retail organization with a large online footprint and
multiple stores worldwide that needs to drive omni-channel transformation around the
customer journey.
ACME needs to address a cloud ready mandate with a desire to increase access to hundreds of
terabytes of data from multiple sources.
ACME’s vision is to build a holistic solution for on line channels, internal reporting and
personalization, building data as a service real time and address operational needs.
To start, ACME deployed a modern, cloud-based enterprise data warehouse, and started
migrating on-premise data to cloud.
Objectives
Lab 1: Learn how to mass ingest files from remote servers to Azure Blob storage
Lab 2: Learn how to easily migrate data from on-premises database to Azure SQL DW
Lab 3: Learn to work with complex file types using hierarchical schema (optional)
Lab 4: Build commonly known data warehouse patterns using cloud data integration for Azure
(optional)
Lab 5: Learn how to control the execution sequence of a data integration task. (optional)

Accessing Remote Desktop
To complete the labs, you will login to a hosted remote desktop from your machine.
Use Remote Desktop on your Windows 10 PC or on your Windows, Android, or iOS device to
connect to the remote desktop.
1. RDP: You may already have the ability to connect to remote desktop. If you’re unsure
check to see if you Remote Desktop enabled.
select Start > Settings > System > Remote Desktop, and turn on Enable Remote
Desktop.
2. Use Remote Desktop to connect to the PC you set up:
• On your local Windows 10 PC: In the search box on the taskbar, type Remote
Desktop Connection, and then select Remote Desktop Connection. In Remote
Desktop Connection, type the name of the PC you want to connect to (from Step 1),
and then select Connect.
1. Computer Name: Enter the IP address you were assigned.
2. User Name: Administrator Password: Infaworld2018
3. Click Connect.
1. On your Windows, Android, or iOS device: Open the Remote Desktop app
(available for free from Microsoft Store, Google Play, and the Mac App Store), and add
the name of the PC that you want to connect to (from Step 1). Select the remote PC
name that you added, and then wait for the connection to complete.
3. IICS: Once you’re logged into remote desktop, launch the chrome browser and click the
bookmark IICS. This will take you to the IICS login home page.
4. To login to IICS, use the credential you were assigned
Username: [email protected] (XX is your user id)
Password: StudentXX_azure (XX is your user id)
For example: If user id = 01
Username: [email protected]
Password: Student01_azure
5. Click Continue if you face the below prompt,

Before We Start…
Informatica Intelligent Cloud Services is a next generation iPaaS, which is made up of several
data management products. The productivity of the environment is accelerated by a common
user experience across all products, the AI/ML-driven intelligence of the CLAIRE™ engine, and a
microservices architecture. In this lab, we will be mainly focusing on the data integration cloud
but feel free to navigate other available services.
When you log in to Informatica Intelligent Cloud Services, the My Services page displays the
services that apply to data integration. The My Services page might also include other services
that you subscribe to and trial versions of other services.
We will primarily be using Data Integration, but feel free to navigate thru other services.

Working with Cloud Data Integration Services
When you select Data Integration from the My Services page, the Data Integration Home page
appears, as follows:

The Home page displays the following panels:
• Overview. A summary of projects, folders, connections, and assets available to your
organization.
• Runtime Environment Status. The status of all the organization's runtime environments.
• My Jobs. A list of jobs that you ran in the last 24 hours.
• Most Recent Project. The last project that you created or that contains the most recently
modified asset.
• Recent Assets. The assets that you most recently modified.
You can access the following pages from the navigation bar for Data Integration:
• New. Create new data integration assets such as mappings, tasks, and Taskflow. You
can create assets from scratch or use templates as a head start.
• Home. Return to the Home page.
• Explore. Create and manage data integration projects and assets.
• Bundles. Create and manage bundles of assets to share with your organization or other
organizations.
• My Jobs. View the status of your Data Integration jobs.
When you switch from Data Integration to another service such
as Administrator or Monitor, the options in the navigation bar change to suit the service.

When you click on “New” these are the following tasks that you can integrate data with the
following tasks:
• Mass ingestion task. Transfer files between on-premise and remote servers, and Data
Integration.
• Synchronization task. Use the synchronization task to synchronize data between a source and a
target and use expressions to transform the data according to your business logic or use data
filters to filter data before writing it to targets.
• Mapping task. Process data based on the data flow logic that you define in a mapping.
• Replication task. Replicate data from Salesforce or database sources to database or file
targets. You might replicate data to archive the data, perform offline reporting, or consolidate
and manage data.
• Masking task. Replace source data in sensitive columns with realistic test data for non-
production environments. Masking rules define the logic to replace the sensitive data.
Assign masking rules to the columns you need to mask.
• PowerCenter task. Import a PowerCenter workflow and run it as a Data Integration PowerCenter
task.
• Taskflow. You can use Taskflow for complex data integration projects. Taskflow orchestrate
the execution sequence of multiple data integration tasks.
In the first lab exercise, you’re going to use the mass ingestion task
Lab 1 – Mass Ingest files to Cloud Object Storage
Duration: 15 minutes
Objective: Create mass ingestion Task to read data from the Flat file and load into Azure Blob.
In this lab, will learn how to move Flat files from Linux machine or Ftp server to Azure blob
storage.
One of ACME use case is to collect and analyze data about their customers to understand the
types of rewards customers are interested in. For example, one customer might be interested in
saving money on groceries while another customer might be interested in travel deals. Data

needs to be collect about customer demographics, lifestyle metric, income, transaction history,
spending habits, online presence, interests, opinions, and brand knowledge.
Before the data analysts can begin working with the data, as the data engineer, you need to
ingest the data from a remote server into Azure Blob storage. But you cannot spend the time
and resources required to ingest the large amounts of data. You will have to develop numerous
mappings and parameter sets to ingest the data to make sure that the data is ingested properly.
Instead of manually creating and running mappings, you can use mass ingestion. Mass
ingestion is the ingestion or replication of large amounts of data for use or storage in a cloud
data warehouse or cloud object store. The mass ingestion tasks transfer large number of files
of any file type between on-premises and cloud repositories and to track and monitor file
transfers. You create one mass ingestion specification that ingests all the data at once. When
you create a mass ingestion task, you define the source from which to transfer files and the
target to which to transfer the files. You can define a schedule by which the task runs.
Below are the steps to create a mass ingestion task:
1. Log back in to Informatica Intelligent Cloud Services with the credentials provided and
navigate to the “Data Integration” Service.

2. Click option "Explore" on the left panel and then click Project "Default". For this workshop,
you are going to create all your assets under this “Default” project. You can also find the
folder “SAMPLE CODE FOR REFERENCE” which contains a sample asset for each of the
following Labs for your reference if required.

3. At the left top corner, click on “New” .
4. Browse “Tasks” > “Mass Ingestion Task” and then click “Create”.
5. You will see a task wizard that will navigate you to the mass ingestion task.
a. Enter Task Name as “MASS_INGESTION_LINUX TO_AZURE_BLOB_STUDENTXX”
– Here XX refers your user id. For example, if you’re logged on as student01, then
name the task “MASS_INGESTION_LINUX TO_AZURE_BLOB_STUDENT01”
b. Skip the Location as Default. Skip the Description.
c. Choose Runtime Environment as “tttinfasvc.infa.com”
d. Click Next

6. Next, under Source details,
a. Select Connection Type as “Local Folder” from drop list.
b. Enter Source Directory as “/data01/infa_shared/SrcFiles/acme_retail/” (without
double quotes).
(This is the path that stored source file)
c. File Pattern as “*.dat” (without double quotes).
Note: For this lab, we are moving all files, therefore enter File Pattern as “*.dat”
(without double quotes)
d. Click Next>

7. Under Target,
a. Choose Connection Type as “Microsoft Azure Blob Storage V3”
b. Choose Connection as “RETAIL_AZURE_BLOB_STORAGE_STUDENTXX” from
drop list. Here XX refers your user id.
c. Ignore the remaining options as it is.
d. Click Next>

8. Under Schedule,
a. Then click Finish
9. Once the job is saved successfully,
a. select “Run” to execute the task
10. Go to MyJobs and monitor for Job success. Keep clicking option “Refresh” to get the
latest status if task is running.

11. Once job is succeeded, open “MS Azure Storage Explorer” from task bar and go to
path Local & Attached > Storage Accounts > AzureDemo (Key) > Blob Containers >
azuredemoblobforsqldw > STUDENTXX (where XX is your user ID)
12. Please validate the files and its Last modified timestamp. You are successfully moved
the bulk number of files from Linux to Azure Blob storage.

Lab 2 – Easily synchronize data from on-premises
database to a cloud data warehouse
Duration: 20 minutes
Objective: Create Synchronization Task to read data from the Flat file and load into Azure SQL
DW.
Often the very purpose of an application is to modify and update data. But when data is
modified in an application, you must take care that those changes are communicated back to
other systems that use that data. Data synchronization provides a means of creating harmony
and consistency among all the systems that have access to data.
The synchronization task allows you to synchronize data between a source and a target. For
example, you can read sales leads from your sales database and write them into Salesforce or
SaaS data warehouse. You can also use expressions to transform the data according to your
business logic or use data filters to filter data before writing it to targets.
In this lab, you will learn how to move data from a relational database, such as Oracle, and sync
it to Azure SQL DW. You will also apply data filters to the synchronization job.
1. Click option "Explore" on the left panel.
2. To create a data synchronize task, click New on the left top corner

3. Under the task Asset, select the Synchronization Task and click Create.
4. When the Task Wizard appears to create New Synchronization Task, enter the following
information:
• Enter Task Name as
“Synchronization_DIM_STORE_AZURE_SQL_DW_STUDENTXX” – Here XX refers
your user ID. Skip the Location and Description.
• Select Task Operation as “Insert” from drop down list and Click Next >.

5. Source:
a. Select Connection as “RETAIL_ORACLE_STAGE” from drop list.
b. Select "Source Type" as “Multiple”
c. Click “Add…” under Source objects.
d. In Select Source Object window, type "DATE_DIM" and click Search. Select the
object "DATE_DIM" from search result. Now you will see DATE_DIM is added
under “Selected Objects” on right side.
e. Similarly type "S_STORE" and click Search. Select the object "S_STORE" from
search result.
f. Finally click blue button “Select” to close the window.
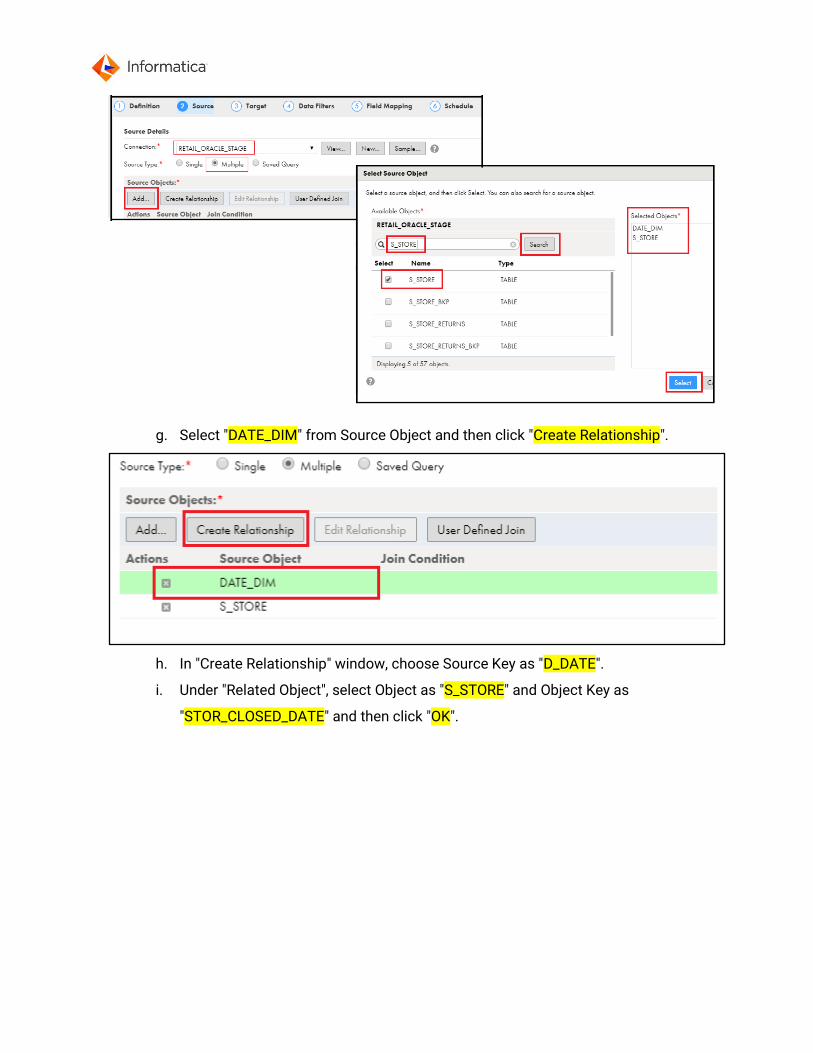
g. Select "DATE_DIM" from Source Object and then click "Create Relationship".
h. In "Create Relationship" window, choose Source Key as "D_DATE".
i. Under "Related Object", select Object as "S_STORE" and Object Key as
"STOR_CLOSED_DATE" and then click "OK".

j. Click Next >.
6. Target:
a. Select Connection as “RETAIL_AZURE_SQL_DW” from drop list.
b. For Target Object, from drop list, choose "DIM_RETAIL_STORE_STUDENTXX"
where XX is your user ID.
c. Click Next >.

7. Using data filter you can reduce the number of source rows that
the synchronization task reads for the task. By default, the synchronization task reads all
source rows. To configure a filter, follow the steps :
a. Click “New” next to “Data Filters” to get “Data Filter” window.
b. Select Object as “S_STORE” from drop list.
c. Choose "STORE_CLOSED_DATE" as Filter by:
d. Select "Is Not Null" as Operator.
e. Click "OK".
f. Click Next >.
8. Under “Field Mapping”,
a. Click “Automatch” to map the similar fields from Source and Target.
b. Now you can see most of fields are mapped Automatically. Now we will see how
to define the expression for the remaining unmapped fields.
c. Click on the right side of Target field “stor_store_sk”. Refer below
screenshot.
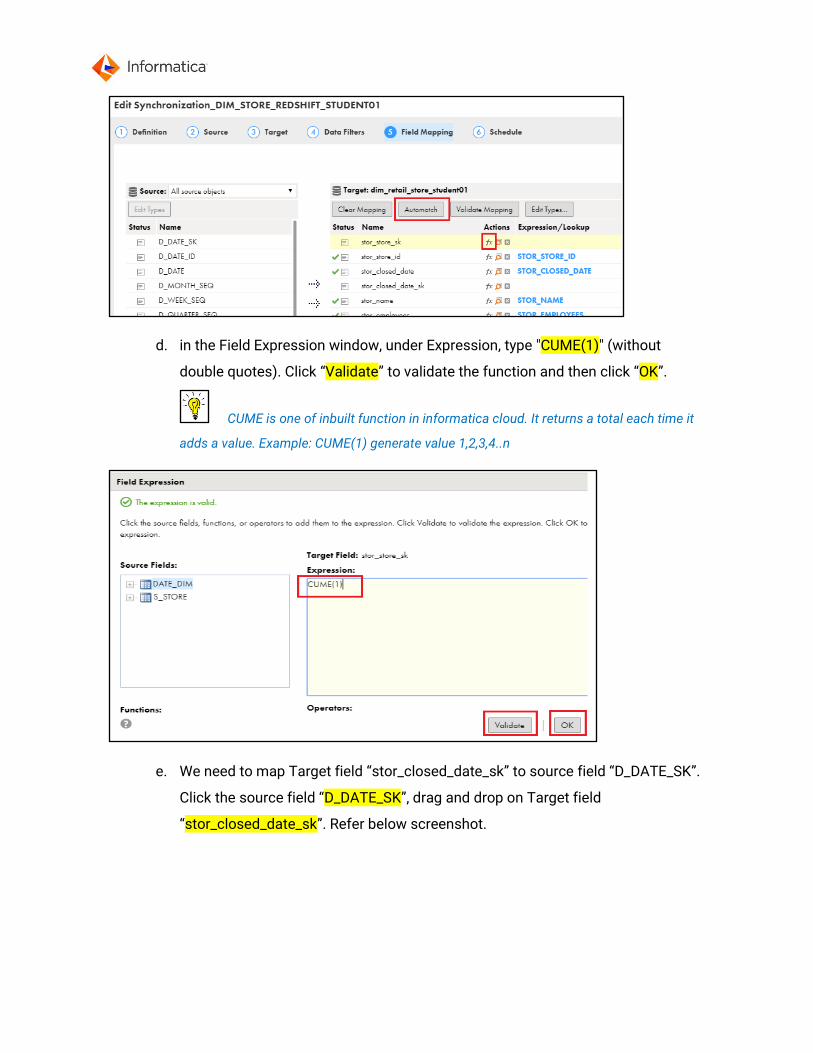
d. in the Field Expression window, under Expression, type "CUME(1)" (without
double quotes). Click “Validate” to validate the function and then click “OK”.
CUME is one of inbuilt function in informatica cloud. It returns a total each time it
adds a value. Example: CUME(1) generate value 1,2,3,4..n
e. We need to map Target field “stor_closed_date_sk” to source field “D_DATE_SK”.
Click the source field “D_DATE_SK”, drag and drop on Target field
“stor_closed_date_sk”. Refer below screenshot.

f. Click on the right side of Target field “dw_insert_dt”.
g. Enter “SYSDATE” under Expression (without double quotes) and click OK.
SYSDATE generate current datetime while load the data.
h. Scroll down the right-side Target panel. Click on the right side of Target field
“current_flg”. Enter 'Y' under Expression (with Single Quotes) and click OK. This
will populate hard coded value Y.
i. Leave the target field "dw_update_dt" as blank since we are not going to do any
update as part of this lab. Finally, your Field mapping should look like below.

j. Click Next >
9. Skip Schedule Details as it is.
10. Skip “Email Notification Options” as it is.
11. Under Advanced Target Properties,
a. enter Azure Blob Container Name as “azuredemoblobforsqldw”. (without double
quotes).
b. Enable the check box for “Truncate Table”. This will truncate the existing data
before every load.

12. Then Click Finish to save the data synchronization task.
13. Click “Run” at the top right had corner.
14. Monitor the Task:
Click “My jobs” on the left-hand side, and Check the job status. If the job is in running
status, click “Refresh” periodically. Once the job status is “Success” then note down the
“Rows Processed”.
15. Data Validation:
To ensure that the data loaded correctly, connect to Azure SQL DW by clicking the icon
which is pin on the task bar and run the below query to complete validation.

a. Select the connection profile “AZURE_SQL_DW” and click OK.
Query: Paste the below query in Query Tab 1. After entered query, select the sql
statement and click icon to execute the query.
SELECT * FROM AZUREDEMO.DIM_RETAIL_STORE_STUDENTXX;
-- where XX is your user Id.
From the result, observe data on the fields “stor_closed_date_sk”,”dw_insert_dt” &
“current_flg”. Data on these fields are generated based on the expression we entered
manually.

Lab 3 – Working with semi-structured data (Optional)
Duration: 20 minutes
Objective: Using a wide array of data generated by social media, mobile devices and the
Internet of Things (IoT), ACME who have been harvesting terabytes of information, most of it
semi-structured, can now study their customers’ needs and habits with a level of granularity
once thought impossible. However, ACME needs to understand how to store, analyze and give
context to semi-structure data.
Many companies assume data generated by IoT, web and mobile are temporarily stored on the
cloud and believe that using such data requires exporting it into a local repository—and thus
increasing the cost of data transfer. However, a cloud data warehouse is well suited to
accommodate the growth of systems of engagement born in the cloud. By conducting analytics

in the cloud, where such data already resides, a company can reduce network costs while also
paying only for the storage its uses—and enjoying a virtually unlimited capacity to expand.
In this lab, you will learn how to load a JSON file to a cloud data warehouse using Informatica’s
Intelligent Cloud Services. First you will use Hierarchical parser to convert hierarchical input
into relational output. The transformation processes XML or JSON input from the upstream
transformation and provides relational output to the downstream transformation. You will learn
to convert call the transformation in a mapping and load the data to a cloud data warehouse.
We need 2 files as the input to use Hierarchy Parser transformation in the Mapping. We have
already placed these 2 files under folder desktop > SourceFile for this lab.
1. Customer_data_Json.json – json file which has customer data. We will use this file while
create “Hierarchy Schema”.
2. file_path.txt – file that contains json file location. We will use this file as input source file
in Mapping.

1. To begin the lab, click option "Explore" on the left panel.
2. click New on the left top corner, navigate to “Components” and select “Hierarchical
Schema” and click “Create”.
3. Enter Name as
“Hierarchical_Schema_CUSTOMER_JSON_TO_RELATIONAL_STUDENTXX” where XX is
your id.
4. Click “Upload” to upload sample customer json file.

5. Click “Choose file” and navigate to Desktop > SourceFile and select the file
“Customer_data_Json.json”. Click Open.
6. Validate the JSON file and click “OK”.

7. Click Save on the right Up corner to save the schema.
8. Next, create a new mapping that will use the schema in the mapping. To do this, click
“New” on the left top corner, click on “Mappings”, click “Create”.

9. On the bottom screen, Under Properties, enter Name as
“Mapping_JSON_TO_RELATIONAL_STUDENTXX” where XX is your user id.
10. Click “Source” on mapping flow.

11. Under Source Properties,
• Click General and enter Name as “Source_Flatfile”.
• Click Source and choose Connection as “FF_AWS_WINDOWS”
• To select Object, click “Select” and choose “file_path.txt” and click OK.
12. Now we are going to add “Hierarchy Parser” transformation in to mapping flow.
In the mapping canvas window, find the transformation “Hierarchy Parser” from left side,
click, drag and drop the transformation between source and target.

13. Click the target and move little to right side to see the objects clearly.
14. Click “HierarchyParser” transformation from mapping flow.
• Under properties, click “Input Settings”
• Select “Input Type” as “File”
• To choose “Schema”, click “Select”

15. In Select Schema window, under project “Default” > select your Hierarchical Schema
“Hierarchical_Schema_Customer_Json_STUDENTXX” where XX is your user id and click
“Select”.
16. Once you select the schema, you can observe link between source and Hierarchy
transformation is disconnected in mapping design window. Make the link again as show
in below screenshot.
17. Under Properties, select “Input Field Selection” then click “path” under Incoming Fields
(left side) and drag and drop on “Mapped field” under “Hierarchical Schema” (Right side)

18. Click symbol to expand the structure and observe it.
If you cannot see the structure properly, click the highlighted option
on the right middle window to maximize the property window.
a. You can choose the fields as per your requirements. For this lab, we are going to
choose all fields. Under “Element Name”, click the box shaped icon and
select the option “Map all descendants”. Now all fields will be mapped to right
side “Relational Fields”.
19. Come back to mapping design window,
Make the link from HierarchyParser to Target in mapping flow.

Window will prompt to Select Output Group. Select “root” and click OK.
20. Click Target from mapping flow.
21. Under Target Properties,
• General, enter Name as “Target_Azure_Customer”
• Click Target and choose Connection as “RETAIL_AZURE_SQL_DW”
• Click “Select” to choose Target Object.
22. In “Target Object” window,
• Choose “Create New at Runtime”

• Enter Object Name as “CUSTOMER_RELATIONAL_STUDENTXX” where XX is
your user ID and then click OK.
23. Under “Advanced”,
a. enter Azure Blob Container Name as “azuredemoblobforsqldw”.
b. Enable checkbox "Truncate Table”
24. You are now done with mapping creation with Hierarchy transformation. Click “Save” to
save and validate the mapping.

25. Once the mapping is validated successfully, click “Run” to execute the mapping.
26. Choose “Runtime Environment” as “tttinfasvc.infa.com” and click “Run”.
27. Click “My jobs” on the left-hand side, and Check the job status. If the job is in running
status, click “Refresh” periodically. Once the job status is “Success” then note down the
“Rows Processed”.
28. Data Validation:
To ensure that the data loaded correctly, connect to Azure SQL DW by clicking the icon
which is pin on the task bar and run the below query to complete validation.
a. Select the connection profile “AZURE_SQL_DW” and click OK.

Query: Paste the below query in Query Tab 1. After entered query, select the sql
statement and click icon to execute the query.
Select * from azuredemo.CUSTOMER_RELATIONAL_STUDENTXX;
-- where XX is your User Id.
From the result, observe data in relational format converted from Json input file.

Lab 4 – Build commonly known data warehouse
patterns using cloud data integration (Optional)
Duration: 30 minutes
Objective: Create a slowly changing dimension mapping that reads data from Oracle source
and load into Azure SQL DW.
Slowly Changing Dimensions (SCD) are the most commonly used advanced dimensional
technique used in dimensional data warehouses. Slowly changing dimensions are used when
you wish to capture the changing data within the dimension over time. As a cloud data
architect, you must decide how to respond to the changes in the descriptions of dimensional
entities like customer, product, supplier, location and others.
As an example, consider a system that tracks retail sales over a period of months or years.
During that time, the underlying product line, pricing structure, sales region geography – virtually
every part of a transaction’s context – is likely to change.
In this lab, using the mapping template, you will build a slowly changing dimension type 2
mapping, where we took a simple product table, the item table to implement the dimension
which will insert, update the items table located on Azure SQL DW.
1. To begin the lab, click option "Explore" on the left panel.
2. click New on the left top corner, browse for “Mappings” -> “Warehousing” -> select
“Slowly changing dimension Type 2”, click “Create”. The mapping canvas will open with a
pre-built type 2 slowly changing dimension.

3. Under “Mapping1 Properties”, enter Name as
“Mapping_SCD_TYPE2_ITEM_DIM_AZURE_SQL_DW_STUDENTXX” where XX is your user
id.
4. Click “src” on the top section and wait to load src Properties on the bottom screen.
5. Under “src Properties” click “Source” tab,

a. Choose Connection as “RETAIL_AZURE_BLOB_STORAGE_STUDENTXX”. Where
XX is your User ID.
b. Click "Yes" if you prompt with "Change connection" window.
c. Set Source Type as “Single Object”
d. For Object, click “Select”
e. In Select Source object, under “Package Explorer”, click “azuredemoblobsqldw” to
expand the folder.
f. Select the folder STUDENTXX where XX is your ID.
g. Enter “item” and click Search. Select “item.dat” from result and then enter OK.
h. Click “Formatting Options”.
i. Select “Format Type” as “Flat”
j. Select “delimiter” as symbol pipe (|). Click OK.

6. Select Expression “exp_fields_src” from the mapping
7. Under Properties,
a. Click Expression > “p_src_scd_fields”

b. Choose Expression as “Not Parameterized” from drop list.
c. Enter the following as Expression function:
ITEM_ITEM_ID||ITEM_ITEM_DESCRIPTION||ITEM_LIST_PRICE||ITEM_WHOLESALE_COST||I
TEM_SIZE||ITEM_FORMULATION||ITEM_COLOR||ITEM_UNITS||ITEM_CONTAINER||ITEM_M
ANAGER_ID
d. Click “OK”.
8. Click the next expression “p_src_key”

a. Select Expression as “Not Parameterized”
b. Enter the following as Expression function:
ITEM_ITEM_ID
c. Click OK.
9. Once above step is done successfully, select “src_dim” from top mapping flow.

10. Under Source,
a. Choose Connection as “RETAIL_AZURE_SQL_DW”
b. Click "Yes" if you prompt with "Change connection" window.
c. Choose Source type as “Single Object”
d. For Object, Click “Select”
e. Type “item” and click Search.
f. Select “DIM_RETAIL_ITEM_STUDENTXX” where XX is your user ID. Then Click
OK.

11. Under Source > Advanced > Azure Blob Container Name to “azuredemoblobforsqldw”
12. Select “exp_key_dim” from mapping flow.

13. Under Properties, Click Expression on the left panel,
a. Click “p_dim_natural_key”
b. Select Expression as “Not Parameterized”
Enter the following as Expression function: DM__item_item_id
c. Click OK.

14. Scroll down and Click the next Expression “p_dim_surrogate_key”
a. Select Expression as “Not Parameterized”
Enter the following as Expression function: DM__item_item_sk
b. Click OK.
c. Click icon on the right side of Expression.
d. In the Edit Field window,
i. Leave “Field Type” as “Output Field”
ii. Enter “Name” as “OUT_dim_scd_field_list”

iii. Leave “Type” as “string”
iv. Type “Precision” as 2000
v. Click OK
e. Click “Configure…”
f. Leave Expression as “Not Parameterized”
g. Enter the following as Expression function:
DM__ITEM_ITEM_ID||DM__ITEM_ITEM_DESCRIPTION||DM__ITEM_LIST_PRICE||DM__ITEM_
WHOLESALE_COST||DM__ITEM_SIZE||DM__ITEM_FORMULATION||DM__ITEM_COLOR||DM_
_ITEM_UNITS||DM__ITEM_CONTAINER||DM__ITEM_MANAGER_ID
h. Click Validate and confirm there is no issue. Click OK.

15. Click “srt_dim” from mapping flow.
16. Under Properties,
a. Click “Sort” tag on the left panel.
b. On the right side, click to add new “Sort Condition”.
c. Select Field as “DIM__infa_surr_key” and Sort Order as “Descending”

17. Click “exp_calculate”
18. Click the Expression on the left panel. click the highlighted option
on the right middle window to maximize the property window.
19. Under Properties, click “Expression”.
20. Click then Click the icon at the right side.
21. In Edit field window, do the following
a. Select “Field Type” as “Variable Field”
b. Type “Name” as “DM__crc_num”
c. Leave “Type” as “string”
d. Enter “Precision” as 500 and Click “OK”.

22. Click “Configure…”
23. In Expression window,
a. Leave Expression as “Not Parameterized”
b. Enter the following as Expression function:
CRC32(OUT_dim_scd_field_list)
c. Click Validate and confirm there is no issue. Click OK.

24. Now we need to move newly created Expression "DM_crc__num" to 2nd position i.e.,
next to "v_NewCRCNo". Select the expression and click the upward icon which will
just move one step upward. Do this continuously until it reaches 2nd position. Refer the
below screenshot.
25. After finishing above step, it should look like below.
26. We need to update the Connection and Field mapping for all 3 Targets. Please follow the
below steps.
27. Click the target “tgt_dim_new_insert” from mapping
a. Under Properties, click the “Target” from left panel.
b. Choose Connection as “RETAIL_AZURE_SQL_DW”
c. Click “Yes” if you prompt “Change connection” window.
d. Choose “Target type” as “Single Object”
e. For Object, Click “Select”

f. Type “item” and click Search.
g. Select “DIM_RETAIL_ITEM_STUDENTXX” (where XX is your User ID) from the
select and then Click OK.
h. Under Advanced enter "Azure Blob Container Name" as “azuredemoblobforsqldw”
28. Scroll down the left panel and Click “Field Mapping” from left panel,
a. Change "Field map options" to "Manual"
b. And click “Automatch”
c. Scroll down the “Incoming Fields” and find the field “NEXTVAL”. Click it and drag
and drop on right side of Target field “ITEM_ITEM_SK”. Refer screenshot.

d. Mapp INOUT_infa_valid_from_default to "ITEM_REC_START_DATE"
e. Leave “ITEM_REC_START_DATE” as blank
f. Mapp INOUT_infa_current_flag_Y to "CURRENT_FLG"
g. Finally, your field mapping should look like below.

29. Click the target “tgt_dim_ex_insert” from mapping
a. Under Properties, click the “Target” from left panel.
b. Choose Connection as “RETAIL_AZURE_SQL_DW”
c. Click “Yes” if you prompt “Change connection” window.
d. Choose Target type as “Single Object”
e. For Object, Click “Select”
f. Type “item” and click Search.
g. Select “DIM_RETAIL_ITEM_STUDENTXX” (where XX is your User ID) from the
select and then Click OK.
h. Leave Operation as “Insert” from drop list.
i. Under Operation, Expand “Advanced” and enter Azure Blob Container Name to
“azuredemoblobforsqldw”.

30. Scroll down the left panel and Click Field Mapping in the left panel.
31. click the highlighted option on the right middle window to
maximize the property window.
32. Choose “Field map options” as “Manual” and then click “Automatch”
33. We need to manually map the remaining fields between incoming Fields and Target
fields as shown in below screenshot.

a. ITEM_ITEM_SK scroll down the “Incoming Fields” and find the field “NEXTVAL”. Click it and drag and drop on right side of Target field “ITEM_ITEM_SK”
b. ITEM_REC_START_DATE from left side, find the field “INOUT_infa_valid_to_reset”, click it and drag and drop on right side of Target field “ITEM_REC_START_DATE”
c. ITEM_REC_END_DATE Skip it as blank.
d. CURRENT_FLG from left side, find the field “INOUT_infa_current_flag_Y”, click it and drag and drop on right side of Target field “CURRENT_FLG”
Click the below icon to restore window.

34. Click the target “tgt_dim_ex_upd” from mapping
a. Under Properties, click the “Target” from left panel.
b. Choose Connection as “RETAIL_AZURE_SQL_DW_2”
c. Choose Target type as “Single Object”
d. For Object, Click “Select”
e. Type “item” and click Search.
f. Select “DIM_RETAIL_ITEM_STUDENTXX” (where XX is your User ID) from the
select and then Click OK.
g. Ignore Operation as “Update” from drop list.
h. Click "Add" to add key for "Update columns"
i. In Update columns window, select “ITEM_ITEM_SK” under Target Columns and
click symbol “>” to move the selected field to right side and then click OK. Refer
below screenshot.

j. Under Advanced, Enter Azure Blob Container Name as "azuredemoblobforsqldw"

35. Click Field Mapping in the left panel and choose “Field map options” as “Manual”.
36. We need to manually Map the fields one by one between incoming Fields and Target
fields as shown in below screenshot.
a. ITEM_ITEM_SK Drag and drop "DIM__infa_surr_key" from left panel to right side of "ITEM_ITEM_SK"
b. ITEM_REC_END_DATE Drag and drop "INOUT_infa_valid_to_reset" from left panel to right side of ITEM_REC_END_DATE
c. CURRENT_FLG Drag and drop "INOUT_infa_current_flag_N" from left panel to right side of "CURRENT_FLG"

37. Click “Save” to save and validate the mapping. Once the mapping is saved without any
error, click 3 dots on the right corner.
38. Then select “New Mapping Task…” from drop list.
39. In the New MappingTask window,
a. Enter Task Name as
“MappingTask_SCD_TYPE2_ITEM_DIM_AZURE_STUDENTXX” where XX is your
user id.

b. Select Runtime Environment as “tttinfasvc.infa.com”
c. Click Next>
40. Do not make any changed on the Sequence value. Click Next>
41. Skip the “Email Notification Options” as it is.
42. Click “Finish” to save the mapping task.
43. Click “Run” to execute the mapping task and mapping.
44. Click “My Jobs” from left panel to monitor the running job. Click Refresh periodically to
update the job status.
45. Data Validation:
To ensure that the data loaded correctly, connect to Azure SQL DW by clicking the icon
which is pin on the task bar and run the below query to complete validation.

a. Select the connection profile “AZURE_SQL_DW” and click OK.
Query: Paste the below query in Query Tab 1. After entered query, select the sql
statement and click icon to execute the query.
SELECT * FROM AZUREDEMO.DIM_RETAIL_ITEM_STUDENTXX;
-- where XX is your Id.
46. Since this is first run and table is empty, by default all records got inserted. Now we are
going to see how this mapping will behave if we have new record and updated record
coming from source.
47. For this testing, we are going to use source “item_updated.dat” which has 2 records. One
is new Id and another one is existing but data on other columns are modified.

48. Go back to Informatica cloud, Click option "Explore" on the left panel.
49. Find and open the mapping
“Mapping_SCD_TYPE2_ITEM_DIM_AZURE_SQL_DW_STUDENTXX” where XX is your user
ID.
50. Click source “src” on the mapping flow.
51. Under “src Properties” click “Source” tab on the left panel. To change the Object click
“Select”
52. In “Select Source Object” window, type “item” and Search. From the result, select object
“item_updated.dat” and click OK.

53. Click “Yes” to Continue.
54. Click “Formatting Options” to change the delimiter for new source.
a. Select “Format Type” as “Flat”
b. Select “delimiter” as symbol pipe (|). Click OK.

55. Click Save to save the changes and validate the mapping.
56. Click the “Explorer”.
57. Find and open the task “MappingTask_SCD_TYPE2_ITEM_DIM_AZURE_STUDENTXX”
where XX is your user ID.
58. Click “Run” to execute the Mapping Task with latest changed made.
59. Go to “My Jobs” and monitor the latest run. Keep click “Refresh” with regular interval.
60. Once the task is completed, go back to Azure Server Studio, and run the below query.
SELECT * FROM AZUREDEMO.DIM_RETAIL_ITEM_STUDENTXX ORDER BY 2,1;
Where XX is your user Id.

Observe the data. You can see new id (itm_id_0011) is inserted and existing record
(itm_id_001) is updated with changes and previous version is preserved with current_flg
= N and end_date as current date.
Lab 5 – Control the execution sequence using task
flow (Optional)
Use a Taskflow to control the execution sequence of a Data Integration task. You can run tasks
in parallel, use advance decision-making criteria, time tasks, and perform other advanced
orchestrations.
Duration: 15 mins
Objective:
Create Taskflow to execute previously created Mapping and Synchronization task.
Overview:
Use a Taskflow to control the execution sequence of a Data Integration tasks (Mapping and
Synchronization task). You can run tasks in parallel and sequence order. In this lab, we are
going to use Mapping created in Lab 4 and Synchronization task in Lab 2.
Steps
1. Once you logged into “Data Integration”,
a. Click “Explore” from left panel

2. Click New on the left top corner
3. Browse Taskflows > “Parallel Tasks” and then click “Create”.
4. Enter Taskflow name as “Taskflow_Parallel_Tasks_STUDENTXX” where XX is your user
id.

5. Now click plus sign in “Data Task1” from the Taskflow.
6. From Select Data Task window, select Mapping
“MappingTask_SCD_TYPE2_ITEM_DIM_AZURE_STUDENTXX” where XX is your ID and
click “Select”.
7. Under Properties, go to General and enter Name as “Mapping_SCD_TYPE2_ITEM_DIM”.

8. Click plus sign in “Data Task2” from the Taskflow.
9. From Select Data Task window, select Synchronization task
“Synchronization_DIM_STORE_AZURE_SQL_DW_STUDENTXX” where XX is your user id
and click “Select”.
10. Under Properties, click General and enter Name as “Sync_DIM_STORE”

11. Click “Save” to save and validate the Taskflow.
12. Once Taskflow is saved and validated, click “Run” next to Save to execute the Taskflow.
This will run Mapping for SCD Type 2 and Synchronization task in parallel. You need not
to validate data as these tasks have validated individually in above Labs.
Congratulations! You have successfully learnt the basics of IICS – Cloud Data Integration.


![5. Logging in by Azure AD Certification · 2019-10-02 · Login to S-PAS (via Azure AD Certification) 5 S-PAS Login. ... Click [Sign Out From All] 4 Click [Profile] 3 5 Click [OK]](https://static.documents.pub/doc/80x56/5f3c150a67b3bf4d6f4d812f/5-logging-in-by-azure-ad-certification-2019-10-02-login-to-s-pas-via-azure-ad.jpg)