84
Datasheet DS000603 CMV12000 12Mp High Speed Machine Vision Global Shutter CMOS Image Sensor v5-00 • 2022-Feb-04

Datasheet
DS000603
CMV12000
12Mp High Speed Machine Vision Global Shutter
CMOS Image Sensor
v5-00 • 2022-Feb-04
Document Feedback CMV12000 Content Guide
Datasheet • PUBLIC DS000603 • v5-00 • 2022-Feb-04 84 2
Content Guide
1 General Description ...................... 3
1.1 Key Benefits & Features ............................... 3 1.2 Applications .................................................. 3 1.3 Block Diagram .............................................. 4
2 Ordering Information .................... 5
3 Pin Assignment ............................. 6
3.1 Pin Diagram .................................................. 6 3.2 Pin Description ............................................. 6
4 Absolute Maximum Ratings ....... 13
5 Electrical Characteristics............ 14
6 Typical Operating Characteristics ............................ 16
6.1 Electro-Optical Characteristics ................... 16 6.2 Spectral Characteristics ............................. 17
7 Functional Description................ 19
7.1 Sensor Architecture .................................... 19 7.2 Operating the Sensor ................................. 20 7.3 Sensor Readout Format ............................. 28 7.4 Configuring Exposure and Readout ........... 36 7.5 Configuring Output Data Format ................ 57 7.6 Additional Features .................................... 60 7.7 Additional Required Register Settings ....... 64
8 Register Description .................... 71
8.1 Register Categories .................................... 71 8.2 Register Overview ...................................... 71
9 Application Information ............... 76
9.1 Color Filter .................................................. 76 9.2 Socket ......................................................... 77 9.3 Pin Layout ................................................... 77
10 Package Drawings & Markings ... 78
11 Packing Information .................... 80
12 Soldering & Storage Information 81
12.1 Soldering ..................................................... 81 12.2 Storage ....................................................... 82
13 Revision Information ................... 83
14 Legal Information ......................... 84

Document Feedback CMV12000 General Description
Datasheet • PUBLIC DS000603 • v5-00 • 2022-Feb-04 84 3
1 General Description
The CMV12000 is a high speed CMOS image sensor with 4096 by 3072 pixels (22.5 mm x 16.9 mm)
developed for machine vision and other applications. The image array consists of 5.5 μm x 5.5 μm
pipelined global shutter pixels, which allow exposure during read-out. The image sensor has 64 8-, 10-
or 12-bit digital LVDS outputs (serial). The image sensor also integrates a programmable gain
amplifier and offset regulation. Each channel runs at 600 Mbit/s which results in 132 fps frame rate at
full resolution and 12-bit. When 10-bit per pixel is used, the frame rate increases to 300 fps. Higher
frame rates can be achieved in row-windowing mode or row-subsampling mode. These modes are all
programmable using the SPI interface. A programmable on-board sequencer generates all internal
exposure and read-out timings. External triggering and exposure programming is possible. Extended
optical dynamic range can be achieved by multiple integrated high dynamic range modes.
1.1 Key Benefits & Features
The benefits and features of CMV12000, 12Mp High Speed Machine Vision Global Shutter CMOS
Image Sensor are listed below:
Figure 1:
Added Value of Using CMV12000
Benefits Features
Designed for high performance applications A resolution of 4096×3072 at 300 frames per second
Capture fast moving objects 8T global shutter pixel with true Correlated Double Sampling (true CDS)
Select high frame rate or improved image quality 8-bit, 10-bit and 12-bit ADC
See bright and dark objects simultaneous Standard dynamic range of 60 dB High Dynamic Range (HDR) modes possible
1.2 Applications
Machine Vision
High End Inspection
Video/Broadcast
Motion Capture
Intelligent Transportation System (ITS)

Document Feedback CMV12000 General Description
Datasheet • PUBLIC DS000603 • v5-00 • 2022-Feb-04 84 4
1.3 Block Diagram
The functional blocks of this device are shown below:
Figure 2:
Functional Blocks of CMV12000
Pixel array4096 x 3072 active pixels
SPI
Seq
uen
cer
32, 16, 8, 4, 2 or 1 outputs
External driving signals
...
Input clock
SPI signals
Temp Sensor
LVDS LVDS LVDS LVDS
Analog Front End(gain, offset, ADCs)
...
32, 16, 8, 4, 2 or 1 outputs
...
Analog Front End(gain, offset, ADCs)
...
LVDSLVDSLVDSLVDS
Pixel (0,3071)

Document Feedback CMV12000 Ordering Information
Datasheet • PUBLIC DS000603 • v5-00 • 2022-Feb-04 84 5
2 Ordering Information
Ordering Code Package Chroma Delivery Quantity
CMV12000-2E5M1PA 237-µPGA Mono 18 pcs/tray
CMV12000-2E5C1PA 237-µPGA Color 18 pcs/tray
CMV12000-2E5M1PN 237-µPGA Mono 18 pcs/tray

Document Feedback CMV12000 Pin Assignment
Datasheet • PUBLIC DS000603 • v5-00 • 2022-Feb-04 84 6
3 Pin Assignment
3.1 Pin Diagram
Figure 3:
Pin Numbering
3.2 Pin Description
Figure 4:
Pin Description of CMV12000
Number Name Type Description
A2 TANA Analog output Test pin for analog pixel signals (do not connect)
A3 VREF Bias Reference for column amps (decouple with 100 nF to GND)
A4 VPCH_L Bias Pre-charge low voltage (decouple with 100 nF to GND)
A5 OUTCTR_N LVDS output LVDS negative control channel output
A6 OUTCTR_P LVDS output LVDS positive control channel output
A7 OUT2_N LVDS output LVDS negative output channel 2
A8 OUT2_P LVDS output LVDS positive output channel 2
A9 GND Ground Ground pin

Document Feedback CMV12000 Pin Assignment
Datasheet • PUBLIC DS000603 • v5-00 • 2022-Feb-04 84 7
Number Name Type Description
A10 VDD18 Supply 1.98 V supply
A11 OUT9_N LVDS output LVDS negative output channel 9
A12 OUT9_P LVDS output LVDS positive output channel 9
A13 OUT13_N LVDS output LVDS negative output channel 13
A14 OUT13_P LVDS output LVDS positive output channel 13
A15 VDD18 Supply 1.98 V supply
A16 VDD18 Supply 1.98 V supply
A17 OUT19_N LVDS output LVDS negative output channel 19
A18 OUT19_P LVDS output LVDS positive output channel 19
A19 OUT23_N LVDS output LVDS negative output channel 23
A20 OUT23_P LVDS output LVDS positive output channel 23
A21 GND Ground Ground pin
A22 VDD18 Supply 1.98 V supply
A23 OUT29_N LVDS output LVDS negative output channel 29
A24 OUT29_P LVDS output LVDS positive output channel 29
A25 GND Ground Ground pin
A26 VDD18 Supply 1.98 V supply
A27 VDD18 Supply 1.98 V supply
A28 GND Ground Ground pin
A29 GND Ground Ground pin
A30 VDD_PIX Supply 3.0 V supply
B1 CMD_COL_LOAD Bias Decouple with 100 nF to VDD33
B2 VTREF Analog input Test pin (decouple with 100 nF to GND)
B3 VREF_ADC Bias Reference for ADC (decouple with 100 nF to GND)
B4 VDD18 Supply 1.98 V supply
B5 GND Ground Ground pin
B6 OUT1_N LVDS output LVDS negative output channel 1
B7 OUT1_P LVDS output LVDS positive output channel 1
B8 OUT5_N LVDS output LVDS negative output channel 5
B9 OUT5_P LVDS output LVDS positive output channel 5
B10 OUT8_N LVDS output LVDS negative output channel 8
B11 OUT8_P LVDS output LVDS positive output channel 8
B12 OUT12_N LVDS output LVDS negative output channel 12
B13 OUT12_P LVDS output LVDS positive output channel 12
B14 OUT16_N LVDS output LVDS negative output channel 16
B15 OUT16_P LVDS output LVDS positive output channel 16
B16 OUT18_N LVDS output LVDS negative output channel 18
B17 OUT18_P LVDS output LVDS positive output channel 18
B18 OUT22_N LVDS output LVDS negative output channel 22
B19 OUT22_P LVDS output LVDS positive output channel 22

Document Feedback CMV12000 Pin Assignment
Datasheet • PUBLIC DS000603 • v5-00 • 2022-Feb-04 84 8
Number Name Type Description
B20 OUT26_N LVDS output LVDS negative output channel 26
B21 OUT26_P LVDS output LVDS positive output channel 26
B22 GND Ground Ground pin
B24 OUT31_N LVDS output LVDS negative output channel 31
B25 OUT31_P LVDS output LVDS positive output channel 31
B26 GND Ground Ground pin
B27 GND Ground Ground pin
B28 GND Ground Ground pin
B29 CMD_RAMP Bias Decouple with 100 nF to VDD33
B30 VTF_LOW2 Bias Transfer low voltage 2 (decouple with 100 nF to GND)
C1 CMD_LVDS Bias Decouple with 100 nF to GND
C2 VTSIG Analog input Test pin (decouple with 100 nF to GND)
C3 VCM_COMP33 Bias Decouple with 100 nF to GND
C4 VPCH_H Bias Pre-charge high voltage (decouple with 100 nF to GND)
C5 VTF_LOW0 Bias Transfer low voltage 0 (connect to GND)
C6 CMD_COLAMP Bias Decouple with 100 nF to VDD33
C7 OUT4_N LVDS output LVDS negative output channel 4
C8 OUT4_P LVDS output LVDS positive output channel 4
C9 OUT7_N LVDS output LVDS negative output channel 7
C10 OUT7_P LVDS output LVDS positive output channel 7
C11 OUT11_N LVDS output LVDS negative output channel 11
C12 OUT11_P LVDS output LVDS positive output channel 11
C13 OUT14_N LVDS output LVDS negative output channel 14
C14 OUT14_P LVDS output LVDS positive output channel 14
C15 GND Ground Ground pin
C16 GND Ground Ground pin
C17 OUT21_N LVDS output LVDS negative output channel 21
C18 OUT21_P LVDS output LVDS positive output channel 21
C19 OUT25_N LVDS output LVDS negative output channel 25
C20 OUT25_P LVDS output LVDS positive output channel 25
C21 OUT28_N LVDS output LVDS negative output channel 28
C22 OUT28_P LVDS output LVDS positive output channel 28
C24 OUT32_N LVDS output LVDS negative output channel 32
C25 OUT32_P LVDS output LVDS positive output channel 32
C26 VDD33 Supply 3.3 V supply
C27 VDD33 Supply 3.3 V supply
C28 GND Ground Ground pin
C29 VBGAP Bias Decouple with 100 nF to GND
C30 VTF_LOW3 Bias Transfer low voltage 3 (decouple with 100 nF to GND)
D1 CMD_COL_PC Bias Decouple with 100 nF to VDD33

Document Feedback CMV12000 Pin Assignment
Datasheet • PUBLIC DS000603 • v5-00 • 2022-Feb-04 84 9
Number Name Type Description
D2 GND Ground Ground pin
D3 VDD33 Supply 3.3 V supply
D4 VCLAMP Bias Decouple with 100 nF to GND
D5 VRES_L Bias Reset low voltage (decouple with 100 nF to GND)
D6 VTF_LOW1 Bias Transfer low voltage 1 (connect to GND)
D7 OUT3_N LVDS output LVDS negative output channel 3
D8 OUT3_P LVDS output LVDS positive output channel 3
D9 OUT6_N LVDS output LVDS negative output channel 6
D10 OUT6_P LVDS output LVDS positive output channel 6
D11 OUT10_N LVDS output LVDS negative output channel 10
D12 OUT10_P LVDS output LVDS positive output channel 10
D13 OUT15_N LVDS output LVDS negative output channel 15
D14 OUT15_P LVDS output LVDS positive output channel 15
D15 OUT17_N LVDS output LVDS negative output channel 17
D16 OUT17_P LVDS output LVDS positive output channel 17
D17 OUT20_N LVDS output LVDS negative output channel 20
D18 OUT20_P LVDS output LVDS positive output channel 20
D19 OUT24_N LVDS output LVDS negative output channel 24
D20 OUT24_P LVDS output LVDS positive output channel 24
D21 OUT27_N LVDS output LVDS negative output channel 27
D22 OUT27_P LVDS output LVDS positive output channel 27
D23 OUT30_N LVDS output LVDS negative output channel 30
D24 OUT30_P LVDS output LVDS positive output channel 30
D25 GND Ground Ground pin
D26 VDD33 Supply 3.3 V supply
D27 GND Ground Ground pin
D28 VDD_PIX Supply 3.0 V supply
D29 GND Ground Ground pin
D30 VDD_PIX Supply 3.0 V supply
E1 VDD18_PLL Supply PLL 1.98 V supply (unused)
E2 VDD_RES Supply 3.3 V supply
E3 GND Ground Ground pin
E4 DIO2 Ground Connect to ground
E5 LVDS_CLK_N LVDS input LVDS input clock N
E6 LVDS_CLK_P LVDS input LVDS input clock P
E7 OUT35_N LVDS output LVDS negative output channel 35
E8 OUT35_P LVDS output LVDS positive output channel 35
E9 OUT38_N LVDS output LVDS negative output channel 38
E10 OUT38_P LVDS output LVDS positive output channel 38
E11 OUT42_N LVDS output LVDS negative output channel 42

Document Feedback CMV12000 Pin Assignment
Datasheet • PUBLIC DS000603 • v5-00 • 2022-Feb-04 84 10
Number Name Type Description
E12 OUT42_P LVDS output LVDS positive output channel 42
E13 OUT46_N LVDS output LVDS negative output channel 46
E14 OUT46_P LVDS output LVDS positive output channel 46
E15 GND Ground Ground pin
E16 GND Ground Ground pin
E17 OUT51_N LVDS output LVDS negative output channel 51
E18 OUT51_P LVDS output LVDS positive output channel 51
E19 OUT55_N LVDS output LVDS negative output channel 55
E20 OUT55_P LVDS output LVDS positive output channel 55
E21 OUT59_N LVDS output LVDS negative output channel 59
E22 OUT59_P LVDS output LVDS positive output channel 59
E23 OUT62_N LVDS output LVDS negative output channel 62
E24 OUT62_P LVDS output LVDS positive output channel 62
E25 GND Ground Ground pin
E26 VDD33 Supply 3.3 V supply
E27 GND Ground Ground pin
E28 SPI_IN Digital input SPI data input pin
E29 T_EXP2 Digital input Input pin for external exposure
E30 CLK_IN Digital input Master input clock
F1 CMDN Bias Decouple with 100 nF to GND
F2 CMDP Bias Decouple with 100 nF to VDD33
F3 CMDP_COMP18 Bias Decouple with 100 nF to VDD33
F4 DIO1 Ground Connect to ground
F5 VDD33 Supply 3.3 V supply
F6 OUT33_N LVDS output LVDS negative output channel 33
F7 OUT33_P LVDS output LVDS positive output channel 33
F8 OUT37_N LVDS output LVDS negative output channel 37
F9 OUT37_P LVDS output LVDS positive output channel 37
F10 OUT40_N LVDS output LVDS negative output channel 40
F11 OUT40_P LVDS output LVDS positive output channel 40
F12 OUT44_N LVDS output LVDS negative output channel 44
F13 OUT44_P LVDS output LVDS positive output channel 44
F14 OUT48_N LVDS output LVDS negative output channel 48
F15 OUT48_P LVDS output LVDS positive output channel 48
F16 OUT49_N LVDS output LVDS negative output channel 49
F17 OUT49_P LVDS output LVDS positive output channel 49
F18 OUT53_N LVDS output LVDS negative output channel 53
F19 OUT53_P LVDS output LVDS positive output channel 53
F20 OUT57_N LVDS output LVDS negative output channel 57
F21 OUT57_P LVDS output LVDS positive output channel 57

Document Feedback CMV12000 Pin Assignment
Datasheet • PUBLIC DS000603 • v5-00 • 2022-Feb-04 84 11
Number Name Type Description
F22 OUT60_N LVDS output LVDS negative output channel 60
F23 OUT60_P LVDS output LVDS positive output channel 60
F24 NC Not connected
F25 NC Not connected
F26 VDD33 Supply 3.3 V supply
F27 GND Ground Ground pin
F28 SPI_EN Digital input SPI enable input pin
F29 VRAMP2 Bias Start voltage second ramp (decouple with 100 nF to GND)
F30 SYS_RES_N Digital input Input pin for sequencer reset
G1 VDD_PIX Supply 3.0 V supply
G2 CMDN_OSC Bias Decouple with 100 nF to GND
G3 DIO4 Ground Connect to ground
G4 VDD_RES Supply 3.3 V supply
G5 GND Ground Ground pin
G6 OUTCLK_N LVDS output LVDS negative clock output signal
G7 OUTCLK_P LVDS output LVDS positive clock output signal
G8 OUT36_N LVDS output LVDS negative output channel 36
G9 OUT36_P LVDS output LVDS positive output channel 36
G10 OUT39_N LVDS output LVDS negative output channel 39
G11 OUT39_P LVDS output LVDS positive output channel 39
G12 OUT43_N LVDS output LVDS negative output channel 43
G13 OUT43_P LVDS output LVDS positive output channel 43
G14 OUT47_N LVDS output LVDS negative output channel 47
G15 OUT47_P LVDS output LVDS positive output channel 47
G16 OUT50_N LVDS output LVDS negative output channel 50
G17 OUT50_P LVDS output LVDS positive output channel 50
G18 OUT54_N LVDS output LVDS negative output channel 54
G19 OUT54_P LVDS output LVDS positive output channel 54
G20 OUT58_N LVDS output LVDS negative output channel 58
G21 OUT58_P LVDS output LVDS positive output channel 58
G22 OUT61_N LVDS output LVDS negative output channel 61
G23 OUT61_P LVDS output LVDS positive output channel 61
G24 OUT64_N LVDS output LVDS negative output channel 64
G25 OUT64_P LVDS output LVDS positive output channel 64
G26 TDIG2 Digital output Test pin for digital sequencer signals (do not connect)
G27 TDIG1 Digital output Test pin for digital sequencer signals (do not connect)
G28 SPI_OUT Digital output SPI data output pin
G29 VRAMP1 Bias Start voltage first ramp (decouple with 100 nF to GND)
G30 FRAME_REQ Digital input Frame request pin
H1 GND Ground Ground pin

Document Feedback CMV12000 Pin Assignment
Datasheet • PUBLIC DS000603 • v5-00 • 2022-Feb-04 84 12
Number Name Type Description
H2 CMDP_OSC Bias Decouple with 100 nF to VDD18
H3 CMDP_COMP33 Bias Decouple with 100 nF to VDD33
H4 DIO3 Ground Connect to ground
H5 VDD18 Supply 1.98 V supply
H6 GND Ground Ground pin
H7 OUT34_N LVDS output LVDS negative output channel 34
H8 OUT34_P LVDS output LVDS positive output channel 34
H9 GND Ground Ground pin
H10 VDD18 Supply 1.98 V supply
H11 OUT41_N LVDS output LVDS negative output channel 41
H12 OUT41_P LVDS output LVDS positive output channel 41
H13 OUT45_N LVDS output LVDS negative output channel 45
H14 OUT45_P LVDS output LVDS positive output channel 45
H15 VDD18 Supply 1.98 V supply
H16 VDD18 Supply 1.98 V supply
H17 OUT52_N LVDS output LVDS negative output channel 52
H18 OUT52_P LVDS output LVDS positive output channel 52
H19 OUT56_N LVDS output LVDS negative output channel 56
H20 OUT56_P LVDS output LVDS positive output channel 56
H21 GND Ground Ground pin
H22 VDD18 Supply 1.98 V supply
H23 OUT63_N LVDS output LVDS negative output channel 63
H24 OUT63_P LVDS output LVDS positive output channel 63
H25 GND Ground Ground pin
H26 VDD18 Supply 1.98 V supply
H27 GND Ground Ground pin
H28 VDD_PIX Supply 3.0 V supply
H29 SPI_CLK Digital input SPI clock input pin
H30 T_EXP1 Digital input Input pin for external exposure

Document Feedback CMV12000 Absolute Maximum Ratings
Datasheet • PUBLIC DS000603 • v5-00 • 2022-Feb-04 84 13
4 Absolute Maximum Ratings
Stresses beyond those listed under “Absolute Maximum Ratings” may cause permanent damage to
the device. These are stress ratings only. Functional operation of the device at these or any other
conditions beyond those indicated under “Operating Conditions” is not implied. Exposure to absolute
maximum rating conditions for extended periods may affect device reliability.
Figure 5:
Absolute Maximum Ratings of CMV12000
Symbol Parameter Min Max Unit Comments
Electrical Parameters
VDD18 Digital supply LVDS, ADC 1.8 2.0 V
VDD33 Analog Supply ADC, PGA 3.0 3.6 V
VDD_PIX Analog Pixel Supply 2.3 3.6 V
VDD_RES Analog Pixel Reset Supply 3.0 3.6 V
Continuous Power Dissipation (TA = 70 °C)
PT Continuous Power Dissipation 4200 mW At max. frame rate
Electrostatic Discharge
ESDHBM Electrostatic Discharge HBM ±2000 V JS-001-2012 Class 2
Temperature Ranges and Storage Conditions
TJ Operating Junction Temperature -30 70 °C
TSTRG Storage Temperature Range 20 40 °C
RHNC Relative Humidity (non-condensing)
30 60 % Storage conditions

Document Feedback CMV12000 Electrical Characteristics
Datasheet • PUBLIC DS000603 • v5-00 • 2022-Feb-04 84 14
5 Electrical Characteristics
Figure 6:
Electrical Characteristics of CMV12000
Symbol Parameter Conditions Min Typ Max Unit
Power Supplies
VDD18 Digital supply LVDS, ADC
1.95 1.98 1.98 V
VDD33 Analog supply ADC, PGA
3.2 3.3 3.4 V
VDD_PIX Analog pixel supply
2.9 3.0 3.1 V
VDD_RES Analog pixel reset supply
3.2 3.3 3.4 V
IDD18 Supply current Readout
Peak
750
1700 mA
IDD33 Supply current Readout
Peak
180
250 mA
IDD_PIX Supply current Readout
Peak
15
1000(1) mA
IDD_RES Supply current Readout
Peak
25
200 mA
Digital I/O
VIH High level Input 2.0 VDD33 V
VIL Low level input GND 0.8 V
VOH High level output VDD=3.3 V
IOH = -2 mA 2.4 V
VOL Low level output VDD=3.3 V
IOH = 2 mA 0.4 V
fSPI SPI clock 30 MHz
fCLK
Temp. sensor(2)
input clock 10 60 MHz
LVDS I/O
VID Differential input voltage
Steady state 100 350 600 mV
VIC Receiver input range
Steady state 0.0 2.4 V

Document Feedback CMV12000 Electrical Characteristics
Datasheet • PUBLIC DS000603 • v5-00 • 2022-Feb-04 84 15
Symbol Parameter Conditions Min Typ Max Unit
IID Receiver input current
VINP|INN=1.2 V±50 mV, 0 ≤ VINP|INN ≤ 2.4 V
20 µA
ΔIID Receiver input current difference
|IINP – IINN| 6 µA
VOD Differential output voltage
Steady state, Rload= 100 Ω
247 350 454 mV
ΔVOD
Difference in VOD between complementary output states
Steady state, Rload = 100 Ω
50 mV
VOC Common mode voltage
Steady state, Rload = 100 Ω
1.125 1.25 1.375 V
ΔVOC
Difference in VOC between complementary output states
Steady state, Rload = 100 Ω
50 mV
IOS,GND Output short circuit current to ground
VOUTP=VOUTN=GND 24 mA
IOS,PN Output short circuit current
VOUTP=VOUTN 12 mA
fLVDS LVDS input clock frequency
100 600 MHz
(1) This is a short peak during FOT, at the global shutter reset of all pixels. This peak has to be supplied by enough
decoupling capacitors.
(2) Optional input clock at pin CLK_IN for the temperature sensor

Document Feedback CMV12000 Typical Operating Characteristics
Datasheet • PUBLIC DS000603 • v5-00 • 2022-Feb-04 84 16
6 Typical Operating Characteristics
6.1 Electro-Optical Characteristics
Below are the typical electro-optical specifications of the CMV12000. These are typical values for the
whole operating temperature range unless otherwise specified.
Figure 7:
Electro-Optical Characteristics
Parameter Value Remark
Effective pixels 4096 × 3072
Pixel pitch 5.5 µm × 5.5 µm
Optical format APS-like 28.16 mm
Pixel type Global shutter with true CDS
Allows fixed pattern noise correction and reset (kTC) noise canceling by true correlated double sampling (true-CDS).
Shutter type Pipelined global shutter
Exposure of next image during readout of the previous image.
Full well charge 13500 e Pixel full well charge
Conversion gain 0.11 DN/e 10b, unity gain
Sensitivity 4.64 V/lux.s
0.22 A/W @555 nm
Temporal noise 13 e
Dynamic range 60 dB
SNRMAX 41.3 dB
Shutter efficiency 1/50000 @555 nm
Dark current 70 e/s @ 25 °C junction temperature
DC doubles every 6.5 °C increase
DCNU 7.5 e/s @ 25°C sensor temperature; DC Non Uniformity
FPN <1 LSB <0.1 % of full swing in 10b mode; Fixed Pattern Noise
PRNU < 1.27 % RMS Photo Response Non Uniformity; RMS of signal
Color filters Optional RGB Bayer pattern
QE 50 % Monochrome device @ 555 nm; Quantum Efficiency
LVDS outputs
64 Data
1 Control
1 Clock
Each data output running @600 Mbit/s maximum.
Less outputs selectable at reduced frame rate
Frame rate 300 fps Using 10-bit mode at 600 Mbit/s
Higher frame rate possible in row windowing mode.
Timing generation On-chip Possibility to control exposure time through external pin.
PGA Yes x1, x2, x3, x4 analog gain settings
Programmable registers
Sensor parameters
Window coordinates, Timing parameters, Gain & offset, Exposure time,
Document Feedback CMV12000 Typical Operating Characteristics
Datasheet • PUBLIC DS000603 • v5-00 • 2022-Feb-04 84 17
Parameter Value Remark
HDR mode Interleaved
Multiple slope
2 exposure times for odd/even columns
Partial pixel reset
ADC 8/10/12-bit Column ADC
Interface LVDS; 600 Mbit/s Serial output data + synchronization signals
I/O logic levels LVDS = 1.8 V
Dig. I/O = 3.3 V
Cover glass D263T eco Double sided AR coating
T≥97.0 % abs, 400 - 900 nm, per surface, AOI=15°
Mass 15.2 g
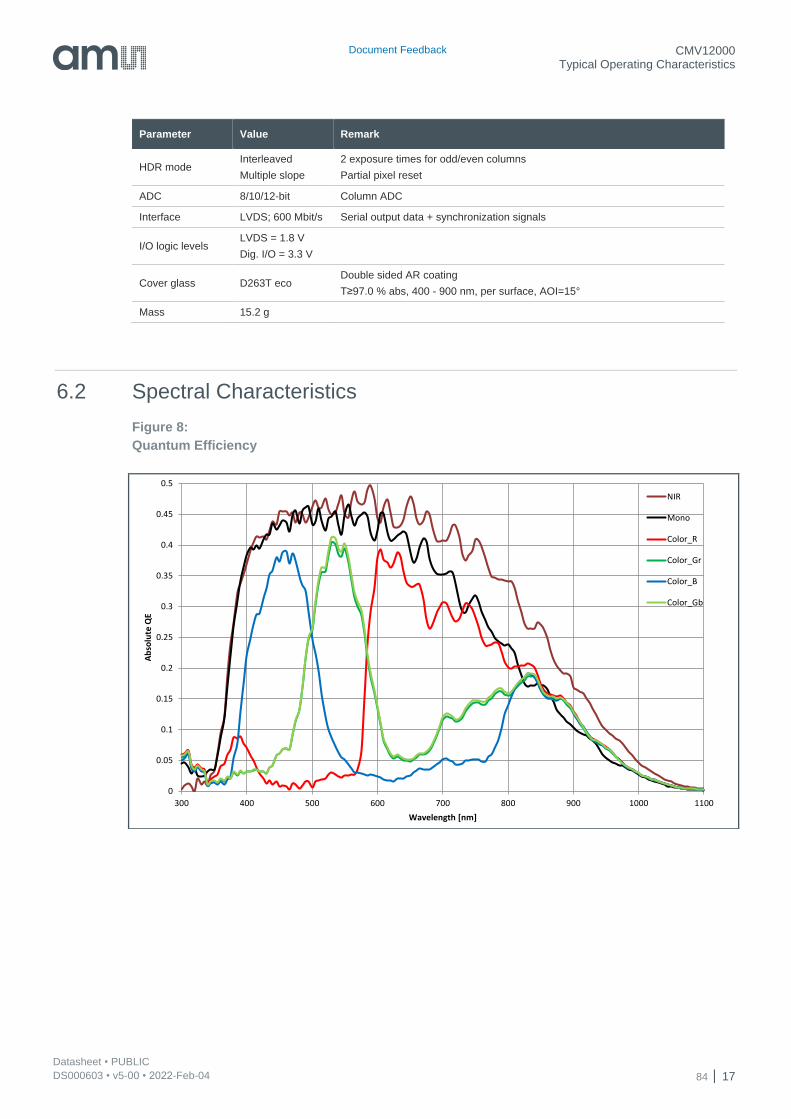
6.2 Spectral Characteristics
Figure 8:
Quantum Efficiency
0
0.05
0.1
0.15
0.2
0.25
0.3
0.35
0.4
0.45
0.5
300 400 500 600 700 800 900 1000 1100
Ab
solu
te Q
E
Wavelength [nm]
NIR
Mono
Color_R
Color_Gr
Color_B
Color_Gb

Document Feedback CMV12000 Typical Operating Characteristics
Datasheet • PUBLIC DS000603 • v5-00 • 2022-Feb-04 84 18
Figure 9:
Spectral Response
Figure 10:
Angular Response
0
0.05
0.1
0.15
0.2
0.25
0.3
300 400 500 600 700 800 900 1000 1100
Spe
ctra
l re
spo
nse
[A
/W]
Wavelength [nm]
NIR
Mono
Color_R
Color_Gr
Color_B
Color_Gb
0
10
20
30
40
50
60
70
80
90
100
-45 -40 -35 -30 -25 -20 -15 -10 -5 0 5 10 15 20 25 30 35 40 45
Re
lati
ve r
esp
on
se [
%]
Incmoming light angle [°]
Vertical
Horizontal

Document Feedback CMV12000 Functional Description
Datasheet • PUBLIC DS000603 • v5-00 • 2022-Feb-04 84 19
7 Functional Description
7.1 Sensor Architecture
Figure 2 shows the image sensor architecture. The internal sequencer generates the necessary
signals for image acquisition. The image is stored in the pixel (global shutter) and they are read out
sequentially, row-by-row. On the pixel output, an analog gain is possible. The pixel values then passes
to a column ADC cell, in which ADC conversion is performed. The digital signals are then read out
over multiple LVDS channels. Each LVDS channel reads out 128 adjacent columns of the array. The
read-out of the pixel array is performed on both sides (top and bottom) of the pixel array to speed up
the read-out process and achieve the frame rate of 300 fps at full resolution and 10-bit. In each line
read-out cycle, two lines are selected for read-out. In the Y-direction, rows of interest are selected
through a row-decoder, which allows a flexible windowing. Control registers are foreseen for the
programming of the sensor. These register parameters are uploaded via a four-wire SPI interface. A
temperature sensor, which can be read out over the SPI interface, is also included.
7.1.1 Pixel Array
The pixel array consists of 4096 x 3072 square global shutter pixels with a pitch of 5.5 μm (5.5 μm x
5.5 μm). This results in an optical area of 22.5 mm x 16.9 mm (28.1 mm diameter).
The pixels are designed to achieve maximum sensitivity with low noise (using CDS) and low PLS
specifications. Micro lenses are placed on top of the pixels for improved fill factor and quantum
efficiency.
There are 16 dark reference columns available on the sensor (columns 0 to 7 and 4088 to 4095)
which can be enabled/disabled by programming the appropriate sensor register.
7.1.2 Analog Front End
The analog front end consists of two major parts, a column amplifier block and a column ADC block.
The column amplifier prepares the pixel signal for the column ADC and applies analog gain if desired
(programmable using the SPI interface). The column ADC converts the analog pixel value to an 8-, 10-
or 12-bit value and can apply a gain. A digital offset can also be applied to the output of the column
ADCs. All gain and offset settings can be programmed using the SPI interface.
7.1.3 LVDS Block
The LVDS block converts the digital data coming from the column ADC into standard serial LVDS data
running at maximum 600 Mbit/s. The sensor has 66 LVDS output pairs:

Document Feedback CMV12000 Functional Description
Datasheet • PUBLIC DS000603 • v5-00 • 2022-Feb-04 84 20
64 Data channels
1 Control channel
1 Clock channel
The 64 data channels are used to transfer 8-bit, 10-bit or 12-bit data words from sensor to receiver.
The output clock channel transports a DDR clock (max 300 MHz), synchronous to the data on the
other LVDS channels. This clock can be used at the receiving end to sample the data. The data on the
control channel contains status information on the validity of the data on the data channels, among
other useful sensor status information. Details on the LVDS timing and format can be found in section
7.3 of this document.
7.1.4 Sequencer
The on-chip sequencer will generate all required control signals to operate the sensor from only a few
external control signals. This sequencer can be activated and programmed through the SPI interface.
7.1.5 SPI Interface
The SPI interface is used to load the sequencer registers with data. The data in these registers is used
by the sequencer while driving and reading out the image sensor. Features like windowing,
subsampling, gain and offset are programmed using this interface. The data in the on-chip registers
can also be read back for test and debug of the surrounding system.
7.1.6 Temperature Sensor
A 16-bit digital temperature sensor is included in the image sensor and can be controlled by the SPI-
interface. The on-chip temperature can be obtained by reading out the register with address 127.
7.2 Operating the Sensor
This section explains how to connect and power the sensor, as well as basic recipes of how to
configure the sensor in a certain operation mode.
Information
All register values are in decimal notation unless otherwise specified.
7.2.1 Power Supplies
To power the sensor, five externally generated supplies are required (VDD18, VDD33, VDD_PIX and
VDD_RES).

Document Feedback CMV12000 Functional Description
Datasheet • PUBLIC DS000603 • v5-00 • 2022-Feb-04 84 21
It is recommended to decouple every physical supply pin at the sensor with a 100 nF ceramic
capacitor per pin. As VDD18 and VDD_PIX draw large peak currents it is also recommended to add a
larger (>10 µF) local capacitor close to the sensor for those supplies. At the voltage regulator side also
enough bulk decoupling has to be foreseen.
VDD18 draws its peak current every read out line. The peak current decreases with lower data rates.
Care has to be taken in the supply and decoupling design so that VDD18 is always above 1.93 V
during these peaks (so max. 50 mV dip) to guarantee sensor performance. The voltage regulator
should be able to handle the 1.7 A.
VDD_PIX draws a short but large peak current during FOT. Care has to be taken in the supply and
decoupling design so that VDD_PIX is always above 2.9 V during these peaks (so max. 100 mV dip)
to guarantee sensor performance. The peak current should be handled by the decoupling capacitors,
not the voltage regulator.
For VDD33 and VDD_RES the peak currents are lower, but still care has to be taken not allowing the
voltages dips outside the voltage range.
The voltage required is the voltage on the supplies to guarantee the best sensor performance. The
voltage range is the range the voltage should stay within (so during current peaks) to guarantee
sensor performance. If the supply is outside the voltage range, the sensor might still be functional but
performance is not guaranteed. The voltage absolute maximum is the range outside which
(permanent) sensor malfunction might occur.
For more details on the power figures and peak plots, an application note is available. This supply
needs therefor decent decoupling to dampen the current peak.
The sensor will heat up above ambient (+ ~20/40 °C idle/running at 600 MHz). Therefore decent
system heat management is needed to keep the sensor junction temperature below the specifications
limit of 70 °C.
7.2.2 Biasing
For optimal performance, some bias pins need to be decoupled to ground or to VDD. Please refer to
the pin list for a detailed description for every pin and the appropriate decoupling.
7.2.3 Digital Input Pins
The table below gives an overview of the external pins used to operate the sensor.
Figure 11:
Digital Input Pins
Pin Name Description
CLK_IN Optional input clock, frequency range between 10 MHz and 60 MHz. Only needed for the internal temperature sensor.

Document Feedback CMV12000 Functional Description
Datasheet • PUBLIC DS000603 • v5-00 • 2022-Feb-04 84 22
Pin Name Description
LVDS_CLK_P/N Input clock, frequency range between 100 MHz and 600 MHz, depending on the bit mode.
SYS_RES_N System reset pin, active low signal. Resets the on-board sequencer and must be kept low during start-up
FRAME_REQ Frame request pin. When a high state is detected on this pin, the programmed number of frames is captured and sent by the sensor. The pulse should be at least 8, 10 or 12 * LVDS input clock periods wide to be detected, depending on the used bit mode.
SPI_IN Data input pin for the SPI interface. The data to program the image sensor is sent over this pin.
SPI_EN SPI enable pin. When this pin is high the data should be written/read on the SPI
SPI_CLK SPI clock. This is the clock on which the SPI runs (max 30 MHz)
T_EXP1 Input pin, which can be used to program the exposure time externally. The pulse should be at least 8, 10 or 12 * LVDS input clock periods wide to be detected, depending on the used bit mode. Optional
T_EXP2 Input pin, which can be used to program the exposure time externally in interleaved high dynamic range mode. The pulse should be at least 8, 10 or 12 * LVDS input clock periods wide to be detected, depending on the used bit mode. Optional
7.2.4 Clocking
The LVDS input clock defines the output data rate of the CMV12000. The maximum data rate of the
output is 600 Mbit/s (DDR 300MHz output clock) which results in an input LVDS_CLK clock of
600 MHz. The minimum LVDS_CLK_P/N frequency is 100 MHz for 12-bit, 10-bit and 8-bit. At lower
frequencies, image performance will decrease. Any input frequency (min < f < max) applied (in MHz)
will result in a corresponding output data rate (in Mbit/s). Some register settings need to be changed
when changing the input clock frequency from 600 MHz. See section 7.7.4.
7.2.5 Startup Sequence
The following sequence should be followed when the device is started up.
Figure 12:
Startup Sequence
1μs
1μs
Stable time
Supply
LVDS_CLK
SYS_RES_N
FRAME_REQ

Document Feedback CMV12000 Functional Description
Datasheet • PUBLIC DS000603 • v5-00 • 2022-Feb-04 84 23
The LVDS input clock should only start after the rise time of the supplies. The external reset pin
should be released at least 1μs after the supplies have become stable. The first frame can be
requested 1 μs after the reset pin has been released. An optional SPI upload (to program the
sequencer) is possible 1 μs after the reset pin has been released. In this case, the FRAME_REQ
pulse must be postponed until after the SPI upload has been completed.
7.2.6 Reset Sequence
If a sensor reset is necessary while the sensor is running, the next sequence should be followed.
Figure 13:
Reset Sequence
The on-board sequencer will be reset and all programming registers will return to their default start-up
values when a falling edge is detected on the SYS_RES_N pin. After the reset there is a minimum
time of 1 μs needed, before a FRAME_REQ pulse can be sent.
When a switch from 12-bit to 10-bit or 8-bit mode (or vice versa) is necessary, the following sequence
should be followed.
Figure 14:
Reset Sequence with Changing Bit Mode
The following SPI register should be uploaded in this mode: Bit_mode (address 118): set to desired bit
resolution mode.
1μs
LVDS_CLK
SYS_RES_N
FRAME_REQ
1μs
LVDS_CLK
SYS_RES_N
FRAME_REQ
Bit mode settingsSPI upload
1μs

Document Feedback CMV12000 Functional Description
Datasheet • PUBLIC DS000603 • v5-00 • 2022-Feb-04 84 24
7.2.7 SPI Programming
Programming the sensor is done by writing the appropriate values to the on-board registers. These
registers can be written over a simple serial interface (SPI). The details of the timing and data format
are described below. The data written to the programming registers can also be read out over this
same SPI interface.
SPI I/O’s are pulled low when not used/enabled.
SPI Write
The timing to write data over the SPI interface can be found below.
Figure 15:
SPI Write
The data is sampled by the device on the rising edge of the SPI_CLK and read-in at the last falling
SPI_CLK edge. The SPI_CLK has a maximum frequency of 30 MHz. The SPI_EN signal has to be
high for half a clock period before the first data bit is sampled. SPI_EN has to remain high for one
clock period after the last data bit is sampled.
One write action contains 24 data bits:
One control bit: First bit to be sent, indicates whether a read (‘0’) or write (‘1’) will occur on the
SPI interface.
7 address bits: These bits form the address of the programming register that needs to be
written. The address is sent MSB first.
16 data bits: These bits form the actual data that will be written in the register selected with the
address bits. The data is written MSB first.
When several sensor registers need to be written, the timing above can be repeated with SPI_EN
remaining high all the time. See the figure below for an example of 2 registers being written.
Figure 16:
SPI Write of Multiple Registers
SPI_EN
SPI_IN
SPI_CLK
C=’1' A6 A5 A4 A3 A2 A1 A0 D15 D14 D13 ... D3 D2 D1 D0
½ CLK 1 CLK
...
SPI_EN
SPI_IN
SPI_CLK
C=’1' A6 A5 A4 A3 A2 A1 A0 D15 D14 D13 ... D3 D2 D1 D0 C=’1' A6 A5 A4 A3 A2 A1 A0 D15 D14 D13 ... D3 D2 D1 D0
½ CLK 1 CLK
... ...

Document Feedback CMV12000 Functional Description
Datasheet • PUBLIC DS000603 • v5-00 • 2022-Feb-04 84 25
SPI Read
The timing to read data from the registers over the SPI interface can be found below.
Figure 17:
SPI Read
To indicate a read action over the SPI interface, the control bit on the SPI_IN pin is made ‘0’. The
address of the register being read out is sent immediately after this control bit (MSB first). After the
LSB of the address bits, the data is launched on the SPI_OUT pin on the falling edge of the SPI_CLK
with an 8 ns delay (independent of SPI or sensor clock speeds). This means that the data can be
sampled by the receiving system on the rising edge of the SPI_CLK. The data comes over the
SPI_OUT with MSB first.
7.2.8 Requesting a Frame
After starting up the sensor, a number of frames can be requested by sending a FRAME_REQ pulse.
The number of frames can be set by programming the appropriate register (address 80). The default
number of frames to be grabbed is 1.
In internal exposure mode, the exposure time will start after this FRAME_REQ pulse. In the external
exposure mode, the read-out will start after the FRAME_REQ pulse. Both modes are explained into
detail in the sections below.
Internal Exposure Control
In this mode, the exposure time is set by programming the appropriate register (addresses 71-72) of
the device.
After the high state of the FRAME_REQ pulse is detected, the exposure time will start immediately.
When the exposure time ends (as programmed in the registers), the pixels are being sampled and
prepared for read-out. This sequence is called the frame overhead time (FOT). Immediately after the
FOT, the frame is read out automatically. If more than one frame is requested, the exposure of the
next frame starts already during the read-out of the previous one. See the diagram below for more
details.
SPI_EN
SPI_IN
SPI_CLK
C= 0' A6 A5 A4 A3 A2 A1 A0
D15 D14 D13 D12 D11 D10 D9 D8SPI_OUT
½ CLK 1 CLK
8ns
D7 D6 D5 D4 D3 D2 D1 D0
Document Feedback CMV12000 Functional Description
Datasheet • PUBLIC DS000603 • v5-00 • 2022-Feb-04 84 26
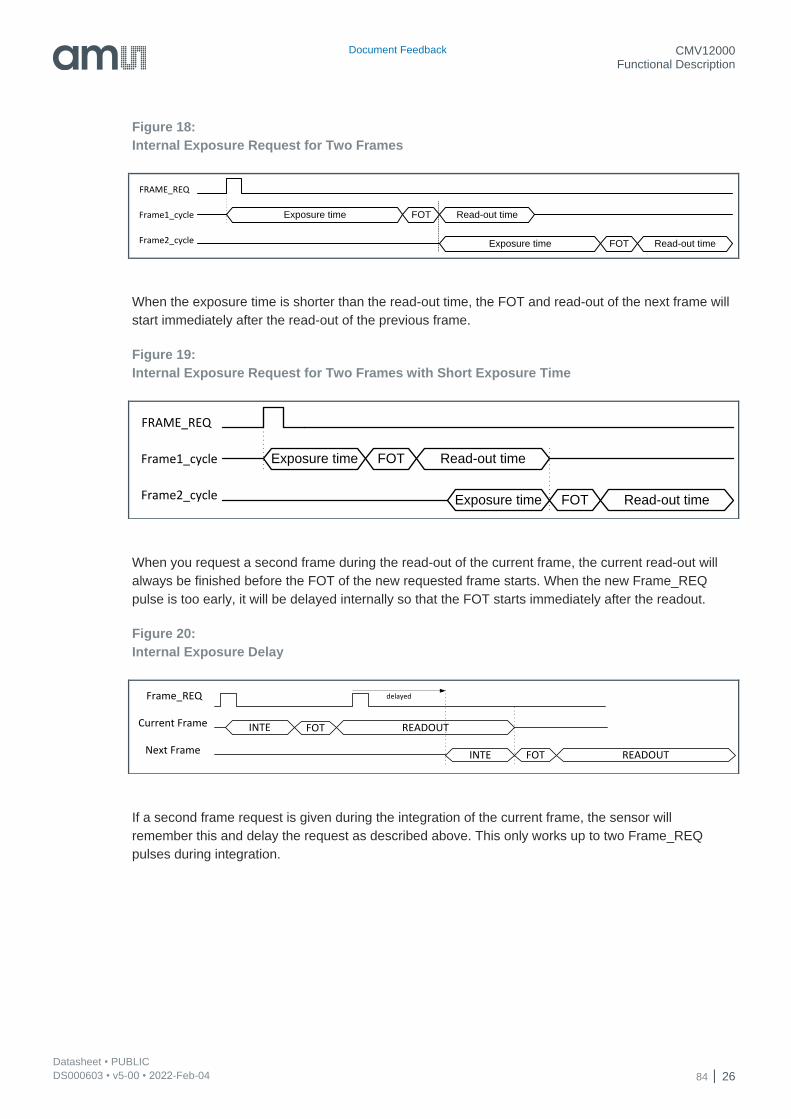
Figure 18:
Internal Exposure Request for Two Frames
When the exposure time is shorter than the read-out time, the FOT and read-out of the next frame will
start immediately after the read-out of the previous frame.
Figure 19:
Internal Exposure Request for Two Frames with Short Exposure Time
When you request a second frame during the read-out of the current frame, the current read-out will
always be finished before the FOT of the new requested frame starts. When the new Frame_REQ
pulse is too early, it will be delayed internally so that the FOT starts immediately after the readout.
Figure 20:
Internal Exposure Delay
If a second frame request is given during the integration of the current frame, the sensor will
remember this and delay the request as described above. This only works up to two Frame_REQ
pulses during integration.
FRAME_REQ
Exposure timeFrame1_cycle FOT Read-out time
Exposure timeFrame2_cycle FOT Read-out time
FRAME_REQ
Frame1_cycle FOT Read-out time
Exposure timeFrame2_cycle FOT Read-out time
Exposure time
FOT READOUTINTE
FOT READOUT
Frame_REQ
INTE
delayed
Current Frame
Next Frame

Document Feedback CMV12000 Functional Description
Datasheet • PUBLIC DS000603 • v5-00 • 2022-Feb-04 84 27
Figure 21:
Internal Exposure Delay 2
When keeping the Frame_REQ pin continuously high, the sensor will continuously read out frames at
the maximum achievable frame rate.
Figure 22:
Internal Continuous Exposure
External Exposure Control
The exposure time can also be programmed externally by using the T_EXP1 (and T_EXP2) input pin.
This mode needs to be enabled by setting the appropriate register (address 70[0]). In this case, the
exposure starts when a high state is detected on the T_EXP1 pin. When a high value is detected on
the FRAME_REQ input, the exposure time stops and the read-out will start automatically. A new
exposure can start by sending a pulse to the T_EXP1 pin during or after the read-out of the previous
frame.
Figure 23:
External Exposure Request for Two Frames
When the exposures stops too soon (by giving a Frame_REQ pulse during read-out), the current read-
out will be finished normally and the exposure time will be extended so that the FOT starts
immediately after the read-out.
FOT READOUTINTE
FOT READOUT
Frame_REQ
INTE
delayed
Current Frame
Next Frame
FOT READOUTINTE
FOT READOUT
Frame_REQ
INTE
Current Frame
Next Frame
FRAME_REQ
Exposure timeFrame1_cycle FOT Read-out time
Exposure timeFrame2_cycle FOT Read-out time
T_EXP1
Document Feedback CMV12000 Functional Description
Datasheet • PUBLIC DS000603 • v5-00 • 2022-Feb-04 84 28
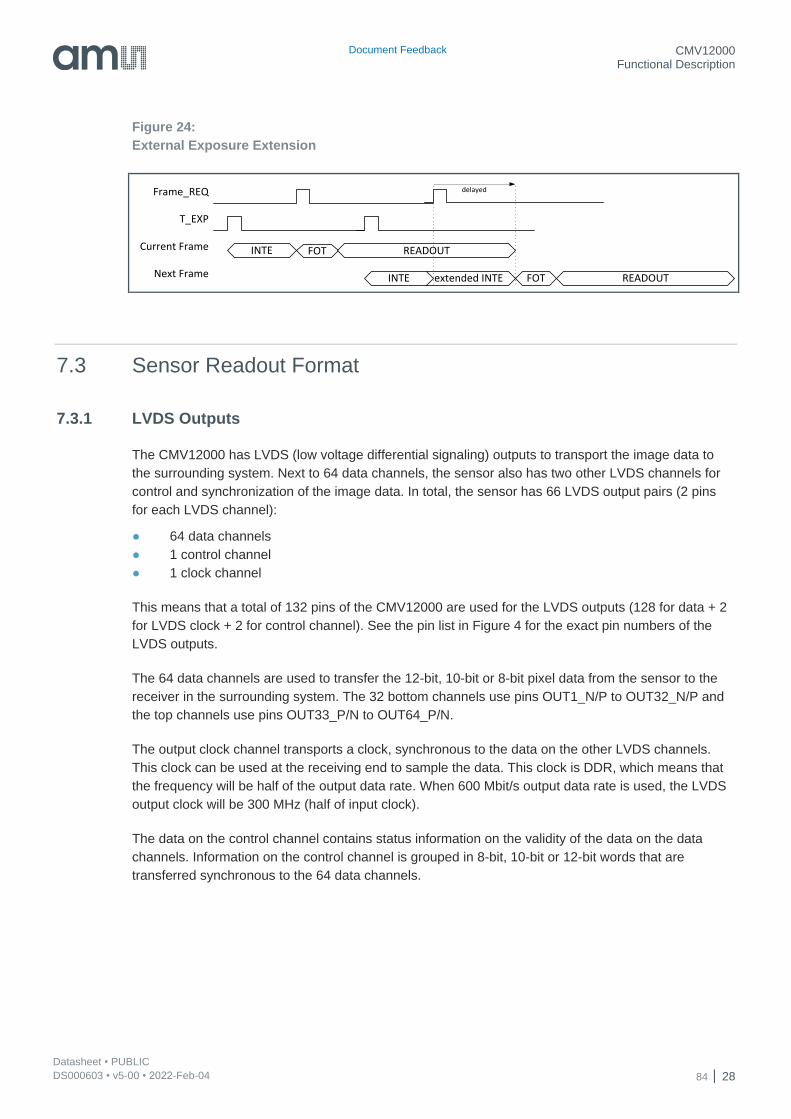
Figure 24:
External Exposure Extension
7.3 Sensor Readout Format
7.3.1 LVDS Outputs
The CMV12000 has LVDS (low voltage differential signaling) outputs to transport the image data to
the surrounding system. Next to 64 data channels, the sensor also has two other LVDS channels for
control and synchronization of the image data. In total, the sensor has 66 LVDS output pairs (2 pins
for each LVDS channel):
64 data channels
1 control channel
1 clock channel
This means that a total of 132 pins of the CMV12000 are used for the LVDS outputs (128 for data + 2
for LVDS clock + 2 for control channel). See the pin list in Figure 4 for the exact pin numbers of the
LVDS outputs.
The 64 data channels are used to transfer the 12-bit, 10-bit or 8-bit pixel data from the sensor to the
receiver in the surrounding system. The 32 bottom channels use pins OUT1_N/P to OUT32_N/P and
the top channels use pins OUT33_P/N to OUT64_P/N.
The output clock channel transports a clock, synchronous to the data on the other LVDS channels.
This clock can be used at the receiving end to sample the data. This clock is DDR, which means that
the frequency will be half of the output data rate. When 600 Mbit/s output data rate is used, the LVDS
output clock will be 300 MHz (half of input clock).
The data on the control channel contains status information on the validity of the data on the data
channels. Information on the control channel is grouped in 8-bit, 10-bit or 12-bit words that are
transferred synchronous to the 64 data channels.
FOT READOUTINTE
FOT READOUT
T_EXP
Frame_REQ
extended INTEINTE
delayed
Current Frame
Next Frame

Document Feedback CMV12000 Functional Description
Datasheet • PUBLIC DS000603 • v5-00 • 2022-Feb-04 84 29
7.3.2 Low-Level Readout Format
The data is transferred LSB first, with the transfer of bit D[0] during the high phase of the DDR output
clock. An example of 10b mode is shown below for the P-channel of one LVDS channel. T1 is the
period of the input clock (600 MHz input clock = 300 MHz output clock).
Figure 25:
10b Pixel Data on an LVDS Channel
7.3.3 Pixel Readout Format
The read-out of image data is grouped in bursts of 128 pixels per channel (2 rows at the same time via
top and bottom outputs). Each pixel is 8, 10 or 12 bits wide. For details on pixel remapping and pixel
vs. channel location please see section 7.3.4. An overhead time exists between two bursts of 128
pixels. This overhead time has the length of one pixel read-out (i.e. the length of 8, 10 or 12 bits at the
selected data rate).
Please note that depending on the bit mode (8-bit, 10-bit or 12-bit) and read-out mode (subsampling,
binning…), the actual timing of the image data may differ from one mode to another. The sections
below show the relative location of the pixel data only.
The sensor is designed to be used with both sides (bottom and top) simultaneously. There is a “one
side mode” where only one side (bottom) can be used to read out data, but binning and subsampling
in X and Y direction are not supported in this mode.
The sensor is able to send all pixel data over fewer channels. The overview of which outputs are used
when multiplexing to fewer outputs is shown below.
Figure 26:
Channel Muxing Overview
D(8) D(9) D(0) D(1) D(2) D(3) D(4) D(5) D(6) D(7) D(8) D(9) D(0) D(1) D(2) D(3)
T1LVDS_CLOCK
_OUT
DATA_OUT
OUT OUT OUT OUT OUT OUT OUT OUT OUT OUT OUT OUT OUT OUT OUT OUT OUT OUT OUT OUT OUT OUT OUT OUT OUT OUT OUT OUT OUT OUT OUT OUT
1 2 3 4 5 6 7 8 9 10 11 12 13 14 15 16 17 18 19 20 21 22 23 24 25 26 27 28 29 30 31 32
32 x x x x x x x x x x x x x x x x x x x x x x x x x x x x x x x x
16 x x x x x x x x x x x x x x x x
8 x x x x x x x x
4 x x x x
2 x x
1 x
OUT OUT OUT OUT OUT OUT OUT OUT OUT OUT OUT OUT OUT OUT OUT OUT OUT OUT OUT OUT OUT OUT OUT OUT OUT OUT OUT OUT OUT OUT OUT OUT
33 34 35 36 37 38 39 40 41 42 43 44 45 46 47 48 49 50 51 52 53 54 55 56 57 58 59 60 61 62 63 64
32 x x x x x x x x x x x x x x x x x x x x x x x x x x x x x x x x
16 x x x x x x x x x x x x x x x x
8 x x x x x x x x
4 x x x x
2 x x
1 x

Document Feedback CMV12000 Functional Description
Datasheet • PUBLIC DS000603 • v5-00 • 2022-Feb-04 84 30
By default, all 64 data output channels are used to transmit the image data. This means that two entire
rows of image data are transferred (one using the top outputs and one using the bottom outputs) in
one slot of 128 pixel periods (64 x 128 = 8192). Next figure shows the timing for the top and bottom
LVDS channels. The bottom channels read out the odd rows (start at 1) and the top channels read out
the even rows.
Figure 27:
Data Output Timing with 64 (2x32) Channels
Only when 64 data outputs, running at 600 Mbit/s in 10b mode are used, the frame rate of 300 fps can
be achieved.
Using less output channels, this can be programmed with register 81. In this multiplexed mode, the
read-out of one row takes N × 128 periods (but two rows will be sent out at the same time). N = 1, 2, 3
… for 32, 16, 8 … channels per side. Each block of 128 pixels (=DVAL) is separated by one OH, while
each row of pixels (=LVAL) is separated by a longer OH (depending on the number of outputs and
sides, subsampling and binning).
Next figure shows the timing when multiplexing to 16 channels on each side.
Figure 28:
Data Output Timing With 2x16 Channels
When using the ‘one side mode’, each row is readout by the bottom outputs following the pattern in
the figure below.
Figure 29:
One Side Readout Mode With 32 (1x32) Channels
IDLE OH 128 OHDATA_OUT_BOTTOM 128 OH 128
Row 1 Row3 Row5
OH 128
Row7
IDLE OH 128 OHDATA_OUT_TOP 128 OH 128
Row2 Row4 Row62x32CH
OH 128
Row8
IDLE OH 128 OHDATA_OUT_TOP 128 OH 128
Row2 Row4
OH 128 OH 128 OH 128
Row62x16CH
OH 128 OH 128
Row8
IDLE OH 128 OHDATA_OUT_BOTTOM 128 OH 128
Row 1 Row3
OH 128 OH 128 OH 128
Row5
OH 128 OH 128
Row7
IDLE OH 128 OHDATA_OUT_BOTTOM 128 OH 128
Row 1 Row 2 Row 4
1x32CH
OH 128
Row 3

Document Feedback CMV12000 Functional Description
Datasheet • PUBLIC DS000603 • v5-00 • 2022-Feb-04 84 31
7.3.4 Pixel Remapping
Depending on the number of output channels, the pixels are located at different channels and are read
out at a different moment in time. With the details from the next sections, the end user is able to remap
the pixels on the outputs to their correct image array location.
Two Sided Readout Mode
Below are two examples of the pixel mapping when using 2 × 32 channels and 2 × 16 channels. It will
be similar for less channels.
64 bursts (2 × 32) of 128 pixels happen in parallel on the data outputs. This means that two complete
rows are read out in one burst; the odd rows via the bottom channels, the even rows via the top
channels. The amount of rows that will be read out depends on the value in the corresponding
register. By default there are 3072 rows read out.
Figure 30:
Pixel Mapping Using 2 x 32 Channels
When 2 × 16 output mode is used, the pixel data is placed on the outputs as detailed in the figure
below. 16 bursts of 128 pixels happen in parallel on the data outputs on both sides simultaneous (16
on the top and 16 on the bottom outputs); the odd rows via the bottom channels, the even rows via the
top channels. This means that one complete row one each side is read out in two burst (so effectively
two rows are read-out in two bursts).
The time needed to read out two rows is doubled compared to when 64 outputs are used. The even
LVDS channels are not being used in this case, so they can be turned off by setting the correct bits in
IDLE Pixel 0 to 127Channel 1
IDLEChannel 2
Row 1
Pixel 128 to 255
IDLEChannel 31 Pixel 3840 to 3967
IDLEChannel 32 Pixel 3968 to 4095
Pixel 0 to 127
Row 3
Pixel 128 to 255
Pixel 3840 to 3967
Pixel 3968 to 4095
IDLE Pixel 0 to 127Channel 33
IDLEChannel 34
Row 2
Pixel 128 to 255
IDLEChannel 63 Pixel 3840 to 3967
IDLEChannel 64 Pixel 3968 to 4095
Pixel 0 to 127
Row 4
Pixel 128 to 255
Pixel 3840 to 3967
Pixel 3968 to 4095
2x32CH

Document Feedback CMV12000 Functional Description
Datasheet • PUBLIC DS000603 • v5-00 • 2022-Feb-04 84 32
the register with addresses 92-93. Turning off these channels will reduce the power consumption of
the chip. The amount of rows that will be read out depends on the value in the corresponding register.
By default there are 3072 rows being read out.
Figure 31:
Pixel Mapping Using 2 x 16 Channels
One Sided Readout Mode
When only one side is used, the pixel data is placed on the outputs as detailed in the figure below
(example of 1 × 32 and 1 × 16). N bursts of 128 pixels happen in parallel on the data outputs. This
means that one complete row is read out in one burst. The rows will be read out following the pattern:
row 1, row 2, row 4, row 3, row 5, row 6, row 8, row 7… So every 3rd and 4th row are switched.
The time needed to read out two rows is doubled compared to when 64 outputs are used. The top
LVDS channels are not being used in this mode, so they can be turned off by setting the correct bits in
the register with addresses 92-93. Turning off these channels will reduce the power consumption of
the chip. The amount of rows that will be read out depends on the value in the corresponding register.
By default there are 3072 rows read out.
IDLE Pixel 0 to 127Channel 1
IDLEChannel 3
Row 1
Pixel 256 to 383
IDLEChannel 29 Pixel 3584 to 3711
IDLEChannel 31 Pixel 3840 to 3967
Pixel 128 to 255
Pixel 384 to 511
Pixel 3712 to 3839
Pixel 3968 to 4095
IDLE Pixel 0 to 127Channel 33
IDLEChannel 35
Row 2
Pixel 256 to 383
IDLEChannel 61 Pixel 3584 to 3711
IDLEChannel 63 Pixel 3840 to 3967
Pixel 128 to 255
Pixel 384 to 511
Pixel 3712 to 3839
Pixel 3968 to 4095
2x16CH
Pixel 0 to 127
Row 3
Pixel 256 to 383
Pixel 3584 to 3711
Pixel 3840 to 3967
Pixel 128 to 255
Pixel 384 to 511
Pixel 3712 to 3839
Pixel 3968 to 4095
Pixel 0 to 127
Row 4
Pixel 256 to 383
Pixel 3584 to 3711
Pixel 3840 to 3967
Pixel 128 to 255
Pixel 384 to 511
Pixel 3712 to 3839
Pixel 3968 to 4095

Document Feedback CMV12000 Functional Description
Datasheet • PUBLIC DS000603 • v5-00 • 2022-Feb-04 84 33
Figure 32:
Pixel Mapping Using 1 x 32 Channels
Figure 33:
Pixel Mapping Using 1 x 16 Channels
7.3.5 Control Channel
The CMV12000 has one LVDS output channel dedicated for the valid data synchronization and timing
of the output channels. The end user must use this channel to know when valid image data or training
data is available on the data output channels.
The control channel transfers status information in 8-bit, 10-bit or 12-bit word format. Every bit of the
word has a specific function. Next table describes the function of the individual bits.
IDLE Pixel 0 to 127Channel 1
IDLEChannel 2
Row 1
Pixel 128 to 255
IDLEChannel 3 Pixel 256 to 383
IDLEChannel 31 Pixel 3840 to 3967
IDLEChannel 32 Pixel 3968 to 4095
Pixel 0 to 127
Row 2
Pixel 128 to 255
Pixel 256 to 383
Pixel 3840 to 3967
Pixel 3968 to 4095
1x32CH
Pixel 0 to 127
Row 4
Pixel 128 to 255
Pixel 256 to 383
Pixel 3840 to 3967
Pixel 3968 to 4095
Pixel 0 to 127
Row 3
Pixel 128 to 255
Pixel 256 to 383
Pixel 3840 to 3967
Pixel 3968 to 4095
IDLE Pixel 0 to 127Channel 1
IDLEChannel 3
Row 1
Pixel 256 to 383
IDLEChannel 5 Pixel 512 to 639
IDLEChannel 29 Pixel 3584 to 3711
IDLEChannel 31 Pixel 3840 to 3967
Pixel 128 to 255
Pixel 384 to 511
Pixel 640 to 767
Pixel 3712 to 3839
Pixel 3968 to 4095
Pixel 0 to 127
Row 2
Pixel 256 to 383
Pixel 512 to 639
Pixel 3584 to 3711
Pixel 3840 to 3967
Pixel 128 to 255
Pixel 384 to 511
Pixel 640 to 767
Pixel 3712 to 3839
Pixel 3968 to 4095
1x16CH
Pixel 0 to 127
Row 4
Pixel 256 to 383
Pixel 512 to 639
Pixel 3584 to 3711
Pixel 3840 to 3967
Pixel 128 to 255
Pixel 384 to 511
Pixel 640 to 767
Pixel 3712 to 3839
Pixel 3968 to 4095
Pixel 0 to 127
Row 3
Pixel 256 to 383
Pixel 512 to 639
Pixel 3584 to 3711
Pixel 3840 to 3967
Pixel 128 to 255
Pixel 384 to 511
Pixel 640 to 767
Pixel 3712 to 3839
Pixel 3968 to 4095

Document Feedback CMV12000 Functional Description
Datasheet • PUBLIC DS000603 • v5-00 • 2022-Feb-04 84 34
Figure 34:
Control Channel Status Bits
Bit Function Description
[0] DVAL Indicates valid pixel data on the outputs
[1] LVAL Indicates the validity of the read-out of a row
[2] FVAL Indicates the validity of the read-out of a frame
[3] FOT Indicates when the sensor is in FOT (sampling of image data in pixels)(1)
[4] INTE1 Indicates when pixels of integration block 1 are integrating(1)
[5] INTE2 Indicates when pixels of integration block 2 are integrating(1)
[6] ‘0’ Constant zero
[7] ‘1’ Constant one
[8] ‘0’ Constant zero
[9] ‘0’ Constant zero
[10] ‘0’ Constant zero
[11] ‘0’ Constant zero
(1) These status bits are purely functional and are not required to know if the pixel data is valid. DVAL, LVAL and FVAL is
sufficient to know when to sample the image data.
The status bits of the control channel can be monitored on the TDIG1/2 pins (G26/G27) to see the
state of the sensor. See section 7.6.6 for more details.
DVAL, LVAL and FVAL
The first three bits of the control word must be used to identify valid data and the read-out status. The
next figure shows the timing of the DVAL, LVAL and FVAL bits of the control channel with an example
of the read-out of a frame of four rows (default is 3072 rows). This example uses the default mode of
64 outputs (identical for one-side 32 outputs).
Figure 35:
xVAL Timing in 2 x 32 Channel Readout Mode
When only 16 outputs are used per side, the line read-out time is two times longer. The control
channel considers this and the timing in this mode looks like the diagram below. The timing
extrapolates identically for 8, 4, 2 and 1 output(s). Below is an example of a frame of two rows when
only using 16 channels per side.
IDLE OH 128 OH 128 OH 128DATA_OUT
DVAL
LVAL
FVAL
OH 128

Document Feedback CMV12000 Functional Description
Datasheet • PUBLIC DS000603 • v5-00 • 2022-Feb-04 84 35
Figure 36:
xVAL Timing in 2 x 16 Channel Readout Mode
7.3.6 Training Data
To synchronize the receiving side with the LVDS outputs of the device, a known data pattern can be
put on the output channels. This pattern can be used to “train” the LVDS receiver of the surrounding
system to achieve correct bit and word alignment of the image data. Such a training pattern is set on
all 64 data channel outputs when there is no valid image data to be sent (so, also in between bursts of
128 pixels). The training pattern is an 8-bit, 10-bit or 12-bit data word that replaces the pixel data. The
sensor has a 12-bit sequencer register (address 89) that can be loaded via SPI to change the contents
of the 12-bit training pattern TP1 for training during idle mode. TP2 equals TP1 with the 8 LSBs
inverted and the 4 MSBs set to ‘0’ and can be used for word alignment during overhead time (OH).
TP2 will be put on the data channels for one bit period and only before every LVAL. When there is
more than one bit of idle time between two LVALs, TP1 will be set on the outputs for the remaining
time. When DVAL is low but LVAL is high, only TP1 will be set on the data outputs.
The control channel does not send a training pattern, because it is used to send control information at
all time. Word alignment can be done on this channel when the sensor is idle (not exposing or sending
image data). In this case, all bits of the control word are zero, except for bit [7] (TPC).
The figure below shows the location of the training pattern on the data channels and control channel
when the sensor is in idle mode and when a frame of two rows is read out. The mode of 16 outputs is
selected.
Figure 37:
TP Timing
The typical output skew of the CMV12000 can be seen below. Per channel per side there is about a
150ps skew, which leads to a total skew of 4650ps between the first and lasts channels (OUT1 to
OUT32 and OUT33 to OUT64). TP1 and TP2 can be used to correct for this during operation. The
skew is independent of the clock speed, but shifts with temperature. Therefore realignment is needed
IDLE OH 128 OH 128 OH 128DATA_OUT
DVAL
LVAL
FVAL
OH 128
TP1 TP2 TP1 TP2Data
channels
DVAL
LVAL
FVAL
Control
channelTPC Control information
Sensor in idle mode
TP1 Pixel dataTP1 Pixel dataPixel dataPixel data
128 clock cycles1 clock cycle 1 clock cycle

Document Feedback CMV12000 Functional Description
Datasheet • PUBLIC DS000603 • v5-00 • 2022-Feb-04 84 36
when (large) temperature changes occur. The skew can differ between devices; 150 ps is a typical
value.
Figure 38:
Typical LVDS Output Skew
7.4 Configuring Exposure and Readout
This section explains how the CMV12000 can be programmed using the on-board sequencer
registers.
7.4.1 Exposure Modes
The exposure time can be programmed in two ways, externally or internally. Externally, the exposure
time is defined as the time between the rising edge of T_EXP1 and the rising edge of FRAME_REQ
(see section 7.2.8 for more details). Internally, the exposure time is set by uploading the desired value
to the corresponding sequencer register.
The table below gives an overview of the registers involved in the exposure mode.
Figure 39:
Exposure Modes
Reg. Name Address Bits Default Description
Exp_ext 70 [7:0] 0
0: Internal Exposure Mode. Exposure time is defined by register 71-72.
1: External Exposure Mode. Exposure time is defined by T_EXPx and FRAME_REQ triggers.
T1LVDS
CLOCK_OUT
CTR
CH1
CH2
CH33
CH34
D(0) D(1) D2)
D(0) D(1) D2)
D(0) D(1) D2)
D(0) D(1) D2)
D(0) D(1) D2)
+150ps
0 ps
0 ps
0 ps
+150ps

Document Feedback CMV12000 Functional Description
Datasheet • PUBLIC DS000603 • v5-00 • 2022-Feb-04 84 37
Reg. Name Address Bits Default Description
Exp_time 71
72
[15:0]
[7:0] 1536
Sets the exposure time in Internal Exposure Mode using the formula below.
The formula to calculate the actual exposure time in internal exposure mode from the programmed
registers is given by:
Equation 1:
𝐸𝑥𝑝𝑜𝑠𝑢𝑟𝑒 𝑡𝑖𝑚𝑒 = ((𝐸𝑥𝑝𝑡𝑖𝑚𝑒 − 1) ∗ (𝑟𝑒𝑔85 + 1) + (34 ∗ 𝑟𝑒𝑔82[7: 0]) + 1) ∗ 𝐿𝑉𝐷𝑆_𝐶𝐿𝐾_𝑝𝑒𝑟𝑖𝑜𝑑 ∗ #𝑏𝑖𝑡𝑠
The minimal exposure times when running at 600 MHz in internal mode will therefore be:
Figure 40:
Minimum Exposure Times in Internal Exposure Mode
When using external exposure mode, the actual exposure time will be given by:
Equation 2:
𝐸𝑥𝑝𝑜𝑠𝑢𝑟𝑒 𝑡𝑖𝑚𝑒 = 𝑡𝑖𝑚𝑒 𝑏𝑒𝑡𝑤𝑒𝑒𝑛 𝑇_𝐸𝑋𝑃 𝑎𝑛𝑑 𝐹𝑅𝐴𝑀𝐸_𝑅𝐸𝑄 + ((34 ∗ 𝑟𝑒𝑔82[7: 0]) ∗ 𝐿𝑉𝐷𝑆_𝐶𝐿𝐾_𝑝𝑒𝑟𝑖𝑜𝑑
∗ #𝑏𝑖𝑡𝑠)
The time between the T_EXP and FRAME_REQ pulses will be clocked to a multiple of
(LVDS_CLK_P/N_period * #bits).
For both modes there is an overlap of the exposure during the FOT (= the (34 * reg82[7:0]) part).
Figure 41:
Exposure FOT Overlap
Bit Mode Min. Exposure Time [µs]
8 15.4
10 15.3
12 20.4
Frame_REQ
Frame_cycle Exposure time FOT
Actual exposure time
(reg82[15:8] + 2) * (reg85 + 1) * clk_per
Read-out time
(34 * reg82[7:0]) * clk_per

Document Feedback CMV12000 Functional Description
Datasheet • PUBLIC DS000603 • v5-00 • 2022-Feb-04 84 38
7.4.2 Frame Timing
The frame rate of the CMV12000 is defined by two main factors.
Exposure time
Read-out time
FOT (Frame Overhead Time) will only have an influence when very few rows are read out.
For ease of use we will assume that the exposure time is equal to or shorter than the read-out time. By
assuming the frame rate is completely defined by the read-out time (because the exposure time
happens in parallel with the read-out time). The read-out time (and thus the frame rate) is defined by:
Clock speed: 600 MHz maximum
ADC mode: 8, 10 or 12-bit
Number of lines read-out (windowing, subsampling or binning)
Number of LVDS data outputs used: 64 maximum
This means that if any of the parameters above are changed, it will have an impact on the frame rate
of the sensor.
All timings can be expressed in line times:
Equation 3:
𝐿𝑖𝑛𝑒 𝑡𝑖𝑚𝑒 = (𝑟𝑒𝑔85 + 1) ∗ 𝐿𝑉𝐷𝑆_𝐶𝐿𝐾_𝑝𝑒𝑟𝑖𝑜𝑑 ∗ #𝑏𝑖𝑡𝑠
The total read-out time is composed of the FOT and the image readout time. The image readout time
is dependent of the total number of read out lines (#readout lines), sides used and the line time.
Equation 4:
𝐹𝑂𝑇 = (𝑟𝑒𝑔82[15: 8] + 2) ∗ 𝐿𝑖𝑛𝑒 𝑡𝑖𝑚𝑒
Equation 5:
𝑅𝑒𝑎𝑑𝑜𝑢𝑡 𝑡𝑖𝑚𝑒 =#𝑟𝑒𝑎𝑑𝑜𝑢𝑡 𝑙𝑖𝑛𝑒𝑠
#𝑠𝑖𝑑𝑒𝑠∗ 𝐿𝑖𝑛𝑒 𝑡𝑖𝑚𝑒
The number of lines read out will depend on the mode:
Normal mode: #readout lines = Number_lines_tot
X&Y-Subsampling: #readout lines = Number_lines_tot/2
Binning: #readout lines = Number_lines_tot/4
Number_lines_tot is the value of register 1.
When running at 600 MHz in 10-bit mode with 64 output channels, register 82[15:8] is 12 and register
85 is 128. This will result in a line time of 2.15 µs, FOT of 30.1 µs and an image read-out time of
3.3024 ms for the full pixel array.

Document Feedback CMV12000 Functional Description
Datasheet • PUBLIC DS000603 • v5-00 • 2022-Feb-04 84 39
The total frame time will be 3.3024 ms + 0.0301 ms = 3.3368 ms, which results in a frame rate of
300 fps.
If the exposure time is longer than the readout time the frame rate will depend on the exposure time.
Below you can see an overview of the frame rate in fps for a full resolution image and 64 outputs with
a 600 MHz LVDS input clock.
Figure 42:
Frame Rates vs Modes
Bit Mode Normal X&Y-Subs. Binning
8 333 401 251
10 300 533 267
12 132 267 267
As binning is done in the readout circuit, the four binned pixels have to be sampled, causing a longer
readout time needed and a drop in frame rate. When using fewer outputs, the frame rate will improve
when using binning.
Number of Frames
When using internal exposure mode, the number of frames taken at each frame request can be
programmed. In external exposure mode, only one frame is taken each time or you can use
continuous mode.
Figure 43:
Number of Frames Setting
Reg. Name Address Bits Default Description
Number_frames 80 [15:0] 1 1 to 65535
7.4.3 High Dynamic Range Modes
The sensor has different ways to achieve high optical dynamic range in the grabbed image.
Interleaved read-out: the odd and even columns have a different exposure time
Multiple slope: partial reset of the photodiode, within an exposure time, to reset the saturated
pixels
All the HDR modes mentioned above can be used in both the internal and external exposure time
modes.

Document Feedback CMV12000 Functional Description
Datasheet • PUBLIC DS000603 • v5-00 • 2022-Feb-04 84 40
Interleaved HDR
In this HDR mode, the odd and even columns of the image sensor will have a different exposure time.
This mode can be enabled by setting the register in the table below.
Figure 44:
Interleaved HDR Settings
Reg. Name Address Bits Default Description
Exp_dual 70 [1] 0 0: HDR Off
1: HDR On
The surrounding system can combine the image of the odd columns with the image of the even
columns, which can result in a high dynamic range image. In such an image, very bright and very dark
objects are made visible without clipping. The table below gives an overview of the registers involved
in the interleaved read-out when the internal exposure mode is selected.
Figure 45:
Interleaved HDR Exposure Settings
Reg. Name Address Bits Default Description
Exp_time 71
72
[15:0]
[7:0] 1536 Sets the exposure time for the even columns.
Exp_time2 73
74
[15:0]
[7:0] 1536 Sets the exposure time for the odd columns.
When the external exposure mode and interleaved read-out are selected, the different exposure times
are achieved by using the T_EXP1 and T_EXP2 input pins. T_EXP1 defines the exposure time for the
even columns, while T_EXP2 defines the exposure time for the odd columns. See the figure below for
more details.
Figure 46:
Interleaved HDR With External Exposure
FRAME_REQ
T_EXP1
T_EXP2
Exposure time even columns
Exposure time odd columns

Document Feedback CMV12000 Functional Description
Datasheet • PUBLIC DS000603 • v5-00 • 2022-Feb-04 84 41
When a color sensor is used, the sequencer should be programmed to make sure it takes the bayer
pattern into account when doing interleaved read-out. This can be done by setting the appropriate
registers to ‘0’.
Figure 47:
Interleaved HDR Color Mode
Reg. Name Address Bits Default Description
Color 68 [0] 1 0: Color sensor
1: Monochrome sensor
Color_exp 68 [3] 1 0: Color sensor
1: Monochrome sensor
Multiple Slope HDR
The CMV12000 has the possibility to achieve a high optical dynamic range by using a multiple slope
feature. This feature will partially reset those pixels, which reach a programmable voltage, while
leaving the other pixels untouched. This can be done 2 times within one exposure time to achieve a
maximum of three exposure slopes. See figure below for more details.
Figure 48:
Multiple Slope HDR
In the figure above, the red lines represent a pixel on which a large amount of light is falling. The blue
line represents a pixel on which less light is falling. As shown in the figure, the bright pixel is held to a
programmable voltage for a programmable time during the exposure time. This happens two times to
make sure that at the end of the exposure time, the pixel is not saturated. The darker pixel is not
Vhigh
Vtfl2
Vtfl3
VlowTotal exposure time
Exp_kp2
Exp_kp1
Pixel reset Pixel sample

Document Feedback CMV12000 Functional Description
Datasheet • PUBLIC DS000603 • v5-00 • 2022-Feb-04 84 42
influenced by this multiple slope and will have a normal response. The Vtfl voltages and different
exposure times are programmable using the sequencer registers. Using this feature, a response as
detailed in the figure below can be achieved. The placement of the kneepoints in X is controlled by the
Vtfl programming (64 = Vlow; 127 = Vhigh), while the slope of the segments is controlled by the
programmed exposure times.
A good starting point is to set Exp_kp1 to 1% of the total exposure time and Exp_kp2 to 10% and
setting Vtfl2 to 84 and Vtfl3 to 104.
Figure 49:
Multiple Slope HDR Kneepoints
The following registers need to be programmed when multiple slopes in internal exposure mode are
desired.
Figure 50:
Multiple Slope HDR Settings with Internal Exposure
Reg. Name Address Bits Default Description
Exp_time 71
72
[15:0]
[7:0] 1536 Sets the total exposure time
Number_slopes 79 [1:0] 1 Sets the number of slopes (min=1, max=3)
Exp_kp1 75
76
[15:0]
[7:0] 0 Sets the exposure time of kneepoint 1
Exp_kp2 77
78
[15:0]
[7:0] 0 Sets the exposure time of kneepoint 2
Vtfl2 106 106[6:0] 64
Sets the level of kneepoint 1:
Bit [6] = 0/1: Enable/Disable DAC
Bits [5:0]: Vtfl2 voltage level
Saturation
level
Kneepoint 1
Kneepoint 2
# of electrons
Ou
tpu
t sig
na
l

Document Feedback CMV12000 Functional Description
Datasheet • PUBLIC DS000603 • v5-00 • 2022-Feb-04 84 43
Reg. Name Address Bits Default Description
Vtfl3 106 106[13:7] 64
Sets the level of kneepoint 2:
Bit [13] =0/1: Enable/Disable DAC
Bits [12:7]: Vtfl3 voltage level
With external exposure mode, the kneepoint and total exposure times are set with the T_EXP1/2 and
FRAME_REQ triggers. The timing that needs to be applied in this external exposure mode looks like
the one below.
Figure 51:
Multiple Slope HDR with External Exposure
Attention
A combination of multiple slope and interleaved HDR is not supported.
7.4.4 Windowing
To limit the amount of data or to increase the frame rate of the sensor, windowing in Y direction is
possible. The number of lines and start address can be set by programming the appropriate registers.
The start address of a window should be a multiple of four (0, 4, 8 …).
The size (number of rows) of a window has to be a certain multiple and this depends on the mode and
number of sides used. These multiples are stated below:
Figure 52:
Window Size Multiples
Sides Used Normal XY-Subsampling Binning
1 1 2 4
2 2 4 8
FRAME_REQ
T_EXP1
Total exposure time
Exposure kp1
Exposure kp2

Document Feedback CMV12000 Functional Description
Datasheet • PUBLIC DS000603 • v5-00 • 2022-Feb-04 84 44
The CMV12000 has the possibility to read out multiple (max=32) predefined sub-windows in one read-
out cycle. The default mode is to read out one window with the full frame size (4096x3072).
Single Window
When a single window is read out, the start address and size can be uploaded in the corresponding
registers. The default start address is 0 and the default size is 3072 (full frame).
Figure 53:
Single Window Settings
Reg. Name Address Bits Default Description
Number_lines_tot 1 [15:0] 3072 Total number of lines read out from the sensor (1 to 3072).
Y_start_1 2 [15:0] 0 Row start address of the window (0 to 3071).
Figure 54:
Single Window
4096
30
72
Number_lines_tot
Y_start_1

Document Feedback CMV12000 Functional Description
Datasheet • PUBLIC DS000603 • v5-00 • 2022-Feb-04 84 45
Multiple Windows
The CMV12000 can read out a maximum of 32 different sub-windows in one read-out cycle. The
location and length of these sub-windows must be programmed in the correct registers. The location
of multiple windows can be random but the windows should not overlap. The total number of lines to
be read out (sum of all windows) needs to be specified in the Number_lines_tot register. The registers,
which need to be programmed for the multiple windows, can be found in the table below.
Figure 55:
Multiple Window Settings
Reg. Name Address Bits Default Description
Number_lines_tot 1 [15:0] 3072 Total number of lines read out from the sensor (1 to 3072).
Y_start_1
Y_start_2
…
Y_start_32
2
3
…
33
[15:0] 0 Row start address of the window (0 to 3071).
Y_size_1
Y_size_2
…
Y_size_31
34
33
…
65
[15:0] 0 Number of read out lines in the window (1 to 3072).
The default values will result in readout of one window with 3072 lines starting at row 0.

Document Feedback CMV12000 Functional Description
Datasheet • PUBLIC DS000603 • v5-00 • 2022-Feb-04 84 46
Figure 56:
Multiple Windows
7.4.5 Mirroring
The image coming out of the image sensor, can be flipped in Y direction. When flipping in Y is enable,
the bottom left pixel (0, 3071) is read out first instead of the top left one (0, 0). The following registers
are involved in image flipping.
Figure 57:
Mirroring Settings
Reg. Name Address Bits Default Description
Image_flipping 69 [1:0] 0 0: No mirroring
2: Mirror in Y
7.4.6 Subsampling
This mode is only supported in two sided readout. To maintain the same field of view but reduce the
amount of data coming out of the sensor, a subsampling mode is implemented on the chip. Different
subsampling schemes can be programmed by setting the appropriate registers. These subsampling
4096
30
72
Y_size_4
Y_start_4
Y_size_3
Y_start_3Y_size_2
Y_start_2
Y_size_1
Y_start_1
Number_lines_tot = Y_size_1 + Y_size_2 + Y_size_3 + Y_size_4

Document Feedback CMV12000 Functional Description
Datasheet • PUBLIC DS000603 • v5-00 • 2022-Feb-04 84 47
schemes can take into account whether a color or monochrome sensor is used to preserve the Bayer
pattern information. The registers involved in subsampling are detailed below. A distinction is made
between a monochrome and color mode and subsampling in Y (skip rows) and X and Y (skip columns
and rows). Subsampling can be enabled in every windowing mode.
Depending on the subsampling and color mode different subsampling schemes are possible.
Figure 58:
Subsampling Schemes
Color Mode Y-Subsampling X&Y-Subsampling
Monochrome Read out 1 row, skip 1,5,9… rows Read out 1 column and row, skip 1 column and row
Color Read out 2 rows, skip 2, 6, 10 … rows Read out 2 column and row, skip 2 column and rows
Y-Subsampling
Below you can find an overview of the settings used for monochrome and color devices together with
some examples for Y-subsampling.
Figure 59:
Y-Subsampling Settings for Monochrome
Reg. Name Address Bits Default Description
Number_lines_tot 1 [15:0] 3072 Total number of lines read out from the sensor (1 to 1536)
Sub_offset 66 [15:0] 0 Value = (number_of_lines_to_skip +1) /2
Sub_step 67 [15:0] 1 Value = (number_of_lines_to_skip +1)
Sub_en 68 [1] 0 Set to 0
Color 68 [0] 1 Set to 1
Color_exp 68 [3] 1 Set to 1

Document Feedback CMV12000 Functional Description
Datasheet • PUBLIC DS000603 • v5-00 • 2022-Feb-04 84 48
Figure 60 :
Y-Subsampling for Monochrome Examples (skip 5 and skip 1)
Figure 61:
Y-Subsampling Settings for Color
Reg. Name Address Bits Default Description
Number_lines_tot 1 [15:0] 3072 Total number of lines read out from the sensor (1 to 1536)
Sub_offset 66 [15:0] 0 Set to 0
Sub_step 67 [15:0] 1 Value = (number_of_lines_to_skip/2) +1
Sub_en 68 [1] 0 Set to 0
Color 68 [0] 1 Set to 0
Color_exp 68 [3] 1 Set to 0
Sub_offset = 3
Sub_step = 6
Number_lines_tot = sum of red lines
Sub_offset = 1
Sub_step = 2
Number_lines_tot = sum of red lines

Document Feedback CMV12000 Functional Description
Datasheet • PUBLIC DS000603 • v5-00 • 2022-Feb-04 84 49
Figure 62:
Y-Subsampling for Color Examples (skip 6 and skip 2)
X&Y-Subsampling
With subsampling in both X and Y, the sensor skips both rows and columns. There are only 2
schemes possible in this mode: read 1 row/column, skip 1 row/column (monochrome) and read 2
rows/columns, skip 2 rows/columns (color). Below you can find an overview of the settings used for
monochrome and color devices together with some examples for X&Y-subsampling.
Figure 63:
X&Y-Subsampling Settings for Monochrome
Reg. Name Address Bits Default Description
Number_lines_tot 1 [15:0] 3072 Total number of lines read out from the sensor (1 to 1536)
Sub_offset 66 [15:0] 0 Set to 1
Sub_step 67 [15:0] 1 Set to 2
Sub_en 68 [1] 0 Set to 1
Color 68 [0] 1 Set to 1
Color_exp 68 [3] 1 Set to 1
Sub_offset = 0
Sub_step = 4
Number_lines = sum of red lines
Sub_offset = 0
Sub_step = 2
Number_lines = sum of red lines

Document Feedback CMV12000 Functional Description
Datasheet • PUBLIC DS000603 • v5-00 • 2022-Feb-04 84 50
Figure 64:
Y-Subsampling for Monochrome Example
Figure 65:
X&Y-Subsampling Settings for Color
Reg. Name Address Bits Default Description
Number_lines_tot 1 [15:0] 3072 Total number of lines read out from the sensor (1 to 1536)
Sub_offset 66 [15:0] 0 Set to 0
Sub_step 67 [15:0] 1 Set to 2
Sub_en 68 [1] 0 Set to 1
Color 68 [0] 1 Set to 0
Color_exp 68 [3] 1 Set to 0
Sub_offset = 1
Sub_step = 2
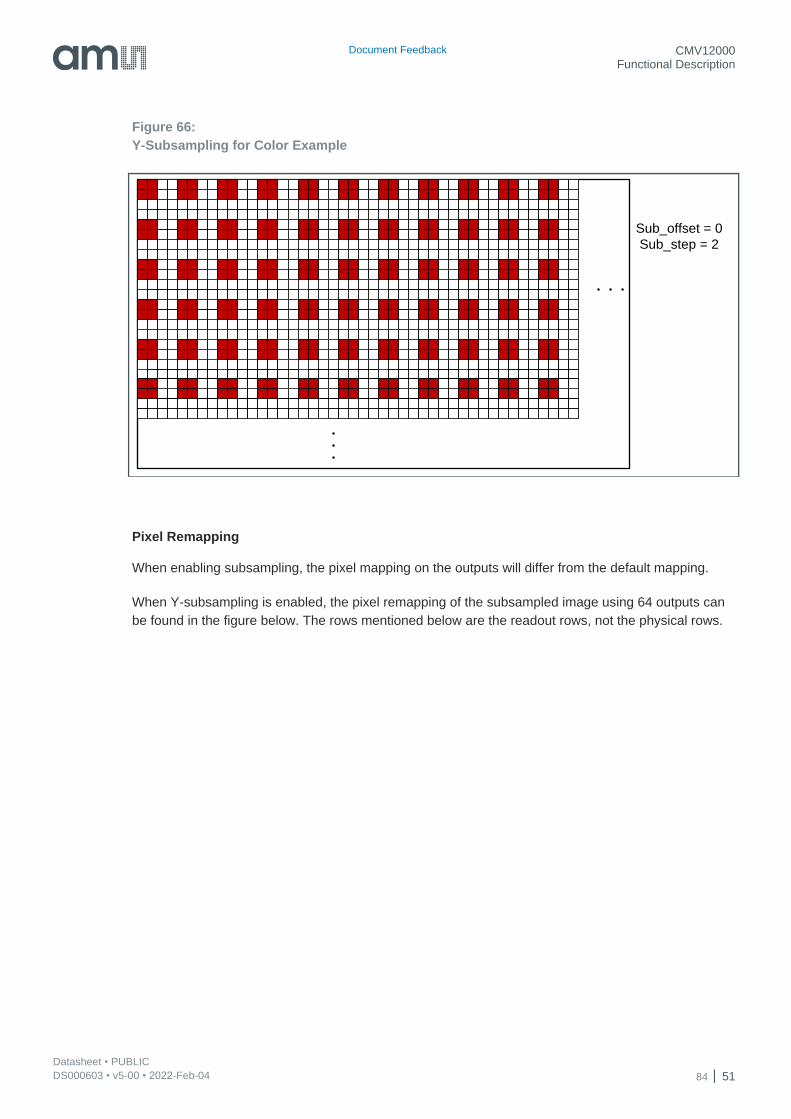
Document Feedback CMV12000 Functional Description
Datasheet • PUBLIC DS000603 • v5-00 • 2022-Feb-04 84 51
Figure 66:
Y-Subsampling for Color Example
Pixel Remapping
When enabling subsampling, the pixel mapping on the outputs will differ from the default mapping.
When Y-subsampling is enabled, the pixel remapping of the subsampled image using 64 outputs can
be found in the figure below. The rows mentioned below are the readout rows, not the physical rows.
Sub_offset = 0
Sub_step = 2

Document Feedback CMV12000 Functional Description
Datasheet • PUBLIC DS000603 • v5-00 • 2022-Feb-04 84 52
Figure 67:
Pixel Remapping for Y-Subsampling
So the bottom channels will read out rows 1, 4, 5, 8, 9, 12 … and the top channels will read out rows
2, 3, 6, 7, 10, 11 … 64 bursts (2 x 32) of 128 (2 x 64) pixels happen in parallel on the data outputs.
This means that two complete subsampled rows are read out in one burst. The amount of rows that
will be read out depends on the value in the corresponding register. By default there are 1536 rows
being read out (3072/2).
When X&Y-subsampling is enabled, the pixel remapping is different for monochrome and color
devices. An example of the subsampled image using 64 outputs can be found in the figures below.
IDLE Pixel 0 to 127Channel 1
IDLEChannel 2
Row 1
Pixel 128 to 255
IDLEChannel 31 Pixel 3840 to 3967
IDLEChannel 32 Pixel 3968 to 4095
Pixel 0 to 127
Row 4
Pixel 128 to 255
Pixel 3840 to 3967
Pixel 3968 to 4095
IDLE Pixel 0 to 127Channel 33
IDLEChannel 34
Row 2
Pixel 128 to 255
IDLEChannel 63 Pixel 3840 to 3967
IDLEChannel 64 Pixel 3968 to 4095
Pixel 0 to 127
Row 3
Pixel 128 to 255
Pixel 3840 to 3967
Pixel 3968 to 4095
2x32CH
MONO
Pixel 0 to 127
Row 5
Pixel 128 to 255
Pixel 3840 to 3967
Pixel 3968 to 4095
Pixel 0 to 127
Row 8
Pixel 128 to 255
Pixel 3840 to 3967
Pixel 3968 to 4095
Pixel 0 to 127
Row 6
Pixel 128 to 255
Pixel 3840 to 3967
Pixel 3968 to 4095
Pixel 0 to 127
Row 7
Pixel 128 to 255
Pixel 3840 to 3967
Pixel 3968 to 4095

Document Feedback CMV12000 Functional Description
Datasheet • PUBLIC DS000603 • v5-00 • 2022-Feb-04 84 53
Figure 68:
Pixel Remapping for Monochrome X&Y-Subsampling
Figure 69:
Pixel Remapping for Color X&Y-Subsampling
64 bursts (2 x 32) of 128 (2 x 64) pixels happen in parallel on the data outputs. This means that four
complete subsampled rows are read out in one burst. The amount of rows that will be read out
depends on the value in the corresponding register. By default there are 1536 rows being read out
(3072/2).
IDLE Pixel 0 row1Channel 1
IDLEChannel 2
Row 1+3
IDLEChannel 3
IDLEChannel 31
IDLEChannel 32
Pixel 0 row3 Pixel 1 row1 Pixel 1 row3 Pixel 63 row1 Pixel 63 row3
Pixel 64 row1 Pixel 64 row3 Pixel 65 row1 Pixel 65 row3 Pixel 127 row1 Pixel 127 row3
Pixel 128 row1 Pixel 128 row3 Pixel 129 row1 Pixel 129 row3 Pixel 191 row1 Pixel 191 row3
Pixel 1920 row1 Pixel 1920 row3 Pixel 1921 row1 Pixel 1921 row3 Pixel 1983 row1 Pixel 1983 row3
Pixel 1984 row1 Pixel 1984 row3 Pixel 1985 row1 Pixel 1985 row3 Pixel 2047 row1 Pixel 2047 row3
Pixel 0 row5
Row 5+7
Pixel 0 row7 Pixel 1 row5 Pixel 1 row7 Pixel 63 row5 Pixel 63 row7
Pixel 64 row5 Pixel 64 row7 Pixel 65 row5 Pixel 65 row7 Pixel 127 row5 Pixel 127 row7
Pixel 128 row5 Pixel 128 row7 Pixel 129 row5 Pixel 129 row7 Pixel 191 row5 Pixel 191 row7
Pixel 1920 row5 Pixel 1920 row7 Pixel 1921 row5 Pixel 1921 row7 Pixel 1983 row5 Pixel 1983 row7
Pixel 1984 row5 Pixel 1984 row7 Pixel 1985 row5 Pixel 1985 row7 Pixel 2047 row5 Pixel 2047 row7
IDLE Pixel 0 row2Channel 33
IDLEChannel 34
Row 2+4
IDLEChannel 35
IDLEChannel 63
IDLEChannel 64
Pixel 0 row4 Pixel 1 row2 Pixel 1 row4 Pixel 63 row2 Pixel 63 row4
Pixel 64 row2 Pixel 64 row4 Pixel 65 row2 Pixel 65 row4 Pixel 127 row2 Pixel 127 row4
Pixel 128 row2 Pixel 128 row4 Pixel 129 row2 Pixel 129 row4 Pixel 191 row2 Pixel 191 row4
Pixel 1920 row2 Pixel 1920 row4 Pixel 1921 row2 Pixel 1921 row4 Pixel 1983 row2 Pixel 1983 row4
Pixel 1984 row2 Pixel 1984 row4 Pixel 1985 row2 Pixel 1985 row4 Pixel 2047 row2 Pixel 2047 row4
Pixel 0 row6
Row 6+8
Pixel 0 row8 Pixel 1 row6 Pixel 1 row8 Pixel 63 row6 Pixel 63 row8
Pixel 64 row6 Pixel 64 row8 Pixel 65 row6 Pixel 65 row8 Pixel 127 row6 Pixel 127 row8
Pixel 128 row6 Pixel 128 row8 Pixel 129 row6 Pixel 129 row8 Pixel 191 row6 Pixel 191 row8
Pixel 1920 row6 Pixel 1920 row8 Pixel 1921 row6 Pixel 1921 row8 Pixel 1983 row6 Pixel 1983 row8
Pixel 1984 row6 Pixel 1984 row8 Pixel 1985 row6 Pixel 1985 row8 Pixel 2047 row6 Pixel 2047 row8
BOTTOM
TOP
IDLE Pixel 0 row1Channel 1
IDLEChannel 2
Row 1+3
IDLEChannel 3
IDLEChannel 31
IDLEChannel 32
Pixel 0 row3Pixel 1 row1 Pixel 1 row3 Pixel 62 row3 Pixel 63 row3
Pixel 64 row1 Pixel 64 row3Pixel 65 row1 Pixel 65 row3 Pixel 126 row3 Pixel 127 row3
Pixel 128 row1 Pixel 128 row3Pixel 129 row1 Pixel 129 row3 Pixel 190 row3 Pixel 191 row3
Pixel 1920 row1 Pixel 1920 row3Pixel 1921 row1 Pixel 1921 row3 Pixel 1982 row3 Pixel 1983 row3
Pixel 1984 row1 Pixel 1984 row3Pixel 1985 row1 Pixel 1985 row3 Pixel 2046 row3 Pixel 2047 row3
Pixel 0 row5
Row 5+7
Pixel 0 row7Pixel 1 row5 Pixel 1 row7 Pixel 62 row7 Pixel 63 row7
Pixel 64 row5 Pixel 64 row7Pixel 65 row5 Pixel 65 row7 Pixel 126 row7 Pixel 127 row7
Pixel 128 row5 Pixel 128 row7Pixel 129 row5 Pixel 129 row7 Pixel 190 row7 Pixel 191 row7
Pixel 1920 row5 Pixel 1920 row7Pixel 1921 row7 Pixel 1921 row7 Pixel 1982 row7 Pixel 1983 row7
Pixel 1984 row5 Pixel 1984 row7Pixel 1985 row7 Pixel 1985 row7 Pixel 2046 row7 Pixel 2047 row7
IDLE Pixel 0 row2Channel 33
IDLEChannel 34
Row 2+4
IDLEChannel 35
IDLEChannel 63
IDLEChannel 64
Pixel 0 row4Pixel 1 row2 Pixel 1 row4 Pixel 62 row4 Pixel 63 row4
Pixel 64 row2 Pixel 64 row4Pixel 65 row2 Pixel 65 row4 Pixel 126 row4 Pixel 127 row4
Pixel 128 row2 Pixel 128 row4Pixel 129 row2 Pixel 129 row4 Pixel 190 row4 Pixel 191 row4
Pixel 1920 row2 Pixel 1920 row4Pixel 1921 row2 Pixel 1921 row4 Pixel 1982 row4 Pixel 1983 row4
Pixel 1984 row2 Pixel 1984 row4Pixel 1985 row2 Pixel 1985 row4 Pixel 2046 row4 Pixel 2047 row4
Pixel 0 row6
Row 6+8
Pixel 0 row8Pixel 1 row6 Pixel 1 row8 Pixel 62 row8 Pixel 63 row8
Pixel 64 row6 Pixel 64 row8Pixel 65 row6 Pixel 65 row8 Pixel 126 row8 Pixel 127 row8
Pixel 128 row6 Pixel 128 row8Pixel 129 row6 Pixel 129 row8 Pixel 190 row8 Pixel 191 row8
Pixel 1920 row6 Pixel 1920 row8Pixel 1921 row6 Pixel 1921 row8 Pixel 1982 row8 Pixel 1983 row8
Pixel 1984 row6 Pixel 1984 row8Pixel 1985 row6 Pixel 1985 row8 Pixel 2046 row8 Pixel 2047 row8
BOTTOM
TOP

Document Feedback CMV12000 Functional Description
Datasheet • PUBLIC DS000603 • v5-00 • 2022-Feb-04 84 54
7.4.7 Binning
This mode is only supported in two sided read-out. To maintain the same field of view but reduce the
noise coming out of the sensor, a binning mode is implemented on the chip. This mode will sum four
pixels (in the analog domain) to reduce the noise and data coming from the chip. This increases the
responsivity with x4. The PGA divide-by-3 can be used to reduce this. Other PGA gains are not
possible (x2, x3, x4). Different binning schemes can be programmed by setting the appropriate
registers. These binning schemes can take into account whether a color or monochrome sensor is
used to preserve the Bayer pattern information. The registers involved in binning are detailed below. A
distinction is made between a monochrome and color mode. Binning can be enabled in every
windowing mode.
When monochrome binning is used, the CMV12000 will average four pixels and reads out this
average pixel value. This will result in an image, which is four times smaller than the original image (X-
size/2 and Y-size/2, max 2048 x 1536).
To enable this monochrome binning, the following registers need to be changed.
Figure 70:
Binning Settings for Monochrome
Reg. Name Address Bits Default Description
Number_lines_tot 1 [15:0] 3072 Total number of lines of the original (pre-binning) image (1 to 3072)
Sub_offset 66 [15:0] 0 Set to 0
Sub_step 67 [15:0] 1 Set to 1
Bin_en 68 [2] 0 Set to 1
Color 68 [0] 1 Set to 1
Color_exp 68 [3] 1 Set to 1

Document Feedback CMV12000 Functional Description
Datasheet • PUBLIC DS000603 • v5-00 • 2022-Feb-04 84 55
Figure 71:
Binning for Monochrome Example
Figure 72:
Binning Settings for Color
Reg. Name Address Bits Default Description
Number_lines_tot 1 [15:0] 3072 Total number of lines of the original (pre-binning) image (1 to 3072)
Sub_offset 66 [15:0] 0 Set to 1
Sub_step 67 [15:0] 1 Set to 1
Bin_en 68 [2] 0 Set to 1
Color 68 [0] 1 Set to 0
Color_exp 68 [3] 1 Set to 0
Sub_offset = 0
Sub_step = 1

Document Feedback CMV12000 Functional Description
Datasheet • PUBLIC DS000603 • v5-00 • 2022-Feb-04 84 56
Figure 73:
Binning for Color Example
Pixel Remapping
When enabling binning, the pixel mapping on the outputs will differ from the default mapping.
Figure 74:
Pixel Remapping for Monochrome Binning
Sub_offset = 1
Sub_step = 1
IDLE Pixel 0 row1Channel 1
IDLEChannel 2
Row 1+2
IDLEChannel 3
IDLEChannel 31
IDLEChannel 32
Pixel 0 row2 Pixel 1 row1 Pixel 1 row2 Pixel 63 row1 Pixel 63 row2
Pixel 64 row1 Pixel 64 row2 Pixel 65 row1 Pixel 65 row2 Pixel 127 row1 Pixel 127 row2
Pixel 128 row1 Pixel 128 row2 Pixel 129 row1 Pixel 129 row2 Pixel 191 row1 Pixel 191 row2
Pixel 1920 row1 Pixel 1920 row2 Pixel 1921 row1 Pixel 1921 row2 Pixel 1983 row1 Pixel 1983 row2
Pixel 1984 row1 Pixel 1984 row2 Pixel 1985 row1 Pixel 1985 row2 Pixel 2047 row1 Pixel 2047 row2
Pixel 0 row5
Row 5+6
Pixel 0 row6 Pixel 1 row5 Pixel 1 row6 Pixel 63 row5 Pixel 63 row6
Pixel 64 row5 Pixel 64 row6 Pixel 65 row5 Pixel 65 row6 Pixel 127 row5 Pixel 127 row6
Pixel 128 row5 Pixel 128 row6 Pixel 129 row5 Pixel 129 row6 Pixel 191 row5 Pixel 191 row6
Pixel 1920 row5 Pixel 1920 row6 Pixel 1921 row5 Pixel 1921 row6 Pixel 1983 row5 Pixel 1983 row6
Pixel 1984 row5 Pixel 1984 row6 Pixel 1985 row5 Pixel 1985 row6 Pixel 2047 row5 Pixel 2047 row6
IDLE Pixel 0 row3Channel 33
IDLEChannel 34
Row 3+4
IDLEChannel 35
IDLEChannel 63
IDLEChannel 64
Pixel 0 row4 Pixel 1 row3 Pixel 1 row4 Pixel 63 row3 Pixel 63 row4
Pixel 64 row3 Pixel 64 row4 Pixel 65 row3 Pixel 65 row4 Pixel 127 row3 Pixel 127 row4
Pixel 128 row3 Pixel 128 row4 Pixel 129 row3 Pixel 129 row4 Pixel 191 row3 Pixel 191 row4
Pixel 1920 row3 Pixel 1920 row4 Pixel 1921 row3 Pixel 1921 row4 Pixel 1983 row3 Pixel 1983 row4
Pixel 1984 row3 Pixel 1984 row4 Pixel 1985 row3 Pixel 1985 row4 Pixel 2047 row3 Pixel 2047 row4
Pixel 0 row7
Row 7+8
Pixel 0 row8 Pixel 1 row7 Pixel 1 row8 Pixel 63 row7 Pixel 63 row8
Pixel 64 row7 Pixel 64 row8 Pixel 65 row7 Pixel 65 row8 Pixel 127 row7 Pixel 127 row8
Pixel 128 row7 Pixel 128 row8 Pixel 129 row7 Pixel 129 row8 Pixel 191 row7 Pixel 191 row8
Pixel 1920 row7 Pixel 1920 row8 Pixel 1921 row7 Pixel 1921 row8 Pixel 1983 row7 Pixel 1983 row8
Pixel 1984 row7 Pixel 1984 row8 Pixel 1985 row7 Pixel 1985 row8 Pixel 2047 row7 Pixel 2047 row8
BOTTOM
TOP

Document Feedback CMV12000 Functional Description
Datasheet • PUBLIC DS000603 • v5-00 • 2022-Feb-04 84 57
Figure 75:
Pixel Remapping for Color Binning
7.5 Configuring Output Data Format
7.5.1 Output Mode
The number of LVDS channels on each side can be selected by programming the appropriate
sequencer register. The pixel remapping scheme and the read-out timing for each mode can be found
in section 0 of this document. See section 5.15 for additional required register settings. The bottom
channels use output pins OUT1_N/P to OUT32_N/P and the top channels use output pins
OUT33_N/P to OUT64_N/P.
Figure 76:
Output Mode
Reg. Name Address Bits Default Description
Output_mode 81 [4:0] 0
0: 32 outputs used on each side
1: 16 outputs used on each side
3: 8 outputs used on each side
7: 4 outputs used on each side
15: 2 outputs used on each side
31: 1 output used on each side
Disable_top 81 [5] 0 0: Two side readout
1: One side readout (bottom channels only)
Sub_offset 66 [15:0] 0 Set to 65535 when Disable_top = 1 and no subsampling in Y is used.
IDLE P0 R1Channel 1
IDLEChannel 2
R 1+2+3+4
IDLEChannel 3
IDLEChannel 31
IDLEChannel 32
P1 R2 P0 R3 P1 R4 P62 R1 P63 R2
P64 R1 P65 R2 P64 R3 P65 R4 P126 R1 P127 R2
P128 R1 P129 R2 P128 R3 P129 R4 P190 R1 P191 R2
P1920 R1 P1921 R2 P1920 R3 P1921 R4 P1982 R1 P1983 R2
P1984 R1 P1985 R2 P1984 R3 P1985 R4 P2046 R1 P2047 R2
BOTTOM
TOP
P2 R1 P3 R2 P2 R3 P3 R4 P62 R3 P63 R4
P66 R1 P67 R2 P66 R3 P67 R4 P126 R3 P127 R4
P130 R2 P131 R2 P130 R3 P131 R4 P190 R3 P191 R4
P1922 R1 P1923 R2 P1922 R3 P1923 R4
P1986 R1 P1987 R2 P1987 R3 P1986 R4
P1982 R3 P1983 R4
P2046 R3 P2047 R4
IDLE P0 R2Channel 33
IDLEChannel 34
R 1+2+3+4
IDLEChannel 35
IDLEChannel 63
IDLEChannel 64
P1 R1 P0 R4 P1 R3 P62 R2 P63 R1
P64 R2 P65 R1 P64 R4 P65 R3 P126 R2 P127 R1
P128 R2 P129 R1 P128 R4 P129 R3 P190 R2 P191 R1
P1920 R2 P1921 R1 P1920 R4 P1921 R3 P1982 R2 P1983 R1
P1984 R2 P1985 R1 P1984 R4 P1985 R3 P2046 R2 P2047 R1
P2 R2 P3 R1 P2 R4 P3 R3 P62 R4 P63 R3
P66 R2 P67 R1 P66 R4 P67 R3 P126 R4 P127 R3
P130 R2 P131 R1 P130 R4 P131 R3 P190 R4 P191 R3
P1922 R2 P1923 R1 P1922 R4 P1923 R3
P1986 R2 P1987 R1 P1986 R4 P1987 R3
P1982 R4 P1983 R3
P2046 R4 P2047 R3
P0 R5
R 5+6+7+8
P1 R6 P0 R7 P1 R8 P62 R5 P63 R6
P64 R5 P65 R6 P64 R7 P65 R8 P126 R5 P127 R6
P128 R5 P129 R6 P128 R7 P129 R8 P190 R5 P191 R6
P1920 R5 P1921 R6 P1920 R7 P1921 R8 P1982 R5 P1983 R6
P1984 R5 P1985 R6 P1984 R7 P1985 R8 P2046 R5 P2047 R6
P2 R5 P3 R6 P2 R7 P3 R8 P62 R7 P63 R8
P66 R5 P67 R6 P66 R7 P67 R8 P126 R7 P127 R8
P130 R5 P131 R6 P130 R7 P131 R8 P190 R7 P191 R8
P1922 R5 P1923 R6 P1922 R7 P1923 R8
P1986 R5 P1987 R6 P1987 R7 P1986 R8
P1982 R7 P1983 R8
P2046 R7 P2047 R8
P0 R6
R 5+6+7+8
P1 R5 P0 R8 P1 R7 P62 R6 P63 R5
P64 R6 P65 R5 P64 R8 P65 R7 P126 R6 P127 R5
P128 R6 P129 R5 P128 R8 P129 R7 P190 R6 P191 R5
P1920 R6 P1921 R5 P1920 R8 P1921 R7 P1982 R6 P1983 R5
P1984 R6 P1985 R5 P1984 R8 P1986 R7 P2046 R6 P2047 R5
P2 R6 P3 R5 P2 R8 P3 R7 P62 R8 P63 R7
P66 R6 P67 R5 P66 R8 P67 R7 P126 R8 P127 R7
P130 R6 P131 R5 P130 R8 P131 R7 P190 R8 P191 R7
P1922 R6 P1923 R5 P1922 R8 P1923 R7
P1986 R6 P1987 R5 P1986 R8 P1987 R7
P1982 R8 P1983 R7
P2046 R8 P2047 R7

Document Feedback CMV12000 Functional Description
Datasheet • PUBLIC DS000603 • v5-00 • 2022-Feb-04 84 58
Attention
Subsampling and binning are not supported when only using one side readout
7.5.2 Training Pattern
As detailed in section 7.3.6, a training pattern is sent over the LVDS data channels whenever no valid
image data is sent. The training pattern TP1 can be programmed using the sequencer register below.
Figure 77:
Training Pattern
Reg. Name Address Bits Default Description
Training_pattern 89 [11:0] 85 Sets the training pattern value.
7.5.3 Bit Mode
The CMV12000 has the possibility to send 12 bits, 10 bits or 8 bits per pixel. The end user can select
the desired resolution by programming the corresponding sequencer register. See section 3.8 for
details on how the bit mode can be changed. See section 5.17 for additional required register settings.
Figure 78:
Bit Mode Setting
Reg. Name Address Bits Default Description
Bit_mode 118 [1:0] 1
0: 12b (12 bits per pixel)
1: 10b (10 bits per pixel)
2: 8b (8 bits per pixel)
When changing the bit mode of the ADC, the ADC input range also has to be modified so the analog
pixel voltage is in the correct range of the ADC input.
Figure 79:
ADC Range Settings
Reg. Name Address Bits Default Description
ADC_range 116 [7:0] 127
Change the slope and the input range of the ramp used by the ADC
205: 8b
165: 10b
230: 12b

Document Feedback CMV12000 Functional Description
Datasheet • PUBLIC DS000603 • v5-00 • 2022-Feb-04 84 59
Reg. Name Address Bits Default Description
ADC_range_mult 116 [9:8] 1
Change multiplier of the slope and the input range of the ramp used by the ADC
0: 8b (x1)
1: 10b (x2)
3: 12b (x4)
ADC_range_mult2 100 [1:0] 0
Change multiplier of the slope and the input range of the ramp used by the ADC for lower clock speeds. Only use with ADC_range_mult=3.
0: x4
1: x8
3: x16
The ADC range also has to be adjusted when using different clock speeds. See section 7.7.4.
7.5.4 Data Rate
During start-up or after a sequencer reset, the data rate can be changed if a lower speed than
600 Mbit/s is desired. This can be done by applying a lower LVDS input clock (LVDS_CLK_P/N).
7.5.5 Power Consumption
The power consumption of the sensor can be decreased by disabling the LVDS data channels when
they are not used (in 32, 16, 8, 4, 2 or 1 channel(s) mode). Disabling an output saves about 15mW on
the VDD18 supply per output.
Figure 80:
Power Consumption
Reg. Name Address Bits Default Description
Channel_en_bot 90
91
[15:0]
[15:0] 65535
Sets 1 channel per bit for the bottom outputs
0: Disabled
1: Enabled
Channel_en_top 92
93
[15:0]
[15:0] 65535
Sets 1 channel per bit for the top outputs
0: Disabled
1: Enabled
Channel_en 94 [2:0] 7
Bit 0: Output clock channel
Bit 1: Control channel
Bit 2: Input clock channel
0: Disabled
1: Enabled

Document Feedback CMV12000 Functional Description
Datasheet • PUBLIC DS000603 • v5-00 • 2022-Feb-04 84 60
7.6 Additional Features
7.6.1 Offset
A digital offset can be applied to the output signal. This dark level offset can be programmed by setting
the desired value in the sequencer registers. A bottom and top channel offset can be given to the dark
level by programming the appropriate registers. This offset should be adjusted per device and per bit
mode to get the desired dark level.
Figure 81:
Offset Settings
Reg. Name Address Bits Default Description
Offset_bot 87 [11:0] 780
Sets the relative offset of the dark level for the bottom outputs following a 2’s-complement code.
1815: 12b
510: 10b
520: 8b
Offset_top 88 [11:0] 780
Sets the relative offset of the dark level for the top outputs following a 2’s-complement code.
1815: 12b
510: 10b
520: 8b
7.6.2 Gain
An analog (using a Programmable Gain Amplifier) and digital gain (after ADC) can be applied to the
image. The digital gain has to be adjusted based on the bit mode for a unity gain.
Figure 82:
Gain Settings
Reg. Name Address Bits Default Description
PGA_gain 115 [2:0] 0
0: x1
1: x2
3: x3
7: x4
PGA_div 115 [3] 0
Can be used in binning mode
0: Divide by 1
1: Divide by 3
Dig_gain 117 [4:0] 4
Set to 1,2,3,4,6,8,10,12,14,16 to get the appropriate digital gain. For unity gain use:
1: 12b
4: 10b
6: 8b

Document Feedback CMV12000 Functional Description
Datasheet • PUBLIC DS000603 • v5-00 • 2022-Feb-04 84 61
7.6.3 Electrical Black Reference Columns
The first and last eight columns of the pixel array can be changed to an electrical black reference.
This electrical black reference can be used to correct row noise. The black level offset between the EB
and normal pixels will differ. Because of the limited amount of EB pixels per row (16), row correction is
limited.
Figure 83:
Electrical Black Reference Settings
Reg. Name Address Bits Default Description
Black_col_en 89 [15] 0 0: Off
1: On
7.6.4 Test Pattern
The sensor has a built-in digital fixed test pattern. This can be used, for example, to test the FPGA’s
data input implementation.
The pattern consists of increasing pixel values per column per channel. The first column of each (top
and bottom) channel, offsets with 1 compared to the previous channel. So channels 1/33 will contain
0, 1, 2 … 126, 127 and channels 2/34 contain 1, 2, 3 … 127, 128 and channels 32/64 contain 31, 32,
33 … 157, 158 and so on.
To have the same test pattern in 8b as in 10b and 12b, the digital gain has to be set to 16. Set it back
to 6 when taking normal images again.
Figure 84:
Test Pattern Setting
Reg. Name Address Bits Default Description
Test 122 [1:0] 0 0: Off
3: On
Figure 85:
Test Pattern Image

Document Feedback CMV12000 Functional Description
Datasheet • PUBLIC DS000603 • v5-00 • 2022-Feb-04 84 62
Figure 86:
Test Pattern Data
7.6.5 Temperature Sensor
A 16-bit digital temperature sensor is included in the image sensor and can be controlled by the SPI-
interface. An input clock at pin CLK_IN must be applied to use the temperature sensor. The on-chip
temperature can be calculated by reading out the Temp_sensor register.
The value in the temperature sensor register is dependent on the CLK_IN frequency. The value has
an offset (so at 0°C the value in this register is not 0) and a slope (DN/°C). Both are input clock
dependent. For example, if you read out a value of 1000DN at 40MHz, you will read a value of 500DN
at 20MHz at the same temperature.
The offset and slope values will vary between devices. The typical offset and slope values are:
Equation 6:
𝑂𝑓𝑓𝑠𝑒𝑡 [𝐷𝑁] =825 × 𝑓𝐶𝐿𝐾_𝐼𝑁
30
Equation 7:
𝑆𝑙𝑜𝑝𝑒 [𝐷𝑁
°𝐶] =
3.5 × 𝑓𝐶𝐿𝐾_𝐼𝑁
30
As the offset value varies between devices, at least a 1-point calibration per device should be done at
a known temperature to compensate this offset. As the slope variation is and has less of an influence
on the accuracy, a 2-point calibration is only needed if higher accuracy of the temperature is needed.
Below is an example of two devices (CLK_IN = 60 MHz) register values at different temperatures. The
offset and slope vary about 300DN and 0.5DN/°C between each other. You can clearly see that not
calibrating for the offset difference (so using 1600DN) will result in a very large error while using the
typical 7DN/°C will yield only small inaccuracy.
0
20
40
60
80
100
120
140
160
0 128 256 384 512 640 768 896 1024 1152 1280 1408 1536 1664 1792 1920 2048 2176 2304 2432 2560 2688 2816 2944 3072 3200 3328 3456 3584 3712 3840 3968 4096
Ou
tpu
t [D
N]
Column number

Document Feedback CMV12000 Functional Description
Datasheet • PUBLIC DS000603 • v5-00 • 2022-Feb-04 84 63
Figure 87:
Temperature Sensor Calibration Examples
Figure 88:
Temperature Sensor Register
Reg. Name Address Bits Default Description
Temp_sensor 127 [15:0] - Read-Only. Contains a value for calculating the sensor temperature.
The on-chip temperature sensor is located in the middle of the left side. See Figure 89.
y = 6.82x + 1505
y = 7.38x + 1804
1400
1500
1600
1700
1800
1900
2000
2100
2200
2300
0 10 20 30 40 50 60
Reg
iste
r V
alu
e [D
N]
Device Temperature [°C]
Reg_val_dev1
Reg_val_dev2

Document Feedback CMV12000 Functional Description
Datasheet • PUBLIC DS000603 • v5-00 • 2022-Feb-04 84 64
Figure 89:
Temperature Sensor Location
7.6.6 Digital Test Outputs
The sensor has two digital test output pins (TDIG1, TDIG2), which can be used to easily monitor the
sensor state without using the high-speed LVDS control channel.
Use register 123[7:0] to program the output functionality:
Figure 90:
Digital Test Pins
Reg123[3:0] TDIG1 Reg123[7:4] TDIG2
0 LVAL 0 DVAL
2 FOT 3 INTE_1
3 INTE_2 5 CLK_PIX (= Output clock divided by the bit mode)
15 FVAL
7.7 Additional Required Register Settings
Depending on the mode or clock speed of the sensor, some additional registers are required to be set.
7.7.1 8b Mode
These settings need to be adjusted per number of channels used per side and normal, X&Y-
subsampling or binning mode.

Document Feedback CMV12000 Functional Description
Datasheet • PUBLIC DS000603 • v5-00 • 2022-Feb-04 84 65
Figure 91:
Additional Required Settings for 8b Mode
Mode Number of Outputs Per Side
Reg. Address 32 16 8 4 2 1
Normal Mode
82 3618 2082 1058 546 290 290
83 5894 5896 5896 5896 5896 5896
84 143 143 143 143 143 143
85 143 257 515 1031 2063 4127
86 143 257 515 1031 2063 4127
87 510 510 510 510 510 510
88 510 510 510 510 510 510
98 36362 36362 36362 36362 36362 36362
107 11614 11614 11614 11614 11614 11614
109 13416 13416 13416 13416 13416 13416
113 788 788 788 788 788 788
114 90 90 90 90 90 90
X&Y-Subsampling
82 2338 2082 1058 546 290 290
83 5893 5893 5893 5893 5893 5893
84 143 143 143 143 143 143
85 239 257 515 1031 2063 4127
86 119 128 257 515 1031 2063
87 510 510 510 510 510 510
88 510 510 510 510 510 510
98 36621 36621 36621 36621 36621 36621
107 11614 11614 11614 11614 11614 11614
109 13416 13416 13416 13416 13416 13416
113 791 791 791 791 791 791
114 93 93 93 93 93 93
Binning
82 802 802 802 546 290 290
83 5896 5896 5896 5896 5896 5896
84 163 163 163 163 163 163
85 767 767 767 1031 2063 4127
86 191 191 191 257 515 1031
87 360 360 360 360 360 360
88 360 360 360 360 360 360
98 36618 36618 36618 36618 36618 36618
107 11614 11614 11614 11614 11614 11614

Document Feedback CMV12000 Functional Description
Datasheet • PUBLIC DS000603 • v5-00 • 2022-Feb-04 84 66
Mode Number of Outputs Per Side
Reg. Address 32 16 8 4 2 1
109 13416 13416 13416 13416 13416 13416
113 1571 1571 1571 1571 1571 1571
114 90 90 90 90 90 90
7.7.2 10b Mode
These settings need to be adjusted per number of channels used per side and normal, X&Y-
subsampling or binning mode.
Figure 92:
Additional Required Settings for 10b Mode
Mode Number of Outputs Per Side
Reg. Address 32 16 8 4 2 1
Normal Mode
82 3099 1563 795 539 283 283
83 5893 12805 12805 12805 12805 12805
84 128 128 128 128 128 128
85 128 257 515 1031 2063 4127
86 128 257 515 1031 2063 4127
87 540 540 540 540 540 540
88 540 524 524 524 524 524
98 44812 44812 44812 44812 44812 44812
107 11614 11614 11614 11614 11614 11614
109 13416 13416 13416 13416 13416 13416
113 789 789 789 789 789 789
114 84 84 84 84 84 84
X&Y-Subsampling
82 2843 1563 795 539 283 283
83 5891 5893 5893 5893 5893 5893
84 143 257 257 257 257 257
85 143 257 515 1031 2063 4127
86 71 128 257 515 1031 2063
87 550 480 480 480 480 480
88 540 480 480 480 480 480
98 44815 36620 36620 36620 36620 36620
107 11614 11614 11614 11614 11614 11614
109 13416 13416 13416 13416 13416 13416

Document Feedback CMV12000 Functional Description
Datasheet • PUBLIC DS000603 • v5-00 • 2022-Feb-04 84 67
Mode Number of Outputs Per Side
Reg. Address 32 16 8 4 2 1
113 798 1586 1586 1586 1586 1586
114 90 109 109 109 109 109
Binning
82 798 798 798 542 286 286
83 5894 5894 5894 5898 5908 5908
84 575 575 575 575 575 575
85 575 575 575 1031 2063 4127
86 143 143 143 257 515 1031
87 630 630 630 630 630 630
88 630 630 630 630 630 630
98 36619 36619 36619 36619 36619 36619
107 11606 11606 11606 11606 11606 11606
109 13416 13416 13416 13416 13416 13416
113 1054 1054 1054 1054 1054 1054
114 100 100 100 100 100 100
7.7.3 12b Mode
These settings need to be adjusted per number of channels used per side and normal, X&Y-
subsampling or binning mode.
Figure 93:
Additional Required Settings for 12b Mode
Mode Number of Outputs Per Side
Reg. Address 32 16 8 4 2 1
Normal Mode
82 1822 1822 1054 542 286 286
83 5897 5897 5897 5897 5897 5897
84 244 257 257 257 257 257
85 244 257 515 1031 2063 4127
86 244 257 515 1031 2063 4127
87 1910 1910 1910 1910 1910 1910
88 1910 1910 1910 1910 1910 1910
98 39433 39433 39433 39433 39433 39433
107 11102 11102 11102 11102 11102 11102
109 14835 14448 14448 14448 14448 14448
113 534 542 542 542 542 542

Document Feedback CMV12000 Functional Description
Datasheet • PUBLIC DS000603 • v5-00 • 2022-Feb-04 84 68
Mode Number of Outputs Per Side
Reg. Address 32 16 8 4 2 1
114 200 200 200 200 200 200
X&Y-Subsampling
82 2078 3102 1054 542 286 286
83 5893 5893 5893 5893 5893 5893
84 239 257 257 257 257 257
85 239 257 515 1031 2063 4127
86 119 128 257 515 1031 2063
87 1975 1935 1935 1935 1935 1935
88 1975 1935 1915 1915 1915 1915
98 36364 36364 36364 36364 36364 36364
107 11102 11102 11102 11102 11102 11102
109 14835 14835 14835 14835 14835 14835
113 529 542 542 542 542 542
114 190 200 200 200 200 200
Binning
82 1054 1054 1054 542 286 286
83 5893 5893 5893 5898 5898 5898
84 479 479 479 479 479 479
85 479 479 515 1031 2063 4127
86 119 119 128 257 515 1031
87 1255 1255 1425 1425 1425 1425
88 1255 1255 1425 1425 1425 1425
98 36620 36620 36620 36620 36620 36620
107 11102 11102 11102 11102 11102 11102
109 14835 14835 14835 14835 14835 14835
113 13342 13342 9246 7710 7710 7710
114 200 200 200 200 200 200
7.7.4 Clock Speed
Some settings need to be changed depending on the clock speed.
FOT
When you are running at a lower speed, register 107[13:7] has to be adjusted to keep the image
quality good. The plots below give you an overview, which value to choose per bit mode. Round down
if the recommended register value is between integers.

Document Feedback CMV12000 Functional Description
Datasheet • PUBLIC DS000603 • v5-00 • 2022-Feb-04 84 69
Figure 94:
FOT Register vs Clock Speed
Information
Bits [6:0] of register 107 do not change with clock speed. Keep these bits always the same, at the
recommended value from previous sections. For example at 10b default mode, register 107 =
11614, so bits [6:0] should remain 94.
ADC Range
The ADC range is dependent of the input clock speed, the slower the clock the higher the ADC range
setting has to be. Below you can see a plot showing which ADC range and multipliers to use with a
certain clock speed and bit mode.
The multiplier registers set the total multiplication for the ADC input range. The table below gives an
overview of the total multiplication (used in Figure 96) that is applicable.
For example, when running at 400 MHz, make a vertical line on this frequency until crossing all 3
diagonal lines. Crossing the dashed yellow line, this refers to 12b_mult_x16. Then, find x16 on the
table from Figure 95, finally, you should use the values:
ADC_range = 70, ADC_range_mult = 3, ADC_range_mult2 = 3 for 12b ADC.
ADC_range = 220, ADC_range_mult = 1, ADC_range_mult2 = 0 for 10b ADC.
ADC_range = 247, ADC_range_mult = 0, ADC_range_mult2 = 0 for 8b ADC.
77
78
79
80
81
82
83
84
85
86
87
88
89
90
91
100 150 200 250 300 350 400 450 500 550 600
Reg
10
7[1
3:7
]
LVDS Input CLK [MHz]
FOT register vs CLK
8b
10b
12b

Document Feedback CMV12000 Functional Description
Datasheet • PUBLIC DS000603 • v5-00 • 2022-Feb-04 84 70
Figure 95:
ADC Range Multiplication
ADC_range_mult2
ADC_range_mult
0
ADC_range_mult
1
ADC_range_mult
3
0 ×1 ×2 ×4
1 N/A N/A ×8
3 N/A N/A ×16
Figure 96:
ADC Range Settings
10
20
30
40
50
60
70
80
90
100
110
120
130
140
150
160
170
180
190
200
210
220
230
240
250
260
100 150 200 250 300 350 400 450 500 550 600
AD
C_R
an
ge S
etti
ng
[ ]
LVDS Input CLK [MHz]
8b_mult_x1
10b_mult_x2
12b_mult_x4
8b_mult_x4
10b_mult_x8
12b_mult_x16

Document Feedback CMV12000 Register Description
Datasheet • PUBLIC DS000603 • v5-00 • 2022-Feb-04 84 71
8 Register Description
8.1 Register Categories
The registers are grouped into various categories, based on when they may (or not may) be updated
and synced. The table below explains the details of the various categories.
Figure 97:
Register Categories
Category Description
- Register without category that can be uploaded at any time, but might directly influence the sensor execution.
SYNC
Registers are internally synchronized to the end of FOT, so the read out will be done with these registers applied.
Registers can only be uploaded during IDLE or FOT.
FRAME Registers will be internally synced at FRAME_REQ.
Registers can only be uploaded during IDLE.
INTE Registers will be internally synced at start of INTE.
Registers can only be uploaded during IDLE or FOT.
DC Registers will be internally synced immediately.
Registers can only be uploaded during IDLE or FOT.
IDLE Registers will be internally synced immediately.
Registers can only be uploaded when the sensor is IDLE.
RO Registers can be read only.
8.2 Register Overview
Below is an overview of all registers, together with their default value after reset/startup. Some
registers have to be changed to another fixed value after reset/startup, independent on the sensor
control or modes. This value is in the last column.
Figure 98:
Register Overview
Address Register Name(s) Category Default Value Fixed Value
0 - 0
1 Number_lines_tot[15:0] SYNC 3072
2 Y_start_1[15:0] SYNC 0
3 Y_start_2[15:0] SYNC 0
4 Y_start_3[15:0] SYNC 0

Document Feedback CMV12000 Register Description
Datasheet • PUBLIC DS000603 • v5-00 • 2022-Feb-04 84 72
Address Register Name(s) Category Default Value Fixed Value
5 Y_start_4[15:0] SYNC 0
6 Y_start_5[15:0] SYNC 0
7 Y_start_6[15:0] SYNC 0
8 Y_start_7[15:0] SYNC 0
9 Y_start_8[15:0] SYNC 0
10 Y_start_9[15:0] SYNC 0
11 Y_start_10[15:0] SYNC 0
12 Y_start_11[15:0] SYNC 0
13 Y_start_12[15:0] SYNC 0
14 Y_start_13[15:0] SYNC 0
15 Y_start_14[15:0] SYNC 0
16 Y_start_15[15:0] SYNC 0
17 Y_start_16[15:0] SYNC 0
18 Y_start_17[15:0] SYNC 0
19 Y_start_18[15:0] SYNC 0
20 Y_start_19[15:0] SYNC 0
21 Y_start_20[15:0] SYNC 0
22 Y_start_21[15:0] SYNC 0
23 Y_start_22[15:0] SYNC 0
24 Y_start_23[15:0] SYNC 0
25 Y_start_24[15:0] SYNC 0
26 Y_start_25[15:0] SYNC 0
27 Y_start_26[15:0] SYNC 0
28 Y_start_27[15:0] SYNC 0
29 Y_start_28[15:0] SYNC 0
30 Y_start_29[15:0] SYNC 0
31 Y_start_30[15:0] SYNC 0
32 Y_start_31[15:0] SYNC 0
33 Y_start_32[15:0] SYNC 0
34 Y_size_1[15:0] SYNC 0
35 Y_size_2[15:0] SYNC 0
36 Y_size_3[15:0] SYNC 0
37 Y_size_4[15:0] SYNC 0
38 Y_size_5[15:0] SYNC 0
39 Y_size_6[15:0] SYNC 0
40 Y_size_7[15:0] SYNC 0
41 Y_size_8[15:0] SYNC 0
42 Y_size_9[15:0] SYNC 0
43 Y_size_10[15:0] SYNC 0
44 Y_size_11[15:0] SYNC 0

Document Feedback CMV12000 Register Description
Datasheet • PUBLIC DS000603 • v5-00 • 2022-Feb-04 84 73
Address Register Name(s) Category Default Value Fixed Value
45 Y_size_12[15:0] SYNC 0
46 Y_size_13[15:0] SYNC 0
47 Y_size_14[15:0] SYNC 0
48 Y_size_15[15:0] SYNC 0
49 Y_size_16[15:0] SYNC 0
50 Y_size_17[15:0] SYNC 0
51 Y_size_18[15:0] SYNC 0
52 Y_size_19[15:0] SYNC 0
53 Y_size_20[15:0] SYNC 0
54 Y_size_21[15:0] SYNC 0
55 Y_size_22[15:0] SYNC 0
56 Y_size_23[15:0] SYNC 0
57 Y_size_24[15:0] SYNC 0
58 Y_size_25[15:0] SYNC 0
59 Y_size_26[15:0] SYNC 0
60 Y_size_27[15:0] SYNC 0
61 Y_size_28[15:0] SYNC 0
62 Y_size_29[15:0] SYNC 0
63 Y_size_30[15:0] SYNC 0
64 Y_size_31[15:0] SYNC 0
65 Y_size_32[15:0] SYNC 0
66 Sub_offset[15:0] SYNC 0
67 Sub_step[15:0] SYNC 1
68 Color[3], Bin_en[2], Sub_en[1], Color[0] IDLE 9
69 Image_flipping[1:0] DC 0
70 Exp_dual[1], Exp_ext[0] IDLE 0
71 Exp_time[15:0] INTE 1536
72 Exp_time[23:16] INTE 0
73 Exp_time2[15:0] INTE 1536
74 Exp_time2[23:16] INTE 0
75 Exp_kp1[15:0] INTE 0
76 Exp_kp1[23:16] INTE 0
77 Exp_kp2[15:0] INTE 0
78 Exp_kp2[23:16] INTE 0
79 Number_slopes[1:0] INTE 1
80 Number_frames[15:0] FRAME 1
81 Disable_top[5], Output_mode[4:0] IDLE 0
82 IDLE 5682
83 IDLE 5893
84 IDLE 130

Document Feedback CMV12000 Register Description
Datasheet • PUBLIC DS000603 • v5-00 • 2022-Feb-04 84 74
Address Register Name(s) Category Default Value Fixed Value
85 IDLE 130
86 IDLE 130
87 Offset_bot[11:0] DC 780
88 Offset_top[11:0] DC 780
89 Black_col_en[15], Training_pattern[14:0] - 85
90 Channel_en_bot[15:0] IDLE 65535
91 Channel_en_bot[31:16] IDLE 65535
92 Channel_en_top[15:0] IDLE 65535
93 Channel_en_top[31:16] IDLE 65535
94 Channel_en[2:0] IDLE 7
95 ADC_clk_en_bot[15:0] IDLE 65535
96 ADC_clk_en_top[15:0] IDLE 65535
97 IDLE 0
98 IDLE 34952
99 IDLE 34952 34956
100 IDLE 0
101 IDLE 0
102 IDLE 8256 8302
103 IDLE 4032
104 IDLE 64
105 IDLE 8256
106 Vtfl3[13:7], Vtfl2[6:0] IDLE 8256
107 IDLE 12384
108 IDLE 12384 12381
109 Vramp2[13:7], Vramp1[6:0] IDLE 12384
110 IDLE 12384 12368
111 IDLE 34952
112 IDLE 0 277
113 IDLE 778
114 IDLE 95
115 PGA_div[3], PGA_gain[2:0] IDLE 0
116 ADC_range_mult[9:8], ADC_range[7:0] IDLE 383
117 DIG_gain[4:0] IDLE 4
118 Bit_mode[1:0] IDLE 1
119 IDLE 0
120 IDLE 9
121 IDLE 1
122 Test_pattern[1:0] IDLE 32
123 - 0
124 IDLE 5 15

Document Feedback CMV12000 Register Description
Datasheet • PUBLIC DS000603 • v5-00 • 2022-Feb-04 84 75
Address Register Name(s) Category Default Value Fixed Value
125 IDLE 2
126 RO 770
127 Temp_sensor[15:0] RO 0

Document Feedback CMV12000 Application Information
Datasheet • PUBLIC DS000603 • v5-00 • 2022-Feb-04 84 76
9 Application Information
9.1 Color Filter
For a color version of the CMV12000, the color filters are applied in a Bayer pattern. When flipping in
Y is not enabled (register 69 =0), the first pixel read-out, pixel (0, 0), is the top left one and has a red
filter. If register 69 is ‘2’ (recommended), the bottom left pixel (0, 3071) is read-out first and it has a
green filter.
Figure 99:
Color Filter Layout
Pixel (0,0)
R G R G
G B G B
R G R G
G B G B
R G R G
G B G B
R G R G
G B G B
Pixel (0,3071)

Document Feedback CMV12000 Application Information
Datasheet • PUBLIC DS000603 • v5-00 • 2022-Feb-04 84 77
9.2 Socket
To avoid putting the sensor through the soldering heat (stressing the color filters and micro-lenses), it
is advised to use a socket and place the sensor after the soldering phase. Sockets for this device are
available from Andon Electronics (www.andonelectronics.com) in both SMD and THT configuration.
10-30-07(A)-237-400T4-R27-L14: THT
10-30-07(A)-237-414T4-R27-L14: SMD
10-30-07(A)-237-RB501T4-R27-L14: SMD
An optional window in the socket is possible (A) for easy access to the sensor backside. Contact
Andon Electronics directly for more information.
9.3 Pin Layout
Figure 100:
Pin Layout from Bottom View
30 29 28 27 26 25 24 23 22 21 20 19 18 17 16 15 14 13 12 11 10 9 8 7 6 5 4 3 2 1
HT
_EXP2
SPI
_CLK
VDD
_PIXVSS VDD18 VSS
OUT63
_P
OUT63
_NVDD18 VSS
OUT56
_P
OUT56
_N
OUT52
_P
OUT52
_NVDD18 VDD18
OUT45
_P
OUT45
_N
OUT41
_P
OUT41
_NVDD18 VSS
OUT34
_P
OUT34
_NVSS VDD18 DIO3
CMDP
_COMP33
CMDP
_OSCVSS
GFRAME
_REQVRAMP1
SPI
_OUTTDIG1 TDIG2
OUT64
_P
OUT64
_N
OUT61
_P
OUT61
_N
OUT58
_P
OUT58
_N
OUT54
_P
OUT54
_N
OUT50
_P
OUT50
_N
OUT47
_P
OUT47
_N
OUT43
_P
OUT43
_N
OUT39
_P
OUT39
_N
OUT36
_P
OUT36
_N
OUTCLK
_P
OUTCLK
_NVSS
VDD
_RESDIO4
CMDN
_OSC
VDD
_PIX
FSYS
_RES_NVRAMP2
SPI
_ENVSS VDD33 NC NC
OUT60
_P
OUT60
_N
OUT57
_P
OUT57
_N
OUT53
_P
OUT53
_N
OUT49
_P
OUT49
_N
OUT48
_P
OUT48
_N
OUT44
_P
OUT44
_N
OUT40
_P
OUT40
_N
OUT37
_P
OUT37
_N
OUT33
_P
OUT33
_NVDD33 DIO1
CMDP
_COMP18CMDP CMDN
E MCLKT
_EXP1
SPI
_INVSS VDD33 VSS
OUT62
_P
OUT62
_N
OUT59
_P
OUT59
_N
OUT55
_P
OUT55
_N
OUT51
_P
OUT51
_NVSS VSS
OUT46
_P
OUT46
_N
OUT42
_P
OUT42
_N
OUT38
_P
OUT38
_N
OUT35
_P
OUT35
_N
LVDS
_CLK_P
LVDS
_CLK_NDIO2 VSS
VDD
_RES
VDD18
_PLL
DVDD
_PIXVSS
VDD
_PIXVSS VDD33 VSS
OUT30
_P
OUT30
_N
OUT27
_P
OUT27
_N
OUT24
_P
OUT24
_N
OUT20
_P
OUT20
_N
OUT17
_P
OUT17
_N
OUT15
_P
OUT15
_N
OUT10
_P
OUT10
_N
OUT6
_P
OUT6
_N
OUT3
_P
OUT3
_N
VTF
_LOW1
VRES
_LVCLAMP VDD33 VSS
CMD_COL
_PC
CVTF
_LOW3VBGAP VSS VDD33 VDD33
OUT32
_P
OUT32
_N
OUT28
_P
OUT28
_N
OUT25
_P
OUT25
_N
OUT21
_P
OUT21
_NVSS VSS
OUT14
_P
OUT14
_N
OUT11
_P
OUT11
_N
OUT7
_P
OUT7
_N
OUT4
_P
OUT4
_N
CMD
_COLAMP
VTF
_LOW0
VPCH
_H
VCM
_COMP33VTSIG
CMD
_LVDS
BVTF
_LOW2
CMD
_RAMPVSS VSS VSS
OUT31
_P
OUT31
_NVSS
OUT26
_P
OUT26
_N
OUT22
_P
OUT22
_N
OUT18
_P
OUT18
_N
OUT16
_P
OUT16
_N
OUT12
_P
OUT12
_N
OUT8
_P
OUT8
_N
OUT5
_P
OUT5
_N
OUT1
_P
OUT1
_NVSS VDD18
VREF
_ADCVTREF
CMD_COL
_LOAD
AVDD
_PIXVSS VSS VDD18 VDD18 VSS
OUT29
_P
OUT29
_NVDD18 VSS
OUT23
_P
OUT23
_N
OUT19
_P
OUT19
_NVDD18 VDD18
OUT13
_P
OUT13
_N
OUT9
_P
OUT9
_NVDD18 VSS
OUT2
_P
OUT2
_N
OUTCTR
_P
OUTCTR
_N
VPCH
_LVREF TANA
CMV12000237 µPGA Pins
(BOTTOM VIEW)
LVDS
No Pin
Not Connect
Reg/Bias/Ref
I/O
Supply
Ground

Document Feedback CMV12000 Package Drawings & Markings
Datasheet • PUBLIC DS000603 • v5-00 • 2022-Feb-04 84 78
10 Package Drawings & Markings
Figure 101:
237p µPGA Package Outline Drawing
(1) All dimensions are in mm
(2) Pin material: Kovar
(3) Pin plating: Au 1.5 µm min. over Ni 2.0 µm min.
(4) Ceramic material: Alumina (Al2O3)
(5) Ceramic properties: Thermal Conductivity = 18 W/m.K; Young’s mod = 280GPa; CTE = 7.6×10⁻⁶/K
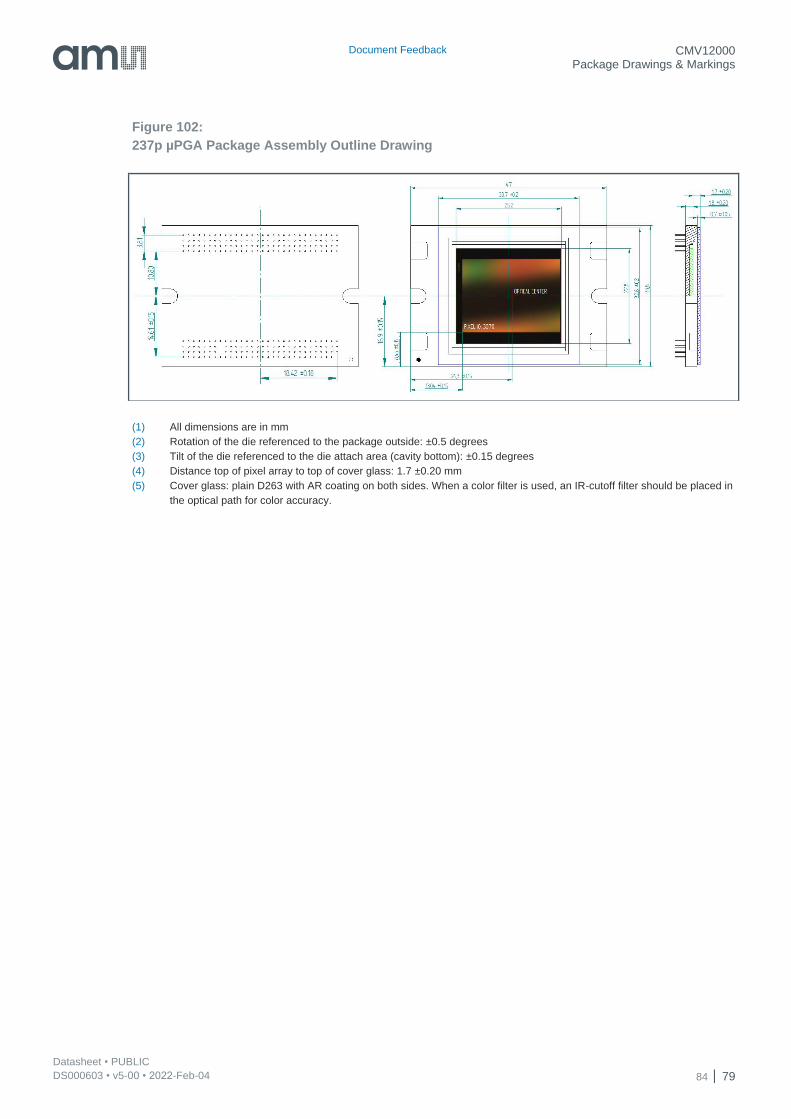
Document Feedback CMV12000 Package Drawings & Markings
Datasheet • PUBLIC DS000603 • v5-00 • 2022-Feb-04 84 79
Figure 102:
237p µPGA Package Assembly Outline Drawing
(1) All dimensions are in mm
(2) Rotation of the die referenced to the package outside: ±0.5 degrees
(3) Tilt of the die referenced to the die attach area (cavity bottom): ±0.15 degrees
(4) Distance top of pixel array to top of cover glass: 1.7 ±0.20 mm
(5) Cover glass: plain D263 with AR coating on both sides. When a color filter is used, an IR-cutoff filter should be placed in
the optical path for color accuracy.

Document Feedback CMV12000 Packing Information
Datasheet • PUBLIC DS000603 • v5-00 • 2022-Feb-04 84 80
11 Packing Information
Devices are shipped in a 3×6 matrix 33.8×47 µPGA JEDEC tray.

Document Feedback CMV12000 Soldering & Storage Information
Datasheet • PUBLIC DS000603 • v5-00 • 2022-Feb-04 84 81
12 Soldering & Storage Information
12.1 Soldering
CMV12000 is not shipped in a moisture barrier package. When reflow soldering, a dry bake needs to
be performed upfront! The CMV12000 device has passed MSL3 testing. Figure 103 shows the
maximum recommended thermal profile for a reflow soldering system (following Standard J-STD-020).
If the temperature/time profile exceeds these recommendations, damage to the image sensor can
occur.
Attention
1. Image sensors with color filter arrays (CFA) and micro lenses are especially sensitive to high
temperatures. Prolonged heating at elevated temperatures may result in deterioration of the
optical performance of the sensor.
2. A socket (see 9.2) is the safest way to avoid any thermal stress. When not using a socket, to
avoid heating up the device we recommend to use manual hand soldering. Wave soldering
can be used with precautions (see below). Reflow soldering is not recommended.
Manual soldering: Use partial heating method and use a soldering iron with temperature control. The
soldering iron tip temperature is not to exceed 350 °C with a 270 °C maximum pin temperature. Touch
for a 2 seconds maximum duration per pin. Avoid touching and global heating of the ceramic package
during soldering. Failure to do so may alter device performance and reliability.
Wave soldering: Wave solder dipping can cause damage to the glass and harm the imaging capability
of the device. Avoid the solder to come in contact with the glass or ceramic body.

Document Feedback CMV12000 Soldering & Storage Information
Datasheet • PUBLIC DS000603 • v5-00 • 2022-Feb-04 84 82
Figure 103:
Solder Reflow Profile Graph
12.2 Storage
Image sensors should be stored under the following conditions:
Dust free
Temperature between 20 °C and 40 °C
Humidity between 30% and 60% RH
Avoid radiation, electromagnetic fields, ESD and mechanical stress

Document Feedback CMV12000 Revision Information
Datasheet • PUBLIC DS000603 • v5-00 • 2022-Feb-04 84 83
13 Revision Information
Document Status Product Status Definition
Product Preview Pre-Development Information in this datasheet is based on product ideas in the planning phase of development. All specifications are design goals without any warranty and are subject to change without notice
Preliminary Datasheet Pre-Production Information in this datasheet is based on products in the design, validation or qualification phase of development. The performance and parameters shown in this document are preliminary without any warranty and are subject to change without notice
Datasheet Production Information in this datasheet is based on products in ramp-up to full production or full production which conform to specifications in accordance with the terms of ams-OSRAM AG standard warranty as given in the General Terms of Trade
Datasheet (discontinued)
Discontinued Information in this datasheet is based on products which conform to specifications in accordance with the terms of ams-OSRAM AG standard warranty as given in the General Terms of Trade, but these products have been superseded and should not be used for new designs
Changes from previous version to current revision v5-00 Page
Updated Functional Blocks 4
Added Ordering Information scheme 5
Corrected information about pin C3, F3, G2, H2 and H3 8, 10, 11 and 12
ADC Range example clarification and correction 69
Pin Layout image correction 77
Page and figure numbers for the previous version may differ from page and figure numbers in the current revision.
Correction of typographical errors is not explicitly mentioned.

Document Feedback CMV12000 Legal Information
Datasheet • PUBLIC DS000603 • v5-00 • 2022-Feb-04 84 84
14 Legal Information
Copyrights & Disclaimer
Copyright ams-OSRAM AG, Tobelbader Strasse 30, 8141 Premstaetten, Austria-Europe. Trademarks Registered. All rights reserved. The material herein may not be reproduced, adapted, merged, translated, stored, or used without the prior written consent of the copyright owner.
Devices sold by ams-OSRAM AG are covered by the warranty and patent indemnification provisions appearing in its General Terms of Trade. ams-OSRAM AG makes no warranty, express, statutory, implied, or by description regarding the information set forth herein. ams-OSRAM AG reserves the right to change specifications and prices at any time and without notice. Therefore, prior to designing this product into a system, it is necessary to check with ams-OSRAM AG for current information. This product is intended for use in commercial applications. Applications requiring extended temperature range, unusual environmental requirements, or high reliability applications, such as military, medical life-support or life-sustaining equipment are specifically not recommended without additional processing by ams-OSRAM AG for each application. This product is provided by ams-OSRAM AG “AS IS” and any express or implied warranties, including, but not limited to the implied warranties of merchantability and fitness for a particular purpose are disclaimed.
ams-OSRAM AG shall not be liable to recipient or any third party for any damages, including but not limited to personal injury, property damage, loss of profits, loss of use, interruption of business or indirect, special, incidental or consequential damages, of any kind, in connection with or arising out of the furnishing, performance or use of the technical data herein. No obligation or liability to recipient or any third party shall arise or flow out of ams-OSRAM AG rendering of technical or other services.
RoHS Compliant & ams Green Statement
RoHS Compliant: The term RoHS compliant means that ams-OSRAM AG products fully comply with current RoHS directives. Our semiconductor products do not contain any chemicals for all 6 substance categories plus additional 4 substance categories (per amendment EU 2015/863), including the requirement that lead not exceed 0.1% by weight in homogeneous materials. Where designed to be soldered at high temperatures, RoHS compliant products are suitable for use in specified lead-free processes.
ams Green (RoHS compliant and no Sb/Br/Cl): ams Green defines that in addition to RoHS compliance, our products are free of Bromine (Br) and Antimony (Sb) based flame retardants (Br or Sb do not exceed 0.1% by weight in homogeneous material) and do not contain Chlorine (Cl not exceed 0.1% by weight in homogeneous material).
Important Information: The information provided in this statement represents ams-OSRAM AG knowledge and belief as of the date that it is provided. ams-OSRAM AG bases its knowledge and belief on information provided by third parties, and makes no representation or warranty as to the accuracy of such information. Efforts are underway to better integrate information from third parties. ams-OSRAM AG has taken and continues to take reasonable steps to provide representative and accurate information but may not have conducted destructive testing or chemical analysis on incoming materials and chemicals. ams-OSRAM AG and ams-OSRAM AG suppliers consider certain information to be proprietary, and thus CAS numbers and other limited information may not be available for release.
Headquarters
ams-OSRAM AG
Tobelbader Strasse 30
8141 Premstaetten
Austria, Europe
Tel: +43 (0) 3136 500 0
Please visit our website at www.ams.com
Buy our products or get free samples online at www.ams.com/Products
Technical Support is available at www.ams.com/Technical-Support
Provide feedback about this document at www.ams.com/Document-Feedback
For sales offices, distributors and representatives go to www.ams.com/Contact
For further information and requests, e-mail us at [email protected]


