69
Ver. 13.09.06 HDxViewer Manual
Ver. 13.09.06
HDxViewer
Manual
HHDDxxVViieewweerr MMaannuuaall
2 / 69
SSyymmbboollss aanndd LLeetttteerrss uusseedd iinn tthhiiss MMaannuuaall
Importance mark : Arrangement of items to be considered for completing work
Additional information or tip to avoid in order to completing work
Mouse left button click
Mouse left button double-click
Mouse right button click
HHDDxxVViieewweerr MMaannuuaall
3 / 69
Symbols and Letters used in this Manual .............................................................................. 2
Quick Manual .............................................................................................................................. 5
Live..................................................................................................................................... 5
Search ............................................................................................................................... 7
System Setup ................................................................................................................... 8
1. HDxViewer............................................................................................................................ 10
1.1 Time check ............................................................................................................... 10
1.2 Search, screen capture, setup, E-Map ................................................................ 11
1.3 Server list indication .............................................................................................. 11
1.4 Program shutdown, PTZ control, server connection & disconnection............ 14
1.5 Screen division, full screen and switching ......................................................... 15
1.6 LCD window and log ............................................................................................... 16
1.7 Single channel player, network recording and preset ...................................... 17
1.8 Authentication ......................................................................................................... 18
1.9 Screen capture ........................................................................................................ 19
1.10 Server list .............................................................................................................. 20
1.10.1 Server connection .............................................................................. 22
1.10.2 Server disconnection .......................................................................... 22
1.10.3 Connect all servers ............................................................................ 23
1.10.4 Watching video.................................................................................. 23
1.10.5 Not watching video ............................................................................ 24
1.11 Server list use ....................................................................................................... 25
1.11.1 Server addition ................................................................................. 27
1.11.2 Server information change .................................................................. 28
1.11.3 Server deletion.................................................................................. 28
1.12 Single channel player .......................................................................................... 29
1.12.1 Single channel player ......................................................................... 29
1.13 Preset ..................................................................................................................... 30
1.13.1 Add preset ........................................................................................ 32
1.13.2 Preset information change .................................................................. 33
1.13.3 Delete preset .................................................................................... 34
1.14 Setup ...................................................................................................................... 34
1.14.1 Local setup ....................................................................................... 35
1.14.2 Remote setup ................................................................................... 45
Contents
HHDDxxVViieewweerr MMaannuuaall
4 / 69
1.15 Search .................................................................................................................... 46
1.16. Backup Viewer ..................................................................................................... 47
1.17. E-Map .................................................................................................................... 49
1.17.1 Time check ....................................................................................... 49
1.17.2 Map management .............................................................................. 49
1.17.3 Selection of server ............................................................................. 53
1.17.4 Log .................................................................................................. 53
1.17.5 Setup ............................................................................................... 54
1.17.6 Map setup ........................................................................................ 55
1.17.7 Map menu ........................................................................................ 58
1.18 Callback Server ..................................................................................................... 60
1.18.1 Notification Setup .............................................................................. 60
1.18.2 Callback Server Setup ........................................................................ 63
1.18.3 Callback Server Function .................................................................... 64
HHDDxxVViieewweerr MMaannuuaall
5 / 69
QQuuiicckk MMaannuuaall
LLiivvee
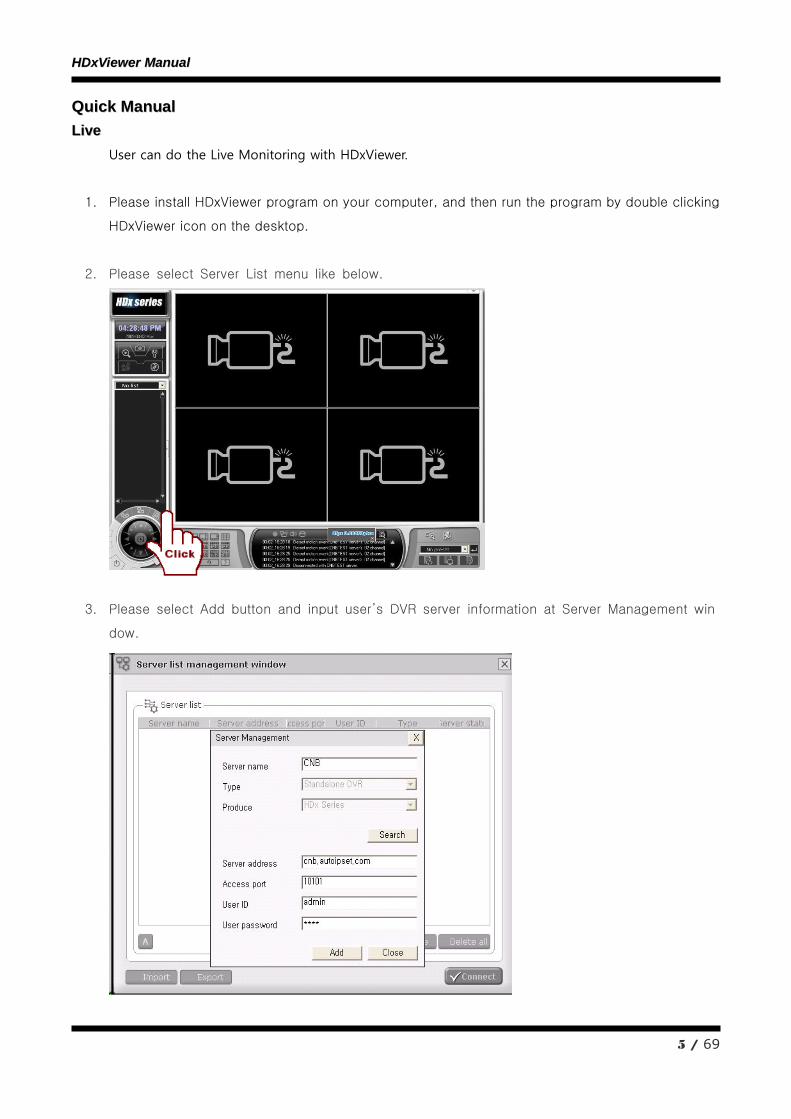
User can do the Live Monitoring with HDxViewer.
1. Please install HDxViewer program on your computer, and then run the program by double clicking
HDxViewer icon on the desktop.
2. Please select Server List menu like below.
3. Please select Add button and input user’s DVR server information at Server Management win
dow.
HHDDxxVViieewweerr MMaannuuaall
6 / 69
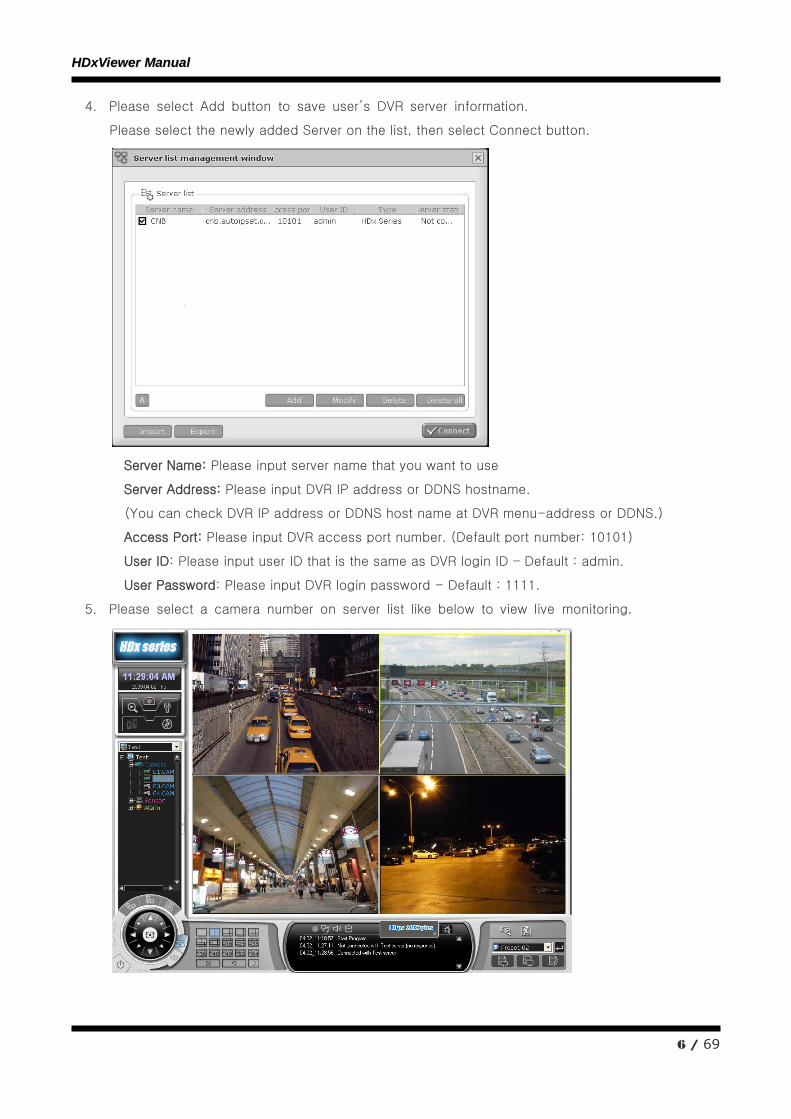
4. Please select Add button to save user’s DVR server information.
Please select the newly added Server on the list, then select Connect button.
Server Name: Please input server name that you want to use
Server Address: Please input DVR IP address or DDNS hostname.
(You can check DVR IP address or DDNS host name at DVR menu-address or DDNS.)
Access Port: Please input DVR access port number. (Default port number: 10101)
User ID: Please input user ID that is the same as DVR login ID – Default : admin.
User Password: Please input DVR login password - Default : 1111.
5. Please select a camera number on server list like below to view live monitoring.
HHDDxxVViieewweerr MMaannuuaall
7 / 69
SSeeaarrcchh
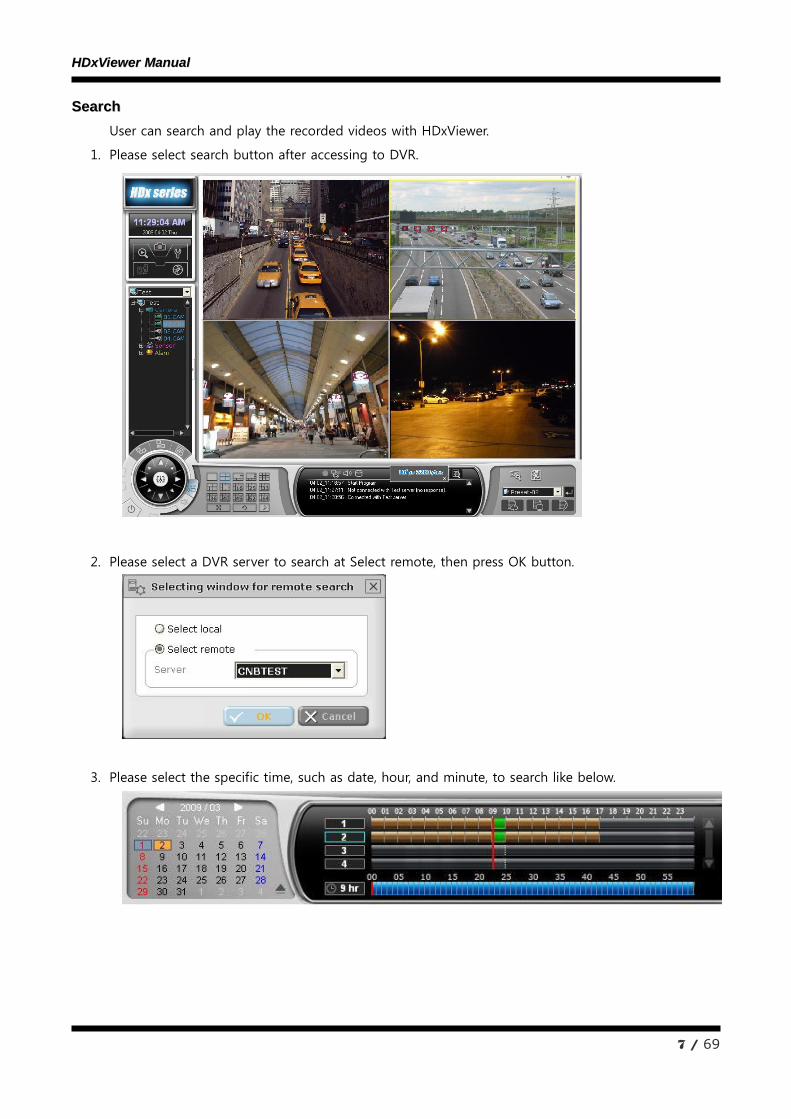
User can search and play the recorded videos with HDxViewer.
1. Please select search button after accessing to DVR.
2. Please select a DVR server to search at Select remote, then press OK button.
3. Please select the specific time, such as date, hour, and minute, to search like below.
HHDDxxVViieewweerr MMaannuuaall
8 / 69
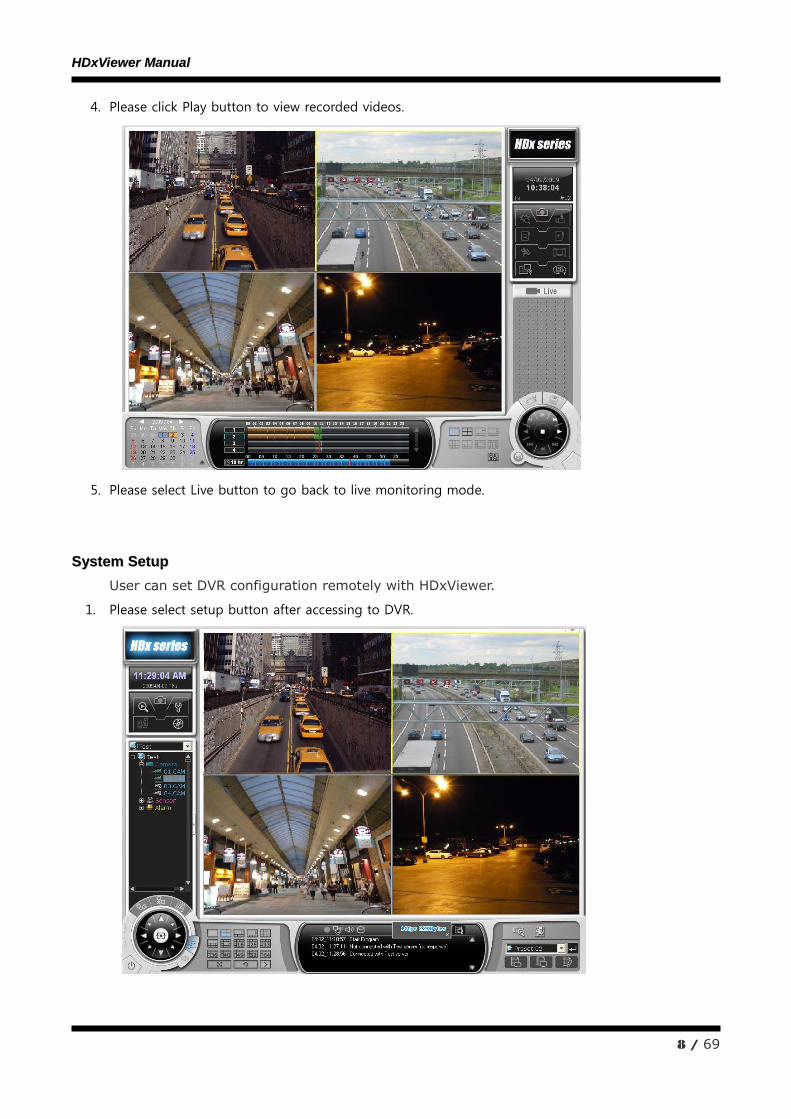
4. Please click Play button to view recorded videos.
5. Please select Live button to go back to live monitoring mode.
SSyysstteemm SSeettuupp
User can set DVR configuration remotely with HDxViewer.
1. Please select setup button after accessing to DVR.
HHDDxxVViieewweerr MMaannuuaall
9 / 69
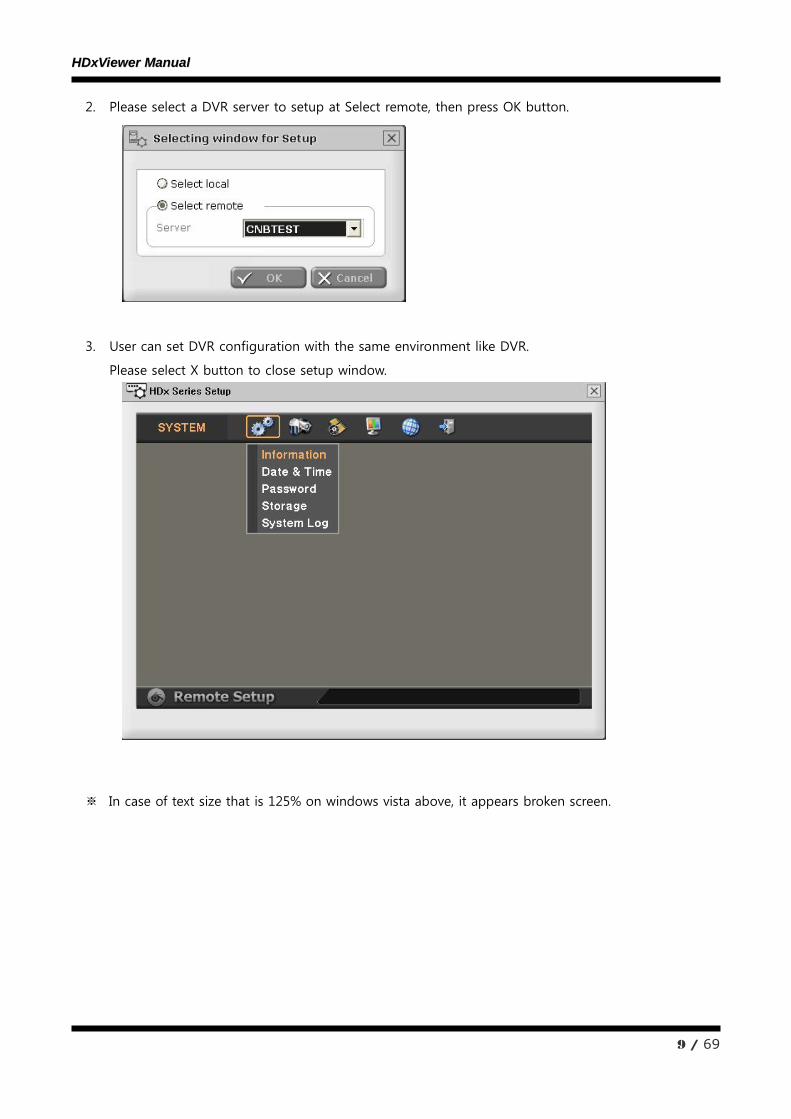
2. Please select a DVR server to setup at Select remote, then press OK button.
3. User can set DVR configuration with the same environment like DVR.
Please select X button to close setup window.
※ In case of text size that is 125% on windows vista above, it appears broken screen.

HHDDxxVViieewweerr MMaannuuaall
10 / 69
11.. HHDDxxVViieewweerr
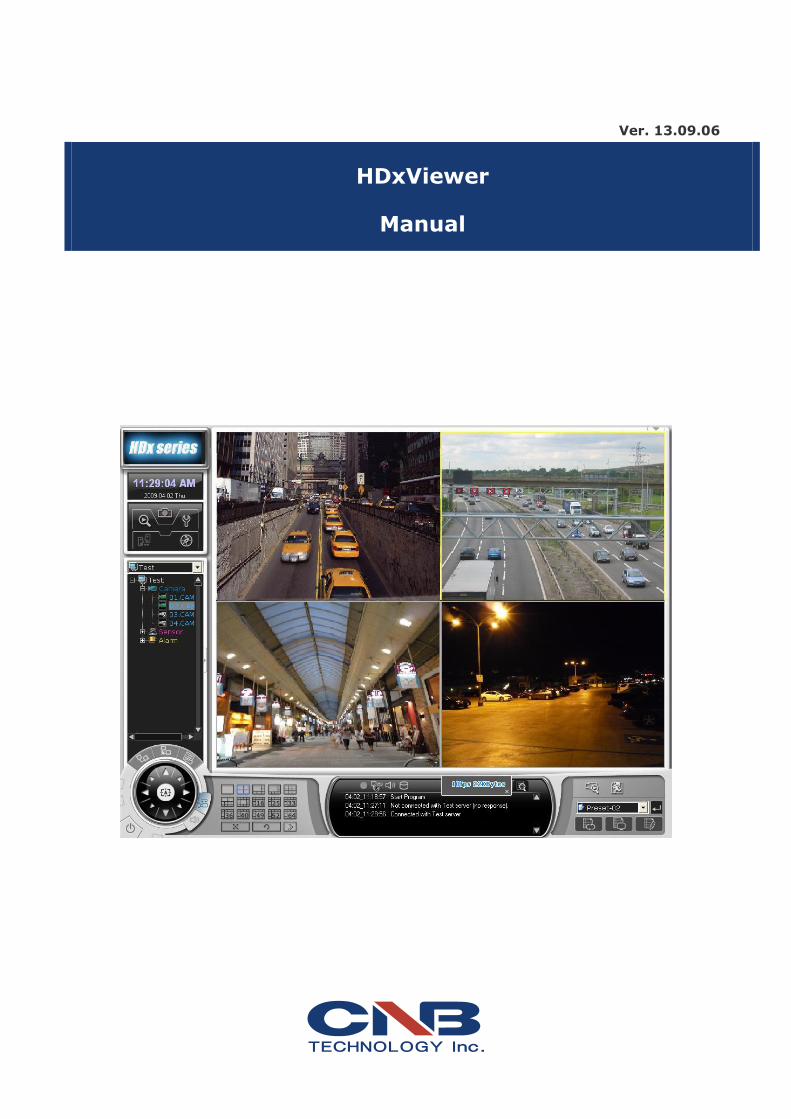
HDxViewer can manage a number of DVR (maximum 16 DVRs) as integrated through network.
HDxViewer can indicate video of DVR systems connected to network in 64 video channel screen
at maximum and utilize various functions such as setup, PTZ control, preset setup, search
(remote/local), E-Map.
① indicates current date, time, day of system where HDxViewer is installed.
② is used for search, screen capture, setup, and E-Map
② indicates list of servers registered on HDxViewer
④ is used for program shut down, server connection and disconnection, management,
and PTZ control
⑤ is used for control of screen division
⑥ indicates logs detected in server and HDxViewer
⑦ is used for single channel display, network recording and adding, editing and switching
of preset.
is minimizing button.
11..11 TTiimmee cchheecckk
It indicates time, date, day of system set HDxViewer. Type of indicating
date and time can be changed by double-clicking here.
HHDDxxVViieewweerr MMaannuuaall
11 / 69
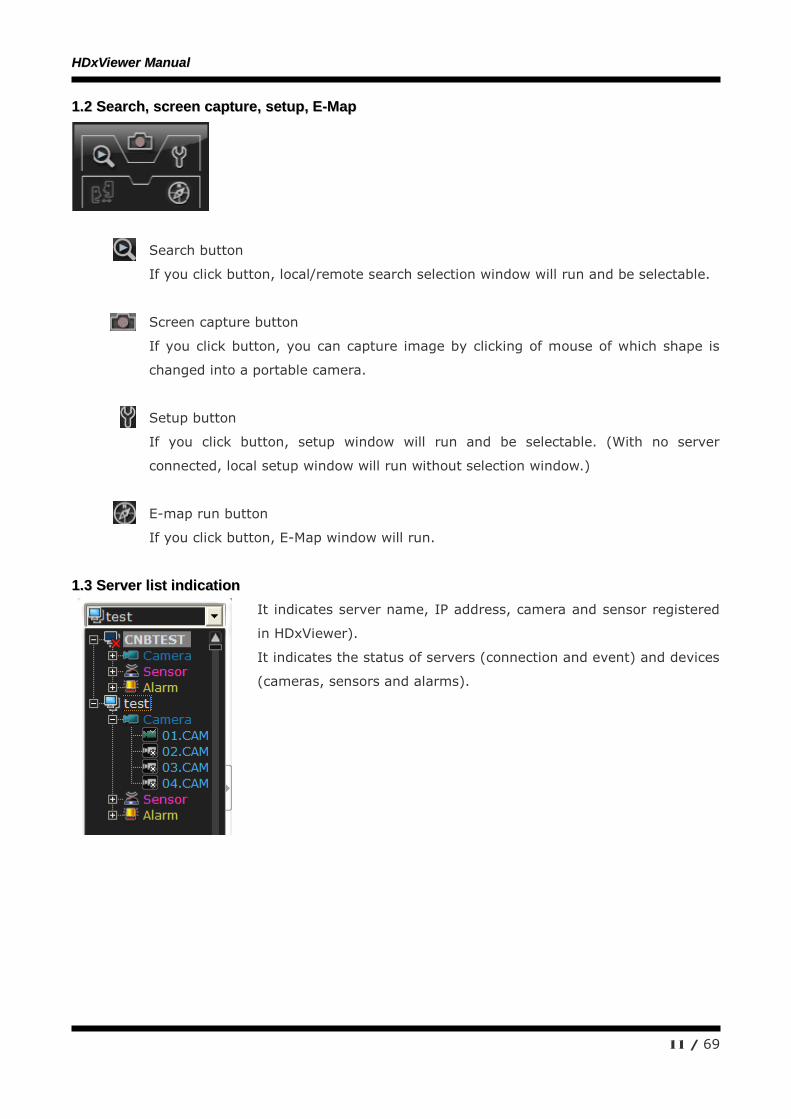
11..22 SSeeaarrcchh,, ssccrreeeenn ccaappttuurree,, sseettuupp,, EE--MMaapp
Search button
If you click button, local/remote search selection window will run and be selectable.
Screen capture button
If you click button, you can capture image by clicking of mouse of which shape is
changed into a portable camera.
Setup button
If you click button, setup window will run and be selectable. (With no server
connected, local setup window will run without selection window.)
E-map run button
If you click button, E-Map window will run.
11..33 SSeerrvveerr lliisstt iinnddiiccaattiioonn
It indicates server name, IP address, camera and sensor registered
in HDxViewer).
It indicates the status of servers (connection and event) and devices
(cameras, sensors and alarms).
HHDDxxVViieewweerr MMaannuuaall
12 / 69
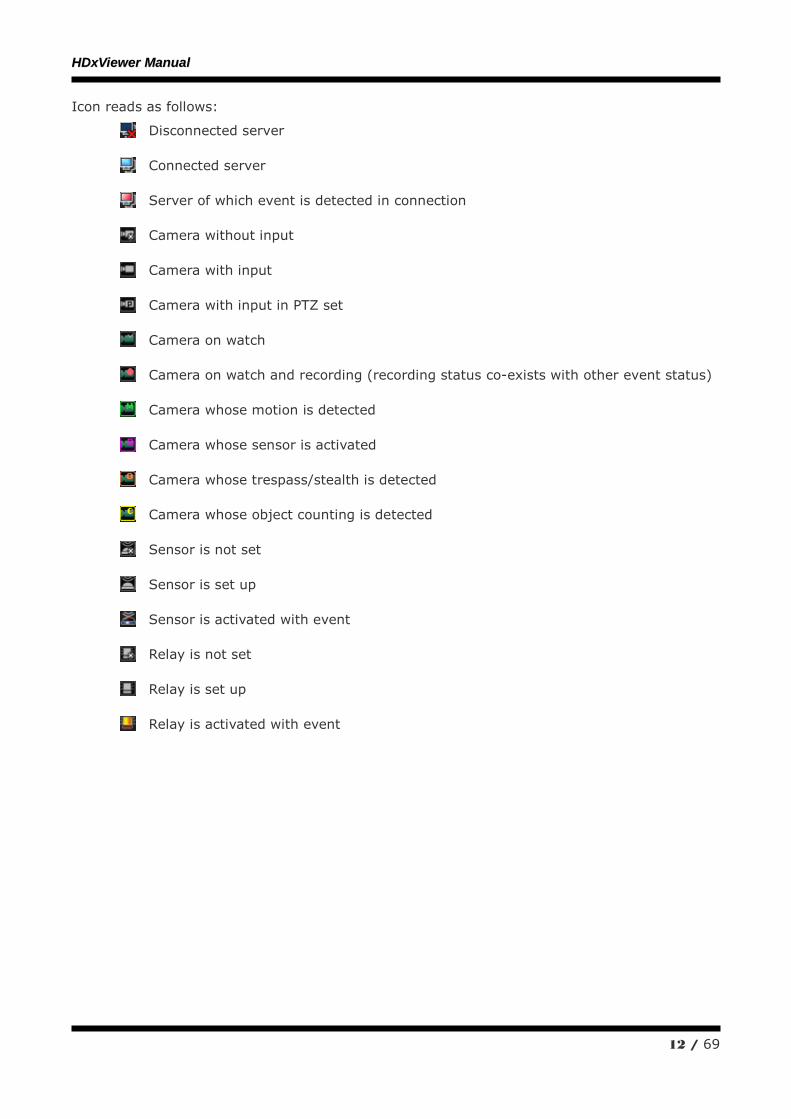
Icon reads as follows:
Disconnected server
Connected server
Server of which event is detected in connection
Camera without input
Camera with input
Camera with input in PTZ set
Camera on watch
Camera on watch and recording (recording status co-exists with other event status)
Camera whose motion is detected
Camera whose sensor is activated
Camera whose trespass/stealth is detected
Camera whose object counting is detected
Sensor is not set
Sensor is set up
Sensor is activated with event
Relay is not set
Relay is set up
Relay is activated with event
HHDDxxVViieewweerr MMaannuuaall
13 / 69
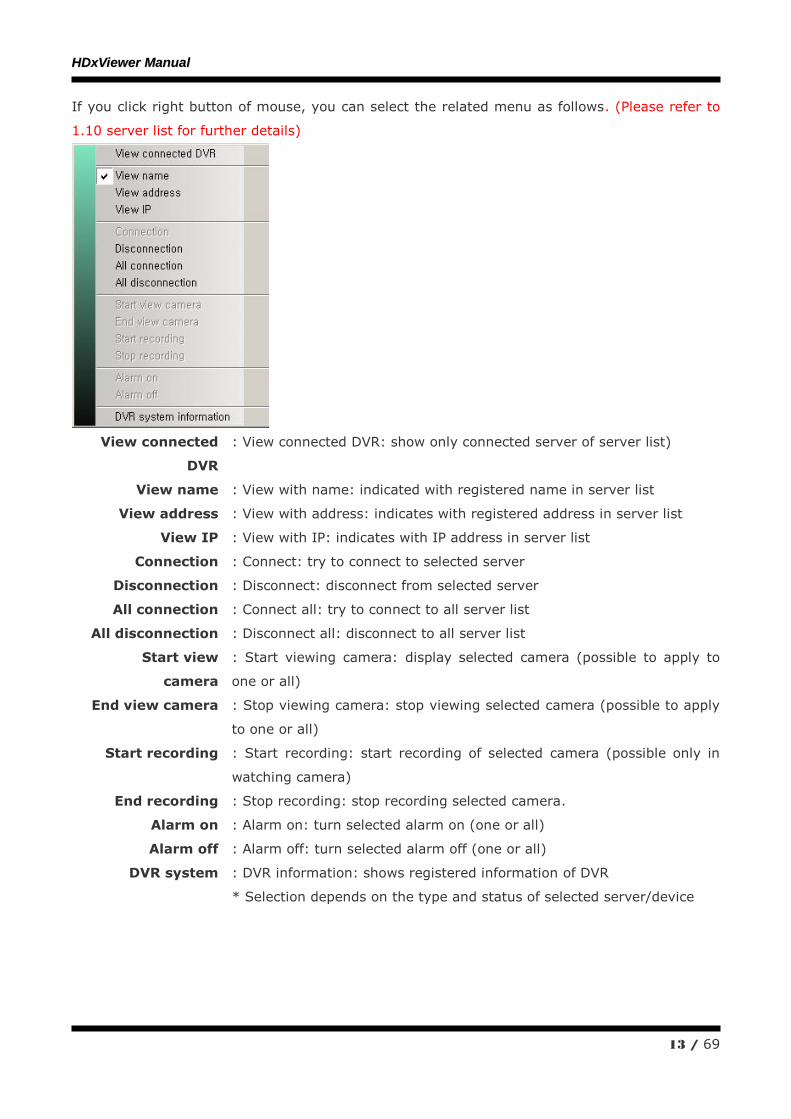
If you click right button of mouse, you can select the related menu as follows. (Please refer to
1.10 server list for further details)
View connected
DVR
: View connected DVR: show only connected server of server list)
View name : View with name: indicated with registered name in server list
View address : View with address: indicates with registered address in server list
View IP : View with IP: indicates with IP address in server list
Connection : Connect: try to connect to selected server
Disconnection : Disconnect: disconnect from selected server
All connection : Connect all: try to connect to all server list
All disconnection : Disconnect all: disconnect to all server list
Start view
camera
: Start viewing camera: display selected camera (possible to apply to
one or all)
End view camera : Stop viewing camera: stop viewing selected camera (possible to apply
to one or all)
Start recording : Start recording: start recording of selected camera (possible only in
watching camera)
End recording : Stop recording: stop recording selected camera.
Alarm on : Alarm on: turn selected alarm on (one or all)
Alarm off : Alarm off: turn selected alarm off (one or all)
DVR system : DVR information: shows registered information of DVR
* Selection depends on the type and status of selected server/device
HHDDxxVViieewweerr MMaannuuaall
14 / 69
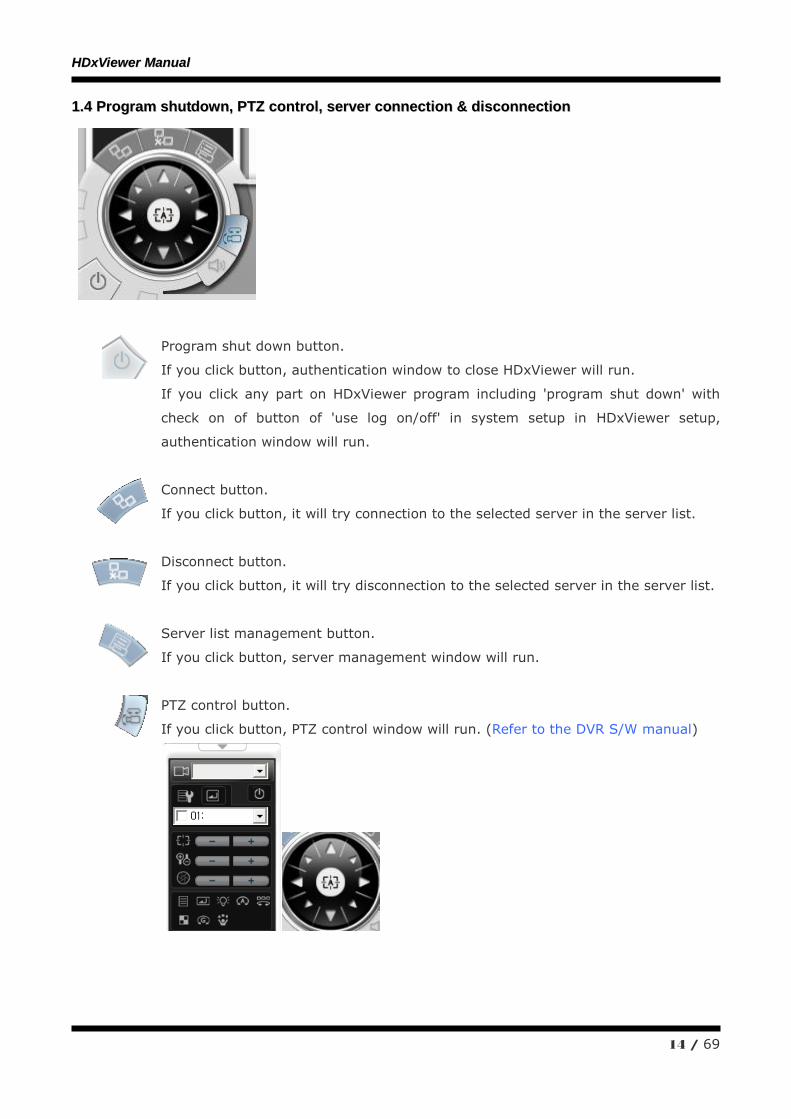
11..44 PPrrooggrraamm sshhuuttddoowwnn,, PPTTZZ ccoonnttrrooll,, sseerrvveerr ccoonnnneeccttiioonn && ddiissccoonnnneeccttiioonn
Program shut down button.
If you click button, authentication window to close HDxViewer will run.
If you click any part on HDxViewer program including 'program shut down' with
check on of button of 'use log on/off' in system setup in HDxViewer setup,
authentication window will run.
Connect button.
If you click button, it will try connection to the selected server in the server list.
Disconnect button.
If you click button, it will try disconnection to the selected server in the server list.
Server list management button.
If you click button, server management window will run.
PTZ control button.
If you click button, PTZ control window will run. (Refer to the DVR S/W manual)
HHDDxxVViieewweerr MMaannuuaall
15 / 69
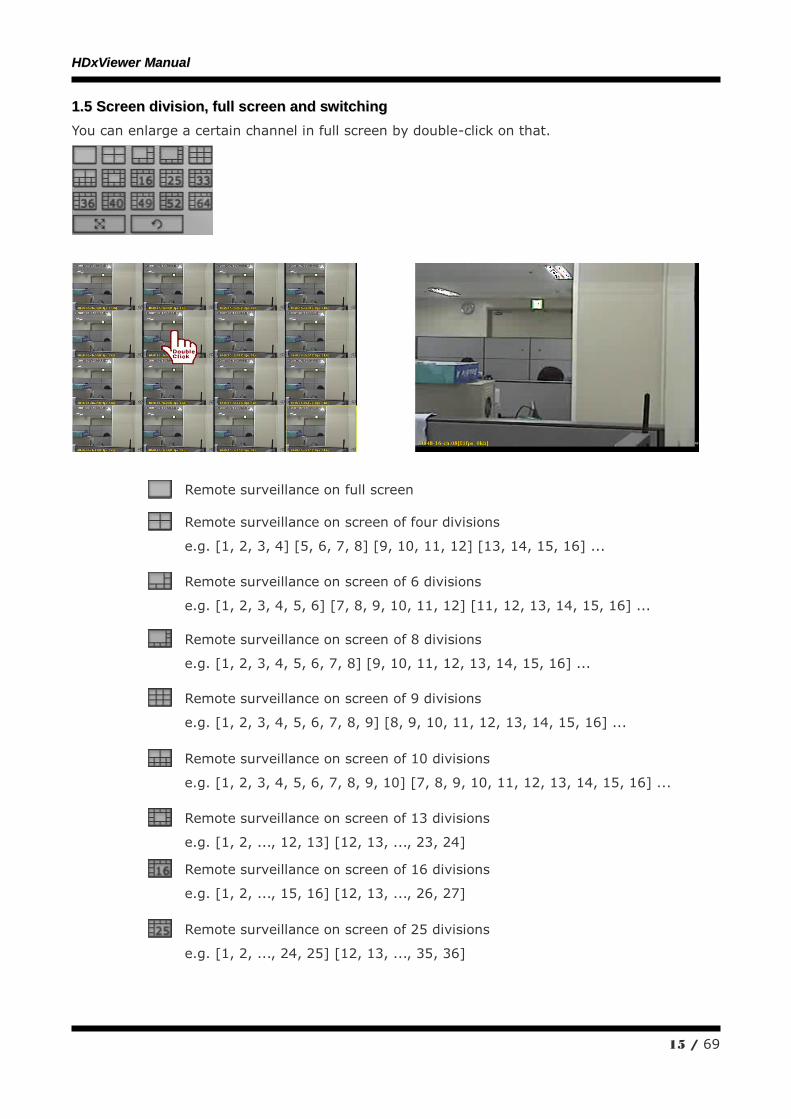
11..55 SSccrreeeenn ddiivviissiioonn,, ffuullll ssccrreeeenn aanndd sswwiittcchhiinngg
You can enlarge a certain channel in full screen by double-click on that.
Remote surveillance on full screen
Remote surveillance on screen of four divisions
e.g. [1, 2, 3, 4] [5, 6, 7, 8] [9, 10, 11, 12] [13, 14, 15, 16] ...
Remote surveillance on screen of 6 divisions
e.g. [1, 2, 3, 4, 5, 6] [7, 8, 9, 10, 11, 12] [11, 12, 13, 14, 15, 16] ...
Remote surveillance on screen of 8 divisions
e.g. [1, 2, 3, 4, 5, 6, 7, 8] [9, 10, 11, 12, 13, 14, 15, 16] ...
Remote surveillance on screen of 9 divisions
e.g. [1, 2, 3, 4, 5, 6, 7, 8, 9] [8, 9, 10, 11, 12, 13, 14, 15, 16] ...
Remote surveillance on screen of 10 divisions
e.g. [1, 2, 3, 4, 5, 6, 7, 8, 9, 10] [7, 8, 9, 10, 11, 12, 13, 14, 15, 16] ...
Remote surveillance on screen of 13 divisions
e.g. [1, 2, ..., 12, 13] [12, 13, ..., 23, 24]
Remote surveillance on screen of 16 divisions
e.g. [1, 2, ..., 15, 16] [12, 13, ..., 26, 27]
Remote surveillance on screen of 25 divisions
e.g. [1, 2, ..., 24, 25] [12, 13, ..., 35, 36]
HHDDxxVViieewweerr MMaannuuaall
16 / 69
Remote surveillance on screen of 33 divisions
e.g. [1, 2, ..., 32, 33] [12, 13, ..., 42, 43]
Remote surveillance on screen of 36 divisions
e.g. [1, 2, ..., 35, 36] [12, 13, ..., 47, 48]
Remote surveillance on screen of 40 divisions
e.g. [1, 2, ..., 39, 40] [12, 13, ..., 50, 51]
Remote surveillance on screen of 49 divisions
e.g. [1, 2, ..., 48, 49] [12, 13, ..., 59, 60]
Remote surveillance on screen of 52 divisions
e.g. [1, 2, ..., 51, 52] [12, 13, ..., 62, 63]
Remote surveillance on screen of 64 divisions
e.g. [1, 2, ..., 63, 64] [12, 13, ..., 74, 75]
It watches a channel in full screen.
It watches all screen division with consequent switching except screen of 64
divisions.
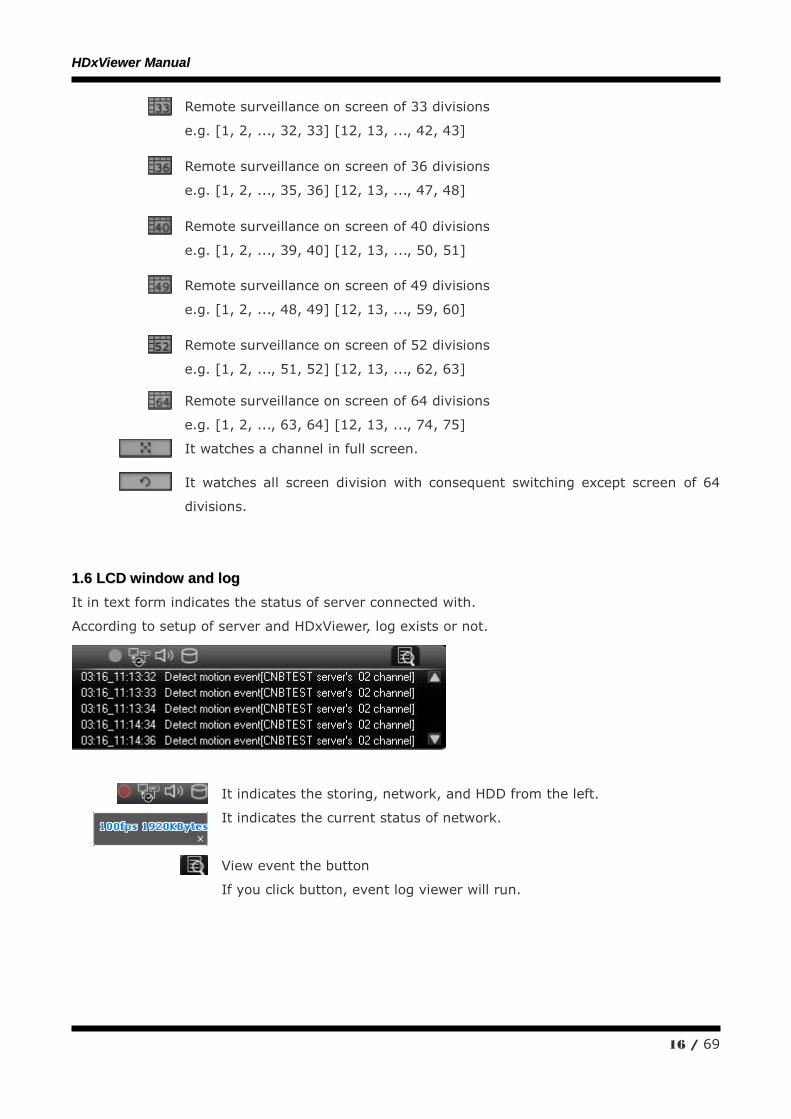
11..66 LLCCDD wwiinnddooww aanndd lloogg
It in text form indicates the status of server connected with.
According to setup of server and HDxViewer, log exists or not.
It indicates the storing, network, and HDD from the left.
It indicates the current status of network.
View event the button
If you click button, event log viewer will run.

HHDDxxVViieewweerr MMaannuuaall
17 / 69
11..77 SSiinnggllee cchhaannnneell ppllaayyeerr,, nneettwwoorrkk rreeccoorrddiinngg aanndd pprreesseett
Single channel player button
If you click button after selecting channel, a window to see single
channel will run.
Network recording button
If you click button, it changes „activate status‟ icon and stores
the video in the system where HDxViewer is installed.
If you click 'go to preset' button after selecting preset, it is
applied to the current HDxViewer.
Go to preset button
If you click button, the current screen changes into preset screen.
Preset switching button
If you click button, it switches the preset consequently.
Edit preset button
If you click button, preset setup window will run.
Preset screen button
If you click button, preset addition window will run.
HHDDxxVViieewweerr MMaannuuaall
18 / 69
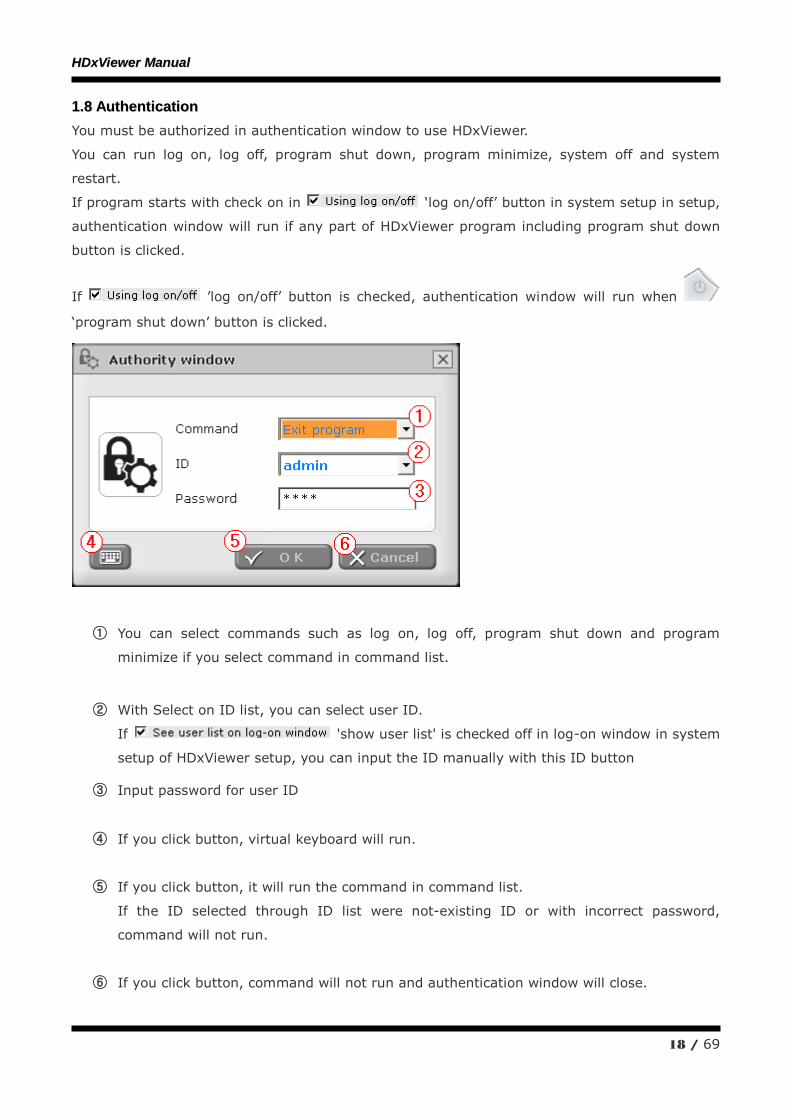
11..88 AAuutthheennttiiccaattiioonn
You must be authorized in authentication window to use HDxViewer.
You can run log on, log off, program shut down, program minimize, system off and system
restart.
If program starts with check on in „log on/off‟ button in system setup in setup,
authentication window will run if any part of HDxViewer program including program shut down
button is clicked.
If ‟log on/off‟ button is checked, authentication window will run when
„program shut down‟ button is clicked.
① You can select commands such as log on, log off, program shut down and program
minimize if you select command in command list.
② With Select on ID list, you can select user ID.
If 'show user list' is checked off in log-on window in system
setup of HDxViewer setup, you can input the ID manually with this ID button
③ Input password for user ID
④ If you click button, virtual keyboard will run.
⑤ If you click button, it will run the command in command list.
If the ID selected through ID list were not-existing ID or with incorrect password,
command will not run.
⑥ If you click button, command will not run and authentication window will close.
HHDDxxVViieewweerr MMaannuuaall
19 / 69
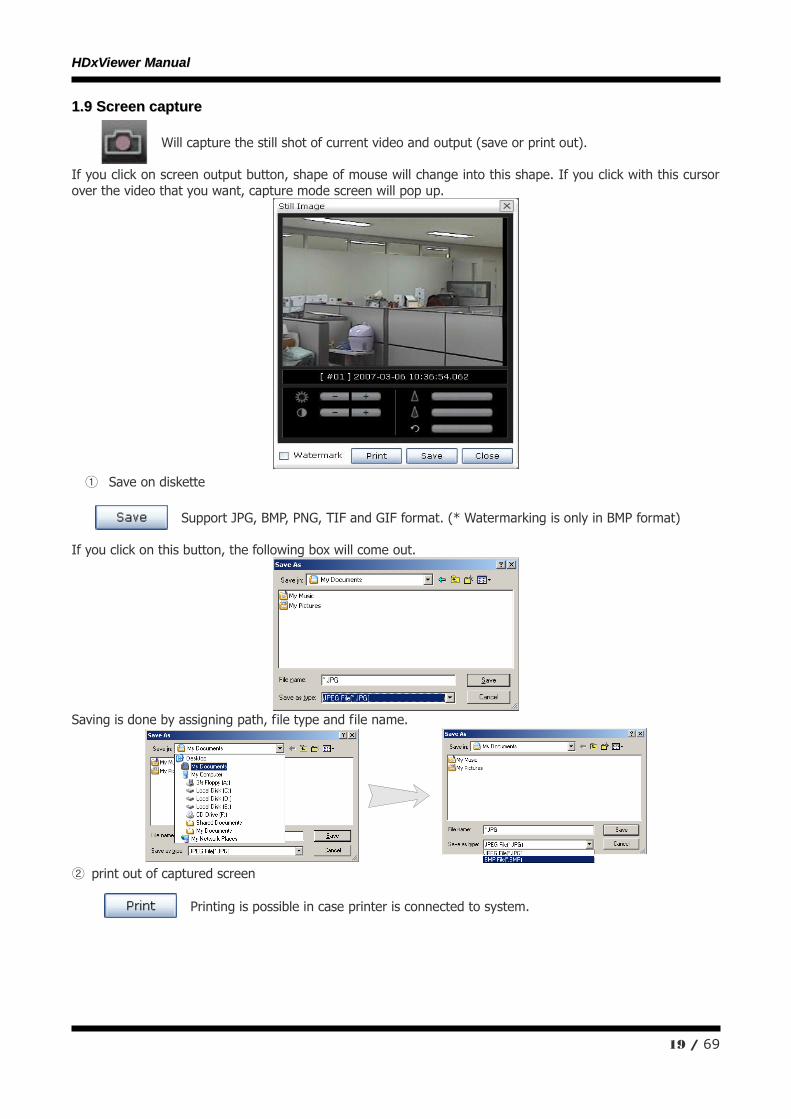
11..99 SSccrreeeenn ccaappttuurree
Will capture the still shot of current video and output (save or print out).
If you click on screen output button, shape of mouse will change into this shape. If you click with this cursor
over the video that you want, capture mode screen will pop up.
① Save on diskette
Support JPG, BMP, PNG, TIF and GIF format. (* Watermarking is only in BMP format)
If you click on this button, the following box will come out.
Saving is done by assigning path, file type and file name.
② print out of captured screen
Printing is possible in case printer is connected to system.
HHDDxxVViieewweerr MMaannuuaall
20 / 69
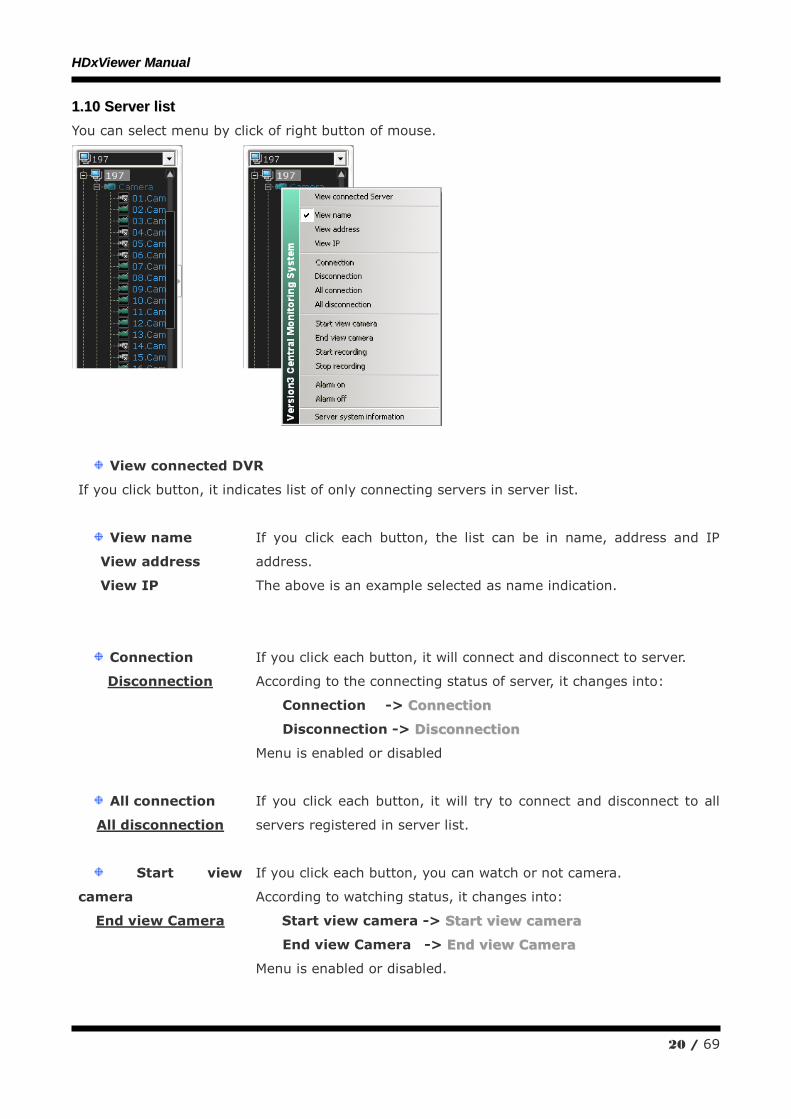
11..1100 SSeerrvveerr lliisstt
You can select menu by click of right button of mouse.
View connected DVR
If you click button, it indicates list of only connecting servers in server list.
View name
View address
View IP
If you click each button, the list can be in name, address and IP
address.
The above is an example selected as name indication.
Connection
Disconnection
If you click each button, it will connect and disconnect to server.
According to the connecting status of server, it changes into:
Connection -> CCoonnnneeccttiioonn
Disconnection -> DDiissccoonnnneeccttiioonn
Menu is enabled or disabled
All connection
All disconnection
If you click each button, it will try to connect and disconnect to all
servers registered in server list.
Start view
camera
End view Camera
If you click each button, you can watch or not camera.
According to watching status, it changes into:
Start view camera -> SSttaarrtt vviieeww ccaammeerraa
End view Camera -> EEnndd vviieeww CCaammeerraa
Menu is enabled or disabled.
HHDDxxVViieewweerr MMaannuuaall
21 / 69
Start recording
End recording
If you click each button, you can record video or not.
According to recording status, it changes into:
Start recording -> SSttaarrtt rreeccoorrddiinngg
End recording -> EEnndd rreeccoorrddiinngg
Menu is enabled or disabled.
Alarm on
Alarm off
If you click each button, you can activate alarm or dissolve.
According to alarm activating status, it changes into
Alarm on -> AAllaarrmm oonn
Alarm off -> AAllaarrmm ooffff
Menu is enabled or disabled.
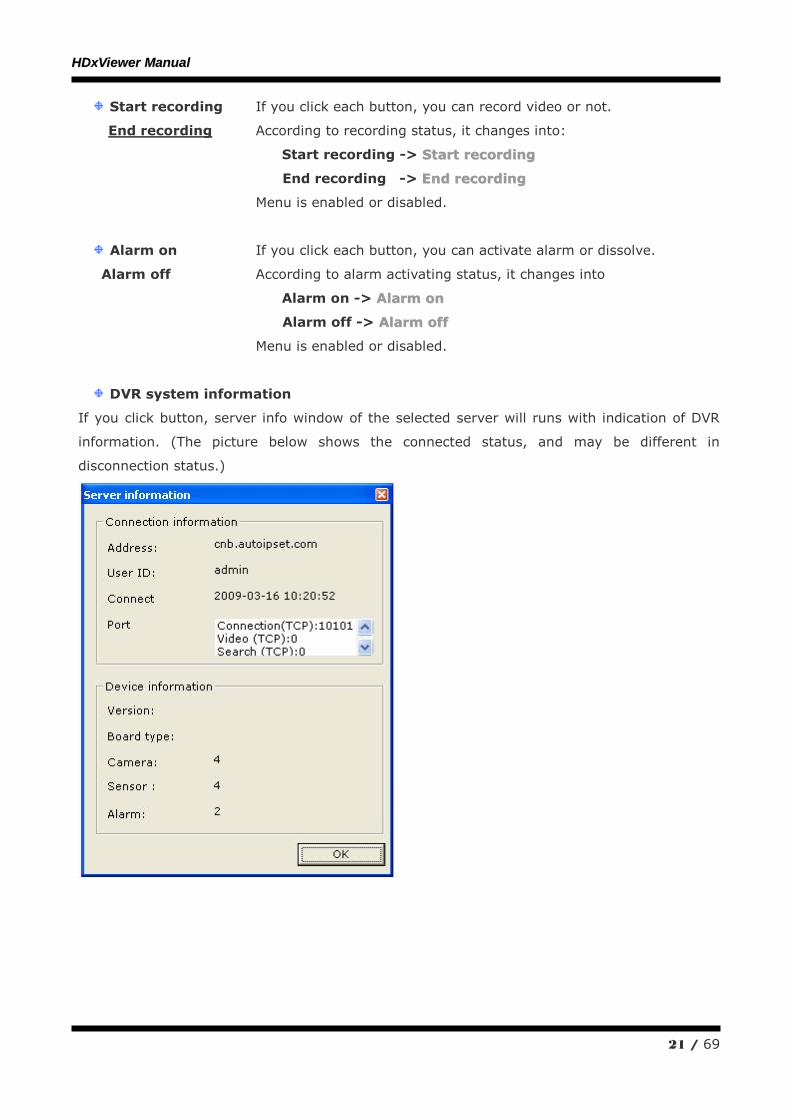
DVR system information
If you click button, server info window of the selected server will runs with indication of DVR
information. (The picture below shows the connected status, and may be different in
disconnection status.)
HHDDxxVViieewweerr MMaannuuaall
22 / 69
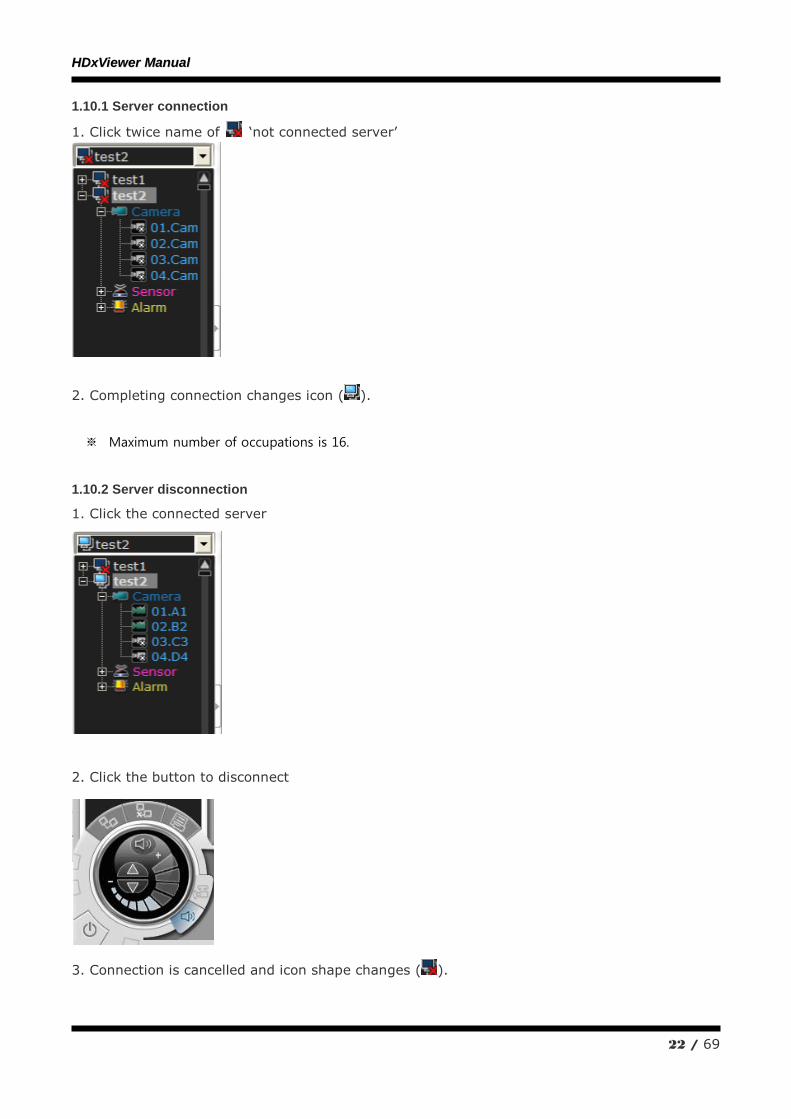
1.10.1 Server connection
1. Click twice name of „not connected server‟
2. Completing connection changes icon ( ).
※ Maximum number of occupations is 16.
1.10.2 Server disconnection
1. Click the connected server
2. Click the button to disconnect
3. Connection is cancelled and icon shape changes ( ).
HHDDxxVViieewweerr MMaannuuaall
23 / 69
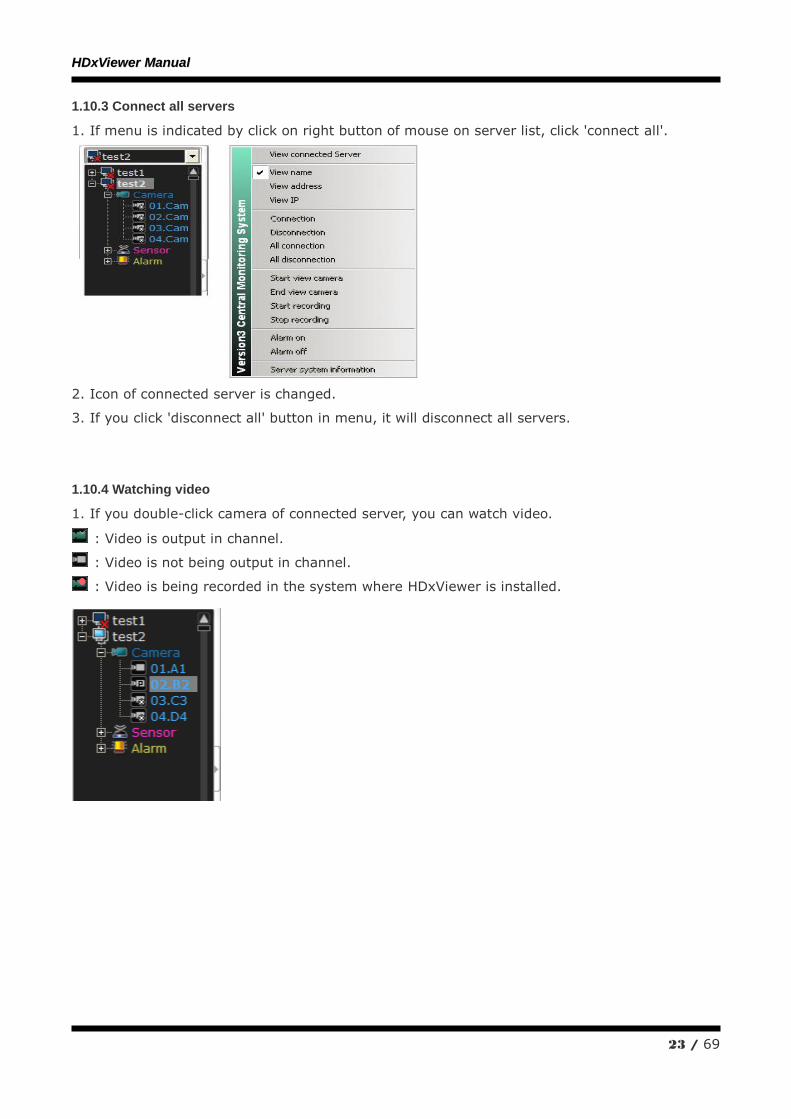
1.10.3 Connect all servers
1. If menu is indicated by click on right button of mouse on server list, click 'connect all'.
2. Icon of connected server is changed.
3. If you click 'disconnect all' button in menu, it will disconnect all servers.
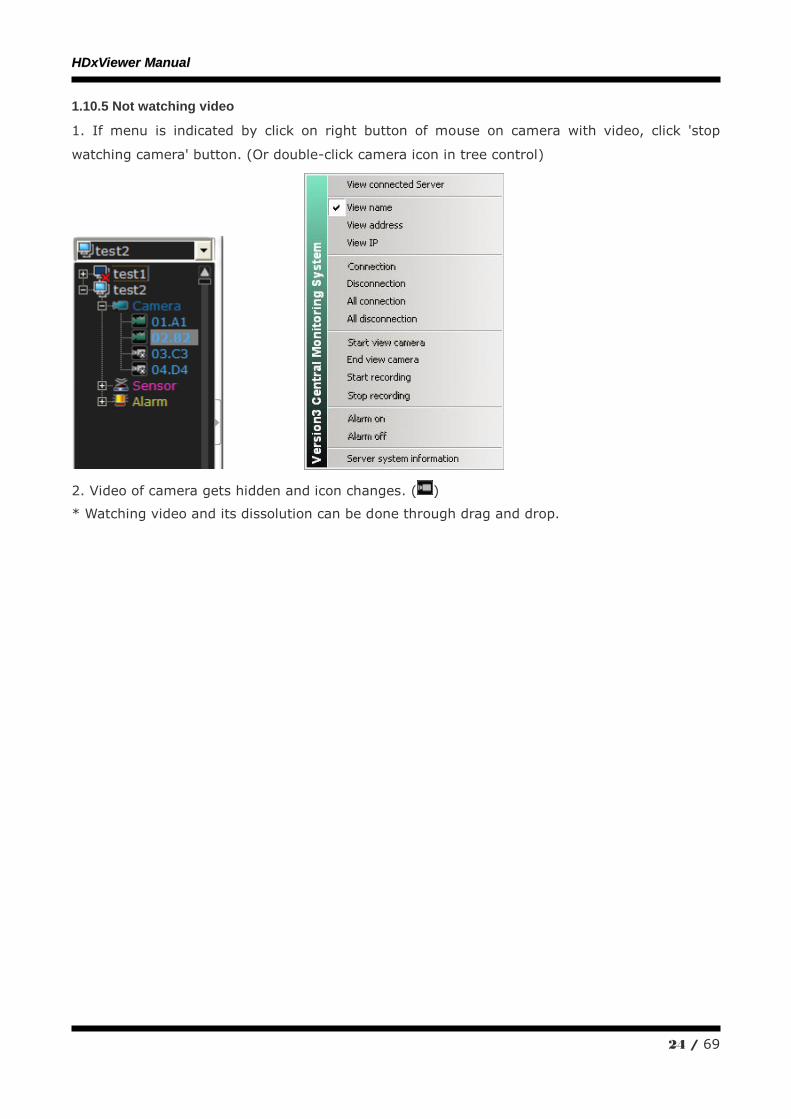
1.10.4 Watching video
1. If you double-click camera of connected server, you can watch video.
: Video is output in channel.
: Video is not being output in channel.
: Video is being recorded in the system where HDxViewer is installed.
HHDDxxVViieewweerr MMaannuuaall
24 / 69
1.10.5 Not watching video
1. If menu is indicated by click on right button of mouse on camera with video, click 'stop
watching camera' button. (Or double-click camera icon in tree control)
2. Video of camera gets hidden and icon changes. ( )
* Watching video and its dissolution can be done through drag and drop.
HHDDxxVViieewweerr MMaannuuaall
25 / 69
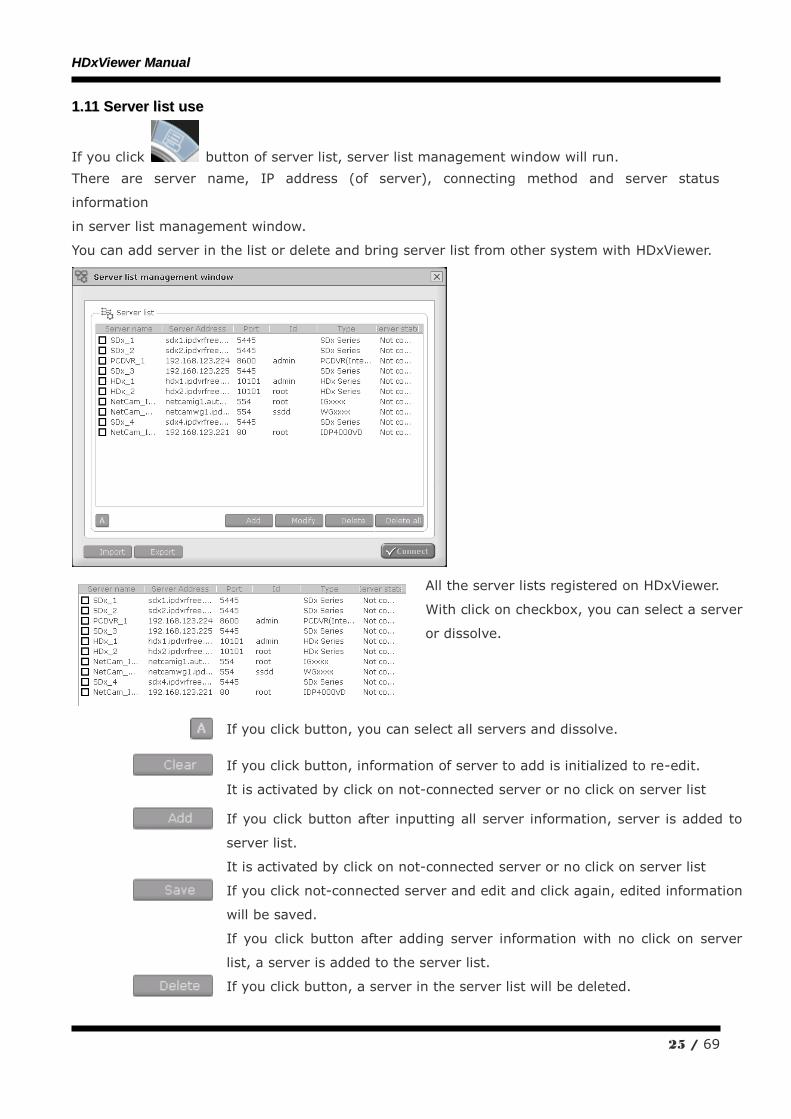
11..1111 SSeerrvveerr lliisstt uussee
If you click button of server list, server list management window will run.
There are server name, IP address (of server), connecting method and server status
information
in server list management window.
You can add server in the list or delete and bring server list from other system with HDxViewer.
All the server lists registered on HDxViewer.
With click on checkbox, you can select a server
or dissolve.
If you click button, you can select all servers and dissolve.
If you click button, information of server to add is initialized to re-edit.
It is activated by click on not-connected server or no click on server list
If you click button after inputting all server information, server is added to
server list.
It is activated by click on not-connected server or no click on server list
If you click not-connected server and edit and click again, edited information
will be saved.
If you click button after adding server information with no click on server
list, a server is added to the server list.
If you click button, a server in the server list will be deleted.
HHDDxxVViieewweerr MMaannuuaall
26 / 69
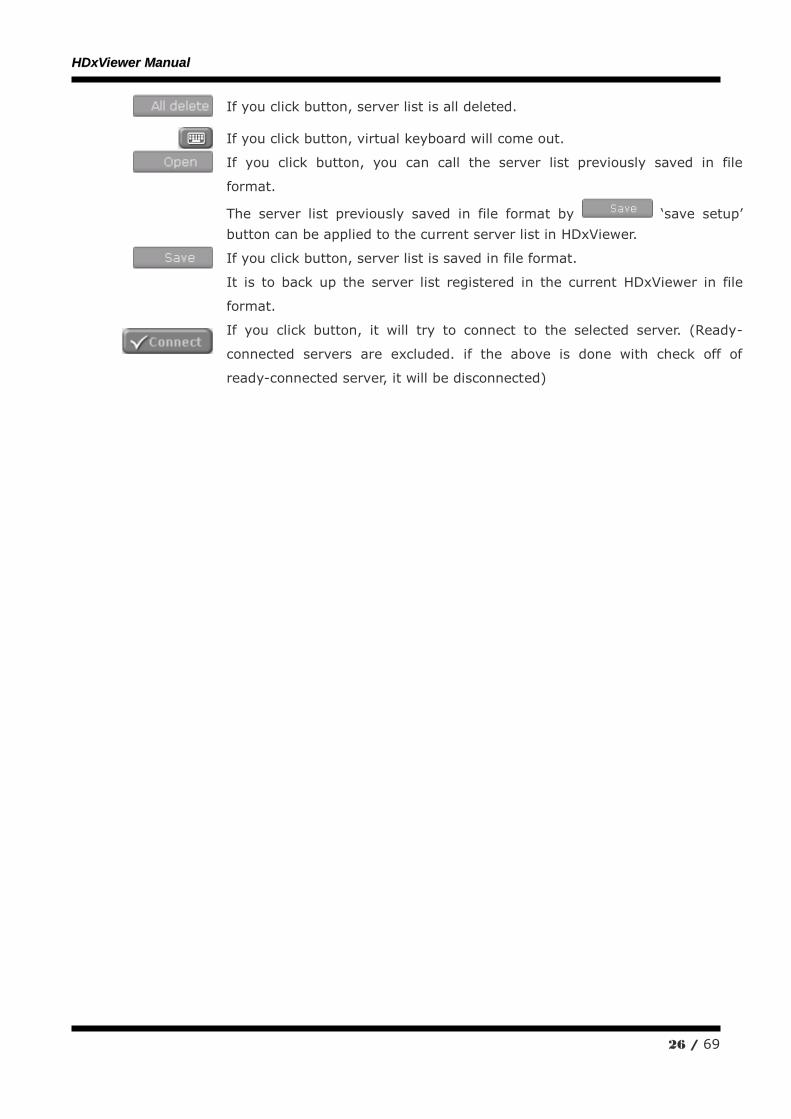
If you click button, server list is all deleted.
If you click button, virtual keyboard will come out.
If you click button, you can call the server list previously saved in file
format.
The server list previously saved in file format by „save setup‟
button can be applied to the current server list in HDxViewer.
If you click button, server list is saved in file format.
It is to back up the server list registered in the current HDxViewer in file
format.
If you click button, it will try to connect to the selected server. (Ready-
connected servers are excluded. if the above is done with check off of
ready-connected server, it will be disconnected)
HHDDxxVViieewweerr MMaannuuaall
27 / 69
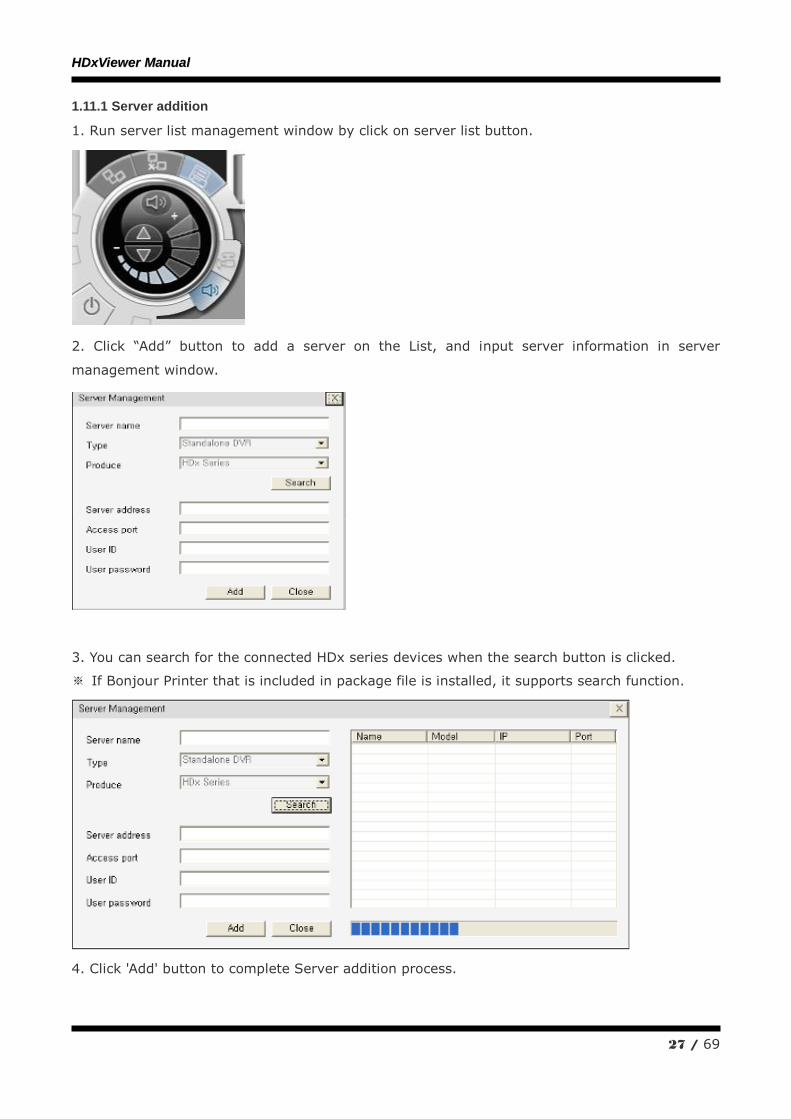
1.11.1 Server addition
1. Run server list management window by click on server list button.
2. Click “Add” button to add a server on the List, and input server information in server
management window.
3. You can search for the connected HDx series devices when the search button is clicked.
※ If Bonjour Printer that is included in package file is installed, it supports search function.
4. Click 'Add' button to complete Server addition process.
HHDDxxVViieewweerr MMaannuuaall
28 / 69
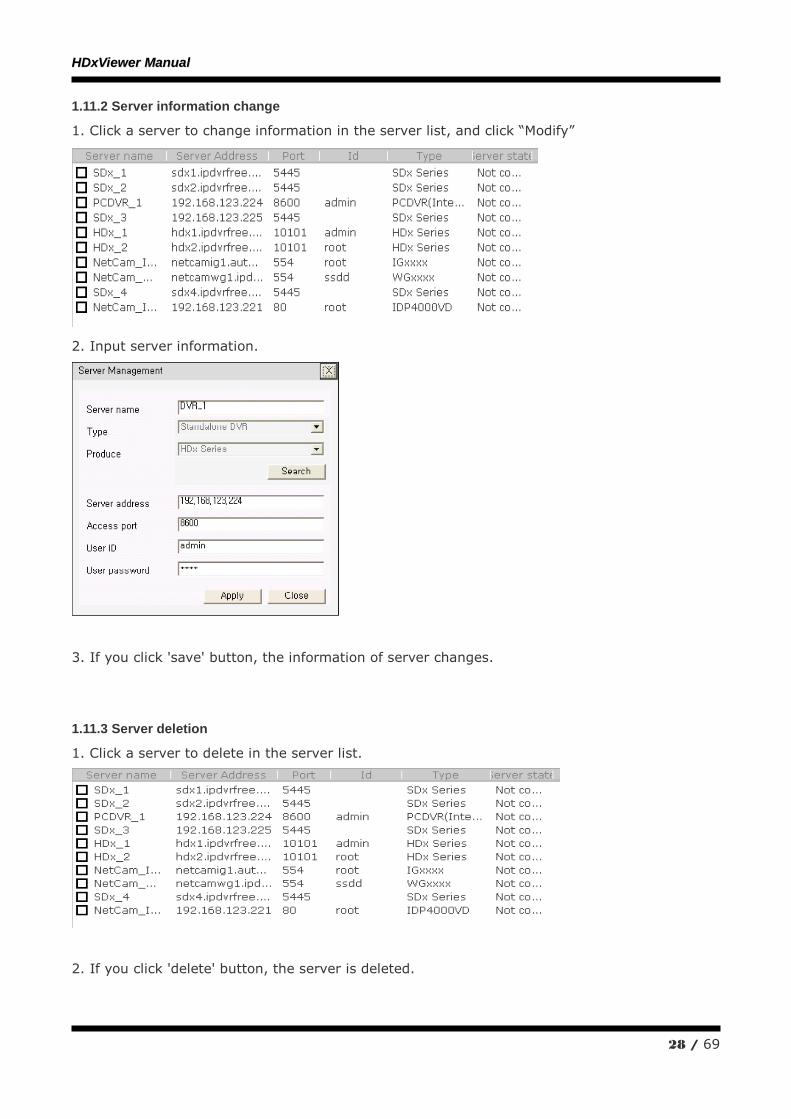
1.11.2 Server information change
1. Click a server to change information in the server list, and click “Modify”
2. Input server information.
3. If you click 'save' button, the information of server changes.
1.11.3 Server deletion
1. Click a server to delete in the server list.
2. If you click 'delete' button, the server is deleted.
HHDDxxVViieewweerr MMaannuuaall
29 / 69
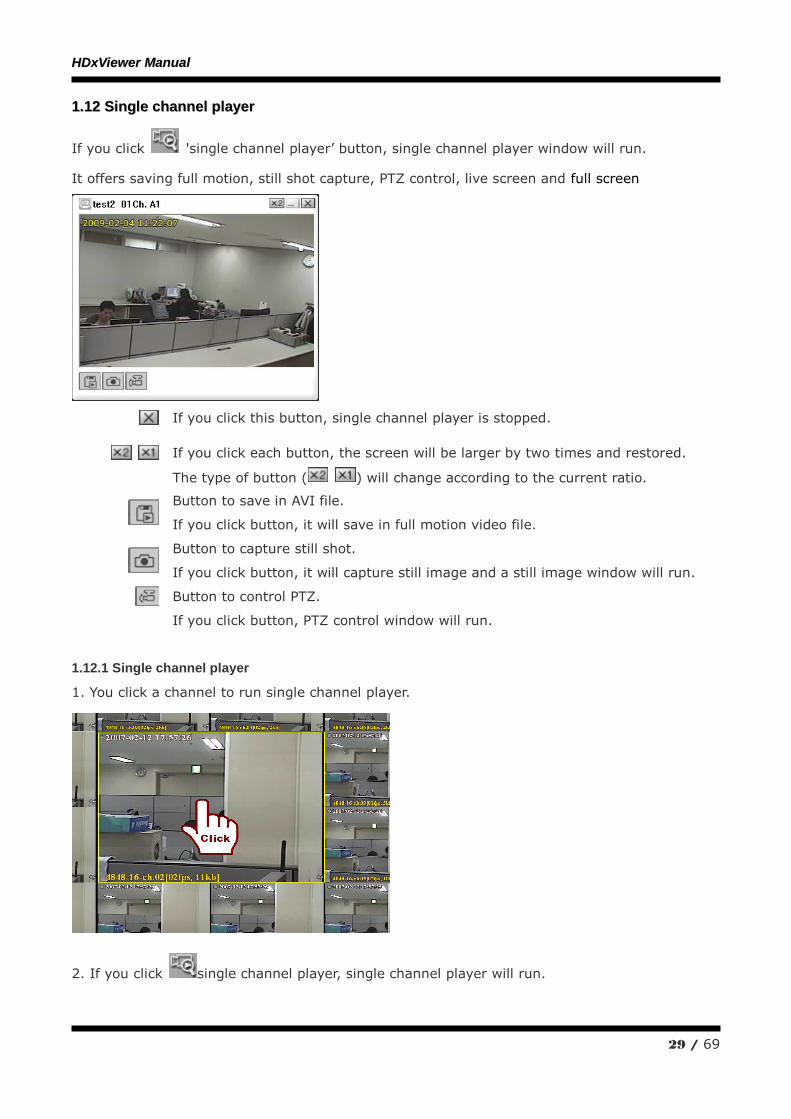
11..1122 SSiinnggllee cchhaannnneell ppllaayyeerr
If you click 'single channel player‟ button, single channel player window will run.
It offers saving full motion, still shot capture, PTZ control, live screen and full screen
If you click this button, single channel player is stopped.
If you click each button, the screen will be larger by two times and restored.
The type of button ( ) will change according to the current ratio.
Button to save in AVI file.
If you click button, it will save in full motion video file.
Button to capture still shot.
If you click button, it will capture still image and a still image window will run.
Button to control PTZ.
If you click button, PTZ control window will run.
1.12.1 Single channel player
1. You click a channel to run single channel player.
2. If you click single channel player, single channel player will run.
HHDDxxVViieewweerr MMaannuuaall
30 / 69
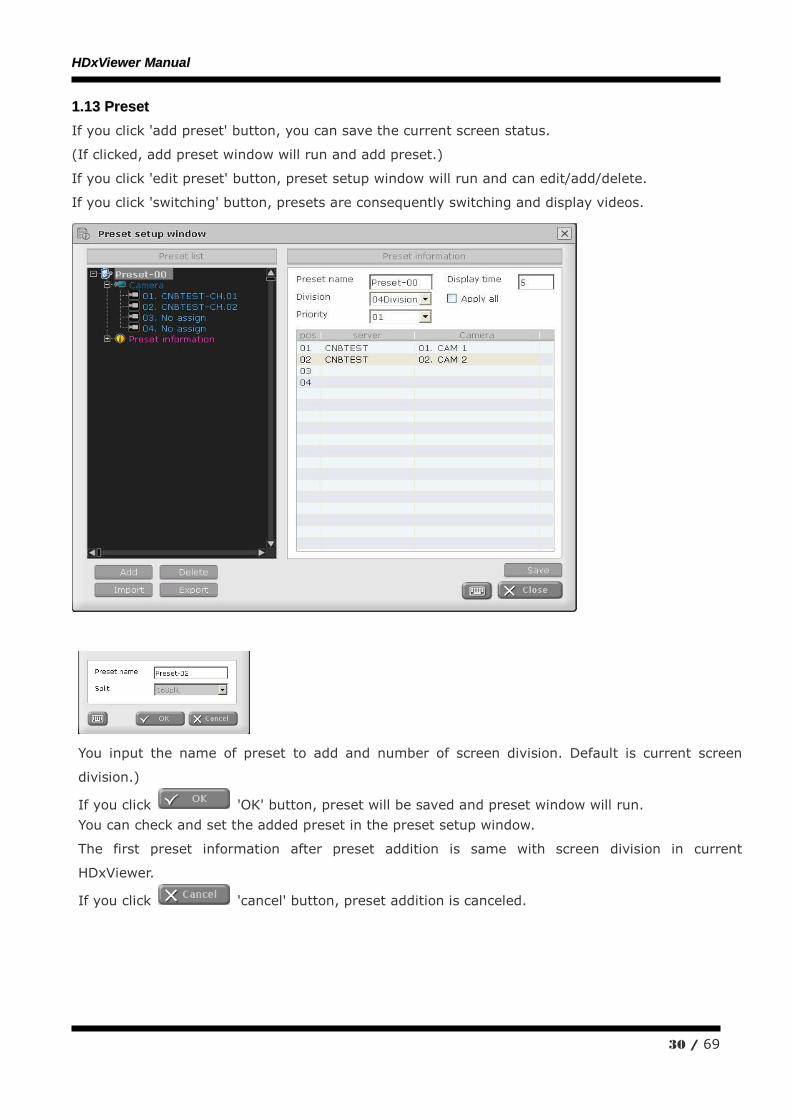
11..1133 PPrreesseett
If you click 'add preset' button, you can save the current screen status.
(If clicked, add preset window will run and add preset.)
If you click 'edit preset' button, preset setup window will run and can edit/add/delete.
If you click 'switching' button, presets are consequently switching and display videos.
You input the name of preset to add and number of screen division. Default is current screen
division.)
If you click 'OK' button, preset will be saved and preset window will run.
You can check and set the added preset in the preset setup window.
The first preset information after preset addition is same with screen division in current
HDxViewer.
If you click 'cancel' button, preset addition is canceled.
HHDDxxVViieewweerr MMaannuuaall
31 / 69
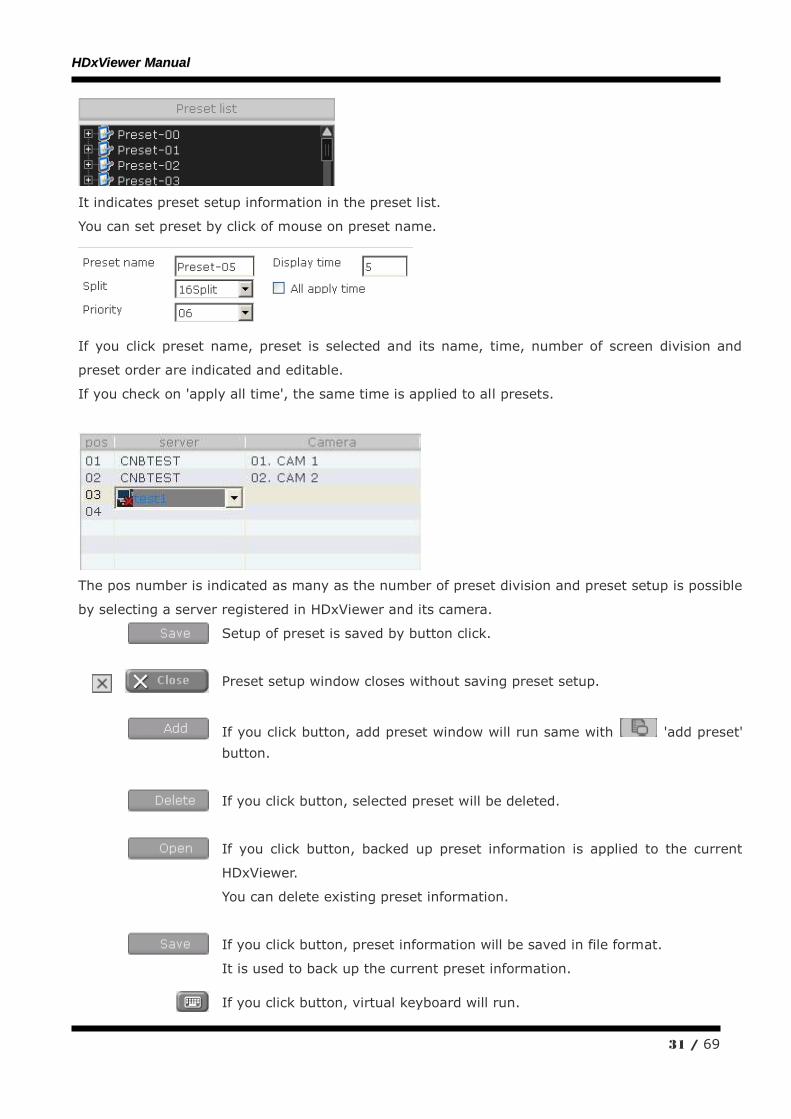
It indicates preset setup information in the preset list.
You can set preset by click of mouse on preset name.
If you click preset name, preset is selected and its name, time, number of screen division and
preset order are indicated and editable.
If you check on 'apply all time', the same time is applied to all presets.
The pos number is indicated as many as the number of preset division and preset setup is possible
by selecting a server registered in HDxViewer and its camera.
Setup of preset is saved by button click.
Preset setup window closes without saving preset setup.
If you click button, add preset window will run same with 'add preset'
button.
If you click button, selected preset will be deleted.
If you click button, backed up preset information is applied to the current
HDxViewer.
You can delete existing preset information.
If you click button, preset information will be saved in file format.
It is used to back up the current preset information.
If you click button, virtual keyboard will run.
HHDDxxVViieewweerr MMaannuuaall
32 / 69
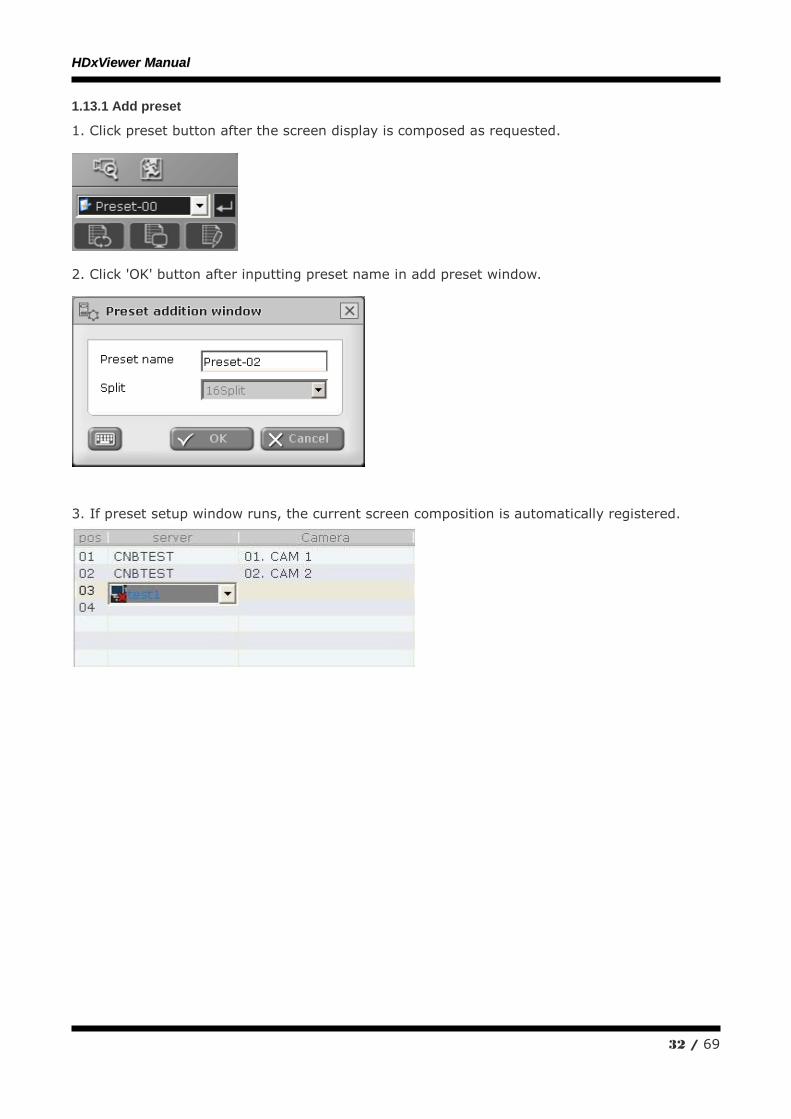
1.13.1 Add preset
1. Click preset button after the screen display is composed as requested.
2. Click 'OK' button after inputting preset name in add preset window.
3. If preset setup window runs, the current screen composition is automatically registered.
HHDDxxVViieewweerr MMaannuuaall
33 / 69
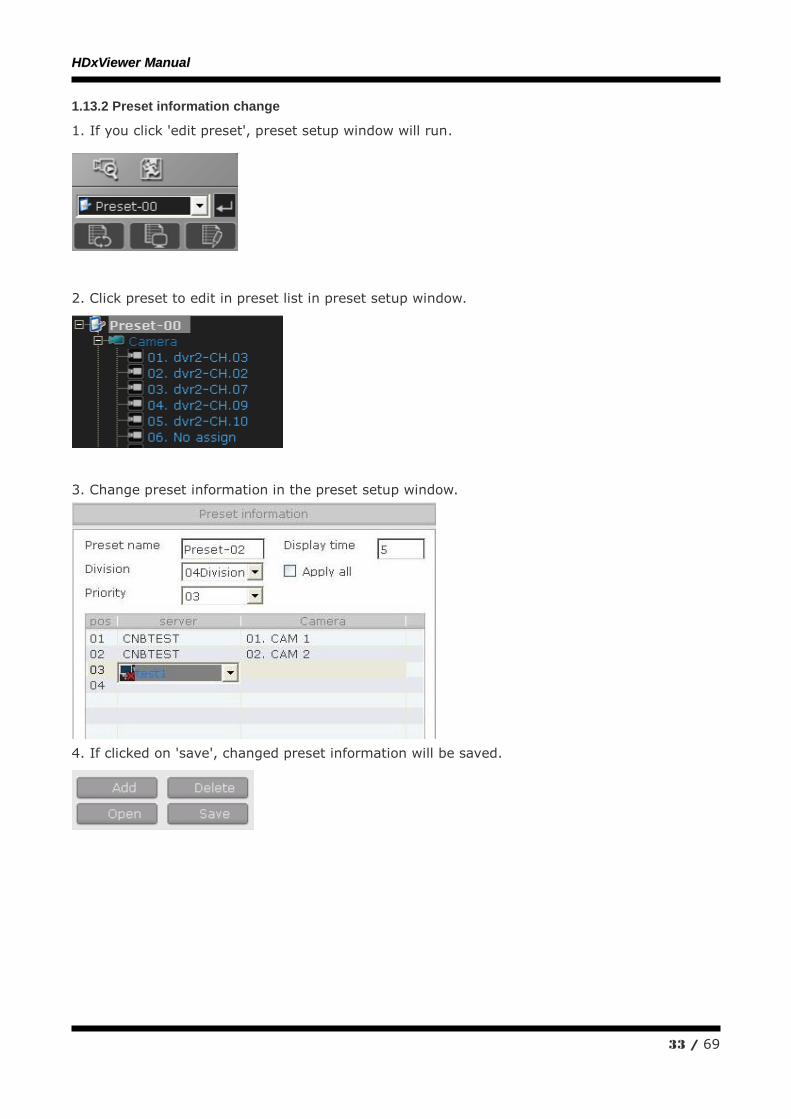
1.13.2 Preset information change
1. If you click 'edit preset', preset setup window will run.
2. Click preset to edit in preset list in preset setup window.
3. Change preset information in the preset setup window.
4. If clicked on 'save', changed preset information will be saved.
HHDDxxVViieewweerr MMaannuuaall
34 / 69
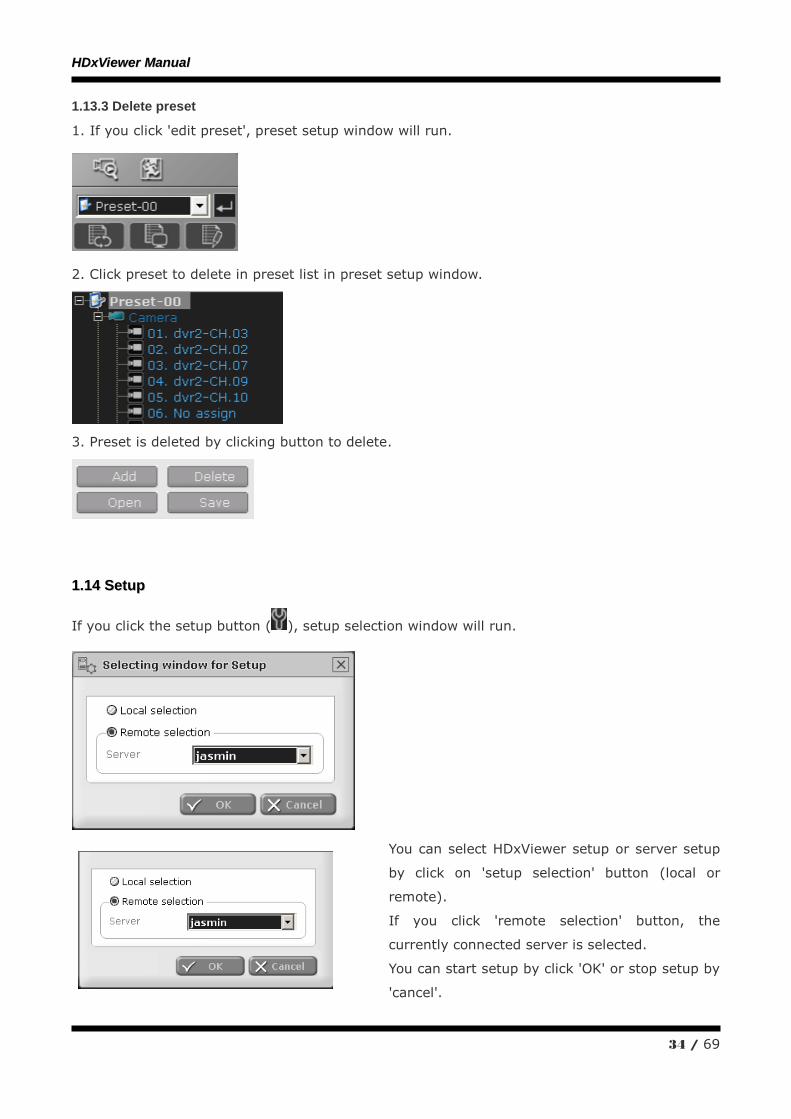
1.13.3 Delete preset
1. If you click 'edit preset', preset setup window will run.
2. Click preset to delete in preset list in preset setup window.
3. Preset is deleted by clicking button to delete.
11..1144 SSeettuupp
If you click the setup button ( ), setup selection window will run.
You can select HDxViewer setup or server setup
by click on 'setup selection' button (local or
remote).
If you click 'remote selection' button, the
currently connected server is selected.
You can start setup by click 'OK' or stop setup by
'cancel'.
HHDDxxVViieewweerr MMaannuuaall
35 / 69
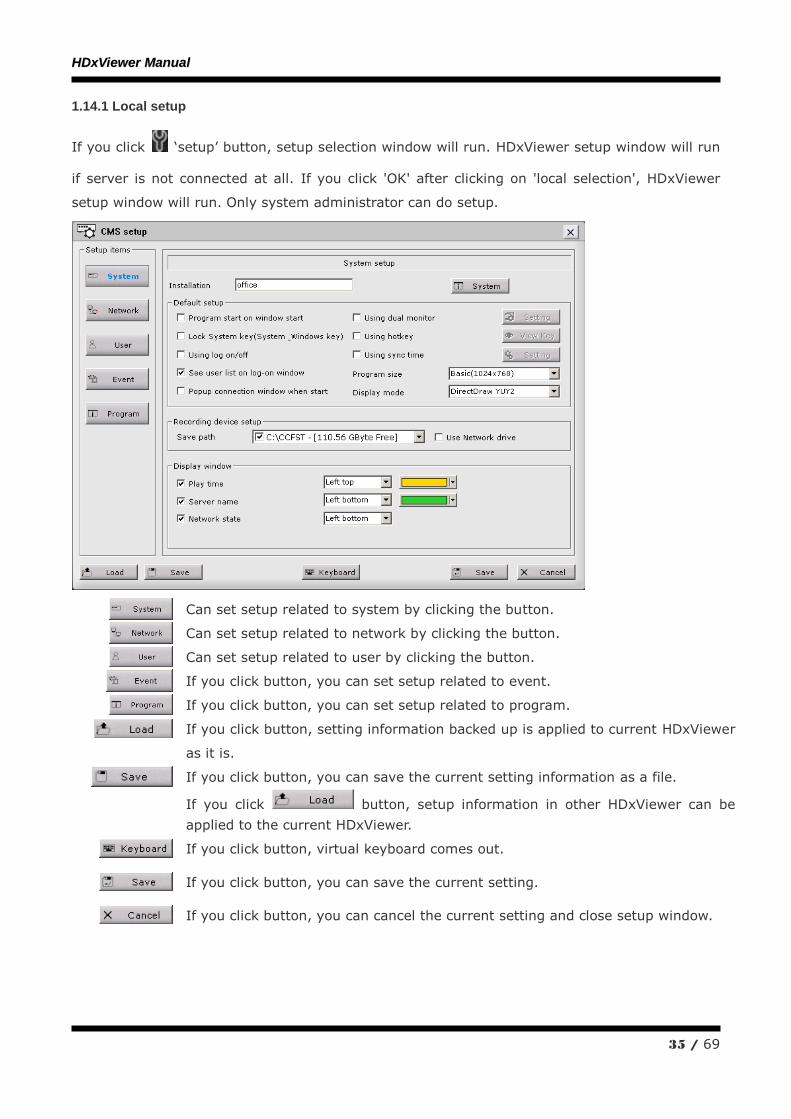
1.14.1 Local setup
If you click „setup‟ button, setup selection window will run. HDxViewer setup window will run
if server is not connected at all. If you click 'OK' after clicking on 'local selection', HDxViewer
setup window will run. Only system administrator can do setup.
Can set setup related to system by clicking the button.
Can set setup related to network by clicking the button.
Can set setup related to user by clicking the button.
If you click button, you can set setup related to event.
If you click button, you can set setup related to program.
If you click button, setting information backed up is applied to current HDxViewer
as it is.
If you click button, you can save the current setting information as a file.
If you click button, setup information in other HDxViewer can be
applied to the current HDxViewer.
If you click button, virtual keyboard comes out.
If you click button, you can save the current setting.
If you click button, you can cancel the current setting and close setup window.
HHDDxxVViieewweerr MMaannuuaall
36 / 69
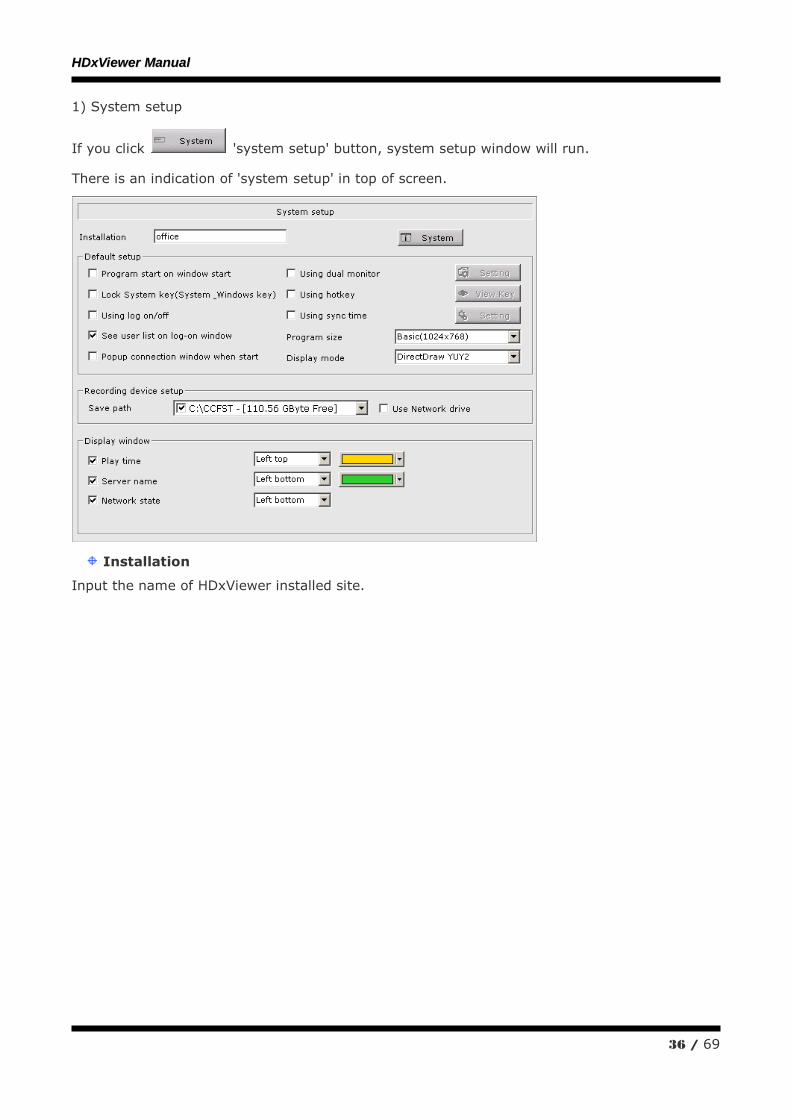
1) System setup
If you click 'system setup' button, system setup window will run.
There is an indication of 'system setup' in top of screen.
Installation
Input the name of HDxViewer installed site.
HHDDxxVViieewweerr MMaannuuaall
37 / 69
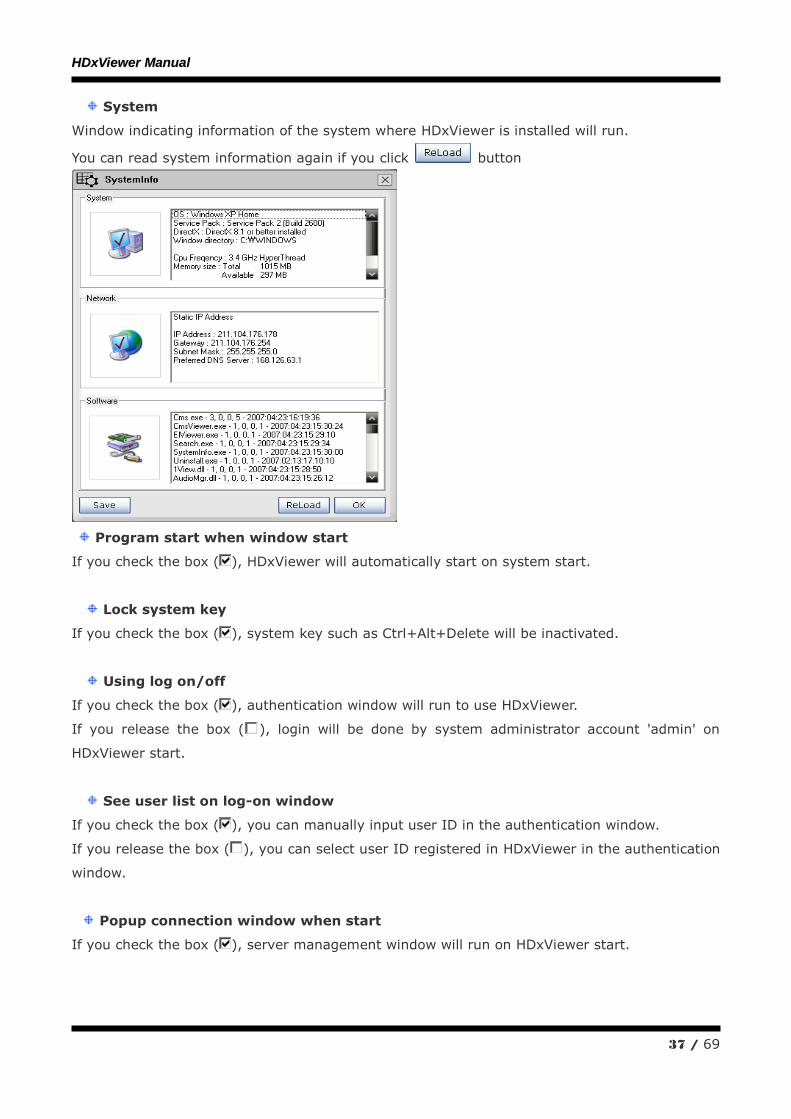
System
Window indicating information of the system where HDxViewer is installed will run.
You can read system information again if you click button
Program start when window start
If you check the box ( ), HDxViewer will automatically start on system start.
Lock system key
If you check the box ( ), system key such as Ctrl+Alt+Delete will be inactivated.
Using log on/off
If you check the box ( ), authentication window will run to use HDxViewer.
If you release the box ( ), login will be done by system administrator account 'admin' on
HDxViewer start.
See user list on log-on window
If you check the box ( ), you can manually input user ID in the authentication window.
If you release the box ( ), you can select user ID registered in HDxViewer in the authentication
window.
Popup connection window when start
If you check the box ( ), server management window will run on HDxViewer start.
HHDDxxVViieewweerr MMaannuuaall
38 / 69
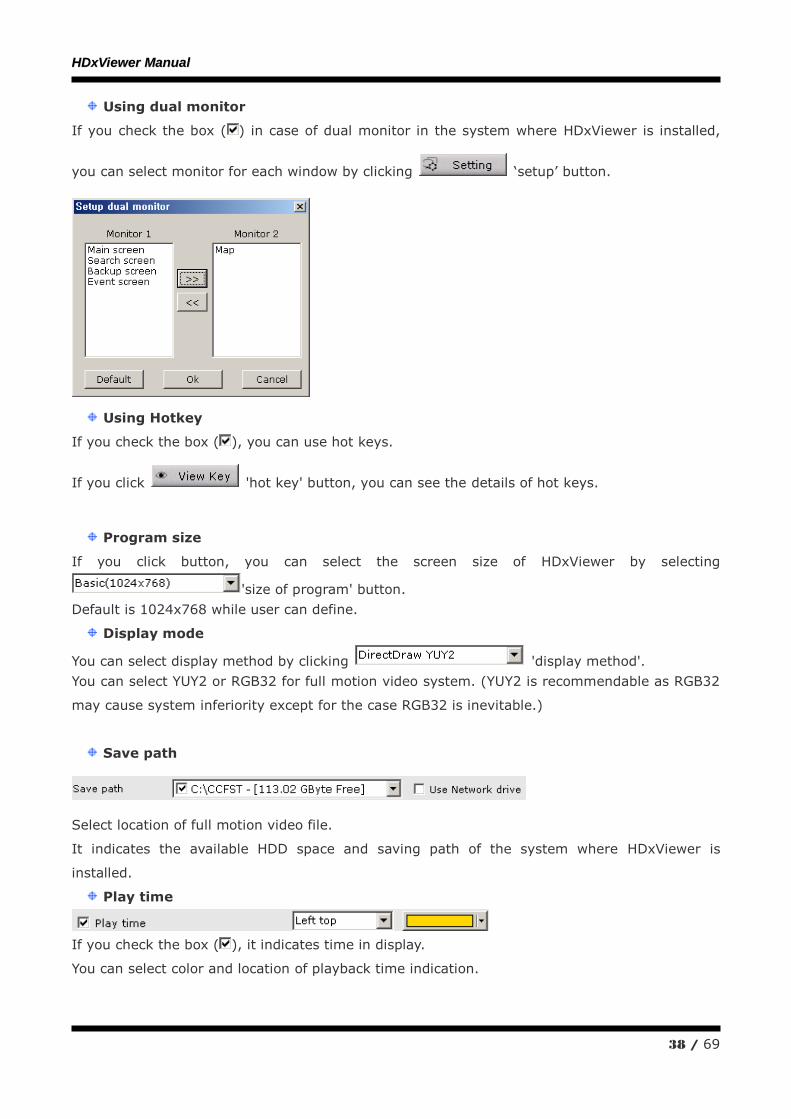
Using dual monitor
If you check the box ( ) in case of dual monitor in the system where HDxViewer is installed,
you can select monitor for each window by clicking „setup‟ button.
Using Hotkey
If you check the box ( ), you can use hot keys.
If you click 'hot key' button, you can see the details of hot keys.
Program size
If you click button, you can select the screen size of HDxViewer by selecting
'size of program' button.
Default is 1024x768 while user can define.
Display mode
You can select display method by clicking 'display method'.
You can select YUY2 or RGB32 for full motion video system. (YUY2 is recommendable as RGB32
may cause system inferiority except for the case RGB32 is inevitable.)
Save path
Select location of full motion video file.
It indicates the available HDD space and saving path of the system where HDxViewer is
installed.
Play time
If you check the box ( ), it indicates time in display.
You can select color and location of playback time indication.
HHDDxxVViieewweerr MMaannuuaall
39 / 69
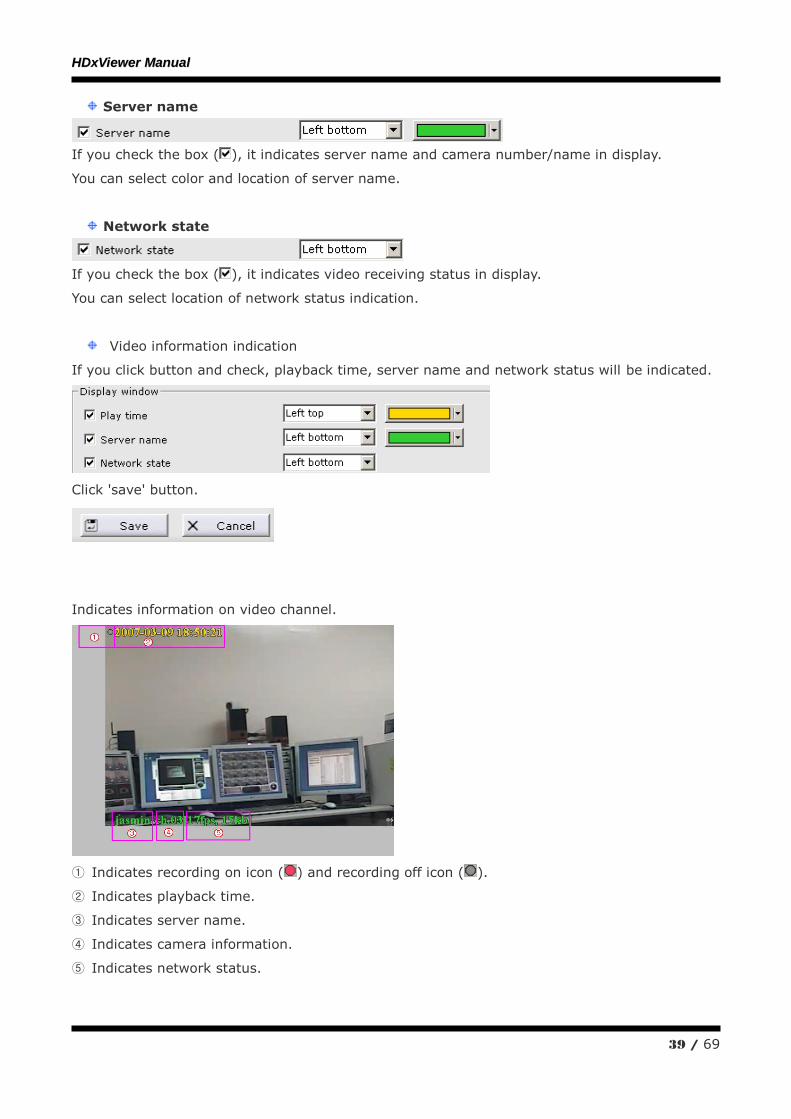
Server name
If you check the box ( ), it indicates server name and camera number/name in display.
You can select color and location of server name.
Network state
If you check the box ( ), it indicates video receiving status in display.
You can select location of network status indication.
Video information indication
If you click button and check, playback time, server name and network status will be indicated.
Click 'save' button.
Indicates information on video channel.
① Indicates recording on icon ( ) and recording off icon ( ).
② Indicates playback time.
③ Indicates server name.
④ Indicates camera information.
⑤ Indicates network status.
HHDDxxVViieewweerr MMaannuuaall
40 / 69
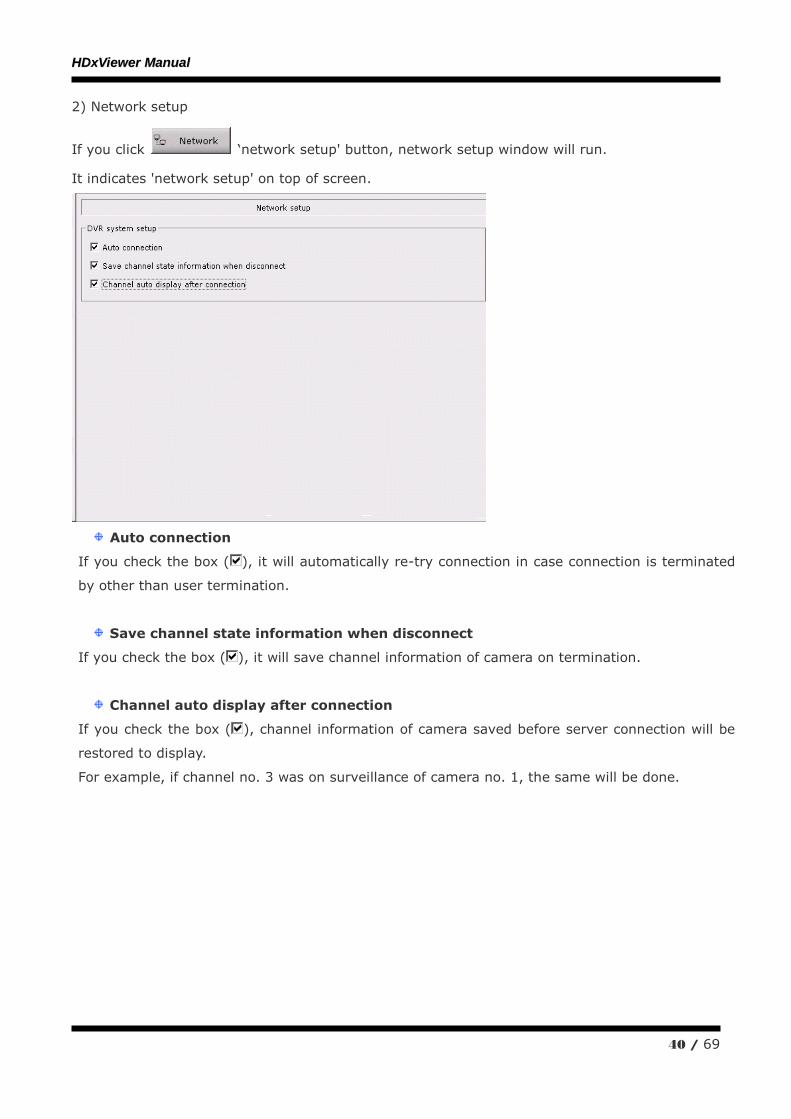
2) Network setup
If you click „network setup' button, network setup window will run.
It indicates 'network setup' on top of screen.
Auto connection
If you check the box ( ), it will automatically re-try connection in case connection is terminated
by other than user termination.
Save channel state information when disconnect
If you check the box ( ), it will save channel information of camera on termination.
Channel auto display after connection
If you check the box ( ), channel information of camera saved before server connection will be
restored to display.
For example, if channel no. 3 was on surveillance of camera no. 1, the same will be done.
HHDDxxVViieewweerr MMaannuuaall
41 / 69
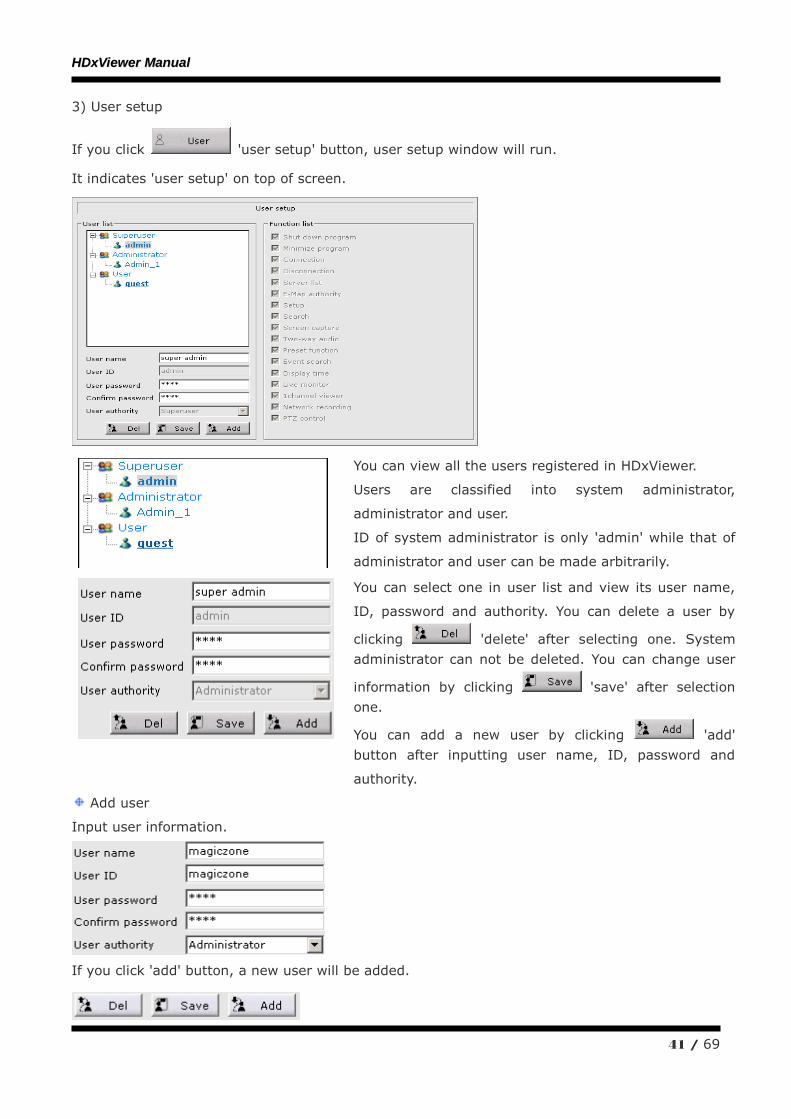
3) User setup
If you click 'user setup' button, user setup window will run.
It indicates 'user setup' on top of screen.
You can view all the users registered in HDxViewer.
Users are classified into system administrator,
administrator and user.
ID of system administrator is only 'admin' while that of
administrator and user can be made arbitrarily.
You can select one in user list and view its user name,
ID, password and authority. You can delete a user by
clicking 'delete' after selecting one. System
administrator can not be deleted. You can change user
information by clicking 'save' after selection
one.
You can add a new user by clicking 'add'
button after inputting user name, ID, password and
authority.
Add user
Input user information.
If you click 'add' button, a new user will be added.
HHDDxxVViieewweerr MMaannuuaall
42 / 69
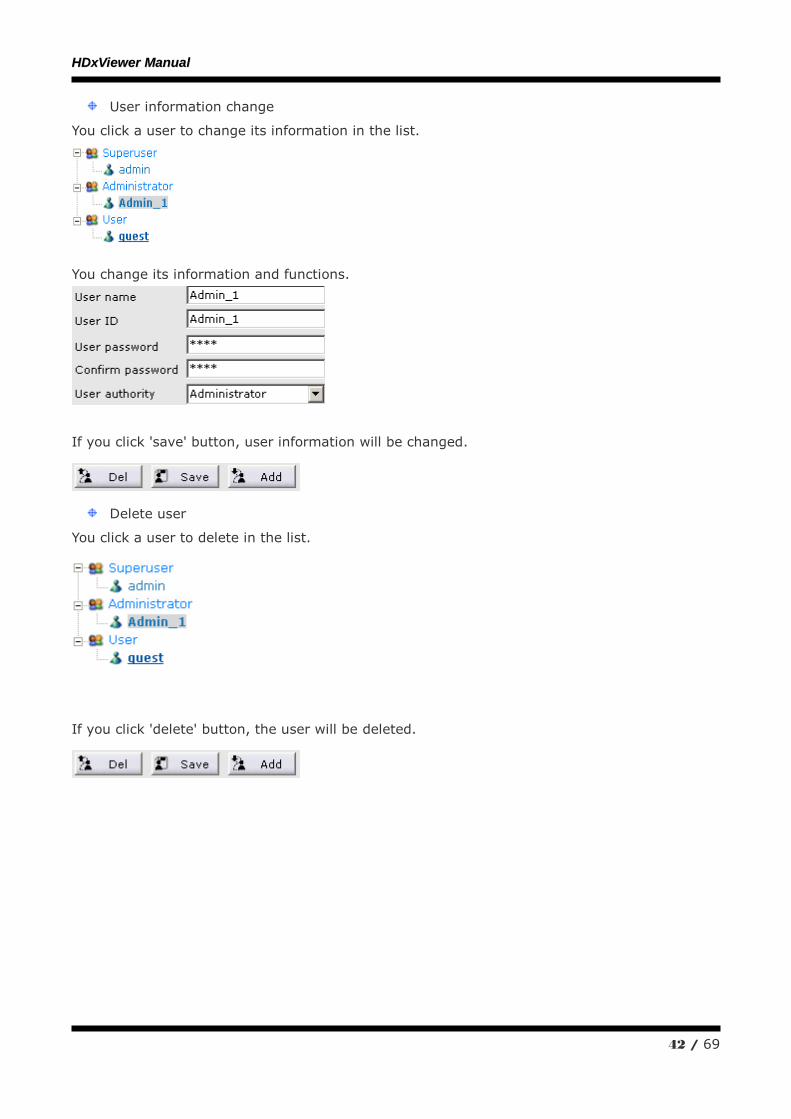
User information change
You click a user to change its information in the list.
You change its information and functions.
If you click 'save' button, user information will be changed.
Delete user
You click a user to delete in the list.
If you click 'delete' button, the user will be deleted.
HHDDxxVViieewweerr MMaannuuaall
43 / 69
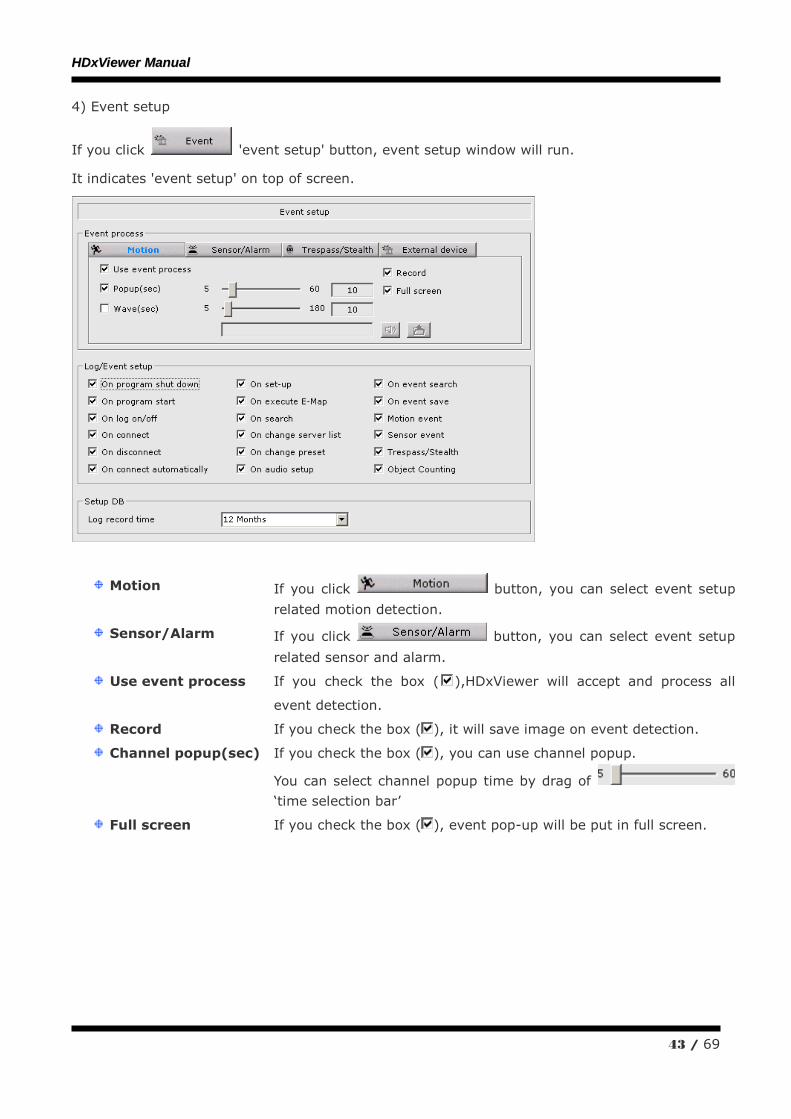
4) Event setup
If you click 'event setup' button, event setup window will run.
It indicates 'event setup' on top of screen.
Motion If you click button, you can select event setup
related motion detection.
Sensor/Alarm If you click button, you can select event setup
related sensor and alarm.
Use event process If you check the box ( ),HDxViewer will accept and process all
event detection.
Record If you check the box ( ), it will save image on event detection.
Channel popup(sec) If you check the box ( ), you can use channel popup.
You can select channel popup time by drag of
„time selection bar‟
Full screen If you check the box ( ), event pop-up will be put in full screen.
HHDDxxVViieewweerr MMaannuuaall
44 / 69
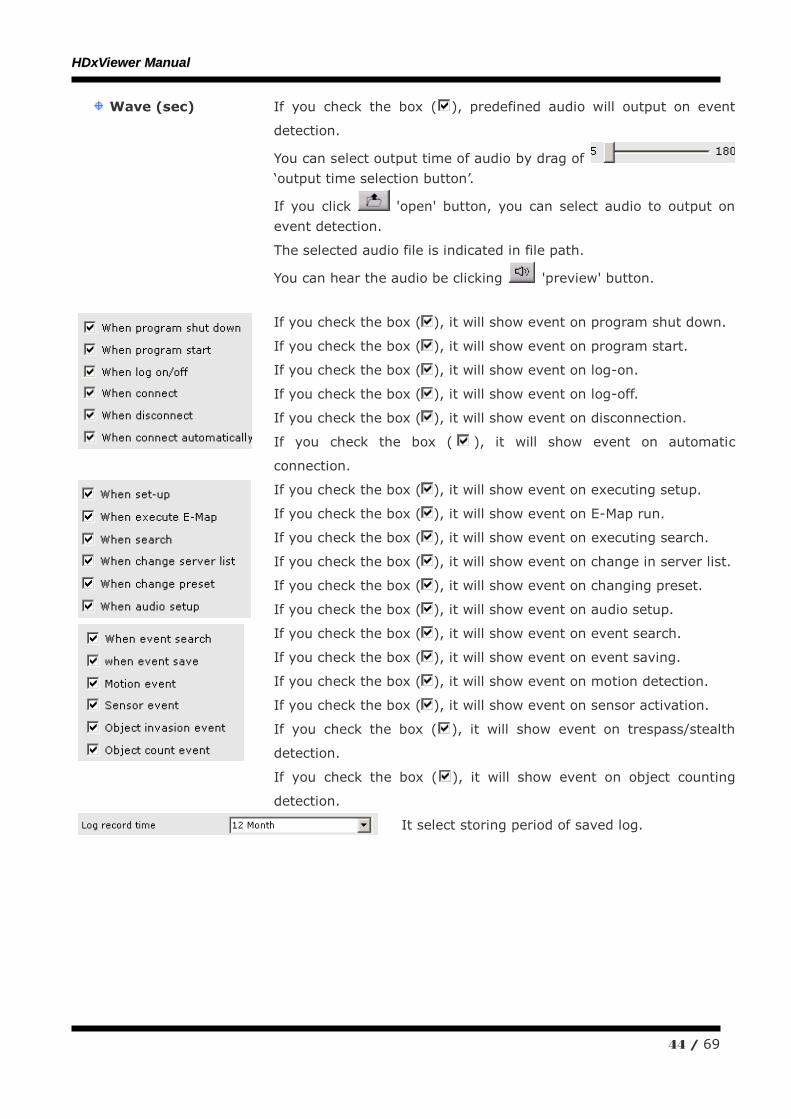
Wave (sec) If you check the box ( ), predefined audio will output on event
detection.
You can select output time of audio by drag of
„output time selection button‟.
If you click 'open' button, you can select audio to output on
event detection.
The selected audio file is indicated in file path.
You can hear the audio be clicking 'preview' button.
If you check the box ( ), it will show event on program shut down.
If you check the box ( ), it will show event on program start.
If you check the box ( ), it will show event on log-on.
If you check the box ( ), it will show event on log-off.
If you check the box ( ), it will show event on disconnection.
If you check the box ( ), it will show event on automatic
connection.
If you check the box ( ), it will show event on executing setup.
If you check the box ( ), it will show event on E-Map run.
If you check the box ( ), it will show event on executing search.
If you check the box ( ), it will show event on change in server list.
If you check the box ( ), it will show event on changing preset.
If you check the box ( ), it will show event on audio setup.
If you check the box ( ), it will show event on event search.
If you check the box ( ), it will show event on event saving.
If you check the box ( ), it will show event on motion detection.
If you check the box ( ), it will show event on sensor activation.
If you check the box ( ), it will show event on trespass/stealth
detection.
If you check the box ( ), it will show event on object counting
detection.
It select storing period of saved log.
HHDDxxVViieewweerr MMaannuuaall
45 / 69
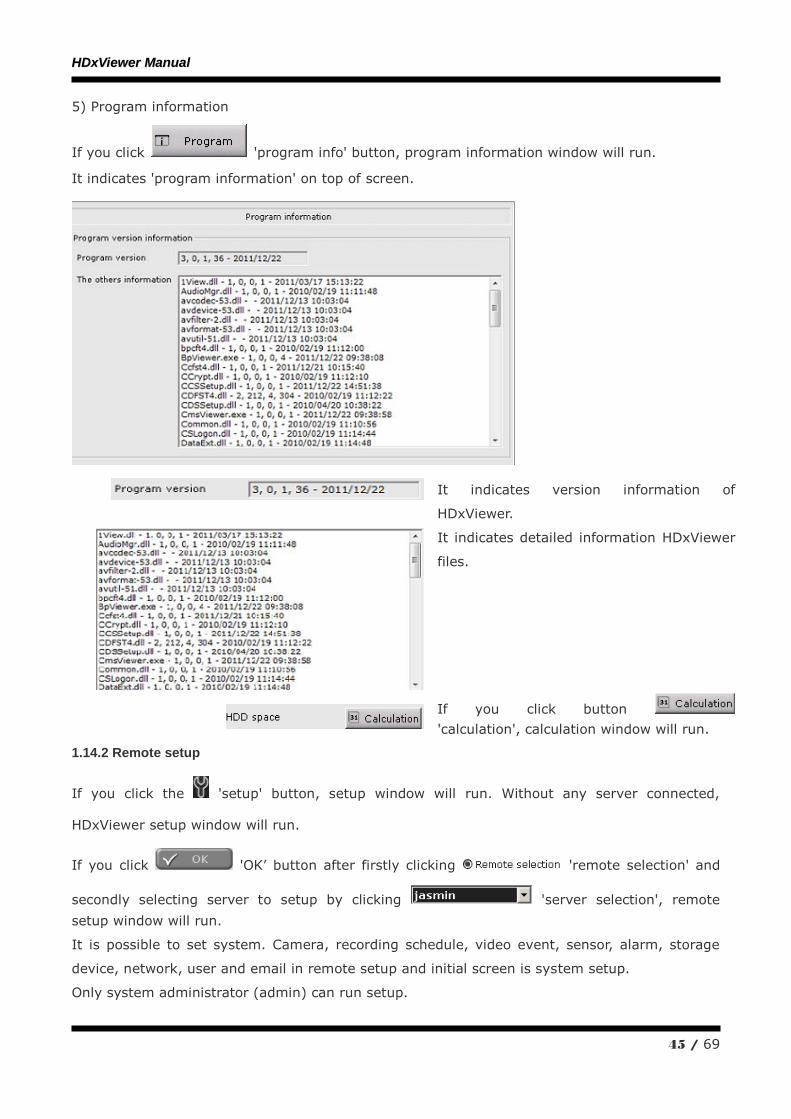
5) Program information
If you click 'program info' button, program information window will run.
It indicates 'program information' on top of screen.
It indicates version information of
HDxViewer.
It indicates detailed information HDxViewer
files.
If you click button
'calculation', calculation window will run.
1.14.2 Remote setup
If you click the 'setup' button, setup window will run. Without any server connected,
HDxViewer setup window will run.
If you click 'OK‟ button after firstly clicking 'remote selection' and
secondly selecting server to setup by clicking 'server selection', remote
setup window will run.
It is possible to set system. Camera, recording schedule, video event, sensor, alarm, storage
device, network, user and email in remote setup and initial screen is system setup.
Only system administrator (admin) can run setup.
HHDDxxVViieewweerr MMaannuuaall
46 / 69
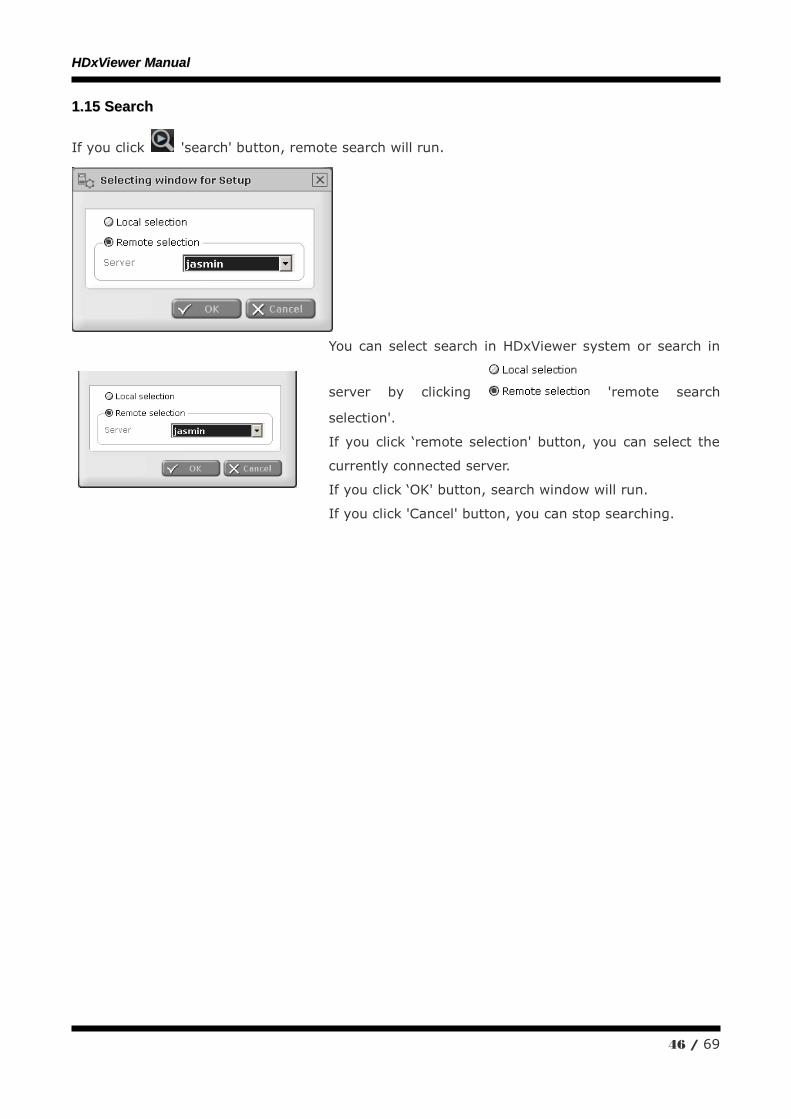
11..1155 SSeeaarrcchh
If you click 'search' button, remote search will run.
You can select search in HDxViewer system or search in
server by clicking 'remote search
selection'.
If you click „remote selection' button, you can select the
currently connected server.
If you click „OK' button, search window will run.
If you click 'Cancel' button, you can stop searching.
HHDDxxVViieewweerr MMaannuuaall
47 / 69
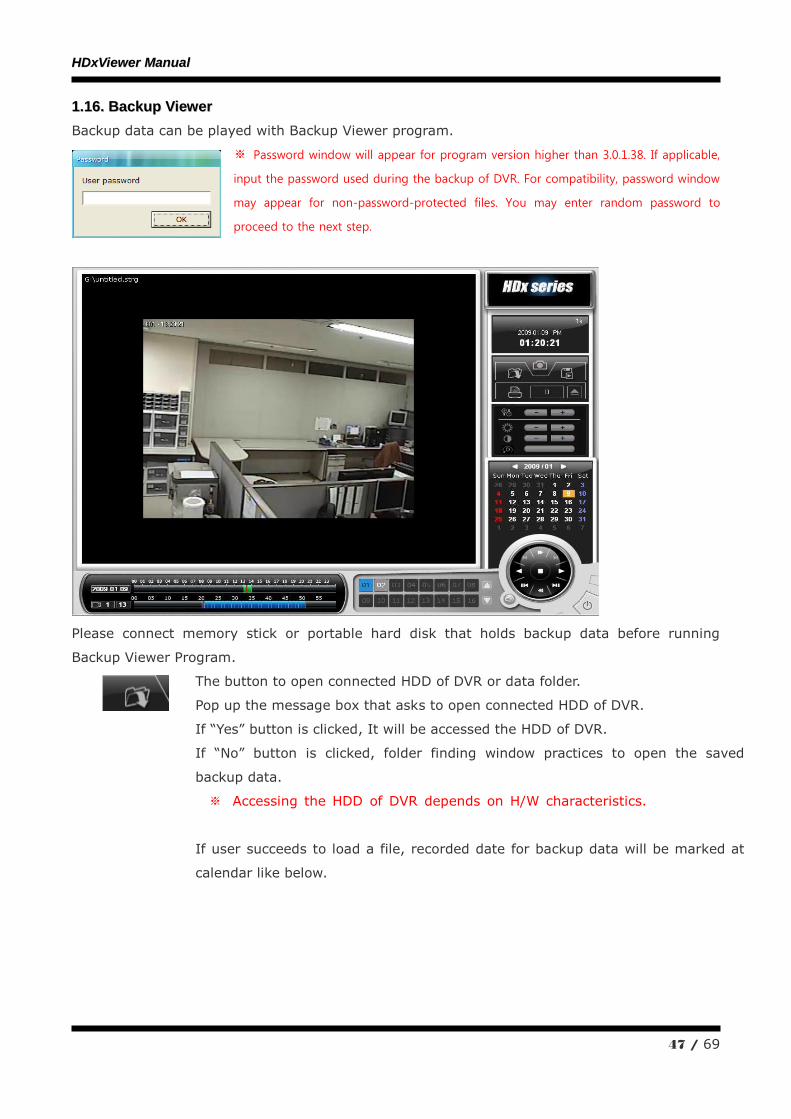
11..1166.. BBaacckkuupp VViieewweerr
Backup data can be played with Backup Viewer program.
※ Password window will appear for program version higher than 3.0.1.38. If applicable,
input the password used during the backup of DVR. For compatibility, password window
may appear for non-password-protected files. You may enter random password to
proceed to the next step.
Please connect memory stick or portable hard disk that holds backup data before running
Backup Viewer Program.
The button to open connected HDD of DVR or data folder.
Pop up the message box that asks to open connected HDD of DVR.
If “Yes” button is clicked, It will be accessed the HDD of DVR.
If “No” button is clicked, folder finding window practices to open the saved
backup data.
※ Accessing the HDD of DVR depends on H/W characteristics.
If user succeeds to load a file, recorded date for backup data will be marked at
calendar like below.
HHDDxxVViieewweerr MMaannuuaall
48 / 69
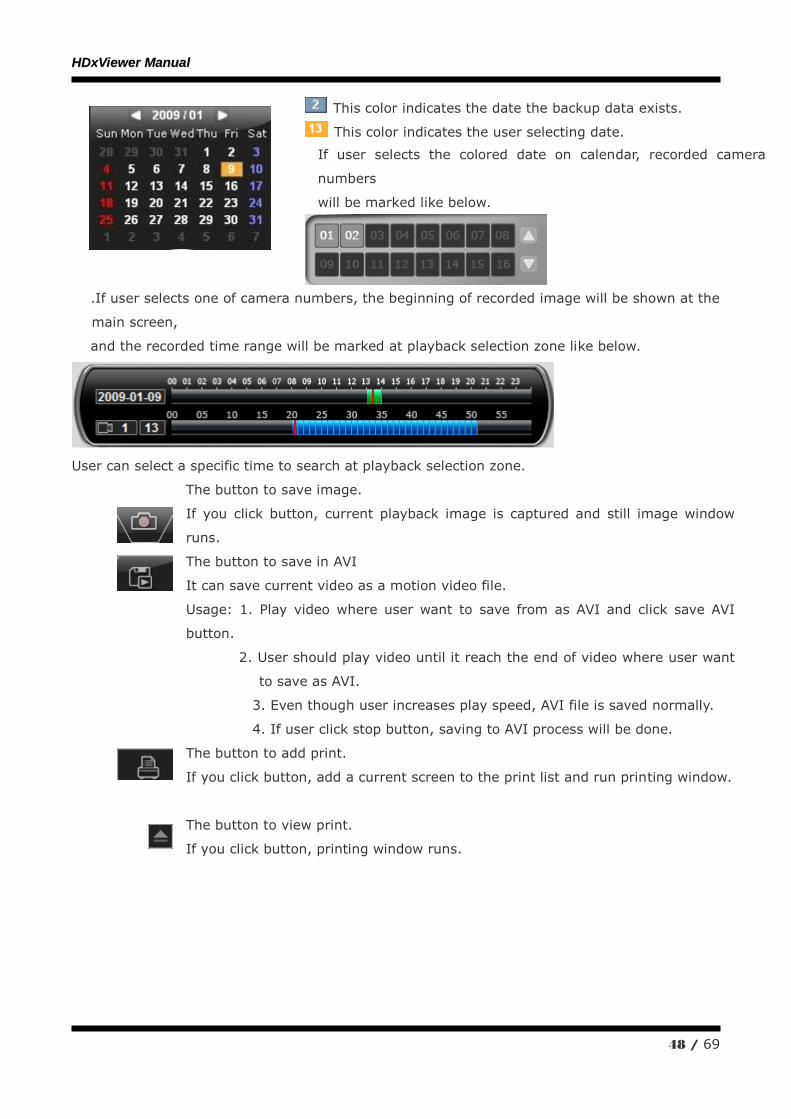
This color indicates the date the backup data exists.
This color indicates the user selecting date.
If user selects the colored date on calendar, recorded camera
numbers
will be marked like below.
.If user selects one of camera numbers, the beginning of recorded image will be shown at the
main screen,
and the recorded time range will be marked at playback selection zone like below.
User can select a specific time to search at playback selection zone.
The button to save image.
If you click button, current playback image is captured and still image window
runs.
The button to save in AVI
It can save current video as a motion video file.
Usage: 1. Play video where user want to save from as AVI and click save AVI
button.
2. User should play video until it reach the end of video where user want
to save as AVI.
3. Even though user increases play speed, AVI file is saved normally.
4. If user click stop button, saving to AVI process will be done.
The button to add print.
If you click button, add a current screen to the print list and run printing window.
The button to view print.
If you click button, printing window runs.
HHDDxxVViieewweerr MMaannuuaall
49 / 69
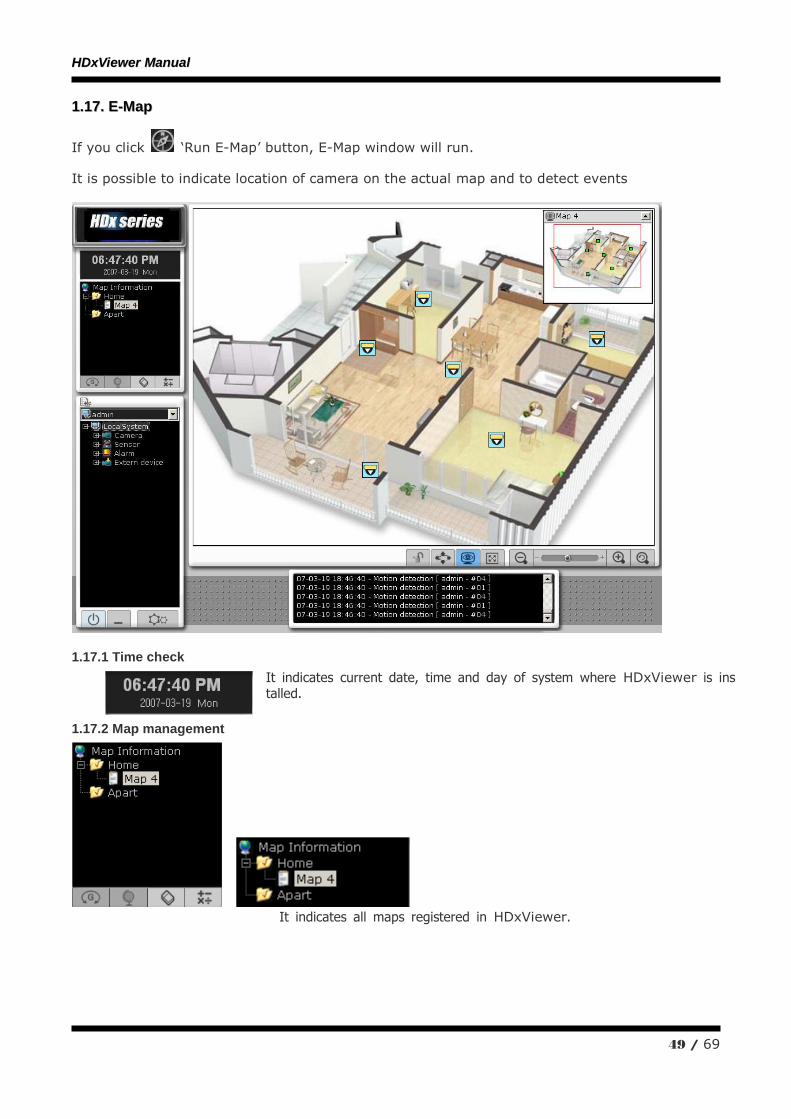
11..1177.. EE--MMaapp
If you click „Run E-Map‟ button, E-Map window will run.
It is possible to indicate location of camera on the actual map and to detect events
1.17.1 Time check
It indicates current date, time and day of system where HDxViewer is installed.
1.17.2 Map management
It indicates all maps registered in HDxViewer.
HHDDxxVViieewweerr MMaannuuaall
50 / 69
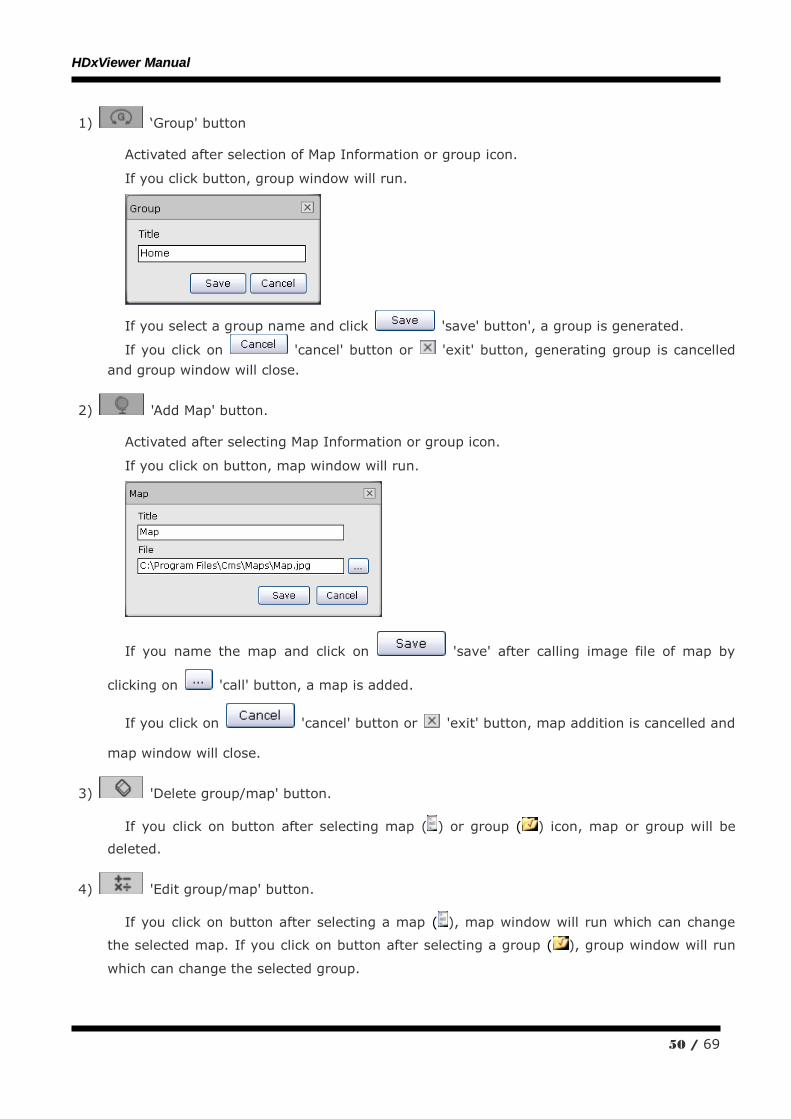
1) „Group' button
Activated after selection of Map Information or group icon.
If you click button, group window will run.
If you select a group name and click 'save' button', a group is generated.
If you click on 'cancel' button or 'exit' button, generating group is cancelled
and group window will close.
2) 'Add Map' button.
Activated after selecting Map Information or group icon.
If you click on button, map window will run.
If you name the map and click on 'save' after calling image file of map by
clicking on 'call' button, a map is added.
If you click on 'cancel' button or 'exit' button, map addition is cancelled and
map window will close.
3) 'Delete group/map' button.
If you click on button after selecting map ( ) or group ( ) icon, map or group will be
deleted.
4) 'Edit group/map' button.
If you click on button after selecting a map ( ), map window will run which can change
the selected map. If you click on button after selecting a group ( ), group window will run
which can change the selected group.
HHDDxxVViieewweerr MMaannuuaall
51 / 69
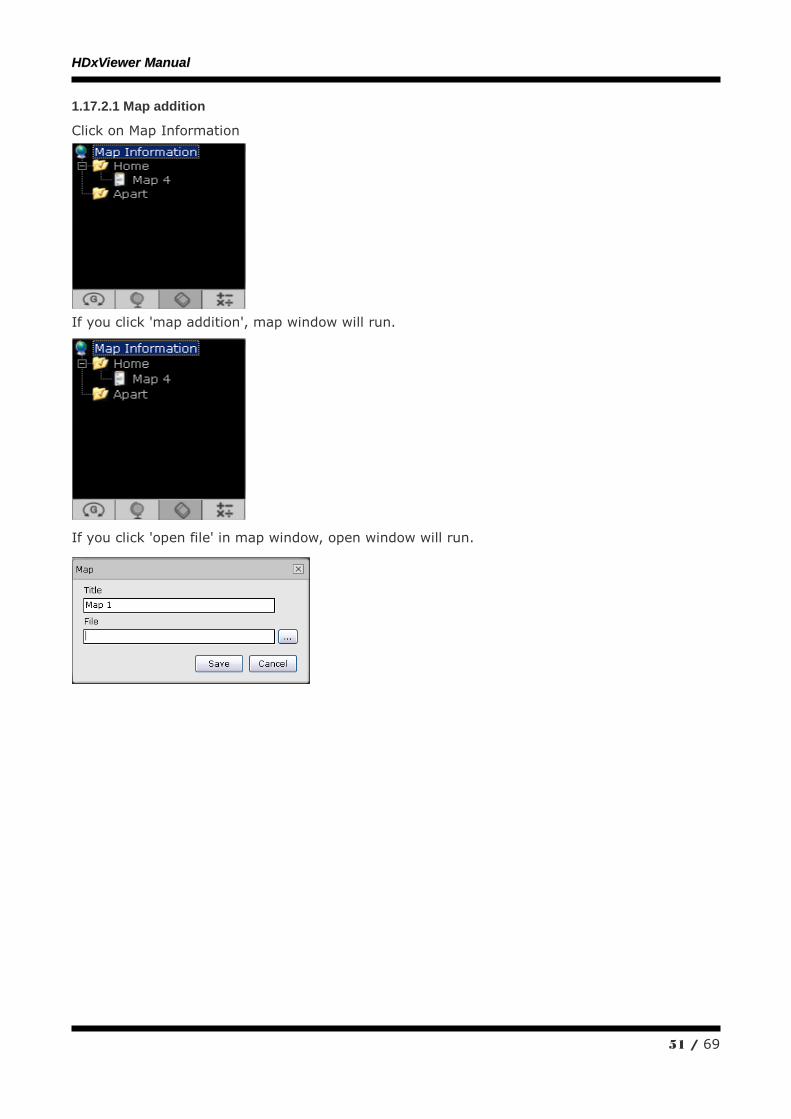
1.17.2.1 Map addition
Click on Map Information
If you click 'map addition', map window will run.
If you click 'open file' in map window, open window will run.
HHDDxxVViieewweerr MMaannuuaall
52 / 69
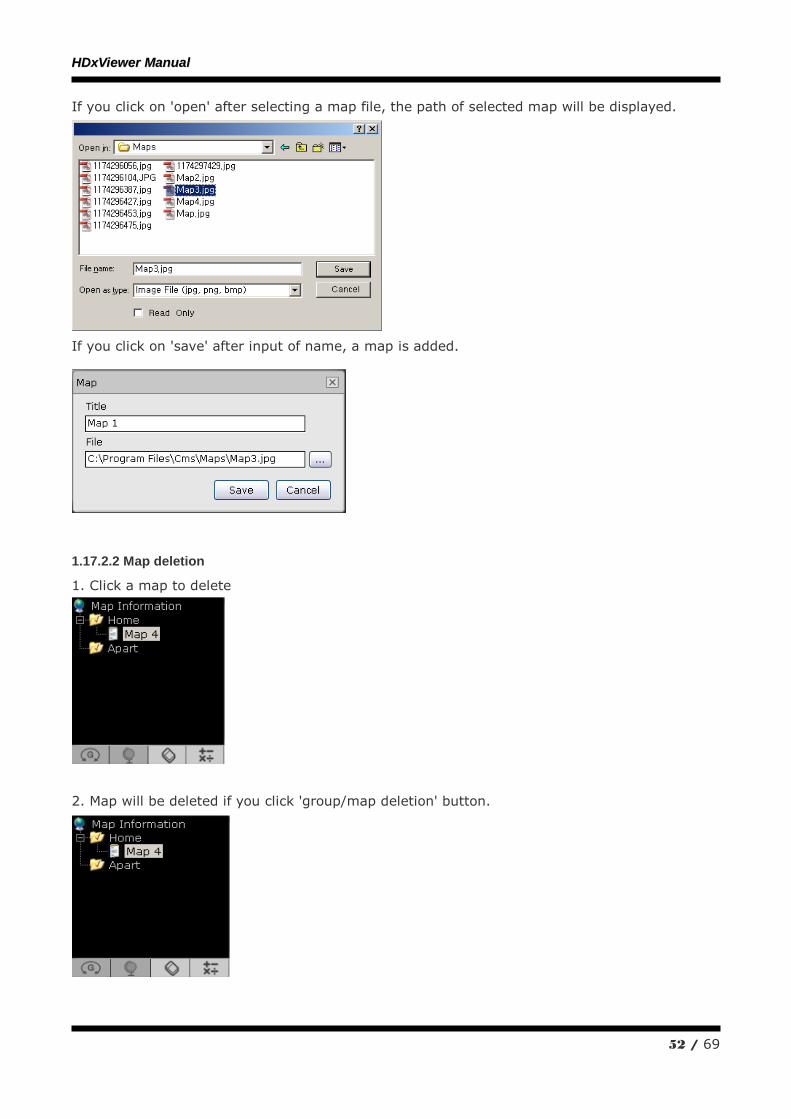
If you click on 'open' after selecting a map file, the path of selected map will be displayed.
If you click on 'save' after input of name, a map is added.
1.17.2.2 Map deletion
1. Click a map to delete
2. Map will be deleted if you click 'group/map deletion' button.
HHDDxxVViieewweerr MMaannuuaall
53 / 69
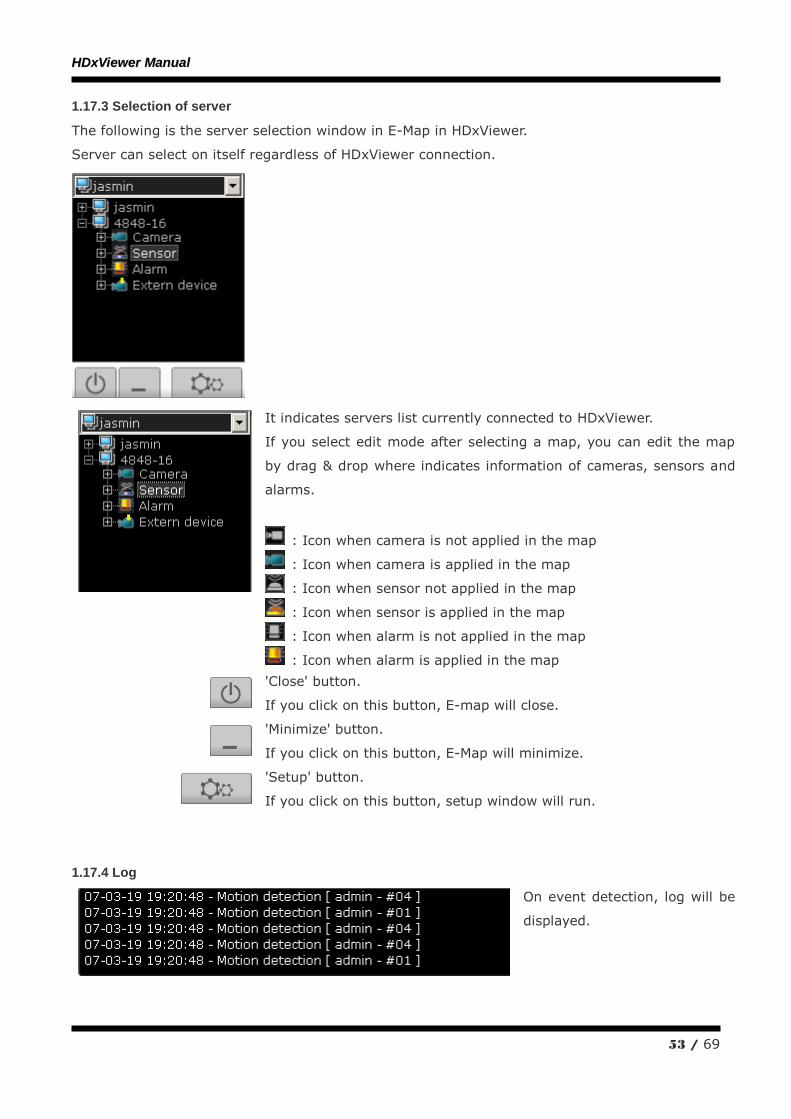
1.17.3 Selection of server
The following is the server selection window in E-Map in HDxViewer.
Server can select on itself regardless of HDxViewer connection.
It indicates servers list currently connected to HDxViewer.
If you select edit mode after selecting a map, you can edit the map
by drag & drop where indicates information of cameras, sensors and
alarms.
: Icon when camera is not applied in the map
: Icon when camera is applied in the map
: Icon when sensor not applied in the map
: Icon when sensor is applied in the map
: Icon when alarm is not applied in the map
: Icon when alarm is applied in the map
'Close' button.
If you click on this button, E-map will close.
'Minimize' button.
If you click on this button, E-Map will minimize.
'Setup' button.
If you click on this button, setup window will run.
1.17.4 Log
On event detection, log will be
displayed.

HHDDxxVViieewweerr MMaannuuaall
54 / 69
1.17.5 Setup
If you click on this button, setup window will run.
If button is checked ( ), it indicates motion detection.
If button is checked ( ), it indicates trespass/stealth
detection.
If button is checked ( ), it indicates object counting
detection.
If button is checked ( ), it indicates sensor activation.
If button is checked ( ), it indicates alarm activation.
It select time to indicate map where event is detected
It selects time to have the detected event indicated on
map.
If you click 'save' button,
the current setting will be saved.
If you click 'cancel' button,
setting will not be saved and the setup window will close.
HHDDxxVViieewweerr MMaannuuaall
55 / 69
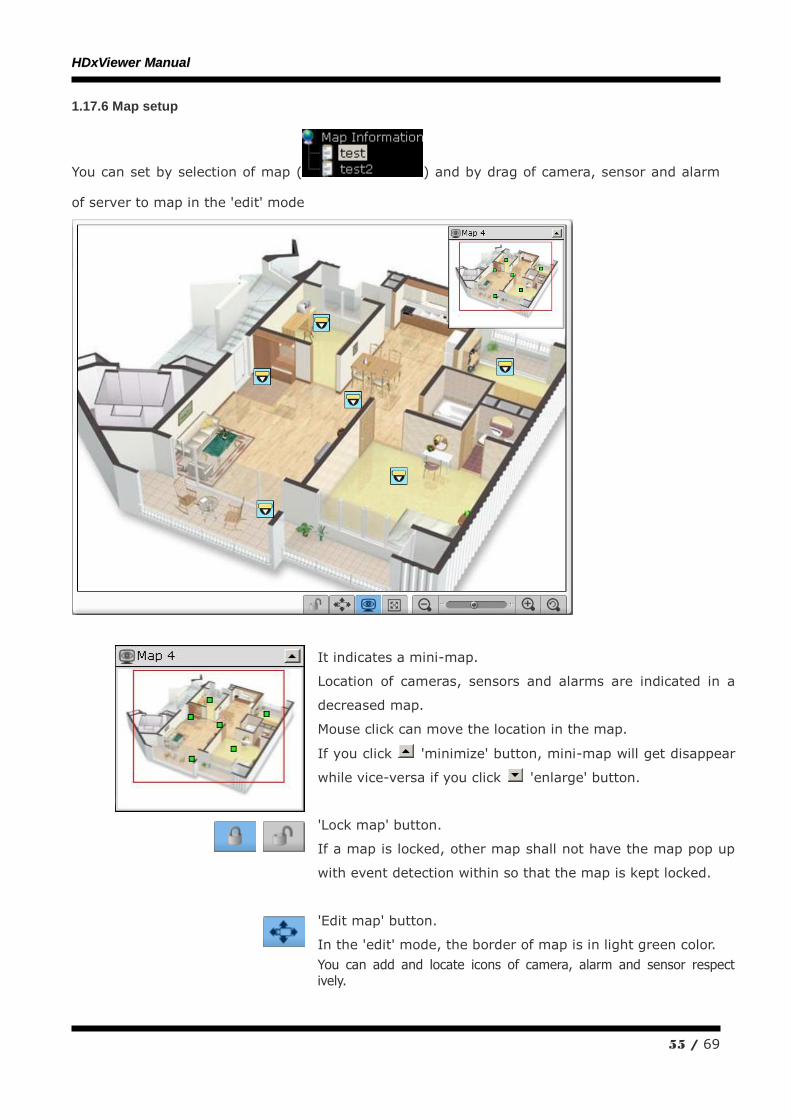
1.17.6 Map setup
You can set by selection of map ( ) and by drag of camera, sensor and alarm
of server to map in the 'edit' mode
It indicates a mini-map.
Location of cameras, sensors and alarms are indicated in a
decreased map.
Mouse click can move the location in the map.
If you click 'minimize' button, mini-map will get disappear
while vice-versa if you click 'enlarge' button.
'Lock map' button.
If a map is locked, other map shall not have the map pop up
with event detection within so that the map is kept locked.
'Edit map' button.
In the 'edit' mode, the border of map is in light green color.
You can add and locate icons of camera, alarm and sensor respect
ively.
HHDDxxVViieewweerr MMaannuuaall
56 / 69
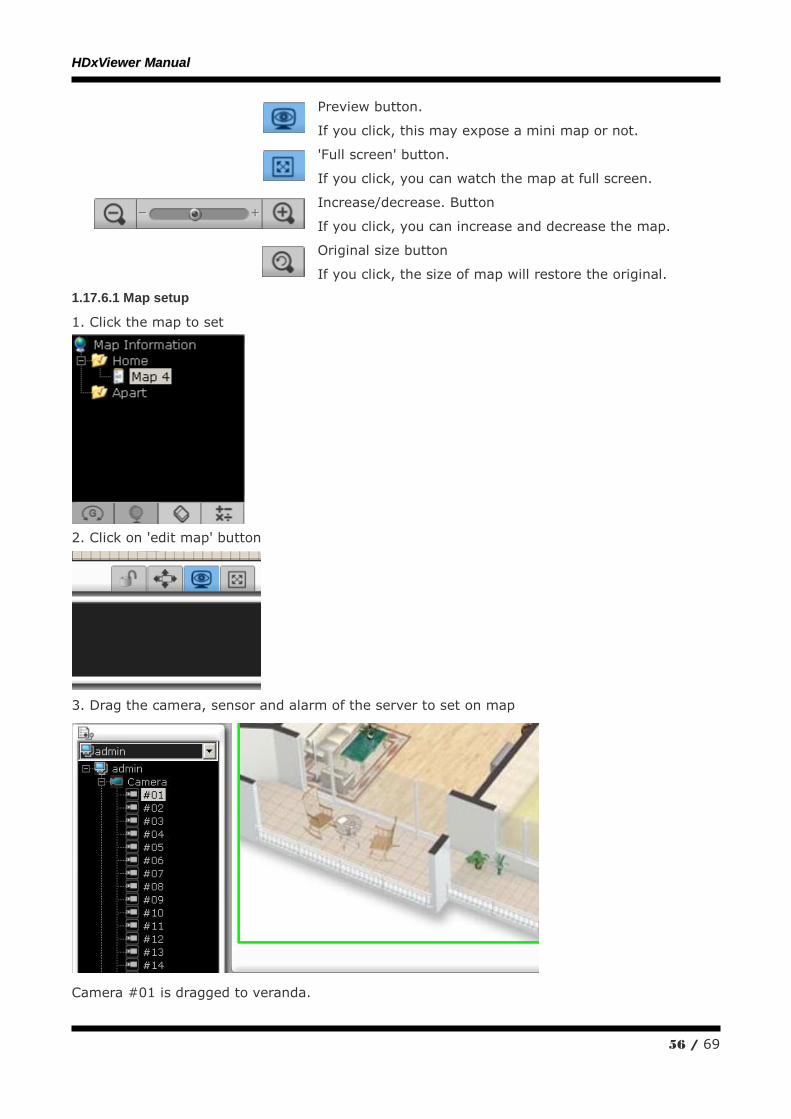
Preview button.
If you click, this may expose a mini map or not.
'Full screen' button.
If you click, you can watch the map at full screen.
Increase/decrease. Button
If you click, you can increase and decrease the map.
Original size button
If you click, the size of map will restore the original.
1.17.6.1 Map setup
1. Click the map to set
2. Click on 'edit map' button
3. Drag the camera, sensor and alarm of the server to set on map
Camera #01 is dragged to veranda.
HHDDxxVViieewweerr MMaannuuaall
57 / 69
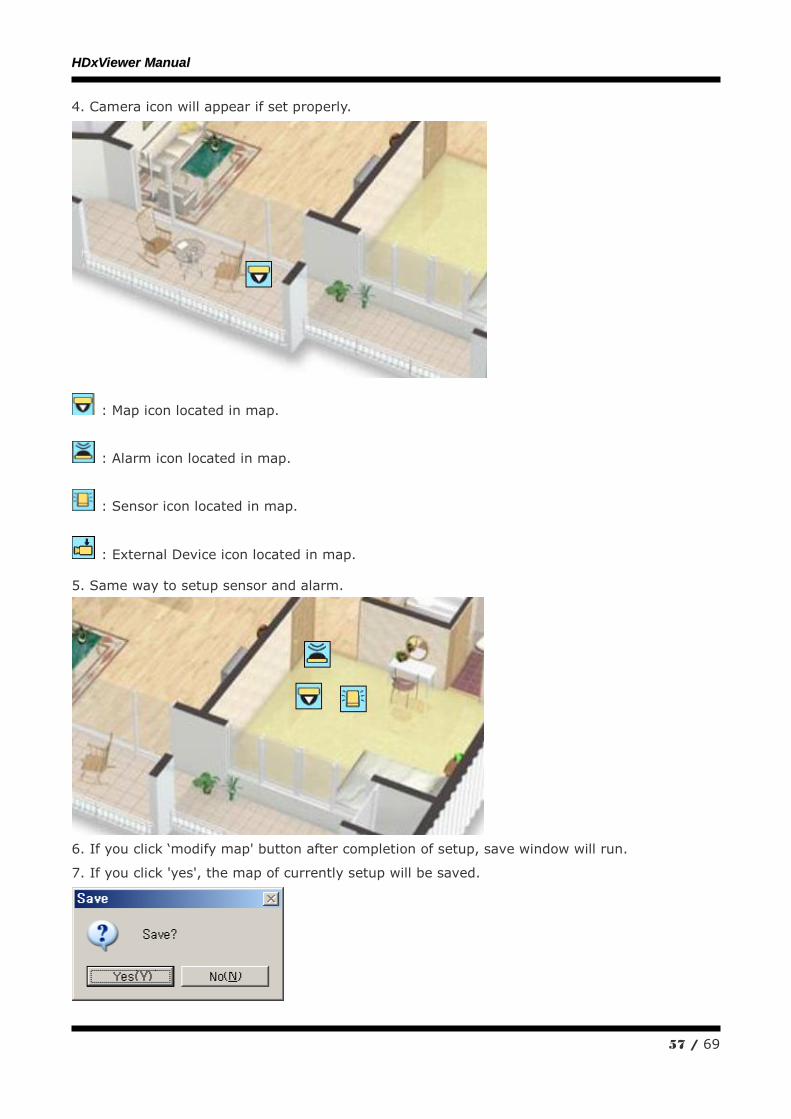
4. Camera icon will appear if set properly.
: Map icon located in map.
: Alarm icon located in map.
: Sensor icon located in map.
: External Device icon located in map.
5. Same way to setup sensor and alarm.
6. If you click „modify map' button after completion of setup, save window will run.
7. If you click 'yes', the map of currently setup will be saved.
HHDDxxVViieewweerr MMaannuuaall
58 / 69
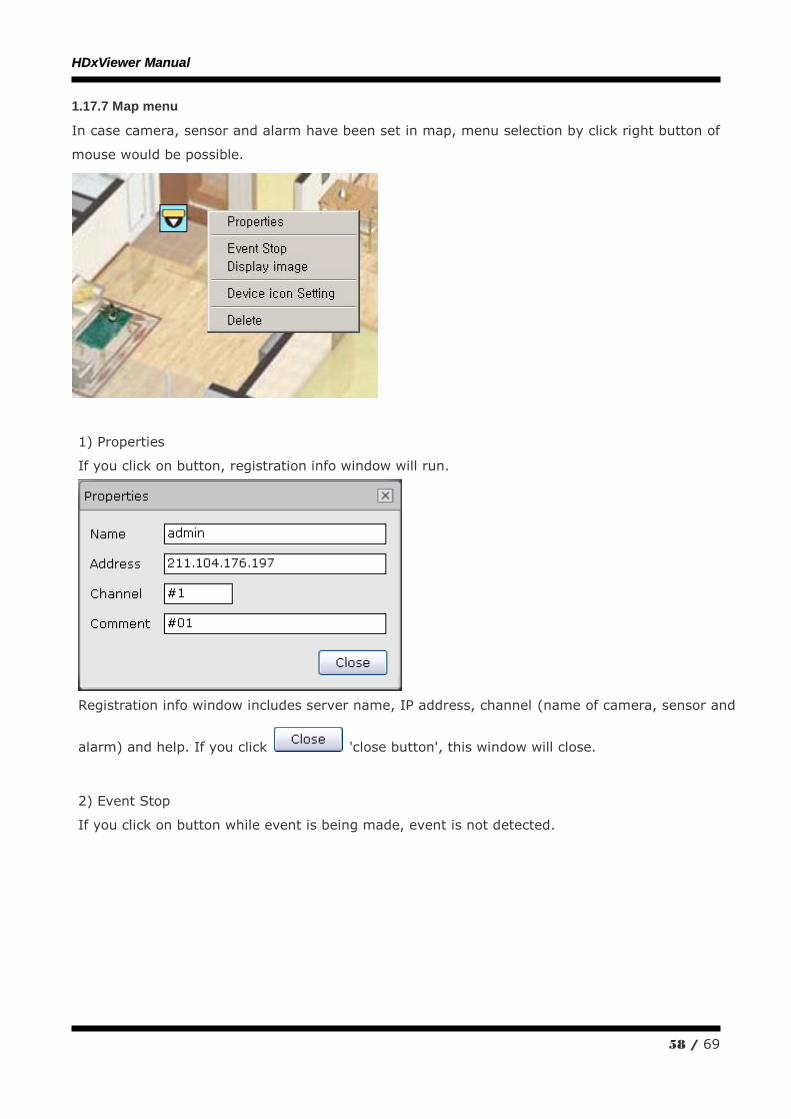
1.17.7 Map menu
In case camera, sensor and alarm have been set in map, menu selection by click right button of
mouse would be possible.
1) Properties
If you click on button, registration info window will run.
Registration info window includes server name, IP address, channel (name of camera, sensor and
alarm) and help. If you click 'close button', this window will close.
2) Event Stop
If you click on button while event is being made, event is not detected.
HHDDxxVViieewweerr MMaannuuaall
59 / 69
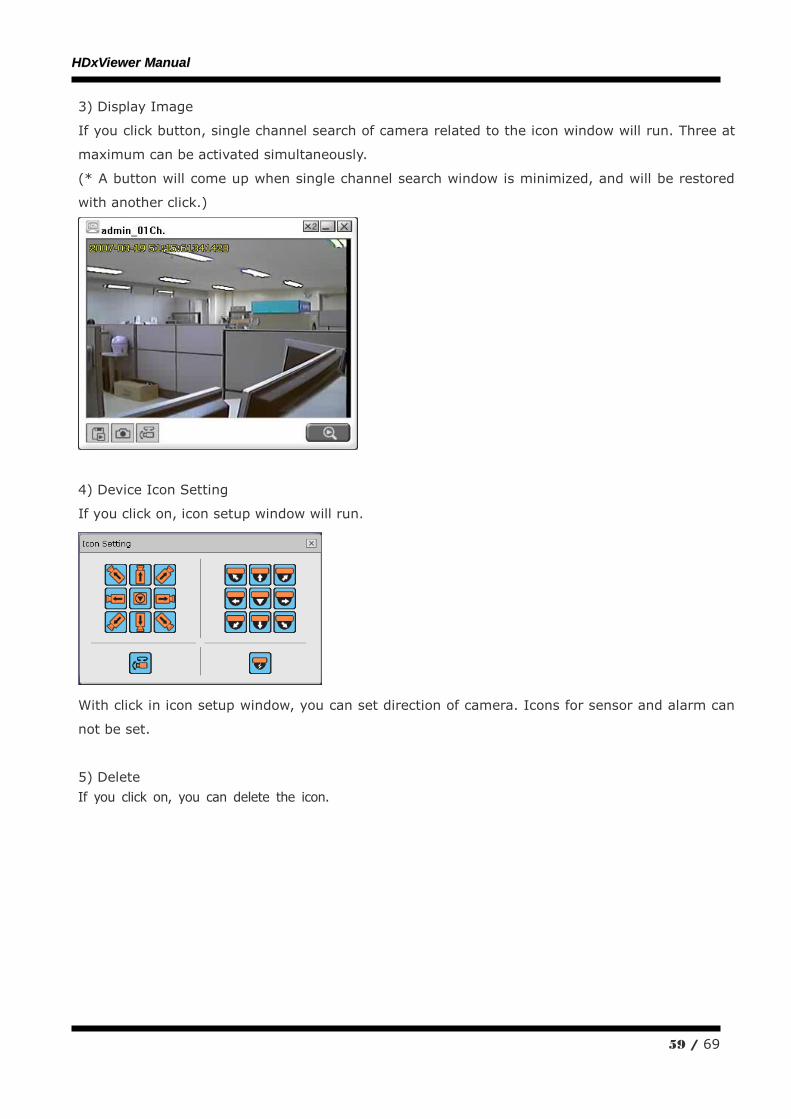
3) Display Image
If you click button, single channel search of camera related to the icon window will run. Three at
maximum can be activated simultaneously.
(* A button will come up when single channel search window is minimized, and will be restored
with another click.)
4) Device Icon Setting
If you click on, icon setup window will run.
With click in icon setup window, you can set direction of camera. Icons for sensor and alarm can
not be set.
5) Delete
If you click on, you can delete the icon.
HHDDxxVViieewweerr MMaannuuaall
60 / 69
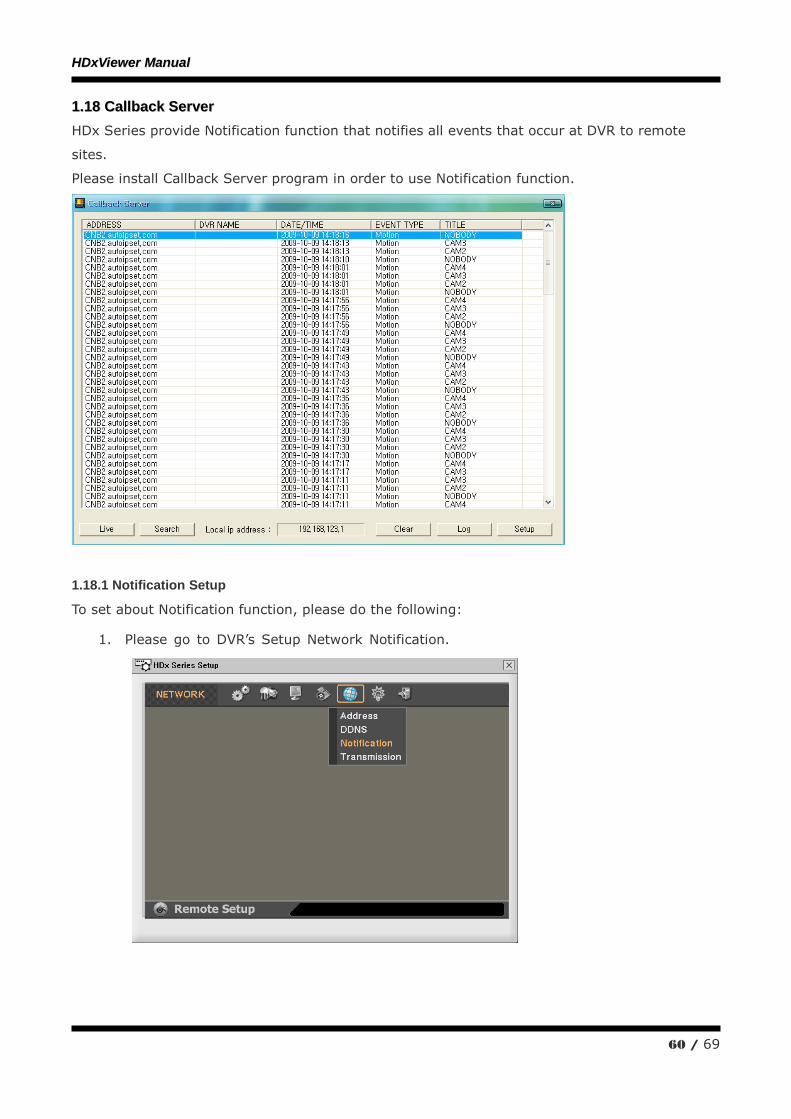
11..1188 CCaallllbbaacckk SSeerrvveerr
HDx Series provide Notification function that notifies all events that occur at DVR to remote
sites.
Please install Callback Server program in order to use Notification function.
1.18.1 Notification Setup
To set about Notification function, please do the following:
1. Please go to DVR‟s Setup Network Notification.
HHDDxxVViieewweerr MMaannuuaall
61 / 69
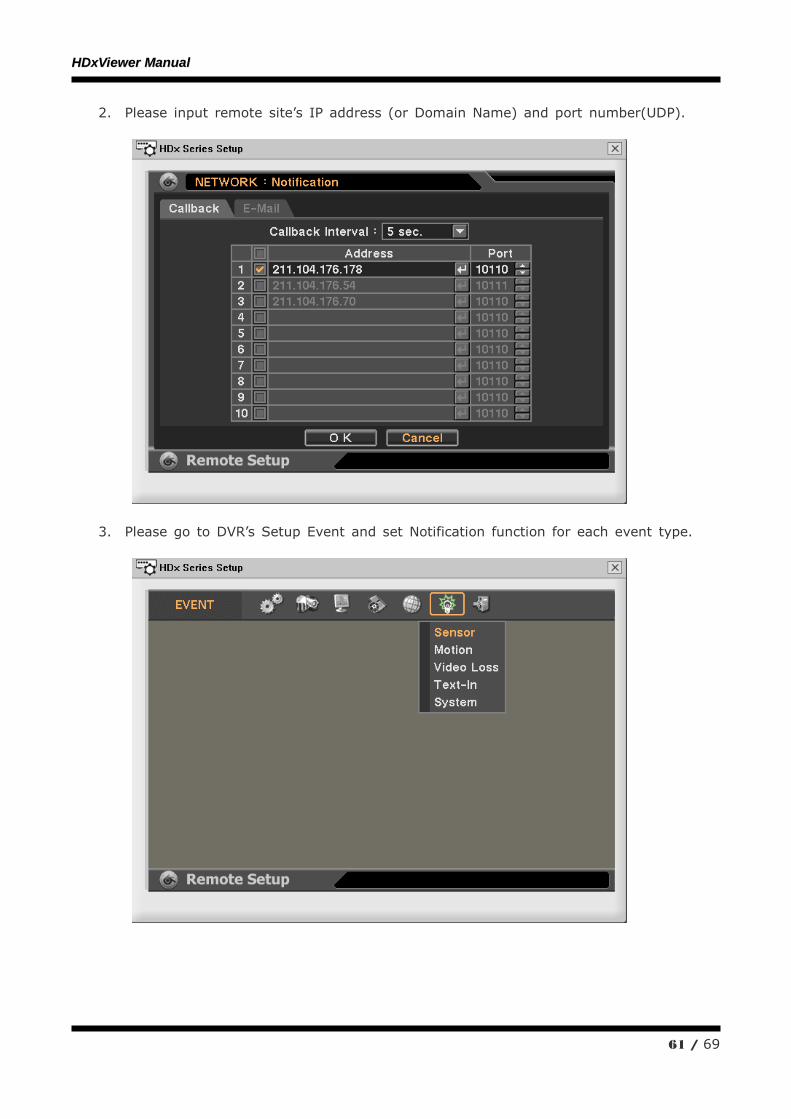
2. Please input remote site‟s IP address (or Domain Name) and port number(UDP).
3. Please go to DVR‟s Setup Event and set Notification function for each event type.
HHDDxxVViieewweerr MMaannuuaall
62 / 69
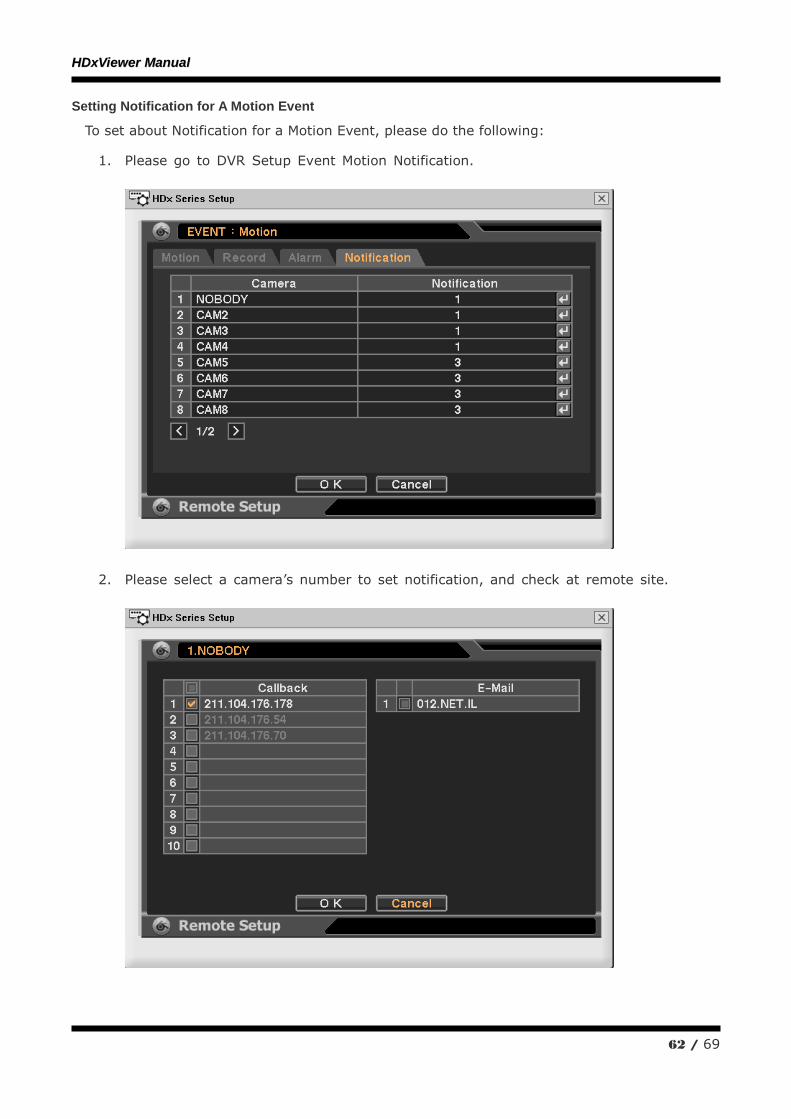
Setting Notification for A Motion Event
To set about Notification for a Motion Event, please do the following:
1. Please go to DVR Setup Event Motion Notification.
2. Please select a camera‟s number to set notification, and check at remote site.
HHDDxxVViieewweerr MMaannuuaall
63 / 69
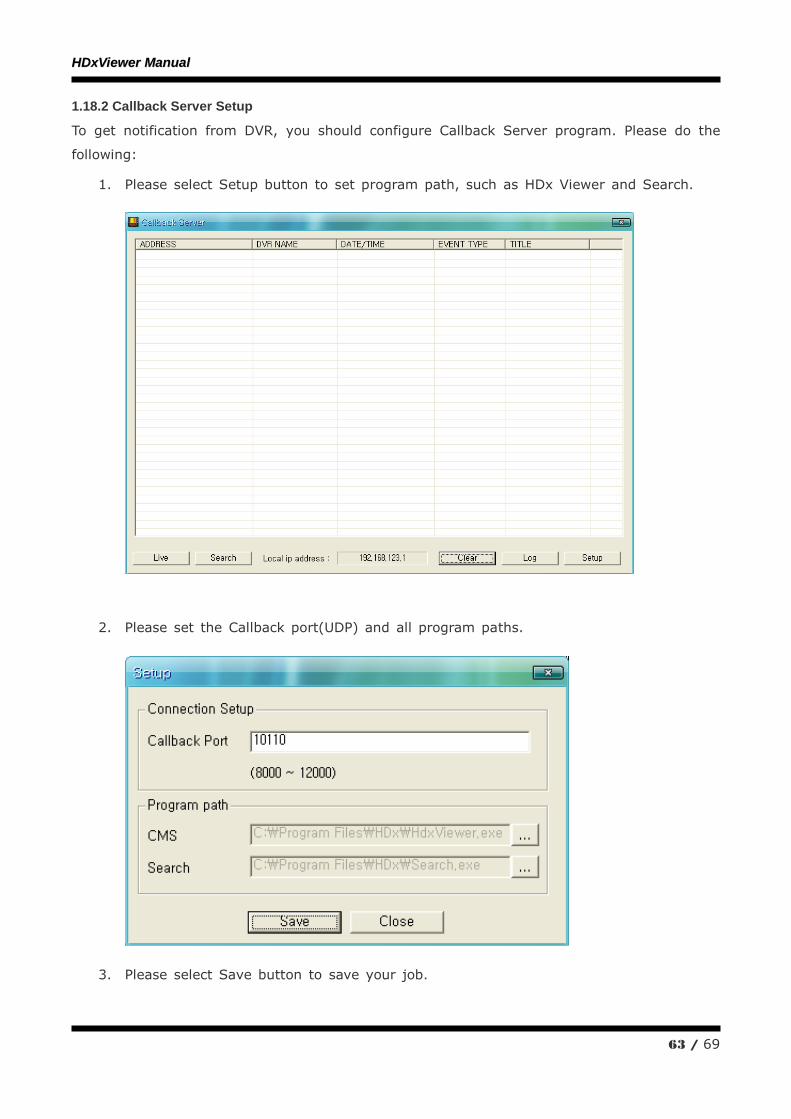
1.18.2 Callback Server Setup
To get notification from DVR, you should configure Callback Server program. Please do the
following:
1. Please select Setup button to set program path, such as HDx Viewer and Search.
2. Please set the Callback port(UDP) and all program paths.
3. Please select Save button to save your job.
HHDDxxVViieewweerr MMaannuuaall
64 / 69
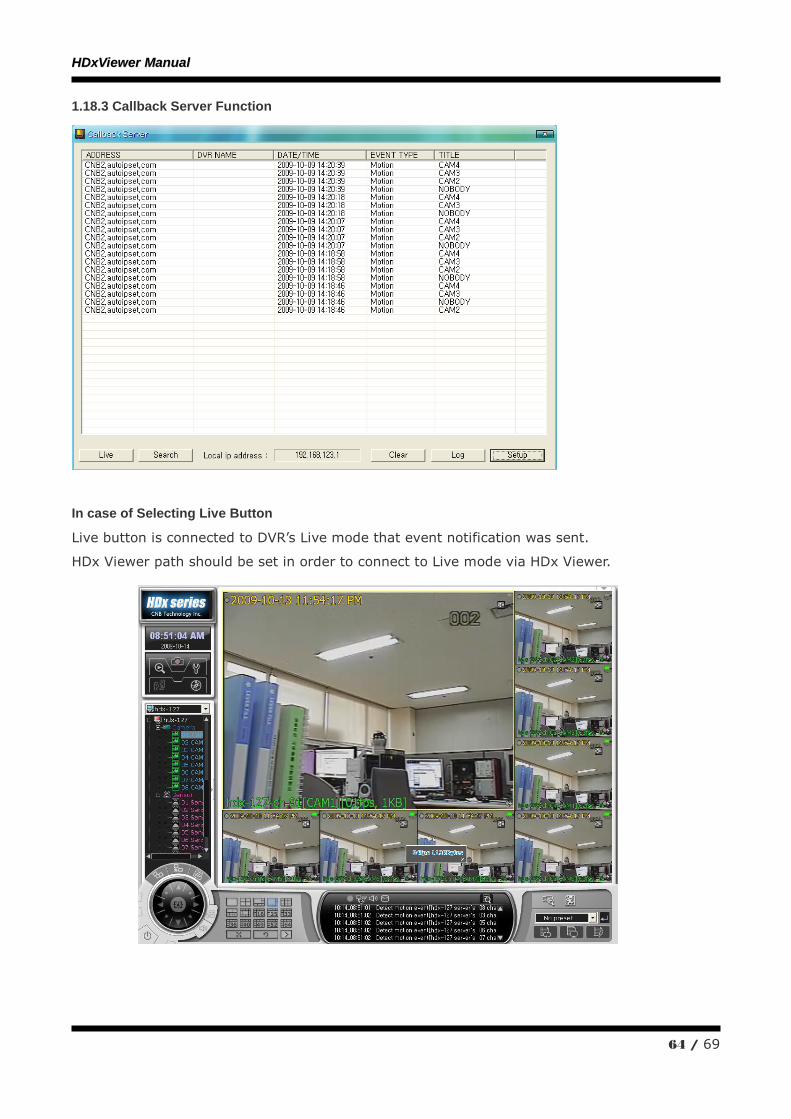
1.18.3 Callback Server Function
In case of Selecting Live Button
Live button is connected to DVR‟s Live mode that event notification was sent.
HDx Viewer path should be set in order to connect to Live mode via HDx Viewer.

HHDDxxVViieewweerr MMaannuuaall
65 / 69
If event notification occurred DVR is not registered at HDx Viewer‟s Server List,
Server List Management Window will pop up for registration.
1. Please select Yes button as figure above.
2. Please input Server Name, ID, and password at Server Management window, then pl
ease select Add button.
If HDx Viewer is already connected with other DVRs,
user should select whether maintaining the existing connection or not.
HHDDxxVViieewweerr MMaannuuaall
66 / 69
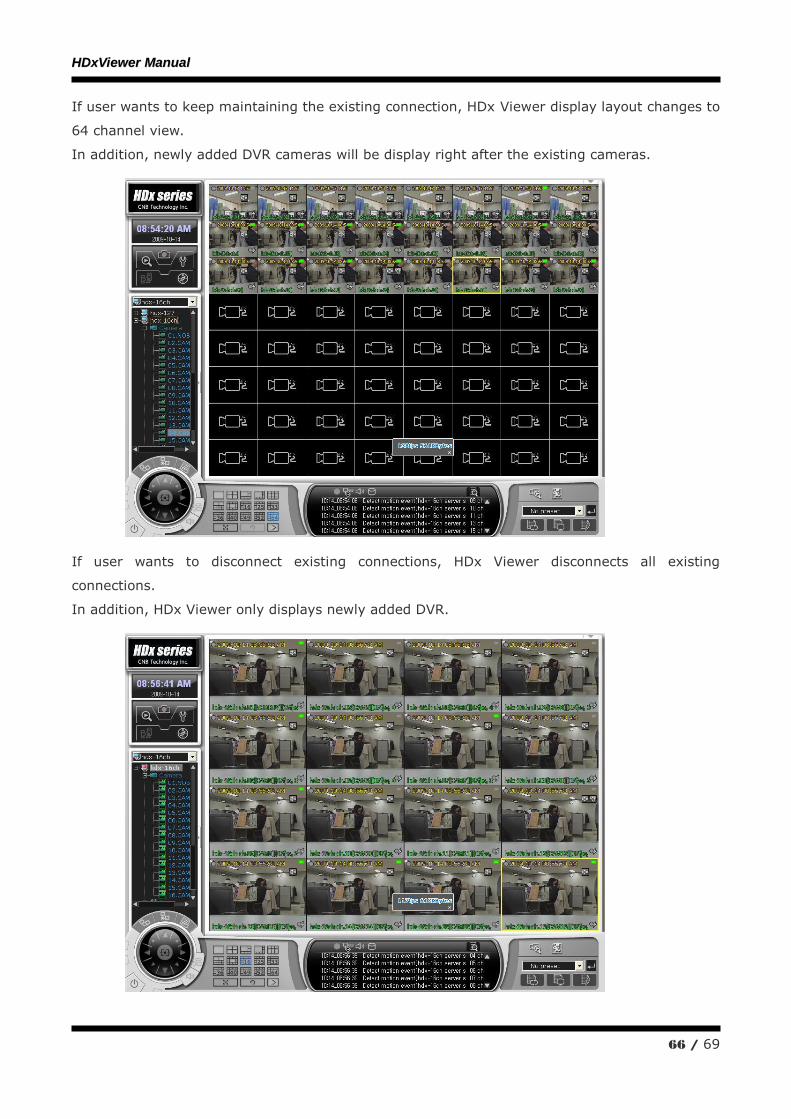
If user wants to keep maintaining the existing connection, HDx Viewer display layout changes to
64 channel view.
In addition, newly added DVR cameras will be display right after the existing cameras.
If user wants to disconnect existing connections, HDx Viewer disconnects all existing
connections.
In addition, HDx Viewer only displays newly added DVR.
HHDDxxVViieewweerr MMaannuuaall
67 / 69
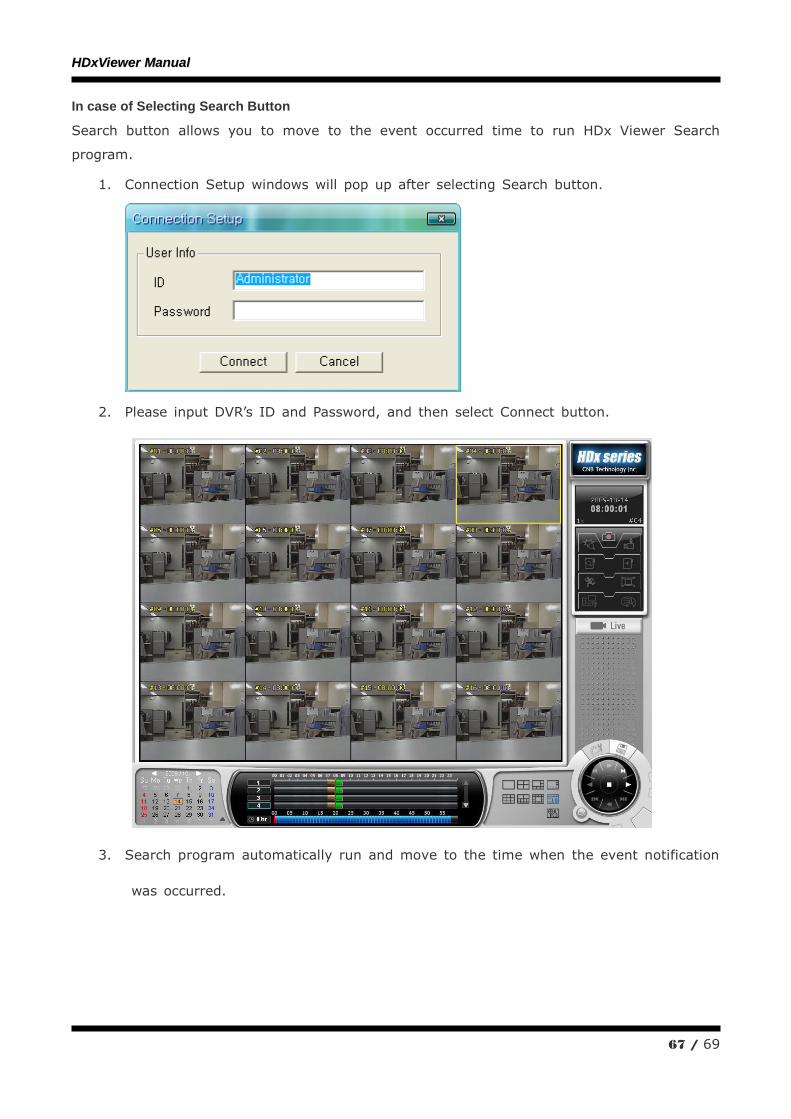
In case of Selecting Search Button
Search button allows you to move to the event occurred time to run HDx Viewer Search
program.
1. Connection Setup windows will pop up after selecting Search button.
2. Please input DVR‟s ID and Password, and then select Connect button.
3. Search program automatically run and move to the time when the event notification
was occurred.
HHDDxxVViieewweerr MMaannuuaall
68 / 69
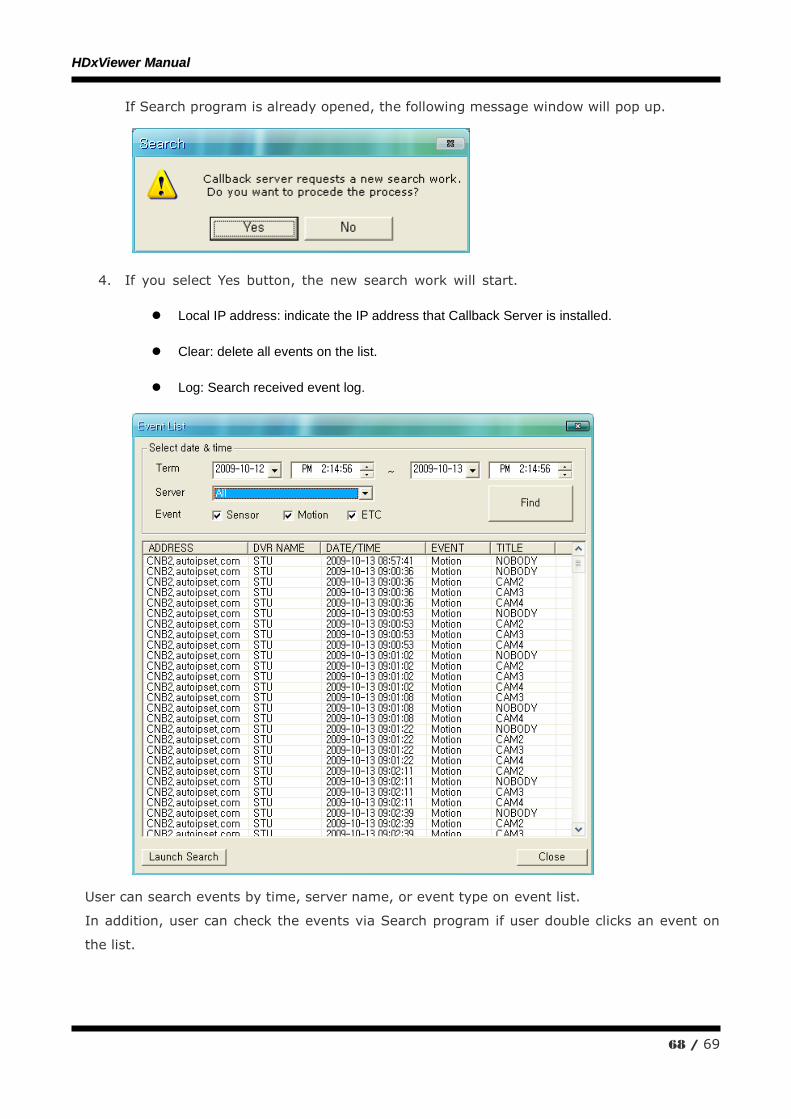
If Search program is already opened, the following message window will pop up.
4. If you select Yes button, the new search work will start.
Local IP address: indicate the IP address that Callback Server is installed.
Clear: delete all events on the list.
Log: Search received event log.
User can search events by time, server name, or event type on event list.
In addition, user can check the events via Search program if user double clicks an event on
the list.
HHDDxxVViieewweerr MMaannuuaall
69 / 69
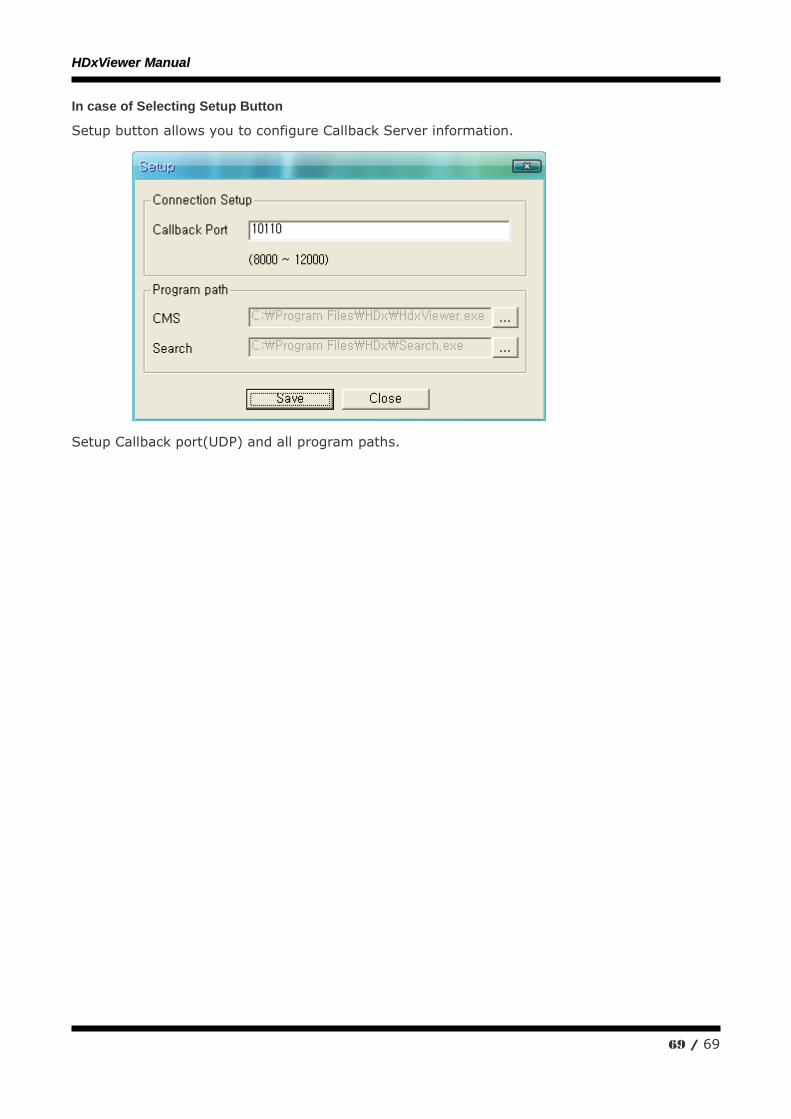
In case of Selecting Setup Button
Setup button allows you to configure Callback Server information.
Setup Callback port(UDP) and all program paths.


