CNC milling On this page Material choices File preparation: Rhino File preparation: Mastercam Related articles Material choices METHOD MATERIAL COST ($/sf) TIME: file prep TIME: fab TIME: assembly TIME: total MATERIAL RECYCLABILITY CNC milling - smooth terrain white foam $8 7 2 0.25 9.25 yes (special service provider) CNC milling - smooth terrain plywood $40 9.5 2.25 h to mill the base, 4.5 h to cut the buildings 1 17.25 yes (if unpainted) CNC milling - smooth terrain hardwood (poplar) $34 9.5 2.25 h to mill the base, 4.5 h to cut the buildings 1 17.25 yes (if unpainted) Considerations for this method In addition to file prep, fabrication, and assembly time, CNC milling requires: Material preparation time Plywood: cut down, glued, clamped, left to dry Hardwood: planed, cut down, glued, clamped, left to dry File review and approval wait time CNC appointment scheduling If you're unfamiliar with Mastercam, your first CNC milled model will take much more time to prepare than an equivalent laser cut model. Once you become familiar with Mastercam and the milling process, it becomes much less time intensive. PROS: Large, seamless models are possible High degree of precision CONS: Steep learning curve Limitations for milling context buildings In foam, buildings can be about 2" tall. Tall buildings must be at least 1/4" apart. Shorter buildings (<1") can be 1/8" apart. In wood, buildings can be about 1" tall.
Transcript
CNC milling
On this page
Material choicesFile preparation: RhinoFile preparation: MastercamRelated articles
Material choices
METHOD MATERIAL COST ($/sf)
TIME:
file prep
TIME:
fab
TIME:
assembly
TIME:
total
MATERIALRECYCLABILITY
CNC milling - smooth terrain white foam $8 7 2 0.25 9.25 yes (special service provider)
CNC milling - smooth terrain plywood $40 9.5 2.25 h to mill the base,4.5 h to cut the buildings
1 17.25 yes (if unpainted)
CNC milling - smooth terrain hardwood (poplar)
$34 9.5 2.25 h to mill the base,4.5 h to cut the buildings
1 17.25 yes (if unpainted)
Considerations for this method
In addition to file prep, fabrication, and assembly time, CNC milling requires:
Material preparation timePlywood: cut down, glued, clamped, left to dryHardwood: planed, cut down, glued, clamped, left to dry
File review and approval wait timeCNC appointment scheduling
If you're unfamiliar with Mastercam, your first CNC milled model will take much more time to prepare than an equivalent laser cut model. Once you become familiar with Mastercam and the milling process, it becomes much less time intensive.
PROS:
Large, seamless models are possibleHigh degree of precision
CONS:
Steep learning curve
Limitations for milling context buildings
In foam, buildings can be about 2" tall. Tall buildings must be at least 1/4" apart. Shorter buildings (<1") can be 1/8" apart.In wood, buildings can be about 1" tall.
1.
a.
b.
c.
i.
d. i.
e.
f. 2.
1.
2.
CNC milling - smooth terrain high density foam
$83 7 2 0.25 9.25 no
CNC milling - stepped terrain (fine)
white foam $8 14 3.6 0.25 17.85 yes (special service provider)
CNC milling - stepped terrain (1/16" contours)
white foam $8 7 2 0.25 9.25 yes (special service provider)
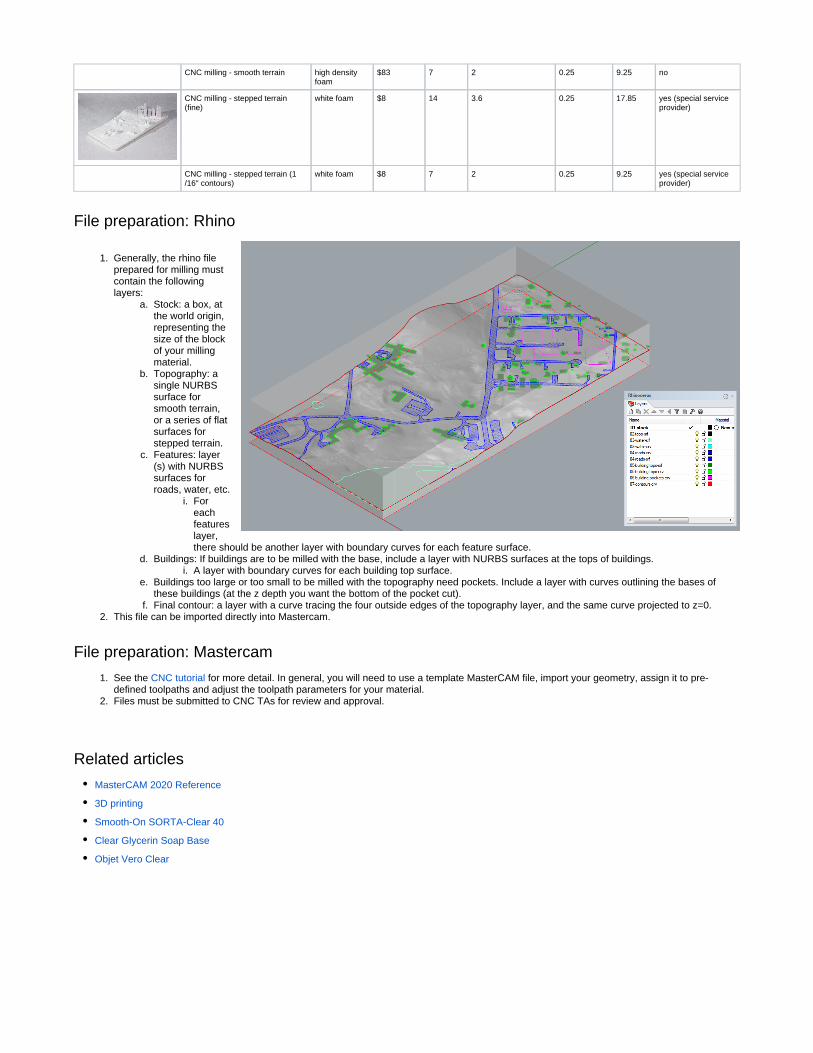
File preparation: Rhino
Generally, the rhino file prepared for milling must contain the following layers:
Stock: a box, at the world origin, representing the size of the block of your milling material.Topography: a single NURBS surface for smooth terrain, or a series of flat surfaces for stepped terrain.Features: layer(s) with NURBS surfaces for roads, water, etc.
For each featureslayer, there should be another layer with boundary curves for each feature surface.
Buildings: If buildings are to be milled with the base, include a layer with NURBS surfaces at the tops of buildings.A layer with boundary curves for each building top surface.
Buildings too large or too small to be milled with the topography need pockets. Include a layer with curves outlining the bases of these buildings (at the z depth you want the bottom of the pocket cut).Final contour: a layer with a curve tracing the four outside edges of the topography layer, and the same curve projected to z=0.
This file can be imported directly into Mastercam.
File preparation: Mastercam
See the for more detail. In general, you will need to use a template MasterCAM file, import your geometry, assign it to pre-CNC tutorialdefined toolpaths and adjust the toolpath parameters for your material.Files must be submitted to CNC TAs for review and approval.


![Recording Studio - SLQ Wiki [SLQ Wiki]](https://static.documents.pub/doc/80x56/61b067815b3f904d2d012f5b/recording-studio-slq-wiki-slq-wiki.jpg)


