12 HAMMER’S BLOW CO N T ROLLED HAND FORG I N G By Peter Ross and Doug Wilson Illustrations by Tom Latané Lesson Number One– Draw a sharp point on a 1/2" square bar.. The taper should be straight, three inches long and in line with the axis of the parent bar. The cross section of the taper should be square. The surfaces of the bar should be smooth with no dis- cernable hammer marks.The beginning of the taper should be a crisp line. Intent: Students will learn to draw out tapers of specified length and check their results for accuracy. Tools Needed: Forge, anvil, hammer, ruler, square. Materials: 24" of 1/2" square mild steel bar ( this is enough material to practice the exercise several times). Method: When working to a specified length, establish the point first, then extend the taper to the desired length. Step One: Mark the anvil with soapstone or marker three inches from the anvil step. This is the finished length of the taper you will forge. Take a yellow-white heat on the end of the bar. Place the bar on the anvil so that the end of the bar is at the far edge of the anvil and only the end of the bar is touching the anvil face. This way, the hammer won’t strike the anvil surface if it overhangs the hot bar. Strike a blow on the end of the bar with your hammer. The hammer should strike at an angle. There will be a wedge-shaped daylight space between the hammer face and the anvil face which corresponds to the angle of the taper you want to forge. As you work, adjust the height of the bar as you hold it on the anvil and the angle of your hammer blows. If you hold the bar too high it will bend down in the middle; too low and the bar tip bends down. The bar will remain straight if you are gauging the angles just right. Rotate the bar 90 degrees after every one or two blows to keep the bar from getting too wide as the forging progresses. Hit, turn 90 degrees, hit and turn 90 degrees back again. You need only turn the bar back and forth as the underside of the bar is worked against the anvil. Continue this sequence of forging until you have made a sharp point. Hint: It is very important to rotate the bar exactly 90 degrees each time. Use the original flats of the bar as a reference. If the turn is either more or less, the bar will become a parallelogram in cross section and that makes it difficult to attain the desired result. If the bar does become a parallelogram, hit the corner of the long diagonal; then return to forging the flats of the bar. The sooner you catch and correct this error, the better. Keep a square cross section Step Two: Once the point is established, start working back from the point Lesson One: Drawing Out The measured piece held over the anvil. Placement of steel and position of the hammer blow.
Transcript
12 HAMMER’S BLOW
CO N T ROLLED HAND FORG I N G
By Peter Ross and Doug Wilson
Illustrations by Tom LatanéLesson Number One–
Draw a sharp point on a 1/2" square bar..
The taper should be straight, three inches long and in line withthe axis of the parent bar. The cross section of the taper shouldbe square. The surfaces of the bar should be smooth with no dis-cernable hammer marks.The beginning of the taper should be acrisp line.
Intent:
Students will learn to draw out tapers of specified length andcheck their results for accuracy.
Tools Needed:
Forge, anvil, hammer, ruler, square.
Materials:
24" of 1/2" square mild steel bar ( this is enough material topractice the exercise several times).
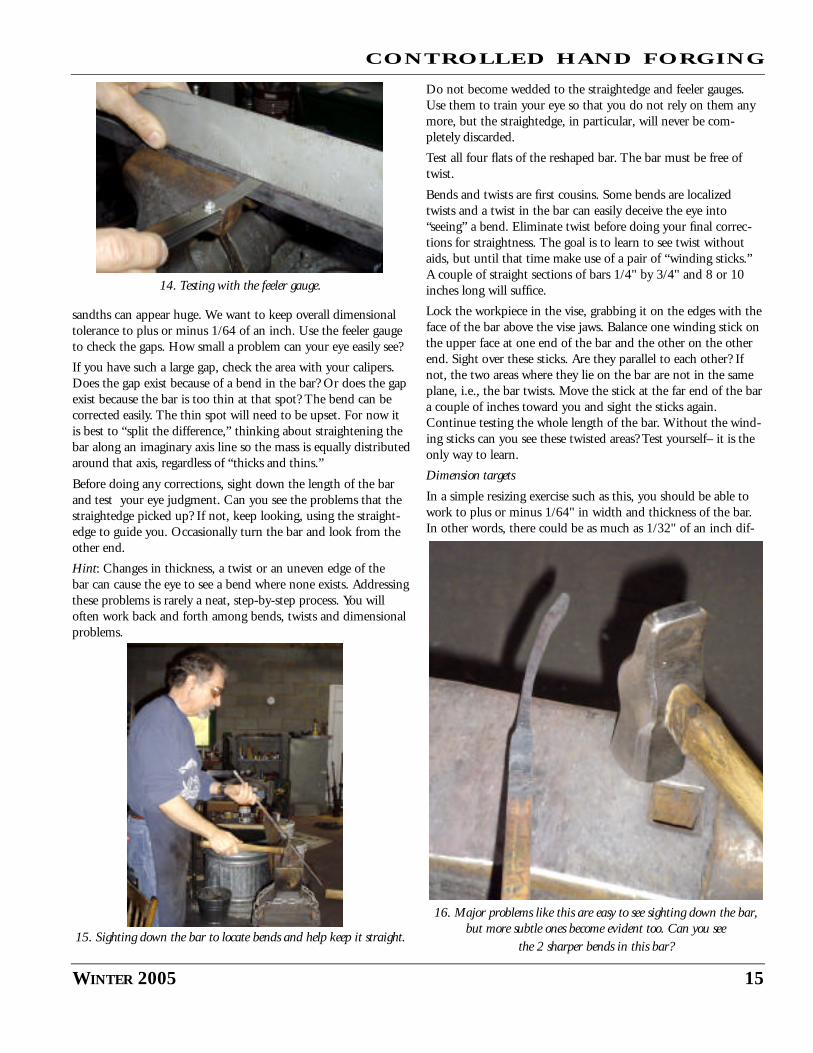
Method:
When working to a specified length, establish the point first,then extend the taper to the desired length.
Step One:
Mark the anvil with soapstone or marker three inches from theanvil step. This is the finished length of the taper you will forge.
Take a yellow-white heat on the end of the bar. Place the bar on
the anvil so that the end of the bar is at the far edge of the anviland only the end of the bar is touching the anvil face. This way,the hammer won’t strike the anvil surface if it overhangs the hotbar. Strike a blow on the end of the bar with your hammer. Thehammer should strike at an angle. There will be a wedge-shapeddaylight space between the hammer face and
the anvil face which corresponds to the angle of the taper youwant to forge.
As you work, adjust the height of the bar as you hold it on theanvil and the angle of your hammer blows. If you hold the bartoo high it will bend down in the middle; too low and the bartip bends down. The bar will remain straight if you are gaugingthe angles just right.
Rotate the bar 90 degrees after every one or two blows to keepthe bar from getting too wide as the forging progresses. Hit, turn
90 degrees, hit and turn 90 degrees back again. You need onlyturn the bar back and forth as the underside of the bar is workedagainst the anvil. Continue this sequence of forging until youhave made a sharp point.
Hint:
It is very important to rotate the bar exactly 90 degrees eachtime. Use the original flats of the bar as a reference. If the turn iseither more or less, the bar will become a parallelogram in crosssection and that makes it difficult to attain the desired result.
If the bar does become a parallelogram, hit the corner of thelong diagonal; then return to forging the flats of the bar. Thesooner you catch and correct this error, the better. Keep a squarecross section
Step Two:
Once the point is established, start working back from the point
Lesson One: Drawing Out
The measured piece held over the anvil.
Placement of steel and position of the hammer blow.
WINTER 2003 13
CO N T ROLLED HAND FORG I N G
until the taper is 1/4 " short of the desired length . Work withheavy hammer blows at a bright heat while you are reducing thecross section. Lighter hammer blows at lower heats will help yourefine the shape of your taper and smooth the surface. Establish aclear and well-defined beginning of your taper.
Step Three:
Now focus on smoothing the surfaces and straightening the taperat the same time. Make the taper straight and true. Refine theshape of the taper with light overlapping hammer blows. Do thisas the bar cools to dark orange and red color. The bar scales lessat this lower heat and you will get a smoother surface. Sightdown the length of the bar for straightness. Straighten with lightblows at low heat. Another way to tell if the taper is straight is to
stand the bar up with the point on the anvil face and spin it in .If it is straight there will be no wobble.
The four flat sides of the taper should be in line with the originalflat sides of the bar and the taper should align with the originalcenterline of the bar. Any deviation should be corrected withyour hammer at the anvil.
Targets:
Try to draw out and finish the taper in two heats. Beginners maytake several extra heats.
Maintain a square cross-section in the taper. Check this with asquare.
Hammer-finish with smooth surfaces and without discernablehammer marks.
Maintain a perfectly straight axis in the bar and in the 3" longtaper. Check this with a rule and also practice sighting down thelength of the bar until you can attain the same results by eye.
Measure your results using a square and a rule. The four flats ofyour taper should be straight within two or three thousandths ofan inch, length within 1/16" and square in cross section. Withpractice you should be able to forge to this accuracy by eye.Repeating this exercise with care and attention will enable you toachieve these results quickly and consistently.
Forging Dynamics :
In this exercise, when the square bar is struck, it gets thinner topAngle of the bar and hammer when dressing the final taper.
Rotation and deformation of the bar by the hammer,and correcting a parralellogram.
Straightening a bent point (above) andcentering an off-center point (below).
14 HAMMER’S BLOW
CO N T ROLLED HAND FORG I N G
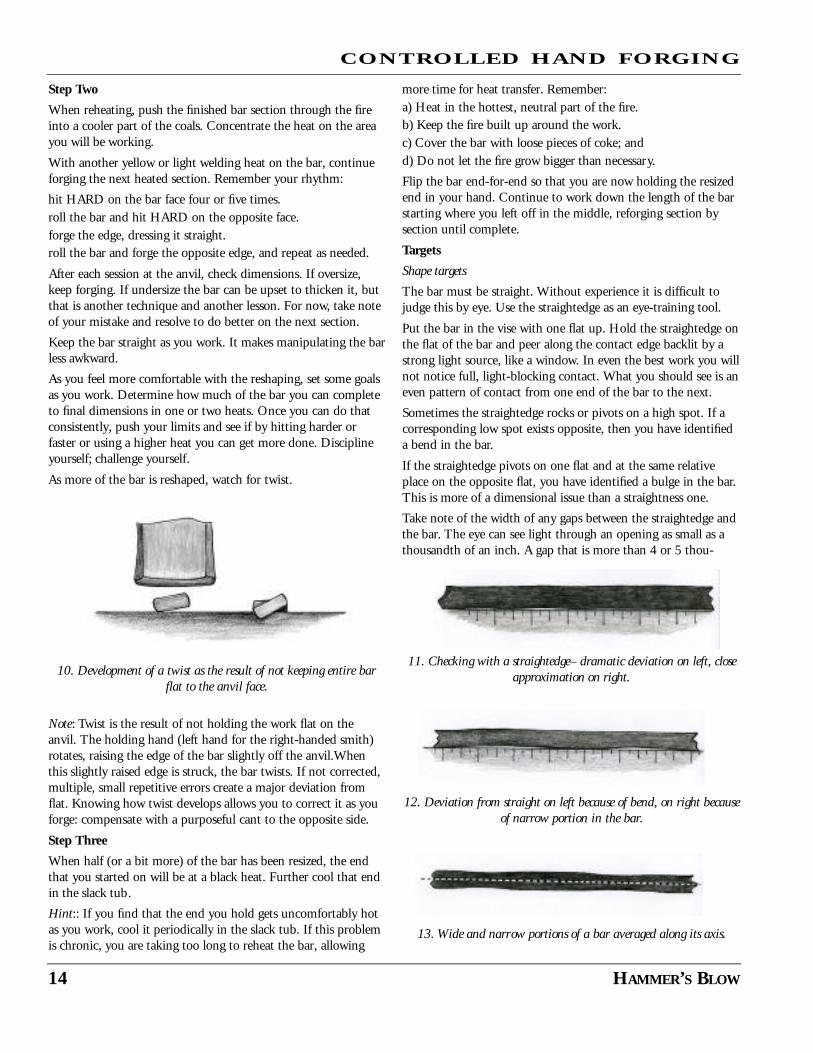
to bottom but wider side to side. When you turn the bar 90degrees and hit again, (you are restricting the spread of the bar,but allowing lengthwise stretch. Repeating this hit, turn, hit,turn sequence results in creating a taper. You are redistributingthe mass of the bar with your hammer. As the bar become thin-ner it becomes longer. Notice that the thinner steel heats faster.It also chills faster. This is because there is less mass. Also notehow much the bar you tapered has stretched in length.
Methods of measuring the dimensions. Exaggerated deviations show how to measure goal tolerance.
WINTER 2003 15
CO N T ROLLED HAND FORG I N G
By Doug Wilson
Illustrations by Tom LatanéLesson Number Two–
Create holes or recesses in bars or plate by driving punches intoor through hot material.
(Holes or impressions can be made any shape you can make apunch.)
Punch a 3/8" round hole through the center of a 3/8" x 1" barwith the hole’s center 3" from the end of the bar. Drift (stretch)the hole to finished size.
The finished hole should be 3/8" round, with clean sharp edges.
The hole should pass through the bar at 90 degrees.
The wide surfaces of the bar should be flat with no discerniblehammer marks.
The bar should remain 3/8" thick.
The bar will bulge out slightly on either side of the hole.
The original edges of the bar should be straight in line on eachside of the hole and without any twisting.
Intent:
Students will learn to hot punch clean accurate holes and tocheck their results for accuracy.
Tools Needed:
Forge, anvil, hammer, round punch, center punch, square andruler.
Materials:
24" of 3/8" x 1" hot rolled mild steel.
24" of 3/8" hot rolled round bar(to check final size of punchedhole).
Method:
When working to a specific hole size, start with a punch slightlysmaller than the finished hole size. After the hole is made it canbe enlarged to final size by drifting (stretching) with the punch.
The Punch
The punch may be made of plain carbon tool steel at least 5/8"in cross section, forged to shape and normalized (air cooled untilroom temperature from a red heat). W1 or O1 drill rod, avail-able at industrial supply shops, would be a good steel for thispunch.
The business end of the punch should be a tapered round crosssection 2 1/2" long, 9/32" to 5/16" round at its end and filed orground flat with sharp edges after normalizing.
The top end should be tapered slightly to reduce mushroomingin use.
A hand held punch should be 10" to 11" long. A punch held intongs should be 3 1/2" to 4" long.
Step One:
Make a center punch mark in the center of the bar 3" from itsend. Take a bright yellow heat where the bar is center punched.Place the bar flat across the face of the anvil, center punch markup. Carefully place the punch over the center punch mark. Strikea single solid blow to sink the punch into the hot bar. Make surethe end of the punch is still where it is supposed to be. Continuestriking solid blows until the punch is nearly through; another
Lesson Two: Hot Punching
Punching- layout and specifications
Some different styles of punches
16 HAMMER’S BLOW
CO N T ROLLED HAND FORG I N G
two or three blows. The punch will feel solid against the face ofthe anvil. If you have done this quickly the bar will still be at abright orange heat.
Hints:
Wear a glove on the hand that is holding the punch.
Quench your punch after every four or five blows. This will helpto prevent the punch from deforming.
A few soapstone X-marks on the center punched side of the barwill help you get the punched side of the bar facing up when youfirst put it on the anvil.
Scraping the surface of the bar with your hammer will help youlocate the punch mark. (Scale will fall into the punch mark leav-ing a small black spot.)
Learn to hit the punch directly and hard on the first blow. Avoidaiming blows.
The cold end of the bar can be supported on your thigh or onan adjustable stand set anvil high.
Step Two:
Immediately turn the bar over on the anvil. Look for slightbulges on either side of the hole and a dark spot where thepunch was driven into the first side of the bar. Position the endof the punch exactly over the dark spot. Strike several heavyblows. You will feel the punch solid against the anvil face again.Move the bar, with the punch in the hole, over the pritchell hole(the round hole in the heel of the anvil). Strike one or two moreblows over the pritchell hole and a small slug will be driven outof the hole. Now, straighten and flatten the bar with light ham-mer blows on the anvil face. (The bar should still show colorduring this part of the process.)
At this point you will have a hole. It should be a bit smallerthan the desired size.
Notes:
If the punch doesn’t clear the slug from the hole it is likelybecause the punch was misaligned when the bar was turned overor because the punch didn’t have sharp edges on the businessend.
The slug should be driven out from the second side of the bar.Avoid the temptation to turn the bar back over to the first sideand try to drive the slug out.
Illustration of misaligned punch with slug hanging from one sideof the hole.
Step Three:
Now you need to drift (stretch) the hole to the desired size. Heatthe bar to an orange heat again if necessary. Place the hole overthe pritchell hole , insert the punch and drive it in a bit further.Remove the punch, turn the bar over and drive the punch fromthe second side. Continue this sequence until the hole is justlarge enough for the 3/8" round bar to fit through easily. Thedrifted hole should be just a bit larger than the 3/8" round barso that when it is cool the 3/8" round will still fit through thehole.
Hints:
When drifting, work a bit from one side of the bar and thenfrom the other. This will make the hole more uniform in size. Ifyou only drift from one side the hole would be wider on the topthan on the bottom.
Finally, straighten and flatten the bar with light blows and a lowheat.
Targets:
Try to punch and drift the hole and straighten the bar in oneheat.
(Beginners may need a second heat to accomplish this.)
Check you results using the 3/8" round bar, a square and astraight-edged rule. The 3/8" round bar should just fit throughthe hole you punched. The hole should pass through the bar at90 degrees. The bar should be flat and uniform in thickness. Thebar should be straight and without twist. The surfaces of the barshould be smooth with no discernable hammer marks.
Forging Dynamics:
The flat bottom of the punch pushes the steel beneath it out-ward as it is driven into the hot bar. The sides of the bar bulgeoutward slightly.
When the bar is turned over and punched from the second sidethe sharp edges of the punch end shear out a small slug.
Driving the punch further into the hot bar stretches the holelarger, increasing the bulges on either side of the bar.
Steel expands when it is hot and shrinks as it cools. When hot,the drifted hole should be just a bit larger than the 3/8" roundbar so that when it is cool the 3/8" round will still fit throughthe hole.
Correct and incorrect alignment of the punch
12 HAMMER’S BLOW
CO N T ROLLED HAND FORG I N G
By Jay CloseIllustrations by Tom LatanéLesson Number Three– Drawing a Round Taper
Definition: “Drawing”, “drawing out” or “drawing down” meansto reduce the cross sectional area of a bar.
[Pictures of three or four examples should be inserted here.]
Drawing a round straight taper to a point 3 inches long on theend of a square sectioned bar.
Intent:
The student will learn to forge a round taper of a specifiedlength on the end of a square bar and to control for the materialstretch that results from converting square to round sections.
Tools Needed:
Basic tools only, these to include a rule, straightedge, dividersand outside calipers.
Materials:
24 inches of 1/2 inch square mild steel.
Method:
When forging a round sectioned taper, first create an accuratesquare sectioned taper. The square taper is hammered to an accu-rate octagonal taper and sometimes to a 16 sided or 32 sidedtaper before final rounding.
As the square taper is forged progressively toward round, thelength of the taper will grow about 20%.
Knowing this, the square taper you begin with should be 5/6 thedesired length of the round taper you need.
Step One:
Review the previous lesson on drawing a straight square sec-tioned taper on the end of a square bar.
Starting at a yellow or light welding heat , forge a square taperon the end of the 1/2 inch square bar. This taper should be 2and 1/2 inches long and hammered to a sharp point.
Review also the Targets section of the previous lesson on drawingout a straight taper.
Make sure the sides of your taper are straight and the point oncenter. It is hard to make a round taper significantly better thanthe straight taper you start with.
Step Two:
Place a chalk or soap stone mark 3 inches in from the front edgeof the anvil. This will be a reference for drawing your taper tofinished length. Alternatively, set the points of dividers 3 inches
apart and keep them handy for comparison to your work.
Note in the technical sketch shown above the “fingernail” transi-tion between the square and round, and where on the bar wemeasure to judge the needed length.
Carefully reheat the bar with the point pushed through to the farside of the fire so that it does not burn before heavier sections ofthe bar are at a working temperature.
At a yellow or light welding heat, bring the bar to the anvil andplace it “corner up.”
Raise the hand holding the workpiece until you can feel goodcontact along the downside corner of the square taper.
Starting where the bar is thickest, match your hammer blows tothe slope of the upper corner and forge a neat flat or facet all theway down the corner.
As the taper narrows, so too must the facet. Lighten your ham-mer blows progressively as you approach the point. You want tocreate a clean facet. This facet will end up with an elongated,asymmetrical diamond shape.
The diamond will be widest at the base of the original squaretaper. It will taper gradually toward the point. Above the base ofthe square taper, the diamond will come to a quicker point cen-tered on the corner of the bar. This is where the hammer over-laps on the corner into the parent bar — the diagonal dimensionof the bar is greater than the diameter of the needed round taper.
Drawing a Round Taper
1. The final forged shape.
2. Needed straight taper and dimensions.
3. Corner up position.
SPRING 2003 13
CO N T ROLLED HAND FORG I N G
Roll the bar 90 degrees left or right (remember which) and workanother flat on the next corner.
Roll the bar 90 degrees in the same direction and now the bot-tom flat of the first forged facet will come on top.
The anvil has already begun the facet for you. It is not as broadas the hammered facet, but the smooth anvil face has probablymade a neater flat than you could hammer.
Forge this facet to match the one originally hammered. Roll thebar another 90 degrees in the same rotation and refine the otherfacet started by the anvil face.
At this point you should have four long diamond shaped facetscentered on the corners down the length of the taper. On theoriginal flats of the square taper you will see long triangularfacets. Your goal is to create an equal sided octagonal sectiondown the entire point length.
Step Three:
At another light orange to yellow heat, work down each of thecorners of the taper to create a 16 sided taper. This is especiallyimportant where the taper is heaviest and the most materialneeds to be reshaped.
Step Four:
This can often be done at the end of the heat of Step Three.Keeping the taper evenly on the anvil surface, slowly roll the barbeneath the hammer to create an an even texture of hammermarks approximating a smooth, round, even taper.
Trouble Shooting and Corrections
Shape And Dimension Problems:
Check that the sides of the taper are straight and that the pointis centered. Review the lesson on making a straight taper with asquare section for hints on correcting these problems. If you have
approached the work in the organized fashion described, and ifyou have managed to keep the taper well supported on the anvilas you work, there should be little correction needed .
If the taper is too short, and you began with a proper square sec-tion taper, the material must be “hiding” somewhere. Are thesides of the taper straight? Check against a straightedge. Anybulge is material that could be forged into length.
Perhaps, you did not forge an accurate or complete even sidedoctagonal taper before rounding. The result is a taper that is still“squarish” in section with rounded corners.
[Insert picture here -- sketch # 7]
Go back and hammer down these rounded corners as facets oncemore. Then forge down the new corners before rolling androunding.
Sometimes the taper will be a bit short simply because the ham-mered texture isn’t refined enough. Make sure there are no obvi-ous flats or facets left on the work that are more than about a1/16 inch wide.
If your taper is too long, determine why. For example, you mayhave worked into the square sectioned bar beyond the start ofthe initial square taper. You must do this on the corners but noton the flats of the square. Using your hot cut hardie, trim the tipback to prepare for drawing and rounding the taper once more.
Important: you must trim back more than the needed shapechange. If the taper is 1/2 inch too long, trim off 1/2 plus a bitmore. You still must draw out the now blunt tip. How much totrim is a matter of experiment and experience, but you’ve lost theelement of control that working from a specific square taper gaveyou. As a “guesstimate” to get you started, try trimming back anextra 50% of your original error. For example, if the taper is 1/2inch too long, cut back 3/4 inch.
Having trimmed the tip, re-draw the point starting again withfacets down the length of the taper that are then blended into a
5. The forging should look like this.
4. Forge a neat flat all the way down to the point.
6. The goal is to create an even-sided octagon
14 HAMMER’S BLOW
CO N T ROLLED HAND FORG I N G
smooth round. When changing the dimensions of a round,always work from facets first.
If the taper is too long, maybe you have over forged some por-tion of the round creating concave sides. On a thin point like,this do not attempt to upset the bar to shorten it and fill out theconcavity. Rather, trim as recommended above and redraw thepoint, square first, then round.
Surface Texture Problems:
Small concavities or dimples are a common problem with thesurface, especially near the thicker part of the taper where thecorners of the bar are first forged . These dimples result from nothaving the bar hot enough or from not hitting hard enough or acombination. If not severe, they can be forged out and blendedinto the surrounding surface.
Remember to keep your anvil surface clean and work the bardown to a black red finishing heat. Hit hard to make the shapechange, but lighten up with finish work. Hit light, sharp,smoothing blows. Keep the taper well supported on the anvil.Create an even textured surface with no individual hammer markpredominate.
Targets
Time Targets: See the earlier lesson on drawing a square sectionedtaper for goals for the first step of this lesson.
Once the square section taper is established, try to convert it intoan even sided octagonal taper in one heat.
Take a second heat to make the upper part of the taper 16 sidedand round the whole length. (A larger diameter taper mayrequire the whole length worked 16 sided or even 32 side. Asmaller diameter taper may be able to skip the 16 sided step.)
A third heat working down to a dull red may be used to refineand smooth the surface.
Dimension Targets: Strive to create a taper that is 3 inches longplus or minus 1/16 inch.
Draw the point as fine as you can, but no more than 1/16 flat onthe end.
No section of the taper is to be greater than 1/2 inch diameter.
Except on the corners above the taper the original 1/2 square barshould remain unchanged.
Shape Targets: The point must be on center.
The sides of the taper must be straight. (The previous lesson onthe square section taper will give guidance on judging this.)
The section of the taper must be round not “rounded squarish”.
Except for the corners, the dimensions of the parent bar mustremain unchanged above the taper.
Strive for a clearly defined “fingernail” transition between thesquare and round sections.
Forging Dynamics
(1) There are three reasons to work the round sectioned taper asa square, then a series of progressively smaller facet before achiev-ing a round:
a. When using wrought iron, the traditional and historical mate-rial of the blacksmith, this was the way to retain the fibrousintegrity of the material. Premature rounding causes the individ-ual iron strands to shear past one another and create internalcracks and other flaws in the bar.
b. With any material, this method allows the greatest control ofdimension and repeatability of results.
c. A hammer blow that travels across a surface in motion or ahammer blow that makes a sweeping motion itself is less effec-tive.
Working the bar as opposed stationary facets for as long as possi-ble makes most effective use of the hammer blow.
(2) Comparing the cross sectional area of bars helps predictmaterial requirements for different forging operations. For exam-ple, a one inch square bar has a cross sectional area of one squareinch. On the other hand, the cross sectional area of a round barone inch in diameter is only about 80% of the square:
area of a circle equals pi times the radius squared, OR
area of a 1 inch circle equals 3.14 times (.5 X .5), OR
.785 inches
When the square becomes round, the material in the corners ofthe square gets forged in, causing the bar to stretch.
It is actually quite easy to make a round greater than one inch indiameter from a one-inch square bar. Do this by not retainingthe one inch dimension as the corners are first forged to createan octagon. The bar will swell to greater than one inch across theflats.
If you want a one-inch diameter round from a one-inch square,first hammer the square slightly undersize, then octagon andthen round. This anticipates the swelling that results from forg-ing in the corners of the square.
3) When you forge the first facet on the top corner of the squaretaper, the anvil is beginning a facet directly underneath on thebottom corner. The hotter (softer) the bar and the harder youhit, the more closely will the bottom facet made by the anvilapproximate the dimensions of the top one made by the ham-mer. However, even with the hardest blow on the hottest metal,the iron itself absorbs some of the impact of the hammer so thebottom shape change will never exactly equal that of the top.This is why we work all surfaces of a bar if a uniform product isdesired.
(4) If the hammer blows are light and/or the bar is cool, theshape change brought about by the hammer is increasingly con-centrated on the surface directly beneath the hammer. If youdon’t forge the corners of your taper forcefully enough or hotenough the corner alone will spread. As the adjacent cornersspread you create a small pocket or concavity in the surface.Look for these as they are an indication of working the bar toocold or not hitting hard enough to force the shape change intothe middle of the bar.
7. Cross sections of a “sqarish octagonal” bar and desired round bar.
SPRING 2003 15
CO N T ROLLED HAND FORG I N G
By Jay CloseIllustrations by Tom LatanéLesson Number Four– Bending
Definition: For bar stock, bending creates a change in the longi-tudinal axis of the bar. This change can occur in a single plane asin bending a classic scroll, or the change can occur in multipleplanes as in a corkscrew.
Straightening is a special form of bending, as are sinking andraising when dealing with sheet stock.
Bending a semicircular curve with a three inch inside radius onthe end of a flat bar.
Intent: The student will practice calculating the bar stock needed
to produce a bend of specified radius and learn to use the hornof the anvil to create a controlled semicircular bend of requireddimensions.
Tools Needed: Basic tools only, these to include a rule and asquare.
Material: 24 to 30 inches as convenient of 1/4 inch by 1 inchmild steel bar.
Method: After calculating the needed material to make the bend,the curve is produced by using the horn as a bending point orfulcrum. Shifting the location of the bar on the horn and chang-ing where and how hard the bar is struck controls the neededcurve.
Step One:
In the technical sketch, above, the radius of the bend is con-stant, i.e. you are asked to make a semicircle or a half circle witha radius of 3 inches measured to the inside of the bend.
However, the actual needed bar stock is determine by an imagi-nary line down the middle of the bar thickness. Therefore, as thebar is 1/4 inch thick, calculate the material needed for a 3 and1/8 inch radius bend.
There are many ways to determine the needed material. Thesemethods vary in accuracy and convenience. If you lack a fullsized drawing and are working from a scaled drawing or just a set
of dimensions, simple geometry yields an accurate result.
In the same way that pi times the diameter of a circle equals itscircumference, pi times the radius will give the linear dimensionof a semicircle or half circle.
bar length needed = pi times radius
bar length needed = 3.14 times 3.125 inches or 3 and 1/8 inches
bar length needed = 9.8125 inches or 9 and 13/16 inches
Measure 9 and 13/16 inches from the end of the bar and centerpunch a distinct mark on the edge of the bar (not on the face).
This arithmetical method of determining the needed length ofbar will only work with curves that have an even, unchangingradius, but it is very accurate.
Many smiths feel it necessary to work from a full sized drawing.
If this is available, other methods for determining the needed barstock are possible. Some smiths lay a piece of string or wire onthe drawing along the needed curve and then straighten thestring or wire to take a measurement. Others will step off theneeded material using a set of dividers or a compass. A usefultool called a "traveler" can also be employed and yield a veryaccurate result. These methods, while of varying degrees of accu-racy, have the advantage of being useful for scrolls and irregularcurves as well as semicircles and full circles. Where appropriate,we will cover these other methods in subsequent lessons.
Whatever method you choose, remember to take your measure-ment down the middle of the bar thickness.
Bending
1. Dimensions of the finished forging.
2. Material needed.
3. Material layout.
16 HAMMER’S BLOW
CO N T ROLLED HAND FORG I N G
You may feel it useful to make a full sized sketch of the neededshape, not just to determine stock requirements, but as a guideto the desired final form. If so, use the above dimensioned draw-ing as a guide. For such simple shapes as this, ultimately you willcome to find this drawing unnecessary and you will learn to holdan image in your mind of the completed form to guide you.
Step Two:
Take an even, light orange to yellow heat on the end of the bar.Try to heat at least 4 or 5 inches, but evenness of the heat isimportant.
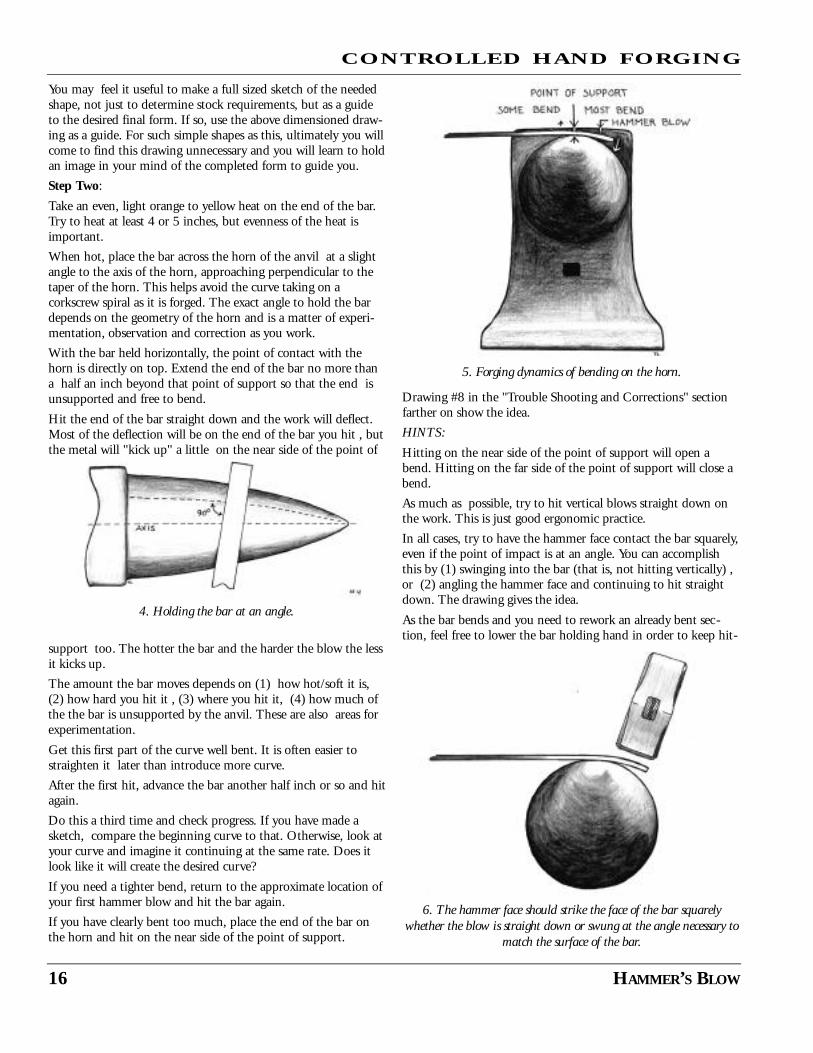
When hot, place the bar across the horn of the anvil at a slightangle to the axis of the horn, approaching perpendicular to thetaper of the horn. This helps avoid the curve taking on acorkscrew spiral as it is forged. The exact angle to hold the bardepends on the geometry of the horn and is a matter of experi-mentation, observation and correction as you work.
With the bar held horizontally, the point of contact with thehorn is directly on top. Extend the end of the bar no more thana half an inch beyond that point of support so that the end isunsupported and free to bend.
Hit the end of the bar straight down and the work will deflect.Most of the deflection will be on the end of the bar you hit , butthe metal will "kick up" a little on the near side of the point of
support too. The hotter the bar and the harder the blow the lessit kicks up.
The amount the bar moves depends on (1) how hot/soft it is,(2) how hard you hit it , (3) where you hit it, (4) how much ofthe the bar is unsupported by the anvil. These are also areas forexperimentation.
Get this first part of the curve well bent. It is often easier tostraighten it later than introduce more curve.
After the first hit, advance the bar another half inch or so and hitagain.
Do this a third time and check progress. If you have made asketch, compare the beginning curve to that. Otherwise, look atyour curve and imagine it continuing at the same rate. Does itlook like it will create the desired curve?
If you need a tighter bend, return to the approximate location ofyour first hammer blow and hit the bar again.
If you have clearly bent too much, place the end of the bar onthe horn and hit on the near side of the point of support.
Drawing #8 in the "Trouble Shooting and Corrections" sectionfarther on show the idea.
HINTS:
Hitting on the near side of the point of support will open abend. Hitting on the far side of the point of support will close abend.
As much as possible, try to hit vertical blows straight down onthe work. This is just good ergonomic practice.
In all cases, try to have the hammer face contact the bar squarely,even if the point of impact is at an angle. You can accomplishthis by (1) swinging into the bar (that is, not hitting vertically) ,or (2) angling the hammer face and continuing to hit straightdown. The drawing gives the idea.
As the bar bends and you need to rework an already bent sec-tion, feel free to lower the bar holding hand in order to keep hit-
4. Holding the bar at an angle.
5. Forging dynamics of bending on the horn.
6. The hammer face should strike the face of the bar squarelywhether the blow is straight down or swung at the angle necessary to
match the surface of the bar.
CO N T ROLLED HAND FORG I N G
SPRING 2003 17
ting straight down. Do not bend at the waist, but flexing theknees can help. At a certain point this becomes awkward, soangle your hammer blow as necessary. Raising and lowering thebar holding hand will also alter the point of contact of the baron the anvil and the nature of the bend.
In no case bend the bar against the curve of the angle. The hornis not a forming jig. It is only a variable fulcrum point for bend-ing.
Much of the ease of bending a smooth curve comes from evenand anticipated resistance to the hammer blow.
Any blow that pinches the bar between the hammer and theanvil is a drawing blow that thins the work and makes control-ling the bend more difficult.
Likewise hot and cold spots in the bar present the same chal-lenges.
A hard blow at a high heat close to the anvil horn with a smallamount of the bar unsupported will result in the tightest bend.
Hit lighter and bend less.
Work colder and bend less.
Push more of the bar across the horn, hit farther away and thecurve will be gentler.
Work the curve never hitting twice in a row on the same spot.Keep the hammer blows moving and the bar advancing across
the horn.
Bending will develop its own cadence: Hit. Advance the work.Hit. Advance the work. Hit. Advance the work…etc.
Check your work.
Make corrections.
Check your work again.
Do not mindlessly hit the work. Observe the shape. Decide on acourse of action. Then hit with confidence.
Step Three:
When satisfied with the first part of the bend, put the bar backin the fire to heat the next section.
At a light orange to yellow heat repeat the sequence of Step Twoto continue the bend. Keep track of your punch mark and visu-alize the complete curve as you work.
Step Four:
After you are satisfied with the curve allow the bar to cool slowlyin the air and then check the needed dimensions (see the Targetssection below). A cold bar will allow a more accurate assessmentof the required specifications. At this point small corrections inthe curve and dimensions can be made cold employing the sameapproaches you used while the iron was hot.
Trouble Shooting and Corrections:
Identifying and correcting problems are the keys to this lesson. Itwill take much experience before a semicircular curve can bemade with no fuss.
Basically, problems are of two types: over bending and underbending. Both present their own challenges.
To correct a bend, you can vary (1) where the bar is supportedon the horn, (2) the deviation from horizontal of the straightsection of the bar , (3) whether the bar is held with the bend upor down, and (4) whether you hit on the far side or the near sideof the point of bar support . How you manipulate these optionsto correct a problem often depends on how far along the bend isbefore the problem is addressed.
The earlier a problem is corrected the easier will be the correc-tion and the less the effect of the correction on the subsequentwork.
Here are some problems and potential solutions:
a) An over bent end of the the bar that is caught early is cor-rected by setting the tip of the bar on the horn and hitting onthe near side of the point of support. Remember the prior hint:Hitting on the near side of the point of support will tend toopen or straighten a curve; hitting on the far side of the pointof support will tend to close or tighten a curve.
If, on the other hand, the over bend is not noticed until most ofthe curve is already completed, then the bar is best flipped so thecurve reaches under the horn and the end comes on top. Supportthe end and hit to the far side of the point of support.
b) An under bent end of the bar, if caught soon, can be cor-rected by placing the end of the bar on top of the horn, loweringthe holding hand down and hitting down to tighten thebend.(See drawing #7)
8. Bending sequentially by moving the bar across the horn.
7. Lowering the bar to alter the point of contact.
18 HAMMER’S BLOW
CO N T ROLLED HAND FORG I N G
If not caught soon enough, an under bent end of the bar can becorrected by flipping the curve to run under the anvil. Supportthe end on the horn and hit as needed on the near side of thepoint of support to tighten the bend.
c) Sometimes the bend will begin to twist like a corkscrew. Thisresults from holding the bar perpendicular to the axis of the anvilnot the curvature of the horn. Try to flatten this corkscrew onthe anvil face as you work, but alter the angle of the bar on the horn to keep the twist from developing in the first place.
Using the horn, you can also bring the twist into alignment bytilting the bar with one edge off the horn and striking down onthat unsupported edge to swing the bar back into a single plane.You may have to do this sequentially along a broad section of the bend depending on how extensive the spiral has become.Remember, avoid thinning the bar against the anvil. You wantto hit only the unsupported edge of the bar.
Targets:
Try to get the bend done in two or three heats.
The distance between the end of the bar and the beginning ofthe straight section should be 6 inches plus or minus a 1/16.
If you slide a square along the straight section, where is meets thepunched layout it should also hit the end of the bend.
The straight section should remain straight
The curve should be even— no flat, straight areas or sharperbends than the needed curve.
Forging Dynamics:
The hotter the bar, the softer it is. Therefore, the more shapechange that will result when a given hammer blow is applied. Inbending we apply a force to change the axis of a bar. By sup-porting the bar at a given point on the horn we concentrate theeffect of our hammer blow to a certain length of that bar axis.On the far side of the horn where the bar is unsupported and
free to bend, the hammer will have most effect. On the worker’sside or near side of the point of support the effect of the blow is"dampened" by the anvil horn and the support given the bar bythe worker’s arm and body. The effects of a bending blow will tosome degree transfer past the point of support on the anvil, butwill be less than on the unsupported side. The softer/hotter thebar, the more effective the dampening effect of the horn andworker’s body.
Hitting on the end of a long unsupported section, spreads theenergy of the hammer blow over a longer area so the effect onany one point is less. Hence, a gentler bend.
9. Straightening an overbent bar.
11. Correcting an underbent end
12. Correcting a spiral10. Another way to straighten an overbent end.
Hitting in the middle of a long unsupported section will resultin an ‘S-curve’. The part supported by the horn won’t bend; thefree end has its own inertia and resists bending from a force placefar from it; the middle bends down and the ends tend to staywhere they are.
A hotter section or a thinner section will respond to a hammerblow the same way, by deflecting more than the cooler or thickerareas to either side.
(2) Every bent bar has an inside and an outside radius differentby the bar thickness.
When calculating material needs for a bend of a specified radius,if you figure the lineal requirements using the outside radius,you will have too much material. If you use the inside radius youwill end up short. The central axis of the bar will remainunchanged in a bend or twist, therefore, do your calculationsfrom that dimensions whether or not it is specified on thedimensioned drawing.
(3) As you bend a bar of iron, the bar upsets on the inside ofthe bend and stretches on the out side. The stresses of stretchand upsetting combined with differential resistance to the stressof bending will make a bar cup in cross section as it is bent.
The upset bar inside the bend is offered the least resistance bygrowing side ways. The bar actually gets wider. The stretched baron the outside of the bend is forced longer but the material forthe stretch must come from somewhere. The bar grows narrowas a result. The combined widening of the inside of the bendwith the narrowing of the outside makes the bar cup.
(4) When marking out for a bend, use only a round centerpunchmark, not a chisel cut or something similar. This will minimizethe potential for concentration of stress in the bar that could lead
to a crack or split. In no case should you mark the face of the bareither inside or outside of a bend. Both situations, by disruptingthe unbroken, bar surface will result in the concentration of
stresses at that point. These considerations are particularly criticalwhen forging wrought iron and when the bend is acute.
(5) Assessing final dimensions when the bar is cold has twoadvantages. First, it is more convenient and safer to look closelyat the work when the bar is at room temperature. Second, likemost materials, iron expands when hot. When working to high
levels of accuracy, final dimension should only be assessed atroom temperature.
(6) Even quenching ferrous materials with low carbon contentscan leave them with internal stresses and slightly stiffer. As a gen-eral principle, allow your work to cool slowly in the air whenfinished forging. If there is any slight adjustment need to bedone while the bar is cold, the bar will resist less.
SPRING 2003 19
CO N T ROLLED HAND FORG I N G
14. Forging dynamics– forging an “S” curve.
15. Forging dynamics– “cupping” of the metal within the curve.
13. Checking your work.
12 HAMMER’S BLOW
CO N T ROLLED HAND FORG I N G
By Bob FredellIllustrations by Tom Latané
Lesson Number Five--Twisting
Definition:
Twisting rotates the bar around its axis.
Intent:
The student will twist a 1/2"square bar one and one-half turns.
The twist is 3" long and starts 2" from the end of the bar. Thefinished twist is to be straight and along the same axis as theuntwisted portions of the bar. The entire length of the twist iseven so that it does not easily show variations in the spacesbetween the turns. The twist is to be made to dimensions and inone heat.
Tools Needed:
You will need basic tools plus a twisting wrench, divider, con-tainer to direct water to parts of the twist and two lightweightbars 6" to 10" long.
Different types of twisting wrenches may be used. By welding ahandle on to a smooth jaw plumbers’ wrench an adjustable twist-ing wrench is made. The traditional "S" shaped twisting wrench
may also be used. Experienced blacksmiths are able to use flat-lipped blacksmith tongs. However, beginners using this methodrun a higher risk of making a crooked twist because when apply-ing the rotational force from only one side of the bar there is atendency to bend the bar up, down or sideways.
Two light bars to test completeness of the twist.
The exact size of these bars is not critical. Bars in the area of1/4"x 1/2"x10", or slightly shorter, work well. The idea is to usestraight, lightweight bars.
Water container
Use a container of your choice. You may use an old soap squeezebottle, a tin can with a pinched top or anything else that pro-duces a small, well-controlled stream of water.
Materials:
24" of 1/2" square mild steel
Step One:
Place the bar in the fire so that 2" from the end of the bar is inthe center of the fire and heat to a medium orange heat. Pushthe bar so that 5" from the end is over the center of the fire andheat to a medium orange heat. This is done to insure that theheat is well beyond the area to be twisted. Withdraw the bar andinspect the temperature. The color of the bar must be exactly thesame for at least one inch beyond both directions of the area to
Twisting
2. A Twisting Wrench.
1. The completed twist
4. Measuring and heating the bar.
3. An alternative type of twisting wrench.
SUMMER 2003 13
CO N T ROLLED HAND FORG I N G
be twisted. Reheat as necessary to achieve a perfectly even heatthat is three inches long. The length of this heat will ensure aneven twist.
Hints:
An even heat makes for an even twist; an uneven heat makes foran uneven twist… close to even doesn’t do it!
Do not heat the bar hotter than the recommended temperaturebecause too high of a heat may cause the edges to crack whentwisting.
Step Two
Place 2" of the bar horizontally in the vise. This may be achievedin several ways. (a) Before heating the bar, center punch 2" fromthe end. However, this will leave a mark that you may or maynot consider unsightly. (b) Place a chalk mark on the vise 2"from the end. This will work only if the twist is to be close tothe end of the bar. (c) For twists in the center of a long bar, placea blacksmith’s stand or other obstacle on the opposite side of thevise to act as a stop. Note—for some applications other than thislesson, the smith may find it useful to place the bar vertically inthe vise.
Use the dividers pre-set at 3" to determine the location of thetwisting wrench and place the twisting wrench on the bar.
Hints:
When setting down the dividers do not allow the weight of thetwisting wrench to rest on the bar as the bar may bend down-ward.
Step Three:
Twist one turn using even pressure with both hands. The twist-ing will take place only between the vise and the twistingwrench. Be sure to use gloves to protect your hands from fallingscale.
Hints:
Be consciously aware of not bending the bar up, down or side-ways, as this will put a bend in the bar.
Some twists call for multiple twists in the opposite direction.Always make the first twist in the same direction to avoid forget-ting which way to twist. (This may be either clockwise orcounter clockwise.) It is well to develop the habit of always twist-ing in the same direction, except when the design calls for doingotherwise.
Step Four:
Quickly brush off the scale and inspect the twist. If part of thetwist is tighter that the rest, cool it with water. Continue twistingto finish with exactly one and one-half turns.
Hints:
You will need some practice to learn how much water to use.
4. Setup for twisting.
5. Twisting in the vise.
6. Cool tight sections with water.
14 HAMMER’S BLOW
CO N T ROLLED HAND FORG I N G
Step Five:
Sight lengthways down the bar; rotate 90 degrees and sightagain. The bar, including the twisted and untwisted portions, isto be straight. The bar needs correction if you can detect a bend.Learn to train your eye to see deviations.
Beginners may need to use the following procedure to check forstraightness: Place a straightedge lengthwise along the bar on acorner covering the twist and both untwisted parts. Do this onall four corners. The straightedge is to make contact with theuntwisted corners and the corners of the twist.
If the bar is not straight and requires correction, proceed to step#6. If it is straight go to step #7.
Step Six:
If the bar is simply bent, this may be quickly corrected by plac-ing the twist in the vise on the diamond and gently tighten,rotate to the other diamond and tighten, then repeat this proce-dure on the flat of the bar. A second method is to place the baron a block of wood and strike it with a wooden or rawhide mal-let. Be sure to use wood to avoid deforming the edges of thetwist. Wet the wood to reduce the amount of smoke in youreyes.
Correction may be more difficult if the bar is offset at the junc-tion of the twist and untwisted portion. The block of woodmethod described above may correct the offset. Or, reheat to anorange heat, quench the twist to protect it and place the twist inthe vise at the point of the offset. Strike the bar to move it back
into alignment. At the same time apply pressure in the oppositedirection at the end of the bar to avoid bending the bar.
Hints:
Bends and offsets are most often caused by moving the twistingwrench up, down or sideways or allowing gravity to sag the bardownward when twisting. Be consciously aware of applying evenpressure on both handles of the twisting wrench.
8. Correcting a simple bend.
9. Another method for correcting a simple bend.
7. Check the twist to make sure it’s straight.
10. Correcting an offset bend.
SUMMER 2003 15
CO N T ROLLED HAND FORG I N G
Step Seven:
To check for exactly one and one half turns, place the twisted barhorizontally in the vise. Lay one of the light bars on the flat,untwisted portion at one end of the twist and at a right angle tothe twisted bar. Likewise, lay the other light bar on the other sideof the twist. Sight lengthwise down the twisted bar. If the lightbars are exactly parallel you have completed this lesson. If theyare not exactly parallel the bar is either twisted too much or notenough. Place the twisted bar back in the original position in thevise and adjust. This process may require the twist to be heated.
Targets:
The twist is to be:
1. 3" long and 2" from the end with a deviation no more than1/16 of an inch.
2. 1 1/2 turns with the leveling bars as described in step #7.
3. No cracked edges.
4. Equal size increments of the turns. The spaces between eachcorner of the twist are to vary no more than 1/16" as measuredlengthwise along the bar. Note—the vise and the twisting wrenchare heat sinks causing slightly wider turns at the ends.
5. The entire bar is straight. A good test for straightness of thetwist is to place a straightedge along the twist and check for con-tact with each of the corners of the twist. Also, sight lengthwisealong the bar—there is to be no detectable crookedness for theentire length of the bar.
6. Complete the twist in one heat.
Forging Dynamics:
The length of the bar remains the same because the axis of thebar does not change. Twisting makes the edges stretch; the flatsurfaces remain straight, although they have the appearance ofbeing concave. A cross section of the twist will show the flat sur-faces as straight.
The corner-to-corner diameter of a square is greater than theface-to-face diameter. Before twisting the bar, the corners and thefaces are parallel to the axis. When twisted, the corners and facesrevolve around the axis at an angle to the axis. The corners, hav-ing a greater radius than the faces, will protrude farther out fromthe axis of the twist than will the faces. The radii of the facegradually becomes less moving from the corner to the center ofthe face; a concave shape is then created between the cornerswhile the faces remain straight.
11. Forging dynamics of twisting.
10. Another way to straighten an overbent end.
16 HAMMER’S BLOW
CO N T ROLLED HAND FORG I N G
By Peter RossIllustrations by Tom LatanéLesson Number Six- Drawing Punching, and Bending
Definition: This lesson uses skills developed by previously pub-lished lessons.
Intent:
The student will learn to incorporate several basic skills into asingle project while maintaining dimensional control.
Tools needed:
Basic tools plus tongs to hold 1/4" thick flat bar, tongs to hold5/8" or 3/4" diameter on end, and punching tongs to holdpunch (if using a short punch), center punch, rule, compasses.
Materials:
24" (or as convenient) of 1/4" x 1 1/4"
24" (or as convenient) of 1/2" square mild steel
5/8" or 3/4" tool steel to make two punches
Method:
It will take planning to achieve target dimensions. Let’s start bythinking of the bent rectangular bar.
First, the bar must be the right length and the two holes cor-rectly placed. If the bar is forged to proper length, the bendingwill be simple. We can accurately compute the overall length andthe distance between holes from the plan (see lesson Four,Bending, Hammer’s Blow, Volume 11, #2, Spring 2003). Thiswill give us the “straightened” layout of the bar. With this layoutestablished, the choice of steps can begin.
In planning a project, it is wise to do the less-predictable opera-
tions early and do the more predictable ones later. By “pre-dictable” I mean in the dimensional sense- not the skills of theworkman.
For example, forging a taper of precise length can be done withcertainty (using the method learned in lesson one, Hammer’sBlow, Volume 11, #1, Winter 2003), but it is difficult to predicthow much stretching will occur while punching holes. If wepunch early in the sequence, the uncertain effects on dimensionsare resolved before drawing to final length. Maintaining correctdimensions will be simpler and more direct. Making the roundtapered pin will not affect the dimensions or fit of the flat bar,and can be done independently.
Step One:
Make two punches, each with a 4"-long round taper. One shouldend in 3/16" diameter and the other end in 3/8" diameter. Becertain that the entire taper is carefully forged and truly round.Any irregularities in the tool will transfer to the work.
Review Lesson #3 (drawing a round taper) if necessary.
Previous lessons have involved only mild steel, but for this exer-cise, we will need something tougher for the punch. If the punchis made of mild steel it will likely bend in use. Using a hardersteel, even if it is not hardened and tempered, will make a moredurable tool. At this beginning stage, I recommend avoidingmore exotic and expensive tool steels. A very serviceable punchcan be made from the simplest tools steels (such as W-1) andthey will be much more forgiving for the beginner to use. Thedrawback of simple steels is that they are softer and will deformmore easily during use, especially if they get hot. Good tech-nique will enable you to use them with very little problem.
If you would rather not buy new steel, you may use a piece ofscrap (such as a piece of coil spring) of appropriate thickness.
Step Two:
We will start with the flat bar.
Refer to the drawing of this project for dimensions and calculatethe length of the flat bar before bending. Also determine the dis-tance between holes. Review this procedure in Lesson Four(Bending) if necessary.
It is often a good idea to make a simple sketch of the piece as itshould look before bending with these dimensions noted. At thisstage, it is nothing more than a tapered flat bar with two holes.
Begin by forging a taper on the end of the flat bar. This taperdoes not end in a point, so draw the end of the bar only until
Drawing, Punching, and Bending
1. The final forged shape.
2. Flat bar in its unbent layout.
CO N T ROLLED HAND FORG I N G
SUMMER 2003 17
you reach the target dimension- in this case, 1/4" x 1". Squarethe end by upsetting if necessary. Once you have forged the endto dimension, work your way back up the bar until you have astraight, even taper 1/4" shorter than the desired length. Thiswill allow for some stretching during punching and final correc-tions.
Hints:
Do not draw the bar too thin, as this is the hardest fault to cor-rect. Any areas that are too thin must be upset to proper thick-ness. Refer to the lesson on upsetting if necessary.
Targets:
Make sure the bar is an even 1/4 " thick the entire length of thetaper. Variation should be 1/64" or less.
Hold length tolerance within 1/16"
Make the taper as smooth and straight as if it were the end of theproject.
Step Three:
Measure from the small end to find the location of the smallhole. Using the center punch, mark the location. Make a deepmark so that it will be clearly visible when the bar is hot.
Take a heat and punch the small hole.
Drift the hole to 9/32" diameter using the punch.
Refer to lesson 2 (Hot Punching) if necessary.
Hints:
It is a good idea to mark the bar when cold (or mostly). This willavoid errors caused by measuring a hot, expanded bar: after thebar cools and shrinks, the marks can be off by as much as 1/8".Also, using the center punch on hot material may draw the tem-per from the small tip.
Targets:
Punch and drift the hole in the same heat. Since the punch isclose to the final hole size, this should not be difficult. Afterdrifting, the bar should be at a low heat and ready for smooth-ing. For this project, it will be acceptable to leave the bulge
around the hole.
With practice you should be able to punch, drift, and smooththe bar in one heat.
Step Four:
Using the center of the first hole as the starting point, measurefor the location of the second. Punch and drift the second holeto 1/2" diameter.
Hints:
Rather than center punching the exact location, make the markapproximately 1/16" too close to the first hole. This will allowfor inevitable stretching, and decrease the chance of the holesbeing too far apart. If there is any error to correct, it will bemuch easier to stretch the bar a little than to shorten it.
A more accurate measurement can be made when the bar is cool.
With the second hole finished, measure between the holes andcorrect the taper length to match the dimensions on your sketch.Final measurement is best done with the bar below a red heat, tominimize errors. This is also the time to make sure the taper isstraight and even and the surfaces smooth.
For this project, the bulging of the bar edges around thepunched holes may be left as is.
Once the holes have been punched and the bulges created, it isvery important not to let the bulge rest on the anvil even whenworking in the middle of the taper. With a bulge on the anvil,the taper will not rest squarely on the anvil face. A hammer blow
in this condition will bend the bar and squash the hole. This isan example of an idea presented in lesson one: the bar issqueezed by the hammer and the anvil simultaneously. You mustthink of what the anvil will do whenever positioning the bar.
Targets:
Hold length tolerances of each section to plus or minus 1/32",and overall length to within 1/16".
3. The marked bar.
4. The layout of the second hole.
5. Proper placement of the bar.
18 HAMMER’S BLOW
CO N T ROLLED HAND FORG I N G
Step Five:
Now that final length is established, the piece can be cut fromthe bar. Make a mark on the face of the bar with the centerpunch, or on the edge with the hardie. Take a heat, and usingthe hardie, cut the piece from the bar.
Hints:
It is helpful to cut before bending for two reasons: first, if we aregoing to dress the end of the bar with the hammer, this is the lastconvenient time. Once the bar is bent, it will be impossible.
Second, cutting would deform the bend if it were already done.We would have to do the work all over again.
Careful cutting will keep the end of the bar as square as possibleand make upsetting easier. Since this is a rectangular bar, it willhelp to cut part way through from all four sides. The intent is tokeep the resulting burr as small as possible and centered on theend. If you cut equally from opposite sides rather than mostlyfrom one side this will happen.
From this point onwards, it will be necessary to hold the piecewith tongs. Simple flat jaw tongs will work well for this project.Most tongs are made to fit one size bar, though they sometimeswill hold several additional sizes adequately. To check to see iftongs fit properly, the jaws should be parallel at the thickness ofthe bar. Thus, the jaws will contact the bar for the entire lengthof the jaw. Conveniently, one pair of tongs sized to hold 1/4"thick flat bar will hold the piece at either end, or anywhere inbetween.
Hints:
It may be necessary to square the end after cutting. If so, makesure to quench everything except the end itself to prevent undo-
ing the accurate dimensions already achieved.
In preparation for the final step, it may be helpful to mark thelimits of the bend (see Lesson 4, Bending) on the edge of thebar.
Step Six:
Bend the piece to match the given dimensions. Heat approxi-mately one half the length of the bar and bend while holding thecold end in the tongs. Once done, switch grip to the bent end,heat the second half, and finish the bending. Switch grip as oftenas necessary to make corrections and adjustments.
Hints:
Since the bar is tapered, care must be used to get an even bend(it will bend more easily where it is smaller). If you have chosento center punch the edges of the bar for reference it should beeasy to determine if the bends start and stop at the correctplaces.
7. The bar with punch marks on edge.
8. Manipulation of stock for bending on the horn.6. Proper and improper tong fit.
SUMMER 2003 19
CO N T ROLLED HAND FORG I N G
Refer to Lesson Four (Bending) if necessary.
Remember, the two ends including the holes are not bent, butstraight.
Targets:
The two straight sections at either end should be parallel in sideand end views, and the correct distance apart. They should alsobe perpendicular to the imaginary "horizon" created by connect-ing the two dots.
With a straightedge connecting the two reference dots, check theradius of the bend and whether the ends are square.
Match the given dimensions within 1/16" or less.
Step Seven:
With the flat bar completed, it is time to make the taperedround pin.
Starting with 1/2" square bar, draw a round taper to match thegiven dimensions.
With the proper taper made, cut the piece from the bar andsquare the cut end if necessary.
Straighten and check for accuracy.
Hints:
Refer to Lesson Three (Drawing a Round Taper, Hammer’s Blow,Volume 11, #2, Spring 2003) if necessary.
When cutting a round bar that is to have the end squared, cutevenly all the way around the bar. This will leave the resultingburr small and centered on the end.
Since you are using 1/2" square bar as a starting material, it ispossible to make a pin which is larger than 1/2 " diameter.Therefore, use care in checking your progress.
Step Eight:
With both parts cool, slide the pin through the holes in the bentbar. The pin should stop close to the desired location, with closeto correct amounts projecting from both holes. If the pin isround and straight, the distance between it and the top of the arcwill remain constant even if the pin is rotated.
Check all given dimensions.
Hold tolerances to 1/16" or less
If you have made a full-size drawing, you can place the finishedpiece directly over it to check your results.
If the piece does not match the sketch, you can also figure outwhere the errors occurred; whether holes are in the right place,bending was accurate enough, or overall length was estimatedcorrectly.
9. A square can be used to assure that the curve begins and endsproperly, to locate a center to check the curve, and to check that thestraight ends are parallel. The sides of the curved bar should lieevenly on a flat surface except for the swelling around the punchedholes.
WINTER 2004 11
CO N T ROLLED HAND FORG I N G
By Peter Ross Illustrations by Tom Latané
Lesson Number Eight–Upsetting
Definition:
Upsetting increases the cross sectional area by deforming exist-ing material instead of adding material.
Upset 1" of the end of a 1/2" square bar by 25% (drawing offinished shape)
Intent:
The student will learn the basic principles for upsetting the endof a bar efficiently, practice the methods, and be able to produceaccurate results.
Tools needed: basic tools only, including a square
Materials:
14" of 1/2 " square mild steel
Method:
The bar is hammered end-on. This shortens the bar and causes itto swell where it is hot.
In order to work efficiently, the following conditions must bemet:1. the bar must remain straight.2. the bar must be at a very high heat3. the bar must be hit hard
Managing these factors is more difficult than it might appear.This is one process where almost everything works against you.Since hot steel bends so easily, it is very likely for a bend to starteven while striking on end. Once even a little bend starts, almostall upsetting ceases and the blows simply cause more bending (Ifyou have ever tried to drive a nail once it has bent even a littlebit, you will understand the situation).
Very little is accomplished unless the bar is at its softest. At amedium orange heat or below, results are almost negligible.Therefore, it is crucial to start at the highest heat and workquickly.
As a practical example, try to make a small section of rope swellby pushing from both ends. If you hold too far apart, the ropewill bend. It only swells when you keep everything straight andlocalize the work area. Also, compare the resistance betweenupsetting and bending the rope. It will bend with much lessforce. This illustrates the necessity of following the three require-ments when working steel.
Factors to consider when upsetting:
1. The size of the hammer affects the results. A light hammer canbe used faster, but since it has less mass, the blows work only thevery end of the bar.
A heavier hammer will have a deeper effect.
If too heavy, the hammer cannot be used fast enough; addingextra heats. For this exercise, a hammer between 1 1/2 and 2pounds will be adequate.
2. The length of the heat is very important. If too long a heat istaken, the bar will bend rather than upset.
3. The end of the bar affects straightness. Even though the endof the bar will deform during upsetting, how it looks at the startis crucial. If the end is not square to the bar length, the first blowwill cause bending. Additional blows only exaggerate the condi-tion.
Upsetting
Upsetting with lighter vs. heavier hammers
The finished shape
12 HAMMER’S BLOW
CO N T ROLLED HAND FORG I N G
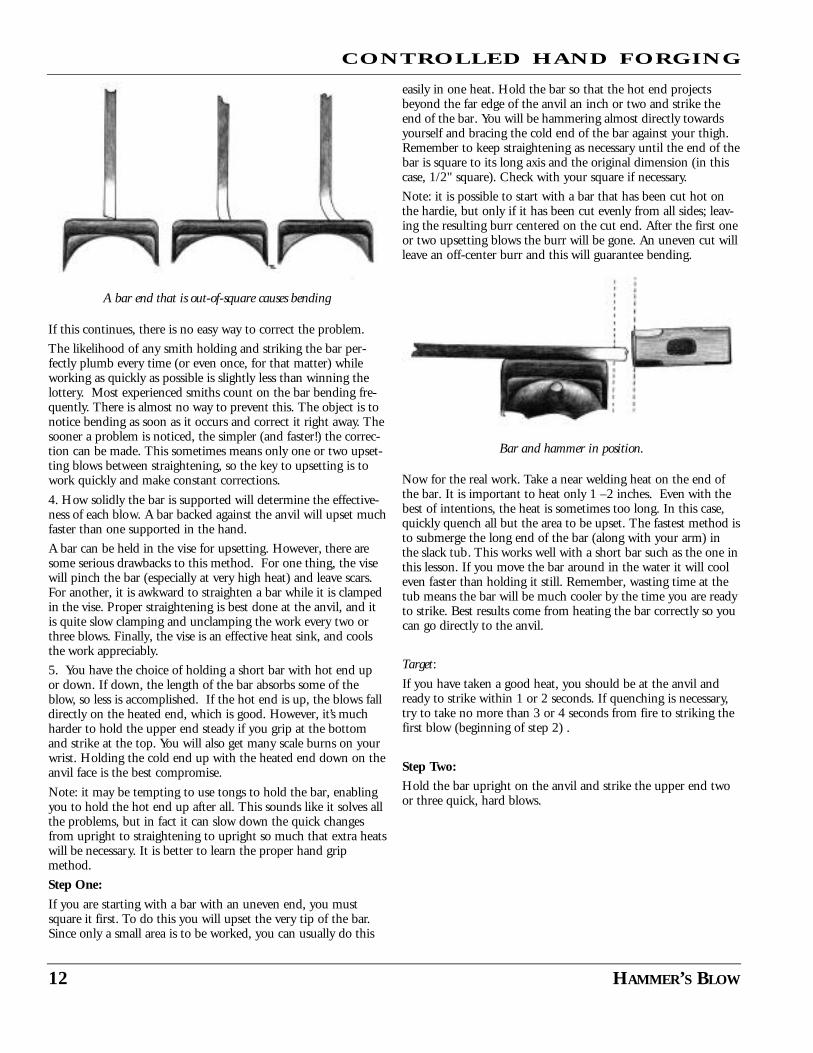
If this continues, there is no easy way to correct the problem.
The likelihood of any smith holding and striking the bar per-fectly plumb every time (or even once, for that matter) whileworking as quickly as possible is slightly less than winning thelottery. Most experienced smiths count on the bar bending fre-quently. There is almost no way to prevent this. The object is tonotice bending as soon as it occurs and correct it right away. Thesooner a problem is noticed, the simpler (and faster!) the correc-tion can be made. This sometimes means only one or two upset-ting blows between straightening, so the key to upsetting is towork quickly and make constant corrections.
4. How solidly the bar is supported will determine the effective-ness of each blow. A bar backed against the anvil will upset muchfaster than one supported in the hand.
A bar can be held in the vise for upsetting. However, there aresome serious drawbacks to this method. For one thing, the visewill pinch the bar (especially at very high heat) and leave scars.For another, it is awkward to straighten a bar while it is clampedin the vise. Proper straightening is best done at the anvil, and itis quite slow clamping and unclamping the work every two orthree blows. Finally, the vise is an effective heat sink, and coolsthe work appreciably.
5. You have the choice of holding a short bar with hot end upor down. If down, the length of the bar absorbs some of theblow, so less is accomplished. If the hot end is up, the blows falldirectly on the heated end, which is good. However, it’s muchharder to hold the upper end steady if you grip at the bottomand strike at the top. You will also get many scale burns on yourwrist. Holding the cold end up with the heated end down on theanvil face is the best compromise.
Note: it may be tempting to use tongs to hold the bar, enablingyou to hold the hot end up after all. This sounds like it solves allthe problems, but in fact it can slow down the quick changesfrom upright to straightening to upright so much that extra heatswill be necessary. It is better to learn the proper hand gripmethod.
Step One:
If you are starting with a bar with an uneven end, you mustsquare it first. To do this you will upset the very tip of the bar.Since only a small area is to be worked, you can usually do this
easily in one heat. Hold the bar so that the hot end projectsbeyond the far edge of the anvil an inch or two and strike theend of the bar. You will be hammering almost directly towardsyourself and bracing the cold end of the bar against your thigh.Remember to keep straightening as necessary until the end of thebar is square to its long axis and the original dimension (in thiscase, 1/2" square). Check with your square if necessary.
Note: it is possible to start with a bar that has been cut hot onthe hardie, but only if it has been cut evenly from all sides; leav-ing the resulting burr centered on the cut end. After the first oneor two upsetting blows the burr will be gone. An uneven cut willleave an off-center burr and this will guarantee bending.
Now for the real work. Take a near welding heat on the end ofthe bar. It is important to heat only 1 –2 inches. Even with thebest of intentions, the heat is sometimes too long. In this case,quickly quench all but the area to be upset. The fastest method isto submerge the long end of the bar (along with your arm) inthe slack tub. This works well with a short bar such as the one inthis lesson. If you move the bar around in the water it will cooleven faster than holding it still. Remember, wasting time at thetub means the bar will be much cooler by the time you are readyto strike. Best results come from heating the bar correctly so youcan go directly to the anvil.
Target:
If you have taken a good heat, you should be at the anvil andready to strike within 1 or 2 seconds. If quenching is necessary,try to take no more than 3 or 4 seconds from fire to striking thefirst blow (beginning of step 2) .
Step Two:
Hold the bar upright on the anvil and strike the upper end twoor three quick, hard blows.
A bar end that is out-of-square causes bending
Bar and hammer in position.
WINTER 2004 13
CO N T ROLLED HAND FORG I N G
Look frequently at the hot end as you are working. As soon asyou see the bar bending, stop upsetting and straighten, using asfew blows as possible. Overzealous straightening can lead todrawing out the bar… negating your progress. You do not needto get the bar perfectly straight, but close.
As soon as possible, return the bar to upright and strike two orthree more upsetting blows. Continue in this manner until youhave slightly exceeded the target dimension, taking additionalheats if the bar cools below a medium orange.
Note:
While checking for straightness, remember also to keep watchingthe end. If you see the end of the bar going out of square, youmust stop upsetting and correct as illustrated in step 1.
What can be done to minimize the time used in straightening?Many smiths will rotate the bar 1/4 or 1/2 turn between blowsto keep minor mistakes from compounding.
Occasionally, a correction can be done without much interrup-tion. If the bar end goes out of square and causes a bend, bend-ing the bar in the opposite direction will address both corrections(straightening the bar, and squaring the end) at once. Remember,reducing the interruptions to actual upsetting means fewer heatsto accomplish the goal. Every second saved counts.
Step Three:
Smooth and straighten the upset area, being careful to draw thebar just to size. A lower heat (dark orange to bright red) is bestfor this step.
Check the bar dimensions to confirm it is square in cross sec-tion, straight, and proper size (5/8"). Correct as necessary (seelessons on drawing, straightening, bending)
Target:
With practice this exercise may be accomplished in one heat,though a beginner may take two or three at first. The finishedupset section should be within 1/32" of the intended 5/8 thick-ness and the bar should be straight and square.
Holding the bar on the anvil top
Correcting an end that is out-of-square
CO N T ROLLED HAND FORG I N G
10 HAMMER’S BLOW
By Jay Close Illustrations by Doug Wilson, photos by JayCloseLesson Number Eight–Splitting
Definition:
Cutting a bar by driving a sharp-edged chisel usually parallel tothe length of the bar.
Lesson: slitting and drifting two mortises or slots in a square sec-tioned bar.
Intent:
The smith will learn the technique of slitting and drifting a nar-row mortise to specified dimensions and how to anticipate thestretching of the bar to position mortises accurately.
Materials:
24 inches of 5/8 inch square mild steel.
Tools:
In addition to the basic tools you will need a slitting chisel about5/8-inch wide forged from W-1 or some other appropriate steel,and a drift 3/4-inch wide and 1/4-inch thick.
Make the drift of the same sort of steel as the chisel, although adrift of mild steel, carefully used, will work for a few repetitionsof the lesson.
If the chisel is short, you will need chisel tongs to hold it. A pairof pick up tongs will be useful dealing with the drift.
Make the cutting edge of the chisel to approximate the drawingabove. The edge is curved and thin. Keep it symmetrical—anoff-center edge will be hard to drive straight. The length of thechisel edge should be about 75% of the length of the finishedopening—in this case about 5/8-inch for an opening 3/4-inchlong.
Make the drift to resemble the drawing. Provide a long, leadtaper, a parallel section and a driving taper a bit longer than thebar thickness. To avoid sharp inside corners in the material, fileor grind a slight chamfer on the edges of the drift. Round thetop where the hammer hits to minimize mushrooming.
Method:
Overview of the Process: When a narrow slot or mortise isneeded it is often slit and drifted rather than punched. This isparticularly true when it is desirable to retain the full thickness ofthe bar stock around the opening.
Splitting
The finished practice piece with dimensions
A coffee table by Doug Wilson using the techniques describedA slitting chisel
A drift
Jay’s tooling for this lesson
SPRING 2004 11
CO N T ROLLED HAND FORG I N G
In the process taught here, a slit is cut then a drift inserted intothe slit. This drift works like an internal anvil as the sides of thebar are progressively forged thinner on either side of the slit andthe ends of the slit squared as the drift is driven in further.
Step One:
Measure the overall length of the bar you are starting with andrecord that measurement.
One inch from one end of the bar place a center punch markdeep enough that it will be readily observed on the heated bar.Center the punch mark in the middle of the bar.
Roll the bar 180 degrees and place a corresponding center punchmark on the opposite side. These two marks will guide the place-ment of your chisel as you cut from both sides.
Step Two:
With tools ready at the anvil, heat the end of the bar to a fullyellow. Make sure that the area around the center punch marks ishottest.
Place the heated end of the bar in the middle of the anvil with acenter punch mark facing up.
Put the chisel edge centered over the punch mark aligned withthe length of the bar.
Tip: If you have difficulty seeing the punch mark, rub the side ofyour hammer across the bar surface. This will scrape the surfacefree of scale, but scale will collect in the center punch mark andmake it visible.
Steady the end of the bar you have been holding against yourthigh. Pick up the hammer.
Hit the end of the chisel to leave a distinct but light witnessmark to your chisel placement.
If necessary, correct the placement of the chisel and drive it hardinto the bar a little more than half way.
Hold the chisel vertically. Hit the chisel vertically, and you willcut vertically.
Do not allow the chisel to stay in the cut! If it softens in use, itstops cutting and begins to deform. As a starting point, threequick hammer blows to the chisel and then get it out of the cut.
Especially for a W-1 chisel, as soon as you notice it turning red,quench the edge. Residual heat in the rest of the tool will slightlydraw the hardness, keeping the tool from becoming brittle.
Tip: If the chisel sticks, twist it to slightly widen the slot and itshould pull free. Sometimes tapping the sides of the slot willknock out a reluctant chisel. Or turn the work upside down andswat the end of the bar on the edge of the anvil to use momen-tum to pull the chisel free.
A “witness mark” centered on the centerpunch mark
The cut halfway through
Removing a sticky chiselJay Close steadies the bar against his thigh.
CO N T ROLLED HAND FORG I N G
12 HAMMER’S BLOW
With the cut a little more than half way through, put the barback in the fire.
Tip: Inspect the chisel. If it has deformed on the edge, correctand resharpen before continuing.
Unless you need to resharpen the chisel, resist the temptation tothoroughly cool the chisel. It will cool in the air as you reheatthe bar and will have enough remaining heat to not overly coolthe bar as you continue cutting.
Step Three:
Repeat step two chiseling through from the opposite side untilthe two cuts meet halfway through the bar. You should see aclean opening all the way through with the sides of the slitbulged out.
Step Four
Prepare your tools so that the drift and pick-up tongs are handy.Take a good yellow heat on the bar around the slit. Tap the driftinto the slit until solid resistance is met, i.e., until you are begin-ning to reshape the ends of the opening just by driving in thedrift.
The lead taper of the drift should extend through to the oppositeside of the bar. Make sure you are hitting it in over the hardiehole, the pritchel hole, a bolster block or open vise jaws.
The trick is to support the work as closely around the slit as pos-sible.
Tip: An unsupported bar can collapse into a wide pritchel orhardie hole, so hold the bar along the side of the hole where oneedge at least will receive support. If you are hitting the drift anumber of successive blows, move the bar left, right, front, backaround the square hardie hole or around the circumference of alarge pritchel hole.
Once you meet resistance, forge the bulge of the sides against thedrift working both sides evenly. Knock the drift in further tocontinue squaring the ends and bulge the sides again.
Remember, you are shaping the sides of the slot with the ham-mer working against the drift, but the ends of the slot can onlybe cleaned up by driving the drift in against them.
The exact balance between forging the sides with the drift inplace and driving the drift deeper to clean the ends of the slot isa matter of experiment. The variables include the width of yourchisel, the taper of your drift and how aggressively you pursueeach shaping option.
Repeat the forging of the sides and then remove the drift by tap-ping on the end of the lead taper or tapping the lead taper onthe anvil surface.
The sides will stretch longer and thinner. This is good. But thewall around the slot will also stretch wider. This is bad. Theundesirable stretch must be forged out with the drift knockedfree of the slot.
Do this now. A couple of hammer blows on each side shouldsuffice.
WARNING: the drift is now VERY HOT and can only be han-dled with tongs!
If the drift has taken on a red color, quench it quickly to blackbut not down to hand-holding temperature.
If the bar is still at least orange, put the drift in from the oppo-site side of the slot and repeat the forging in of the bulge and re-setting the drift.
Do not work below a clear orange to bright red heat. Do notallow the drift to get red and soften while in the slit. Get it outand keep it relatively cool. A soft internal anvil is of little use.
Resist the temptation to cool the drift to hand-holding tempera-ture. This will rob heat from the workpiece and slow down thepace of the work. Handle the drift with tongs.
When the bar is red, remove the drift, forge in the unwantedstretch in width and get it back in the fire.
Step Five
Complete the drifting of the hole using the same procedure out-lined in Step Four:
Tap in the drift until the drift squares the ends of the slot. Forgein the bulge on both sides evenly. Remove the drift and dress thetop and bottom of the slot. Re-set the drift from the oppositedirection and work the sides evenly again.
As a final sizing step, as the bar cools to red, drive the driftthrough all the way from one direction. The sides should notbulge.
The drifted slit
The completed slit
Supporting the bar with the edges of the pritchel hole
SPRING 2004 13
CO N T ROLLED HAND FORGING
Then, drive the drift through from the opposite direction as thebar loses forging heat. If necessary, do some low heat dressing ofthe bar surfaces and tap the drift through one final time.
Step Six
Now that you have slit and drifted a mortise, measure its overalllength with the bar at room temperature.
Compare that to the overall length of the bar before the mortise.The difference will tell you how much the bar stretched to createa mortise of that size.
Knowing this stretch factor, mark the center point for anothermortise that will end up 3 inches from the center of the first one.
For example, say you started with 10 inches of bar. After youmade the first mortise the bar grew to 10 and 1/2 inches. Fromthe mortise center, the mortise pushed the bar 1/4 inch forwardand another 1/4 inch back. If you want a second mortise aspecified distance from the first, you must anticipate this 1/4inch stretch center to center.
Mark the center of the second slot half the overall stretch of thematerial closer to the first slot than the needed final dimension.
Slit and drift the second mortise just as the first.
Troubleshooting:
Your mortise should look like a rectangle reflecting the cross-sec-tion of your drift. If it looks like the drawing below, the driftnever had a chance to square the ends of the slit. This cameabout because either (1) the length of the chisel cutting edge wastoo long compared to the width of the drift, or (2) you did notdrive the drift in far enough before stretching the sides of theslot.
If your mortise looks like this, you have over-stretched the sidesof the slot so that on the final forging the drift was not com-pletely filling the mortise.
You can also create a mortise that is fairly rectangular but toolong. This comes from over-stretching the sides of the slot. Witha careful heat localized around the slot you can upset the slotshorter and then re-forge and drift. Remember to adjust the bal-ance between stretching the sides and driving the drift on the
next mortise. If this does not help, you probably need a narrowerchisel.
Sometimes the chisel cuts are centered in the bar but misalignedalong the bar length. Often this problem will sort itself out inthe drifting. You can also put the drift in—it will enter at anangle—and tap it more upright as you forge in the sides. Do alittle at a time from both sides taking advantage of the stiffnessof the drift “on edge.”
Chisel cuts not centered in the bar will leave uneven material inthe mortise walls. You can help the problem by concentratingyour hammer blows on the thicker sections and avoiding thethinner ones. In the drawing below with two off-center chiselcuts, hit where the arrows point.
A similar correction can assist if the slit is angled away from theaxis of the bar. Work the areas shown below more.
Tip: A poorly shaped chisel edge can cause much frustration.Even if centered on the bar and struck vertically, an asymmetricaledge will lead the chisel at an angle causing poorly centered cuts.Inspect the cutting edge of the chisel often.
If your mortises are not 3 inches apart, you will need to adjustthem—hopefully, just slightly. For greatest accuracy, rememberto make your assessment when the bar is at room temperature.For your own interest, record the measurement both while thebar is red and when it is at room temperature and note the dif-ference.
If the holes are a little far apart, take a long heat in the middle.Make certain the two slots are cool and carefully shorten the barby upsetting. With care this can be done without producing anobvious bloating of the middle of the bar.
If the distance between the slots is short, you'll have to draw outthe middle to lengthen the bar. Again, take a long heat and dis-tribute your efforts over a long section of the bar so as not toproduce an obvious thinning.
TARGETS
Time Targets: With experience and confidence you will be able
Results of a chisel too long for the drift
Results of overstretched sides
Correcting off center chisel cuts
CO N T ROLLED HAND FORG I N G
14 HAMMER’S BLOW
to cut the slit in one heat and drift it in perhaps two or threemore. For your first efforts, cut half way in one heat and take asecond heat to complete the slit from the opposite side. Then
allow four or even five heats to complete the drifting and a finalone for clean up.
Shape and Dimension Targets: The dimensions of the slot will belargely determined by the size and shape of your drift, i.e., 1/4-inch by 3/4-inch. This should be “on the money,” no more thana 1/16-inch longer than the drift is wide.
The bar should remain the same dimensions through the slot asthe rest of the bar. A straight edge laid along the flats of the barshould show no particular swelling or cavity around the mortise.
Tip: Hot-rolled bar often has slightly rounded corners. The areaaround the two mortises has been bulged, stretched and reforgedenough that the corners are likely quite square. The contrast ofsquare corner areas and round corner areas can often fool the eyeinto “seeing” a change of dimension where none exits, so observecarefully when testing the sides for straightness.
The slots should be centered in the bar with even wall thick-nesses. The distance between the two slots should be 3 inchesplus or minus 1/16-inch.
If you upset or drew out the bar between the slots to achieve theproper dimension, any dimensional change in the bar should bespread over as wide an area as possible and not be immediatelyobvious. The bar should be straight along its axis.
Chisel cuts angled away from the axis of the bar
Skipjack Striker
CO N T ROLLED HAND FORGING
16 HAMMER’S BLOW
Text and Illustrations by Doug Wilson
Lesson Number Nine–Mortise and tenon joinery
Definition:
Making a mechanical joint with two or more pieces
Intent:
The smith will learn to forge a tenon and assemble a mortise andtenon joint.
Tools
Side set – top and bottom (drawing #2) Note that the cuttingedges aren’t sharp. The cutting edges are slightly radiused.
Set hammer
Monkey tool or bolster plate with 1/4" x 3/4" hole (drawing #3)
(This is a tool block with a 1/4" x 3/4" hole in center.)
Materials:
1/2" x 1" x 18" mild steel bar.
Method:
Step One:
Upset end of bar and forge to 1 1/8" x 5/8", 3/4" from end. Endtapers down to 3/8" x 3/4". (drawing #4) Mark bar on hot cut3/4" from end.
Step Two:
Take a full yellow heat. Place the bar over the bottom side set.Hit a light blow. The bottom surface of the bar will be cut. Turn
the bar up on its corner. Strike another light blow.
Turn bar onto uncut next surface. Strike again. This marks thesecond side of the bar. (drawing #5)
Repeat and cut the remaining two corners and sides with lightblows.
Notes: The light blows on the corners help to insure proper toolalignment.
Misaligned cuts or double cuts cause hot shuts, then cracks.Proper tool alignment is critical here. Any mis-cuts should befiled out immediately.
Once marked, the bar can be supported on a stand or your hip.Use top tool to continue. (See previous lesson for bar support.)
Reheat bar if necessary. Continue cutting until the core of thebar is just a bit oversize, in this case about 5/16" x 13/16".
Mortise and Tenon Joinery
#1. Example of technique
#3. A bolster plate
#2. A top and bottom side set
SUMMER 2004 17
CO N T ROLLED HAND FORGING
Notes: If the tenon is a bit too fat that’s ok. Too thin won’t do.
A striker’s assistance helps with drawing down the tenon.
Step Three:
Reheat bar to full yellow. Place bar over sharp edge of anvil face.Place set hammer directly over it. (drawing #6)
Strike a heavy blow. Turn the bar 1/4 turn. Strike again. Turnagain in the same rotation. Strike again. You are drawing out thetenon.
Continue until you have drawn down the tenon to 1/4" x 3/4";length as far as it goes.
Finally, lightly forge down the corners.
Note: As you forge down the tenon, the set hammer and theanvil must be parallel. Check size of tenon by inserting end oftenon into bolster.
Step Four:
Upset square shoulders. Reheat to full yellow. Heat shouldextend about an inch up from tenon shoulder.
Note: Quench the tenon to prevent burning if necessary.
Pull the bar from the fire. Set bolster over the hardie hole. Inserttenon. Upset and square by hitting hard on top end of bar.(drawing #7)
Straighten bar as necessary. Square shoulders to bar with lighthits on anvil face.
Note: Tenon should be centered on the bar. Centerlines of barshould be straight. Shoulders should be straight and square.
Step Five:
Cut tenon to length on cutoff hardy. In this case, length shouldbe 1 1/4" from shoulder.
Note: Beveled edges on the end of the tenon help prevent thin,sharp or cracked edges on the finished tenon head.
Step Six:
Finishing the joint. Heat tenon and about 1" above shoulder tofull yellow.
Quickly set bar in vise. Set mortise onto it. Tap it down so it sitsfirmly on tenon shoulders. With rapid hammer blows, upset thetenon. (drawing #8) First hammer blows are straight down.Finish with angled blows.
#5. Marking the second side of the bar
#4. Upsetting and forging dimensions
#6. Using the set hammer
18 HAMMER’S BLOW
CO N T ROLLED HAND FORGING
Note: The entire tenon and a bit of the shoulder must be at abright heat to insure a tight joint.
Forge the head of the tenon into a symmetrical shape withsmooth edges. It should be centered on the face of the bar it hasjoined.
Note: If you run out of heat, you can use a torch to reheat thetenon head. It is best to finish this operation in one heat. A sec-ond heat should only heat the tenon, not the bar with the mor-tise. (drawing #9)
Troubleshooting:
If the tenon has cracks at the shoulder, this was caused by (1)cutting too deep in step two, (2) misaligned or double cuts, or(3) forging tenon at black heat.
Note: File out hot shuts before and during forging of the tenon.
If the tenon head is not centered on the bar it joins, your upset-ting blows may not have been straight down or the mortise wasnot centered in the bar the tenon joins.
Targets, Time:
Upsetting bar, one heat.
Cutting shoulder and drawing out tenon, two to three heats.
Trimming end of tenon, one heat.
Assembling pieces and heading tenon, one heat.
Targets, Dimensional:
Tenon head should be symmetrical, without sharp edges andcentered on the bar it joins.
Tenon shoulder should be the same dimension or slightly smallerthan the bar it passes through and joins.
#7. Using the bolster plate
#8. Upsetting the tenon
#9. The lesson completed
CO N T ROLLED HAND FORG I N G
10 HAMMER’S BLOW
By Dan NaumanIllustrations by Tom LatanéPhotos by Dan NaumanLesson Number 10– Forge Welding
Definition:
Fusing two or more bars together by bringing them to a highheat in a forge, and applying pressure to the area being fused byhammer blows.
Lesson: Upsetting, scarfing (see *Definitions, below), and forgewelding the ends of two bars of equal size together to make onebar.
Intent: The smith will learn the technique of welding two bars ofequal size together, accurately maintaining the original stock sizeand shape after welding.
Materials: Two 15" bars of 1/2" square mild steel.
Tools needed: Basic tools include standard cross peen hammer andanvil. Flux (see *Definitions, below), either borax or EZ Weld.Calipers and a square can be used to evaluate your work.
Method:
Forge welding is used in several circumstances: to produce asmooth transition of adjoining elements; to secure several ele-ments into a bundle (i.e. leaves, grapes, acorns, basket twist); tojoin a bundle to another element; to close the ends of a singlebar shaped in a ring, oval, or rectangular shape (as in a frame); tojoin mild steel to high carbon steel (as in an ax bit); or to lami-nate several bars together to form a billet (as in Damascus lami-nate).
Definitions:
1.) Scarf (scarfing): Preparation or preparing a portion, often theend of a bar for welding by tapering to a thin edge which can beblended into the mating material.
2.) Flux: The product applied to the areas to be fused to reduceoxidation, and lower the melting temperature of thescale.(Examples: borax, EZ weld, etc.)
3.) Clinker: The hard, gritty, often glassy mass that congeals inthe bottom of the fire-pit.
4.) Coke: Soft coal that has had the bulk of its impurities burnedout. Coke’s appearance is puffy. As good quality soft coal burns,it expands and congeals to the neighboring coal nugget forminga larger mass. Almost entirely carbon in its makeup.
Note: Just as there are different approaches to other aspects offorging, the same is true for forge welding. It cannot be said thatany one way is best, as there are many experienced smiths whoproduce consistently sound welds in a different manner thanexplained here. Different scarf forms, different fluxes, and severalother aspects of forge welding can be learned and utilized. Tointroduce these differences in this lesson would prove confusingto the student. Thus, this lesson will concentrate on the methodtaught to me in the 1970’s. Differences aside, the fundamentalsusually prove to be similar or identical.
In all cases, a high heat is needed at the point of fusion to suc-cessfully weld the bars together. The color of the bars should beyellow to yellow/white when removed from the fire. The onlyexception to this would be when welding high carbon steel tomild steel. A lower heat of orange/yellow should be the highestheat applied so as not to burn the carbon out of the carbon steel.
The gray scale that forms on a bar when heated is the enemy ofthe forge weld. The bars will not fuse properly when scale ispresent. Scale forms on the outside of the bar in the presence ofoxygen. Flux forms a barrier around the areas to be fused, pro-tecting it from oxidation. It is applied to the bars at an orangeheat. Flux is not glue, or a bonding agent, rather it lowers themelting temperature of this scale, and prevents more scale fromforming while heating in the fire. Some smiths theorize that to
Forge Welding
Figure 1: Upset end preparation
A forge welded sample from Cyril Colnik
FALL 2004 11
CO N T ROLLED HAND FORG I N G
some degree flux also raises the burning temperature of themetal.
Another important aspect of welding is to be absolutely sure youhave a “clean,” domed fire. A clean fire is free of a clinker in thefire-pit, and has no fresh coal burning in the center of the fire. Agood welding fire also has an abundance of coke domed andbanked in the fire-pit. Should the fire “hollow out” while heatingthe bars, only coke should be added to the fire to replenish thefuel. Fresh coal cools the fire, and also introduces impurities nat-urally found in coal. These impurities are largely burned out asthe coal becomes coke.
When taking a welding heat, a good deep fire with the bar in thecenter of the fire under a good two or so inches of coke willreduce (but not eliminate) the amount of scale which forms onthe bar during heating.
Step One–Preparing the scarf:
Taking a short high (yellow) heat on the last 1" of the bar. Thenupset about 1" of the end of the bar so that the bar measures atleast 9/16" square. (See previous lesson Number 7) Next, forgeone dimension back to 1/2" producing a cross section measuring1/2" x 5/8".
Step Two:
Take another yellow heat on the end of the bar, again on the last1" of the bar, place the end of the bar (with the 5/8" sides verti-cal) squarely on the anvil’s face with the end of the bar 1/4" fromthe inside edge of the anvil. The edge of the anvil should besomewhat sharp for this step. Hitting straight down with thehammer’s face halfway above the anvil face and halfway beyondthe anvil face (Figure 2, photo), reduce the cross section to about1/2 the thickness of the material, in this case to 5/16".
Tip: In order to create a clean shoulder in this operation, put aslight downward pressure on the bar so the bar stays where youput it. Then after the first or second blow add a slight forwardpressure to keep the bar from “stepping” off the anvil.
Step Three:
The forging dynamics of the material will cause the area of thebar on top of the anvil to slightly spread wider than desired. Inthe same heat from step two, turn the bar 90 degrees, and forgethis area back down to 1/2" in thickness.
Step Four:
Take another yellow heat on the last inch of the bar. Place theshoulder produced on a sharp edge of the anvil, pressing theshoulder squarely against the side of the anvil. The hand the baris holding should be lowered slightly so the face of the scarf is offthe anvil face. (Figure 4, photo). Move the hand holding the barto the left of square, and take a blow. Moving the bar back andforth at a 90 degree angle (right to left), and using each step pro-duced by the previous blow to brace against the side of the anvil,slowly step the bar off the anvil. (Figure 5, photos). In this sameprocess, the profile of the bar should be drawn out to a flatpoint. (Figure 6, photo). If done correctly, the face of the scarfshould have steps as shown in the figure 7 below. When the scarf
Figure 3:Above, correct. Below, incorrect. Left– initial shoulderbacked off anvil too soon. Right– no upset remains
for scarf to be laid upon during weld.
Figure 2: A half-face blow Figure 4
CO N T ROLLED HAND FORG I N G
12 HAMMER’S BLOW
is drawn out, forge a slight curve at the end of the scarf. (Figure7) You should be able to do all of step four in one heat.
Notes on scarves:
The reason for the curve at the end of the scarf is simple. Theanvil acts as a heat sink when hot metal is applied to it. If theend of the scarf is not off the anvil when welding, it might cooltoo rapidly, and the weld will not be properly fused in this area.The curve keeps the thin edge of the scarf off the anvil beforethe first blow, retaining the heat longer to produce a sound weld.
The thin tapered edge of the scarf is formed to produce asmooth weld joint. A scarf with a thick edge will produce a weldwith a very visible seam (Drawing, figure 8).
Step Five:
Repeat steps One through Four on the second bar.
Step Six: Fluxing the scarves.
SAFETY! - Some fluxes may emit noxious fumes when heated.Make sure your forge and building are vented properly.
Reduce the air blast in the fire if you have an electric blower. Ifyou are manually applying the air blast, reduce the force of theblast to more of a whisper. This will reduce the chances of burn-
ing the scarves while fluxing by reducing the available oxygen inthe fire.
Making sure you have a clean and deep fire, place the scarvesinto the center of the fire, face up. If the bars are not coveredwith coke, cover them. When the bars reach a bright orange,with the bars remaining in the fire, take your fire rake make ahole in the fire over the scarves so flux may be sprinkled on theface of the scarves. With a small spoon with a long handle (soyou do not burn your hand), apply enough flux with to coverthe scarf, as well as beyond the scarf where the other scarf willjoin. (Figure 9, drawing). Cover the bars once again with coke.When you are finished fluxing the scarves, position them so theyare facing down in the fire.
Notes:
One of the biggest mistakes beginners make in welding is notapplying the flux back far enough on the bar where the bars willbe fused.
Some smiths prefer to flux all sides of the scarves, while otherssimply apply flux to the scarf faces. The theory behind fluxing allsides of the bar is to insure that all surfaces are free from scale, aswell as to increase the burning temperature of the bar. The barcan and will burn if allowed to get to a full sparkling white heat,at which point the flux will also burn off. The bars likely will notweld at this high temperature. Also, the molecular structure ofthe material will break down, creating a weaker joint, and oftenan unsightly weld.
Figure 8: Blunt scarf makes seam difficult to blend
Figure 7:Top– shouldered and stepped scarf. Bottom– Curved tip.Shoulder prevents scarf from overlapping beyond upset area when
scarfs are quickly placed together.Figure 5
Figure 6
FALL 2004 13
CO N T ROLLED HAND FORGING
If you choose to flux all sides of the scarves, turn the bar 90degrees only after you are certain the flux has adhered to thescarf surface. You will know when this happens, as the flux willbe the same color as the bar. If one bar gets hotter than theother, move it to the side of the fire where the fire is cooler, orreduce the air blast further.
Fluxing the scarves in the fire keeps them hot, and reduces theamount of scale formed, therefore shortening the time it takes toproduce the weld. Removing the bars from the fire to flux thescarves is not necessarily wrong, as many smiths prefer this pro-cedure, and do so successfully. Sometimes, fluxing in the fire isvirtually impossible (i.e. welding a wagon wheel tire.) In thesecases, removing the bar from the fire is necessary.
Always keep coke on top of the bars when not in the act of flux-ing.
Tip: Rub soapstone or chalk on the face side of the bar to indi-cate direction of the scarf face when pulling the bars from thefire.
Step Seven: Welding the bars
Have your hammer at the anvil in a position to grab it quickly.The scarves are at a welding heat when they are at a yellow-whiteappearance in color (Often referred to as a “welding heat.”)Make sure the scarves are heated well beyond the shoulder wherethe mating bar will join. Some smiths wait to see just a fewsparks coming from the fire, indicating the piece is just startingto burn. This is not necessary, and can lead to burning the tipsoff of the scarves.
Tip: If you are not sure if the pieces are at a welding heat, gently
touch the pieces together in the fire. If they want to stick, almostlike a magnet, they are probably ready to weld. With experience,this touching in the fire will not be necessary.
SAFETY : When welding, molten sparks fly from the bars which canburn others, as well as you. Alert others in the area when performinga weld, and make sure other items in the shop that are flammableare protected from the sparks. Some smiths wear a protective leatherapron when welding to prevent their clothes from burning. You andanyone else present should be wearing eye protection with side shieldsat all times. After welding, be aware of the possibility of fire causedfrom stray sparks in the surrounding area i.e. shop rags, charcoal, drywood, etc. These items and others ignite easily from molten metal
Figure 9:Fluxed face heated from below.
Some other forms of bar end scarfs. The 90º shoulder on the scarfdescribed in the text will aid in quick alignment of bars to be
welded, preventing overlap beyond upset material.
Figure 10
CO N T ROLLED HAND FORG I N G
14 HAMMER’S BLOW
and flux spattered from the forge welding process.
Bring the pieces out of the fire, rotating one piece 180 degrees sothat the scarf is facing up. Place the bar with the face up on thecenter of the face of the anvil, coming in from the far side of theanvil. (This bar should be in your hammer hand.) Place theother bar on the near edge of the anvil, with the scarf off theface, pointing up at about a 45 degree angle. (Figure 10, photo).In a hinging fashion, lower the scarf down onto the opposingscarf, keeping contact with the edge of the anvil to control theaccuracy of the placement of the scarf (Figure 11, photo) andpress down on the opposing scarf. The heels of the scarvesshould be placed together as shown. (Figure 12, photo). Pressdown hard enough so you can release the bar in your hammerhand.
Release the bar in your hammer hand, grab the hammer, andstrike firmly in the center of the joint. Forge the entire joint rap-idly with six or seven blows. Make sure you forge the thin tip ofthe scarf as it will cool rapidly. Next, flip the now welded bar180 degrees to forge the opposite side. Hit six or seven blows onthe entire joint and then turn the bar 90 degrees and repeat fiveor six more blows on the joint. Flip the bar 180 degrees and hitthe joint once again five or six blows. Repeat as necessary, neverforging colder than a medium orange heat.
Note: Dark spots on the joint indicate cooling of the materialand will not weld there. This may be caused by too low of a
heat, or inadequate fluxing. These areas must be fluxed again,returned to a welding heat, and forged to fuse the joint.
While welding, keep in mind that you do not want to forge thecross section of the joint down beyond the parent stock size.Also, be careful not to forge beyond the joint as this will reducethe cross section of the bar beyond the parent stock size.
With a properly executed weld there will not be any "dark spots"or evidence of a scarf. If there is evidence that the weld is notcomplete, flux the open seams of the joint, and take anotherwelding heat. Remove the bar from the fire, and forge downcarefully, so as not to greatly reduce the cross section of the barbeyond the parent stock size.
Note: Timing is important. If you take to much time getting thepieces from the fire to the anvil, you may lose too much heat toweld the bars together. To increase your proficiency, you maywant to take a few "practice runs" by removing the bars whilecold from the fire pit positioning them on the anvil as describedin Step Seven. Do this until you are comfortable with the proce-dure. You will then be able to release the bar from your hammerhand and grasp the hammer without the bar falling to theground.
Tips:
-Some fluxes, such as EZ Weld brand, are very aggressive andmay adhere to the metal after the weld has been completed. Toremove it, take another welding heat, remove the bar from thefire, and scrub vigorously with a stiff wire brush. Flux is harderthan a file, so do not try to file the flux off, as it can ruin yourfile.
-A lighter hammer of 1 1/2 to 2 pounds may work better than alarger hammer. With a lighter hammer, the hammer can beswung faster, and more accurately. Also, the chance of forging
Figure 13: Bars for practice weld– no alignment of scarfs.
Figure 11
Figure 12
Figure 14: Top– thin areas due to loss of material from burning, toolittle upset, or over-hammering, must be upset. Bottom– remaining
bulge must be drawn down to dimension.
FALL 2004 15
CO N T ROLLED HAND FORG I N G
down beyond parent stock size is reduced with a smaller ham-mer, as you will not have the heavier force of the larger hammer.
-You may want to first practice a more simple weld to get used tothe properties of forge welding. The faggot weld is a simple,crude weld which has no end preparation (no scarves.) Try bend-ing a 3/16" x 3/4" piece in half and weld the last 3/4" of the endof the bars together. (Figure 13, drawing). Be extra careful whenperforming this type of weld, because the larger surface areacauses more molten flux and sparks to fly from the joint.
Step Eight: Refining the weld (If necessary)
If the cross section of the joint is still larger than the parent stocksize, place the bar back in the fire and bring the joint to a weld-ing heat. Remove the bar from the fire, and carefully forge thejoint back down to the parent stock size.
Potential problems and solutions:
If the weld is properly executed, the joint is invisible, the bar hasno bulges or "necked in" spots, and has sharp 90 degree corners.(Figure 14, See drawing of bulge and necked in spots). To refinethe bulge, proceed as described in Step Eight.
If the bar is necked in it will be more difficult to fix. The portionof the bar where it is necked in is taken to a welding heat, andthen upset (refer to Lesson Seven) back to the parent stock size.A poorly executed weld will begin to come apart or fail entirelyin the upsetting process.
If a parallelogram was formed at the joint, first upset the joint,then take another heat and forge down the acute angles slightly.(As explained in Lesson One.) Then carefully reduce to the par-ent stock size.
Targets:
-The scarf is produced in one heat.
-The weld is completed in one to two heats, and the jointreturned to the parent stock size.
-The joint is to be square in section with sharp corners, nonecked in areas, and no bulges. You can check your accuracywith a pair of calipers. Check for squareness with a steel square.
-The welded bar is to be straight, have no twist, be free of fluxresidue and the bar should have no visual evidence of a seam.
More examples of forge welding from Cyril Colnik
Teaching Tapes
NC Tool
WINTER 2005 11
CO N T ROLLED HAND FORG I N G
by Jay Close
Illustrations by Tom Latané, photos by JayClose and Jane GuldenLesson # 11- Drawing Down- Part One
Definition: Reducing the cross-sectional area of a bar.
Lesson: Resizing a 1/2-inch square bar into a 1/4 by 5/8-inch rec-tangular bar by hitting the bar “on the flat.”
Intent: This lesson is a first practical experience in hand forging.
The student's primary mission is to strive for good technique:proper fire maintenance, good heat selection and use, and relaxedand effective hammering.
After familiarity with the process, the student should be comfort-able working a bar linearly, from one end to the other, with min-imal reheating of finished sections.
The student will also practice correcting twist and crookedness inthe bar and gain experience working to given dimensions.
Tools: Basic tools are needed. Include a straight edge and a dou-ble caliper. Lacking a double caliper, two outside calipers can besubstituted. Set one caliper to 1/4 inch, the other caliper to 5/8inch.
Hint: An easy way to repeatedly set your calipers accurately is toset them to an unworked bar of the target dimension. Collect anarray of short bar sections that become your shop’s standards forsetting caliper dimensions.
Make certain your hammer face is properly ground, withoutsharp corners.
Prepare two “winding sticks” from 1/4 by 3/4-inch bar asdescribed below. Feeler gauges will be helpful in evaluating thework, as will a dial caliper, if available.
Material: 1/2-inch square mild steel about 24 inches long.
Method: The bar is heated in sections and each section resized byhammering flat on the bar face. Each section is finished beforemoving to the next. Corrections to the bar are carried out asneeded. When half of the bar is resized, it is turned end-for-endand the resizing continued from the middle where the work leftoff.
1. The starting bar and the resized bar.
D rawing Down- Pa rt One
2. Properly ground hammer face
Table bracket by Jay Close. Every bar was resized from larger stock.
CO N T ROLLED HAND FORG I N G
12 HAMMER’S BLOW
Step One
Review the earlier discussions on hammer selection, theergonomics of forging, fire maintenance and shop safety.
Place the bar horizontally in the neutral part of the fire.
The tip of the bar will heat more quickly. Place it beyond thefire’s hot spot and let the heat of the bar radiate to the end.
To speed heating, keep the fire built up on the sides and keepthe bar covered with loose coke. You should still be able to mon-itor the heat of the bar through this coke layer.
Heat no more of the bar than you can work at any given ham-mering session, perhaps three or four inches of the bar.
At a yellow or light welding heat, get the bar to the anvil whereyour hammer is waiting. The bar will never be hotter and neverbe softer than when you first take it from the fire. DO NOTWASTE TIME GETTING TO WORK.
Hint: Set your hammer in the same place on the anvil and in thesame orientation, ready for each heat. This minimizes confusionand wasted time.
With the bar held horizontally and flat on the anvil, with the hotpart in the middle of the anvil face, hit FLAT, HARD, andRHYTHMICALLY.
Hint:: Regardless of the length of the heated section of the bar,only work on as much of the bar as you are able to completelyresize in one or two heats–probably no more than two or threeinches.
The first blow inevitably creates an offset or step in the bar onone side. Keep the bar horizontal.
Hit HARD four or five times on the top, then roll the bar 180degrees to work the surface that had been against the anvil.
Try to roll between hammer blows with no interruption of therhythm. Keep the holding hand relaxed to help you quickly andassuredly manipulate the bar.
When you flip the bar 180 degrees, the offset created by yourwork on the first face keeps the bar from sitting flat on the anvil.This is unavoidable, but your first blows on the new side willpush the metal down to contact the anvil.
Hold the bar horizontally. Resist any tendency to raise or lowerthe holding hand.
As the re-forged section lengthens you can sometimes hang theunworked section of the bar off the anvil face and still be work-ing toward the middle of the anvil. This will help you keep thebar horizontal.
Take four or five blows on the new face, then work the edges ofthe bar. Smooth them and note the effect of your hammerblows. You may need to adjust the strength of the blow becauseyou are hitting a narrower surface. On the other hand, if theseedge blows become too light, you risk the development of anI-beam cross-section to the bar. See the discussion in Part Two ofthis article under “Forging Dynamics,” in the next issue.
Work all sides of the bar. Alternate heavy flattening blows on thefaces of the bar with blows needed to refine the edges.
Develop a rhythm. For example: five hard blows on one face.roll the bar 180 degrees and hit five hard blows on the oppositeface. roll the bar 90 degrees, work the edge. roll the bar 180 degrees, work the other edge, and repeat.
Hint: The tip of the bar heats fastest and reshapes easiest. Thereis danger of over-thinning the end. Forge the tip when the bar isslightly cooler and offers more resistance.
If you reach an orange heat and are far from the target dimen-sions, put the bar back in the fire. Keep it soft.
Take a second heat on this section and continue forging.
Note: If you have been unable to complete a section of the bar bythe end of the second heat, think about why this is the case. Areyou not hitting hard enough? Perhaps you are spreading yourefforts over too much bar? Did you start at a yellow heat to max-imize softness and available time? Are you wasting time throughineffective hammering or taking too long to get to the anvil?
Intelligent analysis and self-correction are the foundations ofprogress as a blacksmith.
If you near finished dimensions at an orange heat, make a checkwith the calipers and continue working to a dull red. The bar ismuch stiffer now and resists shape change. That is fine forlighter, smoothing blows.
4. Step created by drawing part of the bar down. Bar is rotated180° and kept horizontal as drawing continues.
3. Bar placed in the fire horizontally, with the tipbeyond the hottest part of the fire
WINTER 2005 13
CO N T ROLLED HAND FORGING
The calipers should just slip onto the bar and glide over the sur-faces without rattle or feeling sprung open. With practice you geta sensitive feel for dimension by use of these simple tools.Remember, unless the caliper points are opposite each other onthe bar, they will not measure accurately.
As you smooth, pay more attention to the texture your hammerleaves. If you:
a) Maintain a clean, scale-free anvil face
b) Do not overheat the bar
c) Work all sides of the bar, and
d) Work all sides down to a dull red heat,
You can achieve a clean, hammered surface.
Often it is convenient when forging a long area to keep the ham-mer hitting in one spot on the anvil and work the bar back and
forth beneath it. This can be particularly effective when workingtoward a smoothly hammered surface.
Hint: You may notice that the side of the work held against theanvil (if the anvil surface is clean) often appears smoother thanthe flat you are hammering. The broad flat of the anvil naturallycreates a smoother finish than the hammer. Use this to youradvantage, working each flat equally against the anvil as the barapproaches dull red.
Use the available heat wisely. The first part of the heat when thebar is softest is for the major shape change, the latter part of theheat is to refine the shape, smooth the surface, straighten the barand get it ready to put back in the fire.
If this is your first experience at the anvil, the actual dimensionsyou achieve are almost irrelevant. You have been focusing on andlearning much else. If on your first try you have resized a sectionto an even rectangular shape with straight sides, this is asignificant achievement, but it is only the beginning.
After one or two repetitions of this lesson, set goals for yourself.Check each section as you complete it with the calipers and holdyourself to their target dimensions before considering a sectioncomplete. This is mostly a matter of self-discipline.
Final evaluation will wait until after the bar is cold.
If you have completed the first section, you can now heat thenext area. Work in a linear fashion, one section complete beforemoving to the next. This is a key to efficient forging.
In preparation for another hammering session, before the bargoes back in the fire, straighten it as best as you can. Put yourhammer in its “ready position,” put the bar back in the fire andfinally wipe the anvil surface clean of scale.
5-7. Working the face of the bar in the middle of the anvil,working the edge of the bar, and working the face
with the unforged bar off the anvil.
8-9. Top– proper use of the caliper with points opposite each other.Bottom photo shows a false reading.
CO N T ROLLED HAND FORG I N G
14 HAMMER’S BLOW
Step Two
When reheating, push the finished bar section through the fireinto a cooler part of the coals. Concentrate the heat on the areayou will be working.
With another yellow or light welding heat on the bar, continueforging the next heated section. Remember your rhythm:
hit HARD on the bar face four or five times.roll the bar and hit HARD on the opposite face.forge the edge, dressing it straight. roll the bar and forge the opposite edge, and repeat as needed.
After each session at the anvil, check dimensions. If oversize,keep forging. If undersize the bar can be upset to thicken it, butthat is another technique and another lesson. For now, take noteof your mistake and resolve to do better on the next section.
Keep the bar straight as you work. It makes manipulating the barless awkward.
As you feel more comfortable with the reshaping, set some goalsas you work. Determine how much of the bar you can completeto final dimensions in one or two heats. Once you can do thatconsistently, push your limits and see if by hitting harder orfaster or using a higher heat you can get more done. Disciplineyourself; challenge yourself.
As more of the bar is reshaped, watch for twist.
Note: Twist is the result of not holding the work flat on the anvil. The holding hand (left hand for the right-handed smith)rotates, raising the edge of the bar slightly off the anvil.Whenthis slightly raised edge is struck, the bar twists. If not corrected,multiple, small repetitive errors create a major deviation fromflat. Knowing how twist develops allows you to correct it as youforge: compensate with a purposeful cant to the opposite side.
Step Three
When half (or a bit more) of the bar has been resized, the endthat you started on will be at a black heat. Further cool that endin the slack tub.
Hint:: If you find that the end you hold gets uncomfortably hotas you work, cool it periodically in the slack tub. If this problemis chronic, you are taking too long to reheat the bar, allowing
more time for heat transfer. Remember:a) Heat in the hottest, neutral part of the fire.b) Keep the fire built up around the work.c) Cover the bar with loose pieces of coke; andd) Do not let the fire grow bigger than necessary.
Flip the bar end-for-end so that you are now holding the resizedend in your hand. Continue to work down the length of the barstarting where you left off in the middle, reforging section bysection until complete.
Targets
Shape targets
The bar must be straight. Without experience it is difficult tojudge this by eye. Use the straightedge as an eye-training tool.
Put the bar in the vise with one flat up. Hold the straightedge onthe flat of the bar and peer along the contact edge backlit by astrong light source, like a window. In even the best work you willnot notice full, light-blocking contact. What you should see is aneven pattern of contact from one end of the bar to the next.
Sometimes the straightedge rocks or pivots on a high spot. If a corresponding low spot exists opposite, then you have identifieda bend in the bar.
If the straightedge pivots on one flat and at the same relativeplace on the opposite flat, you have identified a bulge in the bar.This is more of a dimensional issue than a straightness one.
Take note of the width of any gaps between the straightedge andthe bar. The eye can see light through an opening as small as athousandth of an inch. A gap that is more than 4 or 5 thou-
10. Development of a twist as the result of not keeping entire barflat to the anvil face.
11. Checking with a straightedge– dramatic deviation on left, closeapproximation on right.
12. Deviation from straight on left because of bend, on right becauseof narrow portion in the bar.
13. Wide and narrow portions of a bar averaged along its axis.
WINTER 2005 15
CO N T ROLLED HAND FORG I N G
sandths can appear huge. We want to keep overall dimensionaltolerance to plus or minus 1/64 of an inch. Use the feeler gaugeto check the gaps. How small a problem can your eye easily see?
If you have such a large gap, check the area with your calipers.Does the gap exist because of a bend in the bar? Or does the gapexist because the bar is too thin at that spot? The bend can becorrected easily. The thin spot will need to be upset. For now itis best to “split the difference,” thinking about straightening thebar along an imaginary axis line so the mass is equally distributedaround that axis, regardless of “thicks and thins.”
Before doing any corrections, sight down the length of the barand test your eye judgment. Can you see the problems that thestraightedge picked up? If not, keep looking, using the straight-edge to guide you. Occasionally turn the bar and look from theother end.
Hint: Changes in thickness, a twist or an uneven edge of the bar can cause the eye to see a bend where none exists. Addressingthese problems is rarely a neat, step-by-step process. You willoften work back and forth among bends, twists and dimensionalproblems.
Do not become wedded to the straightedge and feeler gauges.Use them to train your eye so that you do not rely on them anymore, but the straightedge, in particular, will never be com-pletely discarded.
Test all four flats of the reshaped bar. The bar must be free oftwist.
Bends and twists are first cousins. Some bends are localizedtwists and a twist in the bar can easily deceive the eye into “seeing” a bend. Eliminate twist before doing your final correc-tions for straightness. The goal is to learn to see twist withoutaids, but until that time make use of a pair of “winding sticks.”A couple of straight sections of bars 1/4" by 3/4" and 8 or 10inches long will suffice.
Lock the workpiece in the vise, grabbing it on the edges with theface of the bar above the vise jaws. Balance one winding stick onthe upper face at one end of the bar and the other on the otherend. Sight over these sticks. Are they parallel to each other? Ifnot, the two areas where they lie on the bar are not in the sameplane, i.e., the bar twists. Move the stick at the far end of the bara couple of inches toward you and sight the sticks again.Continue testing the whole length of the bar. Without the wind-ing sticks can you see these twisted areas? Test yourself– it is theonly way to learn.
Dimension targets
In a simple resizing exercise such as this, you should be able towork to plus or minus 1/64" in width and thickness of the bar.In other words, there could be as much as 1/32" of an inch dif-
14. Testing with the feeler gauge.
15. Sighting down the bar to locate bends and help keep it straight.
16. Major problems like this are easy to see sighting down the bar,but more subtle ones become evident too. Can you see
the 2 sharper bends in this bar?
CO N T ROLLED HAND FORG I N G
16 HAMMER’S BLOW
ference between the thickest part of your bar and the thinnest. Use the calipers as your standard. Feel how they fit on the bar.Can you rattle the tips back and forth? If so, you are undersize.Perhaps you are evenly undersize. Compare the rattle at different
points along the bar. At the loosest spot, how thick a feeler gaugecan you readily slip between the bar and the point of the caliper?
Perhaps you have thick spots. The calipers slip over the bar butyou can feel them sprung open. Test along the bar. Get a sensefor the amount of spring necessary to use the caliper. This tellsyou in a relative way how much oversize you are.
If you have a dial caliper, use it to take measurements at severalplaces along the bar. What is the difference between your largestand smallest measurement? Is it greater than 1/32 of an inch?
On a cold bar use your fingers to feel for thick and thin areas.They can be more sensitive than your eyes.
The calipers, feeler gauges, straightedges and winding sticks aretraining tools. Can you see where the major problems lie with-out them? Work to identify these problem areas as you forge.
As an experiment, forge the first 3 or 4 inches of the bar care-fully to dimension, using the calipers as a reference. Then forgethe next section just trying to match the first by eye. Cool thebar and check your dimensions. You will be surprised at howclose you can get.
Texture targets
One of the hallmarks of skilled work is the quality of the ham-mered finish. On your resized bar you want a smooth, even tex-ture. No one hammer blow should jump out as distinct from therest. Likewise, the surface should be free of loose scale and fromevidence of overheating. Comparing your work to the photoswill be the best initial guide to evaluating its texture.
Time targets
For your first efforts, time is largely irrelevant. Going throughthis exercise a few times, you ought to be able to reforge twoinches of the original bar to final size in two heats.
This article will continue with Part Two- Straightening- in thenext issue of the Hammer’s Blow.
18. Sighting winding sticks to locate twist.
17. Winding sticks placed on a bar.
SPRING 2005 11
CO N T ROLLED HAND FORG I N G
by Jay CloseIllustrations by Tom Latané, photos byJay Close and Jane GuldenLesson # 11- Drawing Down- Part Two
Definition: Reducing the cross-sectional area of a bar.
Lesson: Resizing a 1/2 inch square bar into a 1/4 by 5/8 inch rec-tangular bar by hitting the bar “on the flat.”
Troubleshooting
Straightening
Straightening could be a lesson of its own. These comments willget you started.
For the sake of these directions, assume that bends, twists anddimensional issues are all independent problems that can beaddressed independently. This is far from the case in reality.
If you have kept the bar relatively straight as you worked it, littleadditional attention to this is needed at the end of reshaping.That needed attention can be done at room temperature.
Straightening is not a single operation but a series of correctionsstarting from the major working toward the subtle, a process ofprogressive refinement.
Approach straightening with a strategy. Some work from one endof the bar to the other. Some start in the middle and "chase" anycrookedness out to the ends. These approaches work well forsubtle correction.
Generally it is best to tackle the big problems first, then work onthe more subtle ones.
Decide which plane of the bar needs most correction. Startwhere the most work is needed, sorting out the major issues first.
In practice you will likely work back and forth, correcting prob-lems both on the edge and on the face.
Putting the bar on the anvil with the concave part of the bendup makes for ineffective straightening. The correcting blow justlevers the holding hand up. This works much better if the bar ishot.
D rawing Down- Pa rt Two
Areas to address for straightening.
Ineffective approach to straightening
Proper approach to straightening
CO N T ROLLED HAND FORG I N G
12 HAMMER’S BLOW
More effective is to place the bend with the convex portion up.The bend is supported on either side by the anvil creating a“bridge” effect. Then your correcting blow will drive the benddown and straight.
Experiment making your correction different places and orienta-tions on the anvil face. One correction might need to be angledacross the face to support a long, gentle curve. A more "spot"correction can be made with a sharp blow over the hardie hole.
When straightening, as in all forging, be decisive. Inspect yourwork. Decide where the problem lies and how to hold the workon the anvil to correct it. Take one, maybe two, correcting blowsat the appropriate spot and check your progress.
Avoid a multitude of random, light, pecking blows. Hit withauthority and immediately inspect your work. Always seek tomake the needed changes with as few hammer blows as possible.
Sometimes correcting one problem reveals another. In the casebelow, correcting one bend as illustrated shows there are reallytwo more bends that need addressing.
Once the bar is fairly straight along one plane, repeat thestraightening on the other. Recheck the bar for straightness andstart to work on more subtle problems. To accommodate theinevitable thick and thin places, and wide and narrow areas, keepin mind that the goal is the mass of the bar evenly distributedaround an imaginary center line.
Dealing with twist:
If you have kept after the twisting as you worked there will belittle remediation needed when finished.
A variety of small problems can mask a more subtle twist, so it isoften best to work on the small problem areas first. You can thenbe left with one or two gentle twists to correct at the last.
If the twist is localized so it can be supported on either side bythe anvil, treat it like a bend. Put the twist up and hit an author-itative corrective blow.
This kind of twist and this kind of correction will show that thebar is actually bent at that spot. After flattening the twist, youwill have to remove a bend.
For twists that can not be readily supported on either side by theanvil, the simple cant of the bar that worked well while the ironwas hot is unlikely to be effective cold.
Sometimes you must resort to the vise and a pair of tongs ortwisting wrench to eliminate twist. Situations will vary, butworking from the middle of the bar out to the ends is frequentlyconvenient.
Photo 11: Correcting a twist with a pair of tongs and the bar heldin the vise horizontally.
An isolated bend in an otherwise straight bar.
Secondary bends revealed after correction of the primary bend.
Correcting a localized twist.
SPRING 2005 13
CO N T ROLLED HAND FORGING
Hold the bar with the twist exposed just past the vise jaws. Placethe tongs or wrench at the point needed to make the correctionand bring the twisted bar in alignment. Hold the bar either verti-cally or horizontally, as seems most handy.
Texture
Your quest for a smooth, hammered texture on the bar beginswith where you heat it in the fire. Heat the bar in the neutralpart of the fire. If it is poked down into the oxidizing zone, youwill have increased scale and a smoothing challenge.
Do not overheat the bar. If your bar looks like a Fourth of Julysparkler when taken from the fire, you have pitted its surface andmade a smooth texture almost impossible, particularly if you arealready near final dimensions.
Hint:: If you should overheat a section of your workpiece, imme-diately cool it in the slack tub to below burning temperature andget to work. You may save the bar.
If your hammer face is too flat or has sharp edges, this too willmake a smooth texture challenging.
Keep the anvil free of scale as you work. If the bar comes fromthe fire excessively scaly, scrape it clean on the corner of the anvil using the hammer to apply downward scraping pres-sure. Do not take much time doing this as you are wasting thebest, softest part of the heat. But it is sometimes necessary. Awire brush could be employed, but that needlessly involves pick-ing up another tool and delays getting to work with the hammer.
Remember to work all sides of the bar. Not only is this criticalfor achieving the proper shape, but it means that scale is notbeing trapped between the work and the anvil where it canimpress an undesirable texture.
Finally, work the bar down to a dull red. The bar has stoppedscaling by then. This is your opportunity to work the surfacewithout troublesome oxide.
Photo 12: The bottom bar has been burned. The top bar has beenburned then slightly up set and reworked–
alas, the damage has been done.
Photo 13: The marks left on the bar came from thispoorly dressed hammer face.
Photo 13A: Can you see the corner that marked the bar?
Photo 14: Scraping along a sharp anvil corner to get rid of scalebefore forging. Use the hammer head to apply downward pressure.
CO N T ROLLED HAND FORG I N G
14 HAMMER’S BLOW
FORGING DYNAMICS
Cross-sectional area:
Comparing cross-sectional areas is a good way to compare themasses of two different bars or two different shapes. For exam-ple, suppose you wondered whether a bar 1/2-inch by 1/2-inchhad sufficient material to allow forging into a bar 1/4-inch by1-inch. Multiply the width times the thickness of each bar–
1/2-inch times 1/2-inch equals 1/4-inch
1/4-inch times 1-inch equals 1/4-inch
Each bar has the same cross-sectional area and it seems like youshould be able to get the needed 1/4 inch by 1 inch bar from theone that is 1/2-inch square.
However, hitting with the face of the hammer spreads the workall directions from the middle of the face. Material is usedstretching the bar longer as well as wider. In practice, you cannot readily forge 1/4-inch by 1-inch bar from another bar withequal cross-sectional area.
Work all sides. Achieving a smooth, hammered texture is not theonly reason to work all sides of the bar. It also helps to achievethe proper shape. The force of the hammer blow on the face ofthe bar is absorbed so that the force is not transferred all the waythrough. Were you to hit from only one side, particularly on athick bar, you would soon create a trapezoidal cross-section.
Photo 15: Four sections of re-sized bar exhibiting different textures.From left to right:
A. Smooth, even texture;
B. An acceptable texture from a hammer with a more radiused facethan the first example;
C. A fairly even texture but definitely not smooth;
D. A poor texture achieved by heating in the oxidizing part of thefire, not cleaning the anvil of scale, and not working all sides of thebar to a dull red heat.
Photo 16: A close up of "D".
Photo 16A : A close up of "C".
Photo 16B: A close-up of "B".
Photo 16C: A close up of "A".
SPRING 2005 15
CO N T ROLLED HAND FORG I N G
The I-beam effect:
You may notice the edges of your bar mushroom out, creating ahollow on the flat surfaces. The cross-section looks like anI-beam. This happens because you are working the edges (1) attoo low a heat, (2) hitting too lightly, or (3) with a combinationof the low heat and light hammering. The effect of your hammerblow is dramatically concentrating on the bar surface. The shapechange is not being forced into the middle of the bar. (See Photo18)
Ergonomic tips
Stand comfortably, weight on both feet evenly. Get close to theanvil so you can hit down on the work– you shouldn’t have toreach for it.
Don’t bend at the waist. It is hard on the back and makes yourface more vulnerable to the rebound of a misplaced hammerblow. The bend at the waist also limits the acceleration of yourhammer swing to a very small arc. An ineffective blow results.
Take long, smooth hammer strokes. As you raise your hammer,at the top of its swing it should be outside of your vision. If youcan see your hammer head at all times you are limiting its travel,its speed and the strength of its blow.
Do not keep a white-knuckle grip on the hammer. Propel thehammer forward, then hang on for the ride. Feel how the ham-mer rebounds and make use of the rebound to help bring thehammer back.
Use the handle length. If you must choke up on the hammerhandle, your hammer is probably too heavy for you. By using the
Photo 19: What is wrong with this picture? The bend at the waist ishard on the back. The face is more vulnerable to anything comingoff the anvil. The waist bend also minimizes the travel of thehammer, hammer speed and the power of the blow are negativelyeffective. The grip close to the hammer head suggests the hammermay be too heavy. The "choked” grip shortens the arc of hammertravel. and the power of the blow.
Photo 20: Do not be afraid of the the anvil. Step up close to it soyou are not reaching for the work, but can strike downward withauthority.
Cross-section of a bar becoming trapezoidalwhen hit only from one side.
Photo 18: A really bad case of the the I-beam effect.
CO N T ROLLED HAND FORG I N G
16 HAMMER’S BLOW
full length of the handle you increase the speed and the power ofthe blow.
RELAX
Above all pay attention to your body and what it is telling you.Hand forging is physical. If you are not conditioned, injuries area possibility even with the best technique. Warm up. Stretch andcontinue to stretch as you work. If it hurts, STOP! Evaluatewhat you are doing. Rest and recover. If problems persist, seekprofessional help.
Photo 21: Perhaps not the paragon of forge technique, this smith isstanding upright and is close to the anvil. He is gripping the handlenear its end. He has raised his hammer out of his field of vision andis thus beginning to maximize the effect of the hammer swing.
CanIRON V Registration is now being accepted for CanIRON V, AnnapolisRoyal, Nova Scotia, Canada. August 30 - September 2, 2005.Please check out our website at www.caniron.ca for full infor-mation. Scheduled participants include:
-Fred Crist, United States - demonstrations/lecture-Christoph Friedrich, Switzerland - demonstrations/lecture-David James, United Kingdom - demonstrations/lecture-Adrian Legge, United Kingdom - teaching station/lecture-John & Becky Little, Canada - demonstrations/lecture-Doug Newell, Canada - design workshops-Henry Pomfret, United Kingdom - teaching station-Brad Silberberg, United States - demonstrations/lecture-Kellysmyth, United States - lecture-Paul & Heiner Zimmermann, Germany - demonstrations/lec-ture-Clare Yellin, United States - lecture-Dark Ages Re-creation Company: Darrell Markewitz, DavidCox, Kevin Jarbeau, Canada-Viking age smelt and interpretation
As well as demonstrations, lectures and workshops there will bea Viking-age smelt and forging competition, outdoor auction,
oxen pull, vendor area, virtual gallery, CanIRON gallery exhibit(see below), and a closing night seafood dinner. All in the beau-tiful coastal community of Annapolis Royal.(For more information, contact: [email protected])
Ironwork Exhibition Call for SubmissionsIn association with the CanIRON V international black-smithing conference in Annapolis Royal, Nova Scotia, August30-September 2, 2005, ArtsPlace Gallery in Annapolis Royalwill be hosting an exhibition of contemporary ironwork fromAugust 14- September 11, 2005. We are soliciting submissionsfrom all interested blacksmiths who will be attending the con-ference. Anyone interested in participating in this exhibitionmust have his/her work (3 pieces maximum) at the ArtsPlaceGallery by August 7, 2005. Please include an artist statement. ArtsPlace GalleryP.O. Box 543 Annapolis Royal, NS B0S 1A0 Canada
We are also hoping to present this exhibition in Halifax, NovaScotia, in the fall 2005. The venue would be the Mary BlackGallery operated by the Nova Scotia Designer Crafts Council.
For information about the conference see:www.caniron.ca
FALL 2005 11
CO N T ROLLED HAND FORG I N G
by Dan Nauman
Illustrations by Doug Wilson Lesson #13
Definition:Cutting a hot bar using the hot cut hardy.
Note: A hot cut hardy has a cutting edge of about 25 to 30degrees. A cold cut hardy has a cutting edge of about 60 degrees.
Intent: To learn to cut through a round, square, or rectangularbar using the hot cut hardy on the anvil, making a clean andeven cut, with the resulting burr located in the center of thecross section of the bar. With the burr in the center of the bar, itwill make life easier for following forging operations such asupsetting the end of the newly cut bar.
It must be said here that this method is not necessary for all cut-ting applications. A bar can be cut faster (and easier) by drivingthe bar down into the hardy from one side. This procedure willleave a burr on one side of the bar, and will also create an anglededge on the end. This edge may be desirable in some circum-stances, i.e. starting a taper on the end of the bar, or an inten-tionally angled end of the bar to form a scarf.
Tools: Anvil; hot cut hardy; hammer; soapstone or chalk.
Material: 1/2" square x 12" mild steel.
Forging Dynamics: The angle of the cutting edge of the hardy isimportant when cutting hot metal. With the narrower cuttingedge of the hot cut hardy at 25 to 30 degrees, the material beingcut will not only distort less, but the act of cutting will be morerapid. The wider 60 degree cutting edge of a cold cut hardy willtend to distort the material, i.e. creating a wide v-notch, and alsopotentially reducing the cross section of the bar from the addi-tional hammer blows necessary to drive the bar through a thickwedge.
Step One
Measure 2" from the end of the bar and mark that distance withsoapstone on the bar. Place the cold bar on top of the hot cuthardy edge, with the 2" mark directly above the cutting edge.Turn the bar up onto its corner, With your hammer, strike thebar down onto the hardy, hard enough to make a good nick.This nick will be used to indicate where the bar will be cut whenhot. (For alternative marking methods, see "Notes" at the end ofthis lesson.)
Caution: Nicking the corner of a bar on a hot cut hardy as in themanner of Step One could damage your hardy’s cutting edge if youare using cold rolled steel. Cold rolled steel (as milled) is harder thanhot rolled steel of the same type. Once heated, or normalized, thecold rolled steel’s properties match that of hot rolled steel.
Also, this method is never a good idea if forging high carbonsteel. Review the alternative marking methods at the end of thislesson, and use good judgement.
Step Two
Heat the area to be cut to a yellow heat. Place the bar on thehardy, and move the bar back and forth to find the nick. Turnthe bar onto its flat side (side "A") and hit a solid blow.
Cutting a Bar
A hardy, with the cutting edge parallel with the anvil ’s edge.
The hammer correctly placed over the bar and hardy .
CO N T ROLLED HAND FORG I N G
12 HAMMER’S BLOW
Note: Keep the bar parallel to the face of the anvil, and 90degrees to the hardy, at all times during this process.
Turn the bar 45 degrees (right or left), and strike again lightly tomark the corner. Continue to turn the bar in the same directionto mark the next face with a sharp blow.
Reversing the direction you have previously turned the bar, turnthe bar back to side "A", and then turn 45 degrees and lightlynick the corner. Proceed in the same direction to the next face,and mark this face with a sharp blow.
Next, turn the bar 90 degrees to the fourth face. Look down atthe bar from a bird’s eye view, and you should be able to line upthe nicks on the bar with the cutting edge of the hardy. Onceyou have lined up the nicks, proceed to strike the bar solidly.
Continue rotating the bar to each face, and continue cuttinginto the bar. Cut until the thickness of the area uncut is roughly1/8".
Note: Do not cut the bar all the way through….as you may severthe bar, and you may damage both your hammer as well as thehardy. Severing the bar could also send the very hot, cut-end ofthe bar sailing across your shop.
Step 3
There are several methods to break off the end of the bar. Youmay:
A.) Hold the short end of the bar with tongs or hammer andbend up and down or twist until the end breaks off.
B.) Shear the end of the bar by lining the cut up with the faredge of the anvil and strike down on the protruding end withyour hammer.
C.) Quench the area cut with water. This will mildly harden thebar so that the bar can be snapped off easily.
Targets:
–You should be able to cut the bar in one heat.
–The cut should be even. No "corkscrewing" or misalignment ofcuts.
–The bar should remain straight.
–The burr left on the end of the bar should be centered in thecross section of the bar.
Notes:
Some alternatives to nicking the bar on the hardy to mark wherethe bar is to be cut:
A.) For shorter cuts, you can draw a line on the face of the anvil.The line should indicate the length of bar you wish to cut.Measure from the near side edge of the anvil with chalk, soap-stone, or for longer lasting lines, a felt-tip pen. Place the end ofthe bar even with the chalk line. Use the edge of your hammerface to indicate the line to be cut by lining it up with the edge ofthe anvil (with the hammer on top of the bar). Now carefullybring the bar and hammer to the hardy. Line the hammer edgeup with the cutting edge of the hardy. Apply some downwardpressure so the bar does not slide off the mark. Strike solidly andproceed as indicated in the lesson.
B.) Some smiths prefer to use a center punch, and others a chiselto mark where bar is to be cut. If using a center punch, makesure the punch mark is deep enough so that you can see it whenyou bring the glowing bar out from the fire.
C.) For marking cold rolled or high carbon steels, use soapstoneto mark the cut, then take an initial low heat (bright red). Thesoapstone mark should still be easily seen at this temperature.Nick the bar, (with a hardy, chisel, or center punch) then reheatto make the final cut as outlined in this lesson.
Weighting one end of the bar with the hammer to twist the bar.
Alternate method of holding the short end with tongsto twist the bar.
SPRING 2006 11
CO N T ROLLED HAND FORGING
Text by Bob Freddell,
illustrations by Tom LatanéLesson #15- Forge an eye on the end of a bar.
Definition: Altering the centerline of a bar..
Intent: To learn to forge a well rounded eye to a specific diame-ter.
Tools: Anvil, hammer..
Material: 3/8" square x 24" mild steel.
Note
The reader is referred to two earlier articles in the ControlledHand Forging series: (1) Bending Bar Stock by Jay Close,Hammer's Blow, Vol. 11, # 2, Spring 2003, (2) Drawing,Punching and Bending by Peter Ross, Hammer's Blow, Vol. 11,#3, Summer 2003. Read these articles. They detail the forgingdynamics and the process of bending bar stock. The directionsin this lesson are not as comprehensive as the two previous les-sons.
Step One
The formula to determine the length of material needed for theeye is:
Inside diameter of the eye + thickness of the stock x π = lengthof stock.
OR
2"+ .38"x 3.14 = 7.5", or 71/2".
The numbers for this lesson are written using decimals. If youprefer to use fractions, 3 1/7" is used for π and 3/8" for stocksize.
Tip: If you are overwhelmed by the mathematics, the same infor-mation can be gleaned from a full sized sketch of the finishedeye. Use a piece of wire or string along the median circumferenceof the sketch to get the needed stock requirement for the bend.Or step it off with dividers set at, say, 1/2 inch. Lifting dimen-sions from a drawing is an important skill to develop. Manyforms– such as scrolls– will not readily submit to a mathematicalapproach.
Center a punch mark 7 _" from the end of the bar. There ismore than one way to hold the bar while center punching. Itmay be placed in the corner of the anvil's step, or set on the visewith the jaws opened to slightly less than the diameter of thebar.
Step Two
Heat the entire 7 1/2" portion of stock, plus about another inch,to light yellow.
a.) Place the punch mark at the far rounded edge of the anvilwith the punch mark facing to the side where you can see it andkeep track of it.
Be certain to keep the bar stock horizontal and flat to the anvilface.
Strike next to the bend–not near the tip of the bar, and bend thebar down 90º. As you do this you will probably note two
counter bends.
b.) The portion of the heated bar on the face of the anvil willlikely have lifted slightly off the anvil in a counter curve. This iscaused by the edge of the anvil acting as a fulcrum. As you strikedown on one side, the bar levers up on the other. Forge downthis unwanted counter bend without reducing the bar dimen-sion.
If you have directed your bending blows near the bend itself, youwill likely notice the tip of the bar curving up. The inertia of thebar’s end is tending to keep it stationary as the remainder of thebar is forced to bend. The result is a curve like a reversed "J". Donot straighten this! Use it in the next step.
Making the first bend and correcting the counter bend.
B e n d i n g
CO N T ROLLED HAND FORG I N G
12 HAMMER’S BLOW
Step Three
Go to the anvil horn quickly to use the same heat as in StepTwo.
Flip the bar over with the bent portion pointing up.
Raise the hand holding the bar high so you can place the tip ofbar horizontally on the anvil horn.
The tip should extend over the horn about 1/4". You have ahead start if the tip already has a slight bend (see Step Two).
To make it curve, strike the hot bar that extends beyond thehorn. You are working on the side of the horn that is furthestfrom the smith. Do not pinch the bar between the hammer andhorn, as that will not bend it. That will only reduce its dimen-sions by drawing it out.
Continue to feed the bar across the horn in short increments ofabout one half of an inch. Never strike the bar twice in the sameplace. Continue working in this manner until the hammerblows approach the point of the initial 90 degree bend of Step
Two.
Inspect your progress frequently. Are you bending a sufficientcurve? Is the curve too tight? You may need to go back to analready bent section of the eye for correction. Alter the positionof your holding hand– raising it or lowering it–- so that the cor-recting blow is as near vertical as possible.
Sometimes the eye seems to spiral like a coil. Pay attention tohow it contacts the horn and how you hit it. Remove the coileffect with a flattening blow or two on the anvil face.
Note: A common error is to hold the hammer at such an anglethat the hammer edge strikes the hot bar making unwanteddents. Only the hammer face is to strike the hot bar.
Depending on how the eye is forming, you may find it necessary
to flip the eye so the termination is on the top-side of the horn.In this orientation the bending hammer blows will come on theside of the horn nearest the smith.
Note- Making such a bend is really a matter of approximationsand on-going corrections.
With experience, this step can be completed in one heat.However, the beginner should work for control and accuracy, notspeed.
The eye is now formed, but may need further refinement.
Troubleshooting and corrections
-Look at the eye you have formed. Make mental notes if it is nottrue to your specifications. It may exhibit "kinks" where the
Progressive bends form the eye.
Returning the eye to the proper plane.
Eye flipped to an area of insufficient bend.
Opening a kink– eye contacts horn at points A, struck at point B,resulting in movement at C.
SPRING 2006 13
CO N T ROLLED HAND FORGING
curve is too tight and "flats" where it is too gentle.
-To remove a kink, with the eye heated to a light orange, placethe high spot of the kink on the top of the horn where the hornis wide enough to support the eye on either side of the kink.Sometimes you need to angle the work on the horn to get such abridging effect with a small diameter. Strike the top of the kink,then make a note of any change of shape, i.e. not enough, toomuch, or just right.
-To remove a flat spot, place the flat spot on the top of the hornso that the flat spot is supported. Gently strike the eye on thefar side of the horn slightly past where the bar contacts the horn.
Check your progress. Is the adjustment better, worse or justright?
-These techniques are also used to adjust the tip of the eye tomeet the parent stock.
-You may need to raise or lower the holding hand as needed topresent the correction conveniently to the hammer.
-The handle and its alignment with the eye may need correction.If so, first straighten the handle so you can accurately read its
relationship to the eye. Once the handle is satisfactory, assess itsalignment to the eye. The handle must point straight to the cen-ter of the eye.
-If the eye is out of alignment, proceed by heating the area of theinitial 90 degree bend. Lay the handle across the anvil with the
bend on the far rounded edge and the eye placed so that any off-set is up. Forge it down into alignment and then make any smallcorrections to the eye and handle that may be needed.
Targets:
-The eye has a 2" inside diameter, and has an error of no morethan 1/16".
-The end of the bar that forms the eye is to touch the bend atthe handle.
-No twists, kinks, or flat spots.
-The handle is to point directly to the center of the eye.
Removing a flat spot– eye contacts horn at point A, struck at pointB, resulting in movement at C.