28
CPR Coastal Passage Raft OWNER'S Manual

CPR Coastal Passage Raft
OWNER'S Manual

This publication is issued as the owner's manual for the Switlik Coastal Passage Raft, model CPR-1140-( ).
All rights reserved. Copyright © 2013 by Switlik Parachute Company, Inc.
This manual may not be reproduced in whole or in part, by any means, without permission. For information, address all questions to:
Switlik Parachute Company
1325 E. State Street Trenton, NJ 08609
(609) 587-3300 (609) 586-6647 FAX www.switlik.com

Table of Contents
TOC
Chapter Page
WARNINGS 1 Description 2 Launching 4 Righting the Raft 6 Boarding 7 Heaving Line 8 Knife 9 Combination Valves 10 Arches/Canopy 11 Survival Equipment 15 Buoyancy Tube Redundancy System 18 Servicing 20 Storage 21 Survival Tips 22

WARNINGS
1
WARNING! Read these instructions fully before use. Failure to comply with instructions may result in injury or death.
WARNING! This device must be used in accordance with the instructions in this manual for maximum performance. Failure to comply with instructions could result in a lower level of performance or in failure of the device, which could result in death. Under some circumstances, even if used properly this device may not save your life.
WARNING! Do not attempt to open the raft container except for an actual emergency. Tampering with the raft can prevent the raft from working when it is actually needed. If the raft appears to have been tampered with, return the raft to an Authorized Service Center for servicing.
WARNING! If the raft is packed in a valise, store the raft in a cool, dry place. If the raft is packed in a hard container, the use of a cradle is recommended, and the container oriented with the drain holes on the bottom facing the deck for proper drainage.
WARNING! This raft requires periodic maintenance to ensure operation in an emergency. Do not use this raft if it has not been properly maintained. See “Servicing” section for additional details.
WARNING! Never use a raft that has obvious damage. Return the raft to an Authorized Service Center for servicing.

Description
2
The Switlik Coastal Passage Raft is a lightweight (40 lbs), single-tube life raft providing a minimum of 1,140 lbs of buoyancy.
Reinforced Boarding Ladder
Independently-Inflated
Canopy Arches Air Inflation System
Bright Orange Canopy
SOLAS-grade Reflective Tape
Exterior Light
Lifeline
Weighted Water Pocket

Description continued
3
Features:
Convertible Canopy System.
Manually-operated, gas-inflated canopy arches are not directly connected to the main buoyancy tube, improving the integrity of the raft.
Configurable canopy allows for 360° visibility. Canopy can be configured from furled to fully enclosed, or
anywhere in between. Oral-inflation tubes, with attached deflation caps, allow the
arches to be raised or lowered as needed. Bright orange canopy color, with strips of SOLAS-grade
reflective tape, aids in rescue. Water-activated light on top of canopy can be seen up to a
mile away and lasts for over 8 hours. Compressed air inflation system.
Improved low temperature performance. Gauge on inflation valve head remains accessible, even
when packed, allowing for a quick systems check. Buoyancy Tube Redundancy System allows you to regain the original buoyancy of the life raft even after the main tube is torn or punctured. Four conveniently located boarding ladders make boarding fast and easy. Lifelines, with highly-reflective patches, located inside and outside the raft. 4 weighted, water pockets provide stability in rough water, and for boarding or disembarking the raft. Reduced-volume packing in a hermetically-sealed bag allows for a 5 year service interval.
Launching
4
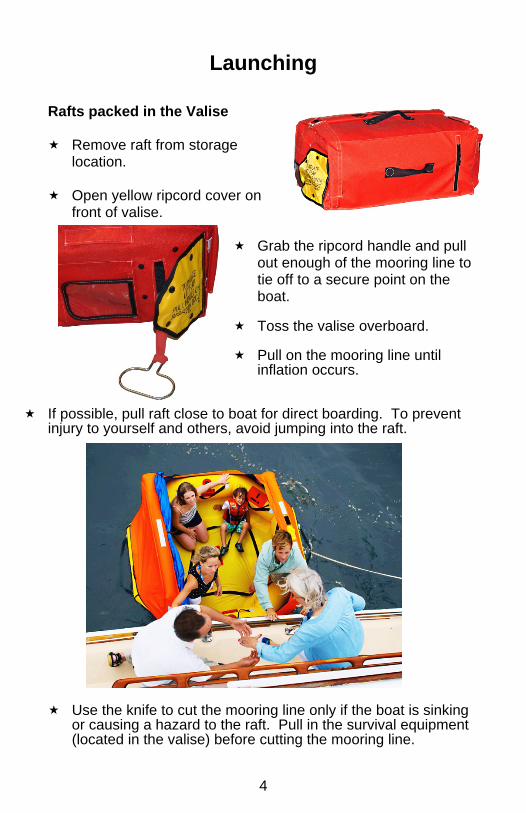
Rafts packed in the Valise Remove raft from storage
location. Open yellow ripcord cover on
front of valise.
Grab the ripcord handle and pull out enough of the mooring line to tie off to a secure point on the boat.
Toss the valise overboard. Pull on the mooring line until
inflation occurs.
If possible, pull raft close to boat for direct boarding. To prevent injury to yourself and others, avoid jumping into the raft.
Use the knife to cut the mooring line only if the boat is sinking
or causing a hazard to the raft. Pull in the survival equipment (located in the valise) before cutting the mooring line.

Launching continued
5
Rafts packed in the Hard Container If you need to manually deploy the
raft, or your raft does not have a hydrostatic release, first make sure the painter line (coming out of the raft container) is secured to the cradle or a strong point on the boat.
Pull the red release cord at the front of the tie-down cables.
Lift the container from the
cradle and throw it overboard.
Pull the painter/mooring
line until inflation occurs. The first 3 feet of the line is a stainless steel cable, followed by red, 1” webbing.
If possible, pull raft
close to boat for direct boarding. To prevent injury to yourself and others, avoid jumping into the raft.
Use the knife to cut the mooring line only if the boat is sinking
or causing a hazard to the raft. Pull in the survival equipment before cutting the mooring line.
Righting the Raft
6
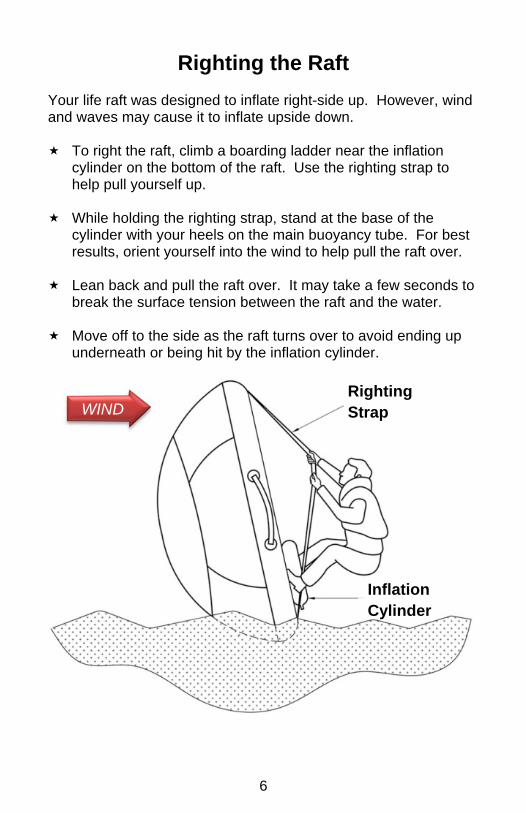
Your life raft was designed to inflate right-side up. However, wind and waves may cause it to inflate upside down. To right the raft, climb a boarding ladder near the inflation
cylinder on the bottom of the raft. Use the righting strap to help pull yourself up.
While holding the righting strap, stand at the base of the
cylinder with your heels on the main buoyancy tube. For best results, orient yourself into the wind to help pull the raft over.
Lean back and pull the raft over. It may take a few seconds to
break the surface tension between the raft and the water. Move off to the side as the raft turns over to avoid ending up
underneath or being hit by the inflation cylinder.
Inflation Cylinder
WIND Righting Strap

Boarding
7
The CPR raft has 4 boarding stations, however, with the canopy furled, the raft can be boarded at any point around the raft. The preferred boarding method is to enter the raft directly from the distressed vessel, staying as dry as possible in the process. To prevent injury to yourself and others, avoid jumping into the raft. Water pockets, located on the bottom of the raft, keep the raft stable allowing even a single person to board from the water without the threat of capsizing. Once in the raft, occupants should move away from the point of boarding and find a place to sit, with their backs against the main buoyancy tubes. At least one of the occupants should remain at the point of boarding to assist others in boarding.

Heaving Line
8
A heaving line with a throwing ring is attached to the buoyancy tube. Use this line to help pull in survivors having difficulty getting to the raft.
When not in use, coil the line up and place it, along with the throwing ring, in its holder.
Knife
9
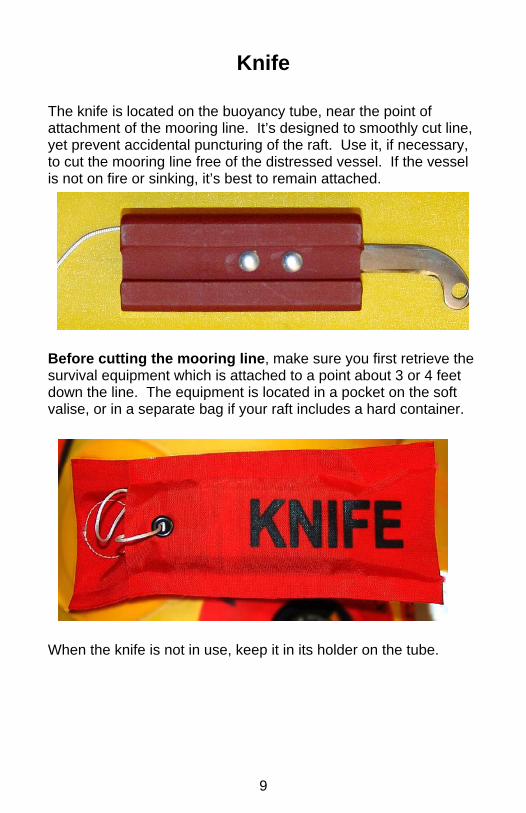
The knife is located on the buoyancy tube, near the point of attachment of the mooring line. It’s designed to smoothly cut line, yet prevent accidental puncturing of the raft. Use it, if necessary, to cut the mooring line free of the distressed vessel. If the vessel is not on fire or sinking, it’s best to remain attached.
Before cutting the mooring line, make sure you first retrieve the survival equipment which is attached to a point about 3 or 4 feet down the line. The equipment is located in a pocket on the soft valise, or in a separate bag if your raft includes a hard container.
When the knife is not in use, keep it in its holder on the tube.
Combination Valves
10
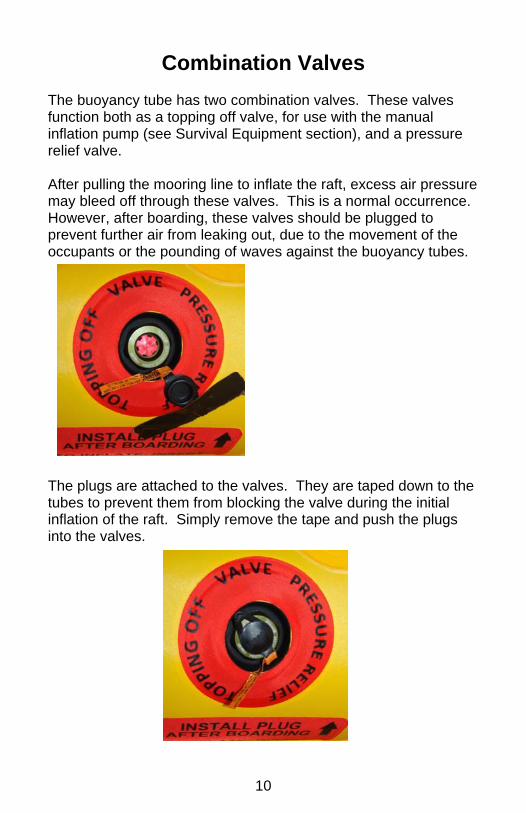
The buoyancy tube has two combination valves. These valves function both as a topping off valve, for use with the manual inflation pump (see Survival Equipment section), and a pressure relief valve. After pulling the mooring line to inflate the raft, excess air pressure may bleed off through these valves. This is a normal occurrence. However, after boarding, these valves should be plugged to prevent further air from leaking out, due to the movement of the occupants or the pounding of waves against the buoyancy tubes.
The plugs are attached to the valves. They are taped down to the tubes to prevent them from blocking the valve during the initial inflation of the raft. Simply remove the tape and push the plugs into the valves.

Arches/Canopy continued
11
Two, independent arches are used on the raft canopy. Each arch is furled and secured with furling ties to the buoyancy tube. The canopy should remain furled until everyone has boarded the raft.
When the canopy is needed, release the furling ties and pull the beaded inflation handle located on each arch. Pull in the direction indicated on the cylinder cover.

Arches/Canopy continued
12
The canopy top is furled to one of the arches. Release the furling ties and close the zipper to completely enclose the raft.

Arches/Canopy continued
13
There are 2 zipper pulls on the canopy top. They can be used to make side openings in the canopy, if desired. Furling ties are provided to hold these doors open. These openings allow for 360° visibility and good ventilation to help minimize sea sickness.

Arches/Canopy continued
14
Each arch also contains an oral inflation tube. These tubes can be used to add pressure to the arches when needed. Remove the black cap and blow air into the arch, then place the cap back on when finished.
To deflate the arch, pull the black cap off the oral tube, invert the cap and push it back into the end of the oral tube. This will hold the oral valve open. When deflated, place the cap back on the end of the oral tube to prevent water from entering.

Survival Equipment
15
The following survival equipment is included with your raft: A water-proof, LED flashlight, powered by hand-cranking or
an integrated solar panel.
When charging by hand-cranking, wind the handle about 3 revolutions per second. If charging with the solar panel, leave the flashlight in direct sunlight for 8 hours for a full charge. The flashlight has 3 different settings. Press the side switch once and 1 LED illuminates. Press it again, and all 3 LEDs illuminate. Press it again, and all 3 LEDs start flashing. Press the switch one more time, and the LEDs shut off.

Survival Equipment continued
16
A repair clamp kit. This kit includes 2 repair clamps. These
clamps can be used to repair tears in the buoyancy tube.
1. Loop cord around your wrist to prevent loss. 2. Dip plug in water to make insertion easier. 3. Push bottom plate through hole in tube (if hole is too small,
carefully enlarge, so the plate can be inserted).
4. Pull bottom plate back against inner tube and slide top
plate over screw, against outer tube surface. 5. Adjust plug to cover hole completely, and hold it in place. 6. Screw down wing nut firmly.
Survival Equipment continued
17
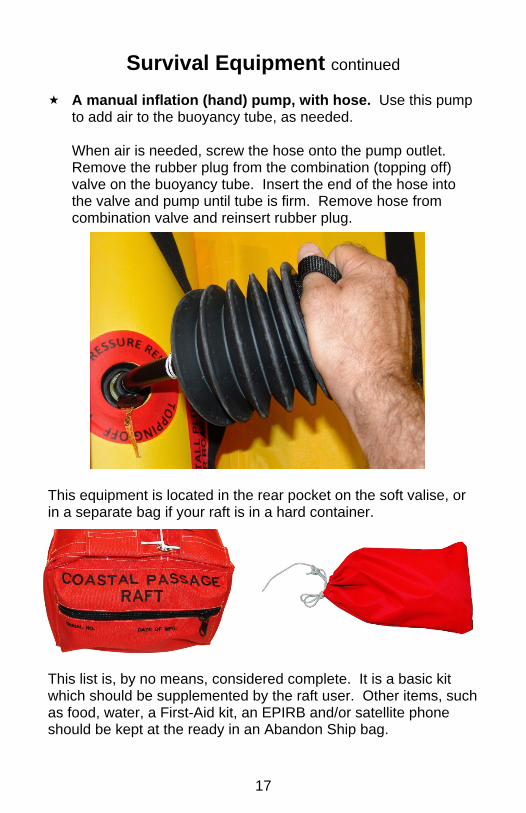
A manual inflation (hand) pump, with hose. Use this pump
to add air to the buoyancy tube, as needed.
When air is needed, screw the hose onto the pump outlet. Remove the rubber plug from the combination (topping off) valve on the buoyancy tube. Insert the end of the hose into the valve and pump until tube is firm. Remove hose from combination valve and reinsert rubber plug.
This equipment is located in the rear pocket on the soft valise, or in a separate bag if your raft is in a hard container.
This list is, by no means, considered complete. It is a basic kit which should be supplemented by the raft user. Other items, such as food, water, a First-Aid kit, an EPIRB and/or satellite phone should be kept at the ready in an Abandon Ship bag.

Buoyancy Tube Redundancy System
18
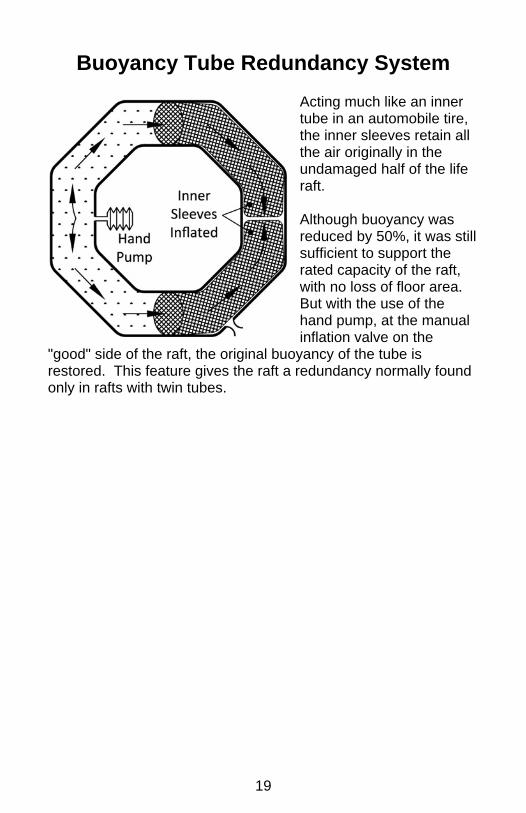
This Switlik raft provides two separate chambers within the buoyancy tube by using two internal sleeves, which are each closed at one end. The open ends are attached to the inside of the buoyancy tube at the same position where bulk heads would normally be found. Upon inflation of the life raft, these internal sleeves lie flat and deflated on the bottom of the raft buoyancy tube, because air pressure through the entire interior of the buoyancy tube is equal.
Should there be an irreparable leak in either buoyancy chamber of the raft, the air will escape from that chamber, resulting in greater relative pressure in the good chamber. This pressure forces both inner sleeves towards the half of the buoyancy tube from which air is escaping until they meet end to end.
Buoyancy Tube Redundancy System
19
Acting much like an inner tube in an automobile tire, the inner sleeves retain all the air originally in the undamaged half of the life raft. Although buoyancy was reduced by 50%, it was still sufficient to support the rated capacity of the raft, with no loss of floor area. But with the use of the hand pump, at the manual inflation valve on the
"good" side of the raft, the original buoyancy of the tube is restored. This feature gives the raft a redundancy normally found only in rafts with twin tubes.

Servicing
20
Life raft assemblies and their equipment should be inspected/ tested periodically to ensure their safety and effectiveness in an emergency situation.
At the start of every trip, it’s a good idea to inspect the gauge on your raft to ensure it’s operational. On valise packs, the gauge can be checked through a zippered opening on the right-hand side. On hard container packs, check the gauge through the window provided. The gauge should read approximately 3,000 psi. If the gauge reads below 2,500 psi, return the raft to an authorized service center for servicing.
In addition to this on-board inspection, your raft should be thoroughly inspected and tested at regular intervals. The frequency of these intervals starts from the date of manufacture. The CPR Life Raft must be serviced every 5 years by an authorized service center. Check the factory website, www.switlik.com, for an authorized service center near you.
Storage
21
Valise-packed rafts should be stored out of the weather, but close enough at hand to be retrieved quickly in an emergency. Rafts in hard containers should be mounted in a cradle, which is secured to the deck. The container should be oriented so that the drain holes are facing down, allowing unobstructed drainage. When the raft is stowed off the vessel, it should be placed in a cool, dry area away from excessive heat. The ideal storage temperature is between 60º F - 70º F with no more than 50% humidity. The maximum storage temperature must not exceed 160º F. The raft must also be protected against vermin, sunlight, acids, gasoline, fuel oil, and other chemicals or their fumes which may contaminate the material. Flotation systems should not be stood on end nor stacked. They should always be raised off the ground.
Survival Tips
22
Seven Steps to Survival
From AMSEA: The Alaska Marine Safety Education Association
Recognition - admit that your life is in danger. Act! Inventory - decide what can help and hurt. Do First Aid. Shelter – preserve body heat with insulating materials. Signals – help rescuers find you. Water – take as much as you can carry. Food – don’t eat if you don’t have water. Play – stay busy and keep a positive attitude.
Hypothermia
Symptoms:
may include shivering, confusion, poor coordination, unconsciousness
are often hard to see severely hypothermic victims may look dead; treat them
anyway Treatment:
keep trying if conditions indicate the possibility of hypothermia, treat for it handle the victim very gently check for breathing and pulse; do CPR if necessary get the victim out of weather and remove wet clothing put victim in thermal protective aid and lay body to body


1325 E. State Street Trenton, NJ 08609
(609) 587-3300 (609) 586-6647 FAX
www.switlik.com
Manual P/N S-4358-1, revision A, dated 8/13.


