12
Codemotion Bluemix Lab Building a Micro-Service System Using IBM DevOps Services and Bluemix March 28 th 2015
Codemotion Bluemix Lab
Building a Micro-Service System Using IBM DevOps Services and Bluemix
March 28th 2015
3
Notices and Disclaimers
Copyright © 2015 by International Business Machines Corporation (IBM). No part of this document may be reproduced or transmitted in any form without written permission from IBM.
U.S. Government Users Restricted Rights - Use, duplication or disclosure restricted by GSA ADP Schedule Contract with IBM.
Information in these presentations (including information relating to products that have not yet been announced by IBM) has been reviewed for accuracy as of the date of initial publication and could include unintentional technical or typographical errors. IBM shall have no responsibility to update this information. THIS document is distributed "AS IS" without any warranty, either express or implied. In no event shall IBM be liable for any damage arising from the use of this information, including but not limited to, loss of data, business interruption, loss of profit or loss of opportunity. IBM products and services are warranted according to the terms and conditions of the agreements under which they are provided.
Any statements regarding IBM's future direction, intent or product plans are subject to change or withdrawal without notice.
Performance data contained herein was generally obtained in a controlled, isolated environments. Customer examples are presented as illustrations of how those customers have used IBM products and the results they may have achieved. Actual performance, cost, savings or other results in other operating environments may vary.
References in this document to IBM products, programs, or services does not imply that IBM intends to make such products, programs or services available in all countries in which IBM operates or does business.
Workshops, sessions and associated materials may have been prepared by independent session speakers, and do not necessarily reflect the views of IBM. All materials and discussions are provided for informational purposes only, and are neither intended to, nor shall constitute legal or other guidance or advice to any individual participant or their specific situation.
It is the customer’s responsibility to insure its own compliance with legal requirements and to obtain advice of competent legal counsel as to the identification and interpretation of any relevant laws and regulatory requirements that may affect the customer’s business and any actions the customer may need to take to comply with such laws. IBM does not provide legal advice or represent or warrant that its services or products will ensure that the customer is in compliance with any law.
Information concerning non-IBM products was obtained from the suppliers of those products, their published announcements or other publicly available sources. IBM has not tested those products in connection with this publication and cannot confirm the accuracy of performance, compatibility or any other claims related to non-IBM products. Questions on the capabilities of non-IBM products should be addressed to the suppliers of those products. IBM does not warrant the quality of any third-party products, or the ability of any such third-party products to interoperate with IBM’s products. IBM expressly disclaims all warranties, expressed or implied, including but not limited to, the implied warranties of merchantability and fitness for a particular purpose.
The provision of the information contained herein is not intended to, and does not, grant any right or license under any IBM patents, copyrights, trademarks or other intellectual property right.
• IBM, the IBM logo, ibm.com, Bluemix, Blueworks Live, CICS, Clearcase, DOORS®, Enterprise Document Management System™, Global Business Services ®, Global Technology Services ®, Information on Demand, ILOG, Maximo®, MQIntegrator®, MQSeries®, Netcool®, OMEGAMON, OpenPower, PureAnalytics™, PureApplication®, pureCluster™, PureCoverage®, PureData®, PureExperience®, PureFlex®, pureQuery®, pureScale®, PureSystems®, QRadar®, Rational®, Rhapsody®, SoDA, SPSS, StoredIQ, Tivoli®, Trusteer®, urban{code}®, Watson, WebSphere®, Worklight®, X-Force® and System z® Z/OS, are trademarks of International Business Machines Corporation, registered in many jurisdictions worldwide. Other product and service names might be trademarks of IBM or other companies. A current list of IBM trademarks is available on the Web at "Copyright and trademark information" at: www.ibm.com/legal/copytrade.shtml.
4
Contents Introduction 5
Preparing Bluemix 5
Setting up the Nginx proxy 6
Forking Nginx proxy project 6
Setting up the delivery pipeline 6
Writing the first NodeJS micro-service 7
Adapting the code 7
Inspecting the structure 8
Setting up the delivery pipeline for Bluemix deployment 8
Hooking up the micro-service to the proxy 8
Enabling Facebook authentication 9
Registering Facebook OAuth client 9
Enabling authentication code 9
Switching to Redis session store 10
Adding another NodeJS micro-service 11
Forking the ‘Page 2’ project 11
Adding the new micro-service path to the proxy 12
5
Introduction
Welcome to the managed Codemotion Rome 2015 lab, where you are going to build a micro-service
system using NodeJS, Nginx, Redis, Facebook OAuth2 and other technologies using solely IBM
DevOps Services for development, and deploy it to IBM Bluemix PaaS. The fact that we only need a
browser for this is amazing and shows the power of both platforms.
Important: There are certain preconditions for participating in the lab:
1. You need to have an IBM ID and a Bluemix account (http://bluemix.net). If not, sign up at
ibm.biz/Bluemix2015 for both.
2. Once you have your IBM ID, you can use it to sign in into IBM DevOps Services
(http://hub.jazz.net). Verify you can do it before starting the work.
3. For the authentication portion of the lab, you need to have a Facebook account (I know,
crazy). You can use it to create a Facebook app and its credentials at
http://developers.facebook.com .
This lab assumes you have basic understanding of JavaScript and NodeJS, as well as Web
development.
The purpose of this lab is to gradually build a small micro-service system using techniques such as
UI composition and federated authentication. We will build it step by step, with success checkpoints
along the way.
Preparing Bluemix
Before we start writing applications and deploying them to Bluemix, we want to make sure we have
an organization and space where we will deploy our apps and services.
1. Log into the Bluemix dashboard
2. Verify that the organization you received as part of your trial account is being selected (top
left)
3. You should have at least one space created (dev). This is the space we will use to deploy all
our apps.
4. Select the ‘US South’ region in the top right drop-down menu and create a new space if
required (dev).
6
Setting up the Nginx proxy
We will proxy all the micro-services so that we have a feel that we are running a single app. We will
use Nginx for this purpose.
Forking Nginx proxy project
Start by forking a project in IBM DevOps Services (IDS in short):
1. Log into https://hub.jazz.net/. You should end up in the page called ‘My Stuff’.
2. Switch to ‘Explore’ and enter ‘codemotion-proxy-start’ in the search field. A single project
should appear. Follow the title link to go in.
3. Locate the ‘FORK PROJECT’ button in the upper right section, and press it. A dialog should
appear.
4. Name the project (use something that can also be useful as an app name and first segment
in the URL domain).
5. Leave it public, or make it private to you, deselect ‘features for Scrum development’, and
select ‘Deploy to Bluemix’ checkbox.
6. Chose the Bluemix ‘US South’ region, the org and space you previously set up.
Once the project has been forked, you will be in the project overview page. Click on ‘Edit Code’ to
switch to the Web IDE.
Before setting up the pipeline, make sure all code changes are committed:
1. Switch to the Source Control view in Web IDE (second tab on the left nav bar),
2. If there are changes, add some summary, Select All, Commit, and then Push (on the left side
of the screen). You should get the ‘Fast Forward’ green notification that the push succeeded.
3. Remember these steps – we will need to repeat them every time we change code so that the
code is committed to Git and picked up by the delivery pipeline.
Setting up the delivery pipeline
Observe the file ‘index.html’ – it contains some boilerplate text to show us we have Nginx running.
Now switch to ‘Build & Deploy’ button in the upper right corner of the page.
1. After reading the ‘Welcome’ message, you can close the panel. Click on ‘ADD STAGE’.
7
2. Accept the defaults on the first page of the dialog. Select ‘Jobs’ and ‘Add Job’. Pick ‘Build’
from the list, select ‘Simple’. Also name the stage (e.g. ‘Build’) and Save.
3. Add a new deployment stage by repeating steps (1) and (2), only this time select ‘Deploy’ as
the job type. Name the stage (e.g. ‘Deploy’).
4. Verify that the org and space are correct.
5. Modify the deploy script as follows, to specify a custom buildpack and allocate 128MB to the
application (instead of the default value of 1GB):
cf push "${CF_APP}" -m 128M -b https://github.com/cloudfoundry-community/staticfile-buildpack.git
6. Save.
Kick-start the pipeline by pressing the ‘Play’ button at the top of the Build stage. If all goes well, the
build will quickly finish, followed by automatic deployment to the domain <my app
name>.mybluemix.net
Verify the deployment by navigating to http://<my-app-name>.mybluemix.net. You can also switch to
Bluemix and observe the app running in the designated space.
Writing the first NodeJS micro-service
Go to Explore page and search for ‘codemotion-node1-start’ project. When you find it, click on it and
fork it into your own. Again, pick a name that will be useful for both the Bluemix app name and the
URL domain (e.g.: ‘IC2015-<initials>-Home’).
Adapting the code
You need to make changes to the forked project in several places:
1. Click on ‘package.json’ and change the name to reflect your app name it’s not already done.
2. Click on ‘manifest.yml’ and do the same for the app name, and host name (the first segment
of the URL before mybluemix.net).
3. Go into /config/app.json and change all occurrences of <app1-name> to your chosen
route/app name as specified in manifest.yml. Also change all occurrences of <proxy-name>
to the route name we picked for your Nginx proxy app.
4. Switch to the Source Control and commit and push all the changes as before.
8
Inspecting the structure
Take some time to inspect the structure of the project. This service is designed to have dual-purpose
– it serves two pages (/ and /about) and also serves the shared header (this header is going to be
reused by all micro-services). Shared header is served from /header path.
Some sections of the code are commented out now (mostly authentication and session sharing). We
will change that later on.
Setting up the delivery pipeline for Bluemix deployment
Repeat the delivery pipeline configuration.
1. When configuring the builder, select ‘Simple’ as before.
2. Configure the deployment stage by making sure org and space selections are correct. Accept
the default choices for the rest.
3. Build and deploy. When done, navigate to the app URL to verify it is working.
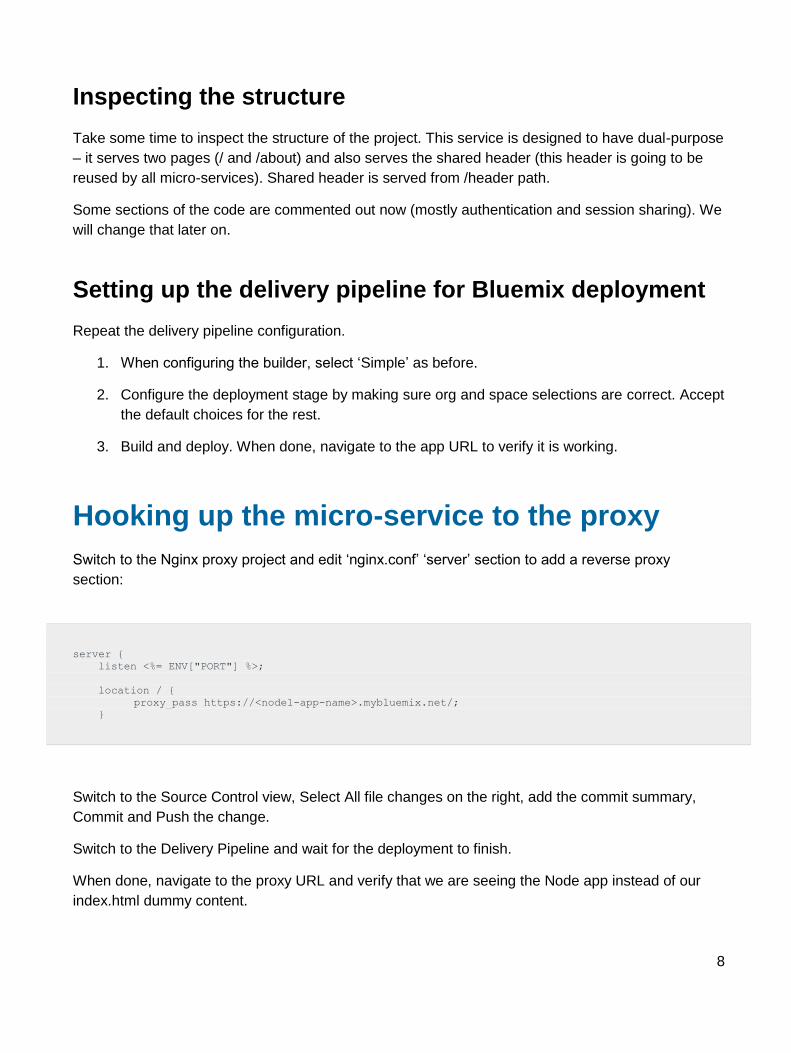
Hooking up the micro-service to the proxy
Switch to the Nginx proxy project and edit ‘nginx.conf’ ‘server’ section to add a reverse proxy
section:
server {
listen <%= ENV["PORT"] %>;
location / {
proxy_pass https://<node1-app-name>.mybluemix.net/;
}
Switch to the Source Control view, Select All file changes on the right, add the commit summary,
Commit and Push the change.
Switch to the Delivery Pipeline and wait for the deployment to finish.
When done, navigate to the proxy URL and verify that we are seeing the Node app instead of our
index.html dummy content.
9
Enabling Facebook authentication
We now want to enable authentication that is already part of the Node app.
Registering Facebook OAuth client
Before proceeding, we need to obtain credentials from Facebook.
1. Log into Facebook and navigate to http://developers.facebook.com
2. Click on ‘My Apps’ in the header and select ‘Add new app’
3. Select ‘Website’ from the list of choices (the last one)
4. Select ‘Skip and Create App ID’ in the upper right
5. Select ‘Settings’ on the left, then ‘Advanced’ at the top
6. Scroll down to ‘Security’, ‘Valid OAuth redirect URIs’
7. Enter the direct URL of your node App (https://<app-name>.mybluemix.net) as well as
proxied URl (https://<proxy-name>.mybluemix.net). Save changes.
8. Go back to ‘Basic’ and copy ‘App ID’ and ‘App Secret’ values. You need to copy them into
‘/config/auth.json’ file in our NodeJS into ‘client’ and ‘secret’ properties.
Enabling authentication code
Go into app.js and uncomment the sections that are currently commented (but only those marked
with ‘Uncomment to enable authentication’. Once done, switch to Source Control and commit/push
the changes to Git.
Switch to the Delivery Pipeline and wait the deployment to finish.
Navigate to your proxy URL and click on ‘Login’ link in the upper right. Verify that log in works and
that you are now rendered in the authenticated state, with your profile picture showing and the body
of the Home page showing your user name.
10
Switching to Redis session store
We now want to switch from in-memory to Redis session store. Before using it, we will need to bind
a Redis service to our app.
1. Go to Bluemix Dashboard and navigate to your Node app running in our org and space.
2. Click on ‘Add a service’ button to open the catalog.
3. Chose ‘redis’ service from Web and App category (last service in the list).
4. Ensure that Space and App in the upper right of the service page is your space and app.
Press ‘Create’. Wait for the app to restage.
5. Switch to Web IDE and open app.js. Scroll down near the end where session is configured.
6. Comment the lines marked with ‘Comment this to disable memory store’
7. Uncomment the lines marked with ‘Uncomment this to enable Redis store’
8. Switch to Source Control view, Select All, add summery, commit and push.
9. Switch to the Build & Deploy and wait until the app has been deployed.
10. Navigate to the proxy URL and verify that authentication still works as before.
11
Adding another NodeJS micro-service
The demo so far has everything working vertically, but it is needlessly complex for just one micro-
service. We will now add another and it will become clear why the complexity was needed.
Forking the ‘Page 2’ project
We will start by creating a new project by forking the existing Node micro-service project written to
provide ‘Page 2’ for the micro-service system:
1. Go to ‘Explore’ and search for a project with a name ‘codemotion-node2-start’
2. Navigate into it and fork it. As before, give it a name that can be used as a unique app name,
and also as a first segment of the URL.
3. Switch to Code.
4. Edit ‘manifest.yml’ to change the app, route name and enter the name of the name of the
Redis services you have created for the node1 application (so it will be automatically bound
to the second application):
---
applications:
- name: <node2-app-name>
host: <node2-app-name>
domain: mybluemix.net
memory: 128M
instances: 1
path: .
command: node app.js
services:
- <redis-service-name>
5. Edit ‘/config/auth.json’ and copy Facebook app ID and secret from the first micro-service.
6. Edit ‘/config/app.json’ and change the header URL property to use the domain of your own
NodeJS app serving the header (the first one we created). Also change the references to
‘codemotion-proxy’ to the name of your proxy app.
7. Now switch to the Source Control page and commit and push these changes to the Git repo.
8. Switch to the Delivery Pipeline and configure the builder to ‘NPM’, add a stage and configure
it to deploy to your org and space.
9. Request a build and wait until it finished deploying.
12
10. Go to Bluemix dashboard and bind the app to the same Redis instance as the first page app.
Adding the new micro-service path to the proxy
Navigate to your proxy project, go into Web IDE and open nginx.conf. Add the line to proxy the
‘page2’ path:
location / {
proxy_pass https://<node1-app-name>.mybluemix.net/;
}
location /page2/ {
proxy_pass https://<node2-app-name>.mybluemix.net/page2/;
}
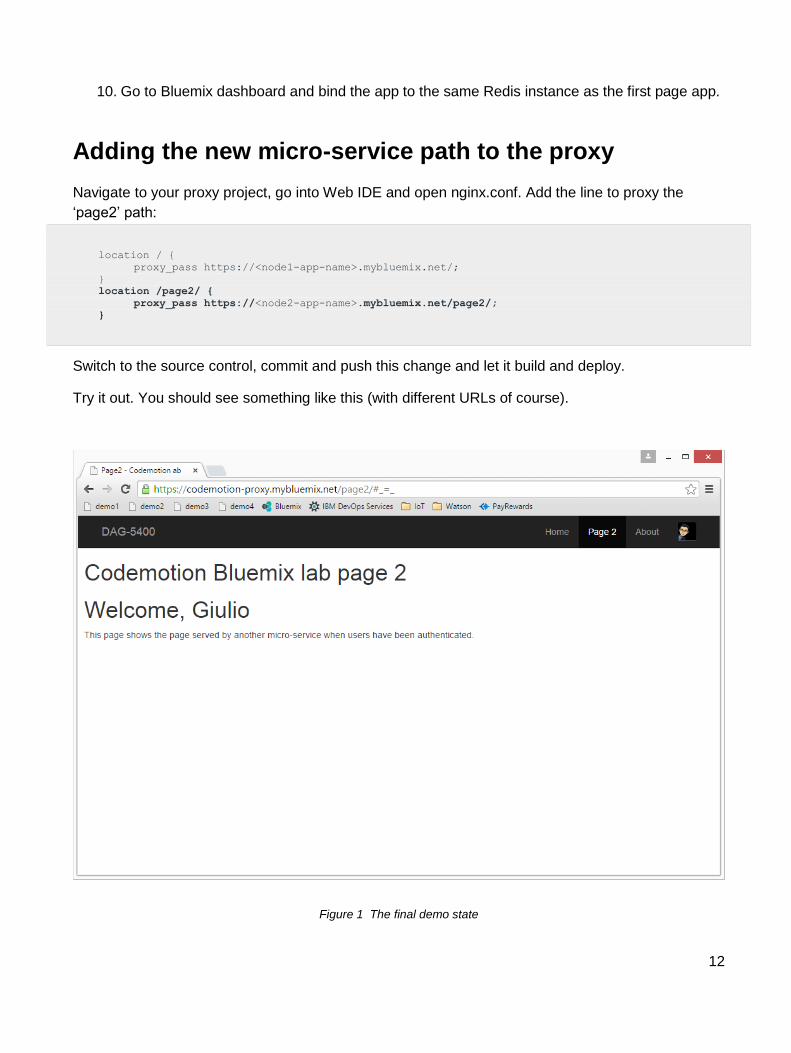
Switch to the source control, commit and push this change and let it build and deploy.
Try it out. You should see something like this (with different URLs of course).
Fall
Figure 1 The final demo state

13
Congratulations – you have built a micro-service system with Nginx proxy, two Node micro-services
and session backed by Redis store.
You can now go and build a real-world site using these ideas. Have fun during the rest of
Codemotion Rome 2015!


