13
CODESYS Beginners Tutorial Getting started with CODESYS Version: 1.3 Last updated: 15/05/2017 Author: Noor Mufti
CODESYS Beginners Tutorial
Getting started with CODESYS
Version: 1.3
Last updated: 15/05/2017
Author: Noor Mufti
CODESYS
Beginners
Tutorial
Version: 1.3
Index
CODESYS Beginners Tutorial index Introduction ..................................................................................................................................... 1
Objectives..................................................................................................................................... 1
Prerequisites ................................................................................................................................ 1
How to write your first program in XSoft – CODESYS 3 ................................................................... 1
Step 1: Preparing the environment ............................................................................................. 1
A) Open the development environment (IDE) ......................................................................... 1
B) Create a new Project ........................................................................................................... 1
C) Identify the project .............................................................................................................. 2
D) Set the Project device and language ................................................................................... 3
Step 2: Write the program ........................................................................................................... 3
A) Open the project.................................................................................................................. 3
B) Select PLC_PRG (PRG) .......................................................................................................... 4
C) Write the program ............................................................................................................... 4
D) Name the Contact................................................................................................................ 5
E) Add a coil to the program .................................................................................................... 6
F) Name the coil ....................................................................................................................... 7
Step 3: Run this program ............................................................................................................. 8
A) Enter Simulation mode ........................................................................................................ 8
B) Once you are in simulation mode ........................................................................................ 8
C) Create the application on the device ................................................................................... 9
D) Run the simulation. ............................................................................................................. 9
E) Manipulate the values ....................................................................................................... 10
F) See how Button1 effects Bulb1 .......................................................................................... 11
Conclusion ...................................................................................................................................... 11
CODESYS
Beginners
Tutorial
Version: 1.3
Page 1 of
11
Introduction This tutorial is designed for aspiring programmers who wish to learn more about
industrial and physical computing using the open source platform; CODESYS.
More information about CODESYS can be gained from the Smart Software Solutions (3S)
website www.codesys.com.
Objectives In the course of this tutorial you will learn how to:
• Create and save new CODESYS projects
• Implement and control physical elements in a virtual environment
• Run virtual simulations to test your programme
• Have the confidence to further explore the programming environment
Prerequisites There is no need for previously proven software development skills in order to
successfully complete this tutorial. All that is required is a licenced (including a Demo
licence) copy of CODESYS version 3.5 or higher, and basic computer literacy.
How to write your first program in XSoft – CODESYS 3
Step 1: Preparing the environment
A) Open the development environment (IDE) Double click on the XSOFT icon to open the software.
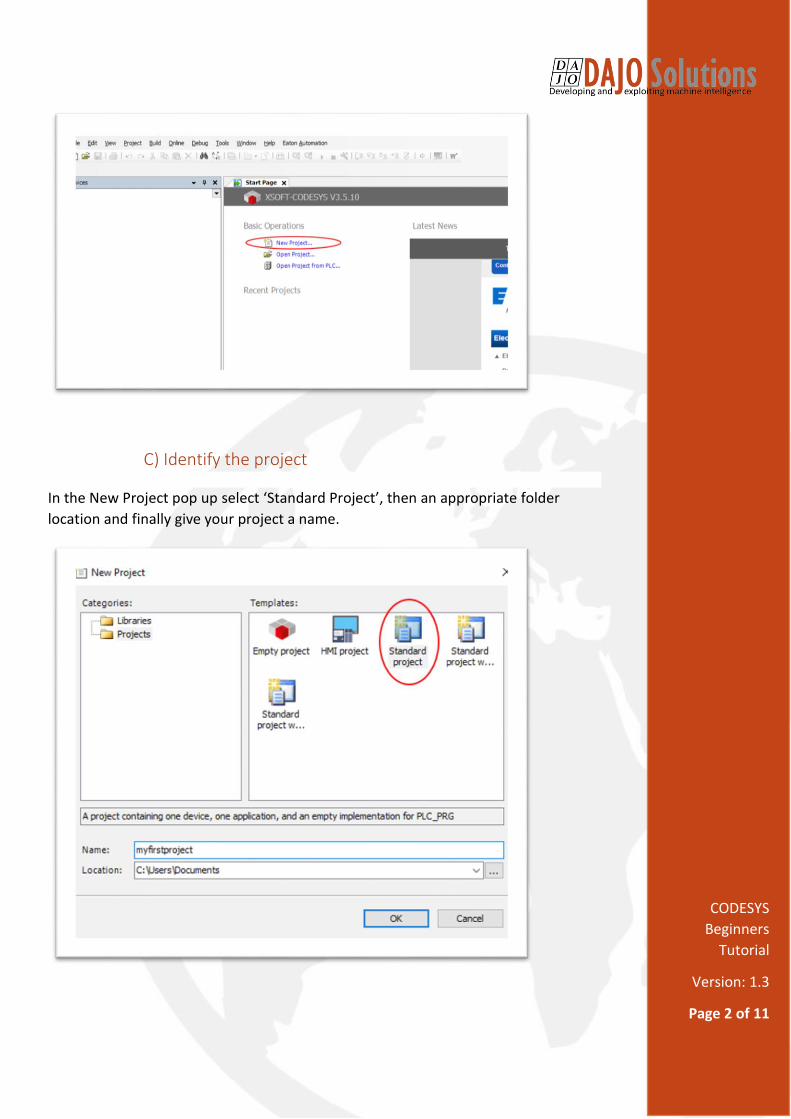
B) Create a new Project Within the homepage of the application select New Project…
CODESYS
Beginners
Tutorial
Version: 1.3
Page 2 of 11
C) Identify the project
In the New Project pop up select ‘Standard Project’, then an appropriate folder
location and finally give your project a name.
CODESYS
Beginners
Tutorial
Version: 1.3
Page 3 of 11
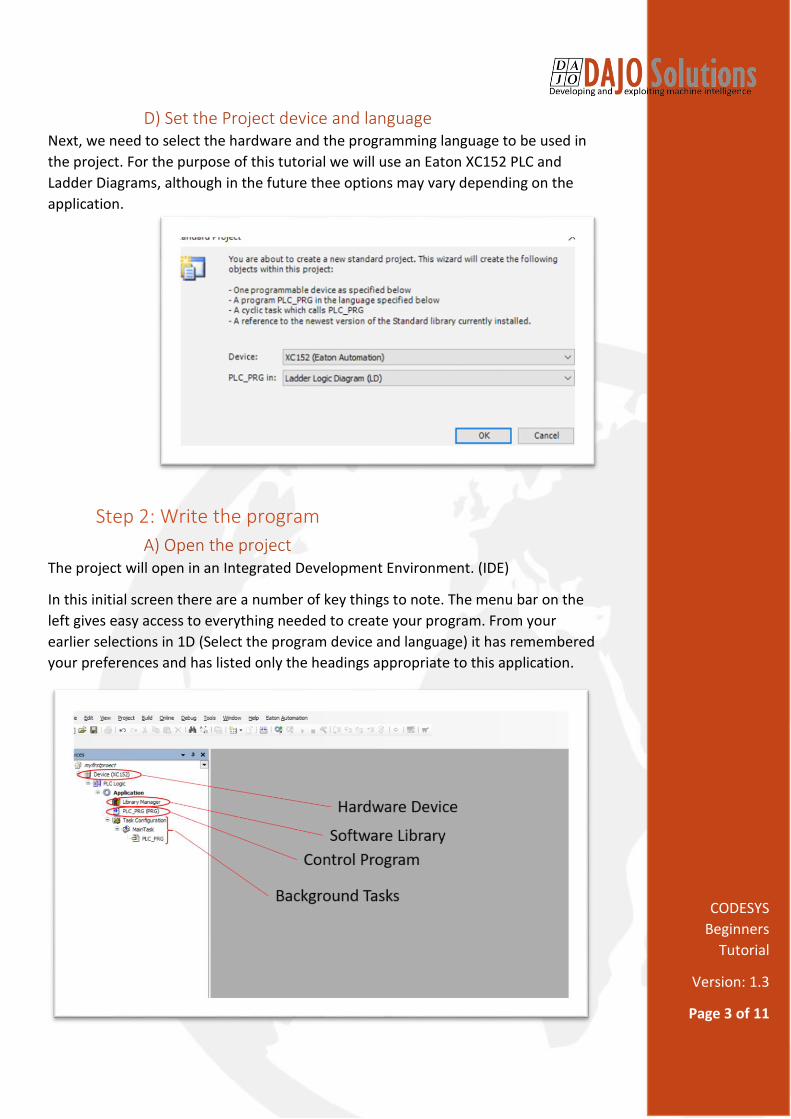
D) Set the Project device and language Next, we need to select the hardware and the programming language to be used in
the project. For the purpose of this tutorial we will use an Eaton XC152 PLC and
Ladder Diagrams, although in the future thee options may vary depending on the
application.
Step 2: Write the program
A) Open the project The project will open in an Integrated Development Environment. (IDE)
In this initial screen there are a number of key things to note. The menu bar on the
left gives easy access to everything needed to create your program. From your
earlier selections in 1D (Select the program device and language) it has remembered
your preferences and has listed only the headings appropriate to this application.
CODESYS
Beginners
Tutorial
Version: 1.3
Page 4 of 11
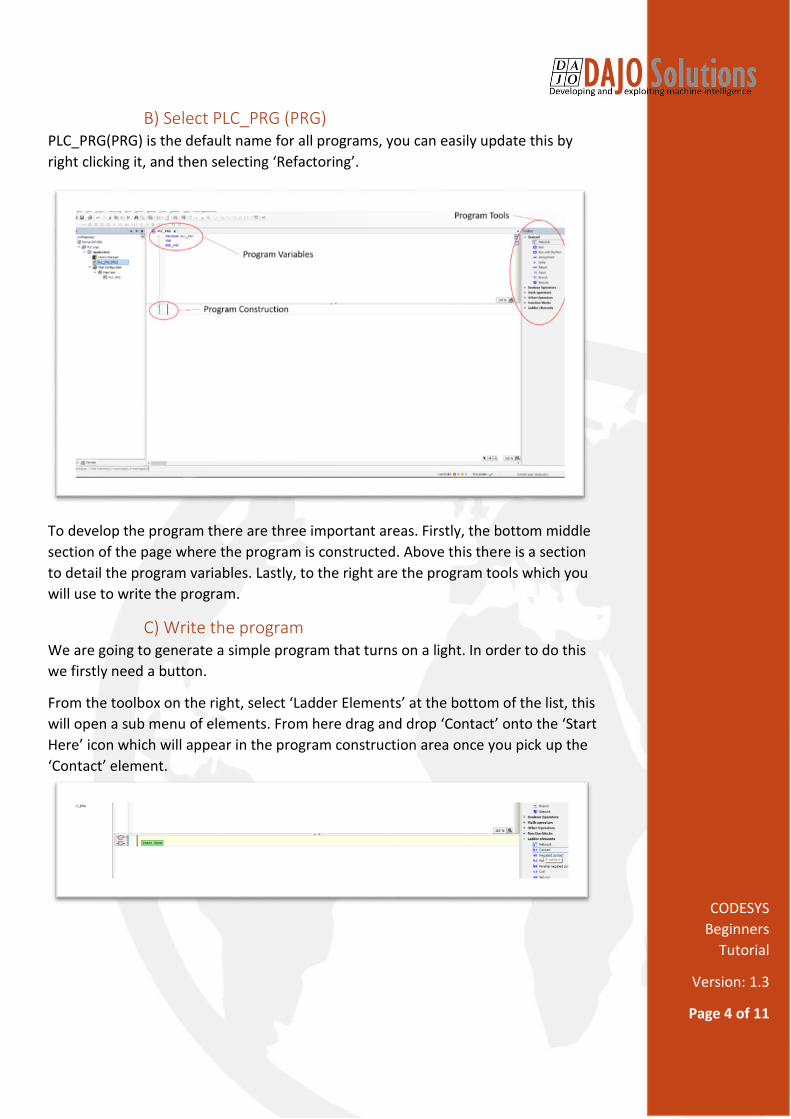
B) Select PLC_PRG (PRG) PLC_PRG(PRG) is the default name for all programs, you can easily update this by
right clicking it, and then selecting ‘Refactoring’.
To develop the program there are three important areas. Firstly, the bottom middle
section of the page where the program is constructed. Above this there is a section
to detail the program variables. Lastly, to the right are the program tools which you
will use to write the program.
C) Write the program We are going to generate a simple program that turns on a light. In order to do this
we firstly need a button.
From the toolbox on the right, select ‘Ladder Elements’ at the bottom of the list, this
will open a sub menu of elements. From here drag and drop ‘Contact’ onto the ‘Start
Here’ icon which will appear in the program construction area once you pick up the
‘Contact’ element.
CODESYS
Beginners
Tutorial
Version: 1.3
Page 5 of 11
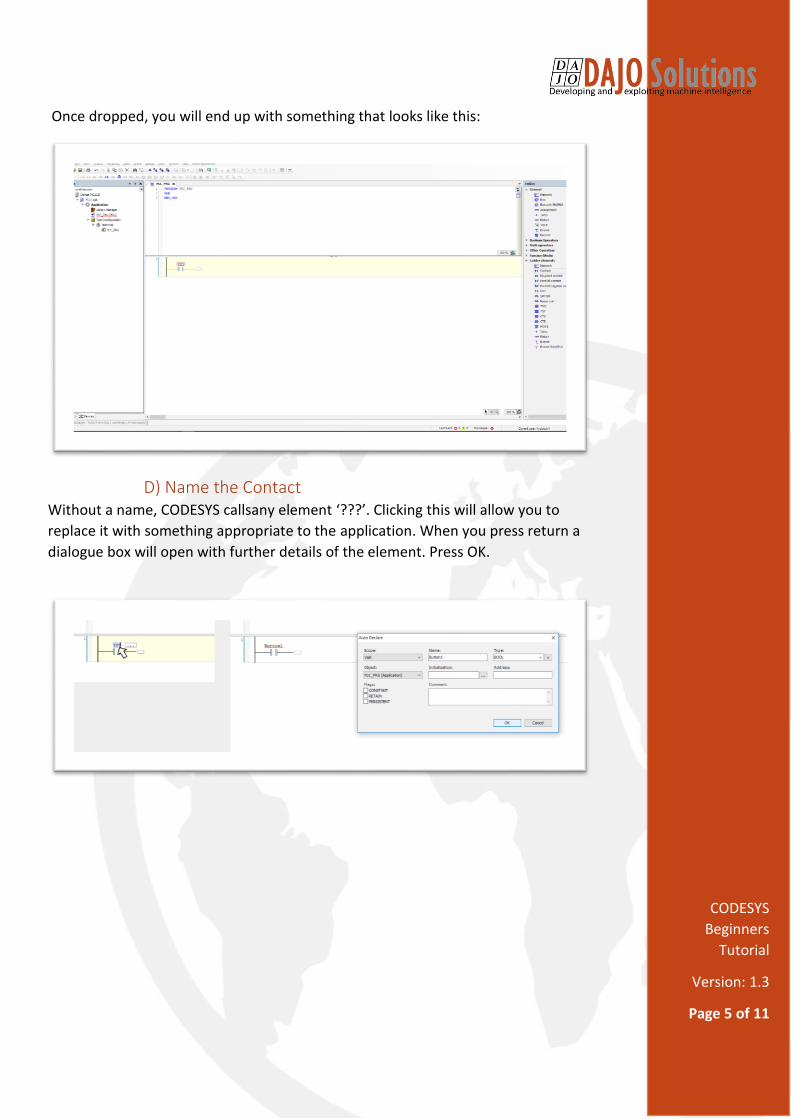
Once dropped, you will end up with something that looks like this:
D) Name the Contact Without a name, CODESYS callsany element ‘???’. Clicking this will allow you to
replace it with something appropriate to the application. When you press return a
dialogue box will open with further details of the element. Press OK.
CODESYS
Beginners
Tutorial
Version: 1.3
Page 6 of 11
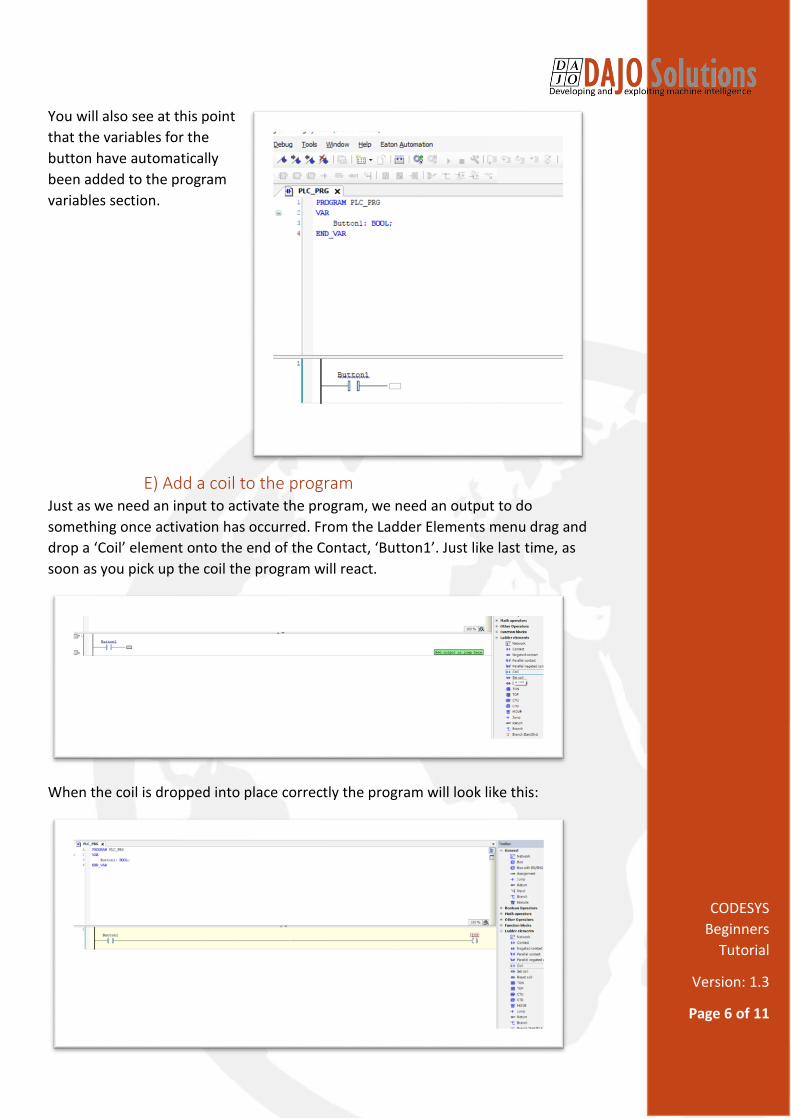
You will also see at this point
that the variables for the
button have automatically
been added to the program
variables section.
E) Add a coil to the program Just as we need an input to activate the program, we need an output to do
something once activation has occurred. From the Ladder Elements menu drag and
drop a ‘Coil’ element onto the end of the Contact, ‘Button1’. Just like last time, as
soon as you pick up the coil the program will react.
When the coil is dropped into place correctly the program will look like this:
CODESYS
Beginners
Tutorial
Version: 1.3
Page 7 of 11
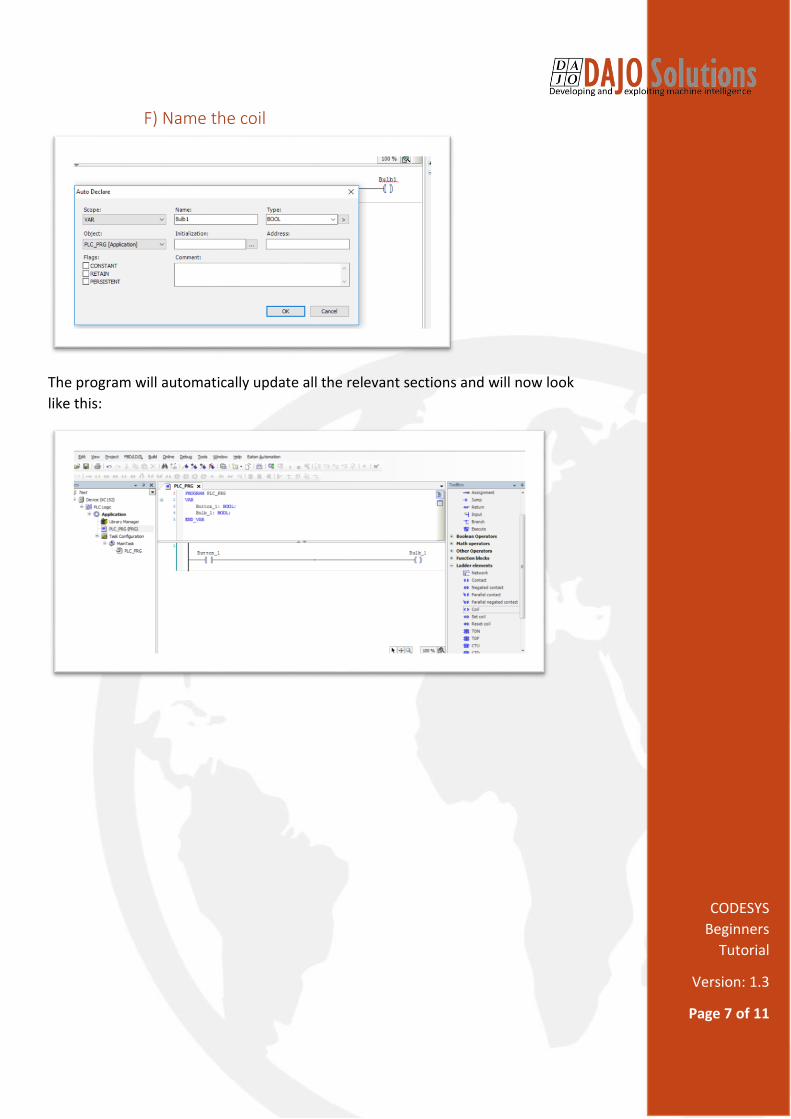
F) Name the coil
The program will automatically update all the relevant sections and will now look
like this:
CODESYS
Beginners
Tutorial
Version: 1.3
Page 8 of 11
Step 3: Run this program
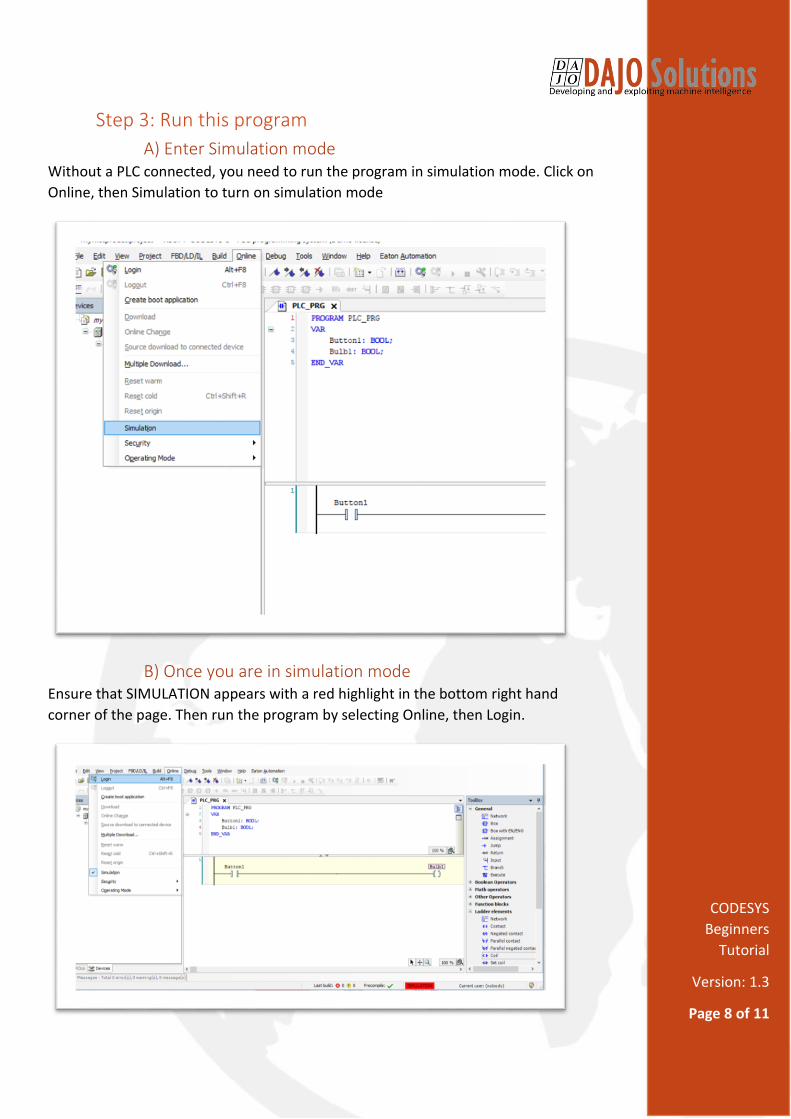
A) Enter Simulation mode Without a PLC connected, you need to run the program in simulation mode. Click on
Online, then Simulation to turn on simulation mode
B) Once you are in simulation mode Ensure that SIMULATION appears with a red highlight in the bottom right hand
corner of the page. Then run the program by selecting Online, then Login.
CODESYS
Beginners
Tutorial
Version: 1.3
Page 9 of 11
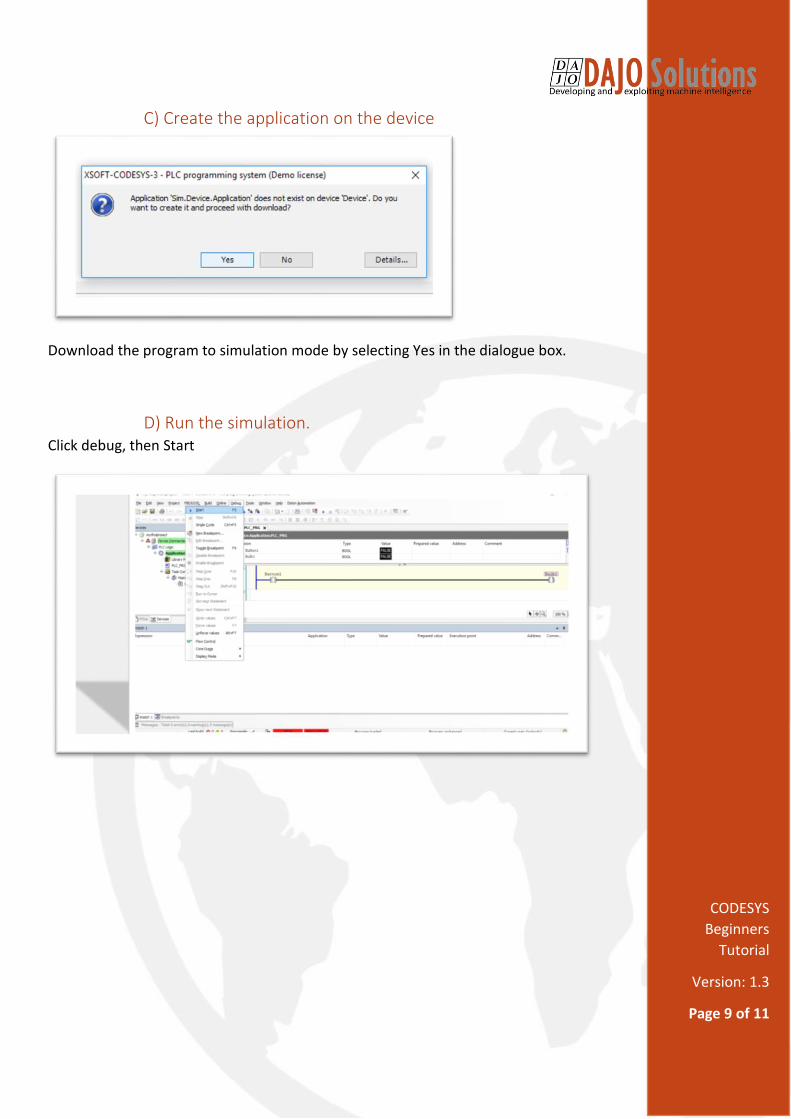
C) Create the application on the device
Download the program to simulation mode by selecting Yes in the dialogue box.
D) Run the simulation. Click debug, then Start
CODESYS
Beginners
Tutorial
Version: 1.3
Page 10 of 11
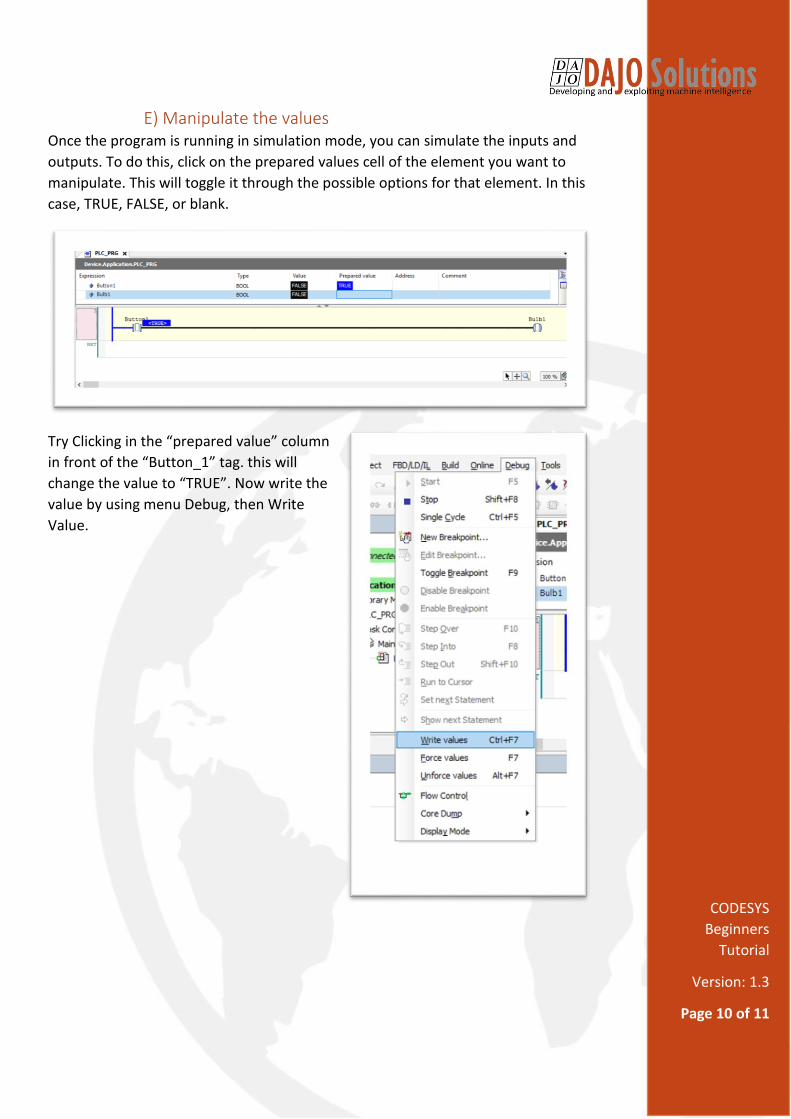
E) Manipulate the values Once the program is running in simulation mode, you can simulate the inputs and
outputs. To do this, click on the prepared values cell of the element you want to
manipulate. This will toggle it through the possible options for that element. In this
case, TRUE, FALSE, or blank.
Try Clicking in the “prepared value” column
in front of the “Button_1” tag. this will
change the value to “TRUE”. Now write the
value by using menu Debug, then Write
Value.
CODESYS
Beginners
Tutorial
Version: 1.3
Page 11 of 11
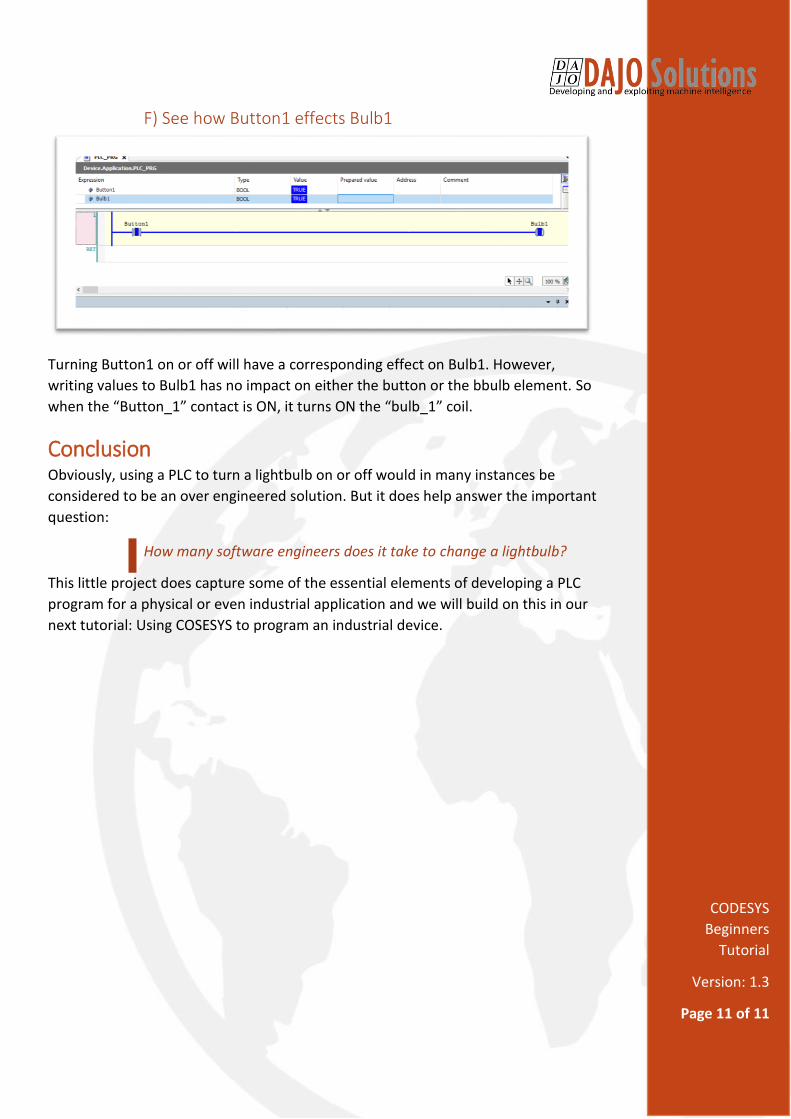
F) See how Button1 effects Bulb1
Turning Button1 on or off will have a corresponding effect on Bulb1. However,
writing values to Bulb1 has no impact on either the button or the bbulb element. So
when the “Button_1” contact is ON, it turns ON the “bulb_1” coil.
Conclusion Obviously, using a PLC to turn a lightbulb on or off would in many instances be
considered to be an over engineered solution. But it does help answer the important
question:
How many software engineers does it take to change a lightbulb?
This little project does capture some of the essential elements of developing a PLC
program for a physical or even industrial application and we will build on this in our
next tutorial: Using COSESYS to program an industrial device.


