17
Cognos Report Studio Using Blocks, Classes, Conditional Styles, and Conditional Blocks

Cognos Report Studio
Using Blocks, Classes, Conditional Styles, and Conditional Blocks
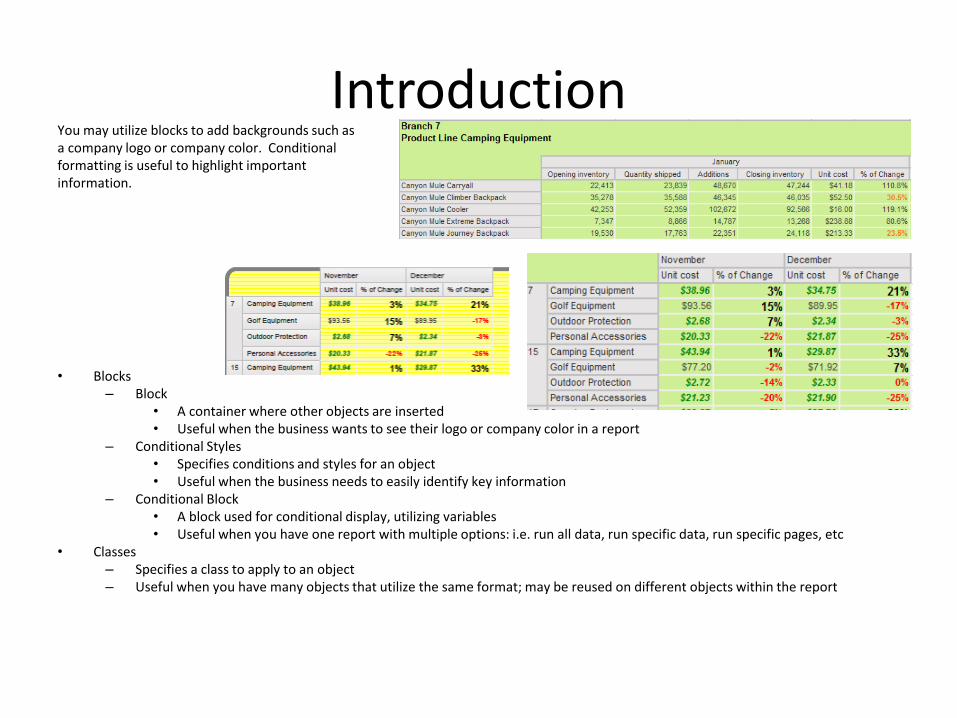
IntroductionYou may utilize blocks to add backgrounds such as a company logo or company color. Conditional formatting is useful to highlight importantinformation.
• Blocks– Block
• A container where other objects are inserted• Useful when the business wants to see their logo or company color in a report
– Conditional Styles• Specifies conditions and styles for an object• Useful when the business needs to easily identify key information
– Conditional Block• A block used for conditional display, utilizing variables• Useful when you have one report with multiple options: i.e. run all data, run specific data, run specific pages, etc
• Classes– Specifies a class to apply to an object– Useful when you have many objects that utilize the same format; may be reused on different objects within the report
Scenario
• The company requires that all reports contain their company color of green in the background
• A Block is needed
• The company needs to track the inventory for each Branch– Each branch needs to be on it’s own page
• A page set is needed
• The company wants to highlight inventory based on the percent of change between the closing inventory and the opening inventory– Classes and Conditional Styles are needed
• When the percent of change is negative, change the font to red • When the percent of change is between 0 and 50%, change the font
to orange• When the percent of change is above 50%, use the default format
Step One
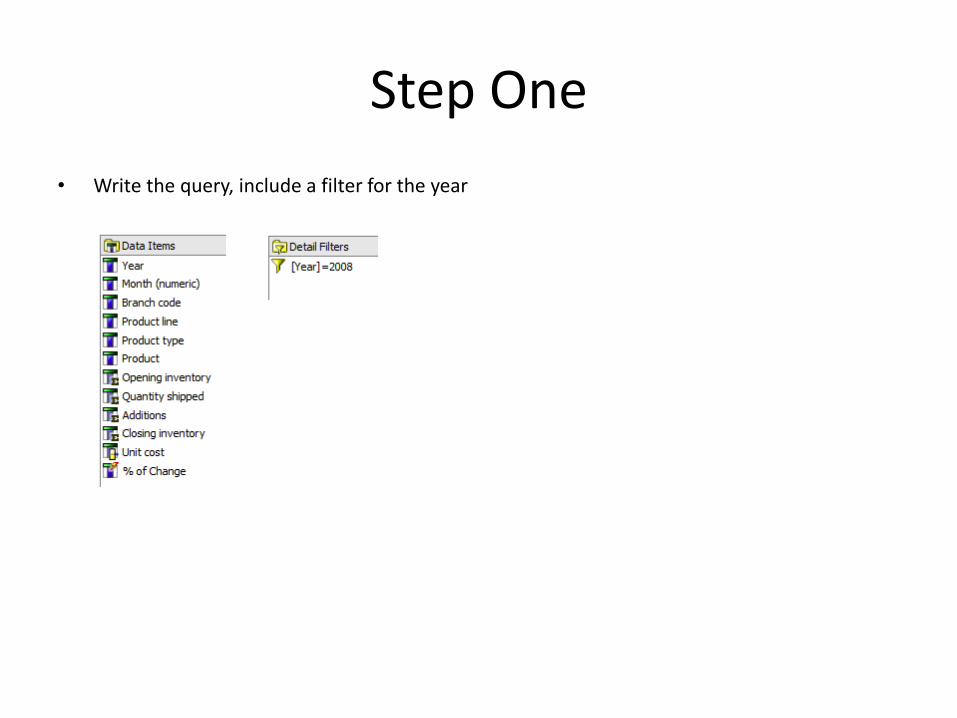
• Write the query, include a filter for the year
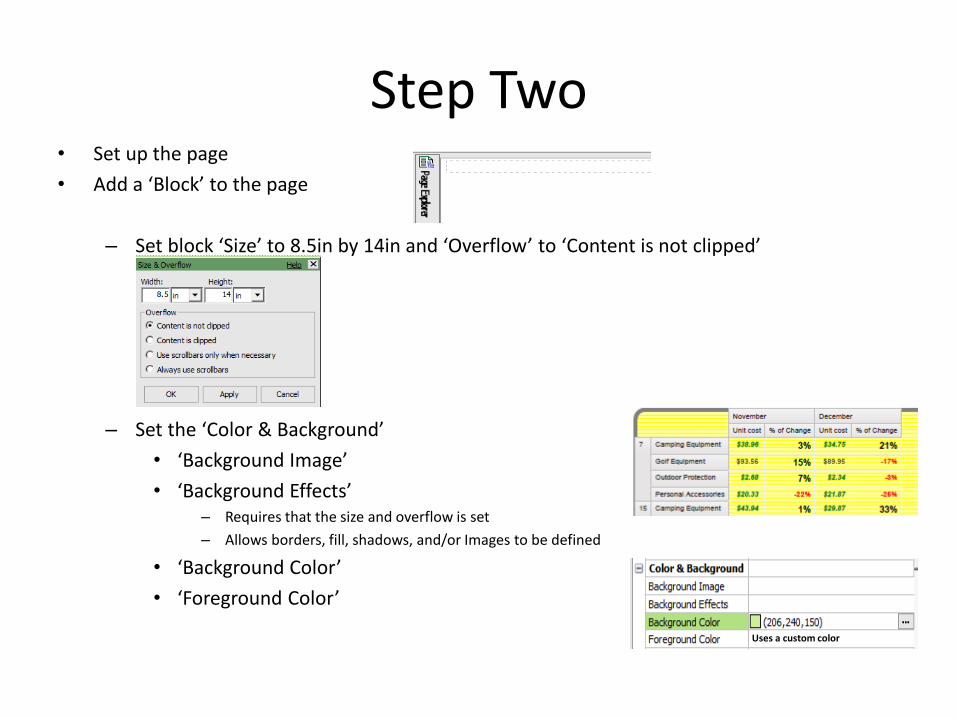
Step Two• Set up the page
• Add a ‘Block’ to the page
– Set block ‘Size’ to 8.5in by 14in and ‘Overflow’ to ‘Content is not clipped’
– Set the ‘Color & Background’
• ‘Background Image’
• ‘Background Effects’– Requires that the size and overflow is set
– Allows borders, fill, shadows, and/or Images to be defined
• ‘Background Color’
• ‘Foreground Color’
Uses a custom color
Step Two Continued
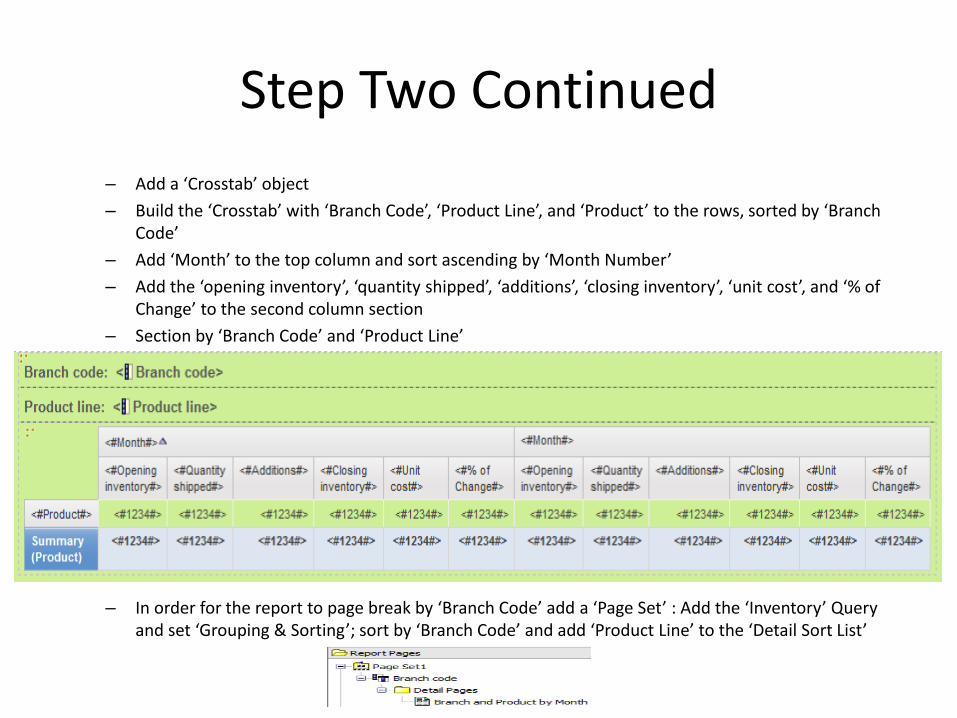
– Add a ‘Crosstab’ object
– Build the ‘Crosstab’ with ‘Branch Code’, ‘Product Line’, and ‘Product’ to the rows, sorted by ‘Branch Code’
– Add ‘Month’ to the top column and sort ascending by ‘Month Number’
– Add the ‘opening inventory’, ‘quantity shipped’, ‘additions’, ‘closing inventory’, ‘unit cost’, and ‘% of Change’ to the second column section
– Section by ‘Branch Code’ and ‘Product Line’
– In order for the report to page break by ‘Branch Code’ add a ‘Page Set’ : Add the ‘Inventory’ Query and set ‘Grouping & Sorting’; sort by ‘Branch Code’ and add ‘Product Line’ to the ‘Detail Sort List’
Step ThreeAnytime you are using conditional styles, adding
classes will be helpful. You might receive additional requirements where the same
formatting that you have already used is needed on a
different column or columns. Also, if you have applied the
same format for multiple columns, then receive instructions
to change the format, update the class and anywhere that the
class has been utilized will be updated.
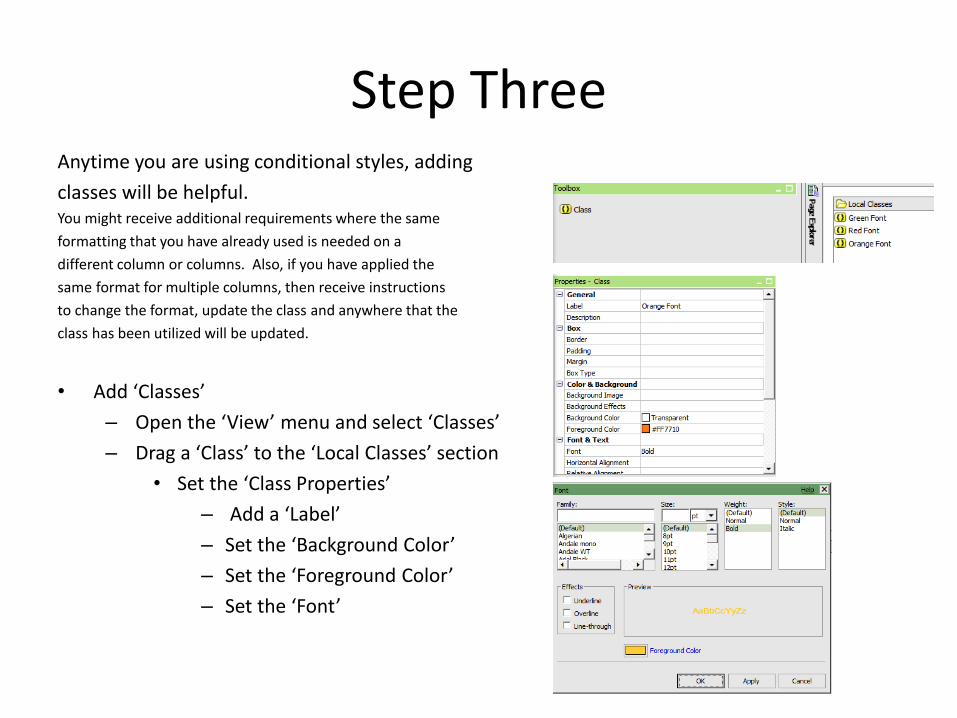
• Add ‘Classes’
– Open the ‘View’ menu and select ‘Classes’
– Drag a ‘Class’ to the ‘Local Classes’ section
• Set the ‘Class Properties’
– Add a ‘Label’
– Set the ‘Background Color’
– Set the ‘Foreground Color’
– Set the ‘Font’
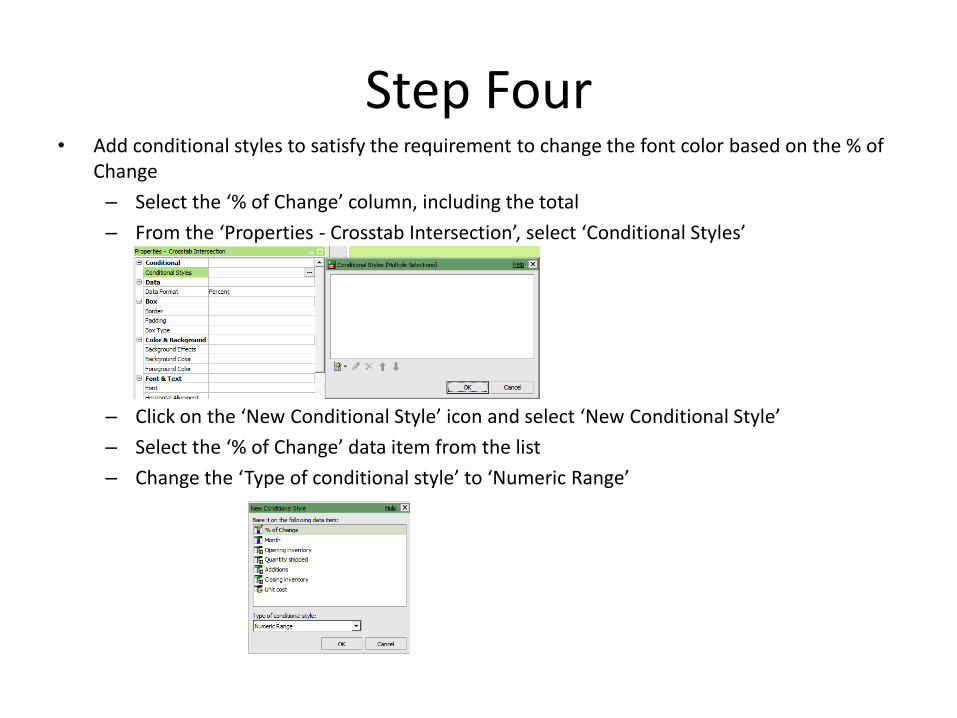
Step Four• Add conditional styles to satisfy the requirement to change the font color based on the % of
Change
– Select the ‘% of Change’ column, including the total
– From the ‘Properties - Crosstab Intersection’, select ‘Conditional Styles’
– Click on the ‘New Conditional Style’ icon and select ‘New Conditional Style’
– Select the ‘% of Change’ data item from the list
– Change the ‘Type of conditional style’ to ‘Numeric Range’
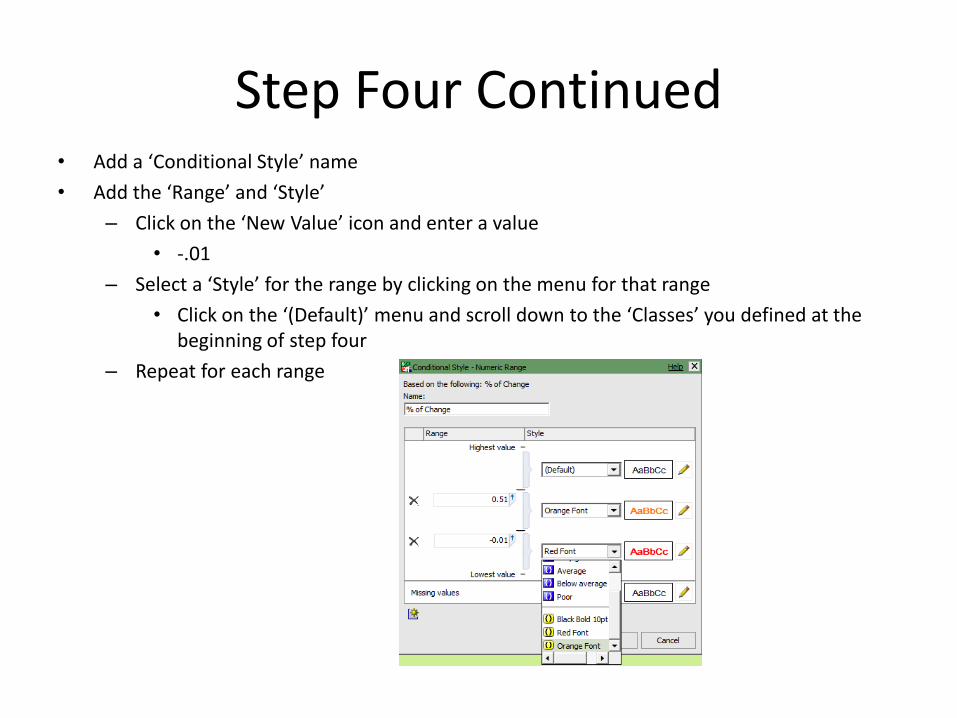
Step Four Continued• Add a ‘Conditional Style’ name
• Add the ‘Range’ and ‘Style’
– Click on the ‘New Value’ icon and enter a value
• -.01
– Select a ‘Style’ for the range by clicking on the menu for that range
• Click on the ‘(Default)’ menu and scroll down to the ‘Classes’ you defined at the beginning of step four
– Repeat for each range
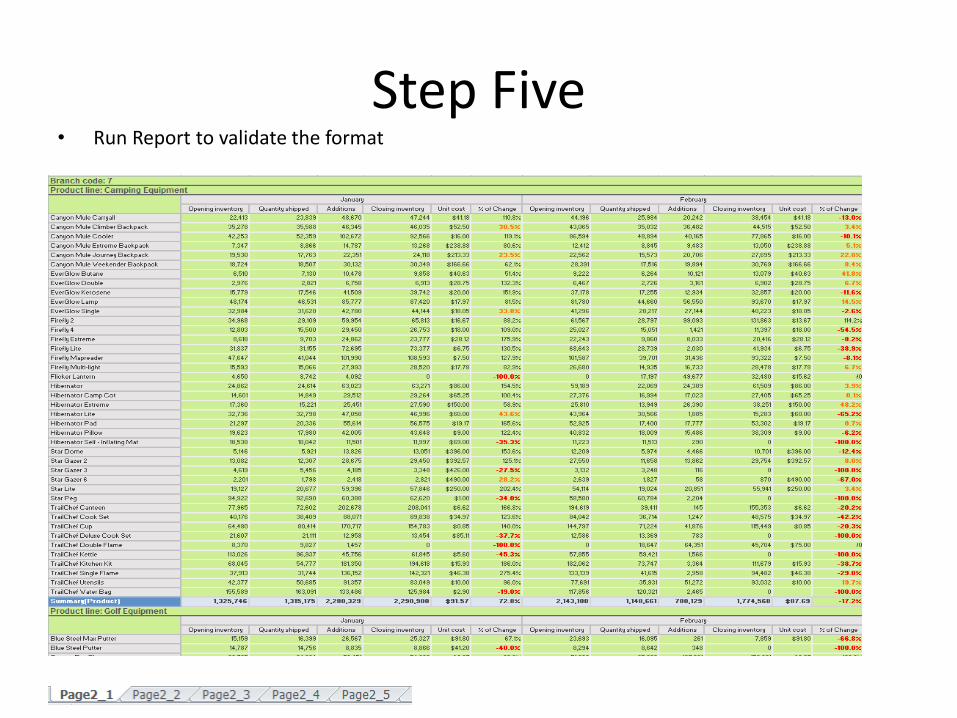
Step Five• Run Report to validate the format
New Requirement
• You receive a new requirement to allow the consumer to either run the entire report or to select the Branch Code and Product Line
– You will need to add a Conditional Block, variables, prompts, and a prompt page
Add Prompts and Conditional Blocks
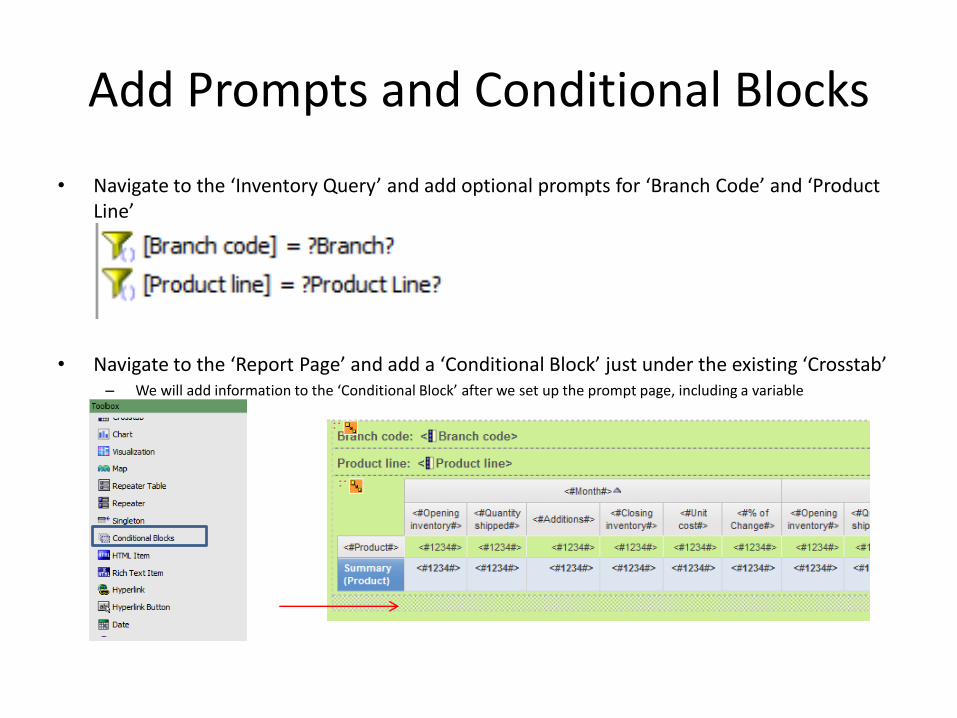
• Navigate to the ‘Inventory Query’ and add optional prompts for ‘Branch Code’ and ‘Product Line’
• Navigate to the ‘Report Page’ and add a ‘Conditional Block’ just under the existing ‘Crosstab’– We will add information to the ‘Conditional Block’ after we set up the prompt page, including a variable
Add a Prompt Page and Define Prompts
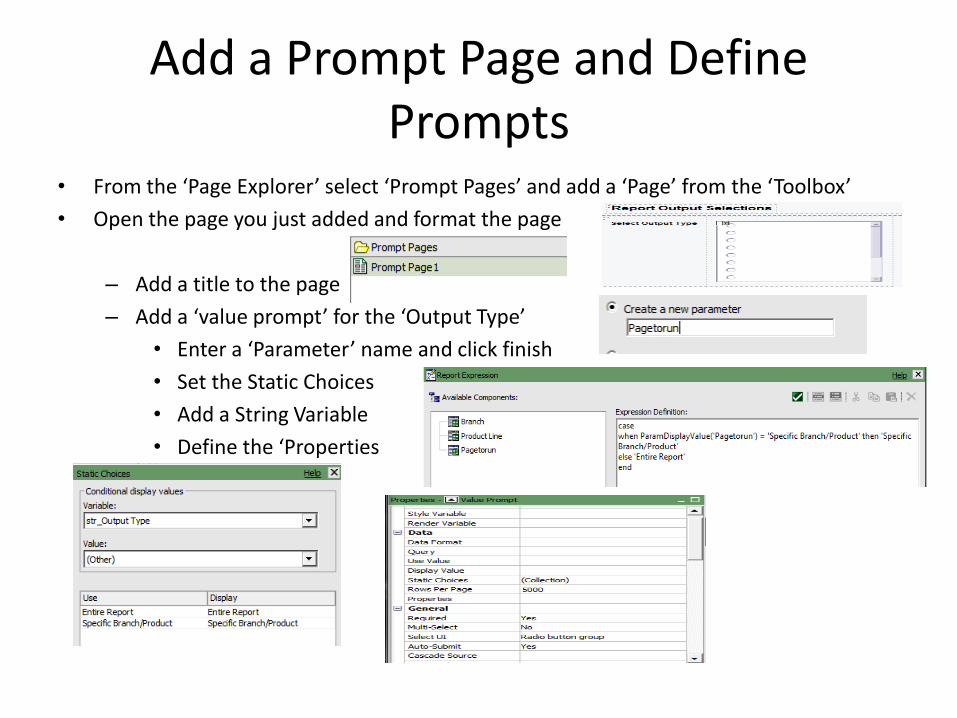
• From the ‘Page Explorer’ select ‘Prompt Pages’ and add a ‘Page’ from the ‘Toolbox’
• Open the page you just added and format the page
– Add a title to the page
– Add a ‘value prompt’ for the ‘Output Type’
• Enter a ‘Parameter’ name and click finish
• Set the Static Choices
• Add a String Variable
• Define the ‘Properties
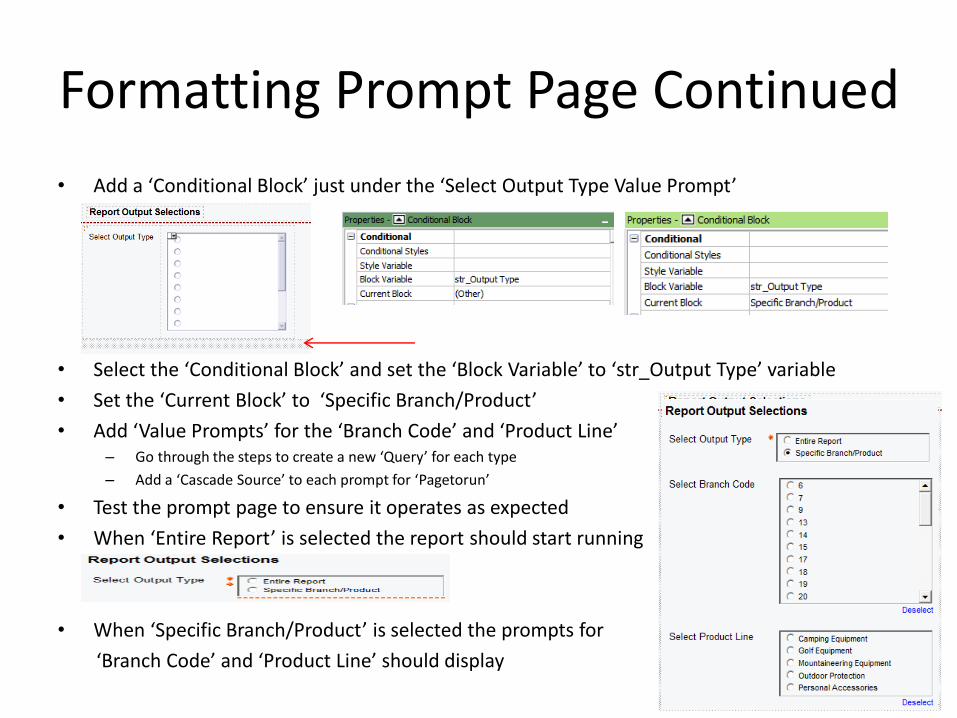
Formatting Prompt Page Continued
• Add a ‘Conditional Block’ just under the ‘Select Output Type Value Prompt’
• Select the ‘Conditional Block’ and set the ‘Block Variable’ to ‘str_Output Type’ variable
• Set the ‘Current Block’ to ‘Specific Branch/Product’
• Add ‘Value Prompts’ for the ‘Branch Code’ and ‘Product Line’– Go through the steps to create a new ‘Query’ for each type
– Add a ‘Cascade Source’ to each prompt for ‘Pagetorun’
• Test the prompt page to ensure it operates as expected
• When ‘Entire Report’ is selected the report should start running
• When ‘Specific Branch/Product’ is selected the prompts for
‘Branch Code’ and ‘Product Line’ should display
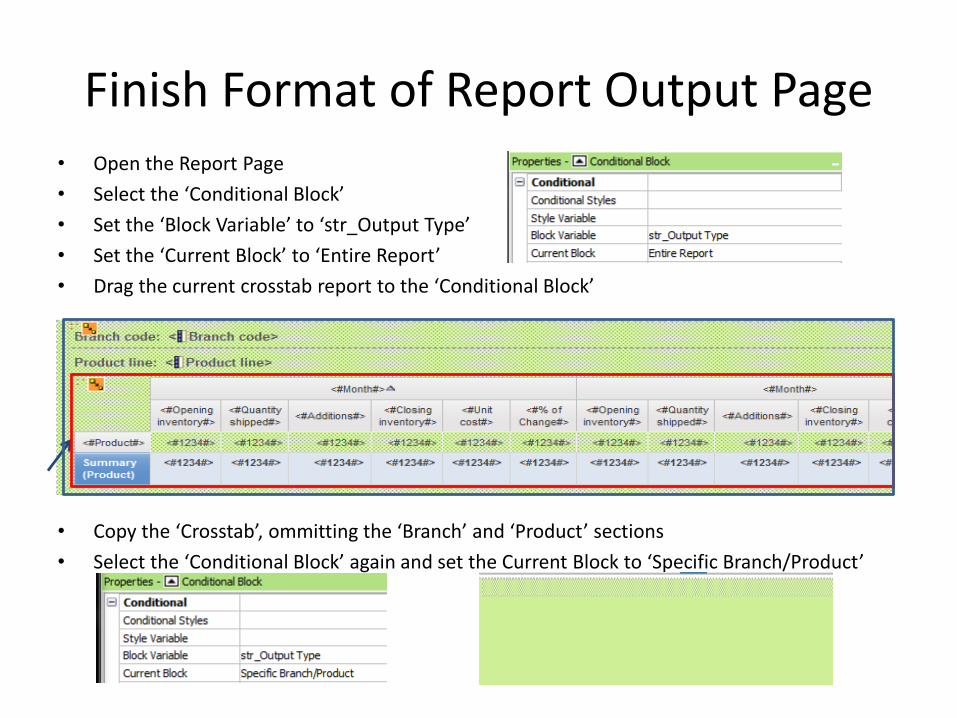
Finish Format of Report Output Page• Open the Report Page
• Select the ‘Conditional Block’
• Set the ‘Block Variable’ to ‘str_Output Type’
• Set the ‘Current Block’ to ‘Entire Report’
• Drag the current crosstab report to the ‘Conditional Block’
• Copy the ‘Crosstab’, ommitting the ‘Branch’ and ‘Product’ sections
• Select the ‘Conditional Block’ again and set the Current Block to ‘Specific Branch/Product’
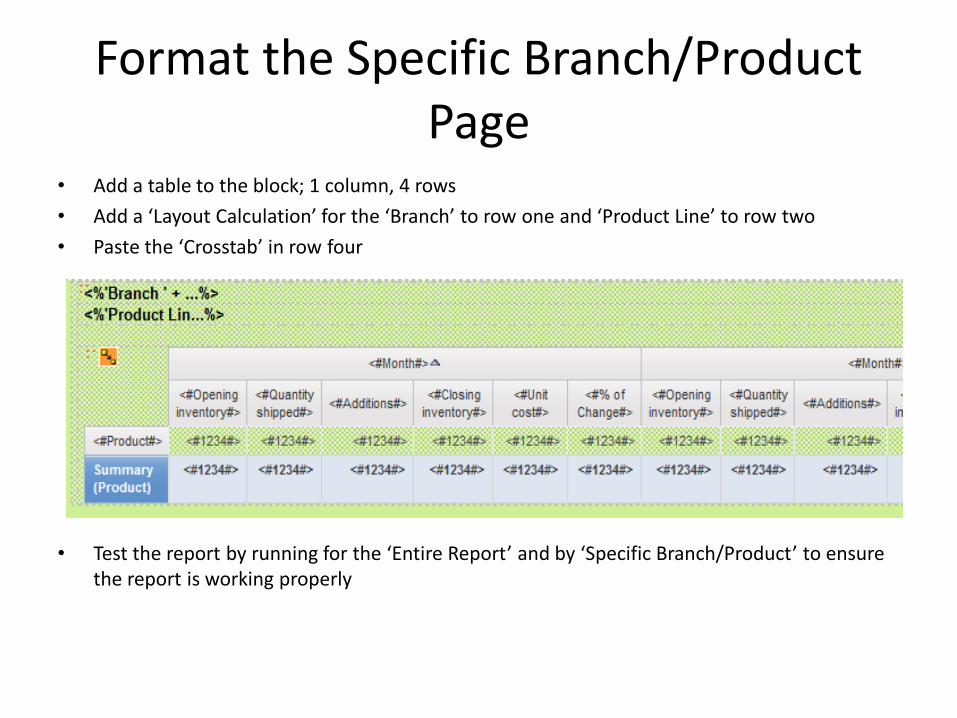
Format the Specific Branch/Product Page
• Add a table to the block; 1 column, 4 rows
• Add a ‘Layout Calculation’ for the ‘Branch’ to row one and ‘Product Line’ to row two
• Paste the ‘Crosstab’ in row four
• Test the report by running for the ‘Entire Report’ and by ‘Specific Branch/Product’ to ensure the report is working properly

Q& A


