28
Cognos Introduction to Cognos

Cognos
Introduction to Cognos
P a g e 1 | 27
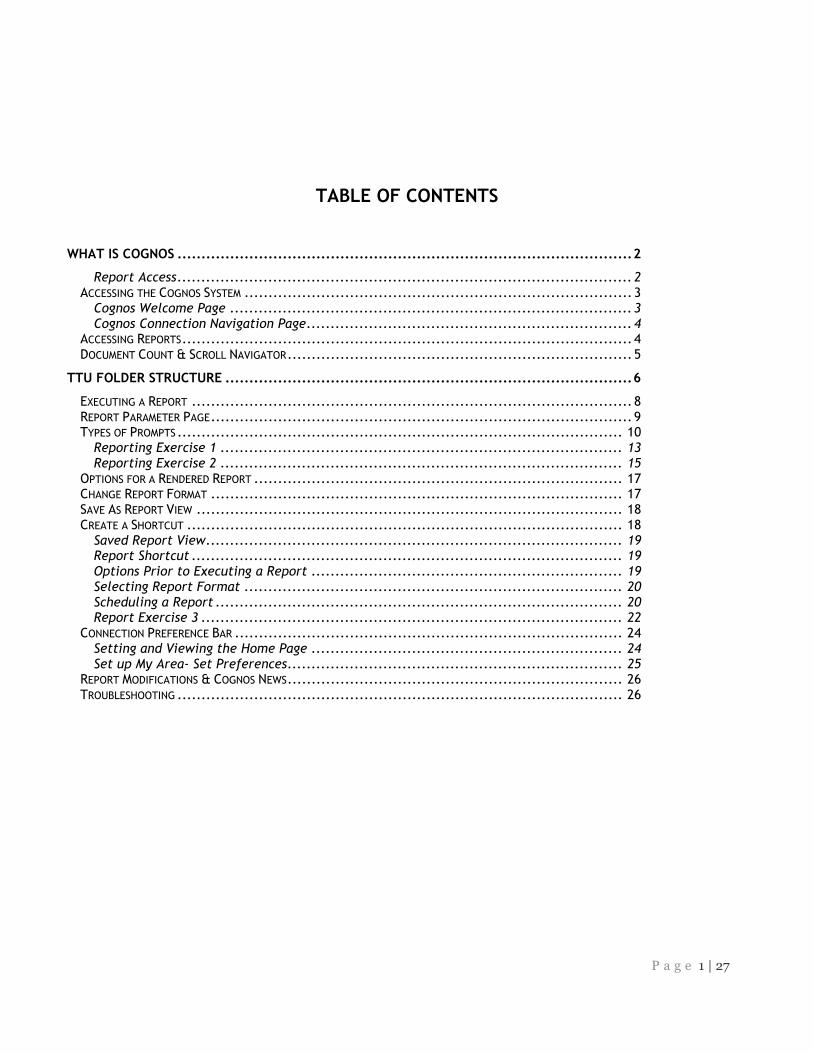
TABLE OF CONTENTS
WHAT IS COGNOS ............................................................................................... 2
Report Access ............................................................................................... 2 ACCESSING THE COGNOS SYSTEM ................................................................................. 3
Cognos Welcome Page .................................................................................... 3 Cognos Connection Navigation Page .................................................................... 4
ACCESSING REPORTS .............................................................................................. 4 DOCUMENT COUNT & SCROLL NAVIGATOR ........................................................................ 5
TTU FOLDER STRUCTURE ..................................................................................... 6
EXECUTING A REPORT ............................................................................................ 8 REPORT PARAMETER PAGE ........................................................................................ 9 TYPES OF PROMPTS ............................................................................................. 10
Reporting Exercise 1 .................................................................................... 13 Reporting Exercise 2 .................................................................................... 15
OPTIONS FOR A RENDERED REPORT ............................................................................. 17 CHANGE REPORT FORMAT ...................................................................................... 17 SAVE AS REPORT VIEW ......................................................................................... 18 CREATE A SHORTCUT ........................................................................................... 18
Saved Report View ....................................................................................... 19 Report Shortcut .......................................................................................... 19 Options Prior to Executing a Report ................................................................. 19 Selecting Report Format ............................................................................... 20 Scheduling a Report ..................................................................................... 20 Report Exercise 3 ........................................................................................ 22
CONNECTION PREFERENCE BAR ................................................................................. 24 Setting and Viewing the Home Page ................................................................. 24 Set up My Area- Set Preferences ...................................................................... 25
REPORT MODIFICATIONS & COGNOS NEWS ...................................................................... 26 TROUBLESHOOTING ............................................................................................. 26
P a g e 2 | 27
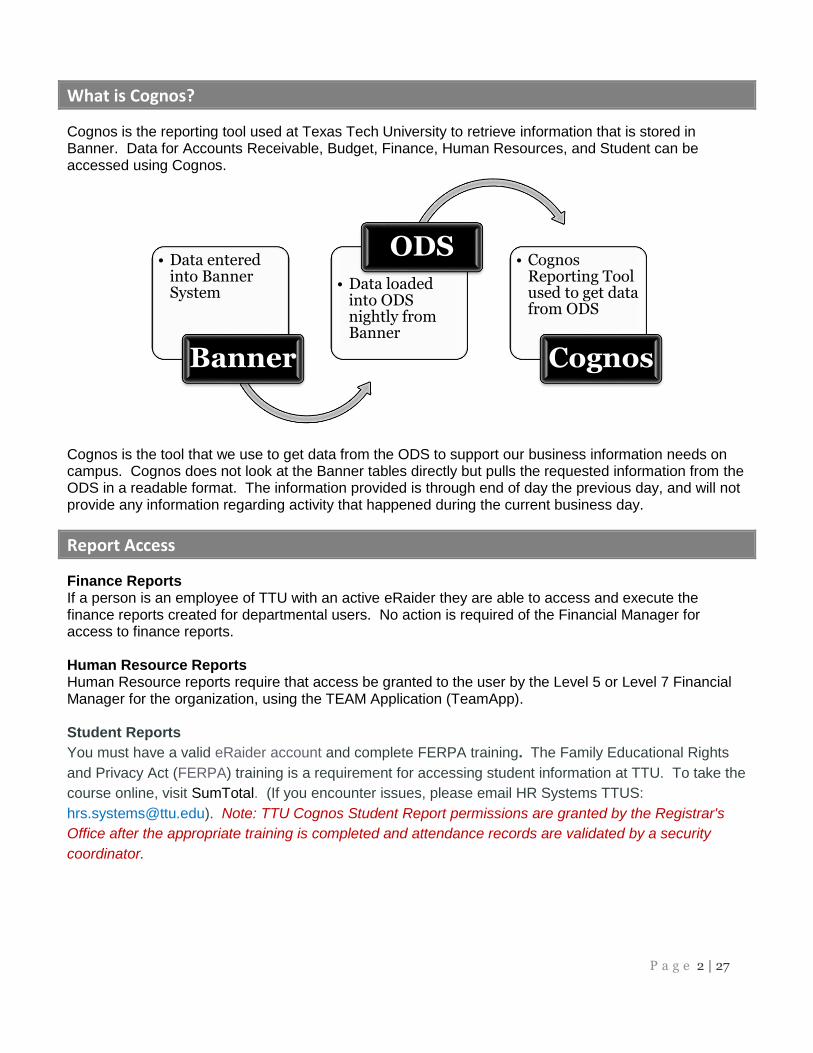
What is Cognos?
Cognos is the reporting tool used at Texas Tech University to retrieve information that is stored in Banner. Data for Accounts Receivable, Budget, Finance, Human Resources, and Student can be accessed using Cognos.
Cognos is the tool that we use to get data from the ODS to support our business information needs on campus. Cognos does not look at the Banner tables directly but pulls the requested information from the ODS in a readable format. The information provided is through end of day the previous day, and will not provide any information regarding activity that happened during the current business day.
Report Access
Finance Reports If a person is an employee of TTU with an active eRaider they are able to access and execute the finance reports created for departmental users. No action is required of the Financial Manager for access to finance reports. Human Resource Reports Human Resource reports require that access be granted to the user by the Level 5 or Level 7 Financial Manager for the organization, using the TEAM Application (TeamApp). Student Reports
You must have a valid eRaider account and complete FERPA training. The Family Educational Rights
and Privacy Act (FERPA) training is a requirement for accessing student information at TTU. To take the
course online, visit SumTotal. (If you encounter issues, please email HR Systems TTUS:
[email protected]). Note: TTU Cognos Student Report permissions are granted by the Registrar's
Office after the appropriate training is completed and attendance records are validated by a security
coordinator.
• Data entered into Banner System
Banner
• Data loaded into ODS nightly from Banner
ODS• Cognos
Reporting Tool used to get data from ODS
Cognos
P a g e 3 | 27
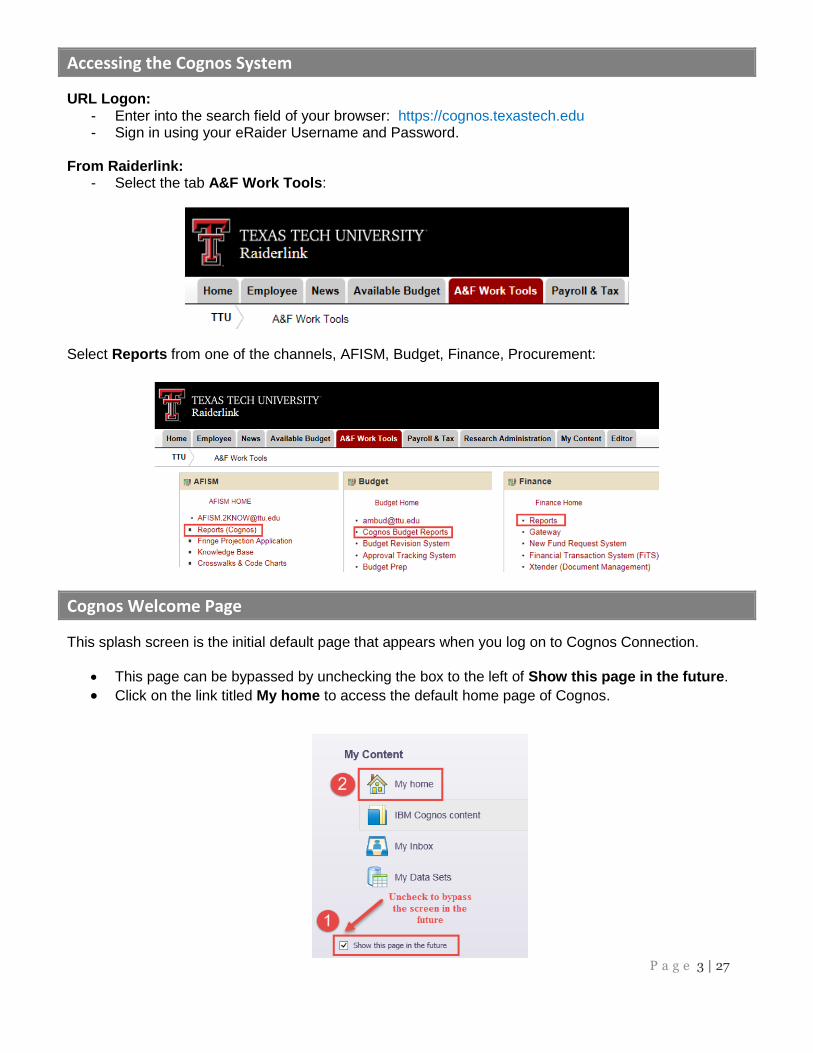
Accessing the Cognos System
URL Logon: - Enter into the search field of your browser: https://cognos.texastech.edu - Sign in using your eRaider Username and Password.
From Raiderlink:
- Select the tab A&F Work Tools:
Select Reports from one of the channels, AFISM, Budget, Finance, Procurement:
Cognos Welcome Page
This splash screen is the initial default page that appears when you log on to Cognos Connection.
This page can be bypassed by unchecking the box to the left of Show this page in the future.
Click on the link titled My home to access the default home page of Cognos.
P a g e 4 | 27
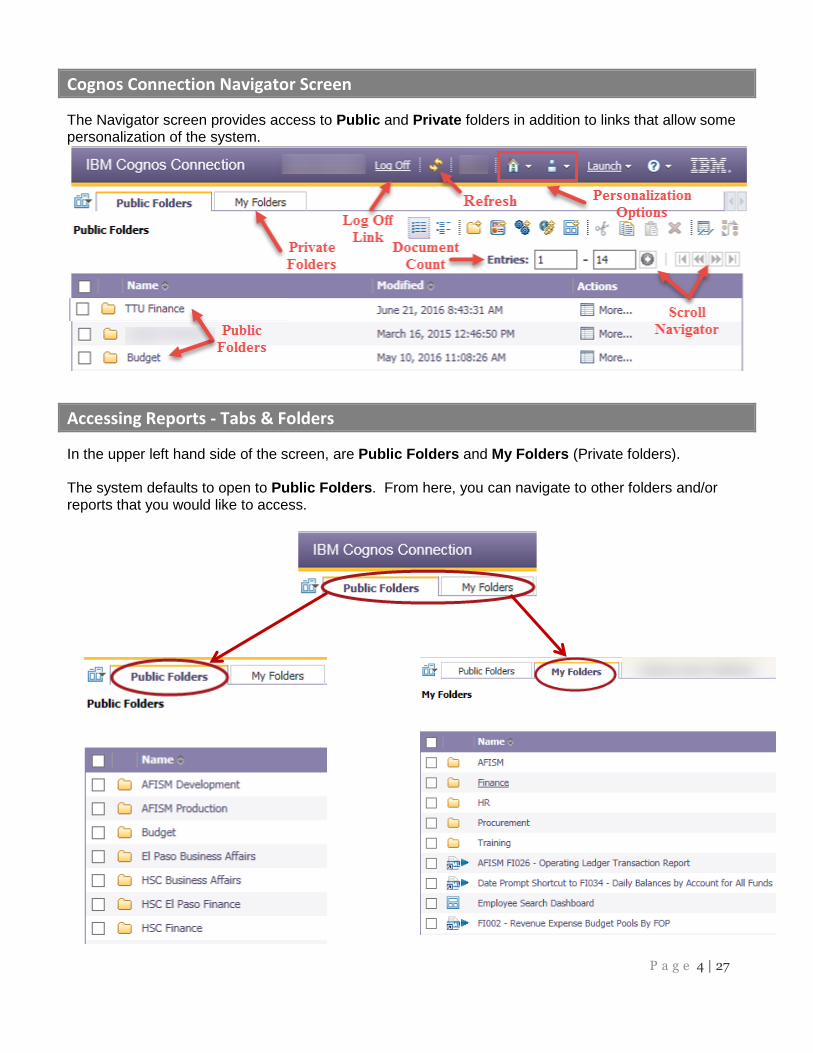
Cognos Connection Navigator Screen
The Navigator screen provides access to Public and Private folders in addition to links that allow some personalization of the system.
Accessing Reports - Tabs & Folders
In the upper left hand side of the screen, are Public Folders and My Folders (Private folders). The system defaults to open to Public Folders. From here, you can navigate to other folders and/or reports that you would like to access.
P a g e 5 | 27
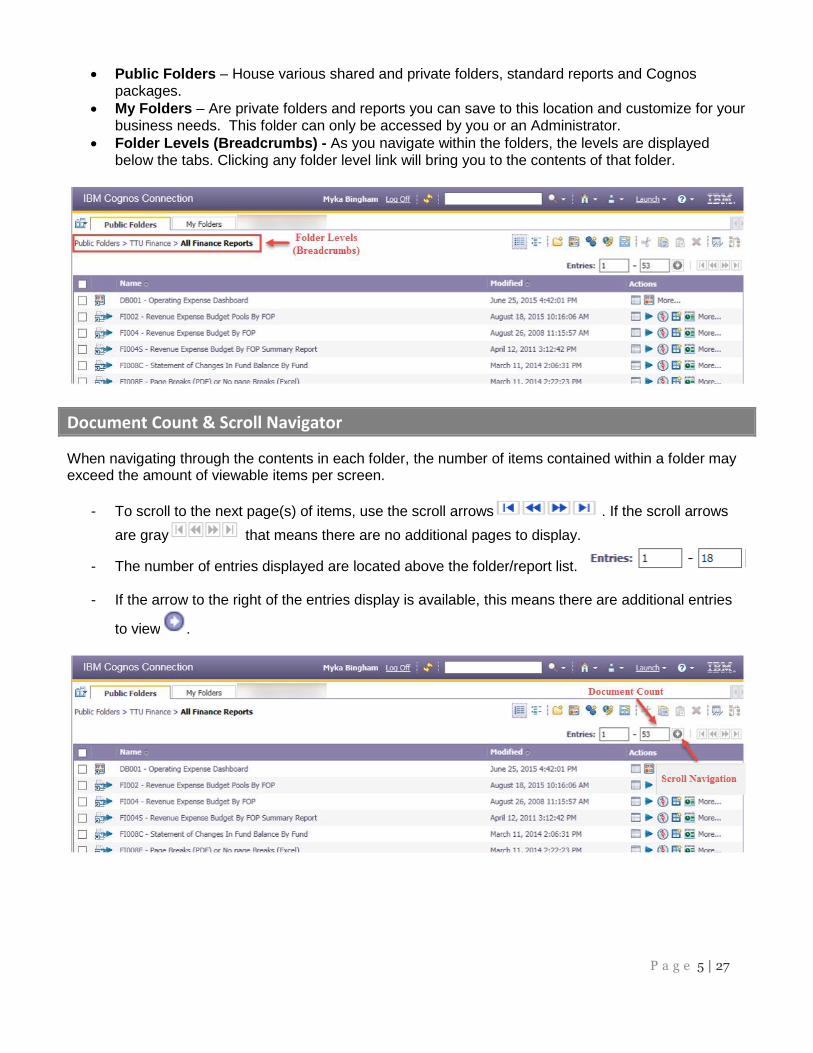
Public Folders – House various shared and private folders, standard reports and Cognos packages.
My Folders – Are private folders and reports you can save to this location and customize for your business needs. This folder can only be accessed by you or an Administrator.
Folder Levels (Breadcrumbs) - As you navigate within the folders, the levels are displayed below the tabs. Clicking any folder level link will bring you to the contents of that folder.
Document Count & Scroll Navigator
When navigating through the contents in each folder, the number of items contained within a folder may exceed the amount of viewable items per screen.
- To scroll to the next page(s) of items, use the scroll arrows . If the scroll arrows
are gray that means there are no additional pages to display.
- The number of entries displayed are located above the folder/report list.
- If the arrow to the right of the entries display is available, this means there are additional entries
to view .
P a g e 6 | 27
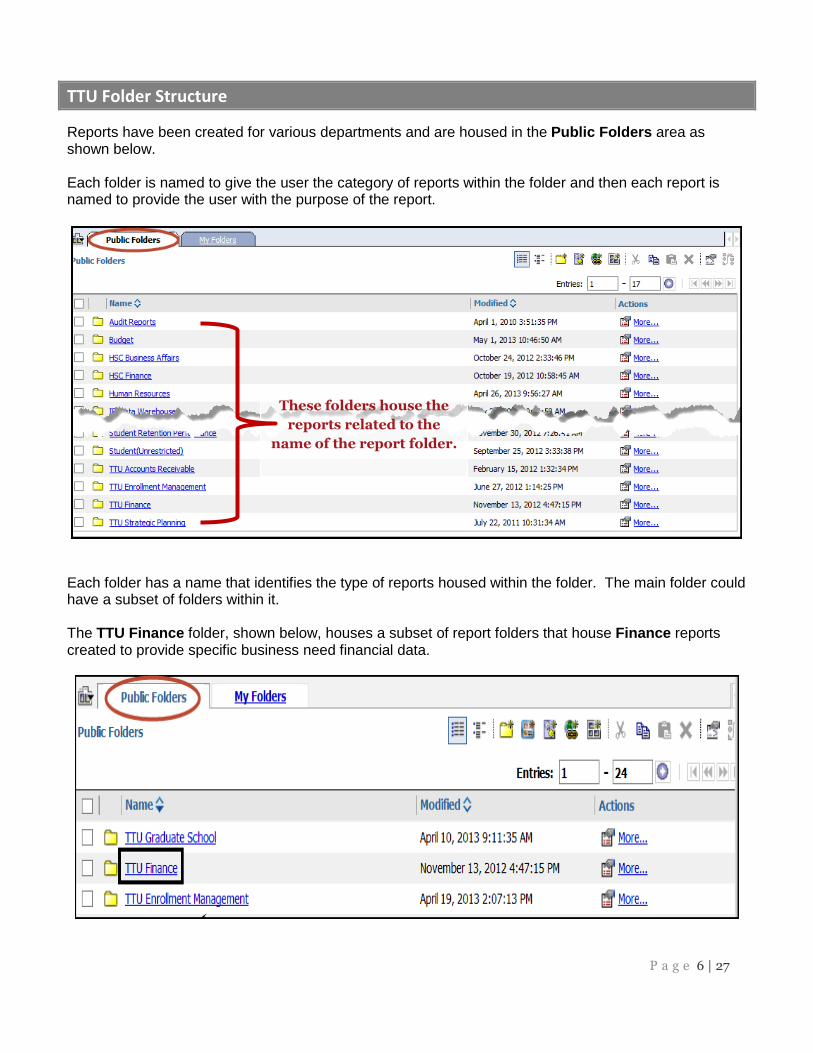
TTU Folder Structure
Reports have been created for various departments and are housed in the Public Folders area as shown below. Each folder is named to give the user the category of reports within the folder and then each report is named to provide the user with the purpose of the report.
Each folder has a name that identifies the type of reports housed within the folder. The main folder could have a subset of folders within it. The TTU Finance folder, shown below, houses a subset of report folders that house Finance reports created to provide specific business need financial data.
These folders house the
reports related to the
name of the report folder.
P a g e 7 | 27
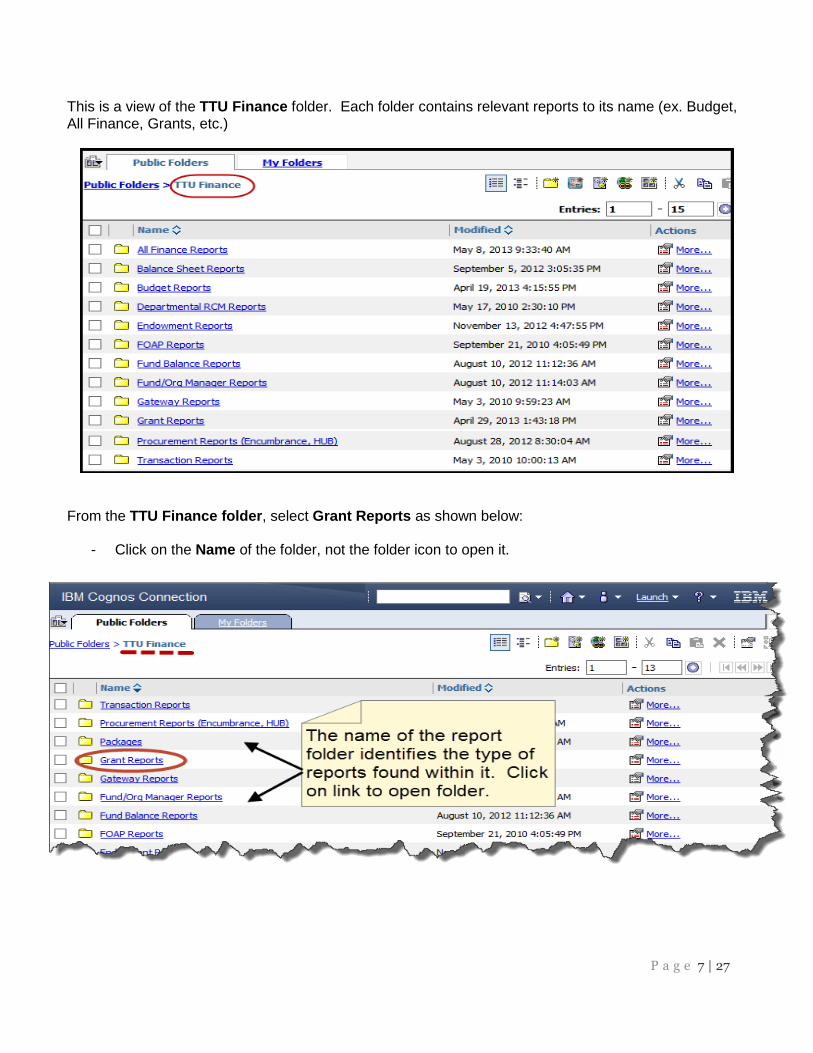
This is a view of the TTU Finance folder. Each folder contains relevant reports to its name (ex. Budget, All Finance, Grants, etc.)
From the TTU Finance folder, select Grant Reports as shown below:
- Click on the Name of the folder, not the folder icon to open it.
P a g e 8 | 27
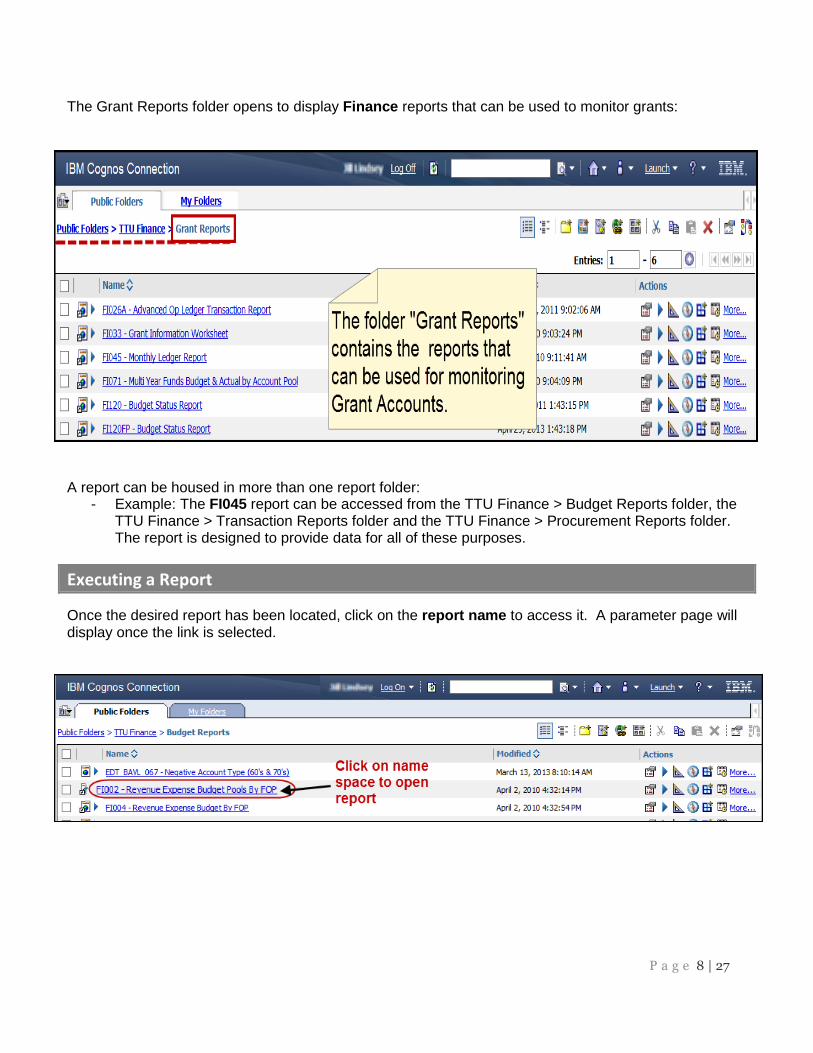
The Grant Reports folder opens to display Finance reports that can be used to monitor grants:
A report can be housed in more than one report folder:
- Example: The FI045 report can be accessed from the TTU Finance > Budget Reports folder, the TTU Finance > Transaction Reports folder and the TTU Finance > Procurement Reports folder. The report is designed to provide data for all of these purposes.
Executing a Report
Once the desired report has been located, click on the report name to access it. A parameter page will display once the link is selected.
P a g e 9 | 27
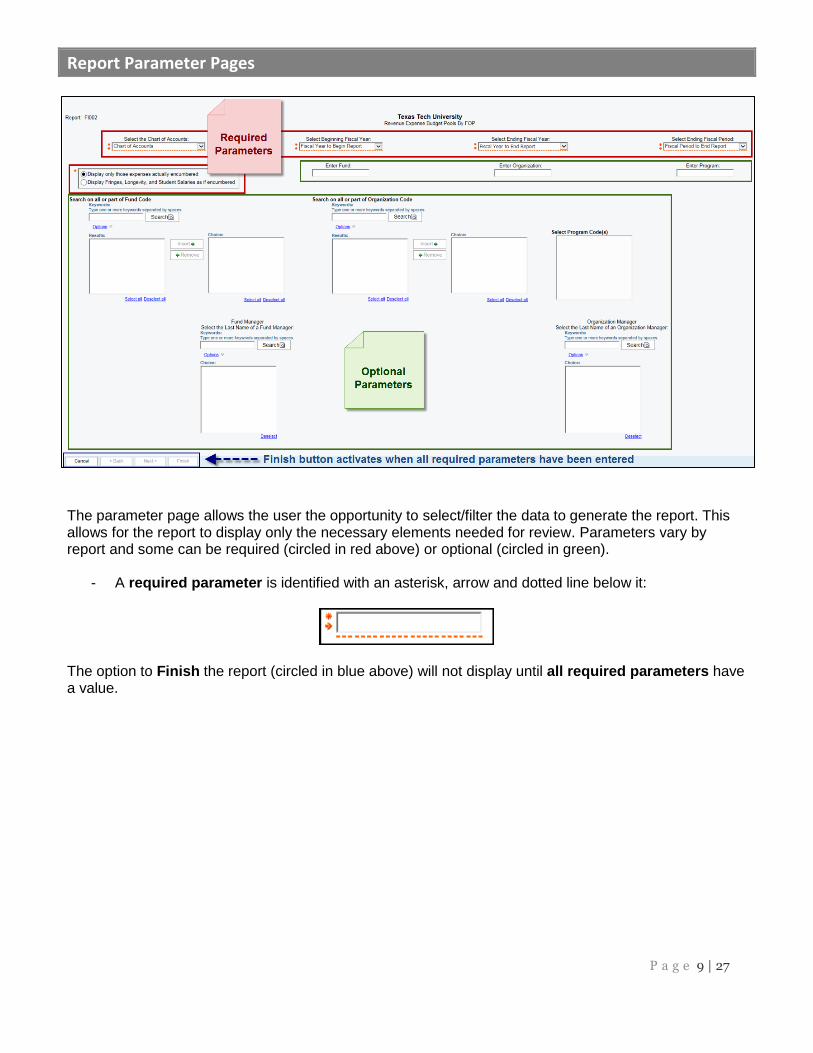
Report Parameter Pages
The parameter page allows the user the opportunity to select/filter the data to generate the report. This allows for the report to display only the necessary elements needed for review. Parameters vary by report and some can be required (circled in red above) or optional (circled in green).
- A required parameter is identified with an asterisk, arrow and dotted line below it:
The option to Finish the report (circled in blue above) will not display until all required parameters have a value.
P a g e 10 | 27
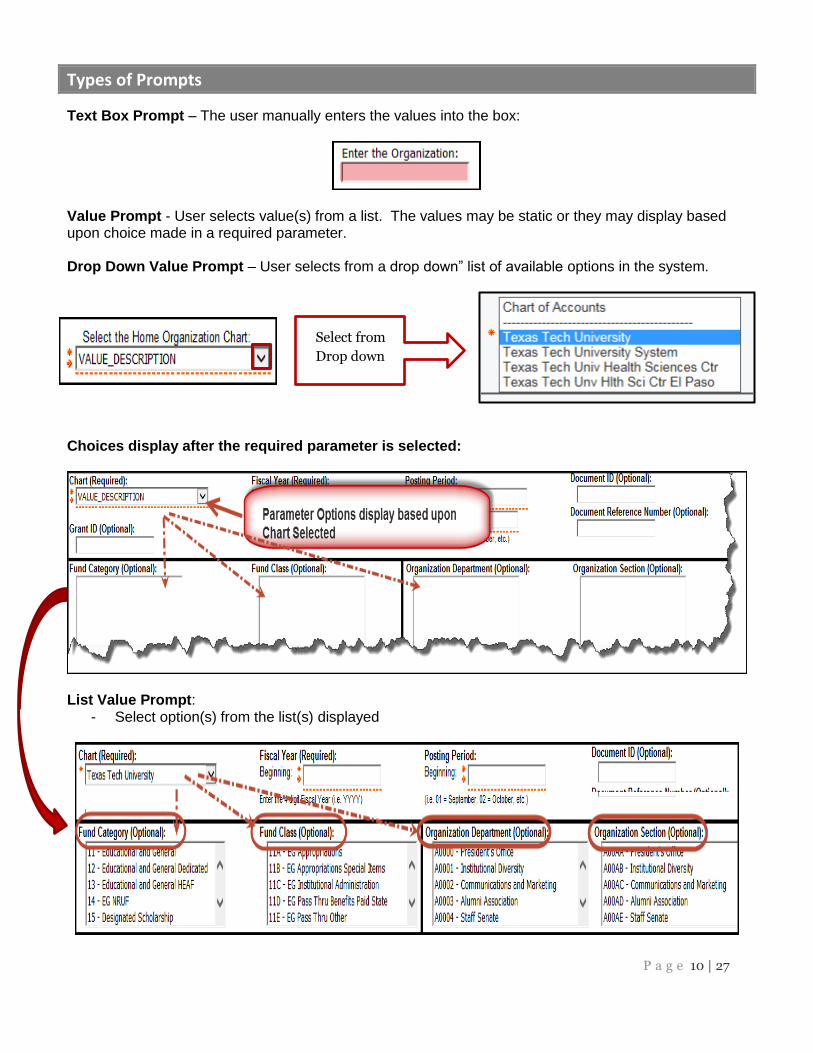
Types of Prompts
Text Box Prompt – The user manually enters the values into the box:
Value Prompt - User selects value(s) from a list. The values may be static or they may display based upon choice made in a required parameter. Drop Down Value Prompt – User selects from a drop down” list of available options in the system.
Choices display after the required parameter is selected:
List Value Prompt:
- Select option(s) from the list(s) displayed
Select from
Drop down
P a g e 11 | 27
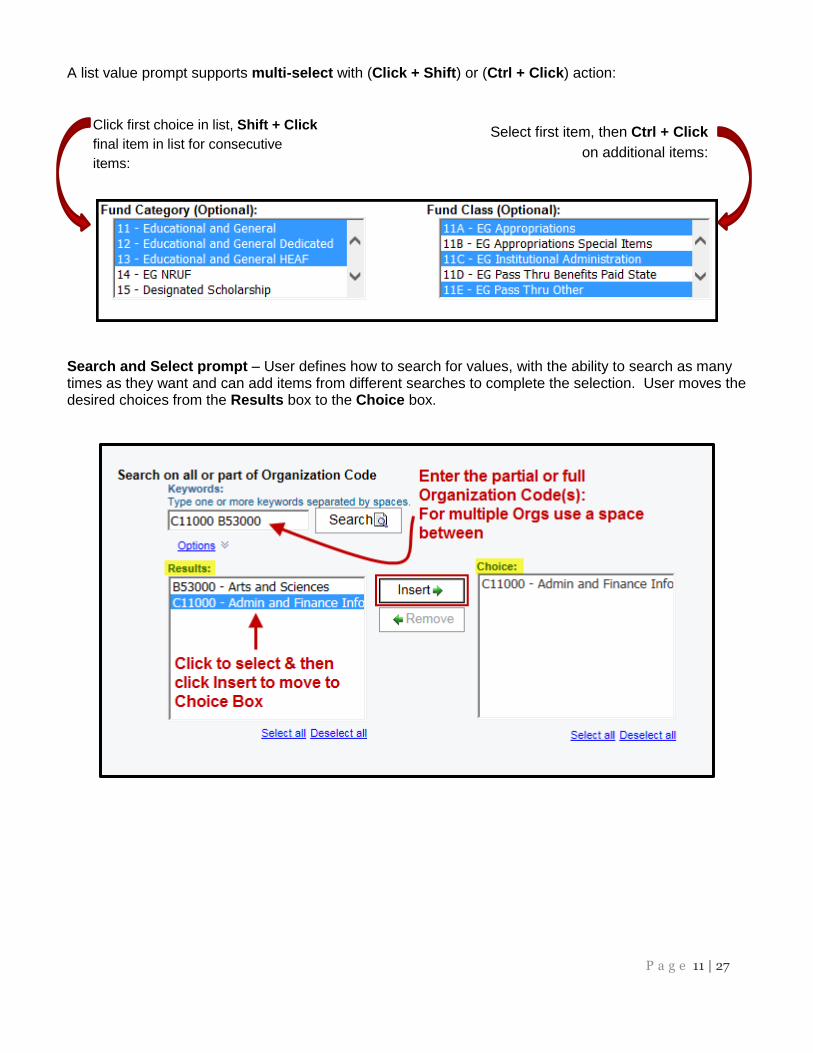
A list value prompt supports multi-select with (Click + Shift) or (Ctrl + Click) action:
Search and Select prompt – User defines how to search for values, with the ability to search as many times as they want and can add items from different searches to complete the selection. User moves the desired choices from the Results box to the Choice box.
Click first choice in list, Shift + Click
final item in list for consecutive
items:
Select first item, then Ctrl + Click
on additional items:
P a g e 12 | 27
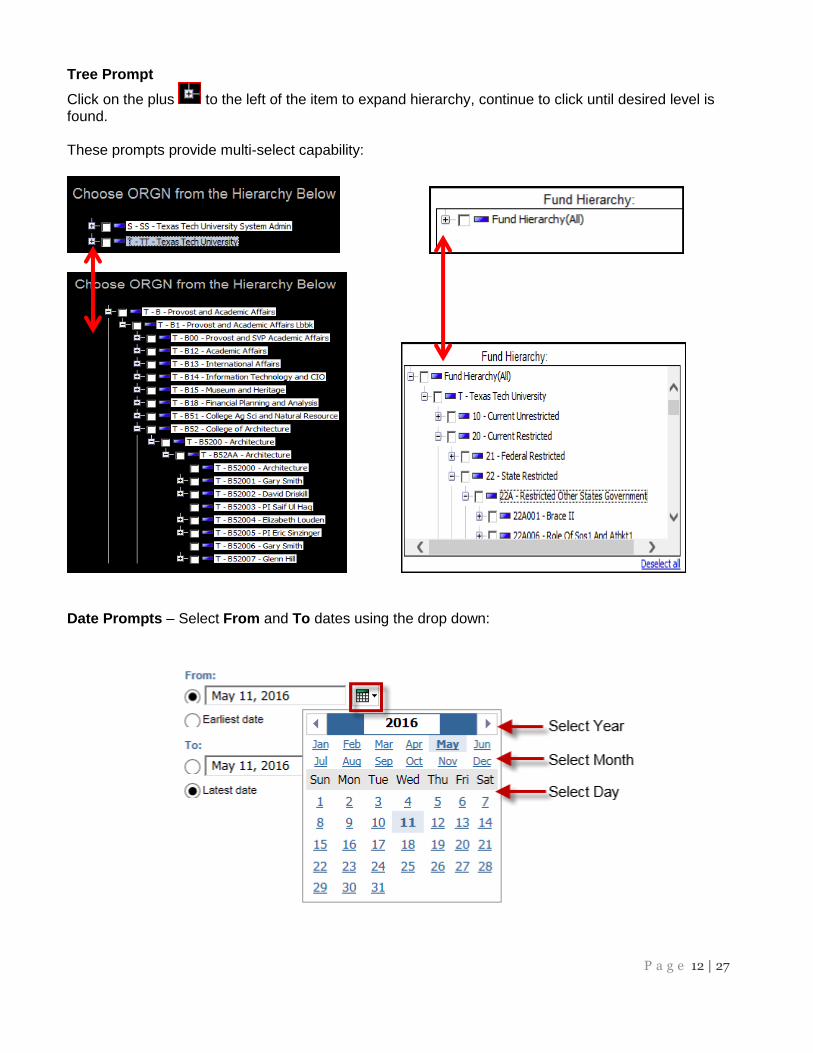
Tree Prompt
Click on the plus to the left of the item to expand hierarchy, continue to click until desired level is found. These prompts provide multi-select capability:
Date Prompts – Select From and To dates using the drop down:
P a g e 13 | 27
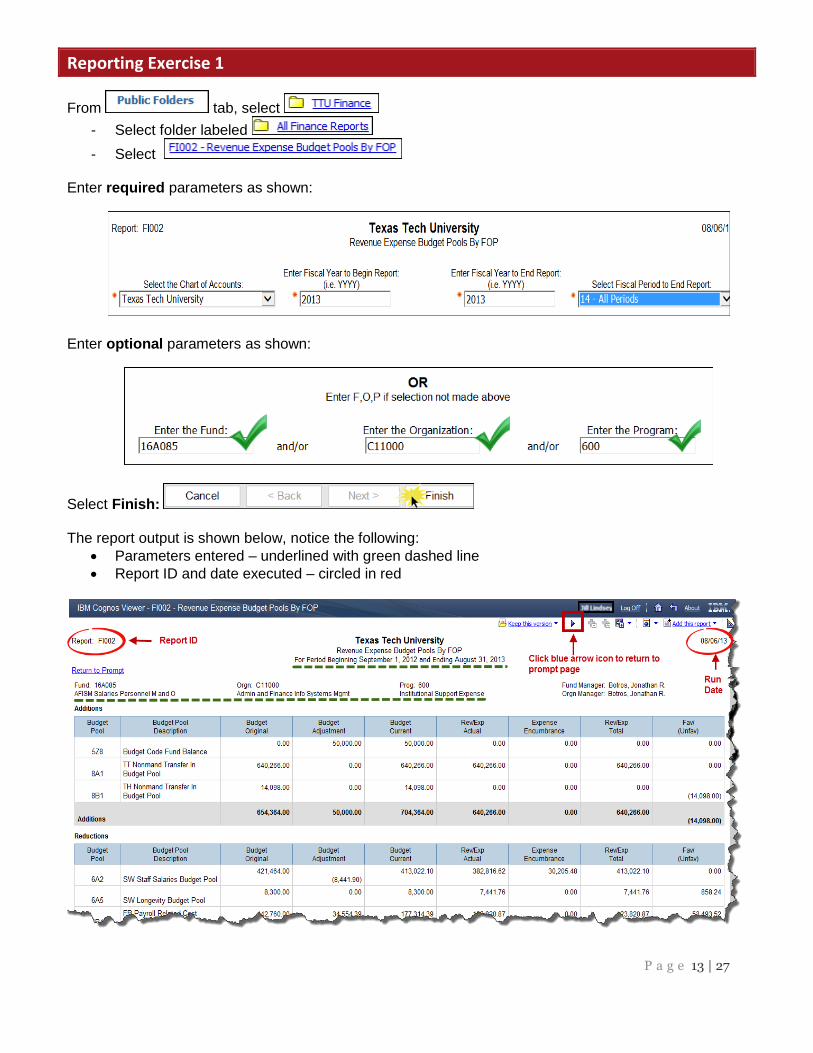
Reporting Exercise 1
From tab, select
- Select folder labeled
- Select
Enter required parameters as shown:
Enter optional parameters as shown:
Select Finish:
The report output is shown below, notice the following:
Parameters entered – underlined with green dashed line
Report ID and date executed – circled in red
P a g e 14 | 27
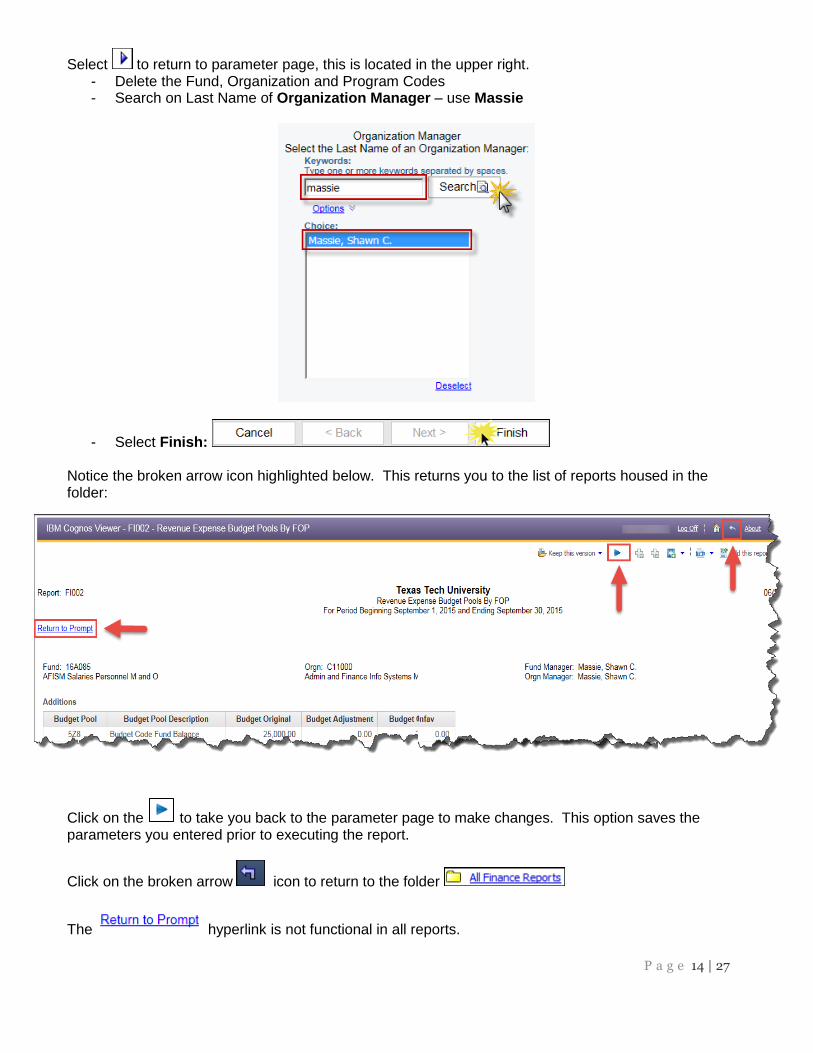
Select to return to parameter page, this is located in the upper right. - Delete the Fund, Organization and Program Codes - Search on Last Name of Organization Manager – use Massie
- Select Finish:
Notice the broken arrow icon highlighted below. This returns you to the list of reports housed in the folder:
Click on the to take you back to the parameter page to make changes. This option saves the parameters you entered prior to executing the report.
Click on the broken arrow icon to return to the folder
The hyperlink is not functional in all reports.
P a g e 15 | 27
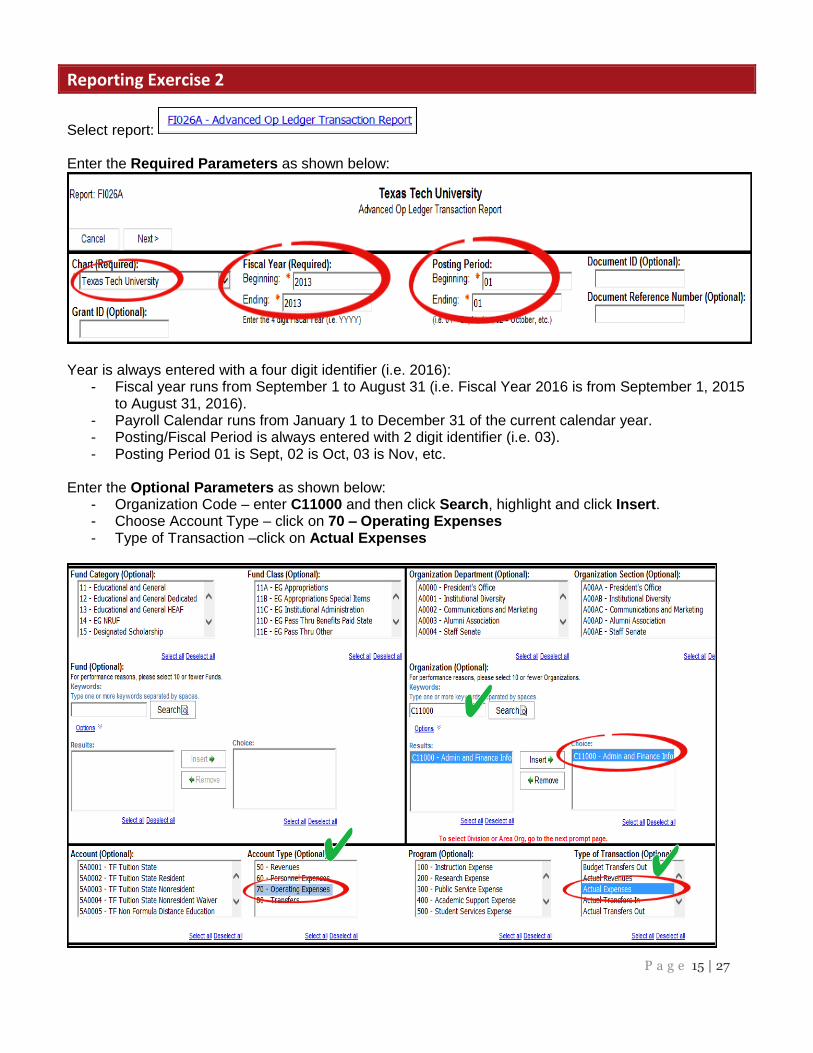
Reporting Exercise 2
Select report: Enter the Required Parameters as shown below:
Year is always entered with a four digit identifier (i.e. 2016):
- Fiscal year runs from September 1 to August 31 (i.e. Fiscal Year 2016 is from September 1, 2015 to August 31, 2016).
- Payroll Calendar runs from January 1 to December 31 of the current calendar year. - Posting/Fiscal Period is always entered with 2 digit identifier (i.e. 03). - Posting Period 01 is Sept, 02 is Oct, 03 is Nov, etc.
Enter the Optional Parameters as shown below:
- Organization Code – enter C11000 and then click Search, highlight and click Insert. - Choose Account Type – click on 70 – Operating Expenses - Type of Transaction –click on Actual Expenses
P a g e 16 | 27
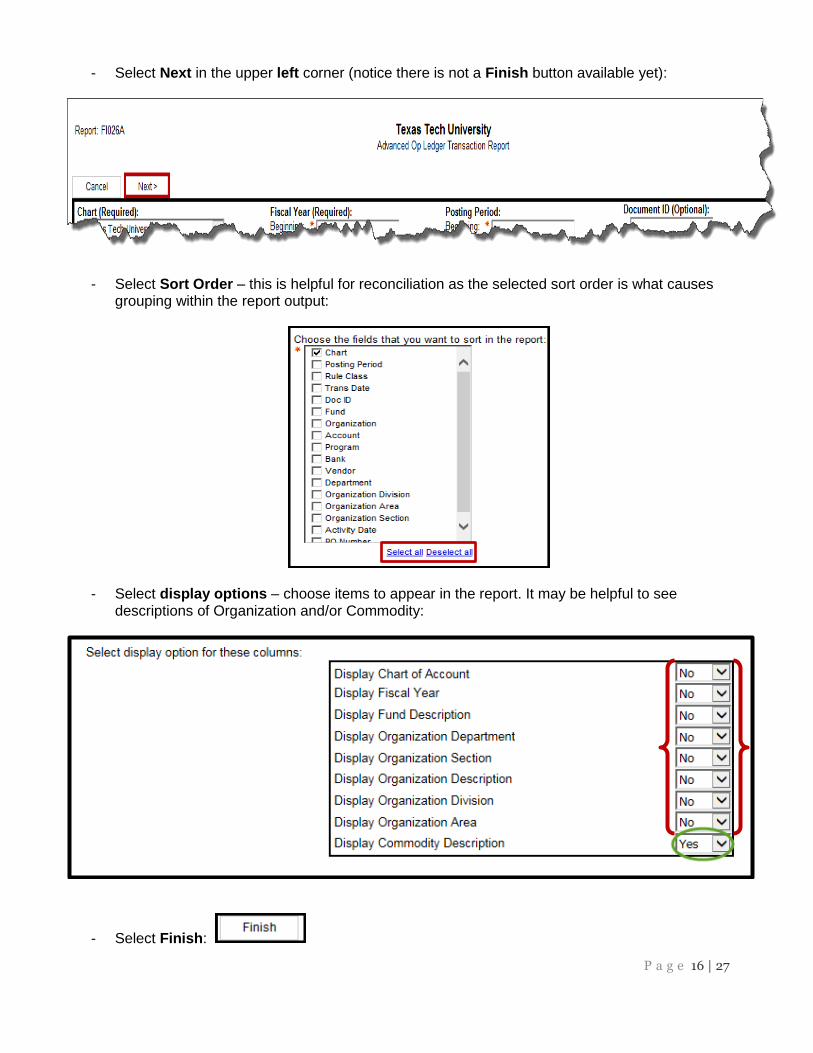
- Select Next in the upper left corner (notice there is not a Finish button available yet):
- Select Sort Order – this is helpful for reconciliation as the selected sort order is what causes grouping within the report output:
- Select display options – choose items to appear in the report. It may be helpful to see descriptions of Organization and/or Commodity:
- Select Finish:
P a g e 17 | 27
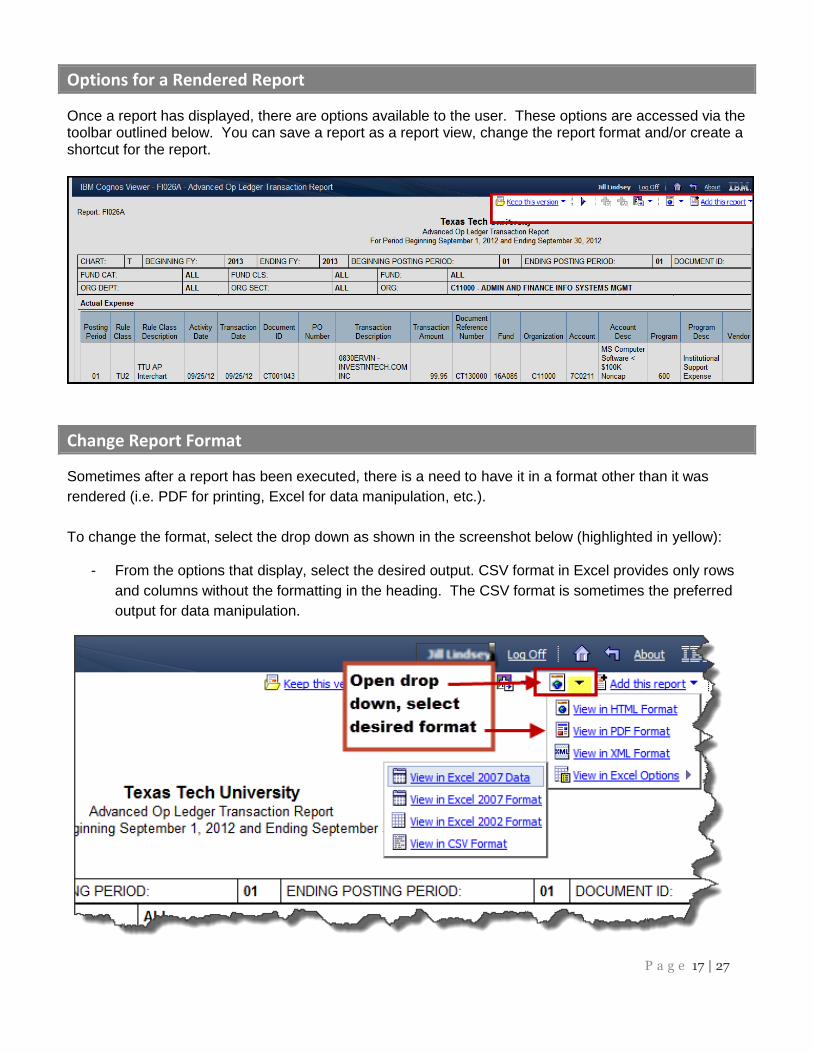
Options for a Rendered Report
Once a report has displayed, there are options available to the user. These options are accessed via the toolbar outlined below. You can save a report as a report view, change the report format and/or create a shortcut for the report.
Change Report Format
Sometimes after a report has been executed, there is a need to have it in a format other than it was
rendered (i.e. PDF for printing, Excel for data manipulation, etc.).
To change the format, select the drop down as shown in the screenshot below (highlighted in yellow):
- From the options that display, select the desired output. CSV format in Excel provides only rows
and columns without the formatting in the heading. The CSV format is sometimes the preferred
output for data manipulation.
P a g e 18 | 27
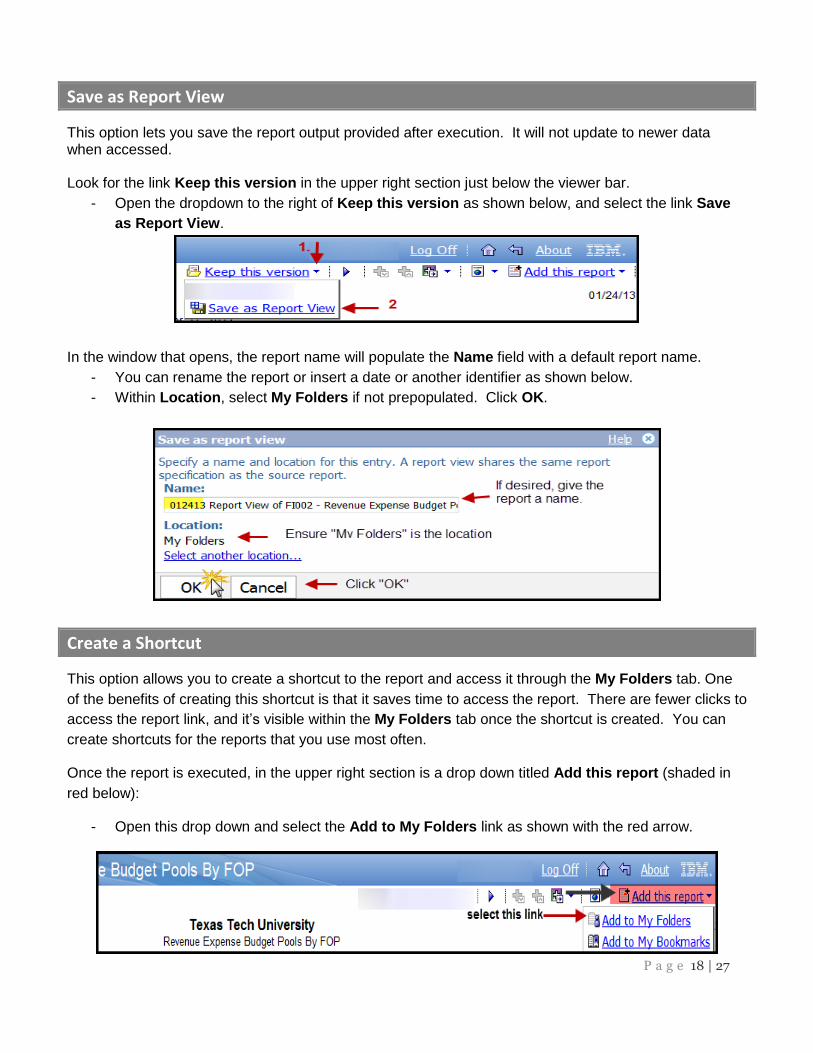
Save as Report View
This option lets you save the report output provided after execution. It will not update to newer data when accessed. Look for the link Keep this version in the upper right section just below the viewer bar.
- Open the dropdown to the right of Keep this version as shown below, and select the link Save
as Report View.
In the window that opens, the report name will populate the Name field with a default report name.
- You can rename the report or insert a date or another identifier as shown below.
- Within Location, select My Folders if not prepopulated. Click OK.
Create a Shortcut
This option allows you to create a shortcut to the report and access it through the My Folders tab. One
of the benefits of creating this shortcut is that it saves time to access the report. There are fewer clicks to
access the report link, and it’s visible within the My Folders tab once the shortcut is created. You can
create shortcuts for the reports that you use most often.
Once the report is executed, in the upper right section is a drop down titled Add this report (shaded in
red below):
- Open this drop down and select the Add to My Folders link as shown with the red arrow.
P a g e 19 | 27
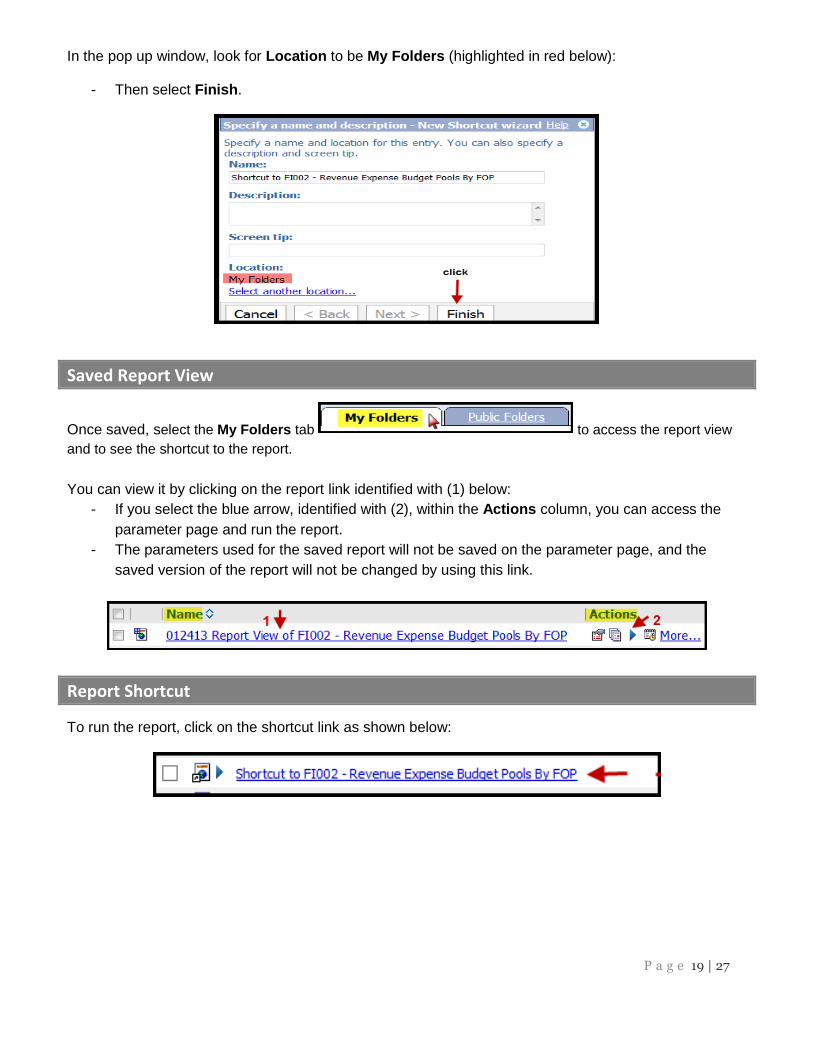
In the pop up window, look for Location to be My Folders (highlighted in red below):
- Then select Finish.
Saved Report View
Once saved, select the My Folders tab to access the report view
and to see the shortcut to the report.
You can view it by clicking on the report link identified with (1) below:
- If you select the blue arrow, identified with (2), within the Actions column, you can access the
parameter page and run the report.
- The parameters used for the saved report will not be saved on the parameter page, and the
saved version of the report will not be changed by using this link.
Report Shortcut
To run the report, click on the shortcut link as shown below:
P a g e 20 | 27
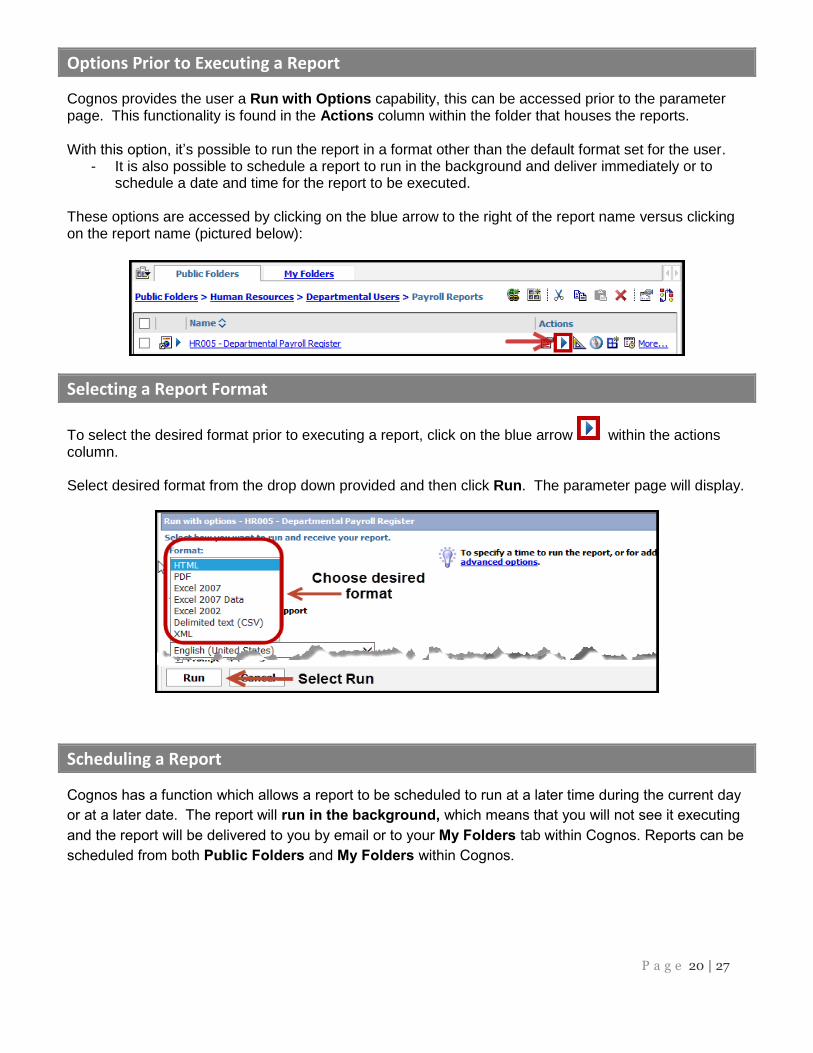
Options Prior to Executing a Report
Cognos provides the user a Run with Options capability, this can be accessed prior to the parameter page. This functionality is found in the Actions column within the folder that houses the reports. With this option, it’s possible to run the report in a format other than the default format set for the user.
- It is also possible to schedule a report to run in the background and deliver immediately or to schedule a date and time for the report to be executed.
These options are accessed by clicking on the blue arrow to the right of the report name versus clicking on the report name (pictured below):
Selecting a Report Format
To select the desired format prior to executing a report, click on the blue arrow within the actions column. Select desired format from the drop down provided and then click Run. The parameter page will display.
Scheduling a Report
Cognos has a function which allows a report to be scheduled to run at a later time during the current day
or at a later date. The report will run in the background, which means that you will not see it executing
and the report will be delivered to you by email or to your My Folders tab within Cognos. Reports can be
scheduled from both Public Folders and My Folders within Cognos.
P a g e 21 | 27
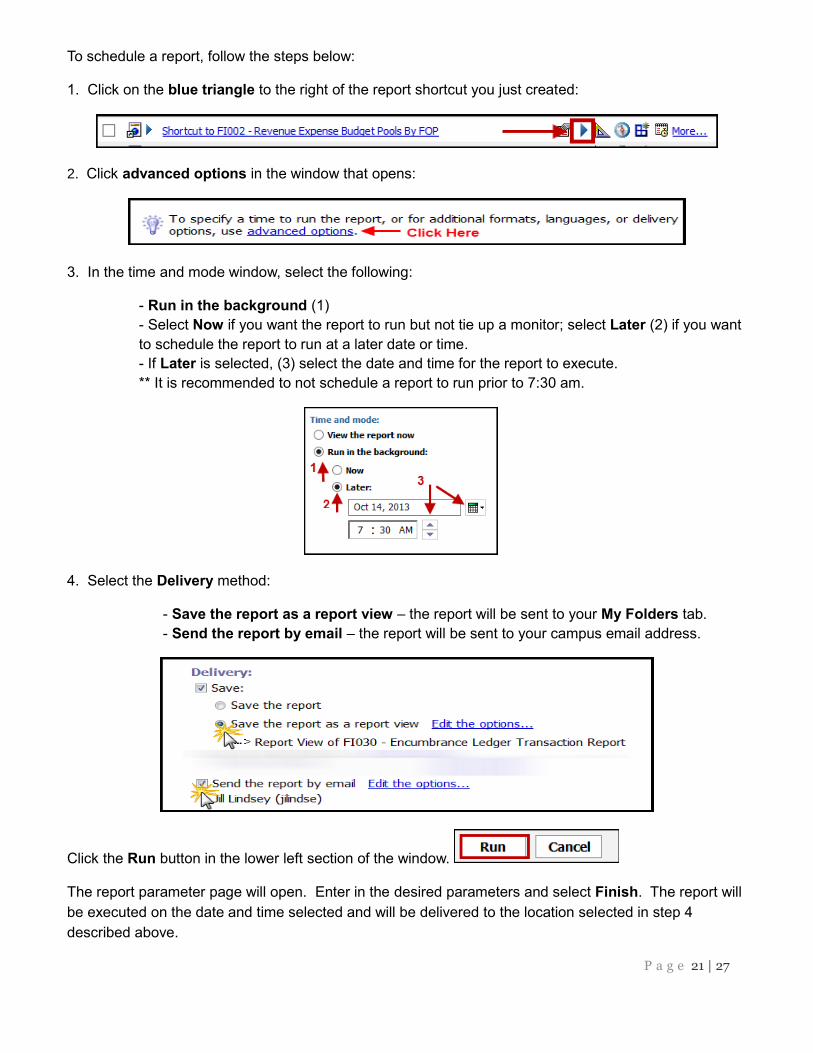
To schedule a report, follow the steps below:
1. Click on the blue triangle to the right of the report shortcut you just created:
2. Click advanced options in the window that opens:
3. In the time and mode window, select the following:
- Run in the background (1)
- Select Now if you want the report to run but not tie up a monitor; select Later (2) if you want
to schedule the report to run at a later date or time.
- If Later is selected, (3) select the date and time for the report to execute.
** It is recommended to not schedule a report to run prior to 7:30 am.
4. Select the Delivery method:
- Save the report as a report view – the report will be sent to your My Folders tab.
- Send the report by email – the report will be sent to your campus email address.
Click the Run button in the lower left section of the window.
The report parameter page will open. Enter in the desired parameters and select Finish. The report will
be executed on the date and time selected and will be delivered to the location selected in step 4
described above.
P a g e 22 | 27
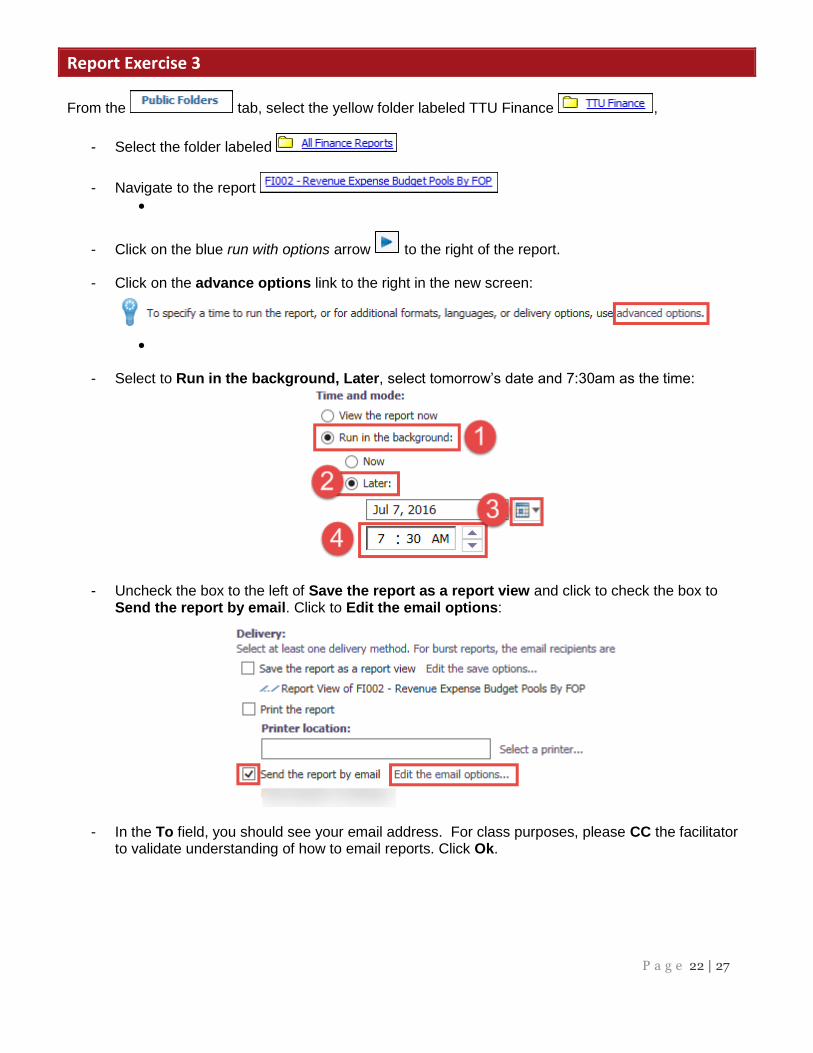
Report Exercise 3
From the tab, select the yellow folder labeled TTU Finance ,
- Select the folder labeled
- Navigate to the report
- Click on the blue run with options arrow to the right of the report.
- Click on the advance options link to the right in the new screen:
- Select to Run in the background, Later, select tomorrow’s date and 7:30am as the time:
- Uncheck the box to the left of Save the report as a report view and click to check the box to
Send the report by email. Click to Edit the email options:
- In the To field, you should see your email address. For class purposes, please CC the facilitator
to validate understanding of how to email reports. Click Ok.
P a g e 23 | 27
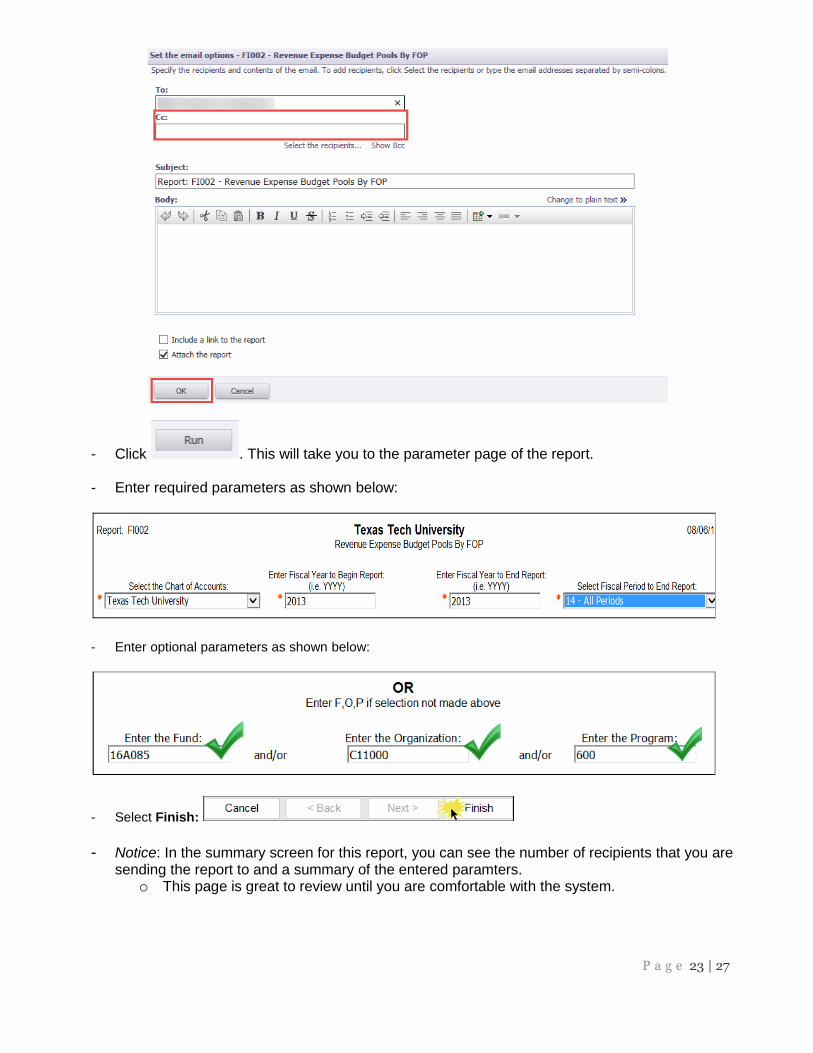
- Click . This will take you to the parameter page of the report.
- Enter required parameters as shown below:
- Enter optional parameters as shown below:
- Select Finish:
- Notice: In the summary screen for this report, you can see the number of recipients that you are
sending the report to and a summary of the entered paramters. o This page is great to review until you are comfortable with the system.
P a g e 24 | 27
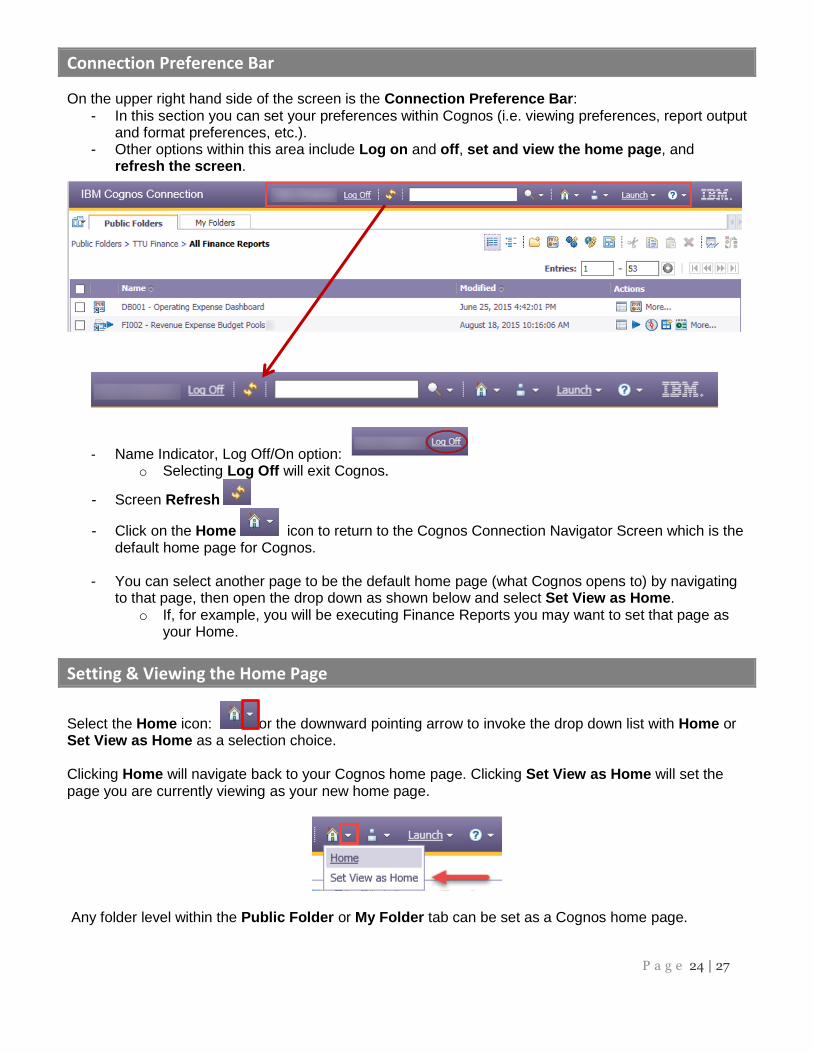
Connection Preference Bar
On the upper right hand side of the screen is the Connection Preference Bar: - In this section you can set your preferences within Cognos (i.e. viewing preferences, report output
and format preferences, etc.). - Other options within this area include Log on and off, set and view the home page, and
refresh the screen.
- Name Indicator, Log Off/On option: o Selecting Log Off will exit Cognos.
- Screen Refresh
- Click on the Home icon to return to the Cognos Connection Navigator Screen which is the default home page for Cognos.
- You can select another page to be the default home page (what Cognos opens to) by navigating
to that page, then open the drop down as shown below and select Set View as Home. o If, for example, you will be executing Finance Reports you may want to set that page as
your Home.
Setting & Viewing the Home Page
Select the Home icon: or the downward pointing arrow to invoke the drop down list with Home or Set View as Home as a selection choice. Clicking Home will navigate back to your Cognos home page. Clicking Set View as Home will set the page you are currently viewing as your new home page.
Any folder level within the Public Folder or My Folder tab can be set as a Cognos home page.
P a g e 25 | 27
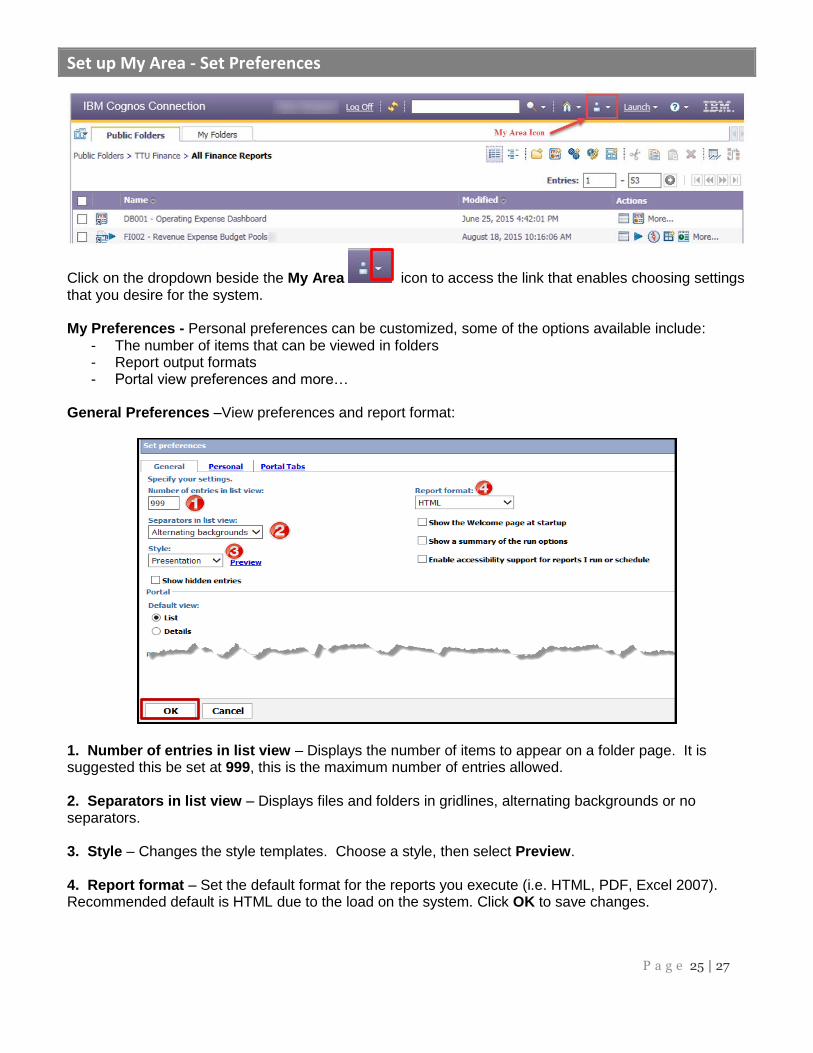
Set up My Area - Set Preferences
Click on the dropdown beside the My Area icon to access the link that enables choosing settings that you desire for the system. My Preferences - Personal preferences can be customized, some of the options available include:
- The number of items that can be viewed in folders - Report output formats - Portal view preferences and more…
General Preferences –View preferences and report format:
1. Number of entries in list view – Displays the number of items to appear on a folder page. It is suggested this be set at 999, this is the maximum number of entries allowed. 2. Separators in list view – Displays files and folders in gridlines, alternating backgrounds or no separators. 3. Style – Changes the style templates. Choose a style, then select Preview. 4. Report format – Set the default format for the reports you execute (i.e. HTML, PDF, Excel 2007). Recommended default is HTML due to the load on the system. Click OK to save changes.
P a g e 26 | 27
Report Modifications & Cognos News
AFISM features Report Modifications, New Report Information, Report Spotlights and more through the monthly Newsletter.
- The Newsletter is published on the AFISM website and available through Raiderlink>AFISM Newsletters.
- Each edition is announced through TechAnnounce and available the first week of the new month.
Troubleshooting
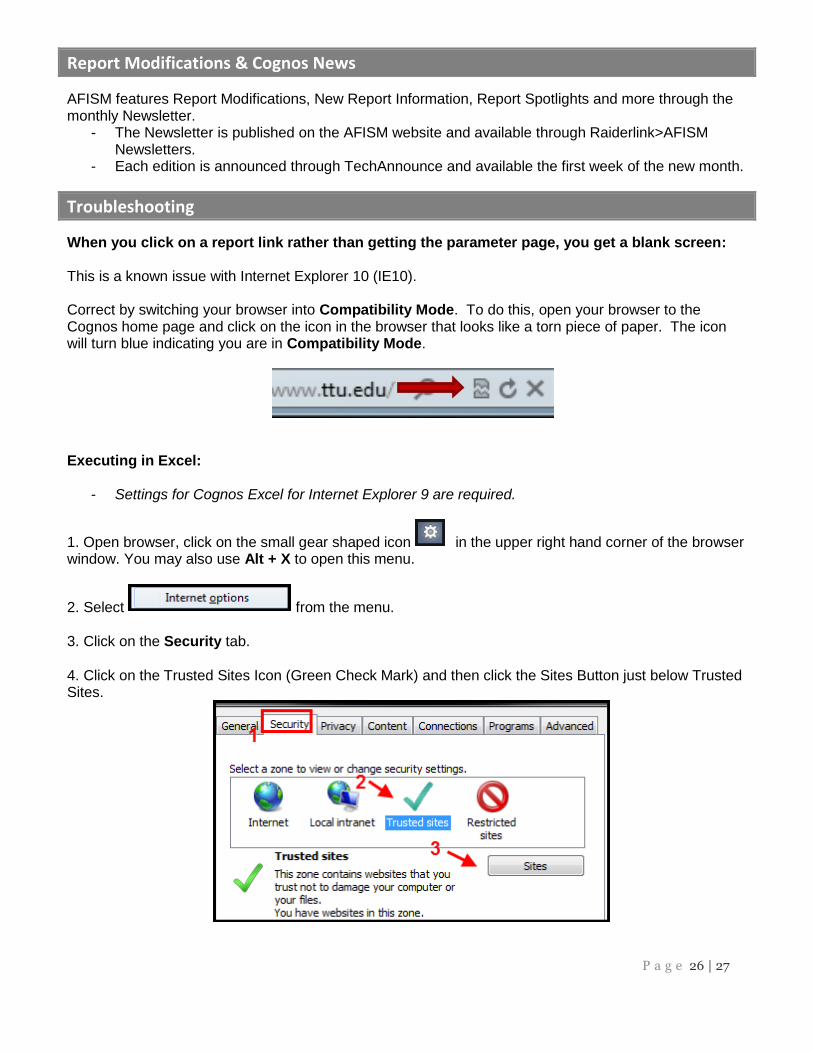
When you click on a report link rather than getting the parameter page, you get a blank screen: This is a known issue with Internet Explorer 10 (IE10).
Correct by switching your browser into Compatibility Mode. To do this, open your browser to the Cognos home page and click on the icon in the browser that looks like a torn piece of paper. The icon will turn blue indicating you are in Compatibility Mode.
Executing in Excel:
- Settings for Cognos Excel for Internet Explorer 9 are required.
1. Open browser, click on the small gear shaped icon in the upper right hand corner of the browser window. You may also use Alt + X to open this menu.
2. Select from the menu.
3. Click on the Security tab.
4. Click on the Trusted Sites Icon (Green Check Mark) and then click the Sites Button just below Trusted Sites.
P a g e 27 | 27
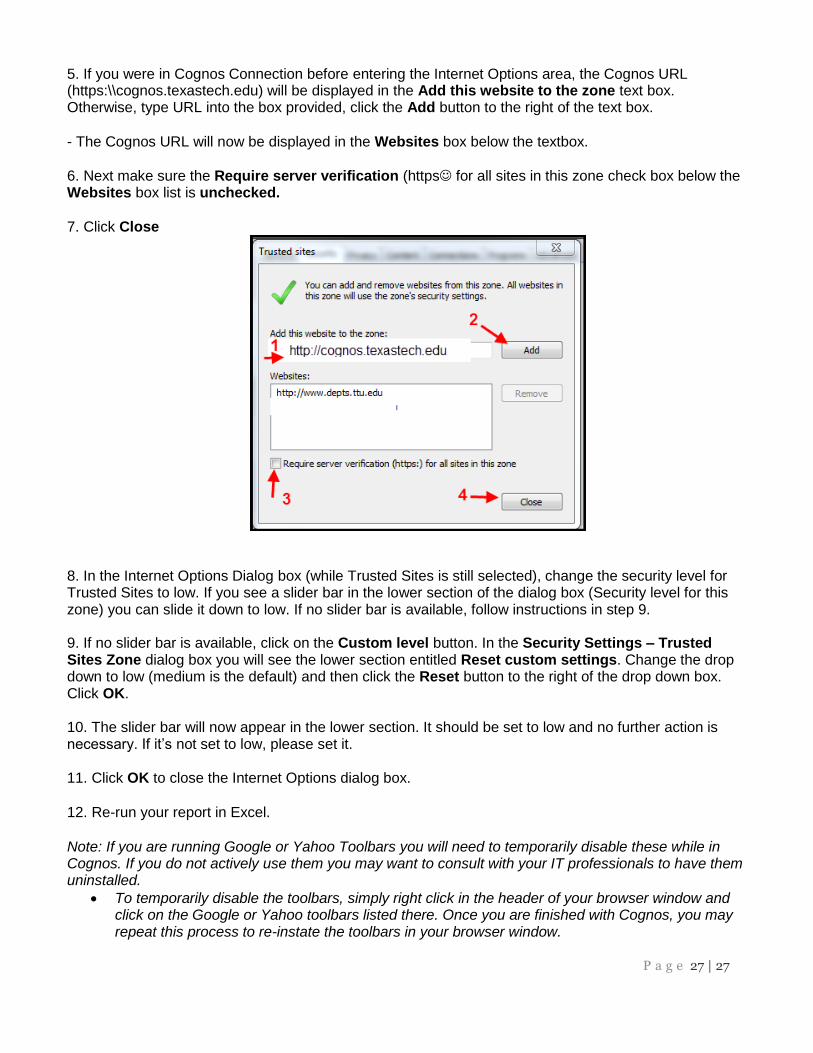
5. If you were in Cognos Connection before entering the Internet Options area, the Cognos URL (https:\\cognos.texastech.edu) will be displayed in the Add this website to the zone text box. Otherwise, type URL into the box provided, click the Add button to the right of the text box.
- The Cognos URL will now be displayed in the Websites box below the textbox.
6. Next make sure the Require server verification (https for all sites in this zone check box below the Websites box list is unchecked.
7. Click Close
8. In the Internet Options Dialog box (while Trusted Sites is still selected), change the security level for Trusted Sites to low. If you see a slider bar in the lower section of the dialog box (Security level for this zone) you can slide it down to low. If no slider bar is available, follow instructions in step 9. 9. If no slider bar is available, click on the Custom level button. In the Security Settings – Trusted Sites Zone dialog box you will see the lower section entitled Reset custom settings. Change the drop down to low (medium is the default) and then click the Reset button to the right of the drop down box. Click OK. 10. The slider bar will now appear in the lower section. It should be set to low and no further action is necessary. If it’s not set to low, please set it.
11. Click OK to close the Internet Options dialog box.
12. Re-run your report in Excel.
Note: If you are running Google or Yahoo Toolbars you will need to temporarily disable these while in Cognos. If you do not actively use them you may want to consult with your IT professionals to have them uninstalled.
To temporarily disable the toolbars, simply right click in the header of your browser window and click on the Google or Yahoo toolbars listed there. Once you are finished with Cognos, you may repeat this process to re-instate the toolbars in your browser window.


