DIY Anemometer Collect • 5 small paper cups (3 oz works best) • Scissors • Pushpin • 2 straws • Pencil with eraser • Marker or sticker • Stopwatch • Fan (optional) • Adult supervision Make an anemometer 1. Sit one of the cups on a stable surface. Use a pencil to make one mark on the top rim of the cup. Make another mark directly across from the first one. Repeat with the remaining four cups. 2. Use scissors to poke holes one inch below each mark on the rim. 3. On one cup, make two more marks on the rim in between the first two. Use the scissors to poke holes one inch below each mark. You should be left with four, evenly spaced holes around the cup. This will be the center hub for your anemometer. 4. Poke one straw through two of the holes in the center hub. Poke the other straw through the remaining two holes. The center of each straw should overlap in the center of the cup to form a cross. 5. Make one hole in the center of the cup’s base. Poke the pencil through the hole so that the eraser end touches the crossed straws inside of the cup. Pin the straws to the eraser using a pushpin. 6. Thread one of the straws through both holes in one of the remaining cups. Repeat with the last three cups so that one cup is on the end of each straw. 7. Position each outer cup so that the opening of one cup faces the bottom of the cup next to it. 8. Mark one of the outer cups on the bottom using a marker or sticker. Test it out! 9. Take your anemometer outside when the wind is blowing, or hold it in front of a fan. 10. Use a stopwatch to count the number of turns the anemometer takes in one minute. The mark on the bottom of one of the cups will help you count the number of spins (revolutions). 11. Compare your anemometer’s measurements at different times of the day, in different places in your yard, or with different settings of the fan. Do you notice a difference in number of revolutions? The number of revolutions in one minute can be written as revolutions per minute (rpm’s). 601 Light Street Baltimore, MD 21230 • www.marylandsciencecenter.org
Transcript
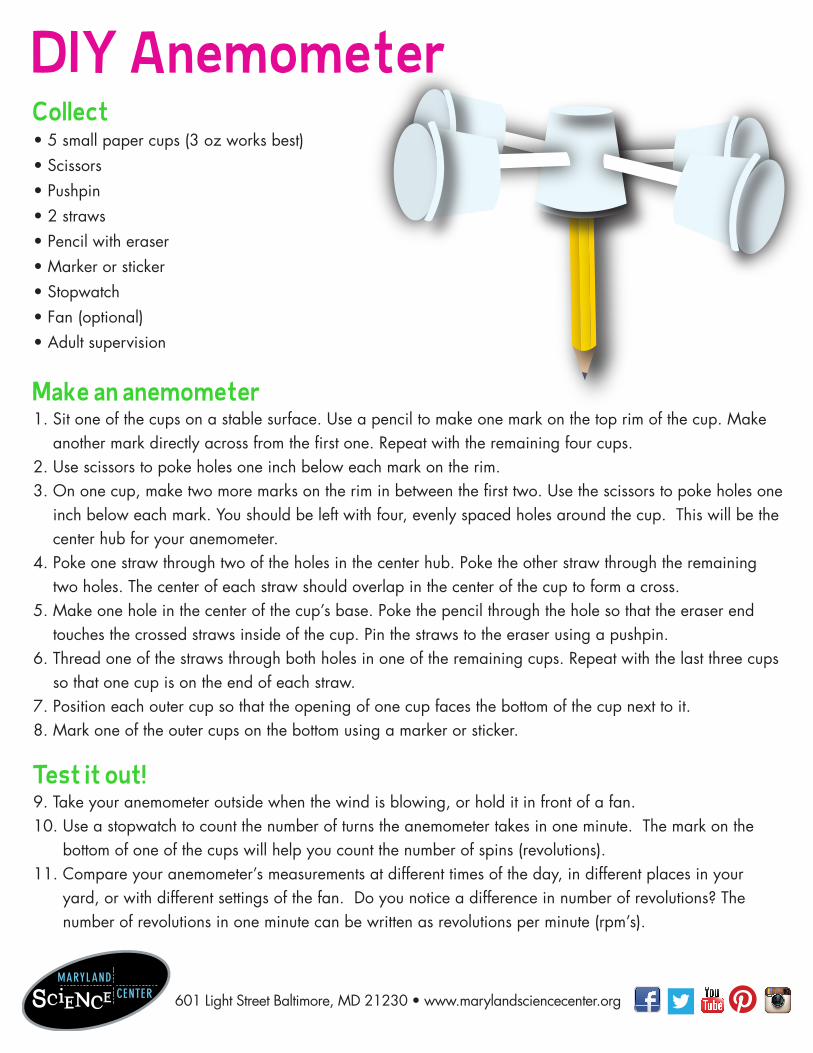
DIY AnemometerCollect• 5 small paper cups (3 oz works best)• Scissors• Pushpin• 2 straws• Pencil with eraser• Marker or sticker• Stopwatch• Fan (optional) • Adult supervision
Make an anemometer1. Sit one of the cups on a stable surface. Use a pencil to make one mark on the top rim of the cup. Make another mark directly across from the first one. Repeat with the remaining four cups.2. Use scissors to poke holes one inch below each mark on the rim. 3. On one cup, make two more marks on the rim in between the first two. Use the scissors to poke holes one inch below each mark. You should be left with four, evenly spaced holes around the cup. This will be the center hub for your anemometer. 4. Poke one straw through two of the holes in the center hub. Poke the other straw through the remaining two holes. The center of each straw should overlap in the center of the cup to form a cross. 5. Make one hole in the center of the cup’s base. Poke the pencil through the hole so that the eraser end touches the crossed straws inside of the cup. Pin the straws to the eraser using a pushpin. 6. Thread one of the straws through both holes in one of the remaining cups. Repeat with the last three cups so that one cup is on the end of each straw. 7. Position each outer cup so that the opening of one cup faces the bottom of the cup next to it.8. Mark one of the outer cups on the bottom using a marker or sticker.
Test it out!9. Take your anemometer outside when the wind is blowing, or hold it in front of a fan. 10. Use a stopwatch to count the number of turns the anemometer takes in one minute. The mark on the bottom of one of the cups will help you count the number of spins (revolutions).11. Compare your anemometer’s measurements at different times of the day, in different places in your yard, or with different settings of the fan. Do you notice a difference in number of revolutions? The number of revolutions in one minute can be written as revolutions per minute (rpm’s).
601 Light Street Baltimore, MD 21230 • www.marylandsciencecenter.org
How does it work?Anemometers measure how fast the wind is blowing by counting the number of spins (revolutions) it makes in one minute. Weather forecasters use anemometers to convert the number of revolutions (rpm) into miles per hour (mph). Since the size and circumference of each homemade anemometer is different, the exact wind speed cannot be measured. Other factors that also change how fast the anemometer spins are drag and friction. However, homemade anemometers are excellent tools for comparing wind speeds. Can you measure your own breath? How fast can you make your anemometer spin by blowing into the cups?
DIY AnemometerCollect• 5 small paper cups (3 oz works best)• Scissors• Pushpin• 2 straws• Pencil with eraser• Marker or sticker• Stopwatch• Fan (optional) • Adult supervision
Make an anemometer1. Sit one of the cups on a stable surface. Use a pencil to make one mark on the top rim of the cup. Make another mark directly across from the first one. Repeat with the remaining four cups.2. Use scissors to poke holes one inch below each mark on the rim. 3. On one cup, make two more marks on the rim in between the first two. Use the scissors to poke holes one inch below each mark. You should be left with four, evenly spaced holes around the cup. This will be the center hub for your anemometer. 4. Poke one straw through two of the holes in the center hub. Poke the other straw through the remaining two holes. The center of each straw should overlap in the center of the cup to form a cross. 5. Make one hole in the center of the cup’s base. Poke the pencil through the hole so that the eraser end touches the crossed straws inside of the cup. Pin the straws to the eraser using a pushpin. 6. Thread one of the straws through both holes in one of the remaining cups. Repeat with the last three cups so that one cup is on the end of each straw. 7. Position each outer cup so that the opening of one cup faces the bottom of the cup next to it.8. Mark one of the outer cups on the bottom using a marker or sticker.
Test it out!9. Take your anemometer outside when the wind is blowing, or hold it in front of a fan. 10. Use a stopwatch to count the number of turns the anemometer takes in one minute. The mark on the bottom of one of the cups will help you count the number of spins (revolutions).11. Compare your anemometer’s measurements at different times of the day, in different places in your yard, or with different settings of the fan. Do you notice a difference in number of revolutions? The number of revolutions in one minute can be written as revolutions per minute (rpm’s).
How does it work?Anemometers measure how fast the wind is blowing by counting the number of spins (revolutions) it makes in one minute. Weather forecasters use anemometers to convert the number of revolutions (rpm) into miles per hour (mph). Since the size and circumference of each homemade anemometer is different, the exact wind speed cannot be measured. Other factors that also change how fast the anemometer spins are drag and friction. However, homemade anemometers are excellent tools for comparing wind speeds. Can you measure your own breath? How fast can you make your anemometer spin by blowing into the cups?
601 Light Street Baltimore, MD 21230 • www.marylandsciencecenter.org