43
Collecting Consent Blackbaud Solutions User Guide Version 1.0 April 2017
Collecting Consent Blackbaud Solutions User Guide
Version 1.0
April 2017
Collecting Consent Blackbaud Solutions User Guide
Contents 1 Introduction............................................................................................................................................ 3
2 eTapestry .............................................................................................................................................. 4
3 Raiser’s Edge 7 ................................................................................................................................... 12
4 Blackbaud NetCommunity ................................................................................................................... 21
5 Online Express .................................................................................................................................... 25
6 Raiser’s Edge NXT .............................................................................................................................. 26
7 Blackbaud CRM .................................................................................................................................. 29
8 everydayhero ....................................................................................................................................... 42
Collecting Consent Blackbaud Solutions User Guide
1 Introduction
Recent enforcement actions taken by the UK’s Information Commissioner’s Office (the “ICO”) and the upcoming enactment of the EU’s General Data Protection Regulation (“GDPR”) have placed the data collection and usage practices of non-profits under intense scrutiny. The ICO’s concerns focus on ensuring non-profits are transparent in their data processing activities and that donors give informed consent to such activities. In May 2018, GDPR will require all EU organisations relying on consent as a basis for processing personal information to make certain that data subjects affirmatively opt-in to processing of their data by the organisation. Further, GDPR will require that organisations be able to demonstrate they have collected such consent. The purpose of this guide is to inform our customers on how best to use our solutions’ functionality – as they are today – to collect consent, record consent, and then effectively use that consent to determine what processing activities may be taken with respect to each constituent. For the purposes of this document:
- The term “consent” is used to describe a supporter’s permission to use their data in a certain way (eg. marketing, communications, wealth screening).
- The term “preference” is used to describe the supporter’s desired content subscriptions (eg. annual report, monthly newsletter, appeals).
- The term “processing” refers to any activities an organisation takes with respect to a supporter’s data, including collection, use, storage, sharing, data enrichment or analytics.
As always, it is best to work with your organisation’s legal advisor, who is familiar with your practices and constituents, to determine your obligations under existing laws. We do not guarantee that use of our solutions as set forth in this guide will satisfy the requirements of laws and regulations to which your organisation may be subject. Nothing in this document should be construed as legal advice or a legal opinion on any specific facts or circumstances.
We are fully committed to making sure our solutions are not in breach of the law as it is currently, whilst also helping you prepare for the future. We keenly await the ICO’s final recommendations and are preparing to build any necessary changes in our solutions to maintain this. Further, we will continue to work on ways to improve the user experience in the products, specifically as relates to the capture, recording and use of your supporters’ consent. We will publish a follow-up communication describing these product developments in more detail – this is a big project as we are coordinating our approach across our full solution set.
Further to this Solutions Guide, please visit our GDPR for ongoing updates: https://fundraising.blackbaud.co.uk/gdpr/

Collecting Consent Blackbaud Solutions User Guide
2 eTapestry
In order to capture a constituent’s consent to your organisation’s processing activities in eTapestry, Blackbaud recommends the use of User Defined Fields (UDFs) on the constituent’s defined fields tab to track opt-in consent per channel. These should reflect the current or active consent. The eTapestry Journal can be used to track historical consent. Additionally, though perhaps not required for compliance with existing privacy laws or GDPR, organisations may wish to collect further preferences from constituents, such as specific communication pieces they want to receive, or frequency of communication, or preferred channel. The consent and communication preferences can be used in eTapestry Queries to select which constituents to send communications to. Below we have outlined how eTapestry users can collect and document consent to an organisation’s processing activities. This is broken into four categories – Configuration, Capture, Use and Retrieve.
2.1 Configuration
UDF Category Field Application
UDF Name UDF Data Type
Display Type
UDF Values
Consent Constituent Email Consent* Text Single Select
Consent Assumed Consent Declined Consent Given Consent Withdrawn
Phone Consent* Text Single Select
""
Postal Consent* Text Single Select
""
SMS Consent* Text Single Select
""
Third Party Data Share*
Text Single Select
""
Wealth Processing* Text Single Select
""
Journal (all) Historical Consent Text Multi-Select Email, Phone, Postal, SMS, etc.
Communication Preferences
Constituent Specific Communications
Text Multi-select E.g. Fundraising; Latest News
* Make these fields required. Include only those channels your organisation uses.

Collecting Consent Blackbaud Solutions User Guide
2.2 Capture
Constituents can be entered or updated in eTapestry in the below ways:
Direct entry on the eTapestry record
Created via import (from external data sources)
DIY Forms
o Newsletter/Contact Us
o Volunteer
o Membership
o Donation
o Event Registration
Cart Module (optional)
everydayhero integration (optional)
Consent may also be changed via the constituent unsubscribing from an email sent from eTapestry. Below we detail how to include consent information when capturing new constituents in eTapestry and updating existing accounts.
2.2.1 Creating a New Constituent Account with Consent Fields (direct entry on the eTapestry record)
To create a new constituent and include consent fields: First, check to ensure that the account does not already exist. You can do so by using the Search bar at the top of your database. If you find the account already exists, then follow instructions found in the next section - Updating a Constituent Account (direct entry on the eTapestry record). If you cannot find an existing account, you'll need to create one using the steps listed below:
1. Click Accounts
2. Click Add an Account
3. Ensure that the Constituent checkbox is marked below the Roles heading
4. Below the Name and Recognition heading, select the appropriate Name Format from the drop down
menu.
5. If the donor is an Individual, fill in the First and Last Name fields; the Account Name and Sort Name
will automatically generate based on the organisation's Data Entry Rules. If the donor is a Business
or Family, fill in the Account Name field; the Sort Name will automatically generate based on the
organisation's Data Entry Rules.
6. Below the Persona heading, select the appropriate Persona (address) type from the drop down
menu
7. Enter the constituent's street address, email address, phone number, and any additional fields you'd
like to include
8. If there are any fields marked with a red dot or asterisk, complete those fields, as well (these are
User Defined Fields) and locate the category of User Defined Fields which house all consent fields
and select this to expand fields
9. Select each field name to select a value for the UDF
10. Enter values for consent if known, if not known, use “not asked”
11. Select "Save And" to save and create the account
Collecting Consent Blackbaud Solutions User Guide
2.2.2 Updating a Constituent Account (direct entry on the eTapestry record)
To update consent on an existing constituent: 1. Search for the account in eTapestry using the search bar at the top of your database
2. Go to the Account
3. Go to the Defined Fields tab
4. Locate the category of User Defined Fields which house all consent fields and select this to expand
fields
5. Select each UDF, in turn, to overwrite UDF with new/changed consent
6. Select "Save And Go to Journal" to complete the changes to the UDF
7. Create the appropriate Journal entry related to the interaction (i.e. what was the interaction that
prompted the updated info – a new gift, a participation, an inbound or outbound meeting or phone
call?)
i. Under the Historical Consent UDF, check all that apply of which have changed
ii. In the notes area of the Journal, enter the old consent information and what it has
changed to
iii. The date of the change should be the Journal Date
2.2.3 Importing New Accounts
To include consent fields when importing: 1. Click Management
2. Click Import
3. Select the category where you'd like to store the import
4. Click New Import
5. Enter a name for the import template
6. Click Browse Files/Choose File
7. In the Type of Information to Import drop-down menu, select Account Information
8. Select the appropriate CSV file for this import
9. Select your preference from the Name Format drop down menu
a. If you have multiple types of Name Formats in your CSV file, select "Map from your import
file" and select the appropriate column
b. If you have only one Name Format in your CSV file, assign that Name Format to all accounts
10. Select the Country from the drop down menu (all accounts in the file must be from the same
country)
11. Select your Multi Select Delimiter from the drop down menu
12. Click Next
13. Click the green arrow icon next to the name of the field
14. Select the corresponding column from the CSV file
15. Repeat for all of the fields in your import file (we will not import fields for Name Format or Country
on this page since we did that on the first page)
a. Please note that we can select "Use auto-generated Data Entry Rules" for the Sort Name
and Salutations (we can also do this for the Account Name on the Individual names)
16. Click the link that says Import Another eTapestry Field at the bottom of the screen
17. Click the names of the additional fields you'd like to import and select your consent fields:

Collecting Consent Blackbaud Solutions User Guide
18. Click the green arrow icon next to the names of these fields
19. Select the corresponding column from the CSV file:
20. Mark the checkboxes for the Import Keys
21. Click Next
22. Preview the layout of the information
23. Click Next
24. Preview the duplicates and select how you would like to handle the information (if there are no
duplicates, the database will skip this step)
a. Only Import Into Empty Fields (Merge) will only add new information from the CSV file, but it
will not replace any existing information
b. Don't Modify Any Account Info (Trust) will not change anything on the existing accounts, it
will also not add any new information
c. Replace eTapestry Info (Replace) will override the existing information in eTapestry with the
information in the CSV file
d. Create New Account (Create) will indicate that these are not duplicate accounts and we
should create a new eTapestry account for the information in the CSV file
e. Ignore this Line (Ignore) will not import any information from this line in the CSV file to
eTapestry
25. Click Next
26. Click Run to process the import
2.2.4 DIY Forms
To capture consent via a DIY Form, you must have the relevant UDFs present on each form. 1. Click Management
2. Click DIY Forms in the Online Presence section
3. Click Edit to the right of the DIY form you would like to edit
4. Click the plus Icon in the Section where you would like to add your User Defined Field
5. Select Add Fields

Collecting Consent Blackbaud Solutions User Guide
6. From the drop-down menu, select the category in which the User Defined Field is stored
7. Select your User Defined Field
8. For additional options pertaining to the selected User Defined Field, click on the + icon to the left of
your selected User Defined Field. Additional options include changing the label (what appears
online), marking the field required (consent fields should be marked as required), changing which
location this data is applied towards, or adjusting which values appear as an option on your DIY
form:
We recommend that you make these fields required, and only show the relevant options (eg exclude "not asked"). This way, you will have consent collected at each interaction online.
9. Click Update
10. Once your User Defined Field has been added to your DIY form, Save and then Publish to make
your changes live.
For newsletter sign ups via Contact DIY forms, the email consent UDF should be marked with a value of yes as a hidden field – as the act of signing up to receive a newsletter is giving consent.
2.2.5 Cart
To capture consent via the Cart module, you must have the relevant UDFs present on each form. 1. Click the arrow next to Management in the menu bar
2. Click eStore (Cart) in the Online Presence section
3. Click Edit Cart Preferences under Customise Cart
4. Select Step 2 Online Options
5. Select your User Defined Field for the Field Name under Add Question
6. Type your question under Display Text eg. "Are you happy to be contacted via email in future?"
7. Mark Required, if you require a Constituent to answer this question before completing their order
(we recommend you do so)
8. Click Add
9. Click Save and Finish
2.2.6 Everydayhero Integration
See Section 7: everydayhero for our guide to collecting consent through Everydayhero (EDH). New accounts are created in eTapestry when EDH ID and standard duplicate checks return no matches. The UDF "EDH Communication Preference" on the constituents Defined Fields tab will be updated with the EDH consent chosen. If an existing constituent comes through EDH and does not select to opt-in, there will be no change to their UDF "EDH Communication Preference". If they do opt-in, then the UDF will be populated with the value “Opt-In”.
Collecting Consent Blackbaud Solutions User Guide
How to query on Opt-Ins for everydayhero for a specific communication channel: 1. Click Queries
2. Click Manage Queries
3. Select a category that you want to store this query in (Eg. Base)
4. Click New Query under the tasks menu
5. Name the query
6. Set the Starting Query to Base/All Constituents
7. Under Results, select ‘Constituent’ as the Data Return Type
8. Under Criteria Options mark ‘Match each criteria’
9. Under Browse Fields select ‘UDFs – Constituent’ from the drop down menu and click on the UDF
‘EDH Communication Preference’
10. Select the value of ‘Opted-In’
11. Click Save and Preview
You may then select “Choose Columns” and select the consent UDF’s for you to then view if anyone requires these to be updated accordingly either manually or using mass update. You can repeat this for those who have a value of Opted-Out. You must also add a Journal Contact or Note to track the change in consent. This can be done individually or via Mass Update.
1. Click Management
2. Click Mass Update
3. Click "Create New Notes/Contacts"
4. Select your query category and query name that was created from Opt Out Report
5. In the note section enter “Opted Out via everydayhero” or “Opted In via everydayhero”
6. Select historical consent change UDF
7. Select Next
8. Select Next again to run the mass update
2.2.7 Email Unsubscribe
When a constituent unsubscribes from an advanced mass email using the "Remove my name from all future email correspondence" link eTapestry provides, their account in eTapestry is marked as Opted Out. When this occurs, you should update the email consent UDF to “Consent Withdrawn” based on results in the Opt Out Report.
1. Click Reports
2. Click eTapestry Standard Reports
3. Click Opt Out Report
4. Set a date range if desired
5. Select Find
6. Click on the Accounts name to manually update the email consent UDF individually or select
"Create a Custom Query in "query category", enter a query name and select "Create" to begin the
process to change on mass
a. Click Management
b. Click Mass Update
c. Click "Update Existing Accounts"
d. Select your query category and query name that was created from Opt Out Report
e. Set the Update Type as "Assign"
f. Select email consent UDF and set the value to "consent withdrawn"
g. Select Next
h. Select Next again to run the mass update

Collecting Consent Blackbaud Solutions User Guide
You must also add a Journal Contact or Note to track the change in consent. This can be done individually or via Mass Update.
1. Click Management
2. Click Mass Update
3. Click "Create New Notes/Contacts"
4. Select your query category and query name that was created from Opt Out Report
5. In the note section enter “Unsubscribed by email (see persona opt-out)”
6. Select historical consent change UDF and set the value to "email"
7. Select Next
8. Select Next again to run the mass update
2.3 Use and Retrieve
How to query on active consent for a specific communication channel: 1. Click Queries
2. Click Manage Queries
3. Select a category that you want to store this query in (Eg. Base)
4. Click New Query under the tasks menu
5. Name the query
6. Set the Starting Query to Base/All Constituents
7. Under Results, select ‘Constituent’ as the Data Return Type
8. Under Criteria Options mark ‘Match each criteria’
9. Under Browse Fields select ‘UDFs – Constituent’ from the drop down menu and click on the name
of the field eg email consent
10. Select the value of ‘consent given’ (you may also include consent assumed)
11. Click Save and Preview
This query can then be used for sending communications eg a mass email. You can always add additional criteria to further segment. How to query on historical consent changes:
1. Click Queries
2. Click Manage Queries
3. Select a category that you want to store this query in (Eg. Base)
4. Click New Query under the tasks menu
5. Name the query
6. Set the Starting Query to Base/All Constituents
7. Under Results, select Journal Entry as the Data Return Type
8. Under Criteria Options mark Match any criteria
9. Under Browse Fields select UDFs – Transaction from the drop down menu and click on the field
"historical consent change"
10. Select the "field has any value"
11. Repeat steps 9 and 10 for each journal entry type
12. Click Save and Preview
Collecting Consent Blackbaud Solutions User Guide
2.3.1 Customising current views to show consent information at a glance
On the Account: 1. Click Accounts
2. Click Find an Account
3. Search for and click on the account name
4. Select Tiles and Layout
5. Select Custom Tile
6. Click Save
7. On the Account Home page file the Custom Tile
8. Title Tile eg. "Current Consent Information"
9. Select Add Field
10. Change drop down menu to "User Defined Fields: Account"
11. Choose all consent UDFs
12. Select the cross icon to close window
13. Select Save
14. You can then move to your desired location on the Home page
In the Journal: 1. Click Accounts
2. Click Find an Account
3. Search for and click on the account name
4. Click Journal
5. Click the "Add / Remove Columns" link at the bottom of the page, in the lower left corner
6. Under the "Select Columns to Display" tile, click on a category to see the field options available
7. Mark the checkbox next to the fields you want to display or unmark the checkbox to the left of any
fields you want to remove
8. Reorder the columns by hovering over a field name in the "Select Column Order" tile and dragging
the field into the desired order
Click Save
In Query: 1. When you are in the preview of your query
2. Select Choose Columns
3. Browse or Search for your consent fields, for example, email consent.
4. Select Apply and these fields will be added to your query results.

Collecting Consent Blackbaud Solutions User Guide
3 Raiser’s Edge 7
3.1 Outline Solution
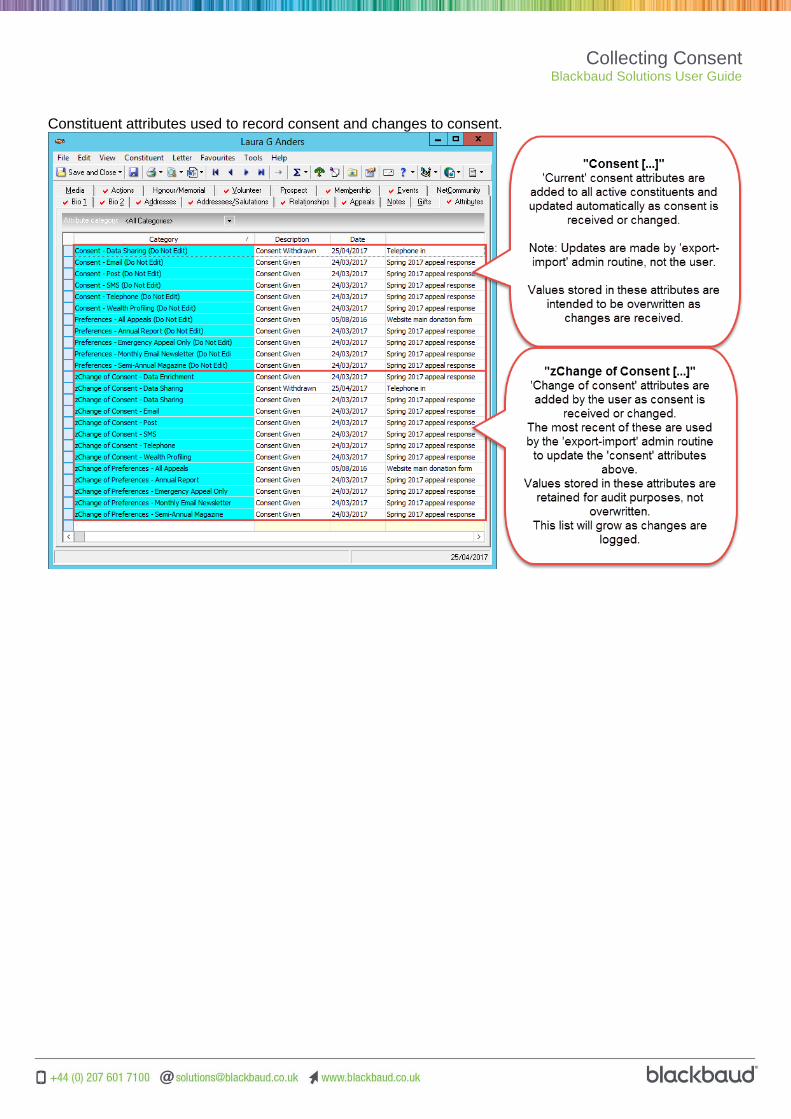
The solution outlined below provides a method for capturing, recording, and tracking consent and preferences. All active constituents should have a set of attributes added to their record to store consent in each area. When a supporter’s consent and preferences are received or changed (paper form, telephone, email, online) the consent status is added to the supporter’s record as an attribute “change of consent”. The attribute includes the nature of the consent or preference, the date, and any other notes such as the information source. A record of the interaction that captured the consent change (i.e. a new gift, a phone call, a meeting, an appeal response etc.) should also be retained, as part of standard procedures of recording constituent interactions with the organisation. Periodically, as necessary, the administrator runs a routine procedure to update consent. This is done using an export-import routine that uses the values from the ‘change’ attributes to update the ‘current’ attributes. All marketing selections and suppression lists are based on the current ‘consent’ constituent attributes. Using this approach an audit trail of consent changes can be maintained.
Telephone
Constituent Record
Consent Status
(Constituent Attributes)
Mailing Selection
(Query)
Website
Periodic Update
(Export-Import)
Consent Change
(Constituent Attributes)
Consent is received
Find or create the constituent record
Add ‘consent change’ attribute – either manually
or via BBNC, import etc.
Admin runs consent update
routine as often as necessary
(export/import)
Consent status attribute updated
automatically
Marketing and Communication selections made
using query
Collecting Consent Blackbaud Solutions User Guide
Constituent attributes used to record consent and changes to consent.
Collecting Consent Blackbaud Solutions User Guide
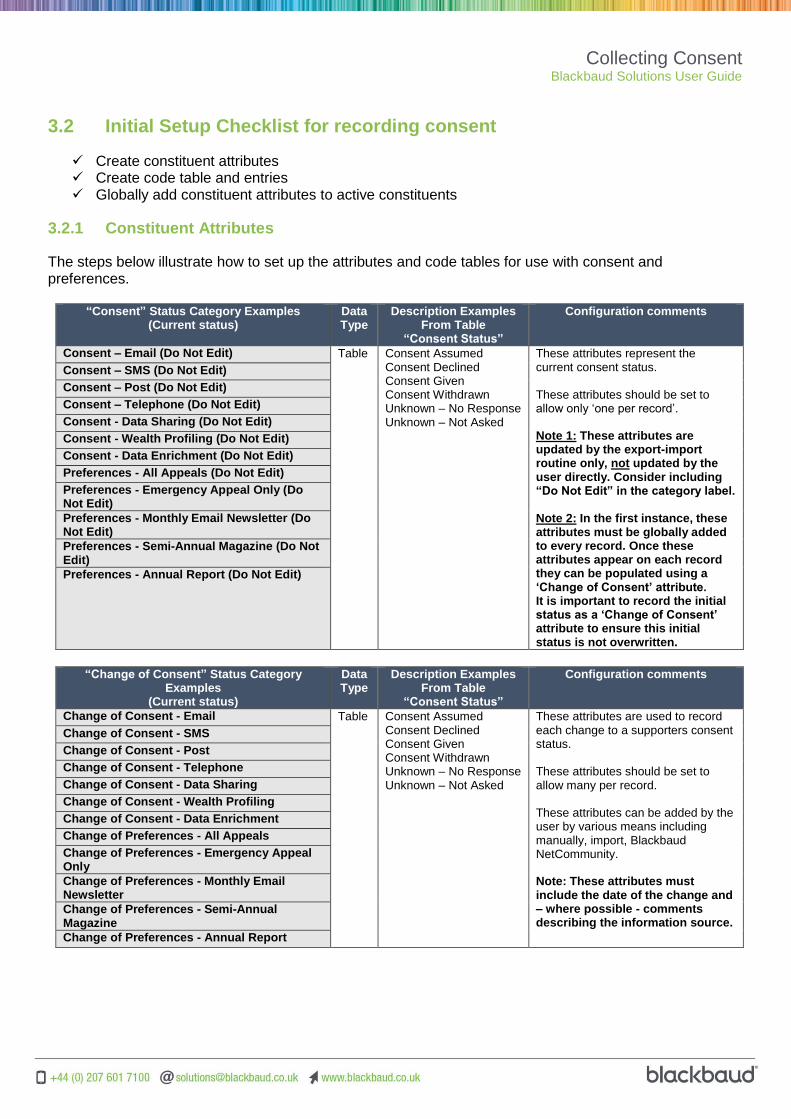
3.2 Initial Setup Checklist for recording consent
Create constituent attributes Create code table and entries Globally add constituent attributes to active constituents
3.2.1 Constituent Attributes
The steps below illustrate how to set up the attributes and code tables for use with consent and preferences.
“Consent” Status Category Examples (Current status)
Data Type
Description Examples From Table
“Consent Status”
Configuration comments
Consent – Email (Do Not Edit) Table
Consent Assumed Consent Declined Consent Given Consent Withdrawn Unknown – No Response Unknown – Not Asked
These attributes represent the current consent status. These attributes should be set to allow only ‘one per record’. Note 1: These attributes are updated by the export-import routine only, not updated by the user directly. Consider including “Do Not Edit” in the category label.
Note 2: In the first instance, these attributes must be globally added to every record. Once these attributes appear on each record they can be populated using a ‘Change of Consent’ attribute. It is important to record the initial status as a ‘Change of Consent’ attribute to ensure this initial status is not overwritten.
Consent – SMS (Do Not Edit)
Consent – Post (Do Not Edit)
Consent – Telephone (Do Not Edit)
Consent - Data Sharing (Do Not Edit)
Consent - Wealth Profiling (Do Not Edit)
Consent - Data Enrichment (Do Not Edit)
Preferences - All Appeals (Do Not Edit)
Preferences - Emergency Appeal Only (Do Not Edit)
Preferences - Monthly Email Newsletter (Do Not Edit)
Preferences - Semi-Annual Magazine (Do Not Edit)
Preferences - Annual Report (Do Not Edit)
“Change of Consent” Status Category
Examples (Current status)
Data Type
Description Examples From Table
“Consent Status”
Configuration comments
Change of Consent - Email Table Consent Assumed Consent Declined Consent Given Consent Withdrawn Unknown – No Response Unknown – Not Asked
These attributes are used to record each change to a supporters consent status. These attributes should be set to allow many per record. These attributes can be added by the user by various means including manually, import, Blackbaud NetCommunity. Note: These attributes must include the date of the change and – where possible - comments describing the information source.
Change of Consent - SMS
Change of Consent - Post
Change of Consent - Telephone
Change of Consent - Data Sharing
Change of Consent - Wealth Profiling
Change of Consent - Data Enrichment
Change of Preferences - All Appeals
Change of Preferences - Emergency Appeal Only
Change of Preferences - Monthly Email Newsletter
Change of Preferences - Semi-Annual Magazine
Change of Preferences - Annual Report
Collecting Consent Blackbaud Solutions User Guide
3.3 Consent Status Update Procedure
The procedure outlined below is intended to provide a semi-automated approach for updating the current consent status attribute to match the most recent ‘change of consent’ attribute.
3.3.1 Initial Setup
For each consent category to be updated Create a constituent query Create a constituent export Create a constituent import
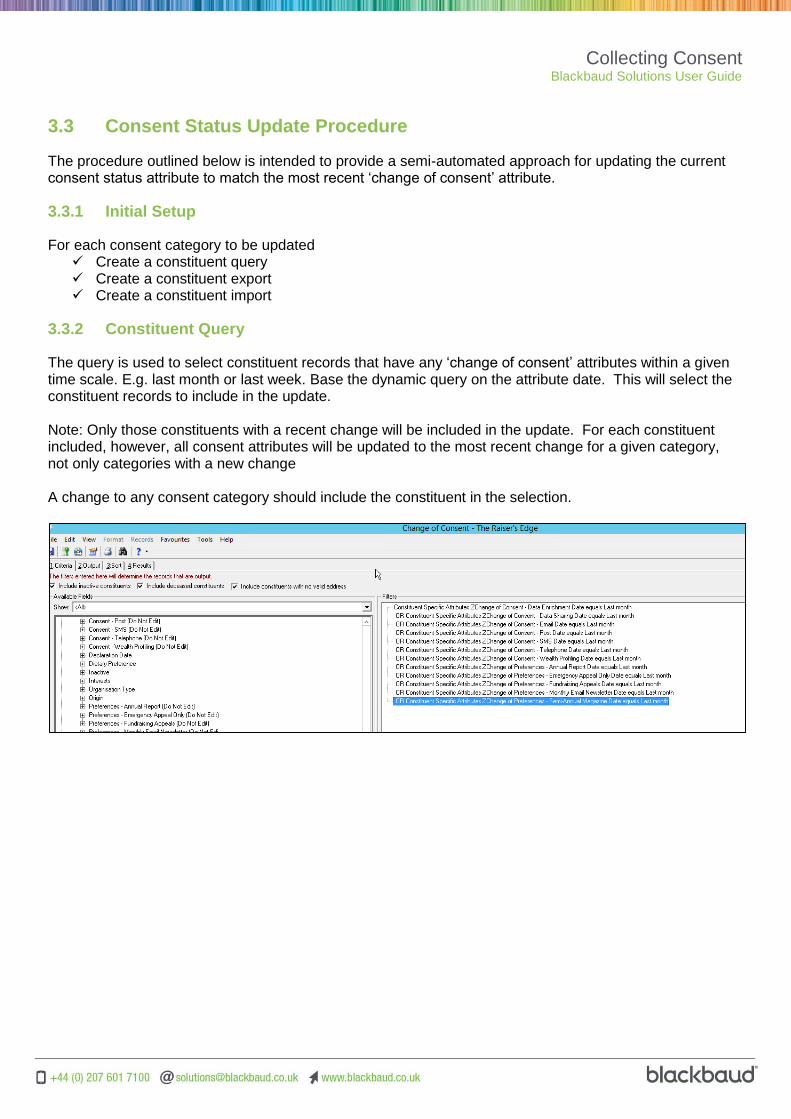
3.3.2 Constituent Query
The query is used to select constituent records that have any ‘change of consent’ attributes within a given time scale. E.g. last month or last week. Base the dynamic query on the attribute date. This will select the constituent records to include in the update. Note: Only those constituents with a recent change will be included in the update. For each constituent included, however, all consent attributes will be updated to the most recent change for a given category, not only categories with a new change A change to any consent category should include the constituent in the selection.

Collecting Consent Blackbaud Solutions User Guide
3.4 Export Details of the Change
This method is based on always updating all of the most recent ‘change to consent’ attributes for all categories. This means that, in some cases, there be no actual change to the value. The benefit of this approach is that it vastly simplifies the procedure for the administrator; compared to building and running a separate query-export-import for each category. Create the export linked to the query in the previous step.
Include the import ID of the constituent and the current status attribute, as well as the description, comments, and date of the change.

Collecting Consent Blackbaud Solutions User Guide
For the ‘change to consent’ attribute, set the number to export to 1, and sort by date descending to export the most recent attribute.
A preview of the data to be exported.
Collecting Consent Blackbaud Solutions User Guide
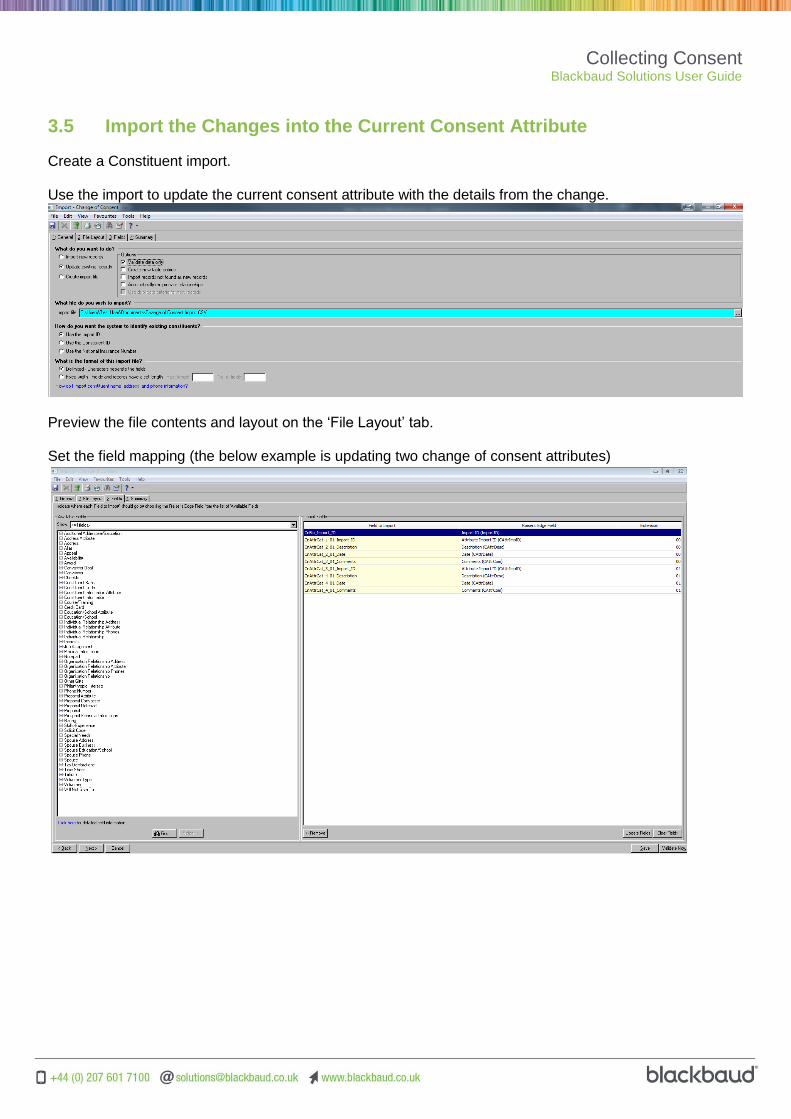
3.5 Import the Changes into the Current Consent Attribute
Create a Constituent import. Use the import to update the current consent attribute with the details from the change.
Preview the file contents and layout on the ‘File Layout’ tab. Set the field mapping (the below example is updating two change of consent attributes)

Collecting Consent Blackbaud Solutions User Guide
At this point, running the export and the import back to back should result in an updated “Current…” attribute for any channel that has a “Change” attribute added in the last month.
Collecting Consent Blackbaud Solutions User Guide
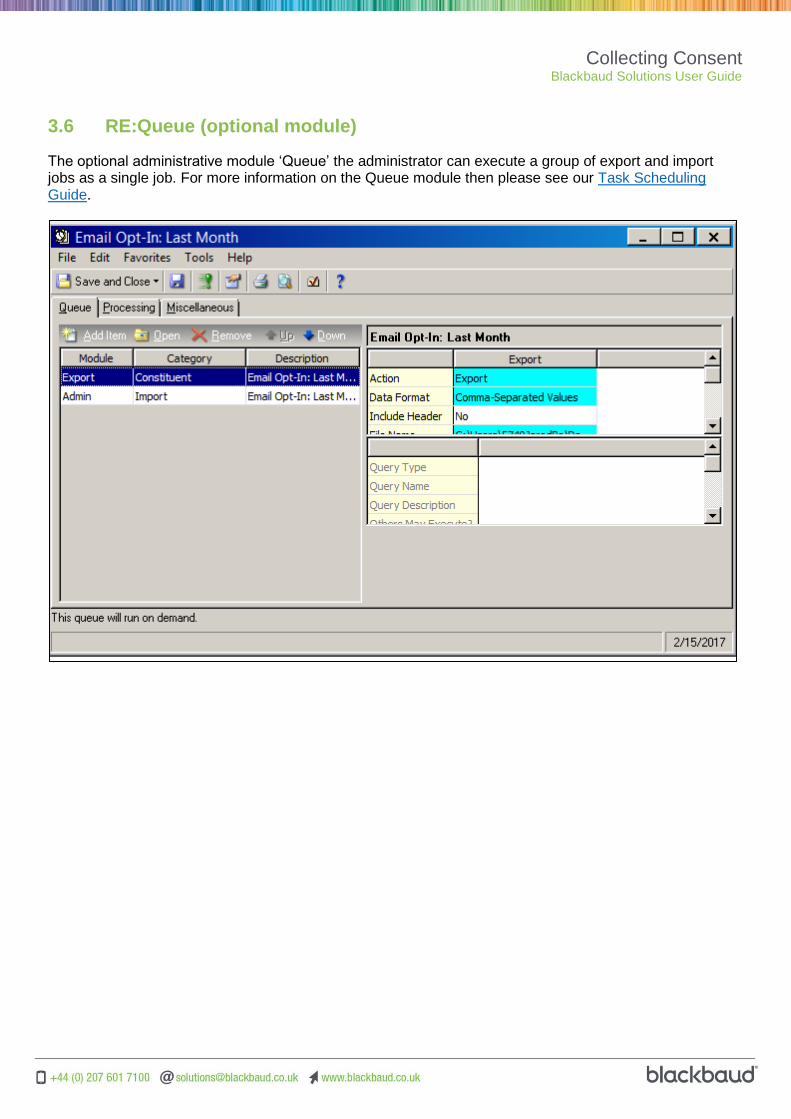
3.6 RE:Queue (optional module)
The optional administrative module ‘Queue’ the administrator can execute a group of export and import jobs as a single job. For more information on the Queue module then please see our Task Scheduling Guide.
Collecting Consent Blackbaud Solutions User Guide
4 Blackbaud NetCommunity
4.1 Self-Service Viewing Current Consent
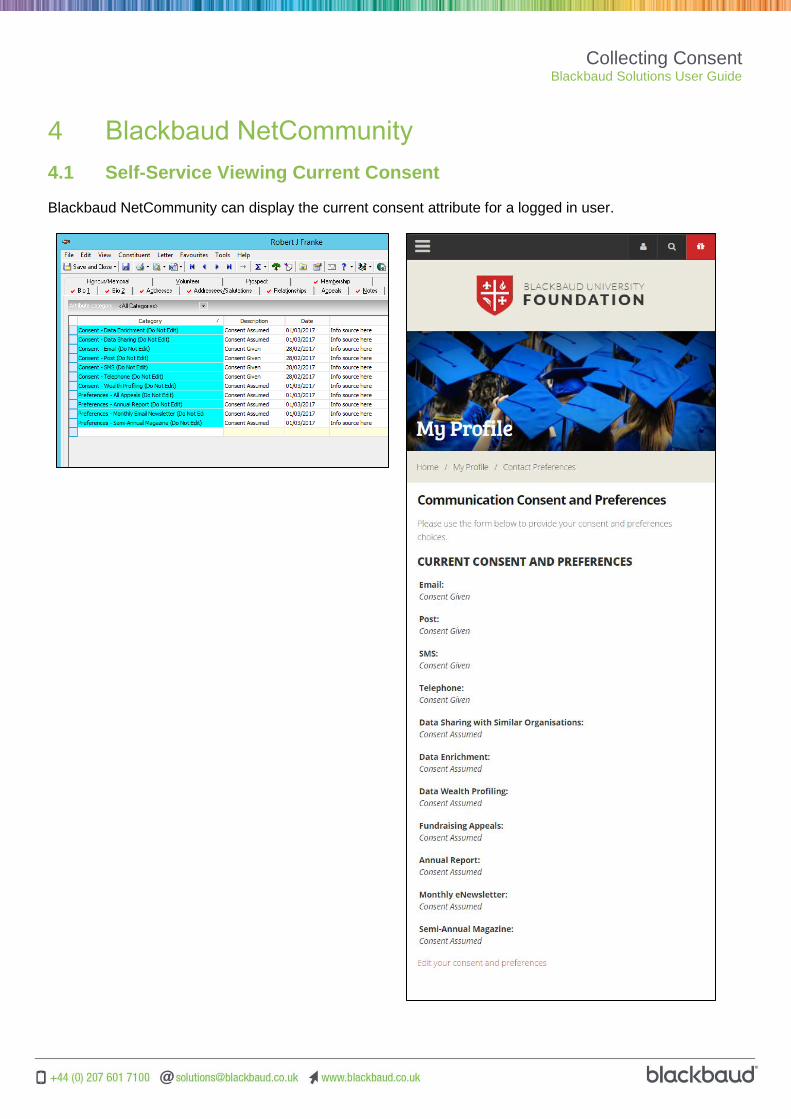
Blackbaud NetCommunity can display the current consent attribute for a logged in user.
Collecting Consent Blackbaud Solutions User Guide
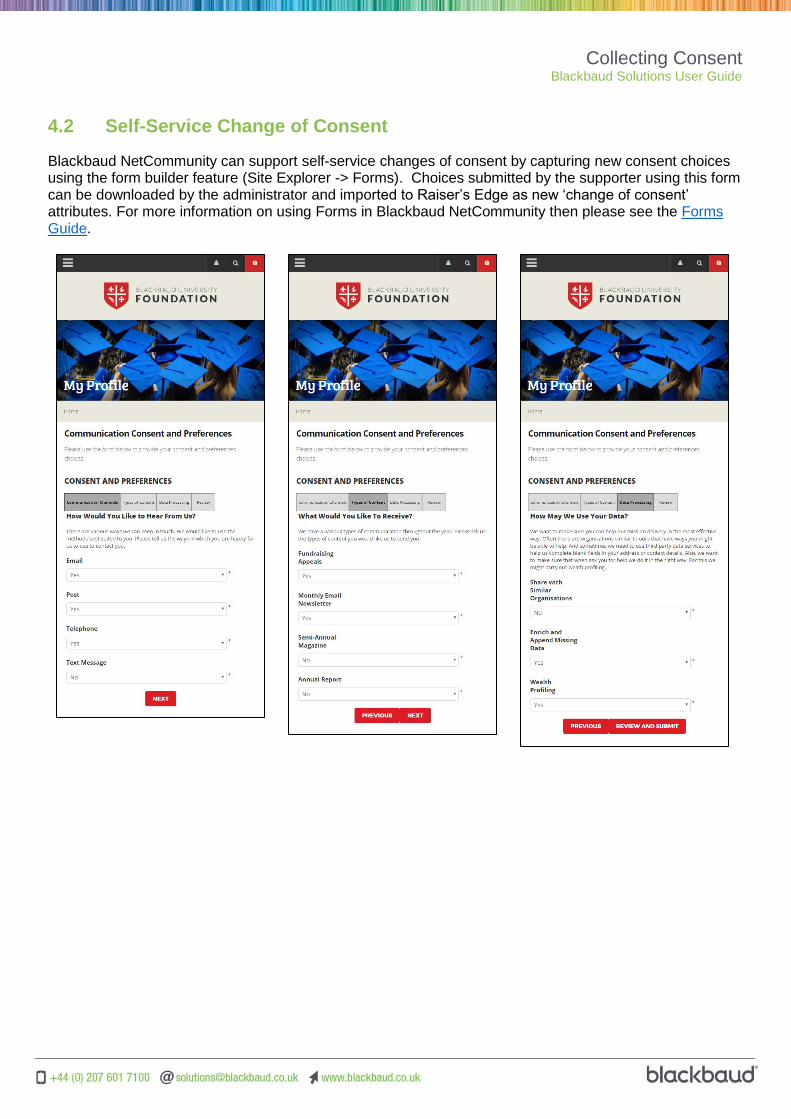
4.2 Self-Service Change of Consent
Blackbaud NetCommunity can support self-service changes of consent by capturing new consent choices using the form builder feature (Site Explorer -> Forms). Choices submitted by the supporter using this form can be downloaded by the administrator and imported to Raiser’s Edge as new ‘change of consent’ attributes. For more information on using Forms in Blackbaud NetCommunity then please see the Forms Guide.

Collecting Consent Blackbaud Solutions User Guide
Submission of the form produces an acknowledgement email for the supporter; and a notification email for the administrator providing an audit trail. Support’s acknowledgement email
The data can be downloaded from NetCommunity by the administrator in CSV format. This can be used to match to the constituent and import as ‘Change of Consent’ attributes; which will feed into the process described in the Raiser’s Edge 7 section above.
Collecting Consent Blackbaud Solutions User Guide
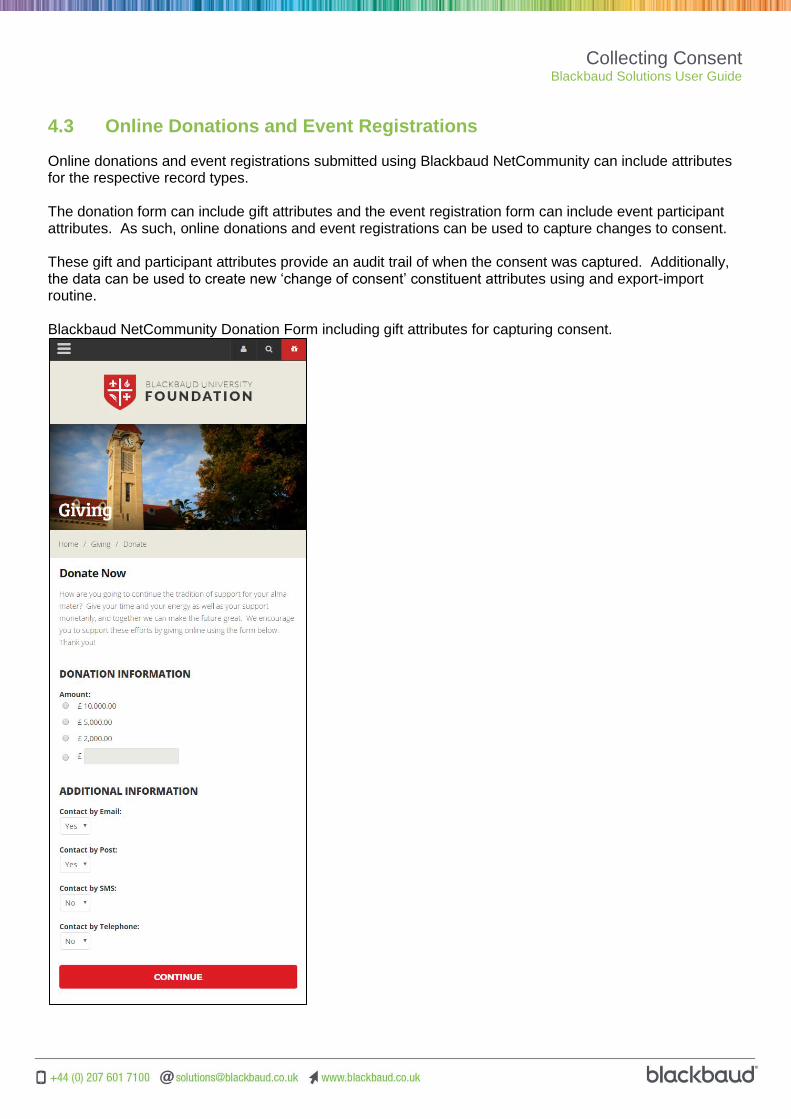
4.3 Online Donations and Event Registrations
Online donations and event registrations submitted using Blackbaud NetCommunity can include attributes for the respective record types. The donation form can include gift attributes and the event registration form can include event participant attributes. As such, online donations and event registrations can be used to capture changes to consent. These gift and participant attributes provide an audit trail of when the consent was captured. Additionally, the data can be used to create new ‘change of consent’ constituent attributes using and export-import routine. Blackbaud NetCommunity Donation Form including gift attributes for capturing consent.
Collecting Consent Blackbaud Solutions User Guide
5 Online Express
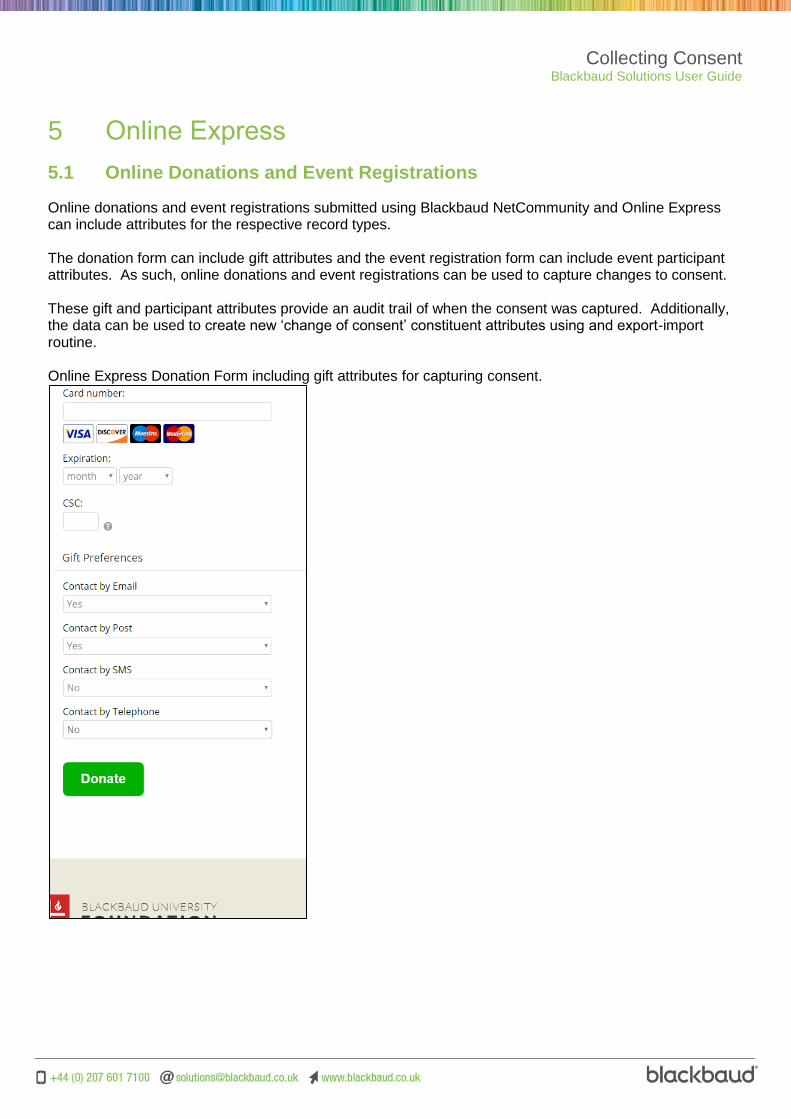
5.1 Online Donations and Event Registrations
Online donations and event registrations submitted using Blackbaud NetCommunity and Online Express can include attributes for the respective record types. The donation form can include gift attributes and the event registration form can include event participant attributes. As such, online donations and event registrations can be used to capture changes to consent. These gift and participant attributes provide an audit trail of when the consent was captured. Additionally, the data can be used to create new ‘change of consent’ constituent attributes using and export-import routine. Online Express Donation Form including gift attributes for capturing consent.
Collecting Consent Blackbaud Solutions User Guide
6 Raiser’s Edge NXT
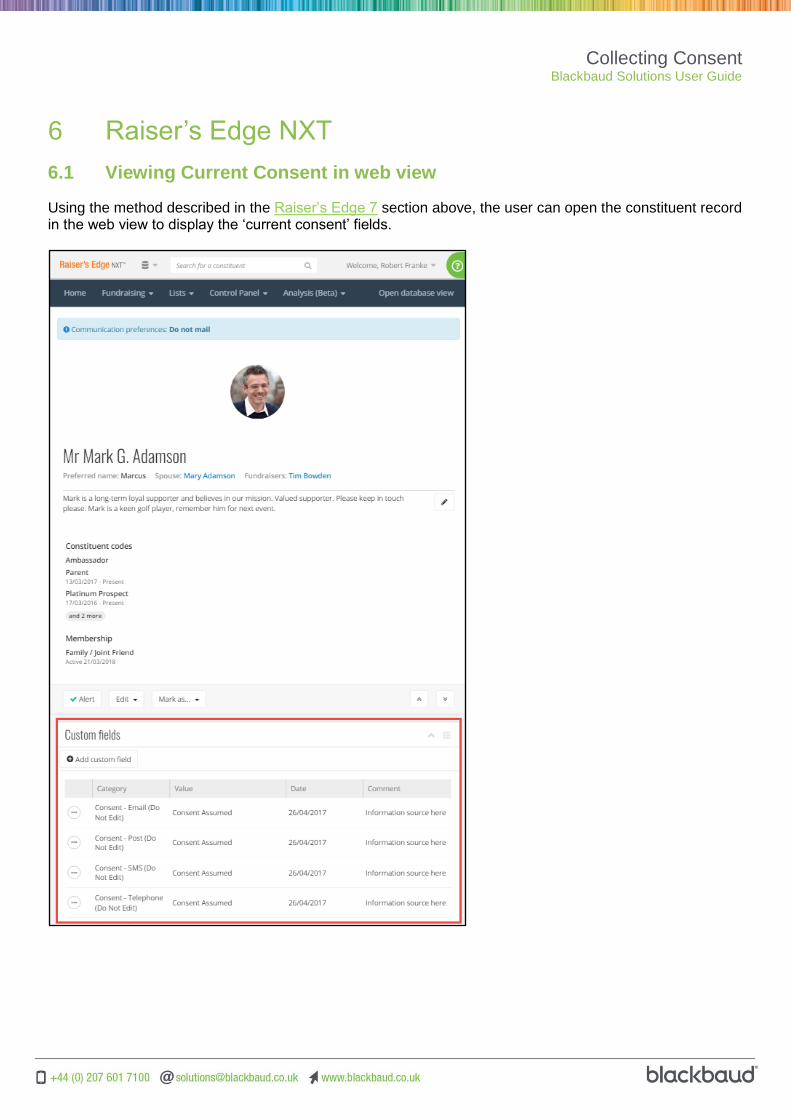
6.1 Viewing Current Consent in web view
Using the method described in the Raiser’s Edge 7 section above, the user can open the constituent record in the web view to display the ‘current consent’ fields.
Collecting Consent Blackbaud Solutions User Guide
6.2 Change of Consent in web view
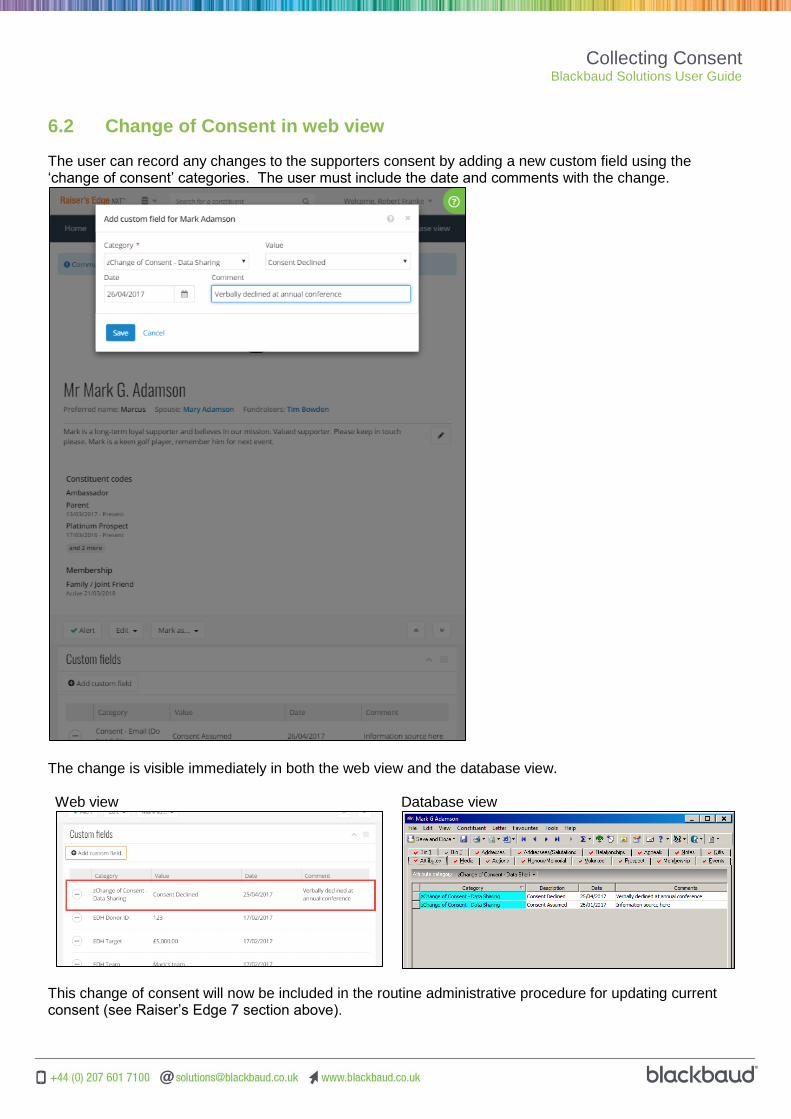
The user can record any changes to the supporters consent by adding a new custom field using the ‘change of consent’ categories. The user must include the date and comments with the change.
The change is visible immediately in both the web view and the database view. Web view
Database view
This change of consent will now be included in the routine administrative procedure for updating current consent (see Raiser’s Edge 7 section above).
Collecting Consent Blackbaud Solutions User Guide
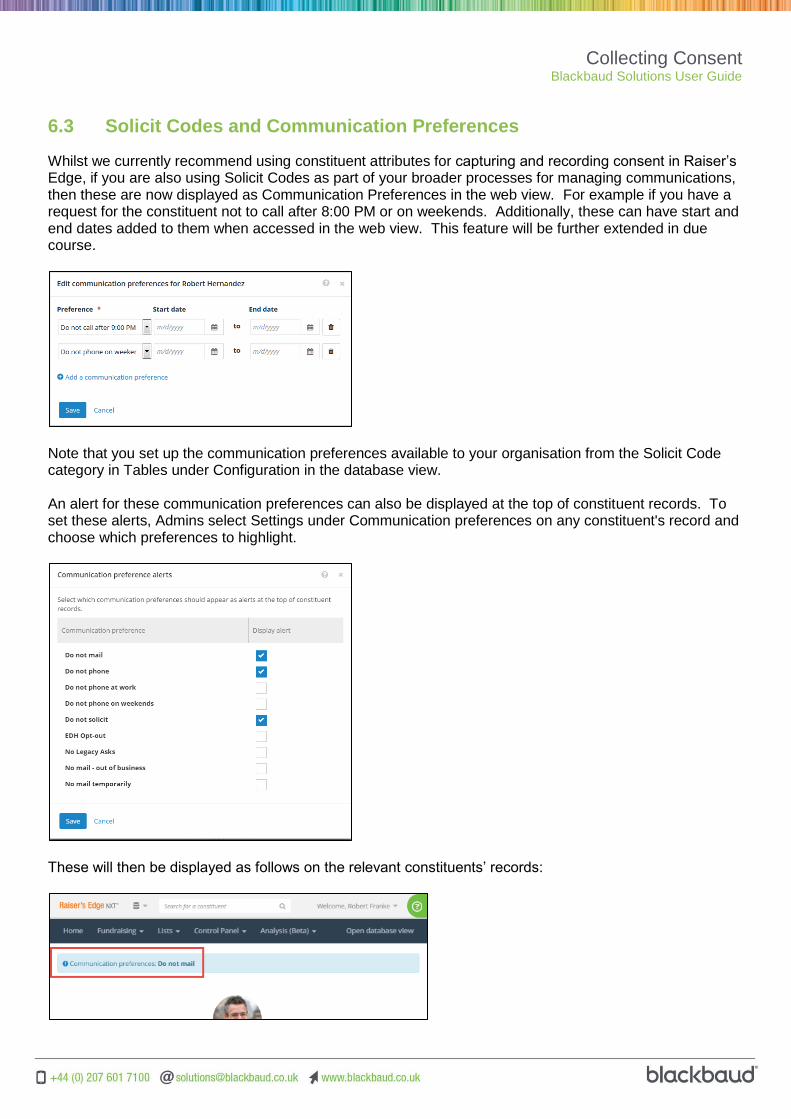
6.3 Solicit Codes and Communication Preferences
Whilst we currently recommend using constituent attributes for capturing and recording consent in Raiser’s Edge, if you are also using Solicit Codes as part of your broader processes for managing communications, then these are now displayed as Communication Preferences in the web view. For example if you have a request for the constituent not to call after 8:00 PM or on weekends. Additionally, these can have start and end dates added to them when accessed in the web view. This feature will be further extended in due course.
Note that you set up the communication preferences available to your organisation from the Solicit Code category in Tables under Configuration in the database view. An alert for these communication preferences can also be displayed at the top of constituent records. To set these alerts, Admins select Settings under Communication preferences on any constituent's record and choose which preferences to highlight.
These will then be displayed as follows on the relevant constituents’ records:
Collecting Consent Blackbaud Solutions User Guide
7 Blackbaud CRM
7.1 Overview
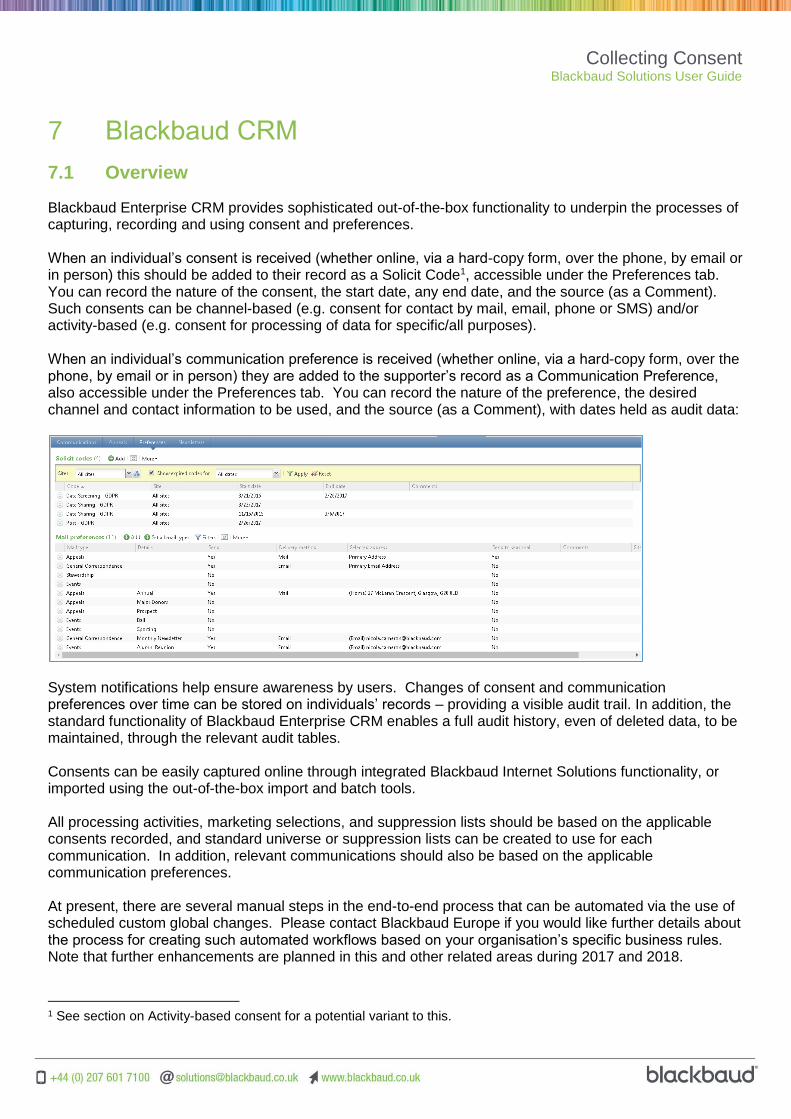
Blackbaud Enterprise CRM provides sophisticated out-of-the-box functionality to underpin the processes of capturing, recording and using consent and preferences. When an individual’s consent is received (whether online, via a hard-copy form, over the phone, by email or in person) this should be added to their record as a Solicit Code1, accessible under the Preferences tab. You can record the nature of the consent, the start date, any end date, and the source (as a Comment). Such consents can be channel-based (e.g. consent for contact by mail, email, phone or SMS) and/or activity-based (e.g. consent for processing of data for specific/all purposes). When an individual’s communication preference is received (whether online, via a hard-copy form, over the phone, by email or in person) they are added to the supporter’s record as a Communication Preference, also accessible under the Preferences tab. You can record the nature of the preference, the desired channel and contact information to be used, and the source (as a Comment), with dates held as audit data:
System notifications help ensure awareness by users. Changes of consent and communication preferences over time can be stored on individuals’ records – providing a visible audit trail. In addition, the standard functionality of Blackbaud Enterprise CRM enables a full audit history, even of deleted data, to be maintained, through the relevant audit tables. Consents can be easily captured online through integrated Blackbaud Internet Solutions functionality, or imported using the out-of-the-box import and batch tools. All processing activities, marketing selections, and suppression lists should be based on the applicable consents recorded, and standard universe or suppression lists can be created to use for each communication. In addition, relevant communications should also be based on the applicable communication preferences. At present, there are several manual steps in the end-to-end process that can be automated via the use of scheduled custom global changes. Please contact Blackbaud Europe if you would like further details about the process for creating such automated workflows based on your organisation’s specific business rules. Note that further enhancements are planned in this and other related areas during 2017 and 2018.
1 See section on Activity-based consent for a potential variant to this.
Collecting Consent Blackbaud Solutions User Guide
7.2 Capturing consent
Blackbaud Enterprise CRM provides a variety of functional capabilities to underpin the processes of capturing consent and preferences.
7.2.1 Online consent and preference forms
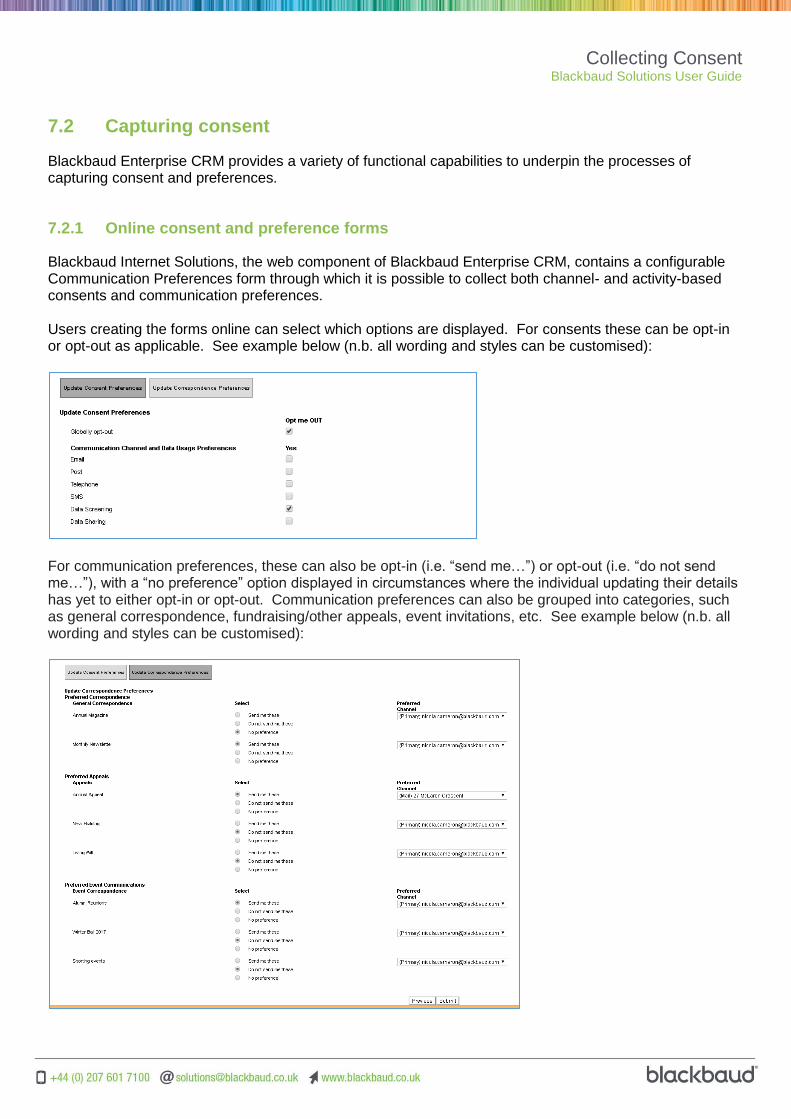
Blackbaud Internet Solutions, the web component of Blackbaud Enterprise CRM, contains a configurable Communication Preferences form through which it is possible to collect both channel- and activity-based consents and communication preferences. Users creating the forms online can select which options are displayed. For consents these can be opt-in or opt-out as applicable. See example below (n.b. all wording and styles can be customised):
For communication preferences, these can also be opt-in (i.e. “send me…”) or opt-out (i.e. “do not send me…”), with a “no preference” option displayed in circumstances where the individual updating their details has yet to either opt-in or opt-out. Communication preferences can also be grouped into categories, such as general correspondence, fundraising/other appeals, event invitations, etc. See example below (n.b. all wording and styles can be customised):

Collecting Consent Blackbaud Solutions User Guide
Additionally, for communication preferences it is possible to provide individuals with the option to choose between mail and/or email receipt of any given communication, where applicable, and to be able to select which address/email they would like the communication to be sent to. See example below (n.b. all wording and styles can be customised):
In each of the above online form examples, it is first necessary for the individual in question to login, using a unique username and password2 provided to them, since the form displays personal data that is specific to him/her, using the latest information available in Blackbaud Enterprise CRM. Using a separate Profile Update Form, the individual can also update their contact and other information. If, however, an individual is directed to update their consent/preferences online via a link included in an email sent from within Blackbaud Enterprise CRM, then (if you so wish) that individual can do without needing to login, since embedded code in the email will unique identify him/her and display their personalised details on the linked form. Once all such data above is processed through the web transactions area, it will appear on their individual record in the relevant Solicit Codes and/or Communication Preferences. Via a scheduled custom global change, you can also automatically populate into the relevant Comments field summarised details of the specific web form from which this data was collected (e.g. “Captured online through BBIS Communication Preferences Form V1.4, published 12 September 2016”), which coupled with the date stamp will enable you retrospectively to reference back the form in question:
We recommend that you keep a record of all changes made to forms over time, with accompanying dates, so that you can maintain a full audit trail.
7.2.2 Donation, event registration and membership forms
To collect consents on donation, event registration and/or membership forms, you can configure specific Attributes on such forms, covering the type of consent most applicant for the visitor to that form. Once that data has been processed through the web transactions area and exists on the individual’s Blackbaud
2 Which can be through either Social Sign On (e.g. Twitter, LinkedIn etc) or Single Sign On (e.g. your organisation’s Active Directory login), if this has been configured for your Blackbaud Internet Solutions webpages.

Collecting Consent Blackbaud Solutions User Guide
Enterprise CRM record, you can use a scheduled custom global change to add/update their Solicit Codes and/or Communication Preferences as appropriate. Alternatively, you can (re)direct the individual to the Communication Preferences form at any stage of the donation, event registration and/or membership process, including as part of the acknowledgement/thank you email that is automatically sent upon processing of their payment.
7.2.3 Import of externally captured consents
In addition to the above built-in functionality for online consent and preference capture, it is also possible to import such data from external spreadsheets, third-party forms or other data sources. Blackbaud Enterprise CRM contains sophisticated import functionality, including advanced algorithms to support duplicate matching in scenarios where your data does not have a unique Lookup or Alternate ID with which to robustly match data to existing individuals, although ID-based matching is of course always desirable. Imports can also be scheduled for Blackbaud Enterprise CRM, to automate processing in situations where for example the consent files is regularly updated into a specific file location. Blackbaud Enterprise CRM and Internet Solutions also come with a full set of web services and APIs as standard. Using these, organisations who have access to the appropriate developer resources (whether internal, partner/third-party or Blackbaud) have flexibility to build more automated integrations with other solutions to streamline adding or updating externally-captured details into Blackbaud Enterprise CRM.
7.3 Recording consent
Blackbaud Enterprise CRM provides a variety of functional capabilities to underpin the processes of recording consent and preferences.
7.3.1 Recording channel-based consent
Within Solicit Codes you can record channel-based consent, i.e. consent for sending communications by email, mail, phone and/or SMS. These can be configured to be organisation-wide, or specific to certain parts of the organisation – for example if you have a federated structure requiring a hierarchy of consents. You can select the nature of the consent, and whether it is opt-in or opt-out, any associated Site, the start date and (if applicable) end date, and the source as a Comment field. You can track changes in each of these consents over time, for example if an individual opt-in but then removes that opt-in:

Collecting Consent Blackbaud Solutions User Guide
We recommend using a naming convention for the source, to enable subsequent tracking. We also recommend recording a detail of the consent, if it was not captured online, via a separate Interaction (into which you can store linked documentation notes, attachments or media files as appropriate):

Collecting Consent Blackbaud Solutions User Guide
We also recommend that you use the built-in system notifications functionality available within Blackbaud Enterprise CRM, which can be assigned automatically per business rules established via a set of preconfigured queries, to provide simple summary notifications for your users that explain the consents currently in place for any given individual:
7.3.2 Recording activity-based consent
The process for recording activity-based consent, such as an overall Collected Consent for Marketing Activities – or, if appropriate to your organisation, more granular consent for specific activities such as data enrichment, wealth screening and/or social listening – can be very like that above for channel-based
Collecting Consent Blackbaud Solutions User Guide
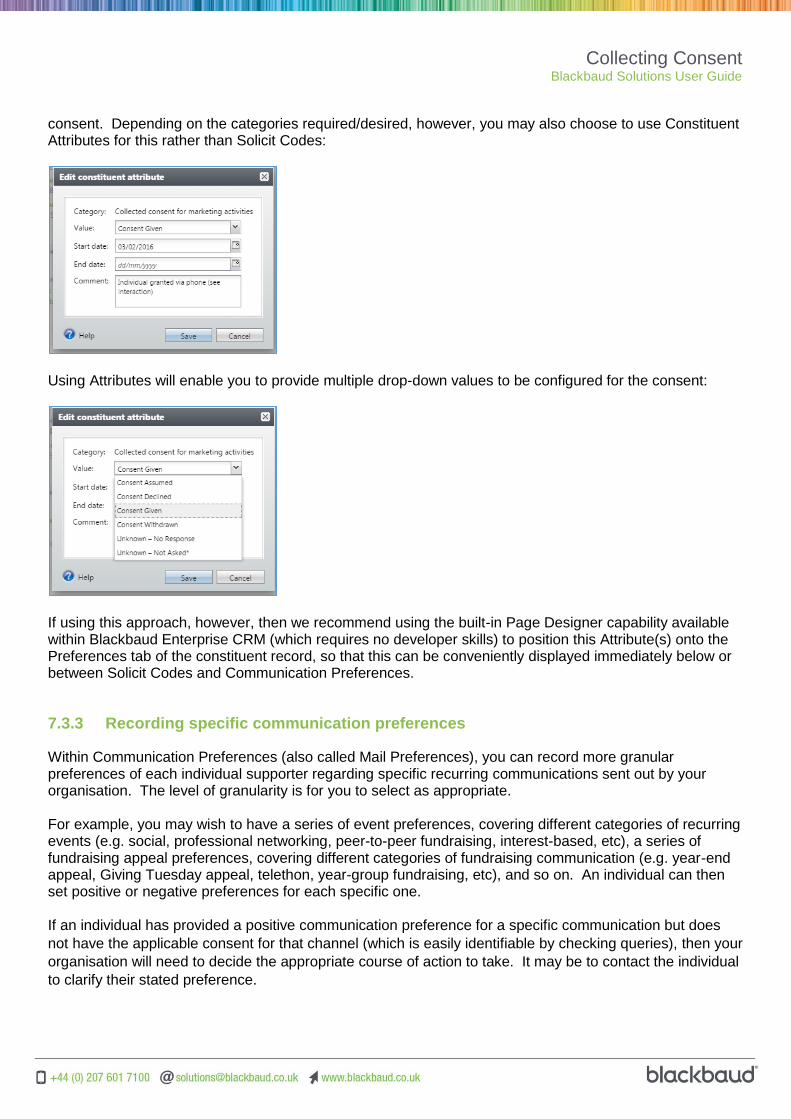
consent. Depending on the categories required/desired, however, you may also choose to use Constituent Attributes for this rather than Solicit Codes:
Using Attributes will enable you to provide multiple drop-down values to be configured for the consent:
If using this approach, however, then we recommend using the built-in Page Designer capability available within Blackbaud Enterprise CRM (which requires no developer skills) to position this Attribute(s) onto the Preferences tab of the constituent record, so that this can be conveniently displayed immediately below or between Solicit Codes and Communication Preferences.
7.3.3 Recording specific communication preferences
Within Communication Preferences (also called Mail Preferences), you can record more granular preferences of each individual supporter regarding specific recurring communications sent out by your organisation. The level of granularity is for you to select as appropriate. For example, you may wish to have a series of event preferences, covering different categories of recurring events (e.g. social, professional networking, peer-to-peer fundraising, interest-based, etc), a series of fundraising appeal preferences, covering different categories of fundraising communication (e.g. year-end appeal, Giving Tuesday appeal, telethon, year-group fundraising, etc), and so on. An individual can then set positive or negative preferences for each specific one. If an individual has provided a positive communication preference for a specific communication but does
not have the applicable consent for that channel (which is easily identifiable by checking queries), then your
organisation will need to decide the appropriate course of action to take. It may be to contact the individual
to clarify their stated preference.

Collecting Consent Blackbaud Solutions User Guide
Preferences can be set to enable sending by email or mail only, both (in preference order) or neither, as
appropriate to that specific communication:
Preferences can also be tailored to specific Sites (e.g. individual departments) and/or Business Units (e.g.
Alumni Relations), and whether to an alternative address from their primary information. System dates in
the backend are queryable for the preference, and the Source can be captured under Comments:
7.3.4 Recording Fundraising Preference Service opt-out
Within Solicit Codes (or elsewhere if desired), it is also possible to record an explicit opt-out to fundraising3 as received through the Fundraising Regulator’s Fundraising Preference Service (FPS), once this new service is live for charities in England and Wales in or shortly after May 2017.
3 Which may appropriately incorporate other forms of marketing as well, depending on the specific nature of services offered by your organisation.
Collecting Consent Blackbaud Solutions User Guide
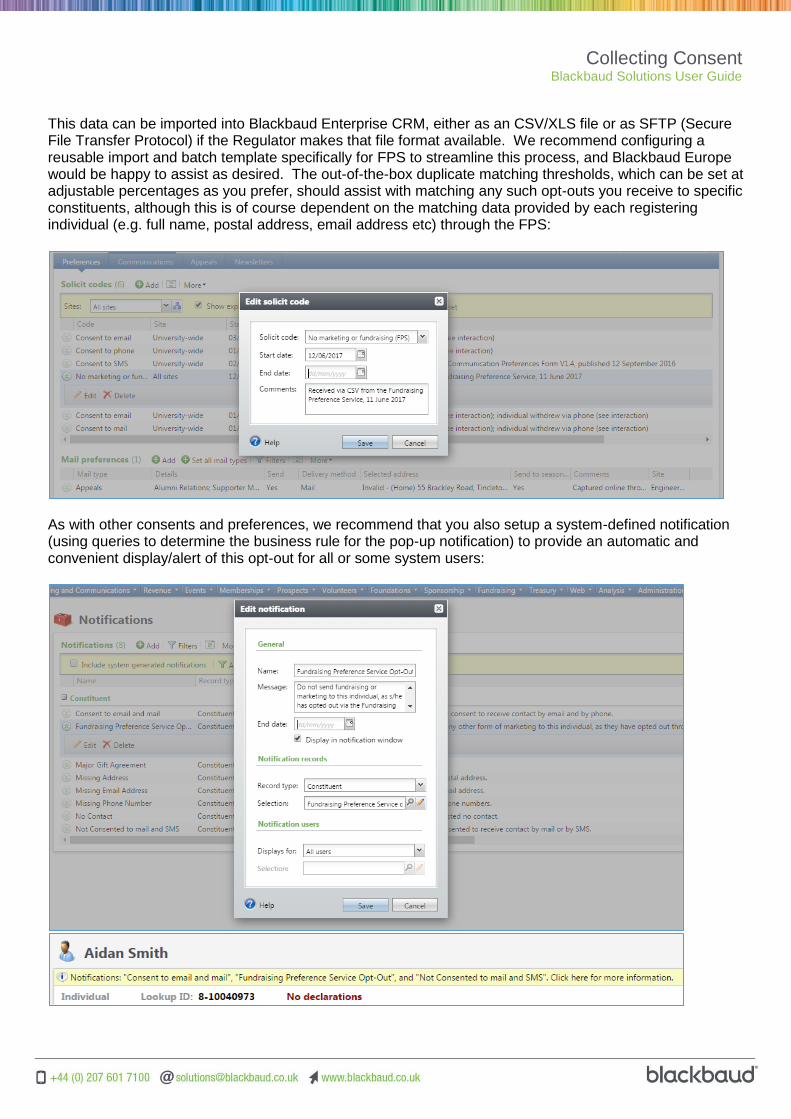
This data can be imported into Blackbaud Enterprise CRM, either as an CSV/XLS file or as SFTP (Secure File Transfer Protocol) if the Regulator makes that file format available. We recommend configuring a reusable import and batch template specifically for FPS to streamline this process, and Blackbaud Europe would be happy to assist as desired. The out-of-the-box duplicate matching thresholds, which can be set at adjustable percentages as you prefer, should assist with matching any such opt-outs you receive to specific constituents, although this is of course dependent on the matching data provided by each registering individual (e.g. full name, postal address, email address etc) through the FPS:
As with other consents and preferences, we recommend that you also setup a system-defined notification (using queries to determine the business rule for the pop-up notification) to provide an automatic and convenient display/alert of this opt-out for all or some system users:
Collecting Consent Blackbaud Solutions User Guide
7.4 Using consent
Blackbaud Enterprise CRM provides a variety of functional capabilities to underpin the processes of using consent and preferences.
7.4.1 Communication processes
Communications sent through different parts of Blackbaud Enterprise CRM can be categorised in a variety of ways, depending on whether they are Marketing Efforts, Event Invitations, General Correspondence, Acknowledgements, and so forth. Each area provides tailored functionality based around the needs of that type of communication. In many cases, you can also specify whether they are by Mail, Email or Phone (also covering SMS at present):
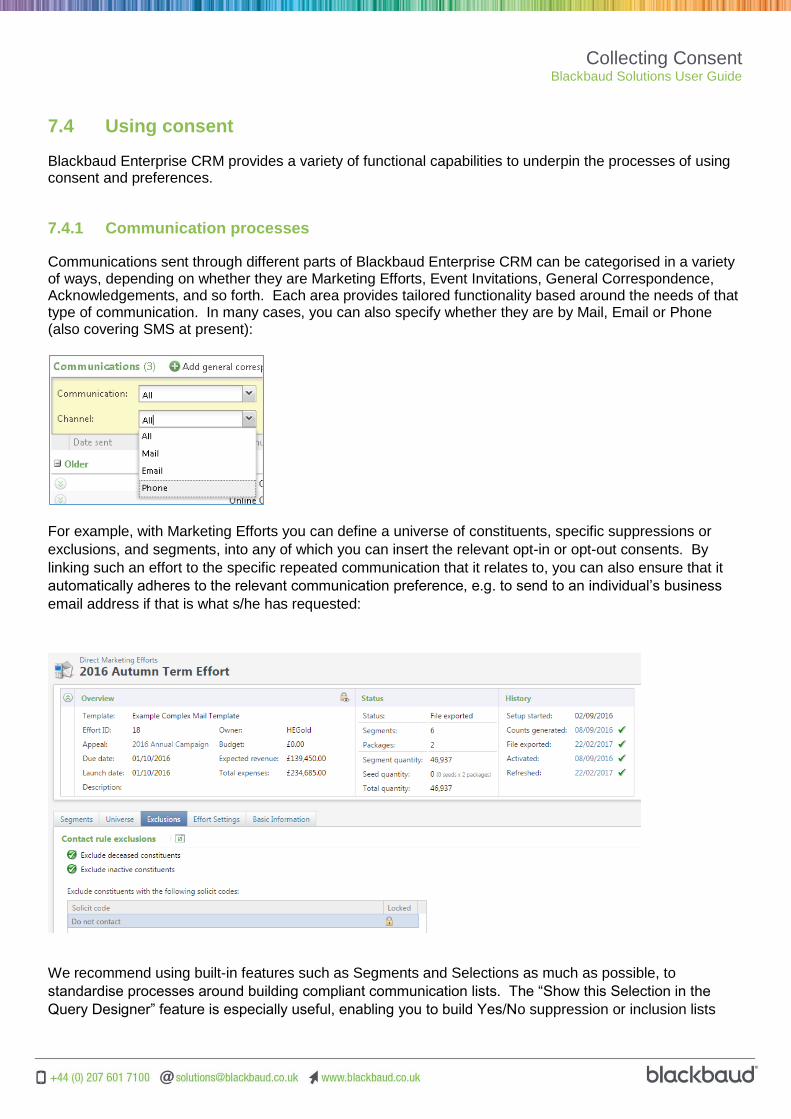
For example, with Marketing Efforts you can define a universe of constituents, specific suppressions or
exclusions, and segments, into any of which you can insert the relevant opt-in or opt-out consents. By
linking such an effort to the specific repeated communication that it relates to, you can also ensure that it
automatically adheres to the relevant communication preference, e.g. to send to an individual’s business
email address if that is what s/he has requested:
We recommend using built-in features such as Segments and Selections as much as possible, to
standardise processes around building compliant communication lists. The “Show this Selection in the
Query Designer” feature is especially useful, enabling you to build Yes/No suppression or inclusion lists

Collecting Consent Blackbaud Solutions User Guide
that can easily be reused for communications and other activities requiring consent – e.g. you need only
selected Yes or No (as appropriate) without rebuilding the segment from scratch each time.
Other standard suppressions such as Deceased or Inactive are also excluded automatically from most
communication areas, a real benefit to using the built-in functionality. Additionally, Communication
Templates enable you to construct one or several reusable templates around the most common inclusions
and exclusions – so that they are automatically inserted into each effort that utilises that template:
This is just a small selection of the features available to assist as you use the consents and preferences that you have collected and recorded. There are too many areas of functionality to list each one here, but we recommend that you carefully consider how each communication or activity undertaken by your organisation will be managed through the system to take account of the consents and preferences held. In addition to constituent based flags, consider the contact-based flags pertaining to specific addresses, emails etc – enabling you to block usage of those where applicable:

Collecting Consent Blackbaud Solutions User Guide
7.4.2 Other key processes
We also recommend that you use naming conventions as well as query folders and other categories where available throughout the system to enable a systematic approach to using consent. Likewise, create a suite of checking queries (using the out-of-the-box Query tool) that you can run daily, weekly or monthly to detect any anomalies in the consents and preferences data (e.g. each one written so that it should return zero results unless there is an error). You can also create linked datalists, reports and/or email alerts based off these data audit queries. For activities that utilise personal data held in the public domain, such as data enrichment services, wealth screening prospect research and social listening, ensure that your Privacy Notice (e.g. containing your data protection statement that sets out how you use data) is explicit and unambiguous in covering these. You may also require explicit affirmative consent to these specific processing activities, in which case services such as Social Media Finder and WealthPoint in Blackbaud Enterprise CRM can be configured to run per a specific query/batch selection. Whenever undertaking fundraising and other marketing processes, try to do so within the system if possible, rather than exporting data out – as this may reduce the opportunities malicious actors may have to obtain unauthorised access to your data. For example, Blackbaud Enterprise CRM contains out-of-the-box functionality for managing the various processes around prospect/supporter research, so that emails, forms attachments etc do not need to be sent outside of the system as part of this workflow:
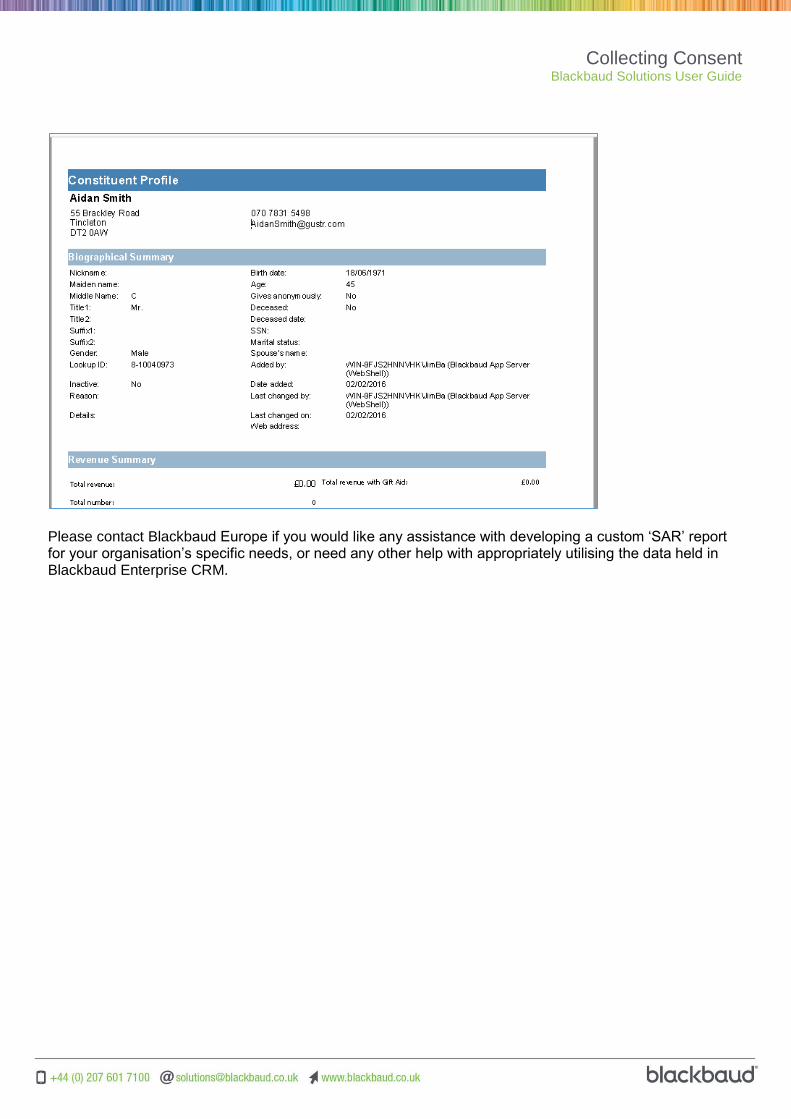
Finally, ensure that you have considered processes for handling any external requests. For example, it possible to produce a custom ‘Subject Access Request’ report from within Blackbaud Enterprise CRM, in instances where an individual has requested to receive a copy of all data held about him or her, which you are obliged to provide (once you have confirmed their data via appropriate data security checks):
Collecting Consent Blackbaud Solutions User Guide
Please contact Blackbaud Europe if you would like any assistance with developing a custom ‘SAR’ report for your organisation’s specific needs, or need any other help with appropriately utilising the data held in Blackbaud Enterprise CRM.

Collecting Consent Blackbaud Solutions User Guide
8 everydayhero
8.1 Process: Donors
As part of the donation screen the donor is prompted if they would like to receive Further Communication from the charity. The tick box is opt in and is not ticked by default, which meets best practice guidelines.
The wording above the text box details that this is consent for:
Post
SMS
Telephone
It is also worth noting that the wording begins with “If you are new to [CHARITY NAME]”…”. The intention of this is to ensure that an existing supporter who is already on your database will not override any existing consents by not opting in at this stage. The payment form is currently under redevelopment and will be rolled out later this year, with improved mobile optimisation and additional fields to capture more granular consent. Until that time, it is our recommendation that, where consent is given that the charity follow up with the donor to thank them for their gift and ask them to confirm their more granular consent through a form on their own website. This data is made available to you through the Heroix Reports and the opt-in is included in the field “Opt-in” as shown below. A value “1” indicates positive consent from that donor.

Collecting Consent Blackbaud Solutions User Guide
8.2 Process: Fundraisers
When a fundraiser creates a new page in everydayhero they will be asked to accept the site’s Terms and Conditions, which contain the following clause:
How your chosen charity will manage your data
Your chosen charity would like to contact you to thank you for your support and, occasionally, to let you know about their projects and activities by post and telephone. They will not share your data and you can unsubscribe at any time. If you would rather not receive such information please contact your chosen charity so they can amend your preferences.
There are no specific opt in boxes provided during this sign up process.
The addition of further preference control is planned for fundraisers to control their communication preferences – however, the fundraiser account is an everydayhero account and they may create pages for multiple charities. Therefore, the preference centre functionality will only serve to control preferences in respect of everydayhero communication, not charity communication. Accordingly, there is no “Opt-in” value in the Heroix reporting.
It is our recommendation that following page creation, the charity contacts the fundraiser and directs them to their own preference centre.
8.3 Everydayhero Terms and Conditions
https://everydayhero.com/uk/terms/ https://everydayhero.com/uk/terms/privacy https://everydayhero.com/ie/terms/ https://everydayhero.com/ie/terms/privacy


