Collision Course: A Practical Guide to Using Autodesk® Revit® MEP with Autodesk® Navisworks® Manage David Foley – Norman Disney & Young Code MP2489 Collision Course: A Practical Guide to Using Autodesk® Revit® MEP with Autodesk® Navisworks® Manage While construction collisions/clashes are not deliberate in the AEC profession, most of them could have been avoided. This class covers practical techniques, tips, and tricks to effectively manage the data exchange between Autodesk Revit software and Autodesk Navisworks software to detect, resolve, and avoid the unforeseen collisions/clashes that have long plagued design professionals in the AEC industry. We start with an overview of what’s required to set up Revit MEP to work with Navisworks on a live construction project, including live examples. We cover proven tips, tricks, and techniques from active practitioners in the fields of architecture, building services, and structural engineering. In the second part of the class, we focus on using the Revit BIM data inside Autodesk Navisworks Manage to produce meaningful clash detection reports, Timeliner animations, and automation tips to standardize and expedite the process of importing models into Navisworks Manage. Learning Objectives At the end of this class, you will be able to: Describe what is required to effectively get Revit models into Navisworks Manage Automate the process with templates, filters, and selection sets Apply standards, tricks, and tips to your own projects. Standardize collision/clash detection in your organization About the Speaker David is an established leader in the management and implementation of Building Information Modelling (BIM) throughout the construction industry. His role at NDY involves the development of BIM protocols, standards, workflows and techniques using the knowledge and experience the has gained from over 20 years experience in both construction and consultancy roles throughout the United Kingdom and Australia. David is devoted to improvement within the construction industry and is passionate about effective collaboration and performance. Contact Details Email [email protected]Linked In au.linkedin.com/pub/david-foley/30/866/a43/
Transcript
Collision Course: A Practical Guide to Using Autodesk® Revit® MEP with Autodesk® Navisworks® Manage
David Foley – Norman Disney & Young
Code MP2489 Collision Course: A Practical Guide to Using Autodesk® Revit® MEP with Autodesk®
Navisworks® Manage
While construction collisions/clashes are not deliberate in the AEC profession, most of them could have been avoided. This class covers practical techniques, tips, and tricks to effectively manage the data exchange between Autodesk Revit software and Autodesk Navisworks software to detect, resolve, and avoid the unforeseen collisions/clashes that have long plagued design professionals in the AEC industry. We start with an overview of what’s required to set up Revit MEP to work with Navisworks on a live construction project, including live examples. We cover proven tips, tricks, and techniques from active practitioners in the fields of architecture, building services, and structural engineering. In the second part of the class, we focus on using the Revit BIM data inside Autodesk Navisworks Manage to produce meaningful clash detection reports, Timeliner animations, and automation tips to standardize and expedite the process of importing models into Navisworks Manage.
Learning Objectives At the end of this class, you will be able to:
Describe what is required to effectively get Revit models into Navisworks Manage
Automate the process with templates, filters, and selection sets
Apply standards, tricks, and tips to your own projects.
Standardize collision/clash detection in your organization
About the Speaker
David is an established leader in the management and implementation of Building Information
Modelling (BIM) throughout the construction industry. His role at NDY involves the
development of BIM protocols, standards, workflows and techniques using the knowledge and
experience the has gained from over 20 years experience in both construction and consultancy
roles throughout the United Kingdom and Australia. David is devoted to improvement within the
construction industry and is passionate about effective collaboration and performance.
Collision Course: A Practical Guide to Using Autodesk® Revit® MEP with Autodesk® Navisworks® Manage
3
Preparing your Revit file
We started by creating a set of 3D Views level by level in each Revit model.
Creating a set of views in Revit for Exporting to Navisworks
To facilitate exporting to Navisworks, each stakeholder is to create dedicated floor plans, with the prefix
ETN, for the purpose of creating a set of 3D views, with a set of a suffix of ETN.
The view ranges are to be set as detailed below:
2D Plan Views:
Level Bottom Range Bottom Range Offset
Top Range Top Range Offset
Level 1 “Unlimited” “Unlimited” “Level Above” 0
Level 2 “Associated Level”
0 “Level Above” 0
Level 3 “Associated Level”
0 “Unlimited” “Unlimited”
Then from the floor Plans we need to create a set of 3d views to create these views
3D Views:
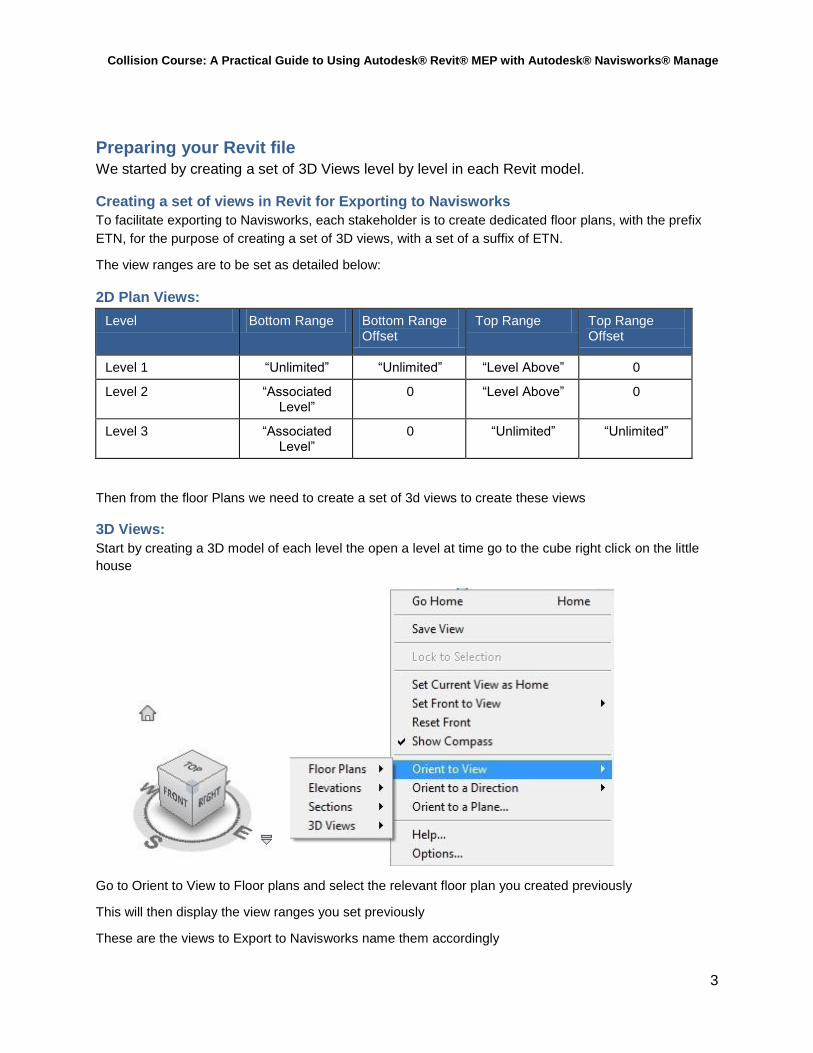
Start by creating a 3D model of each level the open a level at time go to the cube right click on the little
house
Go to Orient to View to Floor plans and select the relevant floor plan you created previously
This will then display the view ranges you set previously
These are the views to Export to Navisworks name them accordingly
Collision Course: A Practical Guide to Using Autodesk® Revit® MEP with Autodesk® Navisworks® Manage
4
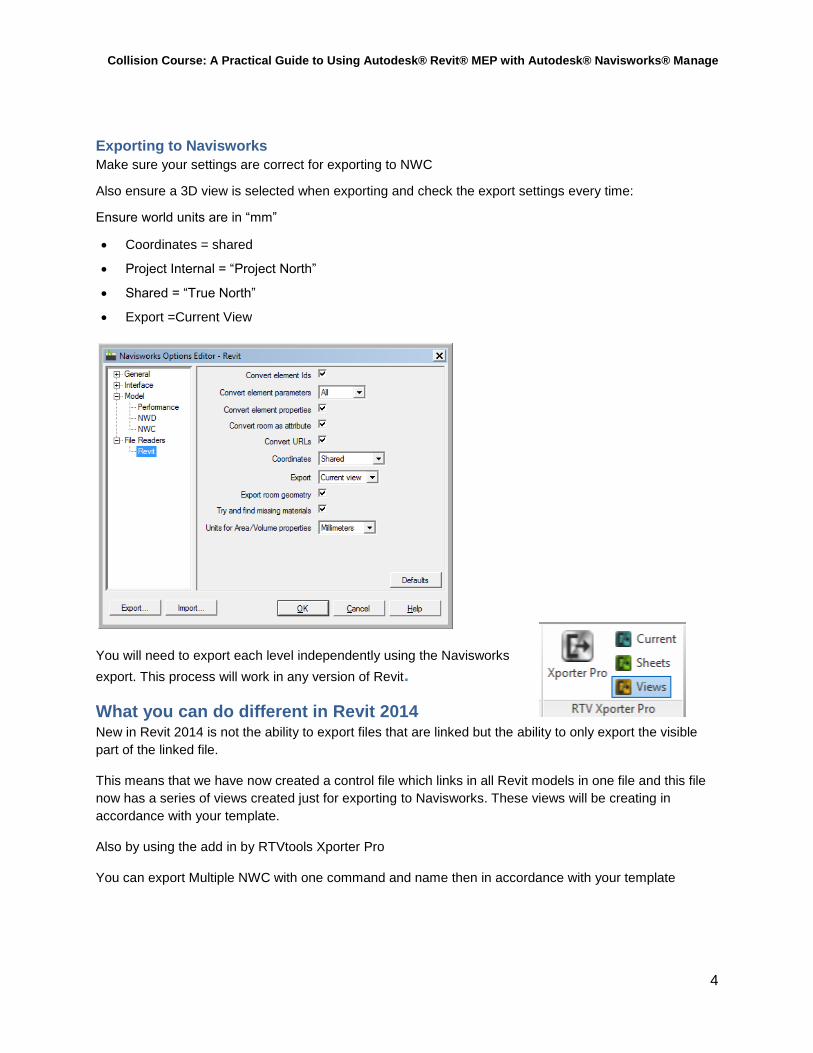
Exporting to Navisworks
Make sure your settings are correct for exporting to NWC
Also ensure a 3D view is selected when exporting and check the export settings every time:
Ensure world units are in “mm”
Coordinates = shared
Project Internal = “Project North”
Shared = “True North”
Export =Current View
You will need to export each level independently using the Navisworks
export. This process will work in any version of Revit.
What you can do different in Revit 2014 New in Revit 2014 is not the ability to export files that are linked but the ability to only export the visible
part of the linked file.
This means that we have now created a control file which links in all Revit models in one file and this file
now has a series of views created just for exporting to Navisworks. These views will be creating in
accordance with your template.
Also by using the add in by RTVtools Xporter Pro
You can export Multiple NWC with one command and name then in accordance with your template
Collision Course: A Practical Guide to Using Autodesk® Revit® MEP with Autodesk® Navisworks® Manage
5
Automate the process with templates, filters, and selection sets
Navisworks files For the purpose of this presentation I have created a basic template which should speed up the way you
work with Navisworks. To create a template in Navisworks you must create a NWC.
We used 3D model text as a place holder and then create copy it and rename it in accordance with your
Template a simple naming convention
The naming convention for this file type (.nwc) is as follows:
[DISCIPLINE]-[LEVEL].NWC
Below is a brief list of the Discipline Abbreviations to be used in the .nwc file naming convention:
Discipline Abbreviation Discipline Abbreviation
Architectural ARCH Mechanical Ductwork DUCT
Civil CIVL Structural STRL
Electrical ELEC Fire Protection FIRE
Mech Pipework/Medical Gas PIPE Hydraulics HYDR
The naming convention follows that each level from Level 1 will be named as such:
Collision Course: A Practical Guide to Using Autodesk® Revit® MEP with Autodesk® Navisworks® Manage
6
Project Defined Levels Abbreviation
LEVEL1 – [L01]
LEVEL2 – [L02]
LEVEL3 – [L03]
Roof – [L04]
Each level below Level 1 will be named as follows:
Project Defined Levels Abbreviation
Ground – [L00]
Lower Ground – [L-01]
Basement 1 – [L-02]
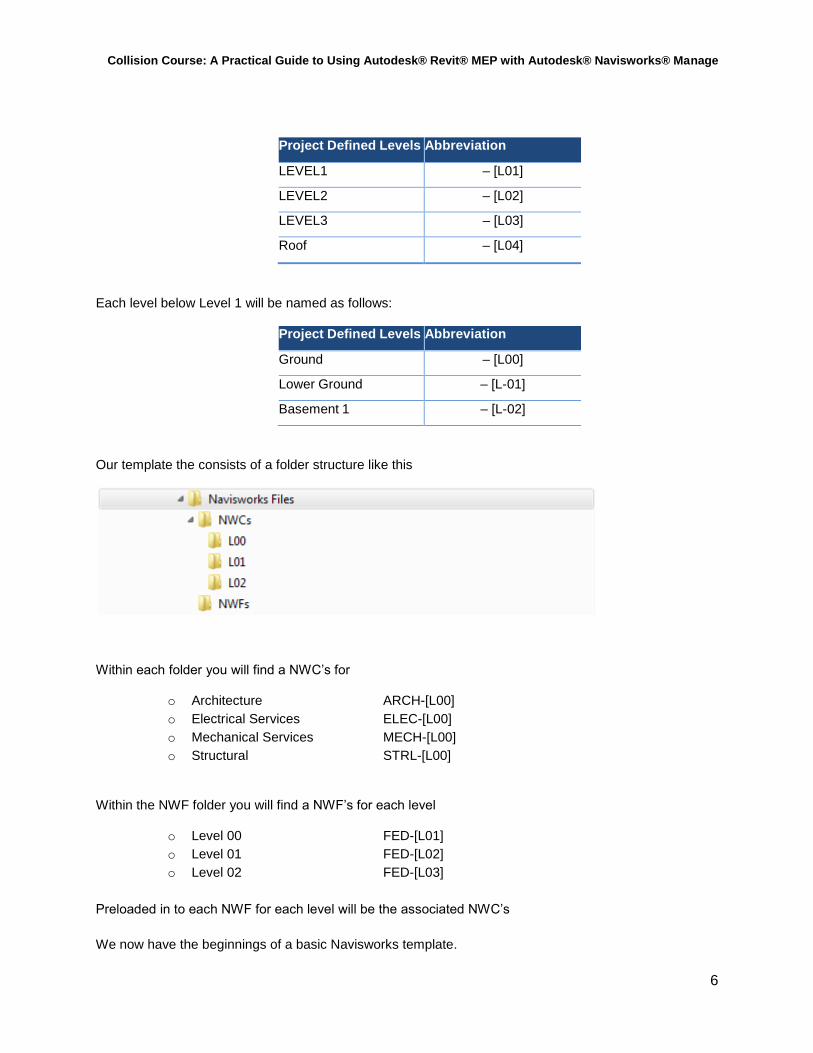
Our template the consists of a folder structure like this
Within each folder you will find a NWC’s for
o Architecture ARCH-[L00]
o Electrical Services ELEC-[L00]
o Mechanical Services MECH-[L00]
o Structural STRL-[L00]
Within the NWF folder you will find a NWF’s for each level
o Level 00 FED-[L01]
o Level 01 FED-[L02]
o Level 02 FED-[L03]
Preloaded in to each NWF for each level will be the associated NWC’s
We now have the beginnings of a basic Navisworks template.
Collision Course: A Practical Guide to Using Autodesk® Revit® MEP with Autodesk® Navisworks® Manage
7
Create Filters/View Templates in Revit
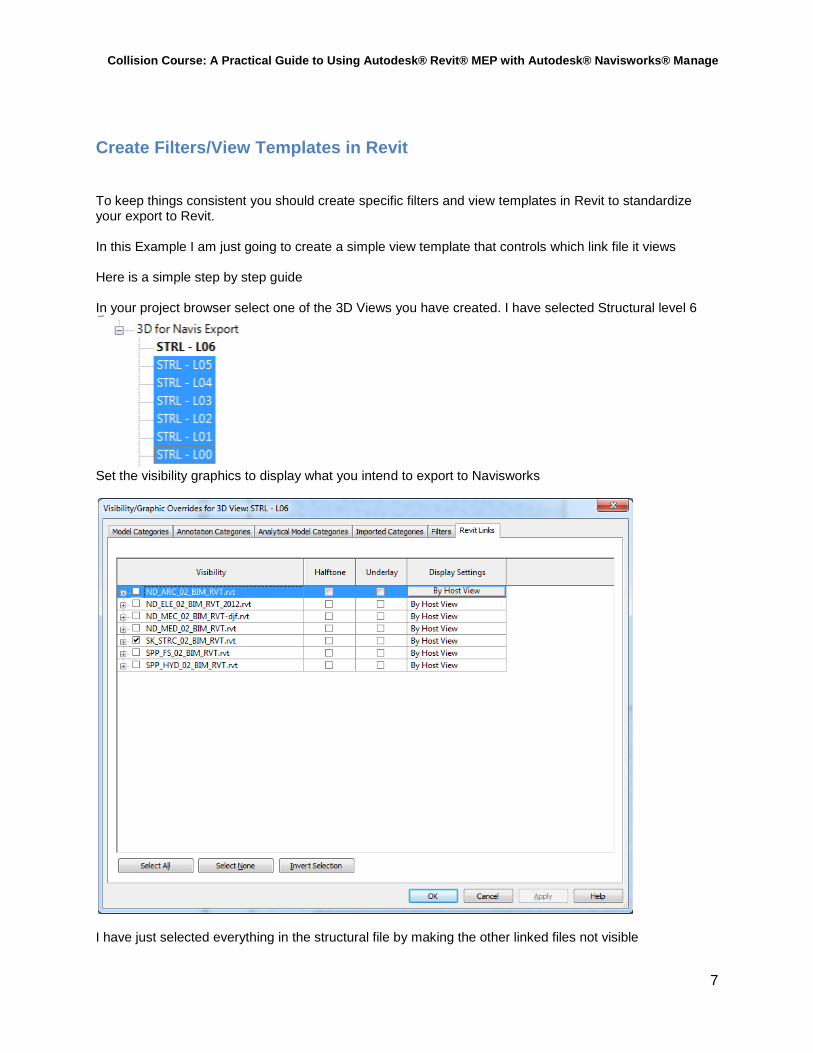
To keep things consistent you should create specific filters and view templates in Revit to standardize your export to Revit. In this Example I am just going to create a simple view template that controls which link file it views Here is a simple step by step guide In your project browser select one of the 3D Views you have created. I have selected Structural level 6
Set the visibility graphics to display what you intend to export to Navisworks
I have just selected everything in the structural file by making the other linked files not visible
Collision Course: A Practical Guide to Using Autodesk® Revit® MEP with Autodesk® Navisworks® Manage
8
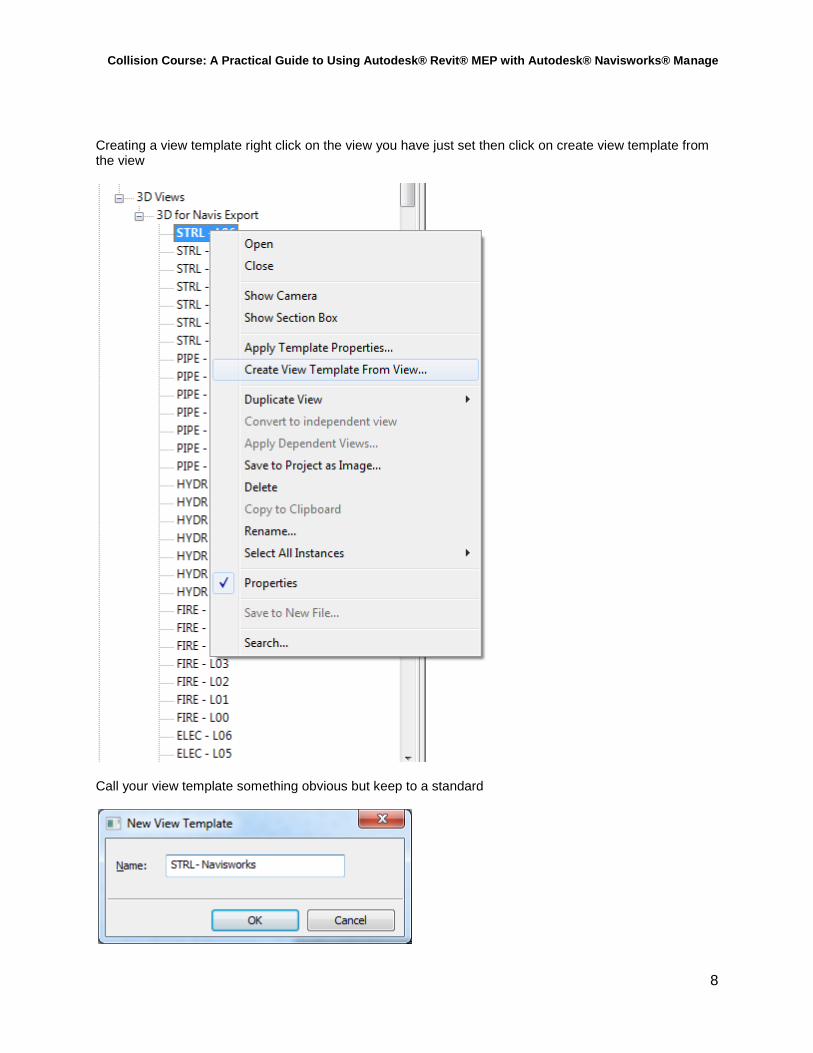
Creating a view template right click on the view you have just set then click on create view template from the view
Call your view template something obvious but keep to a standard
Collision Course: A Practical Guide to Using Autodesk® Revit® MEP with Autodesk® Navisworks® Manage
9
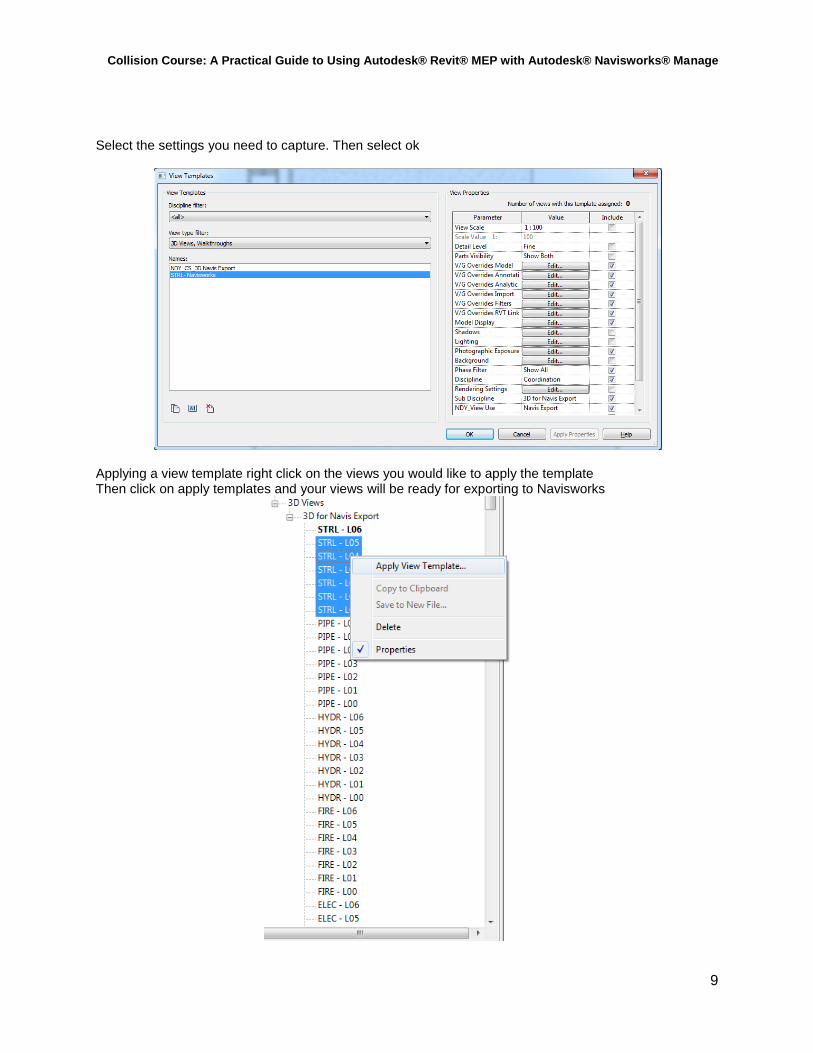
Select the settings you need to capture. Then select ok
Applying a view template right click on the views you would like to apply the template Then click on apply templates and your views will be ready for exporting to Navisworks
Collision Course: A Practical Guide to Using Autodesk® Revit® MEP with Autodesk® Navisworks® Manage
10
How to Create Selection/Search Sets
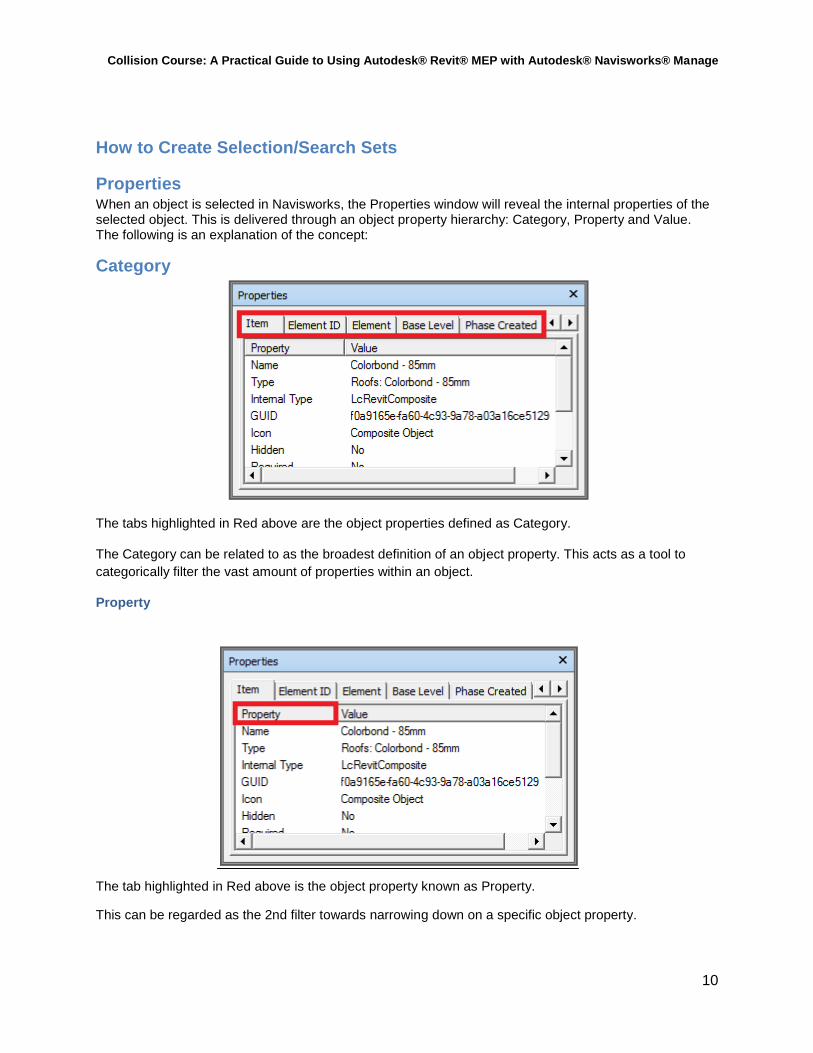
Properties When an object is selected in Navisworks, the Properties window will reveal the internal properties of the selected object. This is delivered through an object property hierarchy: Category, Property and Value. The following is an explanation of the concept:
Category
The tabs highlighted in Red above are the object properties defined as Category.
The Category can be related to as the broadest definition of an object property. This acts as a tool to
categorically filter the vast amount of properties within an object.
Property
The tab highlighted in Red above is the object property known as Property.
This can be regarded as the 2nd filter towards narrowing down on a specific object property.
Collision Course: A Practical Guide to Using Autodesk® Revit® MEP with Autodesk® Navisworks® Manage
11
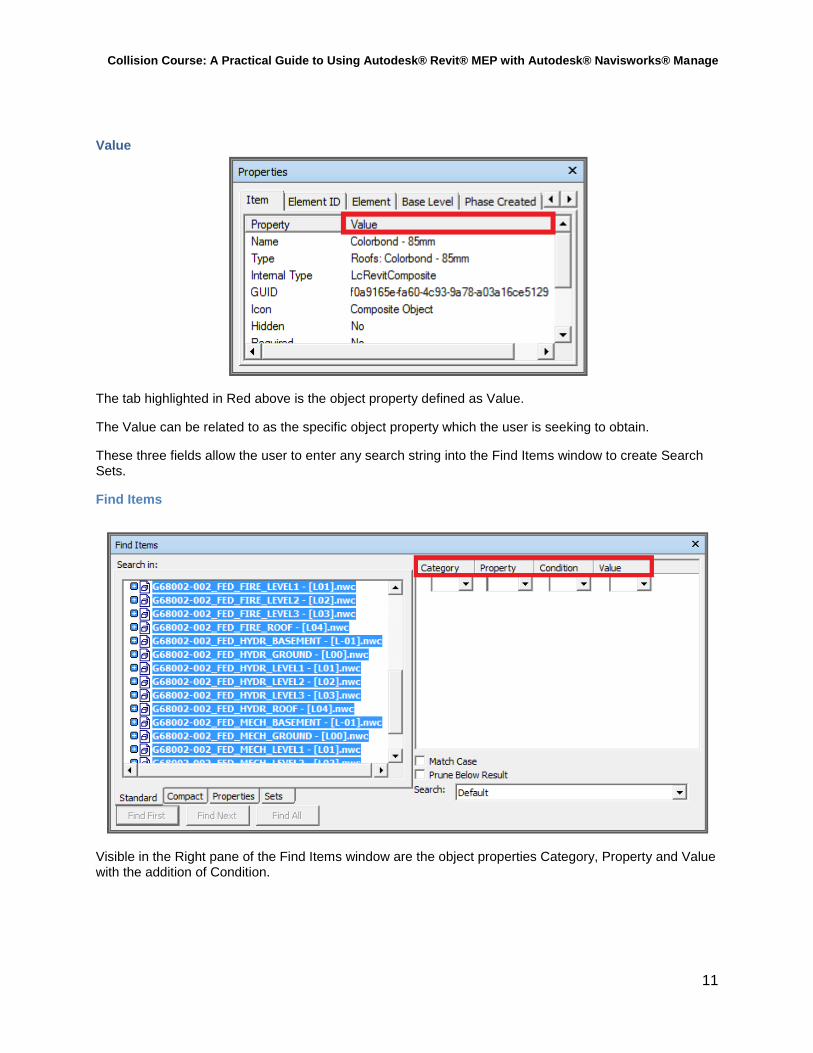
Value
The tab highlighted in Red above is the object property defined as Value.
The Value can be related to as the specific object property which the user is seeking to obtain.
These three fields allow the user to enter any search string into the Find Items window to create Search Sets.
Find Items
Visible in the Right pane of the Find Items window are the object properties Category, Property and Value with the addition of Condition.
Collision Course: A Practical Guide to Using Autodesk® Revit® MEP with Autodesk® Navisworks® Manage
12
Creating Search Sets
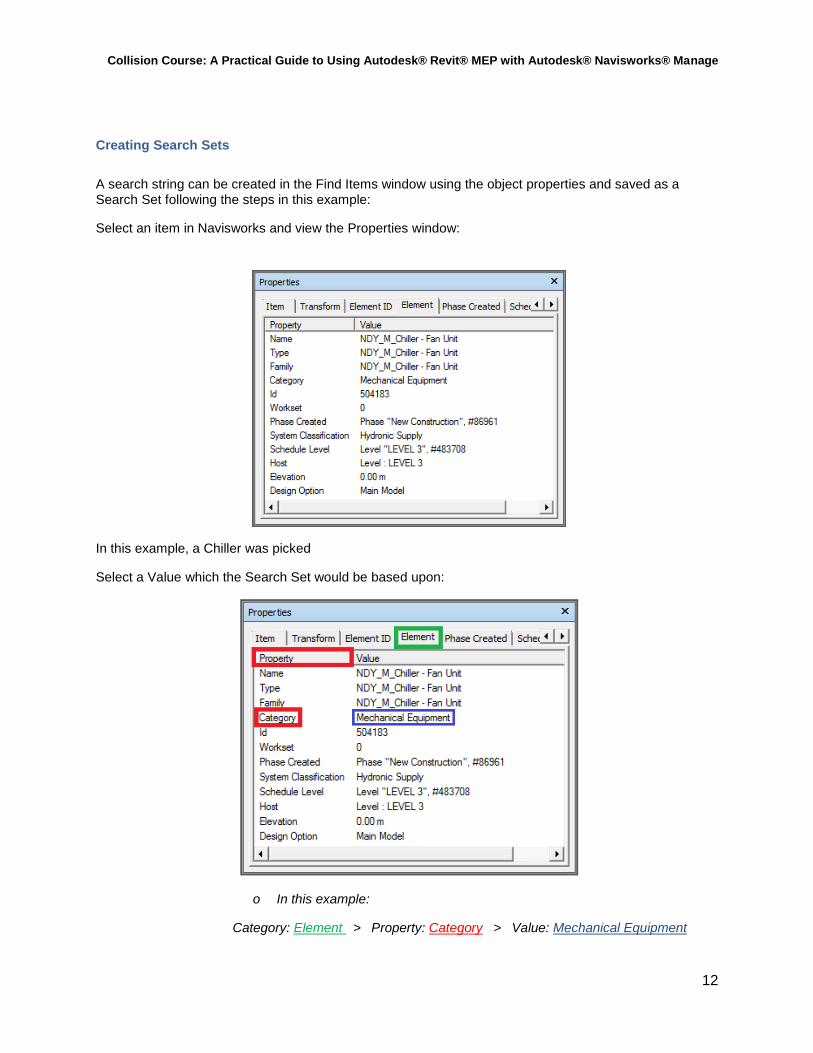
A search string can be created in the Find Items window using the object properties and saved as a Search Set following the steps in this example:
Select an item in Navisworks and view the Properties window:
In this example, a Chiller was picked
Select a Value which the Search Set would be based upon:
o In this example:
Category: Element > Property: Category > Value: Mechanical Equipment
Collision Course: A Practical Guide to Using Autodesk® Revit® MEP with Autodesk® Navisworks® Manage
13
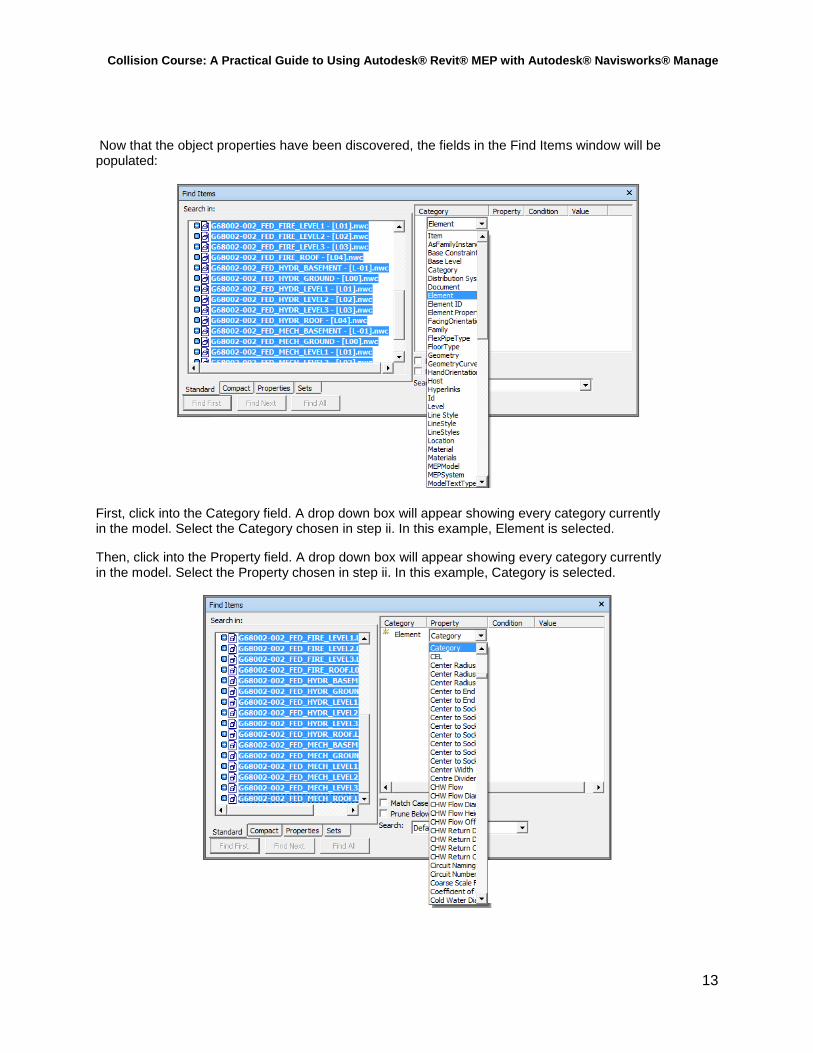
Now that the object properties have been discovered, the fields in the Find Items window will be populated:
First, click into the Category field. A drop down box will appear showing every category currently in the model. Select the Category chosen in step ii. In this example, Element is selected.
Then, click into the Property field. A drop down box will appear showing every category currently in the model. Select the Property chosen in step ii. In this example, Category is selected.
Collision Course: A Practical Guide to Using Autodesk® Revit® MEP with Autodesk® Navisworks® Manage
14
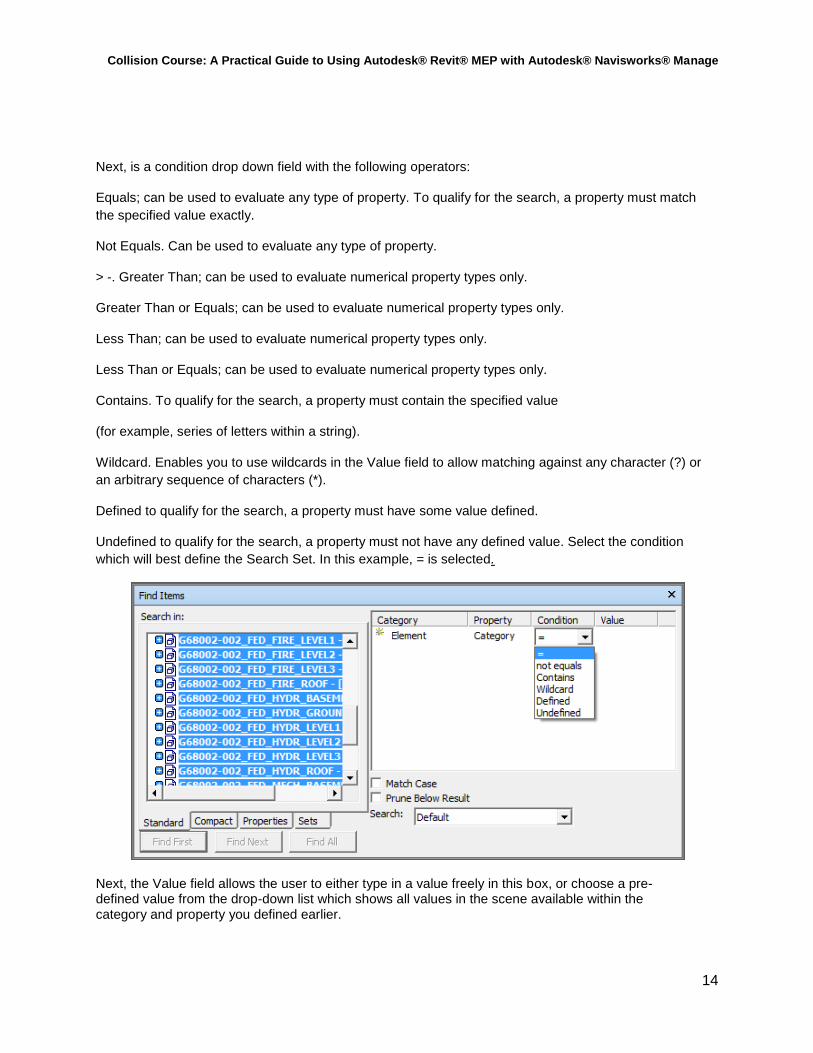
Next, is a condition drop down field with the following operators:
Equals; can be used to evaluate any type of property. To qualify for the search, a property must match
the specified value exactly.
Not Equals. Can be used to evaluate any type of property.
> -. Greater Than; can be used to evaluate numerical property types only.
Greater Than or Equals; can be used to evaluate numerical property types only.
Less Than; can be used to evaluate numerical property types only.
Less Than or Equals; can be used to evaluate numerical property types only.
Contains. To qualify for the search, a property must contain the specified value
(for example, series of letters within a string).
Wildcard. Enables you to use wildcards in the Value field to allow matching against any character (?) or
an arbitrary sequence of characters (*).
Defined to qualify for the search, a property must have some value defined.
Undefined to qualify for the search, a property must not have any defined value. Select the condition
which will best define the Search Set. In this example, = is selected.
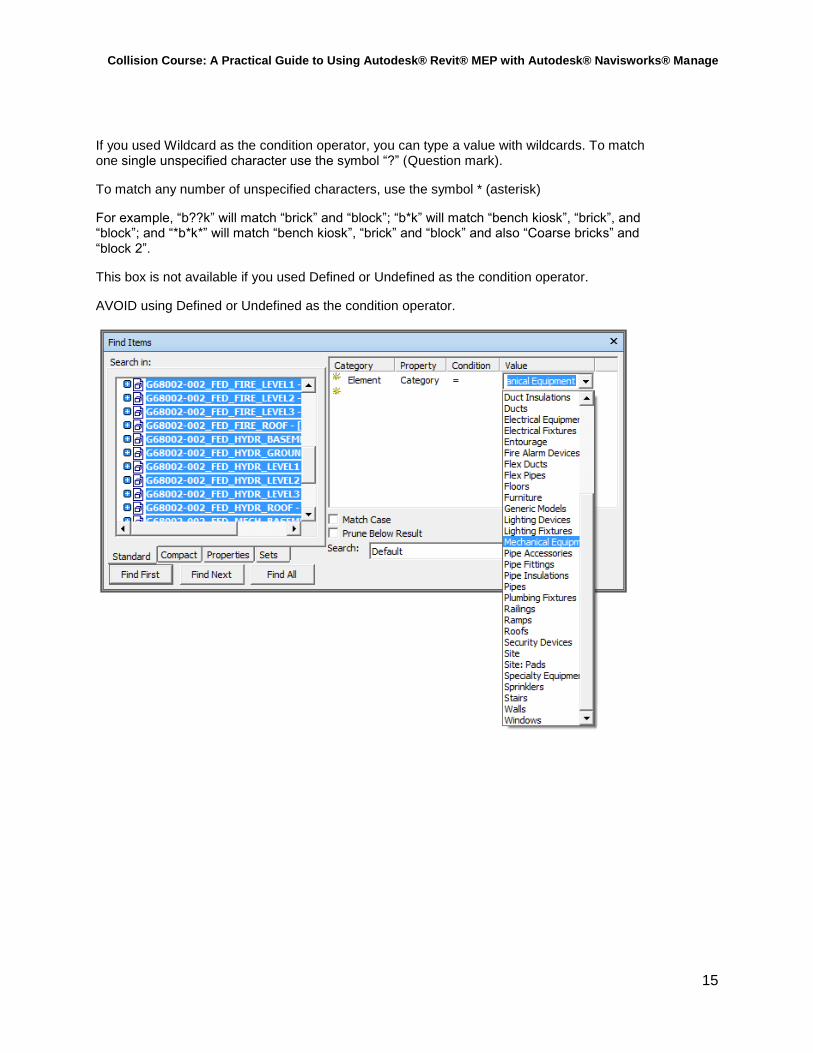
Next, the Value field allows the user to either type in a value freely in this box, or choose a pre-defined value from the drop-down list which shows all values in the scene available within the category and property you defined earlier.
Collision Course: A Practical Guide to Using Autodesk® Revit® MEP with Autodesk® Navisworks® Manage
15
If you used Wildcard as the condition operator, you can type a value with wildcards. To match one single unspecified character use the symbol “?” (Question mark).
To match any number of unspecified characters, use the symbol * (asterisk)
For example, “b??k” will match “brick” and “block”; “b*k” will match “bench kiosk”, “brick”, and “block”; and “*b*k*” will match “bench kiosk”, “brick” and “block” and also “Coarse bricks” and “block 2”.
This box is not available if you used Defined or Undefined as the condition operator.
AVOID using Defined or Undefined as the condition operator.
Collision Course: A Practical Guide to Using Autodesk® Revit® MEP with Autodesk® Navisworks® Manage
16
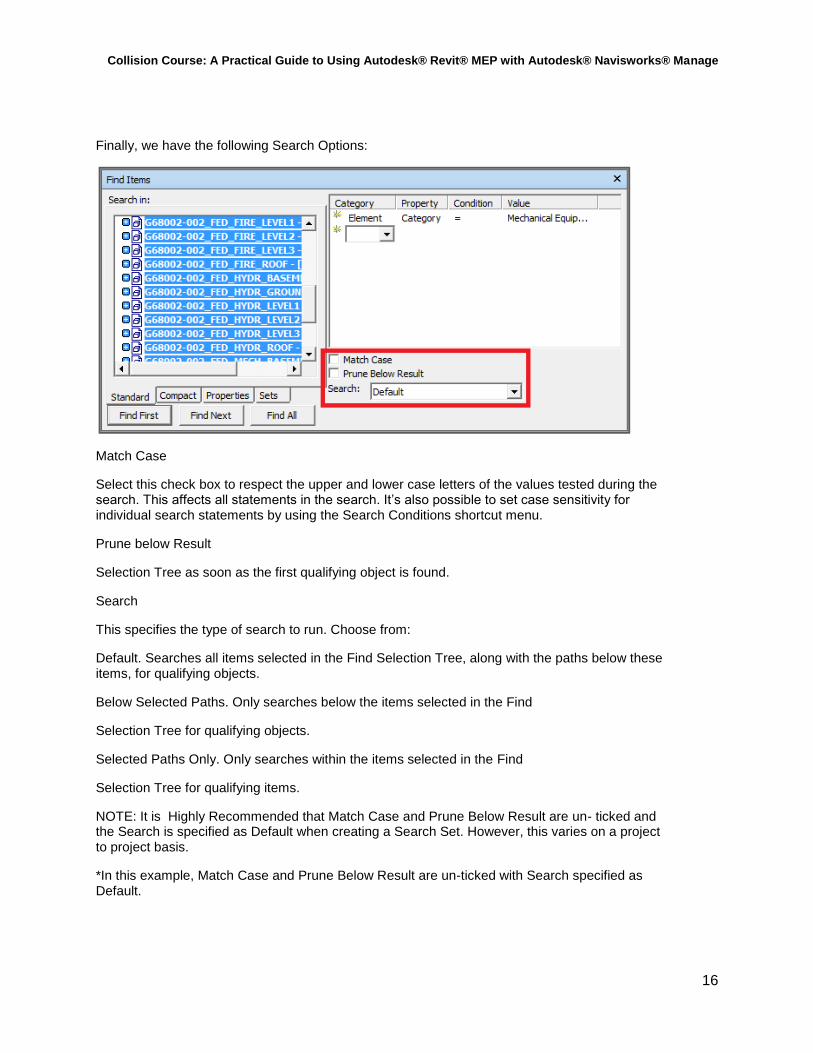
Finally, we have the following Search Options:
Match Case
Select this check box to respect the upper and lower case letters of the values tested during the search. This affects all statements in the search. It’s also possible to set case sensitivity for individual search statements by using the Search Conditions shortcut menu.
Prune below Result
Selection Tree as soon as the first qualifying object is found.
Search
This specifies the type of search to run. Choose from:
Default. Searches all items selected in the Find Selection Tree, along with the paths below these items, for qualifying objects.
Below Selected Paths. Only searches below the items selected in the Find
Selection Tree for qualifying objects.
Selected Paths Only. Only searches within the items selected in the Find
Selection Tree for qualifying items.
NOTE: It is Highly Recommended that Match Case and Prune Below Result are un- ticked and the Search is specified as Default when creating a Search Set. However, this varies on a project to project basis.
*In this example, Match Case and Prune Below Result are un-ticked with Search specified as Default.
Collision Course: A Practical Guide to Using Autodesk® Revit® MEP with Autodesk® Navisworks® Manage
17
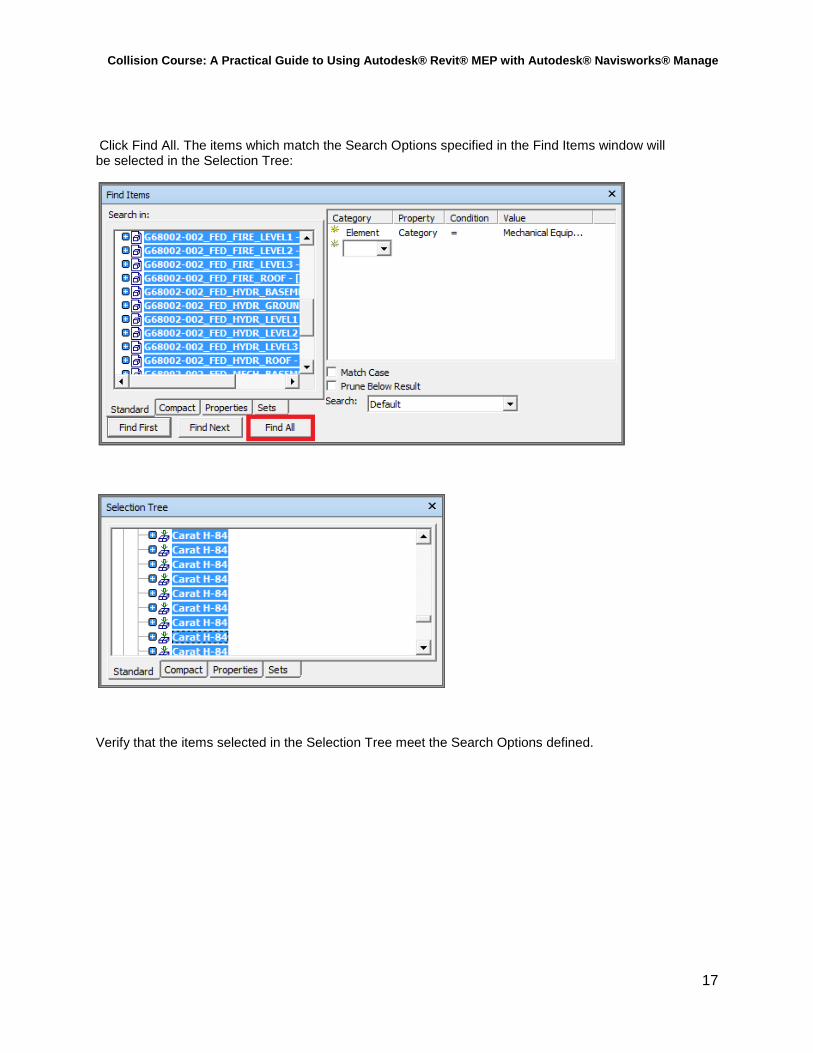
Click Find All. The items which match the Search Options specified in the Find Items window will be selected in the Selection Tree:
Verify that the items selected in the Selection Tree meet the Search Options defined.
Collision Course: A Practical Guide to Using Autodesk® Revit® MEP with Autodesk® Navisworks® Manage
18
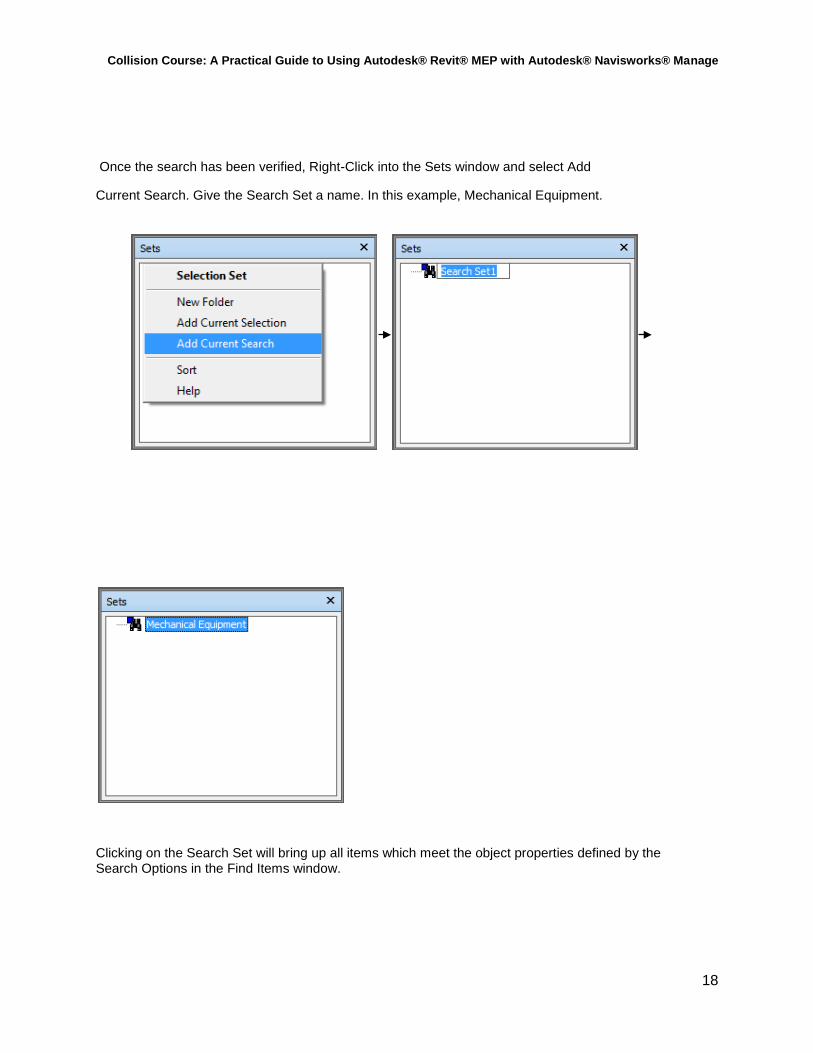
Once the search has been verified, Right-Click into the Sets window and select Add
Current Search. Give the Search Set a name. In this example, Mechanical Equipment.
Clicking on the Search Set will bring up all items which meet the object properties defined by the Search Options in the Find Items window.
Collision Course: A Practical Guide to Using Autodesk® Revit® MEP with Autodesk® Navisworks® Manage
19
Apply standards, tricks, and tips to your own projects.
Selection set tips
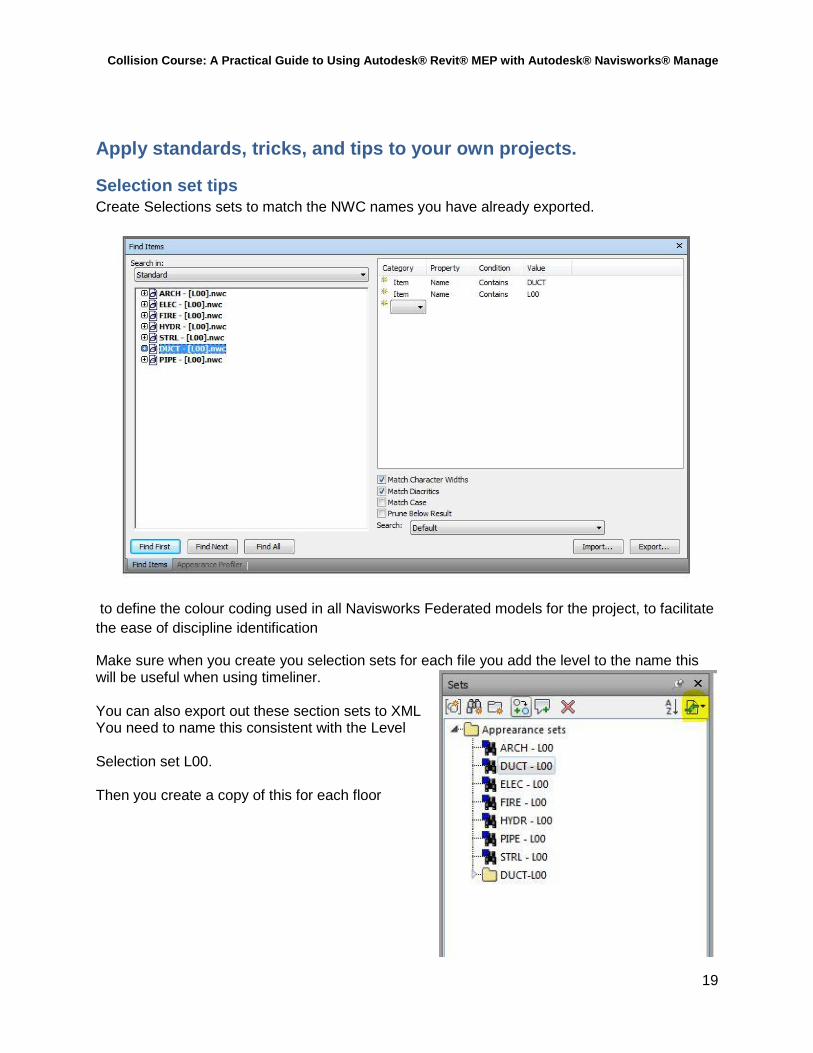
Create Selections sets to match the NWC names you have already exported.
to define the colour coding used in all Navisworks Federated models for the project, to facilitate
the ease of discipline identification
Make sure when you create you selection sets for each file you add the level to the name this will be useful when using timeliner. You can also export out these section sets to XML You need to name this consistent with the Level Selection set L00. Then you create a copy of this for each floor
Collision Course: A Practical Guide to Using Autodesk® Revit® MEP with Autodesk® Navisworks® Manage
20
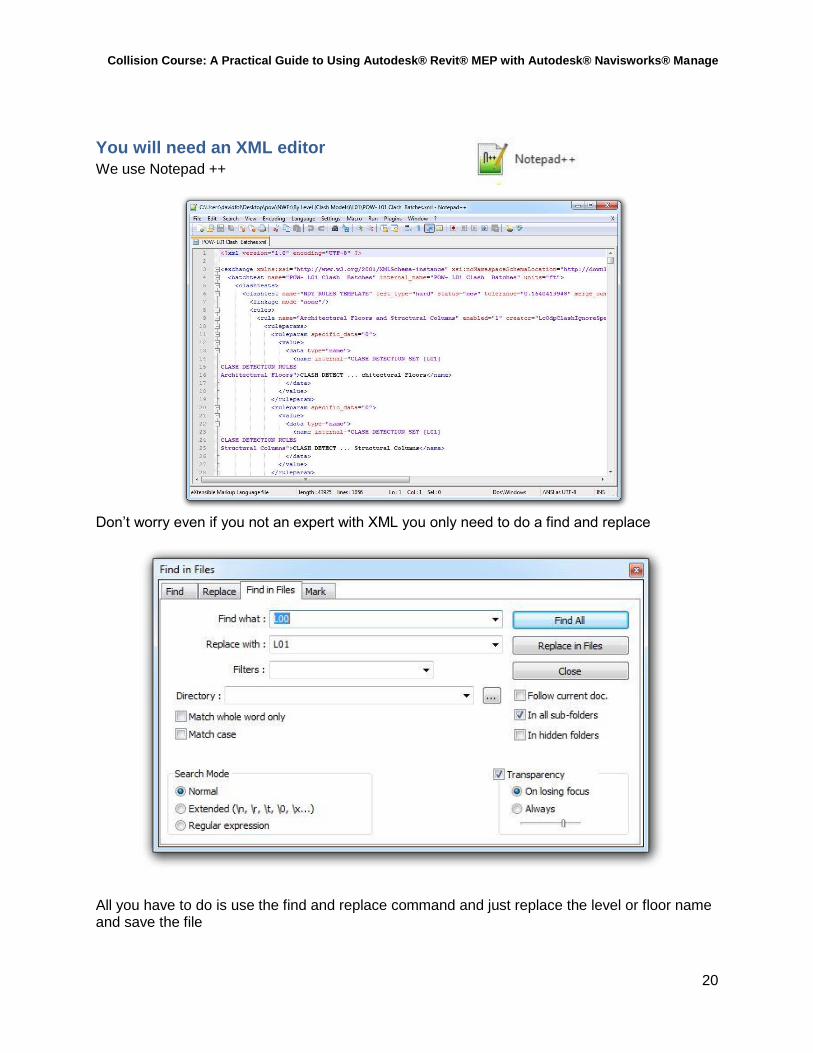
You will need an XML editor
We use Notepad ++
Don’t worry even if you not an expert with XML you only need to do a find and replace
All you have to do is use the find and replace command and just replace the level or floor name and save the file
Collision Course: A Practical Guide to Using Autodesk® Revit® MEP with Autodesk® Navisworks® Manage
21
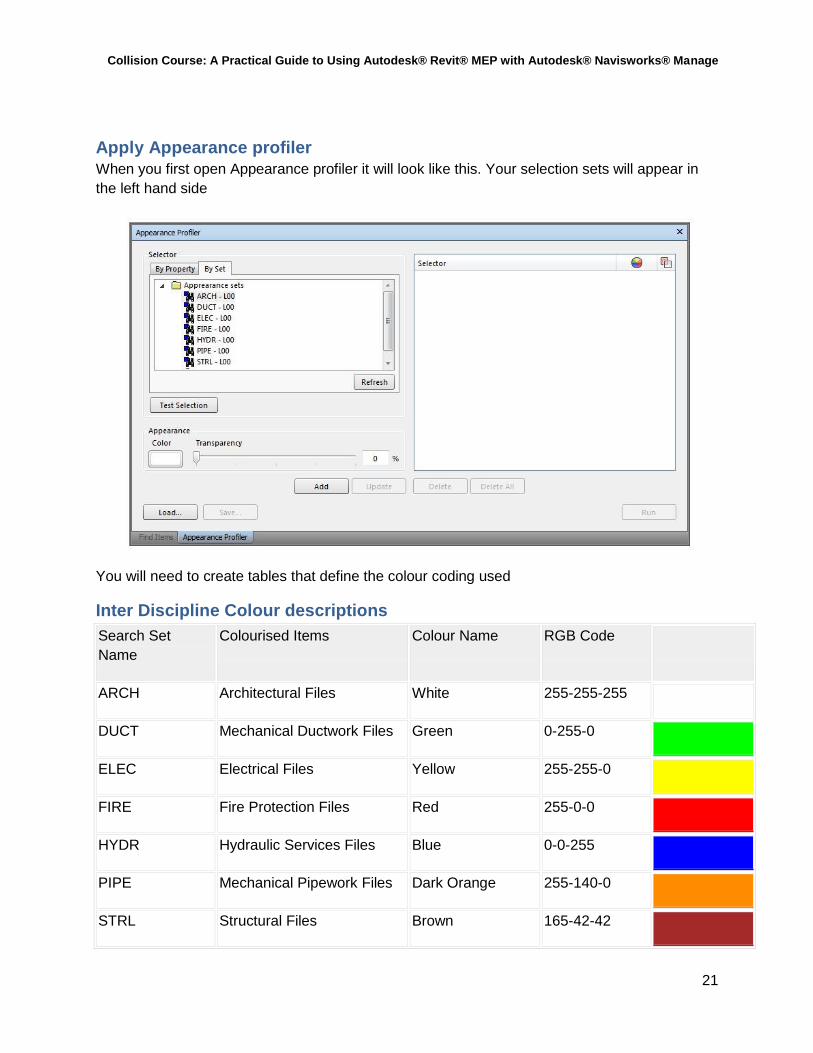
Apply Appearance profiler
When you first open Appearance profiler it will look like this. Your selection sets will appear in
the left hand side
You will need to create tables that define the colour coding used
Inter Discipline Colour descriptions
Search Set
Name
Colourised Items Colour Name RGB Code
ARCH Architectural Files White 255-255-255
DUCT Mechanical Ductwork Files Green 0-255-0
ELEC Electrical Files Yellow 255-255-0
FIRE Fire Protection Files Red 255-0-0
HYDR Hydraulic Services Files Blue 0-0-255
PIPE Mechanical Pipework Files Dark Orange 255-140-0
STRL Structural Files Brown 165-42-42
Collision Course: A Practical Guide to Using Autodesk® Revit® MEP with Autodesk® Navisworks® Manage
22
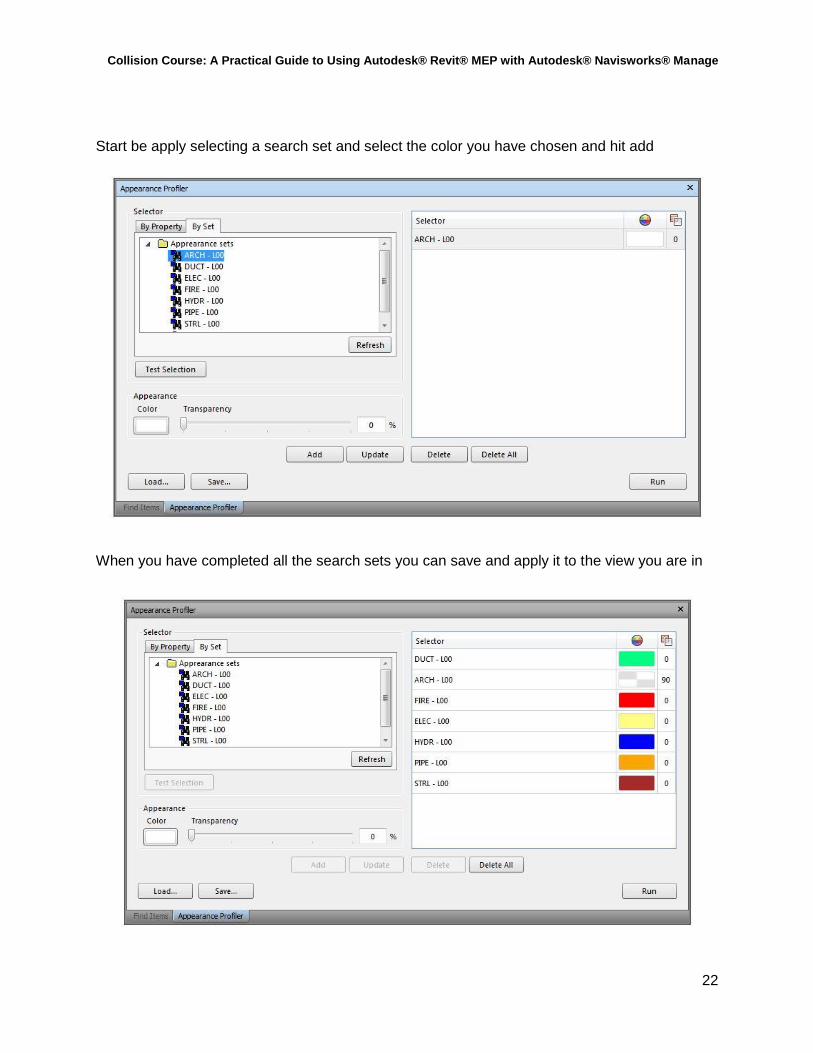
Start be apply selecting a search set and select the color you have chosen and hit add
When you have completed all the search sets you can save and apply it to the view you are in
Collision Course: A Practical Guide to Using Autodesk® Revit® MEP with Autodesk® Navisworks® Manage
23
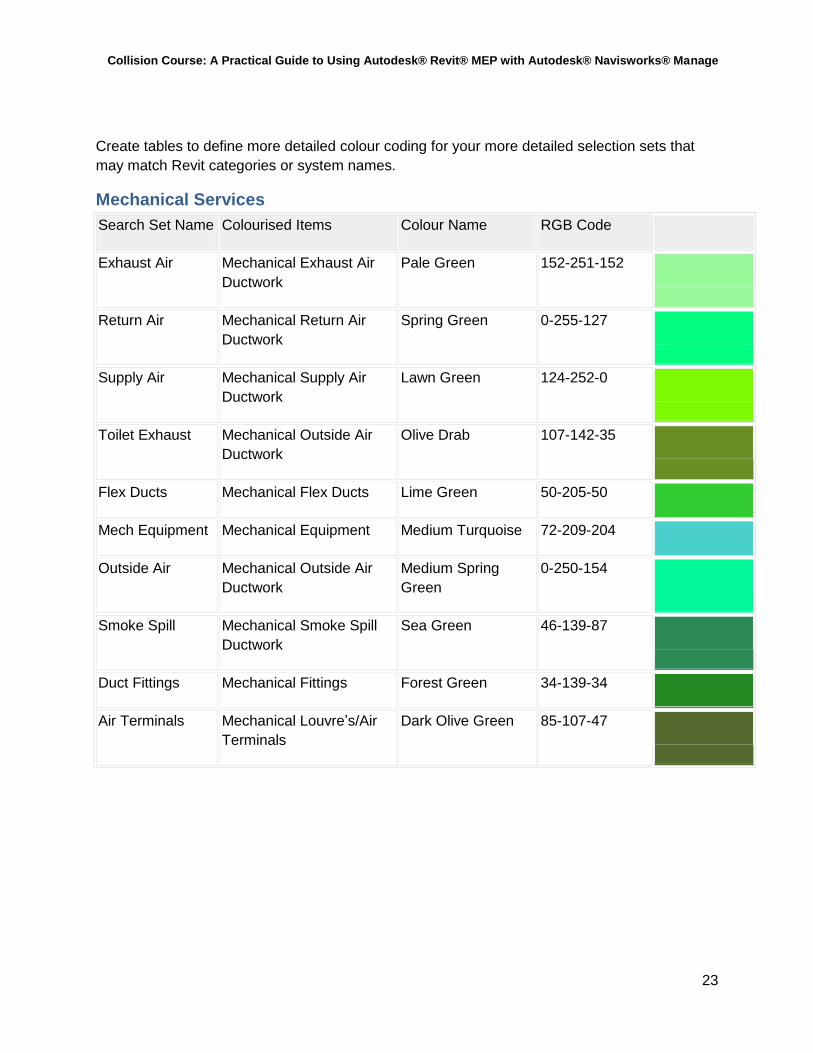
Create tables to define more detailed colour coding for your more detailed selection sets that
may match Revit categories or system names.
Mechanical Services
Search Set Name Colourised Items Colour Name RGB Code
Exhaust Air Mechanical Exhaust Air
Ductwork
Pale Green 152-251-152
Return Air Mechanical Return Air
Ductwork
Spring Green 0-255-127
Supply Air Mechanical Supply Air
Ductwork
Lawn Green 124-252-0
Toilet Exhaust Mechanical Outside Air
Ductwork
Olive Drab 107-142-35
Flex Ducts Mechanical Flex Ducts Lime Green 50-205-50
Mech Equipment Mechanical Equipment Medium Turquoise 72-209-204
Outside Air Mechanical Outside Air
Ductwork
Medium Spring
Green
0-250-154
Smoke Spill Mechanical Smoke Spill
Ductwork
Sea Green 46-139-87
Duct Fittings Mechanical Fittings Forest Green 34-139-34
Air Terminals Mechanical Louvre’s/Air
Terminals
Dark Olive Green 85-107-47
Collision Course: A Practical Guide to Using Autodesk® Revit® MEP with Autodesk® Navisworks® Manage
24
Standardize collision/clash detection in your organization
Use the selection sets you have previously created to define your standard clash detection
batches
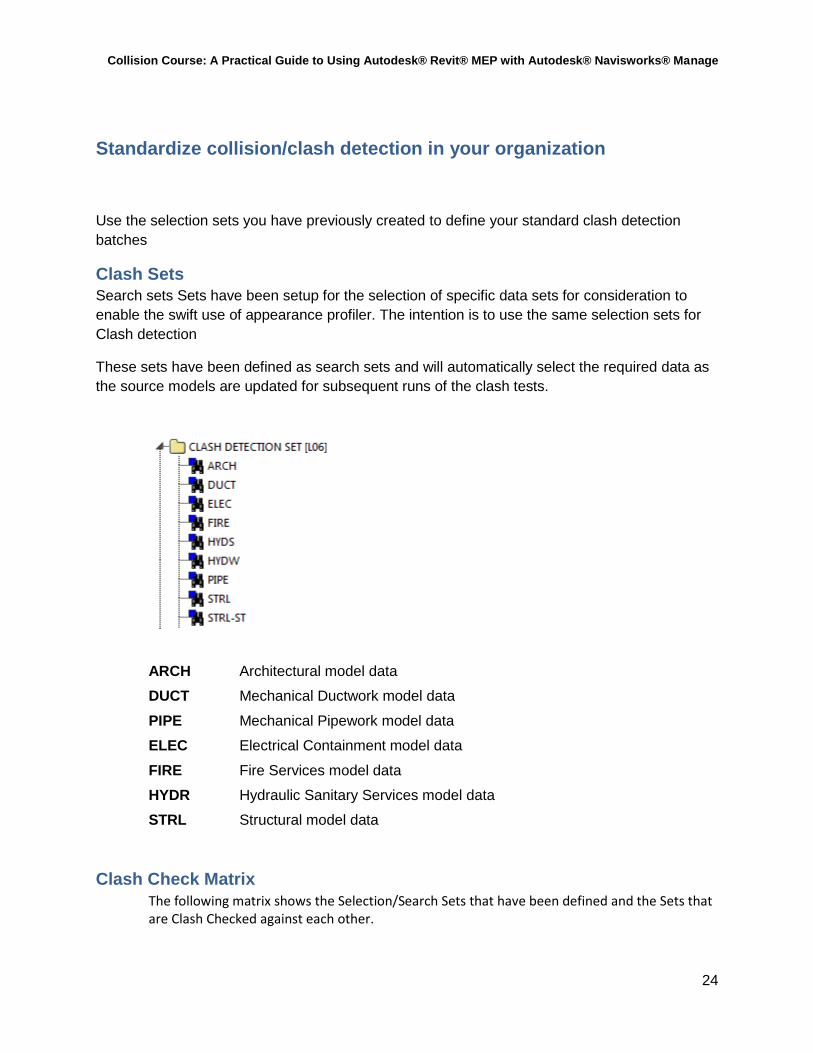
Clash Sets
Search sets Sets have been setup for the selection of specific data sets for consideration to
enable the swift use of appearance profiler. The intention is to use the same selection sets for
Clash detection
These sets have been defined as search sets and will automatically select the required data as
the source models are updated for subsequent runs of the clash tests.
ARCH Architectural model data
DUCT Mechanical Ductwork model data
PIPE Mechanical Pipework model data
ELEC Electrical Containment model data
FIRE Fire Services model data
HYDR Hydraulic Sanitary Services model data
STRL Structural model data
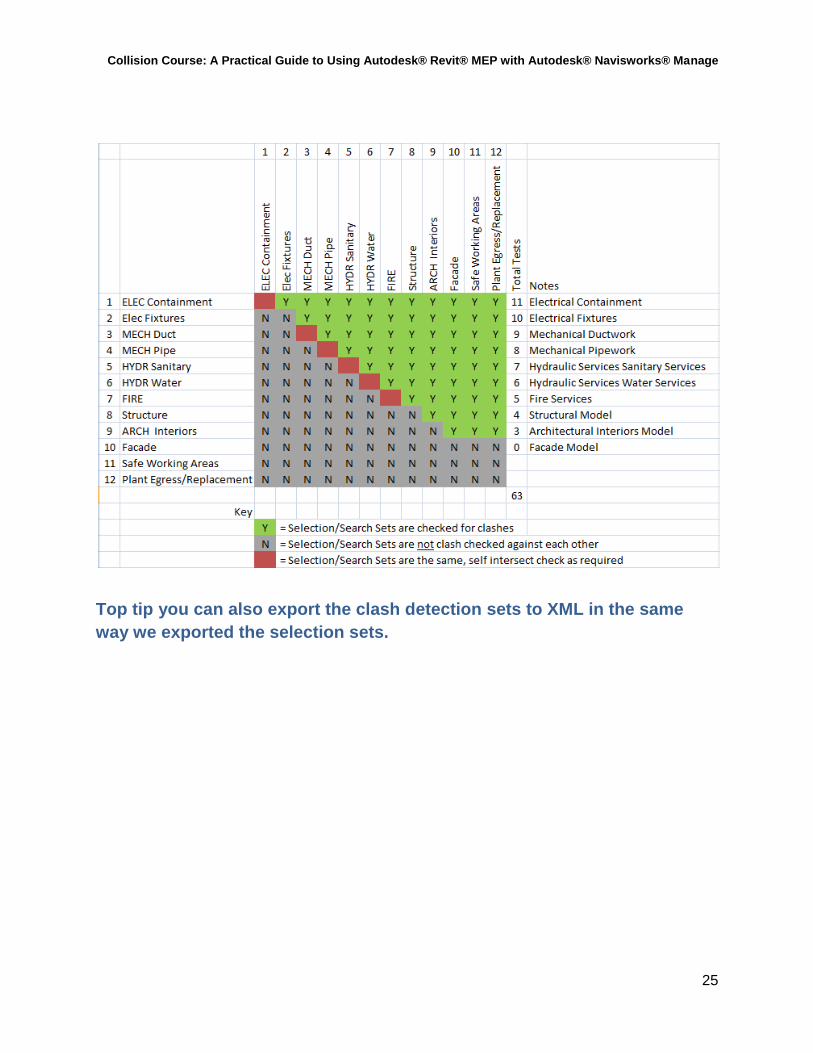
Clash Check Matrix
The following matrix shows the Selection/Search Sets that have been defined and the Sets that are Clash Checked against each other.
Collision Course: A Practical Guide to Using Autodesk® Revit® MEP with Autodesk® Navisworks® Manage
25
Top tip you can also export the clash detection sets to XML in the same