11
ActiveSite Color Dial Pro User Guide
ActiveSite
Color Dial Pro
User Guide

2 ColorDialPro UserGuide
Getting Started with ColorDial ProColorDial™Proisasimple-to-operatelightingcontrollerdesignedforusewithintelligentRGBandintelligentwhite(iW)LEDlightingfixturesfromColorKinetics.WithColorDialPro,youcanplaybackandmodifyasetof16scenes,eightforRGBfixturesandeightforiWfixtures.Asceneconsistsofabuilt-ineffectanduser-editableeffectsettings.
Effectsettingsdifferdependingontheselectedeffect.Forexample,youcanchangethespeedanddirectionoftheColorWasheffect,orthecolortemperatureoftheFixedWhiteeffect.
ASystemSettingsmenuletsyouperformsuchactionsasswitchingbetweenRGBModeandiWMode,lockingthemenus,changingthedisplaylanguagefromEnglishtoanotheravailablelanguage(suchasFrench,Spanish,orItalian),settingbacklightandmenutimeouts,performingbasiclightsetup,andsoon.
Typical ColorDial Pro InstallationsAninstallationusingColorDialProasalightingcontrollertypicallyincludesoneColorDialPro,anEthernetswitchwithoneormorePoweroverEthernet(PoE)ports,anEthernet-enabledpower/datasupply,andColorKineticsintelligentRGBoriWLEDlightingfixturesconnectedtooneormorepower/datasupplyports.
Theexampleontheleftshowsatypicallow-voltageinstallation.ColorDialProisconnectedtooneofthefourPoEportsonaD-LinkDES-1008PAPoEEthernetswitch(availablefromColorKinetics).AnsPDS-60capower/datasupplyisconnectedtoanon-PoEportontheEthernetswitch,andarunofiColorCoveQLXfixturesisconnectedtooneofthe4-pinoutputportsonthesPDS-60ca.
Theexampleontherightshowsatypicalline-voltageinstallation.Asinthelow-voltageexample,ColorDialProisconnectedtoaPoEportontheEthernetswitch.Inthiscase,however,anEthernetDataEnablerisconnectedtotheswitch,andarunofColorBlastPowercorefixturesareconnectedtotheDataEnabler.
E See the ColorDial Pro Installation Instructions and Product Guide for complete installation and configuration details. Visit www.colorkinetics/ls/controllers/colordialpro/ for downloads.
ColorDial Pro
Ethernet PoE switch
sPDS60-ca
iColor Cove QLX fixtures
Data Enabler Pro
ColorDial Pro
Ethernet PoEswitch
iW Blast Powercorefixtures
iW Effect
Fixed White
RGB Effects
Fixed Color
Variable Color Random Color
RGB White
Custom Wash
Rainbow Wash
Color Wash

ColorDialPro UserGuide 3
Playback Mode and Menu ModePlaybackModeletsyoutogglebetweenstoredscenes,adjustthebrightnesslevelofthecurrentscene,andturnconnectedlightsonandoff.MenuModeletsyouswitchbetweenRGBModeandiWMode,changeotherColorDialProsettings,editthecurrentscene(changetheeffectanditsrelatedsettings),andsaveyoureditstoascene.
Navigation and SelectionColorDialProstartsupinPlaybackMode.WhenColorDialProinitiallypowerson,thelogoappearsbrieflyontheLCDscreen,andthescenecurrentlystoredasScene1beginsplayingbackonallconnectedlights.
► To select the next stored scene inorder,pressthefaceplatebutton.
► To enter Menu ModefromPlaybackMode,pressandholdtherotarydial.
► To make selections in Menu Mode,turntherotarydialtohighlightamenuselectionthenpresstherotarydialtoconfirmtheselection.
► To access the System Settings menu,simultaneouslypressandholdtherotarydialandthefaceplatebutton,turntherotarydialtohighlightSystemSettings,andpresstherotarydialtoconfirm.
WhenColorDialProisidle,itautomaticallyreturnstoPlaybackModebyexitingonemenulevelatatime.(YoucanadjustthemenuidletimeoutusingtheSystemSettingsmenu.)
Locking and Unlocking Menu ModeTopreventaccidentalinterruptionofsceneplayback,youmightwanttolockthemenusavailableinMenuMode.Forconvenience,youcantemporarilyaccessmenuswithoutunlockingthem.
► To lock Menu Mode:1. InMenuMode,selectSystemSettings>SetupUI>LockMenus.2. SelectON.3. Presstherotarydialtoconfirm.4. SelectExituntilyoureturntoPlaybackMode.
► To access menus without unlocking Menu Mode:1. PressandholdtherotarydialtodisplaytheLockedmessage.2. PresstherotarydialthreetimestoenterMenuMode.(TodisplaytheSystem
Settingsmenuoption,pressandholdthefaceplatebuttonwhilepressingtherotarydialthreetimes.)
► To unlock Menu Mode:1. PressandholdtherotarydialtodisplaytheLockedmessage.2. Pressandholdthefaceplatebuttonwhilepressingtherotarydialthree
times.3. SelectSystemSettings>SetupUI>LockMenus.4. SelectOFF.5. Presstherotarydialtoconfirm.
6. SelectExituntilyoureturntoPlaybackMode.
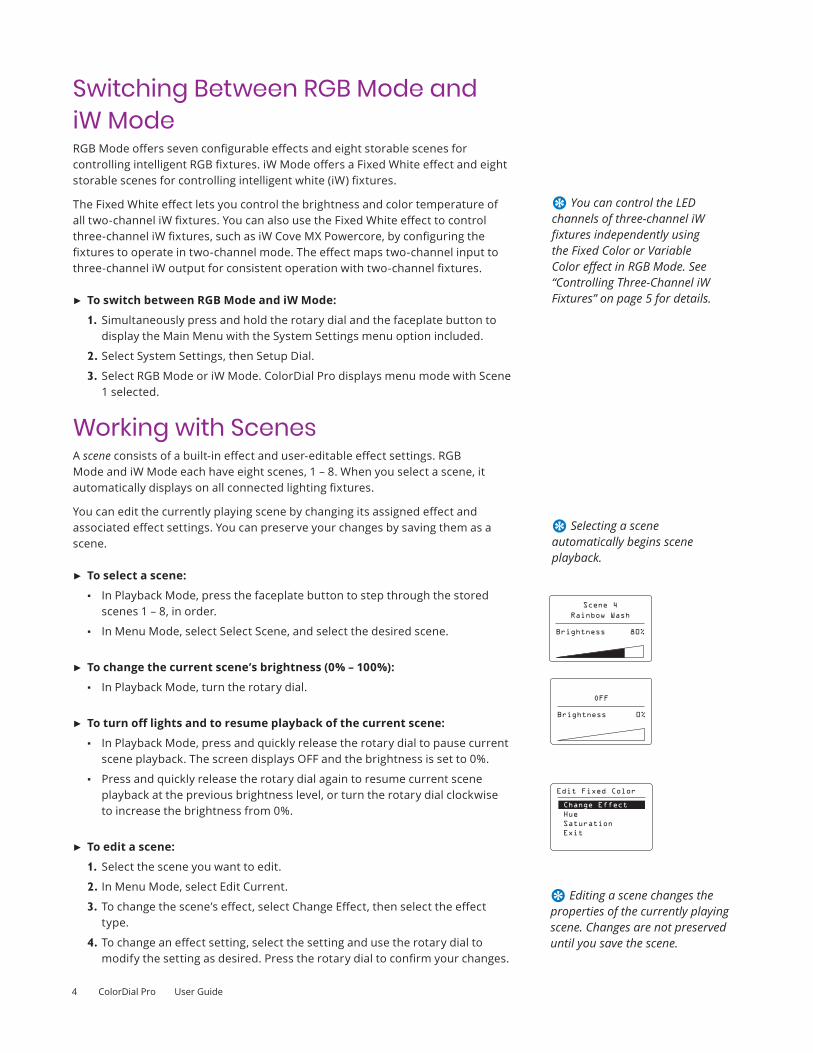
Scene 4
Rainbow Wash
Brightness 80%
Playback ModeMain Menu
Select Scene
Edit Current
Save as Scene
Exit
Menu Mode
LCDscreen
Rotarydial
Faceplatebutton
Locked
E When using the Variable Color effect, Playback Mode adjusts the RGB value of the effect rather than the brightness.
4 ColorDialPro UserGuide
Switching Between RGB Mode and iW ModeRGBModeofferssevenconfigurableeffectsandeightstorablescenesforcontrollingintelligentRGBfixtures.iWModeoffersaFixedWhiteeffectandeightstorablescenesforcontrollingintelligentwhite(iW)fixtures.
TheFixedWhiteeffectletsyoucontrolthebrightnessandcolortemperatureofalltwo-channeliWfixtures.YoucanalsousetheFixedWhiteeffecttocontrolthree-channeliWfixtures,suchasiWCoveMXPowercore,byconfiguringthefixturestooperateintwo-channelmode.Theeffectmapstwo-channelinputtothree-channeliWoutputforconsistentoperationwithtwo-channelfixtures.
► To switch between RGB Mode and iW Mode:
1. SimultaneouslypressandholdtherotarydialandthefaceplatebuttontodisplaytheMainMenuwiththeSystemSettingsmenuoptionincluded.
2. SelectSystemSettings,thenSetupDial.
3. SelectRGBModeoriWMode.ColorDialProdisplaysmenumodewithScene1selected.
Working with ScenesAsceneconsistsofabuilt-ineffectanduser-editableeffectsettings.RGBModeandiWModeeachhaveeightscenes,1–8.Whenyouselectascene,itautomaticallydisplaysonallconnectedlightingfixtures.
Youcaneditthecurrentlyplayingscenebychangingitsassignedeffectandassociatedeffectsettings.Youcanpreserveyourchangesbysavingthemasascene.
► To select a scene:
▪ InPlaybackMode,pressthefaceplatebuttontostepthroughthestoredscenes1–8,inorder.
▪ InMenuMode,selectSelectScene,andselectthedesiredscene.
► To change the current scene’s brightness (0% – 100%):
▪ InPlaybackMode,turntherotarydial.
► Toturnofflightsandtoresumeplaybackofthecurrentscene:
▪ InPlaybackMode,pressandquicklyreleasetherotarydialtopausecurrentsceneplayback.ThescreendisplaysOFFandthebrightnessissetto0%.
▪ Pressandquicklyreleasetherotarydialagaintoresumecurrentsceneplaybackatthepreviousbrightnesslevel,orturntherotarydialclockwisetoincreasethebrightnessfrom0%.
► To edit a scene:
1. Selectthesceneyouwanttoedit.2. InMenuMode,selectEditCurrent.
3. Tochangethescene’seffect,selectChangeEffect,thenselecttheeffecttype.
4. Tochangeaneffectsetting,selectthesettingandusetherotarydialtomodifythesettingasdesired.Presstherotarydialtoconfirmyourchanges.
E Editing a scene changes the properties of the currently playing scene. Changes are not preserved until you save the scene.
Edit Fixed Color
Change Effect
Hue
Saturation
Exit
Scene 4
Rainbow Wash
Brightness 80%
OFF
Brightness 0%
E Selecting a scene automatically begins scene playback.
E You can control the LED channels of three-channel iW fixtures independently using the Fixed Color or Variable Color effect in RGB Mode. See “Controlling Three-Channel iW Fixtures” on page 5 for details.

ColorDialPro UserGuide 5
5. See“ChangingEffectSettings”belowforspecificinstructionsforeachsetting.6. Repeatstep4foreacheffectsettingyouwanttochange.7. SelectExituntilyoureturntoPlaybackMode.
► To save the current scene:
1. Makeanydesiredchangestothecurrentscene’seffectandeffectsettings.
2. InMenuMode,selectSaveAsScene.
3. Selectascenelocation,1through8,towhichtosavethecurrentscene.TheLCDscreendisplaysaStoredmessagetoconfirm.
ChangingEffectSettingsEffectsettingsdifferdependingontheselectedeffect.Forexample,youcanchangethespeedanddirectionoftheColorWasheffect,orthetemperatureoftheWhiteeffect.
► Toeditaneffectsetting:
1. InMenuMode,selectEditCurrent.Changetheeffecttype,ifdesired.
2. Selectthesettingyouwanttochangefromtheeffecttype’sEditmenu
3. Turntherotarydialtomodifythesettingasdesired,thenpresstherotarydialtoconfirmyourselection.
► To edit Custom Wash colors:
1. FromtheEditCustomWashmenu,selectEditColors>NumberColors.
2. Turntherotarydialtoselectfrom2to6colorsfortheCustomWasheffect.
3. Presstherotarydialtoconfirmyourselection.
4. FromtheEditColorsmenu,selectacolor(forinstance,Color1).
5. SelectRed,Green,orBlue,andturntherotarydialtosettheintensityfrom0%to100%.Presstherotarydialtoconfirmyourselection.Repeatasneededuntilyou’vesettheRGBvalueyouwant,thenselectDone.
6. Repeatsteps4and5,asneeded,foreachcolorintheCustomWasheffect.
7. SelectExit.
Controlling Three-Channel iW FixturesTwo-channeliWfixtures,suchasiWGrazePowercoreandiWBlastPowercore,useonechannelofwarmwhiteLEDsandonechannelofcoolwhiteLEDstoproducearangeofcolortemperatures.Three-channelfixtures,suchasiWCoveMXPowercore,addachannelofneutralwhiteLEDsforgreaterprecisionincolortemperatureandcolormixing.
Forcompatibilitywithtwo-channeliWfixtures,three-channelfixturescanbeconfiguredtoaccepttwochannelsofdatainput.Whenafixtureisintwo-channelmode,youcanuseColorDialProiniWModetoadjustthefixture’scolortemperature(relativewarmthorcoolness)andbrightness.Thetwochannelsofdatainputareautomaticallymappedtothefixture’sthreeLEDchannels.
Inthree-channelmode,youcanusetheFixedColororVariableColoreffectinRGBModeformoreprecisecontroloverthefixture’scolortemperature.Inthree-channelmode,thewarmchannelmapstoRed,theneutralchanneltoGreen,andthecoolchanneltoBlue.
E Keep in mind that saving the current scene replaces the scene previously assigned to that location.
Edit Colors
Number Colors
Color 1
Color 2
Exit
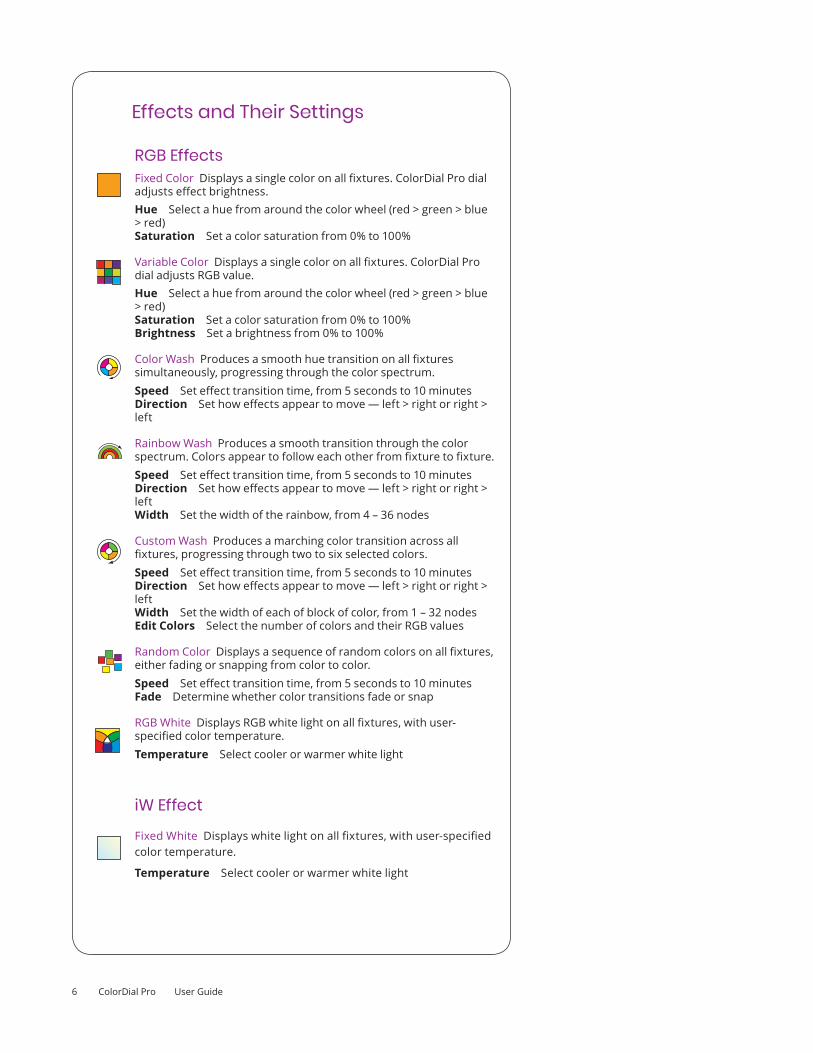
E See the table on the next page for descriptions of the six built-in ColorDial effects and their related settings.
E You set three-channel iW fixtures to two-channel or three-channel mode using QuickPlay Pro addressing and configuration software. You can download QuickPlay Pro from www.colorkinetics.com/support/addressing.
Edit Fixed Color
Hue
R G B R
WarmNeutral
Cool Warm
6 ColorDialPro UserGuide
Effects and Their Settings
RGB EffectsFixedColorDisplaysasinglecoloronallfixtures.ColorDialProdialadjustseffectbrightness.Hue Selectahuefromaroundthecolorwheel(red>green>blue>red)Saturation Setacolorsaturationfrom0%to100%
VariableColorDisplaysasinglecoloronallfixtures.ColorDialProdialadjustsRGBvalue.Hue Selectahuefromaroundthecolorwheel(red>green>blue>red)Saturation Setacolorsaturationfrom0%to100% Brightness Setabrightnessfrom0%to100%
ColorWashProducesasmoothhuetransitiononallfixturessimultaneously,progressingthroughthecolorspectrum.Speed Seteffecttransitiontime,from5secondsto10minutesDirection Sethoweffectsappeartomove—left>rightorright>left
RainbowWashProducesasmoothtransitionthroughthecolorspectrum.Colorsappeartofolloweachotherfromfixturetofixture.Speed Seteffecttransitiontime,from5secondsto10minutesDirection Sethoweffectsappeartomove—left>rightorright>left Width Setthewidthoftherainbow,from4–36nodes
CustomWashProducesamarchingcolortransitionacrossallfixtures,progressingthroughtwotosixselectedcolors.Speed Seteffecttransitiontime,from5secondsto10minutesDirection Sethoweffectsappeartomove—left>rightorright>left Width Setthewidthofeachofblockofcolor,from1–32nodes Edit Colors SelectthenumberofcolorsandtheirRGBvalues
RandomColorDisplaysasequenceofrandomcolorsonallfixtures,eitherfadingorsnappingfromcolortocolor.Speed Seteffecttransitiontime,from5secondsto10minutesFade Determinewhethercolortransitionsfadeorsnap
RGBWhiteDisplaysRGBwhitelightonallfixtures,withuser-specifiedcolortemperature.Temperature Selectcoolerorwarmerwhitelight
iW Effect
FixedWhiteDisplayswhitelightonallfixtures,withuser-specifiedcolortemperature.
Temperature Selectcoolerorwarmerwhitelight
ColorDialPro UserGuide 7
Changing System SettingsTheSystemSettingsmenuletsyouperformmaintenanceandadministrativeactionssuchasswitchingbetweenRGBModeandiWMode,changingthedisplaylanguagefromEnglishtoanotheravailablelanguage,settingbacklightandmenutimeouts,performingbasiclightsetup,andsoon.Becauseyoutypicallyaccesssystemsettingsonlyoccasionally,theSystemSettingsmenuishiddenduringnormaloperation.
► ToaccesstheSystemSettingsmenufromPlaybackMode:
1. Simultaneouslypressandholdtherotarydialandthefaceplatebutton.TheMainMenuappearswiththeSystemSettingsmenuoptionincluded.
2. SelectSystemSettings.
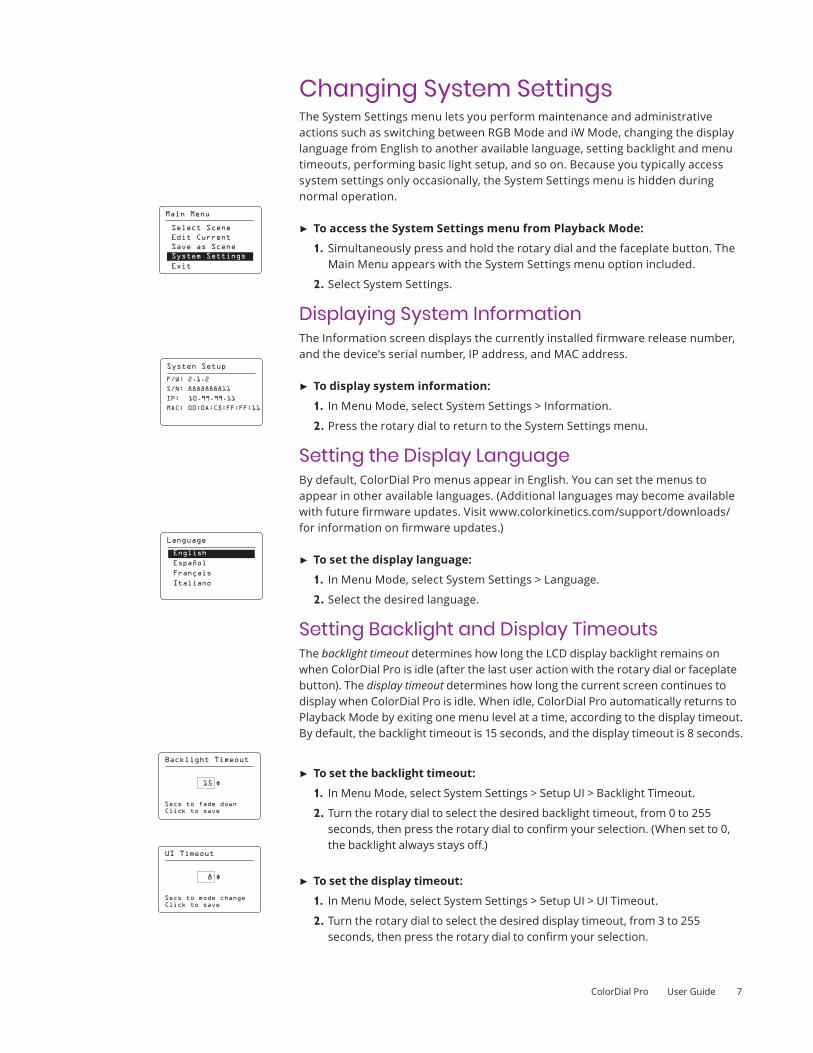
Displaying System InformationTheInformationscreendisplaysthecurrentlyinstalledfirmwarereleasenumber,andthedevice’sserialnumber,IPaddress,andMACaddress.
► Todisplaysysteminformation:
1. InMenuMode,selectSystemSettings>Information.
2. PresstherotarydialtoreturntotheSystemSettingsmenu.
Setting the Display LanguageBydefault,ColorDialPromenusappearinEnglish.Youcansetthemenustoappearinotheravailablelanguages.(Additionallanguagesmaybecomeavailablewithfuturefirmwareupdates.Visitwww.colorkinetics.com/support/downloads/forinformationonfirmwareupdates.)
► Tosetthedisplaylanguage:
1. InMenuMode,selectSystemSettings>Language.
2. Selectthedesiredlanguage.
Setting Backlight and Display TimeoutsThebacklight timeoutdetermineshowlongtheLCDdisplaybacklightremainsonwhenColorDialProisidle(afterthelastuseractionwiththerotarydialorfaceplatebutton).Thedisplay timeoutdetermineshowlongthecurrentscreencontinuestodisplaywhenColorDialProisidle.Whenidle,ColorDialProautomaticallyreturnstoPlaybackModebyexitingonemenulevelatatime,accordingtothedisplaytimeout.Bydefault,thebacklighttimeoutis15seconds,andthedisplaytimeoutis8seconds.
► To set the backlight timeout:
1. InMenuMode,selectSystemSettings>SetupUI>BacklightTimeout.
2. Turntherotarydialtoselectthedesiredbacklighttimeout,from0to255seconds,thenpresstherotarydialtoconfirmyourselection.(Whensetto0,thebacklightalwaysstaysoff.)
► Tosetthedisplaytimeout:
1. InMenuMode,selectSystemSettings>SetupUI>UITimeout.
2. Turntherotarydialtoselectthedesireddisplaytimeout,from3to255seconds,thenpresstherotarydialtoconfirmyourselection.
Backlight Timeout
15
Secs to fade downClick to save
UI Timeout
8
Secs to mode changeClick to save
Systen Setup
F/W: 2.1.2
S/N: 8888888811
IP: 10.99.99.11
MAC: 00:0A:C5:FF:FF:11
Language
English
Español
Français
Italiano
Main Menu
Select Scene
Edit Current
Save as Scene
System Settings
Exit
8 ColorDialPro UserGuide
Restoring Factory Default SettingsYoumaywanttorestorethefactorydefaultsettingsforColorDialPro.Whenyoudoso,allsavedchangestoscenesandsystemsettingsareoverwrittenwiththedefaultsettings.
► Torestorethefactorydefaultsettings:
1. InMenuMode,selectSystemSettings>SetupUI>FactoryReset.
2. SelectYes.ColorDialProreturnstoPlaybackModeandstartsplayingbackscene1withthedefaulteffectandsettings
Setting Up LightsTheSetupLightsmenuletsyouadjustconfigurationsettings,suchastheDMXuniversethatColorDialProcontrolsandthenumberoflightsperpower/datasupplyport.Mostinstallationsfunctionproperlywiththedefaultsettings,sousuallynochangesareneeded.Incertaininstances,however,youmayneedtoadjustthesesettings.
Setting the DMX UniverseBydefault,ColorDialProissettocontrolDMXuniverse0(zero).AllColorKineticspower/datasuppliesalsocomefactory-settoDMXuniverse0.IftheDMXuniverseofaconnectedpower/datasupplyhasbeenchanged—forexample,inacomplexinstallationspanningmultipleDMXuniverses—youmustchangetheUniversesettinginColorDialProtomatchit.
► TosettheDMXuniversethatColorDialProcontrols:
1. InMenuMode,selectSystemSettings>SetupLights>Universe.
2. TurntherotarydialtoselectaDMXuniverse(0–255),thenpresstherotarydialtoconfirmyourselection.
Setting KiNET ModeKiNET™isahigh-performanceEthernetprotocolengineeredbyColorKineticsforLEDlightingcontrol.MostColorKineticspower/datasuppliessupportKiNETversion1(thedefaultinColorDialPro).However,DataEnablerProandsPDS-480capower/datasuppliesrequireKiNETversion2.
► To set KiNET mode:
1. InMenuMode,selectSystemSettings>SetupLights>Universe.
2. Turntherotarydialtoselectversion1or2,thenpresstherotarydialtoconfirmyourselection.
Factory Reset
No
Yes
E An installation may contain power / data supplies with different DMX universe settings. ColorDial Pro will control only those power / data supplies with a matching DMX universe setting.
Kinet Mode
1
Kinet ModeClick to save
Universe
0
Universe numberClick to save

ColorDialPro UserGuide 9
Num Ports
1
Total number portsClick to save
Setting the Number of Lights Per Power / Data Supply PortForKiNETversion1,theLights/PortsettinginColorDialProshouldequalorexceedthenumberofsequentiallyaddressednodesconnectedtothepower/datasupply.Bydefault,ColorDialProissetto72nodesperpower/datasupplyport,whichissufficientformostinstallations.
ForKiNETversion2(DataEnablerEOorsPDS-480ca),setthelightsperporttoequalthemaximumnumberofnodesconnectedtoapower/datasupplyport.
► Tosetthenumberoflightsperpower/datasupply:
1. InMenuMode,selectSystemSettings>SetupLights>Lights/Port.
2. Turntherotarydialtoselectthetotalnumberofnodesyouwant,thenpresstherotarydialtoconfirmyourselection.
Setting the Number of Power / Data Supply PortsForKiNETversion2only,theNumPortssettinginColorDialProshouldequalthenumberofpower/datasupplyportswithconnectedlights.(Toensureoptimaloperation,lightsshouldbeconnectedtopower/datasupplyportsinsequence,startingwithport1—ports1through5onansPDS480ca,forexample.)
► Tosetthenumberofpower/datasupplyports:
1. InMenuMode,selectSystemSettings>SetupLights>NumPorts.
2. Turntherotarydialtoselectthetotalnumberofportsyouwant,thenpresstherotarydialtoconfirmyourselection.
Updating ColorDial Pro FirmwareColorDialProfirmwareisperiodicallyupdatedtoimprovedeviceperformance andfunctionality.Tomaximizesystemperformance,makesureyourColorDialProdevicesarerunningthemostrecentversionofthefirmware.
DownloadColorDialProFirmwareIfamorerecentversionoftheColorDial Profirmwareisavailable,downloadthefirmwarefile(.hexextension):
1. VisittheFirmwareUpdatespageatwww.colorkinetics.com/support/downloads/firmware/tocheckforthelatestfirmwareversion.
2. Ifanewerfirmwareimageisavailable,clickthelinkontheFirmwareUpdatespagetodownloadthefirmwarefiletoanaccessiblelocationonyourcomputer.
DownloadCKFirmwareUpdaterToupdatethefirmwareimageonaColorDial Prodevice,youmustdownloadandinstalltheCKFirmwareUpdaterapplicationonyourcomputer.
1. VisittheFirmwareUpdatespageatwww.colorkinetics.com/support/downloads/firmware/
2. DownloadtheFirmwareUpdaterUtility.
3. Decompressthefiletoanaccessiblelocationonyourcomputerandopenit.
4. Runtheinstaller,andfollowtheon-screeninstructions.
E Most fixtures have one node, but some fixtures have multiple nodes. For example, an iColor Flex SLX string has 50 nodes, while a 4 ft ColorGraze Powercore fixture has four nodes.
Lights / Port
72
Total number lightsClick to save

10 ColorDialPro UserGuide
RunningaColorDialProFirmwareUpdateYoucanupdateColorDial Pro firmwareusingacomputerrunningCKFirmwareUpdatersoftware.
1. ConnectacomputertoyourlightingnetworkusingastandardEthernetcable.
2. RunCKFirmwareUpdater.
3. FromtheInterfaceSelectdrop-downlist,selectEthernetControllers.
4. FromDeviceSelectdrop-downlist,selectColorDial Pro.
5. ClickFileSelect,navigatetothefoldertowhichyoudownloadedthefirmwarefile(.hexextension),andclickOpen.
6. ClickDiscover.CKFirmwareUpdaterdiscoverstheColorDial Pro devicesinstalledinthelightingnetwork.
7. SelecttheColorDial Pro deviceyouwanttoupdate.
8. ClickPROGRAM.
9. Repeatsteps7and8foreachColorDial Pro deviceyouwanttoupdate.
ColorBlast Powercorefixtures
Data Enabler Pro
ColorDial Pro
Ethernet Controller Keypad
Ethernet PoE switch
ColorDial Pro and Ethernet Controller KeypadYoucaninstallColorDialProinasecureareatolimitaccessandavoidaccidentalinterruptionofsceneplaybackbyconnectingaColorKineticsEthernetControllerKeypadtoaPoEportonyourEthernetswitch.YoucanusetheEthernetControllerKeypadtotriggerstoredColorDialProscenes,adjustfixturebrightnessandturnconnectedfixturesoffandon.EthernetControllerKeypadmusthavethelatestfirmwareinstalled.
E For more details, download the ColorDial Pro Product Guide from www.colorkinetics/ls/controllers/colordialpro/
E Your computer must have a static IP address, and the same subnet mask as the fixture (255.0.0.0).
ColorKineticswww.colorkinetics.com
© 2019 Signify Holding. All rights reserved. Specifications are subject to change without notice. No representation or warranty as to the accuracy or completeness of the information included herein is given and any liability for any action in reliance thereon is disclaimed. All other trademarks are owned by Signify Holding or their respective owners. Throughout this brochure, installation photos of Color Kinetics lighting products are featured—and in minor instances, products from other companies may be included in those photos.
PUB-000243-01 R03 11-18

![Operating Manual Back - RICOH IMAGING...Touch the LCD monitor. This displays the [Capture Toolbar] ([Playback Toolbar] in Playback mode) to set the flash, self-timer, and other frequently](https://static.documents.pub/doc/80x56/5f471863b6492e7e226bbbcf/operating-manual-back-ricoh-touch-the-lcd-monitor-this-displays-the-capture.jpg)


