Contents ............................................................................................................................................................... 1 AX Enterprise system installation check list ...................................................................................................... 2
Installation ............................................................................................................................................................ 3 Requirements and Preparation .......................................................................................................................... 3 AX Enterprise Installation on Windows Server 2003 ....................................................................................... 4
Configuring IIS 5.1, IIS 6 ................................................................................................................................... 4 AX Enterprise Installation Windows Server 2008 ............................................................................................. 9
Configuring IIS 7 ................................................................................................................................................ 9 Setting up the Firewall to allow the AX Enterprise to communicate ............................................................... 30
AX Enterprise Installation Windows Server 2008 R2 ..................................................................................... 34 Configuring IIS 7 .............................................................................................................................................. 34
Setting up the Firewall to allow the AX Enterprise to communicate ............................................................ 56 AX Enterprise Installation Windows 7 ............................................................................................................. 61
Configuring IIS 7 .............................................................................................................................................. 61 Setting up the Firewall to allow the AX Enterprise to communicate ............................................................... 79
Setting up AX Enterprise to work with IE10 & IE11 ........................................................................................ 61 How to setup the License Key for the AX Enterprise/AX200 ...................................................................... 822
1. USB Dongle ............................................................................................................................................. 82 2. Adding a License key file to the Card Manage Folder ............................................................................. 82
Upgrading AX Enterprise ................................................................................................................................ 844 AXEnterprise user guide ................................................................................................................................... 86 Home Page ......................................................................................................................................................... 86 Controller Status & Control .............................................................................................................................. 87
High Security Mode (HSM).............................................................................................................................. 88 Build Sites .......................................................................................................................................................... 88
Upload ............................................................................................................................................................. 88 Doors and Sensors .......................................................................................................................................... 88
Cardholder .......................................................................................................................................................... 90 Main Settings ................................................................................................................................................... 90
Card Number............................................................................................................................................... 90 Imprint Number ........................................................................................................................................... 90 Employment ................................................................................................................................................ 91 Department ................................................................................................................................................. 91 Access Group.............................................................................................................................................. 91 Card Type ................................................................................................................................................... 91 Card Status ................................................................................................................................................. 91 Pin Code ..................................................................................................................................................... 91
Password ............................................................................................................................................................ 91 Changing Icon Size on Floor plan of the AXEnterprise ................................................................................. 93
Changing back to Large Icons ........................................................................................................................ 98 Access Area Configuration .............................................................................................................................. 99 Card Printing .................................................................................................................................................... 104
1. Operating system, latest service pack and windows updates. (Activated)
2. Reset password rescue disks for windows 2008
3. Internet explorer 8 (not internet explorer 9)
4. IP address (Static) gateway and mask set,
5. IP address __.__.__.__
6. IIS and media player installed, (refer to documentation)
7. Sub net mask __.__.__.__
8. AX200 installed (refer to documentation)
9. Gateway __.__.__.__
10. AX Enterprise installed (refer to documentation)
11. DNS (if applicable) __.__.__.__
12. Firewall and ports (Ports 5000, 50010, 50011,4372 = UDP and 50505, 4783, 4782 = TCP)
13. Anti-Virus Software
14. Remote access set up
15. Team viewer plus password and reset, Remote support package
16. Windows log file check for errors and unregistered components
17. Back up path
18. License file for AX Enterprise or Dongle
19. IP Camera test (Photo ID)
20. Restart PC and test correct operation and check windows log file
21. Rescue disks and full system back up
www.axxessid.com
Web Server Guide
AXEnterprise Installation and user guide Dec 2013
3
I n s t a l l a t i o n
R e q u i r e m e n t s a n d P r e p a r a t i o n
Hardware: Minimum PC Specification Processor: Dual Core 2.13 GHz or higher—Quad Core 2.0 GHz recommended RAM: 2GB—4GB recommended Hard Disk: 4GB of free disk space (dependant on size of database and amount of backups) Gigabit Ethernet Network Card CD ROM Drive Screen resolution: 1024 x 768 Operating System:-
Windows Server 2003 (SP2)
Windows XP
Windows Server 2008, Windows Server 2008 (R2)
Windows Vista
Windows 7 Internet Information Services (IIS) v6 for Windows XP/Server 2003 Internet Information Services (IIS) v7 for Windows 7/Server 2008 AX Enterprise will only run on computers able to run IIS (Internet Information Services). IIS must be installed before AX Enterprise is installed.
1. Install IIS on your server 2. Install AX200 software
www.axxessid.com
Web Server Guide
AXEnterprise Installation and user guide Dec 2013
4
A X E n t e r p r i s e I n s t a l l a t i o n o n W i n d o w s S e r v e r 2 0 0 3
Configuring IIS 5.1, IIS 6 IE 5 and above Instructions for installing IIS on Windows Server 2003 (This step can be omitted if IIS is already installed except step 13, 14, 15)
1. Install Windows 2003 2. Click Start 3. Control Panel 4. Add/remove programs 5. Add/remove windows components 6. Select Application Server, click on details and tick Internet Information Services. 7. Press OK 8. Click next 9. Once it is installed, Click Start. 10. Admin services 11. Services 12. Find Internet information services and stop this service and associated services (http ssl &web
publishing). 13. go to c:\windows\system32\inetsrv, open metabase.xml
14. Edit the line “AspMaxRequestEntityAllowed” and change the value to 1073741824.(Windows 2003) 15. To enable asp service, open IIS Manager, expand the master server node (that is, the Server name
node), and then select the Web service extensions node. In the right pane of IIS Manager, right-click the extension Active Server Pages to enable. Click to select the Allow check box.
16. Go back to start, admin services, services, and restart IIS, http sll, and web publishing.
To install Enterprise: 1. Install AX200 software (if not previously installed). Right click on AX200 folder and go to properties
security tab and add internet guest account (which is IIS user usually IUSR_ SERVERNAME by default) and set permission to full control then go to security tab and give full control permission to IIS user. To check IIS User, go to Control Panel--- Administrative Tools---IIS manager. Expand local computer---websites. Right click on default websites properties. Go to directory security tab, under authentication and access control click on edit. Under enable anonymous access which will be ticked, you can get user name.
2. Install Enterprise by clicking on setup.exe from USB dongle. 3. Once installed go to default install directory C:/program files/card Manage folder and double click on
CreateIIS.vbs which creates virtual directory named AX200Enterprise (To check virtual dir go to Control Panel--- Administrative Tools---IIS manager. Expand local computer---websites---under default websites you will see AX200Enterprise mode. This is where all web files are pointed. You can right click on file default.asp and click browse on right window pane to get to page) then double click on Acl.bat which will set user rights.
www.axxessid.com
Web Server Guide
AXEnterprise Installation and user guide Dec 2013
5
4. Browse to USB dongle and from the folder Upload double click on the file named upload.msi 5. Please click on allow asp in web service extensions as in the figure below.
6. Applicable to Windows Server 2003 64 bit only:
To run enterprise in windows server 2008 (64 bit) OS
You have to set the application pool to 32 bit as enterprise uses 32 bit dlls. To do that Go to IIS-->Click on Application pool
On the action pane select Set Application Pool Defaults Change Enable 32-Bit Application to True
Now check if you can browse to the webpage by http://server name/Ax200Enterprise or follow, how to browse on step 3 above.
Internet explorer settings on the client PC windows 1. Runs on IE 5 and above. Open browser go to toolsinternet optionsselect advanced tab, under
multimedia check Play animations in web pages click OK and restart browser. 2. On IE 7 check XMLHTTP under security in toolsinternet options advanced tab Since photo ID uses controls to be downloaded to client PC, the client PC internet explorer should have following settings
Go to Tools—Internet options---security tab—trusted sites. Click on Sites add this site (ex: http://<server ip>). Uncheck Require server verification (https:) before adding site. Click OK
Click on custom level. Under ActiveX controls and plug-ins please check the following settings Automatic prompting for ActiveX controls :Enable Download signed ActiveX controls :Enable Download unsigned ActiveX controls :Enable Initialize and script ActiveX controls not marked As safe :Enable Run ActiveX controls and plugins :Enable Script Script ActiveX controls marked safe for scripting :Enable
For photo ID go to cardholder page, enter employee id and click search, then click on photo ID link on the cardholder web page. The controls should download to be installed. Click to install or run added ones, If you see click here to install photo ID link then click on it to install. After install close the page and go back to cardholder page and click on photo ID link. To run:
1. Run AX200 software 2. Run card manage, type in the IP address of the AX200 server as remote IP and AX200 folder path
in second text box click on connect. You will see all transactions coming from the iBox on the form.
3. Now browse the URL http://hostname or IP address /virtual dir
http://server name/Ax200Enterprise or http://ip address of server/Ax200Enterprise. If IP is set in IIS manager default website IP address (web site tab)
Troubleshooting:
This should be followed after you have done all the required steps above. A. If, when uploading floor plan, it gives an error object required then please do the following:
Please check images folder in card manage security tab if IUSR_server name is added as full control, if it is not then add. Then register ASPFileUpload.dll by regsvr32 c:/programfiles/cardmanage/ ASPFileUpload.dll Try uploading floor plan again. If it still does not upload, then follow instructions below:
1. Click Start, point to Settings, and then click Control Panel. 2. In Control Panel, click Administrative Tools, and then click Component Services to open Component
Services in the Microsoft Management Console (MMC). 3. Expand the Component Services node, the Computers node, the My Computer node, and the COM+
Applications node. Check if Upload node is there. If not then go to upload folder on dongle and double click upload.msi. Check again Component services list. Try uploading floor plan again. If it still does not appear, check the following Right click on Upload go to properties. Un-tick enforce access checks for this application Try uploading floor plan again. Right click on Upload go to properties. Under identity tab, select network service instead of Interactive user. Try uploading floor plan again. If the above steps do not solve the problem then delete Upload node and follow the instructions below
COM setting
1. Click Start, point to Settings, and then click Control Panel. 2. In Control Panel, click Administrative Tools, and then click Component Services to open Component
Services in the Microsoft Management Console (MMC). 3. Expand the Component Services node, the Computers node, the My Computer node, and the COM+
Applications node. 4. Right-click the node, point to New, and then, Click Application. 5. In the Install or Create a New Application dialog box, click Create an empty application, name the
application as Upload, make sure that you click to select Server application and then click Next. 6. In the Set Application Identity dialog box, click current logged on user. The user account must have
Write access to the folder that will receive the uploaded file. Make sure it has Creater Owner role. Click Next, under add users to roles, and add IIS (Usually starts with IUSR_SERVERNAME).
7. Click Finish. 8. Expand the node that you have just created for this application. 9. Right-click the node, point to New and then click Component. 10. Click Install new components, and locate the folder where you have saved and registered the .dll file
(which is c:/program files/card manage/AspFileUpload.dll), click the file, click next, and then click finish.
A large picture file can create problem on uploading in windows 2003. Please follow instructions 13 and 14 above of Instructions for installing IIS on Win 2003 If login page does not show (which is the default page) when you browse then please check step 15 of Instructions for installing IIS on Win 2003
www.axxessid.com
Web Server Guide
AXEnterprise Installation and user guide Dec 2013
8
It is better to restart IIS after changes done. If you go to IIS manager—highlight default websites. On top you see play and stop button.
If card manage software gives automation error then please re-register all dlls in the folder like AX200.dll, PrjXML.dll, ASPinterface.dll, double click on TXserver.exe
www.axxessid.com
Web Server Guide
AXEnterprise Installation and user guide Dec 2013
9
A X E n t e r p r i s e I n s t a l l a t i o n W i n d o w s S e r v e r 2 0 0 8
Configuring IIS 7
This applies to Windows Server 2008, please follow the instructions below.
Do not install the AX200 or the AX Enterprise, as you will be prompted later in this document. A static IP address is required. Ensure a static IP has been done before proceeding To Install IIS 7
You must be a member of the Administrators group to install IIS 7.
1. Click Start and then click Control Panel.
2. In Control Panel, click Programs and Features and then click Turn Windows features on or off, found
on the left hand column.
www.axxessid.com
Web Server Guide
AXEnterprise Installation and user guide Dec 2013
1 0
3. Click on the Roles in the left hand column, and wait for it to load and then click on Add Roles.
Check the Role Wizard, Pre-requisites are complete, then click Next
4. Find the Web Server (IIS) in the list and tick the box. Click Next.
5. If the screen below appears after you press next, you also need to install these features, marked below.
Click Add Required Features.
www.axxessid.com
Web Server Guide
AXEnterprise Installation and user guide Dec 2013
1 1
6. Select Role Services in the left-hand Window pane. The next step, you have to select is which of the
services are needed to install with IIS:
Tick the box ASP from the list
When you tick ASP box it will prompt you to add these Role Services, click Add required Role Services.
www.axxessid.com
Web Server Guide
AXEnterprise Installation and user guide Dec 2013
1 2
From the list, ensure all of the following are selected:
Management Tools
IIS Management Console
Application Development Features
ASP
ISAPI Extensions
Common HTTP Features
Default Document
Directory Browsing
HTTP Errors
Static Content
Health and Diagnostics
HTTP Logging
Request Monitor
Performance Features
Static Content Compression
Security
Request Filtering
www.axxessid.com
Web Server Guide
AXEnterprise Installation and user guide Dec 2013
1 3
7. When you have ticked the correct boxes press next at the bottom of the screen, the screen below will
appear. Review the correct items are selected and press install.
8. This screen shows you the progress of the installation.
www.axxessid.com
Web Server Guide
AXEnterprise Installation and user guide Dec 2013
1 4
9. An installation result will indicate that you have successfully installed Web Server (IIS). Click close
www.axxessid.com
Web Server Guide
AXEnterprise Installation and user guide Dec 2013
1 5
10. On Windows Server 2008, you also need to install the feature desktop experience. Go to the server
manager icon next to the Start menu. (If the server manager window is still open, proceed.)
Select Features from the right hand column, and then click Add Feature
11. Click next and find Desktop Experience in the list. Tick this and click next. If prompted, add required
features and confirm install.
After installing Desktop Experience, reboot your PC, and then allow the configuration process to complete and
close.
www.axxessid.com
Web Server Guide
AXEnterprise Installation and user guide Dec 2013
1 6
12. After rebooting your PC, please check to see if IIS is working, do this by typing http://localhost to
Internet Explorer, the screen below should appear. Now close the Internet Explorer when finished.
13. Run setup.exe of the AX200 this is located in the AX200 installation folder.
14. Run setup.exe of AX Enterprise this is located in the AX Enterprise installation folder.
15. Run Upload.exe (application) located in the Installation folder of the AX Enterprise, under Upload –
Upload.exe (An ‘Error registering COM+ Application’ will appear if you have installed the Run Upload
before).
16. Go to Control panel - Administrative tools – Internet Information Services (IIS) Manager. Select the
Default Web Site and right click on the default web site and select Add Virtual directory.
17. Enter Alias as: AXEnterprise. Enter the Physical path to Card manage directory
Please note the Physical path is C:\Program Files (x86)\CardManage for 64-bit machines and
You can check your operating system by clicking Start – Control Panel - System
18. Click ‘Connect as’ and ensure application user pass though authentication is selected.
19. Then click OK and click OK in Add Virtual Directory.
20. This will connect the user IUSR for IIS user. The IUSR account replaces the IUSR_Machine Name
account in IIS. Close IIS Manager.
www.axxessid.com
Web Server Guide
AXEnterprise Installation and user guide Dec 2013
1 8
21. Now browse to the AX200 folder directory and right click and go to the properties of the AX200 folder.
Now go to the security tab and add the user IUSR and set to full control. To add the user click edit, now
click add on the permissions screen. Click on the Advanced.
Note: Please check the location. This should be set as your PC Name.
22. Press Find Now, scroll down and highlight IUSR in the list and click ‘OK’.
www.axxessid.com
Web Server Guide
AXEnterprise Installation and user guide Dec 2013
1 9
Click OK and it will now be added to the User Names in the Properties Screen, set IUSR as full control, and
click apply.
www.axxessid.com
Web Server Guide
AXEnterprise Installation and user guide Dec 2013
2 0
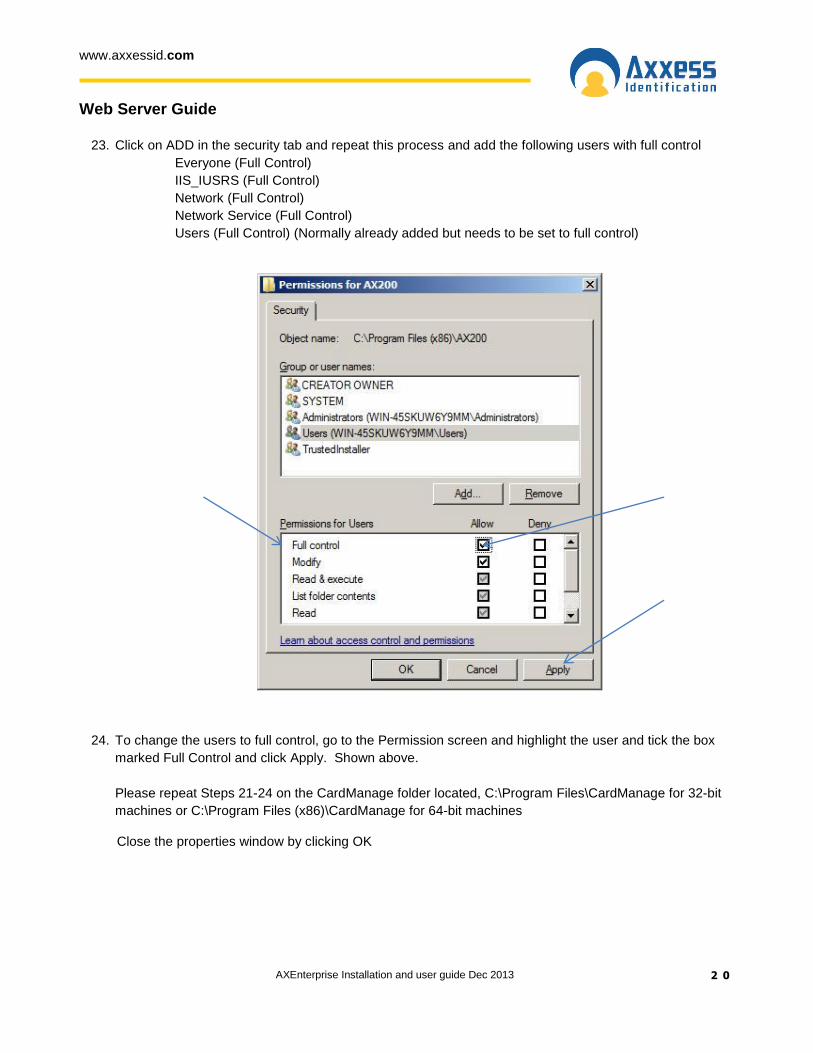
23. Click on ADD in the security tab and repeat this process and add the following users with full control
Everyone (Full Control)
IIS_IUSRS (Full Control)
Network (Full Control)
Network Service (Full Control)
Users (Full Control) (Normally already added but needs to be set to full control)
24. To change the users to full control, go to the Permission screen and highlight the user and tick the box
marked Full Control and click Apply. Shown above.
Please repeat Steps 21-24 on the CardManage folder located, C:\Program Files\CardManage for 32-bit
machines or C:\Program Files (x86)\CardManage for 64-bit machines
Close the properties window by clicking OK
www.axxessid.com
Web Server Guide
AXEnterprise Installation and user guide Dec 2013
2 1
25. Now go to control panel ---administrative tools—Open Internet Information Services (IIS) Manager.
Expand Sites node—click on AX Enterprise node---on the right panel, double click on ASP icon. Expand
Limit Properties node---Change the value of Maximum Requesting Entity Body limit from 200000 to
1073741824. Move the cursor from that field and click apply
Repeat on Default website and the PC, move the cursor from that field and click apply
26. Set the application pool to 32 bit as AXEnterprise uses 32 bit dlls. To do that, inside the Manager-->Click on Application pool. Changing the Application pool to 32 bit, only for 64 bit operating systems.
www.axxessid.com
Web Server Guide
AXEnterprise Installation and user guide Dec 2013
2 2
On the Action panel on the right hand side of the screen, click on Set Application Pool Defaults
27. Change Enable 32-Bit Application to True.
28. Now change the Identity field to LocalSystem. To do this click the button at the end of the Identity field,
shown below
www.axxessid.com
Web Server Guide
AXEnterprise Installation and user guide Dec 2013
2 3
Change the drop down box marked Built-in-account to LocalSystem, Click OK to accept.
Click OK on the application pool defaults screen and Restart IIS Manager. Now close IISManager.
29. Now copy the file ‘Global.asa’ from the C:\Program Files (x86)\ Card manage and copy it into the
directory, C:\inetpub\wwwroot. Now Restart IIS Manager to take effect, or reboot the PC.
Note: Ensure the PC has a Static IP address.
www.axxessid.com
Web Server Guide
AXEnterprise Installation and user guide Dec 2013
2 4
30. Once this is completed, you can start the AX200 software, and set the IP settings up, by going to Access
point/Device Manger /PC Server. Now start the Card manage, found on the Desktop as a global icon
The screen below will appear, set the AX200 Server IP to the IP you set in the AX200, and the AX200 folder
path, to the path where the AX200 is kept. Click start and the card manage will start.
If this screen does not appear, you can find it in the bottom right hand corner, click on the icon and it will
appear.
Note: If you have not yet got a license key it will show here.
31. Now start Internet Explorer, type your http site in e.g. http://___.___.___.___/AXEnterprise. The Login
page should appear.
Note: Internet explorer 8 and Internet explorer 9 is supported.
www.axxessid.com
Web Server Guide
AXEnterprise Installation and user guide Dec 2013
2 5
32. Next you need to Enable the Active X controls on Internet Explorer, go to Tools - Internet option -
Enable Allow previously unused ActiveX controls to run without prompt
Enable Allow Scriptlets
Enable Automatic, prompting for ActiveX controls
Enable Binary and scripts behaviours
Enable Display video and animations on a webpage that does not use external media player
Enable Download signed, ActiveX controls
Enable Download unsigned, ActiveX controls
Enable Initialize and script ActiveX controls not marked as safe for scripting
Enable Only allow approved domains to use ActiveX without prompt
Enable run ActiveX controls and plug-ins
Enable Script Active controls marked safe for scripting
www.axxessid.com
Web Server Guide
AXEnterprise Installation and user guide Dec 2013
2 6
In the download section:
Enable Automatic Prompting for active x controls
www.axxessid.com
Web Server Guide
AXEnterprise Installation and user guide Dec 2013
2 7
After the above changes, click OK.
33. In the Internet Options screen select the Advanced Tab. Find Multimedia and Tick Play animation in
webpages. Please note this step applies to Internet Explorer 9 or higher.
Click OK. Now restart Internet Explorer.
34. When using the AX Enterprise either on Server or as a Client, you need to add it to the trusted sites. You
can do this by going to the Internet Options - Security Tab – Trusted Sites – ‘Sites’ Button.
www.axxessid.com
Web Server Guide
AXEnterprise Installation and user guide Dec 2013
2 8
Type in your IP address and click Add and close, (the IP Address should already be filled in, if you are on your
AX Enterprise screen)
35. Next Open Internet Explorer and select Tools and Internet Options. Please note that steps 35 to 37 apply
only to Internet Explorer 9 or Higher.
Tools
Internet Options
www.axxessid.com
Web Server Guide
AXEnterprise Installation and user guide Dec 2013
2 9
36. In the General Tab, click ‘Settings’ in Browse History
Settings
www.axxessid.com
Web Server Guide
AXEnterprise Installation and user guide Dec 2013
3 0
37. Then select the ‘Every time I visit the webpage button’
Then Click OK. In the Internet Options window click OK
Setting up the Firewall to allow the AX Enterprise to communicate
Go to the Control Panel and click on Windows Firewall.
www.axxessid.com
Web Server Guide
AXEnterprise Installation and user guide Dec 2013
3 1
Now go to ‘Allow a program or feature through Windows Firewall’.
www.axxessid.com
Web Server Guide
AXEnterprise Installation and user guide Dec 2013
3 2
Select the Exception tab and find World Wide Web Services (HTTP) and tick box. Now add a port to the Exceptions list. Click Add port
www.axxessid.com
Web Server Guide
AXEnterprise Installation and user guide Dec 2013
3 3
Name the port, add the port number and select the protocol type. Shown below:
Click OK to add the port There are 6 ports that need to be added, shown in the table below:
Name Port number Protocol
(UPD) Environment 50000 UDP
Client OCX 1 4782 TCP
Client OCX 2 4783 TCP
Client OCX 3 50505 TCP
AX Enterprise 1 50010 UDP
AX Enterprise 2 50011 UPD
Now the AX Enterprise can communicate through the Firewall.
www.axxessid.com
Web Server Guide
AXEnterprise Installation and user guide Dec 2013
3 4
A X E n t e r p r i s e I n s t a l l a t i o n W i n d o w s S e r v e r 2 0 0 8 R 2
Configuring IIS 7 This applies to Windows Server 2008 R2, please follow the instructions below.
Do not install the AX200 or the AX Enterprise, until prompted later in this document. A static IP address is required. Ensure a static IP has been done before proceeding. To install IIS 7, you must be a member of the Administrators group to install IIS 7.
1. Click Start and then click Control Panel.
2. In Control Panel, click Programs and Features and then click Turn Windows features on or off,
found on the left hand column.
3. Click on the Roles in the left hand column, and wait for it to load and then click on Add Roles.
www.axxessid.com
Web Server Guide
AXEnterprise Installation and user guide Dec 2013
3 5
Check the Role Wizard, Pre-requisite are complete, then click next
4. Find the Web Server (IIS) in the list and tick the box. Click next.
www.axxessid.com
Web Server Guide
AXEnterprise Installation and user guide Dec 2013
3 6
5. Click next on WebIIS introduction, you also need to install these features, marked below. Click
Add Required Features.
www.axxessid.com
Web Server Guide
AXEnterprise Installation and user guide Dec 2013
3 7
6. Select Role Services from the left-hand pane, then select which of the services are needed to
install with IIS:
Tick the box ASP from the list
When you tick ASP box it will prompt you to add these Role Services, click Add required Role Services.
From the list, ensure all of the following are selected:
www.axxessid.com
Web Server Guide
AXEnterprise Installation and user guide Dec 2013
3 8
Management Tools
IIS Management Console
Application Development Features
ASP
ISAPI Extensions
Common HTTP Features
Default Document
Directory Browsing
HTTP Errors
Static Content
Health and Diagnostics
HTTP Logging
Request Monitor
Performance Features
Static Content Compression
Security
Request Filtering
www.axxessid.com
Web Server Guide
AXEnterprise Installation and user guide Dec 2013
3 9
7. When you have ticked the correct boxes press next at the bottom of the screen, the screen on the
next page will appear. Review the correct items are selected and press install.
8. This screen shows you the progress of the installation.
9. An installation result will indicate that you have successfully installed Web Server (IIS). Click close
10. On Windows Server 2008, you also need to install the feature desktop experience. Go to the
server manager icon next to the Start menu. (If the server manager window is still open, proceed
to add features step)
Select Features from the right hand column. Now click Add Feature
www.axxessid.com
Web Server Guide
AXEnterprise Installation and user guide Dec 2013
4 0
11. Click next and find Desktop Experience in the list. Tick this and click next. If prompted, add
required features and confirm install.
After installing Desktop Experience, reboot your PC, and then allow the configuration process to complete and
close.
12. After rebooting your PC, please check to see if IIS is working, to do this by typing http://localhost
to Internet Explorer, the screen below should appear. Now close the Internet Explorer when
13. Run setup.exe of the AX200 this is located in the AX200 installation folder.
14. Run setup.exe of AX Enterprise this is located in the AX Enterprise installation folder.
15. Run Upload.exe (application) located in the Installation folder of the AX Enterprise, under Upload –
Upload.exe (An ‘Error registering COM+ Application’ will appear if you have installed the Run
Upload before).
16. Go to Control panel-Administrative tools – Internet Information Services IIS Manager. Select the
Default Web Site and right click on the default web site and select Add Virtual directory.
www.axxessid.com
Web Server Guide
AXEnterprise Installation and user guide Dec 2013
4 2
17. Enter Alias as: AX Enterprise. Enter the Physical path to Card manage directory
Please note the Physical path is C:\Program Files (x86)\CardManage for 64-bit machines and
C:\Program Files\CardManage for 32-bit machines.
You can check your operating system by clicking Start – Control Panel - System
18. Click ‘Connect as’ and ensure application user pass through authentication is selected.
19. Then click OK and click OK in Add Virtual Directory.
20. This will connect the user IUSR for IIS user. The IUSR account replaces the IUSR_Machine Name
account in IIS. Close IIS Manager.
21. Now browse to the AX200 folder directory and right click and go to the properties of the AX200
folder. Now go to the security tab and add the user IUSR and set to full control. To add the user
click edit, now click add on the permissions screen. Click on the Advanced.
www.axxessid.com
Web Server Guide
AXEnterprise Installation and user guide Dec 2013
4 3
Note: Please check the location. This should be set as your PC Name.
22. Press Find Now, scroll down and highlight IUSR in the list and click ‘OK’.
www.axxessid.com
Web Server Guide
AXEnterprise Installation and user guide Dec 2013
4 4
Click OK and it will now be added to the User Names in the Properties Screen, set IUSR as full control, and
click apply.
www.axxessid.com
Web Server Guide
AXEnterprise Installation and user guide Dec 2013
4 5
23. Click on ADD in the security tab and repeat this process and add the following users with full
control
Everyone (Full Control)
IIS_IUSRS (Full Control)
Network (Full Control)
Network Service (Full Control)
Users (Full Control) (Normally already added but needs to be set to full control)
24. To change the users to full control, go to the Permission screen and highlight the user and tick the
box marked Full Control and click Apply. As shown above.
Close the properties window by clicking OK
Please repeat Steps 21-24 on the CardManage folder located, C:\Program Files\CardManage or
C:\Program Files (x86)\CardManage
.
25. Now go to control panel ---administrative tools—Open Internet Information Services IIS Manager.
Expand Sites node—click on AX Enterprise mode---on the right pane, double click on ASP icon.
www.axxessid.com
Web Server Guide
AXEnterprise Installation and user guide Dec 2013
4 6
Expand Limit Properties mode---Change the value of Maximum Requesting Entity Body limit from
200000 to 1073741824. Move the cursor from that field and click apply
Repeat on Default website and PC, move the cursor from that field and click apply
www.axxessid.com
Web Server Guide
AXEnterprise Installation and user guide Dec 2013
4 7
26. Set the application pool to 32 bit as AX Enterprise uses 32 bit dlls. To do that, inside the Manager-->Click on Application pool (not required on 32 bit version of windows server 2008)
27. On the Action panel on the right hand side of the screen, click on Set Application Pool Defaults
www.axxessid.com
Web Server Guide
AXEnterprise Installation and user guide Dec 2013
4 8
28. Change Enable 32-Bit Application to True. Now change the Identity field to NetworkService. To do
this click the button at the end of the Identity field, as shown below (this is required on 32 bit
windows)
Change the drop down box marked Built-in-account to NetworkService, Click OK to accept.
Click OK on the application pool defaults screen and Restart IIS Manager. Now close IISManager.
www.axxessid.com
Web Server Guide
AXEnterprise Installation and user guide Dec 2013
4 9
29. Now copy the file ‘Global.asa’ from the C:\Program Files (x86) Card manage and copy it into the
directory, C:\inetpub\wwwroot. Now Restart IIS Manager to take effect, or reboot the PC.
Note: Ensure the PC has a Static IP address.
30. Once this is completed, you can start the AX200 software, and set the IP settings up, by going to
Access point/Device Manger /PC Server. Now start the Card manage, found on the Desktop as a
global icon
The screen below will appear, set the AX200 Server IP to the IP you set in the AX200, and the AX200 folder
path: to the path where the AX200 is kept. Click start and the Card manage will start.
If this screen does not appear, you can find it in the bottom right hand corner, click on the icon and it will
appear.
Note: If you have not yet got a license key it will show it the bottom of the window.
31. Now start Internet Explorer, type your http site in e.g. http://___.___.___.___/AXEnterprise. The
Login page should appear.
Note: Internet explorer 8 and Internet explorer 9 are supported.
www.axxessid.com
Web Server Guide
AXEnterprise Installation and user guide Dec 2013
5 0
32. Next you need to Enable the Active X controls on Internet Explorer, go to the Internet option-
Enable Allow previously unused ActiveX controls to run without prompt
Enable Allow Scriptlets
Enable Automatic, prompting for ActiveX controls
Enable Binary and scripts behaviours
Enable Display video and animations on a webpage that does not use external media player
Enable Download signed ActiveX controls
Enable Download unsigned Active X controls
Enable Initialize and script ActiveX controls not marked as safe for scripting
Enable Only allow approved domains to use ActiveX without prompt
Enable run ActiveX controls and plug-ins
Enable Script Active controls marked safe for scripting
www.axxessid.com
Web Server Guide
AXEnterprise Installation and user guide Dec 2013
5 1
www.axxessid.com
Web Server Guide
AXEnterprise Installation and user guide Dec 2013
5 2
After the above changes click OK
33. In the Internet Options screen select the Advanced Tab. Find Multimedia and Tick Play animation
in webpages. Please note this applies to Internet Explorer 9 or Higher.
Click OK. Now restart Internet Explorer.
34. When using the AX Enterprise either on Server or as a Client, you need to add it to the trusted
sites. You can do this by going to the Tools - Internet Options - Security Tab – Trusted Sites –
‘Sites’ Button.
www.axxessid.com
Web Server Guide
AXEnterprise Installation and user guide Dec 2013
5 3
Type in your IP address and click Add and close, (the IP Address should already be filled in, if you are on your
AX Enterprise screen)
35. Next Open Internet Explorer and select Tools and Internet Options.
Internet Options
www.axxessid.com
Web Server Guide
AXEnterprise Installation and user guide Dec 2013
5 4
36. In the General Tab, click Settings in Browse History
Settings
www.axxessid.com
Web Server Guide
AXEnterprise Installation and user guide Dec 2013
5 5
37. Then select the ‘Every time I visit the webpage button’
Then Click OK.
www.axxessid.com
Web Server Guide
AXEnterprise Installation and user guide Dec 2013
5 6
S e t t i n g u p t h e F i r e w a l l t o a l l o w t h e A X E n t e r p r i s e t o c o m m u n i c a t e
Configuring Firewall on Server 2008 R2 for AX Enterprise.
38. Go to Control Panel - Administrative Tools - Windows Firewall with Advanced Security.
39. Select Inbound rules
www.axxessid.com
Web Server Guide
AXEnterprise Installation and user guide Dec 2013
5 7
40. Click New rule
41. In Rule Type wizard select Port and click next
www.axxessid.com
Web Server Guide
AXEnterprise Installation and user guide Dec 2013
5 8
42. In the protocol and port number, enter UDP or TCP and the port number. There are a
number of port numbers to be added, in the screen shot UDP has been selected and port 50000. Refer to the table for protocol and port numbers (these will be added one at a time)
Protocol Port Number Title Description
UDP 50000 UDP50000 Environment
UDP 50010 UDP50010 Client
UDP 50011 UDP50011 Client
UDP 50012 UDP50012 Alarm Module
UDP 50013 UDP50013 Alarm Module
UDP 1818 UDP1818 Comms
UDP 4848 UDP4848 Comms
TCP 4782 TCP4782 AX Enterprise
TCP 50050 TCP50050 Dual redundancy
TCP 50505 TCP50505 Comms I-Box
TCP 4783 TCP4783 AX Enterprise
43. Click Next
www.axxessid.com
Web Server Guide
AXEnterprise Installation and user guide Dec 2013
5 9
44. Confirm the action as allow connection. Click Next
45. Under Profile confirm Domain, Private, and public are selected. Click Next
www.axxessid.com
Web Server Guide
AXEnterprise Installation and user guide Dec 2013
6 0
46. Specify the description to match the port number and protocol – Example UDP50000
47. Click finish
48. The Rule will now appear in the Rule list. 49. Repeat this procedure until all Rules are added.
www.axxessid.com
Web Server Guide
AXEnterprise Installation and user guide Dec 2013
6 1
50. Exit the Firewall.
A X E n t e r p r i s e I n s t a l l a t i o n W i n d o w s 7
Configuring IIS 7 This applies to, Windows 7. Please follow the instructions below.
Please do not install the AX200 or the AX Enterprise. You will be prompted later in this document
To Install IIS 7
You must be a member of the Administrators group to install IIS 7.
1. Click Start and then click Control Panel.
2. In Control Panel, click Programs and Features and then click Turn Windows features on or off,
found on the left hand column.
3. In the Windows Features dialog box, click Internet Information Services please check below that the
correct tick boxes are ticked.
www.axxessid.com
Web Server Guide
AXEnterprise Installation and user guide Dec 2013
6 2
www.axxessid.com
Web Server Guide
AXEnterprise Installation and user guide Dec 2013
6 3
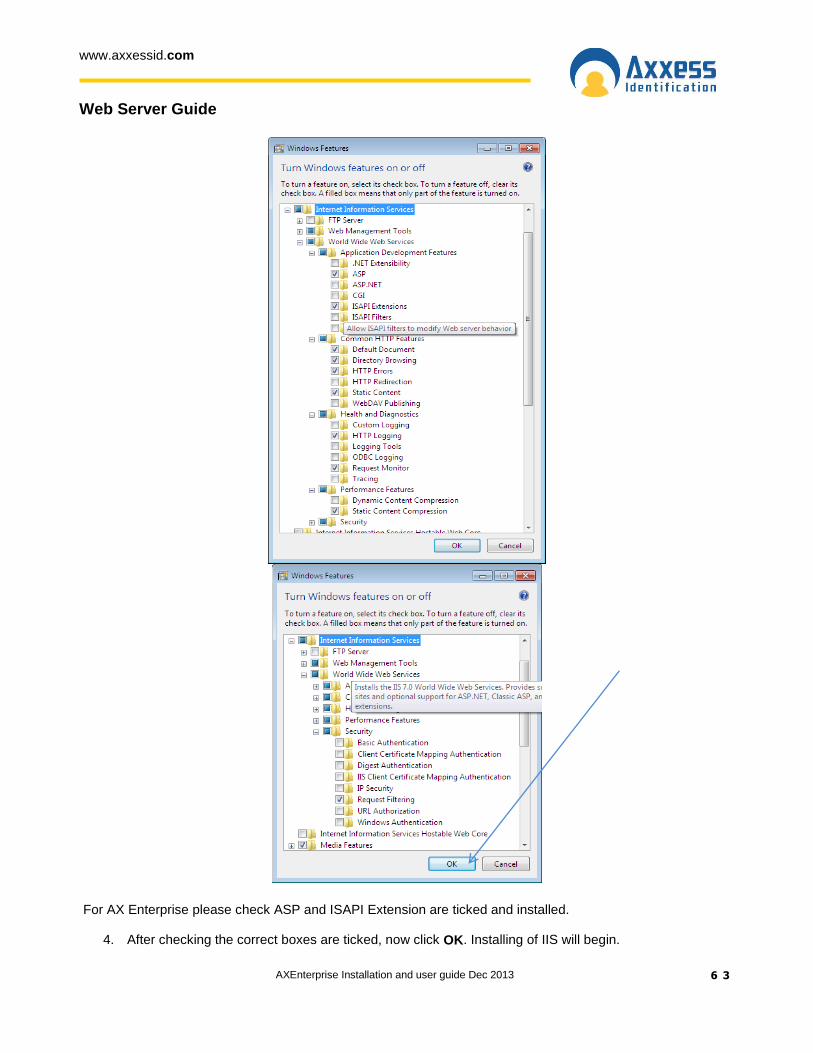
For AX Enterprise please check ASP and ISAPI Extension are ticked and installed.
4. After checking the correct boxes are ticked, now click OK. Installing of IIS will begin.
www.axxessid.com
Web Server Guide
AXEnterprise Installation and user guide Dec 2013
6 4
5. After installing IIS. Please check to see if IIS is working, to do this by typing http://localhost to Internet
Explorer, the screen below should appear. Now close the Internet Explorer when finished.
6. Run setup.exe of AX200 this is located in theAX200 installation folder.
7. Run setup.exe of AX Enterprise this is located in the AX Enterprise installation folder.
8. Run Upload.exe (application) located in the Installation folder of the AX Enterprise, under Upload –
Upload.exe (An ‘Error registering COM+ Application’ will appear if you have installed the Run Upload
before).
9. Go to Control panel-Administrative tools-IIS Manager. Select Add Virtual directory by right click on the
10. Enter Alias as: AXEnterprise. Enter the Physical path to Card manage directory
Note: This may be c:\programfiles(x86)\cardmanage
11. Click ‘Connect as’ and ensure application user pass though authentication is selected.
12. Then click OK and click ok in Add Virtual Directory.
www.axxessid.com
Web Server Guide
AXEnterprise Installation and user guide Dec 2013
6 6
13. This will connect the user IUSR for IIS user. The IUSR account replaces the IUSR_Machine Name
account in IIS. Close IIS Manager.
14. Now browse to the AX200 folder directory and right click and go to the properties of the AX200 folder.
Now go to the security tab and add the user IUSR and set to full control. To add the user click edit, now
click add on the permissions screen. Click on the Advanced.
Everyone (Full Control) IIS_IUSRS (Full Control)
Network (Full Control)
Network Service (Full Control)
Users (Full Control) (Normally already added but needs to be set to full control)
www.axxessid.com
Web Server Guide
AXEnterprise Installation and user guide Dec 2013
6 7
Note: Please check the location. This should be set as your PC Name.
15. The screen below will appear when clicked on advanced button, then press Find Now, highlight IUSR
in the list and click ‘OK’.
www.axxessid.com
Web Server Guide
AXEnterprise Installation and user guide Dec 2013
6 8
16. Click OK and it will now be added to the User Names in the Properties Screen, set IUSR as full control.
www.axxessid.com
Web Server Guide
AXEnterprise Installation and user guide Dec 2013
6 9
17. To change the users to full control, go to the Permission screen and highlight the user and tick the box
marked Full Control and click Apply. As shown above.
Do this to both AX200 and Card manage folders Properties.
Repeat steps 14 to 17 on the Card Manage folder
18. Now go to control panel ---administrative tools—Open IIS manager. Expand Sites node—click on AX
Enterprise mode---on the right pane double click on ASP icon. Expand Limit Properties node---Change
the value of Maximum Requesting Entity Body limit from 200000 to 1073741824. Move the cursor from
that field and click apply.
www.axxessid.com
Web Server Guide
AXEnterprise Installation and user guide Dec 2013
7 0
19. Repeat on Default website and the PC. Move the cursor from that field and click apply
20. Applicable on Windows 7 64 bit only:
You have to set the application pool to 32 bit as enterprise uses 32 bit dlls. To do that Go to IIS-->Click on Application pool
www.axxessid.com
Web Server Guide
AXEnterprise Installation and user guide Dec 2013
7 1
On the Action panel on the right hand side of the screen, select Set Application Pool Defaults, change Enable 32-Bit Application to True, and set the Identity to NetworkServices.by clicking on the text box
www.axxessid.com
Web Server Guide
AXEnterprise Installation and user guide Dec 2013
7 2
21. Then selecting NetworkService from the dropdown menu.
22. Now can you copy the file ‘Global.asa’ from the C:\Program Files\Card manage and copy it into the
directory, C:\inetpub\wwwroot. Now Restart the IIS to take effect.
23. Start AX200 and AX Enterprise, this will create files, then go to the Card manage folder, Click the
Compatibility files, there should be 3 files in there, copy them to Card manage folder.
24. Once this is complete you, start the AX200 software, and set the IP settings up, by going to Access
point/Device Manger /PC Server. Now start the Card manage, found on the Desktop as a global icon
www.axxessid.com
Web Server Guide
AXEnterprise Installation and user guide Dec 2013
7 3
Note: Ensure the PC has a Static IP address.
The screen below will appear, set the AX200 Server IP to the IP you set in the AX200, and the AX200 folder
path, to the path where the AX200 is stored. Click start.
If this screen does not appear, you can find it in the bottom right hand corner, click on the icon and it will appear.
Note: If you have not yet got a license key it will show here.
25. Now start Internet Explorer, type your http site in e.g.
26. http://___.___.___.___/AXEnterprise. The Login page should appear
27. Next you need to Enable the Active X controls on Internet Explorer, go to the Internet option- Security
Tab –Trusted sites - Custom Level button:
www.axxessid.com
Web Server Guide
AXEnterprise Installation and user guide Dec 2013
7 4
Enable Allow previously unused ActiveX controls to run without prompt
Enable Allow Scriptlets
Enable Automatic, prompting for ActiveX controls
Enable Binary and scripts behaviours
Enable Display video and animations on a webpage that does not use external media player
Enable Download signed and unsigned. ActiveX controls
Enable Initialize and script ActiveX controls not marked as safe for scripting
Enable Only allow approved domains to use ActiveX without prompt
Enable run ActiveX controls and plug-ins
Enable Script Active controls marked safe for scripting
www.axxessid.com
Web Server Guide
AXEnterprise Installation and user guide Dec 2013
7 5
After the above changes click OK
28. In the Internet Options screen select the Advanced Tab. Find Multimedia and Tick Play animation in
webpages. Please note this applies only to Internet Explorer 9
www.axxessid.com
Web Server Guide
AXEnterprise Installation and user guide Dec 2013
7 6
Click OK. Now restart Internet Explorer.
29. When using the AX Enterprise either on Server or as a Client, you need to add it to the trusted sites.
You can do this by going to the Internet Options - Security Tab – Trusted Sites – ‘Sites’ Button.
www.axxessid.com
Web Server Guide
AXEnterprise Installation and user guide Dec 2013
7 7
30. Type in your IP address and click Add and close, (the IP Address should already be filled in, if you are
on your AX Enterprise screen).
31. Next Open Internet Explorer and select Tools and Internet Options. Please note steps 31 to 33 apply
only to Internet Explorer 9.
Internet Options
www.axxessid.com
Web Server Guide
AXEnterprise Installation and user guide Dec 2013
7 8
32. In the General Tab, click Settings in Browse History.
Settings
www.axxessid.com
Web Server Guide
AXEnterprise Installation and user guide Dec 2013
7 9
33. Then select the ‘Every time I visit the webpage button’
Then Click OK. Finally click OK to close Internet Options.
Setting up the Firewall to allow the AX Enterprise to communicate
Go to the Control Panel and click on Windows Firewall.
www.axxessid.com
Web Server Guide
AXEnterprise Installation and user guide Dec 2013
8 0
Now go to ‘Allow a program or feature through Windows Firewall’.
Find World Wide Web Services (HTTP) and tick the Home/Work (Private) box and Public Box. Click OK and close the control panel screens.
www.axxessid.com
Web Server Guide
AXEnterprise Installation and user guide Dec 2013
8 1
Now the AX Enterprise can communicate through the Firewall.
S e t t i n g u p A X E n t e r p r i s e t o w o r k w i t h I n t e r n e t E x p l o r e r V e r s i o n s 1 0 a n d 1 1
AX Enterprise is fully compatible with Internet Explorer (IE) versions 8 and 9, and no further action needs to be taken. To run AX Enterprise fully on IE versions 10 and 11, the URL needs to be added to ‘Compatibility View’, under ‘Tools’, as shown in the screenshot below. Click the Tools icon, shown in dark blue, to reveal the menu, ‘Compatibility View Setup’ is shown in the list. Add the AX Enterprise URL LocalHost/AXEnterprise
Windows 8.0 supports IE 10 and Windows 8.1 supports IE 11 Note: AX Enterprise will not run on IE Metro style, only on desktop style. The user has to swith to desktop style in Windows 8.
This screenshot shows AX Enterprise being used with IE 11 on Windows 7.
www.axxessid.com
Web Server Guide
AXEnterprise Installation and user guide Dec 2013
8 2
H o w t o s e t u p t h e L i c e n s e K e y f o r t h e A X E n t e r p r i s e / A X 2 0 0
There are two ways you can setup the license key into the AX Enterprise/AX200 Software. 1 By a dongle(USB Stick) 2 Adding a License key file to the Card Manage Folder
To find out if the software is running in Demo mode, bring up the WEB-IBOX screen. At the top of the Screen it will say WEB-IBOX-DEMO, this is running in Demo mode. To activate the AX Enterprise you are going to have to contact Axxess ID with the ‘Serial number:’ and the details of the purchase order. To find the Serial Number, it will be located at the bottom of the WEB IBOX screen, circled in red. You can see this by starting up the WEB IBOX.
1. USB Dongle
The USB dongle can be used with any PC with USB connection. This is setup by inserting the USB stick with the license Key. When the AX Enterprise is started it will look at the USB dongle.
2. Adding a License key file to the Card Manage Folder
Adding a License Key file to the Card Manage folder can be used with any PC, it is normally used with Virtual Sever as Virtual Servers don’t support USB Devices. You will be sent the License file electronically. Copy the file called license.txt to the software folder (Default C:\Program Files\Card Manage) then restart the software. On a 64bit platform the default path is C:\Program files x86\CardManage. Please ensure you have written permission.
www.axxessid.com
Web Server Guide
AXEnterprise Installation and user guide Dec 2013
8 3
Note: Please keep a copy of the license key on your PC in a secure directory. Installing the AX Enterprise/AX200 software onto another PC, will require a new License Key. You will need to contact Axxess ID to arrange a new Serial no. Please allow 24 hours for us to setup a new License key. Demo Mode Running as Demo mode only lasts for 8 hours, a ’Trial period over’ message will appear and the WEB IBOX will have to be restarted. The message is shown below.
Note: You cannot copy the License Key from the dongle to the Card Manage folder, as the file setup is different.
www.axxessid.com
Web Server Guide
AXEnterprise Installation and user guide Dec 2013
8 4
U p g r a d i n g A X E n t e r p r i s e
When upgrading the Enterprise, we need to turn the AX200 and Card Manage software off. You also need to turn IIS off of the Default Web Site. To turn the IIS off please do the following: Go to: Control Panel - All Control Panel Items - Administrative Tools Double click ‘Internet Information Services (IIS) Manager
Now expand the list of the PC, and go to Sites, and highlight the ‘Default Web site’.
Click ‘Stop’ on the Left hand side of the screen. Now IIS is stopped.
www.axxessid.com
Web Server Guide
AXEnterprise Installation and user guide Dec 2013
8 5
Now you can install the New AX Enterprise software. Click on the Setup.exe in the Software folder and follow the Wizard thought the setup.
When the Software is installed successfully, you can now turn the IIS back on. Click Start on the IIS Screen.
You can now start the AX200 and AX Enterprise software.
www.axxessid.com
Web Server Guide
AXEnterprise Installation and user guide Dec 2013
8 6
A X E n t e r p r i s e u s e r g u i d e
When you log on to the Web site you will be asked for your “User Name” and “Password” the default setting is: User Name 1 Password 1
H o m e P a g e
At the top of the screen you will see a menu Bar. This enables you to find your way around the web page.
In the centre pane of your screen is where your sites can be viewed as an overview.
Home Will allow you to come back to the main page
Build Site Allows you to upload floor plans
Cardholders Allows you to add and view cardholder details
System Settings Set up Timeouts and Passwords
Alarms/Transactions Shows Alarms and Transactions
Controller Allows you to manually open doors/set modes
Logout Will allow you to exit program so another account can be entered
www.axxessid.com
Web Server Guide
AXEnterprise Installation and user guide Dec 2013
8 7
Should one of the sites go into an alarm, you will be able to quickly see this, as a red line encapsulates the site that has an alarm. Displaying as below:
C o n t r o l l e r S t a t u s & C o n t r o l
Devices connected are highlighted and displayed; the door status shows in real-time on the main screen. Doors can be controlled directly from the main screen. Commands can only be given to controllers online and functionality is greyed out if the controller is not available online to avoid any uncertainty.
Door open Opens the door for a set time e.g. 5 seconds
Normal mode Standard mode
Door unlocked Door permanently unlocked
High security mode Only cardholders with high security mode valid will have access
Deadlock Locks door for all cardholders, request to exit is still active. Please exercise care when using the feature.
Clear alarm Door reset, door forced, door held open alarm
www.axxessid.com
Web Server Guide
AXEnterprise Installation and user guide Dec 2013
8 8
High Security Mode (HSM) This feature allows individual doors to be enabled where standard cards no longer have access. Only cardholders with the high security mode set (HSM) have access whilst this feature is enabled. The HSM feature can be switched on by using a card which has the “set high security” enabled, four times consecutively at the reader. To change back to the normal mode use a card with the HSM feature four times consecutively.
B u i l d S i t e s
Upload An example floor image will be shown scroll down in till you see a “Browse” function. You are able to upload a floor image of your office, building etc. and input the access doors and sensors when the floor plan is selected press upload. Your floor plan will replace the example image. The “Browse” function will be replaced by a “Save” Function this is so you may enter a title for the image. Once saved if you go back to the Home page your floor image will be shown next to the example floor plans. Note: The maximum floor plan size 800 x 700 pixels, adding images large then that will be resized by the software and will look different to the original image. The image formats that can be used are jpeg, Gmp, bmp.
Doors and Sensors
Under different titles there will be these icons . Left click on the door or sensor icon on the floor plan.
www.axxessid.com
Web Server Guide
AXEnterprise Installation and user guide Dec 2013
8 9
If you hold the mouse over either of the sensor or doors it will show the name of the icon, e.g Main Reception.
Doors
Right clicking on a door icon will bring up an option to open the door (Door open- Opens the door for a set time e.g. 5 seconds).
Double clicking on the door icon will bring up the door status you are able to see what the current mode is .you are also able to change the mode to the other three option on the page by selecting the suitable function.
Sensors
Double clicking on a sensor icon will show the sensor status. You are able to change the reading rate Time, Reporting rate time, Storage rate time, whether or not the sensor is enabled the min and max temperature in degrees Celsius and the humidity max and min.
Edit
On the bottom of the floor image you will see “Back” which will take you to the home page, “Delete” which will remove the floor plan and “Edit”. Moving the mouse and clicking on Edit will bring up the floor image, know you can drag and move the door and sensors icons to the corresponding door and sensors are in reality.
www.axxessid.com
Web Server Guide
AXEnterprise Installation and user guide Dec 2013
9 0
C a r d h o l d e r
Cardholder configuration consists of five elements
Main Settings
Other Info
Mode Settings
Personal Info
Vehicle Info Adding new cardholders can be done from the main settings screen. The other tabs are for extra features and additional database fields.
Main Settings
Card Number
Unique card number – maximum,10 digit number. This number excludes the facility and site code number which is defined in card type. If you change the card number to 0 (= no card), data can be left on the database in case the person requires a card again or, if all the data is entered first and cards are issued at a later stage. This feature is specifically useful for frequent visitors and contractors.
Imprint Number
If the number on the card is not the ‘true’ number in the card, then this printed number can be entered here. Alternatively this field can be used for other data e.g. membership numbers etc.
www.axxessid.com
Web Server Guide
AXEnterprise Installation and user guide Dec 2013
9 1
Employment
To indicate the type of cardholder, fields can be selected from the drop-down box or entered manually. When entered manually it will ask for confirmation when you save the record and can be selected the next time from the drop-down box.
Department
Select a department from the pop-up window, departments can be added or deleted as required.
Access Group
An access group is a collection of doors. When a group is selected, the cardholder will have access to the doors assigned in the access group. Two groups are fixed and cannot be deleted – All and None. The group all, automatically includes all the doors including those added by the device wizard. If the group none is selected, the cardholder will not have access to any of the doors.
Card Type
If under System Settings, General Settings the Multiple Card Format is enabled, then this field can be used if you require cards from other system to work as well. A card type is the name given to the card format and facility code combined. It is recommended that you use the card format wizard if you wish to add new card types.
Card Status
This field overrides all settings, if the card is set to: Destroyed, Inactive, Lost, Stolen or Suspended. The card will not have access unless set to Active. It is recommended that you use this field if a card is for instance stolen instead of deleting the whole cardholder record. By using this method, you can always see at a later stage why the card was inactive.
Pin Code
1 to 6 numbers – the default setting is 4. This field is required if PIN Settings (found on the Access Point screen) is enabled and a keypad or reader with keypad is used. If a reader with PIN is selected, the card is presented to the reader first followed by entry of the PIN code.
P a s s w o r d
The security levels, usernames and passwords may only be changed through the AX200 software for security Purposes. To change a user name, password or group you go to the AX200 software and from the main screen you click on the security option. In the user option click on the “User settings” tab in this tab you will see three buttons ‘new”, “Delete” and “Change Password” left click on the new button enter the Users name and a password into the allocated areas, click ok a message should appear asking for you to enter a group.
www.axxessid.com
Web Server Guide
AXEnterprise Installation and user guide Dec 2013
9 2
To see which group has the correct function go to the group authorisation screen tab there will be four options:
Admin
Engineer
Guest
Operator By selecting one, you will see what authorisation they have. If none has the required access permission needed, you can create your own group Click on the new button enter a name into the field e.g. Technology press the OK button by double clicking on
the icons turns them to icons. Once your preference are selected press save, you may now enter users to this group Admin
With “Admin view only” the user gets access to the main screen and able to enter security to only change the users personal Password
With “Admin view and edit” selected the user gets access to the main screen and able to enter security to add and delete users and passwords the user is also able to add and remove groups. Cardholder
View only the user can view the “Cardholder Configuration” tab but may not add or edit information. There is also access to “Access points”, “system setting” and “format & statistic” which the user may not add or edit. The user may however edit “Environment”
The user still can view the “Main screen”, “Access points”, “system setting”, “format & statistic” and” Environment” but with “Edit” ticked they may add and configure the cardholder configuration Access points
View only the user can view the “Main screen” and “Access point” tabs but may not add or edit information
The user can still view the “Main screen” and “Access point” but they may now add access points and input information Log
www.axxessid.com
Web Server Guide
AXEnterprise Installation and user guide Dec 2013
9 3
When view log is selected you can view the reports and select any of the option to view the required information appropriate dates.
C h a n g i n g I c o n S i z e o n F l o o r p l a n o f t h e A X E n t e r p r i s e
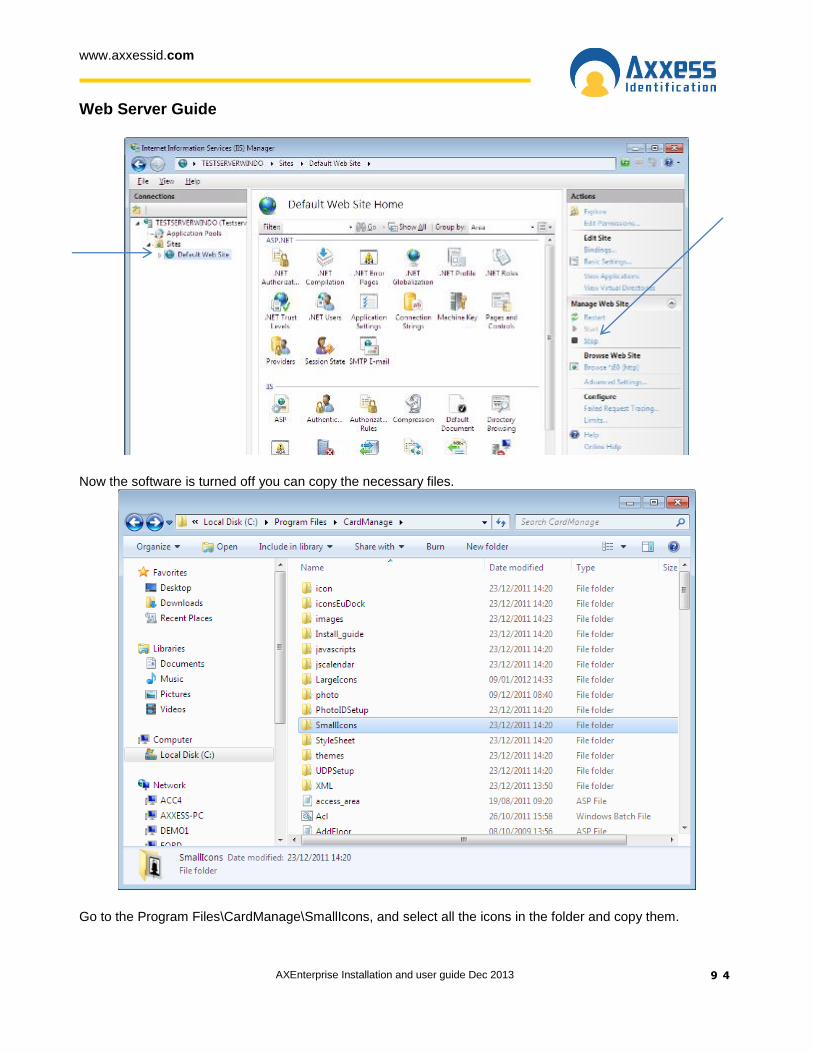
There are two sizes of icons which can be used in the Floor plan of the AX Enterprise, Small and large Icons. When first installing the AX Enterprise, the default size of the Icons will be the large icons. The changing of icon size only works on V1.0.66 and above. To change the size of the icons, you need to turn off both the AX200 and the AX Enterprise software. Now stop the default web site on the IIS, to do this go to Control Panel\All Control Panel Items\Administrative Tools. Double click on the ‘Internet Information Services (IIS) Manager.
When the IIS Screen is up, stop the default web site by, expanding the left column to the screen below. Highlight the default web site and click Stop on the Right hand column.
www.axxessid.com
Web Server Guide
AXEnterprise Installation and user guide Dec 2013
9 4
Now the software is turned off you can copy the necessary files.
Go to the Program Files\CardManage\SmallIcons, and select all the icons in the folder and copy them.
www.axxessid.com
Web Server Guide
AXEnterprise Installation and user guide Dec 2013
9 5
Now paste them into the Program Files\CardManage\icon
A message should appear, like the one below. You need to select ‘Copy and Replace’.
www.axxessid.com
Web Server Guide
AXEnterprise Installation and user guide Dec 2013
9 6
This will now replace all the large icons with the small icons. Now you can start IIS, go to Control Panel - All Control Panel Items - Administrative Tools. Click Start on the right hand side column, shown below.
www.axxessid.com
Web Server Guide
AXEnterprise Installation and user guide Dec 2013
9 7
www.axxessid.com
Web Server Guide
AXEnterprise Installation and user guide Dec 2013
9 8
Changing back to Large Icons
To change back to the large icons, all you need to do is, copy all the icons from the large icon folder, which is found under: Program Files - Card Manage - Large Icons. Paste them into Program Files - Card Manage - Icon, remember to replace the icons in this folder. Note: Before replacing the icons, close both AX200, AX Enterprise and stop IIS, instructed above.
www.axxessid.com
Web Server Guide
AXEnterprise Installation and user guide Dec 2013
9 9
A c c e s s A r e a C o n f i g u r a t i o n
Access Areas are definitions or areas where users are not physically restricted access (by means of banners/turn styles etc. but are not authorised) For example, Production staff are permitted in the production area but not permitted into administration area. There is no physical restriction or access control between the production area and administration area. The Production area to the outside is protected by access control but once through into production the user is able to access administration, anyone in the administration area can be checked on the system to indicate if they are cleared for the administration area. The access level name can be printed onto the card but does not show where the user is permitted, as this is cross reference in access areas. This type of feature is typically used in shopping/Retail outlets and Airports, where cleaners, cabin crew have access to backstage areas, but are not permitted into baggage handling areas. Anyone found in an area that is restricted can be checked to see if they are permitted. Concerning Access Area can consist of one or multiple areas. In Cardholder on AX200 click the pull down arrow under access area to define.
www.axxessid.com
Web Server Guide
AXEnterprise Installation and user guide Dec 2013
1 0 0
Click Add, in the group name shown as a yellow box. Enter the group name such as cleaner.
www.axxessid.com
Web Server Guide
AXEnterprise Installation and user guide Dec 2013
1 0 1
.
Type in a name or category such as ‘Cleaner’.
Repeat this step for each category required.
www.axxessid.com
Web Server Guide
AXEnterprise Installation and user guide Dec 2013
1 0 2
In the access area panel, right click on the access area tick box and select add.
You will be prompted to enter an area code. This is the definition or location code for this area and cannot be changed once set. Enter a reference such as Sales Office.
This will create a fresh area in the access area table with a generic name such as area 1. Right click on this to edit the name. Then rename this to reflect the area definition such as 1.
Repeat these two steps to define more restricted areas, such as loading bay and 2.
Now define which groups are allowed in which areas. For Example the cleaner is permitted into sales office but not the loading bay.
www.axxessid.com
Web Server Guide
AXEnterprise Installation and user guide Dec 2013
1 0 3
Searching within AX Enterprise In the AX Enterprise, when you click on the Search button on the Access Area, it shows all the access areas.
Now select which Access Area, to do this, tick the tick box on the left hand side, tick the boxes you want the cardholder to have access to. Then Click the ‘Search’ button.
The Search button will search for a group which has the specific access areas that you have selected.
www.axxessid.com
Web Server Guide
AXEnterprise Installation and user guide Dec 2013
1 0 4
The Results will show at the top of screen.
C a r d P r i n t i n g
AX200 Software When creating a Photo ID Template the specified field you have to add is Access Area. Choose which Template you want to use. To change the field in the Photo ID, click on Edit on the Photo ID Screen.
Click on the field you want to change and press the right-hand button on the mouse and click ‘Field’.
Find the ‘Access Area’ Field and select it.
www.axxessid.com
Web Server Guide
AXEnterprise Installation and user guide Dec 2013
1 0 5
Once selected, press the button ‘Save’, located below the Template.
AX Enterprise
Now go to the AX Enterprise and go to the Cardholder icon at the top of the screen. Select a Cardholder and
select the Access area box e.g. Cleaner. Now click on . Make sure you have selected the right Photo ID Template. You can change the Photo ID Template by choosing a different template from the drop down box at the top of the Screen. Then press accept. As you can see the Template has access area field on the Template and the Access group selected for that Card holder.
www.axxessid.com
Web Server Guide
AXEnterprise Installation and user guide Dec 2013
1 0 6
On the client PC windows media player needed to be granted permission to play the sound - by default this is on.
If this feature is not enabled it will appear once as a pop up. To manually enable this feature follow these instructions. On Client PC running AX Enterprise Setting up windows media player to play alarm sounds. Select tools from the Internet explorer tool bar
Select Internet options and then select the Programs Tab. Click on the Manage add-ons
www.axxessid.com
Web Server Guide
AXEnterprise Installation and user guide Dec 2013
1 0 7
Wait for Manage Add-ons screen to load, select show ‘All Add-ons’ scroll dpwn and find windows media player and click to enable. Close and apply the changes to the add-on manager, then exit the AX Enterprise
Log-in and the alarm sounds will now be operational.