64
CUCM Configuration Manual for Arc Premium Covering CUCM Versions 7.x, 8.x and 9.x Version 6.0.0

CUCM Configuration Manual for Arc Premium
Covering CUCM Versions 7.x, 8.x and 9.x
Version 6.0.0

909
© 2003 - 2013 Arc Solutions (International) Ltd. All rights reservedNo part of this documentation may be reproduced in any form or by any means or used to make any derivative work (such as translation, transformation, or adaptation) without permission from Arc Solutions (International) Limited.
Arc Solutions (International) Limited reserves the right to revise this documentation and to make changes to its content from time to time without obligation on the part of Arc Solutions (International) Limited to provide notification of such revision or change.Cisco is a registered trademark of Cisco, inc.Unless otherwise indicated, Arc Solutions (International) Limited registered trademarks are registered in the United Kingdom and may or may not be registered in other countries.
All trademarks acknowledged
An Enghouse Interactive Inc. Company
9th Edition, January 201210th Edition, January 2013
EMEA
Arc Solutions (International) Ltd.
Americas
Arc Solutions (International) Inc.
Asia Pacific
Arc Solutions (International) Ltd.
Innovation HousePincents Lane,
Reading, Berkshire.RG31 4UH
Research Triangle Park4819 Emperor Blvd
DurhamNorth Carolina 27703
2 Marks StreetNaremburnNSW 2065Australia
T: +44(0) 118 943 9200f: +44(0) 118 943 9201
T: +1 877 956 0272f: +1 919 313 4794
T: +61 409 692 480F: +61 (0)2 9437 4595
e: [email protected] e: [email protected] e: [email protected]
+44(0) 118 943 9205 Support
+1 877 956 0272Support
+61 1300 797 724 or+44(0) 118 943 9212
www.arcsolutions.com
V5.
1a_0
Call Information Module
Contents
Contents .................................................................................................................................... 1 - 1
Section 7-1: Configuring CallManager 7.x for Arc Professional........................................... 7 - 11.1 Call Manager Partitions and Calling Search Spaces.................................................................... 7 - 11.2 Configuring Host PBX Gateway, Voice, Call Parking, Service Queue and CTI Reference Devices
7 - 11.3 Configuring Pre CT Gateway and Personal Call Parking Devices .............................................. 7 - 3
1.4 Creating the Main Arc user............................................................................................................ 7 - 51.4.1 Application User............................................................................................................................ 7 - 51.4.2 User Groups................................................................................................................................ 7 - 6
Section 7-2: Configuring TAPI and Testing Arc Professional ............................................... 7 - 102.1 Cisco (TAPI) TSP................................................................................................................................ 7 - 10
2.1.1 Installing the Cisco TSP............................................................................................................... 7 - 102.1.2 Configuring the Cisco TSP ......................................................................................................... 7 - 10
Section 7-3: Testing TAPI using Phone.exe........................................................................... 7 - 133.1 Arc Connect: A Simple Test............................................................................................................ 7 - 13
3.1.1 Confirming Console Operator .................................................................................................. 7 - 143.1.2 Confirming Agent....................................................................................................................... 7 - 15
Section 7-4: Configuring access for the Arc CUPs Server .................................................. 7 - 16
Section 8-1: Configuring CallManager 8.x for Arc Professional........................................... 8 - 11.1 Call Manager Partitions and Calling Search Spaces.................................................................... 8 - 11.2 Configuring Host PBX Gateway, Voice, Call Parking, Service Queue and CTI Reference Devices
8 - 11.3 Configuring Pre CT Gateway and Personal Call Parking Devices .............................................. 8 - 3
1.4 Creating the Main Arc user............................................................................................................ 8 - 51.4.1 Application User............................................................................................................................ 8 - 51.4.2 User Groups................................................................................................................................ 8 - 6
Section 8-2: Configuring TAPI and Testing Arc Professional ............................................... 8 - 102.1 Cisco (TAPI) TSP................................................................................................................................ 8 - 10
2.1.1 Installing the Cisco TSP............................................................................................................... 8 - 102.1.2 Configuring the Cisco TSP ......................................................................................................... 8 - 13
Section 8-3: Testing TAPI using Phone.exe........................................................................... 8 - 163.1 Arc Connect: A Simple Test............................................................................................................ 8 - 16
3.1.1 Confirming Console Operator .................................................................................................. 8 - 173.1.2 Confirming Agent....................................................................................................................... 8 - 18
Section 8-4: Configuring access for the Arc CUPs Server .................................................. 8 - 19
Section 9-1: Configuring CallManager 9.x for Arc Professional........................................... 9 - 11.1 Call Manager Partitions and Calling Search Spaces.................................................................... 9 - 11.2 Configuring Host PBX Gateway, Voice, Call Parking, Service Queue and CTI Reference Devices
9 - 11.3 Configuring Pre CT Gateway and Personal Call Parking Devices .............................................. 9 - 3
1.4 Creating the Main Arc user............................................................................................................ 9 - 51.4.1 Application User............................................................................................................................ 9 - 51.4.2 User Groups................................................................................................................................ 9 - 7
Section 9-2: Configuring TAPI and Testing Arc Professional ............................................... 9 - 102.1 Cisco (TAPI) TSP................................................................................................................................ 9 - 10
2.1.1 Installing the Cisco TSP............................................................................................................... 9 - 102.1.2 Configuring the Cisco TSP ......................................................................................................... 9 - 13
1CUCM Configuration Guide for Arc Connect

Section 9-3: Testing TAPI using Phone.exe.......................................................................... 9 - 173.1 Arc Connect: A Simple Test............................................................................................................9 - 17
3.1.1 Confirming Console Operator ..................................................................................................9 - 183.1.2 Confirming Agent .......................................................................................................................9 - 19
Section 9-4: Configuring access for the Arc CUPs Server.................................................. 9 - 20
2

Call Information Module
Section 7-1: Configuring CallManager 7.x for Arc Professional1.1 Call Manager Partitions and Calling Search Spaces
If Partitions and Calling Search Spaces are being used on the CallManager there are some important items to be taken into consideration.
The way in which calls are routed down to operators, transferred to extensions and recalled to the operator means that many devices are used to complete a route. Because of this Partitions and Calling Spaces play a very important role that can affect the Operator functionality. To counteract potential problems you should set up a new partition Arc Partition and a new Calling Search Space Arc Search Space, which includes all partitions. The new Partition and Calling Search Space should be allocated to the entire Arc devices, Pre CT Gateways, Host PBX Gateways, Service Queue, and Voice Port(s). Alternatively, use any other CSS that has full routing access to a partition that is accessible from anywhere.
1.2 Configuring Host PBX Gateway, Voice, Call Parking, Service Queue and CTI Reference Devices
Host PBX Gateway ports for the Arc Professional system are where the calls are held prior to delivery to the client applications. To support the inclusion of Music on Hold from Call Manager the ports should be configured as CTI Ports, which means that they need a voice capability i.e. set up within the limits of the max number of Automated Voice Lines on the Cisco TAPI tsp.
When considering the numbering plan it is required that a CTI reference device isincluded. This is a CTI port with the lowest DN that appears in your TSP User device listin the Call Manager Configuration.
This port should not be used in the configuration, and should not be amended ordeleted once it has been associated as a static device with the profile.
Within Cisco Unified CM Administration
1. Select Device > Phone
7 - 1CUCM 7.x Configuration Manual for Arc Professional

2. Click to add a new CTI Port
3. Select CTI Port from the Phone Type drop down list.4. Click Next.
5. Enter the relevant information for the port including the Music On Hold source. This is configured via the User Hold MOH Audio Source field
6. Click Save.7. The following screen allows you to select the Line to add a device Number to the port.
Click on the Line [1] - Add new DN link in the Association Information box.
7 - 2

Call Information Module
8. The Directory Number Configuration window appears
9. Enter the information as shown above including the partition.10. Click Save to complete.
1.3 Configuring Pre CT Gateway and Personal Call Parking Devices
Within Cisco Unified CallManager Administration
1. Select Device > CTI Route Point.
2. Select to add a new CTI Route Point.
3. Insert a Device Name and Description of Pre CT Gateway.4. Select a Device Pool and Location as required.
7 - 3CUCM 7.x Configuration Manual for Arc Professional

5. Select Save.
6. To configure the directory number, select Add a new DN in the Associated Information section towards the bottom of the page..
7. Enter the Directory Number, Partition and Calling Search Space as required8. To provide resilience you can also enter a destination in the Forward No Answer
section. This will forward the call to the selected destination if Arc cannot answer the call for any reason.
9. Select Save. 10. You should create a separate CTI Route Point for every Pre-Gateway port required. This
can be done by using the Copy facility to create the next route point.11. Edit the Device Name and Description.12. Enter the Device Pool as Default.
If you do not use the Copy facility you will have to repeat steps 7 to 12 for each of
7 - 4

Call Information Module
the new Route Points.
13. When all of the CTI Route Points have been entered click Update to complete the configuration.
1.4 Creating the Main Arc userA User Account has to be specified within CallManager to allow applications like Arc that connect through TAPI to access it. There should be an Arc Server User, which has the Arc CTI reference Device associated to it. In CCM 7.x this should be set up as an Application User.
This process requires setting up an Application User, then create a User Group with the correct Roles associated, and finally associate the Application User with that User Group.
1.4.1 Application UserWithin Cisco Unified CallManager Administration
Select User Management > Application User
1. Using the icon, add a new user called Arc Server (or name of your choice). Click on Save.
2. Scroll down the screen and click on Find more Phones in the Device Information part of the screen. Locate the configured CTI Reference Device and add the device to the user. It is not required to add any of the Arc system devices to the TSP User.
* Note: If you are working with version 5.0.2 of the Arc Premium Operator Console and CTI Server you only have to associate devices that require fixed BLF and Paging.
7 - 5CUCM 7.x Configuration Manual for Arc Professional

3. Within the Find and List Phones screen, select the relevant Devices from the list and click on Add Selected.
4. Return to the Application User Account and confirm that the devices have been associated. Click on Save.
5. Repeat Steps 2 and 3 using the Find more Route Points option to associate the previously created route point devices.
1.4.2 User GroupsThe Application User account now needs to be associated to a
Select User Management > User Group
1. Add a Name for the User Group2. Select Save.
7 - 6

Call Information Module
3. Select Add App Users to Group
4. Select the Application User already configured for the Arc Server (in this example ArcServer), and click Add Selected.
7 - 7CUCM 7.x Configuration Manual for Arc Professional

5. The next step requires you to add Roles to the User Group. To do this return to the main
User Group Page and on the right hand side of the screen click the icon next to our ArcServer Group User Group..
6. At this window select the Assign Role to Group button.
7. Scroll down the list and select the Cisco Computer Telephony Interface (CTI) options, and click Add Selected. The following checkboxes must be selected, Standard CTI Allow Call Park Monitoring Standard CTI Allow Calling Number Modification Standard CTI Allow Control of All Devices Standard CTI Allow Reception of SRTP Key Material Standard CTI Enabled
7 - 8

Call Information Module
Select Standard AXL API Access to use the scalable BLF functionality that is availablewith version Arc Premium 5.0.2. onwards.
Standard CTI Allow Control of Phones supporting Rollover Mode. and Standard CTIAllow Control of Phones supporting Connected Xfer and conf have to be enabled foruse with environments using phone models 69xx, 7931, 7965, 89xx and 99xx. This is onlyavailable from Cisco Unified Communications Manager 7.1.2 onwards.
Do Not include Standard CTI Secure Connection in the selection as this will encryptthe data and stop the software from working correctly.
Select the roles that need to be assigned to this group. The Roles have now been added, click Save
8. Open the Application User account (User Management > Application User)9. Add to User Group and select the Group that has just been set up. Click on Save.
The set up of the Application User account is now complete.
7 - 9CUCM 7.x Configuration Manual for Arc Professional

Section 7-2: Configuring TAPI and Testing Arc Professional2.1 Cisco (TAPI) TSP
The Cisco TSP (Telephony Service Provider) provides the TAPI (Telephony Application Programming Interface) information that the Arc Professional Servers require.
A user needs to be created for the Arc Server that has the ability to use the following devices in TAPI:
All Pre Queue Gateways Devices All Gateway Devices. All Voice Ports. All extensions that will be used by the Console operators. All extensions that will be monitored in the Busy Lamp Field by an Operator.
2.1.1 Installing the Cisco TSPThe TSP is required to be installed only on the Arc Server Machine(s).1. Open the web browser and point to the Cisco CallManager Administration.2. Select the Application > Plugins
3. Click on the Find button.4. A list of available plugins will be displayed, scoll down to the Cisco Telephony Service
Provider, and click on the word Download to the left of the text.5. The install can either be run directly, or copied to the desktop and run later.
(CiscoTSP.exe). 6. During the installation, you will be asked how many instances of TSP you require. Enter
the number of instances based on the number of clusters you are required to connect with. You can also select the Destination Folder to install the TSP.
7. In the case of multiple instances being selected during the installation, the remainder of the installation wizard will request details that we be used for the first TSP instance.
8. Enter the Application User ID of the user that was created for the CallManager and Password (including verifying the Password) required. Enter the IP Address of the CTI Manager. Click on Next.
9. The next window will ask you to enter some TSP options. 10. A window will display the progress of the installation.11. The Installation is complete, click on Finish to complete12. After a successful installation the setup will prompt you to restart the system. You must
restart the machine for the changes to take effect
2.1.2 Configuring the Cisco TSP1. Go to the Control Panel and Select Phone and Modem Options.
7 - 10

Call Information Module
2. Click on the Advanced tab
3. If the Cisco TSP is installed correctly, then it should be seen in this list.4. To configure the TSP, select it in the TSP list and click the Configure button.
5. Ensure that the TSP is the correct version. (The Arc Professional Installation and Configuration Manual has a compatability matrix with this information displayed).
6. Then click the User tab.7. Enter the User Name and Password for the Call Manager User that was setup for the
machine.
8. Select the CTI Manager tab
7 - 11CUCM 7.x Configuration Manual for Arc Professional

9. Enter the Name or IP Address of the Call Manager CTI Manager that you require to obtain your TAPI information from. A second CTI Manager can be used for resilience if required and available.
10. Select the Wave tab
11. Enter the Desired number of possible Automated Voice Lines. This will be the number of Service, Voice and Host PBX Gateway devices that are being run from the server machine. There is a maximum of 255 lines available on a single server. Once this figure is set you will need to (re)install the Cisco TAPI WAVE driver. Click on Apply.
Whenever this number is changed, you will also need to uninstall and reinstall theCisco TAPI WAVE driver. The instructions on how to do this are included on the CiscoTSP readme file.
12. Click OK.13. Reboot all computers that the TSP has been installed on.14. When installing the TSP on the Arc Server machine you will also need to install the Cisco
Wave Driver. Instructions on installing this are found in a text file, which can be found in c:\Program Files\Cisco\CiscoTSP.txt
15. The TAPI must now be tested independently of Arc Professional. Close down all Arc Professional applications.
7 - 12

Call Information Module
Section 7-3: Testing TAPI using Phone.exePhone.exe is an application available from www.Julmar.com (Select the TAPI page and scroll down to TAPI Soft Phone and download). This application can be used to test the TAPI wave driver and TSP connections.
1. Open Phone.exe2. Check that you can view all of the devices configured in your arc user.3. Choose a host PBX port and select start session.4. Make a call to a telephone. If the call can be made and completed, then the TAPI
configuration is correct. Otherwise, recheck the TAPI settings.
3.1 Arc Connect: A Simple Test
1. Open the Arc Connect Server from Start > Programs > Arc Connect > Arc Connect Server
2. If you require Music on Hold this must be set on the server. Select Configuration > Preferences > Call Handling
7 - 13CUCM 7.x Configuration Manual for Arc Professional

Check the box or boxes you require when music is to be played namely after voice messaging and/or when an Operator puts a call on hold. If you require music between messages you must select the Enable Gateway Voice Messaging checkbox. Click OK to continue.
3. Click on File > Start CT Server
4. A successfully started server will show the above status:
3.1.1 Confirming Console Operator 1. Click on the Console Connect tab.2. Dial one of the Console Queue locations configured as Console Queues.3. This tab shows the number of calls waiting for Console Queues.4. After dialling the call, the Calls Waiting indicator should show one call.5. Open the Operator Console and login as an Operator.
PBX The server has successfully Connected to the PBX.
Config Database The Server has successfully Connected to the Configuration Database.
Log Database The Server has successfully Connected to the Logging Database.
Comms: The Server has successfully found I.P. Activite
7 - 14

Call Information Module
6. You will see that a call is waiting in the Console Queue.7. Click the + key to answer the call.8. Click Page Down to put the call on hold.9. Click Page Down again to retrieve the call.10. Type in the number of another extension and click Enter.11. A call should be made from the Operator to that extension.12. Click the Enter key again and the call will be transferred to the third extension and the
Operator console will be free.
3.1.2 Confirming Agent1. Log in Agent2. Make the Agent available.3. Dial the ACD Queue location 8502.4. Answer the call.5. Put the call on hold via the application.6. Retrieve the call from the application.7. End the call.8. See wrap up time activated.
7 - 15CUCM 7.x Configuration Manual for Arc Professional

Section 7-4: Configuring access for the Arc CUPs ServerIt is important that the Arc CUPs Server Address is added to the firewall information on the Cisco Unified Presence Server (CUPS).
To do this go to Cisco Unified Presence menu, and select Proxy Server and Incoming ACL (access control list).
The page Find and List Allowed Incoming Hosts will be displayed..
7 - 16

Call Information Module
Click on Add New and enter the Description and Address Pattern.
Click on Save.
Confirm the address and description have been added.
7 - 17CUCM 7.x Configuration Manual for Arc Professional

7 - 18

Call Information Module
Section 8-1: Configuring CallManager 8.x for Arc Professional1.1 Call Manager Partitions and Calling Search Spaces
If Partitions and Calling Search Spaces are being used on the CallManager there are some important items to be taken into consideration.
The way in which calls are routed down to operators, transferred to extensions and recalled to the operator means that many devices are used to complete a route. Because of this Partitions and Calling Spaces play a very important role that can affect the Operator functionality. To counteract potential problems you should set up a new partition Arc Partition and a new Calling Search Space Arc Search Space, which includes all partitions. The new Partition and Calling Search Space should be allocated to the entire Arc devices, Pre CT Gateways, Host PBX Gateways, Service Queue, and Voice Port(s). Alternatively, use any other CSS that has full routing access to a partition that is accessible from anywhere.
1.2 Configuring Host PBX Gateway, Voice, Call Parking, Service Queue and CTI Reference Devices
Host PBX Gateway ports for the Arc Professional system are where the calls are held prior to delivery to the client applications. To support the inclusion of Music on Hold from Call Manager the ports should be configured as CTI Ports, which means that they need a voice capability i.e. set up within the limits of the max number of Automated Voice Lines on the Cisco TAPI tsp.
When considering the numbering plan it is required that a CTI reference device isincluded. This is a CTI port with the lowest DN that appears in your TSP User device listin the Call Manager Configuration.
This port should not be used in the configuration, and should not be amended ordeleted once it has been associated as a static device with the profile.
Within Cisco Unified CM Administration
1. Select Device > Phone
8 - 1CUCM 8.x Configuration Manual for Arc Professional

2. Click to add a new CTI Port
3. Select CTI Port from the Phone Type drop down list.4. Click Next.
5. Enter the relevant information for the port including the Music On Hold source. This is configured via the User Hold MOH Audio Source field
6. Click Save.7. The following screen allows you to select the Line to add a device Number to the port.
Click on the Line [1] - Add new DN link in the Association Information box.
8 - 2

Call Information Module
8. The Directory Number Configuration window appears
9. Enter the information as shown above including the partition.10. Click Save to complete.
1.3 Configuring Pre CT Gateway and Personal Call Parking Devices
Within Cisco Unified CallManager Administration
1. Select Device > CTI Route Point.
2. Select to add a new CTI Route Point.
3. Insert a Device Name and Description of Pre CT Gateway.4. Select a Device Pool and Location as required.
8 - 3CUCM 8.x Configuration Manual for Arc Professional

5. Select Save.
6. To configure the directory number, select Add a new DN in the Associated Information section towards the bottom of the page..
7. Enter the Directory Number, Partition and Calling Search Space as required8. To provide resilience you can also enter a destination in the Forward No Answer
section. This will forward the call to the selected destination if Arc cannot answer the call for any reason.
9. Select Save. 10. You should create a separate CTI Route Point for every Pre-Gateway port required. This
can be done by using the Copy facility to create the next route point.11. Edit the Device Name and Description.12. Enter the Device Pool as Default.
If you do not use the Copy facility you will have to repeat steps 7 to 12 for each of
8 - 4

Call Information Module
the new Route Points.
13. When all of the CTI Route Points have been entered click Update to complete the configuration.
1.4 Creating the Main Arc userA User Account has to be specified within CallManager to allow applications like Arc that connect through TAPI to access it. There should be an Arc Server User, which has the Arc CTI reference Device associated to it. In CCM 8.x this should be set up as an Application User.
This process requires setting up an Application User, then create a User Group with the correct Roles associated, and finally associate the Application User with that User Group.
1.4.1 Application UserWithin Cisco Unified CallManager Administration
Select User Management > Application User
1. Using the icon, add a new user called Arc Server (or name of your choice). Click on Save.
2. Scroll down the screen and click on Find more Phones in the Device Information part of the screen. Locate the configured CTI Reference Device and add the device to the user. It is not required to add any of the Arc system devices to the TSP User.
8 - 5CUCM 8.x Configuration Manual for Arc Professional

3. Within the Find and List Phones screen, select the relevant Devices from the list and click on Add Selected.
4. Return to the Application User Account and confirm that the devices have been associated. Click on Save.
1.4.2 User GroupsThe Application User account now needs to be associated to a
Select User Management > User Group
1. Add a Name for the User Group2. Select Save.
8 - 6

Call Information Module
3. Select Add App Users to Group
4. Select the Application User already configured for the Arc Server (in this example ArcServer), and click Add Selected.
5. The next step requires you to add Roles to the User Group. To do this return to the main
User Group Page and on the right hand side of the screen click the icon next to
8 - 7CUCM 8.x Configuration Manual for Arc Professional

our ArcServer Group User Group..
6. At this window select the Assign Role to Group button.
7. Scroll down the list and select the Cisco Computer Telephony Interface (CTI) options, and click Add Selected. The following checkboxes must be selected, Standard CTI Allow Call Park Monitoring Standard CTI Allow Calling Number Modification Standard CTI Allow Control of All Devices Standard CTI Allow Reception of SRTP Key Material Standard CTI Enabled Standard AXL API Access Standard CTI Allow Control of Phones supporting Rollover Mode Standard CTI Allow Control of Phones supporting Connected Xfer and conf
8 - 8

Call Information Module
Do Not include Standard CTI Secure Connection in the selection as this will encryptthe data and stop the software from working correctly.
Select the roles that need to be assigned to this group. The Roles have now been added, click Save
8. Open the Application User account (User Management > Application User)9. Add to User Group and select the Group that has just been set up. Click on Save.
The set up of the Application User account is now complete.
8 - 9CUCM 8.x Configuration Manual for Arc Professional

Section 8-2: Configuring TAPI and Testing Arc Professional2.1 Cisco (TAPI) TSP
The Cisco TSP (Telephony Service Provider) provides the TAPI (Telephony Application Programming Interface) information that the Arc Professional Servers require.
A user needs to be created for the Arc Server that has the ability to use the following devices in TAPI:
All Pre Queue Gateways Devices All Gateway Devices. All Voice Ports. All extensions that will be used by the Console operators. All extensions that will be monitored in the Busy Lamp Field by an Operator.
2.1.1 Installing the Cisco TSPThe TSP is required to be installed only on the Arc Server Machine(s).1. Open the web browser and point to the Cisco CallManager Administration.2. Select the Application > Plugins
3. Click on the Find button.4. A list of available plugins will be displayed, scoll down to the Cisco Telephony Service
Provider, and click on the word Download to the left of the text.5. The install can either be run directly, or copied to the desktop and run later.
(CiscoTSP.exe). 6. During the installation, you will be asked how many instances of TSP you require. Enter
the number of instances based on the number of clusters you will be required to connect to. You can also select the Destination Folder to install the TSP.
8 - 10

Call Information Module
7. In the case of multiple instances being selected, the remainder of the installation wizard requests details related to the first TSP instance.
8. Enter the Application User ID of the user that was created for the CallManager and Password (including verifying the Password) required. Enter the IP Address of the CTI Manager. Click on Next.
8 - 11CUCM 8.x Configuration Manual for Arc Professional

9. In the next window enter details regarding the TSP. One of the options is to select the type of Driver to use with the TSP with regards to media compatibility. It is recommended to use the New Cisco Media Driver where possible.
10. A window will display the progress of the installation.
11. The Installation is complete, click on Finish to complete
12. After a successful installation the setup will prompt you to restart the system. You must restart the machine for the changes to take effect
8 - 12
Call Information Module
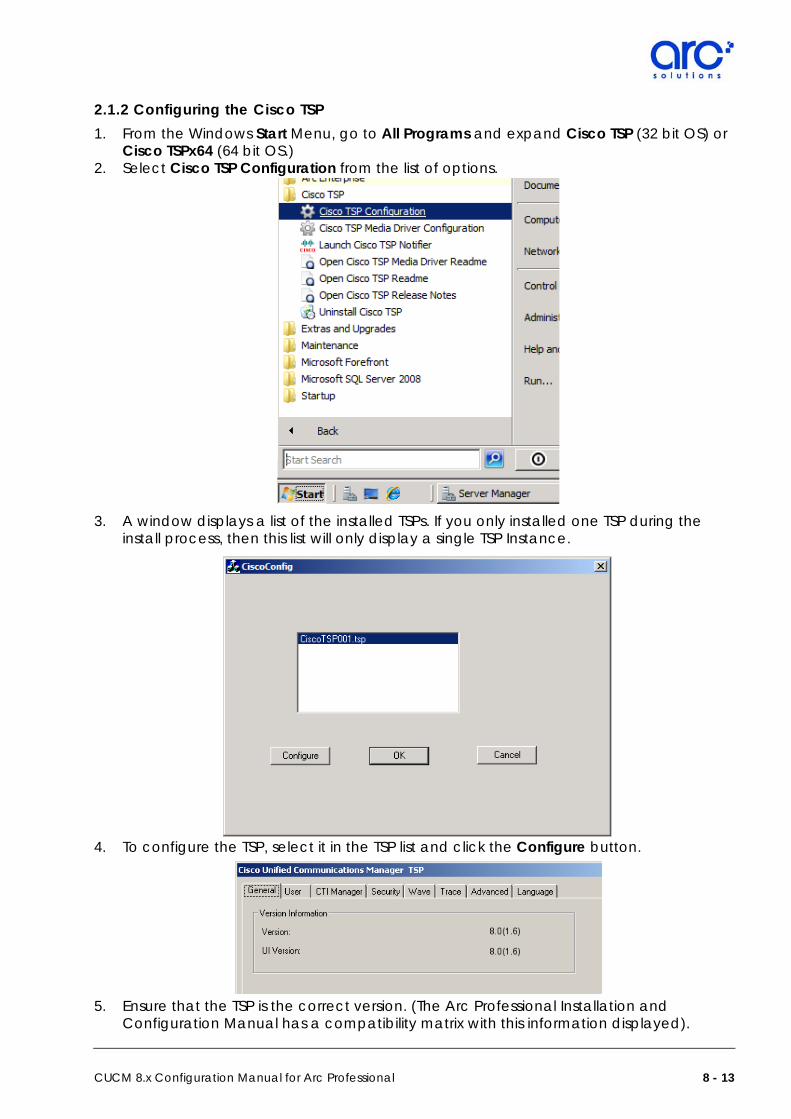
2.1.2 Configuring the Cisco TSP1. From the Windows Start Menu, go to All Programs and expand Cisco TSP (32 bit OS) or
Cisco TSPx64 (64 bit OS.)2. Select Cisco TSP Configuration from the list of options.
3. A window displays a list of the installed TSPs. If you only installed one TSP during the install process, then this list will only display a single TSP Instance.
4. To configure the TSP, select it in the TSP list and click the Configure button.
5. Ensure that the TSP is the correct version. (The Arc Professional Installation and Configuration Manual has a compatibility matrix with this information displayed).
8 - 13CUCM 8.x Configuration Manual for Arc Professional

6. Then click the User tab.7. Enter the User Name and Password for the Call Manager User that was setup for the
machine.
8. Select the CTI Manager tab
9. Enter the Name or IP Address of the Call Manager CTI Manager that you require to obtain your TAPI information from. A second CTI Manager can be used for resilience if required and available.
10. The next step depends on which type of driver that was installed:
Cisco Wave Driver
• During the TSP installation, if you selected to use the Cisco Wave Driver, then follow the next step.
• Select the Wave tab and enter the Desired number of possible Automated Voice Lines. This will be the number of Service, Voice and Host PBX Gateway devices that are being run from the server machine. There is a maximum of 255 lines available on a single server. Once this figure is set you will need to (re)install the Cisco TAPI WAVE driver. Click on Apply.
8 - 14

Call Information Module
Whenever this number is changed, you will also need to uninstall and reinstall theCisco TAPI WAVE driver. The instructions on how to do this are included on the CiscoTSP readme file.
• Click OK.
Cisco Media Driver
• Alternatively, If you selected to install the Cisco Media Driver, then you must configure the port range that the media driver will use.
• From the Cisco TSP program menu described in step 1, select Cisco Media Driver Configuration.
• Enter a port range that will provide your Arc system with enough media channels to handle the call volume that your system will receive. By default Arc recommends you should have 255 media channels by using the range specified in the above screenshot. To apply the changes click Ok.
The port range specified must be excluded from any firewall configuration.
11. Reboot all computers that the TSP has been installed on.
If you selected the option to use the Cisco Wave Driver then you also have to installthe device drivers. Instructions on installing this are found in a text file, which can befound in c:\Program Files\Cisco\CiscoTSP.txt
The TAPI must now be tested independently of Arc Professional. Close down all Arc Professional applications before undertaking the test.
8 - 15CUCM 8.x Configuration Manual for Arc Professional

Section 8-3: Testing TAPI using Phone.exePhone.exe is an application available from www.Julmar.com (Select the TAPI page and scroll down to TAPI Soft Phone and download). This application can be used to test the TAPI wave driver and TSP connections.
1. Open Phone.exe2. Check that you can view all of the devices configured in your arc user.3. Choose a host PBX port and select start session.4. Make a call to a telephone. If the call can be made and completed, then the TAPI
configuration is correct. Otherwise, recheck the TAPI settings.
3.1 Arc Connect: A Simple Test
1. Open the Arc Connect Server from Start > Programs > Arc Connect > Arc Connect Server
2. If you require Music on Hold this must be set on the server. Select Configuration > Preferences > Call Handling
8 - 16

Call Information Module
Check the box or boxes you require when music is to be played namely after voice messaging and/or when an Operator puts a call on hold. If you require music between messages you must select the Enable Gateway Voice Messaging checkbox. Click OK to continue.
3. Click on File > Start CT Server
4. A successfully started server will show the above status:
3.1.1 Confirming Console Operator 1. Click on the Console Connect tab.2. Dial one of the Console Queue locations configured as Console Queues.3. This tab shows the number of calls waiting for Console Queues.4. After dialling the call, the Calls Waiting indicator should show one call.5. Open the Operator Console and login as an Operator.
PBX The server has successfully Connected to the PBX.
Config Database The Server has successfully Connected to the Configuration Database.
Log Database The Server has successfully Connected to the Logging Database.
Comms: The Server has successfully found I.P. Activite
8 - 17CUCM 8.x Configuration Manual for Arc Professional

6. You will see that a call is waiting in the Console Queue.7. Click the + key to answer the call.8. Click Page Down to put the call on hold.9. Click Page Down again to retrieve the call.10. Type in the number of another extension and click Enter.11. A call should be made from the Operator to that extension.12. Click the Enter key again and the call will be transferred to the third extension and the
Operator console will be free.
3.1.2 Confirming Agent1. Log in Agent2. Make the Agent available.3. Dial the ACD Queue location 8502.4. Answer the call.5. Put the call on hold via the application.6. Retrieve the call from the application.7. End the call.8. See wrap up time activated.
8 - 18

Call Information Module
Section 8-4: Configuring access for the Arc CUPs ServerIt is important that the Arc CUPs Server Address is added to the firewall information on the Cisco Unified Presence Server (CUPS).
To do this go to Cisco Unified Presence menu, and select Proxy Server and Incoming ACL (access control list).
The page Find and List Allowed Incoming Hosts will be displayed..
8 - 19CUCM 8.x Configuration Manual for Arc Professional

Click on Add New and enter the Description and Address Pattern.
Click on Save.
Confirm the address and description have been added.
8 - 20

Call Information Module
Section 9-1: Configuring CallManager 9.x for Arc Professional1.1 Call Manager Partitions and Calling Search Spaces
If Partitions and Calling Search Spaces are being used on the CallManager there are some important items to be taken into consideration.
The way in which calls are routed down to operators, transferred to extensions and recalled to the operator means that many devices are used to complete a route. Because of this Partitions and Calling Spaces play a very important role that can affect the Operator functionality. To counteract potential problems you should set up a new partition Arc Partition and a new Calling Search Space Arc Search Space, which includes all partitions. The new Partition and Calling Search Space should be allocated to the entire Arc devices, Pre CT Gateways, Host PBX Gateways, Service Queue, and Voice Port(s). Alternatively, use any other CSS that has full routing access to a partition that is accessible from anywhere.
1.2 Configuring Host PBX Gateway, Voice, Call Parking, Service Queue and CTI Reference Devices
Host PBX Gateway ports for the Arc Professional system are where the calls are held prior to delivery to the client applications. To support the inclusion of Music on Hold from Call Manager the ports should be configured as CTI Ports, which means that they need a voice capability i.e. set up within the limits of the max number of Automated Voice Lines on the Cisco TAPI tsp.
When considering the numbering plan it is required that a CTI reference device isincluded. This is a CTI port with the lowest DN that appears in your TSP User device listin the Call Manager Configuration.
This port should not be used in the configuration, and should not be amended ordeleted once it has been associated as a static device with the profile.
Within Cisco Unified CM Administration
1. Select Device > Phone
9 - 1CUCM 9.x Configuration Manual for Arc Professional
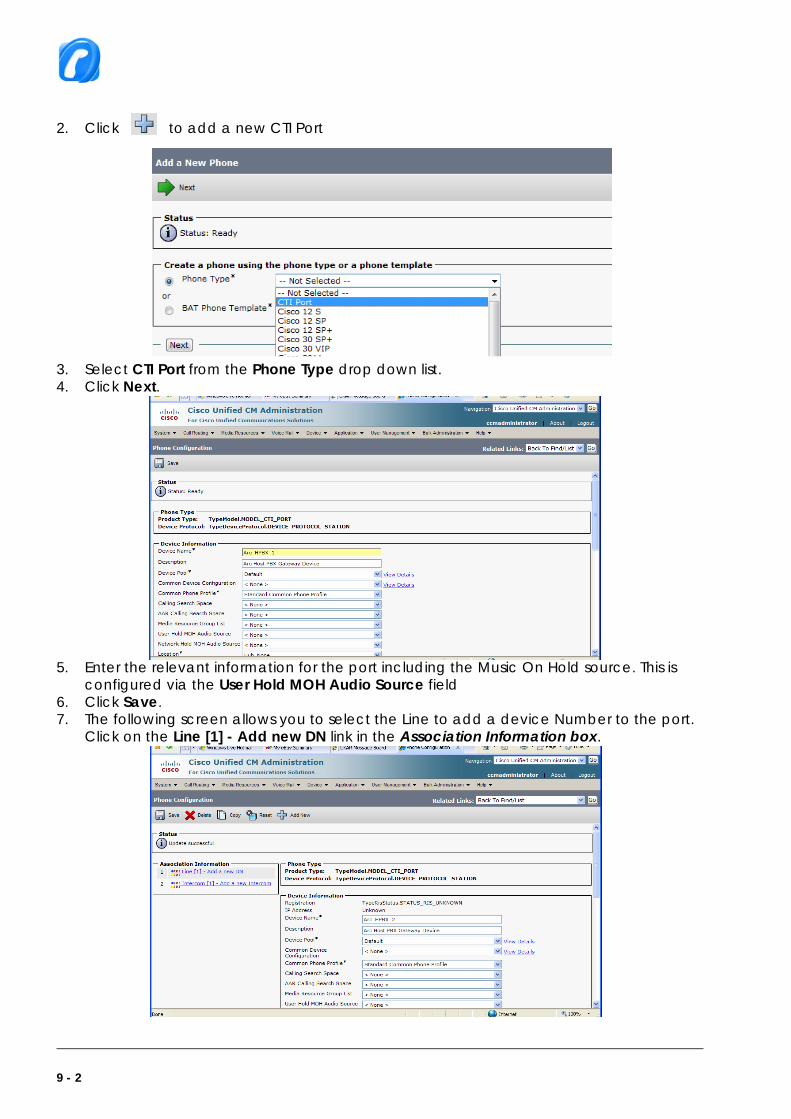
2. Click to add a new CTI Port
3. Select CTI Port from the Phone Type drop down list.4. Click Next.
5. Enter the relevant information for the port including the Music On Hold source. This is configured via the User Hold MOH Audio Source field
6. Click Save.7. The following screen allows you to select the Line to add a device Number to the port.
Click on the Line [1] - Add new DN link in the Association Information box.
9 - 2

Call Information Module
8. The Directory Number Configuration window appears
9. Enter the information as shown above including the partition.10. Click Save to complete.
1.3 Configuring Pre CT Gateway and Personal Call Parking Devices
Within Cisco Unified CallManager Administration
1. Select Device > CTI Route Point.
2. Select to add a new CTI Route Point.
3. Insert a Device Name and Description of Pre CT Gateway.4. Select a Device Pool and Location as required.
9 - 3CUCM 9.x Configuration Manual for Arc Professional

5. Select Save.
6. To configure the directory number, select Add a new DN in the Associated Information section towards the bottom of the page..
7. Enter the Directory Number, Partition and Calling Search Space as required
9 - 4
Call Information Module
8. To provide resilience you can also enter a destination in the Forward No Answer section. This will forward the call to the selected destination if Arc cannot answer the call for any reason.
9. Select Save. 10. You should create a separate CTI Route Point for every Pre-Gateway port required. This
can be done by using the Copy facility to create the next route point.11. Edit the Device Name and Description.12. Enter the Device Pool as Default.
If you do not use the Copy facility you will have to repeat steps 7 to 12 for each ofthe new Route Points.
13. When all of the CTI Route Points have been entered click Update to complete the configuration.
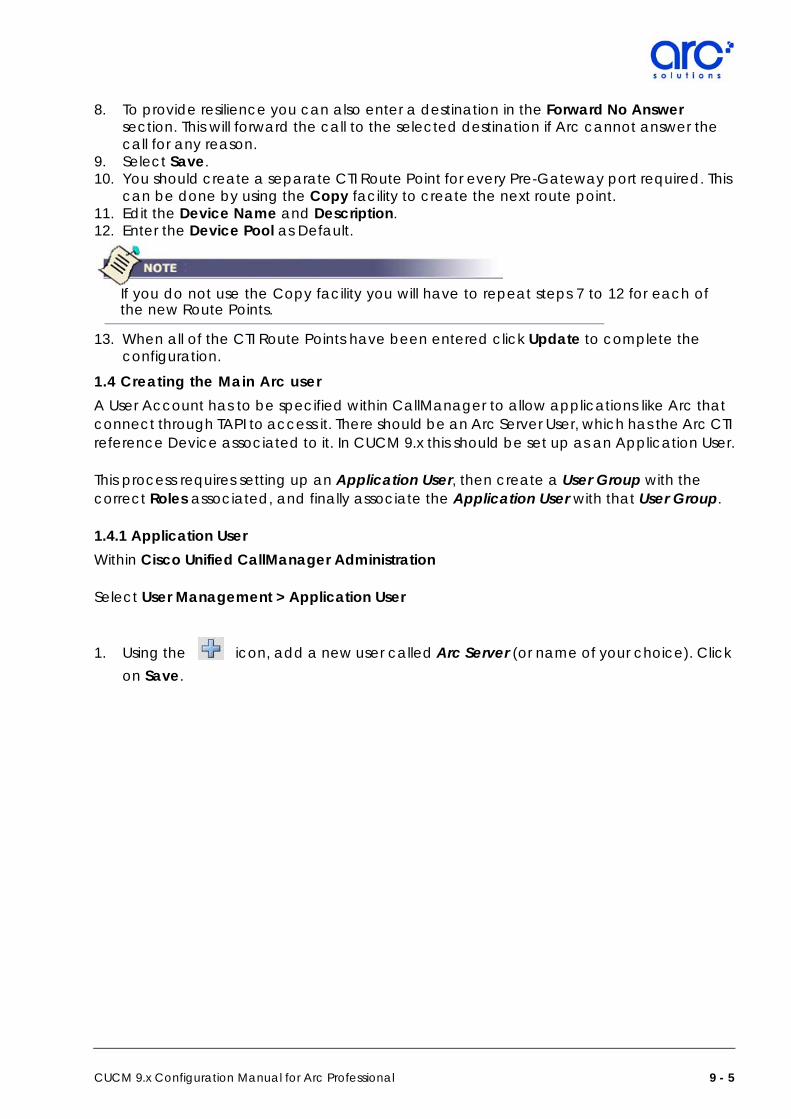
1.4 Creating the Main Arc userA User Account has to be specified within CallManager to allow applications like Arc that connect through TAPI to access it. There should be an Arc Server User, which has the Arc CTI reference Device associated to it. In CUCM 9.x this should be set up as an Application User.
This process requires setting up an Application User, then create a User Group with the correct Roles associated, and finally associate the Application User with that User Group.
1.4.1 Application UserWithin Cisco Unified CallManager Administration
Select User Management > Application User
1. Using the icon, add a new user called Arc Server (or name of your choice). Click on Save.
9 - 5CUCM 9.x Configuration Manual for Arc Professional

2. Scroll down the screen and click on Find more Phones in the Device Information part of the screen. Locate the configured CTI Reference Device and add the device to the user. It is not required to add any of the Arc system devices to the TSP User.
3. Within the Find and List Phones screen, select the relevant Devices from the list and click on Add Selected.
4. Return to the Application User Account and confirm that the devices have been associated. Click on Save.
9 - 6

Call Information Module
1.4.2 User GroupsThe Application User account now needs to be associated to a
Select User Management > User Settings > Access Control Group
1. Using the icon, add a new Access Control Group called Arc Server Group (or name of your choice). Click on Save.
2. Select Add App Users to Group
3. Select the Application User already configured for the Arc Server (in this example
9 - 7CUCM 9.x Configuration Manual for Arc Professional

ArcServer), and click Add Selected.4. The next step requires you to add Roles to the User Group. To do this return to the main
Access Control Groups Page and on the right hand side of the screen click the icon next to the created ArcServer Group Access Control Group..
5. At this window select the Assign Role to Group button.
6. Scroll down the list and select the Cisco Computer Telephony Interface (CTI) options, and click Add Selected. The following checkboxes must be selected, Standard CTI Allow Call Park Monitoring Standard CTI Allow Calling Number Modification Standard CTI Allow Control of All Devices Standard CTI Allow Reception of SRTP Key Material Standard CTI Enabled Standard AXL API Access
9 - 8
Call Information Module
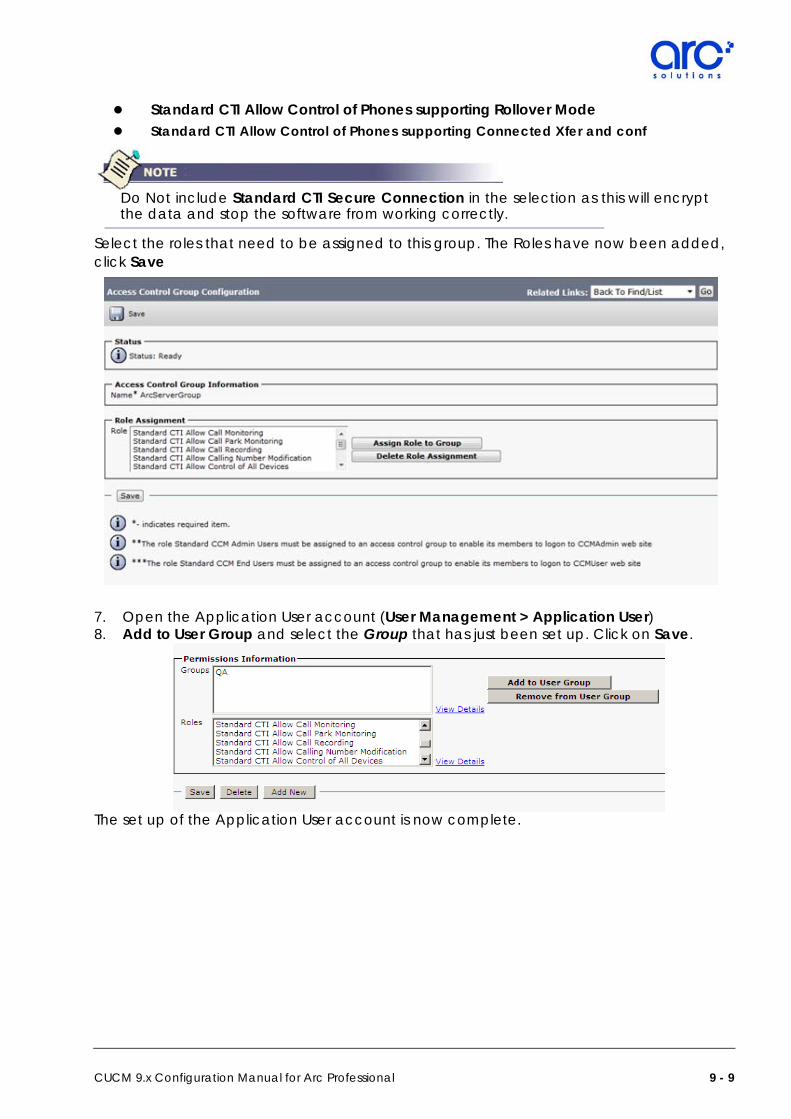
Standard CTI Allow Control of Phones supporting Rollover Mode Standard CTI Allow Control of Phones supporting Connected Xfer and conf
Do Not include Standard CTI Secure Connection in the selection as this will encryptthe data and stop the software from working correctly.
Select the roles that need to be assigned to this group. The Roles have now been added, click Save
7. Open the Application User account (User Management > Application User)8. Add to User Group and select the Group that has just been set up. Click on Save.
The set up of the Application User account is now complete.
9 - 9CUCM 9.x Configuration Manual for Arc Professional

Section 9-2: Configuring TAPI and Testing Arc Professional2.1 Cisco (TAPI) TSP
The Cisco TSP (Telephony Service Provider) provides the TAPI (Telephony Application Programming Interface) information that the Arc Professional Servers require.
A user needs to be created for the Arc Server that has the ability to use the following devices in TAPI:
All Pre Queue Gateways Devices All Gateway Devices. All Voice Ports. All extensions that will be used by the Console operators. All extensions that will be monitored in the Busy Lamp Field by an Operator.
2.1.1 Installing the Cisco TSPThe TSP is required to be installed only on the Arc Server Machine(s).1. Open the web browser and point to the Cisco CallManager Administration.2. Select the Application > Plugins
3. Click on the Find button.4. A list of available plugins will be displayed, scoll down to the Cisco Telephony Service
Provider, and click on the word Download to the left of the text.5. The install can either be run directly, or copied to the desktop and run later.
(CiscoTSP.exe). 6. During the installation, you will be asked how many instances of TSP you require. Enter
the number of instances based on the number of clusters you will be required to connect to. You can also select the Destination Folder to install the TSP.
9 - 10

Call Information Module
7. In the case of multiple instances being selected, the remainder of the installation wizard requests details related to the first TSP instance.
8. Enter the Application User ID of the user that was created for the CallManager and Password (including verifying the Password) required. Enter the IP Address of the CTI Manager. Click on Next.
9 - 11CUCM 9.x Configuration Manual for Arc Professional
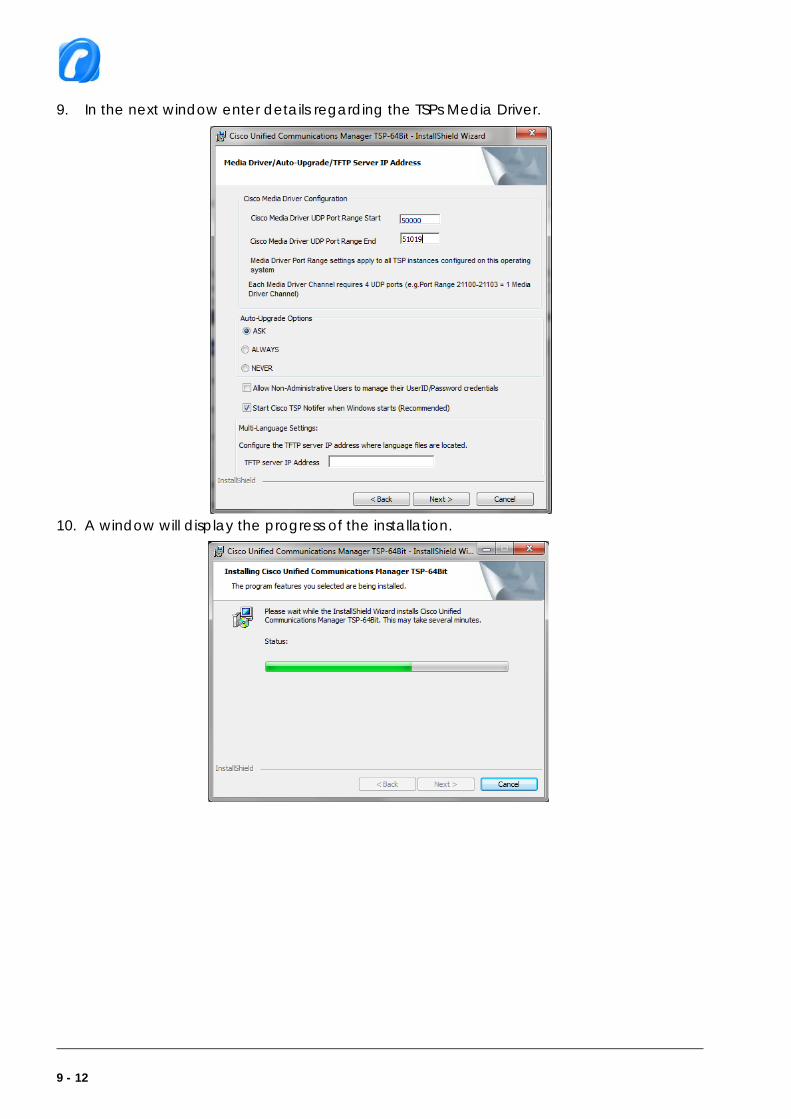
9. In the next window enter details regarding the TSPs Media Driver.
10. A window will display the progress of the installation.
9 - 12

Call Information Module
11. The Installation is complete, click on Finish to complete
12. After a successful installation the setup will prompt you to restart the system. You must restart the machine for the changes to take effect
2.1.2 Configuring the Cisco TSP1. From the Windows Start Menu, go to All Programs and expand Cisco TSP (32 bit OS) or
Cisco TSPx64 (64 bit OS.)2. Select Cisco TSP Configuration from the list of options.
3. A window displays a list of the installed TSPs. If you only installed one TSP during the
9 - 13CUCM 9.x Configuration Manual for Arc Professional

install process, then this list will only display a single TSP Instance.
4. To configure the TSP, select it in the TSP list and click the Configure button.
5. Ensure that the TSP is the correct version. (The Arc Professional Installation and Configuration Manual has a compatibility matrix with this information displayed).
6. Then click the User tab.7. Enter the User Name and Password for the Call Manager User that was setup for the
machine.
9 - 14

Call Information Module
8. Select the CTI Manager tab
9. Enter the Name or IP Address of the Call Manager CTI Manager that you require to obtain your TAPI information from. A second CTI Manager can be used for resilience if required and available.
10. The next step is to configure the Media Driver and its ports configuration.• Install the Cisco Media Driver, and configure the port range that the media driver
will use. • From the Cisco TSP program menu described in step 1, select Cisco Media Driver
Configuration.
• Enter a port range that will provide your Arc system with enough media channels to handle the call volume that your system will receive. By default Arc recommends you should have 255 media channels by using the range specified in the above screenshot. To apply the changes click Ok.
The port range specified must be excluded from any firewall configuration.
11. Reboot all computers that the TSP has been installed on.
9 - 15CUCM 9.x Configuration Manual for Arc Professional

If you selected the option to use the Cisco Wave Driver then you also have to installthe device drivers. Instructions on installing this are found in a text file, which can befound in c:\Program Files\Cisco\CiscoTSP.txt
The TAPI must now be tested independently of Arc Professional. Close down all Arc Professional applications before undertaking the test.
9 - 16

Call Information Module
Section 9-3: Testing TAPI using Phone.exePhone.exe is an application available from www.Julmar.com (Select the TAPI page and scroll down to TAPI Soft Phone and download). This application can be used to test the TAPI wave driver and TSP connections.
1. Open Phone.exe2. Check that you can view all of the devices configured in your arc user.3. Choose a host PBX port and select start session.4. Make a call to a telephone. If the call can be made and completed, then the TAPI
configuration is correct. Otherwise, recheck the TAPI settings.
3.1 Arc Connect: A Simple Test
1. Open the Arc Connect Server from Start > Programs > Arc Connect > Arc Connect Server
2. If you require Music on Hold this must be set on the server. Select Configuration > Preferences > Call Handling
9 - 17CUCM 9.x Configuration Manual for Arc Professional

Check the box or boxes you require when music is to be played namely after voice messaging and/or when an Operator puts a call on hold. If you require music between messages you must select the Enable Gateway Voice Messaging checkbox. Click OK to continue.
3. Click on File > Start CT Server
4. A successfully started server will show the above status:
3.1.1 Confirming Console Operator 1. Click on the Console Connect tab.2. Dial one of the Console Queue locations configured as Console Queues.3. This tab shows the number of calls waiting for Console Queues.4. After dialling the call, the Calls Waiting indicator should show one call.
PBX The server has successfully Connected to the PBX.
Config Database The Server has successfully Connected to the Configuration Database.
Log Database The Server has successfully Connected to the Logging Database.
Comms: The Server has successfully found I.P. Active
9 - 18

Call Information Module
5. Open the Operator Console and login as an Operator.6. You will see that a call is waiting in the Console Queue.7. Click the + key to answer the call.8. Click Page Down to put the call on hold.9. Click Page Down again to retrieve the call.10. Type in the number of another extension and click Enter.11. A call should be made from the Operator to that extension.12. Click the Enter key again and the call will be transferred to the third extension and the
Operator console will be free.
3.1.2 Confirming Agent1. Log in Agent2. Make the Agent available.3. Dial the ACD Queue location 8502.4. Answer the call.5. Put the call on hold via the application.6. Retrieve the call from the application.7. End the call.8. See wrap up time activated.
9 - 19CUCM 9.x Configuration Manual for Arc Professional

Section 9-4: Configuring access for the Arc CUPs ServerIt is important that the Arc CUPs Server Address is added to the firewall information on the Cisco Unified Presence Server (CUPS).
To do this go to Cisco Unified Presence menu, and select Proxy Server and Incoming ACL (access control list).
The page Find and List Allowed Incoming Hosts will be displayed..
9 - 20

Call Information Module
Click on Add New and enter the Description and Address Pattern.
Click on Save.
Confirm the address and description have been added.
9 - 21CUCM 9.x Configuration Manual for Arc Professional

9 - 22


