NetLinx Control for N-Series Products - Documentation Addendum 1 NetLinx Control for N-Series Products Documentation Addendum Introduction NetLinx Studio is commonly used by system programmers to streamline the integration, programming, organization, and support of their AMX equipment. As the cornerstone of AMX's system design software tools, NetLinx Studio offers programmers the most flexible application capable of generating the most sophisticated code possible. Now equipment in our latest N-Series Networked AV Product comes equipped with NetLinx support. This addendum introduces the new configuration aspects necessary to bring all of your NetLinx-compatible equipment up to speed with the latest functionality. This addendum covers NetLinx functionality as it applies to AMX’s N-Series product line and is designed to be used as a supplement to additional product documentation found on our website at http://www.amx.com/techcenter/ . COMMON APPLICATIONS NetLinx Studio is a Microsoft Windows program that integrates programming, organization, and support into one application for NetLinx system development. NetLinx Configuration Using the Unit’s Webpage From any main page of the unit webpage, click the NetLinx tab. See Figure 1. Table 1 provides descriptions for each configuration option. NOTE: For instructions on how to log in to your unit for the first time, please see the Quick Start Guide (provided in shipment) or visit our website to view the unit’s user manual. FIGURE 1 NetLinx Configuration Page Click here to access NetLinx configuration options. Configuration options available will depend on which Master Mode you choose. See Table 1 for more details. TABLE 1 NetLinx Page Options Command Description Enable Click to enable/disable NetLinx on this device. Device Status This status field will show the device to be Online, Connected, Offline, or Unknown. Master Mode Select Auto, Listen, or URL.
Transcript
NetLinx Control for N-Series ProductsDocumentation Addendum
IntroductionNetLinx Studio is commonly used by system programmers to streamline the integration, programming, organization, and support of their AMX equipment. As the cornerstone of AMX's system design software tools, NetLinx Studio offers programmers the most flexible application capable of generating the most sophisticated code possible. Now equipment in our latest N-Series Networked AV Product comes equipped with NetLinx support. This addendum introduces the new configuration aspects necessary to bring all of your NetLinx-compatible equipment up to speed with the latest functionality. This addendum covers NetLinx functionality as it applies to AMX’s N-Series product line and is designed to be used as a supplement to additional product documentation found on our website at http://www.amx.com/techcenter/.
COMMON APPLICATIONS NetLinx Studio is a Microsoft Windows program that integrates programming, organization, and support into one application for NetLinx system development.
NetLinx Conf iguration Using the Unit’s Webpage From any main page of the unit webpage, click the NetLinx tab. See Figure 1. Table 1 provides descriptions for each configuration option. NOTE: For instructions on how to log in to your unit for the f irst time, please see the Quick Start Guide (provided in shipment) or visit our website to view the unit’s user manual.
FIGURE 1 NetLinx Configuration Page
Click here to access NetLinx configuration options.
Configuration options available will depend on which Master Mode you choose. See Table 1 for more details.
TABLE 1 NetLinx Page Options
Command Description
Enable Click to enable/disable NetLinx on this device.
Device Status This status field will show the device to be Online, Connected, Offline, or Unknown.
Master Mode Select Auto, Listen, or URL.
NetLinx Control for N-Series Products - Documentation Addendum 1
Introduction
Batch Conf igurations Using N-AbleOne of the many benefits of using N-Able control is batch configuration. This is especially useful in larger deployments. Instead of using the individual unit web pages (discussed in the previous section), simply open N-Able and select Tools > Batch Conf ig. See Figure 2.
FIGURE 2 Selecting Batch Config in N-Able
The screen shown in figure xx displays and allows you to choose the units you would like to enable for NetLinx control. To select multiple units, hold down the <Ctrl> key. Once all of the units are selected, enable the NetLinx On button and click the OK button at the bottom of the screen.
FIGURE 3 Enabling NetLinx on Multiple Units
NOTE: Items are not f iltered. In other words, if you send a NetLinx command to a device that does not support it, the command is simply ignored.
IP/URL Enter the address of the Master Controller.
Port This field should always be set to 1319.
Device Number Defaults to a dynamic device number. May be set to a static range (e.g., 8000).
System Number Determines which system to connect. This setting is dependent upon the Master Mode selected (see above).• If Master Mode is set to Auto, the System Number is set and the system discovers the Master Controller’s IP
address.• If Master Mode is set to Listen, the device connects to any Master Controller. • If Master Mode is set to URL, the IP of the Master Controller is set.
Username Username for the Master Controller.
Password Password for the Master Controller.
Save Save settings made on this page.
TABLE 1 NetLinx Page Options (Cont.)
Command Description
NetLinx Control for N-Series Products - Documentation Addendum 2
Encoder/Decoder Commands
Encoder/Decoder CommandsThe following section provides information on native, string, IR, and serial commands for N-Series Encoders and Decoders as related to NetLinx management. Commands are issued on the following ports:• Port 1: Native and String Commands• Port 2: IR Commands• Port 3: Serial Commands
Native Commands Port 1Command Description
CO <stream>Set the current Encoder stream number.
IMPORTANT: This command must be sent to D:P:S port 1. Syntax: SEND_COMMAND <DEV>, ’CO <stream>’Variables: stream = The target stream number from 1 to 32767. NOTE: Stream number MOD 256 must not equal 0 or 255. Examples: SEND_COMMAND 5002:1:0, ’CO 2’ Command the Encoder to transmit on stream 2.
CI <stream>Set the current Decoder stream number.
IMPORTANT: This command must be sent to D:P:S port 1. Syntax: SEND_COMMAND <DEV>, ’CI <stream>’Variables: stream = The target stream number from 0 to 32767. NOTE: Stream number MOD 256 must not equal 0 or 255. The only exception to this limitation is that the stream number can be 0 (no stream). Examples: SEND_COMMAND 5002:1:0, ’CI 2’ Command the Decoder to receive stream 2.
CA <stream> Set the current Decoder Audio stream number.
IMPORTANT: This command must be sent to D:P:S port 1. Syntax: SEND_COMMAND <DEV>, ’CA <stream>’Variables: stream = The target stream number from 0 to 32767. Set to 0 for the audio stream to follow the video stream.Examples: SEND_COMMAND 5002:1:0, ’CA 2’ Command the Decoder to receive audio stream 2.
AUDOUT_MUTESet the audio mute.
IMPORTANT: This command must be sent to D:P:S port 1. Syntax: SEND_COMMAND <DEV>, ’AUDOUT_MUTE-<ENABLE|DISABLE>’Variables: ENABLE = Enables audio mute. DISABLE = Disables audio mute. Examples: SEND_COMMAND 5002:1:0, ’AUDOUT_MUTE-ENABLE’ Enable audio mute.
VIDOUT_MUTEDisable the Encoder/Decoder output stream.
IMPORTANT: This command must be sent to D:P:S port 1. Syntax: SEND_COMMAND <DEV>, ’VIDOUT_MUTE-<ENABLE|DISABLE>’Variables: ENABLE = Enables video mute. DISABLE = Disables video mute. Examples: SEND_COMMAND 5002:1:0, ’VIDOUT_MUTE-ENABLE’ Enable video mute.
LIVE_PLAYSet the device into live play mode.
IMPORTANT: This command must be sent to D:P:S port 1. Syntax: SEND_COMMAND <DEV>, ’LIVE_PLAY’Examples: SEND_COMMAND 5002:1:0, ’LIVE_PLAY’ Enable live play.
NetLinx Control for N-Series Products - Documentation Addendum 3
Encoder/Decoder Commands
LOCAL_PLAY <Playlist index>Enable Local Play on Decoders or Host Play on Encoders using the Playlist number.
IMPORTANT: This command must be sent to D:P:S port 1. Syntax: SEND_COMMAND <DEV>, ’LOCAL_PLAY index’Variables: Playlist index = Which Default Playlist index to enable.Examples: SEND_COMMAND 5002:1:0, ’LOCAL_PLAY 1’ Enable local play with Default Playlist 1.
USB_HID_SERVICEEnable or disable USB.
IMPORTANT: This command must be sent to D:P:S port 1. Syntax: SEND_COMMAND <DEV>, ’USB_HID_SERVICE-<ENABLE|DISABLE>’Variables: ENABLE = Enables USB. DISABLE = Disables USB.Examples: SEND_COMMAND 5002:1:0, ’USB_HID_SERVICE-ENABLE’ Enable USB.
NetLinx Control for N-Series Products - Documentation Addendum 4
Encoder/Decoder Commands
Pass Through CommandsFor other commands, the NetLinx String command will interpret any existing N-Series API command. For example, to enable the scaler, send the following string command: SEND_STRING <DEV>, ’scalerenable’
Similarly, to disable the scaler, send the string command: SEND_STRING <DEV>, ’scalerdisable’
The response to a pass through string command is the issued command followed by the status message. For example:• Command string: SEND_STRING <DEV>, ’scalerenable’
SET BAUDSet the RS-232 port's communication parameters.
Syntax: SEND_COMMAND <DEV>, ’SET BAUD <baud>,<parity>,<data>,<stop>’Variables:baud = baud rates are: 115200, 57600, 38400, 19200, 9600, 4800, 2400, 1200.parity = N (none), O (odd), E (even).data = 8 data bits.stop = 1 and 2 stop bits.Example: SEND_COMMAND 5002:3:0, ’SET BAUD 9600,N,8,1’Command Response: 'SET- BAUD 9600,N,8,1'
Native Commands Port 1 (Cont.)Command Description
NetLinx Control for N-Series Products - Documentation Addendum 5
Encoder/Decoder Commands
IR Port 2Using the NetLinx Studio application, download the appropriate IR file to the N-Series device to use the appropriate channels. Port 2 is used to send IR commands. Some tuning of the NetLinx Pulse Time, IR Command Holdoff, and IR Repeat Holdoff on the N-Series device may be required. The Pulse Time is controlled in the SNAPY code. The IR Command Holdoff and the IR Repeat Holdoff are controlled on the Advanced section of the N-Series device Settings web page. See Figure 4 to see where to find these options.IR Command Holdoff• This is the delay between IR commands portions.• To set the IR Command Holdoff, issue the following string command:
SEND_STRING <DEV>, ’setSettings:ircmdtime:<time in ms>’
• The default value is 25 ms.IR Repeat Holdoff• This is the repeat delay between IR commands.• To set the IR Repeat Holdoff, issue the following string command:
SEND_STRING <DEV>, ’setSettings: irc2rtime:<time in ms>’• The default value is 90 ms.
FIGURE 4 Advanced IR Port Settings
Serial Port 3Port 3 is used for serial commands. Any string sent with the send string command will be output through the serial port. Data returned from the serial port will be from the device also on port 3.
NetLinx Control for N-Series Products - Documentation Addendum 6
Windowing Processor Commands
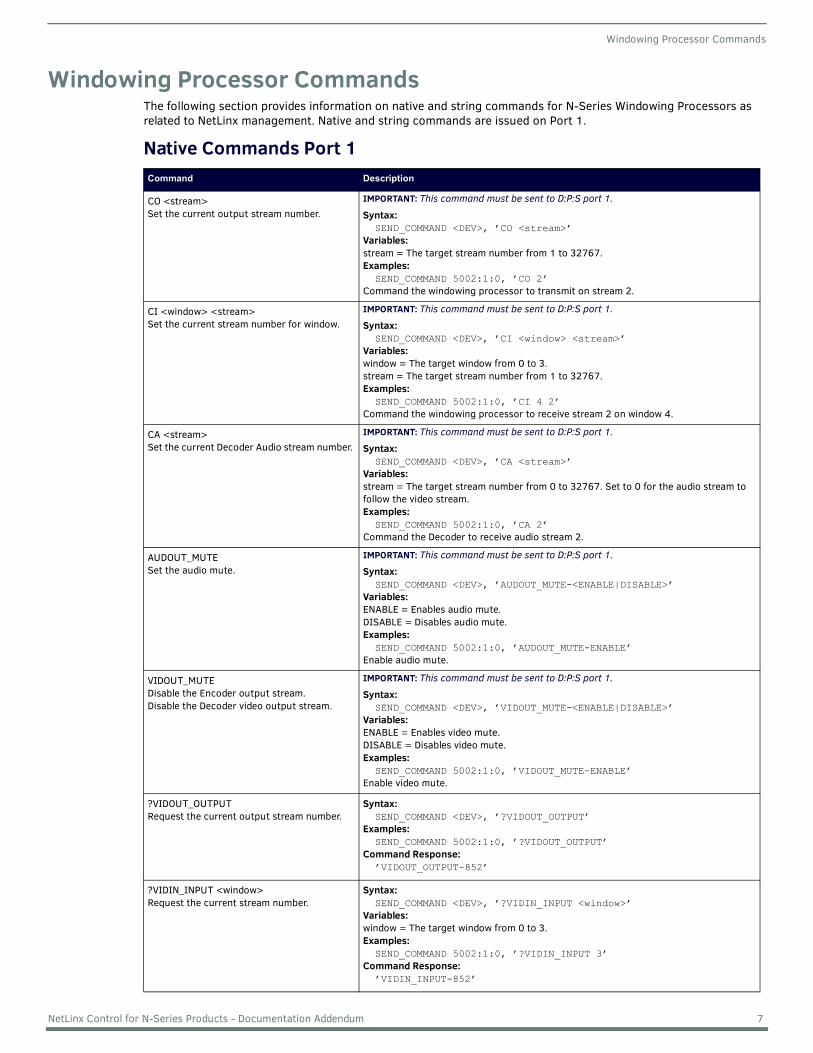
Windowing Processor CommandsThe following section provides information on native and string commands for N-Series Windowing Processors as related to NetLinx management. Native and string commands are issued on Port 1.
Native Commands Port 1Command Description
CO <stream>Set the current output stream number.
IMPORTANT: This command must be sent to D:P:S port 1. Syntax: SEND_COMMAND <DEV>, ’CO <stream>’Variables: stream = The target stream number from 1 to 32767.Examples: SEND_COMMAND 5002:1:0, ’CO 2’ Command the windowing processor to transmit on stream 2.
CI <window> <stream>Set the current stream number for window.
IMPORTANT: This command must be sent to D:P:S port 1. Syntax: SEND_COMMAND <DEV>, ’CI <window> <stream>’Variables: window = The target window from 0 to 3. stream = The target stream number from 1 to 32767. Examples: SEND_COMMAND 5002:1:0, ’CI 4 2’ Command the windowing processor to receive stream 2 on window 4.
CA <stream> Set the current Decoder Audio stream number.
IMPORTANT: This command must be sent to D:P:S port 1. Syntax: SEND_COMMAND <DEV>, ’CA <stream>’Variables: stream = The target stream number from 0 to 32767. Set to 0 for the audio stream to follow the video stream.Examples: SEND_COMMAND 5002:1:0, ’CA 2’ Command the Decoder to receive audio stream 2.
AUDOUT_MUTESet the audio mute.
IMPORTANT: This command must be sent to D:P:S port 1. Syntax: SEND_COMMAND <DEV>, ’AUDOUT_MUTE-<ENABLE|DISABLE>’Variables: ENABLE = Enables audio mute.DISABLE = Disables audio mute. Examples: SEND_COMMAND 5002:1:0, ’AUDOUT_MUTE-ENABLE’ Enable audio mute.
VIDOUT_MUTEDisable the Encoder output stream.Disable the Decoder video output stream.
IMPORTANT: This command must be sent to D:P:S port 1. Syntax: SEND_COMMAND <DEV>, ’VIDOUT_MUTE-<ENABLE|DISABLE>’Variables: ENABLE = Enables video mute. DISABLE = Disables video mute. Examples: SEND_COMMAND 5002:1:0, ’VIDOUT_MUTE-ENABLE’ Enable video mute.
?VIDOUT_OUTPUTRequest the current output stream number.
?VIDIN_INPUT <window>Request the current stream number.
Syntax: SEND_COMMAND <DEV>, ’?VIDIN_INPUT <window>’Variables: window = The target window from 0 to 3. Examples: SEND_COMMAND 5002:1:0, ’?VIDIN_INPUT 3’ Command Response: ’VIDIN_INPUT-852’
NetLinx Control for N-Series Products - Documentation Addendum 7
Windowing Processor Commands
Windowing Processor Pass Through Command ExamplesFor other commands, the NetLinx String command will interpret any existing N-Series API command. The following sequence of string commands exemplifies the pass through commands used to set up a quad window with white border of two pixels for windows 0 and 1 and no border for windows 2 and 3.SEND_STRING <DEV>, ’winon:0’SEND_STRING <DEV>, ’set:0:<stream window 0>’SEND_STRING <DEV>, ’setbordcol:0:255,255,255’SEND_STRING <DEV>, ’bordon:0’SEND_STRING <DEV>, ’setbord:0:2,2’SEND_STRING <DEV>, ’winset:0:0,0,959,539’SEND_STRING <DEV>, ’setz:0:1’SEND_STRING <DEV>, ’winon:1’SEND_STRING <DEV>, ’set:1:<stream window 1>’SEND_STRING <DEV>, ’setbordcol:1:255,255,255’SEND_STRING <DEV>, ’bordon:1’SEND_STRING <DEV>, ’setbord:1:2,2’SEND_STRING <DEV>, ’winset:1:960,0,1919,539’SEND_STRING <DEV>, ’setz:1:2’SEND_STRING <DEV>, ’winon:2’SEND_STRING <DEV>, ’set:2:<stream window 2>’SEND_STRING <DEV>, ’setbordcol:2:255,255,255’SEND_STRING <DEV>, ’bordoff:2’SEND_STRING <DEV>, ’winset:2:0,540,959,1079’SEND_STRING <DEV>, ’setz:2:3’SEND_STRING <DEV>, ’winon:3’SEND_STRING <DEV>, ’set:3:<stream window 3>’SEND_STRING <DEV>, ’setbordcol:3:255,255,255’SEND_STRING <DEV>, ’bordoff:3’SEND_STRING <DEV>, ’winset:3:960,540,1919,1079’SEND_STRING <DEV>, ’setz:3:4’SEND_STRING <DEV>, ’setbkgd:0’SEND_STRING <DEV>, ’seta:333’
?AUDIN_INPUTRequest the current audio stream number.
NetLinx Control for N-Series Products - Documentation Addendum 8
Network Video Recorder Commands
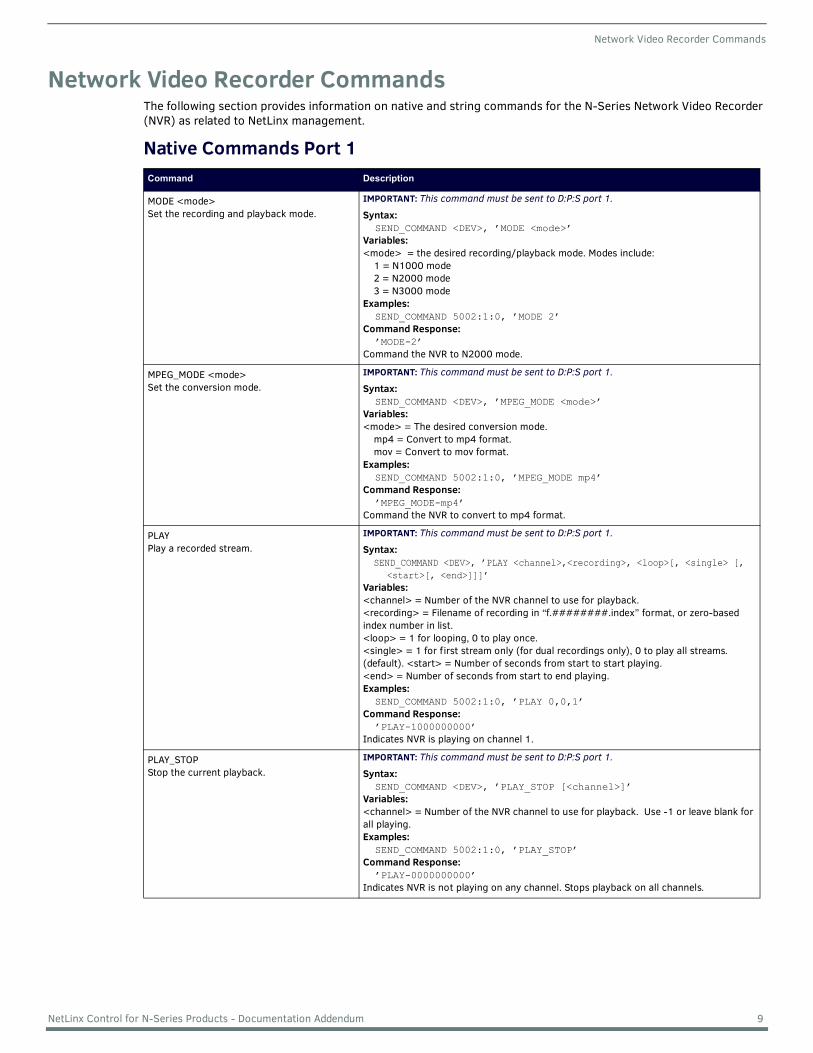
Network Video Recorder CommandsThe following section provides information on native and string commands for the N-Series Network Video Recorder (NVR) as related to NetLinx management.
Native Commands Port 1Command Description
MODE <mode>Set the recording and playback mode.
IMPORTANT: This command must be sent to D:P:S port 1. Syntax: SEND_COMMAND <DEV>, ’MODE <mode>’Variables: <mode> = the desired recording/playback mode. Modes include: 1 = N1000 mode 2 = N2000 mode 3 = N3000 modeExamples: SEND_COMMAND 5002:1:0, ’MODE 2’ Command Response: ’MODE-2’Command the NVR to N2000 mode.
MPEG_MODE <mode>Set the conversion mode.
IMPORTANT: This command must be sent to D:P:S port 1. Syntax: SEND_COMMAND <DEV>, ’MPEG_MODE <mode>’Variables: <mode> = The desired conversion mode. mp4 = Convert to mp4 format. mov = Convert to mov format.Examples: SEND_COMMAND 5002:1:0, ’MPEG_MODE mp4’Command Response: ’MPEG_MODE-mp4’Command the NVR to convert to mp4 format.
PLAY Play a recorded stream.
IMPORTANT: This command must be sent to D:P:S port 1. Syntax: SEND_COMMAND <DEV>, ’PLAY <channel>,<recording>, <loop>[, <single> [,
<start>[, <end>]]]’ Variables: <channel> = Number of the NVR channel to use for playback. <recording> = Filename of recording in “f.########.index” format, or zero-based index number in list. <loop> = 1 for looping, 0 to play once. <single> = 1 for first stream only (for dual recordings only), 0 to play all streams. (default). <start> = Number of seconds from start to start playing. <end> = Number of seconds from start to end playing.Examples: SEND_COMMAND 5002:1:0, ’PLAY 0,0,1’Command Response: ’PLAY-1000000000’ Indicates NVR is playing on channel 1.
PLAY_STOPStop the current playback.
IMPORTANT: This command must be sent to D:P:S port 1. Syntax: SEND_COMMAND <DEV>, ’PLAY_STOP [<channel>]’Variables: <channel> = Number of the NVR channel to use for playback. Use -1 or leave blank for all playing.Examples: SEND_COMMAND 5002:1:0, ’PLAY_STOP’Command Response: ’PLAY-0000000000’ Indicates NVR is not playing on any channel. Stops playback on all channels.
NetLinx Control for N-Series Products - Documentation Addendum 9
Network Video Recorder Commands
PLAY_PAUSEPause the current playing video.
IMPORTANT: This command must be sent to D:P:S port 1. Syntax: SEND_COMMAND <DEV>, ’PLAY_PAUSE [<channel>]’Variables: <channel> = Number of the NVR channel to use for pause. Use -1 or leave blank for all playing. Examples: SEND_COMMAND 5002:1:0, ’PLAY_PAUSE’ Command Response: nonePause the current playing video.
PLAY_RESUMEResume the currently paused, rewinding, or fast forward video.
IMPORTANT: This command must be sent to D:P:S port 1. Syntax: SEND_COMMAND <DEV>, ’PLAY_RESUME [<channel>]’Variables: <channel> = Number of the NVR channel to use for pause. Use -1 or leave blank for all playing. Examples: SEND_COMMAND 5002:1:0, ’PLAY_RESUME’ Command Response: noneResume the video.
PLAY_FAST_FORWARDPut the current playing video into fast forward using the last speed or the given <speed>.
IMPORTANT: This command must be sent to D:P:S port 1. Syntax: SEND_COMMAND <DEV>, ’PLAY_FAST_FORWARD [<channel>[,<speed>]]’Variables: <channel> = Number of the NVR channel to control. Use -1 or leave blank for all playing.<speed> = Number of frames to jump forward per update.Examples: SEND_COMMAND 5002:1:0, ’PLAY_FAST_FORWARD’ Command Response: noneStart fast forwarding the playing video.
PLAY_REWINDPlay current video backward.
IMPORTANT: This command must be sent to D:P:S port 1. Syntax: SEND_COMMAND <DEV>, ’PLAY_REWIND [<channel>[,<speed>]]Variables: <channel> = Number of the NVR channel to control. Use -1 or leave blank for all playing.<speed> = Number of frames to jump back per update.Examples: SEND_COMMAND 5002:1:0, ’PLAY_REWIND’Command Response: nonePut the current playing video into rewind mode using the last speed.
PLAY_SINGLE_STEP_FORWARDSkip a number of frames forward.
IMPORTANT: This command must be sent to D:P:S port 1. Syntax: SEND_COMMAND <DEV>, ’PLAY_SINGLE_STEP_FORWARD [<channel>[,<frames>]]’Variables: <channel> = Number of the NVR channel to control. Use -1 or leave blank for all playing.<frames> = Number of frames to jump forward. Default is 1.Examples: SEND_COMMAND 5002:1:0, ’PLAY_SINGLE_STEP_FORWARD’Command Response: noneStep a single frame forward.
Native Commands (Cont.)Port 1Command Description
NetLinx Control for N-Series Products - Documentation Addendum 10
Network Video Recorder Commands
PLAY_SINGLE_STEP_BACKWARDSkip a number of frames backward.
IMPORTANT: This command must be sent to D:P:S port 1. Syntax: SEND_COMMAND <DEV>, ’PLAY_SINGLE_STEP_BACKWARD [<channel>[,<frames>]]’Variables: <channel> = Number of the NVR channel to control. Use -1 or leave blank for all playing.<frames> = Number of frames to jump backward. Default is 1.Examples: SEND_COMMAND 5002:1:0, ’PLAY_SINGLE_STEP_BACKWARD’Command Response: noneStep a single frame backward.
PLAY_HOLDHold a channel from playing videos until a “release” command is executed. Use “PLAY_STOP <channel>” to abort the hold.
IMPORTANT: This command must be sent to D:P:S port 1. Syntax: SEND_COMMAND <DEV>, ’PLAY_HOLD [<channel>]’Variables: <channel> = Number of the NVR channel to control. Use -1 or leave blank for all playing.Examples: SEND_COMMAND 5002:1:0, ’PLAY_HOLD’Command Response: noneHold all channels from playing video until released.
PLAY_RELEASERelease a playback waiting to start. Used for playing multiple channels at the same synchronous time. Hold first, then do the commands for playback, then do the matching release command.
IMPORTANT: This command must be sent to D:P:S port 1. Syntax: SEND_COMMAND <DEV>, ’PLAY_RELEASE’Examples: SEND_COMMAND 5002:1:0, ’PLAY_RELEASE’Command Response: noneRelease all channels from play hold.
RECORDStart a single or dual recording on the given streams.
IMPORTANT: This command must be sent to D:P:S port 1. Syntax: SEND_COMMAND <DEV>, ’RECORD <channel>, <vid1stream>, <aud1stream>,
[<vid2stream>, <aud2stream>,] <duration>, <description>’Variables:<channel> = Number of the NVR channel to use for this recording.<vid1stream> = Stream number of first video stream to record.<aud1stream> = Stream number of first audio stream to record, or 0 to follow vid1stream.<vid2stream> = Stream number of second video stream to record.<aud2stream> = Stream number of second audio stream to record, or 0 to follow vid2stream.<duration> = Length of recording in seconds.<description> = Text of description in ASCII (NO SPACES ARE ALLOWED IN DESCRIPTION).Examples: SEND_COMMAND 5002:1:0, ’RECORD 0,123,0,600,TestRecording’Start a recording on channel 0, video and audio stream 123, for 10 minutes (600 seconds).
RECORD_STOPStop the current recording.
IMPORTANT: This command must be sent to D:P:S port 1. Syntax: SEND_COMMAND <DEV>, ’RECORD_STOP [<channel>]’Variables: <channel> = Number of the NVR channel to control. Use -1 or leave blank for all playing.Examples: SEND_COMMAND 5002:1:0, ’RECORD_STOP’Command Response: noneStop recording video on all channels.
Native Commands (Cont.)Port 1Command Description
NetLinx Control for N-Series Products - Documentation Addendum 11
Network Video Recorder Commands
RECORD_CONTINUOUSStart a continuous single or dual recording on the given streams. The recording contains the last <duration> time.
IMPORTANT: This command must be sent to D:P:S port 1. Syntax: SEND_COMMAND <DEV>, ’RECORD_CONTINUOUS <channel>, <vid1stream>,
Variables:<channel> = Number of the NVR channel to use for this recording.<vid1stream> = Stream number of first video stream to record.<aud1stream> = Stream number of first audio stream to record, or 0 to follow vid1stream.<vid2stream> = Stream number of second video stream to record.<aud2stream> = Stream number of second audio stream to record, or 0 to follow vid2stream.<duration> = Length of recording in seconds.<description> = Text of description in ASCII (NO SPACES ARE ALLOWED IN DESCRIPTION).Examples: SEND_COMMAND 5002:1:0, ’RECORD_CONTINUOUS 0,123,0,600,TestRecording’Command Response: noneStart a continuous recording of the last 10 minutes (600 seconds) on channel 0, video and audio stream 123.
RECORD_CONVERTStart a single or dual recording on the given streams and convert the recording to either MP4 or MOV (based on MPEG_MODE) afterward.
IMPORTANT: This command must be sent to D:P:S port 1. Syntax: SEND_COMMAND <DEV>, ’RECORD_CONVERT
Variables:<channel> = Number of the NVR channel to use for this recording.<vid1stream> = Stream number of first video stream to record.<aud1stream> = Stream number of first audio stream to record, or 0 to follow vid1stream.<vid2stream> = Stream number of second video stream to record.<aud2stream> = Stream number of second audio stream to record, or 0 to follow vid2stream.<duration> = Length of recording in seconds.<bitrate> = bps video output rate, 0=default (7,500,000 bps).<description> = Text of description in ASCII (NO SPACES ARE ALLOWED IN DESCRIPTION).Examples: SEND_COMMAND 5002:1:0, ’RECORD_CONVERT 0,123,0,600,0,TestRecording’Command Response: noneStart a recording on channel 0, video and audio stream 123, for 10 minutes. When the recording is complete, convert the recording at the default 7.5 Mbps video bitrate.
RECORD_HOLDHolds a channel from recording videos until a “release” command is executed. Use “stop:<channel>” to abort the hold.
IMPORTANT: This command must be sent to D:P:S port 1. Syntax: SEND_COMMAND <DEV>, ’RECORD_HOLD [<channel>]’Variables: <channel> = Number of the NVR channel to control. Use -1 or leave blank for all playing.Examples: SEND_COMMAND 5002:1:0, ’RECORD_HOLD’Command Response: noneHold all channel from recording video until released.
RECORD_RELEASERelease a recording waiting to start. Used for recording multiple channels at the same synchronous time. Hold first, then do the commands for record, then do the matching release command.
IMPORTANT: This command must be sent to D:P:S port 1. Syntax: SEND_COMMAND <DEV>, ’RECORD_RELEASE’Examples: SEND_COMMAND 5002:1:0, ’RECORD_RELEASE’Command Response: noneRelease all channels from record hold.
Native Commands (Cont.)Port 1Command Description
NetLinx Control for N-Series Products - Documentation Addendum 12
Network Video Recorder Commands
?MODEQuery the recording and playback mode.
IMPORTANT: This command must be sent to D:P:S port 1. Syntax: SEND_COMMAND <DEV>, ’?MODE’Variables: <mode> = The desired recording/playback mode. 1 = N1000 mode 2 = N2000 mode 3 = N3000 modeExamples: SEND_COMMAND 5002:1:0, ’?MODE’ Command Response: ’MODE-2’Values: <mode> The recording/playback mode (1 = N1000, 2 = N2000, and 3 = N3000).
?MPEG_MODE <mode>Query the conversion mode.
IMPORTANT: This command must be sent to D:P:S port 1. Syntax: SEND_COMMAND <DEV>, ’?MPEG_MODE’Examples: SEND_COMMAND 5002:1:0, ’?MPEG_MODE’Command Response: ’MPEG_MODE-mp4’Variables: <mode> = The desired conversion mode. mp4 = Convert to mp4 format. mov = Convert to mov format.
?PLAY Query the playback channels.
IMPORTANT: This command must be sent to D:P:S port 1. Syntax: SEND_COMMAND <DEV>, ’?PLAY’ Examples: SEND_COMMAND 5002:1:0, ’?PLAY’Command Response: ’PLAY-1000000000’ Indicating NVR is playing on channel 1.
?PLAY_HOLDQuery the playback channels that are in play hold.
IMPORTANT: This command must be sent to D:P:S port 1. Syntax: SEND_COMMAND <DEV>, ’?PLAY_HOLD’Examples: SEND_COMMAND 5002:1:0, ’?PLAY_HOLD’Command Response: ’PLAY_HOLD-1000000000’ Indicating NVR is holding playing on channel 1.
?RECORDQuery the recording channels.
IMPORTANT: This command must be sent to D:P:S port 1. Syntax: SEND_COMMAND <DEV>, ’?RECORD’ Examples: SEND_COMMAND 5002:1:0, ’?RECORD’Command Response: ’RECORD-1000000000’ Indicating NVR is recording on channel 1.
?RECORD_HOLDQuery the recording channels that are in record hold.
IMPORTANT: This command must be sent to D:P:S port 1. Syntax: SEND_COMMAND <DEV>, ’?RECORD_HOLD’Examples: SEND_COMMAND 5002:1:0, ’?RECORD_HOLD’Command Response: ’PLAY_HOLD-1000000000’ Indicating NVR is holding recording on channel 1.
Native Commands (Cont.)Port 1Command Description
NetLinx Control for N-Series Products - Documentation Addendum 13
Audio over IP Transceiver Commands
Audio over IP Transceiver CommandsThe following section provides information on native and string commands for the N-Series Audio over IP Transceiver (ATC) as related to NetLinx management.
Native Commands Port 1Command Description
CO <stream>Set the current output audio stream number.
IMPORTANT: This command must be sent to D:P:S port 1. Syntax: SEND_COMMAND <DEV>, ’CO <stream>’Variables: <stream> = the target stream number from 1 to 32767Examples: SEND_COMMAND 5002:1:0, ’CO 2’ Command the ATC to transmit audio on stream 2.
CA <stream> Set the current input audio stream number.
IMPORTANT: This command must be sent to D:P:S port 1. Syntax: SEND_COMMAND <DEV>, ’CA <stream>’Variables: <stream> = The target stream number from 1 to 32767. Examples: SEND_COMMAND 5002:1:0, ’CA 2’Command the ATC to receive audio stream 2.
AUDOUT_MUTESet the audio mute.
IMPORTANT: This command must be sent to D:P:S port 1. Syntax: SEND_COMMAND <DEV>, ’AUDOUT_MUTE-<ENABLE|DISABLE>’Variables: ENABLE = Enables audio mute.DISABLE = Disables audio mute. Examples: SEND_COMMAND 5002:1:0, ’AUDOUT_MUTE-ENABLE’Enables audio mute.
REBOOTReboot the device.
Syntax: SEND_COMMAND <DEV>, ’REBOOT’Variables: NoneExamples: SEND_COMMAND 5002:1:0, ’REBOOT’Reboots the device.
?AUDOUT_OUTPUTRequest the current output audio stream number.
Pass Through Commands Port 1For other commands, the NetLinx String command will interpret any existing N-Series API command. For example, to set the ATC’s master volume level for the right channel to 50, send the following string command: SEND_STRING 5002:1:0, ’mastervolright:50’
For more information, refer to the API documentation for the N4321.
N-CommandPass Through Commands Port 1The NetLinx String command will interpret any existing N-Series N-Command API command. For example, to switch the output stream to 30 of a decoder at IP address 169.254.22.30, send the following string command: SEND_STRING 5002:1:0, ’switch 169.254.22.30 25’
For more information, refer to the API documentation of N-Command.