Confidential Page 1 of 44 CommPortal User Guide INTERNAL USE ONLY – CONFIDENTIAL AND PROPRIETARY: The materials contained in this document were created for internal use only and may contain highly sensitive confidential and proprietary information and trade secrets (the “Confidential Materials”). You are not to provide the Confidential Materials, an excerpt, or any summary thereof to any third party. Any disclosure of the Confidential Materials must be limited to those employees with a need to know. Any use of these materials other than as intended or authorized herein is a violation of company policy. Welcome FairPoint Communications’ Hosted PBX provides a whole new level of control over your voice communications. Hosted PBX comes with many powerful, easy-to-use call management features. You can turn on features like Call Forwarding and Do Not Disturb, set up voicemail to email notification and delivery, review an online list of your incoming and outgoing calls, and listen to voice mail messages. With just a few clicks, you can manage your calls online. Make a call simply by clicking on a phone number. Allow incoming calls to ring both your office phone and your cell phone simultaneously. Forward calls to another number by using your computer. To get started, read this guide carefully, so you’ll be able to get the most out of all the new and exciting features of FairPoint’s Hosted PBX service. 1) PC System Requirements • Operating System – Microsoft® Windows 2000, Windows XP, Windows Vista, Windows 7 Apple® MAC OS X, Version 10.6 and 10.7 • Browser – Internet Explorer® 6.0 or above; Firefox 3.0 and above; Safari 5.0 and above (MAC only); Google Chrome (Windows XP, Windows Vista, Widows 7 only) • Plug-ins – Macromedia Flash Plug-in® 7.0 or above • JavaScript must be enabled on your browser 2) Accessing CommPortal 1. To access CommPortal, go to: https://myphone.ptldme.fpviper.com (Figure 1)
Transcript
Confidential Page 1 of 44
CommPortal User Guide INTERNAL USE ONLY – CONFIDENTIAL AND PROPRIETARY: The materials contained in this document were created
for internal use only and may contain highly sensitive confidential and proprietary information and trade secrets (the
“Confidential Materials”). You are not to provide the Confidential Materials, an excerpt, or any summary thereof to any
third party. Any disclosure of the Confidential Materials must be limited to those employees with a need to know. Any use
of these materials other than as intended or authorized herein is a violation of company policy.
Welcome FairPoint Communications’ Hosted PBX provides a whole new level of control over your voice communications. Hosted PBX comes with many powerful, easy-to-use call management features. You can turn on features like Call Forwarding and Do Not Disturb, set up voicemail to email notification and delivery, review an online list of your incoming and outgoing calls, and listen to voice mail messages. With just a few clicks, you can manage your calls online. Make a call simply by clicking on a phone number. Allow incoming calls to ring both your office phone and your cell phone simultaneously. Forward calls to another number by using your computer. To get started, read this guide carefully, so you’ll be able to get the most out of all the new and exciting features of FairPoint’s Hosted PBX service.
1) PC System Requirements
• Operating System – Microsoft® Windows 2000, Windows XP, Windows Vista,
Windows 7
Apple® MAC OS X, Version 10.6 and 10.7 • Browser – Internet Explorer® 6.0 or above; Firefox 3.0 and above; Safari 5.0 and
above (MAC only); Google Chrome (Windows XP, Windows Vista, Widows 7 only) • Plug-ins – Macromedia Flash Plug-in® 7.0 or above • JavaScript must be enabled on your browser
2) Accessing CommPortal
1. To access CommPortal, go to: https://myphone.ptldme.fpviper.com (Figure 1)
Confidential Page 2 of 44
CommPortal User Guide
Figure 1 - Login
2. Enter your 10-digit phone number 3. Enter your CommPortal password
a. your starter Password will be provided by your FairPoint Hosted Support Consultant
4. Click Login 5. For security, be sure to change your starter password right away using directions
provided in the settings section of this guide
3) CommPortal Overview
When you first login, the CommPortal dashboard provides a quick, at-a-glance summary of your messages, missed calls, contacts and phone settings (Figure 2). Along the top of the window you will see a series of tabs used to access the powerful options within CommPortal.
• Dashboard - the at-a-glance summary you see at login • Messages & Calls - see all of your voice & fax messages, and the calls you’ve
made, answered or missed • Contacts - add and view all of your contacts & their phone numbers • Call Manager* - configure the services on your phone line, like Call
Forwarding & Selective Call Rejection • Applications* - download any applications that you have purchased with
your service • Groups+ – see all Call Pick-Up Groups and Multi-Line Hunt Groups (MLHG)
that your line is a member of • Settings - access numerous other options, such as changing your PIN,
selecting voice mail notification options, selecting some mailbox options, and creating Reminders
++ Features available in these tabs will vary based on the type of line you have
purchased.
Confidential Page 3 of 44
CommPortal User Guide ++ The Groups tab is displayed only if your line is a member of a CPUG or MLHG.
Figure 2 - Dashboard
4) Click-to-Dial
You can make a phone call from any tab within CommPortal using the click-to-dial icon that appears at the top of every page. To make a click-to-dial call from CommPortal:
1. Click on the Call icon. 2. Enter the number you want to call in the window that pops up (Figure 3). 3. Click Dial. 4. A box will open letting you know that the call is being placed and system will ring
your phone. 5. As soon as you answer, the number you are calling will ring. 6. Note: While the number you have called is ringing, you will see the message:
“Ringing 3rd party.” Once the call is answered, you will see the message “Connected”.
Click-to-dial also allows you to make calls using any phone while making the calls appear to come from your business line. This other phone could be your cell phone, a payphone, or your home number.
Confidential Page 4 of 44
CommPortal User Guide To make a click-to-dial call from another phone:
1. Click on the Call icon. 2. Select Change 3. Enter the number you want to call in the window that pops up (Figure 16). 4. Note: Remember to enter that number based on the dial plan of your Business
Group. For example, to call from a local number that is not part of your group, you should use 9+ the 7 digits or to call from another extension in your business, you might enter the 3 digit extension number.
5. Click Dial. 6. A box will open letting you know that the call is being placed and the system will
ring your phone. 7. As soon as you answer, the number you are calling will ring.
Figure 3 – Click-to-Dial
5) Dashboard
The CommPortal dashboard provides a quick, at-a-glance summary of your messages, missed calls, contacts and phone settings (Figure 2). In the top left corner of the Dashboard, you can see if you have any new voice messages (Figure 4). To view and listen to new messages from the Dashboard:
1. Click on the messages link. 2. This link takes you directly to the Messages & Calls tab. 3. Review messages as described in the Messages & Calls section of this guide.
Confidential Page 5 of 44
CommPortal User Guide
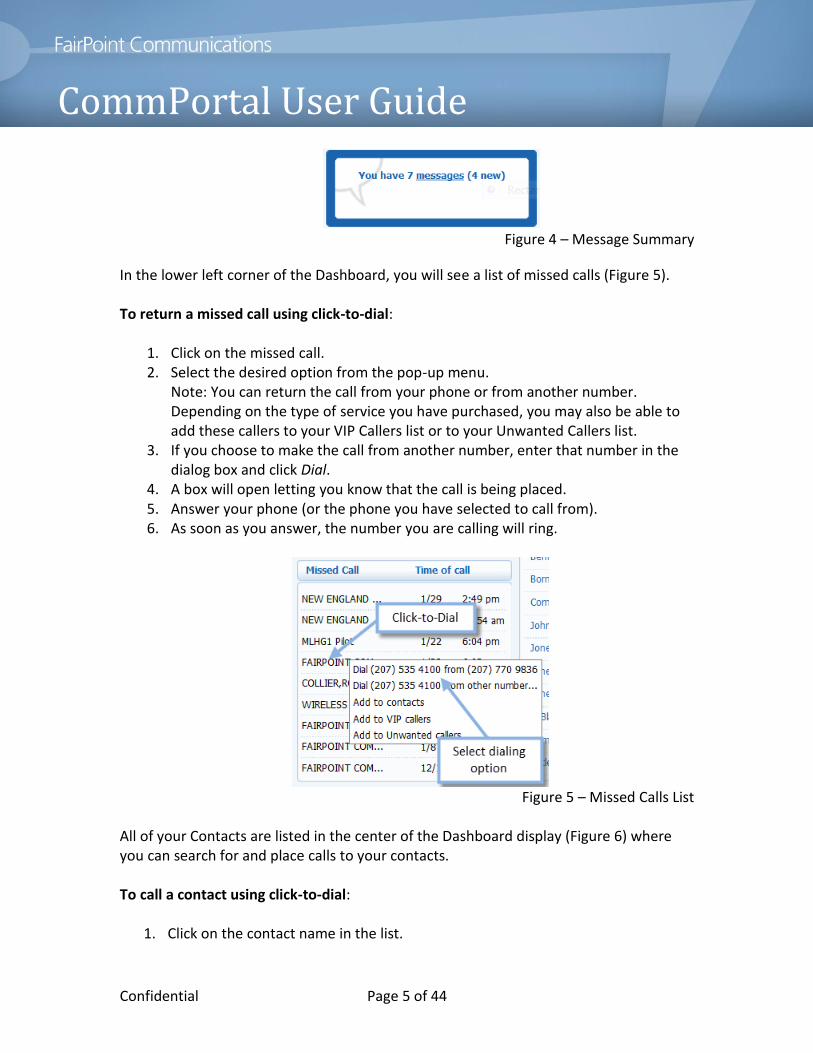
Figure 4 – Message Summary
In the lower left corner of the Dashboard, you will see a list of missed calls (Figure 5). To return a missed call using click-to-dial:
1. Click on the missed call. 2. Select the desired option from the pop-up menu.
Note: You can return the call from your phone or from another number. Depending on the type of service you have purchased, you may also be able to add these callers to your VIP Callers list or to your Unwanted Callers list.
3. If you choose to make the call from another number, enter that number in the dialog box and click Dial.
4. A box will open letting you know that the call is being placed. 5. Answer your phone (or the phone you have selected to call from). 6. As soon as you answer, the number you are calling will ring.
Figure 5 – Missed Calls List
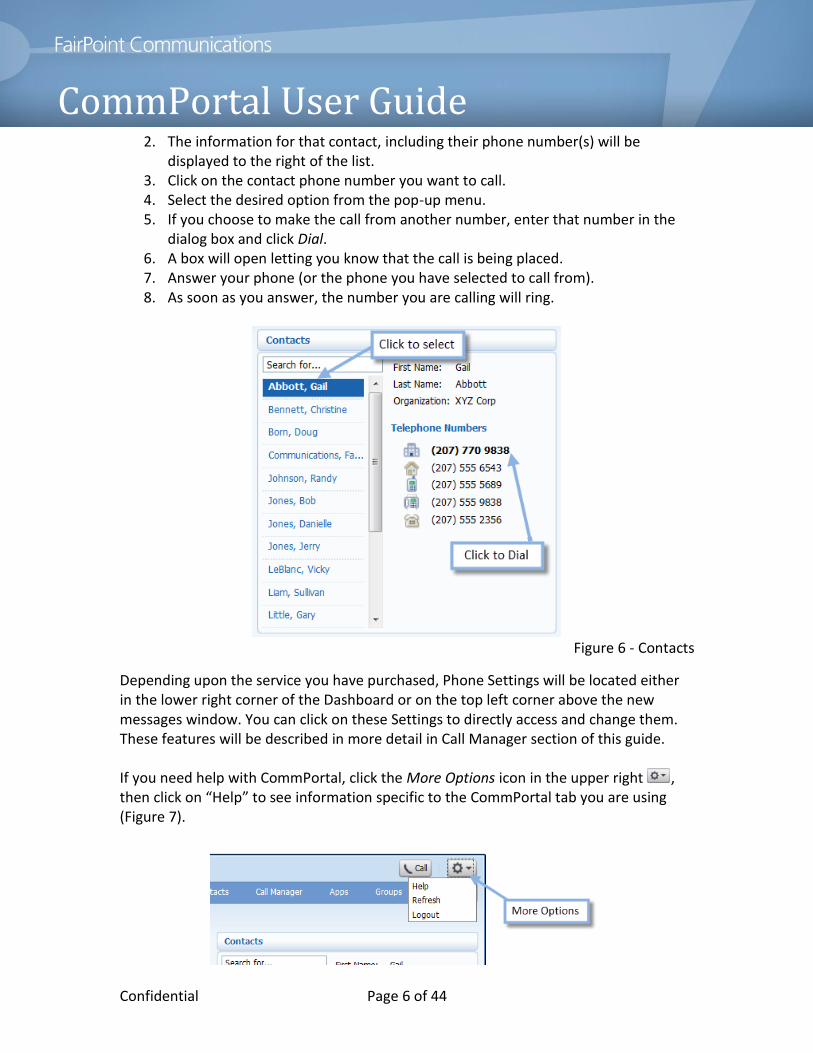
All of your Contacts are listed in the center of the Dashboard display (Figure 6) where you can search for and place calls to your contacts. To call a contact using click-to-dial:
1. Click on the contact name in the list.
Confidential Page 6 of 44
CommPortal User Guide 2. The information for that contact, including their phone number(s) will be
displayed to the right of the list. 3. Click on the contact phone number you want to call. 4. Select the desired option from the pop-up menu. 5. If you choose to make the call from another number, enter that number in the
dialog box and click Dial. 6. A box will open letting you know that the call is being placed. 7. Answer your phone (or the phone you have selected to call from). 8. As soon as you answer, the number you are calling will ring.
Figure 6 - Contacts
Depending upon the service you have purchased, Phone Settings will be located either in the lower right corner of the Dashboard or on the top left corner above the new messages window. You can click on these Settings to directly access and change them. These features will be described in more detail in Call Manager section of this guide. If you need help with CommPortal, click the More Options icon in the upper right , then click on “Help” to see information specific to the CommPortal tab you are using (Figure 7).
Confidential Page 7 of 44
CommPortal User Guide Figure 7 – More Options
If you don’t use CommPortal for 30 minutes, the system will automatically log you out. However, if you wish to manually log out, you can do so by clicking the More Options icon, then click Logout. Helpful Hint: Refresh your screen periodically to display new calls and messages.
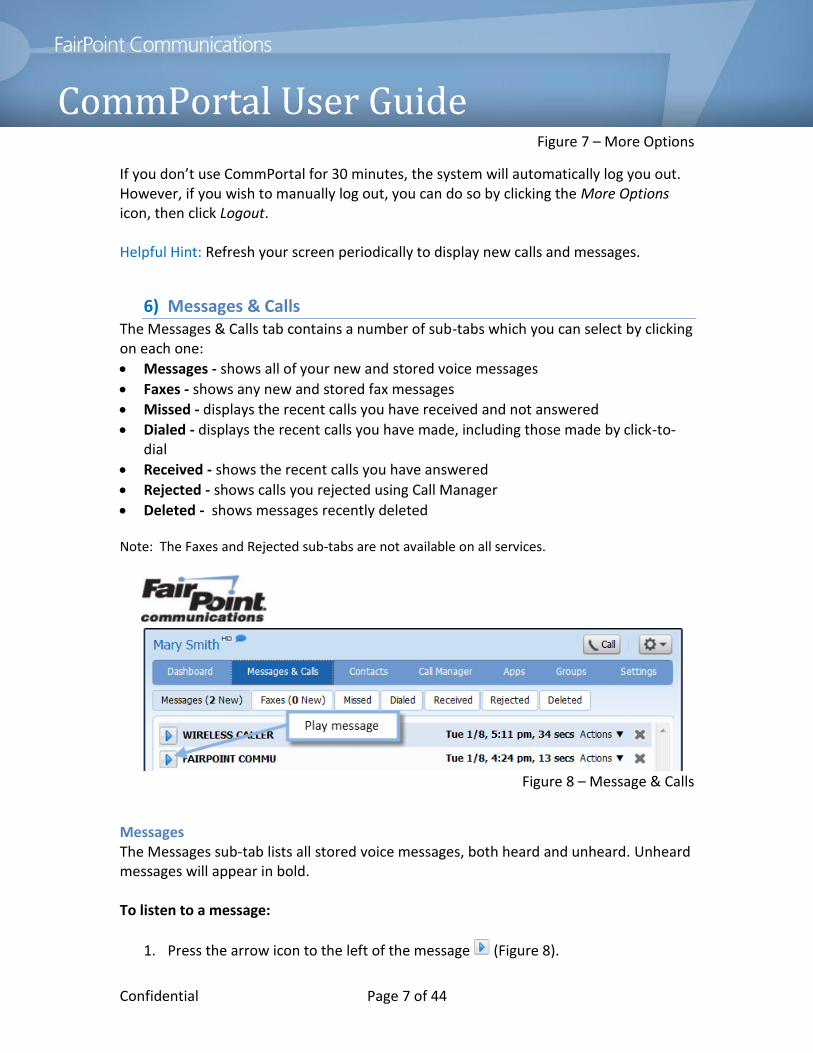
6) Messages & Calls The Messages & Calls tab contains a number of sub-tabs which you can select by clicking on each one:
Messages - shows all of your new and stored voice messages
Faxes - shows any new and stored fax messages
Missed - displays the recent calls you have received and not answered
Dialed - displays the recent calls you have made, including those made by click-to-dial
Received - shows the recent calls you have answered
Rejected - shows calls you rejected using Call Manager
Deleted - shows messages recently deleted Note: The Faxes and Rejected sub-tabs are not available on all services.
Figure 8 – Message & Calls
Messages The Messages sub-tab lists all stored voice messages, both heard and unheard. Unheard messages will appear in bold. To listen to a message:
1. Press the arrow icon to the left of the message (Figure 8).
Confidential Page 8 of 44
CommPortal User Guide 2. The voice mail player will open to play messages (Figure 9). 3. During message playback you have the following options: pause, raise or lower
the volume, delete, skip forward to the next message or skip back to the previous message.
4. Other options for the message include: reply to the message, mark the message as new, forward the message as email, forward the message as voicemail, or save the message to your computer. Simply press the down arrow to the right of the trashcan (Figure 8) to select one of these options from the pop-up menu.
Figure 9 – Voicemail Player
Note that if your account has speech-to-text selected (see Settings), the voicemail player will also display the transcription of the first 10 seconds of your message. On the Messages & Calls list, you can also take several actions with a message. To
delete a voice mail message from the Messages & Calls list, simply click the icon to the right of the message. For other actions, click the “Actions” arrow where you can reply to a message, mark the message as new, forward the message as an email or forward the message as a voicemail.
You can also return a call to a caller who has left you a message using click-to-dial. Simply click once on the message then select the desired call back option from the pop-up menu. You also have the option in this pop-up menu to add the caller to your contact list. Depending on the service you have purchased, you may also be able to add the caller to your VIP callers list or to your Unwanted callers list.
Faxes You will only see the Faxes sub-tab if the service you have purchased includes fax service. This sub-tab allows you to view both read and unread faxes, with handling options similar to voicemail messages. Faxes are stored in PDF file format.
Other Lists Additional sub-tabs under Messages & Calls include: Missed, Dialed, Rejected and Deleted. The Missed sub-tab shows recent calls that you have received but did not answer. As with the other tabs, if a caller is included in your Contacts list, then their name will be
Confidential Page 9 of 44
CommPortal User Guide shown instead of their Caller ID, with an icon indicating which of that Contact’s numbers
they used to call you: Home , Work , Mobile , Fax or Other . The Dialed sub-tab shows recent calls you have made, including any you made using click-to-dial. Note that the maximum number of calls stored in the Dialed list will never exceed 10. The Received sub-tab shows all calls that you have answered. The Rejected sub-tab shows calls you chose to reject using a Call Manager service (not applicable to all services). Depending upon your Call Manager services, you may see a longer list of numbers in the Missed, Received and Rejected sub-tabs. The Deleted sub-tab shows all voice messages and faxes that you have deleted recently. Messages remain in this tab for about 7 days after you delete them. During that period, you may restore them to the Messages sub-tab or permanently delete them. Once permanently deleted, messages are no longer available to be recovered. Helpful Hint: If you need to save an old message that is about to age off, play the message. In the voice mail player window, use the down arrow to the right of the trash can to save the message to your computer (see Figure 9).
7) Contacts The Contacts tab consists contains a number of useful sub-tabs:
Contact List - manage people and groups in your personal contact list
Speed Dials – configure and manage your numeric speed dials
Extensions – see the complete list of extensions within your business
Short Codes - see your business’s numeric speed dials
Contact List From this tab you can add a new contact or group, import and export contacts, as well as edit and delete contacts and groups. The Contact List displays all of your contacts and allows you to search for a name. You can use this search feature from your contact list on the Dashboard or within the Contacts tab. You can add Contacts to your list in several ways. You can add contacts from the Messages list, the Missed calls list, the Dialed calls list and from the Received calls list. You can also add contacts directly in the Contacts tab by using the New Contacts button. To add contacts from any list:
1. Click on the phone number of your caller. 2. A pop-up menu will appear (see Figure 10).
Confidential Page 10 of 44
CommPortal User Guide 3. Click on “Add to contacts”. 4. Complete the appropriate fields in the contact record as described later in this
section. 5. Be sure to click Save when done.
Figure 10 – Add to Contacts from Dialed List
To manually add someone directly to your contact list:
1. Click New Contact at the bottom of the Contact List sub-tab (Figure 11). 2. Enter information in the fields provided (Figure 12). 3. Click the radio button to the right of the main or primary phone number of your
contact. 4. Scroll down to enter email and address information. 5. When done, click Save.
Figure 11 – Add a New Contact or Group
Confidential Page 11 of 44
CommPortal User Guide
Figure 12 – Complete Contact Record
Helpful Hint: If you plan to include a contact in a Group (Figure 15), particularly a Group you plan to use for sending group messages from your voicemail mailbox, be sure to select the phone number with their mailbox on it as the “main” number in their contact record. To edit a contact:
1. Click on the name in your contact list that you want to update. 2. Click Edit. 3. Make changes to fields as applicable. 4. Click on the Save button to complete your update.
To delete a contact:
1. Click on the name in your contacts list that you want to remove. 2. Click Delete. 3. The system will ask you to confirm that you want to delete this contact. 4. Click Delete to confirm or Cancel to keep the contact.
You can use click-to-dial to call a contact directly from your Contacts list, either from the Dashboard or within the Contacts tab.
Confidential Page 12 of 44
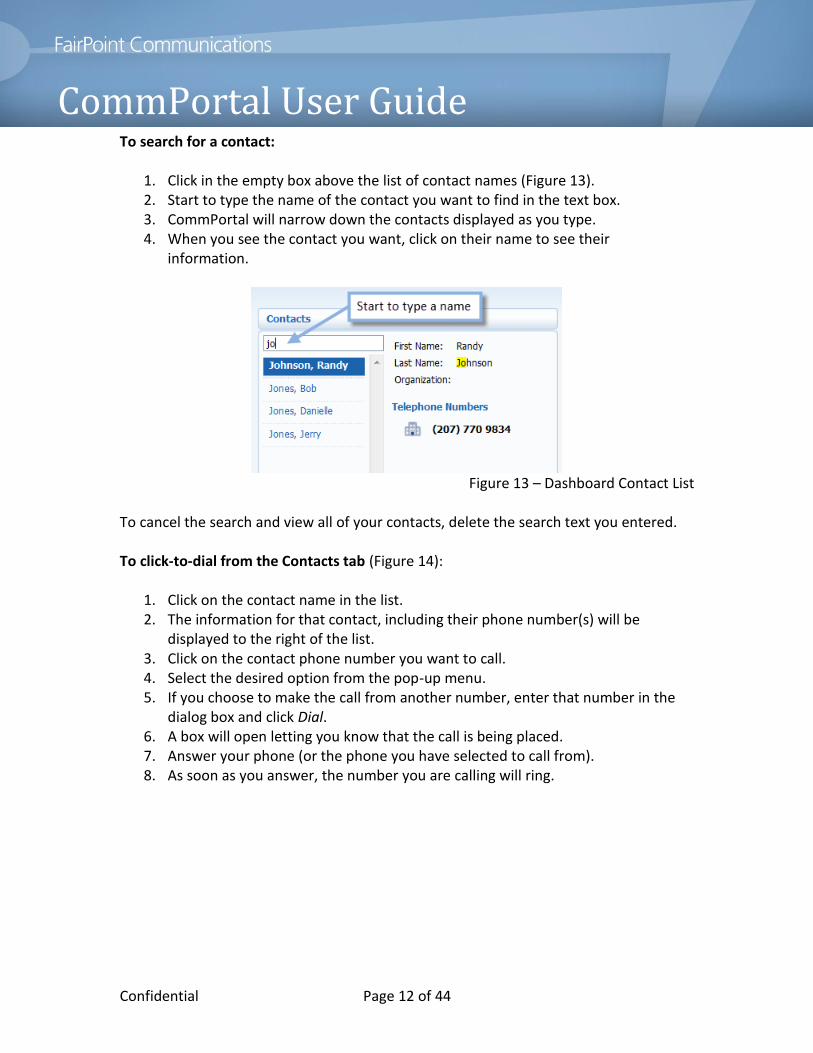
CommPortal User Guide To search for a contact:
1. Click in the empty box above the list of contact names (Figure 13). 2. Start to type the name of the contact you want to find in the text box. 3. CommPortal will narrow down the contacts displayed as you type. 4. When you see the contact you want, click on their name to see their
information.
Figure 13 – Dashboard Contact List
To cancel the search and view all of your contacts, delete the search text you entered. To click-to-dial from the Contacts tab (Figure 14):
1. Click on the contact name in the list. 2. The information for that contact, including their phone number(s) will be
displayed to the right of the list. 3. Click on the contact phone number you want to call. 4. Select the desired option from the pop-up menu. 5. If you choose to make the call from another number, enter that number in the
dialog box and click Dial. 6. A box will open letting you know that the call is being placed. 7. Answer your phone (or the phone you have selected to call from). 8. As soon as you answer, the number you are calling will ring.
Confidential Page 13 of 44
CommPortal User Guide
Figure 14 – Click-to-dial from Contacts
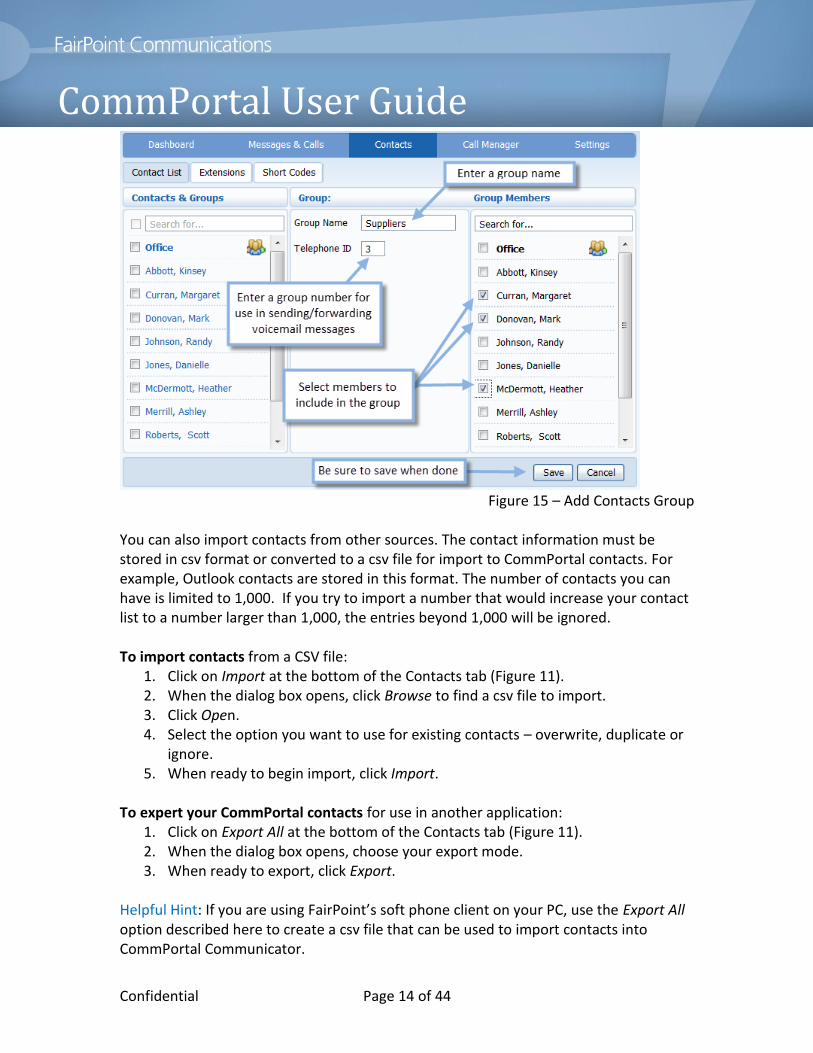
You can manage your contacts by assigning them to groups. This comes in handy when you have a long list of contacts. For example, you might set up a group for all of your suppliers or you might set up a group for your VIP customers. To create a Group:
1. Click on New Group at the bottom of the Contacts tab (Figure 11). 2. Enter a name for the group, such as Suppliers. 3. If you want to use this group to send voicemail messages to all members of the
group from your mailbox, enter a numeric Telephone ID.
Note: This ID can be any number from 1 to 3 for Advantage customers, from 1-6 for Advantage Plus customers, and from 1-10 for Advantage Premium customers.
Note: Advantage customers can include up to 50 members in a group. Advantage Plus and Premium customers can include up to 100 members in a group.
4. Scroll through your Contacts on the right and check the box for each contact to include in this Group (Figure 15).
5. When done, click Save.
Confidential Page 14 of 44
CommPortal User Guide
Figure 15 – Add Contacts Group
You can also import contacts from other sources. The contact information must be stored in csv format or converted to a csv file for import to CommPortal contacts. For example, Outlook contacts are stored in this format. The number of contacts you can have is limited to 1,000. If you try to import a number that would increase your contact list to a number larger than 1,000, the entries beyond 1,000 will be ignored. To import contacts from a CSV file:
1. Click on Import at the bottom of the Contacts tab (Figure 11). 2. When the dialog box opens, click Browse to find a csv file to import. 3. Click Open. 4. Select the option you want to use for existing contacts – overwrite, duplicate or
ignore. 5. When ready to begin import, click Import.
To expert your CommPortal contacts for use in another application:
1. Click on Export All at the bottom of the Contacts tab (Figure 11). 2. When the dialog box opens, choose your export mode. 3. When ready to export, click Export.
Helpful Hint: If you are using FairPoint’s soft phone client on your PC, use the Export All option described here to create a csv file that can be used to import contacts into CommPortal Communicator.
Confidential Page 15 of 44
CommPortal User Guide
Speed Dials The Speed Dials sub-tab allows you to configure numeric speed dials. They are different from speed dials which are assigned to particular keys on your phone. Depending upon your line service, you may have Speed Dial 8 or Speed Dial 30. Both Speed Dial 8 and Speed Dial 30 can be set up through the CommPortal or from you telephone handset. All numbers programmed from the handset, in CommPortal Communicator, or directly in the Speed Dials sub-tab will be displayed in the portal. With Speed Dial 8, you may assign a single digit code from 2-9. With Speed Dial 30, you may assign a two digit code from 20 to 49 (Figure 16). To create a speed dial entry:
1. Go to the Speed Dials sub-tab. 2. In the Number field, enter the phone number as you would dial it from your line.
For example, if you dial 9 before a number, enter 9 and the number here. 3. Use the next available speed dial code or select from the drop down menu. 4. Click Add to include this number to your Speed Dials list. 5. Repeat these steps for any other speed dial you want to set up. 6. When done, click Apply to save your changes.
Note: If you enter a phone number that is not in the correct format for your dialing plan, you will see an error message when you try to Apply the change. You should edit or delete that number before continuing.
Confidential Page 16 of 44
CommPortal User Guide
Figure 16 – Speed Dials
To delete a number from the Speed Dials list:
1. Click on the icon to the right of the number in the list that you want to delete, or click Clear List to delete the entire list.
2. Click Apply to save your changes before leaving the Speed Dials sub-tab.
Extensions & Short Codes The Extensions sub-tab lists of all the extensions in your business. Your administrator sets up these extensions. You can use click-to-dial to call any of these extensions. Simply click on the extension number you wish to call, then select the dialing option from the pop-up menu.
Your phone system also supports Short Codes. These are short numbers (usually 3, 4 or 5 digits) which are speed dials that can be used from any phone in your business. They are set up by your administrator and you can view them in CommPortal.
Confidential Page 17 of 44
CommPortal User Guide 8) Call Manager Find-Me-Follow-Me
Business Advantage service includes a simple yet powerful suite of features that allow you to control where and how callers can reach you. You can set forwarding options and ring several phones at the same time. Summary The Summary sub-tab provides a description of how calls you receive will be handled based on the settings for all of your incoming call services. It will also identify any interactions among them.
This summary (Figure 17) enables you to confirm that services you have configured will have the desired effect on your calls. If the description does not match the behavior you would expect, then it is possible that services you have configured are interacting or overriding one another. If a service is interacting with another service, or being
overridden, then a icon will appear on the configuration page for that service. Click this icon for further information.
Figure 17 – Call Manager Summary tab
Forwarding In the Forwarding tab, Business Advantage user can control the following call forwarding services:
Immediate - calls are forwarded as soon as you receive them
CommPortal User Guide Busy - calls are forwarded whenever your line is busy No Answer - calls are forwarded if you do not answer your phone within a
certain time Unavailable - calls are forwarded if your phone is unavailable (e.g. it is
unplugged or loses power)
Unless you specified otherwise when ordering your service, your account automatically comes with Busy, No Answer and Unavailable forwarding to voicemail. You can configure a different number for Busy, No Answering, and/or Unavailable forwarding at any time and this number will override forwarding to voice mail (Figure 18).
Figure 18 – Busy and No Answer Forwarding
To turn on Busy and/or Don’t Answer Forwarding:
1. Go to the Forwarding sub-tab and click Busy/No Answer. 2. Select to use the same call forwarding destination for both services (by checking
the box) or decide to enter a different number for each service. 3. Under Forward calls when no answer, select to forward calls by checking the
box. 4. Using the drop down menu, select a destination to forward calls to (if you have
programmed Forwarding Destinations as described later in this next section) or select Other to manually enter a phone number.
5. If you select Other, enter the number as you would dial it from your phone.
CommPortal User Guide 6. Enter a number of seconds to let the phone ring before forwarding (each ring is
about 6 seconds so 24 seconds is about 4 rings). 7. If you have decided to use different numbers for Busy and Don’t Answer
Forwarding, repeat steps 4 and 5 for Busy forwarding. 8. Click Apply.
When you want calls to be forwarded to voicemail again, simply remove the check mark(s) and click Apply.
To configure Unavailable forwarding:
1. Go to the Forwarding sub-tab and click Unavailable. 2. Click to check the box to forward calls if your phone is unavailable. 3. Using the drop down menu, select a destination to forward calls to (if you have
programmed Forwarding Destinations as described later in this section) or select Other to manually enter a phone number.
4. If you select Other, enter the number as you would dial it from your phone. 5. Click Apply.
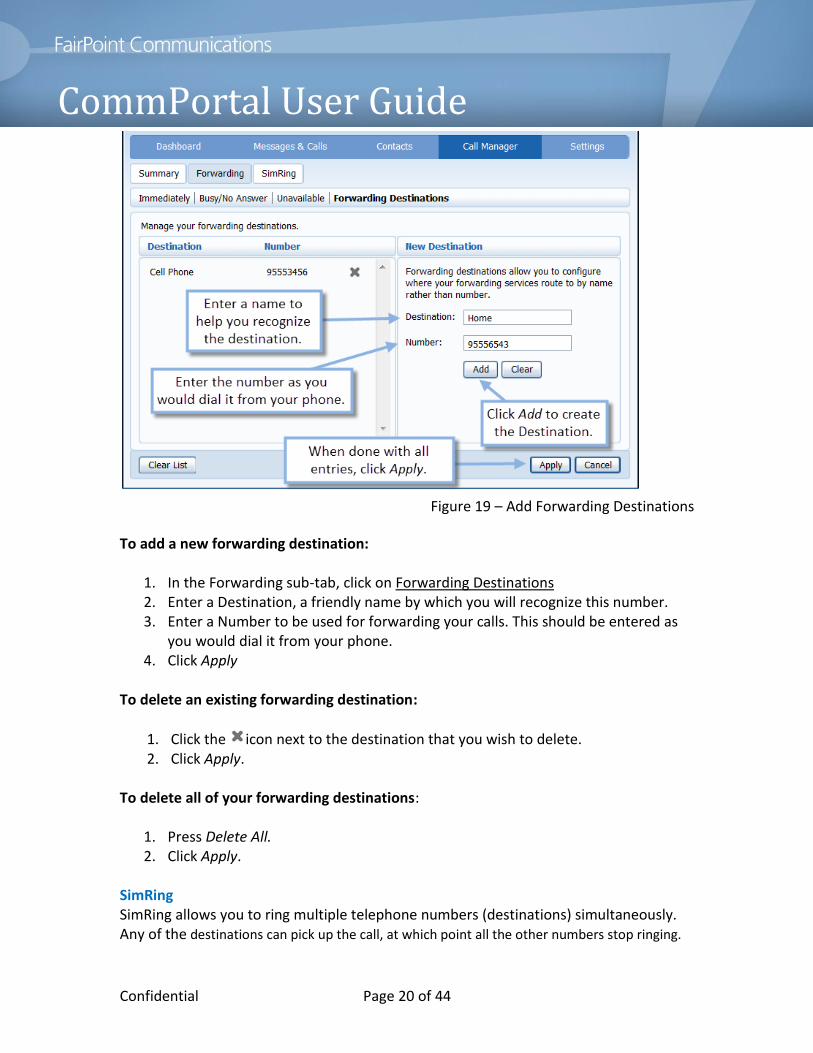
The Forwarding tab also provides access to your Forwarding Destinations (Figure 19). These are numbers that you regularly forward calls to. Pre-configure them here for ease of use throughout Call Manager. If you frequently forward your calls to certain numbers (for example your home or mobile number), configuring them as forwarding destinations makes your others services easier to use.
Confidential Page 20 of 44
CommPortal User Guide
Figure 19 – Add Forwarding Destinations
To add a new forwarding destination:
1. In the Forwarding sub-tab, click on Forwarding Destinations 2. Enter a Destination, a friendly name by which you will recognize this number. 3. Enter a Number to be used for forwarding your calls. This should be entered as
you would dial it from your phone. 4. Click Apply
To delete an existing forwarding destination:
1. Click the icon next to the destination that you wish to delete. 2. Click Apply.
To delete all of your forwarding destinations:
1. Press Delete All. 2. Click Apply.
SimRing SimRing allows you to ring multiple telephone numbers (destinations) simultaneously. Any of the destinations can pick up the call, at which point all the other numbers stop ringing.
Confidential Page 21 of 44
CommPortal User Guide To use this service, you must add one or more destinations (Figure 20). Your own number will always ring, so you should not include it in your list of destinations.
Figure 20 – Add SimRing Destinations
To add a SimRing Destination:
1. In the SimRing sub-tab, check the box to allow SimRing to ring other lines for incoming calls.
2. Select a Destination to ring from the drop down menu. 3. If you select Other, enter a phone number in the box provided. This number
should be entered as you would dial it from your phone. 4. Select to permit forwarding or not. This defines whether or not this destination is
allowed to forward the call (e.g. to voicemail or to another telephone number). 5. Enter a Description. This is a friendly name by which you will recognize this
number in your SimRing list. You may leave this field blank. 6. When done, click Add. 7. To define additional SimRing destinations, repeat steps 2 through 6. 8. When you have finished defining all destinations, click Apply.
To delete an existing SimRing destination, click the icon next to the entry that you wish to delete. To delete all of your SimRing destinations, just press Clear List.
Confidential Page 22 of 44
CommPortal User Guide
9) Easy Call Manager Business Advantage Plus and Business Advantage Premium services include Easy Call Manager, a powerful easy-to-use tool that lets you control when and how your callers reach you. In the Call Manager tab, you can quickly change your status from Available to Do Not Disturb, or Forward calls to another number (Figure 21). Your account is automatically set to Available, but you can change that by clicking your selection in the menu to the left.
Figure 21 – Easy Call Manager
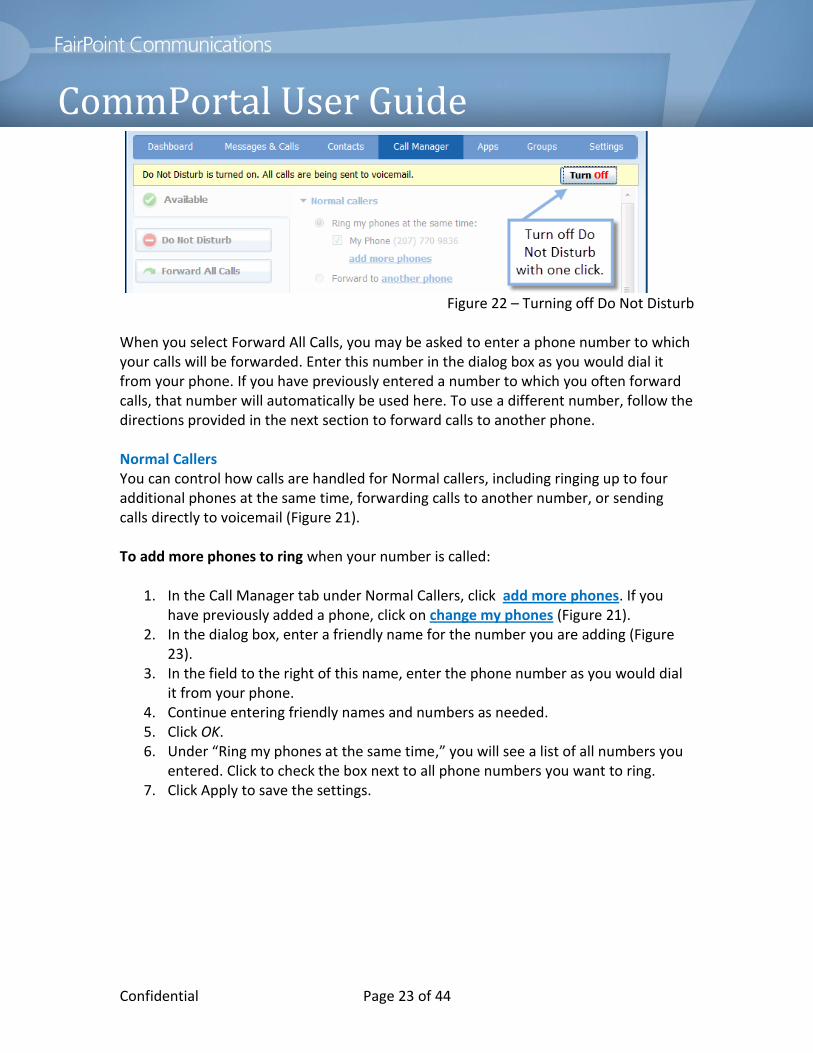
While Do Not Disturb is turned on, your phone will not ring and all callers will be sent to voicemail. To turn off Do Not Disturb, simply click Turn Off in the top right corner (Figure 22).
Confidential Page 23 of 44
CommPortal User Guide
Figure 22 – Turning off Do Not Disturb
When you select Forward All Calls, you may be asked to enter a phone number to which your calls will be forwarded. Enter this number in the dialog box as you would dial it from your phone. If you have previously entered a number to which you often forward calls, that number will automatically be used here. To use a different number, follow the directions provided in the next section to forward calls to another phone. Normal Callers You can control how calls are handled for Normal callers, including ringing up to four additional phones at the same time, forwarding calls to another number, or sending calls directly to voicemail (Figure 21). To add more phones to ring when your number is called:
1. In the Call Manager tab under Normal Callers, click add more phones. If you have previously added a phone, click on change my phones (Figure 21).
2. In the dialog box, enter a friendly name for the number you are adding (Figure 23).
3. In the field to the right of this name, enter the phone number as you would dial it from your phone.
4. Continue entering friendly names and numbers as needed. 5. Click OK. 6. Under “Ring my phones at the same time,” you will see a list of all numbers you
entered. Click to check the box next to all phone numbers you want to ring. 7. Click Apply to save the settings.
Confidential Page 24 of 44
CommPortal User Guide
Figure 23 – Adding phone for simultaneous ringing
To forward calls to another phone (Figure 21):
1. Select Forward to another phone. 2. If you have NOT previously entered a phone number
i. Click on another phone ii. In the dialog box, enter a phone number as you would dial it from your
phone. iii. Click OK
3. If you HAVE previously entered a phone number BUT want to change it i. Click on that phone number (e.g. 95551234).
ii. In the dialog box, enter a new number as you would dial it from your phone.
iii. Click OK 4. Click Apply to save the setting.
To send calls to voicemail, simply select that option and click Apply. Special Call Handling Rules In addition to establishing rules for normal callers, you can set special handling rules to ask anonymous callers to record their name before reaching you (Figure 21), treat VIP callers differently from normal callers, and reject or send Unwanted callers directly to
Confidential Page 25 of 44
CommPortal User Guide voicemail. You can also manage call handling when your phone is busy or you cannot answer (Figure 24).
Figure 24 – VIP, Unwanted and Additional Options
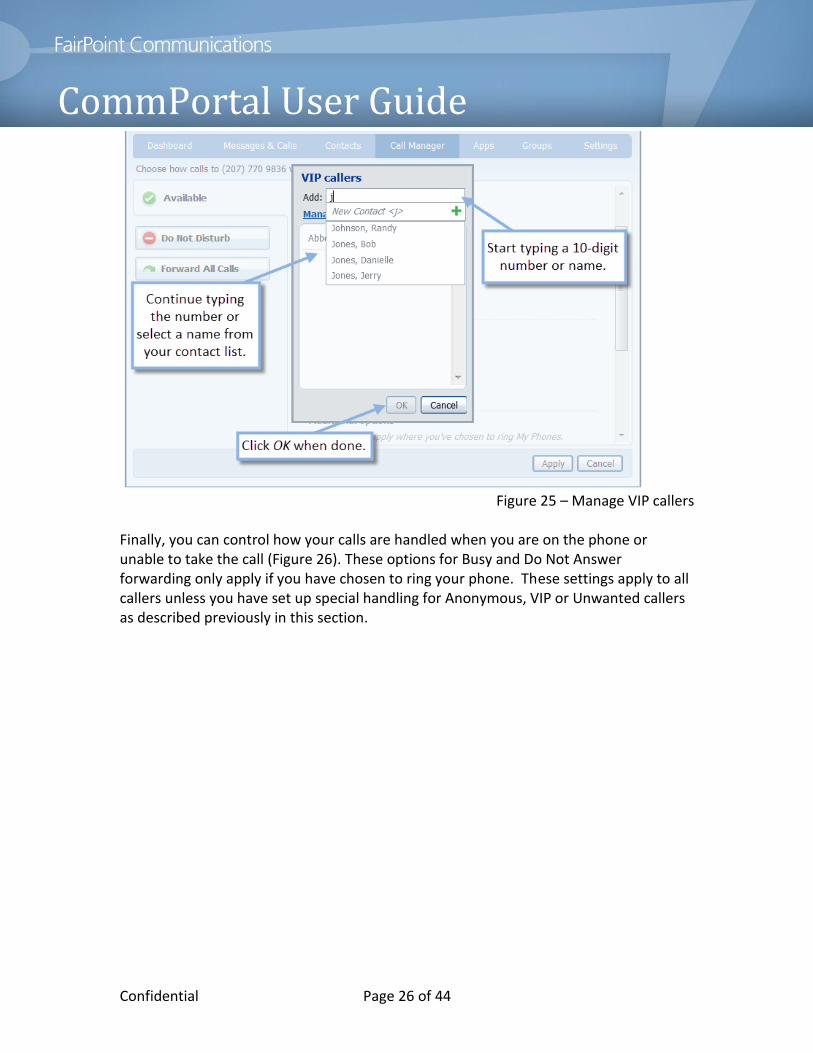
To manage lists for VIP callers and Unwanted callers:
1. On the Call Manger tab, click on Manage VIP callers or Manage Unwanted callers (Figure 24).
2. In the dialog box, type the 10-digit number or start to type a name from your contact list.
3. Finish typing the number, or click on a name in the drop down box to select from your contact list (Figure 25).
4. If the number was not in your contact list: i. Click the icon
ii. Enter first and last name in the boxes provided iii. Click Add
5. Click OK. 6. Click Apply.
Confidential Page 26 of 44
CommPortal User Guide
Figure 25 – Manage VIP callers
Finally, you can control how your calls are handled when you are on the phone or unable to take the call (Figure 26). These options for Busy and Do Not Answer forwarding only apply if you have chosen to ring your phone. These settings apply to all callers unless you have set up special handling for Anonymous, VIP or Unwanted callers as described previously in this section.
Confidential Page 27 of 44
CommPortal User Guide
Figure 26 – Additional Options
10) PC & Mobile Apps Applications available to you will depend upon the services your business has purchased. Applications are available for your computer, your mobile phone and your tablet. From the Apps tab, click on View Apps to see what is available to you (Figure 27).
Figure 27 – Apps tab
Confidential Page 28 of 44
CommPortal User Guide Apps that may be available to you include CommPortal Assistant and CommPortal Communicator for your computer, and Accession Communicator Mobile for your mobile device. Desktop applications are currently available for Windows XP, Vista, Windows 7 and Windows 8. Mobile apps are available for both Android and iPhone. To download the applications to your computer, click on the link provided (Figure 28). You can choose to Run the installation directly from the portal or Save the file locally to launch and install. Additional directions for downloading computer applications can be found in:
CommPortal Communicator Installation Guide
CommPortal Assistant Installation Guide
Figure 28 – Apps on your computer
To download the application to you cell phone or tablet, click on the link provided (Figure 29) and follow on-screen directions. Additional directions for downloading mobile applications can be found in Accession Communicator Installation Guide.
Confidential Page 29 of 44
CommPortal User Guide
Figure 29 – Apps on your Mobile
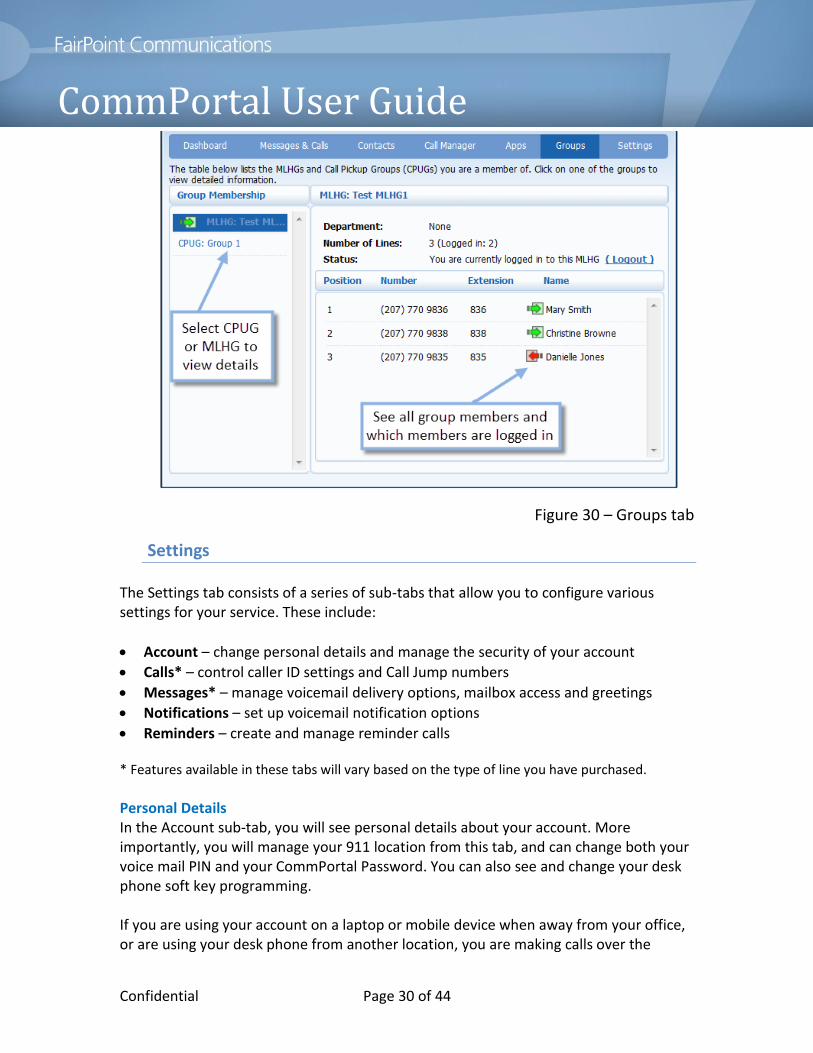
11) Groups If your line has been included in a Call Pick-Up Group (CPUG) or in a Multi-Line Hunt Group (MLHG), you will see the Groups tab displayed in your window. This tab lists all of the MLHGs and Call Pick-Up Groups that you are a member of. You can see which other lines in your business are also members of these groups. For MLHGs, you will see which other users are logged into the group and available to take calls (Figure 30).
Confidential Page 30 of 44
CommPortal User Guide
Figure 30 – Groups tab
Settings The Settings tab consists of a series of sub-tabs that allow you to configure various settings for your service. These include:
Account – change personal details and manage the security of your account
Calls* – control caller ID settings and Call Jump numbers
Messages* – manage voicemail delivery options, mailbox access and greetings
Notifications – set up voicemail notification options
Reminders – create and manage reminder calls * Features available in these tabs will vary based on the type of line you have purchased. Personal Details In the Account sub-tab, you will see personal details about your account. More importantly, you will manage your 911 location from this tab, and can change both your voice mail PIN and your CommPortal Password. You can also see and change your desk phone soft key programming. If you are using your account on a laptop or mobile device when away from your office, or are using your desk phone from another location, you are making calls over the
Confidential Page 31 of 44
CommPortal User Guide internet. Emergency services may not be able to trace a 911 call to your location. Use the set location link to set your current address and make sure a 911 call is routed to a local emergency operator (Figure 31).
Figure 31 – Set 911 Location
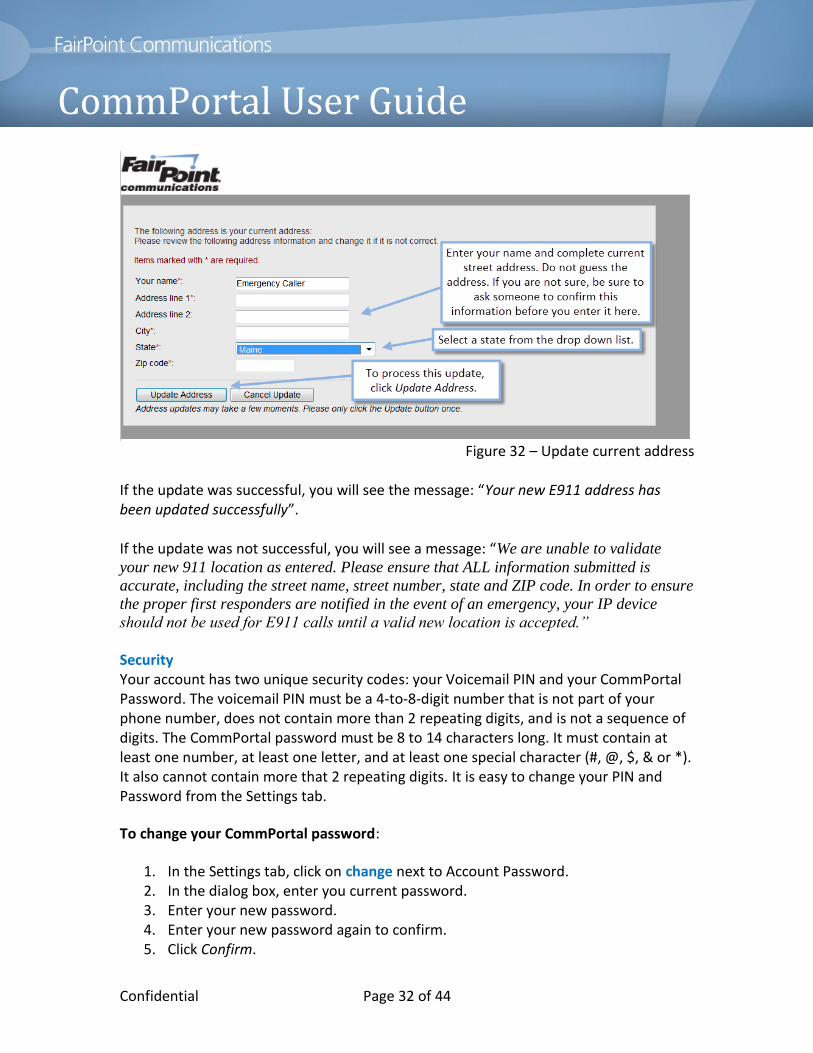
To change your location:
1. In the Settings tab, click on set location. 2. An address screen will open (Figure 32). 3. Add or update address information, as required, to show your current location. 4. Select a state from the drop down list. 5. When done, click Update Address. 6. Your browser may present a Security Warning or two about Trusted sites list.
Click Yes to allow. 7. A new 911 Information change tab will open in your browser. Click on the tab to
view the message.
Confidential Page 32 of 44
CommPortal User Guide
Figure 32 – Update current address
If the update was successful, you will see the message: “Your new E911 address has been updated successfully”. If the update was not successful, you will see a message: “We are unable to validate
your new 911 location as entered. Please ensure that ALL information submitted is
accurate, including the street name, street number, state and ZIP code. In order to ensure
the proper first responders are notified in the event of an emergency, your IP device
should not be used for E911 calls until a valid new location is accepted.”
Security Your account has two unique security codes: your Voicemail PIN and your CommPortal Password. The voicemail PIN must be a 4-to-8-digit number that is not part of your phone number, does not contain more than 2 repeating digits, and is not a sequence of digits. The CommPortal password must be 8 to 14 characters long. It must contain at least one number, at least one letter, and at least one special character (#, @, $, & or *). It also cannot contain more that 2 repeating digits. It is easy to change your PIN and Password from the Settings tab.
To change your CommPortal password:
1. In the Settings tab, click on change next to Account Password. 2. In the dialog box, enter you current password. 3. Enter your new password. 4. Enter your new password again to confirm. 5. Click Confirm.
Confidential Page 33 of 44
CommPortal User Guide
You can change your voicemail PIN using CommPortal, or you can log into the telephone user interface and change your password there. For information on how to change your voicemail PIN through the telephone user interface, see the Calling Features User guide. To change your voicemail PIN through CommPortal:
1. In the Settings tab, click on change next to Voicemail PIN. 2. In the dialog box, enter the new PIN. 3. Click Confirm.
Helpful Hint: When you first login to voice mail through the telephone user interface, you will be prompted to change your starter PIN to better secure your mailbox. You are currently not required to change your CommPortal password. However, it is strongly recommended that you change your password from the default as soon as possible to provide better security for your account. Desk Phone Soft Keys You can configure various settings for your desk phone through CommPortal. When you click on set keys, the Phone Settings window will open showing you a representation of your desk phone. As you hold your mouse over the phone keys (buttons), you will see that some keys will be highlighted in blue and others will be highlighted in red. Soft keys that you can program/change will be highlighted in blue. Keys you cannot change will be highlighted in red. To change the programming of a soft key:
1. In the settings tab, click on set keys to open the Phone Settings window. 2. Place your mouse over the soft key you want to program. 3. If the key is highlighted in blue, click the key. If the key is highlighted in red,
choose another key. 4. Click the key to open the open the dialog box for that key (Figure 33). 5. Click the down arrow to see all of the features available to use on this soft key. 6. Select one of the features from the drop down menu. 7. Some features require additional inputs such as phone numbers and labels.
Complete the required information. 8. Click OK. 9. When done programming soft keys, click Save changes. 10. Your changes will be saved and will be automatically applied to your phone
overnight. If you want the change to take effect immediately, you can manually reboot your phone.
Confidential Page 34 of 44
CommPortal User Guide
Figure 33 – Phone Settings
Helpful Hint: Your business group administrator may have designated that certain keys be used for specific features. You should check with your business group administrator before changing any pre-programmed keys. Calls Options The Calls sub-tab allows you to control caller ID information and to control how call forwarding will be set from your desk phone. For Business Advantage Plus and Business Advantage Premium customers, you can also store numbers to be used with call jump, a feature that allows you to transfer a call from your phone to another device without interrupting the call. You can choose to block caller ID when making calls, or allow your name and number to be passed (Figure 34). All incoming calls will display name and number, but you can change that if you would prefer not to see them. The call forwarding settings are applied when you use star codes from your phone. The default is to always ask what number you would like to forward to, but you can change it if you want to use the same number every time. For more information on call forwarding from your phone, see the Calling Features User Guide.
Confidential Page 35 of 44
CommPortal User Guide
Figure 34 - Caller ID and Call Forwarding settings
Call jump enables you to transfer your end of a call from one phone to another. For example, you might be in the middle of a call on your desk phone and need to leave for a meeting. With call jump you can transfer the call to your mobile phone without hanging up. Call jump allows you to transfer a call to any phone number you like, using star codes. However, it is recommended that you pre-program numbers that you will transfer calls to regularly (e.g. your mobile phone). This will allow you to quickly use a star code to transfer the call instead of entering a star code followed by the full number each time. When you use the option to input the full number, your call is put on hold while you dial the number. If your business group is using music on hold, the music will play on your call until the call is transferred. You can set up two numbers in this way: one wireless number and one other number of your choice (Figure 35). Enter the 10-digit number, or enter the number as you would dial it from your phone (e.g. 95557645). The star codes to use for call jump are described in the Calling Features User Guide.
Confidential Page 36 of 44
CommPortal User Guide
Figure 35 – Call Jump
Voice Mail Options The Messages sub-tab allows you to set various message options, control mailbox access and manage voice mail greetings. Under General settings, you can:
Change the time before calls forward to voicemail when you can’t answer the call (Business Advantage only).
Select for the first 10 seconds of the voicemail message to be transcribed using speech-to-text (Business Advantage Plus and Business Advantage Premium).
Forward messages to email as wav attachments by entering an email address. Choose to leave a copy of the message in your inbox when forwarding a message
to email. Include action links in the email along with your message so you can delete the
message or mark it read/unread right from the email. Mailbox Access settings include:
Fast Login which allows you to enter only your PIN when calling from your phone. This setting is on by default, but you can change it.
Auto-play so that voicemail messages start to play automatically as soon as you have logged in.
Auto-play fax to immediately hear an inventory of fax messages in your mailbox (Business Advantage Plus and Business Advantage Premium customers only).
Confidential Page 37 of 44
CommPortal User Guide Voicemail playback options that let you choose to hear details (date and time)
along with the message, the message only, or the details only.
The Voicemail Greeting option allows you to configure which greeting will be played to your callers (Figure 36). You can choose to use one of the standard system greetings or record a personal greeting. In addition to defining this default greeting, you can also:
Configure an alternative greeting to be played outside business hours (Business Advantage Plus and Premium users only)
Choose an alternate greeting to be played when the line is busy Choose to play an extended absence greeting, and optionally prevent callers
from leaving messages while you are away Choose to play a different greeting when a call comes from within your
business group
Figure 36 – Voicemail Greetings
To record or edit a greeting through CommPortal:
1. In the messages sub-tab, select a greeting from the drop down menu. You may also select one of the greetings under more options.
2. Click edit or record. Note: If no recording has been made previously, you will see record. If a recording has previously been made, you will see edit.
3. In the Greeting Recorder dialog box, press the round red record button to start your recording (Figure 37).
Confidential Page 38 of 44
CommPortal User Guide 4. When you have finished your greeting, press the square red stop button (Figure
38). 5. To review your recording, press the blue play arrow. 6. You can rerecord the greeting by returning to step 3. 7. When you are satisfied with your recording, click Save. 8. Click Apply to save your settings.
Figure 37 – Begin recording a greeting
Figure 38 – Stop recording a greeting
Helpful Hint: Both the system greeting and system greeting with number do not include a recording. All other greetings require a recording. Greetings with an asterisk in the drop down menu have already been recorded, but you can edit them either using your PC microphone or through the telephone user interface. To set up an extended absence greeting:
1. In the messages sub-tab, select Extended Absence from the drop down menu. 2. As needed, follow steps 2 through 7 under “To record or edit a greeting through
CommPortal” shown immediately above. 3. Under more options:
i. Check the checkbox if you want to allow callers to leave a message. ii. Check the checkbox if you want to use a different extended absence
greeting for callers within your business group. iii. If you choose a different greeting for your business group callers, click
edit and record the greeting.
Confidential Page 39 of 44
CommPortal User Guide 4. Click Apply to save your settings.
Notifications The Notifications tab allows you to send message waiting notification to your phone for all messages or only for urgent messages. It also lets you set up notification to other phones on your account. In addition, you can set up notification to email addresses. Your account is initially set up to notify you of all messages via MWI to your phone. To make changes to your MWI setting:
1. Check the checkbox under the type of messages you want to be notified about: All Voicemail, Urgent Voicemail and/or All Faxes.
2. When done, click Apply.
To add another phone to the list:
1. Click New Entry. 2. Enter the phone number in the space provided.
Note: This number must be another phone you own under the same account as this one; you cannot trigger indicators on arbitrary other phones. You may not be able to add other numbers from your business group.
3. Select types of messages that trigger the notification using the checkboxes. 4. Click Apply.
To temporarily disable MWI for all phones on your list:
1. Uncheck the checkbox at the top of the list. 2. Click Apply.
To delete a phone from the list, press the icon.
You can choose whether you want an email to be sent every time you receive a message, or only when you receive a certain type of message, for example, an urgent voicemail. If you wish, you can have email notifications sent to multiple different email addresses. To enable email notifications:
1. Check the checkbox at the top of the tab. 2. To add an email address:
i. Click New Entry ii. Enter an email address in the dialog box
iii. Click Add
Confidential Page 40 of 44
CommPortal User Guide iv. Repeat as needed to add more email addresses
3. Check the checkbox beside each email address for the type of messages you want to be notified about – All Faxes, Urgent Voicemail, All Voicemail.
4. When done, click Apply. To disable all notifications uncheck the checkbox at the top of the tab. To change the types of messages that trigger the email, use the checkboxes beside each email address.
To delete an email address from the list, press the icon. You must press Apply for any of your changes to take effect. Helpful Hint: This feature is for notification to email about voicemail messages that have been left for you. If you want the voicemail wav file or fax pdf delivered to email, see instructions for the Settings/Messages tab. Reminders The reminder service allows you to configure your phone to ring at a specified time. When you configure a reminder, you can choose to record a message to be played when you answer the call. The delivery options for reminder call include:
Once, at a time of your choice.
Every week at a time and day of your choice.
Every day at a time of your choice.
Every weekday at a time of your choice.
To schedule a reminder call:
1. To enable reminders for this line, check the checkbox at the top of the tab. 2. Click New Reminder to open the dialog box. 3. Enter a Description for the reminder. 4. If you have multiple phones on your account, select the phone to notify from the
drop down box. You can only schedule reminders on phones that are registered with your account.
5. Select the type of reminder that you want to occur using the drop down box. 6. If you selected the Once on…. reminder, enter the time of day you want the
reminder call to be delivered. 7. Option: Record the reminder message. 8. Click Add. 9. When done adding reminders, click Apply.
Confidential Page 41 of 44
CommPortal User Guide To cancel a currently scheduled reminder call, click the icon next to the reminder call that you wish to cancel. To cancel all your reminder calls, click Clear List. To disable the reminders service, uncheck the checkbox at the top of the page. Helpful Hint: Use the reminder call service as a wake-up call. Schedule the reminder to ring your phone one time or every morning. Then go to Call Manager to set up your service to ring another phone (SimRing), like your cell phone. No need to record a message.
Confidential Page 42 of 44
CommPortal User Guide Frequently Asked Questions How do I access my Hosted PBX service on line? Go to https://myphone.ptldme.fpviper.com. Login using your 10-digit telephone number and CommPortal password. What is my starter password for the web-based CommPortal? Your starter password for accessing your service online is 9234#fairpoint. For security, you should change this password at your earliest convenience. Your new password must be at least 8 characters long and must contain at least one number, at least one letter, and at least one special character (#, @, $, & or *). What is my starter PIN for voicemail? Your starter PIN is 9234. The first time you log in, the service will walk you through changing your PIN, recording your name and recording a greeting. You new PIN must be 4 to 8-digits long and cannot be part of your phone number. It cannot include repeating digits or digits in order (e.g 2345, 98765). I have forgotten my PIN or Password. How can I have them reset? Contact your Business Group administrator change or reset a forgotten voicemail PIN or CommPortal Password. I just received a new call and message. Why don’t I see them on my Dashboard? The CommPortal screens do not automatically refresh. You can display new information by clicking on the More Options gear icon at the top right of the screen and selecting “refresh” from the drop down menu. Each time you open CommPortal, you will see the most current information. Also, each time you open a new tab, the most current information for that tab is displayed. An old message is about to expire. How can I keep it longer? Messages age off from the service after 30 days. However, you can save a message longer by copying it to your computer. Open the Messages & Calls tab. Click on the “listen to message” arrow to the left of the message. This opens the message playback window. Click on the down arrow to the right of the trash can and select “save file.” Follow your browser’s instructions to save the file to your computer. How can I get a copy of a message? You can get copies of your messages in two ways. First, you can choose to have all of your voicemails delivered to you in email. Each voicemail is delivered as a wav file attachment to an email. This file can be detached and saved or forwarded to others. If you have not chosen this message delivery option, you can still get a copy of the file using CommPortal. Open the Messages & Calls tab. Click on the “listen to message”
CommPortal User Guide arrow to the left of the message. This opens the message playback window. Click on the down arrow to the right of the trash can and select “save file.” Follow your browser’s instructions to save the file to your computer. I deleted a message by mistake. Can I get it back? If you deleted the message within the last 7 days, you can recover the message. Go to the Messages & Calls tab and click on the Deleted sub-tab. You should see a list of all of your recently deleted messages. Click on the Actions button to the far right of the message you want to recover. In the drop down box click Restore. The message will be moved back to the Messages sub-tab. What features are included with FairPoint’s Hosted PBX service?
Standard IP phone with each seat purchased
Unlimited local calling
Station-to-station intercom calling
Caller ID, including name and number
Voicemail
Call forwarding
Call transfer
Call park / retrieve
Speed dialing
Return call / busy redial
Call manager / find me follow me
SimRing (ring up to 5 phone numbers simultaneously, including cell phones)
Call hold, including music on hold
Conferencing
Web portal for do-it-yourself changes and feature activation and management
Attractively priced distance calling plans
What additional features are available with FairPoint’s Hosted PBX service? The following features are available to Business Advantage Plus and Premium customers:
CommPortal Communicator – lets you access all the rich functionality of your FairPoint Hosted PBX desk phone from your PC
Accession Communicator Mobile – makes all the rich functionality of your Hosted PBX desk phone available to you anywhere, anytime via your smart phone
Incoming Call Manager – highly customizable call handling service that enables user to configure powerful rules to provide very flexible and detailed options
Confidential Page 44 of 44
CommPortal User Guide These additional features are available to all customers:
Easy Attendant – offers powerful capabilities for directing incoming callers to the appropriate department or employee
Premium Attendant – provides fully customizable multi-level menus to direct incoming callers to the appropriate department or employee
Announcement Only Mailbox – offers a mailbox that plays recorded information without taking messages
Why is my click-to-dial call not going through? If you are using the icon at the top of the CommPortal to make a call, remember that you must enter the number just as you would call if from your phone. If you would normally dial 9 plus the number, you must include a 9 here. Or if you are using 3-digit dialing to other extensions in your business group, use 3 digits here. You may also use a 10-digit number that you enter or that you select from your contact list in the drop down menu you see as you start to dial the number. Why is my speed dial code not working? Be sure that you have entered the phone number for the speed dial code as you would dial that number from your desk phone. For example, be sure to include 9+ the 7-digit number for a local number, 9+1+10-digit number for an out of state number. Is a wake-up call feature included? You can use the reminder call feature to act as a wake-up call service. Simply program a one time or daily reminder call and don’t record a message. Then go to your Call Manager tab and set your service to ring another phone (SimRing), like your cell phone. Both phones will ring at the time you select and will stop when one of the phones is answered.