616 02 1019 00 10/17/14 Communicating Wall Control With Wi--Fir Capability Owner’s Manual TSTAT0201CW U.S. Patent No. 7,243,004 U.S. Patent No. 7,775,452 COMMUNICATING SYSTEM R All trademarks are the property of the respective owners. Wi-Fi ® is a registered trademark of the Wi-Fi Alliance Corporation.
Software Updates 43. . . . . . . . . . . . . . . . . . . . . . . . . . . . . . . . . . .Setting Up Remote Access and Wi-Fi® Connection 44. . . . . . .Registering Your Observer® Wall Control on the Internet 53. .
3616 02 1019 00
IntroductionCONGRATULATIONS! Your decision to choose theObserverr Control puts you in a select group of homeownerswho understand the value of precise comfort control andappreciate the simplicity of an easy-to-use, intuitive, control.
Your new Observer Control offers high quality comforttechnology. Please take a few moments to review this manual.Set up a comfort schedule that makes sense for your lifestyle;register for remote access; then relax and enjoy the newcomfort of your home!
Home Screen
The basic information displayed on the Home Screen consistsof the following:
Current schedule period: WAKE, DAY, EVE, or SLEEPDate and timeRoom temperature (Zone specific if applicable)Room humidity
4 616 02 1019 00
Actual Outdoor temperature (if applicable)System mode: OFF, HEAT, COOL, AUTO or EMHT (ifapplicable)Fan mode: AUTO, LOW, MED or HIGH (is applicable)Heat To setting (Zone specific if applicable)Cool To settings (Zone specific if applicable)
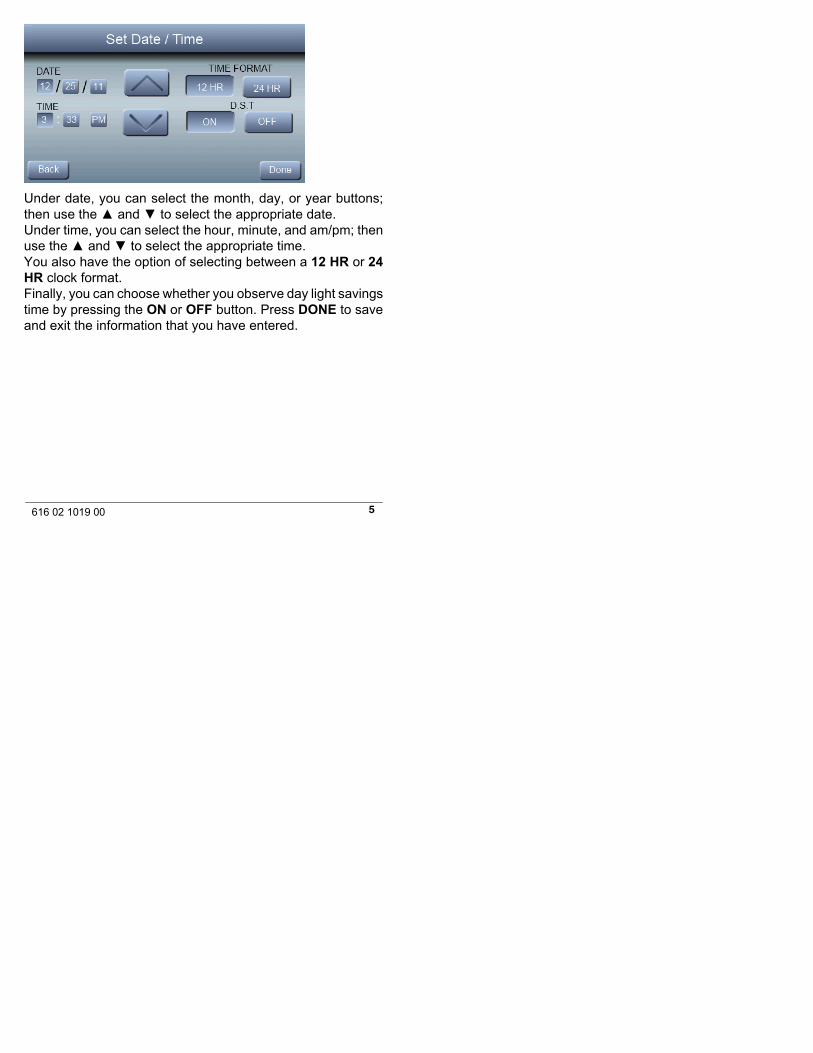
Set Day and Time
A14558
To set the current time and date, press SETUP from the HOMEScreen; then press TIME/DATE.
5616 02 1019 00
Under date, you can select the month, day, or year buttons;then use the ▲ and ▼ to select the appropriate date.Under time, you can select the hour, minute, and am/pm; thenuse the ▲ and ▼ to select the appropriate time.You also have the option of selecting between a 12 HR or 24HR clock format.Finally, you can choose whether you observe day light savingstime by pressing the ON or OFF button. Press DONE to saveand exit the information that you have entered.
6 616 02 1019 00
System ModePress MODE to select the desired system mode.
Off: Heating and cooling systems are off
Auto: Observer® Control automatically selects heating orcooling to maintain your comfort during transitional heating andcooling seasons
Heat: Observer® Control operates only the heating system
7616 02 1019 00
Cool: Observer® Control operates only the cooling system
Emergency Heat: Only electric heat will be used for heating(only for heat pump with auxiliary heat)
NOTE: The fan may operate even though the system Mode isset to OFF, if the Fan Mode is set to a condition other thanAUTO.
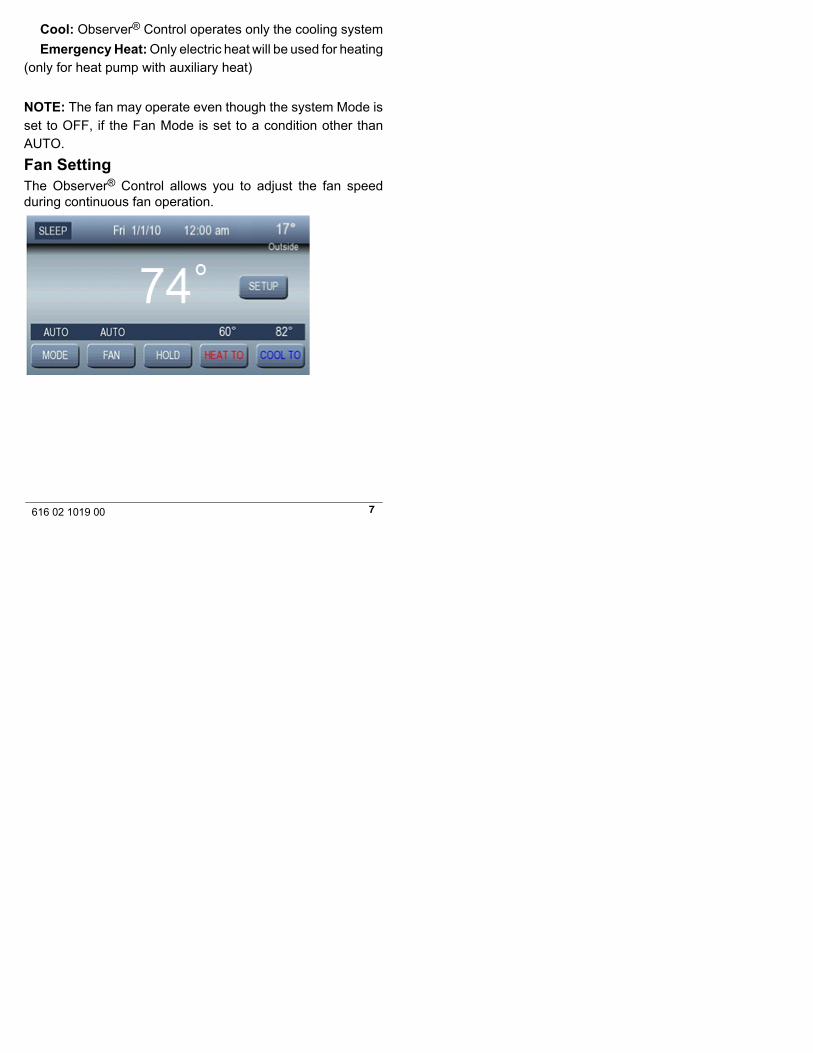
Fan SettingThe Observer® Control allows you to adjust the fan speedduring continuous fan operation.
8 616 02 1019 00
Press FAN, then select the desired fan speed; then pressDONE
LOW, MEDIUM, HIGHAUTO: Fan only runs when the heating or cooling system is
running.Fan Airflow is not selectable by zone. When continuous fan isused, all zones will be open.
Hold Current TemperatureThe Observer® Control allows you to maintain your currenttemperature by overriding the program schedule. Press theHOLD button to override the program and maintain yourcurrent indoor temperate setting indefinitely.
9616 02 1019 00
To go back to your programmed schedule, simply press theRESUME button.
NOTE: For Zoning, overriding the program schedule can bedone for each individual zone by pressing the Zone namebutton. The HOLD / RESUME override program schedule canbe independently selected for each zone.
10 616 02 1019 00
Adjusting Temperature (Temporary Hold)
The Observer® Control allows you to adjust the indoortemperature at any time, overriding the programmed schedule.
Heating
To change the heating set point, press HEAT TO; then use the▲ and ▼ buttons to set the desired temperature.
11616 02 1019 00
An override time will be displayed on the right side of thescreen. You can change the override time in 15-minuteincrements by pressing the arrows below the time. When youhave completed your changes, press DONE.
NOTE: If the schedule is already set to HOLD or HOLD UNTIL,the Until option will not be shown on this screen.
Cooling
To change the cooling set point, press COOL TO; then use thearrow buttons to set the desired temperature.
12 616 02 1019 00
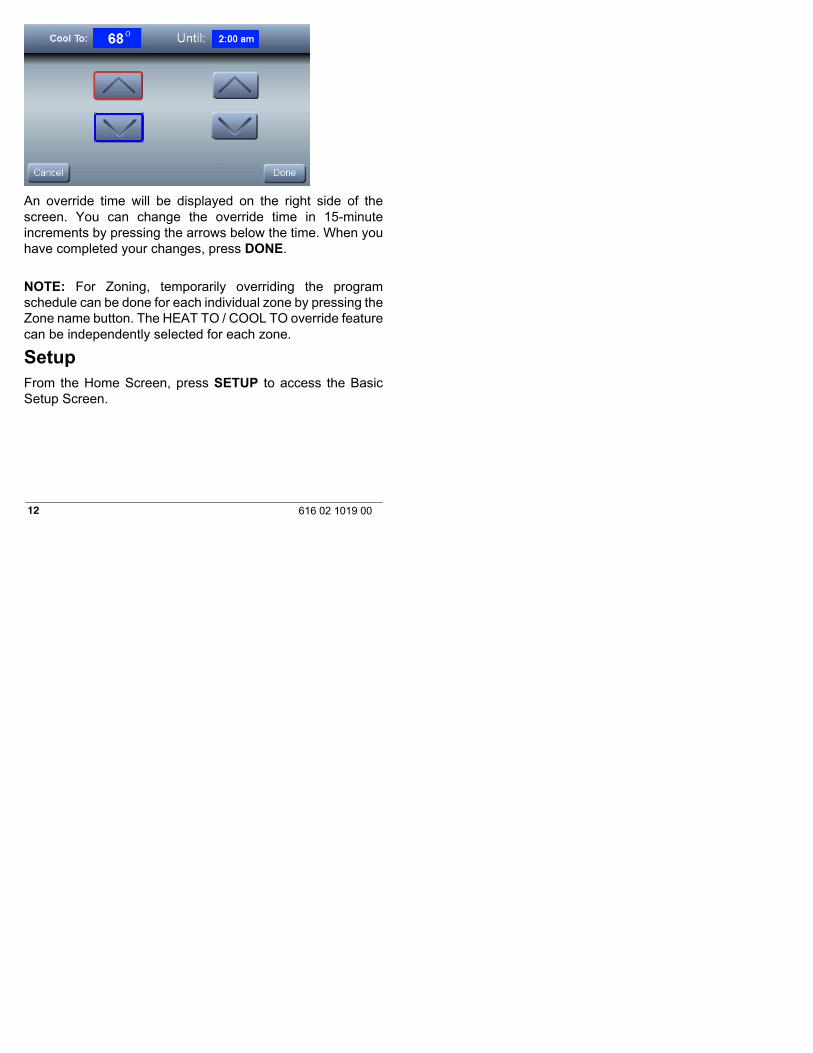
An override time will be displayed on the right side of thescreen. You can change the override time in 15-minuteincrements by pressing the arrows below the time. When youhave completed your changes, press DONE.
NOTE: For Zoning, temporarily overriding the programschedule can be done for each individual zone by pressing theZone name button. The HEAT TO / COOL TO override featurecan be independently selected for each zone.
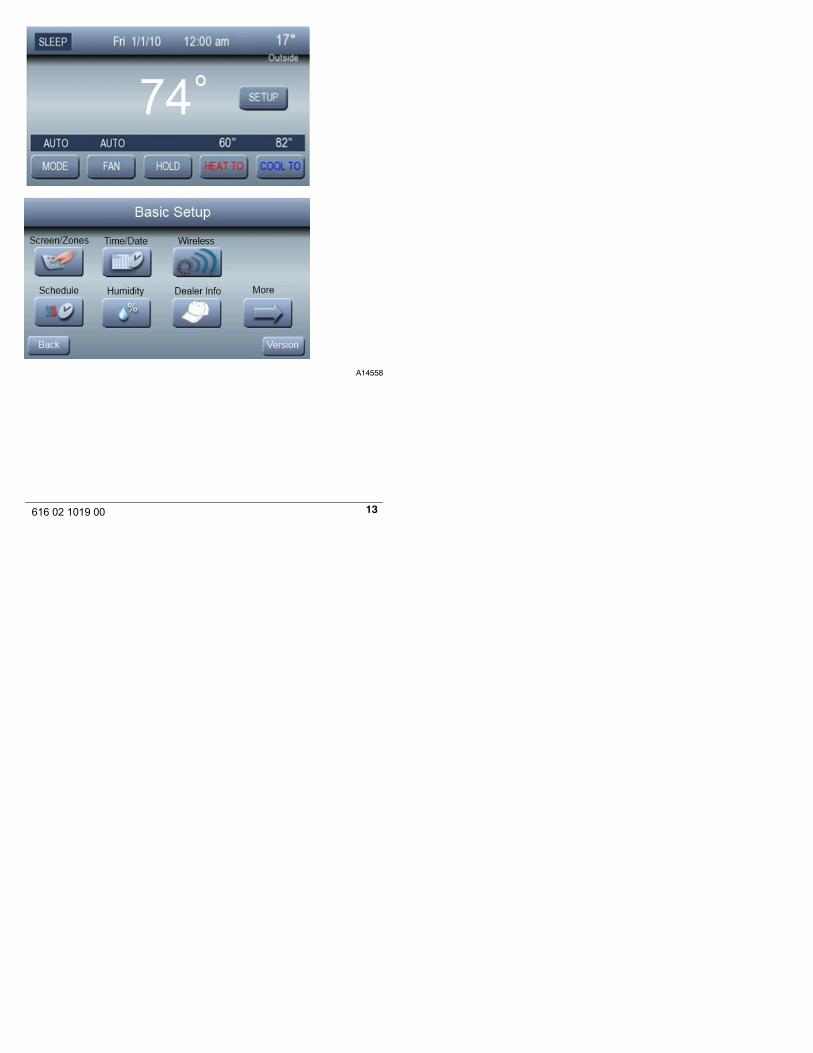
SetupFrom the Home Screen, press SETUP to access the BasicSetup Screen.
13616 02 1019 00
A14558
14 616 02 1019 00
Screen/ZonesFrom the BASIC SETUP screen; press SCREEN/ZONES.
From this screen, you will have the option to adjust the screenbrightness by pressing the ADJUST BRIGHTNESS button.Use the ▲ and ▼ buttons to select your desired screenbrightness. Press DONE to return to normal operation.
To clean your screen, press the CLEAN SCREEN button. Thescreen will remain locked for 30 seconds to allow you to clean
15616 02 1019 00
the display without changing settings. After 30 seconds, thescreen will return to the main screen and become active.
Zone Status
To view the status of each zone, press Zone Status to see thecurrent Temperature and Damper Position for each of yourinstalled zones. In addition, the current temperature from theLeaving Air Sensor will also be displayed on this screen.
16 616 02 1019 00
NOTE: Please see the Zoning section for more informationregarding the features available with Observer® ZoningSystem.
Zone Names
Press Zone Names to customize the descriptions for each ofyour installed zones.
NOTE: In order to activate the Key Board, press each individualZone name. Zone names can be up to eight characters inlength.
17616 02 1019 00
Press Done to save your changes.
Schedule
Determine Your Comfort Schedule
Before you program your Observer® Control, take a moment toplan your comfort schedule. Each day is divided into four timeperiods: WAKE, DAY, EVE, and SLEEP. You can select adifferent heating and cooling temperature for each time period,based on your daily or weekly schedule.
Programming Your Comfort Schedule
The Observer® Control gives you flexibility in how to createyour comfort schedule. You can choose one schedule for alldays; create a schedule for your work week and the weekend;or you can make every day different.
One Schedule for All Days
You can create on schedule for all seven days in the week.
1. Press SETUP, then SCHEDULE
18 616 02 1019 00
A14558
2. Press ▲ under “All Days”, then press EDIT.
19616 02 1019 00
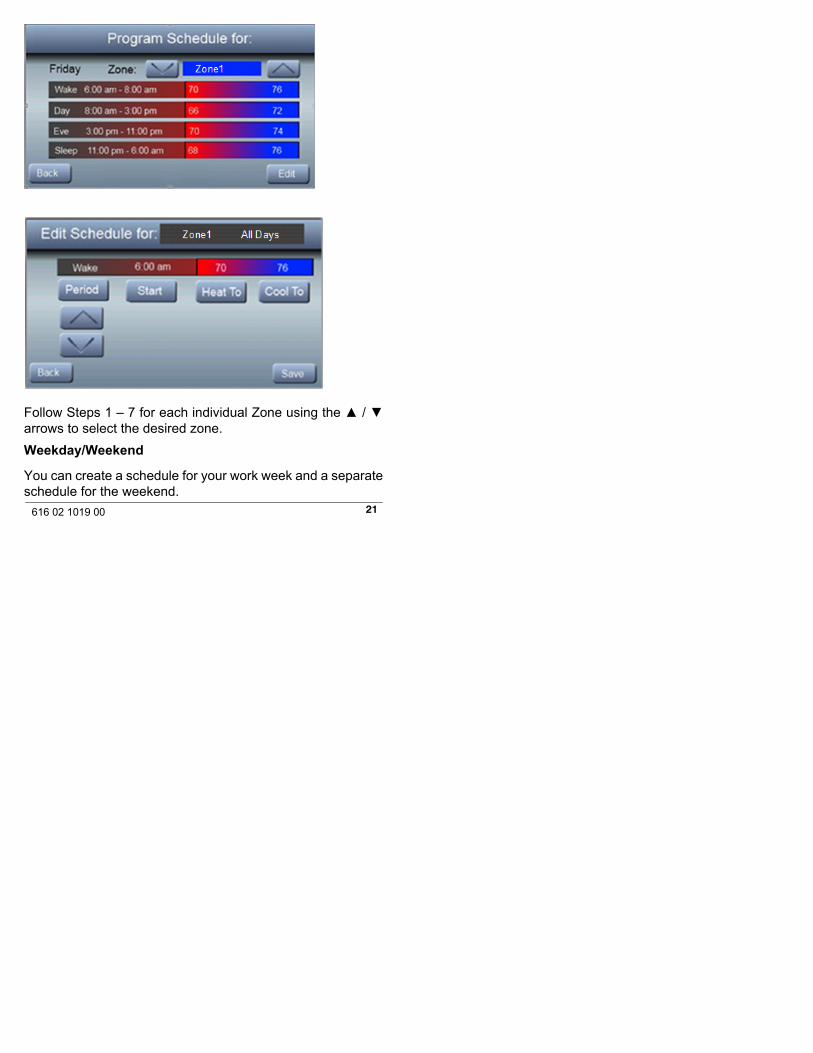
3. Press PERIOD; then use the ▲ or ▼ to select the period tochange.
20 616 02 1019 00
4. Press START; then use the ▲ or ▼ to change the time thecorresponding period starts.
5. Press HEAT TO; then use the▲ or▼ to change the desiredheating temperature for that period.
6. Press COOL TO; then use the▲ or▼ to change the desiredheating temperature for that period.
7. Press SAVE to save your new schedule and exit (or pressCANCEL to exit without saving.)
NOTE: For Zoning
21616 02 1019 00
Follow Steps 1 – 7 for each individual Zone using the ▲ / ▼arrows to select the desired zone.
Weekday/Weekend
You can create a schedule for your work week and a separateschedule for the weekend.
22 616 02 1019 00
1. Press SETUP, then SCHEDULE
2. Press ▲ under “Weekday/Weekend”; then press EDIT tomodify the weekday schedule. To modify the weekendschedule, press the WEEKEND button.
23616 02 1019 00
3. Press PERIOD; then use the ▲ or ▼ to select the period tochange.
4. Press START; then use the ▲ or ▼ to change the time thecorresponding period starts.
5. Press HEAT TO; then use the▲ or▼ to change the desiredheating temperature for that period.
6. Press COOL TO; then use the▲ or▼ to change the desiredheating temperature for that period.
7. Press SAVE to save your new schedule and exit (or pressCANCEL to exit without saving.)
24 616 02 1019 00
NOTE: For Zoning
Follow Steps 1 – 7 for each individual Zone using the ▲ / ▼arrows to select the desired zone.
25616 02 1019 00
Each Day
You can create a different schedule for each day of the week.
1. Press SETUP, then SCHEDULE
2. Press ▲ under “Each Day”; then press EDIT to modify theschedule for that day. To modify a different day, press one ofthe day buttons on the bottom to scroll through the week to findthe day you wish to change.
26 616 02 1019 00
3. Press PERIOD; then use the ▲ or ▼ to select the period tochange.
4. Press START; then use the ▲ or ▼ to change the time thecorresponding period starts.
5. Press HEAT TO; then use the▲ or▼ to change the desiredheating temperature for that period.
6. Press COOL TO; then use the▲ or▼ to change the desiredheating temperature for that period.
7. Press SAVE to save your new schedule and exit (or pressCANCEL to exit without saving.)
NOTE: For Zoning
Follow Steps 1 – 7 for each individual Zone using the ▲ / ▼arrows to select the desired zone.
27616 02 1019 00
28 616 02 1019 00
Humidity SettingsThe Observer® Control allows you to manually set yourhumidity set points to me your comfort levels.If you have a humidifier installed, press SETUP; then pressHUMIDITY. Under HUMIDIFICATION, use the ▲ and ▼buttons to select your desired humidity level during heatingmode. Press DONE to return to normal operation.
During warm weather periods, under DEHUMIDIFICATION,use the ▲ and ▼ buttons to select your desired humidity levelduring cooling mode. Press DONE to return to normaloperation.
29616 02 1019 00
Dealer Info
Upon installation of your Observer® Control, your ServicingDealer has the option of inserting their contact information intothe wall control for your convenience. This information caninclude the Servicing Dealers name, phone number andwebsite (if applicable). Press Dealer Info from the Basic Setupscreen to view the contact information for your ServicingDealer.
NOTE: If your dealer has provided their email address, you willhave the option of sending email Notifications, directly from theObserver® wall control to your dealer. See the Quick Startguide provided with your Observer wall control for moreinformation on registering your Observer wall control forremote access.
30 616 02 1019 00
A14558
To access the Lockout, Sounds and Reminders options, click inthe MORE arrow and go to the second screen of Basic Setupoptions.
A14561
31616 02 1019 00
Keypad Lock
You can lock the Observer® Control to help avoid inadvertentchanges to your settings.
A14558
A14561
Press SETUP; press MORE, then press LOCKOUT. To enablethe lockout feature, press the ON button.
32 616 02 1019 00
After you have enabled the lockout feature, please select a4-digit code to be used to unlock the Observer® Control. PressDONE to return to normal operation.
Once the lockout feature is active, to unlock the screen pressanywhere on the screen to be prompted to enter your 4-digitcode. If your 4-digit code is entered successfully, the screen willshow a validation message and return you to the main screen. Ifyour code is incorrect, the screen will show an unsuccessfulmessage and return you to the main screen to try again.
33616 02 1019 00
Sounds
Press Sounds from the Basic Setup screen to adjust theVolume and Sound Type heard from your Observer® control.
Volume options include: OFF, LOW, MED or HIGH
Sound Types include: Beep, Click and Click 2 (Double Click)
NOTE: When OFF is selected, the sound features of theObserver® Control are disabled
34 616 02 1019 00
Reminders
Reminder messages alert you to when it is time to replace yourfilter. The reminders will be sent after the number of hours ofsystem operation shown on this screen. For example, if youhave your fan set for continuous operation (Fan Mode = On,Low, Med, or High) the fan will operate for approximately 720hours per month. When your alert appears on the screen, pressthe REMINDER button. After you have replaced your filter hitthe RESET button to start the clock on your next replacement.After you press RESET, press DONE to return to normaloperation.
35616 02 1019 00
Zoning Features
When installed as a complete Observer® Zoning System, theObserver Control can be installed as a Master Control with upto five additional sensors. Sensor options can include anycombination of the following:
Room Sensor Zone Sensor
OR
When installed as a complete Zoning System, the Master ZoneControl will serve as the central location for controlling thetemperature and schedule for each individual zone.From the Home Screen, you can override the programschedule by using the Hold, Heat To or Cool To settings foreach individual zone which can be accessed by pressing theZone Name button located in the bottom left hand section of thescreen.
NOTE: See Adjusting Temperature (Temporary Hold) andHold Current Temperature sections for complete details.
36 616 02 1019 00
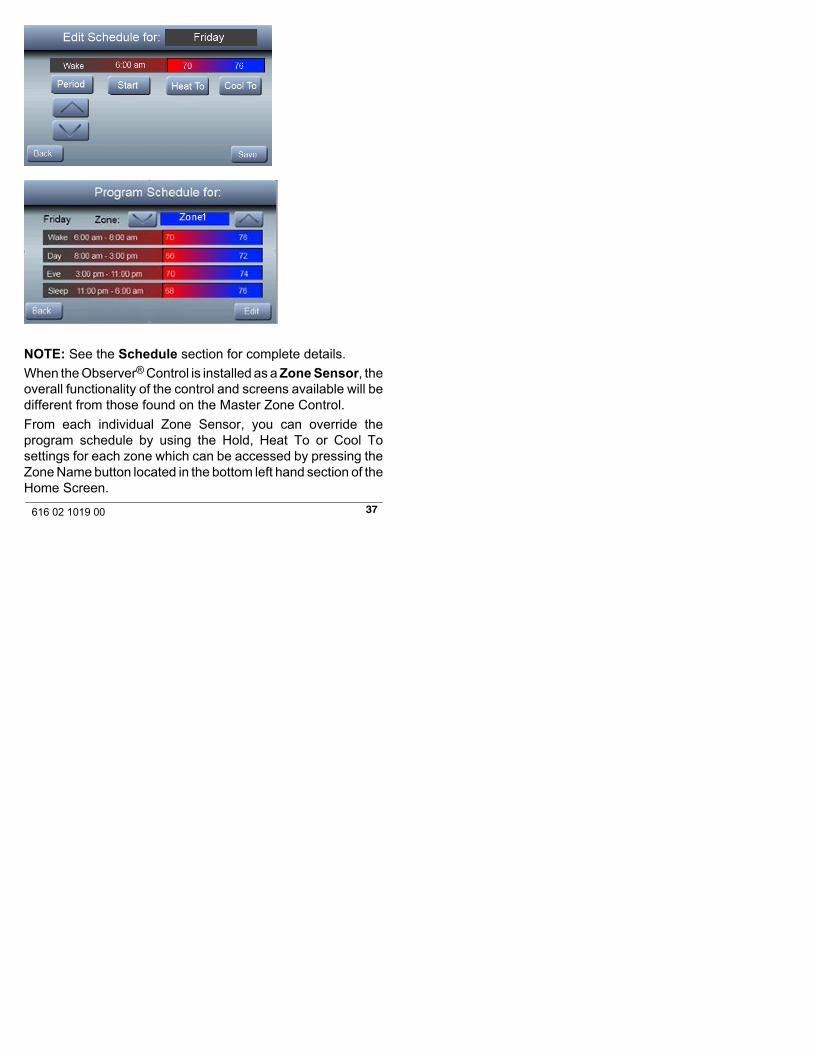
From the Setup menu, you can program a comfort schedule foreach individual zone by using the ▲/ ▼ button to select thecorresponding zone.
37616 02 1019 00
NOTE: See the Schedule section for complete details.
When the Observer® Control is installed as a Zone Sensor, theoverall functionality of the control and screens available will bedifferent from those found on the Master Zone Control.
From each individual Zone Sensor, you can override theprogram schedule by using the Hold, Heat To or Cool Tosettings for each zone which can be accessed by pressing theZone Name button located in the bottom left hand section of theHome Screen.
38 616 02 1019 00
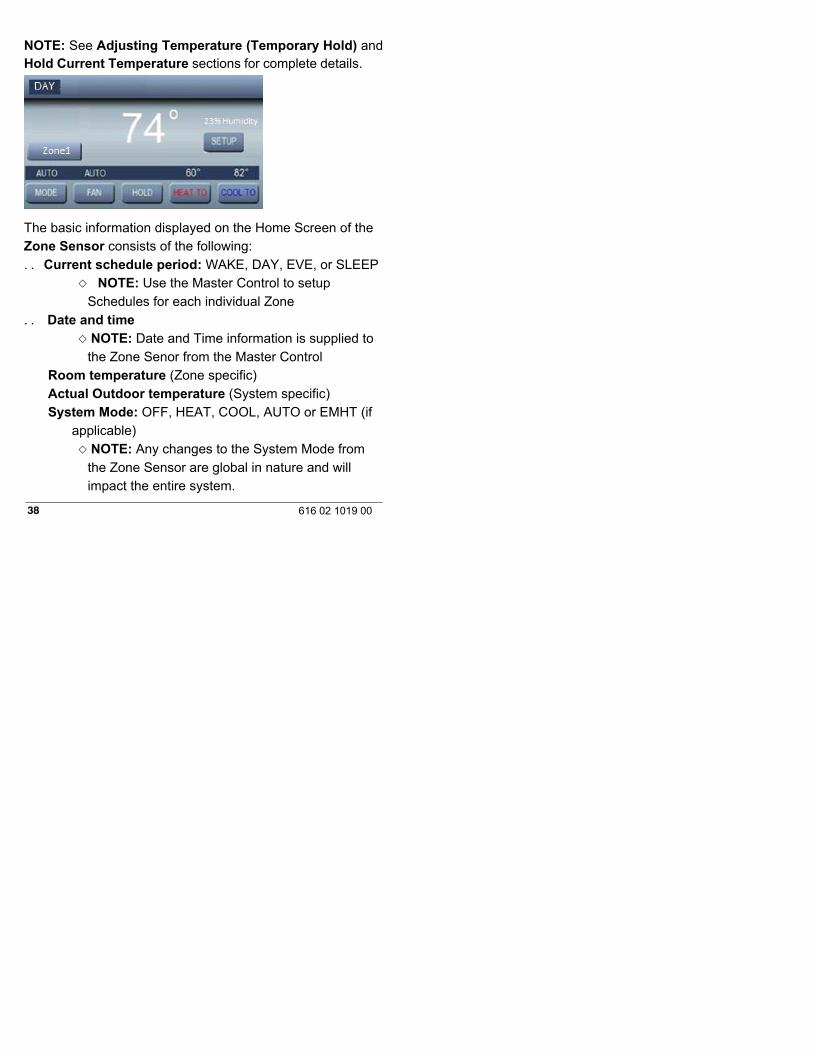
NOTE: See Adjusting Temperature (Temporary Hold) andHold Current Temperature sections for complete details.
The basic information displayed on the Home Screen of theZone Sensor consists of the following:
Current schedule period: WAKE, DAY, EVE, or SLEEP. .Z NOTE: Use the Master Control to setup
Schedules for each individual ZoneDate and time. .
Z NOTE: Date and Time information is supplied tothe Zone Senor from the Master Control
Room temperature (Zone specific)Actual Outdoor temperature (System specific)System Mode: OFF, HEAT, COOL, AUTO or EMHT (if
applicable)Z NOTE: Any changes to the System Mode from
the Zone Sensor are global in nature and willimpact the entire system.
39616 02 1019 00
Fan mode: AUTO, LOW, MED or HIGHZ NOTE: Any changes to the System Mode from
the Zone Sensor are global in nature and willimpact the entire system.
Hold (Zone specific)Heat To setting (Zone specific)Cool To settings (Zone specific)
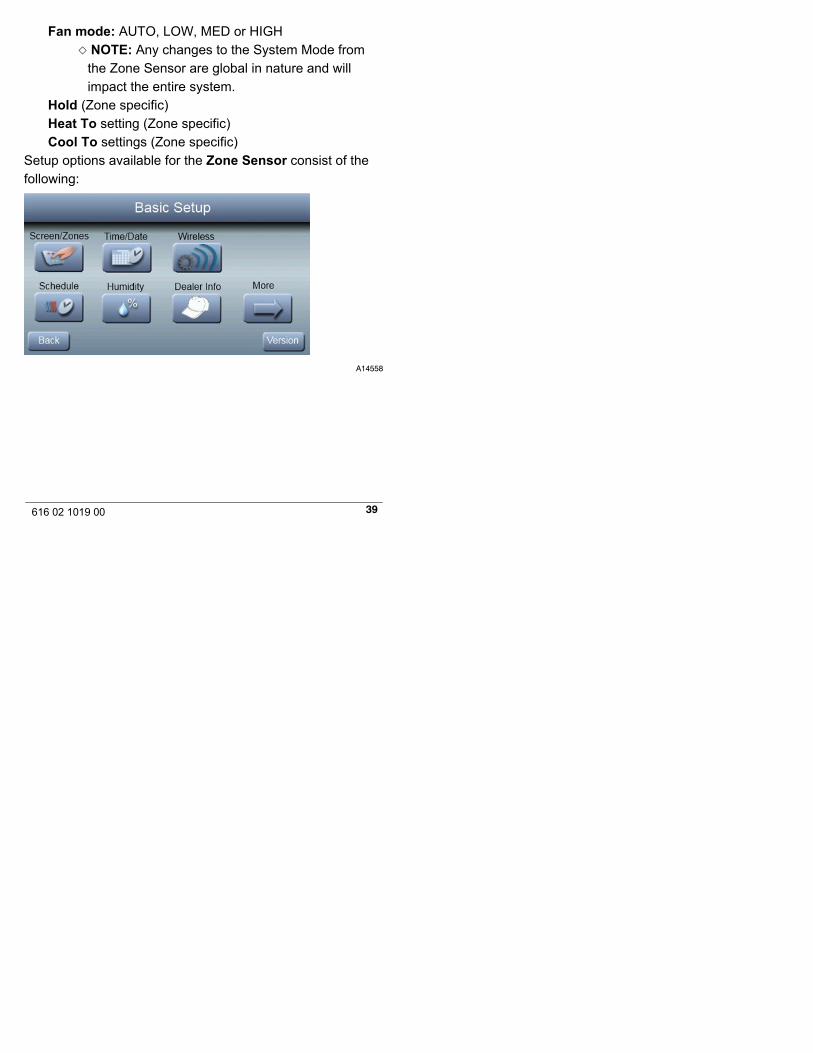
Setup options available for the Zone Sensor consist of thefollowing:
A14558
40 616 02 1019 00
Screen/Zones: Under this Basic Setup Screen, you will have
the option to Adjust Brightness, Clean Screen or change the
Zone Name.
Sounds: Under this menu selection, you will have the option to
adjust the Volume and Sound Type heard from the individual
Zone Sensor.
41616 02 1019 00
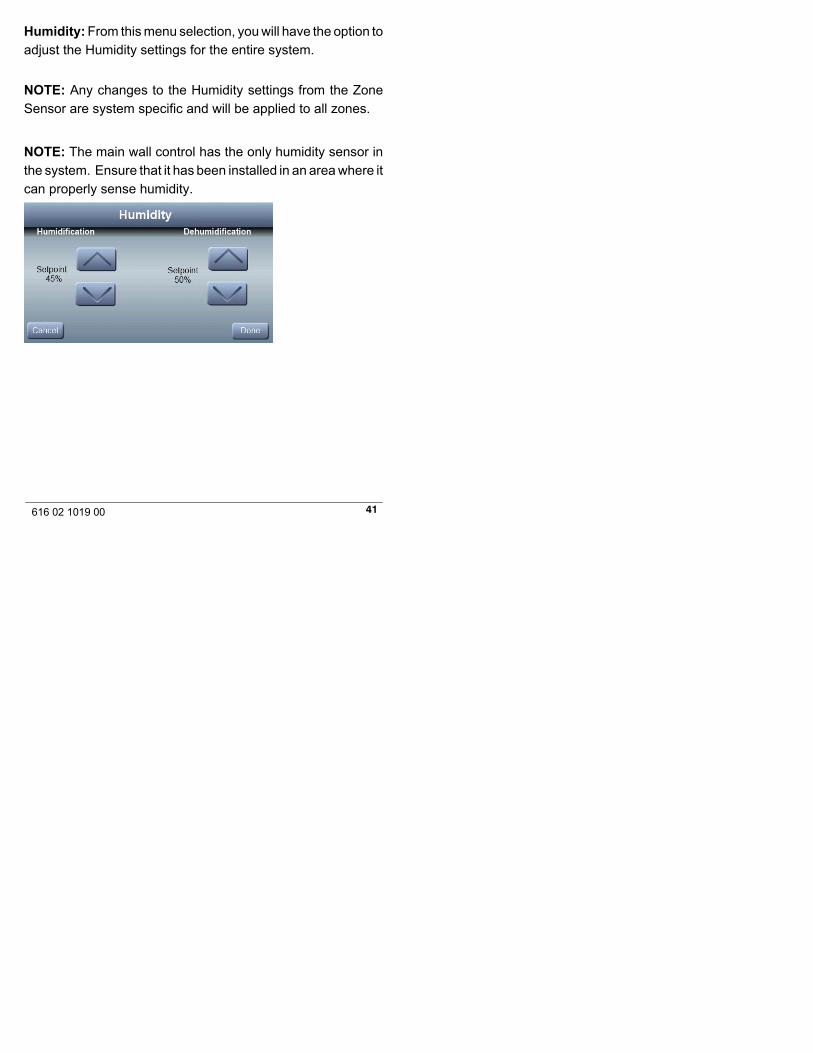
Humidity: From this menu selection, you will have the option to
adjust the Humidity settings for the entire system.
NOTE: Any changes to the Humidity settings from the Zone
Sensor are system specific and will be applied to all zones.
NOTE: The main wall control has the only humidity sensor in
the system. Ensure that it has been installed in an area where it
can properly sense humidity.
42 616 02 1019 00
VersionSelecting this menu option will display the Model Number,
Serial Number, and Software version for the individual Zone
Sensor.
A14558
A14517
43616 02 1019 00
Software UpdatesWe will periodically issue software updates for the Observer®
Communicating Wall Control. Updates are usually made to
support new HVAC equipment that are added to our product
line; so you will likely not need them, unless you upgrade your
comfort system. Ask your dealer if a particular software update
applies to your system, and ask him to update your wall control
for you, if required. Software updates should only be done by
qualified technicians, since part of the update process is to
verify proper system configuration settings.
NOTE: The Downloads page of thewww.MyObserverComfort.com web page also includes thelatest manuals for the Observer wall control.
44 616 02 1019 00
Setting Up Remote Accessand Wi-Fi® ConnectionThe Observer® communicating wall control, model
TSTAT0201CW, can connect through an in-home Wi-Fi®
network to connect to the Internet. If the in-home Wi-Fi network
or router is found to be incompatible with the Observer wall
control, an Observer Wireless Access Point (NAXA00101WA)
or any other compatible wireless router can be installed to
establish Wi-Fi connectivity. See the Installation Instructions
for details. Wi-Fi range extenders may also be used if the wall
control is located a significant distance away from the Wi-Fi
access point or router. More information may be found at the
www.MyObserverComfort.com website.
Please call the helpdesk (available 8:00 AM - 5:00 PM ET, M-F)
at 877-591-8908 if you need help with Wi-Fi set-up and
connection to the MyObserverComfort server.
The ability to remotely access and adjust the settings of
the Observer® wall control with the MyObserverComfort
web and mobile applications is dependent on the
compatibility of the user’s computer/network or mobile
device, the Observer wall control, and/or the
MyObserverComfort web server with, and the availability
of, the user’s Internet service provider or mobile device
carrier service. International Comfort Products makes no
45616 02 1019 00
representations or warranties, express or implied,
including, to the extent permitted by applicable law, any
implied warranty of merchantability or fitness for a
particular purpose or use, about the compatibility of the
user’s computer/network, or mobile device, with the
Observer wall control, and/or the MyObserverComfort
web server, with, and the availability of, the user’s Internet
service provider or mobile device carrier service, or that
the ability to remotely access and adjust the settings of the
Observer wall control will not be negatively affected by the
network-related modifications, upgrades, or similar
activity of the user’s Internet service provider or mobile
device carrier service.
To establish Wi-Fi® connectivity to the Observer® wall control
using an in-home router or wireless access point, the home
network wireless access point SSID and password/passkey
must be known for set-up.
46 616 02 1019 00
A14560
A14520
S Select the WIRELESS button from the Basic Setupscreen
47616 02 1019 00
A14521
S Make sure the Wi-Fi® connection is enabled, bytouching ENABLED. Select Setup Wireless Connec-tion to scan for a wireless network.
S You do not need to select the Manually Enter Ac-cess Point, or Advanced Settings, unless you haveexperience setting up Wi-Fi® networks.d Use the Manually Enter Access Point option if
your SSID is hidden, or is otherwise secured.d Follow the on-screen prompts as required.d Please call the support desk (available 8:00 AM -
5:00 PM ET, M-F) at 877-591-8908 if you needhelp with Wi-Fi® set-up.
S Touch Setup Wireless Connection to begin theprocess.
48 616 02 1019 00
A14522
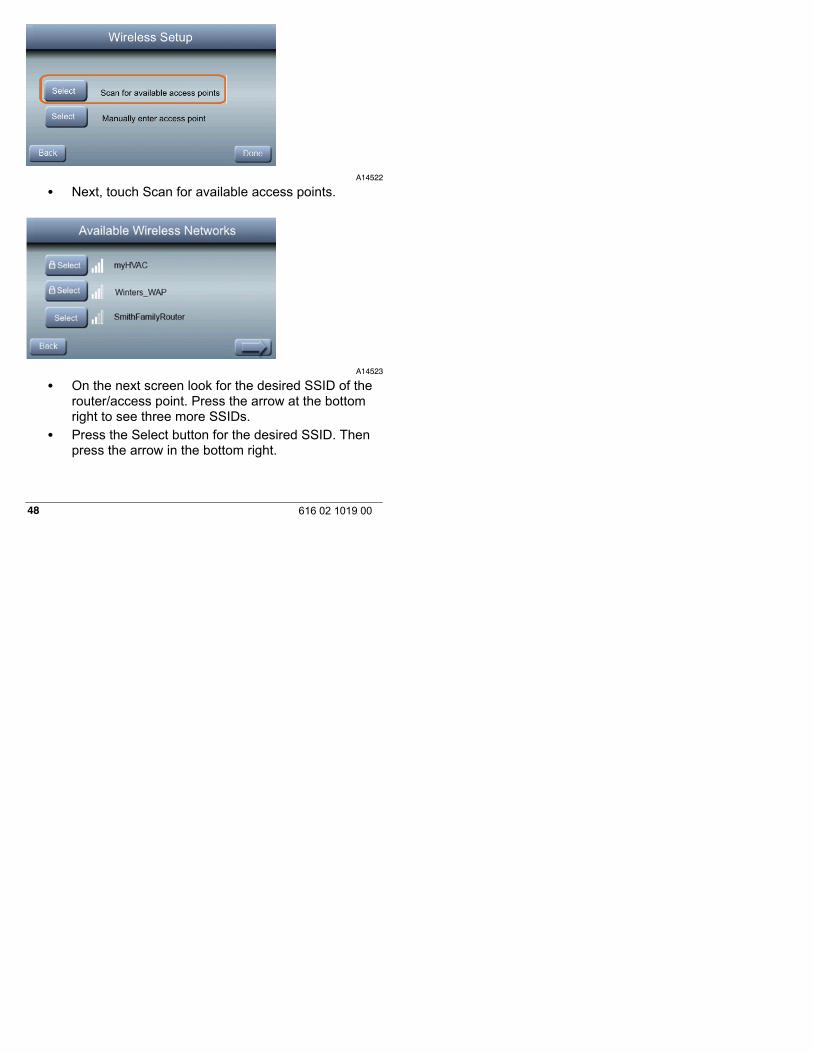
S Next, touch Scan for available access points.
A14523
S On the next screen look for the desired SSID of therouter/access point. Press the arrow at the bottomright to see three more SSIDs.
S Press the Select button for the desired SSID. Thenpress the arrow in the bottom right.
49616 02 1019 00
A14524
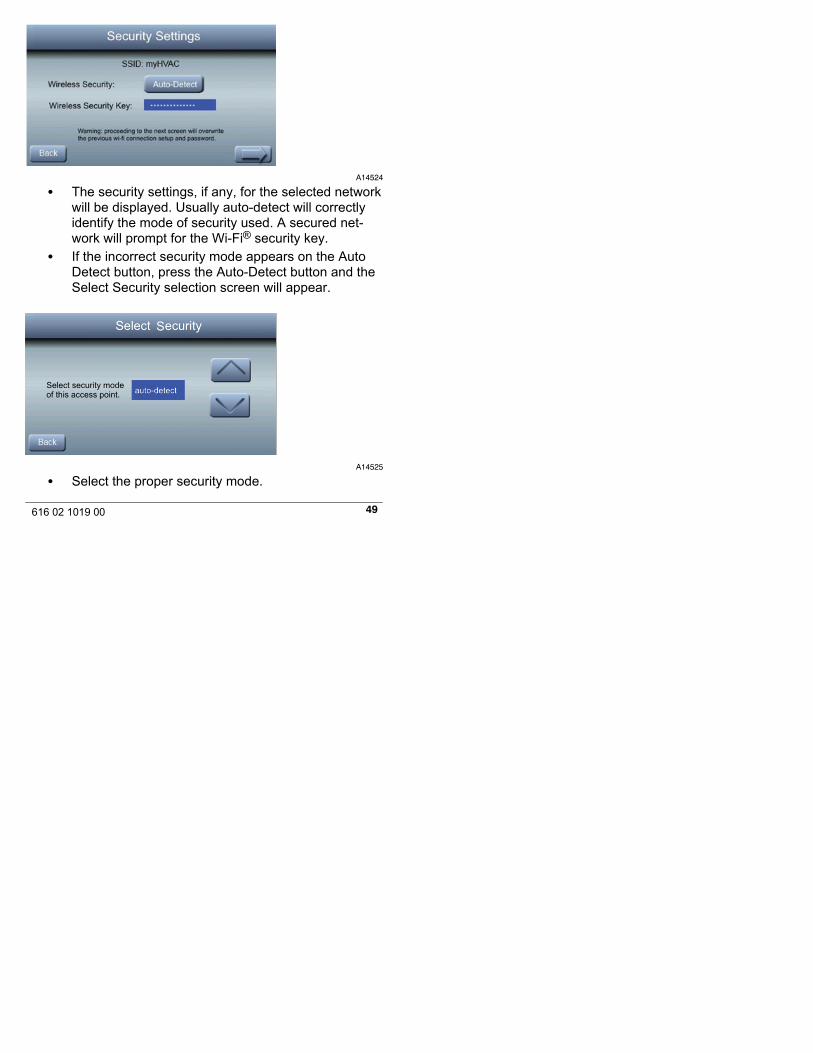
S The security settings, if any, for the selected networkwill be displayed. Usually auto-detect will correctlyidentify the mode of security used. A secured net-work will prompt for the Wi-Fi® security key.
S If the incorrect security mode appears on the AutoDetect button, press the Auto-Detect button and theSelect Security selection screen will appear.
A14525
S Select the proper security mode.
50 616 02 1019 00
S Pressing the Back button will return to the previousscreen, with the updated security mode.
A14524
S If a Wi-Fi® security key is shown as on the SecuritySettings screen, then select the Wireless SecurityKey bar and enter the security key.d Touch in the security key area, and the keyboard
will appear.d Use the on-screen keyboard to enter the Wi-Fi
security key, and then touch the arrow in the bot-tom right corner.
d The progress screen will appear.
51616 02 1019 00
A14526
A14527
S The control will inform you if the connection is suc-cessful. If so, touch DONE.
52 616 02 1019 00
A14528
S If the connection is unsuccessful, verify that theproper information has been entered before youtouch RETRY. The control will attempt to connectwith the information previously entered.
S To start the process from the beginning, press Done.
A14529
53616 02 1019 00
S When the connection to the MyObserverComfortweb server (www.MyObserverComfort.com) hasbeen established, the status screen will show Con-nected for both Wi-Fi® and the server.d Allow 15 minutes for the wall control to connect
to the server.d Please call the help desk (available M-F 8am -
5pm ET) at 877-591-8908 if you need help withWi-Fi® set-up and connection to the MyObserver-Comfort server.
Registering Your Observer® Wall Control WithWi-Fi® Capability on the InternetAfter the control has connected to the network, go to thewww.MyObserverComfort.com website to register theObserver® communicating wall control online. This requiresthe MAC address and serial number of the Observer wallcontrol. To find the serial number and MAC address of theObserver wall control, click on Menu, choose Wireless, andthen choose Register.See the Quick Start Guide included with the product for moreinformation. The Quick Start Guide is also available on theDownloads page of www.MyObserverComfort.com.
54 616 02 1019 00
A14530
This screen will provide the information needed on theMyObserverComfort website (www.MyObserverComfort.com)during registration. Many people take a picture of this screenwith their smartphone for easy reference when registering.
A14531
Click Done once you have copied this information.
55616 02 1019 00
Instructions for registering your wall control may be found onthe Quick Start guide shipped with the product, or on thewww.MyObserverComfort.com website. If you have any issueswith connection or registration, please contact your servicingdealer or contact the help desk (available M-F, 8am - 5pm ET)at 877-591-8908.
After you have registered your device, you will be able tomanage your account from the www.MyObserverComfort.comwebsite, download remote access apps to your smart device,and set up email notifications. Instructions for this may be foundon the www.MyObserverComfort.com website. If you needassistance, feel free to call the help desk (available M-F, 8am -5pm ET) at 877-591-8908.
56 616 02 1019 00
All trademarks are the property of the respective owners.Wi-Fi® is a registered trademark of the Wi-Fi Alliance Corporation.
Copyright 2014, International Comfort ProductsLewisburg, TN 37091 USA