Emergency Preparedness Demonstration Project March 2009 Community Based Vulnerability Assessment A Guide to Engaging Communities in Understanding Social and Physical Vulnerability to Disasters
Transcript
Emergency Preparedness Demonstration Project
March 2009
Community Based Vulnerability Assessment
A Guide to Engaging Communities in Understanding Social and Physical Vulnerability to Disasters
Vulnerability Assessment: Step-By-Step Guidebook
Emergency Demonstration Project Partners
UNC Institute for the Environment 100 Miller Hall, CB #1105, Chapel Hill, NC 27599-1105 Phone: 919.966.9922 | Fax: 919.966.9920 Email: [email protected] | http://www.ie.unc.edu MDC, Inc. PO Box 17268, Chapel Hill, NC 27516-7268 Phone: (919) 968-4531 | Fax: (919) 929-8557 Email: [email protected] | http://www.mdcinc.org/home
This guidebook was made possible by a generous grant from the Federal Emergency Manage-ment Agency (FEMA). The grant funded the Emergency Preparedness Demonstration Project, from which this guidebook was developed. In particular, we would like to thank Ralph Swisher of FEMA for his support of this project and his dedication to emergency preparedness. We would also like to thank Susan Fowler, Bill Hoffman, and Barbara Wyckoff-Baird for their expertise and invaluable role as facilitators in the communities that participated in the demonstration. Those communities included Chester County, Pennsylvania; Dorchester County, Maryland; Hampshire County, West Virginia; Hampton, Virginia; Hertford County, North Carolina; Washington, D.C. and Wilmington, Delaware. And a special thank you to the residents, government officials, nonprofit organizations, and faith-based organizations who articulated the strengths, weaknesses, challenges and opportunities of their communities and brought their energy, opinions, and ideas to address the challenges of emergency preparedness, particularly for socially vulnerable populations. This project could not have occurred without your commitment. Our community partners included: Chester County, PA Chester County Department of Emergency Management Dorchester County, MD Maryland Rural Development Corporation Dorchester County Department of Emergency Management
Hampshire County, WV Eastern West Virginia Community Action Agency, Inc. Hampshire County Department of Emergency Management
Hampton, VA City of Hampton Neighborhood Office City of Hampton Department of Emergency Management
Hertford County, NC Roanoke Economic Development Inc. Hertford County Department of Emergency Management
Washington, DC DC Emergency Management Agency
Wilmington, DE West End Neighborhood House, Inc. City of Wilmington Department of Emergency Management
Vulnerability Assessment: Step-By-Step Guidebook
Table of Contents
Overview…………………………………………………………………………………...1
How to Use this Guidebook………………………………………………………………..6
FIGURES Figure 1: Key Steps in a Vulnerability Assessment ………………...……………….....6 Figure 2: How to Find Demographic Information (Block Group Level).…….…….....12 Figure 3: How to Find FEMA Maps – Using the Interactive Mapping Service..….......18 Figure 4: Sample FIRM Map of Wilmington, Delaware……..…………………..........18 Figure 5: Sample GIS-generated Base Map of Wilmington, Delaware….…...….….....20 Figure 6: Sample Natural Hazards Map of Wilmington, Delaware…………................21 Figure 7: Creating a Map Without GIS………....……....……....……....………….......25 Figure 8: Sample Map of Critical Facilities for Wilmington, Delaware………............25 Figure 9: Sample Floodplain Map of Cambridge, Maryland…………...………….......27 Figure 10: Sample GoogleEarth Map of Cambridge, Maryland……………….………27 Figure 11: Sample Map of Critical Facilities for Wilmington, Delaware…….……......25 Figure 12: Hertford County Social Vulnerability Score– Pop. Aged above 65……......33 Figure 13: Sample Map of Employment Centers and Hazards Areas of Hertford County, North Carolina…………………………………………..………………………….…..36 Figure 14: Sample Map of Environmental Threats in Wilmington, Delaware…..…......41 Figure 15: Final Checklist of Products for the Vulnerability Assessment…..……….....51
TABLES Table 1: Assessment Data and Outputs …………………………….……………..8 Table 2: U.S. Census 2000 Data Locations………………….………….………..12
Every community faces the risk of being struck by a disaster of one type or another, including natu-ral disasters such as floods, hurricanes, ice-storms, wildfires and earthquakes, or technological dis-asters such as a chemical spill or explosion. When disaster strikes, it can wreak havoc on a com-munity—destroying homes and businesses, and leaving people homeless and out of work. Nation-wide, property damage from disasters has been increasing steadily, in part because of larger disaster events, but also because more and more people are living in hazard-prone areas. Hurricane damages alone have cost the nation billions of dollars. According to the Department of Homeland Security, federal aid to the Gulf Coast in the aftermath of Hurricane Katrina topped $110 billion.
In addition to being the costliest disaster in U.S. history, Hurricane Katrina highlighted the vulnerability of populations such as the elderly, poor, racial and ethnic minorities, and those with special medical needs. Households without reliable transportation faced challenges evacuating to safer areas. Many were forced to seek shelter in facilities that were unsafe and ill-equipped. Other residents were forced to flee to distant cities and have faced a difficult and prolonged recovery due to the dissolution of social networks, extended periods of unemployment, a complicated federal aid process, and inadequate resources to repair or replace damaged homes and other property. Some critical facilities, such as nursing homes and hospitals, did not have a plan for evacuating elderly or infirmed residents.
In the disaster’s aftermath, thousands of people faced the financial and emotional burden of putting their lives back together. Many people, particularly the socially vulnerable, are still struggling to recover.
Superdome damaged by Hurricane Katrina. New Orleans, LA 9/5/2005 - (http: www.photolibrary.fema.gov/)
Houses flooded following Hurricane Katrina. New Or-leans, LA 9/4/05- (http: www.photolibrary.fema.gov/)
About the Emergency Demonstration Preparedness Project
In response to the devastation wrought by Hurricane Isabel, the Federal Emergency Management Agency (FEMA) launched the Emergency Preparedness Demonstration Project (EPD) to under-stand the barriers that prevent disadvantaged communities from being aware of and prepared for disasters. The goal of the demonstration project was to uncover promising strategies for involving disadvantaged groups in the process of raising their awareness of and preparedness for disasters. In 2005, FEMA entered into a cooperative agreement with MDC, Inc. to manage this project, in partnership with the University of North Carolina’s Center for Sustainable Community Design (CSCD) within the Institute for the Environment (IE). The project was carried out in six states affected by Hurricane Isabel plus the District of Columbia: Virginia, West Virginia, Delaware, Maryland, North Carolina, and Pennsylvania. One site was selected from each state (those sites are listed in the acknowledgements).
This guidebook grew out of the demonstration project and incorporates the lessons learned from the six demonstration sites. It is designed to help communities identify vulnerable populations, anticipate how they will be affected by likely hazards and develop strategies for reducing their vulnerability. The guidebook provides a step-by-step process for preparing an assessment of a community’s physical and social vulnerability to disasters, both natural and technological, and includes detailed instructions for conducting an assessment, a list of information that is needed to complete the assessment, and worksheets for compiling and organizing data collected.
Why Assess Vulnerability to Disasters?
A vulnerability assessment can serve as the basis for developing strategies for reducing the risks from disasters. The assessment helps a community to:
• Estimate the number of people at risk, including people with special needs,
• Identify the number and location of buildings at risk, including critical facilities such as hos-pitals and schools, and
• Examine the communication links and networks that are vulnerable to disruption during and after a disaster, including informal networks of communication such as church groups.
Under the federal Disaster Mitigation Act of 2000 (Public Law 106-390), state and local govern-ments are required to develop hazard mitigation plans as a condition of receiving federal grant assistance (for more information on the act, see http://www.fema.gov/plan/mitplanning/DMA.shtm). These mitigation plans typically include an assessment of a community’s vulner-ability to natural hazards. Communities can use the assessment to prepare for disaster events and reduce the short and long-term impacts on people and property; that is, to make their communi-ties safer.
Page 3
Vulnerability Assessment: Step-By-Step Guidebook
Why A Community Based Approach?
This guidebook differs from conventional vulnerability assessments in two important ways: (1) it addresses social as well as physical vulnerability and (2) it provides guidance on engaging people from the community who typically are not involved in disaster planning, but who often suffer the most as a result of disasters. Typically, a vulnerability assessment focuses on the physical vulnerability of a community—the risks that hazards pose to structures such as houses, apartments, schools, hospitals and infrastructure. However, Hurricane Katrina vividly illustrated the consequences of overlooking the needs of people who are more vulnerable to disasters due to poverty, race, disability, language barriers or age—that is, social vulnerability. A social vulnerability assessment recognizes that not everyone has the resources to prepare for, cope with, survive and recover from disasters.
In addition, vulnerability assessments typically are carried out by professionals in state or local emergency management offices, often with little or no input from local stakeholders. As a result, the assessments often fail to incorporate the experiential knowledge of people who have lived through disasters and who understand how such disasters make them vulnerable. Involving the community in the preparation of the vulnerability assessment can improve its effectiveness and ensure that the assessment is relevant to those who are the most at risk. Also, meaningful community involvement helps improve awareness about the risks posed by certain hazards and motivate community members and organizations to take steps to become more prepared.
Moreover, the guidebook will help communities understand the social and cultural context within which a disaster occurs and build on local resources and knowledge about disasters and their impact. Finally, the vulnerability assessment outlined in this guidebook will describe and illustrate how to prepare maps of vulnerable areas, identify vulnerable facilities, estimate the number of people at risk, and identify key people to contact during an emergency.
Who Should Use This Guidebook?
This guidebook is designed for anyone who is interested in developing a full picture of vulnerability, including physical and social. It can be used by community groups and nonprofit organizations seeking to understand and reduce a community’s vulnerability to disasters, as well as
by state, county and local emergency preparedness or hazard mitigation offices to help communi-ties become better prepared for disasters. It can be used, for example, in preparing a local hazard mitigation plan. We recognize, however, that not all local governments have the same level of resources and expertise to carry out the vulnerability assessment. Similarly, most community groups do not have the staff or equipment to conduct a highly technical assessment. We have de-signed this guidebook so that a vulnerability assessment can be conducted using information and maps that are readily available, e.g., from government agencies and from the web. In some cases, a community may choose to conduct a more sophisticated analysis, using in-house GIS capabili-ties to generate original maps and more detailed and up-to-date analysis of vulnerable popula-tions.
The Community Based Vulnerability Assessment Process
The key tasks involved in conducting the vulnerability assessment are listed below. Each is ex-plained in greater detail in the following chapters of the guidebook.
• Develop a vulnerability assessment team that is representative of the community.
• Identify, inventory and map likely disaster threats.
• Identify, inventory and map physically vulnerable populations and facilities.
• Identify, inventory and map socially vulnerable populations.
• Seek and integrate community input.
• Create an accessible and understandable product that assembles and analyzes information and maps of the community’s vulnerability to disasters.
• Use the completed assessment to develop and implement strategies to reduce the commu-nity’s vulnerability.
The output of the community-based vulnerability assessment typically includes material items such as maps and accompanying descriptive documents, as well as less tangible but similarly im-portant outcomes such as new relationships, understandings and policies that may further benefit the community in case of disaster. Upon completion of the process, communities will possess a product that meets federal requirements for hazard mitigation plans, reflects the true vulnerabili-ties of the population, and enables communities to rapidly identify and address effected popula-tions and locations in the event of a disaster or calamity.
This guidebook describes the different steps, as summarized in Figure 1 and Table 1, that com-prise a vulnerability assessment. Each of these steps is described in more detail in the sections that follow. The assessment is best carried out through a process of meaningful and sustained community engage-ment to help ensure that the needs, capabilities and concerns of all groups, particularly those who are often underrepre-sented, are addressed.
The first step, Getting Started, involves identifying and organizing the resources (human, fiscal, organizational) available to conduct the assessment. In Step 2, the commu-nity will identify and rank the types of hazards that pose a threat and, in Step 3, map the areas of greatest risk. Step 4 involves conducting an inventory of physical vulnerability—people and property at risk if a disaster occurs—including critical facilities such as hospitals and schools. In Step 5, the community will identify socially vulnerable populations such as the elderly, low income households or people with dis-abilities, and map the locations of these populations when possible. Steps 6 and 7 call for mapping the location of em-ployment centers and environmental threats, respec-tively, that are vulnerable to natural and man-made haz-ards. Environmental threats include facilities such as animal waste lagoons, junkyards and chemical storage plants. In Step 8, community stakeholders validate or “ground-truth” the data gathered and maps produced in the previous steps. Finally, in Step 9, the community will analyze and synthesize the information collected from previous steps and identify areas where it is most vulnerable to disasters.
For simplicity, Figure 1 (above) and Table 1 (page 8) show the steps of a vulnerability assessment occurring sequentially. However, the steps do not have to be conducted in the order shown or as discrete actions. Several steps, such as 1 and 2 (getting started and identifying hazards), or 4 and 6 (preparing an inventory of people, property and employment centers at risk), could be con-ducted simultaneously. The key is to conduct the assessment in a way that works best for your community with input from a diverse cross-section of the community, reaching out and engaging those who often do not participate in such activities.
Figure 1: Key Steps in a Vulnerability Assessment
Getting started
Identify hazards likely to af-fect the community
Identify and map areas of greatest risk
erty Identify and map physically vulnerable people and prop-
Identify and map socially vulnerable populations
Inventory and map employment centers
Inventory and map environmental threats
Community ground-truthing
Putting it all together 9
8
7
6
5
4
3
2
1
Page 7
Vulnerability Assessment: Step-By-Step Guidebook
Communities may also choose to evaluate their capacity (technical, institutional and fiscal) for dealing with disasters. For example, does the community have an office or a person who is re-sponsible for hazard mitigation or disaster management? Is there a dedicated source of funding for that person? Does the community have a hazard mitigation plan (or is it in the process of pre-paring one)? Is there someone to lead the process of conducting a vulnerability assessment? Ta-ble 1, Assessment Data and Output, describes the possible sources of data used in the assessment and the outputs for each step. Notes on Format of the Guidebook A number of features have been included in the guidebook in an effort to make it user-friendly. Words and phrases (e.g., natural hazards) that may be unfamiliar to the reader have been high-lighted in blue. Definitions for the highlighted words and phrases appear in the glossary, begin-ning on page 52. Additionally, worksheets corresponding with the steps outlined in the vulner-ability assessment appear to the end of the guidebook. These worksheets were included to aid in the completion of tasks by providing a centralized and uniform method for recording information gathered. Communities may choose to duplicate, alter, or ignore the worksheets to fit their needs. Finally, boxes like the ones that appear below have been included throughout the guidebook to provide guideposts, tips or additional information (e.g., definitions) that facilitate the completion of a vulnerability assessment.
HOW TO USE THIS GUIDEBOOK
SOURCES OF INFORMATION Provides ideas about where to get information to complete each step in the vulnerability assess-ment.
LOOKING AHEAD— This box denotes information or procedures that are explained fur-ther in subsequent steps.
Key Terms—Key words are phrases that might not be familiar to the reader are defined in the glossary.
TIPS—This box highlights key considerations and recommended practices.
Requirements and considerations for maps and map layers are denoted in gray boxes along with each map.
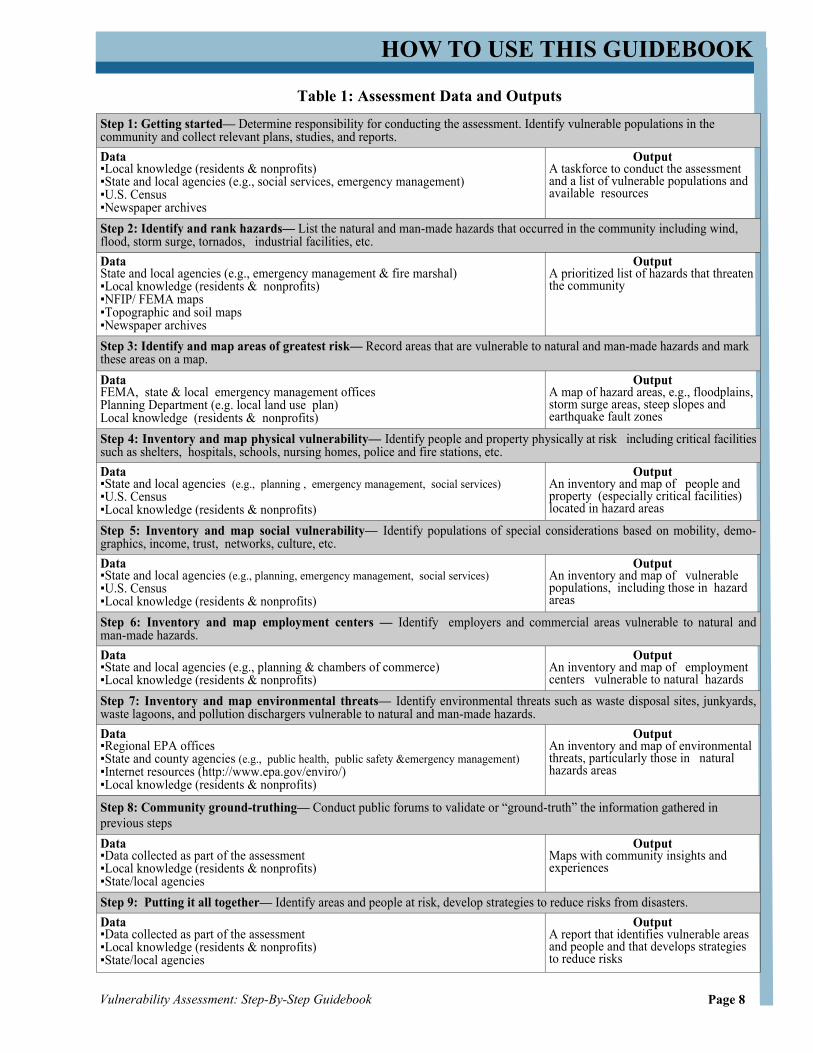
Step 1: Getting started— Determine responsibility for conducting the assessment. Identify vulnerable populations in the community and collect relevant plans, studies, and reports. Data ▪Local knowledge (residents & nonprofits) ▪State and local agencies (e.g., social services, emergency management) ▪U.S. Census ▪Newspaper archives
Output A taskforce to conduct the assessment and a list of vulnerable populations and available resources
Step 2: Identify and rank hazards— List the natural and man-made hazards that occurred in the community including wind, flood, storm surge, tornados, industrial facilities, etc. Data State and local agencies (e.g., emergency management & fire marshal) ▪Local knowledge (residents & nonprofits) ▪NFIP/ FEMA maps ▪Topographic and soil maps ▪Newspaper archives
Output A prioritized list of hazards that threaten the community
Step 3: Identify and map areas of greatest risk— Record areas that are vulnerable to natural and man-made hazards and mark these areas on a map. Data FEMA, state & local emergency management offices Planning Department (e.g. local land use plan) Local knowledge (residents & nonprofits)
Output A map of hazard areas, e.g., floodplains, storm surge areas, steep slopes and earthquake fault zones
Step 4: Inventory and map physical vulnerability— Identify people and property physically at risk including critical facilities such as shelters, hospitals, schools, nursing homes, police and fire stations, etc. Data ▪State and local agencies (e.g., planning , emergency management, social services) ▪U.S. Census ▪Local knowledge (residents & nonprofits)
Output An inventory and map of people and property (especially critical facilities) located in hazard areas
Step 5: Inventory and map social vulnerability— Identify populations of special considerations based on mobility, demo-graphics, income, trust, networks, culture, etc. Data ▪State and local agencies (e.g., planning, emergency management, social services) ▪U.S. Census ▪Local knowledge (residents & nonprofits)
Output An inventory and map of vulnerable populations, including those in hazard areas
Step 6: Inventory and map employment centers — Identify employers and commercial areas vulnerable to natural and man-made hazards. Data ▪State and local agencies (e.g., planning & chambers of commerce) ▪Local knowledge (residents & nonprofits)
Output An inventory and map of employment centers vulnerable to natural hazards
Step 7: Inventory and map environmental threats— Identify environmental threats such as waste disposal sites, junkyards, waste lagoons, and pollution dischargers vulnerable to natural and man-made hazards. Data ▪Regional EPA offices ▪State and county agencies (e.g., public health, public safety &emergency management) ▪Internet resources (http://www.epa.gov/enviro/) ▪Local knowledge (residents & nonprofits)
Output An inventory and map of environmental threats, particularly those in natural hazards areas
Step 8: Community ground-truthing— Conduct public forums to validate or “ground-truth” the information gathered in previous steps Data ▪Data collected as part of the assessment ▪Local knowledge (residents & nonprofits) ▪State/local agencies Step 9: Putting it all together— Identify areas and people at risk, develop strategies to reduce risks from disasters. Data ▪Data collected as part of the assessment ▪Local knowledge (residents & nonprofits) ▪State/local agencies
Output A report that identifies vulnerable areas and people and that develops strategies to reduce risks
Output Maps with community insights and experiences
Table 1: Assessment Data and Outputs
HOW TO USE THIS GUIDEBOOK
Page 9
Vulnerability Assessment: Step-By-Step Guidebook
STEP 1: GETTING STARTED IDENTIFY PARTNERS AND STAKEHOLDERS
OVERVIEW The purpose Step 1 is to determine who will be involved in conducting the vulnerability assessment, who will lead the effort, and what vulnerable populations reside in the community. Essentially this step is the time to get a sense of potential partners and to identify a group or team to spearhead the process.
In this initial step, one of the first tasks will be to determine which members of the community need to be consulted in order to ensure that the group responsible for carrying out the assessment represents all segments of the community, including socially vulnerable populations. In addition, the community will need to decide what process will be used to reach consensus on the goals and objectives of the assessment, and what information is readily available to support that effort (e.g., plans and reports).
Step 1 will help the community get organized to conduct a vulnerability assessment, agree on the objectives of the assessment, better understand the number and location of vulnerable populations in the community, identify the technical resources available (e.g., maps and reports) to conduct an assessment, and assign responsibility for carrying out the assessment.
TASKS a. Organize a group or team that will be responsible for conducting the assessment b. Identify vulnerable populations in the community c. Collect relevant plans, studies, reports, and technical information
Putting it all together
Community ground-truthing
Inventory and map environmental threats
Inventory and map employment centers
Identify and map socially vulnerable populations
Identify and map physically vulnerable people and property
Identify and map areas of greatest risk
5
3
1
2
4
6
7
8
9
Identify hazards likely to affect the community
Getting Started
SOURCES OF INFORMATION • State and local emergency management
(EM) offices • State and local departments of health and/or
social services agencies
• Local knowledge (residents) • Nonprofits organizations and faith-based
groups • Public library (newspaper archives) • U.S. Census
TASK A: Organize a group or team that will be responsible for conducting the assessment
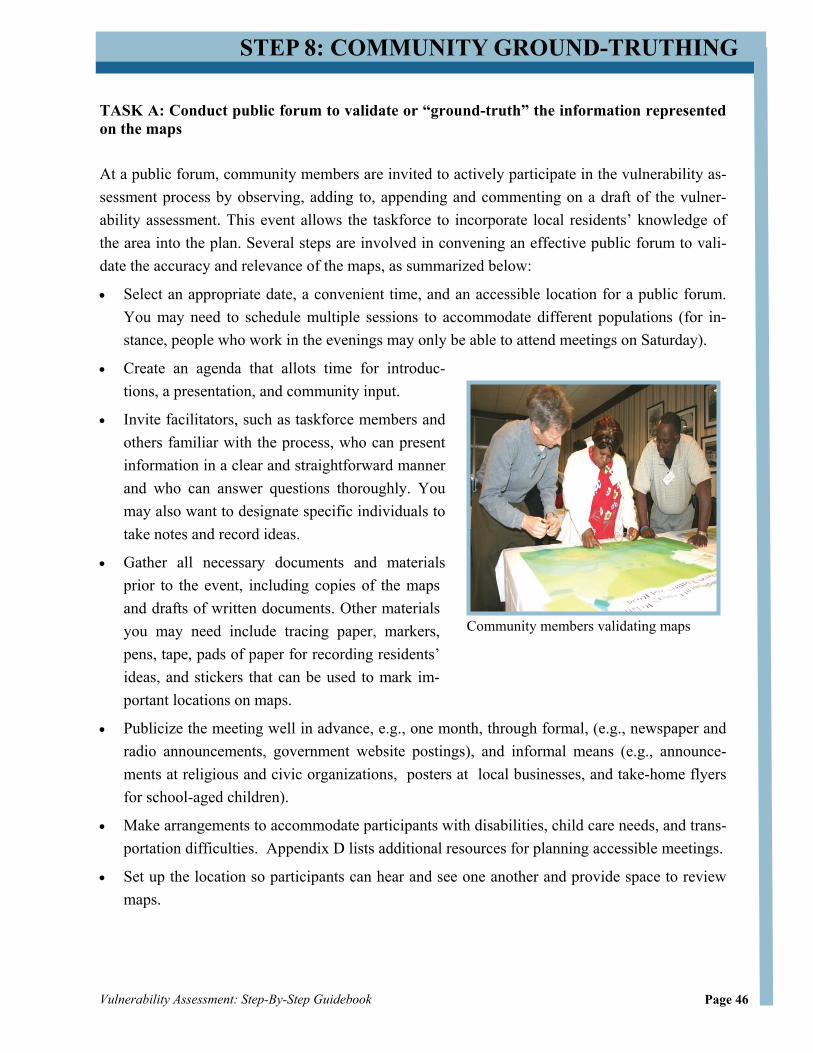
Begin by assembling a group or team that will be responsible for conducting the assessment. Typically, the local or county planning department or emergency management office will take the lead in an assessment, but the team should be representative of the community and include those, such as minorities and people with disabilities, who are often underrepresented in community planning projects and who may, based on per-sonal experience, have knowl-edge of the impacts of disasters on the community. Use Work-sheet 1: Taskforce Membership on page 54 to help ensure the taskforce represents potentially vulnerable populations.
To get things started, you will need people who have the interest, time and energy to lead the as-sessment process. There are different ways of involving people in the vulnerability assessment (see Appendix A for discussion of citizen participation). For the assessment to be relevant, meaningful and effective, participants must be empowered to influence decisions and outcomes. A community may choose to appoint a leader, or co-leaders, to guide the assessment process. One co-leader could be a person who is responsible for emergency planning or response, such as the Emergency Management director. The other co-leader could be a person on the task force who holds a leadership position in the community, such as the director of a community-based organization. These two people could help recruit taskforce members, schedule taskforce activi-ties, and conduct meetings. Enter the contact information for taskforce members on Worksheet #2: Taskforce Contact Information on page 55.
Some communities may decide to hire a community ‘coach’ to help with the assessment process. A coach helps the taskforce through the assessment process by facilitating meeting discussions, helping to build consensus, and mediating conflicts. A good coach is someone who is trusted by the community, can help organize the group and keep it focused and moving forward, and who can mediate disputes and help the group reach consensus.
Vulnerability assessment team meeting
Page 11
Vulnerability Assessment: Step-By-Step Guidebook
Once a group or team is formed, it should begin to identify vulnerable populations in the commu-nity. You can start by drawing on the knowledge and experiences of the group members and then contacting state and local agencies, such as a Department of Health or Social Services, as well as nonprofit and faith-based groups for information about people in the community who may be particularly vulnerable to disasters (Note: in Step 2, you will collect information about the type, location and severity of hazards that have struck the community). For example, a local “Meals on Wheels” program should be able to provide information on the location of homebound, ill or frail people who may need extra assistance during a disaster. The entire process should be open and inclusive and seek out those in the community who have stories to tell about how disasters have affected the community, particularly those who may not have the means to prepare adequately for, or recover from, the disaster.
In addition to state and local agencies, the U.S. Census can be used to gather information about race, ethnicity, median income and other characteristics of the commu-nity. For example, are there many elderly people in the community and do they tend to live in certain areas or blocks? Table 2: U.S. Census 2000 Data Locations provides the location (summary file and specific tables) for information about several possible vulnerable popu-lations (see Figure 2, p. 12 for instructions on how to access this Census data from the U.S. Census website: www.census.gov). Enter data from state and local agencies and the Census on Worksheet # 3: Community Demographics, on page 56. Please note that certain categories of Census data are available only to the block group.
TASK B: Identify vulnerable populations in the community
STEP 1: GETTING STARTED
A Word of Caution: The U.S. Census provides invaluable socio-demographic informa-tion for a variety of geographic areas. However, keep in mind the following caveats when using these data. The data can quickly become out-of-date (for example, the most recent
Census data is from 2000). Additionally, Summary File 3 and Summary File 4 use samples to es-timate the characteristics for a whole geographic area. Both of these circumstances can contribute to inaccurate data about any given area. Double-check the information that is gathered in this step. Recent reports for local and state agencies, newspapers, and well-informed residents can be used to check the validity of (ground-truth) Census data.
The elderly often struggle to recover from disasters
Children (Aged 17 and under) Census 2000 Summary File 1 (SF 1)→P12
Elderly (Aged 65 and over) Census 2000 Summary File 1 (SF 1)→P12
Population with disability Census 2000 Summary File 3 (SF 3)→P41
Single head of household *Male householder, no wife present with own children; Female householder, no wife present with own children; Non-family Male Householder; Non-family Female Householder
Census 2000 Summary File 1 (SF 1)→P19
Institutionalized population Census 2000 Summary File 1 (SF 1)→P37
Households living in poverty Census 2000 Summary File 3 (SF 3)→P92
Vehicle Availability Census 2000 Summary File 3 (SF3)→ H44
Linguistically isolated household Census 2000 Summary File 3 (SF3)→ P20
Housing available for migrants Census 2000 Summary File 3 (SF 3)→H8
Race/Ethnicity Census 2000 Summary File 1 (SF 1)→P4
Residents living in mobile homes Census 2000 Summary File 3 (SF 3)→H30
Block
X
X
X
X
X
Block
X
X
X
X
X
X
STEP 1: GETTING STARTED
Step 1: Go to http://www.census.gov Step 2: Click on ‘American FactFinder’ from left-hand column. Step 3: Click on ‘Data Sets’ from left-hand column. Step 4: Select ‘Census 2000 Summary File 1 (SF 1) 100-Percent Data’ and click on ‘Detailed Tables’. Step 5: Click on tab labeled ‘Geo within geo’. Step 6: In drop-box labeled ‘Show me all’, select Block Groups. Step 7: In drop-down box labeled ‘Within’, select either County or Place depending on the scope of the social vulnerability assessment. Step 6: A drop-down box labeled ‘Select a state’ will appear. Select your state from the list. Step 7: A drop-down box labeled either ‘Select County’ or ‘Select Place’ will appear. Select your County or Place from list. Step 8: A drop-down box labeled ‘Select one or more geographic areas’ will appear. Select ‘All Block Groups’ and click ‘Add’. Step 9: Click ‘Next’.
Figure 2: How to Find Demographic Information (Block Group Level) from the 2000 U.S. Census:
State or local agencies such as the city or county Planning Department, State Emergency Man-agement Office, State Department of Aging, and the local hospital, may already have collected information and prepared plans relevant to a vulnerability assessment. For example, the Depart-ment of Aging may have figures on the number of seniors in a particular community. Contact these agencies for copies of their plans or reports. Ask them if they have prepared any studies on the community’s vulnerability to natural hazards. Review the plans or studies for information about the type of hazards that affect the community, the areas that are most likely to be affected (e.g., the floodplain), and the location of vulnerable populations. Some of the plans may be out-of-date, but will still provide an indication of the types of hazards that threaten the community and the population at risk. Record the information in Worksheet #4: Existing Information (page 57).
TASK C: Collect relevant plans, studies, reports, and technical information
LOOKING AHEAD— Local plans may contain information about vulnerable populations (number of people, their needs, location, etc.) and any policies or programs that have been put in place to help them if disaster strikes. The plans may also include maps of vulnerable
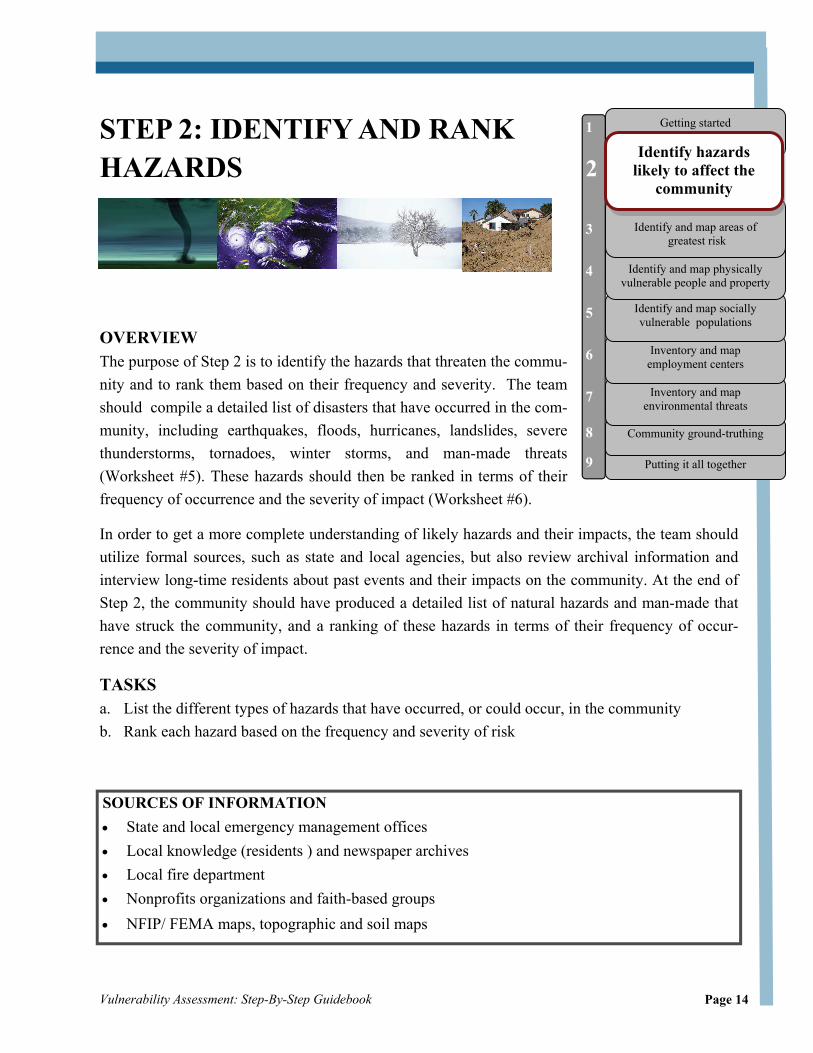
OVERVIEW The purpose of Step 2 is to identify the hazards that threaten the commu-nity and to rank them based on their frequency and severity. The team should compile a detailed list of disasters that have occurred in the com-munity, including earthquakes, floods, hurricanes, landslides, severe thunderstorms, tornadoes, winter storms, and man-made threats (Worksheet #5). These hazards should then be ranked in terms of their frequency of occurrence and the severity of impact (Worksheet #6).
In order to get a more complete understanding of likely hazards and their impacts, the team should utilize formal sources, such as state and local agencies, but also review archival information and interview long-time residents about past events and their impacts on the community. At the end of Step 2, the community should have produced a detailed list of natural hazards and man-made that have struck the community, and a ranking of these hazards in terms of their frequency of occur-rence and the severity of impact.
TASKS a. List the different types of hazards that have occurred, or could occur, in the community b. Rank each hazard based on the frequency and severity of risk
Putting it all together
Community ground-truthing
Inventory and map environmental threats
Inventory and map employment centers
Identify and map socially vulnerable populations
Identify and map physically vulnerable people and property
Identify and map areas of greatest risk
Getting started
Identify hazards likely to affect the
community
5
3
2
1
4
6
7
8
9
SOURCES OF INFORMATION • State and local emergency management offices • Local knowledge (residents ) and newspaper archives • Local fire department • Nonprofits organizations and faith-based groups • NFIP/ FEMA maps, topographic and soil maps
Page 15
Vulnerability Assessment: Step-By-Step Guidebook
TASK A: List the different types of hazards that have occurred in the community and iden-tify the disasters that are the most prevalent
Most of the information needed for this step is available from local, state, and federal agencies and organizations. Start by contacting the state and county (or city) emergency management offices for information about the types of hazards that have occurred, the dates of their occurrence and the severity of impact. Other possible sources of information about the occurrence and severity of hazards include newspaper archives (check with the local library), and social service agencies that typically respond during an emergency (e.g., Red Cross or whatever agency runs the local shelters). Finally, faith-based organizations, nonprofit organizations, elected officials and long-time residents may provide useful information about the type, severity and location of disasters in the community. Many residents who have lived through disasters, or groups that responded to an emergency, can recount stories of their experiences. Record the information collected on Worksheet #5: Identifying Hazards, page 58. An example of Worksheet #5 is provided below.
STEP 2: IDENTIFY AND RANK HAZARDS
Sample of Worksheet #5: Identifying Hazards
Hazard or Event Description (Type of hazard, date of event, number of injuries, cost and types of damage, etc.)
Source of Information Map Available for this Hazard?
Scale of Map
Hurricane Camille—Nov 1969, One death, flooding & wind caused $2.75 million in damages
-Newspaper -Internet -Community members
FIRM Storm surge map
1:6000 1:6000
Winter storm—February 2002. Two deaths, downed trees, roads inaccessi-ble; $400,000 in damages
-Newspaper -Community members -Library archives
No
LOOKING AHEAD—When contacting state, county or local emergency management offices, ask for copies of maps that depict the location of areas vulnerable to natural hazards and where natural and man-made disasters have struck in the past. These maps can be used as a base map in Step 3.
In addition to using formal sources for identifying hazards, such as state and local agen-cies, teams should interview long-time residents about their experiences with disasters and review archival information such as newspapers to fully understand the impacts of
TASK B: Rank each threat based on the frequency and severity of risks
STEP 2: IDENTIFY AND RANK HAZARDS
Some hazards are more likely to occur than others. Some occur infrequently, but their impacts can be widespread and severe. For example, on the Mid-Atlantic coast, thunderstorms occur fre-quently, but their impact tends to be rather moderate, although there are instances when such storms cause severe damage from flooding and high winds. Hurricanes occur infrequently, but their impacts can be severe, causing extensive dam-age to houses, roads and infrastructure, particularly along the coast. Thus, a community may decide to focus its efforts on preparing for hurricanes, given the potential damage that may occur, rather than on thunderstorms.
Task B ranks the hazards that are likely to threaten the community in terms of their potential impacts. In the ranking, you may decide to use a numeric scale, e.g., ranking frequency and severity on a scale of 1-4, with 4 being the most frequent or severe. Alterna-tively, a qualitative ranking may be more suitable, e.g., highly likely, likely, possible and unlikely. Similarly, a ranking for severity of impact could be as follows: catastrophic, critical, limited and negligible. Use Worksheet #6: Ranking Hazards (page 59), to conduct the ranking. A sample of Worksheet #6 is shown below, using a qualitative ranking.
Sample of Worksheet #6: Ranking Hazards
Scale Frequency Severity Overall Ranking 1 Unlikely Negligible Low 2 Possible Limited Medium 3 Likely Critical High 4 Highly likely Catastrophic Very High
Hazard or Event Frequency Severity Overall Ranking Earthquake Possible Catastrophic High Landslide Possible Critical Medium Tornado Unlikely Critical Low Thunderstorm Highly likely Limited Low Wildfire Likely Critical Very High Chemical spill or ex- Unlikely Critical Medium
Hazard or Event Frequency Severity Overall Ranking Earthquake Possible Catastrophic High Landslide Possible Critical Medium Tornado Unlikely Critical Low Thunderstorm Highly likely Limited Low Wildfire Likely Critical Very High Chemical spill or ex- Unlikely Critical Medium
California wildfire. U.S. House of Representa-tives, Committee on Resources
Page 17
Vulnerability Assessment: Step-By-Step Guidebook
STEP 3: MAP AREAS OF GREATEST RISK
OVERVIEW The purpose of Step 3 is to identify and map locations in the community that are at greatest risk from hazards identified in Step 2. Step 3 will walk the vulnerability assessment team through the process of producing a map that shows the locations of hazard areas. The outcome of Step 3 will be a map with associated overlays (see Step 3, Task C) that clearly depict areas and populations that will likely be affected by natural hazards. Creating overlays of hazard areas—that is, areas that have been, and likely will be, affected by hazards such as floods or wildfires—will enable the community to identify, in Steps 4 and 5, where it is most vulnerable to disasters. The key features of the com-munity will be placed on a base map, which can be in digital form (GIS) or hard copy (paper and pencil). Using Wilmington, Delaware as an example, Figure 4 shows a Flood Insurance Rate Map (FIRM) of the city while Figure 5 shows a GIS-generated sample base map that includes major roads, rivers, and municipal boundaries. This map will be used as a sample base map throughout the guidebook. The legend in the map shown in Figure 4 is too small to read, but is included in the fig-ure to provide a sense of what the FIRMs look like. The product from Step 3, a good base map with accurate overlays depicting hazard areas and vulnerable populations, is fundamental to com-pleting the remaining steps in the assessment.
TASKS a. Prepare a base map for use throughout the vulnerability assessment. b. Identify and map specific areas in the community that are vulnerable to disasters, such as flood-
plains, storm surge areas, steep slopes (landslides) and earthquake-prone areas.
Putting it all together
Community ground-truthing
Inventory and map environmental threats
Inventory and map employment centers
Identify and map socially vulnerable populations
Identify and map physical vulnerability
Getting started
Identify hazards likely to affect the community
Identify and map areas of greatest risk
5
2
3
1
4
6
7
8
9
SOURCES OF INFORMATION • FEMA, state, and local emergency
management offices • State and local planning department • Local knowledge (long-time residents and
local nonprofit organizations)
TYPES OF BASE MAPS • FEMA Map Service: http://msc.fema.gov • USGS topographic maps or Digital Orthophoto Quarter Quads (DOQQ) • Topographic and/or planimetric maps from
state or local agencies • Aerial topographic and/or planimetric maps • Roadmaps
3. Under “Search by Address,” enter street address, city, and zip code of parcel within the area you are interested in.
4. Under “Map Search Results,” click “View” to preview the map. You can change the scale (%), zoom in and out, or pan to a different area.
5.Interactive mapping shows you which individual floodplain map tile contains the physical address you have typed in.
6.With the map open you can select other individual floodplain map tiles that you would like to order by using either the “box” or “point” tool on the side of the map.
7.Once you have selected the map tiles that you want, they will be listed in a separate FEMA window.
8.You have the option to look at the individual map tiles to verify they are the correct ones or purchase them.
9. When purchasing FEMA floodplain maps online, you have the following format options: Paper map to be mailed out ($3 fee) Online PDF ($2.50 fee) Digital copy placed on a CD ($3 fee) also to be mailed.
STEP 3: MAP AREAS OF GREATEST RISK
You can search for floodplain map tiles without knowing a specific address by navigating (focusing) within the online map application window to the general geographic area you are interested in and then selecting individual tiles in the same manner as above.
Figure 3: How to Find FEMA Maps – Using the Interactive Mapping Service
You can use an existing map to create a base map of the community. The county or local planning office can be a good source for local maps. When contacting state, county or local emergency man-agement offices (in Step 2), ask for copies of maps that show the location of areas vulnerable to natural hazards and where natural and man-made disasters have occurred in the past or are likely to occur in the future. Flooding is the most common natural hazard, and maps of flood hazard areas, known as Flood Insurance Rate Maps, are available from the Federal Emergency Management Agency an example shown in Figure 4, p. 18). These maps are available in hard copy and, in some communities, in digital format as well. Maps of areas prone to other hazards, such as wildfires or earthquakes, can be obtained from the state or local government (see feature box on Shaking Haz-ard Maps on page 25). Finally, information about the location of man-made hazards, such as chemical storage facilities, is available from EPA’s Enviromapper website (http://www.epa.gov/enviro/html/em/) and may be available from your state environmental agency or local fire depart-ment as well. Enviromapper is an interactive mapping tool that allows users to create maps of their town show-ing the location of flood hazard areas, Superfund sites, EPA regulated sites as well as critical facilities such as schools, hospitals and churches.
Typically, flood maps are based on delineations that were completed years ago and thus might not accurately reflect current local conditions. FEMA has begun the process of updating the maps. However, even outdated maps, modified based on local knowledge and experi-ence, can serve as an initial base map. Flood hazard maps are available from the FEMA Map Service: http://msc.fema.gov (see Figure 3 on page 18 for step-by-step instructions on obtaining these maps). In addition, FEMA has provided a web-based tutorial on understanding how to interpret FIRMs. The tutorial is available at http://www.fema.gov/plan/prevent/fhm/ot_firmr.shtm#play. The base map should be large enough (e.g., poster size) for the citizen planning team or task force to mark up and revise, as necessary. These maps will be used at team meetings and “ground-truthed,” as discussed in Step 8.
FEMA flood maps are limited in geographic coverage from a few to several square miles, so it may take several contiguous individual maps, known as “tiles,” to cover an entire municipality or county. There are a numerous ways to access these maps from FEMA, as described in Figure 3.
TASK A: Select or prepare a base map for use throughout assessment process.
STEP 3: MAP AREAS OF GREATEST RISK
Considerations for select-ing a base map:
Scale – should cover areas that are the focus of the vulnerability assess-ment.
Detail – should be able to see clearly key features such as roads, critical facilities, and hazard areas.
Date – Make sure to check when the map was made and mark recent changes (roads, etc.) that might not be included on the map.
Figure 5: Sample GIS-generated Base Map of Wilmington, Delaware
In addition to existing hardcopy and digital flood maps products, you can also access and use Geographic Information System (GIS) data to make individualized maps that have significantly larger geographic coverage than individual floodplain map tiles. Figure 5, below, shows an exam-ple of a GIS-generated base map.
GIS maps can incorporate different layers showing the extent of the floodplain, areas where earthquakes and wildfires have occurred, and other hazards as well. Other layers could include critical facilities, roads, bridges, and the location of vulnerable populations. If the community does not have GIS capability, they can develop a manual map system—a paper base map with layers or features (e.g., floodplains, critical facilities) depicted on a separate layer or transpar-ency—to display the base map with desired layers of information (see Figure 7, page 22).
Page 21
Vulnerability Assessment: Step-By-Step Guidebook
STEP 3: MAP AREAS OF GREATEST RISK
TASK B: Identify and map specific areas in the community that are vulnerable to disasters
For selection of a base map, there are numerous types of maps that might be available. Political maps (like above) depict road networks, infrastructure and boundaries well and are usually most preferred. In mountainous areas, where landslides and flashfloods are prevalent, contour maps
(produced by USGS) depicting terrain and slopes might be useful as well.
Figure 6: Sample Natural Hazards Map of Wilmington, Delaware
FLOOD ZONES
Create a base map and identify vulnerable areas. Figure 6, below, shows a base map of Wilming-ton, Delaware with the following layers added: roads, water bodies and flood zones (100 and 500-year flood hazard areas). Subsequent maps will add layers for environmental hazards, schools, hos-pitals, and fire stations. The layers included on the map depend on the particular features and cir-cumstances of the community for which you are conducting the vulnerability assessment.
For assessment teams that do not have access to a GIS system such as ArcMap, information from each of the steps can be displayed on a base map using overlays.
Materials Required:
• Selected base map (e.g., a USGS topographic map)
• Acetate transparency (A 48” wide roll is recom-
mended and can be purchased at most office supply
Instructions
1. Lay out base map on wall or on a table
2. Lay blank transparency sheet over base map, centered on
area of interest
3. Mark reference points to align each layer to the base map
• Select two clearly identifiable landmarks on the map
(such as a building or road intersection)
• Mark landmarks with cross-hairs using flair pen
• Label landmarks on overlay
4. Plot data (population locations, facilities, hazard areas,
etc.)
5. Label layer with descriptive name, e.g., health care facili-
ties.
Harrison School
HEALTHCARE FACILITIES
Sample Base Map with Reference Landmarks
Harrison School
Health Care Facilities
Sample Overlay of Point Locations (Healthcare Facilities)
Sample Overlay
Create a layer for each individual type of information (healthcare facilities, flood-plain, hazardous material sites, etc.). This
allows the user to interchange overlays based on the hazard situation, displaying only the information required for that case.
Page 23
Vulnerability Assessment: Step-By-Step Guidebook
OVERVIEW In this step, the team will conduct an inventory of physical vulnerability. The team will assess how many people and structures, including critical facilities, lie within the hazard areas designated in Step 3. Critical facili-ties include, but are not limited to, schools, hospitals, police/fire stations, nursing homes, daycare facilities, sewage treatment plants, water treatment facilities, and power plants. The inventory should include current conditions (people and property currently at risk) as well as potential future conditions (people and property likely to be at risk in the future, given current development trends). This inventory will be represented on a map (using an overlay). TASKS a. Inventory and map the critical facilities that are currently located in hazard-prone areas. b. Estimate the number and value of residential structures currently located in hazard-prone ar-
eas c. Estimate the number of people who live in these structures. d. Estimate the number and value of residential structures that will be located in hazard-prone
areas at some time (e.g., 10 years) in the future and the number of people who will live in those structures.
STEP 4: MAP PHYSICAL VULNERABILITY
SOURCES OF INFORMATION • State and local emergency management and planning departments • Department of social services • Local knowledge (long-time residents and local nonprofit organizations)
Getting started
Identify hazards likely to affect the community
greatest risk Identify and map areas of greatest risk
nerable populations Identify and map socially vulnerable populations
Identify and map physically vulnerable people and property
The first step is to make a list of all critical community facilities (use Worksheet #7) and deter-mine which ones are located in hazard areas. The local emergency management office should be able to help identify such facilities. If not, contact each entity (e.g., the school district, fire
department, nursing homes, congregate care facilities, water authority, hospital, etc.) for the location of critical facilities. Other sources of information include state agencies that license facilities such as nursing homes or daycare cen-ters. Utility companies should be able to pro-vide you with the location of their facilities. Re-cord the information about the locations of criti-cal facilities on Worksheet #7, page 60. A sam-ple of Worksheet #7 is shown below. Figure 8, page 25, shows an example of a map of critical facilities completed for Wilmington, Delaware.
Considerations for Critical Facilities Map Structures or facilities should be depicted by type (see Figure 8) to enable rapid identification and prioritization of steps to protect such facilities. If many cases, critical facilities vulnerable to a particular hazard may occur across adjacent communities.
TASK A: Inventory and map critical facilities located in hazard-prone areas
STEP 4: MAP PHYSICAL VULNERABILITY
Sample of Worksheet #7 - Critical Facilities Inventory
Type of Facility
Address Located in Hazard
Yes No School(s)
Hospital(s)
Police Station(s)
Name of Facility
A damage assessment team checks flood damage to the waste water facility in Chehalis, Washington.
Page 25
Vulnerability Assessment: Step-By-Step Guidebook
Figure 8: Sample Map of Critical Facilities for Wilmington, Delaware
STEP 4: MAP PHYSICAL VULNERABILITY
Shaking Hazard Maps The U.S. Geological Survey (USGS) prepared “shaking-hazard” maps as part of the National Earthquake Hazard Reduction Program or NEHRP. Each of these maps shows the severity of ex-pected earthquakeshaking for a particular level of probability. For example, the map may show the level of earthquake shaking that have a 1-in-10 chance of being exceeded in a 50-year period. Lo-cal governments in many parts of the country rely on these maps to establish the seismic design standards in building codes. Shaking-hazard maps are available at the following website: http://geohazards.cr.usgs.gov/eq/index.html.
Display of key facilities along with the extent of hazard areas identifies places that are most vulnerable to hazards.
TASK B: Estimate the number and value of residential structures (homes, apartment complexes, mobile homes, etc.) currently located in hazard-prone areas
There are several ways to determine the number of residential structures located in hazard prone areas, assuming the information isn’t already available from the local planning office. One ap-proach is to use aerial photographs to count the number of structures in the hazard areas deline-ated on the base map. That is, you can compare a base map that shows the vulnerable areas with an aerial photograph of that same area. For flood hazards, on-line aerial photographs and maps from FEMA (http://msc.fema.gov) delineate the location of the base flood (see Figure 3: How to Find FEMA Maps).
The FEMA photographs include an outline of the flood hazard area, town or county boundaries, street names, and some critical facilities such as hospitals and schools. Using these photos, you can count the number of structures in hazard areas. Aerial photos may also be available at the county or local planning department, the county tax assessor’s office or from websites such as GoogleEarth (www.googleearth.com) or Mapquest (mapquest.com). Thus, base maps can be used in conjunction with aerial photographs to count the number and type of structures (e.g., house, apartment, garage or barn) in the hazard area. See Figures 9 and 10, page 27, for an example of a FEMA flood map and a GoogleEarth aerial photograph of the same location.
For other types of hazards, you will need to see if maps are available to delineate the vulnerable areas. For example, maps depicting the location of earthquake hazard areas have been prepared by the federal government and a few state governments, notably California (see sidebar Shaking Hazard Maps).
For small, rural communities, an inventory could be conducted in the field, e.g., using a “windshield” inventory, (e.g., driving around and counting structures), rather than aerial photo-graphs. Use Worksheet #8, page 61, to help record the data from this step.
Once you have estimated the number of structures in the hazard area, you may need to visit the local tax assessor’s office to obtain the assessed value of these properties (tax assessor files may be available online). If there are a lot of properties to look up, you may want to calculate, based on a sample of properties, the median value for different types of houses in the hazard area (e.g., single-family detached, apartments, etc.). Local realtors may be able to estimate housing values as well. Use Worksheet #8 to help record the data from this step.
STEP 4: MAP PHYSICAL VULNERABILITY
Page 27
Vulnerability Assessment: Step-By-Step Guidebook
Figure 9: Sample Floodplain Map of Cambridge, Maryland
STEP 4: MAP PHYSICAL VULNERABILITY
Figure 10: Sample GoogleEarth Map of Cambridge, Maryland
Considerations For Floodplain Map:
• This map or overlay should depict the extent of possible flooding (such as 100 year or 500 year flood)
• This overlay, joined with criti-cal facility, vulnerable popula-tions, or hazardous material locations, will allow teams to identify people and places likely to be affected by flood-ing.
Hand-drawn, dashed line shows approximate bound-ary of 100-year floodplain using map above as a refer-ence.
Once you have estimated the number and type of structures currently located in areas vulnerable to natural or man-made hazards, you can use this information to estimate the number of people at risk.
Aerial photographs can be used in conjunction with the maps prepared in Step 3 to verify the type of structure (e.g., house, apartment, garage or barn) in the hazard area and then to estimate the population at risk (See Figure 10 for image of houses in flood hazard area). Contact the local planning department for an estimate, a rough average, of the number of people living in different types of housing (e.g., 2.7 people per single-family detached house and 2.1 people per apartment). Another way to estimate the number of people and property at risk is to overlay census data (block group level) onto the base map and estimate the number of structures and people in harm’s way based on the census data. That is, for the census block groups that lie within the hazard areas shown on the base map, determine how many homes and people are within those census blocks. You may also be able to estimate, again using the census data at the block group level, the num-ber and percent of socially vulnerable populations living in hazard-prone areas. The census data, however, is somewhat dated and the boundaries of the hazard areas probably will not coincide exactly with the census boundaries, but you can generate a rough estimate this way. Use Work-sheet #8 to help with record the number and value of structures and the number of people at risk.
Finally, you may want to estimate the value of structures at risk as well. One of the ways disas-ters hurt communities economically is by damaging or destroying homes (or businesses) and thus reducing the tax base. Home values can be obtained from the tax assessor’s office. Depending on the number of homes, this could be a very cumbersome process. Another option is to use the median value of homes for the community, from the census.
TASK C: Estimate the number of people who live in these structures (number of people cur-rently at risk)
STEP 4: MAP PHYSICAL VULNERABILITY
Sample of Worksheet #8: Residential structure multiplier table
Type of Structure Number of struc-tures
Number of people per structure
People at risk
Estimated Value
Single-family detached
Single-family attached
Multi-family
Mobile homes
Page 29
Vulnerability Assessment: Step-By-Step Guidebook
TASK D: Estimate of the number and value of structures, as well as the number of people, that will be located in hazard-prone areas at some time (e.g., 10 years) in the future
To assess the community’s vulnerability to disasters in the future, e.g., 10 years from now, contact the local planning department, if there is one, along with local utilities, chamber of commerce, real-tors and developers for their best guess on how much development will occur in the next 10 years as well as the type (e.g., residential, commercial, or industrial) and location of development. If available, comprehensive plans, zoning maps, and capital improvement plans provide an indication of where future growth is likely to occur and the amount and type of growth, as shown in Figure 11, opposite page. From this, estimate the number of (additional) people and property that would likely be at risk in the future. These will be rough estimates, but they will give the community a sense of whether its policies and practices are promoting (or discouraging) development in hazard-prone areas and thus increasing (or decreasing) the community’s vulnerability to hazards (see Sample Worksheet 9, below and Worksheet 9, page 62). You can use the same process to translate building types into population estimates, i.e., using the process from Task B.
Information gathered from this step (Step 4) should be presented to the community at a public meeting to allow people to validate or ground truth the data estimation and any maps produced.
STEP 4: MAP PHYSICAL VULNERABILITY
Residential housing types
Potential Future Conditions Buildings (#) People (#) Value ($)
Single-Family detached
Single-Family attached
Mobile Homes
Multi-Family
Sample of Worksheet #9—Future Inventory of People and Property
OVERVIEW Some people in the community are more vulnerable than others. So-cially vulnerable populations, including low-income households, elderly or those with disabilities, may lack the resources and ability to prepare for and recover from disasters. In addition, some residents may suffer indirectly from the affects of a disaster, for example if their house wasn’t flooded, but they were cut off from work, daycare, or the local pharmacy due to flooding of roads. Physical impairments may make it difficult to seek shelter or evacuate dur-ing an emergency or to seek help afterward. Similarly, language or cultural barriers, cognitive difficulties or physical isolation, (e.g., an elderly person who lives in an isolated part of a rural community), may cause people to be cut off from crucial information, services or supplies in the event of a disaster. The purpose of this step is to identify disadvantaged people in the community who may be especially vulnerable, directly or indirectly, to the impacts of disasters. The vulner-ability assessment team will catalogue and map the location of socially vulnerable members of the community. TASKS a. Contact nonprofits, faith-based organizations and government agencies for information on the
number, location, needs and capabilities of socially vulnerable people. b. Prepare maps of social vulnerability.
SOURCES OF INFORMATION • State and local emergency management and planning departments • Department of Social Services • Local knowledge (long-time residents and local nonprofit organizations) • U.S. Census 2000
4
5
1
3
6
7
8
2
9
Getting started
Identify hazards likely to affect the community
Identify and map areas of greatest risk
vulnerable people and property Identify and map physically vulnerable people and property
employment centers Inventory and map employment centers
The first task of Step 5 is to organize a meeting of key stakeholders in the community, includ-ing faith-based organizations, hospitals, nonprofit organizations that work with socially vulner-able groups, as well as representatives from state and local agencies. From these meetings, (it may take more than one meeting), develop a list of people in the community who may be so-cially vulnerable. The list could be organized into four main categories or types of barriers:
1. Mobility - the elderly, disabled, or people without cars.
2. Language/communication - people who don’t speak English or who have difficulty reading.
3. Economic - low-income residents.
4. Cultural - people who distrust outsiders and might be reluctant to seek assistance.
Once you have developed a list, determine whether socially vulnerable people live in hazard-prone areas. Mark areas of the city, town or county that are often cut off from the rest of the community during a disaster—for example by flooded roads, or downed trees, which can block roads or knock out electricity or telephone service. There are two main techniques or methods of identifying socially vulnerable populations: (1) registries and (2) developing a social vulnerability score from census data. Each of these methods is summarized below and described in more detail in the appendix.
Registries Some communities have created registries to help identify individuals that may need assistance before, during, and after a disaster. Due to privacy concerns, registries tend to be voluntary and are unlikely to be comprehensive. However, outreach can help encourage individuals to regis-ter. In Pitt County, North Carolina, outreach activities included mass mailings in utility bills, community newsletters, and registration forms at agencies and organizations serving popula-tions with special medical needs. Appendix B: Using Registries, describes the process used to develop a special medical needs registry in Pitt County, North Carolina.
TASK A: Contact nonprofit groups, faith-based organizations, and governmental agen-cies for information on the number, location, needs and capabilities of socially vulnerable populations
STEP 5: MAP SOCIAL VULNERABILITY
A Community cut off by flood
Page 33
Vulnerability Assessment: Step-By-Step Guidebook
Figure 12: Hertford County, NC Social Vulnerability Score for Population Aged above 65
STEP 5: MAP SOCIAL VULNERABILITY
Developing a Social Vulnerability Score from Census Data Communities may choose to develop a social vulnerability index to assess the location of socially vulnerable populations relative to areas of physical vulnerability (i.e., floodplains, hazardous facili-ties, etc.). Appendix C: Using Census Data, describes the process for creating a Social Vulnerabil-ity Score and a Social Vulnerability Index using U.S. Census 2000. The score uses secondary data from the census to highlight block groups where socially vulnerable populations are clustered and allows comparisons between block groups using different population denominators. The Social Vulnerability Index is a composite of all the social vulnerability scores. See note (“a word of cau-tion”) on page 11 about the use of census data.
TASK B: Prepare maps of social vulnerability
Using census data, a vulnerability index can be calculated and mapped for a variety of factors, in-cluding age, income, and disability. Figure 12, below, provides an illustration of the social vulner-ability score for populations aged 65 and older living in Hertford County, North Carolina. The dif-ferent colors reflect the level of vulnerability, with darker colors corresponding to areas of greatest social vulnerability (higher scores). A longer discussion of the calculation of the creation of the Social Vulnerability Index is included in Appendix C.
SOURCES OF INFORMATION • State and local departments of planning and economic development • Local chambers of commerce and State Department of Commerce • Local knowledge (long-time residents and local nonprofit organizations)
OVERVIEW Individuals and communities can be vulnerable to financial distress (e.g., loss of income or tax base) if major employer’s facilities be-come damaged or destroyed by a disaster. Also, people could be at risk if their workplace is located in a hazard-prone area. The purpose of Step 6 is to identify employers or employment centers in or near the community that would be adversely effected by hazards identified in Step 2. The team should identify whether these employers are located in hazard-prone areas, such as a floodplain, and determine whether they would likely be inaccessible during an emer-gency, (e.g., if the roads leading to the employment facility were cut off or if utility service was inoperable for more than a day or two). This step could be conducted as part of Step 4 or when identifying potential environmental threats, since you may have to contact some of the same organizations or agencies for information.
The two main outcomes of Step 6 will be (1) a list of employers in and near the community, including their size, location and susceptibility to adverse effects from identified hazards and (2) a map that includes any employers whose access may be restricted due to earthquakes, flooding, landslide, winter storm or other hazard. Use Worksheet 10 to develop a list of em-ployment centers.
TASKS a. Prepare list of employers or employment centers in the community. Include current and
projected future employment locations and estimate of the number of employees. b. Map location of employers and highlight those that are located in known hazard areas. You
may want to focus on major employers only.
Getting started
Identify hazards likely to affect the community
Identify and map areas of greatest risk
Inventory and map environmental threats
Community ground-truthing
Identify and map of physically vulnerable people and property
nerable populations Identify and map socially vulnerable populations
Inventory and map employment centers
4
6
1
3
5
7
8
2
Putting it all together 9
Page 35
Vulnerability Assessment: Step-By-Step Guidebook
Contact the local planning department, Chamber of Commerce, office of economic development and other relevant sources about the current and likely future location of employment centers. State agencies, e.g., the Department of Commerce, may also be able to help. Ask for estimates of the number of employees in each of the employment centers. In addition, ask these contacts for their best projection of the number and location of employers likely to locate in the community in the next 10 years, and the number of employees at each location. If there are only a few large employ-ers, you may want to contact them directly for more accurate figures on the number of employees and to inquire about whether they plan to expand the size of their workforce. In fact, you should invite employers in the community to take part in preparing the vulnerability assessment. Some employers may have adopted their own emergency plans. Record the information about the loca-tions of employers and the number of employees on Worksheet #10, page 63. A sample of Work-sheet #10 is shown below.
STEP 6: IDENTIFY AND MAP EMPLOYMENT CENTERS
TASK A: Prepare list of employers or employment centers in the community. Include current and future employers and an estimate of the number of employees
Employer or employment center Physical Address Employees (#)
Located in Hazard Area?
Yes No Johnson’s tools 100 Industrial Avenue 87 X
Acme Assembly 107 Oak Street 55 X General Hospital 200 Main Street 230 X Future employers or employ-ment center
Physical Address Employees (#)
Located in Hazard Area?
Yes No Advanced Solar Products 200 Pine Street 25 X Biogenetics 800 Industrial Avenue 75 X
Sample of Worksheet #10 - Employment Centers in the Community
For producing a map layer manually to display employers and other informa-tion, such as likely areas effected by
Figure 13: Sample Map of Employment Centers and Hazards Areas in Hertford County
On the base map prepared in Step 3, mark the location of employers in the area. If there are nu-merous firms in the community, you might want to limit your analysis to major employers, e.g., those with over 50 employees. Identify those that are located in hazard areas such as floodplains or storm surge areas, or that could be cut off if access roads are damaged or destroyed Also, de-termine whether any future employers will likely be located in hazard areas and whether any of the employers will likely handle or store hazardous materials on-site that could pose a threat to the community. The sample map in Figure 13, below, shows employment centers in relation to wildfire and flood hazard areas in Hertford County, North Carolina.
TASK B: Map location of employers and highlight those located in known hazard areas
KEY POINTS & INFO:
• Employment centers should be listed by type
• Hazards should be depicted as well
• Protective action buffers, as illustrated by the broad cir-cles on the map, indicate where environmental threats may pose a risk to employers (and residents).
Buffers for protective action distances
Page 37
Vulnerability Assessment: Step-By-Step Guidebook
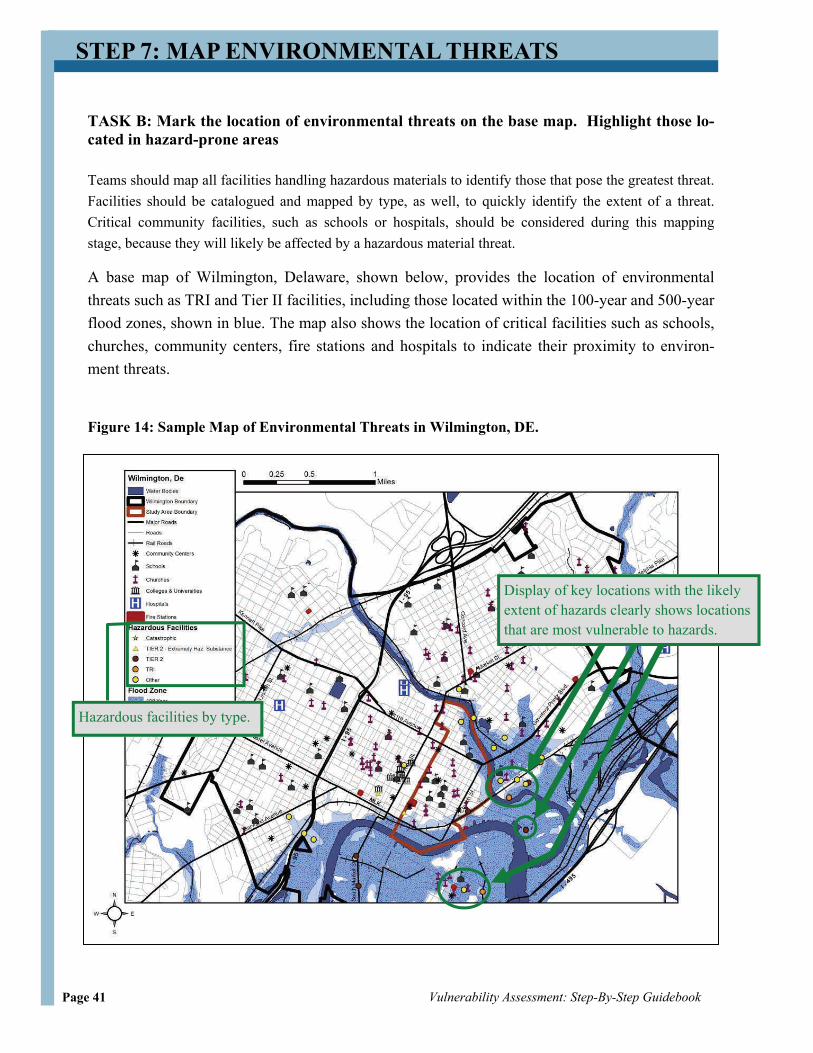
OVERVIEW The purpose of this step is to identify facilities that may pose a threat to the health and safety of the community, particularly if the facilities are located in hazard-prone areas. Such facilities could include haz-ardous waste operators, hog waste lagoons, sewage treatment plants, industrial facilities such as chemical manufacturing or paper plants, or any facility that stores haz-ardous or toxic materials in an amount that, if spilled or released to the environment, could threaten the health of people in the community. Many of these facilities will have been identified in Step 6, when listing employment centers.
Once a list of facilities is completed, the next task is to rank them based on the nature and degree of the threat, and mark their location on the base map.
TASKS a. List all facilities in or near the community that treat, handle, store, manufacture or transport
substances (e.g., chemical wastes) that may pose a threat to health and safety of people.
b. Mark the location of these facilities on the base map. Highlight facilities located in hazard-prone areas such as floodplains.
c. Determine the number of people that could be at risk if there were an accident or spill at one of the facilities.
d. Rank the facilities in order of the severity of the threat.
STEP 7: MAP ENVIRONMENTAL THREATS
Getting started
Identify hazards likely to affect the community
Identify and map areas of greatest risk
Putting it all together
Community ground-truthing
Identify and map physically vulnerable people and property
Identify and map socially vulnerable populations
centers Inventory and map employment centers
Inventory and map environmental threats
4
7
1
3
5
6
8
2
9
SOURCES OF INFORMATION • Environmental Protection Agency regional offices • State and county agencies (e.g., Public Health, Public Safety & Emergency Management ) • Internet resources (http://www.epa.gov/enviro/) • Local knowledge (residents & nonprofits)
TASK A: List all facilities that treat, handle, store, manufacture or transport substances that may pose a threat to the community
STEP 7: MAP ENVIRONMENTAL THREATS
Environmental Threat Physical Address Type of Hazard
Material
Located in Natural
Hazard Area?
People at risk
(#) Rank
Y N
Bluestone Waste Re-cycling
45 Industry Way Misc. pet-rochemicals
Acme Chemicals 100 Prospect Street Organic chemicals
Century Pulp and Pa-per Mill
10 Water Street Chlorine
Union Pipeline Gasoline
Sample of Worksheet #11— Environmental Threat Inventory
Make a list of all facilities that may pose a threat to the community if, either through normal op-erations or due to an accident, hazardous or toxic materials were released to the environment. Such facilities could include, for example, a paper manufacturer that stores large quantities of chlorine on site, or a facility that stores, even temporarily, hazardous wastes. You can use Work-sheet #11 (sample below) to assist in this task.
There are several ways of obtaining information about the location and operation of facilities that treat, handle, store, manufacture or transport sub-stances that could threaten public health. One way is to contact the local or state environmental planning or health office. These offices should know the loca-tion of facilities that could pose a threat to the com-munity (many facilities that treat, store, dispose or manufacture hazardous substances are either licensed by the state or are required to submit reports annually to the state about the type and quantity of substances released to the environment). Fire departments and Local Emergency Planning Committees may also be helpful. In addition, two information sites are operated by the U.S. Environmental Protection Agency: (1) Enviromapper and (2) the Tier 2 data, as discussed in the following sections.
Potential environmental threat
Page 39
Vulnerability Assessment: Step-By-Step Guidebook
EPA’s Enviromapper This site combines interactive maps and aerial photography that can be used to locate EPA regu-lated facilities. You can search for a particular facility either by address or by name and zoom in and out on the facility. For those preparing map overlays using GIS, the site also provides the lati-tude and longitude coordinates for each facility.
The Enviromapper includes brownfield sites, Super-fund sites and facilities listed on EPA’s Toxic Re-lease Inventory (TRI), which includes facilities that are subject to reporting requirements under the Emergency Planning and Community Right-to-Know Act, also known as Title III of the Superfund Amendments and Reauthorization Act of 1986. The purpose of the act is to inform the public about chemical hazards in their communities. Under the law, certain industries, which manufacture, process, or use significant amounts of toxic chemicals, are required to report annually on their releases of these chemicals. EPA maintains this information in a database, the Toxics Release Inventory, which is available to the public over the Internet (http://www.epa.gov/tri). EPCRI sets varying release thresholds that trigger reporting, from 10 pounds per year for highly toxic and persistent chemicals that can accumulate in the environment, to 25,000 pounds or more for less toxic chemicals.
The information from Enviromapper must be used with caution, however. Generally, data obtained from the site is not the most current and is routinely a year or more out-of-date. Furthermore, the site mixes older, inactive sites with facilities that are still active, which can skew the perceived threat from environmental hazards.
More specifically, TRI data, which is one of the numerous types of data on the EPA site, can lead to the exclusion of facilities that release and/or transport certain toxic substances below threshold levels. For example, in order to be on the inventory, a facility must release and/or transport at least 50 gallons or 500 pounds of at least one substance on an extensive list of toxic substances. If a fa-cility releases or transports a pound less of any substance on the list (e.g., 499 pounds), then it will not be included on the TRI registry for that substance. This loophole will expand in the future when EPA regulations significantly increase the minimum threshold.
Tier 2 Data Facilities covered by the Emergency Planning and Community Right to Know Act must submit an emergency and hazardous chemical inventory form to the Local Emergency Planning Commit-tee, the State Emergency Response Commission, and the local fire department annually. There are two forms available: Tier I or Tier II. Most states require the Tier II form. Tier II forms re-quire basic facility identification information, employee contact information for both emergencies and non-emergencies, and information about chemicals stored or used at the facility, including: • the chemical name or the common name; • an estimate of the maximum amount of the chemical present at any time during the preceding
calendar year and the average daily amount; • a brief description of the manner of storage of the chemical; • the location of the chemical at the facility; • an indication of whether the owner of the facility elects to withhold location information from
disclosure to the public. Limitations of Tier II Data Tier II data is often more up-to-date than data obtained from the EPA’s Enviromapper site, but it is often considerably more difficult to obtain in a post 9/11 atmosphere where people’s intentions are more subject to scrutiny. For example, given the level of specificity concerning potentially hazardous substances used or housed at these facilities, state agencies and emergency manage-ment personnel that often control access to this data may be reluctant to release it to outside or-ganizations or individuals with whom they are unfamiliar. The main fear or concern is that the information could be used by terrorists to target these facilities, e.g., cause an explosion at a chemical warehouse and trigger a release of hazardous or toxic chemicals.
Another limitation of Tier II data as well as the data obtained from the EPA Envirompapper site is that the sites individually offer an incomplete collection of potentially hazardous facilities in an area. It is best to talk to local (city or county) emergency management officials to utilize their professional judgment and local knowledge to develop a more thorough and accurate accounting of the environmental threats within an area. This could be part of the ground-truthing that occurs as part of Step 8.
STEP 7: MAP ENVIRONMENTAL THREATS
Page 41
Vulnerability Assessment: Step-By-Step Guidebook
STEP 7: MAP ENVIRONMENTAL THREATS
TASK B: Mark the location of environmental threats on the base map. Highlight those lo-cated in hazard-prone areas
Display of key locations with the likely extent of hazards clearly shows locations that are most vulnerable to hazards.
Hazardous facilities by type.
Figure 14: Sample Map of Environmental Threats in Wilmington, DE.
Teams should map all facilities handling hazardous materials to identify those that pose the greatest threat. Facilities should be catalogued and mapped by type, as well, to quickly identify the extent of a threat. Critical community facilities, such as schools or hospitals, should be considered during this mapping stage, because they will likely be affected by a hazardous material threat.
A base map of Wilmington, Delaware, shown below, provides the location of environmental threats such as TRI and Tier II facilities, including those located within the 100-year and 500-year flood zones, shown in blue. The map also shows the location of critical facilities such as schools, churches, community centers, fire stations and hospitals to indicate their proximity to environ-ment threats.
TASK C: Determine the number of people that could be at risk if there were an accident or spill at one of the facilities
Talk with emergency managers, state environmental and health agencies, and even federal offi-cials as well as plant managers about the level of risk and the likelihood of disaster at the facilities identified in Step 7. Draw buffers around these facilities and estimate the number of people who live or work within the buffer. Include critical facilities such as schools, nursing homes and hos-pitals. The size of the buffer (e.g., 1/4, 1/2, or 1 mile) depends on the level of risk as well as the community’s risk tolerance. Risk depends on a number of factors, including the type and amount of potentially hazardous material manufactured, used or stored on site, quality of management of the facility, amount and duration of exposure, the population likely to be exposed (children and the elderly tend to be more vulnerable than others), the pathway of exposure (e.g., wind) and how quickly people within the buffer area can be evacuated during a disaster.
In short, on the base map, mark the location of potential environmental threats and draw buffers around these threats or facilities. Identify structures (houses, critical facilities and employment centers) within the buffer, and identify vulnerable populations such as children, elderly, or the poor (e.g., those without cars to evacuate). Then, in Task D, rank the facilities by severity of risk.
Chemical explosion in Apex, NC - 2006
Page 43
Vulnerability Assessment: Step-By-Step Guidebook
STEP 7: MAP ENVIRONMENTAL THREATS
TASK D: Rank the facilities in order of the severity of the threat
Communities should not only identify facilities that pose a threat to health and safety, due to the type and amount of materials stored, they should also rank these threats in order to prioritize miti-gation efforts and responses in the event of a disaster. When ranking facilities, consider the fol-lowing: • Nature of the chemical(s) located at the facility. • Amount of chemicals located at the facility. • Proximity to population centers or critical facilities. • Ability to contain, handle, and clean-up whatever hazardous materials are spilled or released. Worksheet # 11 (page 64) provides a form to inventory and rank facilities that may pose a threat to the community in the event of a spill or release, e.g., from an explosion. A sample of this worksheet is shown below (using a mock list of companies made up for this worksheet).
Sample of Worksheet #11 - Ranking Environmental Threat
Environmental Threat Physical Address
Type of Hazard
Material
Located in Natural
Hazard Area?
People at risk
(#) Rank
Y N
Bluestone Waste Recycling
45 Industry Way Misc. pet-rochemicals
X 2,000 1
Acme Chemicals 100 Prospect Street Organic chemicals
OVERVIEW This step involves working with local residents and organizations, par-ticularly those who have lived or worked in the community for many years, in a process of ground-truthing the information collected in previ-ous steps. Ground-truthing refers to a method of validating data with in-put from community members to ensure outcomes accurately reflect con-ditions in the community. The goal is to produce a dataset and maps that incorporate resident’s and service provider’s knowledge, insights and experiences.
Information about areas susceptible to hazards is often outdated and might not accurately reflect current conditions. In Step 8, community members are encouraged to verify the accuracy of the maps and to provide additional information based on personal experience or knowledge. For in-stance, in Hertford County, North Carolina, a community member provided information about areas that had not been marked on the base map, but which began to experience flooding after the con-struction of a new housing development nearby. Thus, during the ground-truthing process, maps are double-checked for accuracy and appended with information that may aid in the assessment process. Additionally, incorporating community voices into the technical exercise of gathering and displaying data can improve community relationships with emergency management organizations and increase community participation and ownership of the assessment process.
TASKS
a. Conduct public forum to validate or “ground-truth” the information represented on the maps you have prepared in steps 3-8 as part of the vulnerability assessment. Make revisions as neces-sary, based on participant input.
b. Make preparations to involve interested participants in future taskforce activities.
STEP 8: COMMUNITY GROUND-TRUTHING
SOURCES OF INFORMATION • Data collected as part of the assessment • Local knowledge (residents & nonprofits) • State/local agencies
Getting started
Identify hazards likely to affect the community
Identify and map areas of greatest risk
Putting it all together
Identify and map physically vulnerable people and property
Identify and map socially vulnerable populations
Inventory and map employment centers
4
8
1
3
5
6
7
2
9
environmental threats Inventory and map environmental threats
At a public forum, community members are invited to actively participate in the vulnerability as-sessment process by observing, adding to, appending and commenting on a draft of the vulner-ability assessment. This event allows the taskforce to incorporate local residents’ knowledge of the area into the plan. Several steps are involved in convening an effective public forum to vali-date the accuracy and relevance of the maps, as summarized below:
• Select an appropriate date, a convenient time, and an accessible location for a public forum. You may need to schedule multiple sessions to accommodate different populations (for in-stance, people who work in the evenings may only be able to attend meetings on Saturday).
• Create an agenda that allots time for introduc-tions, a presentation, and community input.
• Invite facilitators, such as taskforce members and others familiar with the process, who can present information in a clear and straightforward manner and who can answer questions thoroughly. You may also want to designate specific individuals to take notes and record ideas.
• Gather all necessary documents and materials prior to the event, including copies of the maps and drafts of written documents. Other materials you may need include tracing paper, markers, pens, tape, pads of paper for recording residents’ ideas, and stickers that can be used to mark im-portant locations on maps.
• Publicize the meeting well in advance, e.g., one month, through formal, (e.g., newspaper and radio announcements, government website postings), and informal means (e.g., announce-ments at religious and civic organizations, posters at local businesses, and take-home flyers for school-aged children).
• Make arrangements to accommodate participants with disabilities, child care needs, and trans-portation difficulties. Appendix D lists additional resources for planning accessible meetings.
• Set up the location so participants can hear and see one another and provide space to review maps.
STEP 8: COMMUNITY GROUND-TRUTHING
TASK A: Conduct public forum to validate or “ground-truth” the information represented on the maps
Community members validating maps
Page 47
Vulnerability Assessment: Step-By-Step Guidebook
STEP 8: COMMUNITY GROUND-TRUTHING
TASK B: Make preparations to involve interested participants in future taskforce activities
In addition to gathering information from residents, the community ground-truthing step is also an important activity for generating broader buy-in to the process of community planning for dis-asters. The meeting can be used as a tool for recruiting new taskforce members and maintaining the interest and energy of current members. Key to this are to effectively manage participants’ time at the meeting, acknowledge their talent as volunteers and follow up with participants to keep them engaged in the process. Some approaches include the following:
• Prepare an agenda - the agenda lets people know why they are being asked to meet. The agenda should include the topics being addressed, the time allotted to each topic or issue, and the timeframe and location of the meeting.
• Develop ground rules - set rules for conduct, such as only one person can speak at a time and be respectful of others. A facilitator can help enforce the ground rules.
• Use a facilitator - a facilitator could be a respected leader from the community, e.g., a member of the clergy, businessperson, elected official or head of a local nonprofit organization. The facilitator can help keep the group focused, enforce the ground rules, encourage everyone to participate, and begin and end the meeting on time.
• Provide food and refreshments
• Collect contact information of participants and remember to follow up with them to both let them know that their efforts were reflected in the final products, as well as to keep them in-formed about future opportunities to get involved.
At the meeting, place maps that you have prepared as part of the vulnerability assessment, such as base maps, maps of critical facilities and environmental threats, on tables or affix to the walls so the attendees can look at them closely and mark them up. Encourage people to discuss their ex-periences with previous disasters and to identify the location of vulnerable areas, critical facilities, and environmental threats. As they review the maps, people may recall details such as roads or bridges that were washed out by flooding or landslides, pockets of the community that are par-ticularly isolated, areas with high concentrations of minority populations, neighborhoods that were evacuated in the past, etc. Facilitators or scribes should record this information directly on the maps. You may want to schedule some time at the end of the agenda to present the new ideas back to everyone at the forum.
Once the participants have reached consensus that the maps, as reviewed and marked up at the meeting, provide an accurate reflection of community vulnerability, task force members should synthesize the new information and revise the maps to reflect the community’s input.
OVERVIEW The purpose of this step is to combine, analyze, interpret and discuss the information collected from the previous steps. It involves identify-ing the areas of greatest risk, as well as the most critical facilities, vul-nerable populations, at-risk employment centers and the environmental facilities that pose the greatest risk to the community today and in the future. Each of these risks can be ranked in terms of the severity and extent of the threat and the likelihood of occurrence. This ranking will be used to develop and prioritize strategies and in-vestments to reduce risks.
As a result of putting together a vulnerability assessment, the community should have a greater awareness of the different threats posed by different hazards, an inventory of the different plans, policies and actions in place to reduce vulnerability to hazards, improved communication net-works among those groups that typically respond to disasters, and a greater understanding of why and how to include socially vulnerable populations in the planning and implementation process. Finally, the vulnerability assessment should link closely with the community’s hazard mitigation plan and will establish a baseline of information for planning and for evaluating the success of plans or strategies to reduce vulnerability.
Pulling together and making sense of the information collected and organized in the previous steps will likely involve several meetings with the community both to validate the information collected and to develop and prioritize strategies to reduce the community’s vulnerability to
STEP 9: PUTTING IT TOGETHER Getting started
Identify hazards likely to affect the community
Identify and map areas of greatest risk
Inventory and map physically vulnerable people and property
Identify and map socially vulnerable populations
Inventory and map employment centers
Inventory and map environmental threats
4
9
1
3
5
6
7
2
Community ground-truthing
Putting it all together
8
SOURCES OF INFORMATION • Data collected as part of the assessment • Local knowledge (residents & nonprofits) • State/local agencies
Page 49
Vulnerability Assessment: Step-By-Step Guidebook
natural and man-made hazards. Those members of the community that have contributed to the process, as well as others who are interested, should be invited to discuss the findings from the previous 8 steps, comment on their accuracy and significance, and discuss strategies for re-ducing the community’s vulnerability.
The vulnerability assessment serves as the basis for de-veloping strategies for action: for prioritizing steps to reduce a community’s vulnerability, including social and physical vulnerability. The strategies, which should re-flect the community’s capabilities and in particular the needs and challenges of its most vulnerable people, could include raising awareness about the need to prepare for disasters, identifying policies and plans that facilitate development in hazard-prone areas, and im-proving communication and coordination between agencies that are responsible for emergency planning and organizations that serve or represent the poor, minorities, immigrants, or those with disabilities. The goal is to reduce the entire community’s vulnerability in order to make it more resilient to future disasters.
TASKS a. Consolidate ground-truthed information into accessible data base b. Produce a final report that identifies the community’s hazards, socially and physically vulner-
able populations, and possible strategies for mitigating risks. c. Present final result to the community. d. Incorporate into comprehensive plans, land use plan, emergency management plans. TASK A: Consolidate ground-truthed information into an accessible database
One of the final tasks in putting together a vulnerability assessment is to assemble the information collected as part of the process into a database that will be readily accessible to emergency man-agers, nonprofit groups, elected officials, faith-based organizations and others who may want to use it. The database, which represents information that has been collected, analyzed and vali-dated by the community, should be updated, revised and revisited regularly. It represents the most up-to-date information on people and places that are vulnerable to disasters and the strategies to reduce that vulnerability. The checklist of products (Figure 15, page 51) will assist with this task.
A report should be produced that can be used by state and local emergency managers as well as nonprofit groups. The final report should include all information, maps, photographs, and work-sheets collected or prepared as part of the vulnerability assessment. The purposes of the report are to identify and describe the community’s hazard risks, socially and physically vulnerable populations, and possible strategies for reducing risk, as well as to identify priorities for action, outline a strategy for implementation and provide a schedule for revisions as new conditions or circumstances change and new information becomes available. Finally, the report should de-scribe the process of conducting the assessment, the lessons learned, and the key organizations involved, both to give legitimacy to the community-based nature of the document and also for the benefit of other communities that may want to prepare a vulnerability assessment.
TASK C: Present the final results to the community at a public meeting
Upon completion of the community-based vulnerability assessment, the taskforce should hold a final public meeting to inform the community about the findings and results of the process. At this meeting, it is important to acknowledge the contributions of the community institutions and individuals who have helped develop the final document, and to look toward the future by high-lighting the report’s recommendations and opportunities to make the community safer. This meeting represents the closure of the information-gathering phase and marks the beginning of the implementation phase of the process. In addition, it is a useful forum for building momen-tum toward implementing the recommendations of the report. It is also a good way to help maintain the involvement of people who have participated in earlier steps and help them see how their efforts will help shape the future of their community.
TASK D: Incorporate findings and strategies into relevant plans and policies
Now that your community possesses this wealth of information on hazard vulnerability, the document is ready to be used to inform local policy. The results should be incorporated into the local comprehensive or general plan, capital improvement plan, emergency management plans, and other relevant documents. This will help ensure that the agencies responsible for imple-menting plans are working in concert with one another and not at cross purposes. Successful preparation, mitigation, and recovery from natural or man-made disasters requires coordinated planning and action among agencies and between agencies and nonprofit organizations. Dis-semination of the vulnerability assessment’s findings among these agencies can strengthen net-works within the community and between the community and outside organizations.
STEP 9: PUTTING IT TOGETHER
Page 51
Vulnerability Assessment: Step-By-Step Guidebook
Figure 15: Final Checklist of Products for the Vulnerability Assessment
STEP 9: PUTTING IT TOGETHER
HAZARDS
List of Hazards (Worksheet #5)
Ranking of Hazards by Probability and Impact
MAPS
Base Map (Step 3,)
Layer Depicting Hazards (Step 3, Task C)
Layer Depicting Vulnerable Locations (Step 3, Task C)
Layer Depicting Critical Facilities (Step 3, Task C)
Layer Depicting Hazardous Locations (Step 3, Task C)
Layer Depicting Businesses/ Employers (Step 3, Task C)
Additional Layers
Additional Layer 1 ________________________
Additional Layer 2 ________________________
Additional Layer 3 ________________________
INVENTORIES
Task Force Organization Checklist (Worksheet #1)
Task Force Contact Information (Worksheet #2)
Vulnerable Population Identification Checksheet (Worksheet #3)
Inventory of Existing Information (Worksheet #4)
Inventory of Critical Facilities (Worksheet #9)
Inventory of Residential Structures (Worksheet #7)
Future Inventory of People and Property (Worksheet #8)
Inventory of Employment Centers (Worksheet #10)
Ranked Inventory of Employment Centers (Worksheet #11)
Critical Facilities– Locations that possess resources that will be needed in a disaster or hazard, such as police/fire stations, or have high concentrations of vulnerable people, such as hospitals, nursing homes, and daycare.
Enviromapper - An online interactive mapping application provided by the EPA that allows us-ers to view the location and general characteristics of facilities that produce, store or release at least one or more of four EPA designated types of pollution, including hazardous waste, toxic waste, air pollution and wastewater.
Emergency Planning and Community Right-to-Know Act (EPCRA) - was created to help communities plan for emergencies involving hazardous substances. The primary purpose of the act is to inform communities and citizens of chemical hazards in their areas. EPCRA has four major provisions: 1) emergency planning, 2) emergency notification, 3) community right-to-know, and 4) Toxics Release Inventory. Under the Act, every community in the United States must be part of a comprehensive emergency response plan. Facilities are required to participate in the planning process.
Flood Insurance Rate Map (FIRM) - An official map created by FEMA that graphically repre-sents the extent of the floodplain for a geographic area and is used for the purpose of rating the relative risk and subsequent rate of flood insurance policies sold through the National Flood In-surance Program.
Ground Truthing– Method of validating data with input from community residents and organi-zations to ensure outcomes accurately reflect conditions in the community.
Hazards– Any natural or manmade event that could harm or otherwise adversely effect members of the community.
Institutionalized population - A term used by the Census Bureau to refer to a household in which no one 14 years old and over speaks only English or speaks a non-English language and speaks English very well.
LEPC— Local Emergency Planning Committees (LEPCs) work to understand chemical hazards in the community, develop emergency plans in case of an accidental release, and look for ways to prevent chemical accidents.
Linguistically isolated households – The Census Bureau defines a linguistically isolated house-hold as on in which no one 14 years old and over speaks English "very well" or better.
Man-made hazards– Those hazards that are due to human actions (or inaction), such as a chemi-cal spill, fire, or explosion.
Manual map system- A paper base map with layers of information (facilities, floodplains, etc.).
Page 53
Vulnerability Assessment: Step-By-Step Guidebook
GLOSSARY, continued Natural hazards– Hazards related to natural phenomena or catastrophes, such as floods, tornados, or hurricanes.
Physical vulnerability – People who are more likely to be affected by disasters due to remote loca-tion, physical disability, or other condition that will significantly limit mobility and the ability to react to potential threats or disasters.
Superfund Amendments and Reauthorization Act (SARA) - A Federal statute which designates funds for cleaning up abandoned waste disposal sites and leaking underground petroleum tanks. SARA also requires facilities that store certain types of hazardous materials to provide the public with data on the types, amounts and the specific locations of such material. This information is pro-vided by facilities within a document called a Tier II report.
State Emergency Response Commission (SERC) oversee the implementation of EPCRA require-ments in each state.
Social vulnerability – People who are more likely to be affected by disasters due to poverty, race, disability, language barriers or age. A social vulnerability assessment recognizes that not everyone has the resources to prepare for, cope with, and recover from disasters.
Toxic Release Inventory (TRI) - is a publicly available EPA database that contains information on toxic chemical releases and waste management activities reported annually by certain industries as well as federal facilities. The inventory contains information on releases of nearly 650 chemicals and chemical categories from industries including manufacturing, metal and coal mining, electric utilities, and commercial hazardous waste treatment, among others.
Tier II Report– A report required annually by FEMA for every facility that stores an extremely toxic subset hazardous material. The report is an inventory of every hazardous material on site (from this subset) along with the amount and specific location of it.
Agencies Public Safety/ Emergency Management Office
Department of Health (include Office of Aging)
Department of Planning
Department of Social Services
Fire & Law enforcement
School
State agencies
Other
Other
Community groups Community development corporations (CDCs) Faith-based organizations Other nonprofit groups Small business owners Private companies and organizations Other Other
Residents
Elderly Disabled Low income
Non-English speakers
Race/ethnic minorities Other Other
Possible Taskforce Member Affiliations and Characteristics
WORKSHEET # 1: Taskforce Membership
STEP 1, TASK A: Organize a taskforce that will be responsible for conducting the assess-
Page 55
Vulnerability Assessment: Step-By-Step Guidebook
Contact information for assessment taskforce Name Phone number Email address Mailing address
WORKSHEET # 2: Taskforce Contact Information
STEP 1, TASK A: Organize a group of team that will lead the vulnerability assessment
Coastal Erosion (Type of hazard, date of event, number of injuries, cost and types of damage, etc.)
Coastal Storm
Dam Failure
Drought
Earthquake
Expansive Soils
Extreme Heat
Flood
Hailstorm
Hurricane
Land Subsidence
Severe Winter Storm
Tornado
Tsunami
Volcano
Wildfire
Windstorm
.
Other:.
WORKSHEET # 5: Identifying Hazards
STEP 2, TASK A: List the hazards that may occur in the community 1. Review existing plans and reports.
2. Research newspapers and other historical records.
3. Talk to the local residents and experts in your community, state, or region.
4. Gather information on Internet Websites.
5. Put a check mark in the Occur? boxes beside all hazards that may occur in your community or county.
Adapted from State and Local Mitigation Planning How-to-guide, August 2001)
Use this space to record information you find for each of the hazards you will be researching. Attach additional pages as necessary. Occ
ur?
Page 59
Vulnerability Assessment: Step-By-Step Guidebook
WORKSHEET # 6: Ranking Hazards
STEP 2, TASK B: Rank possible hazards based on frequency and severity of risk 1. Using the hazards from Task A, talk to state and local emergency management (EM) depart-ments, the local fire department, and other experts in your community, state, or region about the frequency and severity of risks.
2. Talk to the local residents, nonprofits organizations and faith-based groups about their experi-ences with the hazards from Task A.
3. Gather information from Internet searches and newspaper archives.
4. Discuss the frequency and severity of the hazards identified in Task A and make a group determination of the frequency and severity of hazards in your community.
Frequency Severity Overall Ranking Unlikely Negligible Low Possible Limited Medium Likely Critical High Highly likely Catastrophic Very High
Hazard or Event Frequency Severity Overall Ranking
WORKSHEET #8: Current Inventory of People and Property
STEP 4, TASKS B and C: Calculate the number and value of residential structures and people currently in hazard areas. 1. Determine the number and value of structures (homes, apartment complexes, mobile homes, etc.)
that are currently located in hazard-prone areas. 2. Estimate the number of people who live in the residential structures using the multiplier table
below.
Current Conditions Buildings (#) People (#) Value ($)
Single-Family detached
Single-Family attached
Mobile Homes
Multi-Family
Other*
Other*
Type of Structure Number of structures Number of people per structure
WORKSHEET #9: Future Inventory of People and Property
STEP 4, TASK D: Inventory People and Property Potentially at Risk in the Future Estimate the number of people, structures, and the value of structures that will be located in harm’s way at some time (e.g. 10 years) in the future.
Potential Future Conditions Buildings (#) People (#) Value ($)
Single-Family detached
Single-Family attached
Mobile Homes
Multi-Family
Other*
Other*
* Include critical facilities in Worksheet #7 and employment centers on Worksheet #10.
Page 63
Vulnerability Assessment: Step-By-Step Guidebook
WORKSHEET # 10: Employment Center Inventory
STEP 6, TASK A: Employment Inventory 1. Prepare list of employers or employment centers in the community. Include the current and likely
future employers. 2. Estimate the number of employees. 3. Include the physical address location of employers. 4. Indicate whether the employer is located in known natural hazard areas.
Employer or employment center Physical Address Employees (#)
Environmental Threat Physical Address Type of Hazard
Material
Located in Natural Hazard Area?
People at risk
(#) Rank
Y N
STEP 7, TASK A: Environmental Threat Inventory A. Prepared list of all facilities that may pose a threat to the community. Include the physical address. B. Mark the location of these facilities on the base map and highlight those located in a hazard-prone areas. C. Determine the number of people that could be at risk if there were an accident or spill at one of the facilities. D. Rank the facilities in order of the severity of the threat.
WORKSHEET #11: Environmental Threat Inventory
Page 65
Vulnerability Assessment: Step-By-Step Guidebook
Citizen Power
Tokenism
Non-participation
WHAT IS CITIZEN PARTICIPATION? In an influential article on citizen participation, Sherry Arnstein proposed a ladder of citizen
participation that identifies eight types of participation and non-participation. Figure 2 is an illustration
of the eight rungs on the ladder of citizen participation. The bottom rungs, Manipulation and
Therapy, are types of non-participation where citizens are included in program development to
“educate” or “cure” them, not to engage them in the
planning process. On the Informing and Consulting
rungs, citizens may be present at discussions and have
their views heard. However, citizens “lack the power to
insure that their views will be heeded by the powerful”. Pla-
cation occurs when citizens advise, but have no role in the
final decision-making process. The top three rungs, Partner-
ship, Delegated Power, and Citizen Control, represented types
of participation where citizens have increasing amounts of
decision-making power. Partnership occurs when negotia-
tion between citizens and public officials enables citizens
share planning responsibilities and decision-making power.
Delegated Power is when citizens achieve “dominant deci-
sion-making authority over a particular plan or program.” Fi-
nally, though not absolute control, Citizen Control occurs
when citizens govern a program with control of policy direc-
tion and management. Public officials negotiate directly
with citizens to influence policy changes.
Though this ladder is a simplification, it creates a framework
for examining how citizens, specifically those representing
vulnerable populations, are deliberately included in the decision-making processes and the extent to
which their participation is valued and integrated into the process.
Manipulation
Informing
Therapy
Consulting
Partnership
Placation
Delegated Power
Citizen Control
Source: Arnstein, Sherry R. “A Ladder of Citizen Participation,” JAIP, Vol. 35, No. 4, July 1969, pp. 216-224).
Figure 2: Eight Rungs on the Ladder of Citizen Participation
Techniques for identifying socially vulnerable populations using Census Data
The Social Vulnerability Index (SVI) helps to assess the location of socially vulnerable populations
relative to areas of physical vulnerability (i.e., floodplains, hazardous facilities, etc.). Adapted from a
GIS-based method proposed by Cutter et al. (1997, 2000), this method uses secondary data from the
U.S. Census to highlight block groups where socially vulnerable populations are clustered and allows
comparisons between block groups with different population denominators. For example, if Census
data identifies ten people in Block Group A living in mobile homes and Block Group A has a total
populations of 100 people, the mobile home residents can be represented as a percentage, 10%. Block
Group B with 100 people living in mobile homes and a total population of 1000 could also be
represented as 10%. However, the mobile home residents in Block Group B most likely present a
larger planning undertaking (e.g., planning for the evacuation of and shelter space for 100 versus 10).
This example demonstrates how comparing areas using simple percentages can obscure important
information.
This methodology transforms a variable (See Table 2: U.S. 2000 Census Data Locations for a list of
proposed variables) from simple counts (e.g., the number of mobiles homes in a block group) to ra-
tios (e.g., the proportion of a county’s mobile homes within one block group); see Figure C2 below.
Figure 12: Hertford County Social Vulnerability Score– Population Aged above 65 is an illustration
of the social vulnerability Score for populations aged 65 and older.
Figure C2: Calculating the Mobile Homes Social Vulnerability Score
The calculation involves two steps:
STEP 1: Calculate % living in mobile homes in each block group
Divide population living in mobile homes in each census block group by the total population living in mobile homes in the county STEP 2: Standardize relative to block with highest population
Calculate the Mobile Home index score by dividing result of Step 1 by the block group with the highest percentage of mobile home residents to standardize the score between 0 and 1.
Figure C1: Hertford County, NC Social Vulnerability Score
The first step in calculating the Social Vulnerability Score is to calculate scores for each of the census
variables (see Table 2: U.S. 2000 Census Data Locations for a list of proposed variables). For exam-
ple, to calculate the social vulnerability score for the populations aged 65 and over, first calculate the
ratio of people aged 65 and older in each block group within the area of interest (e.g., neighborhood,
city, or county). To calculate the ratio, divide the number of people aged 65 and older in each census
block group by the total population aged 65 or older in the area of interest. The next step is to stan-
dardize the ratio for a score between 0 or 1. To standardize the score, divide the ratios calculated in
the first step by the ratio of the block group with the highest ratio. To calculate the index, add scores
for all the variables suggested in Table 2: U.S. 2000 Census Data Locations.
A map of the social vulnerability score for populations 65 and over in Hertford County, North Caro-
lina is shown in Figure 12.
Page 69
Vulnerability Assessment: Step-By-Step Guidebook
Planning Accessible Meetings
Removing Barriers: Planning Meetings that are Accessible to All Participants, a 68-page guide developed the North Carolina Office on Disability and Health and the Center for Universal Design at North Carolina State University, which includes a checklist for accessible meetings. The guide is available at http://www.fpg.unc.edu/~ncodh/Publications.cfm. Lighthouse International, non-profit organization helping people of all ages overcome the chal-lenges of vision loss, has short articles and examples demonstrating methods of making documents readable. These articles would be helpful in the development of advertisement and meeting materi-als, and are available at http://www.lighthouse.org/accessibility/. Additional practices around accessible meetings can be found at the Promising Practices website associated with this guide, which can be found at FEMA’s website (insert website)
Recruiting and Maintaining Volunteer Participation.
State and local nonprofits that promotes volunteerism through the recruitment and mobilization of volunteers and the connecting volunteers to community needs. The Volunteer Center of the Vir-ginia Peninsula ( http://www.volunteerpeninsula.org/newfiles/index.html) and Maryland Gover-nor’s Office on Service and Volunteerism (http://www.gosv.state.md.us/) are examples of this type of organization. Look for similar agencies in your area and seek out their expertise. The Governor’s Office on Service and Volunteerism developed a website entitled Best Practices for Developing a Volunteer Program (http://www.gosv.state.md.us/volunteerism/bestprac/sec00.htm). Additional effective practices around volunteer recruitment and management can be found at the Promising Practices website associated with this guide, which can be found at FEMA’s website (Insert website).
UNC Institute for the Environment 100 Miller Hall CB #1105 Chapel Hill, NC 27599-1105 P: 919.966.9922 | F: 919.966.9920 Email: [email protected] http://www.ie.unc.edu
MDC, Inc. PO Box 17268 Chapel Hill, NC 27516-7268 P: (919) 968-4531 | F: (919) 929-8557 Email: [email protected] http://www.mdcinc.org/home